


User Manual
- Your 24h Safe Guarder
V 1.0

Welcome
Thankyouforpurchasing our wire-free WiFicameraDefend X!
This user manual is designed to be a reference tool for the installation and operation of your
DefendX camera.
Here youcan findinformationaboutthe camera’s featuresand functions, as wellas information
toaidintroubleshooting.
Support
Many of the setup and installation sections have corresponding introductions on Defend X
officialwebsite,pleasego to: www.defendcamera.com
Foraccess todetails ofthecloudserviceandyour subscription plans,go to:
YourDefendCam App
www.defendcamera.com
www.wuyuantech.com
TocontactDefendXfortimelysupport,please sendyouremails to:
support@defendcamera.com

Content
1. In tro ductio n to the Ca mera
2. Setup Your Camera
2.1 Get the Camera Ready
2.2 Get the DefendCam App
2.3 Add Your Camera to Your App
2.4 Configure Your Camera
3. Manage You r Camera
3.1 Add New Camera
3.2 Edit the Camera
3.3 Reset the Camera
3.4 Delete the Camera
.................................................................................................................
................................................................................................................
.............................................................................................................
...............................................................................................................
..........................................................................................................
.......................................................................................................................
.........................................................................................................................
......................................................................................................................
....................................................................................................................
..............................................................................................
....................................................................................................
4. View & Manage You r Contents
4.1 View & Manage Your Contents on Camera
4.2 View & Manage You Contents on Cloud
4.3 View & Manage Your Contents in Gallery
5. Place & Mount You r Camera
5.1 Place Your Camera
5.2 Mount Your Camera
....................................................................................................................
..................................................................................................................
..........................................................................................
.....................................................................................
..............................................................................
...................................................................................
.................................................................................
1
3
3
6
7
9
13
13
13
14
15
15
15
17
18
19
19
20
6. Manage You r Subscr ipt ion Plans
7. Specific ati on
8. Q& A and Tr oub les hoo tin g
9. Wa rranty
.............................................................................................................................
...............................................................................................
.....................................................................................................................................
.................................................................................
22
22
23
28

1
1. Introduction to the Camera
Inside View
13
14
15
19
20
21
22
23
24
161718
FrontView
RightView
1
2
3
4
5
6
7
8
9
12
10
11

2
① Working StatusIndicatorLight
② PIR MotionSensor
③ Lens
④ IRLEDs
⑤ BuiltinMic
⑥ LightSensor
⑦ InsulationPaper
⑧ Cover
⑨ Latch
⑩ Screws
⑪ Lock Hole
⑫ Strap Hole
⑬ WorkingStatusShiftButton
⑭ PowerChargingIndicatorLight
⑮ Micro SDCard Slot
⑯ Micro USB Port
⑰ Preview/NavigationButton
⑱ OK Button
⑲ DisplayScreen
⑳ PowerSwitch
㉑ Speaker
㉒ Menu/Exit
㉓ Network Status/NavigationButton/Reset
㉔ PowerPort
Please refertothefollowing chart for information about the camera’s indicatorlights.
Please refertobelowchartforinformationaboutthecamera’sbuttons.
No.
Indicator Light
Meaning
①
WorkingStatus
Indicator Light
The light turns red-the camera cover is open and the power is
switchedon;
The lightblinks-thecamera isatpreview/settingmodeanddetects
a motion;
The light turns off after 5 flashes-the camera enters auto
photo/videotakingmodewhenitscoverisclosed.
⑭
PowerCharging
Indicator Light
The light turns red-the camera is on process of power charging
whenconnectedwith externalpowersource;
The lightturnsgreen-thecameraischargedfull.
NO.
Buttons
Function
⑳
PowerSwitch
Topower on/offthe camera
㉒
Menu/Exit
Toentermenuor exitfromcurrent step
⑱
OKButton
Totake a photo/video manually; to confirm setting changes; to
play videoswhenpreviewing.
⑰
Preview/Navigation
Topreviewphotos/videos;to navigateto previousoptions.

2
2.Setup Your Camera
1)PowerCharge
The camera is provided with 2 built-in rechargeable batteries. For full performance of the
camera, please charge the batteries full by DC with the provided power adaptor in the box
beforeyou use the camera.
Note: There is an insulation paper inserted in the battery compartment, please pull it out at
your firsttime of use.Ifitistoo tight topull out, please unscrew thebattery compartment cover,
and rememberto screw it back forthe best waterproofeffect.
The powercharging indicator light will turngreen whenthecamera battery is fully charged.
Button
㉓
Network Status/
Navigation Button/Reset
To checknetwork status; tonavigate to nextoptions; toreset
the camera when pressingup to15seconds.
⑬
Working StatusShift
Button
When it is pressed down by close of the camera cover, the
camera entersintoautophoto/videotaking mode;
When itisreleased byopening of cameracover, and the
camera screen lights up for previewing / programming/
manualtest.
Note:Thecamera will auto turn off whenthere isnooperation
atthemaininterface more than 3 minutes.
2.1 Getthe Camera Ready

3
Note: Except for powered by DC power (12V/1A output), the internal batteries of the camera
can be also charged by solar power and other external power supply kits (sold separately) that
with 9V/1A output. For uninterrupted camera use, you can consider adopting these spare
powersources on hand for long term outdooruse.
Battery Warning
• Pleasekeep the batteries awayfromchildren;
• Pleaseplace the batteriesin the rightdirection ofpolarity;
• Pleasedonot mix-use oldandnewor differenttypes ofbatteriestogether;
• Please remove the batteries in avoidance of erosion resulting from battery leakage if you do
not use the camera for long periods, and storethem ina cool, dry,ventilated area.
4
2)StorageSpace
DefendXsupportsSD cardlocal storage andonline cloudstorage.
When the camera detects a movement, it will record and save the photo/ video to the SD
card,thensend toyour encryptedDefendCamcloud account.
In this part, we will mainly introduce the SD card storage. For more details about the cloud
storage,please refer tofollowing chapter2.2and6.
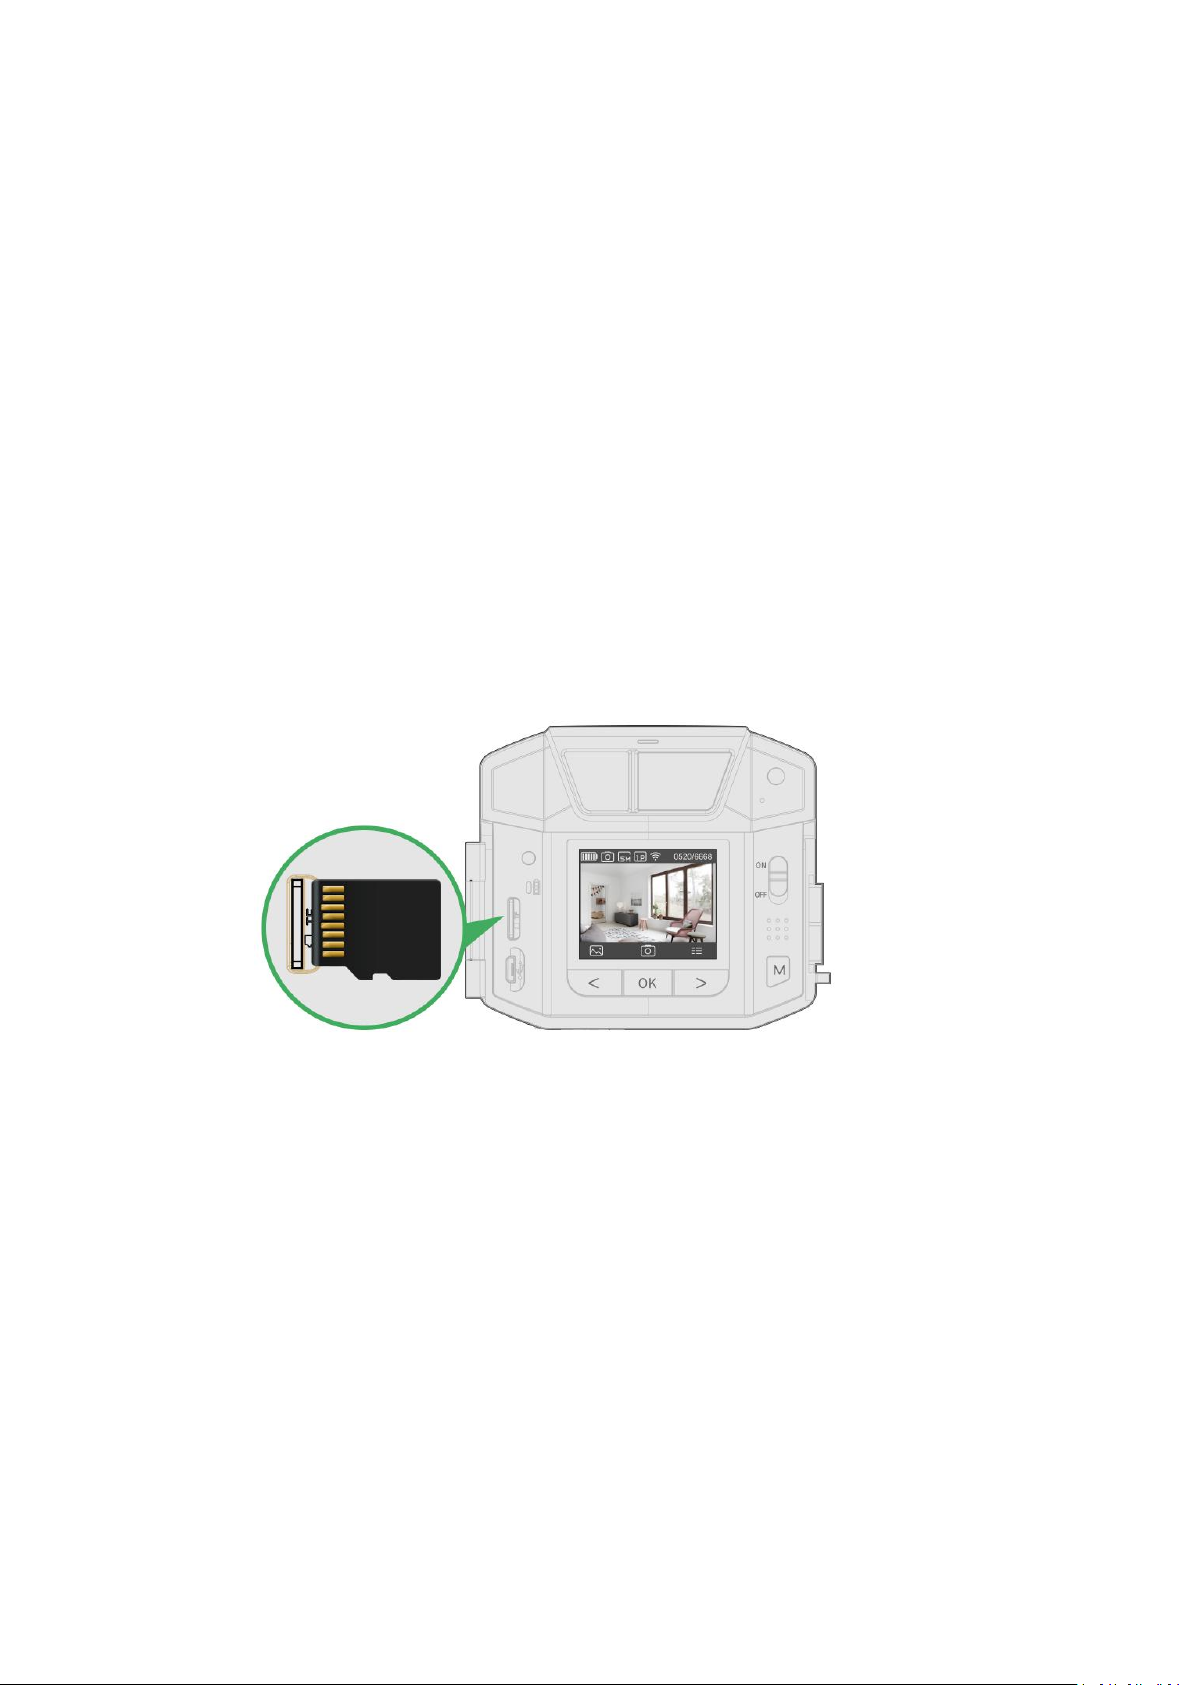
This camera supports 4-32GB Micro SD card, Class 10, UHS-1 or higher level, FAT32. When the
SDcard is notcompatibleornotproperly inserted,the camerawill display a prompt“NoCard ”.
Pleaserefer tobelowphoto forcorrectinsertion(golden partfaceto left):
Wheninsertingor removing theSDcard,please makesure that thecamera is turned off.
Steps to format the SD card: Left Navigation button -> OK button -> Right Navigation Button ->
OKButton ->Yes->OKButton ->M Button toback tomaininterface.
Note: There is no SD card included in the camera package, please purchase one and insert it in
the camera.
2.2 Get the DefendCam App
Download the DefendCam app for your smartphone by scanning QR codes below or those on
the camerapacking box or searching for DefendCam in theappstore.

5
Note:Ifyou alreadyuse theDefendCam app, make sure thatyou are using the latest version. To
findoutif anupdate is available,go tothe app store andsearch.
2.3 AddYour Camera to Your App
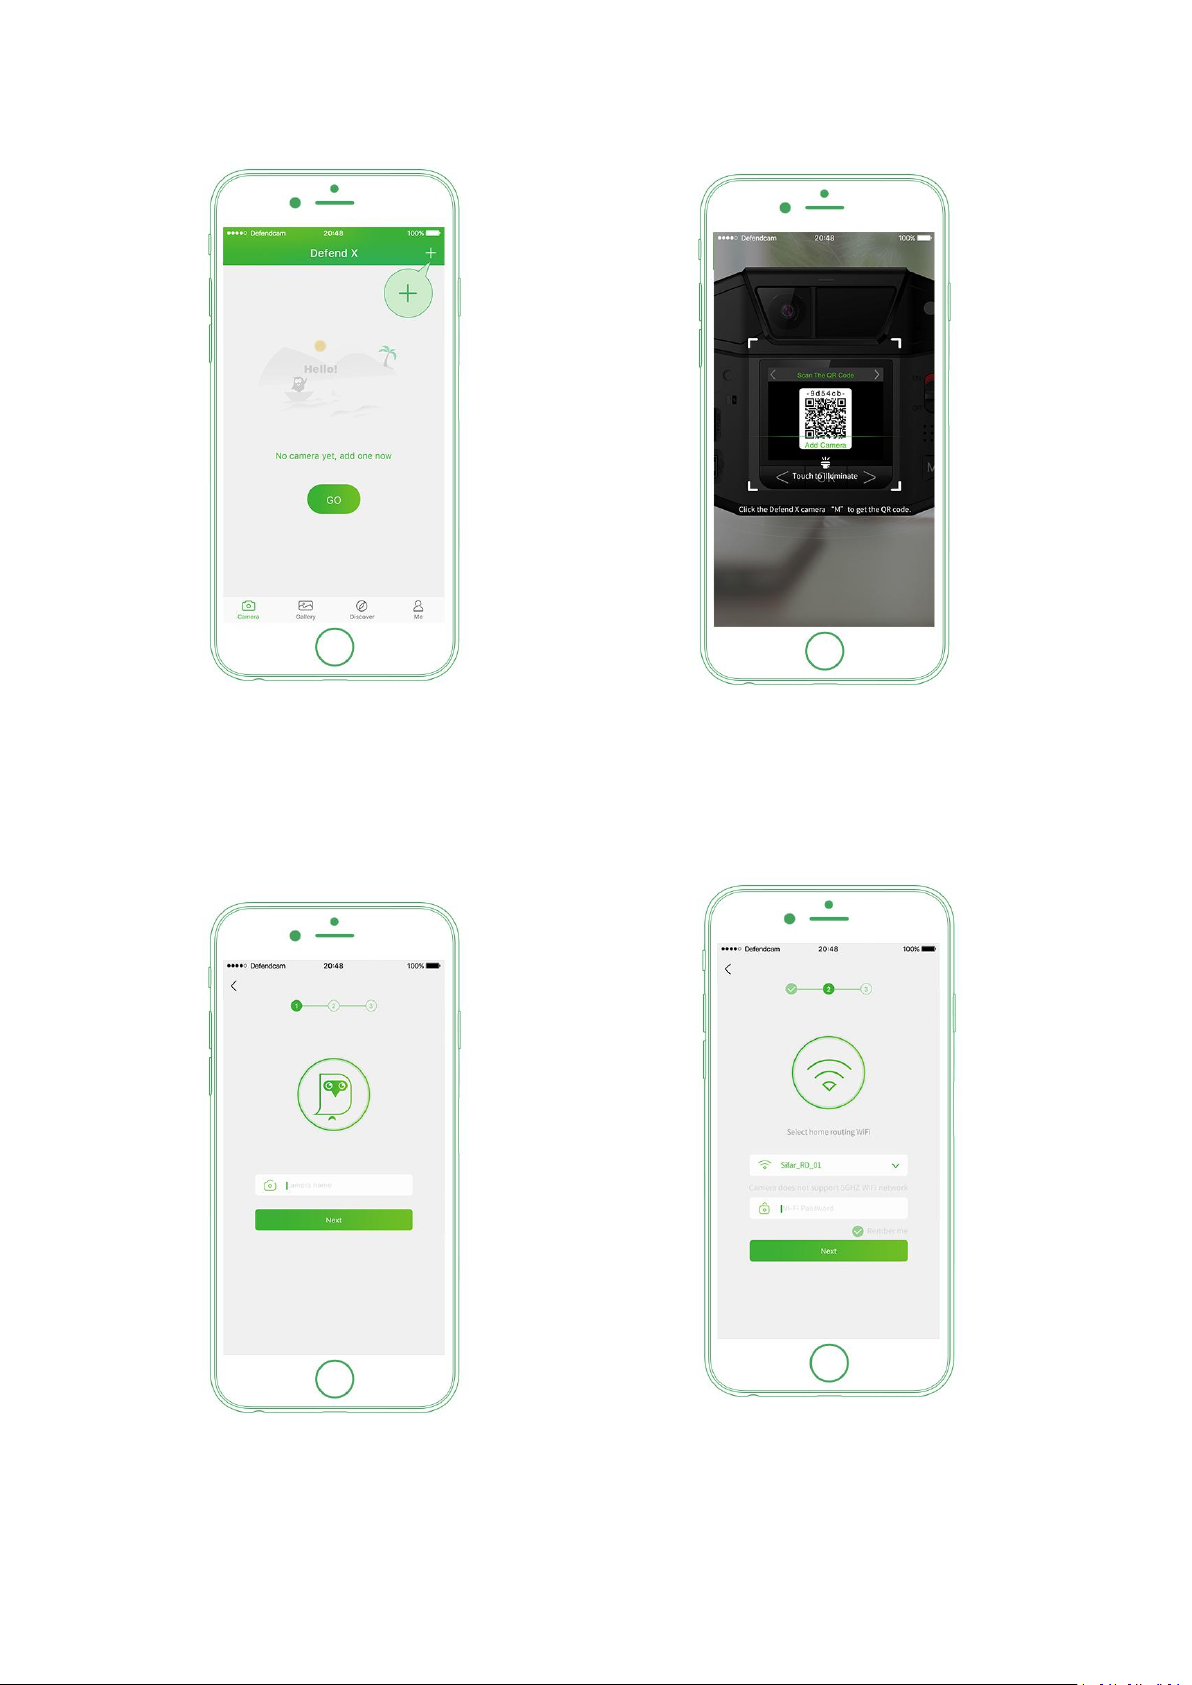
After successfully installed the app, please tap the DefendCam app icon on your mobile device
tolaunchtheapp, and follow belowstepstoaddyour camera to the app.
1.Please use a valid email address to register, then active
the accountby clickingthe email youreceived, andlog in.
6
2.Click “Camera” icon, then click “+” to
add yourDefendX cameras.
3.Switch ON camera, please press menu
button to enter main interface. Scan QR
code on the camera.
4.Please name your camera for
device management.
5.Please select your home router and
enter the password (camera doesn't
support 5GHZ Wi-Fi).

7
6.For Android users, please connect
your camera Wi-Fi accordingtothe ID
on the QR code. Then it will prompt
the boot operation after success or
failure.
A n d r o i d AP P
7.For iOS users, please click the green button to
enter into the setting interface. And then
connect your camera Wi-Fi according to the ID
on the QR code, the default password
abc.1234. At last, click back to DefendCam app
atthe topleft corner.
i O S A P P
8
2.4 Configure YourCamera
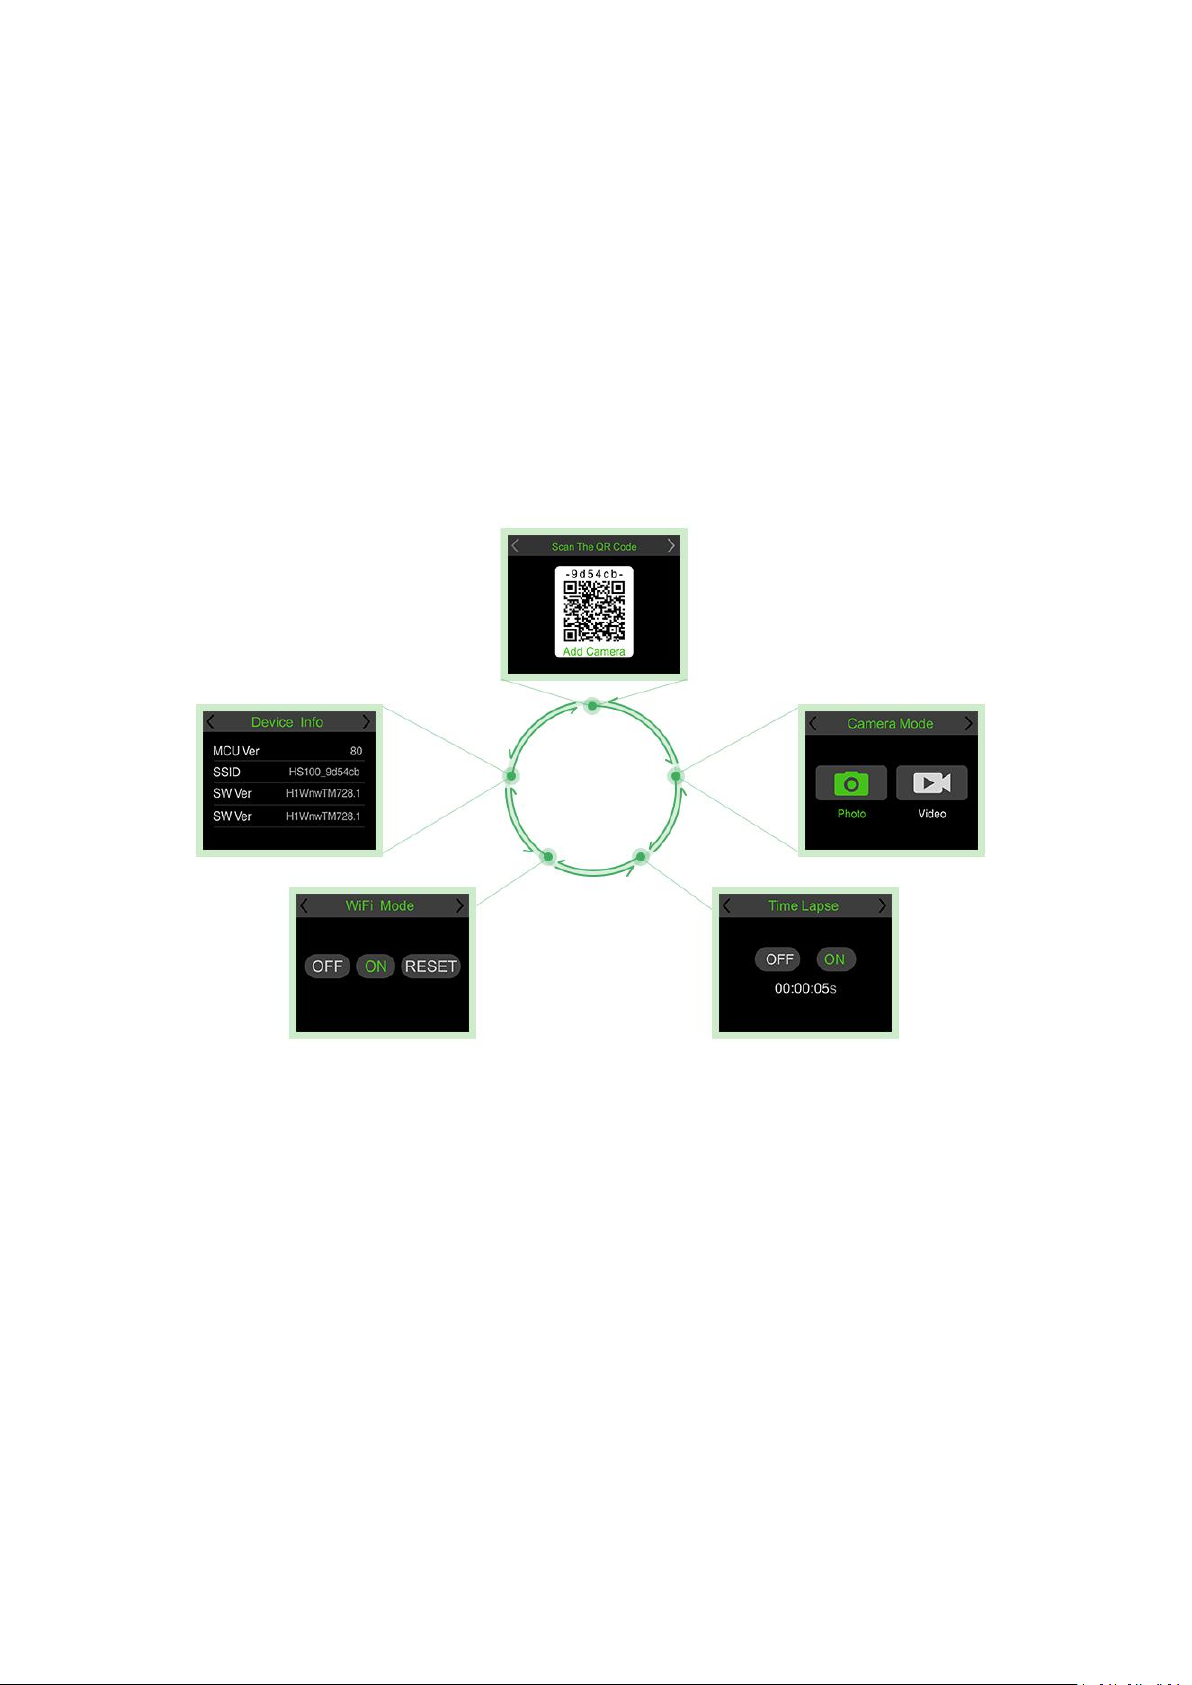
1)Camera Operation Menu
Press “ Menu ” button to enter camera setting menu; to navigate setting interface by pressing
navigationbuttons “ ← ”, “ → ”, press “ OK ” toconfirm the configurations, “ Menu ” to exitthe
configurationpage.

9
Menu Options
Functions(Default SettingsMarkedinRed)
Camera QR Code
The identificationfor you torecognize, add& manage the camera
Camera Mode
Photo/Video
Photo: camera shootsphotosbased on configured Multi-shot&ImageSize;
Video: camera shoots videos basedonconfigured Video Length/Size.
TimeLapse
OFF/ON(HH:MM:SS)
Select “ON”, press “OK”, to set the interval; PIRsensor of camera willbe turned
off; camera will shoot pics or video clips automatically upon the interval user
set.
Configurableinterval: 00:00:05~23:59:59.
WiFi Mode
OFF/ON(HH:MM:SS)
OFF: thecamera cutsoff thenetwork connection atthismode;
ON: the WiFi connection capabilityofthe camera is onatthis mode;
RESET: tocleartheWiFinetwork alreadyconfigured.
Device Info
MCU Ver/SWVer/SSID/MAC
MCU Ver: theMCU version ofthe camera chipset;
SWVer: the software version of thecamera;
SSID: theusernameof the WiFi network ofthe camera;
MAC: the physicaldeviceaddress of camera.

10
2) App Function List
: AddNewCameras, tap this iconto addnew camera.
: Arm/Disarm, tap thisicon toturn off/onPIR/TimeLapseworking mode.
: Settings, tap thisicon to entersettings page of the App.
: BatteryStatus,this icon shows you left power volumeof the camera.
: New recordings,this iconshows volume ofcamera feeds.
: Addedcamera list, tap thisicon to view allcameras addedon the App.
: Gallery,tap this iconto view & manage downloadedphotos/videos.
: Tap thisicontodiscoverthe accessfor moreservices & cameras.
: Tap thisicontoknow more details of your account.

11
3) Remote Camera Settings
Tap “ ” icon on top right of each camera on the app, you will go to the interface for
camera setting. Belowisalistofsettings you canchangeremotely on the phone App.
(Default SettingsMarked inRed)
3.Manage Your Camera
This part will introduce how to add new camera, modify the camera information and modify
camera login passwordetc.
You can addthe newcamera byscanning the QR codeon the camera menu.Tap “ ” to
start.
Scan the QR code incamera menu tocontinue.
Note : In thedark environment,pleaseturn onthe flashlight onyour phone.
Camera Name
Programmable up to12characters in length
Camera Mode
Photo/Video
ImageSize
5MP(2560x1920), 8MP(3264x2448), 12MP(4032x3024)
MultiShot
1P-5P
Video Size
FHD 1080P@30FPS; HD720P@30FPS;WVGA
Video Length
5s-10s
PIR Sensitivity
High/Middle/Low
Timer 1
OFF/ON(HH:MM-HH:MM),00:00-23:59
Timer 2
OFF/ON(HH:MM-HH:MM),00:00-23:59
Timelapse
OFF/ON(HH:MM: SS),00:00:05-23:59:59
Delay
OFF/ON(HH:MM: SS),00:00:03-23:59:59
Change CameraWiFi
Shortcutto connect the cameratoanotherWiFinetwork.
Note:Pleasefollow the stepsindicated onthe App.
Delete Camera
No/Yes, the shortcut todelete thecamera fromthelist
Other Settings
Manually Upgrade: Shortcut to upgrade camera software when
thereareupdatesavailable.
SDCycle:OFF/ON
Sync Server Time
3.1 AddNew Camera

12
Followthestepsindicatedon theAppandcameratofinishtheaddingprocess.
For detailed instruction,please refer tothe stepsexplained in chapter2.3 to addnew cameras.
3.2 Editthe Camera
To modifythelogininformationofyour camera,follow thestepsbelow:
1) Tap “ ” to enteryour account info page
2)Tapthe account icon toenter cameraaccountediting page
3) Tap “ User Name ” and “ Change Password ”, then enter new login username and password
(English letters & numbers only), and tap “ Save” and “ Done ” on topright to save settings and
tap “ < ” ontop lefttoreturnto the previous page.

13
3.3 Reset theCamera
To reset the camera to factory original settings, please stayat main interface and press the right
“ Navigation ” button up to 15 seconds, then release and a prompt “ Complete ” means the
camera hasbeen resetsuccessfully.
Note: A reset of the camera will remove all personal settings you made on the camera, include
the WiFinetworkinfoyouconfiguredonsuccessfully.
Onthe “ Camera ” page, choosethe camera you wantto deletefrom the list, andtap“ ”
ontopright toenter Camera Settingspage, andtap “ Delete Camera ” to deletethe camera.
3.4 Delete the Camera

14
Note : A camera will be able to be added from another DefendCam account only after it is
deleted fromthepreviousaccount ithas beenadded before.
4.View & Manage Your Contents
The photos and videos taken are firstly stored on camera SD card, then sent to your encrypted
DefendCam cloud storage space, and for permanent record of the contents in need, you will
needto downloadthemtimely toyour local Gallery.
When the camera is on hand, you can check and manage the contents directly on camera or
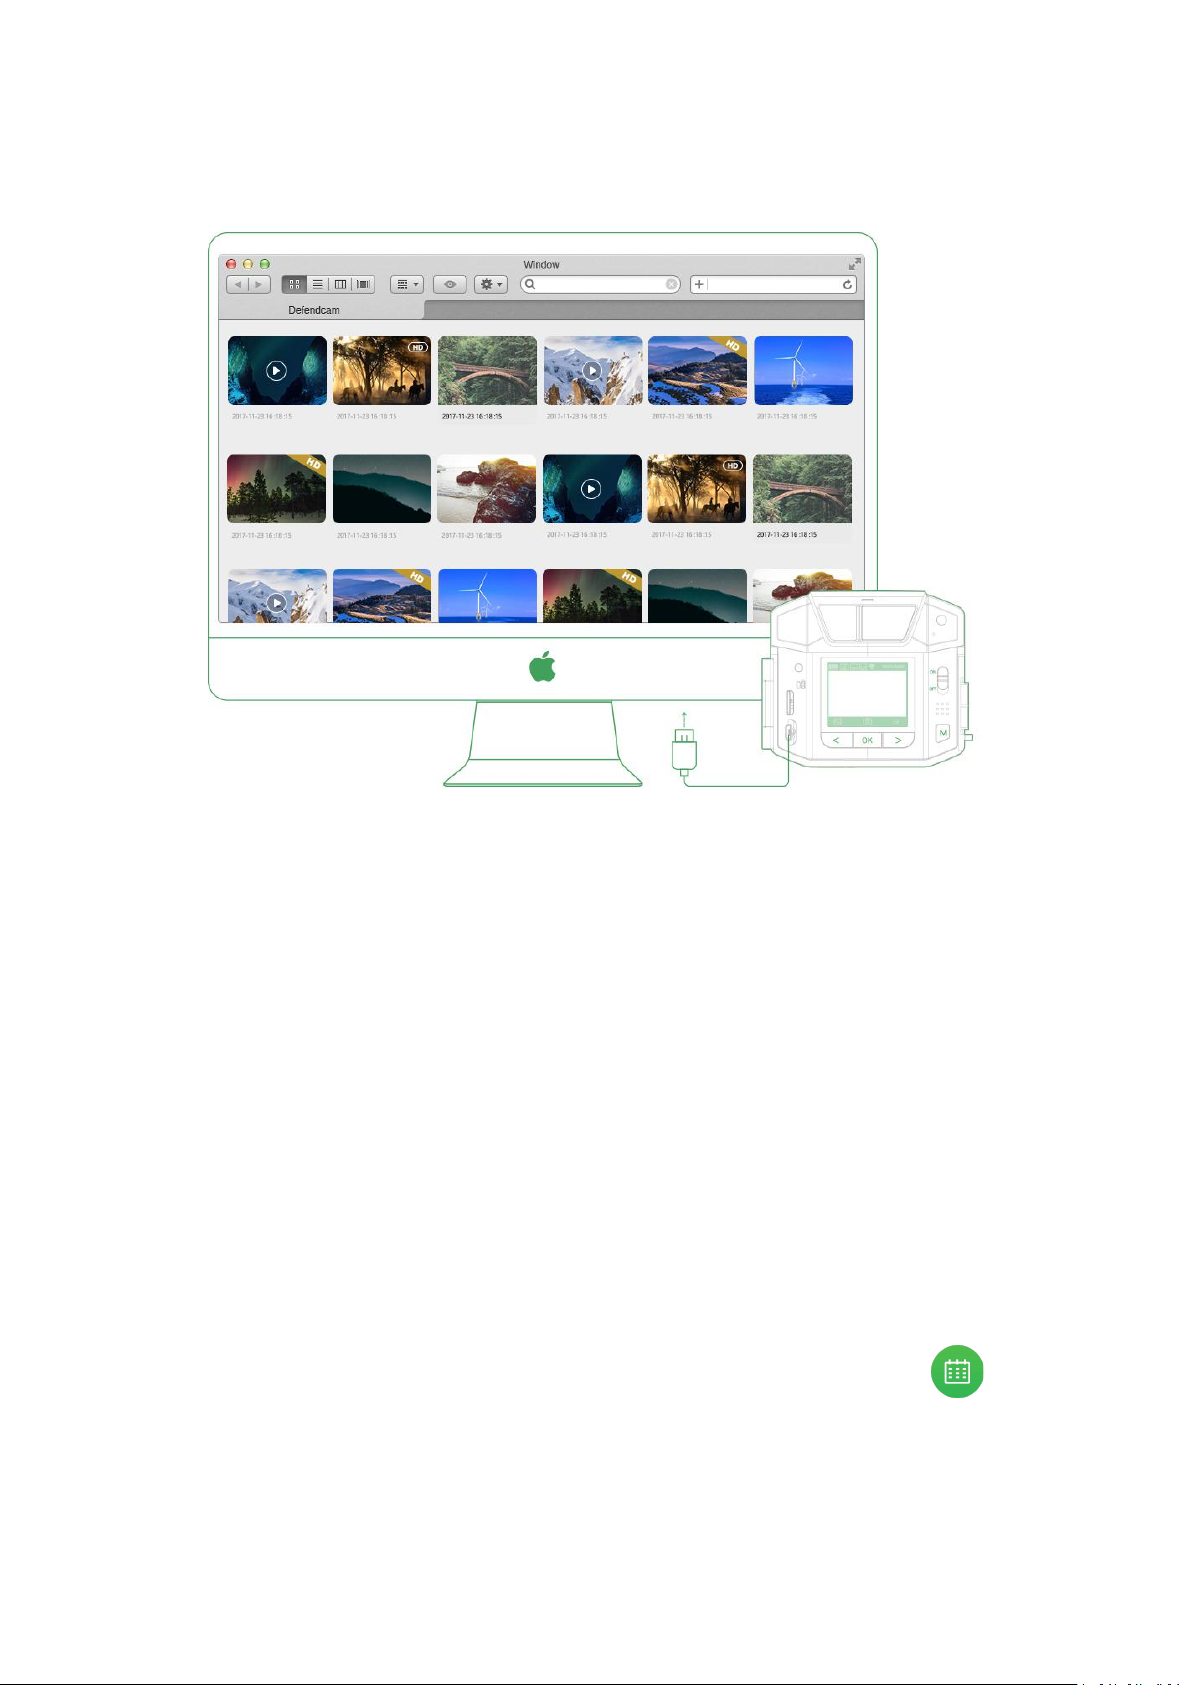
use the provided USB cable or your own prepared SD card reader to view and manage the
contents oncomputer.
1) Directlyon Camera
Steps: Switch ON Camera -> Press Left Navigation Button to enter contents previewing ->
Left/Right Navigation Button to move forward/backward -> OK Button to edit/confirm -> M
Button to exit/back.
Video
Photo
4.1 View & Manage Your ContentsonCamera
15
2) Via USB/Card reader
4.2 View & Manage YouContents on Cloud
Even without fetching your camera, you can also view and manage your camera contentsat any
timeviayour phoneAppDefendCam.
For photos and videos sent from camera, we offer free cloud storage for rolling contents of
latest period and selectable value-added services for larger & longer rolling storage. For long
term storage,you can downloadthesecontents youinterest from the cloud toyour Gallery.
Note: All cloud contents are encrypted with the user name and password you that create. No
one elsecanaccess your recordings.
1) View yourcontents oncloud
Tap icon “Camera” -> Select the target camera -> Tap cover image of the camera -> View
contents under the camera. You cantap thetop/leftdate bar or thecalendaricon“ ”
tofilterandview the photos/videos bydate.

16
2) Download/deleteyour contents oncloud
You can download/delete the contents under a camera either in batch by tapping icon
“ ” and then confirm to download/delete at bottom of the page, or tap into a single
photoor videotodownload/delete oneby one.
3)Share yourcontents on cloud
Whenyou tapinto a single photo or video, thereis a “ ” icon on topright corner, and
you cantapto choosethe method that youwant to use tosharethecontent.
4.3 View & Manage Your ContentsinGallery
For photos and videos downloaded from cloud, they will be stored local in Gallery, and via the
app,you can viewand manage thecontents.

17
1) View yourcontents inGallery
Tap icon “Gallery” -> Tap “Select” on top left (it appears a camera list) -> Choose your target
camera on the list -> Viewdownloadedcontentsunder the camera.
The photos/videosdownloaded fromthe cloud aresortedbycameras. Youcan tap theleft date
barorthe calendaricon “ ” tofilter andview the photos/videosby date.
2) Deleteyour contentsin Gallery
You can delete the downloaded contents under a camera at Gallery either in batch by tapping
icon “ ” and then confirm todelete at bottom of thepage, or tap into a single photo or
videoto delete one byone.
3) Share your contents inGallery
Whenyou tap intoa singlephotoorvideounder your Gallery, thereisa “ ” iconontop
right corner, andyoucantapto choose the method that youwantto use tosharethecontent.
18
5.Place & Mount Your Camera
Defend X’s App view function allows you to see what your camera sees when placing the
camera. By viewing the photos/videos sent to App on site, you can adjust the camera to
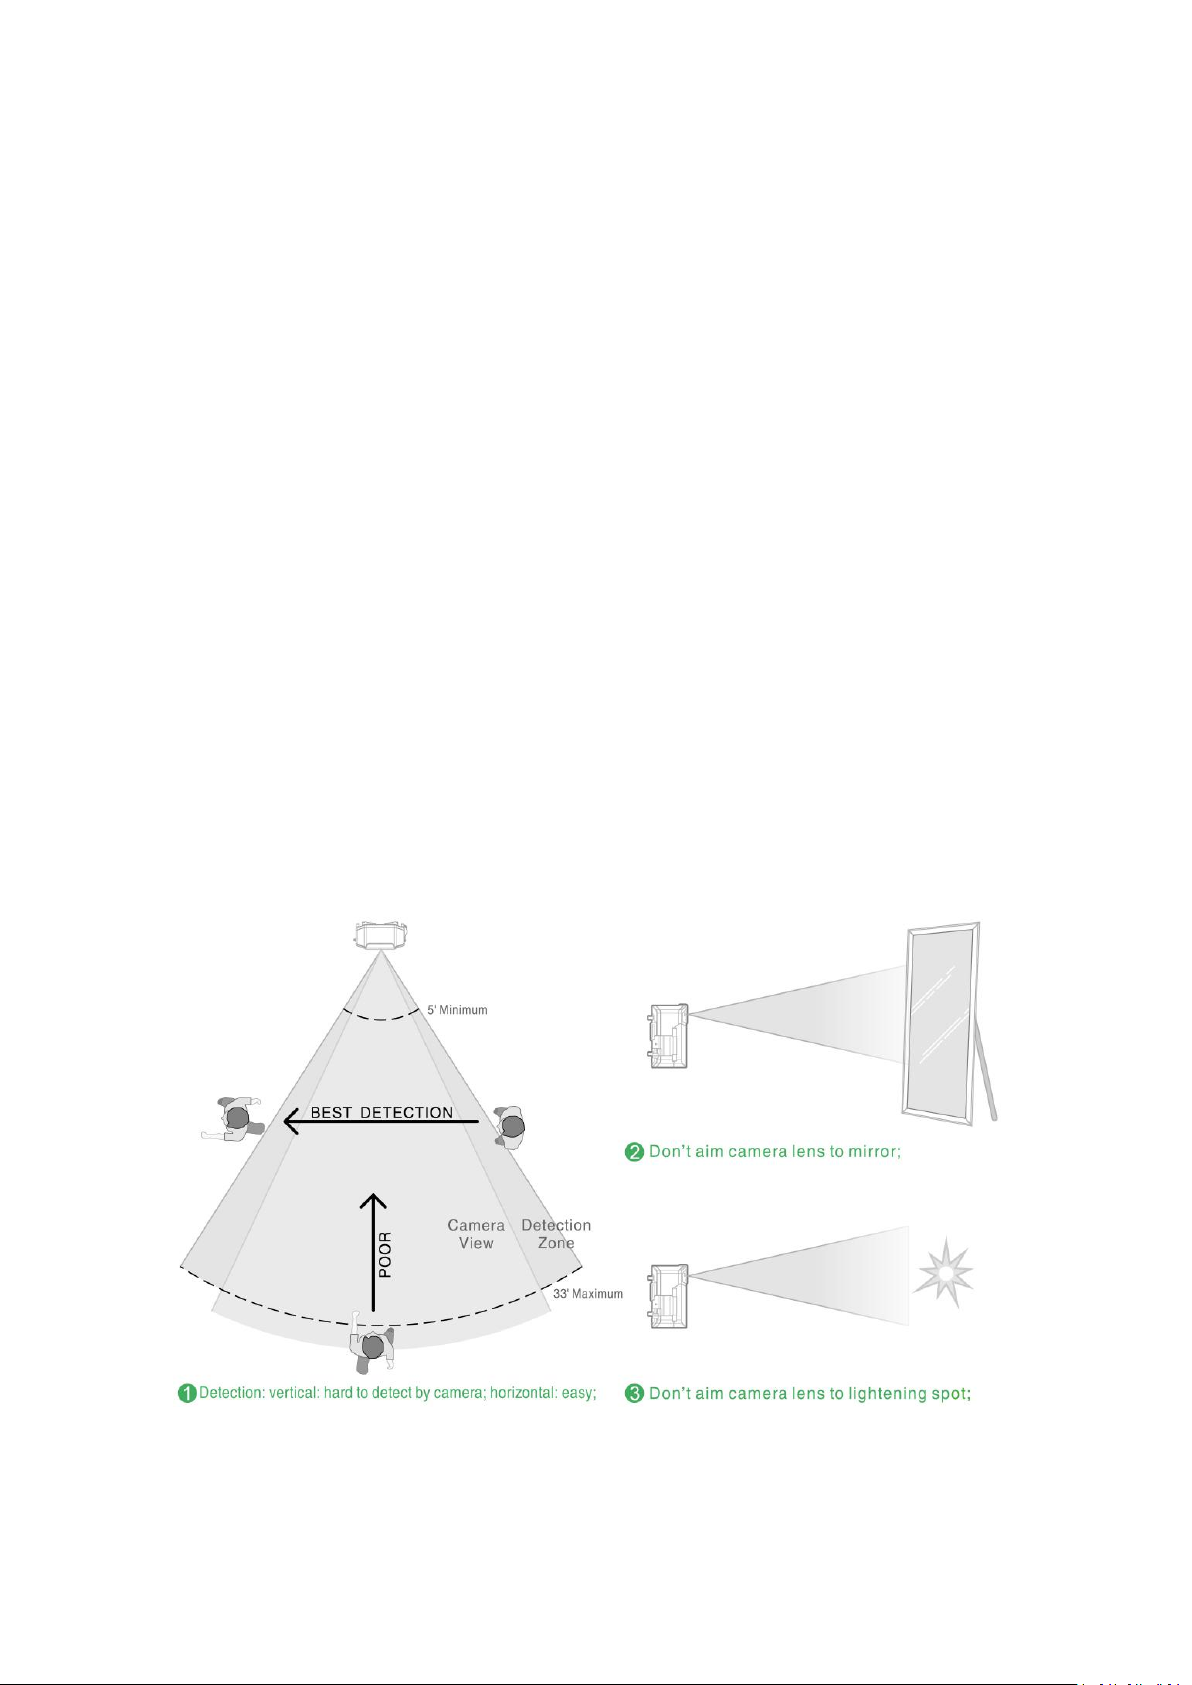
monitor the preciseareathat you want.Beloware severaltips tokeepin mind:
Place your Defend X at proper distance to the base station for best signal receiving. Meanwhile
pleasedon’tput camerastoo closeto eachotherto prevent WiFisignals interfering,
The Defend X provides 85-degree field of view. Please take this into consideration when aiming
the area thatyouwantto monitoris withinthe camera’s fieldofview.
Place your Defend X at proper height to capture the whole scene. The camera’s sensitivity to
side tosidedmovementismuch higher thanthat ofvertical directiontothecamera.
Please don’t place the camera facing mirrors, or any other objects with/reflect bright lights like
sunshine,stronglamplight,etc.
Keep the camera away from frequent moving vehicles,and air conditioner vents, humidifier
outlets,the heat transfer ventofprojectors,etc.
5.1 Place Your Camera
19
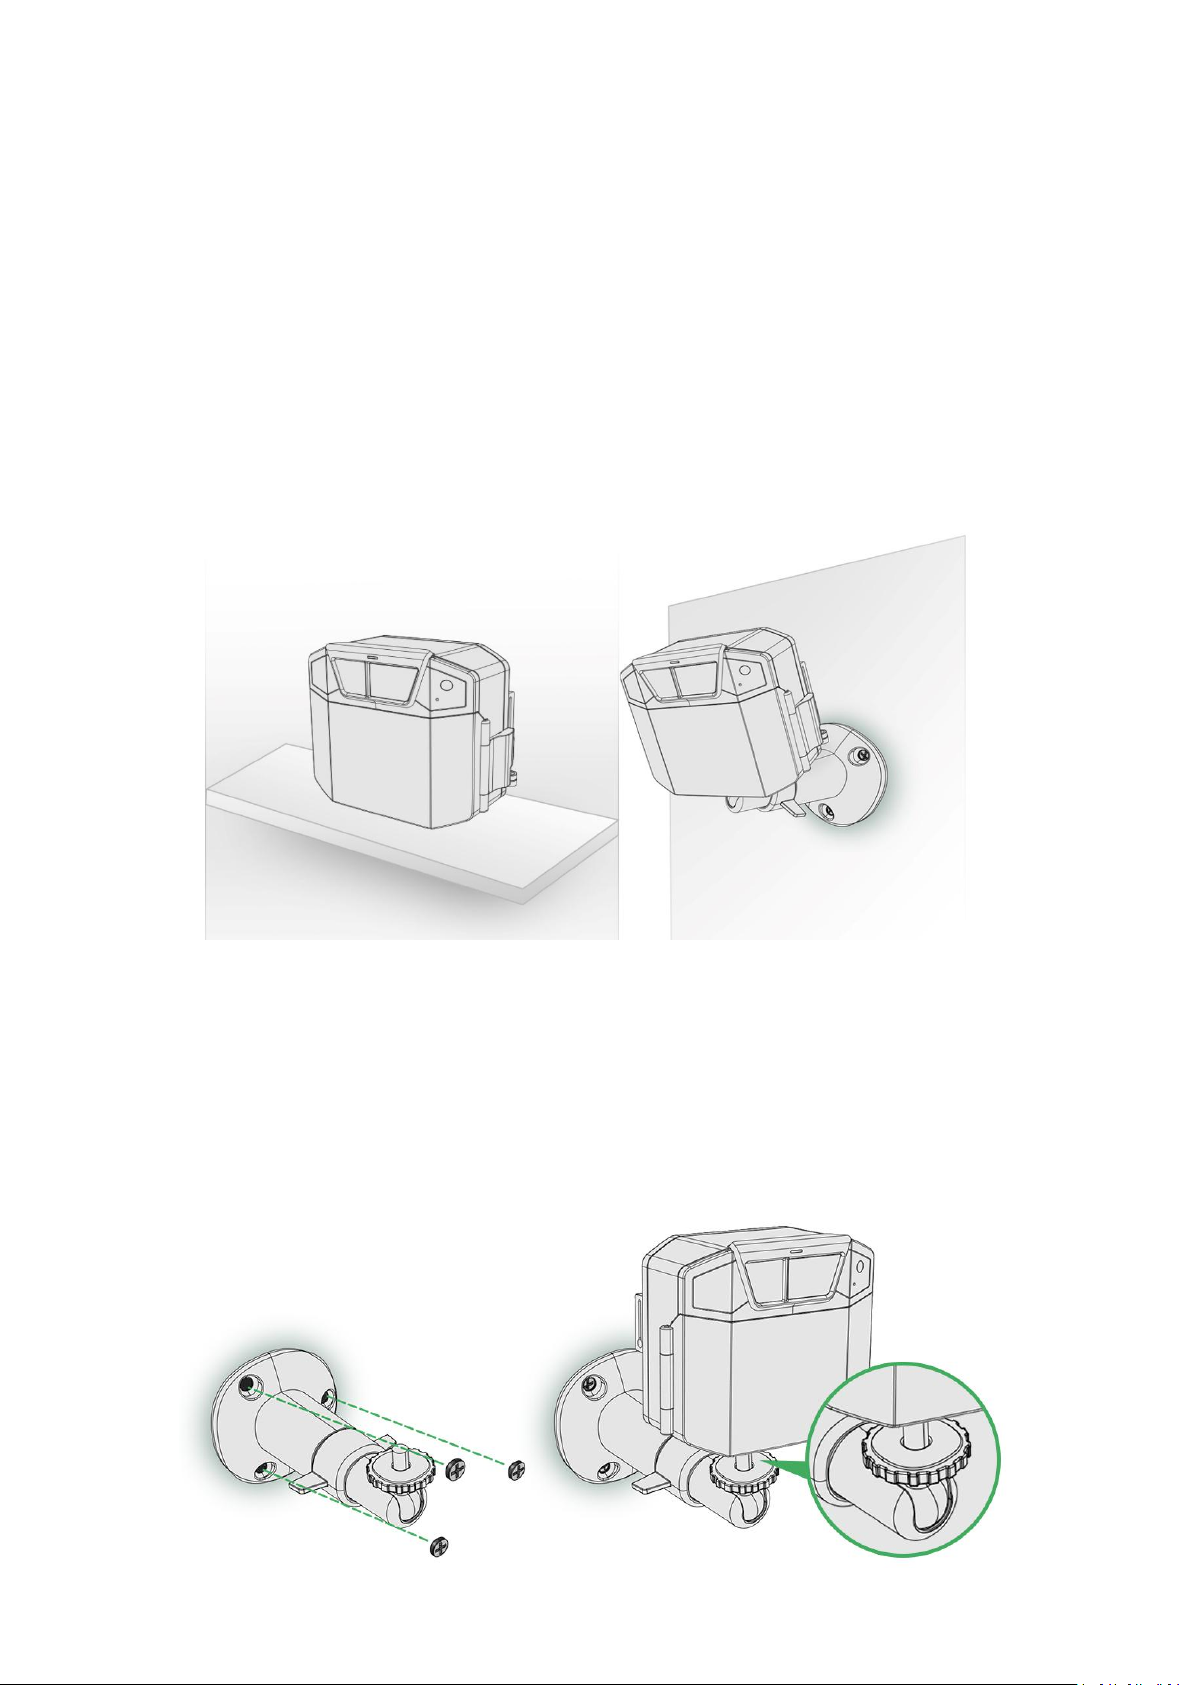
5.2 Mount YourCamera
You can place your camera on a shelf or other flat surface,oryou canmountittothe
wall,treesorany other poles.
1) To place thecamera onSurface
Whenyou place thecamera on surface,you can placeitdirectlyoruse theprovided
brackettoplaceitonthe surfaces.For the best effect, pleasenote to avoidsurfacesthat
reflectslightorthosewithobstaclesnearby.
2)To mountthe camera on wall
Place thewall plateand secure itwiththreescrews. Attachthe camera to thewall plate.
Ifyou’remountingthe camera to drywall, be sure touse theincludedplasticdrywall
anchors.
20
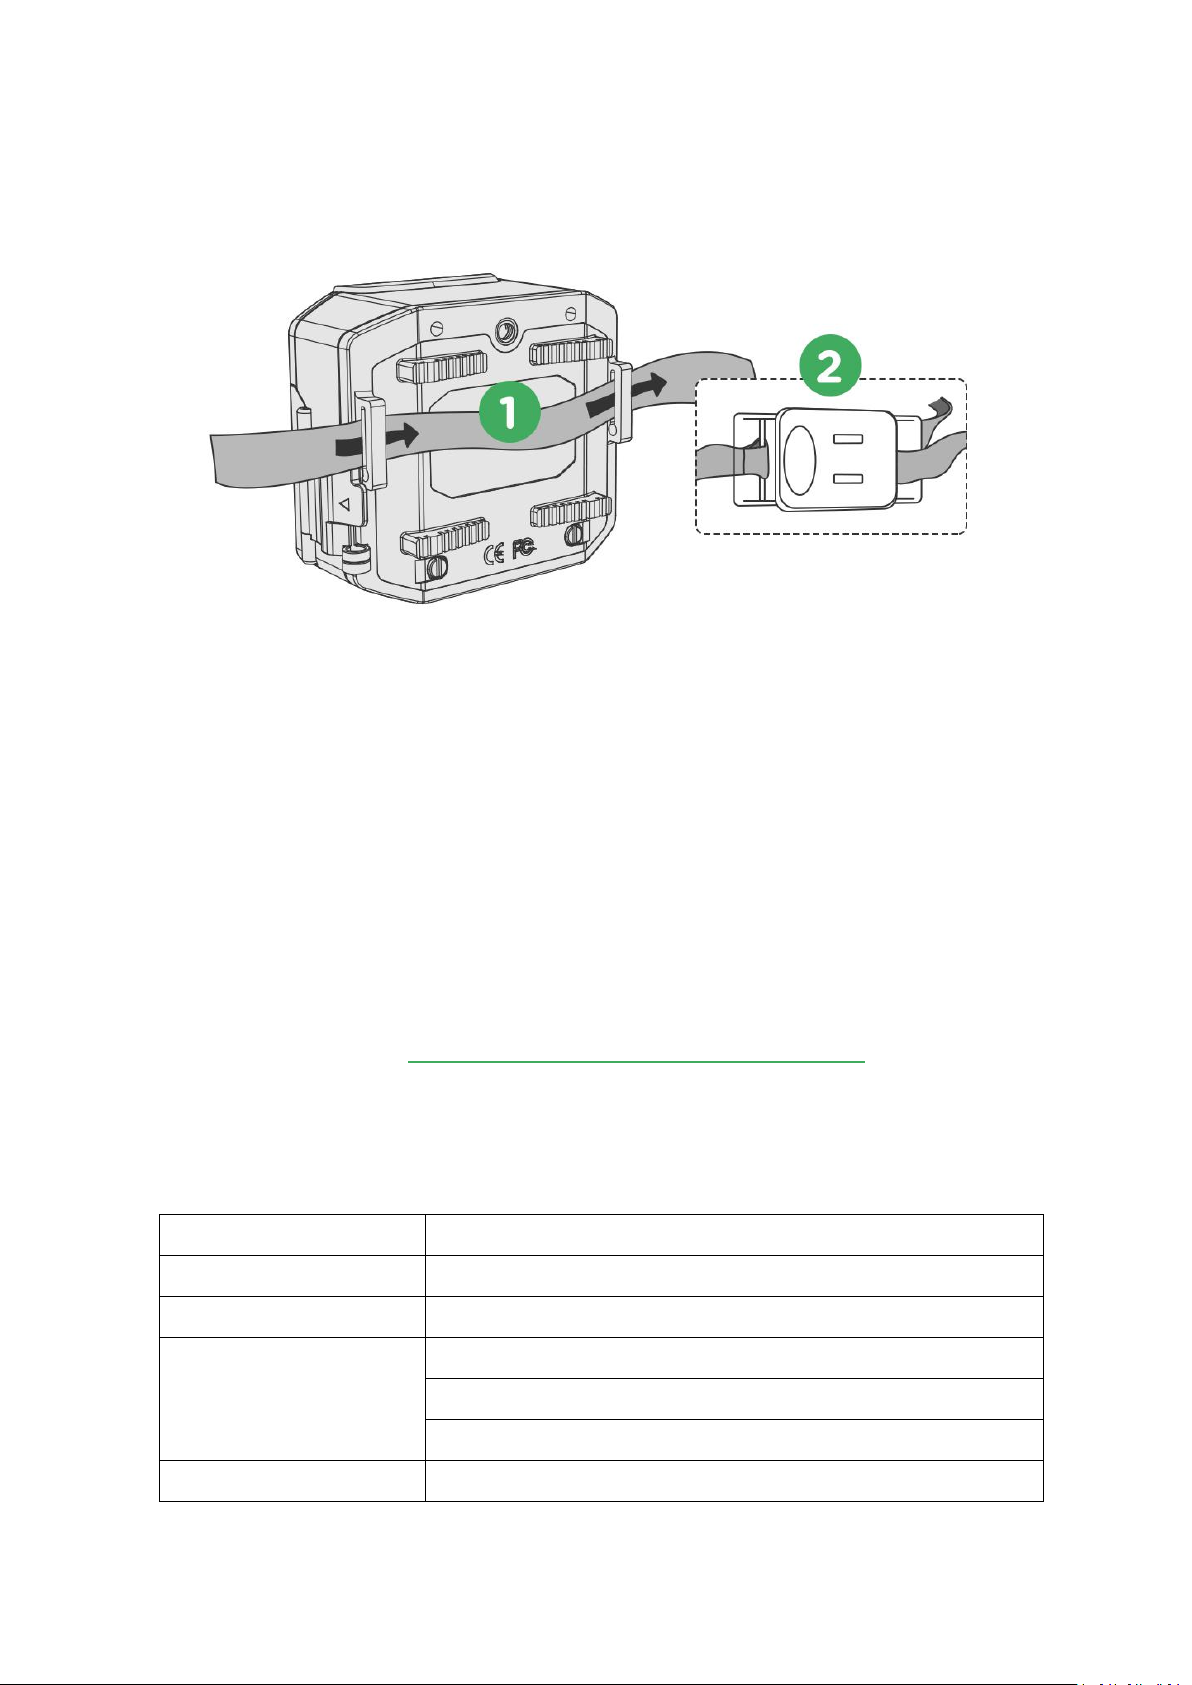
2) To mount thecamera on trees/poles
6.Manage Your Subscription Plans
DefendCam includes severaldaysofunlimited free trial of allvalue-addedservices for
everynew accountuser. Thefree trialcountsfrom thedate when the1st camerais
added tothe account. After thetrialperiod,you can choose betweenfree Basic service
and Elite service plan.
The freebasic service plan offers basic features andfunctionality. Thepaid Elite service
plangivesyouthe ability to increase theuses of your camera to suit yourspecific needs.
For informationabout service plans,visityour DefendCam account onpageof
“ Discover ”, or website: http://www.wuyuantech.com/WuYuan/
LCD Screen
Built-in 2” TFTcolor screen
ImageSensor
5 Mega Pixels Color CMOS
Lens
FOV:85Degree; Auto IR-Cut-Remove (atNight)
PIR
Angle:65Degree
Distance: 10-12m
Sensitivity: 3 sensitivelevel- High/Normal/Low
ImagePixel
5MP(2560x1920), 8MP(3264x2448), 12MP(4032x3024)
7.Specification

21
8.Q&A and Troubleshooting
1)The camera does notboot up properly.
Video
Coding:H.264
FHD 1080P@30FPS; HD720P@30FPS;WVGA
File Format:MOV
StorageMedium
Micro SD Card(4-32GB)
Trigger Time
0.4s
Audio
Microphone and Speaker
IRLED
850nm
IRFlash Rang
8-10m
WirelessTransmission
2.4 GHz Wi-Fi,IEEE 802.11b/g/n, WEP / WPA-PSK/ WPA2-PSK
PowerSupply
2 built-in3.7V18650 rechargeable Li-onbatteries
USB Interface
Micro USBinterface
Mounting
Strap; Tripod;Bracket,1/4inchinterface
OperatingTemperature
-25℃ ~ 55℃
Waterproof Spec
IP66
Dimension
106*88*55mm
Weight
337g(built-inbatteries included)
Certification
Possiblereasons
Solutions
a. Power volume ofbuilt-in
batteries are too low.
Please charge the batteries with the provided power
adapter incamera box.
b. The built-in batteries are
too aged or damaged
Replace the batteries with new compatiblebatteries.
3.7V 18650 Li-on protectedrechargeable batteries.
c.Damage ordrop ofcodes
oncamera software.
Updatethe camera software with the USBprovided.
Please consult customerservice for instruction.

22
2)WhenI scan theQRcode to adda camera,why can’t I add it?
3) Whycan’t I connect thecamera to the WiFi network?
d.Damage ofhardware or
burnout ofcircuit
Please contact customerservice for instruction.
Possiblereasons
Solutions
a. The camerais not onthe
server cloud, and it shows “The
device does not exist” in this
situation.
Very rare situation. Please provide the MAC address of
yourcamera to customer service toadd itto the server.
b. The camerahasbeen
addedby other DefendXaccount.
Please delete the camera from the previously added
account first before adding itto anotheraccount.
c. The WiFiof thecamerais
connected by a cellphone or other
mobile devices.
Please stop and ignore the WiFi network on your
cellphone or othermobiledevices.
d. Incorrect network
configuration details, like wrong
account nameor password
Double check the network details and router setting and
configureagain.
Possiblereasons
Solutions
a. WiFi accountor password
error
Double check the account & password details, and pay
attentionto capitalization ofthe letters, etc.
b. The mobile phone doesn’t have
internet access
Make sure thatyour mobile phone is connected with data
serviceor WiFinetwork.
c. The WiFirouter doesn’t
have network connection
Make sure the WiFi router can access the network
normally.
d. The WiFi routerhas
network restrictions (likeMAC
address restriction; network
blacklist; bandwidth limit; DHCP
server shutdown, etc.)
Check the router settings to make sure there are no
networkaccess restrictions

23
4) What are thefactorstoconsider before you connect thecamera to another WiFi?
a. Reset theexistingWiFi on camera first;
b. Make sure the camera WiFi (DefendX_******) is not connected by other mobile
devices; Ifyes,please ignore it on your mobiledevice;
c. Details of theWiFi router to configure with areaccurate;
d. Themobile phone to configure has normalaccess tonetwork.
5)How to confirm the camera iswell connected withWiFi network?
a. When camera screen is on, press the Right Navigation button. If the IP shows
192.168.1.xxxand theWiFi is theone youconfigured it to, then it’s well connected.
b. After the camera is added and configured to network, manually press OK button to
takea photoand send, then check on mobileApp to seeifitiswellreceived.
6) When the camera screen is on, does it take and send photos/videos as preset
working mode (PIR MotionDetection/TimeLapse)?
No. When the camera screen turns on, it enters previewing/ programming/manual test
mode, and under this mode, the camera responds to button operations but not PIR
motion triggers andtimelapsesettings.
7) What are theeffectiveways tolight upthe screenwhen it turnsoff automatically?
a. Closethe camera cover andunlock it again, thescreen will light up;
b. Directly press thesoft WorkingStatusShift Button to wake up thescreen;
c. Turn off the PowerSwitchbuttonand turn on again.
8) Howabout if I want to addthe cameraswithanother DefendCamaccount?
a. Please make sure the camera is not added by other account. If it is already added,
please delete it in previous account (Take this step cautious since delete of the camera
means delete of itsphotos stored on thecloud)
b. Reset theexisting WiFi on camera
c. Make sure the camera WiFi (DefendX_******) is not connected by other mobile
devices; Ifyes,please ignore it on your mobiledevice.

24
d. Addthe camera as a newonthe newaccount.
9) Howabout if I log in my DefendCam account onanothermobiledevice?
Yes. You can do that, but for safety purpose of your account, the account can be only
logged in on one mobile device at the same time, which means when you log in your
accountonanother device, your account on the previous devicewill be logged out.
10) When will the setting changesI make on Appsynchronizetocamera?
a. When the camera is at Arm Mode, the camera will be able to take and send
photos/videos upon motion trigger/time lapse setting, and among the process of
sending, thesetting changes will besynchronizedtocamera also.
b. When the camera is at Disarm Mode, the camera doesn’t respond to motion
triggers/time lapse setting, thus no photo/video taking and sending process, and the
camera willauto-connect toserver to synchronize the infoper hour.
Note: No matter in what situation, to make sure the server info will be synchronized to
camera at least once a day, the camera is designed to wake up automatically to
synchronize theinfo23hours laterafter thesettingchange.
11) What is workingcapacityofthe built-inbatteries?
Officialstatisticsfor reference:
a. Without network connection and the camera is set to take 1 photo every 5 minutes,
the batteries cansupport camera to take more than12,000photos.
b. With stable network connection, the camera is set to take and send 1 photo every 5
minutes, the batteries cansupportcamera to take more than 3,000 photos.
12) Howlong does it take to charge thebuilt-in batteries full?
Officialstatisticsfor reference:
Ittakes 3 to4 hours tocharge the lowpower batteriesfullbyDC(9-12V input).
13) Why do thebatteries drain out so fast?
a. Motion triggers are toofrequentinthe area;

25
b. Theconfigured WiFi router is outofrangeto connect;
c. The configured WiFi router doesn’t have reliable internet access, and the
transmission onlyendswhenitwaitstotimeout;
d. The configured WiFi network is not stable, and the network traffic results in low
successfultransmissionrate and longer transmission time.
14) HowaboutifI forget theDefendCamaccountname andpassword?
a. Forget account name: If a camera is added under this account, then you can track
back your account by providing your camera Mac address to customer service; If you
didn’t adda camera to theaccount,thenthere isnoway totrackback.
b. Forget password: Fill in your account on App, and click “Forget Password” to reset
your password.
9.Warranty
With great pride and full confidence in our products, we always keep our words which
are given to our customers as specified warranty terms and services below. Based on a
strict QC system, we initially offer all ourcustomers one yearlong time limited warranty,
come along with selectable chargeable renewal policy of warranty as one, two, three,
orfour years.
Our products are warranted against defects in materials and workmanship for a period
of one year from the date of original purchase. If a defect exists, we will, at our option
and to extent permitted by law will (1) repair the product at no charge using new or
refurbished parts; (2) exchange the product with a functionally equivalent product that
isnew or refurbished.Provided theproduct is returnedfreight charge paid.
This warranty excludes damage resulting from abuse, accident, modifications or other
causes that are not defects in materials and workmanship, or by someone other than
our authorized technicians.This warranty only covers failures due to defectsin materials
orworkmanship under normalusage.
To obtain warranty service, please contact us to determine the nature of problem
before return the product under this warranty (with a written description of the
problem andprint samples) for repairingorexchanging.

26

sup p o rt @ d efen d c am e r a . co m
w w w . d e f e n d c a m e r a . c o m
 Loading...