

Page 1
Page 1 of 3 8/20/08 (DP)
1
Driver/Left Sidebar
14
12mm ID x 24.1mm OD x 2.1mm Flat Washers
1
Passenger/Right Sidebar
10
12mm Lock Washers
1
Driver/Left Front Frame Mounting Bracket
8
12mm Hex Nuts
1
Passenger/Right Front Frame Mounting Bracket
4
10mm x 35mm Hex Bolts
1
Driver/Left Front Sidebar Mounting Bracket
8
10mm ID x 21mm OD x 1.7mm Flat Washers
1
Passenger/Right Front Sidebar Mounting Bracket
4
10mm Lock Washers
1
Driver/Left Rear Sidebar Mounting Bracket
4
10mm Hex Nuts
1
Passenger/Right Rear Sidebar Mounting Bracket
8
8mm x 25mm Hex Bolts
2
Support Bracket Tabs (fits L-Front & R-Rear)
8
8mm x 22mm OD x 1.5mm Flat Washers
2
Support Bracket Tabs (fits R-Front & L-Rear)
8
8mm Lock Washers
2
12mm Nut Plates
4
6mm x 35mm Hex Bolts
2
12mm x 35mm Short Bolt Plates
8
6mm ID x 18mm OD x 1.6mm Flat Washers
2
12mm x 95mm Long Bolt Plates
4
6mm Nylock Nuts
6
12mm x 35mm Hex Bolts
PROCEDURE:
1. REMOVE CONTENTS FROM BOX. VERIFY ALL PARTS ARE PRESENT. READ
INSTRUCTIONS CAREFULLY BEFORE STARTING INSTALLATION. DO NOT ATTEMPT
INSTALLATION ALONE; PERSONAL INJURY OR DAMAGE TO THE VEHICLE M AY
RESULT. DRILLING IS REQUIRED
2. Starting at the driver side front, install the 12mm x 35mm Short Bolt Plate in the location
pictured in Figure 1A. Next, insert the 12mm Nut Plate into the hole in the underside of the
vehicle pictured in Figure 1B. Locate the driver side Front Frame Bracket and hang it from the
previously installed Nut and Bolt Plates using (1) 12mm x 35mm Bolt, (2) 12mm Lock
Washers, (2) 12mm Flat Washers and (1) 12mm Hex Nut, (Figure 2). Do not tighten hardware
at this time.
INSTALLATION INSTRUCTIONS
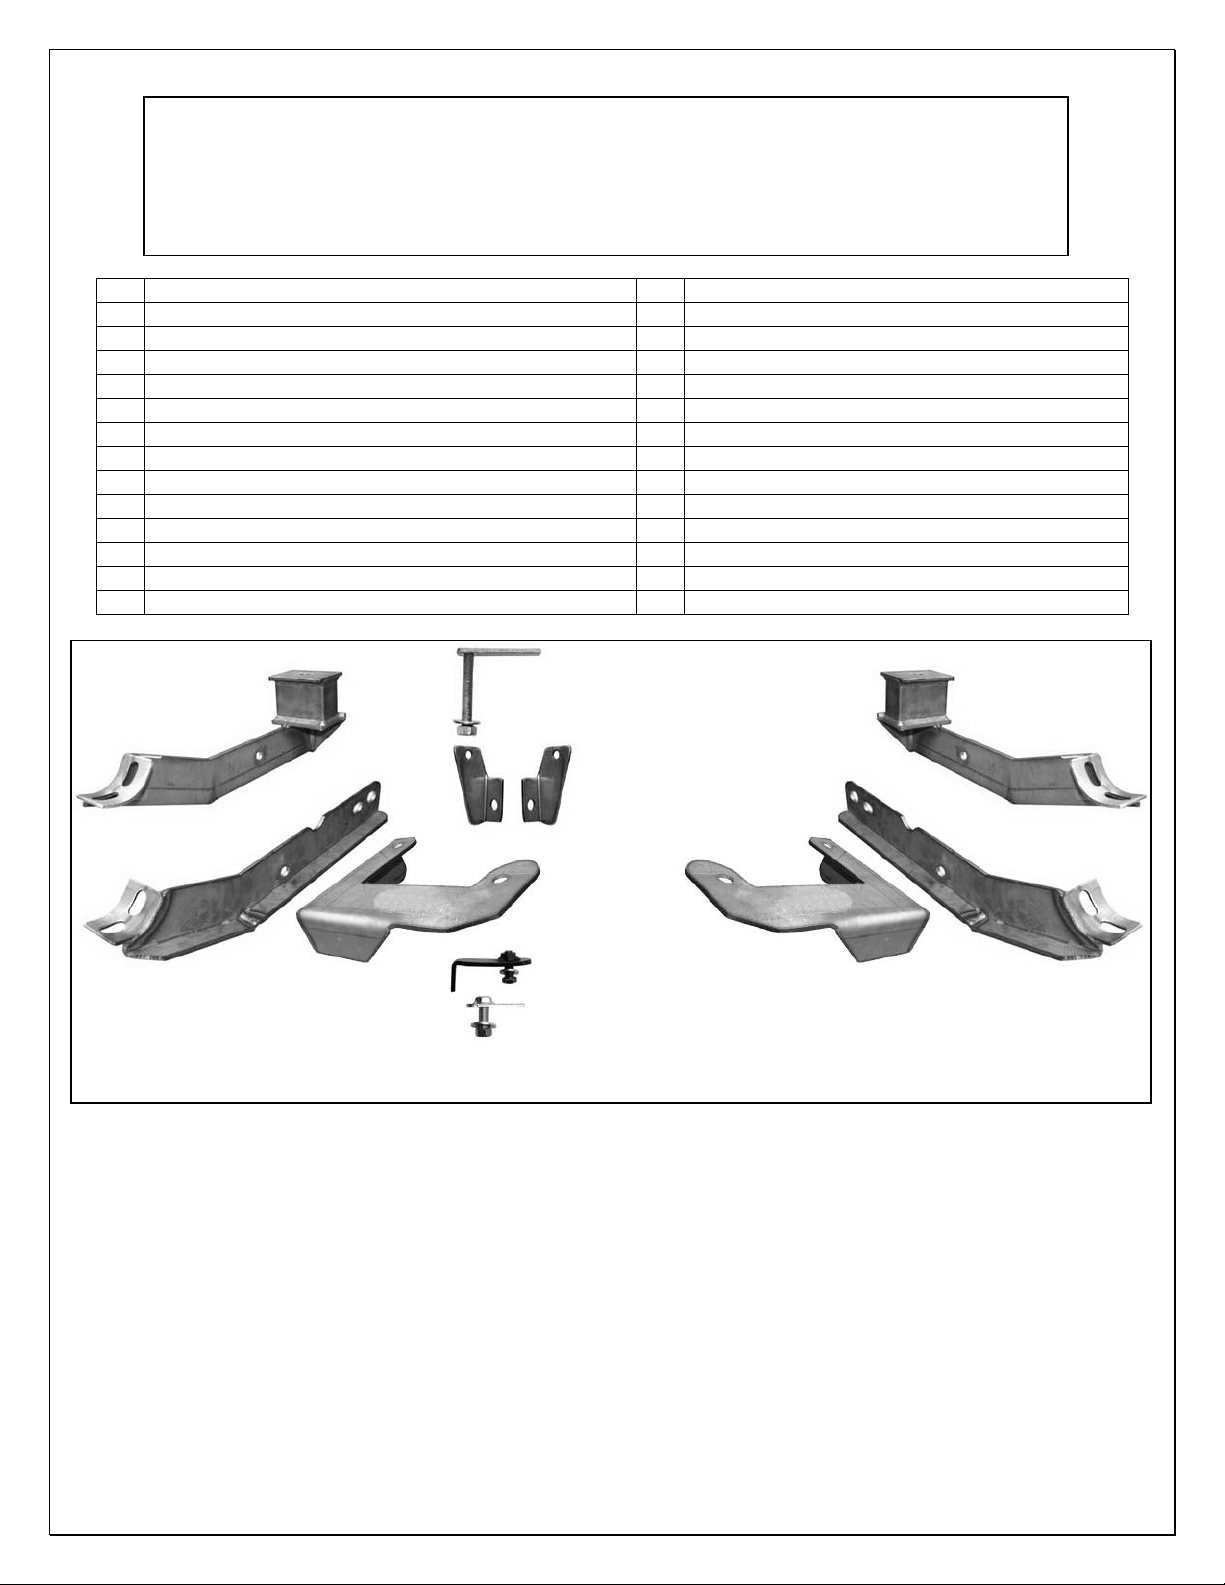
SIDEBAR
09 DODGE JOURNEY
PART NUMBER DZ 37020x
Rear
Mounting
Front &
Rear
Support
Brackets
Front
Frame
Bracket
Front
Mounting
Front
Frame
Bracket
Front
Mounting
Rear
Mounting
Rear Bolt Plate
(long)
Front Nut
Plate
Bolt Plate
(short)
Driver Side Hardware
Passenger Side Hardware
Page 2

Page 2 of 3 8/20/08 (DP)
3. Locate the driver side Front Mounting Bracket and bolt it to the backside of the Frame Bracket
using (2) 12mm x 35mm Hex Bolts, (4) 12mm Flat Washers, (2) 12mm Lock Washers and (2)
12mm Hex Nuts. Snug but do not tighten bolts at this time.
4. Moving to the driver side rear of the vehicle, determine the location and install the 12mm x
95mm Long Bolt Plate, (Figure 4). Rotate Bolt Plate counter-clockwise 90 degrees or until it
stops in frame channel.
5. Hang the driver side Rear Mounting Bracket from the Bolt Plate using (1) 12mm Flat Washer,
(1) 12mm Lock Washer and (1) 12mm Hex Nut. Snug but do not tighten at this time.
6. Carefully unwrap the Sidebars and determine the Driver Sidebar from the picture on page 3,
(Figure 6). The step pad closest to the end of the tube goes toward the rear of the vehicle.
7. Gently align and place the Sidebar onto the Mounting Brackets and hold it in place with the
included (4) 8mm x 25mm Hex Bolts, (4) 8mm Lock Washers and (4) 8mm Flat Washers.
Snug all hardware but do not tighten at this time.
8. Adjust and level the Sidebar then tighten all Bracket-mounting hardware only. Next remove the
Sidebar.
9. Locate the driver side Front Support Bracket Tab and secure it to the Mounting Bracket using
(1) 10mm x 35mm Hex Bolt, (2) 10mm Flat Washers, (1) 10mm Lock Washer and (1) 10mm
Hex Nut. Note: This same tab also fits on The Passenger/Right Side Rear Bracket. Snug but
do not tighten the bolt at this time. Rotate the Support Bracket next to the Pinch Weld on the
vehicle and Drill a 1/4” hole through the pinch weld to secure the bracket.
Tip A : Clamp the bracket to the pinch weld and use the hole in the tab to guide the drill bit.
Tip B: Mark this location for drilling, move tab then drill hole, (Figure 5).
10. Attach the Support Tab using the included (1) 6mm x 35mm Hex Bolts, (2) 6mm Flat Washers
and (1) 6mm Nylock Nut. Reinstall the Sidebar and tighten all hardware at this time.
11. Repeat Steps 2 - 10 for passenger/right Sidebar.
To protect your investment, wax this product after installing. Regular waxing is recommended to
add a protective layer over the finish. Do not use any type of polish or wax that may contain abrasives
that could damage the finish.
For stainless steel: Aluminum polish may be used to polish small scratches and scuffs on the finish.
Mild soap may be used also to clean the Sidebar.
For gloss black finishes: Mild soap may be used to clean Sidebar.
Driver Side Installation Shown
Fig 1A
Fig 1B
Nut Plate
Installation
for Front
Bracket
Bolt Plate
Installation
for Front
Bracket
Page 3

Page 3 of 3 8/20/08 (DP)
Driver side rear
Long Bolt Plate
installation.
Rotate Bolt
Plate 90-
degrees
counter-
clockwise after
installation
Bolt Support Tab on
each bracket then
mark for drilling
(Driver side front
Shown)
Drilling
Location
Front
8mm x 25mm Hex Bolt
8mm Lock Washer
8mm Flat Washer
Fig 2
Fig 3
Fig 4
Fig 5
Installation
Complete
Driver side rear
shown wi th
Support Bracket
Note distance from end of the
Sidebar to step pad to determine
driver Sidebar. Step pad closest to
the end of the tube goes toward
rear of vehicle.
Front
Rear
Fig 6
10mm x 35mm Hex Bolts
10mm Lock Washers
10mm Flat Washers
 Loading...