

Page 1
Before returning this product
DZ 3019
to the store of purchase
Contact Dee Zee if you experience the following problems:
•MissingParts
•InstallationProblems/Questions
•WarrantyQuestions
1.800.779.2102
Hoursofoperation:8am-5pmCST,Mon-Friday
Reviewcompletewarrantypolicyandregisteryourproductat:
www.deezee.com
Page 2
DZ Running Board Installation Instructions
DZ 3019
Dodge Ram Pickups '94-Current
Congratulations on your purchase of a quality Dee Zee product.
Dee Zee is recognized as having the highest quality running boards
and accessories on the market today. We have earned this reputation
by offering our customers a product they can be proud to place on their
vehicles. Dee Zee meets all the criteria of manufacturing a custom-fit
product which guarantees it to be the easiest product to install.
NOTICE: This product requires the use of sheet metal screws. To use
these screws, drill a hole as specified in the instructions. Once the hole
has been drilled, tighten the screw firmly into the hole with a wrench.
Caution should be taken not to overtighten the sheet metal screws.
INSTRUCTIONS: Please take time to read all instructions
before beginning installation.
NOTE: After drilling, Dee Zee recommends putting a sealant or rust
inhibitor around all holes drilled into the body panel of the vehicle.
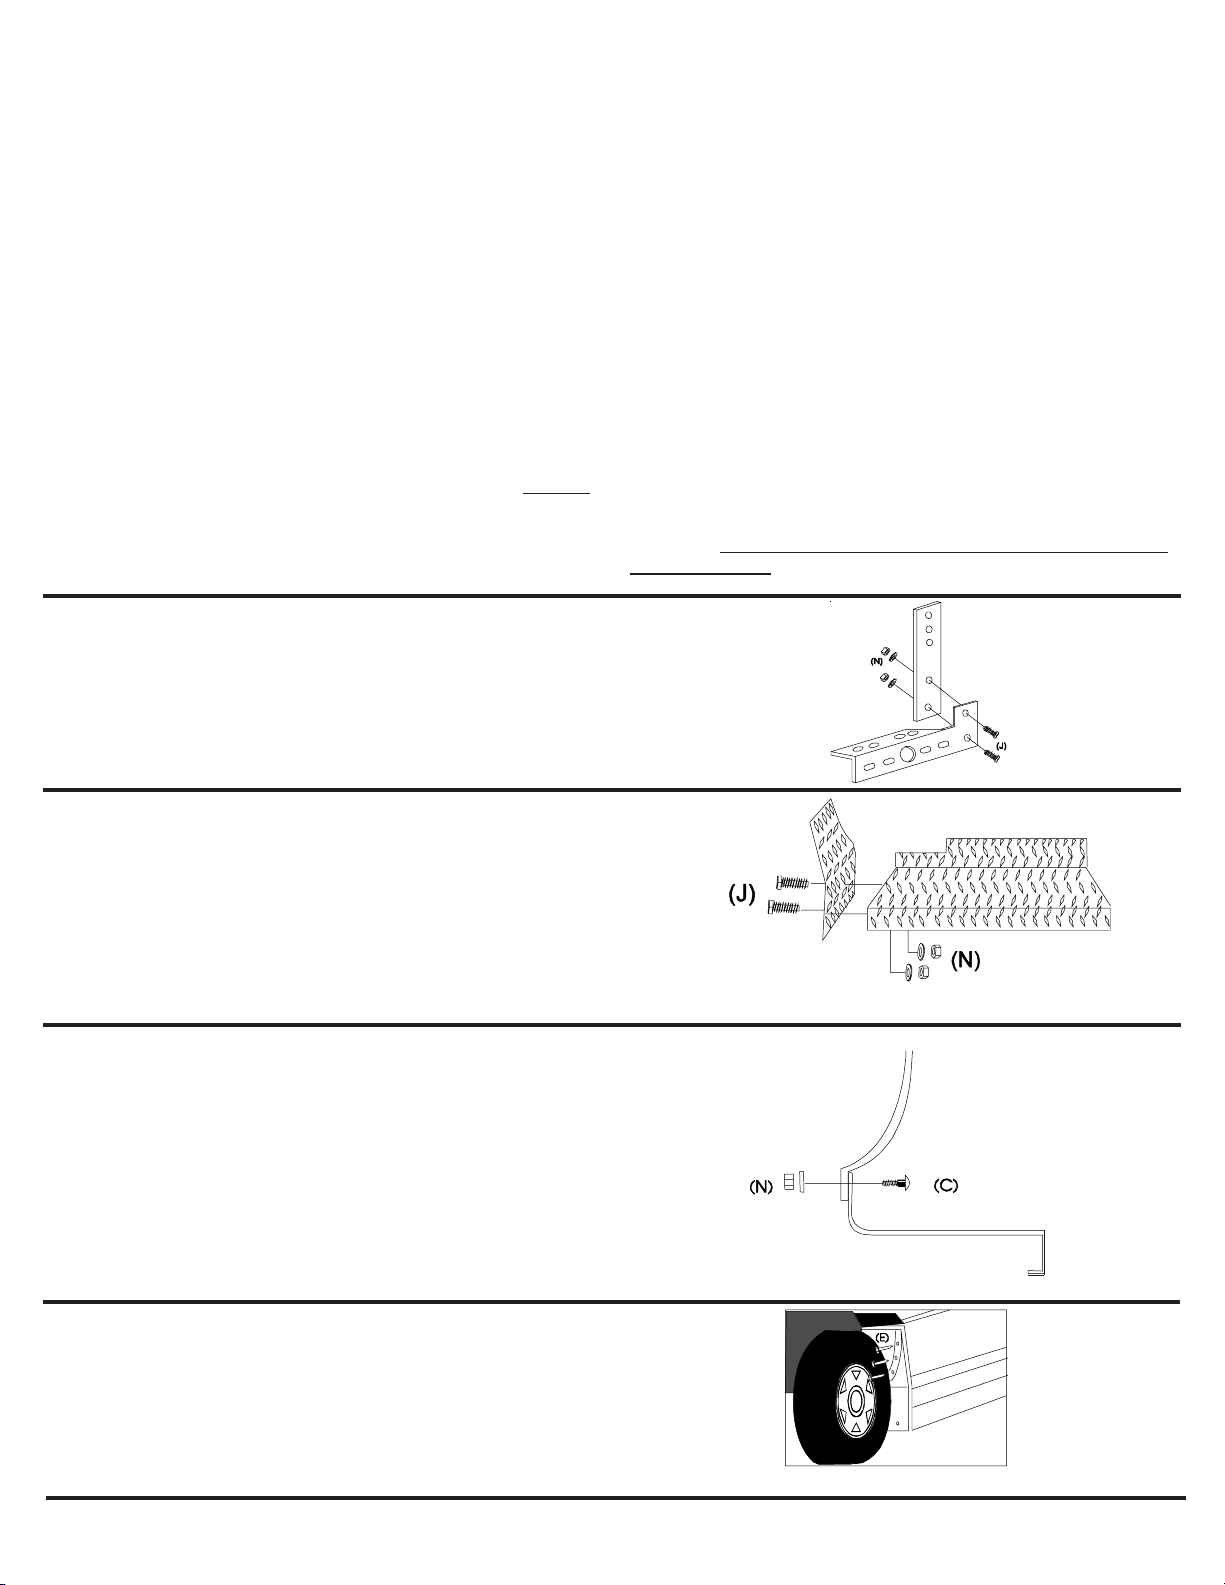
NOTICE: With the left and right angle brace, add a flat bar by
matching the two holes in each part. Fasten with two 1/4" x
3/4" hex head bolts (J), washers and nuts (N). These L-braces
will be used later in the instruction.
carefully
TOOLS REQUIRED:
Two 7/16" Wrenches A Level
A 3/8" Wrench Locking Pliers
A Drill with a set of Bits A Tape Measure
PARTS LIST: QTY
Running Boards ........................................................2
Mudguards ................................................................2
Channel Braces ........................................................2
Left & Right Angle Braces.........................................2
8 1/2" Flat Bar Braces...............................................2
Hardware Bag ...........................................................1
Warning: It is the sole responsibility of the vehicle owner to check
for tire clearance.
STEP 1
Attach a mudguard to the front of each running board with two
1/4" x 3/4" hex head bolts (J), washers and nuts (N).
BEFORE PROCEEDING: Take the time to check the rocker
panels and wheel wells of your vehicle for protruding bolt heads
that may prevent a flush mounting. Remove these bolts and
replace or discard after installation.
STEP 2
Position the running board to the side of your vehicle so that the
back lip of the running board is aligned to the vehicle's rocker
panel lip and the mudguard is snug against the trailing edge of
the front wheel well.
Level the running board and drill four evenly spaced 1/4" holes
through the running board and the rocker panel lip. Attach the
running board to the rocker panel lip with four 1/4" x 1" carriage
bolts (C), washers and nuts (N).
STEP 3
Level the running board and drill three 3/16" holes through the
mudguard and wheel well lip. Attach the mudguard to the wheel
well lip with three 1/4" x 1" sheet metal screws (E).
FRONT
DZ 3019 10/17/97 PAGE 1
Page 3

STEP 4
At approximately 53" from the front of the board, position an Lbrace to the sub-body support and the rear of the board. Use the
first and third holes in the L-brace as a guide to drill two
1/4" holes through the running board step. Secure in place with
1/4" x 1" carriage bolts (C), washers and nuts (N). Level the
running board to the vehicle. Use the holes in the top of the brace
as a guide to drill two 3/16" holes through, the sub-body support.
Attach with two 1/4" x 1" sheet metal screws (E).
STEP 5
At approximately 30" back from the front of the running board,
position channel brace to the underside of the running board and
sub-floor support as shown. Use the holes in the channel brace
as a guide to drill two 1/4" holes through the running board step.
Secure in place with 1/4" x 1" carriage bolts (C), washers and
nuts (N).
Use the hole in the opposite end of the channel brace as a guide
to drill one 1/4" hole up through the sub-floor support and attach
the channel brace to the sub-floor support using a 1/4" x 3/4" hex
head bolt (J), washer and nut (N).
CLEANING INSTRUCTIONS: To maintain the bright finish of your
Dee Zee aluminum running boards, clean with a mild detergent.
**If you should incur any problems with the installation of this product, please feel free to call us at 1-800-779-8222.
So that we may better serve you when you call, please have the W/O#, SEQUENCE#, and the DATE
from the labels on the outside of the box.
WARNING: It is unlawful and dangerous to ride on running boards or
side box boards while vehicle is in motion. It is the sole responsibility
of the owner to check for tire clearance.
DZ 3019 10/17/97 PAGE 2
Page 4

1/4“ x 1”
1/4“ x 1”
#10 x 5/8“
1/4“ x 1”
Black Sheet
Metal Screw
PN 97B
S
1/4“ x 1”
Slotted Head
Bolt
PN 86A
Sheet Metal
Screw
PN 97
E
1/4“ Washer
PN 72 &
1/4“ Nut
PN 71
Phillips Head
Screw
PN 140
P
1/4“ x 1”
Black
Carriage Bolt
PN 87B
Slotted Fillister
Head Screw
PN 80
L
1/4“ x 1”
Carriage Bolt
PN 87
A
1/4“ x 3/4”
Hex Head Bolt
PN 70
PN 70B (Black)
N
Nylon Bushing
(Spacer)
PN 116
T
1/4“ x 1 1/4”
Hex Head Bolt
PN 94
1/4“ x 3/4”
Carriage Bolt
PN 223
Stainless Steel
Boards Onl y
C
J
DZ 3019 10/17/97 PAGE 3
 Loading...