


D
D
D
e
e
e
d
d
d
i
i
i
P
P
P
r
r
r
o
o
o
g
g
g
T
T
T
e
e
e
c
c
c
h
h
h
n
n
n
o
o
o
l
l
l
o
o
o
g
g
g
y
y
y
C
C
C
o
o
o
.
.
.
L
L
L
t
t
t
d
d
d
w
w
w
w
w
w
w
w
w
.
.
.
d
d
d
e
e
e
d
d
d
i
i
i
p
p
p
r
r
r
o
o
o
g
g
g
.
.
.
c
c
c
o
o
o
m
m
m
1
StarProg Series
Engineering IC Programmer
User Manual
V1.0
Last Updated on Sep. 2013
StarProg Series User Manual

D
D
D
e
e
e
d
d
d
i
i
i
P
P
P
r
r
r
o
o
o
g
g
g
T
T
T
e
e
e
c
c
c
h
h
h
n
n
n
o
o
o
l
l
l
o
o
o
g
g
g
y
y
y
C
C
C
o
o
o
.
.
.
L
L
L
t
t
t
d
d
d
w
w
w
w
w
w
w
w
w
.
.
.
d
d
d
e
e
e
d
d
d
i
i
i
p
p
p
r
r
r
o
o
o
g
g
g
.
.
.
c
c
c
o
o
o
m
m
m
2
I. General Description .................................................................................. 3
II. Product Information ................................................................................ 3
III. System Requirements .............................................................................. 4
IV. Hardware Description .............................................................................. 5
4.1 StarProg-U/ StarProg-F ............................................................................................... 5
V. Quick User Guide ...................................................................................... 7
5.1 Software Installation ..................................................................................................... 7
5.2 StarProg Setup ............................................................................................................... 8
5.3 Dediware Software setting .......................................................................................... 8
VI. Revision History ....................................................................................... 11
StarProg Series User Manual

D
D
D
e
e
e
d
d
d
i
i
i
P
P
P
r
r
r
o
o
o
g
g
g
T
T
T
e
e
e
c
c
c
h
h
h
n
n
n
o
o
o
l
l
l
o
o
o
g
g
g
y
y
y
C
C
C
o
o
o
.
.
.
L
L
L
t
t
t
d
d
d
w
w
w
w
w
w
w
w
w
.
.
.
d
d
d
e
e
e
d
d
d
i
i
i
p
p
p
r
r
r
o
o
o
g
g
g
.
.
.
c
c
c
o
o
o
m
m
m
3
I. General Description
II. Product Information
StarProg-U
StarProg-F
Universal programmer
√
EEPROM/FLASH/eMMC/SD Card
Micro SD slot
√
√
Mini USB port
√
√
LCD port
√
√
COM port
√
√
Socket adaptor connector
√
√
Power/Pass/Busy/Error LED
√
√
Start key
√
√
Offline programming
√
√
Multiple programmers
√
√
HDCP key programming
√
√
Programmer
Features
This user manual mainly describes the hardware features of StarProg Series. If you
want know more about software and application information, please go to
Dediprog website (www.dediprog.com) to download Dediware user manual and
application note.
StarProg Series User Manual

D
D
D
e
e
e
d
d
d
i
i
i
P
P
P
r
r
r
o
o
o
g
g
g
T
T
T
e
e
e
c
c
c
h
h
h
n
n
n
o
o
o
l
l
l
o
o
o
g
g
g
y
y
y
C
C
C
o
o
o
.
.
.
L
L
L
t
t
t
d
d
d
w
w
w
w
w
w
w
w
w
.
.
.
d
d
d
e
e
e
d
d
d
i
i
i
p
p
p
r
r
r
o
o
o
g
g
g
.
.
.
c
c
c
o
o
o
m
m
m
4
CPU:
P4 or above
OS:
Win XP or above
USB Port:
USB 2.0
Free Disk Space:
At least 1GB
CD Rom:
Necessary
III. System Requirements
StarProg Series User Manual

D
D
D
e
e
e
d
d
d
i
i
i
P
P
P
r
r
r
o
o
o
g
g
g
T
T
T
e
e
e
c
c
c
h
h
h
n
n
n
o
o
o
l
l
l
o
o
o
g
g
g
y
y
y
C
C
C
o
o
o
.
.
.
L
L
L
t
t
t
d
d
d
w
w
w
w
w
w
w
w
w
.
.
.
d
d
d
e
e
e
d
d
d
i
i
i
p
p
p
r
r
r
o
o
o
g
g
g
.
.
.
c
c
c
o
o
o
m
m
m
5
IV. Hardware Description
A. Power LED
B. Operation LED
C. LCD Keypad Connector
D. COM Port
E. Socket Adaptor Headers
F. Start Button
G. Power Connector
H. USB Connector
I. Micro SD Card Slot
4.1 StarProg-U/ StarProg-F
StarProg Series User Manual

D
D
D
e
e
e
d
d
d
i
i
i
P
P
P
r
r
r
o
o
o
g
g
g
T
T
T
e
e
e
c
c
c
h
h
h
n
n
n
o
o
o
l
l
l
o
o
o
g
g
g
y
y
y
C
C
C
o
o
o
.
.
.
L
L
L
t
t
t
d
d
d
w
w
w
w
w
w
w
w
w
.
.
.
d
d
d
e
e
e
d
d
d
i
i
i
p
p
p
r
r
r
o
o
o
g
g
g
.
.
.
c
c
c
o
o
o
m
m
m
6
1
GND
NC 2 3
5V
START
4
5
FAIL
PASS
6 7 BUSY
NC
8
A. Power LED
Power LED shines when StarProg series is powered by USB or power adaptor.
B. Operation LED
Red Led: error Orange Led: operation on going Green Led: pass
C. LCD Keypad Connector
Connect LCD Module to StarProg series when executing stand alone programming.
D. COM Port
COM Port is for the application of integrating StarProg series to customers’ own system.
Pin Out
E. Socket Adaptor Headers
Socket adaptor headers are used to connect to different socket adaptors provided by Dediprog in
order to support all package types.
F. Start Button
By pressing the start button, the StarProg series starts to execute the operation procedures
defined in the project pre-downloaded to the Micro SD card.
G. Power Connector
Connect power adaptor to StarProg series when executing stand alone programming. USB can
also be used as power source during standalone programming.
H. USB Connector
USB connector is used to communicate with the Dediware software during the USB mode or to
provide the power during the standalone mode.
I. Micro SD Card Slot
Insert the Micro SD card with programming project when executing stand alone programming.
LCD displays the standalone project related information such as the file checksum, chip type, ass
counter, and fail counter.
StarProg Series User Manual

D
D
D
e
e
e
d
d
d
i
i
i
P
P
P
r
r
r
o
o
o
g
g
g
T
T
T
e
e
e
c
c
c
h
h
h
n
n
n
o
o
o
l
l
l
o
o
o
g
g
g
y
y
y
C
C
C
o
o
o
.
.
.
L
L
L
t
t
t
d
d
d
w
w
w
w
w
w
w
w
w
.
.
.
d
d
d
e
e
e
d
d
d
i
i
i
p
p
p
r
r
r
o
o
o
g
g
g
.
.
.
c
c
c
o
o
o
m
m
m
7
V. Quick User Guide
5.1 Software Installation
1. Install Dediware software
2. After installation, Dediware Engineer, Dediware Production and Dediware CLI
icons will appear on desktop.
StarProg Series User Manual
D
D
D
e
e
e
d
d
d
i
i
i
P
P
P
r
r
r
o
o
o
g
g
g
T
T
T
e
e
e
c
c
c
h
h
h
n
n
n
o
o
o
l
l
l
o
o
o
g
g
g
y
y
y
C
C
C
o
o
o
.
.
.
L
L
L
t
t
t
d
d
d
w
w
w
w
w
w
w
w
w
.
.
.
d
d
d
e
e
e
d
d
d
i
i
i
p
p
p
r
r
r
o
o
o
g
g
g
.
.
.
c
c
c
o
o
o
m
m
m
8
5.2 StarProg Setup
1. Connect StarProg to PC
2. Connect socket adaptors to StarProg
3. Put IC on socket adaptors.
5.3 Dediware Software setting
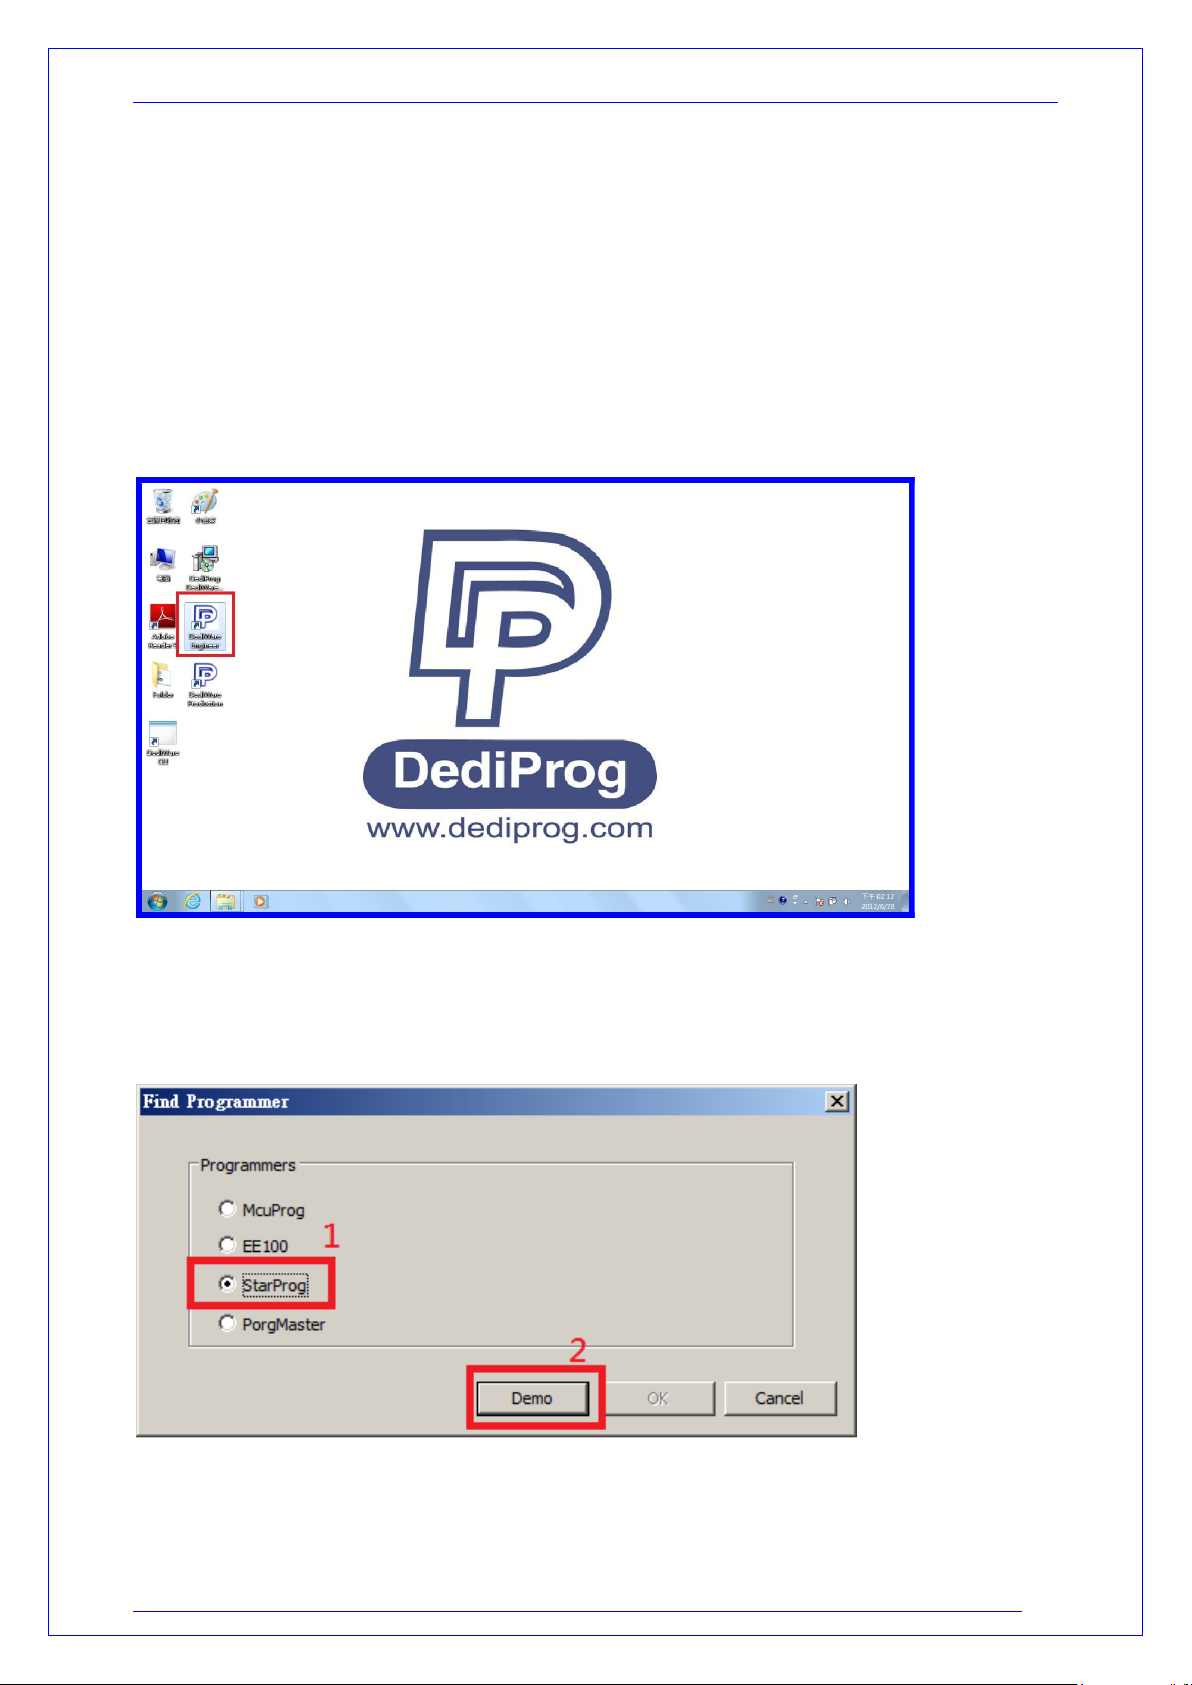
1. Open Dediware Engineer software.
2. Select StarProg (when using Demo mode)
If the software already detected the programmer inserted to PC, there is no need
to select the programmer manually.
StarProg Series User Manual

D
D
D
e
e
e
d
d
d
i
i
i
P
P
P
r
r
r
o
o
o
g
g
g
T
T
T
e
e
e
c
c
c
h
h
h
n
n
n
o
o
o
l
l
l
o
o
o
g
g
g
y
y
y
C
C
C
o
o
o
.
.
.
L
L
L
t
t
t
d
d
d
w
w
w
w
w
w
w
w
w
.
.
.
d
d
d
e
e
e
d
d
d
i
i
i
p
p
p
r
r
r
o
o
o
g
g
g
.
.
.
c
c
c
o
o
o
m
m
m
9
3. Select IC brand and IC part number.
4. Load the programming file.
StarProg Series User Manual
D
D
D
e
e
e
d
d
d
i
i
i
P
P
P
r
r
r
o
o
o
g
g
g
T
T
T
e
e
e
c
c
c
h
h
h
n
n
n
o
o
o
l
l
l
o
o
o
g
g
g
y
y
y
C
C
C
o
o
o
.
.
.
L
L
L
t
t
t
d
d
d
w
w
w
w
w
w
w
w
w
.
.
.
d
d
d
e
e
e
d
d
d
i
i
i
p
p
p
r
r
r
o
o
o
g
g
g
.
.
.
c
c
c
o
o
o
m
m
m
10
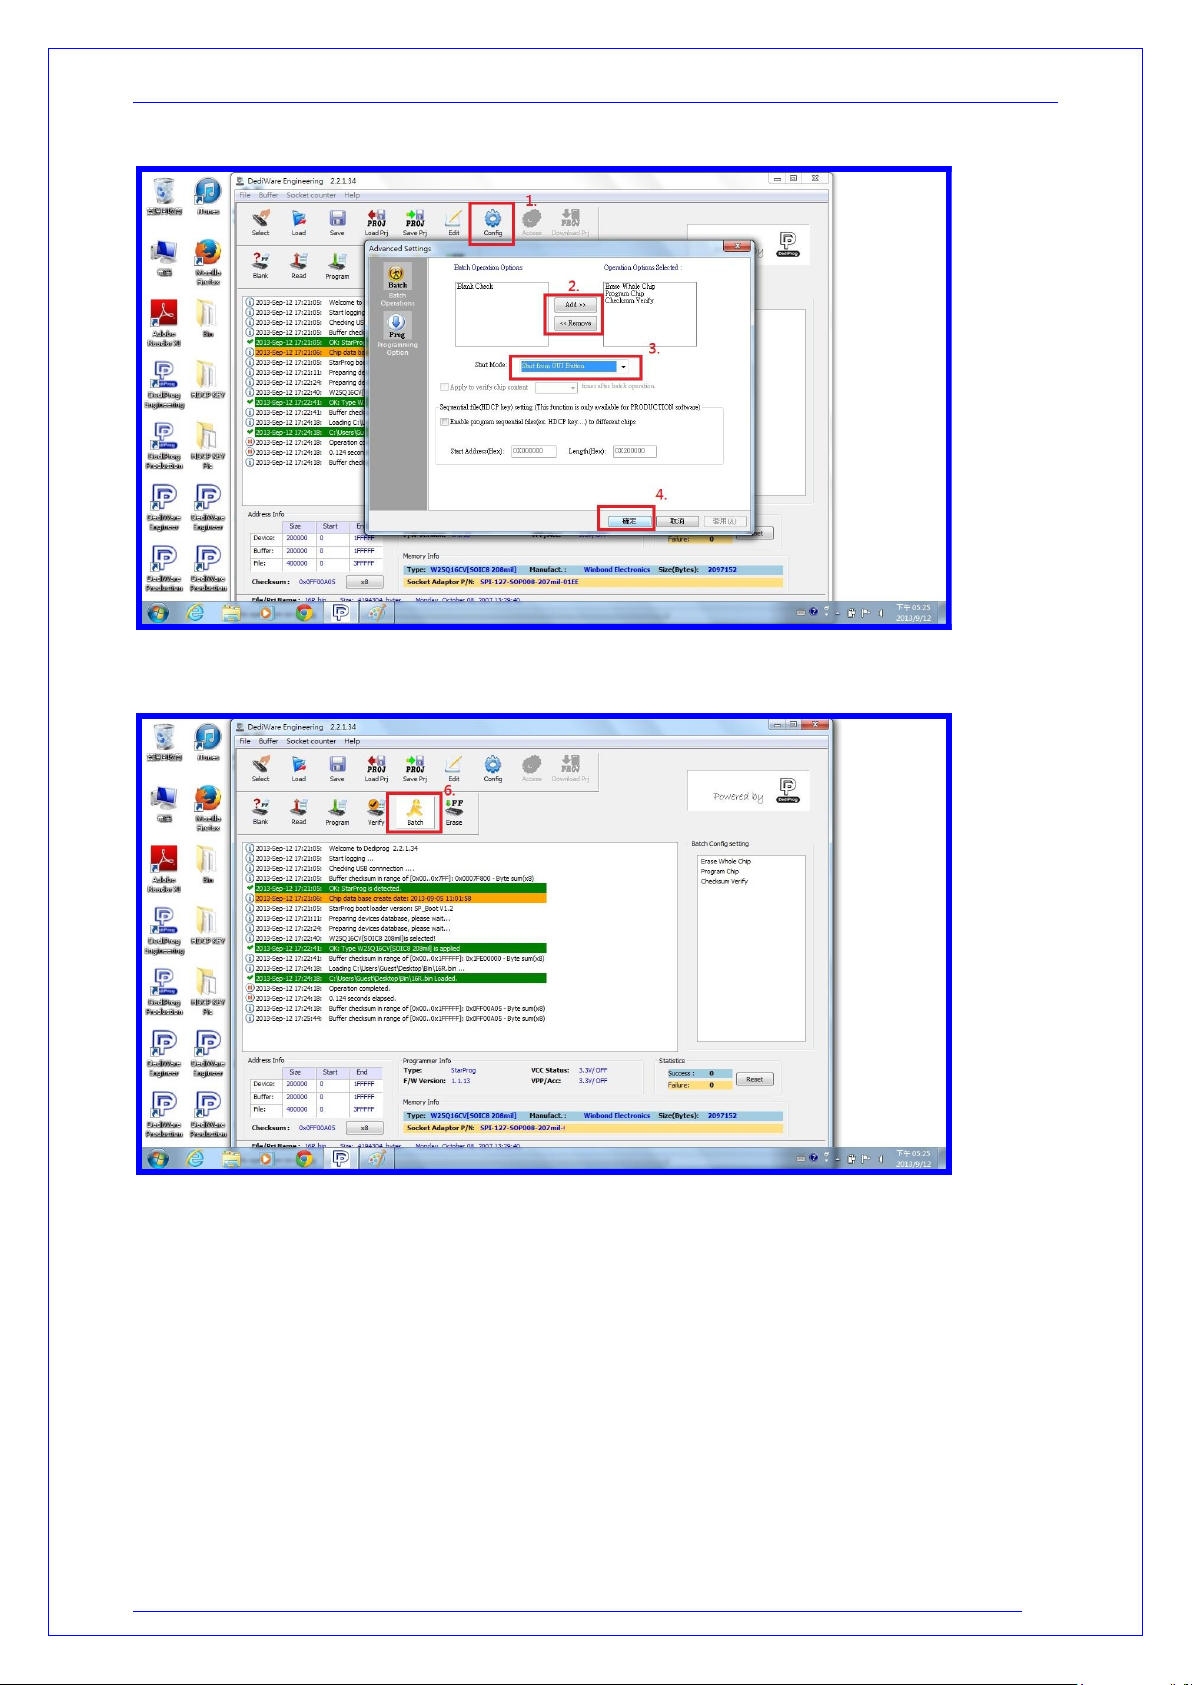
5. Set programming procedure
6. Press Batch to start programming
StarProg Series User Manual

D
D
D
e
e
e
d
d
d
i
i
i
P
P
P
r
r
r
o
o
o
g
g
g
T
T
T
e
e
e
c
c
c
h
h
h
n
n
n
o
o
o
l
l
l
o
o
o
g
g
g
y
y
y
C
C
C
o
o
o
.
.
.
L
L
L
t
t
t
d
d
d
w
w
w
w
w
w
w
w
w
.
.
.
d
d
d
e
e
e
d
d
d
i
i
i
p
p
p
r
r
r
o
o
o
g
g
g
.
.
.
c
c
c
o
o
o
m
m
m
11
Date
Version
Changes
2013/09/11
1.0
First release
VI. Revision History
DediProg Technology Co. LTD
4F., No.7, Ln. 143, Xinming Rd., Neihu Dist., Taipei City 114, Taiwan
Email for technical support: support@dediprog.com
Email for Sale information: sales@dediprog.com
www.DediProg.com
StarProg Series User Manual
 Loading...