

Page 1
MENU SYSTEM MANUAL
HANDLEIDING MENUSYSTEEM
MANUEL D’UTILISATION ET DE PARAMETRAGE
MANUALE DI SISTEMA DEI MENU
MENÚ DEL MANUAL DEL SISTEMA
Page 2

This product is marked with the CE symbol and indicates
compliance with all applicable directives.
Directive 89/336/EEC.
A “Declaration of Conformity” is held at Dedicated Micros Ltd.,
11 Oak Street, Swinton, Manchester, M27 4FL.
Page 3

Contents
1. THE DENNARD 2060 DOME CAMERA 3
2. THE DENNARD 2040 DOME CAMERA 5
3. PROGRAMMABLE FEATURES 7
3.1 Preset Positions 7
3.2 Preset Position Titles 7
3.3 Tours 7
3.4 Real Time Clock 7
3.5 Alarm Response 7
3.6 Bottom Flip 8
3.7 Camera Mode 8
3.8 Digital Zoom Extension 8
3.9 Dome Selection Cursor 8
3.10 Text Positioning and Selection 8
3.11 Joystick Range 8
3.12 Host polling 8
3.13 Error Reporting 9
3.14 Activity light 9
3.15 User Timeout 9
3.16 Set Video Amplification 9
3.17 Privacy mode 9
4. OPERATION WITH A CONTROL PANEL 10
4.1 Dome Menu Structure with Dennard controllers 10
4.2 Main Menu 11
4.2.1 Go to Preset or Start Tour 11
4.2.2 PIN number entry 12
4.3 Supervisor Menu 15
4.3.1 Store/Edit Preset 15
4.3.2 Store/Edit Tour 16
4.3.3 Alarm Setup 17
Dennard 2040 / 2060 Menu System Manual Page. 1
Page 4

4.3.4 Supervisor Options 19
4.3.5 Enter New PIN 22
4.3.6 Privacy Zone Setup 22
4.4 Technician Menu 23
4.4.1 Camera set up 23
4.4.2 Enable/Disable options 24
4.4.3 Joystick control 24
4.4.4 Miscellaneous Services 25
4.4.5 Enter New PIN 26
5. MENU FLOW CHART 27
6. ALTERNATIVE CONTROLLERS 31
6.1 Dedicated Micros Digital Sprite 2 31
6.1.1 Up the coax control 31
6.1.2 RS485 control 32
6.2 Baxall / Vista controllers 32
6.3 Dennard dtx1000/dc 33
6.4 Building Block Video TX1000/DC 34
6.5 Dennard dtx400/dc 35
6.6 Building Block Video TX400DC 36
7 TROUBLE SHOOTING GUIDE 37
Dennard 2040 / 2060 Menu System Manual Page. 2
Page 5

1. THE DENNARD 2060 DOME CAMERA
The Dennard 2060 Dome Camera is a precision unit, offering a wide variable speed range, together
with a large pre-set memory for positions, tours and alarm responses. It has a switchable
colour/monochrome camera (colour-only on indoor units) with an 18:1 or 26:1 zoom lens plus x 4
digital enhancement.
The unit has a comprehensive set of features as standard, which can be tailored for individual
preferences. These can be accessed through an internally generated set of menus overlaid on the
video signal if the controller does not have a suitable layout. Each Dome Camera is delivered with a
separate weatherproof power supply.
Outline Specification:
Dennard 2040 / 2060 Menu System Manual Page. 3
Speed range 0.05 to 300° / second max (both Pan and Tilt)
Repeatability 5 minutes of arc
Control
RS 485 half duplex or simplex, 9600 Baud OR ‘Up the coax’ using
built in DEN PANEL or BAX PANEL protocol converter for Dennard,
BBV & DM or Baxall controls
Storage capacity
200 positions, with identifying title of up to 20 characters
100 tours of up to 16 preset positions
100 deep alarm response memory
Power Supply
24Va.c, Camera & control electronics:-10VA
Heater & blower unit:-10VA
Dimensions
Dome Camera: 150mm diameter hemisphere x 230mm overall
Power Supply: 165L x 135W x 95H.
Protection BS EN 60529 to level IP66 (no water ingress)
Weight
Dome Camera: 1.7 kg + mounting bracket
Power Supply: 1.3 kg
Mounting Configurations
Ceiling mount, pendant mount, wall bracket, corner mount, snowdrop
& tile mounts available
Page 6

18X zoom camera module
26X zoom camera module
Dennard 2040 / 2060 Menu System Manual Page. 4
Optical range
4.1mm to 73.8mm zoom; F1.4 to F3.0
Auto-focus with manual override
Privacy zones 24 programmable zones (8 on screen at any time)
Video sensitivity 0.7 lux colour
Video resolution
768 horizontal x 494 vertical pixels
More than 470 TVL
Video output 1.0v p-p composite, negative synch
Optical range
3.5mm to 91.0mm zoom; F1.6 to F3.8
Auto-focus with manual override
Privacy zones 24 programmable zones (8 on screen at any time)
Video sensitivity 1.0 lux colour
Video resolution
768 horizontal x 494 vertical pixels
More than 470 TVL
Video output 1.0v p-p composite, negative synch
Page 7

2. THE DENNARD 2040 DOME CAMERA
The Dennard 2040 Dome Camera is a precision indoor unit, offering a wide variable speed range,
together with a large pre-set memory for positions, tours and alarm responses. It has a colour
camera with a 18:1 zoom lens.
The unit has a comprehensive set of features as standard, which can be tailored for individual
preferences. These can be accessed through an internally generated set of menus overlaid on the
video signal if the controller does not have a suitable layout.
Outline Specification:
Dennard 2040 / 2060 Menu System Manual Page. 5
Speed range 0.05 to 300° / second max (both Pan and Tilt)
Repeatability 5 minutes of arc
Control
RS 485 half duplex or simplex, 9600 Baud OR 'Up the coax' using
built in DEN PANEL or BAX PANEL protocol converter for Dennard,
BBV & DM or Baxall controls
Storage capacity
100 positions with identifying title of up to 20 characters
50 tours of up to 16 preset positions
50 alarm responses
Power Supply 24Va.c, camera & control electronics; 10VA
Dimensions
150mm diameter hemisphere with 220mm ceiling ring
110mm height behind ceiling panel
Weight 1.5 kg
Mounting Configurations Tile mount.
Page 8

18X zoom camera
Dennard 2040 / 2060 Menu System Manual Page. 6
Optical range
4.1mm to 73.8mm optical zoom; F1.4 to F3.0
Auto focus with manual override
Privacy zones 24 programmable zones with 8 on screen at any time
Video sensitivity 3 Lux colour
Video resolution
768 horizontal x 494 vertical pixels
More than 470 TVL
Video output 1.0v p-p composite, negative sync
Page 9

3. PROGRAMMABLE FEATURES
The Dennard 2040 / 2060 Camera's have a number of features which can be selected by the
System Supervisor when the dome is installed. Any of these can be altered subsequently, or
cancelled altogether, to give the best operational responses for any particular application. They are
invoked or cancelled through on-screen menu structures, described in section 4, and the settings
are then retained in non-volatile memory so that they are not affected by a loss of power.
The features, and what they offer, are described below:
3.1 Preset Positions
Up to 200 (Dennard 2060) or 100 (Dennard 2040) positions can be stored and recalled at any time.
Each position stores the Pan, Tilt, Zoom, and Focus positions as well as the position title.
3.2 Preset Position Titles
Each preset position title can have up to 20 alphanumeric characters to identify the associated
position uniquely. The default title position lies at the top left hand corner of the video picture, left
justified, but this can be altered if required.
The preset position titles only appear at the position they identify: any movement from that position
will remove them.
3.3 Tours
Up to 100 (Dennard 2060) or 50 (Dennard 2040) tours can be stored and recalled at any time.
Each tour can contain up to 16 positions together with a ‘Dwell’ time at each position plus the
‘Travel Time’ that the dome unit must take to reach the next position. When the last position in the
tour is reached, the tour ‘loops’ back to the first position.
3.4 Real Time Clock (Not applicable to the Dennard 2040)
The Dennard 2060 dome camera is fitted with a real time clock to provide time and date marks for
the operator and the recording system if required. A range of selectable formats can provide time
and date displays and the unit is able to use the information to provide enhanced alarm functions
where the reaction to an alarm can be modified depending on the time of day or the day of the
week.
3.5 Alarm Response
Up to 100 (Dennard 2060) or 50 (Dennard 2040) Alarm responses can be stored. Each alarm
response creates a specified reaction to an alarm number. This is a very powerful feature, allowing
a number of domes, or any other device conforming to the Dennard protocol, to invoke a pre-set
alarm action from one single loop broadcast command.
Dennard 2040 / 2060 Menu System Manual Page. 7
Page 10

3.6 Bottom Flip
The dome will automatically pan through 180 degrees as fast as possible when tilted fully down so
that it is possible to follow a person or car, moving directly underneath the dome, with only a single
joystick direction to consider.
3.7 Camera Mode
The camera in both Dennard 2060 and Dennard 2040 can be switched between colour and
monochrome mode. In the Dennard 2060 it can be selected as colour/mono in which case it will
automatically switch to mono when the light level is insufficient for good quality colour pictures.
3.8 Digital Zoom Extension
The camera system allows an extension of the optical zoom by selecting more of the central part of
the picture and expanding this to fill the frame. This feature is selectable.
3.9 Dome Selection Cursor
The menu structure itself, and the choices and selections offered, are searched and invoked by a
single cursor or flashing character and the direction in which this moves depends on the particular
control panel in use. The direction of movement can be reversed separately for horizontal and
vertical movement if required.
3.10 Text Positioning and Selection
All text can be positioned where it is wanted, replaced with default text (eg: Position 31, or Sector
18), or removed as required.
3.11 Joystick Range
Even if the control panel has a wide range proportional joystick output, the dome has such a wide
speed range that both a fast and a slow speed range are needed to realise the full performance
(provided of course that the control panel in question has a facility to invoke these separately).
The slow speed range is simply the same as the fast speed range following the same in-built
correlation law, but divided by a constant. This constant can be set between 2 and 128.
3.12 Host polling
When the dome is configured for communication using RS485 protocols it can be set to check its
communication link at regular intervals. If a continuous data stream is expected from the controller,
enabling Host Polling will get the dome to report a communications error if nothing is received for 5
seconds. Normally, this setting is disabled.
Dennard 2040 / 2060 Menu System Manual Page. 8
Page 11

3.13 Error Reporting
The dome constantly monitors its own health and is able to indicate that a problem has occurred by
a flashing square in the top right hand corner of the transmitted picture. The cause can
subsequently be requested when convenient. Alternatively, the unit can display the error text
instead of the flashing square.
3.14 Activity light
A green LED provides some diagnostic help when first switching the dome on and also indicates
when command signals are received. As it may be visible externally it can be switched on or off.
3.15 User Timeout
There is a possibility that the dome may be left pointing at an unhelpful scene and, for whatever
reason, ‘forgotten’. To cater for this eventuality, two settings have the specific function of acting to
prevent this happening. These are Preset 001 and Tour 001.
A time delay can be set between 1 and 999 seconds and a default response to the timeout being
reached also defined. If the time is exceeded after any joystick/key entry Pan and Tilt input at the
Control Panel then the default action will occur.
If a delay time of 0 is set, no default action will occur and the unit will wait indefinitely for the next
user input.
If a dome menu screen is left waiting for an input for more than 3 minutes then the system times
out and the dome resumes its previous activity.
3.16 Set Video Amplification
This facility allows the video gain to be adjusted from the normal setting, with four levels available.
Video lift can be tuned on or off and is normally set to the Off position.
3.17 Privacy mode
It is sometimes desirable to prevent operators from viewing certain areas. To meet this requirement
the Privacy mode allows black patches to be set up to cover these areas.
The size of the patch overlaid is the size of the monitor view at whatever zoom setting is used.
When zooming out, the patch reduces in size so that it only covers the original area.
Dennard 2040 / 2060 Menu System Manual Page. 9
Page 12

4. OPERATION WITH A CONTROL PANEL
NB: This will vary between control panels. Please refer to the Controller manual.
The Dome Camera's are open protocol devices. Consequently, there are several different
manufacturers’ controllers available to drive it. All of the many features offered by the dome are
programmed from one of three menu structures. Each controller will have individual control
configurations which make it essential that the user reads the controller manual to ascertain which
button activation gives access to the menu features. Section 6 gives these functions for several
popular controllers.
The following instructions will guide you through the menu structure when using the Dome & PSU
(with address set to No. 253… DEN PANEL) controlled by either a Dennard dtx400dc or dtx1000dc
4.1 Dome Menu Structure with Dennard controllers
The Menus appear on the screen when activated by the following commands:
Note that the ‘shift’ key must be held down while the selection is made.
On activation, the menu will appear on the monitor screen against the normal video scene
background with a cursor on the left hand edge. A choice is made by positioning the cursor over the
desired feature and operating an “ACCEPT” button(s) which, for the Dennard controllers, is as
follows:-
For Dennard dtx1000dc, hold the preset button and press CAMERA SELECT 1
For Dennard dtx 400dc, press preset 1 button
Dennard 2040 / 2060 Menu System Manual Page. 10
Dennard dtx1000dc
access
Dennard dtx400dc
access
User Menu shift wash shift 1
Supervisor Menu (password required) shift wipe shift 2
Technicians Menu (password required) shift autopan shift 3
Page 13

4.2 Main Menu
When called, the Main Menu screen will display the following options, against a camera display
background, with a cursor at the left hand edge:
Using the joystick, or direction arrow keys, move up or down the list to select the feature required
then press the appropriate key(s) to accept/select it. If ‘Exit’ is chosen the menu is cleared and no
other action is taken by the dome.
4.2.1 Go to Preset or Start Tour
These selections allow the operator to recall the full range of stored Preset positions and Tours,
even if the control panel has neither the numerical range nor general ability to do so.
Note that this screen only allows existing preset positions and tours to be accessed. To set
up new presets or tours, see section 4.3.1 or 4.3.2
The display will prompt for the required numerical entry with the following subsidiary menu:
The cursor can be moved across the numerical line, using the joystick or control buttons, until the
desired number is reached. The characters will flash their position in turn and, as soon as one is
selected with the ACCEPT button(s), will be displayed in the _ _ _ part of the display.
Leading zeros need not be entered (eg 001 may be entered simply as ‘1’) but the entry must be
within range, eg 001 - 250 for Presets and 001 - 100 for Tours (Dennard 2060) and 001 - 100 for
Presets and 001 - 50 for Tours (Dennard 2040). Entries outside the range will cause an ‘Illegal
Entry’ message to flash, and the entry must be cleared and re-entered.
When the digits have been selected, Accept Entry will invoke that choice and the screen will
automatically clear to the desired camera position.
Dennard 2040 / 2060 Menu System Manual Page. 11
Go to Preset
Start Tour
Technician Menu
Supervisor Menu
Exit
Preset Number___ (orTourNumber)
0123456789
Accept Entry
Clear Entry
Return
Page 14

To change the choice, ‘Clear Entry’ will start the process again.
Note that Preset number 1 and Tour number 1 should be allocated to the most common or
important views. These values are the ones to which the dome automatically returns
following a power cut if no operator is in attendance. See the section on power fail, sec
4.4.2.
4.2.2 PIN number entry
When the Technician or Supervisor menu is called the following screen appears. The password
or PIN Number is keyed in using the same method as used with previous entries.
The cursor is run across the numerical line, using the joystick or control buttons, until the desired
number is reached. The characters will flash their position in turn and as soon as one is selected
with the ACCEPT button(s) it will be displayed in the _ _ _ _ part of the display.
When all four digits have been selected, Accept Entry will invoke that choice and the screen will
automatically change to the selected menu i.e. the Technician or Supervisor menu.
Dennard 2040 / 2060 Menu System Manual Page. 12
Enter PIN____
0123456789
Accept Entry
Clear Entry
Cancel
Page 15

THE FACTORY SET PASSWORDS (PINs), WHICH CAN BE
CHANGED BY THE TECHNICIAN OR SUPERVISOR IN THEIR
RESPECTIVE MENUS, ARE PRINTED BELOW.
TO PREVENT UNAUTHORISED CHANGES BEING MADE TO
SETTINGS OR STORED CAMERA POSITIONS, IT IS ADVISED
THAT PIN NUMBERS ARE KEPT IN A SAFE PLACE.
IF IT IS FELT NECESSARY, CUT THIS PAGE OUT OF THE
MANUAL.
Dennard 2040 / 2060 Menu System Manual Page. 13
To gain access to the Supervisor Menu, enter PIN as ‘1111’
To gain access to the Technician Menu, enter PIN ‘9999’
Page 16

THIS PAGE IS INTENTIONALLY LEFT BLANK
Dennard 2040 / 2060 Menu System Manual Page. 14
Page 17
4.3 Supervisor Menu
The SUPERVISOR MENU allows the supervisor not only to duplicate the operator menu functions,
but also to programme Preset positions (with their identifying title) and Tours. Additionally, cursor
setting and text positioning and selection are accessed here.
The functions are split into a series of underlying menus in ‘layers’. When returning from most
underlying menus, the overlying menu is re-presented. The functions which are less likely to be
needed lie deeper in the structure.
The Supervisor Menu displays:
4.3.1 Store/Edit Preset
The first option enables the supervisor to define a view (including pan, tilt and zoom settings) and
store it for future recall. Note that storing a Preset requires that the desired camera view is already
visible when this screen is entered. Selecting this option calls up the following underlying screens.
Selecting the preset number is achieved as with the previous numerical entry screens. When the
number is accepted, a new display will allow the supervisor to give this position a name (such as
‘Main Gate’ or ‘Front Door’) or use the default names stored in the dome software. The screen will
prompt with:
Edit Preset Text -
Yes
No
Preset Number___
0123456789
Accept Entry
Clear Entry
Return Without Change
Delete Preset
Store/Edit Preset
Store/Edit Tour
Alarm Setup
Supervisor Options
Change PIN
Privacy Zone Setup
Return
Exit
Dennard 2040 / 2060 Menu System Manual Page. 15
Page 18

Select ‘No’ to use the default names or ‘Yes’ to enter a new name through the following screen.
The title choice is made as usual with the cursor and accepted when ready (which will store the
chosen Title with the stored Preset position). Backspace allows a correction to be made while
‘Return without change’ will store the Preset position with the default title. The title appears in the _
_ space as it is compiled.
Note that the ‘_’ symbols indicate where the title will appear - they do not appear on-screen
4.3.2 Store/Edit Tour
A Tour is a predefined journey taken by the camera, between a number of Preset positions. Before
accessing this facility, ensure that all the required Preset positions have been stored, as shown in
section 4.3.1. Choosing to program a Tour first requires the Tour Number to be entered in an
identical procedure to selecting a Position (except that the range must lie between 001 and 100).
Once the number has been accepted, a subsidiary menu is displayed:
If a tour has already been established on this number its initial data is displayed as ‘Old’. This data
can be edited by adding new values or a new tour can be established.
Here the entry format follows the now-familiar procedure but the _ _ _ characters have specific
functions: The first three characters, PPP, represent a Preset position number. ‘DD’ is the dwell
time that the camera must spend stationary at that position and ‘SS’ represents the time that the
camera must take to reach the next position in the tour. The times are entered as seconds,
between 01 and 99. If no value is entered, the Tour will use the default values of 2 seconds dwell
time and 3 seconds travel time.
When all characters are completed and then accepted, the display clears the entry ready to receive
the next position information and the ‘Item’ counter is incremented. When all entries are complete,
select the ‘Store Tour’ instruction.
Dennard 2040 / 2060 Menu System Manual Page. 16
ABCDEFGHIJKLMNOPQRSTUVWX
YZabcdefghijklmnopqrstuv
wxyz0123456789:/*=+.-
Backspace
Return Without Change
Accept Entry
____________
Item ___intour___
PPPDDTT
Old_______
New_______
0123456789
Accept Entry
Clear Entry
Return Without Change
Store Tour
Page 19

4.3.3 Alarm Setup
Alarms are inputs into the dome which require the dome to undertake a specific action. They may
come from a number of external sources, such as door entry systems or PIR motion sensors. The
Dennard 2060 dome has a clock function that enables the supervisor to select different actions
depending on the time of day or the day of the week. This clock function is not available in the
Dennard 2040, go to section 4.3.3.1. The Alarm Setup screen provides access to three options:
4.3.3.1 Alarm Action Setup
On selecting this function the supervisor must select an alarm number in the usual way with the
following screen:
Accepting the Alarm number brings up the following screen:
This allows a specified preset position P or tour T to be stored, along with its identification number
‘nnn’ which will be implemented when the alarm is activated. To select an option, use the code ‘01’
for Tour or ‘10’ for Preset (the 1 under the P or T selects its use; 11 is invalid). Accepting the entry
will increment the alarm number allowing all inputs to have an action allocated to them or their
existing action, shown as ‘Old’, modified. The alarm action will be sustained for a duration set by
the user timeout (see section 4.3.4.1).
Dennard 2040 / 2060 Menu System Manual Page. 17
Alarm Action Setup
Mask Alarm
Select Holidays
Return
Exit
Alarm Number___
01234567890
Accept Entry
Clear Entry
Return Without Change
Delete Alarm
Alm___Select P or T
PTnnn
Old____
New____
0123456789
Accept Entry
Clear Entry
Return Without Change
(This screen is not applicable to Dennard 2040)
Page 20

4.3.3.2 Mask Alarms (Not Applicable to Dennard 2040)
Alarm responses can be modified, depending on when they are activated. Selecting this facility will
bring up the following screen:
The letters displayed indicate:
MTWTFSS Monday to Sunday
H Holiday
hhmm Time of ‘Mask On’
hhmm Time of ‘Mask Off’
Entering a ‘1’ under a day of the week means that the alarms will be masked – i.e. they will not
cause a response from the dome – on that day. Similarly, a ‘1’ under the Holiday means that the
alarm is masked on specified holidays (note that the setting for a holiday will override the setting for
a day of the week). The mask will operate throughout the days selected unless a mask on and off
time are entered. This is achieved through numerical entry of the time using the 24hr clock. The
mask temporarily disables all connected alarms.
For example, if motion sensors have been connected into the dome but are only required to
operate outside of normal working hours they can be masked by entering the code
‘1111100008301800’. This masks the alarms on Mon – Fri between 08.30 a.m and 6 p.m. Outside
these times, and at the weekends and on holidays, the dome will respond to the alarms as desired.
To add complete flexibility, up to ten levels of configuration are available, indicated by the ‘Item
number’ on the screen. As each entry is accepted the number increments until the full action is
saved. Secondary levels allow different masking times to be selected on different days. In the
example above, it may be that the building closes early on Friday. To achieve the different times,
the first code (item) would be modified to ‘1111000008301800’ and a second item code entered as
‘0000100008301400’. Now, the first mask only applies from Monday to Thursday while the second
level masks the alarms on Fridays, between 8.30 a.m. and 2 p.m. More complex masks can be built
up using the same logic for more variations.
4.3.3.3 Select Holidays (Not Applicable to Dennard 2040)
Up to 15 days can be programmed in as holidays, to cover periods such as Christmas or Bank
Holidays, when the alarm action may require modification. When the option is selected the following
screen is displayed:
Dennard 2040 / 2060 Menu System Manual Page. 18
Item___ofAlarm Mask
PTWTFSSHhhmmhhmm
Old______________
New____
0123456789
Accept Entry
Clear Entry
Return Without Change
Save and Return
__________
Page 21

Dates can now be entered (e.g. 2512 for Christmas Day) to define the holidays for the year.
Accepting each entry will bring up a prompt for the next one. Select ‘Save and Return’ when
complete.
Note that some dates, such as Bank Holidays, may need to be reassigned at the start of a
new year.
4.3.4 Supervisor Options
A number of functions are grouped under the Supervisor Options category. Most of these alter the
way in which text and information is presented to the operator but there are some camera settings
which can be altered to suit the installation requirements. Selecting the options menu brings up the
following screen:
The first three options relate to camera facilities and are all set in the same way. To change the
setting, move the cursor up/down until it is alongside the feature. Moving the joystick to the left or
right (or pressing the left/right direction arrows) will scroll through alternative settings. Moving up or
down will fix the value on the screen. If the digital zoom is enabled the feature is automatically
invoked by the camera when the zoom control is held in after the optical zoom has reached its
mechanical end stop. The Dennard 2040 screen allows the supervisor to select a language in the
same way. The digital zoom setting is stored with any preset positions, but if the digital zoom option
is later disabled, the preset positions involved will only return the position with the optical zoom at
full extension.
The bottom flip facility may be used to track objects moving directly under the dome. With this
disabled, the camera view can be moved down until it looks directly under the dome but remains in
that orientation. With bottom flip enabled, the camera will be automatically rotated through 180° to
allow the operator to track the object as it moves on, away from the dome. The freeze frame option,
when selected, will hold the last view on the display while the dome moves at full speed to a preset
position. On arrival, the normal image view is displayed. This avoids a blur as the dome moves at
high speed to preset positions.
Dennard 2040 / 2060 Menu System Manual Page. 19
Item___ofHoliday Days
ddmm
Old______________
New____
0123456789
Accept Entry
Clear Entry
Return Without Change
Save and Return
__________
Digital zoom: disabled
Bottom flip:
Freeze frame:
Set User Timeout:
Set Date/Time/Language
Preset Text Options
Back
Exit
enabled
disabled
none
(No Date/Time in Dennard 2040)
Page 22

4.3.4.1 Set User Timeout
The user timeout facility can be used to select what the dome should do if it is left idle by the
operator. Selecting this option will bring up the following screen:
The screen allows for the selection of a default timeout from 1 - 999 seconds entered as ‘SSS’.
This is the time between the last joystick (or P/T keys) input from the operator, and an automatic
move to the start of the default Tour or to the default Position, provided these have been
programmed. The value for ‘PT’ defines which action to take. Entering code 01 will select the Tour
and 10 will select the Preset position (11 is an illegal entry).
Accepting the entry will return the supervisor to the Options menu and the time selected will be
displayed on the screen. If a timeout of zero is selected, the display will show ‘none’ and the dome
will wait indefinitely for the next operator action.
4.3.4.2 Set Date/Time/Language (Not Applicable to Dennard 2040)
The Dennard 2060 dome has a Real Time Clock which must be set up on installation. Your unit
may also contain other language options and an ability to select and change the format for the time
display. Selecting this option brings up the following screen:
The first three options are all set in the same way. To change the setting, move the cursor up/down
until it is alongside the feature. Moving the joystick to the left or right (or pressing the left/right
direction arrows) will scroll through alternative settings. Moving up or down will fix the value on the
screen.
The time and date format determine the way in which the normal operator viewing screen displays
the time and date. Several options are available by scrolling through the list and it is also possible
to switch the time and date display off if preferred.
Dennard 2040 / 2060 Menu System Manual Page. 20
SSSPT
Old____
New____
0123456789
Accept Entry
Clear Entry
Return Without Change
Language: English
Date Format:
Time Format:
Set Time and Date
Save and Return
Save and Exit
dd-mm-yy
hh:mm:ss
Page 23

When setting the time or date the following screen is presented:
Using the numerical entry, the current date and time can be entered or the existing values left
unchanged.
4.3.4.3 Preset Text Options
The names allocated to preset camera views can be created individually or a default name can be
allocated. This default name is pre-programmed as “Position” but this can be changed if required by
using this facility. The location of the name on the screen can also be adjusted. The following
screen is presented:
The preset position name can be displayed on the left or right of the screen or switched off by
selecting the appropriate feature and moving left/right to toggle the value. If the default name needs
to be altered then selecting the Edit facility will bring up the virtual keyboard used to enter the
name:
The choice is made as usual with the cursor and accepted when ready (which will store the chosen
Title as the default name). Backspace allows a correction to be made while ‘Return without change’
will leave the default name unchanged.
Note that the ‘_’ symbols indicate where the title will appear - they do not appear on-screen
Dennard 2040 / 2060 Menu System Manual Page. 21
yymmddhhmm
Old_______
New_______
0123456789
Accept Entry
Clear Entry
Return Without Change
Preset txt justify: L
Default preset txt:
Edit default text
Return
Exit
On
ABCDEFGHIJKLMNOPQRSTUVWX
YZabcdefghijklmnopqrstuv
wxyz0123456789:/*=+.-
Backspace
Return Without Change
Accept Entry
____________
Page 24

4.3.5 Enter New PIN
The PIN number for the supervisor is pre-programmed but can be changed by the supervisor
through the following screen:
Key in your new PIN (password) and accept the entry.
Make a note of the new PIN number and keep it in a safe place
4.3.6 Privacy Zone Setup
The final option on the Supervisor Menu allows specific areas within view of the camera to be
blanked out, preventing the operator from monitoring or storing the images from those areas.
Before selecting the feature, ensure that the camera is positioned so that the required area to be
blocked is shown full screen on the monitor. The feature then allows the following options:
Selecting ‘Define single zone’ will make the screen go black as the patch is inserted. As the dome
has returned to normal mode, out of the screen settings, move the camera view away from the area
and the black section will remain in its specific location.
When defining multiple zones the screen will go black and the text ‘Privacy zones’ will be displayed.
Move the camera to the desired area and press ‘Enter’ for each zone. When finished, use the key
sequence to enter the menu structure (e.g. #1 for the dtx400) to escape from the feature.
To clear a privacy zone, the camera must be positioned over the zone before selecting the ‘Clear’
facility or the “Clear all privacy zones” feature selected. The dome will immediately return to normal
operation after the zone(s) has been deleted.
Dennard 2040 / 2060 Menu System Manual Page. 22
Enter new PIN____
0123456789
Accept Entry
Clear Entry
Return Without Change
Define single zone
Clear single zone
Define multiple zones
Clear all privacy zones
Return
Exit
Page 25

4.4 Technician Menu
The Technician menu provides access to a number of features to determine overall dome operating
configurations. This menu will be little used after the dome is first installed and commissioned.
When called, it displays:
4.4.1 Camera set up
A number of changes can be made to the operation of the camera module inside the dome. The
following screen is used:
The options are all set in the same way. To change the setting, move the cursor up/down until it is
alongside the feature. Moving the joystick to the left or right (or pressing the left/right direction
arrows) will scroll through alternative settings. Moving up or down will fix the value on the screen.
When col/mono is selected the camera will operate in colour mode until the light level falls below a
predetermined value when it will automatically switch to mono mode. The reverse will occur when
the light returns to a suitable level for colour operation. The camera may also be fixed in colour or
mono mode if preferred.
When a preset position is stored the focus position of the lens is also stored. If the preset focus is
set to ‘auto’ (the preferred setting) the camera will re-focus itself to cope with any changing
circumstances. Setting this to manual will force the original focus setting onto the camera while it
remains at the preset position.
The Near focus setting may be used in indoor applications as it allows the camera to focus at
objects less than a metre away. This should be disabled for normal outdoor operation as, otherwise,
it will auto focus onto raindrops that fall on the hemisphere.
If the frame integration is set to ‘auto’ the camera is able to adjust its frame rate to suit low light
applications. If ‘normal’ is selected, the frame rate will remain constant but the image quality may
suffer in low light.
Dennard 2040 / 2060 Menu System Manual Page. 23
Camera set up
Enable/Disable options
Joystick control
Miscellaneous Services
Change PIN
Return
Exit
Camera colour: col/mono
Preset focus:
Near focus:
Frame integ: auto
Save and Return
Save and Exit
auto
disabled
Page 26

4.4.2 Enable/Disable options
A number of settings are available to allow the Technician to reposition text and determine suitable
action when errors occur. Selecting this brings up the following screen:
The options are all set in the same way. To change the setting, move the cursor up/down until it is
alongside the feature. Moving the joystick to the left or right (or pressing the left/right direction
arrows) will scroll through alternative settings. Moving up or down will fix the value on the screen.
The ‘Text edit’ option determines whether screen text will be edited locally, that is selected from the
dome’s own screen options; or whether it is compiled at the system Control Panel and transferred
to the dome within the Dennard serial protocol.
The ‘Head info’ option enables text to be displayed, in the top corner of the screen, indicating the
current configuration of the dome and information on some of its current actions. The display may
be positioned at the left or right of the screen.
‘Error display’ enables the flashing square to appear to indicate any communication errors.
‘Power fail’ determines what the dome should do if power is lost. When the power is restored, the
dome can either return to preset position number 1 or restart tour number 1. Selecting ‘none’ will
result in the dome remaining in its last position.
4.4.3 Joystick control
The dome may be controlled by a wide range of telemetry controllers and recorders with many
different joystick devices. To allow optimal use from the joystick a range of settings can be
configured:
Joystick divide determines the relationship between the fast and slow joystick speeds where the
control panel is able to offer this feature. The selection determines the mathematical ratio between
fast and slow speeds for Pan and Tilt. Divide values between 2 and 128 are available.
Dennard 2040 / 2060 Menu System Manual Page. 24
Text edit: local
Head info disp:
Head info just:
Error display: enabled
Power fail: none
Save and Return
Save and Exit
disabled
left
Divide by: 16
Linear speed:
Pan direction:
Tilt direction:
Horiz cursor:
Vert cursor:
Save and Return
Save and Exit
5
default
default
default
default
Page 27

The linear speed setting alters the speed at which the dome rotates and tilts. The range can be set
from 1 (slowest) to 8 (fastest). It may be desired to reverse the direction of the joystick in relation to
camera movement or cursor positioning. These are all selectable from the screen.
4.4.4 Miscellaneous Services
This facility groups together a range of data and settings that may be useful to the technician in
fault finding. The following options become available:
Selecting ‘Software version’ will briefly display the programmed software revision level at the top of
the screen. Similarly, ‘Homing values’ will briefly display encoder values from the pan and tilt
motors.
‘Home servos’ will perform a motor reset where the dome will go into a routine where it pans and
tilts through its ranges to re-establish its base position.
‘Reset head’ provides a reboot to the dome. It will perform its power-on self test and then home its
servos.
4.4.4.1 Host comms/video amp
Selecting this brings up the following screen:
The small green LED in the dome can be switched on or off. This can be useful to check if power is
reaching the dome but it may be visible in low light conditions.
Host polling determines whether the dome responds to messages in half duplex serial
communications, or acts in simplex mode without answering. This will depend on the controller
being used and the configuration of the dome communications.
The video signal may require boost and lift to compensate for different types or lengths of coax.
Video gain is factory set at 1 with Video lift off and different settings are made in the usual way.
Dennard 2040 / 2060 Menu System Manual Page. 25
Host comms/video amp
Software version
Homing values
Home servos
NVM Services
Reset Head
Return
Exit
Activity LED: Off
Host polling:
Video gain:
Video lift: Off
Save and Return
Save and Exit
On
2
Page 28

4.4.4.2 NVM Services
The dome retains data about its current position, stored presets and tours, along with other data
which it requires for normal operation, in a Non-Volatile Memory device or NVM. Any loss or
corruption of this data will prevent the unit from operating normally. The following checks on the
device are available:
Reload factory defaults’ should not be used unless directed to do so by a trained technician. It will
reload all the default settings and delete all stored data such as preset positions, time and date etc.
4.4.5 Enter New PIN
The PIN number for the technician menu is pre-programmed but can be changed by the technician
through the following screen:
Key in your new PIN (password) and accept the entry.
Make a note of the new PIN number and keep it in a safe place
Dennard 2040 / 2060 Menu System Manual Page. 26
Reload Factory Defaults
Clear NVM Errors
Run NVM check
Return
Exit
Enter new PIN ____
0123456789
Accept Entry
Clear Entry
Return Without Change
Page 29

5. MENU FLOW CHART
Dennard 2040 / 2060 Menu System Manual Page. 27
Main Menu
To Technician Menu
To Supervisor Menu
Go to Preset
Start Tour
Technician Menu
Supervisor
Exit
Preset Numbe
r___
0123456789
Accept Entry
Clear Entry
Return
Tour Numbe
r___
0123456789
Accept Entry
Clear Entry
Return
EnterPIN____
0123456789
Accept Entry
Clear Entry
Return Without Change
EnterPIN____
0123456789
Accept Entry
Clear Entry
Return Without Change
Page 30

Supervisor Menu
To Supervisor Menu
Store/Edit Preset
Store/Edit Tour
Alarm Setup
Supervisor Options }
Change PIN
}
Privacy Zone Setup }
Return
Exit
Preset Numbe
r___
0123456789
Accept Entry
Clear Entry
Return Without Change
Delete Preset
Tour Numbe
r___
0123456789
Accept Entry
Clear Entry
Return Without Change
Delete Tour
Alarm Action Setup
Mask Alarms
Select Holidays
Return
Exit
Enter Preset Text -
Yes
No
Alarm Numbe
r___
0123456789
Accept Entry
Clear Entry
Return
Delete Alarm
Item___in
sequenc
e___
PPPDDTT
Old_____
New_____
0123456789
Accept Entry
Clear Entry
Return Without Change
Store Tour
Item___ofAlarm Masks
MTWTFSSHhhmmhhmm
Old_____
New
0123456789
Accept Entry
Clear Entry
Return Without Change
Save and Return
________
_____________
Item___of
Holiday Days
ddmm
Old_____
New
0123456789
Accept Entry
Clear Entry
Return Without Change
Save and Return
________
_____________
ABCDEFGHIJKLMNOPQRSTUVW>
YZabcdefghijklmnopqrstuv
wxyz0123456789:/*=+.-
Backspace
Return Without Change
Accept Entry
________________
Alm___
Select P
or T
Ptnn
Old___
New___
0123456789
Store Alarm
Clear Entry
Return Without Change
(2060 only)
(2060 only)
(2060 only)
(2040 only)
Dennard 2040 / 2060 Menu System Manual Page. 28
(Dennard
2060 only)
(Dennard
2060 only)
(Dennard
2060 only)
(Dennard 2040 only)
Page 31
Supervisor Options
Digital zoom:
disabled
Bottom flip:
enabled
Freeze frame:
disabled
Set User Timeout: none
Set Date/Time/Language
Preset Text Options
Back
Exit
SSSPT
Old ____
New____
012345689
Accept Entry
Clear Entry
Return Without Changes
Language:
English
Date Format:
dd-mm-yy
Time format:
hh:mm:ss
Set Time and Date
Save and Return
Save and Exit
yymmddhhmm
Old ________
New ________
Accept Entry
Clear Entry
Return Without Change
Preset txt Justify: L
Default Preset txt: on
Edit default T
ext
Return
Exit
Enter new PI
N___
0123456789
Accept Entry
Clear Entry
Return Without Change
Define single zone
Clear single zone
Define multiple zones
Clear all privacy zones
Return
Exit
Privacy zones
ABCDEFGHIJKLMNOPQRSTUVW>
YZabcdefghijklmnopqrstuv
wxyz0123456789:/*=+.-
Backspace
Return Without Change
Accept Entry
________________
(2060 only)
(2060 only)
Dennard 2040 / 2060 Menu System Manual Page. 29
(Dennard
2060 only)
(Dennard
2060 only)
Page 32

Technician Menu
Camera set up
Enable/Disable options
Joystick controls
Miscellaneous Services
Change PIN
Return
Exit
Camera colour: col/mono
Preset focus: auto
Near focus:
disabled
Frame integ:
auto
Save and Return
Save and Exit
Activity LED: off
Host polling: on
Video gain:
2
Video lift: off
Save and Return
Save and Exit
Text edit:
local
Head info disp: disabled
Head info just: left
Error display: enabled
Power fail: P/T/Joy
Save and Return
Save and Exit
Reload Factory Defaults
Clear NVM Errors
Run NVM Check
Return
Exit
Divide by:
16
Linear speed: 5
Pan direction: default
Tilt direction:
Save and Return
Save and Exit
default
Horiz cursor: default
Vert cursor:
default
Host comms/Video amp
Software version
Homing values
Home servos
NVM Services
Reset Head
Return
Exit
EnternewPIN____
0123456789
Accept Entry
Clear Entry
Return Without Change
Dennard 2040 / 2060 Menu System Manual Page. 30
Page 33

6. ALTERNATIVE CONTROLLERS
It is possible to control the Dennard 2060 and Dennard 2040 domes from a wide range of controller
devices. Always refer to the controller manual to identify the correct operating procedures. The
following pages describe the settings and key sequences to control the domes from some of the
most common controllers. However, subsequent changes in controller and keyboard design and
operation may mean that these notes become incorrect.
6.1 Dedicated Micros Digital Sprite 2
6.1.1 Up the coax control
The controller telemetry must be configured as follows:-
Dedicated Micros Alarm and Preset Menu set to BBV Telemetry control.
Dome address switches set to DEN PANEL.
(Refer to the Operation/Installation Manual, supplied with each Dome)
Blue rotary address switch set to F…. Yellow rotary address switch set to D
STORING PRESET POSITIONS:
Note that, in this configuration, it may be quicker to use the DM controller software rather
than using the Dome software.
Move the camera to the desired position then press, and hold, the ‘Preset’ key until “Save preset”
or “Enter preset number” appears on the screen. Enter the preset number using the number keys
and press ‘Enter’. The numbers are entered as normal for presets 1 to 9 but, to access preset 10
enter ‘1’ then ‘10’. Preset numbers 1 – 16 are accessed by entering them as single digits (i.e. ‘1’
then ‘1’ for 11; ‘1’ then ‘6’ for 16).
Preset positions greater than 17 can be programmed using the dome menu. At this stage the preset
menu from the dome will be displayed on the screen enabling you to key in a preset identification.
Text can be entered by moving the cursor under each letter/number in turn using the joystick then
pressing the preset,1, enter keys to accept.
When you have finished entering text, close the menu by moving the cursor down to the Accept edit
line and accept by pressing the ‘preset’, ‘1’, ‘enter’ keys.
On the Digital Sprite there are two enter/accept commands.
1. Press the preset key until “go to position” is shown on the screen then press key 1 then
the enter key i.e. preset,1, enter.
2. Press the preset key until go to position is shown on the screen then key 10 followed by
key 1 i.e. preset,10,1
Dennard 2040 / 2060 Menu System Manual Page. 31
Page 34

DOME PROGRAMMING:
To access the domes menus, there are two possibilities:
1. For systems set up for 485 control or with Sprite systems dating from mid-2004 onwards,
configured for Dennard C coax control, press the * key twice and a message will appear
on the screen saying, “To enter the menu press enter button”.
2. For older systems using coax control, the following key presses are used:
For the Operator menu press: * 8 8 9 10 10 2
For the Supervisor menu press: * 8 8 9 10 10 3
For the Technician menu press: * 8 8 9 10 10 4
The Operator menu will then be displayed enabling you to navigate around the menus using the
joystick to move the cursor and pressing the ‘enter’ key to accept menu options.
6.1.2 RS485 control
The controller telemetry must be configured as follows:-
Dennard Serial telemetry. This is set up in the System Options menu of the Sprite 2 and then
selected in the Alarms and Presets menu.
Each Dome must be individually addressed
(Refer to the Operation/Installation Manual, supplied with each Dome, for an explanation on access
to, and setting of, the address switches)
RS485 connection from the Sprite 2 is via a 9-way D type female connector and the connection is
as follows: pin 1 = data A =yellow wire from dome
pin 9 = data B =green wire from dome
Domes are, by default, supplied with termination resistors fitted. These will need to be removed
from all but the last dome in the Daisy chain.
6.2 Baxall / Vista controllers
Up the coax control
The controller telemetry must be configured as follows:-
1: Rx attached, needs to be set to DC
2: Telemetry mode, needs to be set to STANDARD
The Dome address switches need to be set to BAX DC PANEL
(Refer to the Operation/Installation Manual, supplied with each Dome, for an explanation on access
to, and setting of, the address switches)
Blue rotary address switch set to F…. Yellow rotary address switch set to E.
Dennard 2040 / 2060 Menu System Manual Page. 32
Page 35

STORING PRESET POSITIONS:
Note that, in this configuration, it is quicker to use the Baxall controller software rather than
using the Dome software.
To programme a preset via the controller, enable the TELEMETRY, CAMERA and WIPE keys.
Move the camera to the desired position.
Press the function key and enter the preset number using the number keys, then press the preset
key. At this stage the preset menu from the dome will be displayed on the screen enabling you to
key in a preset identification. If you don’t want to add a preset identification, move the cursor down
to the ‘Accept entry’ line and accept by pressing the WASH key. Text can be entered by moving the
cursor under each letter/number in turn, using the joystick, and then pressing the WASH key to
accept.
When you have finished entering text close the menu by moving the cursor down to the ‘Accept
entry’ line and accept by pressing the WASH key. Once the presets have been stored, switch off the
‘CAMERA’ and ‘WIPE’ functions for normal operation.
DOME PROGRAMMING:
Access to the dome menu can be achieved by enabling the TELEMETRY, CAMERA and WIPE
buttons then pressing & holding the preset key, pressing & holding key 6 then release the preset
key then key 6. This will give you access to the operator menu. The Supervisor menu and
Technicians menu can be accessed from this menu. The WASH button is used to enter/accept.
6.3 Dennard dtx1000/dc
Up the coax control
The controller telemetry will output BBV protocols.
The Dome address switches need to be set to DEN PANEL.
(Refer to the Operation/Installation Manual, supplied with each Dome, for an explanation on access
to, and setting of, the address switches)
Blue rotary address switch set to F…. Yellow rotary address switch set to D.
This is the default setting for the domes unless specified otherwise. If the dome is supplied with a
remote protocol converter in the PSU box, then the address switches will be factory set to:
Yellow = 1 Blue = 0
STORING PRESET POSITIONS:
Notes:
In this configuration, it may be quicker to use the controller software rather than using the
Dome software
The Dennard dtx1000 uses on screen menu display which is only available if the monitor is
connected to the keyboard. Simple programming options, like setting a preset position, can
be programmed in without the ability to see the menu display.
Dennard 2040 / 2060 Menu System Manual Page. 33
Page 36

Move the camera to the desired position.
Press the ‘program’ key (to bring up the menu display), press key No 1 (to select the programme
preset option) then press the number key you want to use to identify the preset. At this stage the
preset menu from the dome will be displayed on the screen enabling you to key in a preset
identification. Text can be entered by moving the cursor under each letter/number in turn using the
joystick then pressing and holding the ‘preset’ key, then pressing key number 1 to accept.
When you have finished entering text, close the menu by moving the cursor down to the ‘Accept
entry’ line and accept by pressing and holding the ‘preset’ key, then pressing key number 1.
DOME PROGRAMMING:
To access the dome menu:
Press and hold the ‘shift’ key then press the ‘wash’ key.
This will give you access to the operator menu. The Supervisor menu and Technicians menu can
be accessed from this point. Holding the ‘preset’ key, then pressing key number 1 is used to
enter/accept.
6.4 Building Block Video TX1000/DC
Up the coax control
The controller telemetry will output BBV protocols
The Dome address switches need to be set to DEN PANEL
(Refer to the Operation/Installation Manual, supplied with each Dome, for an explanation on access
to, and setting of, the address switches)
Blue rotary address switch set to F…. Yellow rotary address switch set to D.
This is the default setting for domes unless specified otherwise.
NB If the dome is supplied with a remote protocol converter in the PSU box, then the
address switches will be factory set to: Yellow = 1 Blue = 0
STORING PRESET POSITIONS:
Notes:
In this configuration, it may be quicker to use the controller software rather than using the
Dome software
The Dennard dtx1000 uses on screen menu display which is only available if the monitor is
connected to the keyboard. Simple programming options, like setting a preset position, can
be programmed in without the ability to see the menu display.
Move the camera to the desired position. Press the ‘program’ key (to bring up the menu display),
press key No 1 (to select the programme preset option) then press the number key you want to use
to identify the preset. At this stage the preset menu from the dome will be displayed on the screen
enabling you to key in a preset identification. Text can be entered by moving the cursor under each
letter/number in turn using the joystick then pressing and holding the ‘preset’ key, then pressing key
number 1 to accept.
Dennard 2040 / 2060 Menu System Manual Page. 34
Page 37

When you have finished entering text close the menu by moving the cursor down to the ‘Accept
entry’ line and accept by pressing and holding the ‘preset’ key, then pressing key number 1.
DOME PROGRAMMING:
To access the dome menu:
Press and hold the # key then press the ‘wash’ key.
This will give you access to the operator menu. The Supervisor menu and Technicians menu can
be accessed from this point. Holding the ‘preset’ key, then pressing key number 1 is used to
enter/accept.
6.5 Dennard dtx400/dc
Up the coax control
The controller telemetry will output BBV protocols
The Dome address switches need to be set to DEN PANEL
(Refer to the Operation/Installation Manual, supplied with each Dome, for an explanation on access
to, and setting of, the address switches)
Blue rotary address switch set to F…. Yellow rotary address switch set to D.
This is the default setting for domes unless specified otherwise.
NB If the dome is supplied with a remote protocol converter in the PSU box, then the
address switches will be factory set to: Yellow = 1 Blue = 0
ST
ORING PRESET POSITIONS:
Note that, in this configuration, it may be quicker to use the Dennard controller software
rather than using the Dome software.
Move the camera to desired position.
Press and hold the ‘Set’ key then press the number key you want to use to identify the preset.
(Note that only eight preset positions can be set using this controller.) At this stage the preset menu
from the dome will be displayed on the screen enabling you to key in a preset identification. If you
don’t want to add a preset identification, move the cursor down to the ‘Accept entry’ line and accept
by pressing key number 1. Text can be entered by moving the cursor under each letter/number in
turn, using the joystick, and then pressing key number 1 to accept.
When you have finished entering text, close the menu by moving the cursor down to the ‘Accept
entry’ line and accept by pressing key number 1.
DOME PROGRAMMING:
To access the dome menu:
Press and hold the ‘shift’ key then press No 1 key
This will give you access to the Operator menu. The Supervisor menu and Technicians menu can
be accessed from this point. The number 1 key is used to enter/accept.
Dennard 2040 / 2060 Menu System Manual Page. 35
Page 38

6.6 Building Block Video TX400DC
Up the coax control
The controller telemetry will output BBV protocols
The Dome address switches need to be set to DEN PANEL
(Refer to the Operation/Installation Manual, supplied with each Dome, for an explanation on access
to, and setting of, the address switches)
Blue rotary address switch set to F…. Yellow rotary address switch set to D.
This is the default setting for the domes unless specified otherwise.
NB If the dome is supplied with a remote protocol converter in the PSU box, then the
address switches will be factory set to: Yellow = 1 Blue = 0
STORING PRESET POSITIONS:
Note that, in this configuration, it may be quicker to use the Dennard controller software
rather than using the Dome software.
Move the camera to the desired position.
Press and hold the ‘Program’ key then press the number key you want to use to identify the preset.
(Note that only eight preset positions can be set using this controller.) At this stage the preset menu
from the dome will be displayed on the screen enabling you to key in a preset identification. If you
don’t want to add a preset identification, move the cursor down to the ‘Accept entry’ line and accept
by pressing key number 1. Text can be entered by moving the cursor under each letter/number in
turn, using the joystick, and then pressing key number 1 to accept.
When you have finished entering text, close the menu by moving the cursor down to the ‘Accept
entry’ line and accept by pressing key number 1.
DOME PROGRAMMING:
To access the dome menu:
Press and hold the # key then press No 1 key
This will give you access to the Operator menu. The Supervisor menu and Technicians menu can
be accessed from this point. The number 1 key is used to enter/accept
Dennard 2040 / 2060 Menu System Manual Page. 36
Page 39

7. TROUBLE SHOOTING GUIDE
Dennard 2040 / 2060 Menu System Manual Page. 37
PROBLEM ACTION
No picture
Check the PSU fuses
Check the input and output voltages
Check all co-ax connections
Continuity check the dome multicore cable:-
Pin 1 =Video
Pin 2 =Video screen
Pin 3 =Data + (Yellow)
Pin 4 =Data(Green)
Pin 5 =24Volt Neutral (blue)
Pin 6 =24Volt Live (red)
Pin = Earth (drain wire)
Picture with no control
If control is via a Dennard drx100 protocol converter, check that the Green
and Yellow wires from the dome are connected correctly ie Green to C1
Yellow to C2. Using a video level metre, check the sync pulse is 0.3V
If control is via RS485 check that the data connections are:Green Wire data - Yellow Wire data +
If control is via a Dennard 2060 co-ax (which has built in protocol
converters), control is “up the co-ax” but the address switches have to be
set to suit the controller protocol. See the Operation/Installation Manual for
settings.
Picture with intermittent
control
This problem is often due too to much or too little video gain.
If you are using the Dennard 2060 co-ax dome with built in protocol
converters, video amplification is accessed through the menu system.
Refer to the manual and adjust the gain to suit.
If you are using a Dennard 2060drx as per Dennard 2040drx then the
Video Gain can be found on the drx card behind the BNC connectors
located in the PSU box
Flashing cursor size box
top right corner of monitor
This indicates that the Dome software has detected an error. Before
contacting Dennard Technical on 01420 485713 the error display should
be enabled as this will help Dennard Technical to solve your problem.
See section 4.4.2 for details on this.
On Baxall controlled
Domes, alphabet menu
pops up when the joystick
is touched
This may be because the Baxall controller has been configured to
ALTERNATE mode which is not supported by the Dome. Setting the
dome to STANDARD mode with Rx set to DC should solve the
problem.
On Dennard & BBV
controllers the dome
spins continuously
This may be due to the joystick having no ‘dead band’, possibly through
the joystick being off centre on power up. Power the controller down
then power up again ensuring that the joystick is free to self-centre.
(Applicable to Dennard 2060 only)
Page 40

Notes
Page 41

Notes
Page 42
HANDLEIDING MENUSYSTEEM
Page 43

Page 44

Inhoud
1. DE DENNARD 2060 DOME-CAMERA 3
2. DE DENNARD 2040 DOME-CAMERA 5
3. PROGRAMMEERBARE FUNCTIES 7
3.1 Preset-posities 7
3.2 Titels preset-posities 7
3.3 Tours 7
3.4 Real-time klok 7
3.5 Alarmrespons 7
3.6 Doordraaifunctie 8
3.7 Cameramodus 8
3.8 Vergroting digitale zoom 8
3.9 Dome-selectiecursor 8
3.10 Plaatsing en selectie van tekst 8
3.11 Bereik joystick 8
3.12 Host polling 8
3.13 Foutenrapportage 9
3.14 Activiteitslampje 9
3.15 User Timeout 9
3.16 Videoversterking instellen 9
3.17 Privémodus 9
4. BEDIENING MET EEN BEDIENINGSPANEEL 10
4.1 Dome-menustructuur met Dennard-controllers 10
4.2 Hoofdmenu 11
4.2.1 Naar Preset of Tour starten 11
4.2.2 Invoeren PIN-code 12
4.3 Supervisor-Menu 15
4.3.1 Preset opslaan/wijzigen 15
4.3.2 Tour opslaan/wijzigen 16
Dennard 2040 / 2060 Handleiding Menusysteem Blad 1
Page 45

4.3.3 Alarm instellen 17
4.3.4 Supervisor-opties 19
4.3.5 Geef nieuwe PIN 22
4.3.6 Privézone instellen 22
4.4 Technisch menu 23
4.4.1 Camera instellen 23
4.4.2 Opties aan/uitzetten 24
4.4.3 Joystickregelaars 24
4.4.4 Diverse functies 25
4.4.5 Geef nieuwe PIN 26
5. MENU-OPZET 27
6. ALTERNATIEVE CONTROLLERS 31
6.1 Dedicated Micros Digital Sprite 2 31
6.1.1 Besturing via de coaxiale kabel 31
6.1.2 Bediening via RS485 32
6.2 Baxall- / Vista-controllers 32
6.3 Dennard dtx1000/dc 33
6.4 Building Block Video TX1000/DC 34
6.5 Dennard dtx400/dc 35
6.6 Building Block Video TX400DC 36
7. PROBLEMEN OPLOSSEN 37
Dennard 2040 / 2060 Handleiding Menusysteem Blad 2
Page 46

1. DE DENNARD 2060 DOME-CAMERA
De Dennard 2060 dome-camera beschikt over vele instelbare snelheden en een groot geheugen
voor voorprogrammeerbare cameraposities, tours en alarmresponsen. De camera kan zowel
kleuren- als zwart/wit-beelden opnemen (kleur alleen op binneneenheden) en beschikt over 18:1 of
26:1 optische zoom en 4x digitale zoom.
De eenheid biedt standaard vele functies die kunnen worden aangepast aan uw eigen wensen. U
kunt van deze functies gebruik maken via de controller of, als deze daarvoor niet geschikt is, door
middel van intern gegenereerde menu's die over het videosignaal worden afgebeeld. Elke domecamera wordt geleverd met een aparte voedingseenheid die geschikt is voor elk weertype.
Specificaties:
Dennard 2040 / 2060 Handleiding Menusysteem Blad 3
Snelheden 0,05 tot 300 º / seconde (zowel voor de pan- als de tiltfunctie)
Herhaling 5 boogminuten
Bediening
RS485 half duplex of simplex, 9600 Baud OF via coaxiale kabel door
middel van de ingebouwde DEN PANEL- of BAX PANELprotocolconverter voor Dennard, BBV & DM of Baxall regelaars
Opslagcapaciteit
200 posities, elk met unieke titel van maximaal 20 tekens.
100 rondes van maximaal 16 preset-posities geheugen voor 100
alarmresponsen
Voeding
24 V AC, Camera & bedieningselektronica: -10 VA
Heater- en blowereenheid: -10 VA
Afmetingen
Dome-camera: doorsnede koepel 150 mm x totale hoogte 230 mm
Voeding 165 x 135 x 95 (l x b x h).
Bescherming BS EN 60529 tot klasse IP66 (waterdicht)
Gewicht
Dome-camera: 1,7 kg + montagebeugel
Voeding 1,3 kg
Bevestigingsmogelijkheden
Plafondmontage, hangende montage, wandbeugel, hoekmontage,
montage aan een mast en verzonken in het plafond
Page 47

18x zoom cameramodule
26x zoom cameramodule
Dennard 2040 / 2060 Handleiding Menusysteem Blad 4
Optisch bereik
4,1 mm tot 73,8 mm zoom; F 1,4 tot F 3,0
Automatische focus met handmatige override
Privacy-zone 24 programmeerbare zones (standaard 8 op scherm)
Lichtgevoeligheid 0.7 lux kleur
Videoresolutie
768 pixels horizontaal x 494 verticaal
Meer dan 470 TV-lijnen
Video-uitgang 1,0 Vpp composiet, negatieve sync.
Optisch bereik
3,5 mm tot 91,0 mm zoom; F 1,6 tot F 3,8
Automatische focus met handmatige override
Privacy-zone 24 programmeerbare zones (standaard 8 op scherm)
Lichtgevoeligheid 1.0 lux kleur
Videoresolutie
768 pixels horizontaal x 494 verticaal
Meer dan 470 TV-lijnen
Video-uitgang 1,0 Vpp composiet, negatieve sync.
Page 48

2. DE DENNARD 2040 DOME-CAMERA
De Dennard 2040 dome-camera is een camera met hoge precisie en beschikt over vele
snelheidsinstellingen en een groot geheugen voor voorprogrammeerbare cameraposities, tours en
alarmresponsen.
Het is een kleurencamera met een 18x optische zoom. De eenheid biedt standaard vele functies
die kunnen worden aangepast aan uw eigen wensen. U kunt deze functies bedienen via de
controller of, als deze daarvoor niet geschikt is, door middel van intern gegenereerde menu's die
over het videosignaal worden afgebeeld.
Specificaties:
Dennard 2040 / 2060 Handleiding Menusysteem Blad 5
Snelheden 0,05 tot 300 º / seconde (zowel voor de pan- als de tiltfunctie)
Herhaling 5 boogminuten
Bediening
RS 485 half duplex of simplex, 9600 baud OF via coaxiale kabel door
middel van de ingebouwde DEN PANEL- of BAX PANELprotocolconverter voor Dennard, BBV & DM of Baxall controllers
Opslagcapaciteit
100 posities, elk met unieke titel van maximaal 20 tekens
50 rondes van maximaal 16 preset-posities
50 alarmresponsen
Voeding 24 V AC, camera- en bedieningselektronica: 10 VA
Afmetingen
doorsnede koepel 150 mm
met een plafondring van 220 mm doorsnede
Gewicht 1,5 kg
Montageconfiguraties plaat voor montage in plafondtegel
Page 49

18x zoom cameramodule
Dennard 2040 / 2060 Handleiding Menusysteem Blad 6
Optisch bereik
4,1 mm tot 73,8 mm zoom; F 1.4 tot F 3.0
Automatische focus met handmatige override
Privacy-zone 24 programmeerbare zones (standaard 8 op scherm)
Lichtgevoeligheid 3 lux kleur
Videoresolutie
768 pixels horizontaal x 494 verticaal
Meer dan 470 TV-lijnen
Video-uitgang 1,0 Vpp composiet, negatieve sync.
Page 50

3. PROGRAMMEERBARE FUNCTIES
De Dennard 2040/2060 dome-camera heeft een aantal functies die de systeembeheerder na het
installeren van de dome kan selecteren. Hij kan deze functies uitschakelen of anders instellen om
bij elke specifieke toepassing een optimaal werkend systeem te realiseren. De functies kunnen
worden opgeroepen of uitgeschakeld door middel van schermmenu's (zie sectie 4). De instellingen
worden opgeslagen in permanent geheugen; bij een stroomstoring worden ze dus niet gewist.
Hieronder vindt u een beschrijving van de functies en hun mogelijkheden:
3.1 Preset-posities
U kunt maximaal 200 (Dennard 2060) of 100 (Dennard 2040) posities opslaan en op elk moment
oproepen. Per positie worden de pan-, tilt-, zoom- en focusinstellingen en de titel van de positie
opgeslagen.
3.2 Titels preset-posities
De titel van elke preset-positie bestaat uit maximaal 20 alfanumerieke tekens en is uniek voor die
positie. De titel wordt standaard linksonder in het scherm afgebeeld. Dit kan naar wens worden
gewijzigd.
De titels van de preset-posities verschijnen alleen bij de posities waarnaar ze verwijzen: bij elke
wijziging van de positie verdwijnt de titel.
3.3 Tours
U kunt maximaal 100 (Dennard 2060) of 50 (Dennard 2040) tours opslaan en op elk moment
oproepen. Elke tour bevat maximaal 16 posities, met een 'rust'-tijd op elke positie en de tijd die de
dome nodig heeft om te draaien van een positie naar de volgende. Als de laatste positie in de tour
is bereikt, begint de volgende ronde weer bij de eerste positie.
3.4 Real-time klok (niet van toepassing op de Dennard 2040)
De Dennard 2060 dome-camera is voorzien van een real-time klok zodat beelden indien nodig
kunnen worden voorzien van tijd en datum voor de beheerder en het opnamesysteem. Tijd en
datum kunnen worden weergegeven in verschillende formaten. Op basis van deze informatie kan
de respons op een alarm worden aangepast afhankelijk van de tijd van de dag of de dag van de
week.
3.5 Alarmrespons
U kunt maximaal 100 (Dennard 2060) of 50 (Dennard 2040) alarmresponsen opslaan. Bij elke
alarmrespons wordt een specifieke reactie naar een alarmnummer verzonden. Met deze zeer
krachtige functie kan een aantal domes, of enig ander apparaat dat voldoet aan het Dennardprotocol, een geprogrammeerde alarmrespons oproepen door middel van één
broadcastcommando.
Dennard 2040 / 2060 Handleiding Menusysteem Blad 7
Page 51

3.6 Doordraaifunctie
Als de dome volledig naar beneden gekanteld is, draait hij automatisch 180 graden op maximale
snelheid om een persoon of auto die recht onder de dome door beweegt te kunnen volgen. Hierbij
hoeft slechts rekening gehouden te worden met één joystickrichting.
3.7 Cameramodus
De camera van zowel de Dennard 2060 als de Dennard 2040 kan omschakelen van kleur naar
zwart/wit en omgekeerd. De Dennard 2060 kan worden ingesteld op kleur/mono, waarbij
automatisch wordt omgeschakeld naar zwart/wit als het licht ontoereikend is voor scherpe
kleurenopnames.
3.8 Vergroting digitale zoom
Het is mogelijk de optische zoom te vergroten door het midden van het beeld te selecteren en dit
schermvullend weer te geven. Deze functie is instelbaar.
3.9 Dome-selectiecursor
De navigatie door en de selectie van de menu's en opties gebeurt door middel van een cursor of
knipperend teken. De bewegingsrichting hiervan hangt af van het gebruikte bedieningspaneel. De
bewegingsrichting kan indien nodig afzonderlijk worden omgekeerd voor horizontale en verticale
beweging.
3.10 Plaatsing en selectie van tekst
Alle tekst kan op de gewenste positie worden geplaatst, worden vervangen door standaardtekst
(b.v. Positie 31 of Sector 18), of worden verwijderd.
3.11 Bereik joystick
De beschikt over zoveel snelheden dat het bereik van het bedieningspaneel in combinatie met de
joystick, hoewel zeer groot, ontoereikend is. Daarom heeft de dome zowel een hogesnelheids- als
lagesnelheidsbereik om optimaal te kunnen presteren (uiteraard op voorwaarde dat het betreffende
bedieningspaneel beide bereiken apart kan oproepen).
In feite is het lagesnelheidsbereik gelijk aan het hogesnelheidsbereik gedeeld door een constante,
met dezelfde geïntegreerde correlatie. De constante kan worden ingesteld tussen 2 en 128.
3.12 Host polling
Bij communicatie met de dome via RS485-protocollen kan worden ingesteld dat deze regelmatig de
verbinding controleert. Als Host Polling is ingeschakeld, zal de dome een verbindingsfout aangeven
bij een onderbreking van de stroom gegevens van de controller van 5 seconden of langer. Normaal
gesproken is deze instelling uitgeschakeld.
Dennard 2040 / 2060 Handleiding Menusysteem Blad 8
Page 52

3.13 Foutenrapportage
De dome controleert onafgebroken het eigen functioneren; als er een probleem optreedt, verschijnt
in de rechter bovenhoek van het beeld van de camera een knipperend rechthoekje. De oorzaak kan
vervolgens worden opgevraagd. Ook kan de eenheid de tekst van de foutmelding weergeven in
plaats van het knipperende rechthoekje.
3.14 Activiteitslampje
Een groen indicatielampje kan helpen bij het opsporen van problemen als u de dome voor het eerst
inschakelt. Ook geeft het lampje aan wanneer de dome commandosignalen ontvangt. Omdat het
buiten zichtbaar kan zijn, kan het in- of uitgeschakeld worden.
3.15 User Timeout
Het kan voorkomen dat de dome in een bepaalde positie geen nuttige beelden opneemt en om wat
voor reden dan ook niet wordt verplaatst. Om deze situatie te voorkomen heeft de dome twee
specifieke instellingen, namelijk Preset 001 en Tour 001.
U kunt de time-out instellen op 1 tot 999 seconden en een standaardrespons programmeren. De
time-out gaat in na een joystick- of toetshandeling of een pan- en tilt-invoer vanaf het
bedieningspaneel. Na het verstrijken van de ingestelde tijd treedt de standaardrespons in werking.
Als de vertraging is ingesteld op 0, volgt geen standaardrespons; de eenheid wacht op de volgende
opdracht van de gebruiker.
Als een dome-menu meer dan drie minuten open is zonder dat er iets ingevoerd wordt, wordt het
gesloten en hervat de dome zijn eerdere activiteit.
3.16 Videoversterking instellen
Met deze functie kan de videoversterking op vier niveaus worden ingesteld. Deze functie kan
worden in- of uitgeschakeld. De standaardinstelling is Uit. De standaardinstelling is Uit.
3.17 Privé-modus
Soms is het gewenst bepaalde zones aan het zicht van de operator te onttrekken. De Privé--modus
biedt u de mogelijkheid om deze zones af te schermen.
De geselecteerde zone wordt, onafhankelijk van de gebruikte zoominstelling, afgeschermd op de
monitor. Bij uitzoomen verkleint de afscherming, zodat deze alleen de gewenste zone bedekt.
Dennard 2040 / 2060 Handleiding Menusysteem Blad 9
Page 53

4. BEDIENING MET EEN BEDIENINGSPANEEL
Let op: De bedieningswijze varieert per bedieningspaneel. Lees daarom de controllerhandleiding.
De dome-camera’s werken volgens een ‘open’ protocol. Er zijn dan ook controllers van
verschillende fabrikanten beschikbaar voor de besturing. Alle functies waarover de dome beschikt,
worden vanuit een van de drie menustructuren geprogrammeerd. Elke controller heeft individuele
bedieningsinstellingen. Het is dan ook zeer belangrijk dat de gebruiker in de handleiding van de
controller nagaat hoe hij toegang tot de menufuncties krijgt. In sectie 6 vindt u deze informatie voor
verschillende veelgebruikte controllers.
De volgende instructies begeleiden u bij het gebruik van de menu’s van de dome en
voedingseenheid (met het adres ingesteld op nr. 253... DEN PANEL) in combinatie met een
Dennard dtx400dc / dtx1000dc-controller.
4.1 Dome-menustructuur met Dennard-controllers
De menu's worden geactiveerd met de volgende commando's:
Let op: Houd de 'Shift'-toets ingedrukt tijdens de selectie.
Wanneer een menu wordt geactiveerd, verschijnt het over het videobeeld op het scherm, met een
cursor aan de linkerkant. U kunt een functie kiezen door er de cursor op te plaatsen en als deze
knippert een “BEVESTIG”-commando te geven. Met een Dennard-controller doet u dit als volgt:
Als u de Dennard dtx1000dc gebruikt, houdt u de preset-knop ingedrukt en drukt u op CAMERA
SELECT 1
Als u de Dennard dtx400dc gebruikt, drukt u op de preset 1-knop
Dennard 2040 / 2060 Handleiding Menusysteem Blad 10
Dennard dtx1000dctoegang
Dennard dtx400dctoegang
Gebruikersmenu Shift Wash shift 1
Supervisor-menu (wachtwoord nodig) Shift Wipe shift 2
Technisch menu (wachtwoord nodig) Shift Autopan shift 3
Page 54

4.2 Hoofdmenu
Als u het hoofdmenu opent, verschijnt dit over het videobeeld, met de cursor aan de linkerkant. U
kunt kiezen uit de volgende opties:
Selecteer de gewenste functie door middel van de joystick of de pijltoetsen en bevestig de selectie
door middel van de juiste toets(en). Indien u 'Afsluiten' kiest, wordt het menu gesloten en doet de
dome niets.
4.2.1 Naar Preset of Tour starten
Met deze opties kan de operator alle preset-posities en tours oproepen, zelfs als dit niet kan vanaf
het bedieningspaneel.
Let op: Dit scherm geeft alleen toegang tot de bestaande preset-posities en tours. Zie sectie 4.3.1 of 4.3.2 voor
het instellen van nieuwe preset-posities of tours.
In het volgende menu dient u de benodigde cijfercombinatie in te voeren:
De cursor kan met de joystick of bedieningsknoppen langs de rij cijfers verplaatst worden tot het
gewenste cijfer is bereikt. Het cijfer bij de cursor knippert. Zodra het geselecteerd wordt met de
BEVESTIG-knop, verschijnt het in _ _ _.
Indien de code begint met een 0, hoeft deze niet te worden ingevoerd (b.v. 001 kan simpelweg
worden ingevoerd als ‘1’). De code moet wel binnen het bestaande bereik liggen, namelijk 001-250
voor preset-posities en 001-100 voor tours (Dennard 2060) en 001-250 voor preset-posities en 00150 voor tours (Dennard 2040). Indien u een code buiten het bereik invoert, knippert het bericht
'Illegal Entry' ('Invoer niet mogelijk') en moet de waarde worden gewist en opnieuw ingevoerd.
Als de cijfers zijn ingevoerd, roept u met Waarde bevestigen de bijbehorende functie op. Het menu
verdwijnt en de gewenste camerapositie wordt doorgevoerd
Dennard 2040 / 2060 Handleiding Menusysteem Blad 11
Naar Preset
Tour starten
Technisch menu
Supervisor-menu
Afsluiten
Preset-nummer___ (ofTournummer)
0123456789
Waarde bevestigen
Waarde wissen
Terug
Page 55

Als u uw keuze wilt wijzigen, begint u met 'Waarde wissen' opnieuw.
Gebruik preset-positie 1 en tour 1 voor de meest voorkomende instellingen. Na een stroomstoring of als er geen
operator aanwezig is, keert de dome automatisch naar deze waarden terug. Lees voor meer informatie de sectie
over stroomstoringen, 4.4.2.
4.2.2 Invoeren PIN-code
Bij het oproepen van het Technische Menu of het Supervisor-menu verschijnt het volgende scherm.
Het wachtwoord of de PIN-code wordt ingevoerd op dezelfde manier als de voorgaande waarden.
De cursor kan met de joystick of bedieningsknoppen langs de rij cijfers verplaatst worden tot het
gewenste cijfer is bereikt. Het cijfer bij de cursor knippert. Zodra het geselecteerd wordt met de
BEVESTIG-knop, verschijnt het in _ _ _ _.
Als alle vier cijfers zijn geselecteerd, bevestigt u uw invoer met Waarde bevestigen. Het
geselecteerde menu (Technisch of Supervisor) verschijnt op het scherm.
Dennard 2040 / 2060 Handleiding Menusysteem Blad 12
Geef PIN____
0123456789
Waarde bevestigen
Waarde wissen
Annuleren
Page 56

HIERONDER VINDT U DE FABRIEKSWACHTWOORDEN
(PINCODES). DEZE KUNNEN DOOR DE TECHNICUS OF
SUPERVISOR WORDEN GEWIJZIGD IN DE RESPECTIEVELIJKE
MENU'S.
OM TE VOORKOMEN DAT INSTELLINGEN OF PRESET-POSITIES
ZONDER TOESTEMMING WORDEN GEWIJZIGD, WORDT
GEADVISEERD PIN-CODES VEILIG TE BEWAREN.
VERWIJDER DEZE PAGINA UIT DE HANDLEIDING INDIEN U DIT
NODIG ACHT.
Voer PIN-code '1111' in voor toegang tot het Supervisor-menu
Voer PIN-code '9999' in voor toegang tot het Technische menu
Dennard 2040 / 2060 Handleiding Menusysteem Blad 13
Page 57

Dennard 2040 / 2060 Handleiding Menusysteem Blad 14
Page 58
4.3 Supervisor-Menu
Met het SUPERVISOR-MENU kan de supervisor niet alleen de functies van het operator-menu
dupliceren, maar ook preset-posities (met titel) en tours programmeren. Bovendien geeft het menu
toegang tot de instellingen voor de cursor, tekstplaatsing en -selectie.
De functies zijn uitgesplitst in submenu's. Als u naar een submenu terugkeert, wordt het menu
erboven zichtbaar. De minst gebruikte functies zitten dieper in de structuur.
In het Supervisor-menu vindt u:
4.3.1 Preset opslaan/wijzigen
Met de eerste optie kan de supervisor een beeldpositie vastleggen (inclusief pan-, tilt- en
zoominstellingen) en deze opslaan voor toekomstig gebruik. Om een preset op te slaan moet het
gewenste beeld al op het scherm staan als deze menuoptie wordt geopend. Bij het selecteren van
deze optie verschijnen de volgende subschermen.
Het nummer van de preset wordt op de eerder beschreven manier geselecteerd. Als het nummer is
geaccepteerd, verschijnt een scherm waarin de supervisor de positie een naam kan geven (b.v.
'Hoofdingang' of 'Voordeur') of de standaard namen in de software van de dome kan kiezen. Op het
scherm verschijnt:
Dennard 2040 / 2060 Handleiding Menusysteem Blad 15
Preset opslaan/wijzigen
Tour opslaan/wijzigen
Alarm instellen
Supervisor-opties
PIN wijzigen
Privézone instellen
Terug
Afsluiten
Preset-nummer___
0123456789
Waarde bevestigen
Waarde wissen
Terug zonder wijzigen
Preset wissen
Preset-tekst wijzigen
Ja
Nee
Page 59

Kies 'Nee' voor de standaardnamen of 'Ja' om in het volgende scherm een nieuwe naam in te
voeren.
Ook de titel wordt geselecteerd met behulp van de cursor en moet vervolgens bevestigd worden
(de gekozen titel wordt dan bij de opgeslagen preset-positie opgeslagen). Met 'Backspace' kunt u
een correctie aanbrengen, met 'Terug zonder wijzigen' wordt de preset-positie opgeslagen met de
standaardnaam. De titel verschijnt tijdens het invoeren in _ _.
De _-tekens geven slechts de positie aan; deze verschijnen niet op het scherm.
4.3.2 Tour opslaan/wijzigen
Een tour is een tevoren ingestelde route langs een aantal preset-posities. Voordat u deze functie
gebruikt, dient u te controleren of alle preset-posities zijn opgeslagen zoals uitgelegd in sectie
4.3.1.
Voordat u een tour programmeert, dient u het nummer van de tour in te voeren op dezelfde manier
als dat van een preset-positie (met als uitzondering dat het tussen 001 en 100 moet liggen). Als het
nummer is geaccepteerd, verschijnt een submenu:
Als op het gekozen nummer al een tour is opgeslagen, worden de bijbehorende gegevens
weergegeven als 'Oud'. U kunt deze gegevens bewerken door nieuwe waarden toe te voegen,
maar u kunt ook een nieuwe tour invoeren.
Het invoeren van de tekens gebeurt op de bekende manier, maar de tekens op _ _ _ hebben
specifieke functies. De eerste drie tekens, PPP, staan voor het nummer van een preset-positie. 'DD'
is de tijd dat de camera op de betreffende positie blijft staan, en 'TT' staat voor de tijd waarin de
camera naar de volgende positie draait. De tijden worden ingevoerd in seconden, van 01 tot 99. Als
er geen waarde wordt ingevoerd, worden de standaard 2 seconden weergavetijd en 3 seconden
draaitijd gebruikt.
Als alle karakters zijn ingevoerd en bevestigd, wordt het invoerveld gewist en kunt u de informatie
voor de volgende positie invoeren. De positieteller neemt toe. Als u alle gegevens hebt ingevoerd,
selecteert u 'Tour opslaan' .
Dennard 2040 / 2060 Handleiding Menusysteem Blad 16
ABCDEFGHIJKLMNOPQRSTUVWX
YZabcdefghijklmnopqrstuv
wxyz0123456789: / *=+ . -
Backspace
Terug zonder wijzigen
Waarde bevestigen
____________
Nr.___intour___
PPPDDTT
Oud_______
Nieuw _______
0123456789
Waarde bevestigen
Waarde wissen
Terug zonder wijzigen
Tour opslaan
Page 60
4.3.3 Alarm instellen
Een alarm is een stimulus waarop de dome een bepaalde actie moet ondernemen. Deze stimuli
kunnen van verschillende externe bronnen komen, zoals deurbewakingssystemen of PIRbewegingssensoren. De Dennard 2060 dome beschikt over een klok waardoor de beheerder
verschillende acties kan instellen afhankelijk van de tijd van de dag of de dag van de week. Deze
klokfunctie is niet beschikbaar voor de Dennard 2040, ga naar sectie 4.3.3.1. In het scherm voor
het instellen van het alarm hebt u drie opties:
4.3.3.1 Alarmafhandeling kiezen
Bij het kiezen voor deze functie moet de beheerder op de bekende manier op het volgende scherm
een alarmnummer invoeren:
Als u het alarmnummer accepteert, verschijnt het volgende scherm:
Op deze wijze kan een bepaalde preset-positie P of tour T worden opgeslagen, samen met het
identificatienummer 'nnn', dat zal worden doorgevoerd als het alarm wordt geactiveerd. Om een
optie te selecteren, gebruikt u de code '01' voor tour of '10' voor preset (de 1 onder P of T bepaalt
om welke instelling het gaat; 11 is ongeldig). Bij bevestiging van de waarde wordt het alarmnummer
verhoogd, waardoor aan elke preset een actie toegewezen kan worden, of de bestaande actie
('oud') gewijzigd kan worden. De alarmrespons blijft actief tot het einde van de ingestelde
gebruikerstime-out (zie sectie 4.3.4.1).
Dennard 2040 / 2060 Handleiding Menusysteem Blad 17
Alarmafhandeling kiezen
Alarmen maskeren
Vrije dagen kiezen
Terug
Afsluiten
Alarmnummer___
01234567890
Waarde bevestigen
Waarde wissen
Terug zonder wijzigen
Wis alarm
Alm___Kies P of T
PTnnn
Oud ____
Nieuw ____
0123456789
Waarde bevestigen
Waarde wissen
Terug zonder wijzigen
(Dit scherm is niet van toepassing op de Dennard 2040)
Page 61

4.3.3.2 Alarmen maskeren (Niet van toepassing voor Dennard 2040)
Alarmresponsen kunnen worden gewijzigd, afhankelijk van wanneer ze zijn geactiveerd. Als u deze
functie selecteert, verschijnt het volgende scherm:
De letters op het scherm betekenen:
MTWTFSS Monday to Sunday (maandag t/m zondag)
H Holiday (vakantie)
hhmm Tijd 'Masker aan'
hhmm Tijd 'Masker uit'
Door een '1' in te voeren onder een dag van de week, wordt op die dag het alarm gemaskeerd d.w.z.: op die dag veroorzaakt een alarm geen reactie van de dome. Op dezelfde manier betekent
een '1' onder 'Holiday' ('Vakantie') dat op bepaalde vakantiedagen het alarm wordt gemaskeerd (let
op: de instelling voor een vakantiedag heeft voorrang op de instelling voor de weekdag) Het masker
is de hele geselecteerde dag actief, tenzij tijden zijn ingesteld om het in- en uit te schakelen. Dit
doet u door de tijd numeriek in te voeren met behulp van de 24-uurs klok. Het masker schakelt
tijdelijk alle aangesloten alarmen uit.
Zo kunnen op de dome aangesloten bewegingssensoren die alleen buiten normale kantooruren
hoeven te werken, worden gemaskeerd door de code '1111100008301800' in te voeren. Zo worden
de alarmen op maandag t/m vrijdag tussen 8.30u en 18.00u gemaskeerd. Buiten deze tijden, in het
weekend en op vakantiedagen, reageert de dome zoals gewenst.
Voor absolute flexibiliteit zijn er maximaal tien instellingen beschikbaar. Deze worden aangegeven
door het 'Itemnummer' op het scherm. Na elke bevestiging van een opdracht wordt dit nummer
verhoogd tot de gehele actie is opgeslagen. Subniveaus maken het mogelijk voor verschillende
dagen verschillende maskeringstijden te selecteren. Het kan zo zijn dat het gebouw in bovenstaand
voorbeeld op vrijdag eerder sluit. Om de verschillende tijden in te voeren, zou de eerste code (item)
moeten worden gewijzigd in '1111000008301800' en zou een tweede code moeten worden
ingevoerd als '0000100008301400'. Nu is het eerste masker alleen van toepassing van maandag
t/m donderdag, terwijl het tweede de alarmen uitschakelt op vrijdag van 8.30u t/m 14.00u. Op deze
manier kunnen complexere maskeringsschema's worden ingesteld voor meerdere variaties.
4.3.3.3 Vrije dagen kiezen (Niet van toepassing voor Dennard 2040)
U kunt maximaal 15 dagen programmeren als vrije dagen. Op dagen als Kerstmis of nationale vrije
dagen moet de alarmafhandeling soms worden aangepast . Als deze optie wordt geselecteerd,
verschijnt het volgende scherm:
Dennard 2040 / 2060 Handleiding Menusysteem Blad 18
Nr___vanalarmmaskers
MTWTFSSHuummuumm
Oud______________
Nieuw______________
0123456789
Waarde bevestigen
Waarde wissen
Terug zonder wijzigen
Opslaan en terug
Page 62

U kunt nu data invoeren (b.v. 2512 voor Eerste Kerstdag) om de jaarlijkse vrije dagen vast te
leggen. Elke keer als u een invoer bevestigt, wordt u gevraagd om de volgende. Selecteer 'Opslaan
en terug' als u gereed bent.
Let op: Sommige data, zoals nationale vrije dagen, moeten soms aan het begin van een nieuw jaar opnieuw
worden ingevoerd.
4.3.4 Supervisor-opties
Onder Supervisor-opties vindt u verschillende functies. De meeste van deze functies wijzigen de
weergave van tekst en informatie, maar er zijn enkele camera-instellingen die kunnen worden
gewijzigd om aan de installatievereisten te voldoen. Als u het optiemenu selecteert, verschijnt het
volgende scherm:
Met de eerste drie opties kunnen camera-instellingen worden gewijzigd; ze worden alledrie op
dezelfde wijze ingesteld. Om de instelling te wijzigen verplaatst u de cursor naar boven/beneden tot
hij naast de functie staat. Door de joystick van links naar rechts te drukken (of op de pijltoetsen
naar links/rechts te drukken) loopt u door de alternatieve instellingen. Door de joystick naar boven
of beneden te drukken wordt de waarde op het scherm vastgelegd. Met het scherm van de
Dennard 2040 kan de beheerder op dezelfde manier een taal kiezen. Als de digitale zoom is
ingeschakeld, roept de camera deze functie automatisch op als de maximale optische zoom is
bereikt en de zoom control wordt ingedrukt. Bij preset-posities wordt ook de digitale zoom-instelling
opgeslagen. Als de digitale zoom vervolgens wordt uitgeschakeld, is bij de betreffende presetposities de optische zoom maximaal ingesteld. Met de doordraaifunctie kunnen objecten die recht
onder de dome door bewegen, worden gevolgd. Als deze functie is uitgeschakeld, kan de camera
naar beneden worden gedraaid tot recht onder de dome, maar blijft dan in deze positie. Als de
doordraaifunctie is ingeschakeld, draait de camera automatisch 180o, zodat de beheerder het
object kan volgen als dit van de dome af beweegt. Als de optie Beeld bevriezen' is geselecteerd,
blijft het laatste beeld op het scherm staan terwijl de dome op volle snelheid naar een preset-positie
beweegt. Als de camera daar aankomt, wordt het normale beeld weergegeven. Zo wordt
voorkomen dat u wazig beeld krijgt als de dome op hoge snelheid van een preset-positie naar de
volgende beweegt.
Dennard 2040 / 2060 Handleiding Menusysteem Blad 19
Nr.___vanvrije dagen
ddmm
Oud______________
Nieuw____
0123456789
Waarde bevestigen
Waarde wissen
Terug zonder wijzigen
Opslaan en terug
__________
Digitale zoom: invalide
Onder omkeren:
Beeld bevriezen:
Gebr.-timeout instellen:
Datum/tijd/taal instel.
Opties Preset tekst
Terug
Afsluiten
actief
invalide
geen
Niet Jaartal / Tijd ter Dennard 2040
Page 63

4.3.4.1 Gebr.-timeout instellen
Met de functie 'Gebruikerstime-out' kan worden ingesteld wat de dome moet doen als de operator
niets doet. Als u deze functie selecteert, verschijnt het volgende scherm:
In dit scherm kunt u bij 'SSS' een standaard time-out instellen van 1 t/m 999 seconden. De
ingevoerde tijd is de tijd tussen de laatste joystick- (of toets-) handeling van de operator, en een
automatische verplaatsing naar het begin van de standaard tour of de standaard positie, als deze
zijn geprogrammeerd. De waarde voor 'PT' geeft aan welke actie moet volgen. Met code 01
selecteert u de tour en met 10 de preset-positie (11 is een ongeldige invoer).
Na bevestiging van de opdracht komt de supervisor terug in het menu Opties en de gekozen tijd
verschijnt op het scherm. Als de time-out op 0 wordt ingesteld, verschijnt op het beeld 'geen'; de
dome zal wachten op de volgende handeling van de operator.
4.3.4.2 Datum/tijd/taal instellen (Niet van toepassing voor Dennard 2040)
De Dennard 2060 dome beschikt over een real-time klok, die na de installatie ingesteld moet
worden. Mogelijk kunt u ook de taal en de tijdnotatie wijzigen. Als u deze functie selecteert,
verschijnt het volgende scherm:
De eerste drie opties worden op dezelfde manier ingesteld. Om de instelling te wijzigen verplaatst u
de cursor naar boven/beneden tot hij naast de functie staat. Door de joystick van links naar rechts
te drukken (of op de pijltoetsen naar links/rechts te drukken) loopt u door de alternatieve
instellingen. Door de joystick naar boven of beneden te drukken wordt de waarde op het scherm
vastgelegd.
Het formaat van tijd en datum bepalen hoe deze gegevens op het scherm van de beheerder
weergegeven worden. Door de lijst te doorlopen, zijn verschillende opties beschikbaar. Ook kunt u
de weergave van tijd en datum uitschakelen.
Dennard 2040 / 2060 Handleiding Menusysteem Blad 20
SSSPT
Oud____
Nieuw____
0123456789
Waarde bevestigen
Waarde wissen
Terug zonder wijzigen
Taal: Engels
Datumnotatie:
Tijdnotatie:
Tijd en datum instellen
Opslaan en terug
Opslaan en afsluiten
dd-mm-jj
uu:mm:ss
Page 64

Bij het instellen van tijd of datum verschijnt het volgende scherm:
Door middel van cijfermatige invoer kunnen de juiste datum en tijd worden ingesteld of de
bestaande waarden worden gekozen.
4.3.4.3 Opties Preset tekst
U kunt de namen van preset-posities per positie instellen of een standaard naam toewijzen. Deze
standaardnaam is voorgeprogrammeerd als "Position" ("Positie"). Door middel van deze functie kan
de naam van de positie worden gewijzigd. De locatie op het scherm van de naam kan ook worden
aangepast. Het volgende scherm verschijnt:
De naam van de preset-positie kan links of rechts op het scherm worden weergegeven, en kan
worden uitgeschakeld door de betreffende functie in het menu te selecteren en naar links/rechts te
gaan om tussen de verschillende waarden te kiezen. Als u de standaard naam wilt wijzigen, kiest u
de optie Wijzigen. Er verschijnt een virtueel toetsenbord om de naam in te voeren.
U kiest de letters voor de titel weer met de cursor en bevestigt de titel als de selectie gereed is (de
gekozen titel wordt dan als de standaard naam opgeslagen). Met Backspace kunt u een correctie
aanbrengen, met 'Terug zonder wijzigen' blijft de standaard naam ongewijzigd.
De _-tekens geven slechts de positie aan; deze verschijnen niet op het scherm.
Dennard 2040 / 2060 Handleiding Menusysteem Blad 21
jjmmdduumm
Oud_______
Nieuw _______
0123456789
Waarde bevestigen
Waarde wissen
Terug zonder wijzigen
Preset tekst aanpassen: L
Std. Preset tekst: Aan
Std. tekst wijzigen
Terug
Afsluiten
ABCDEFGHIJKLMNOPQRSTUVWX
YZabcdefghijklmnopqrstuv
wxyz0123456789: / *=+ . -
Backspace
Terug zonder wijzigen
Waarde bevestigen
____________
Page 65
4.3.5 Geef nieuwe PIN
De PIN-code voor de supervisor is voorgeprogrammeerd, maar kan in het volgende scherm worden
gewijzigd door de supervisor:
Toets uw nieuwe PIN (wachtwoord) in en bevestig de invoer.
Noteer de nieuwe PIN-code en bewaar die op een veilige plaats
4.3.6 Privézone instellen
Met de laatste optie in het supervisor-menu kunnen bepaalde zones in het zicht van de camera
worden afgeschermd. De operator kan dan geen beelden van deze zones bekijken of opslaan. Zorg
ervoor dat de af te schermen zone volledig in het gezichtsveld van de camera valt voordat u deze
functie selecteert. Voor deze functie heeft u de volgende opties:
Bij selectie van 'Eén zone opgeven' wordt het scherm zwart als de afscherming wordt geactiveerd.
Als u de scherminstellingen heeft afgesloten en terug bent in de normale modus, blijft de zwarte
afscherming op de gekozen plaats als u de camera naar een andere positie draait.
Bij het vastleggen van meerdere zones wordt het scherm zwart en wordt de tekst 'Privézones'
weergegeven. Beweeg de camera naar de gewenste zone en druk op 'Enter' voor elke zone.
Gebruik als u klaar bent de toetsencombinatie voor het openen van het menu (b.v. #1 voor de
ttx400) om deze functie te verlaten.
Om een afgeschermde zone te wissen, moet de camera op deze zone gericht staan vóór u
'Wissen' of 'Alle privézones wissen' selecteert. De dome functioneert onmiddellijk normaal nadat de
zone(s) is (zijn) gewist.
4.4 Technisch menu
Het technische menu geeft toegang tot een aantal functies om algehele dome-instellingen vast te
leggen. Nadat de dome is geïnstalleerd en ingesteld, zal dit menu weinig worden gebruikt.
Dennard 2040 / 2060 Handleiding Menusysteem Blad 22
Geef PIN____
0123456789
Waarde bevestigen
Waarde wissen
Annuleren
Eén zone opgeven
Eén zone wissen
Meer zones opgeven
Alle privézones wissen)
Terug
Afsluiten
Page 66

Na het oproepen van dit menu verschijnt het volgende scherm:
4.4.1 Camera instellen
Er kunnen verschillende wijzigingen worden aangebracht in de werking van de camera in de dome.
Dit doet u in het volgende scherm:
Alle opties worden op dezelfde manier ingesteld. Om de instelling te wijzigen verplaatst u de cursor
naar boven/beneden tot hij naast de functie staat. Door de joystick van links naar rechts te drukken
(of op de pijltoetsen naar links/rechts te drukken) beweegt u door de alternatieve instellingen. Door
de joystick naar boven of beneden te drukken wordt de waarde op het scherm vastgelegd.
Als u klr/mono kiest, neemt de camera in kleur op tot het licht onder een bepaalde waarde komt.
Dan schakelt de camera automatisch over naar zwart/wit. Het tegenovergestelde gebeurt als het
licht weer voldoende is voor kleuropname. De camera kan ook ingesteld worden op kleur of
zwart/wit.
Bij het opslaan van een preset-positie wordt ook de focuspositie van de lens onthouden. Als de
focusinstelling op 'auto' staat (voorkeursinstelling), zal de camera bij veranderende omstandigheden
zelf de focus regelen. Door de focus op handmatig in te stellen, gebruikt de camera de originele
focusinstelling terwijl hij in de preset-positie blijft.
De instelling 'Korte focus' is zeer geschikt voor gebruik binnenshuis, omdat de camera hiermee kan
scherpstellen op objecten op minder dan een meter afstand. Voor normaal gebruik buiten moet
deze functie worden uitgeschakeld om te voorkomen dat de camera scherpstelt op regendruppels
op de dome.
Als de beeldintegratie is ingesteld op 'auto', kan de camera het aantal beelden per seconde
aanpassen voor toepassing bij weinig licht. Als u 'normaal' selecteert, blijft de beeldsnelheid
constant, maar bij weinig licht kan de beeldkwaliteit afnemen.
Dennard 2040 / 2060 Handleiding Menusysteem Blad 23
Camera instellen
Opties aan/uitzetten
Joystickregelaars
Diverse functies
Pin wijzigen
Terug
Afsluiten
Kleur camera: Klr/mono
Preset focus: auto
Korte focus: uitgeschakeld
Beeldintegr: auto
Opslaan en terug
Opslaan en afsluiten
Page 67

4.4.2 Opties aan/uitzetten
Dankzij een aantal instellingen kan de technicus tekst verplaatsen en geschikte acties instellen voor
als er zich fouten voordoen. Als u deze functie selecteert, verschijnt het volgende scherm:
Alle opties worden op dezelfde manier ingesteld. Om de instelling te wijzigen verplaatst u de cursor
naar boven/beneden tot hij naast de functie staat. Door de joystick naar links of rechts te drukken
(of op de pijltoetsen naar links/rechts te drukken) beweegt u door de alternatieve instellingen. Door
de joystick naar boven of beneden te drukken wordt de waarde op het scherm vastgelegd.
Met de optie 'Tekstwijziging' bepaalt u of tekst wordt gewijzigd vanuit de schermopties van de dome
zelf, of wordt samengesteld met het bedieningspaneel van het systeem en wordt verstuurd naar de
dome door middel van het Dennard seriële protocol.
Met de optie 'Kopinfo' kan tekst worden weergegeven in de bovenhoek van het scherm, zoals de
huidige instelling van de dome en informatie over sommige acties. Deze tekst kan links of rechts op
het scherm worden weergegeven.
Met 'Foutdisplay' ingeschakeld wordt u op de hoogte gebracht van verbindingsfouten door het
knipperende rechthoekje.
Met 'Voedingsfout' legt u vast wat de dome moet doen bij stroomuitval. Als de stroomvoorziening is
hervat, keert de dome terug naar preset-positie 1 of tour 1 opnieuw starten. Door 'geen' te
selecteren blijft de dome in de laatste positie staan.
4.4.3 Joystickregelaars
Voor de bediening van de dome kunnen vele verschillende telemetriecontrollers en recorders met
diverse typen joysticks worden gebruikt. Voor een optimaal gebruik van de joystick zijn een aantal
instellingen beschikbaar.
Dennard 2040 / 2060 Handleiding Menusysteem Blad 24
Tekst wijzigen: lokaal
Kopinfo tonen: uitgeschakeld
Kopinfo aanpassen: links
Foutdisplay: ingeschakeld
Voedingsfout: geen
Opslaan en terug
Opslaan en afsluiten
Deel door: 16
Lineaire snelheid: 5
Pan-richting: standaard
Kantelrichting: standaard
Horiz cursor: standaard
Vert cursor: standaard
Opslaan en terug
Opslaan en afsluite
Page 68

Met de optie 'Deel door' kunt u, indien het bedieningspaneel hier geschikt voor is, de verhouding
tussen hoge en lage joysticksnelheden instellen. De gekozen waarde bepaalt de wiskundige ratio
tussen hoge en lage snelheden voor panning en kantelen. U kunt een waarde instellen tussen 2 en
128.
De lineaire snelheidsinstelling wijzigt de snelheid waarmee de dome draait en kantelt. Deze functie
kan worden ingesteld tussen 1 (langzaam) en 8 (snel).
In sommige gevallen is het gewenst dat de bewegingsrichting van de joystick tegenovergesteld is
aan die van de camera of de cursor. Alle functies kunnen op het scherm worden geselecteerd.
4.4.4 Diverse functies
Onder deze kop vindt u verschillende gegevens en instellingen die de technicus helpen bij het
opsporen van fouten. De volgende opties zijn beschikbaar:
Als u 'Softwareversie' kiest, verschijnt de geprogrammeerde softwareversie kort boven in het
scherm. Als u 'Waarden ruststand' kiest, verschijnen kort de coderingswaarden van de pan- en
tiltmotoren.
Door middel van 'Servo's naar ruststand' wordt een motorreset uitgevoerd, waarbij de dome door
het bereik terugdraait en -kantelt naar de basispositie.
'Reset op kop' start de dome opnieuw op. De dome voert de standaard starttest uit en zet dan de
servo's in ruststand.
4.4.4.1 Hostcomm/Video-verst
Als u deze functie selecteert, verschijnt het volgende scherm:
De kleine groene LED in de dome kan in- en uitgeschakeld worden. Als het lampje aan is, kunt u
zien of de voeding de dome bereikt, maar het kan bij weinig omgevingslicht zichtbaar zijn.
Dennard 2040 / 2060 Handleiding Menusysteem Blad 25
Hostcomm/Video-verst
Softwareversie
Rustwaarden
Servo's naar ruststand
Geheugenfuncties
Reset op kop
Terug
Afsluiten
Activiteits-LED: uit
Host polling: aan
Video-verst: 2
Video-lift: uit
Opslaan en terug
Opslaan en afsluiten
Page 69

Host polling bepaalt of de dome berichten beantwoordt (half duplex seriële verbinding) of berichten
niet beantwoordt (simplex-modus). Dit is afhankelijk van de gebruikte controller en de instelling van
de domeverbinding.
Het kan nodig zijn het videosignaal te versterken en te liften om te compenseren voor verschillende
typen of lengtes coaxiale kabel. Videoversterking staat standaard ingesteld op 1, waarbij de videolift
uitgeschakeld is. Instellingen worden op de gebruikelijke wijze aangepast.
4.4.4.2 Geheugenfuncties
De dome bewaart in een permanent geheugen gegevens over huidige positie, opgeslagen presets
en tours en andere gegevens die nodig zijn om normaal te werken. Als deze gegevens verloren
gaan of beschadigd raken, kan de eenheid niet normaal functioneren. Op het apparaat vindt u de
volgende mogelijkheden:
De optie 'Std.waarden herstellen' mag alleen worden gebruikt onder toezicht van een gekwalificeerd
technicus. Hiermee worden alle standaardinstellingen hersteld en alle opgeslagen gegevens, zoals
preset-posities, tijd, datum enz. verwijderd.
4.4.5 Geef nieuwe PIN
De PIN-code voor het technische menu is voorgeprogrammeerd, maar kan door de technicus
worden gewijzigd in het volgende scherm:
Typ uw nieuwe PIN (wachtwoord) in en bevestig uw invoer.
Noteer de nieuwe PIN-code en bewaar die op een veilige plaats.
Dennard 2040 / 2060 Handleiding Menusysteem Blad 26
Std. waarden herstellen
Geh.fouten wissen
Geheugentest doen
Terug
Afsluiten
Geef PIN ____
0123456789
Waarde bevestigen
Waarde wissen
Annuleren
Page 70

5. MENU-OPZET
Dennard 2040 / 2060 Handleiding Menusysteem Blad 27
Hoofdmenu
Naar Technisch menu
Naar Supervisor-menu
Naar Preset
Tour starten
Technisch menu
Supervisor-menu
Afsluiten
Preset-numme
r___
0123456789
Waarde bevestigen
Waarde wissen
Terug
Tournummer___
0123456789
Waarde bevestigen
Waarde wissen
Terug
Geef PI
N____
0123456789
Waarde bevestigen
Waarde wissen
Terug zonder wijzigen
Geef PI
N____
0123456789
Waarde bevestigen
Waarde wissen
Terug zonder wijzigen
Page 71

Dennard 2040 / 2060 Handleiding Menusysteem Blad 28
Supervisor-menu
Naar Supervisor-opties
Preset opslaan/wijzigen
Tour opslaan/wijzigen
Alarm instellen
Supervisor-opties }
PIN wijzigen
}
Privézone instellen }
Terug
Afsluiten
Preset-numme
r___
0123456789
Waarde bevestigen
Waarde wissen
Terug zonder wijzigen
Preset wissen
Tournumme
r___
0123456789
Waarde bevestigen
Waarde wissen
Terug zonder wijzigen
Tour wissen
Alarmafhandeling kiezen
Alarmen maskeren
Vrije dagen kiezen
Terug
Afsluiten
Preset tekst aanp
assen
Ja
Nee
Alarmnumme
r___
0123456789
Waarde bevestigen
Waarde wissen
Terug
Alarm wissen
Nr.___in
reeks___
PPPDDTT
Oud _____
Nieuw_____
0123456789
Waarde bevestigen
Waarde wissen
Terug zonder wijzigen
Tour opslaan
Nr.___van
alarmmaskers
MTWTFSSHhhmmhhmm
Oud _____________
Nieu
w_____________
0123456789
Waarde bevestigen
Waarde wissen
Terug zonder wijzigen
Opslaan en terug
Nr.___van
vrije dagen
ddmm
Oud _ _ _
Nieuw___
0123456789
Waarde bevestigen
Waarde wissen
Terug zonder wijzigen
Opslaan en terug
ABCDEFGHIJKLMNOPQRSTUVWX
YZabcdefghIjklmnopqrstuv
Wxyz0123456789:/*=+.-
Backspace
Terug zonder wijzigen
Waarde bevestigen
_______________
Alm___
Kies P of T
PTnnn
Oud __ _
Nieu
w___
0123456789
Alarm opslaan
Waarde wissen
Terug zonder wijzigen
(alleen 2060)
(alleen 2040)
(alleen 2060)
(alleen 2060)
alleen
Dennard
2060
alleen
Dennard
2060
alleen
Dennard
2060
alleen Dennard 2040
Page 72

Dennard 2040 / 2060 Handleiding Menusysteem Blad 29
Supervisor-opties
Digitale zoom: actief
Onder omkeren: actief
Beeld bevriezen:uitgeschakeld
Gebr.timeout instellen: geen
Datum/tijd/taal instel.
Opties Preset tekst
Terug
Afsluiten
SSSPT
Oud ____
Nieuw
____
0123456789
Waarde bevestigen
Waarde wissen
Terug zonder wijzigen
Taal:
Engels
Datumnotatie: dd-Mmm-jj
Tijdnotatie: uu:mm:ss
Tijd en datum instellen
Opslaan en terug
Opslaan en afsluiten
jjmmdduumm
Oud ________
Nieuw
________
0123456789
Waarde bevestigen
Waarde wissen
Terug zonder wijzigen
Preset tekst aanpassen: L
Std. Preset tekst:
aan
Std. Tekst wijzigen
Terug
Afsluiten
Geef nieuwe PI
N____
0123456789
Waarde bevestigen
Waarde wissen
Terug zonder wijzigen
Eén zone opgeven
Eén zone wissen
Meer zones opgeven
Alle privézones wissen
Terug
Afsluiten
Privézones
YZabcdefghIjklmnopqrstuv
Wxyz0123456789:/*=+.-
Backspace
Terug zonder wijzigen
Waarde bevestigen
_______________
(alleen 2060)
(alleen 2060)
alleen
Dennard
2060
alleen
Dennard
2060
Page 73
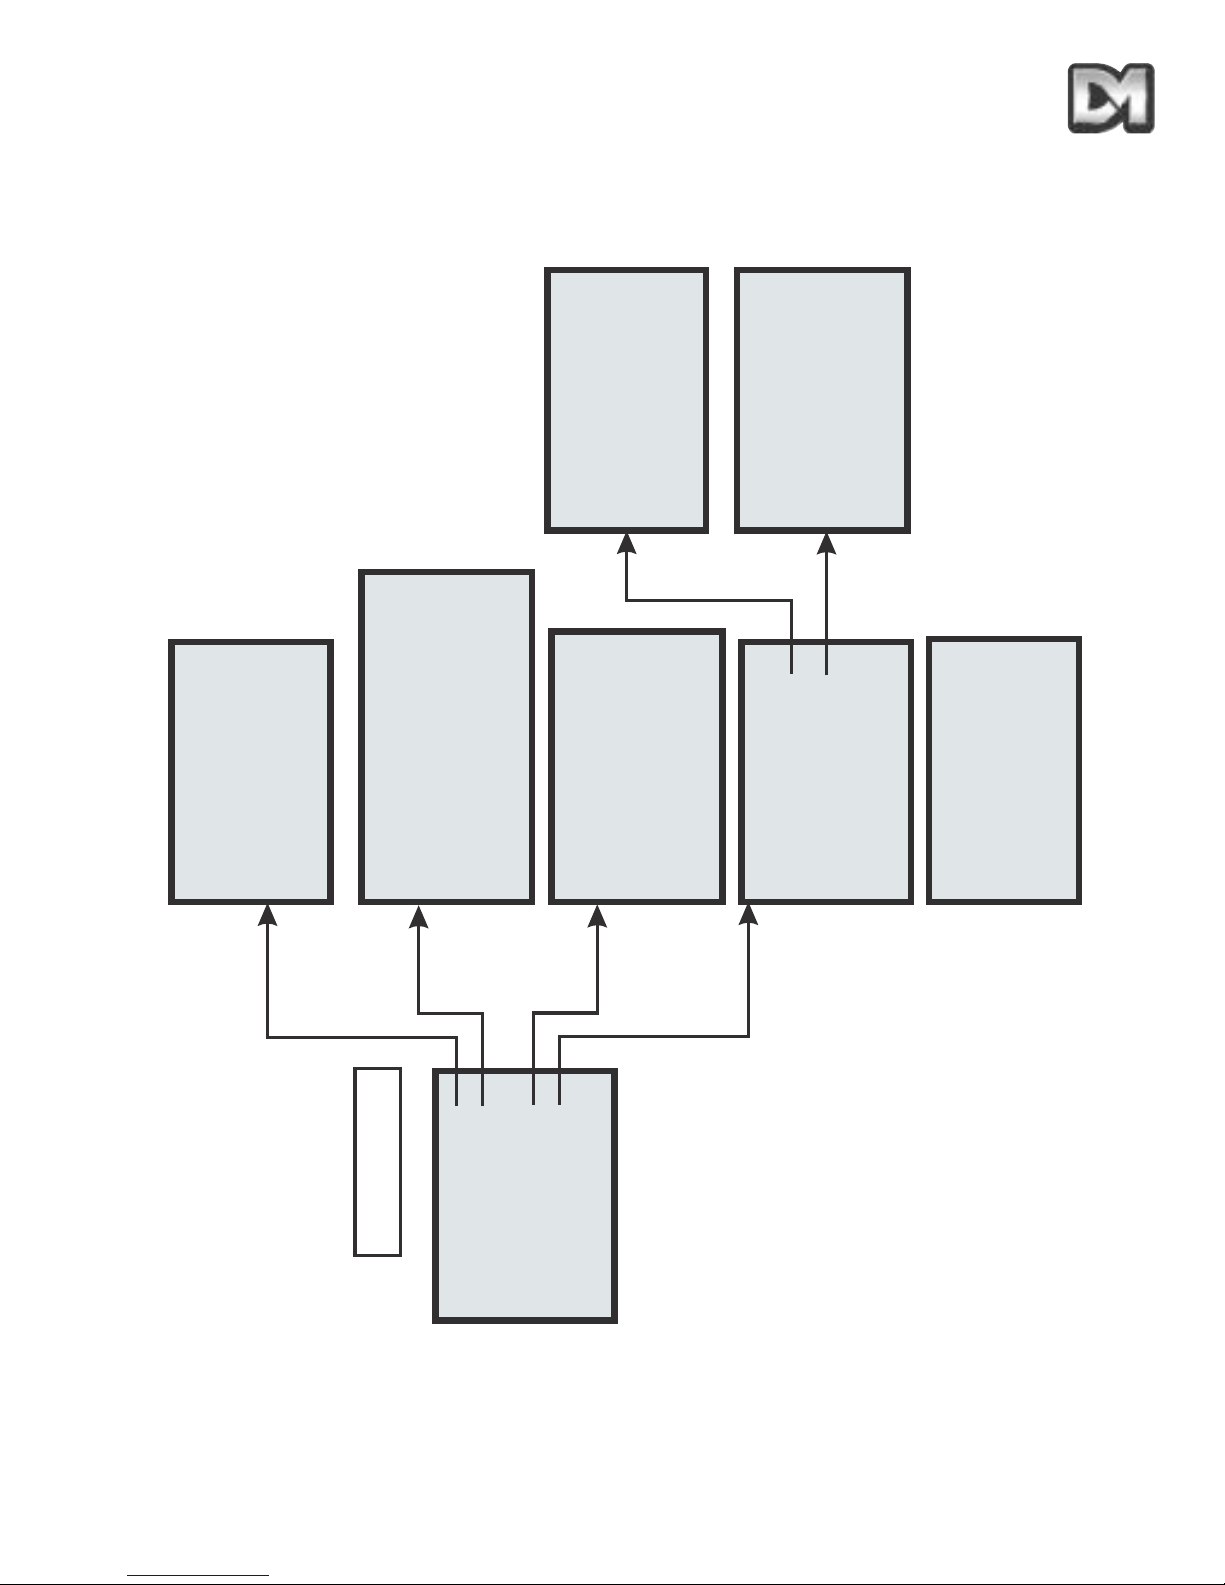
Dennard 2040 / 2060 Handleiding Menusysteem Blad 30
Technisch Menu
Camera instellen
Opties aan/uitzetten
Joystickregelaars
Diverse functies
PIN wijzigen
Terug
Afsluiten
Camerakleur: klr/mono
Preset focus: auto
Korte focus: disabled
Beeldintegr: auto
Opslaan en terug
Opslaan en afsluten
Activiteits-LED: uit
Host polling: aan
Video-verst: 2
Video-lift: uit
Opslaan en terug
Opslaan en afsluiten
Tekst bewerken:
lokaal
Kopinfo tonen:
uitgeschakeld
Kopinfo aanpassen: links
Foutdisplay: actief
Stroomuitval:
P/T/Joy
Opslaan en terug
Opslaan en afsluiten
Std. waarden herstellen
Geh. Fouten wissen
Geheugentest doen
Terug
Afsluiten
Deel door:
16
Lineaire snelheid: 5
Pan-richting: standaard
Kantelrichting: standaard
Horiz cursor: standaard
Vert cursor: standaard
Opslaan en terug
Opslaan en afsluiten
Hostcomm/Video-verst
Softwareversie
Rustwaarden
Servo's naar ruststand
Geheugenfuncties
Reset op kop
Terug
Afsluiten
Geef nieuwe PIN
____
0123456789
Waarde bevestigen
Waarde wissen
Terug zonder wijzigen
Page 74

6. ALTERNATIEVE CONTROLLERS
Voor de bediening van de Dennard 2060 en Dennard 2040 domes kunnen diverse controllers
worden gebruikt. Lees altijd de handleiding van de controller voor informatie over de juiste
gebruiksprocedures. Op de volgende pagina’s vindt u de instellingen en toetscombinaties voor
bediening van de domes met de meest gebruikte controllers. Tengevolge van wijzigingen van de
controller of het keyboard kan het echter voorkomen dat deze informatie niet langer correct is.
6.1 Dedicated Micros Digital Sprite 2
6.1.1 Besturing via de coaxiale kabel
De telemetrie van de controller moet als volgt worden geconfigureerd:Stel het Dedicated Micros Alarm- en Voorinstellingenmenu in op BBV telemetriebesturing.
Zet de adresschakelaars op de Dome op DEN PANEL.
(Lees de gebruikers/bedieningshandleiding, die bij elke dome wordt geleverd, voor een uitleg over
toegang tot en instelling van de adresschakelaars)
Zet de blauwe adres-draaiknop op F.... Zet de gele adres-draaiknop op D....
PRESET
-POSITIES OPSLAAN:
Let op:In deze configuratie kan de DM-controllesoftware sneller werken dan de dome-software.
Zet de camera in de gewenste positie en houd dan de knop 'Preset' ingedrukt tot op het scherm
'Preset opslaan' of 'Presetnummer invoeren' verschijnt. Voer het presetnummer in met behulp van
de cijfertoetsen en druk op 'Enter'. De nummers 1 t/m 9 van de presets worden normaal ingevoerd,
maar voor preset 10 toetst u eerst een 1 en vervolgens 10. De presetnummers 1 - 16 worden
opgeroepen door het intypen van enkele tekens (b.v. '1', '1' voor 11 en '1', '6' voor 16).
Preset-posities vanaf 17 kunnen worden geprogrammeerd met behulp van het dome-menu. Het
presetmenu van de dome verschijnt, zodat u een presetnummer kunt intypen. U kunt tekst invoeren
door de cursor met de joystick onder elke letter / elk nummer te zetten en vervolgens op preset, 1,
Enter te drukken ter bevestiging.
Als u klaar bent met het invoeren van tekst, sluit u het menu door de cursor naar de regel
Bevestigen te verplaatsen en op de 'preset', '1', 'Enter'-toetsen te drukken.
De Digital Sprite heeft twee Enter/bevestig-commando's
1) Druk op de presettoets tot "ga naar positie" op het scherm verschijnt, en druk dan op
toets 1 en Enter, ofwel preset, 1, Enter.
2) Druk op de presettoets tot "ga naar positie" op het scherm verschijnt, en toets dan 10 en
1, ofwel preset, 10, 1.
Dennard 2040 / 2060 Handleiding Menusysteem Blad 31
Page 75

DOME PROGRAMMEREN:
U kunt de dome-menu's op twee manieren openen:
1) Bij Sprite systemen van na juni 2004 die bediend worden via Dennard C coaxiale
kabel en bij systemen die bediend worden via RS-485-kabel drukt u tweemaal op de *knop. Op het scherm verschijnt het bericht "Druk op knop om het menu te
openen".
2) Bij oudere systemen met coaxiale kabel worden de volgende toetscombinaties gebruikt:
Voor het Operator-menu drukt u op: * 8 8 9 10 10 2
Voor het Supervisor-menu drukt u op: * 8 8 9 10 10 3
Voor het technische menu drukt u op: * 8 8 9 10 10 4
Het Operator-menu verschijnt. U kunt nu door de menu's navigeren met behulp van de joystick. Als
de cursor op de gewenste plaats staat, drukt u op 'Enter' om een menuoptie te bevestigen.
6.1.2 Bediening via RS485
De telemetrie van de controller moet als volgt worden geconfigureerd:DENNARD Seriële telemetrie. Dit wordt ingesteld in het menu Systeemopties van de Sprite 2 en
dan geselecteerd in het menu Alarmen en Presets.
Elke dome moet een eigen adres krijgen.
(Lees de gebruikers/bedieningshandleiding, die bij elke dome wordt geleverd, voor een uitleg over
toegang tot en instelling van de adresschakelaars)
De Sprite 2 is door middel van een 9-polige female connector type D op RS-485 aangesloten.
Aansluiting gaat als volgt: pen 1 = data A = gele draad van dome
pen 9 = data B = groene draad van dome
Alle domes zijn standaard voorzien van afsluitweerstanden. Deze moeten van alle domes
verwijderd worden, behalve van de laatste dome in de keten.
6.2 Baxall- / Vista-controllers
Besturing via de coaxiale kabel
De telemetrie van de controller moet als volgt worden geconfigureerd:1: Rx aangesloten, moet op DC ingesteld worden
2: Telemetriemodus, moet op STANDAARD ingesteld worden.
De adresschakelaars van de dome moeten op BAX DC PANEL ingesteld worden.
(Lees de gebruikers/bedieningshandleiding, die bij elke dome wordt geleverd, voor een uitleg over
toegang tot en instelling van de adresschakelaars)
Zet de blauwe adres-draaiknop op F.... Zet de gele adres-draaiknop op E....
Dennard 2040 / 2060 Handleiding Menusysteem Blad 32
Page 76

PRESET-POSITIES OPSLAAN:
Let op: In deze configuratie is de BAXALL-controllersoftware sneller dan de dome-software.
Om via de controller een preset te programmeren, schakelt u de TELEMETRIE- CAMERA- en
WIPE-toetsen in.
Zet de camera in de gewenste positie.
Druk op de functietoets, voer het presetnummer in met behulp van de cijfertoetsen en druk
vervolgens op de presettoets. Nu verschijnt het presetmenu van de dome, zodat u een
presetnummer kunt intypen. Als u geen presetidentificatie wilt toevoegen, verplaatst u de cursor
naar de regel 'Waarde bevestigen' en bevestigt door op de WASH-toets te drukken. U kunt tekst
invoeren door de cursor met de joystick onder elke letter / elk nummer te zetten en vervolgens ter
bevestiging op de WASH-toets te drukken.
Als u klaar bent met het invoeren van tekst, sluit u het menu door de cursor naar de regel 'Waarde
bevestigen' te verplaatsen en ter bevestiging op de WASH-toets te drukken.
Als u de presets hebt opgeslagen, schakelt u de functies 'CAMERA' en 'WIPE' uit om de normale
werking te activeren.
DOME PROGRAMMEREN:
U krijgt toegang tot het menu door de TELEMETRIE-, CAMERA- en WIPE-knoppen in te
schakelen, vervolgens de preset-toets en toets 6 ingedrukt te houden, en dan eerst de toets preset
en daarna toets 6 los te laten. Zo opent u het operator-menu. Dit menu biedt toegang tot het
supervisormenu en het technische menu. Met de WASH-knop kunt u invoeren/bevestigen.
6.3 Dennard dtx1000/dc
Besturing via de coaxiale kabel
De controllertelemetrie levert BBV-protocollen.
De dome-adresschakelaars moeten op DEN PANEL worden ingesteld.
(Lees de gebruikers/bedieningshandleiding, die bij elke dome wordt geleverd, voor een uitleg over
toegang tot en instelling van de adresschakelaars)
Zet de blauwe adres-draaiknop op F.... Zet de gele adres-draaiknop op D....
Dit is de standaardinstelling voor domes, tenzij anders aangegeven. Als de dome voorzien is van
een remote-protocolconverter in de PSU-box, staan de adresschakelaars standaard als volgt
ingesteld: Geel = 1 Blauw = 0
PRESET
-POSITIES OPSLAAN:
Opmerkingen:
1. (Let op: In deze configuratie kan de controllersoftware sneller zijn dan de dome-software.)
2. De Dennard dtx1000 heeft een schermmenu dat alleen beschikbaar is als de monitor is aangesloten op het
toetsenbord. Eenvoudige programmeerhandelingen, zoals een reset-positie invoeren, kunnen worden uitgevoerd
zonder dat het schermmenu zichtbaar is.
Zet de camera in de gewenste positie.
Dennard 2040 / 2060 Handleiding Menusysteem Blad 33
Page 77

Druk op de 'programmeer'-toets (om het menuscherm te openen), druk op toets 1 (om de optie
preset programmeren te selecteren) en druk dan op de cijfertoets die u wilt gebruiken om de preset
te identificeren. Nu verschijnt het presetmenu van de dome, zodat u een presetnummer kunt
intypen. U kunt tekst invoeren door de cursor met de joystick onder elke letter / elk nummer te
zetten, de presettoets ingedrukt te houden en vervolgens ter bevestiging op 1 te drukken.
Als u klaar bent met het invoeren van tekst, sluit u het menu door de cursor naar de regel 'Waarde
bevestigen' te verplaatsen en de presettoets ingedrukt te houden terwijl u ter bevestiging op 1
drukt.
DOME PROGRAMMEREN:
Open het dome-menu:
Houd de 'Shift'-toets ingedrukt en druk op de 'Wash'-toets.
Deze toetscombinatie geeft toegang tot het operatormenu. U kunt nu het supervisormenu en het
technische menu openen. U bevestigt uw keuzes door de 'preset'-toets ingedrukt te houden en op 1
te drukken.
6.4 Building Block Video TX1000/DC
Bediening via de coaxiale kabel
De controllertelemetrie levert BBV-protocollen
De dome-adresschakelaars moeten worden ingesteld op DEN PANEL
(Lees de gebruikers/bedieningshandleiding, die bij elke dome wordt geleverd, voor een uitleg over
toegang tot en instelling van de adresschakelaars)
Zet de blauwe adres-draaiknop op F.... Zet de gele adres-draaiknop op D....
Dit is de standaardinstelling voor domes, tenzij anders aangegeven
Let op: Als de dome voorzien is van een remote-protocolconverter in de PSU-box, staan de adresschakelaars
standaard als volgt ingesteld: Geel = 1 Blauw = 0
PRESET
-POSITIES OPSLAAN:
Opmerkingen:
1. (Let op: In deze configuratie kan de controllersoftware sneller zijn dan de dome-software.)
2. De Dennard dtx1000 heeft een schermmenu dat alleen beschikbaar is als de monitor is aangesloten op het
toetsenbord. Eenvoudige programmeerhandelingen, zoals een preset-positie invoeren, kunnen worden
uitgevoerd zonder dat het schermmenu zichtbaar is.
Zet de camera in de gewenste positie.
Druk op de 'programmeer'-toets (om het menuscherm te openen), druk op toets 1 (om de optie
preset programmeren te selecteren) en druk dan op de cijfertoets die u wilt gebruiken om de preset
te identificeren. Nu verschijnt het presetmenu van de dome, zodat u een presetnummer kunt
intypen. U kunt tekst invoeren door de cursor met de joystick onder elke letter / elk nummer te
zetten, de presettoets ingedrukt te houden en vervolgens ter bevestiging op 1 te drukken.
Dennard 2040 / 2060 Handleiding Menusysteem Blad 34
Page 78

Als u klaar bent met het invoeren van tekst, sluit u het menu door de cursor naar de regel 'Invoer
bevestigen' te verplaatsen en de presettoets ingedrukt te houden terwijl u ter bevestiging op 1
drukt.
DOME PROGRAMMEREN:
Open het dome-menu:
Houd de toets # ingedrukt en druk op de 'Wash'-toets.
Deze toetscombinatie geeft toegang tot het operatormenu. U kunt nu het supervisormenu en het
technische menu openen. U bevestigt uw keuzes door de 'preset'-toets ingedrukt te houden en op 1
te drukken.
6.5 Dennard dtx400/dc
Bediening via de coaxiale kabel
De controllertelemetrie levert BBV-protocollen
Stel de adresschakelaars van de dome in op DEN PANEL
(Lees de gebruikers/bedieningshandleiding, die bij elke dome wordt geleverd, voor een uitleg over
toegang tot en instelling van de adresschakelaars)
Zet de blauwe adres-draaiknop op F.... Zet de gele adres-draaiknop op D....
Dit is de standaardinstelling voor domes, tenzij anders aangegeven.
Let op: Als de dome voorzien is van een remote-protocolconverter in de PSU-box, staan de adresschakelaars
standaard als volgt ingesteld: Geel = 1 Blauw = 0
PRESET
-POSITIES OPSLAAN:
In deze configuratie kan de Dennard-controllesoftware sneller werken dan de dome-software.
Zet de camera in de gewenste positie.
Om de preset te identificeren, houdt u de 'Set'-toets ingedrukt en toetst het gewenste nummer in.
(Let op: U kunt met deze controller slechts acht preset-posities instellen.) Nu verschijnt het
presetmenu van de dome, zodat u een presetnummer kunt intypen. Als u geen preset-identificatie
wilt toevoegen, verplaatst u de cursor naar de regel 'Waarde bevestigen' en bevestigt door op 1 te
drukken. U kunt tekst invoeren door de cursor onder elke letter / elk nummer te plaatsen met
behulp van de joystick, en vervolgens ter bevestiging op 1 te drukken.
Als u klaar bent met het invoeren van tekst, sluit u het menu door de cursor naar de regel 'Waarde
bevestigen' te verplaatsen en ter bevestiging op 1 te drukken.
DOME PROGRAMMEREN:
Open het dome-menu:
Houd de 'Shift'-toets ingedrukt en druk op 1.
Deze toetscombinatie geeft toegang tot het operatormenu. U kunt nu het supervisormenu en het
technische menu openen. Met de toets 1 kunt u invoeren/bevestigen.
Dennard 2040 / 2060 Handleiding Menusysteem Blad 35
Page 79

6.6 Building Block Video TX400DC
Bediening via de coaxiale kabel
De controllertelemetrie levert BBV-protocollen
Stel de adresschakelaars van de dome in op DEN PANEL
(Lees de gebruikers/bedieningshandleiding, die bij elke dome wordt geleverd, voor een uitleg over
toegang tot en instelling van de adresschakelaars)
Zet de blauwe adres-draaiknop op F.... Zet de gele adres-draaiknop op D....
Dit is de standaardinstelling voor domes, tenzij anders aangegeven.
Let op: Als de dome voorzien is van een remote-protocolconverter in de PSU-box, staan de adresschakelaars
standaard als volgt ingesteld: Geel = 1 Blauw = 0
PRESET
-POSITIES OPSLAAN:
In deze configuratie kan de Dennard-controllesoftware sneller werken dan de dome-software.
Zet de camera in de gewenste positie.
Om de preset te identificeren, houdt u de 'Program'-toets ingedrukt en toetst het gewenste nummer
in. (Let op: U kunt met deze controller slechts acht preset-posities instellen.) Nu verschijnt het
presetmenu van de dome, zodat u een presetnummer kunt intypen. Als u geen preset-identificatie
wilt toevoegen, verplaatst u de cursor naar de regel 'Waarde bevestigen' en bevestigt door op 1 te
drukken. U kunt tekst invoeren door de cursor onder elke letter / elk nummer te plaatsen met
behulp van de joystick, en vervolgens ter bevestiging op 1 te drukken.
Als u klaar bent met het invoeren van tekst, sluit u het menu door de cursor naar de regel 'Waarde
bevestigen' te verplaatsen en ter bevestiging op 1 te drukken.
DOME PROGRAMMEREN:
Open het dome-menu:
Houd de toets # ingedrukt en druk op 1.
Deze toetscombinatie geeft toegang tot het operatormenu. U kunt nu het supervisormenu en het
technische menu openen. Met de toets 1 kunt u invoeren/bevestigen
Dennard 2040 / 2060 Handleiding Menusysteem Blad 36
Page 80

7. PROBLEMEN OPLOSSEN
Dennard 2040 / 2060 Handleiding Menusysteem Blad 37
PROBLEEM ACTIE
Geen beeld
Controleer de zekering van de voedingseenheid
Controleer de in- en uitgangsspanning
Controleer alle coax-aansluitingen
Controleer de meeraderige kabel van de dome op breuk:-
Pin 1 =Beeld
Pin 2 =Beeldscherm
Pin 3 =Gegevens + (Geel)
Pin 4 = Gegevens (Groen)
Pin 5 =24 volt nul (blauw)
Pin 6 =24 volt fase (rood)
Pin = Aarde (afvoerdraad)
Wel beeld, bediening niet
mogelijk
Controleer of de groene en gele draden van de dome correct zijn aangesloten
(groen op C1, geel op C2) bij bediening via een drx100 protocolconverter.
Controleer met een videoniveaumeter of de syncpuls 0,3 V is. Zie de
gebruikers/bedieningshandleiding voor de instellingen.
Bij bediening via RS-485 dienen de verbindingen als volgt te zijn:Groene draad gegevens - Gele draad gegevens +
Bij bediening via een dome coaxiale kabel (met ingebouwde
protocolconverters) gebeurt de bediening via deze kabel, maar de
adresschakelaars dienen te worden ingesteld voor het controllerprotocol. Zie de
handleiding voor instellingen.
Wel beeld, haperende
bediening
Dit probleem wordt vaak veroorzaakt door een te sterk of te zwak videosignaal.
Als u de dome met coaxiale kabel met ingebouwde protocolconverters gebruikt,
hebt u toegang tot videoversterking via het menusysteem. Zie deze handleiding
en pas het bereik aan op de gewenste sterkte.
Als u een Dennard 2060drx als Dennard 2040drx gebruikt, vindt u het
videobereik op de drx-kaart, achter de BNC-connectors in de behuizing van de
voeding.
Knipperend rechthoekje in
rechterbovenhoek monitor
De dome software heeft een fout gedetecteerd. Schakel het foutdisplay in
voordat u Technical belt. Zo zal uw probleem makkelijker te verhelpen zijn. Zie
sectie 4.4.2 voor details.
Het alfabetmenu verschijnt
als de joystick wordt
aangeraakt bij besturing met
Baxall-controller
Mogelijk is de Baxall controller ingesteld op de ALTERNATE-modus; die wordt
niet ondersteund door de dome. U lost het probleem op door de dome in
STANDARD-modus te zetten, met Rx op DC.
De dome draait
onafgebroken bij gebruik
van Dennard & BBVcontrollers.
Dit kan worden veroorzaakt doordat de joystick geen 'dode zone' heeft, mogelijk
omdat de joystick niet in het midden stond bij het opstarten. Schakel de
controller uit en weer in; let daarbij op dat de joystick in het midden kan gaan
staan.
(alleen 2060)
Page 81

Opmerkingen
Page 82

MANUEL D’UTILISATION ET DE PARAMETRAGE
Page 83

Page 84

Contents
1. CAMERA DOME DENNARD 2060 3
2. CAMERA DOME DENNARD 2040 5
3. FONCTIONS PROGRAMMABLES 7
3.1 Prépositionnements 7
3.2 Descriptifs de prépositionnement 7
3.3 Rondes 7
3.4 Horloge temps réel 7
3.5 Réponse à une condition d'alarme 8
3.6 Retournement (Bottom Flip) 8
3.7 Mode caméra 8
3.8 Grossissement numérique 8
3.9 Curseur de sélection de la caméra dôme 8
3.10 Positionnement et sélection du texte 8
3.11 Plage de fonctionnement du Joystick 8
3.12 Scrutation (Host polling) 9
3.13 Transmission d'erreur 9
3.14 Voyant d'activité 9
3.15 Temporisation utilisateur 9
3.16 Réglage de l'amplification vidéo 9
3.17 Mode "Vie privée" (Privacy) 10
4. FONCTIONNEMENT AVEC UN DISPOSITIF DE COMMANDE 11
4.1 Arborescence des menus de la caméra dôme avec des contrôleurs Dennard 11
4.2 Menu Principal 12
4.2.1 Go to Preset (Sélection prépositionnement) ou Start Tour (Démarrer Ronde) 12
4.2.2 Saisie d'un code PIN (Identification) 13
4.3 Menu "Supervisor" (Superviseur) 17
4.3.1 Store/Edit Preset (Sauvegarder/Editer prépositionnement) 17
4.3.2 Store/Edit Tour (Sauvegarder /Editer Ronde) 18
Manuel d'utilisation et de paramétrage - caméra dôme Dennard 2040 / 2060 Page . 1
Page 85

4.3.3 Alarm Setup (Paramétrage d'alarme) 19
4.3.4 Supervisor Options (Options Superviseur) 21
4.3.5 Entrer un nouveau code PIN 24
4.3.6 Paramétrage des zones "Vie privée" 25
4.4 Technician Menu (Menu Technicien) 25
4.4.1 Camera set up (Paramétrage caméra) 26
4.4.2 Enable/Disable options (Options validation/invalidation) 26
4.4.3 Joystick control (Commande Joystick) 27
4.4.4 Miscellaneous Services (Fonctionnalités diverses) 28
4.4.5 Enter New PIN (Changer code PIN) 29
5. DIAGRAMME D'ARBORESCENCE DES MENUS 30
6. AUTRES CONTROLEURS COMPATIBLES 34
6.1 Digital Sprite 2 Dedicated Micros 34
6.1.1 Commande via le câble coaxial 34
6.1.2 Commande RS-485 35
6.2 Contrôleurs Baxall / Vista 35
6.3 Dennard dtx1000/dc 36
6.4 TX1000/DC Building Block Video 37
6.5 Dennard dtx400/dc 38
6.6 TX400DC Building Block Video 39
7. RECHERCHE DE DEFAUTS 41
Manuel d'utilisation et de paramétrage - caméra dôme Dennard 2040 / 2060 Page . 2
Page 86

1. CAMERA DOME DENNARD 2060
Cette caméra dôme est un équipement de précision. Elle dispose d'une large plage de vitesses
variables, ainsi que d'un grand nombre d'emplacements mémoire pour les prépositionnements, les
rondes et les réponses en cas d'alarme. Le module caméra permet d'effectuer des prises de vues
en couleur ou en N & B (couleur uniquement sur les équipements intérieurs) et est équipé d'un
objectif zoom 18:1 ou 26:1 avec grossissement numérique x 4.
Cette caméra possède d'origine toute sorte de fonctions, qui peuvent être personnalisées selon des
préférences spécifiques. L'accès aux dites fonctions s'effectue via un jeu de menus généré de
manière interne et incrusté dans le signal vidéo si le contrôleur ne présente pas la disposition
adéquate. Chaque caméra dôme est livrée avec une alimentation étanche séparée.
Specificaties:
Manuel d'utilisation et de paramétrage - caméra dôme Dennard 2040 / 2060 Page . 3
Plage de vitesse 0,05 à 300 º / seconde max. (Pan et Tilt)
Fidélité des mouvements 5 minutes d'arc
Commande
RS-485 half duplex ou simplex / 9600 Bauds OU via le câble coaxial
(Up the coax) grâce au convertisseur de protocole intégré "DEN
PANEL" ou "BAX PANEL" pour les formats Dennard, BBV & DM ou
Baxall.
Capacité de stockage
200 prépositions, avec descriptif d'identification de 20 caractères max.
100 rondes composées d'un maximum de 16 prépositions
100 mémoires de réponse en cas d'alarme
Alimentation
24 Vca / Caméra & électronique de commande : 10 VA
Chauffage et ventilation : 10 VA
Dimensions
Caméra dôme : Ø hémisphérique 150 mm x 230 mm hors tout
Alimentation : 165 (L) x 135 (l) x 95 (h) mm
Degré de protection BS EN 60529 / IP66 (aucune pénétration d'eau)
Poids
Caméra dôme : 1,7 kg + support de fixation
Alimentation : 1,3 kg
Configurations de montage
Au plafond, suspendu, mural, en angle, anti-neige et sur plaque de
faux plafond
Page 87

18x zoom cameramodule
26x zoom cameramodule
Manuel d'utilisation et de paramétrage - caméra dôme Dennard 2040 / 2060 Page . 4
Plage optique
Zoom 4,1 à 73,8 mm zoom / F1.4 à F3
Autofocus avec débrayage manuel
Zones "vie privée" 24 zones programmables (8 sur écran, à tout moment)
Eclairement minimum 0.7 Lux (couleur)
Résolution
768 (H) x 494 (V) pixels
Plus de 470 lignes TV
Sortie vidéo Composite / 1 V crête à crête / Synchro négative
Plage optique
Zoom 3,5 à 91,0 mm zoom / F1.6 à F3.8
Autofocus avec débrayage manuel
Zones "vie privée" 24 zones programmables (8 sur écran, à tout moment)
Eclairement minimum 1.0 Lux (couleur)
Résolution
768 (H) x 494 (V) pixels
Plus de 470 lignes TV
Sortie vidéo Composite / 1 V crête à crête / Synchro négative
Page 88

2. CAMERA DOME DENNARD 2040
Cette caméra dôme est un équipement de précision. Elle dispose d'une large plage de vitesses
variables, ainsi que d'un grand nombre d'emplacements mémoire pour les prépositionnements, les
rondes et les réponses en cas d'alarme. Le module caméra est équipé d'un objectif zoom 18:1.
La caméra dôme Dennard 2040 possède d'origine toutes sortes de fonctions, qui peuvent être
personnalisées selon des préférences spécifiques. L'accès aux dites fonctions s'effectue via un jeu
de menus généré de manière interne et incrusté dans le signal vidéo si le contrôleur ne présente
pas la disposition adéquate.
Specificaties:
Manuel d'utilisation et de paramétrage - caméra dôme Dennard 2040 / 2060 Page . 5
Plage de vitesse 0,05 à 300 º / seconde max. (Pan et Tilt)
Fidélité des mouvements 5 minutes d'arc
Commande
RS 485 half duplex ou simplex / 9600 Bauds OU via le câble coaxial
('Up the coax') grâce au convertisseur de protocole intégré "DEN
PANEL" ou "BAX PANEL" pour les formats Dennard, BBV & DM ou
Baxall
Capacité de stockage
100 prépositions avec descriptif d'identification de 20 caractères
maximum 50 rondes composées au maximum de 16 prépositions 50
mémoires de réponse en cas d'alarme
Alimentation 24 Vca / Caméra & électronique de commande : 10 VA
Dimensions
Bulle 150 mm avec anneau plafond 220 mm
Hauteur 110 mm derrière la dalle plafond
Poids 1,5 kg
Configurations de montage Sur plaque de faux plafond
Page 89

Module caméra avec zoom x18
Manuel d'utilisation et de paramétrage - caméra dôme Dennard 2040 / 2060 Page . 6
Plage optique
Zoom 4,1 à 73,8 mm / F1.4 à F3
Autofocus avec débrayage manuel
Zones "vie privée"
24 zones programmables (8 zones affichables simultanément à tout
instant)
Eclairement minimum 3 Lux (couleur)
Résolution
768 (H) x 494 (V) pixels
Plus de 470 lignes TV
Sortie vidéo Composite / 1 V crête à crête / Synchro négative
Page 90

3. FONCTIONS PROGRAMMABLES
La caméras Dennard 2060/2040 possède de nombreuses fonctions qui peuvent être sélectionnées
par le Superviseur système une fois l'équipement installé. Chaque fonction peut être par la suite
modifiée ou annulée complètement, de manière à obtenir la meilleure réponse fonctionnelle quelle
que soit l'application concernée. Ces fonctions sont appelées ou annulées via une arborescence de
menus présents à l'écran, qui est décrite au chapitre 4. Les paramètres sont ensuite stockés dans
une mémoire non volatile, afin de ne pas être affectés par une coupure d'alimentation. Les
fonctions et leur utilité sont décrites ci-dessous :
3.1 Prépositionnements
Il est possible de stocker jusqu'à 200 positions (Dennard 2060) ou 100 positions (Dennard 2040),
qui peuvent être rappelées à tout moment. Chaque prépositionnement englobe les positions Pan,
Tilt, Zoom et Focus, ainsi que celle du descriptif.
3.2 Descriptifs de prépositionnement
Chaque descriptif peut comporter jusqu'à 20 caractères alphanumériques de manière à identifier
spécifiquement la position concernée. La position par défaut du descriptif est située dans l'angle
supérieur gauche de l'image vidéo, avec justification à gauche. Cependant, cet état peut être
modifié si nécessaire. Les descriptifs de prépositionnements ne s'affichent que pour la position
exacte qu'ils identifient. Tout mouvement tendant à s'écarter de cette position provoque leur
suppression.
3.3 Rondes
IIl est possible de stocker jusqu'à 100 rondes (Dennard 2060) ou 50 rondes (Dennard 2040), qui
peuvent être rappelées à tout moment. Chaque ronde peut contenir jusqu'à 16 positions associées
à un "Temps d'attente" (Dwell Time) pour chacune, plus un "Temps de déplacement" (Travel Time)
nécessaire à la caméra dôme pour rejoindre la position suivante. Lorsque la dernière position de la
ronde est atteinte, ladite ronde revient à la première position.
3.4 Horloge temps réel (Ne s'applique pas au Dennard 2040)
La caméra dôme Dennard 2060 est dotée d'une horloge temps réel qui permet de fournir, si
nécessaire, une information horodatée à l'opérateur et au système d'enregistrement. Un jeu de
formats sélectionnables permet de modifier la présentation d'affichage de l'heure et de la date. De
plus, l'équipement est capable d'utiliser ces informations pour commander les fonctions d'alarme
évoluées, de manière à ce que la réponse à une condition d'alarme puisse être changée selon
l'heure de la journée ou le jour de la semaine.
Manuel d'utilisation et de paramétrage - caméra dôme Dennard 2040 / 2060 Page . 7
Page 91

3.5 Réponse à une condition d'alarme
Il est possible de stocker jusqu'à 100 réponses (Dennard 2060) ou 50 réponses (Dennard 2040)
en situation d'alarme. Chacune de ces réponses crée une réaction spécifique du système à un
numéro d'alarme. Il s'agit là d'une fonction très puissante, permettant à grand nombre de caméras
dômes ou d'autres dispositifs conformes au protocole Dennard, d'appeler une action
préprogrammée à partir d'une simple commande à diffusion générale en boucle.
3.6 Retournement (Bottom Flip)
La caméra dôme exécute automatiquement et très rapidement un mouvement Pan de 180° lorsque
la limite basse de Tilt est atteinte. Il est ainsi possible, avec un simple mouvement de joystick dans
une seule direction, de suivre une personne ou un véhicule se déplaçant directement sous la
caméra.
3.7 Mode caméra
Que ce soit sur le Dennard 2060 ou Dennard 2040, il est possible de sélectionner pour la caméra
le mode couleur ou monochrome. Dans le cas du Dennard 2060, une autre option
couleur/monochrome permet une commutation automatique vers le mode N&B si le niveau
d'éclairement est insuffisant pour obtenir des images couleur de qualité.
3.8 Grossissement numérique
Le système de la caméra permet une extension du grossissement obtenu à partir du zoom optique,
en sélectionnant toute la partie centrale de l'image et en l'agrandissant de façon à ce qu'elle
occupe toute la fenêtre disponible. Cette fonction est sélectionnable.
3.9 Curseur de sélection de la caméra dôme
Les arborescences du menu proprement dites, ainsi que les sélections et choix fournis sont
recherchés et rappelés grâce à un simple curseur ou un caractère clignotant. La direction de
déplacement dépend du dispositif de commande spécifique utilisé. Si nécessaire, la direction du
mouvement peut être inversée séparément sur le plan horizontal et vertical.
3.10 Positionnement et sélection du texte
Selon les besoins, tout texte peut être placé là où on le souhaite, remplacé par un texte par défaut
(ex. : Position 31 ou Secteur 18) ou supprimé.
3.11 Plage de fonctionnement du Joystick
Même si le dispositif de commande est équipé d'une sortie joystick avec une plage de réglage
proportionnel étendue, les caméras dôme possèdent une plage de vitesse telle qu'il est nécessaire
de disposer à la fois d'une large gamme de vitesses rapides et lentes pour pouvoir profiter
pleinement de toutes leurs performances (sous réserve évidemment que le dispositif de commande
en question puisse gérer celles-ci indépendamment).
Manuel d'utilisation et de paramétrage - caméra dôme Dennard 2040 / 2060 Page . 8
Page 92

La plage des vitesses lentes est tout simplement la même que celle des vitesses rapides
puisqu'elles suivent la même loi de corrélation intégrée, mais divisée par une constante. Cette
constante peut être paramétrée de 2 à 128.
3.12 Scrutation (Host polling)
Lorsque la caméra dôme est configurée pour établir des communications via le protocole RS-485,
elle peut être paramétrée pour vérifier sa liaison à intervalles réguliers. Si un flux de données
continu est attendu par le contrôleur, la validation de la fonction "Scrutation" (Host Polling) permet à
la caméra dôme de transmettre un message d'erreur si aucune information n'est reçue pendant 5
secondes. Normalement, ce paramètre est invalidé.
3.13 Transmission d'erreur
La caméra dôme s'auto-surveille en permanence et est capable d'indiquer la survenance d'un
problème en faisant clignoter un carré dans le coin supérieur droit de l'image transmise. La cause
du dysfonctionnement peut ensuite être recherchée lorsque cela devient possible. Comme
alternative, la caméra peut provoquer l'affichage d'un texte d'erreur à la place du carré clignotant.
3.14 Voyant d'activité
Une LED verte fournit une aide au diagnostic lors de la mise sous tension initiale de la caméra
dôme. Elle indique également la réception de signaux de commande. Etant donné qu'elle est visible
de l'extérieur, son fonctionnement peut être validé ou invalidé.
3.15 Temporisation utilisateur
Pour de nombreuses raisons, il est possible que la caméra dôme soit laissée (oubliée) sur une
position peu intéressante et qu'elle délivre des images sans grande utilité. Pour remédier à cette
éventualité, deux paramétrages ont la fonction spécifique d'empêcher qu'une telle condition se
produise. Il s'agit des prépositionnements "Preset 001" et ronde "Tour 001".
Une temporisation peut être réglée entre 1 et 999 secondes et une réponse par défaut à l'expiration
de celle-ci est également définissable. Après une manipulation du joystick ou du clavier pour un
mouvement Pan et Tilt sur le dispositif de commande, si le temps imparti est dépassé l'action par
défaut est exécutée.
Si la temporisation est réglée à "0", aucune action par défaut n'intervient et la caméra attend
indéfiniment la commande utilisateur suivante.
Si le menu de la caméra dôme n'est pas utilisé pendant plus de 3 minutes, le système se met en
attente et la caméra dôme revient à son activité précédente.
3.16 Réglage de l'amplification vidéo
Cette fonction permet d'augmenter le gain vidéo de 4 niveaux par rapport au réglage normal. Ce
paramètre peut être validé ou invalidé et la position "OFF" est celle qui est normalement
programmée par défaut.
Manuel d'utilisation et de paramétrage - caméra dôme Dennard 2040 / 2060 Page . 9
Page 93

3.17 Mode "Vie privée" (Privacy)
Il est parfois nécessaire d'empêcher les opérateurs de visualiser certaines zones. Pour respecter
ces exigences, le mode "Vie privée" (Privacy) permet que des formes noires soient placées sur
l'image, pour masquer les zones concernées.
La taille des formes de masquage correspond à la taille de visualisation sur l'écran quel que soit le
réglage de zoom utilisé. Lorsqu'on effectue un zoom arrière, la taille de la forme se réduit pour ne
couvrir que la zone originale.
Manuel d'utilisation et de paramétrage - caméra dôme Dennard 2040 / 2060 Page . 10
Page 94

4. FONCTIONNEMENT AVEC UN DISPOSITIF DE COMMANDE
NB : les réactions peuvent être différentes selon le dispositif de commande utilisé. Reportezvous au manuel du contrôleur.
Ces caméras dôme sont des équipements multi-protocoles. C'est pourquoi il est possible de la
commander via de nombreux contrôleurs issus de différents constructeurs. Toutes les fonctions
dont le dôme est doté sont programmables à partir de l'une des 3 arborescences de menus. Etant
donné que chaque contrôleur a une configuration de commande spécifique, il est essentiel que
l'utilisateur lise attentivement le manuel du contrôleur concerné pour savoir lequel des boutons
presser pour accéder aux options des menus. Les fonctions des contrôleurs les plus courants sont
données au chapitre 6.
Les instructions suivantes serviront de guide dans l'arborescence des menus (avec les adresses
paramétrées au No. 253… "DEN PANE"L) lors de l'utilisation de le dôme & de son alimentation,
contrôlées via un émetteur de télémétrie Dennard dtx400dc ou Dennard dtx1000dc.
4.1 Arborescence des menus de la caméra dôme avec des contrôleurs
Dennard
Les menus apparaissent à l'écran lorsqu'une activation est lancée à l'aide des commandes
suivantes :
Note : la touche "shift" doit être maintenue enfoncée pendant que la sélection est effectuée.
Dès l'activation, le menu apparaît sur l'écran du moniteur, en incrustation par rapport à l'image
vidéo normale qui est en arrière plan, avec un curseur sur le côté gauche. Le choix s'effectue en
positionnant le curseur sur l'option désirée, puis en pressant le (les) bouton(s) "ACCEPT" qui, pour
les contrôleurs Dennard, est (sont) le(s) suivant(s) :
Sur les Dennard Dtx1000dc : maintenez enfoncé le bouton "Preset" et pressez le bouton
"CAMERA SELECT 1".
Sur les Dennard Dtx 400dc : pressez le bouton "Preset 1".
Manuel d'utilisation et de paramétrage - caméra dôme Dennard 2040 / 2060 Page . 11
Accès par
Dennard dtx1000dc
Accès par
Dennard dtx400dc
Menu Utilisateur "Shift" - Lave glace "Shift" - 1
Menu Superviseur (mot de passe requis)"Shift" - Essuie-glace "Shift" - 2
Menu Technicien (mot de passe requis) "Shift" - Pan auto "Shift" - 3
Page 95

4.2 Menu Principal
Lorsqu'il est sélectionné, l'écran du menu principal affiche les options suivantes, sur l'image vidéo
en arrière plan, avec un curseur sur le côté gauche :
A l'aide du joystick ou des touches fléchées de direction, déplacez le curseur vers le haut ou le bas
de la liste pour sélectionner la fonction requise. Pressez ensuite la (les) touche(s) appropriées pour
valider/sélectionner l'option désirée. Si la commande "Exit" (Quitter) est choisie, le menu est effacé
et aucune autre action n'est exécutée par le dôme.
4.2.1 Go to Preset (Sélection prépositionnement) ou Start Tour (Démarrer Ronde)
Ces options permettent à l'opérateur de rappeler l'ensemble des rondes et prépositionnements
enregistrés, même si le dispositif de commande ne possède pas l'étendue numérique suffisante, ni
la possibilité d'exécuter une telle action.
Note : cet écran permet uniquement d'accéder aux rondes et prépositionnements existants.
Pour paramétrer des nouveaux prépositionnements et rondes, reportez-vous au § 4.3.1 ou
4.3.2
L'écran affiche un message demandant une saisie numérique, ainsi que le sous-menu suivant :
Le curseur peut être déplacé sur la ligne numérique à l'aide du joystick ou des boutons de
commande, jusqu'à ce que le chiffre désiré soit atteint. A tour de rôle, les caractères clignotent à
leur position, puis dès que l'un d'entre eux est sélectionné à l'aide du (des) bouton(s) "ACCEPT", il
vient s'afficher sur la partie "_ _ _" de l'écran.
Il n'est pas nécessaire de saisir des "zéros" de remplissage (par exemple, la valeur "001" est entrée
sous la forme d'un simple "1"). Cependant, la saisie doit être effectuée en respectant les plages
suivantes : "001 à 250" pour les prépositionnements et "001 à 100" pour les rondes (Dennard 2060)
ou "001 à 100" pour les prépositionnements et "001 à 50" pour les rondes (Dennard 2040). Toute
saisie en dehors de ces limites provoque l'affichage clignotant du message "Illegal Entry" (Saisie
incorrecte). Les informations entrées sont alors effacées et la saisie doit être renouvelée.
Manuel d'utilisation et de paramétrage - caméra dôme Dennard 2040 / 2060 Page . 12
Sélection prépositionnement
Démarrer Ronde
Menu Technicien
Menu Superviseur
Quitter
N° préposition. _ _ _(ou N° ronde)
0123456789
Valider saisie
Effacer saisie
Retour
Page 96

Une fois les chiffres sélectionnés, l'option "Accept Entry" permet de valider ce choix. L'écran
s'efface, puis les images provenant du prépositionnement désiré apparaissent.
Pour changer de choix, sélectionnez l'option "Clear Entry" (Effacer saisie) afin de relancer le
processus.
Il est à noter que le numéro de prépositionnement "1" et le numéro de ronde "1" doivent être
attribués aux visualisations les plus courantes ou les plus importantes. Ces valeurs sont
celles vers lesquelles le dôme retourne automatiquement suite à une coupure
d'alimentation, en l'absence de tout opérateur. Pour plus d'informations sur les coupures
d'alimentation, reportez-vous au § 4.4.2.
4.2.2 Saisie d'un code PIN (Identification)
Lorsque le menu Technicien ou Superviseur est appelé, les écrans suivants s'affichent. Le mot de
passe ou le code d'identification "PIN" doit être entré en utilisant la même méthode que celle
employée avec les précédentes saisies.
Le curseur peut être déplacé sur la ligne numérique en utilisant le joystick ou des boutons de
commande, jusqu'à ce que le chiffre désiré soit atteint. A tour de rôle, les caractères clignotent à
leur position, puis dès que l'un d'entre eux est sélectionné à l'aide du(des) bouton(s) "ACCEPT", il
vient s'afficher sur la partie "_ _ _" de l'écran.
Une fois les 4 chiffres sélectionnés, l'option "Accept Entry" permet de valider ce choix. L'affichage
change automatiquement en faveur du menu "Technicien" ou "Superviseur" sélectionné.
Manuel d'utilisation et de paramétrage - caméra dôme Dennard 2040 / 2060 Page . 13
Entrer code PIN____
0123456789
Valider saisie
Effacer saisie
Annuler
Page 97

Manuel d'utilisation et de paramétrage - caméra dôme Dennard 2040 / 2060 Page . 14
Page 98

LES MOTS DE PASSE PAR DÉFAUT (CODE PIN), QUI PEUVENT
ÊTRE MODIFIÉS PAR UN TECHNICIEN OU UN SUPERVISEUR À
PARTIR DE LEURS MENUS RESPECTIFS, SONT INDIQUÉS CI-
DESSOUS.
AFIN D'EMPÊCHER TOUTE MODIFICATION NON AUTORISÉE
DES PARAMÈTRES OU DES PRÉPOSITIONNEMENTS CAMÉRA
ENREGISTRÉS, IL EST VIVEMENT CONSEILLÉ DE CONSERVER
CES CODES EN LIEU SÛR.
SI CELA S'AVÈRE NÉCESSAIRE, DÉCOUPEZ CETTE PAGE DU
MANUEL.
Pour accéder au menu Superviseur, entrez le code PIN "1111".
Pour accéder au menu Technicien, entrez le code PIN "9999".
Manuel d'utilisation et de paramétrage - caméra dôme Dennard 2040 / 2060 Page . 15
Page 99

Manuel d'utilisation et de paramétrage - caméra dôme Dennard 2040 / 2060 Page . 16
Page 100

4.3 Menu Superviseur
Ce menu permet au Superviseur non seulement de copier les fonctions du menu Opérateur, mais
également de programmer les prépositionnements (avec leurs descriptifs d'identification) et les
rondes. De plus, il autorise l'accès au paramétrage du curseur, au positionnement du texte et à sa
sélection.
Les fonctions sont partagées en une série de sous-menus disposés par couche. Lorsqu'on quitte le
menu de la couche inférieure, le menu supérieur réapparaît. Les fonctions qui sont le moins
susceptibles d'être nécessaires sont placées plus profondément dans l'arborescence.
Le Menu "Supervisor" affiche les options suivantes :
4.3.1 Sauvegarder/Editer prépositionnement
Cette première option permet au Superviseur de définir une vue (incluant les paramètres Pan, Tilt
et Zoom) et de l'enregistrer pour un rappel ultérieur. Il est à noter que le stockage d'un
prépositionnement requiert que les images de la caméra désirée soient déjà visibles lorsqu'on
accède à cet écran. Sélectionnez cette option pour faire apparaître le menu disponible à la couche
juste inférieure.
La sélection du numéro de prépositionnement s'effectue de la même manière que pour les écrans
de saisie numérique précédents. Une fois le numéro validé, un nouvel affichage apparaît qui
permet au Superviseur de donner un nom à ce prépositionnement (ex. : "Porte principale" ou
"Entrée") ou d'utiliser un des descriptifs par défaut disponibles via le logiciel du dôme.
Manuel d'utilisation et de paramétrage - caméra dôme Dennard 2040 / 2060 Page . 17
Sauvegarder/Editer Prépositionnement
Sauvegarder/Editer Ronde
Paramétrage alarme
Options Superviseur
Changer code PIN
Paramétrage zones "Vie privée"
Retour
Quitter
N° prépositionnement___
0123456789
Valider saisie
Effacer saisie
Retour sans modification
Supprimer prépositionnement
 Loading...