


Booklet: 105 x 140mm
Sunrise Color Alarm Clock
Radio réveil simulateur d’aube couleur
RL998IM1178_V07_325.indd 1 24/4/18 5:45 pm
RL998
Mode d’emploi • Instruction manual • Manual de instrucciones
Manuale di istruzioni • Manual de instruções
Bedienungsanleitung • Gebruiksaanwijzing
DÉBALLAGE DU PRODUIT
Lors du déballage, vériez que le carton contient tous les éléments suivants :
FRANÇAIS
1 x Radio réveil simulateur d’aube couleur 1 x adaptateur secteur
1 x mode d’emploi 1 x câble micro USB
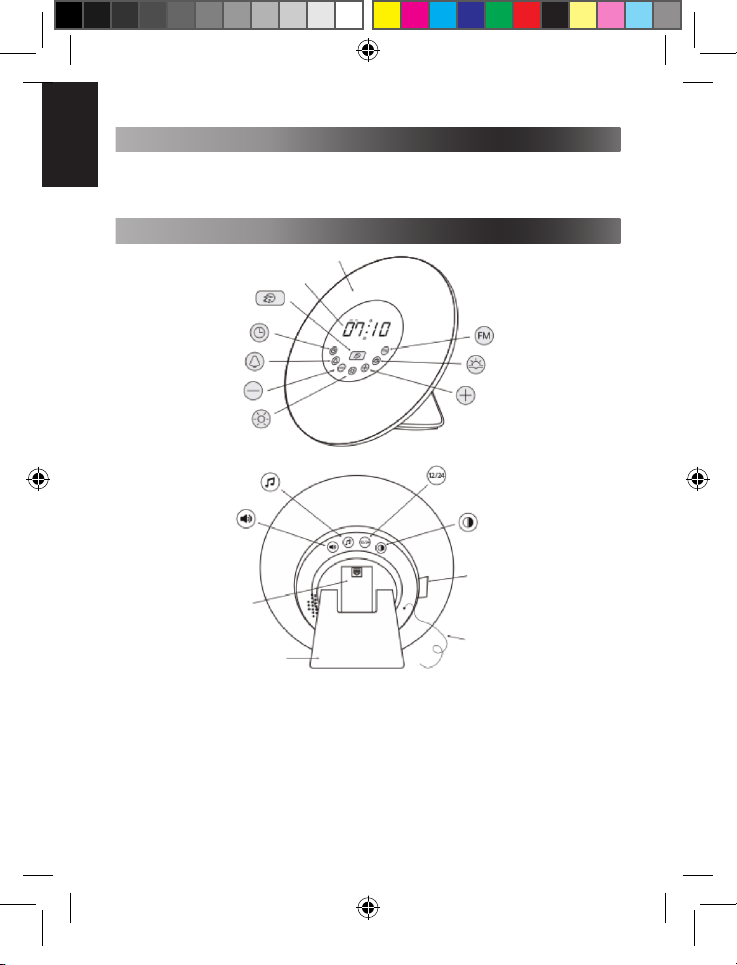
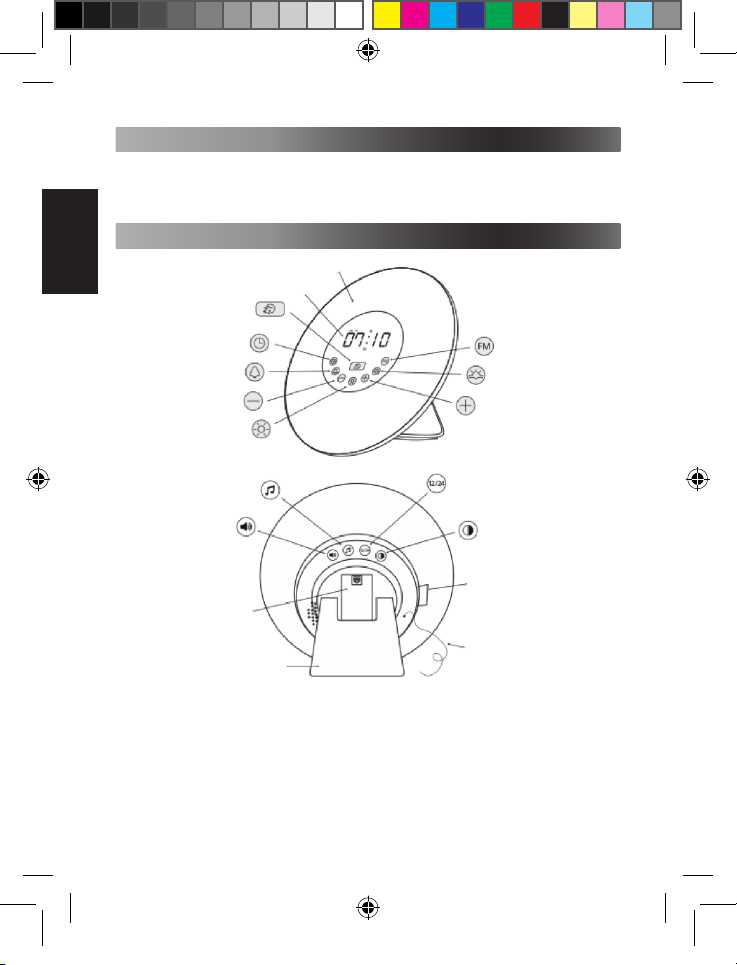
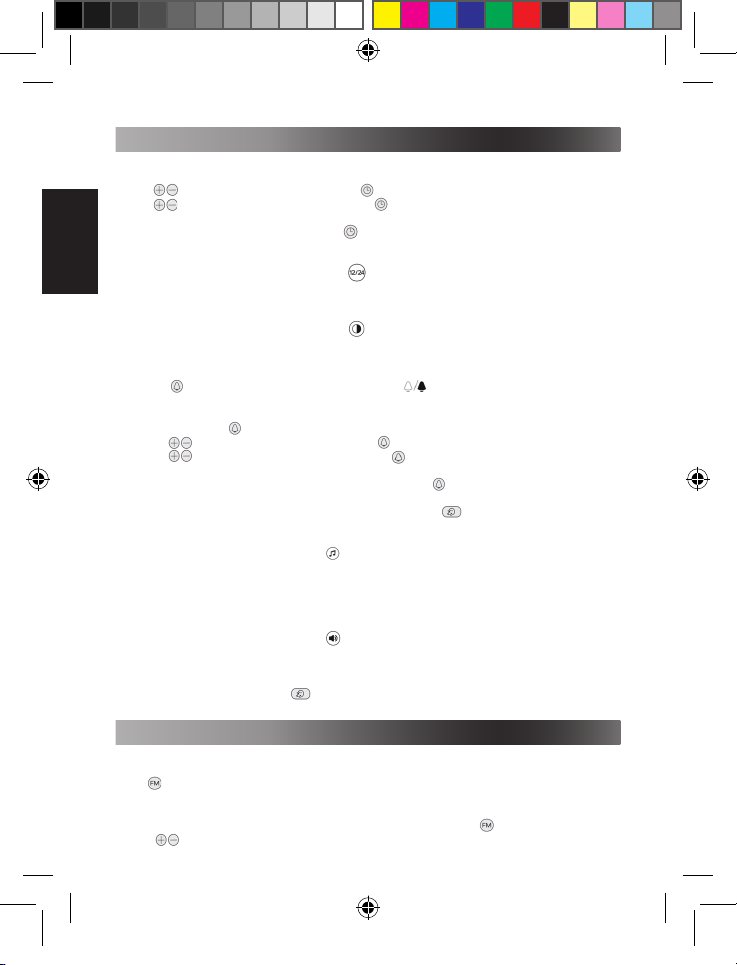
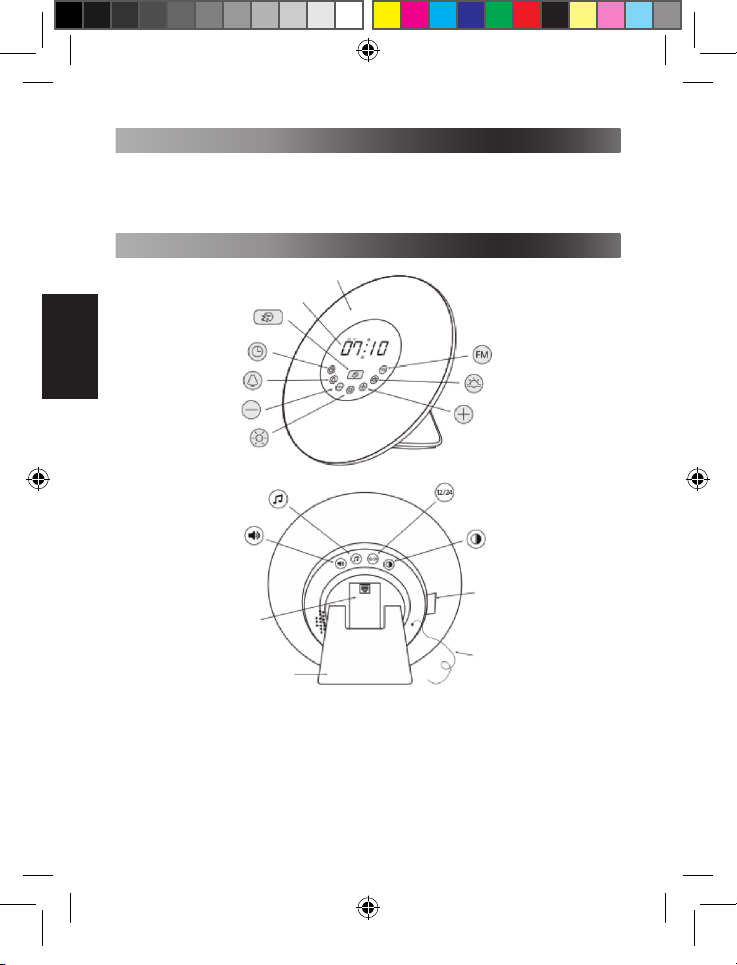
DESCRIPTION DE L’APPAREIL
Panneau lumineux
Répétition d’alarme
Régler / conrmer l’heure
Activer / désactiver l’alarme
- régler l’alarme
Diminuer
Allumer / éteindre la lumière choix de couleur
Écran
Allumer / éteindre la radio
- Scan auto
Activer / désactiver coucher
de soleil - Régler l’heure du
coucher de soleil
Augmenter
RL998IM1178_V07_325.indd 2 24/4/18 5:45 pm
Son de l’alarme
Niveau du volume
Compartiment à piles
Format 12H / 24H
Luminosité de l’écran
Port d’alimentation micro USB
Antenne radio
Pied
2
FRANÇAIS
Votre réveil fonctionne sur une source d’alimentation DC 5V .
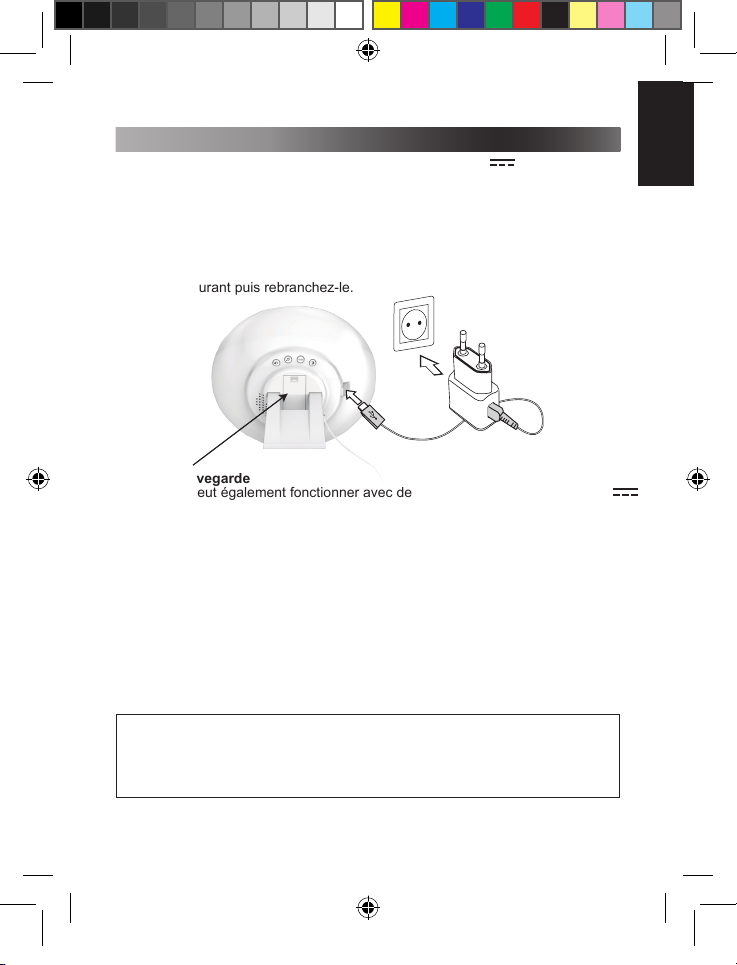
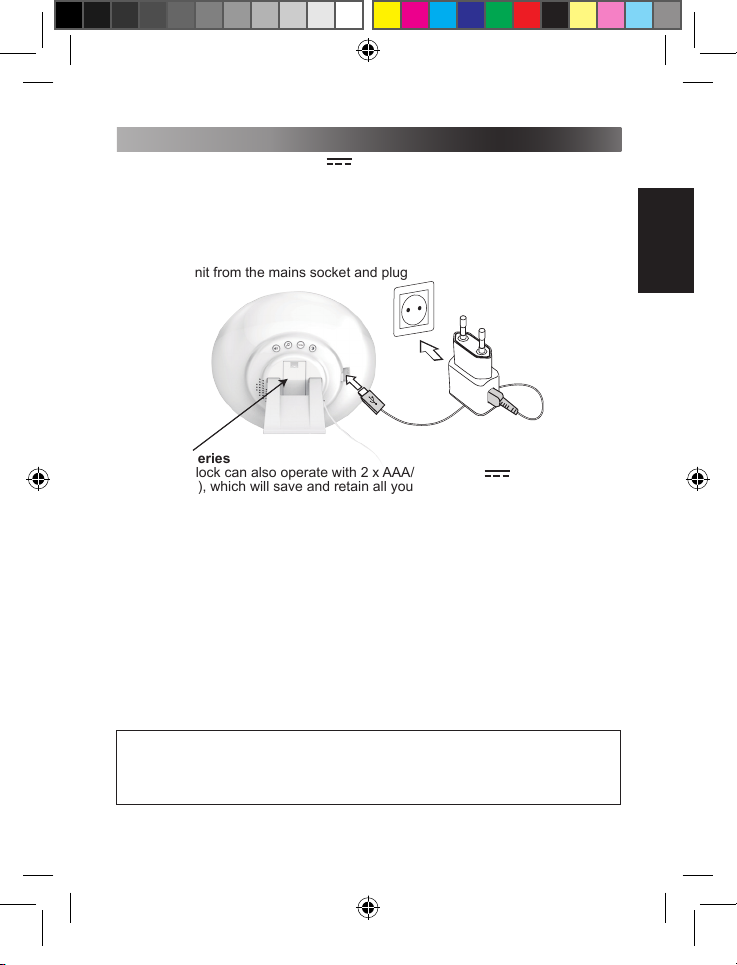
INSTALLATION
1. Insérez une extémité du câble micro USB dans le port micro USB du réveil.
Connectez l’autre extrémité à l’adaptateur secteur DC 5V (inclus).
2. Branchez l’adaptateur secteur à une prise de courant.
ATTENTION : D’importantes interférences électromagnétiques ou des décharges
électrostatiques peuvent provoquer un dysfonctionnement ou une perte de
données. Si l’appareil ne fonctionne pas correctement, débranchez l’appareil de
la prise de courant puis rebranchez-le.
Piles de sauvegarde
Votre réveil peut également fonctionner avec deux piles de type AAA/LR03 1.5V
(non incluses), qui sauvegarderont tous vos paramètres en cas de panne de
courant.
Installation des piles:
1. Ouvrez le compartiment à piles en appuyant et faisant glisser le couvercle vers
le bas.
2. Installez 2 piles de type AAA/LR03 1.5V en respectant les symboles de
polarité situés à l’intérieur du compartiment.
3. Fermez le compartiment en replaçant le couvercle.
Note: Lorsque l’appareil fonctionne sur piles, toutes les fonctions sont disponibles
à l’exception des fonctions lumineuses. Pour économiser de l’énergie, l’afchage
de l’heure s’éteindra au bout de quelques secondes. Appuyez sur n’importe quel
bouton pour l’allumer.
Ne pas recharger les piles non rechargeables. Retirer les accumulateurs de l’appareil avant de les recharger.
Ne charger les accumulateurs que sous la surveillance d’un adulte. Ne pas mélanger différents types de piles
ou accumulateurs, ou des piles et accumulateurs neufs et usagés. Les piles et accumulateurs doivent être mis
en place en respectant la polarité. Les piles et accumulateurs usagés doivent être enlevés du jouet. Les bornes
d’une pile ou d’un accumulateur ne doivent pas être mises en court-circuit. Ne pas jeter les piles au feu. Retirer
les piles en cas de non utilisation prolongée. Ce jeu doit être alimenté avec les piles spéciées seulement. Les
batteries ne doivent jamais être exposées à une source de chaleur excessive, par exemple la lumière du soleil
ou un feu.
ATTENTION : D’importantes interférences électromagnétiques ou des décharges électrostatiques peuvent
provoquer un mauvais fonctionnement ou une perte de données. Si l’appareil ne fonctionne pas correctement,
enlevez puis remettez les piles.
3
RL998IM1178_V07_325.indd 3 24/4/18 5:45 pm
RÉGLAGES HEURE ET ALARME
Réglage de l’heure
FRANÇAIS
Lors du premier réglage et une fois l’appareil branché au courant, les heures se
mettent à clignoter.
Appuyez sur pour régler les heures puis appuyez sur pour conrmer.
Appuyez sur pour régler les minutes puis appuyez sur pour conrmer.
Note: Après 10 secondes d’inactivité, les chiffres s’arrêtent de clignoter. Pour
reprendre le réglage de l’heure, appuyez sur .
Format 12H / 24H
Au dos de l’appareil, appuyez sur pour changer l’heure au format 12H ou 24H.
Au format 12H, la mention AM ou PM apparaîtra à l’écran.
Éclairage de l’écran
Au dos de l’appareil, appuyez sur soit pour sélectionner l’intensité de l’éclairage
de l’écran, soit pour l’éteindre.
Réglage de l’alarme
1. Appuyez sur pour activer ou désactiver l’alarme. Selon votre choix,
s’afche à l’écran. Lorsque l’alarme est activée, l’heure de l’alarme s’afchera
un court instant.
2. Appuyez et maintenez enfoncé pour régler l’heure de l’alarme. Les heures se
mettent clignoter.
3. Appuyez sur pour régler les heures puis appuyez sur pour conmer.
Appuyez sur pour régler les minutes puis appuyez sur pour conmer.
Note: Si les heures s’arrêtent de clignoter appuyez de nouveau sur pour
reprendre le réglage.
4. Lorsque l’alarme se met à sonner, appuyez sur n’importe quel bouton sauf
pour l’arrêter.
Sélection de l’alarme
Au dos de l’appareil, appuyez sur pour sélectionner le son de l’alarme et
appuyez sur + ou – pour changer de son parmi 6 sons de la nature. Vous pouvez
aussi choisir la radio (7). Si le son 7 est sélectionné, l’alarme sera automatiquement
réglée sur la dernière station de radio écoutée.
Volume
Au dos de l’appareil, appuyez sur de façon répétée pour choisir le niveau du
volume de 1 à 15.
Fonction répétition d’alarme
Au son de l’alarme, appuyez sur pour qu’elle se repète 5 minutes plus tard.
L’alarme sonnera toutes les 5 minutes tant que vous continuerez à appuyer sur le
bouton de répétition de l’alarme lorsque qu’elle sonne.
RÉGLAGES RADIO
Avant la première utilisation de la radio, le réveil doit d’abord scanner les stations
4
RL998IM1178_V07_325.indd 4 24/4/18 5:45 pm
de radio disponibles sur la bande de fréquence 87.5-108MHz. Appuyez et
maintenez enfoncé pendant 3 secondes pour amorcer le scan et la recherche
de stations. Une fois les stations détectées, elles seront enregistrées sous P01,
P02, jusqu’à P40.
Une fois la recherche automatique des stations terminée et les stations
enregistrées, appuyez sur pour allumer ou éteindre la radio. Appuyez sur
pour passer d’une station à une autre et sélectionner la station désirée.
FRANÇAIS
Simulateur d’aube
Le simulateur d’aube vous aide à commencer la journée de façon détendue
grâce à la simulation de la lumière du matin. L’intensité de la lumière augmente
graduellement pendant 30 minutes avant l’heure de votre réveil pour vous
réveiller le plus doucement possible.
Un son de la nature ou la radio s’allumera pendant deux minutes à l’heure du
réveil.
Lorsque le simulateur d’aube est en marche, appuyez et maintenez enfoncé
pour l’éteindre.
Simulateur de coucher de soleil
Le simulateur de coucher de soleil vous aide à terminer la journée calmement
grâce à la simulation de la lumière du soir. L’intensité de la lumière diminue
graduellement pendant 30 minutes à mesure que l’heure de votre coucher
approche pour vous aider à vous endormir.
1. Appuyez sur pour activer ou désactiver le simulateur de coucher de soleil.
Selon votre choix, apparaîtra à l’écran.
2. Appuyez et maintenez enfoncé pour régler l’heure du coucher. Lorsque
les heures se mettent à clignoter appuyez sur pour régler les heures et
appuyez sur pour conrmer.
3. Appuyez sur pour régler les minutes et appuyez sur pour conrmer.
4. Lorsque le simulateur de coucher de soleil est en marche, appuyez et
maintenez enfoncé pour l’éteindre.
Lampe de chevet
Votre réveil s’utilise aussi comme lampe de chevet et créé une ambiance
chaleureuse qui s’adapte à vos besoins.
1. Appuyez sur une fois pour allumer la lampe.
2. Appuyez sur pour régler l’intensité de la lumière (1 à 10).
3. Appuyez de nouveau sur pour sélectionner la couleur de la lumière. Puis
appuyez sur pour choisir parmi le vert, rouge, bleu, mauve, orange et
turquoise.
4. Appuyez sur une troisième fois pour éteindre la lampe.
SPÉCIFICATIONS
• Adaptateur secteur : Entrée 100-240V ~ 50/60Hz 0.3A; Sortie 5V 1A
• Puissance : 5W
• Lumen : 80lm
• Bande de fréquences FM : 87.5 - 108MHz
5
FONCTIONS LUMINEUSES
RL998IM1178_V07_325.indd 5 24/4/18 5:45 pm
INSTRUCTIONS RELATIVES A LA SÉCURITÉ
LIRE LES INSTRUCTIONS SUIVANTES AVANT TOUTE UTILISATION DE L’APPAREIL.
FRANÇAIS
Lisez attentivement et suivez ces instructions an d’utiliser au mieux toutes les fonctions qu’offre cet appareil.
Merci de noter qu’il s’agit de précautions générales qui peuvent ne pas s’appliquer à votre unité.
1. Lisez ces instructions.
2. Conservez ces instructions.
3. Suivez toutes les instructions.
4. Prenez en compte les avertissements.
5. N’utilisez pas cet appareil près de l’eau.
6. Nettoyez-le seulement avec un chiffon doux.
7. N’installez pas cet appareil près de sources de chaleur telles que plinthes électriques, cuisinières, ou autres
(même les amplicateurs).
8. Ne tentez pas d’outrepasser la mesure de sécurité de la che polarisée ou de la prise de terre. Une che
polarisée possède deux broches, dont l’une est plus large que l’autre. Une che avec une prise de terre
possède deux broches plates et une troisième broche ronde pour la prise de terre. La broche plus large
et la troisième broche constituent des mesures de sécurité importantes visant à vous protéger. Si vous ne
parvenez pas à insérer complètement la prise dans la prise électrique murale, contactez votre électricien
pour remplacer la prise murale obsolète.
9. Le câble d’alimentation doit être mis en place de sorte qu’on ne marche pas dessus ou qu’il soit écrasé
particulièrement à l’endroit de la prise, à l’endroit où il est branché et à l’endroit d’où il sort de l’appareil.
10. Utilisez uniquement les pièces détachées/accessoires spéciés par le fabricant.
11. Débranchez cet appareil durant les orages ou lorsqu’il n’est pas utilisé durant une longue période.
12. Référez-vous à un personnel qualié pour toute réparation. Une réparation sera nécessaire si l’appareil était
endommagé d’une manière ou d’une autre, si le câble d’alimentation ou la prise était endommagé(e), si un
liquide s’est déversé ou si des objets sont tombés dans l’appareil, si l’appareil a été exposé à la pluie ou à
l’humidité, ou s’il a subi une chute.
13. Cet appareil ne doit pas être exposé à des gouttes d’eau ou à des éclaboussures et aucun objet rempli de
liquide, tel un vase, ne doit être placé sur l’appareil.
14. Ne surchargez pas la prise électrique. Utilisez uniquement la source d’alimentation comme indiqué.
15. Utilisez les pièces de rechange spéciées par le fabricant.
16. Vous ne pouvez installer le produit au mur que si cela est recommandé par le fabricant. Suivez les méthodes
indiquées dans le guide d’utilisation.
17. Les piles ne doivent jamais être exposées à une source de chaleur excessive, par exemple la lumière du
soleil ou un feu.
18. La prise secteur doit être installée près de l’appareil et rester facilement accessible.
19. L’accès à l’adaptateur secteur ne doit pas être gêné OU l’adaptateur secteur doit rester facile d’accès pendant
toute la durée de l’utilisation prévue.
20. Pour débrancher complètement l’appareil de l’alimentation électrique, l’adaptateur secteur doit être sorti de la
prise secteur, car l’adaptateur secteur sert de dispositif de déconnexion.
21. L’appareil et l’adaptateur secteur ne doivent pas être exposés à des gouttes ni à des éclaboussures, et aucun
objet rempli de liquide, par exemple un vase, ne doit être placé près d’eux.
22. Écouter de la musique pendant longtemps à un volume élevé peut détériorer l’acuité auditive de l’utilisateur.
23. Garder une distance minimale autour de l’appareil pour une aération sufsante.
24. Il convient de ne pas obstruer les ouvertures d’aération par des objets tels que journaux, nappes, rideaux, etc.
25. Il convient de ne pas placer sur l’appareil des sources de ammes nues, telles que des bougies allumées.
26. L’appareil est destiné à être utilisé sous un climat tempéré et/ou tropical.
27. Les piles doivent être jetées de façon conforme. Les déposer dans des bacs de collecte prévus an de
protéger l’environnement.
DÉCLARATION UE DE CONFORMITÉ SIMPLIFIÉE
Lexibook® S.A.
6 avenue des Andes, Bâtiment 11.
91940 Les Ulis - France
Désignation : Radio réveil simulateur d’aube couleur
Référence : RL998
Le soussigné, Lexibook Limited, déclare que l’équipement radioélectrique du type RL998 est
conforme à la directive 2014/53/UE.
Le texte complet de la déclaration UE de conformité est disponible à l’adresse internet suivante:
http://www.lexibook.com/doc/rl998/rl998_1.pdf
RL998IM1178_V07_325.indd 6 24/4/18 5:45 pm
6
Yiu Wai Man
Directeur du développement du produit
Hong Kong
ENTRETIEN
Pour éviter tout incendie ou électrocution, débranchez l’appareil de l’alimentation quand vous
le nettoyez. Nettoyez l’appareil en l’essuyant avec un chiffon à poussière comme pour un
meuble. Nettoyez et essuyez les parties en plastique avec précaution.
GARANTIE
Ce produit est couvert par notre garantie de deux (2) ans. Pour toute mise en oeuvre de la
garantie ou du service après-vente, vous devez vous adresser à votre revendeur muni de
votre preuve d’achat. Notre garantie couvre les vices de matériel ou de montage imputables
au constructeur à l’exclusion de toute détérioration provenant du non-respect de la notice
d’utilisation ou de toute intervention intempestive sur l’article (telle que démontage, exposition
à la chaleur ou à l’humidité…).
Note : Veuillez garder ce mode d’emploi, il contient d’importantes informations. Le contenu de
ce mode d’emploi peut changer sans préavis. Aucune partie de ce mode d’emploi ne doit être
reproduite sans le consentement écrit du fabricant.
Reference: RL998
Conçu et développé en Europe – Fabriqué en Chine
© Lexibook®
Lexibook S.A.
6 avenue des Andes, Bâtiment 11
91940 Les Ulis
France
Pour vos demandes concernant un problème SAV ou une réclamation, composez le
01 84 88 58 59 ou écrivez à supporttechnique@support.lexibook.com.
Pour toutes vos autres demandes (conseil d’achat, choix d’un produit, renseignement avantvente sur l’utilisation d’un produit …), composez le 08 92 23 27 26 (0,34€ TTC /minute) ou
écrivez à supporttechnique@support.lexibook.com.
www.decotech-lights.com
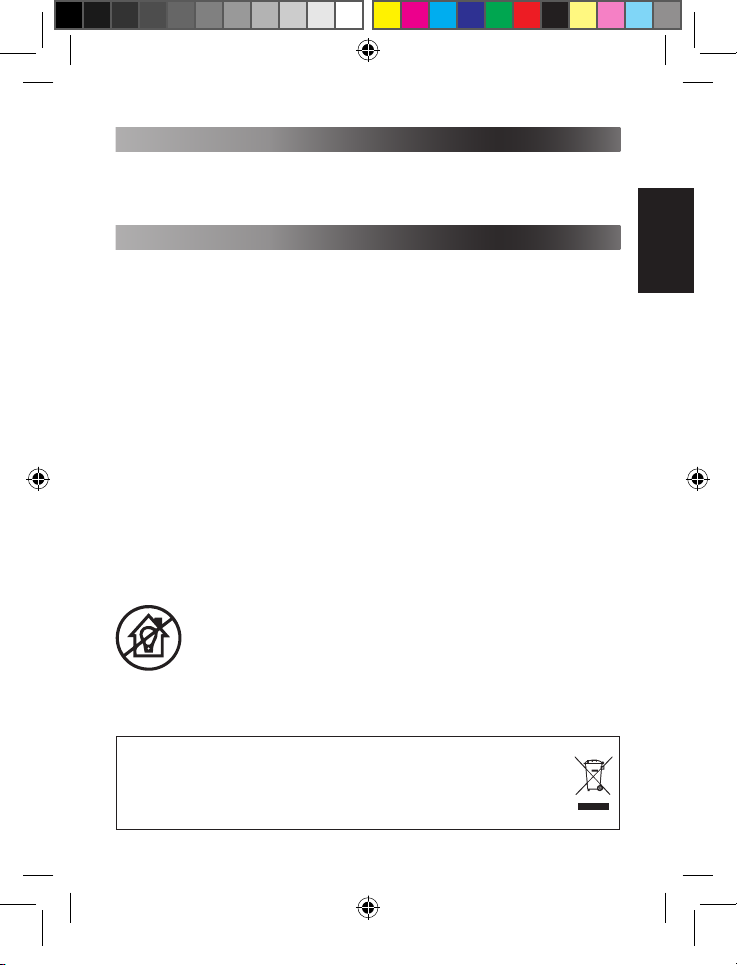
Fonction d’éclairage décoratif uniquement
Cet appareil ne convient pas à l’éclairage
d’une pièce.
Tous les papiers
sont recyclables
FRANÇAIS
RL998IM1178_V07_325.indd 7 24/4/18 5:45 pm
Informations sur la protection de l’environnement
Tout appareil électrique usé est une matière recyclable et ne devrait pas faire partie
des ordures ménagères ! Nous vous demandons de bien vouloir nous soutenir
en contribuant activement au ménagement des ressources et à la protection de
l’environnement en déposant cet appareil dans des sites de collecte (si existants).
7
UNPACKING YOUR DEVICE
When unpacking, ensure that the following elements are included:
1 x Sunrise Colour Alarm Clock 1 x micro USB cable
1 x Power adapter 1 x Instruction manual
PRODUCT DESCRIPTION
ENGLISH
Snooze
Light panel
Screen
Set / conrm time
Activate / deactivate alarm
– set alarm time
Down
Light on / off – select colour
Alarm sound
Volume level
Battery compartment
Stand
Radio on / off – Auto-scan
Activate / deactivate sunset
– set sunset time
Up
12H-24H format
Screen brightness
Micro USB power slot
Radio antenna
8
RL998IM1178_V07_325.indd 8 24/4/18 5:45 pm
ENGLISH
Your alarm clock operates on DC 5V power.
SET UP
1. Insert one end of the micro USB cable into the micro USB port of the alarm
clock. Connect the other end to the DC 5V power adapter (included).
2. Plug the power adapter to a power outlet.
WARNING: Malfunction or loss of memory may be caused by strong frequency
interference or electrostatic discharge. Should any abnormal function occur,
unplug the unit from the mains socket and plug it back in.
Backup batteries
Your alarm clock can also operate with 2 x AAA/LR03 1.5V batteries
(not included), which will save and retain all your settings in the event of a power
outage.
To install the batteries:
1. Open the battery compartment by pressing and sliding down the cover.
2. Install 2 x AAA/LR03 1.5V batteries observing the polarity markings inside the
battery compartment.
3. Close the battery compartment by replacing the cover.
Note: When the device operates on batteries, all functions are available except
lighting features. The time display will also turn off after a few seconds to save
energy. Press any button to switch it on.
ENGLISH
RL998IM1178_V07_325.indd 9 24/4/18 5:45 pm
Non-rechargeable batteries are not to be recharged. Rechargeable batteries are to be removed from the product
before being charged. Rechargeable batteries are only to be charged under adult supervision. Different types
of batteries or new and used batteries are not to be mixed. Only batteries of the same or equivalent type as
recommended are to be used. Batteries are to be inserted with the correct polarity. Exhausted batteries are to
be removed from the product. The supply terminals are not to be short-circuited. Do not throw batteries into a
re. Remove the batteries if you are not going to use the product for a long period of time. Batteries shall not be
exposed to excessive heat such as sunshine, re or the like.
WARNING: Malfunction or loss of memory may be caused by strong frequency interference or electrostatic
discharge. Should any abnormal function occur, remove the batteries and insert them again.
9
Time setting
Once the device is connected to power, the time starts blinking on the screen.
Press to adjust the hours and press to conrm.
Press to adjust the minutes and press to conrm.
Note: After 10 seconds without any operation, the numbers will stop blinking. To
resume the time setting mode, press .
12H / 24H format
ENGLISH
On the back of the alarm clock, press to switch the time to 12H or 24H format.
In 12H format, AM or PM will appear on screen.
Screen brightness
On the back of the alarm clock, press to select your time display brightness or
turn it off.
Alarm setting
1. Press to activate or deactivate the alarm. will be displayed on screen
accordingly. When the alarm is activated, the alarm time will be displayed
shortly.
2. Press and hold to set the alarm time. The hours will start blinking.
3. Press to adjust the hours and press to conrm.
Press to adjust the minutes and press to conrm.
Note: If the hours or minutes stop blinking press again to resume the set up.
4. When the alarm goes off, press any button except to stop the alarm.
Alarm sound selection
On the back of your device, press to select the alarm sound and press + or –
to switch sounds among 6 nature sounds. You can also choose the radio alarm
(7). If sound 7 is selected, the last played radio station will be automatically set as
the alarm sound.
Volume level
On the back of your device, press repeatedly to select the volume level on a
scale of 1 to 15.
Snooze function
Once the alarm rings, press to repeat the alarm after 5 minutes. The alarm
will repeat every time you press the snooze button.
RADIO SET UP
Before using the radio function for the rst time, the alarm clock must scan the
available radio stations on the frequency range 87.5-108MHz. Press and
hold during 3 seconds to start scanning and search for active channels. Once
channels are located, they will be saved as P01, P02, up to P40.
After auto scan has completed and channels saved, press to turn the radio on/off.
TIME AND ALARM SET UP
Press to navigate between the saved stations and select your desired station.
10
RL998IM1178_V07_325.indd 10 24/4/18 5:45 pm
ENGLISH
LIGHT OPTIONS SET UP
Sunrise light simulation
The sunrise light simulation helps you start the day relaxed by simulating the
morning sunlight. It wakes you in a natural way by increasing gradually the light
intensity for around 30 minutes as your chosen wake-up time gets closer.
The nature sound or radio will also be played for 2 minutes at the alarm time.
When the sunrise light simulation is on, press and hold to switch it off.
Sunset light simulation
The sunset light simulation helps you end the day peacefully by simulating the
evening sunlight. It naturally brings you to sleep with a light that decreases
gradually for around 30 minutes as your chosen sleeping time gets closer.
1. Press to activate or deactivate the sunset simulation. will be displayed
on screen accordingly.
2. Press and hold to set the sunset time. When the hours start blinking use
to adjust the hours and press to conrm.
3. Use to adjust the minutes and press to conrm.
4. When the sunset light simulation is on, press and hold to switch it off.
Bedside light
Your alarm clock can operate as a cozy bedside lamp with adjustable colour and
intensity.
1. Press once to switch on the light.
2. Use to adjust the brightness level (1 to 10).
3. Press again to select the light colour. Then press to choose among
green, red, blue, purple, orange and indigo.
4. Press a third time to switch off the light.
ENGLISH
SPECIFICATIONS
• AC/DC Adaptor Input 100-240V ~ 50/60Hz 0.3A; Output 5V 1A
• Wattage: 5W
• Lumen: 80lm
• FM Frequency band: 87.5 - 108MHz
SAFETY INSTRUCTIONS
PLEASE READ BEFORE OPERATING THIS EQUIPMENT.
Before using the unit, be sure to read all operating instructions carefully. Please note that these are general
precautions and may not pertain to your unit.
1. Read these instructions.
2. Keep these instructions.
3. Heed all warnings.
4. Follow all instructions.
5. Do not use this product near water and moisture, for example: near a bathtub, washbowl, kitchen sink or
laundry tub; in a wet basement; or near a swimming pool. No objects such as vases should be placed on
the unit.
6. Unplug this product from the wall outlet before cleaning. Do not use liquid cleaners or aerosol cleaners. It may
damage the screen. Use a dry cloth for cleaning only.
7. Do not install near any heat sources such as radiators, heat registers, stoves, or other apparatus (including
ampliers) that produce heat.
8. Do not defeat the safety purpose of the polarized or grounding type plug. A polarized plug has two blades
with one wider than the other. A grounding type plug has two blades and a third grounding prong. The wide
blade or the third prong is provided for your safety. If the provided plug does not t into your outlet, consult an
electrician for replacement of the obsolete outlet.
11
RL998IM1178_V07_325.indd 11 24/4/18 5:45 pm
9. Protect the power cord from being walked on or pinched particularly at plugs, convenience receptacles, and
the point where they exit from the apparatus.
10. Only use attachments/accessories specied by the manufacturer.
11. Unplug this apparatus during lightning storms or when unused for long periods of time.
12. Refer all servicing to qualied service personnel. Servicing is required when the apparatus has been damaged
in any way, such as power-supply cord or plug is damaged, liquid has been spilled or objects have fallen into
the apparatus; and/or the apparatus has been exposed to rain or moisture and does not operate normally, or
has been dropped.
13. This product should be operated only from the type of power source indicated on the marking label. If you are
not sure of the type of power supply to your home, consult your appliance dealer or local power company. For
products intended to operate from battery power, or other sources, refer to the operating instructions.
14. Do not overload wall outlets and extension cords as this can result in a risk of re or electric shock. Use only
power source as indicated.
15. Never push objects of any kind into this product through openings as they may touch dangerous voltage
points or short out parts that could result in re or electric shock. Never spill or spray any type of liquid on the
product.
ENGLISH
16. Do not attempt to service this product yourself as opening or removing covers may expose you to dangerous
voltage or other hazards. Refer all servicing to qualied service personnel.
17. Upon completion of any service or repairs to this product, ask the service technician to perform safety checks
to determine that the product is in proper operating condition.
18. Batteries shall not be exposed to excessive heat such as sunshine, re or the like.
19. The socket-outlet shall be installed near the equipment and must be easily accessible.
20. The AC/DC adaptor should not be obstructed OR should be easily accessed during intended use.
21. To completely disconnect the power input, the AC/DC adaptor shall be disconnected from the mains, as the
disconnecting part is the AC/DC adaptor.
22. The apparatus and AC/DC adaptor shall not be exposed to dripping or splashing and no objects lled with
liquids , such as vases, shall be placed near them.
23. At full power, listening to a music player for prolonged periods can damage the user’s hearing.
24. Keep a minimum distance around the device for sufcient ventilation;
25. The ventilation should not be impeded by covering the ventilation openings with items, such as newspapers,
table-cloths, curtains, etc.;
26. No naked ame sources, such as lighted candles, should be placed on the apparatus;
27. The use of apparatus in tropical and/or moderate climates.
28. Attention should be drawn to the environment aspects of battery disposal.
SIMPLIFIED EU DECLARATION OF CONFORMITY
Lexibook® S.A.
6 avenue des Andes, Bâtiment 11
91940 Les Ulis - France
Kind of product: Sunrise Color Alarm Clock
Type designation: RL998
Hereby, Lexibook Limited declares that the radio equipment type RL998 is in compliance with
Directive 2014/53/EU.
The full text of the EU declaration of conformity is available at the following internet address:
http://www.lexibook.com/doc/rl998/rl998_1.pdf
Yiu Wai Man
Product Development Manager
Hong Kong
RL998IM1178_V07_325.indd 12 24/4/18 5:45 pm
12
ENGLISH
To prevent re or shock hazard, disconnect your unit from the power source when cleaning.
MAINTENANCE
The nish on your unit may be cleaned with a dust cloth and cared for as other furniture. Use
a soft, clean cloth moistened with plain, lukewarm water to clean the exterior of the unit. Use
caution when cleaning and wiping the plastic parts.
WARRANTY
This product is covered by our 2-year warranty.
For any claim under the warranty or after sale service, please contact your distributor and
present a valid proof of purchase. Our warranty covers any manufacturing material and
workmanship defect, with the exception of any deterioration arising from the non-observance
of the instruction manual or from any careless action implemented on this item (such as
dismantling, exposition to heat and humidity, etc.). It is recommended to keep the packaging
for any further reference.
NOTE: In a bid to keep improving our services, we could implement modication on the
colours and the details of the product shown on the packaging.
Reference: RL998
Designed and developed in Europe – Made in China
© Lexibook®
Lexibook S.A.
6 avenue des Andes, Bâtiment 11
91940 Les Ulis
France
United Kingdom & Ireland
For after-sales service, please contact us at customerservice@support.lexibook.com or
+33 1 84 88 58 59.
www.decotech-lights.com
Decorative Lighting purpose only
Unit not suitable for household room illumination
ENGLISH
RL998IM1178_V07_325.indd 13 24/4/18 5:45 pm
Environmental Protection
Unwanted electrical appliances can be recycled and should not be discarded
along with regular household waste! Please actively support the conservation
of resources and help protect the environment by returning this appliance to a
collection centre (if available).
13
Cuando desembale el equipo, asegúrese de que están incluidos los siguientes
elementos:
1 x Reloj Simulador de Amanecer de Colores 1 x Adaptador de corriente
1 x Cable micro USB 1 x Manual de instrucciones
DESCRIPCIÓN DEL PRODUCTO
Panel de luz
DESEMBALAJE DEL PRODUCTO
Repetición de alarma
Pantalla
Congurar / conrmar hora
Activar / desactivar alarma
ESPAÑOL
- congurar hora de alarma
Encender / apagar luz seleccionar color
Nivel de volumen
Compartimento de las pilas
Disminuir
Sonido de alarma
Soporte
Radio encendida / apagada
- Escaneo automático
Activar / desactivar puesta
de sol - congurar hora de
puesta de sol
Aumentar
Formato 12H-24H
Luminosidad de pantalla
Puerto de alimentación
micro USB
Antena de radio
14
RL998IM1178_V07_325.indd 14 24/4/18 5:45 pm

INSTALACIÓN
Su reloj despertador funciona con alimentación CC 5V.
1. Inserte un extremo del cable micro USB en el puerto micro USB del reloj
despertador. Conecte el otro extremo al adaptador de corriente CC 5V (incluido).
2. Enchufe el adaptador de corriente a una toma de corriente.
¡ADVERTENCIA! Las descargas electrostáticas o interferencias de una frecuencia
fuerte podrán causar el funcionamiento anormal del aparato o la pérdida de los
datos almacenados en la memoria. En caso de observarse algún funcionamiento
anormal, desenchufe el cable de alimentación eléctrica de la toma de corriente y
vuelva a enchufarlo.
Pilas de respaldo
Su reloj despertador también puede funcionar con 2 pilas AAA/LR03 1,5V
(no incluidas) que guardarán y retendrán todas sus conguraciones en caso de
producirse un corte de energía eléctrica.
Para instalar las pilas:
1. Abra el compartimiento de las pilas presionando y deslizando su tapa.
2. Coloque 2 pilas de tipo AAA/LR03 1,5V con las polaridades en la dirección
indicada dentro del compartimiento de las pilas.
3. Cierre el compartimiento de las pilas volviendo a colocar la tapa.
Nota: Cuando el reloj funciona a pilas, están disponibles todas las funciones
menos las opciones de luz. La pantalla también se apagará al cabo de unos
segundos para ahorrar energía. Presione cualquier botón para volver a iluminar
la pantalla.
No se deben intentar cargar aquellas pilas que no sean recargables. Las pilas recargables deberán retirarse
del producto antes de cargarlas. Las pilas recargables deberán recargarse únicamente bajo la supervisión de
un adulto. No deberán mezclarse diferentes tipos de pilas ni tampoco pilas nuevas con otras usadas. Utilice
únicamente pilas del mismo tipo o equivalentes a las recomendadas. Inserte las pilas observando la polaridad
correcta. Deberán retirarse del producto las pilas agotadas. No cortocircuite los terminales de alimentación. No
arroje las pilas al fuego. Retire las pilas del producto si no va a utilizarlo durante periodos prolongados. Deberá
evitarse exponer las pilas a temperaturas excesivamente elevadas tales como las generadas por la acción de
los rayos del sol o de las llamas.
¡ADVERTENCIA! Las descargas electrostáticas o interferencias de una frecuencia sucientemente fuerte podrán
provocar el funcionamiento anormal del aparato o la pérdida de los datos almacenados en su memoria. En caso
de observarse algún funcionamiento anormal, o bien retire y vuelva a instalar las pilas.
15
ESPAÑOL
RL998IM1178_V07_325.indd 15 24/4/18 5:45 pm

CONFIGURACIÓN DE LA HORA Y ALARMA
Conguración de la hora
Al congurar el reloj por primera vez, después de conectarlo a la toma de
alimentación, la hora empieza a parpadear en pantalla.
Presione para ajustar las horas y presione para conrmar.
Presione para ajustar los minutos y presione para conrmar.
Nota: Si no se realiza ninguna operación, las horas dejarán de parpadear al
cabo de 10 segundos. Para activar el modo de cambio de hora, presione .
Formato 12H / 24H
En la parte posterior del reloj, presione para cambiar el formato de hora de
12H o 24H. En el formato de 12H, AM o PM aparecerán en pantalla.
Luminosidad de pantalla
En la parte posterior del reloj, presione para seleccionar la luminosidad de la
pantalla de la hora, o para desactivarla.
ESPAÑOL
Conguración de la alarma
1. Presione para activar o desactivar la alarma. aparecerá en pantalla de
acuerdo a la selección. Cuando la alarma está activada, el tiempo de alarma
aparecerá brevemente en pantalla.
2. Mantenga presionado para congurar la hora de alarma. Las horas
empezarán a parpadear.
3. Presione para ajustar las horas y presione para conrmar.
Presione para ajustar los minutos y presione para conrmar.
Nota: Si las horas o minutos dejan de parpadear, presione de nuevo para
continuar la conguración.
4. Cuando suena la alarma, presione cualquier botón, excepto para detenerla.
Selección del sonido de alarma
En la parte posterior del reloj, presione para seleccionar el sonido de alarma y
presione para desplazarse entre 6 sonidos de la naturaleza. También puede
seleccionar la alarma de radio (7). Si selecciona el sonido 7, (radio FM), la última
emisora de radio que se haya escuchado será la conguración automática del
sonido de alarma.
Nivel de volumen
En la parte posterior del reloj, presione repetidamente para seleccionar el
nivel de volumen de 1 a 15.
Función de repetición de alarma
Cuando suene la alarma, presione para que vuelva a sonar al cabo de 5
minutos. La alarma volverá a sonar cada vez que presione el botón de repetición
de alarma.
RL998IM1178_V07_325.indd 16 24/4/18 5:45 pm
16

CONFIGURACIÓN DE LA RADIO
Antes de usar la función de radio por primera vez, el reloj deberá escanear
las emisoras de radio disponibles en la gama de frecuencia de 87.5-108MHz.
Mantenga presionado durante 3 segundos para iniciar el escaneado y buscar
canales activos. Una vez que se han localizado las emisoras, se guardarán
como P01, P02, hasta P40.
Una vez que ha terminado el escaneo automático y se han guardado las
emisoras, presione para encender/apagar la radio. Presione para
desplazarse entre las emisoras guardadas y seleccionar la deseada.
CONFIGURACIÓN DE LA LUZ
Simulación del amanecer
La luz de simulación del amanecer le ayuda a empezar el día de modo relajado
imitando la luz de la mañana. Le despierta de modo natural aumentando la
intensidad de la luz gradualmente durante unos 30 minutos, cuando se acerca la
hora de alarma.
Los sonidos de la naturaleza o la radio sonarán durante 2 minutos a la hora de
la alarma.
Cuando la simulación de la luz del amanecer está activada, presione para
desactivarla.
Simulación de la luz de la puesta de sol
La luz de simulación de la puesta de sol le ayuda a terminar el día de modo
relajado imitando la luz del atardecer. Le adormece naturalmente con una luz
que disminuye en intensidad gradualmente durante unos 30 minutos cuando se
va acercando la hora de dormir.
1. Presione para activar o desactivar la simulación de la puesta de sol.
aparecerá en pantalla de acuerdo a la selección.
2. Mantenga presionado para congurar la hora de la puesta de sol. Cuando
las horas empiecen a parpadear, use para ajustar las horas y presione
para conrmar.
3. Use para ajustar los minutos y presione para conrmar.
4. Cuando la simulación de la luz de la puesta de sol está activada, presione
para desactivarla.
Luz nocturna
Su reloj puede también funcionar como una agradable lamparilla nocturna con
colores e intensidad regulables.
1. Presione una vez para encender la luz.
2. Use para ajustar el nivel de brillo (de 1 a 10).
3. Presione de nuevo para seleccionar el color de la luz. Luego, presione
para elegir entre verde, rojo, azul, morado, naranja e índigo.
4. Presione una tercera vez para apagar la luz.
ESPAÑOL
RL998IM1178_V07_325.indd 17 24/4/18 5:45 pm
17

• Adaptador AC/DC: Entrada AC 100-240V, 50/60 Hz; 0.3A; Salida 5V 1 A
• Potencia eléctrica: 5 W
• Lumen: 80lm
• Game de frecuencia FM: 87.5 - 108MHz
INSTRUCCIONES DE SEGURIDAD
LEA ESTA SECCIÓN ANTES DE UTILIZAR ESTE EQUIPO.
Antes de utilizar el equipo, asegúrese de leer con cuidado todas las instrucciones de funcionamiento. Tenga en
cuenta que estas son precauciones generales y puede que no tengan aplicación a su equipo.
1. Lea estas instrucciones.
2. Guarde estas instrucciones.
3. Respete todas las advertencias.
4. Siga todas las instrucciones.
5. No utilice este producto cerca del agua o en un ambiente húmedo, por ejemplo junto a una bañera, palangana
de fregar, fregadero o cuba de lavado, ni sobre una supercie húmeda, o cerca de una piscina.
6. Desenchufe el equipo de la red eléctrica antes de proceder a su limpieza. No utilice detergentes líquidos ni de
aerosol. Pueden dañar la pantalla. Utilice solo un paño suave seco para limpiarlo.
7. El producto debe colocarse apartado de fuentes de calor, como radiadores, calentadores, estufas u otros
ESPAÑOL
productos (incluyendo amplicadores) que generen calor.
8. No anule la función de seguridad del enchufe polarizado o con toma de tierra. Un enchufe polarizado tiene dos
conectores planos, uno más ancho que el otro. Un enchufe con toma de tierra tiene dos conectores más una
tercera borna para tierra. El conector plano más ancho o la tercera borna se proporcionan para su seguridad.
Si el enchufe suministrado no encaja en su enchufe de red, consulte con un electricista para que sustituya el
enchufe de tipo obsoleto.
9. Proteja el cable de alimentación para evitar que se pise o se pille, particularmente en las zonas de los
enchufes, enchufes auxiliares y en el lugar por el que sale el cable del equipo.
10. Utilice únicamente los complementos o accesorios especicados por el fabricante.
11. Desenchufe este equipo durante las tormentas eléctricas o cuando no se vaya a utilizar durante un periodo
largo de tiempo.
12. Confíe todas las reparaciones a personal de reparación cualicado. Es necesaria la reparación cuando el
equipo sufra cualquier tipo de daño, como deterioro del cable de alimentación o del enchufe, caída de líquido
sobre el mismo, introducción de objetos dentro del equipo, o cuando el equipo haya estado expuesto a la
lluvia o a la humedad, o no funcione normalmente o se haya dejado caer.
13. Este producto debe alimentarse únicamente con el tipo de alimentación eléctrica indicada en la etiqueta. Si no
está seguro del tipo de alimentación eléctrica disponible en su hogar, consulte a su instalador o a la compañía
de electricidad local. Para productos que funcionan con pilas o con otro tipo de alimentación, consulte las
instrucciones de funcionamiento.
14. No sobrecargue los enchufes de la pared ni los cables de extensión, ya que esto puede ser causa de
incendios y de descargas eléctricas.
15. Nunca empuje ningún objeto a través de las aberturas del equipo, ya que puede entrar en contacto con puntos
de tensión peligrosa o producir cortocircuitos con el consiguiente riesgo de incendio y de descarga eléctrica.
Nunca emplee sobre el equipo pulverizadores de ningún tipo y evite cualquier salpicadura.
16. No intente reparar este producto usted mismo; abrir o retirar las cubiertas le expone a tensiones peligrosas y
otros riesgos. Confíe todas las reparaciones a personal de reparación cualicado.
17. Después de realizada cualquier revisión o reparación en este producto, solicite al técnico que realice las
comprobaciones de seguridad necesarias para asegurar que el producto funciona en condiciones correctas.
18. Deberá evitarse exponer las pilas a temperaturas excesivamente elevadas tales como las generadas por la
acción de los rayos del sol o de las llamas.
19. La toma de corriente debe estar instalada cerca del aparato y debe ser fácilmente accesible.
20. El adaptador AC/DC no debe quedar estar obstruida O debe ser fácilmente accesible durante el uso del
aparato.
21. Para desconectar completamente la alimentación, el adaptador AC/DC debe desconectarse de la toma de
corriente, que se utiliza como dispositivo de desconexión.
22. El aparato y el adaptador AC/DC no deben quedar expuestos a goteos ni salpicaduras. Asimismo, no se debe
colocar ningún objeto lleno de líquido, como un jarrón, cerca de ellos.
23. La escucha a plena potencia de un reproductor de música por periodos prolongados puede perjudicar la
capacidad auditiva del usuario.
24. Guardar una distancia mínima alrededor del aparato, para que tenga una ventilación adecuada.
25. La ventilación no debe quedar impedida debido a la obstrucción de las aberturas de ventilación por objetos
como periódicos, manteles, cortinas, etc.
26. No es conveniente colocar sobre el aparato fuentes de llama viva, como velas encendidas.
27. El aparato está predestinado a ser usado en clima templado y/o tropical.
28. Las pilas gastadas se deben desechar correctamente. Entrega-las en un contenedor especíco para recogida
de pilas con el n de proteger el medio ambiente.
ESPECIFICACIONES
RL998IM1178_V07_325.indd 18 24/4/18 5:45 pm
18

DECLARACIÓN UE DE CONFORMIDAD SIMPLIFICADA
Lexibook® S.A.
6 avenue des Andes, Bâtiment 11
91940 Les Ulis - France
Tipo de producto: Reloj simulador de Amanecer de colores
Designación de tipo: RL998
Por la presente, Lexibook Limited declara que el tipo de equipo radioeléctrico RL998 es
conforme con la Directiva 2014/53/UE.
El texto completo de la declaración UE de conformidad está disponible en la dirección Internet
siguiente:
http://www.lexibook.com/doc/rl998/rl998_1.pdf
Yiu Wai Man
Gerente de desarrollo de productos
Hong Kong
ESPAÑOL
RL998IM1178_V07_325.indd 19 24/4/18 5:45 pm
19

Para evitar fuego o peligro de descarga eléctrica, desconecta la unidad de la red eléctrica de
CA antes de proceder a su limpieza. El acabado de la unidad puede limpiarse con un paño
de polvo y requiere los mismos cuidados que cualquier otro aparato. Utiliza un paño blando,
limpio, humedecido con agua natural tibia para limpiar el exterior de la unidad. Ten cuidado
cuando limpies y frotes las partes de plástico.
GARANTÍA
Este producto tiene una garantía de 2 años.
Para cualquier reclamación sobre la garantía o servicio posventa, contacte con su distribuidor
y presente una prueba válida de compra. Nuestra garantía cubre cualquier defecto de
fabricación por material o por mano de obra, con excepción de cualquier deterioro que resulte
de la inobservancia de las instrucciones de este manual, o de alguna acción imprudente
realizada sobre la unidad (como desmontarla, exposición al calor o a la humedad, etc.). Se
recomienda conservar el embalaje para consultas en el futuro.
En nuestro compromiso por mejorar nuestros servicios, podrían haberse realizado
ESPAÑOL
modicaciones en los colores y detalles del producto mostrado en el embalaje.
Referencia: RL998
Diseñado y desarrollado en Europa – Fabricado en China
© Lexibook®
Lexibook S.A.
6 avenue des Andes, Bâtiment 11
91940 Les Ulis
France
España
Para servicio postventa, entre en contacto con nuestros equipos:
soportetecnico@support.lexibook.com
www.decotech-lights.com
Solo para nes de iluminación decorativa
La unidad no es apta como iluminación de habitaciones residenciales.
MANTENIMIENTO
RL998IM1178_V07_325.indd 20 24/4/18 5:45 pm
Protección medioambiental
¡Los aparatos eléctricos pueden ser reciclados y no deben ser desechados junto
con la basura doméstica habitual! Apoye activamente el aprovechamiento racional
de los recursos y ayude a proteger el medio ambiente enviando este producto a un
centro de recolección para reciclaje (en caso de estar disponible).
20

APRIRE LA CONFEZIONE
Quando si apre la confezione, controllare che contenga i seguenti elementi:
1 Orologio sveglia Sunrise Colour 1 Adattatore di corrente
1 Cavo micro USB 1 Manuale di istruzioni
DESCRIZIONE DEL PRODOTTO
Pannello luminoso
Display
Snooze
Impostare / confermare l’ora
Attivare / disattivare la
sveglia – impostare l’ora
della sveglia
Accendere / spegnere la
luce – impostare il colore
Livello del volume
Giù
Suono della sveglia
Vano batterie
Supporto
Accendere / spegnere la
radio – ricerca automatica
Attivare / disattivare il
tramonto – impostare l’ora
del tramonto
Su
Formato 12/24 ore
Luminosità del display
Porta USB per alimentazione
Antenna della radio
ITALIANO
21
RL998IM1178_V07_325.indd 21 24/4/18 5:45 pm

L’unità è alimentata a corrente CC 5 V.
OPERAZIONI PRELIMINARI
1. Inserire un’estremità piccola del cavo USB nella porta micro USB dell’unità.
Collegare l’altra estremità all’adattatore di corrente CC 5 V (incluso).
2. Collegare l’adattatore di corrente a una presa di corrente.
AVVERTENZA: Forti interferenze di frequenza o scariche elettrostatiche
possono causare malfunzionamenti o perdita di memoria. In caso di
malfunzionamento, togliere il cavo di alimentazione AC dalla presa di corrente e
inserirlo nuovamente.
Batterie di emergenza
ITALIANO
È possibile inserire nell’unità anche 2 batterie AAA/LR03 1,5 V (non incluse)
per memorizzare e conservare tutte le impostazioni in caso di interruzione di
corrente.
Per installare le batterie, procedere come descritto di seguito:
1. Aprire il vano batterie premendo il coperchio e facendolo scorrere verso il
basso.
2. Inserire 2 batterie AAA/LR03 1,5 V orientandole come indicato all’interno del
vano batterie.
3. Chiudere il vano batterie riposizionando il coperchio.
Nota: quando l’apparecchio è alimentato a batterie, sono disponibili tutte le
funzioni tranne quelle luminose. Inoltre, il display dell’orologio si spegnerà
dopo qualche secondo per risparmiare energia. Premere qualsiasi pulsante per
riaccenderlo.
RL998IM1178_V07_325.indd 22 24/4/18 5:45 pm
Le batterie non ricaricabili non devono essere ricaricate. Le batterie ricaricabili devono essere rimosse dal
prodotto prima di essere caricate. Le batterie ricaricabili devono essere caricate solo sotto supervisione di un
adulto. Diversi tipi di batterie o batterie nuove e usate non devono essere mescolati. Utilizzare insieme solo
batterie dello stesso tipo o equivalente a quello consigliato da utilizzare. Le batterie devono essere inserite
con la corretta polarità. Le batterie esaurite devono essere rimosse dal prodotto. I terminali forniti non sono da
cortocircuitare. Non gettare le batterie nel fuoco. Rimuovere le batterie se non si intende utilizzare il gioco per un
lungo periodo di tempo. Non esporre le batterie a un calore eccessivo, ad esempio la luce del sole o un fuoco.
AVVERTENZA: Il cattivo funzionamento o la perdita di memoria può essere causato da una forte interferenza
di frequenza o scariche elettrostatiche. In caso di qualsiasi funzionamento anormale, rimuovere le batterie e
inserirle di nuovo.
22

Impostazione dell’orologio
IMPOSTARE L’OROLOGIO E LA SVEGLIA
Dopo aver collegato l’unità alla rete elettrica per la prima volta, le cifre
dell’orologio lampeggeranno sul display.
Premere per impostare le ore e premere per confermare.
Premere per impostare i minuti e premere per confermare.
Nota: dopo 10 secondi di inattività, le cifre dell’orologio smetteranno di
lampeggiare. Per attivare la modalità di impostazione dell’orologio, premere .
Formato 12/24 ore
Premere sul retro dell’unità per selezionare il formato orario 12 o 24 ore.
Nel formato 12 ore, sul display apparirà AM o PM.
Luminosità del display
Premere sul retro dell’unità per selezionare la luminosità del display
dell’orologio o per spegnerlo.
Impostazione della sveglia
1. Premere per attivare o disattivare la sveglia. In base alla scelta, sul display
apparirà . Dopo aver attivato la sveglia, l’orario della sveglia apparirà
brevemente.
2. Tenere premuto per impostare l’orario della sveglia. Le cifre delle ore
lampeggeranno.
3. Premere per impostare le ore e premere per confermare.
Premere per impostare i minuti e premere per confermare.
Nota: se le cifre delle ore o dei minuti smettono di lampeggiare, premere
nuovamente per continuare con l’impostazione.
4. Quando la sveglia suona, premere qualsiasi pulsante tranne per spegnerla.
Selezione del suono della sveglia
Premere sul retro dell’unità per selezionare il suono della sveglia, e premere
per selezionare tra 6 suoni naturali (1-6). È anche possibile selezionare la
sveglia con radio (7). Se viene selezionato il suono 7 (radio FM), l’ultima stazione
radio ascoltata verrà impostata come suono della sveglia.
Livello del volume
Premere ripetutamente sul retro dell’unità per selezionare il livello del volume
tra 1 e 15.
Funzione Snooze
Quando la sveglia suona, premere per posticipare la sveglia di 5 minuti. La
sveglia verrà posticipata a ogni pressione del pulsante Snooze.
ITALIANO
RL998IM1178_V07_325.indd 23 24/4/18 5:45 pm
23

Prima di usare la funzione radio per la prima volta, l’unità deve cercare le stazioni
radio disponibili sulla gamma di frequenze 87,5-108 MHz. Tenere premuto per
3 secondi per avviare la ricerca delle stazioni attive. Le stazioni verranno
memorizzate come P01, P02, no a P40.
Al termine della ricerca e della memorizzazione automatiche, premere per
accendere o spegnere la radio. Premere per scorrere le stazioni
memorizzate e selezionare quella desiderata.
IMPOSTARE LA LUCE
IMPOSTARE LA RADIO
Simulazione della luce dell’alba
Simulare la luce dell’alba aiuta a iniziare il giorno in modo ottimale. Assicura un
risveglio naturale aumentando gradualmente l’intensità luminosa durante i 30
minuti antecedenti l’orario della sveglia.
All’orario della sveglia, i suoni naturali o la radio verranno riprodotti per 2 minuti .
Quando la simulazione della luce dell’alba è attiva, premere per spegnerla.
Simulazione della luce del tramonto
Simulare la luce del tramonto aiuta a iniziare il giorno in modo ottimale. Assicura
un riposo naturale diminuendo gradualmente l’intensità luminosa durante i 30
minuti antecedenti l’orario del tramonto.
1. Premere per attivare o disattivare la simulazione del tramonto. In base alla
scelta, sul display apparirà .
ITALIANO
2. Tenere premuto per impostare l’orario del tramonto. Quando le cifre delle ore
lampeggiano, usare per regolarle e premere per confermare.
3. Usare per impostare i minuti e premere per confermare.
4. Quando la simulazione della luce del tramonto è attiva, premere per
spegnerla.
Lampada da comodino
L’unità può funzionare come lampada da comodino di colore e intensità regolabili.
1. Premere una volta per accendere la luce.
2. Usare per impostare il livello di luminosità (da 1 a 10).
3. Premere nuovamente per selezionare il colore della luce. Quindi premere
per selezionare tra verde, rosso, blu, viola, arancione e indaco.
4. Premere una terza volta per spegnere la luce.
SPECIFICHE
• Adattatore AC/DC: Ingresso AC 100-240V, 50/60 Hz; 0.3A;
Produzione DC 5V
• Potenza: 5W
• Lumen: 80lm
• Gamma di frequenze FM: 87.5 - 108MHz
1A
RL998IM1178_V07_325.indd 24 24/4/18 5:45 pm
24

LEGGERE PRIMA DI UTILIZZARE L’APPARECCHIO.
ISTRUZIONI DI SICUREZZA
Prima di utilizzare l’unità, leggere attentamente tutte le istruzioni operative. Notare che si tratta di precauzioni
generiche che possono non essere relative alla vostra unità.
1. Leggere le istruzioni.
2. Conservare le istruzioni.
3. Prestare attenzione a tutte le avvertenze.
4. Seguire tutte le istruzioni.
5. Non utilizzare questo prodotto vicino all’acqua e in condizioni di umidità, ad esempio: vicino ad una vasca da
bagno, lavandino, lavello della cucina o lavatoio; in una cantina umida o vicino ad una piscina.
6. Staccare il prodotto dalla presa di corrente prima di pulirlo. Non utilizzare detergenti liquidi o vaporizzatori.
Potrebbero danneggiare lo schermo. Utilizzare soltanto un panno asciutto.
7. Non installare vicino a fonti di calore vicino a fonti di calore quali radiatori, termoconvettori, stufe o altri
apparecchi (compresi gli amplicatori) che producono calore.
8. Non annullare la sicurezza fornita dalla spina polarizzata o con messa a terra. La spina polarizzata ha due
rebbi, uno dei quali distanziato dall’altro. La spina con messa a terra ha due rebbi e un terzo per la messa
a terra. Il terzo rebbo è fornito per garantire la sicurezza. Se la spina in dotazione non si adatta alla presa di
corrente, consultate un elettricista per sostituire la presa di corrente obsoleta.
9. Proteggere il cavo di alimentazione da calpestio o da schiacciamento, in particolare vicino alla spina, alle
prese e nel punto in cui esce dall’apparecchio.
10. Utilizzare soltanto accessori specicati dal costruttore.
11. Staccare l’apparecchio dalla presa di corrente durante temporali o se non utilizzato per periodi prolungati.
12. Per le riparazioni rivolgersi a personale qualicato. La riparazione è necessaria quando l’apparecchio è stato
danneggiato in qualsiasi modo, ad es. quando il cavo di alimentazione o la spina sono danneggiati, è stato
rovesciato liquido o sono caduti oggetti sull’apparecchio, l’apparecchio è stato esposto a pioggia o umidità e
non funziona normalmente, oppure è caduto.
13. Questo prodotto deve essere collegato soltanto al tipo di alimentazione indicato sulla targhetta. Se non si è
certi del tipo di alimentazione della propria casa, consultare il venditore di elettrodomestici o il fornitore di
energia elettrica. Per i prodotti funzionanti a batteria o da altre fonti di energia, fare riferimento alle istruzioni
per il funzionamento.
14. Non sovraccaricare prese di corrente e prolunghe in quanto ciò potrebbe provocare rischio di incendio o
folgorazione.
15. Non spingere oggetti di alcun tipo nel prodotto attraverso le aperture in quanto potrebbero toccare punti di
tensione pericolosi o cortocircuitare parte che potrebbero provocare incendi o folgorazione. Non rovesciare o
spruzzare acqua o altri tipi di liquido sul prodotto.
16. Non tentare di riparare questo prodotto da soli in quanto aprire e togliere i coperchi può esporvi a tensioni
pericolose o altri pericoli. Rivolgersi a personale qualicato per le riparazioni.
17. Dopo aver completato riparazioni o manutenzioni del prodotto, chiedere al tecnico di eseguire controlli di
sicurezza per vericare che il prodotto sia in buone condizioni di funzionamento.
18. Non esporre le batterie a un calore eccessivo, ad esempio la luce del sole o un fuoco.
19. La presa elettrica deve trovarsi vicino all’apparecchio e deve essere facilmente accessibile.
20. L’adattatore AC/DC non deve essere ostruito e deve essere facilmente accessibile durante l’uso.
21. Per scollegare completamente l’alimentazione è necessario scollegare l’adattatore AC/DC, poiché l’elemento
che collega l’apparecchio alla rete è l’adattatore AC/DC.
22. L’apparecchio e l’adattatore AC/DC non devono essere esposti a sgoccolii o schizzi, e non devono essere
collocati vicino a oggetti contenenti liquidi, come vasi.
23. L’ascolto a piena potenza per periodi prolungati può danneggiare l’udito dell’utente.
24. Mantenere una distanza minima intorno all’apparecchio per garantire un’adeguata ventilazione.
25. Per garantire una corretta ventilazione, non ostruire le aperture di ventilazione con oggetti come giornali,
tovaglie, tende, ecc.
26. Non posizionare sull’apparecchio fonti di amme libere, ad esempio candele accese.
27. L’apparecchio deve essere usato in climi temperati e/o tropicali.
28. Smaltire le batterie in modo conforme. Portarle presso gli appositi punti di raccolta per salvaguardare
l’ambiente.
ITALIANO
RL998IM1178_V07_325.indd 25 24/4/18 5:45 pm
25

DICHIARAZIONE DI CONFORMITÀ UE SEMPLIFICATA
Lexibook® S.A.
6 avenue des Andes, Bâtiment 11
91940 Les Ulis - France
Tipo di prodotto: Orologio sveglia Sunrise Colour
Modello: RL998
Il fabbricante, Lexibook Limited, dichiara che il tipo di apparecchiatura radio RL998 è conforme
alla direttiva 2014/53/UE.
Il testo completo della dichiarazione di conformità UE è disponibile al seguente
indirizzo Internet:
http://www.lexibook.com/doc/rl998/rl998_1.pdf
Yiu Wai Man
Manager Sviluppo prodotto
Hong Kong
ITALIANO
RL998IM1178_V07_325.indd 26 24/4/18 5:45 pm
26

Per impedire pericolo di incendio o di folgorazione, scollegare l’unità dalla presa AC durante
la pulizia. La nitura dell’unità può essere pulita con un panno per la polvere e trattata come
un normale accessorio. Utilizzare un panno pulito e morbido inumidito con acqua tiepida per
pulire la parte esterna dell’unità. Prestare attenzione quando si puliscono e si stronano le
parti in plastica.
GARANZIA
Questo prodotto è coperto dalla nostra garanzia di 2 anni.
Per eventuali reclami coperti da garanzia o dal servizio postvendita, contattare il vostro
distributore e presentare uno scontrino valido. La nostra garanzia copre tutti i difetti costruttivi
di componentistica e di manodopera, con l’eccezione di eventuali deterioramenti che derivano
dalla non osservanza del manuale di istruzioni o dall’uso poco attento del prodotto (ad es.
smontaggio, esposizione a calore e umidità, ecc.). Si consiglia di conservare l’imballo per
eventuali riferimenti futuri. Allo scopo di continuare a migliorare il nostro servizio, potremmo
implementare modiche a colori e particolari del prodotto illustrato sull’imballo.
Riferimento: RL998
Progettato e sviluppato in Europa – Fabbricato in Cina
© Lexibook®
Lexibook S.A.
6 avenue des Andes, Bâtiment 11
91940 Les Ulis
France
Per i servizi di assistenza post-vendita, contattare i nostri team:
www.decotech-lights.com
L’illuminazione è a solo scopo decorativo.
L’unità non è destinata all’illuminazione di una stanza.
MANUTENZIONE
ITALIANO
RL998IM1178_V07_325.indd 27 24/4/18 5:45 pm
Protezione Ambientale
Gli elettrodomestici da smaltire possono essere riciclati e non devono essere gettati
con i riuti domestiti! Sostenete attivamente la conservazione delle risorse e aiutate
a proteggere l’ambiente riportando questo apparecchio ad un centro di raccolta
(se disponibile).
27

RETIRAR O APARELHO DA CAIXA
Certique-se de que os seguintes elementos se encontram incluídos:
1 Despertador Colorido Nascer do Sol 1 manual de instruções
1 cabo micro USB 1 adaptador de alimentação
DESCRIÇÃO DO PRODUTO
Painel de luz
Snooze
Ecrã
Acertar/conrmar a hora
Ativar/desativar o
despertador - Acertar a
hora do despertador
Ligar/desligar a luz Selecionar a cor
PORTUGUÊS
Compartimento das pilhas
Diminuir
Som do despertador
Nível do volume
Suporte
Ligar/desligar o rádio Procura automática
Ativar/desativar o pôr-do-sol
- Acertar a hora do pôr-do-sol
Aumentar
Formato de 12/24 horas
Luminosidade do ecrã
Porta de alimentação
micro USB
Antena do rádio
28
RL998IM1178_V07_325.indd 28 24/4/18 5:45 pm

MONTAGEM
O seu despertador funciona com alimentação DC de 5V.
1. Insira uma extremidade do cabo micro USB na porta micro USB do
despertador. Ligue a outra extremidade ao adaptador da alimentação DC de 5V
(incluído).
2. Ligue o adaptador da alimentação a uma tomada.
AVISO: Pode haver um mau funcionamento ou perda de memória devido
a interferências fortes ou descargas electrostáticas. Caso ocorra algum
funcionamento anormal, retire a cha da tomada e volte a ligá-la.
Pilhas de apoio
O seu despertador também funciona com 2 pilhas AAA/LR03 de 1,5V
(não incluídas), que guardam todas as suas denições no caso de falha de
eletricidade.
Para instalar as pilhas:
1. Abra a tampa do compartimento das pilhas pressionando e fazendo-a deslizar
para baixo.
2. Instale as 2 pilhas AAA/LR03 de 1,5V, tendo em conta os sinais da polaridade
dentro do compartimento das pilhas.
3. Volte a colocar a tampa do compartimento das pilhas.
Nota: Quando o aparelho funcionar com as pilhas, todas as funções estão
disponíveis, exceto a luz. A apresentação das horas também é desligada
passados alguns segundos, para poupar energia. Prima qualquer botão para
ligar.
PORTUGUÊS
RL998IM1178_V07_325.indd 29 24/4/18 5:45 pm
Não recarregue pilhas não recarregáveis. As pilhas recarregáveis têm de ser retiradas do produto antes de
serem recarregadas. As pilhas recarregáveis só podem ser recarregadas sob a supervisão de um adulto. Não
misture diferentes tipos de pilhas nem pilhas novas com pilhas usadas. Utilize apenas pilhas do mesmo tipo
ou equivalentes às recomendadas. Coloque as pilhas com a polaridade correcta. Retire as pilhas gastas do
produto. Não coloque os terminais em curto-circuito. Não atire as pilhas para o fogo. Retire as pilhas se não
usar o produto durante um longo período de tempo. As pilhas não deverão ser expostas a calor em excesso,
como luz directa do sol, fogo ou algo parecido.
AVISO: O mau funcionamento ou perda de memória podem ser causados por fortes interferências ou descargas
electrostáticas. Caso ocorra algum funcionamento anormal, retire e volte a colocar as pilhas.
29

ACERTAR A HORA E O DESPERTADOR
Acertar a hora
Para o primeiro acerto, quando o dispositivo estiver ligado à alimentação, a hora
começa a piscar no ecrã.
Prima para acertar as horas, e prima para conrmar.
Prima para acertar os minutos, e prima para conrmar.
Nota: Passados 10 segundos sem qualquer operação, a hora deixa de piscar.
Para ativar o modo de mudança da hora, prima .
Formato de 12/24 horas
Na parte traseira do despertador, prima para alternar entre o formato de 12/24
horas.
No formato de 12 horas, AM (manhã) ou PM (tarde) aparece no ecrã.
Luminosidade do ecrã
Na parte traseira do despertador, prima para selecionar a luminosidade de
apresentação da hora, ou para a desligar.
Acerto do despertador
1. Prima para ativar ou desativar o despertador. será apresentado no ecrã.
Quando o despertador for desativado, a hora do despertador é apresentada
durante um curto espaço de tempo.
2. Prima e mantenha premido para denir a hora do despertador. As horas
começam a piscar.
3. Prima para acertar as horas, e prima para conrmar.
Prima para acertar os minutos, e prima para conrmar.
Nota: Se as horas ou minutos pararem de piscar, prima de novo para continuar
o acerto.
4. Quando o despertador tocar, prima qualquer botão, exceto , para parar o
despertador.
PORTUGUÊS
Seleção do som do despertador
Na parte traseira do seu aparelho, prima para selecionar o som do despertador,
e prima para alternar entre 6 sons da natureza. Também pode selecionar
o despertador com rádio (7). Se selecionar o som 7 (rádio FM), a última
estação de rádio selecionada será denida automaticamente como o som do
despertador.
Nível do volume
Na parte traseira do aparelho, prima repetidamente para selecionar o volume,
numa escala de 1 a 15.
Função Snooze
Quando o despertador tocar, prima para repetir o despertador passados 5
minutos. O despertador é repetido sempre que premir o botão do snooze.
RL998IM1178_V07_325.indd 30 24/4/18 5:45 pm
30

SINTONIZAÇÃO DO RÁDIO
Antes de usar a função de rádio pela primeira vez, o despertador tem de
procurar as estações de rádio disponíveis nas frequências 87.5-108MHz.
Prima e mantenha premido durante 3 segundos para começar a procurar
sintonizações ativas. Quando as sintonizações forem localizadas, serão
guardadas como P01, P02, até P40.
Após terminar a procura automática e guardar os canais, prima para ligar/
desligar o rádio. Prima para correr as estações guardadas e selecionar a
estação desejada.
DEFINIÇÃO DA LUZ
Simulação da luz do nascer-do-sol
A simulação da luz do nascer-do-sol ajuda a começar o dia relaxado, simulando
a luz do sol da manhã. Acorda-o de um modo natural, aumentando gradualmente
a intensidade da luz durante cerca de 30 minutos, à medida que a hora de
acordar se vai aproximando. O som da natureza ou rádio serão tocados durante
2 minutos na hora de despertar.Quando a luz do nascer-do-sol estiver ligada,
prima e mantenha premido para desligar.
Simulação da luz do pôr-do-sol
A simulação da luz do pôr-do-sol ajuda a terminar o dia em paz, simulando a luz
do pôr-do-sol. Ajuda-o a adormecer naturalmente com uma luz que diminui
gradualmente durante 30 minutos, à medida que a hora de ir dormir se aproxima.
1. Prima para ativar ou desativar a simulação do pôr-do-sol.
Será apresentado no ecrã.
2. Prima e mantenha premido para denir a hora do pôr-do-sol. Quando a hora
começar a piscar, use para ajustar as horas, e prima para conrmar.
3. Use para acertar os minutos, e prima para conrmar.
4. Quando a luz do pôr-do-sol estiver ligada, prima e mantenha premido para
desligar.
Luz de mesinha de cabeceira
O seu despertador pode funcionar como uma agradável luz de mesinha de
cabeceira, com cor e intensidade ajustáveis.
1. Prima para ligar a luz.
2. Use para ajustar o nível de luminosidade (1 a 10).
3. Prima de novo para selecionar a cor da luz. De seguida, prima para
escolher entre verde, vermelho, azul, roxo, cor-de-laranja e índigo.
4. Prima uma terceira vez para desligar a luz.
PORTUGUÊS
RL998IM1178_V07_325.indd 31 24/4/18 5:45 pm
ESPECIFICAÇÕES
•
Adaptador AC/DC: Entrada AC 100-240V, 50/60 Hz; 0.3A; Saída DC 5V 1A
• Watts: 5W
• Lumen: 80lm
• Frequência FM: 87.5 - 108MHz
31

INSTRUÇÕES DE SEGURANÇA
POR FAVOR, LEIA ANTES DE UTILIZAR ESTE EQUIPAMENTO.
Antes de usar a unidade, certique-se de que lê com atenção todas as instruções de funcionamento. Tenha em
conta que estas são precauções gerais e podem não abranger a sua unidade.
1. Leia estas instruções.
2. Guarde estas instruções.
3. Preste atenção a todos os avisos.
4. Siga todas as instruções.
5. Não use este produto perto de água ou humidade, por exemplo, perto de uma banheira, lavatório, lava-loiça
ou tina, numa cave húmida ou perto de uma piscina.
6. Desligue a cha deste produto da tomada antes de proceder à limpeza. Não use produtos de limpeza
líquidos nem aerossóis. Estes podem danicar o ecrã. Use apenas um pano seco para proceder à limpeza.
7. Não coloque o aparelho perto de fontes de calor, como radiadores, registadores de calor, fornos ou outros
aparelhos (incluindo amplicadores) que produzam calor.
8. Não danique a segurança da cha polarizada ou com ligação à terra. Uma cha polarizada tem dois dentes,
um maior do que o outro. Uma cha com ligação à terra tem dois dentes e um terceiro dente da ligação à
terra. O dente mais largo ou o terceiro dente existem para sua segurança. Se a cha fornecida não couber
na sua tomada, consulte um electricista especializado para proceder à substituição da tomada obsoleta.
9. Não deixe que passem por cima do o da alimentação e proteja-o de dobras, especialmente perto da cha,
receptáculos de conveniência e no local onde o o sai do aparelho.
10. Use apenas acessórios especicados pelo fabricante.
11. Retire a cha deste aparelho da tomada durante tempestades ou quando não for usado durante um longo
período de tempo.
12. Consulte pessoal qualicado para proceder a todo o tipo de reparações. O aparelho tem de ser reparado
quando for danicado de algum modo, como danos no o ou na cha, derrames de líquidos no aparelho,
exposição do aparelho à chuva ou humidade, ou se deixar cair o aparelho.
13. Este produto deverá ser utilizado apenas com o tipo de alimentação indicado na etiqueta das especicações.
Se não tiver a certeza do tipo de alimentação existente em sua casa, consulte o seu revendedor ou a
companhia local de electricidade. Quanto a produtos criados para funcionarem a pilhas, ou a outras fontes
de energia, consulte as instruções de funcionamento.
14. Não sobrecarregue tomadas de parede e extensões, pois isso pode dar origem ao risco de fogo ou choque
eléctrico.
15. Nunca prima qualquer tipo de objectos contra as entradas deste produto, pois estes podem tocar em pontos
de voltagem perigosa ou colocar alguma peça em curto-circuito, podendo dar origem a fogo ou choques
eléctricos. Nunca derrame nem borrife qualquer tipo de líquido no produto.
16. Não tente reparar este produto sozinho, pois a abertura ou remoção das coberturas pode expô-lo a voltagem
perigosa ou outros perigos. Consulte pessoal qualicado para proceder a qualquer tipo de reparação.
17. As pilhas não deverão ser expostas a calor em excesso, como luz directa do sol, fogo ou algo parecido.
18. A tomada deve ser instalada perto do equipamento e ser de fácil acesso.
19. O adaptador AC/DC não deve car obstruído E deve ser de fácil acesso durante a utilização.
20. Para desligar completamente a energia eléctrica o adaptador AC/DC deve ser desligado da tomada da
parede já que o interruptor para desligar é o próprio adaptador AC/DC.
21. O aparelho e o adaptador AC/DC não devem ser expostos a pingos ou salpicos nem se devem colocar
objecto com líquidos, como jarras, junto deles.
22. Ouvir música no volume máximo durante períodos prolongados pode causar lesões auditivas no utilizador.
23. Mantenha uma distância mínima em redor do aparelho, para uma ventilação suciente.
24. Convém que a ventilação não seja perturbada pela obstrução das aberturas de ventilação por objetos como
jornais, toalhas, cortinas, etc.
25. Convém que não coloque em cima do aparelho fontes de chamas se proteção, como velas acesas.
PORTUGUÊS
26. O aparelho destina-se a ser utilizado num clima temperado e/ou tropical.
27. As pilhas devem ser eliminadas de modo adequado. Coloque-as em contentores de recolha previstos para
este efeito, de modo a proteger o ambiente.
RL998IM1178_V07_325.indd 32 24/4/18 5:45 pm
32

DECLARAÇÃO UE DE CONFORMIDADE SIMPLIFICADA
Lexibook® S.A.
6 avenue des Andes, Bâtiment 11
91940 Les Ulis - France
Tipo de produto: Despertador Colorido Nascer do Sol
Designação do tipo: RL998
O abaixo assinado Lexibook Limited declara que o presente tipo de equipamento de rádio
RL998 está em conformidade com a Diretiva 2014/53/UE.
O texto integral da declaração de conformidade está disponível no seguinte endereço de
Internet:
http://www.lexibook.com/doc/rl998/rl998_1.pdf
Yiu Wai Man
Gerente de Desenvolvimento de Produto
Hong Kong
PORTUGUÊS
RL998IM1178_V07_325.indd 33 24/4/18 5:45 pm
33

Para prevenir fogo ou perigo de choque, desligue a sua unidade da alimentação quando
proceder à limpeza. O acabamento na sua unidade pode ser limpo com um pano do pó e
pode tratá-lo tal como a qualquer peça de mobília. Use um pano suave e limpo, ligeiramente
embebido em água morna para limpar o exterior da unidade. Tenha cuidado quando limpar e
secar as peças de plástico.
GARANTIA
Este produto é abrangido pela nossa garantia de 2 anos.
Para utilizar a sua garantia ou o serviço pós-venda, por favor, contacte o seu distribuidor e
apresente uma prova de compra válida. A nossa garantia abrange qualquer defeito de material
ou de mão-de-obra, com a excepção de qualquer deterioração devido à não observância do
manual de instruções, ou de quaisquer acções sem cuidado implementadas neste aparelho
(como desmontar, expor ao calor e à humidade, etc.). Recomendamos que guarde a caixa
para futuras referências.
Num esforço constante para melhorar os nossos serviços, podemos implementar
modicações nas cores e pormenores do produto apresentado na caixa.
Referência: RL998
Criado e desenvolvido na Europa – Fabricado na China
© Lexibook®
Lexibook S.A.
6 avenue des Andes, Bâtiment 11
91940 Les Ulis
France
Para qualquer serviço pós-venda, por favor, contacte as nossas equipas:
www.decotech-lights.com
MANUTENÇÃO
RL998IM1178_V07_325.indd 34 24/4/18 5:45 pm
PORTUGUÊS
Protecção Ambiental
Os aparelhos eléctricos indesejados podem ser reciclados e não deverão
ser eliminados juntamente com o lixo doméstico comum! Por favor, suporte
activamente a conservação de recursos e ajude a proteger o ambiente, devolvendo
este aparelho num centro de recolha (se disponível).
Apenas para ns de iluminação decorativa.
Unidade não adequada para iluminação das divisões de uma residência.
34

AUSPACKEN DES GERÄTES
Wenn Sie das Gerät auspacken, stellen Sie sicher, dass die folgenden Teile
enthalten sind:
1 x Farbiger Lichtwecker 1 x bedienungsanleitung
1 x Micro USB kabel 1 x Netzadapter
PRODUKTBESCHREIBUNG
Lichtdiffusor
Display
Snooze
Uhrzeit einstellen/
bestätigen
Wecker aktivieren/
deaktivieren – Weckzeit
einstellen
Reduzieren
Licht ein/aus – Farbe
Radio ein/aus – automatischer
Sendersuchlauf
Sonnenuntergang
aktivieren/deaktivieren –
Sonnenuntergang einstellen
Erhöhen
RL998IM1178_V07_325.indd 35 24/4/18 5:45 pm
Weckton einstellen
Lautstärkestufe
Batteriefach
12h- oder 24h-Format
Helligkeit des Displays
Micro-USB-Anschluss
DEUTSCH
Radioantenne
Ständer
35

Ihr Wecker benötigt zum Betrieb DC 5V.
INBETRIEBNAHME
1. Stecken Sie ein Ende des Micro-USB-Kabels in den Micro-USB-Port des
Weckers. Verbinden Sie das andere Ende mit dem DC 5V- Netzadapter
(mitgelieferte).
2. Verbinden Sie den Netzadapter mit einer Steckdose.
WARNUNG: Fehlfunktionen oder Speicherverlust können durch starke
Störungen oder elektrostatische Entladungen verursacht werden. Sollte das
Gerät nicht ordnungsgemäß funktionieren, legen Sie diese wieder ein. Oder
ziehen Sie das AC-Kabel aus der Steckdose und stecken Sie es dann wieder ein.
Notstrombatterien
Ihr Wecker kann auch mit zwei AAA/LR03 1,5V Batterien (nicht mitgeliefert)
betrieben werden, die im Falle eines Stromausfalls alle Ihre Einstellungen
speichern und erhalten.
Einlegen der Batterien:
1. Öffnen Sie das Batteriefach, indem Sie auf die Abdeckung drücken und sie
nach unten schieben.
2. Legen Sie zwei 1,5 V AAA/LR03-Batterien unter Beachtung der
Polaritätsmarkierungen ins Batteriefach ein.
3. Schließen Sie das Batteriefach, indem Sie Abdeckung wiedereinsetzen.
Hinweis: Wenn das Gerät mit Batterien betrieben wird, sind alle Funktionen
verfügbar, mit Ausnahme der Leuchtfunktionen. Die Uhrzeitanzeige schaltet sich
DEUTSCH
ebenfalls nach einigen Sekunden aus, um Strom zu sparen. Drücken Sie eine
beliebige Taste, um die Anzeige wieder zu aktivieren.
Nicht-auadbare Batterien dürfen nicht aufgeladen werden. Auadbare Batterien müssen aus dem Gerät vor
dem Auaden entfernt werden. Auadbare Batterien dürfen nur unter Aufsicht eines Erwachsenen aufgeladen
werden. Unterschiedliche Batterietypen oder neue und alte Batterien dürfen nicht zusammen benutzt werden.
Es dürfen nur Batterien desselben oder eines gleichwertigen Typs verwendet werden. Batterien müssen unter
Beachtung der korrekten Polarität eingelegt werden. Verbrauchte Batterien müssen aus dem Gerät entfernt
werden. Die Anschlusskontakte dürfen nicht kurzgeschlossen werden. Batterien dürfen nicht ins Feuer geworfen
werden. Entfernen Sie die Batterien aus dem Produkt, wenn es für längere Zeit nicht benutzt wird. Die Batterien
dürfen keinen übermäßigen Hitzequellen ausgesetzt werden, zum Beispiel Sonnenschein oder Feuer.
WARNUNG: Fehlfunktionen oder Speicherverlust können durch starke Frequenzstörungen oder elektrostatische
Entladungen verursacht werden. Sollte das Gerät nicht ordnungsgemäß funktionieren, entfernen Sie die Batterien
und legen sie wieder ein.
36
RL998IM1178_V07_325.indd 36 24/4/18 5:45 pm

EINSTELLEN DER UHRZEIT UND DES WECKERS
Uhrzeiteinstellung
Bei der ersten Einstellung blinkt die Uhrzeit auf dem Display, nachdem das Gerät
mit dem Netzstrom verbunden wurde.
Drücken Sie , um die Stunden einzustellen, und drücken Sie zur Bestätigung.
Drücken Sie , um die Minuten einzustellen, und drücken Sie zur Bestätigung.
Hinweis: Wenn 10 Sekunden keine Taste bedient wird, hören die Stunden auf zu
blinken. Um den Uhrzeit-Einstellmodus zu aktivieren, drücken Sie .
12h-/24h-Format
Drücken Sie auf der Rückseite des Weckers , um die Uhrzeitanzeige zwischen
12h- oder 24h-Format umzuschalten.
Im 12h-Format wird AM oder PM auf dem Display angezeigt.
Helligkeit des Displays
Drücken Sie auf der Rückseite des Weckers , um die Helligkeit der
Uhrzeitanzeige auszuwählen oder auszuschalten.
Weckereinstellung
1. Drücken Sie , um den Wecker zu aktivieren oder zu deaktivieren. wird
anschließend auf dem Display angezeigt. Wenn der Wecker aktiviert ist, wird
die Weckzeit kurz angezeigt.
2. Halten Sie gedrückt, um die Weckzeit einzustellen. Die Stunden beginnen zu
blinken.
3. Drücken Sie , um die Stunden einzustellen, und drücken Sie zur
Bestätigung.Drücken Sie , um die Minuten einzustellen, und drücken Sie
zur Bestätigung.
Hinweis: Wenn die Stunden oder Minuten aufhören zu blinken, drücken Sie
erneut, um das Einstellen fortzusetzen.
4. Wenn der Weckalarm ertönt, drücken Sie eine beliebige Taste, mit Ausnahme
von , um den Weckton auszuschalten.
Auswahl des Wecktons
Drücken Sie auf der Rückseite Ihres Gerätes , um den Weckton auszuwählen,
und drücken Sie , um zwischen 6 Naturklängen zu wechseln. Sie können auch
das Radio als Weckton (7) auswählen. Wenn Sie 7 auswählen, wird automatisch
der zuletzt gespielte Sender als Weckton eingestellt.
Lautstärkestufe
Drücken Sie auf der Rückseite Ihres Gerätes mehrmals , um die Lautstärkestufe
auf einer Skala von 1 bis 15 einzustellen.
Snooze-Funktion
Drücken Sie , sobald der Weckton ertönt, um den Weckton nach 5 Minuten zu
wiederholen. Der Weckton wird jedes Mal wiederholt, wenn Sie die Snooze-Taste
auswählen.
DEUTSCH
RL998IM1178_V07_325.indd 37 24/4/18 5:45 pm
37

EINSTELLEN DES RADIOS
Bevor Sie die Radiofunktion zum ersten Mal benutzen, muss der Wecker die
verfügbaren Radiosender auf dem Frequenzband 87,5 bis 108 MHz suchen.
Halten Sie 3 Sekunden lang gedrückt, um den Sendersuchlauf nach aktiven
Kanälen zu starten. Sobald Kanäle gefunden werden, werden sie als P01, P02,
bis zu P40 gespeichert.
Nachdem der Sendersuchlauf beendet wurde und die Kanäle gespeichert
wurden, drücken Sie , um das Radio ein-/auszuschalten. Drücken Sie ,
um zwischen den gespeicherten Sendern zu navigieren und den gewünschten
Sender auszuwählen.
EINSTELLEN DES LICHTES
Simulation des Lichtes bei Sonnenaufgang
Die Simulation des Lichtes bei Sonnenaufgang unterstützt Sie dabei, den Tag
entspannt zum Licht der simulierten Morgensonne zu beginnen. Diese Funktion
weckt Sie auf natürliche Weise, indem die Lichtintensität etwa 30 Minuten vor
Ihrer gewählten Weckzeit beginnt, allmählich heller zu werden.
Der Naturklang oder das Radio wird für 2 Minuten zur Weckzeit gespielt.
Wenn die Simulation des Lichtes bei Sonnenaufgang aktiviert ist, halten Sie
gedrückt, um die Funktion zu deaktivieren.
Simulation des Lichtes bei Sonnenuntergang
Die Simulation des Lichtes bei Sonnenuntergang unterstützt Sie dabei, den Tag
ruhig ausklingen zu lassen, indem das Sonnenlicht am Abend simuliert wird.
Diese Funktion hilft Ihnen, auf natürliche Weise bei Licht einzuschlafen, das 30
Minuten vor Ihrer gewählten Weckzeit beginnt, allmählich dunkler zu werden.
1. Drücken Sie , um die Simulation des Sonnenuntergangs zu aktivieren oder zu
deaktivieren. wird anschließend auf dem Display angezeigt.
2. Halten Sie gedrückt, um die Sonnenuntergangszeit einzustellen. Wenn die
Stunden zu blinken beginnen, stellen Sie die Stunden mithilfe von ein und
drücken Sie dann , um zu bestätigen.
3. Drücken Sie , um die Minuten einzustellen und drücken Sie zur
Bestätigung.
4. Wenn die Simulation des Lichtes bei Sonnenuntergang aktiviert ist, halten Sie
gedrückt, um die Funktion zu deaktivieren.
Nachttischleuchte
DEUTSCH
Ihr Wecker kann als behagliche Nachttischlampe mit einstellbarer Farbe und
Intensität dienen.
1. Drücken Sie einmal , um das Licht einzuschalten.
2. Stellen Sie mithilfe von die Helligkeitsstufe (1 bis 10) ein.
3. Drücken Sie erneut , um die Lichtfarbe auszuwählen. Drücken Sie dann ,
um zwischen Grün, Rot, Blau, Lila, Orange und Indigo zu wählen.
4. Drücken Sie ein drittes Mal, um das Licht auszuschalten.
RL998IM1178_V07_325.indd 38 24/4/18 5:45 pm
38

TECHNISCHE DATEN
• AC/DC-Adapter Eingabe AC 100-240V, 50/60 Hz; 0.3A;
Ausgang DC 5V 1A
• Leistung: 5W
• Lumen: 80lm
• Frequenzband: 87,5-108 MHz
SICHERHEITSHINWEISE
BITTE VOR DER INBETRIEBNAHME DIESES GERÄTES LESEN.
Bevor Sie dieses Gerät benutzen, lesen Sie bitte alle Bedienungsanleitungen sorgfältig durch. Dies sind
allgemeine Vorsichtsmaßnahmen und betreffen eventuell nicht Ihr Gerät.
1. Lesen Sie diese Anleitungen.
2. Bewahren Sie diese Anleitungen auf.
3. Beachten Sie alle Warnungen.
4. Befolgen Sie alle Anleitungen.
5. Benutzen Sie dieses Produkt nicht in der Nähe von Wasser und Feuchtigkeit, zum Beispiel: in der Nähe einer
Badewanne, Waschschüssel, Küchenspüle oder eines Waschbeckens; in einem feuchten Kellerraum oder in
der Nähe eines Schwimmbeckens.
6. Ziehen Sie den Netzstecker aus der Wandsteckdose, bevor Sie das Gerät reinigen. Benutzen Sie keine
Reinigungsüssigkeiten oder –sprays. Sie könnten den Bildschirm beschädigen. Verwenden Sie zur
Reinigung nur ein trockenes Tuch.
7. Stellen Sie das Gerät nicht in der Nähe von Hitzequellen, wie z.B. Heizungen, Wärmespeichern, Öfen oder
anderen Apparaten (einschließlich Verstärkern), die Hitze erzeugen, auf.
8. Zerstören Sie nicht den Sicherheitszweck des polarisierten Netzsteckers oder Schukosteckers. Ein
polarisierter Stecker hat zwei Stifte, wobei einer größer als der andere ist. Ein Schukostecker hat zwei Stifte
und einen dritten Erdungsstift. Der größere Stift oder der dritte Erdungsstift dient Ihrer Sicherheit. Sollte
der mitgelieferte Stecker nicht in Ihre Steckdose passen, wenden Sie sich bitte an einen Elektriker, um die
technisch überholte Steckdose zu erneuern.
9. Schützen Sie das Netzstromkabel vor dem Darauftreten und davor, dass es besonders am Netzstecker, an der
Netzsteckdose und den Austrittspunkten aus dem Gerät abgeknickt wird.
10. Benutzen Sie nur vom Hersteller empfohlene Anbauteile und Zubehör.
11. Ziehen Sie den Netzstecker des Gerätes während eines Gewitters oder wenn Sie es für längere Zeit nicht
benutzen.
12. Überlassen Sie alle Wartungsarbeiten qualiziertem Fachpersonal. Wartungsarbeiten sind erforderlich, wenn
das Gerät in irgendeiner Weise beschädigt wurde, wie z.B. in folgenden Situationen: Das Netzstromkabel
oder der Netzstecker sind beschädigt; Flüssigkeit oder Gegenstände sind in das Gerät gekommen, und/oder
das Gerät wurde Regen oder Feuchtigkeit ausgesetzt; das Gerät funktioniert nicht ordnungsgemäß, zeigt
einen Leistungsabfall oder wurde fallen gelassen.
13. Dieses Produkt sollte von einer Stromquelle mit einer Netzspannung, die mit den Angaben auf dem
Typenschild übereinstimmt, betrieben werden. Wenn Sie sich nicht sicher sind, welche Art Netzspannung in
Ihrem Haus verfügbar ist, fragen Sie bei einem Elektrohändler oder bei dem örtlichen Elektrizitätswerk nach.
Bei Produkten, die mit Batteriestrom oder anderen Stromquellen betrieben werden, lesen Sie bitte in der
Bedienungsanleitung nach.
14. Überladen Sie die Wandsteckdosen und Verlängerungskabel nicht, da dies zu einem Brand oder Stromschlag
führen kann.
15. Schieben Sie niemals irgendwelche Gegenstände durch Öffnungen in das Produkt, da sie gefährliche
Stromspannungspunkte berühren oder Teile kurzschließen könnten, wodurch ein Brand oder Stromschlag
erzeugt werden. Gießen oder sprühen Sie niemals jegliche Art von Flüssigkeiten auf das Gerät.
16. Versuchen Sie niemals, das Produkt selbst zu reparieren, da das Öffnen oder Entfernen von Abdeckungen Sie
gefährlicher Stromspannung oder anderen Gefahren aussetzen kann. Wenden Sie sich für alle Reparaturund Wartungsarbeiten an qualiziertes Fachpersonal.
17. Die Batterien dürfen keinen übermäßigen Hitzequellen ausgesetzt werden, zum Beispiel Sonnenschein oder
Feuer.
18. Die Netzsteckdose sollte sich in der Nähe des Gerätes benden und muss gut zugänglich sein.
19. Der AC/DC-Adapter darf nicht blockiert sein ODER muss gut zugänglich während des bestimmungsgemäßen
Gebrauchs sein.
20. Um die Stromversorgung vollständig zu trennen, muss der AC/DC-Adapter vom Netzstrom getrennt werden,
da der AC/DC-Adapter als Trennvorrichtung fungiert.
21. Das Gerät und der AC/DC-Adapter dürfen keinen tropfenden oder spritzenden Flüssigkeiten ausgesetzt
werden. Es dürfen keine mit Wasser gefüllten Objekte, wie z. B. Vasen, in der Nähe des Gerätes und AC/
DC-Adapters aufgestellt werden.
22. Bei voller Lautstärke kann das Musikhören von einem Musikplayer über längere Zeit das Gehör des Benutzers
schädigen.
23. Halten Sie um das Gerät herum einen Mindestabstand ein, um eine ausreichende Luftzirkulation zu
gewährleisten.
24. Die Luftzirkulation darf nicht durch Bedecken der Lüftungsöffnungen durch solche Gegenstände wie
Zeitschriften,Tischdecken, Vorhängen usw. behindert werden.
25. Es dürfen keine offenen Flammen auf das Gerät gestellt werden, wie zum Beispiel brennende Kerzen.
26. Das Gerät ist für den Gebrauch in einem moderaten und/oder tropischen Klima vorgesehen.
27. Batterien müssen auf sichere Weise entsorgt werden. Entsorgen Sie Batterien in den hierfür vorgesehenen
Sammelbehältern, um die Umwelt zu schützen.
39
DEUTSCH
RL998IM1178_V07_325.indd 39 24/4/18 5:45 pm

VEREINFACHTE EU-KONFORMITÄTSERKLÄRUNG
Lexibook® S.A.
6 avenue des Andes, Bâtiment 11
91940 Les Ulis - France
Produktart: Farbiger Lichtwecker
Typbezeichnung: RL998
Hiermit erklärt Lexibook Limited, dass der Funkanlagentyp RL998 der Richtlinie 2014/53/EU
entspricht.
Der vollständige Text der EU-Konformitätserklärung ist unter der folgenden Internetadresse
verfügbar:
http://www.lexibook.com/doc/rl998/rl998_1.pdf
Yiu Wai Man
Produktentwicklungsleiter
Hong Kong
DEUTSCH
RL998IM1178_V07_325.indd 40 24/4/18 5:45 pm
40

Um Brand- oder Stromschlaggefahr zu vermeiden, trennen Sie das Gerät von der ACStromquelle, wenn Sie es reinigen. Die Politur Ihres Gerätes kann mit einem Staubtuch
gereinigt und wie andere Möbelstücke gepegt werden. Reinigen Sie das Äußere des Gerätes
mit einem weichen, sauberen Tuch, das mit klarem, lauwarmen Wasser angefeuchtet ist.
Seien Sie vorsichtig, wenn Sie die Plastikteile reinigen und abwischen.
GARANTIE
2 Jahre Garantie. Die gesetzlichen Gewährleistungsrechte bleiben neben der Garantie
bestehen.
Bei Beanstandungen, die unter diese Garantie fallen oder sollten Sie den Kundendienst
benötigen, wenden Sie sich bitte an Ihren Händler und legen Sie einen gültigen Kaufbeleg vor.
Unsere Garantie deckt alle Material- und Verarbeitungsmängel ab, mit Ausnahme jeglicher
Verschleißerscheinungen, die aus der Nichtbeachtung der Bedienungsanleitung resultieren
oder durch jedwede fahrlässige Handlung an diesem Produkt verursacht wurden (wie
demontieren, Hitze oder Feuchtigkeit aussetzen, usw.). Es wird empfohlen, die Verpackung für
etwaige zukünftige Bezugnahmen aufzubewahren.
In dem Bemühen unsere Leistungen kontinuierlich zu verbessern, könnte es sein, dass
wir Veränderungen an den Farben oder der Produktausführung, wie auf der Verpackung
abgebildet, vornehmen.
Referenznummer: RL998
Design und Entwicklung in Europa - Hergestellt in China
© Lexibook®.
Lexibook S.A.
6 avenue des Andes, Bâtiment 11
91940 Les Ulis
France
Deutschland & Österreich
Für den Kundendienst wenden Sie sich bitte an unsere Teams:
Tel: 0180 700 00 04
E-Mail: technischehilfe@support.lexibook.com
www.decotech-lights.com
Nur zur dekorativen Beleuchtung.
Das Gerät ist nicht zur Beleuchtung von Zimmern geeignet.
PFLEGE
DEUTSCH
RL998IM1178_V07_325.indd 41 24/4/18 5:45 pm
Hinweise zum Umweltschutz
Alt-Elektrogeräte sind Wertstoffe, sie gehören daher nicht in den Hausmüll! Wir
möchten Sie daher bitten, uns mit Ihrem aktiven Beitrag bei der Ressourcenschonung
und beim Umweltschutz zu unterstützen und dieses Gerät bei den (falls vorhanden)
eingerichteten Rücknahmestellen abzugeben.
41

HET APPARAAT UITPAKKEN
Bij het uitpakken, dient u na te gaan of de volgende elementen inbegrepen zijn:
1 x Kleurrijke zonsopgang-wekker 1 x Netadapter
1 x micro USB-kabel 1 x Gebruiksaanwijzing
PRODUCTBESCHRIJVING
Lichtverspreider
Scherm
Snooze
Tijd instellen /
bevestigen
Alarm aan- / uitzetten
– alarmtijd instellen
Omlaag
Licht aan / uit – kleur
Radio aan / uit – Automatisch
scannen
Zonsondergang aan- / uitzetten
– zonsondergangstijd instellen
Omhoog
RL998IM1178_V07_325.indd 42 24/4/18 5:45 pm
Alarmgeluid instellen
Volumeniveau
NEDERLANDS
12u/24u-notatie
Schermhelderheid
Micro USB-ansluiting
Batterijvak
Radio-antenne
Stander
42

OPSTELLING
Uw wekker werkt op DC 5V voeding.
1. Sluit één uiteinde van de micro USB-kabel aan op de micro USB-aansluiting
van de wekker. Sluit het ander uiteinde aan op de DC 5V netadapter
(inbegrepen).
2. Sluit de netadapter aan op een stroomaansluiting.
WAARSCHUWING: Er kan een slechte werking of geheugenverlies optreden
door een sterke frequentiestoring of elektrostatische ontlading. Mocht er zich een
abnormale functie voordoen, trek de DC kabel uit het stopcontact en steek hem
vervolgens terug in.
Back-upbatterijen
Uw wekker kan tevens op 2 x AAA/LR03 1,5V batterijen (niet inbegrepen)
werken, zodat al uw instellingen in geval van een stroomuitval worden bewaard.
De batterijen installeren:
1. Open het batterijvak door het deksel omlaag te drukken en uit te schuiven.
2. Installeer 2 x AAA/LR03 1,5V batterijen en let hierbij op de juiste polariteit zoals
aangegeven binnenin het batterijvak.
3. Breng het deksel opnieuw aan.
Opmerking: Als het apparaat op batterijvermogen werkt, zijn alle functies,
uitgezonderd de verlichting, beschikbaar. De tijdweergave wordt tevens na enkele
seconden uitgeschakeld om energie te besparen. Druk op een willekeurige knop
om het in te schakelen.
RL998IM1178_V07_325.indd 43 24/4/18 5:45 pm
Laad nooit niet-oplaadbare batterijen op. Haal de oplaadbare batterijen uit het speelgoed voordat u deze laadt.
Oplaadbare batterijen mogen enkel opgeladen worden onder toezicht van een volwassene. Meng geen
verschillende soorten batterijen of oude met nieuwe batterijen. Het wordt aanbevolen om alleen batterijen van
hetzelfde of gelijkwaardig type te gebruiken. Plaats de batterijen volgens de juiste polariteit. Verwijder uitgeputte
batterijen uit het speelgoed. De voedingsbron mag niet kortgesloten worden. Gooi geen batterijen in vuur. Haal
de batterijen uit als u het speelgoed gedurende een lange periode niet zult gebruiken. Stel de batterijen nooit
bloot aan een warmtebron, zoals zonlicht of vuur.
WAARSCHUWING: Storing of geheugenverlies van het apparaat kan worden veroorzaakt door sterke
frequentiestoringen of elektrostatische ontlading. Als het apparaat niet naar behoren werkt, haal de batterijen uit
en plaats deze dan opnieuw.
43
NEDERLANDS

TIJD EN ALARM INSTELLEN
De tijd instellen
Bij ingebruikname van het toestel knippert de tijd op het scherm zodra het op de
voeding is aangesloten.
Druk op om het uur in te stellen en druk op om te bevestigen.
Druk op om de minuten in te stellen en druk op om te bevestigen.
Opmerking: De uurweergave stopt met knipperen na een inactiviteit van 10
seconden. Om de tijdwijzigingsmodus te activeren, druk op .
12u/24u-notatie
Druk aan de achterkant van de wekker op om de tijd op de 12u of 24u-notatie
in te stellen.
In de 12u notatie wordt AM of PM op het scherm weergegeven.
Schermhelderheid
Druk aan de achterkant van de wekker op om de helderheid van uw
tijdweergave te selecteren of het uit te schakelen.
Het alarm instellen
1. Druk op om het alarm aan of uit te zetten. wordt overeenkomstig op het
scherm weergegeven. De alarmtijd wordt tijdens het afgaan van het alarm
kortstondig weergegeven.
2. Druk en houd ingedrukt om de alarmtijd in te stellen. De cijfers voor de
uurweergave knipperen.
3. Druk op om het uur in te stellen en druk op om te bevestigen.
Druk op om de minuten in te stellen en druk op om te bevestigen.
Opmerking: Als de uur- of minutenweergave stopt met knipperen, druk opnieuw
op om het instellen te hervatten.
4. Als het alarm afgaat, druk op een willekeurige knop, uitgezonderd , om het
alarm te stoppen.
Het alarmgeluid kiezen
Druk aan de achterkant van het toestel op om het alarmgeluid te selecteren
en druk op om tussen 6 verschillende natuurgeluiden (1 tot 6) te schakelen.
U kunt tevens de radio (7) als alarm kiezen. Als geluid 7 is geselecteerd, wordt
het laatst gespeeld radiostation automatisch als het alarmgeluid ingesteld.
Volumeniveau
Druk aan de achterkant van het toestel herhaaldelijk op om het volumeniveau
tussen 1 en 15 in te stellen.
Sluimerfunctie
Eenmaal het alarm afgaat, druk op om het alarm na 5 minuten opnieuw te
laten afgaan. Het alarm wordt herhaald telkens u op de sluimerknop drukt.
NEDERLANDS
RL998IM1178_V07_325.indd 44 24/4/18 5:45 pm
44

Voordat u de radiofunctie voor de eerste keer gebruikt, laat de wekker scannen
op beschikbare radiostations binnen het frequentiebereik van 87.5-108MHz. Druk
en houd 3 seconden ingedrukt om het scannen te starten en naar actieve
kanalen te zoeken. Eenmaal er kanalen zijn gevonden, worden ze opgeslagen
als P01, P02, tot P40.
Eenmaal het automatisch scannen is voltooid en de kanalen zijn opgeslagen,
druk op om de radio aan/uit te zetten. Druk op om de opgeslagen stations
te doorlopen en uw gewenst station te selecteren.
HET LICHT INSTELLEN
Zonsopganglicht-simulatie
De zonsopganglicht-simulatie helpt u om de dag op een relaxte manier te starten
door het simuleren van ochtendzonlicht. U wordt op een natuurlijke manier
gewekt door de lichtintensiteit geleidelijk aan te verhogen naarmate uw
ingestelde alarmtijd nadert.
Het natuurgeluid of de radio wordt 2 minuten afgespeeld eenmaal het alarm
afgaat.
Als de zonsopganglicht-simulatie ingeschakeld is, druk en houd ingedrukt om
het uit te schakelen.
Zonsonderganglicht-simulatie
De zonsonderganglicht-simulatie helpt u om de dag op een ontspannende
manier te beëindigen door het simuleren van avondzonlicht. U wordt op een
natuurlijke wijze in slaap gebracht door de lichtintensiteit geleidelijk aan te
verlagen naarmate uw ingestelde inslaaptijd nadert.
1. Druk op om de zonsonderganglicht-simulatie in of uit te schakelen. wordt
overeenkomstig op het scherm weergegeven.
2. Druk en houd ingedrukt om de zonsondergangtijd in te stellen. Als de
uurweergave start met knipperen, druk op om het uur in te stellen en druk
op om te bevestigen.
3. Druk op om de minuten in te stellen en druk op om te bevestigen.
4. Als de zonsonderganglicht-simulatie ingeschakeld is, druk en houd ingedrukt
om het uit te schakelen.
Nachtlamp
Uw wekker kan tevens worden gebruikt als een leuke nachtlamp met regelbare
kleuren en helderheid.
1. Druk eenmaal op om de lamp aan te zetten.
2. Gebruik om het helderheidsniveau (1 tot 10) aan te passen.
3. Druk opnieuw op om de gewenste lichtkleur in te stellen. Druk vervolgens
op om tussen groen, rood, blauw, oranje en indigo te kiezen.
4. Druk een derde keer op om de lamp uit te zetten.
DE RADIO INSTELLEN
NEDERLANDS
RL998IM1178_V07_325.indd 45 24/4/18 5:45 pm
45

SPECIFICATIES
• AC/DC-adapter Invoer AC 100-240V, 50/60 Hz; 0.3A; Uitgang DC 5V 1A
• Wattage: 5W
• Lumen: 80lm
• Frequentiebereik: 87.5-108 MHz
VEILIGHEIDSINSTRUCTIES
GELIEVE TE LEZEN ALVORENS DIT APPARAAT TE GEBRUIKEN.
Alvorens dit apparaat te gebruiken, dient u alle gebruiksinstructies grondig te lezen. Gelieve op te merken dat dit
algemene voorzorgen zijn en misschien geen betrekking hebben op uw apparaat.
1. Lees deze instructies.
2. Bewaar deze instructies.
3. Leef all waarschuwingen na.
4. Volg alle instructies.
5. Gebruik dit product niet in de nabijheid van water en vochtigheid, bijvoorbeeld: in de nabijheid van een bad,
wasbak, gootsteen of waskuip; in een natte kelder; of in de buurt van een zwembad.
6. Trek de stekker van dit product uit het stopcontact alvorens schoon te maken. Gebruik geen vloeibare
schoonmaakmiddelen of aerosol schoonmaakmiddelen. Dit kan het scherm beschadigen. Maak schoon met
een droge doek.
7. Niet installeren nabij hittebronnen, zoals radiatoren, registers, kachels of andere apparaten (inclusief
versterkers) die hitte produceren.
8. Vernietig het veiligheidsdoel van de gepolariseerde of geaarde stekker niet. Een gepolariseerde stekker heeft
twee pennen, waarvan de ene iets breder is dan de andere. Een geaarde stekker heeft twee pennen en een
derde aardklem. De brede pen of de derde aardklem zijn voorzien voor uw veiligheid. Als de voorziene stekker
niet op uw stopcontact past, dient u een elektricien te raadplegen voor het vervangen van het verouderde
stopcontact.
9. Plaats de voedingskabel en de stekker zo, dat er niet kan worden op getrapt of dat ze niet gekneld raken en
bescherm het punt waar de kabel uit het apparaat komt.
10. Gebruik enkel toebehoren/accessoires die opgegeven zijn door de fabrikant.
11. Trek de stekker van dit apparaat uit tijdens onweersbuiten of als het apparaat een lange tijd niet zal gebruikt
worden.
12. Laat alle onderhoud over aan bevoegd onderhoudspersoneel. Onderhoud is vereist als het apparaat enigszins
beschadigd is, als de stroomkabel of stekker bijvoorbeeld beschadigd is, als er vloeistof gemorst is of
voorwerpen in het apparaat gevallen zijn, als het apparaat blootgesteld is aan regen of vochtigheid, niet
correct werkt of gevallen is.
13. Dit product dient enkel gebruikt te worden met het type stroombron aangegeven op het typeplaatje. Als u
niet zeker bent van het type stroomtoevoer bij u thuis, neem dan contact op met uw handelaar of plaatselijk
nutsbedrijf. Voor producten die werken op batterijen op andere bronnen, dient u de gebruiksinstructies te
raadplegen.
14. Het stopcontact en de verlengkabel niet overbelasten, daar dit een risico op brand of een elektrische schok tot
gevolg kan hebben.
15. Duw nooit een voorwerp in de openingen van dit product, daar ze in contact kunnen komen met gevaarlijke
voltagepunten of kortsluitingonderdelen die vuur of een elektrische schok zouden kunnen veroorzaken. Mors
of verstuif nooit een soort vloeistof in het product.
16. Probeer niet om zelf herstellingen aan dit product uit te voeren of de covers te openen of te verwijderen, daar
dit u zou kunnen blootstellen aan gevaarlijke spanning of andere gevaren. Laat alle onderhoud over aan
bevoegd personeel.
17. Stel de batterijen nooit bloot aan een warmtebron, zoals zonlicht of vuur.
18. Zorg ervoor dat het gebruikte stopcontact zich in de nabijheid van het apparaat bevindt en eenvoudig te
bereiken is.
19. De AC/DC-adapter mag tijdens het gebruik niet worden belemmerd OF dient op eenvoudige wijze bereikbaar
te zijn.
20. Om het apparaat volledig van de voeding los te koppelen, haal de stekker van de AC/DC-adapter uit het
stopcontact.
21. Stel het apparaat en de AC/DC-adapter niet bloot aan gedruppel of gespat en plaats geen voorwerpen met
een vloeistof, zoals een vaas, op of in de buurt van het apparaat.
22. Langdurig luisteren naar de speler op maximum volume kan het gehoor van de gebruiker beschadigen.
23. Houd een minimale afstand rond het apparaat voor voldoende ventilatie.
24. De ventilatie dient niet belemmerd te worden door het afdekken van de ventilatieopeningen door voorwerpen
zoals een krant, een tafellaken, gordijnen, etc.
25. Plaats geen voorwerp met een open vlam, zoals een brandende kaars, op het apparaat.
26. Het apparaat is ontworpen om te worden gebruikt in een gematigd en/of tropisch klimaat.
27. Gooi de batterijen op een juiste manier weg. Gooi gebruikte batterijen in de inzamelbakken die voor dit
doeleinde voorzien zijn.
NEDERLANDS
RL998IM1178_V07_325.indd 46 24/4/18 5:45 pm
46

VEREENVOUDIGDE EU-CONFORMITEITSVERKLARING
Lexibook® S.A.
6 avenue des Andes, Bâtiment 11
91940 Les Ulis - France
Soort product: Kleurrijke zonsopgang-wekker
Type benaming: RL998
Hierbij verklaar ik, Lexibook Limited, dat het type radioapparatuur RL998 conform is met
Richtlijn 2014/53/EU.
De volledige tekst van de EU-conformiteitsverklaring kan worden geraadpleegd op het
volgende internetadres:
http://www.lexibook.com/doc/rl998/rl998_1.pdf
Yiu Wai Man
Manager Productontwikkeling
Hong Kong
NEDERLANDS
RL998IM1178_V07_325.indd 47 24/4/18 5:45 pm
47

Om brand of schokgevaar te voorkomen, dient u uw apparaat van de AC stroombron los te
koppelen alvorens het schoon te maken. De afwerking van uw apparaat kan schoongemaakt
worden met een stofdoek en behandeld worden zoals andere meubelen. Gebruik een zachte,
propere doek bevochtigd met zuiver, lauw water om de buitenkant van het apparaat schoon te
maken. Wees voorzichtig bij het schoonmaken en afvegen van de plastic onderdelen.
GARANTIE
Dit product wordt gedekt door onze 2 jaar garantie.
Voor een claim onder de garantie of de dient na verkoop, dient u contact op te nemen met
uw verdeler en een geldig bewijs van aankoop voor te leggen. Onze garantie dekt fabricageen uitvoeringsfouten, met de uitzondering van enige beschadiging die voortvloeit uit de niet
naleving van de handleiding of uit een nalatige actie (zoals het uit mekaar halen, blootstelling
aan hitte en vochtigheid, enz.). Het is aanbevolen dat u de verpakking bewaart voor het geval
u ze later nog zou nodig hebben. In een poging om onze diensten te verbeteren, kan het
gebeuren dat er wijzigingen doorgevoerd worden aan de kleuren en de details van het product
zoals afgebeeld op de verpakking.
Referentie: RL998
Bedacht en ontworpen in Europa – Gemaakt in China
© Lexibook®
Lexibook S.A.
6 avenue des Andes, Bâtiment 11
91940 Les Ulis
France
Voor service na verkoop, neem contact op met onze teams:
www.decotech-lights.com
Alleen bestemd als sfeerverlichting
Niet geschikt als kamerverlichting in woningen.
ONDERHOUD
RL998IM1178_V07_325.indd 48 24/4/18 5:45 pm
Milieubescherming
Ongewenste elektrische apparaten dienen gerecycleerd te worden en niet
weggegooid met het algemeen huishoudelijk afval! Gelieve actief bij te dragen tot
het behoud van middelen en het milieu te helpen beschermen door dit apparaat
terug te bezorgen aan een verzamelcentrum (indien beschikbaar).
NEDERLANDS
48
IM Code: RL998IM1178
 Loading...