

Page 1
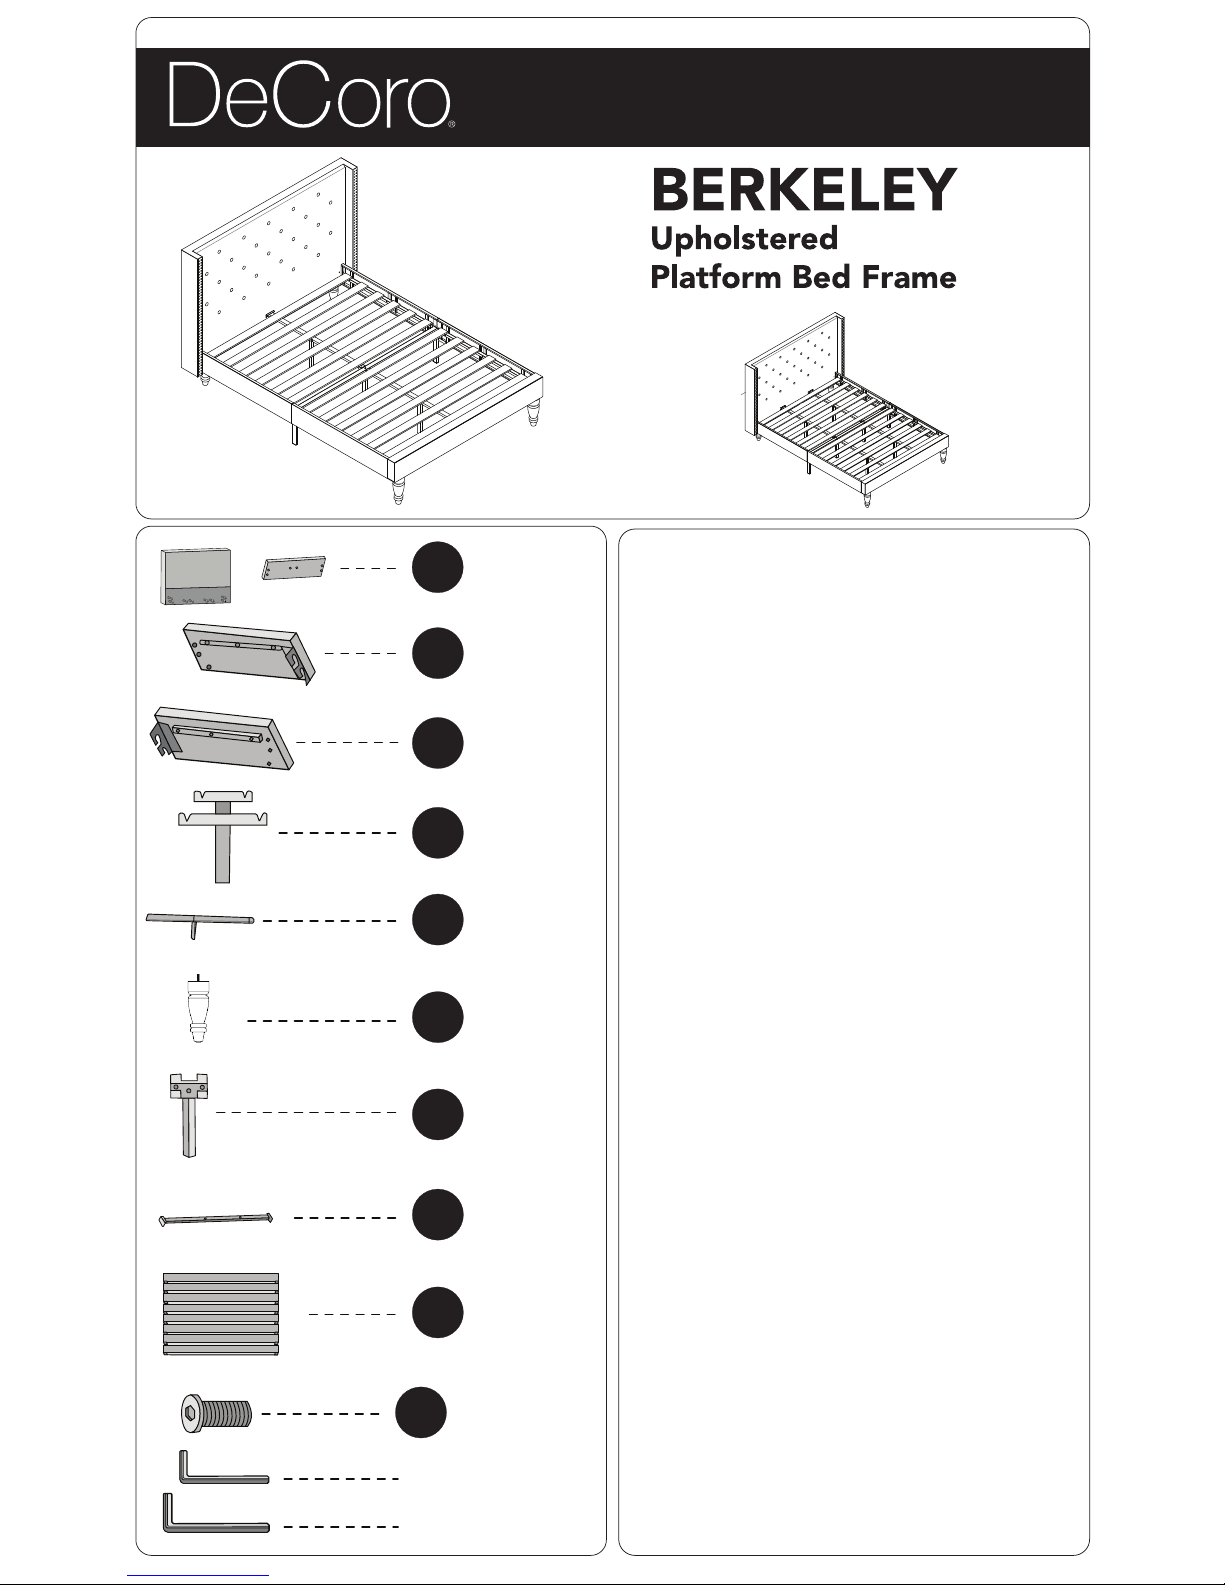
A
Footboard/
Headboard
X 2 PCS
B
C
D
E
F
G
H
I
J
Left
Side Rail
X 2 PCS
Right
Side Rail
X 2 PCS
Center
Support Leg
X 2 PCS
Leg
X 4 PCS
U-Bracket
X 2 PCS
(King & Cal King)
X 1 PC
(Twin, Twin XL, Full, Queen)
Horizontal
Support Rail
X 1 PC
Straight
Slats
X 2 PCS
4 mm Allen Key X 1 PC
5 mm Allen Key X 1 PC
Center Support Rail
X 4 PCS
(King & Cal King)
X 2 PC
(Twin, Twin XL, Full, Queen)
King, Cal King
Twin, Twin XL, Full, Queen
Assembly Instructions
Twin, Twin XL, Full, Queen, King, Cal King
IMPORTANT: Read these instructions
carefully and retain for future reference.
• Due to the size of this product, we recommend
assembling it in the room intended for use.
• Check the packaging and make sure you have all
the parts listed on this sheet.
• Before use, make sure the product is fully
assembled and the screws and bolts are tightened.
• Do not tighten screws until fully assembled and do
not over-tighten screws or bolts.
• Additional tools not included. Do not use power
tools to construct this product.
• This product should only be used on firm, level ground.
• Do not destroy the packaging until after the
product is fully assembled.
• To transport, please dismantle Bed Frame.
WARNINGS
• This product is intended to support 705 lbs. evenly
distributed weight. Do not exceed this weight.
• Keep small parts out of reach of children.
• Make sure the bed frame’s legs remain in
contact with the ground.
• Do not use this product if parts are missing,
damaged, or worn.
• Do not stand on the product.
CARE INSTRUCTIONS
• Clean with a sponge and warm soapy water.
• Never use abrasives or chemicals to clean.
• Do not use solvent-based cleaners or detergents
as they can bleach or damage the product.
• For soft fabric beds, vacuum or brush with a soft
brush on a regular basis. Spot clean with a clean
damp cloth. Do not use cleaners or detergents.
Bolts
X 10 PCS (King, Cal King)
X 5 PCS (Twin, Twin XL,
Full, Queen)
Page 2

1
3
WRONG CORRECT
4
5
6
F
A
C
B
G
E
J
B
C
A
PARTS REQUIRED: Headboard, Footboard, 4 Legs
Step 1: Attach the legs to the bottom of the footboard. Then, attach the legs
to the bottom of the headboard.
PARTS REQUIRED: Left & Right Side Rails, Horizontal Support Rail
Step 2: Assemble the left side rails by joining the two left side rail pieces in the
center to the horizontal support rail using the bolts provided. Assemble the right
side rails by joining the two right side rail pieces in the center to the
horizontal support rail using the bolts provided.
• NOTE: Make sure the pre-assembled wood slat support pieces are toward the
top of the side rails so the slats can rest evenly.
PARTS REQUIRED: Headboard, Footboard, Assembled Side Rails
Step 3: Attach the Headboard to the assembled side rails using the bolts
provided on both sides. Repeat for the Footboard.
PARTS REQUIRED: Center Support Rails, U-bracket, Bolts
Step 4: Attach the two center support rails in the middle with the U-bracket &
bolts provided.
• NOTE: There are two U-brackets for the King and California King sizes.
PARTS REQUIRED:
Center Support Rails,
Horizontal Support Rail
Step 5: Attach the center support
rail with the bolts provided.
PARTS REQUIRED: Straight Slats
Step 6: Place the straight slats on top, and enjoy your new bed frame!
A
H
DRAWINGS FOR ILLUSTRATION ONLY
DRAWINGS FOR ILLUSTRATION ONLY
DRAWINGS FOR ILLUSTRATION ONLY
DRAWINGS FOR ILLUSTRATION ONLY
DRAWINGS FOR ILLUSTRATION ONLY
DRAWINGS FOR ILLUSTRATION ONLY
2
D
B
B
D
C
C
I
 Loading...