

Page 1
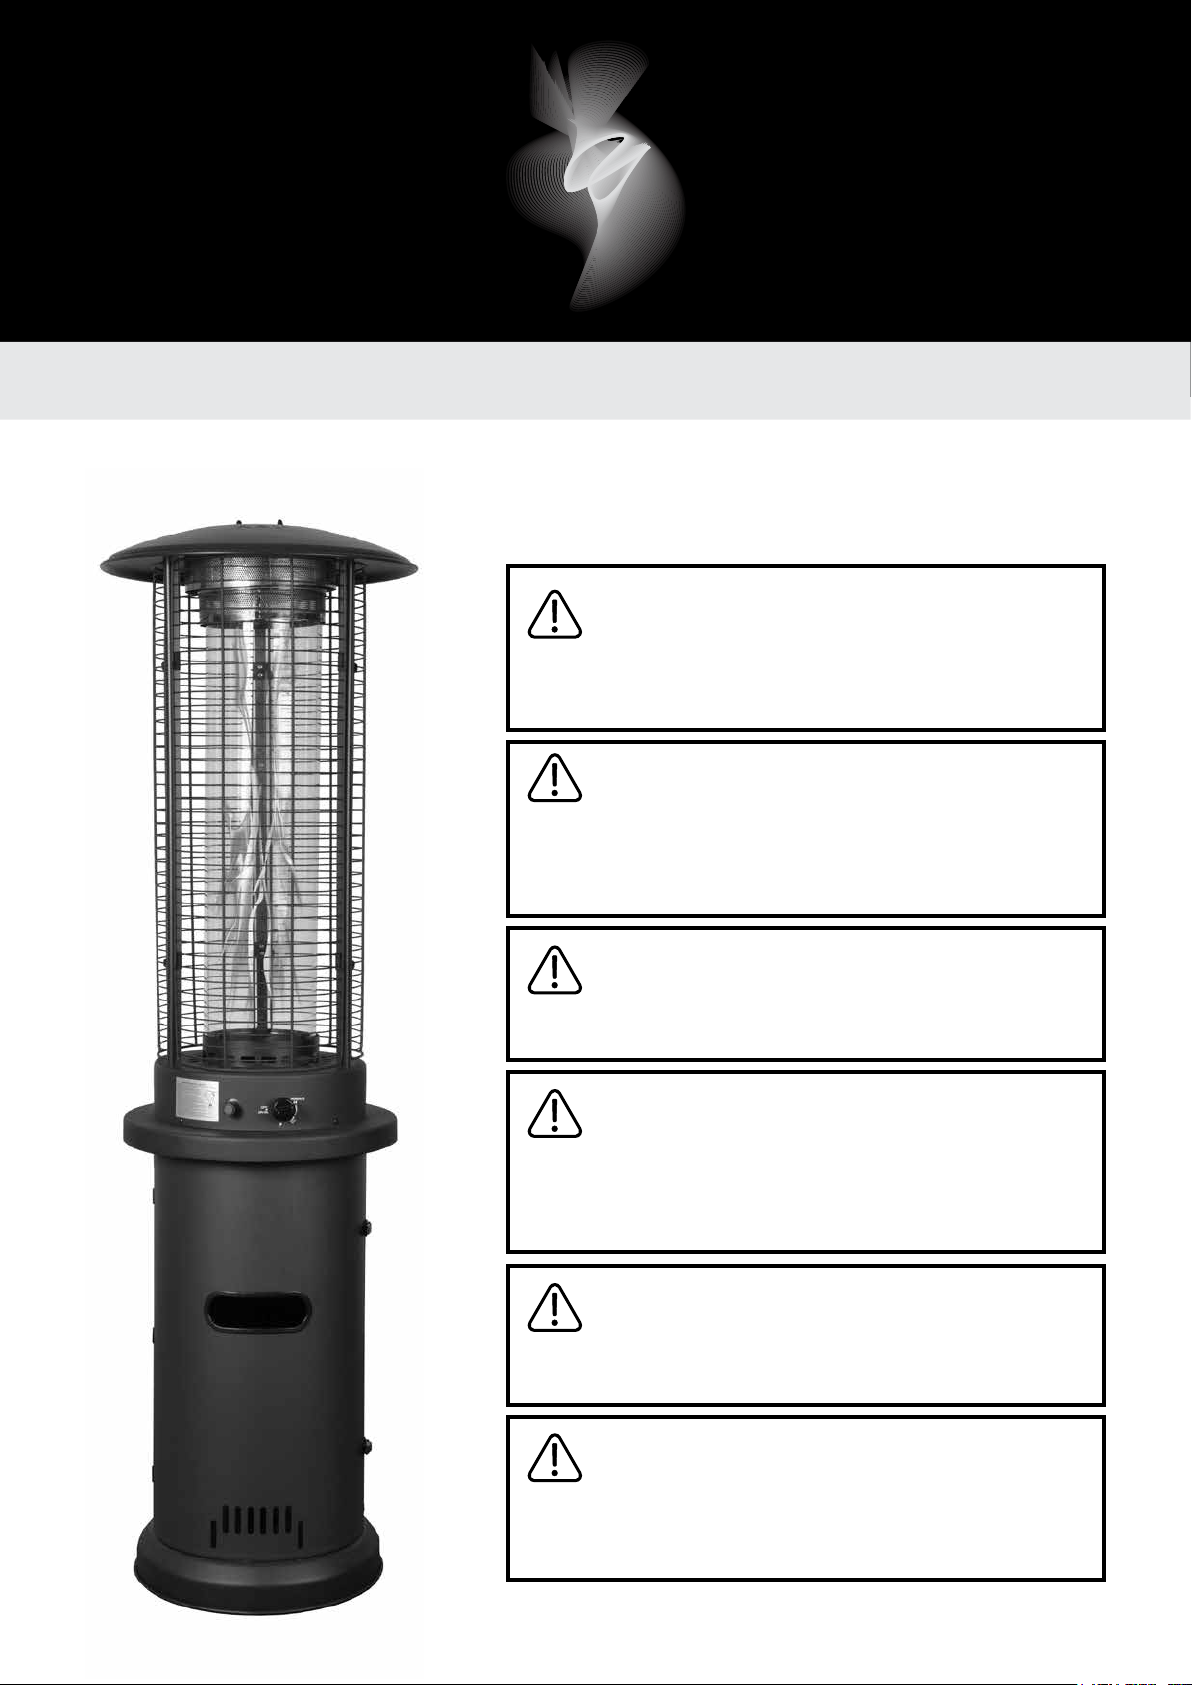
DÉCOFIRE
–
Area
HEATER
–
Assembly, Safety & Operating Instructions
FOR OUTDOOR USE ONLY
READ INSTRUCTIONS CAREFULLY BEFORE ASSEMBLY
OR USE. KEEP INSTRUCTIONS IN A SAFE PLACE
FOR FUTURE REFERENCE. THIS APPLIANCE IS NOT
DESIGNED FOR COMMERCIAL USE
DANGER
If you smell gas:
1. Shut off gas to the appliance.
2. Extinguish any open ame or ignition source
3. If odour continues, keep away from the appliance and
immediately call your local re department
WARNING
Do not store or use any ammable liquids or gases in the
vicinity of this appliance. An LP gas cylinder not connected
for use must not be stored in the vicinity of this appliance.
WARNING
Improper installation, adjustment, alteration, service
or maintenance can cause injury or property damage.
Read the owner’s manual thoroughly before installing or
servicing this equipment. If the information in this manual is
not followed exactly, a re or explosion may result causing
property damage, personal injury or loss of life.
WARNING
The glass ame tube may break if it is wet while in use;
never use the appliance while it’s raining or wet conditions
are present. Do not splash any liquid on the appliance while
it is operating or hot.
DANGER
CARBON MONOXIDE HAZARD
This appliance can produce carbon monoxide, which has no
odour. Using it in an enclosed space can kill you. Never use
this appliance in an enclosed space such as a tent, car or
basement. Do not bring this appliance indoors.
Page 1
Page 2
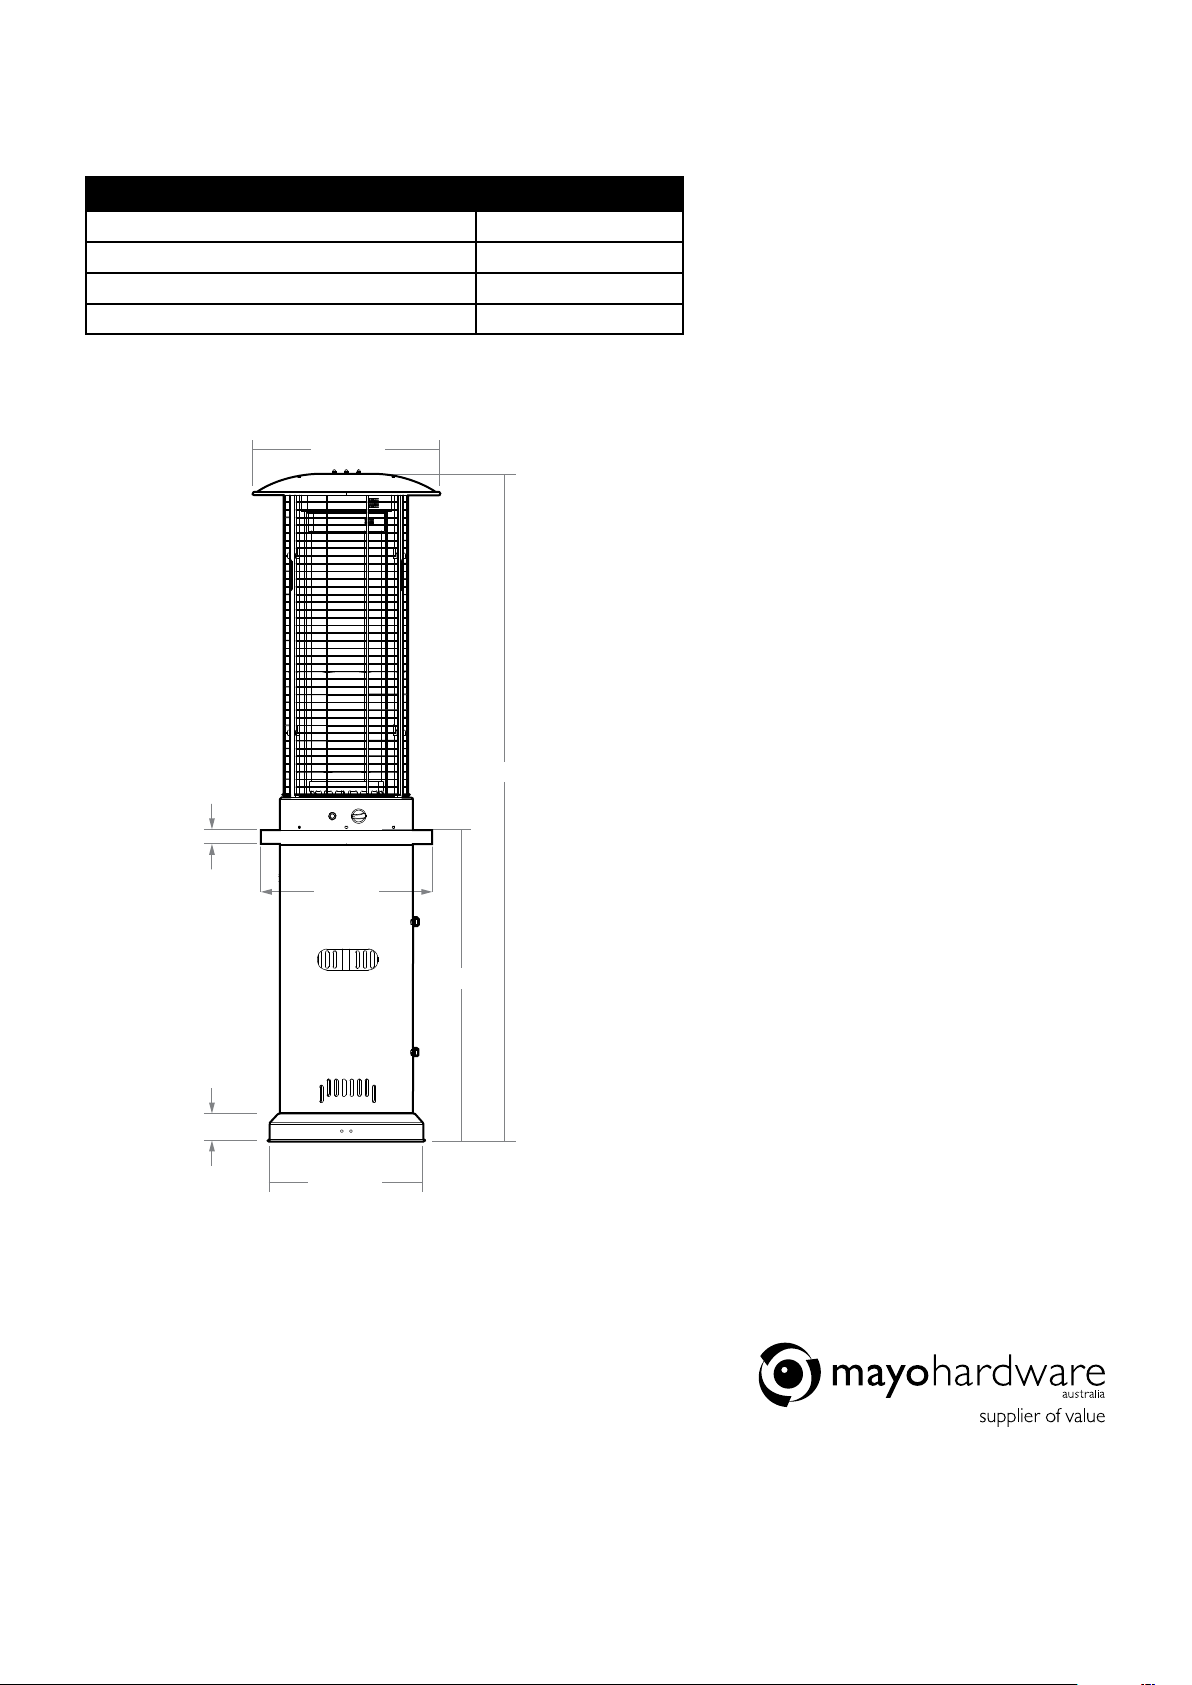
Specifications & Dimensions
Décofire (XXXXXX) Series Outdoor Heater
Specification DF102043
Gas type LPG / Propane
Gas consumption 48 MJ/Hr
Operating Pressure 2.75kPa
Injector Size 2.15mm
535mm
40mm
80mm
1860mm
490mm
850mm
450mm
Page 2
Mayo Hardware PTY LTD
4 Secombe Place, Moorebank
New South Wales 2170 Australia
Customer Service: 1300 360 211
Web: decoreheating.com.au
Page 3

IMPORTANT SAFETY WARNINGS
• THIS APPLIANCE IS DESIGNED AND INTENDED FOR OUTDOOR USE ONLY!
• This appliance shall be used outdoors, in a ventilated space and shall not be used in any enclosed area.
• This appliance shall not be installed or used indoors, inside buildings, sheds or garages or any other enclosed area.
• DO NOT SPRAY AEROSOLS IN THE VICINITY OF THIS APPLIANCE WHILE IT IS IN OPERATION.
• DO NOT place, use or store any ammable liquid or gas fuels or fuel containers within the vicinity of this appliance and
always ensure that any fuel containers or cylinders nearby are sealed or shut off to prevent escaping vapour.
• This appliance is designed and approved for use with LPG / Propane Gas Only. (Cylinder and gas sold separately)
• This appliance is NOT approved for use with Natural Gas. Do Not attempt to convert this appliance to Natural Gas.
Converting this appliance to Natural Gas is dangerous. Unauthorised conversion of this appliance will void the
manufacturer’s warranty.
• DO NOT place any article on or against this appliance. NEVER hang clothes or ammable items over or on this appliance.
• Children & adults must be alerted to the hazards of high surface temperatures and risk of burns and igniting of clothing.
• Children should be carefully supervised when they are in the area of the appliance.
• DO NOT operate this appliance unless it is fully assembled.
• This appliance must be maintained and serviced in accordance with the instructions and recommended service intervals
supplied in this instruction manual. Any repairs should be undertaken by a qualied service technician.
• This appliance should be inspected and serviced at least every 3 years by a qualied service technician.
• It is important that all control compartments, burners and circulating air passages of the appliance be kept clean for
continued safe operation.
• Only use the regulator and hose assembly provided with this appliance. Use only genuine replacement parts.
All replacement parts used must be of the same specication as originally supplied with this appliance.
GENERAL SAFETY WARNINGS
• Ensure this appliance is placed on a rm, level surface.
• Do Not use the appliance if it has been exposed to rain or water. Always allow appliance to dry before operating.
• Check the weather forecast before using this appliance. Don’t use your appliance during high winds. Avoid installing or
operating this appliance, where a direct draft may affect or fan the ames.
• Make sure that the re is completely extinguished before you leave this appliance unattended.
• Do not disassemble or modify this appliance in any manner other than as described within these instructions.
• Installation clearance requirements must be adhered to. Please read the section on installation clearances before installing
or placing this appliance.
• Do not cover or surround this appliance with insulating materials.
• The installation of this unit must adhere to local codes or AS/NZS: 5601
• Never remove or reinstall a gas cylinder from this appliance while it is in use - always turn off all valves and controls before
changing over the gas supply cylinder.
• Never use a naked ame to check for gas leaks.
• Discontinue use if any part of the gas cylinder is damaged. Rust and dents may be hazardous and should be inspected by a
gas supplier or cylinder inspection station.
• Do not operate unit until all parts are fully assembled.
• Do not paint or color any part of this heating unit.
• Never leave this appliance unattended while in use.
• Keep a safe distance to avoid burning skin or clothing.
• Do not sit on or rest hands or feet on this appliance.
• Never use the appliance in spaces which may contain volatile or airborne combustibles.
• If the ame goes out while burning, turn the gas valve off. Wait 5 minutes before repeating the initial lighting procedure.
Once you have a ame started, hold down the control knob for 1 minute.
• Do not spray appliance with water when it is operating. Do not operate appliance if any part has been submerged in water.
• Do not disconnect any part of this appliance while unit is in use.
• If this appliance is being stored indoors, detach the gas cylinder and store in a safe place -ensure all gas valves and controls
are turned to the off position.
• Do not install or operate this on a boat or vehicle.
• Always remove any protective cover (polyester, vinyl or other type of cover).
• Do not set the protective cover over the unit until it is turned off and completely cooled down.
• Always check for leaks if the appliance has not been used for an extended period.
• Inspect the gas hose and all connections to the gas cylinder prior to each use.
• In case of high winds, you may be required to secure this unit to the ground to prevent the unit falling over.
Page 3
Page 4

OPERATING SAFETY WARNINGS
• Always follow lighting instructions carefully.
• This appliance is not intended for cooking.
• Appliance may be hot while in use, do not attempt to move it while in use.
• Always observe any local or state re warnings.
• Do Not use gasoline, petrol, ethanol, alcohol, turpentine, kerosene, lighter uids or any other liquid fuels in conjunction
with this appliance. This is dangerous and may result in an explosion.
• While this appliance is operating or hot, do not touch the main heating surface or immediate surroundings as these areas
may be hot and could cause burns.
• Do not use this appliance for any purpose other than its intended use.
• To prevent accidental re and / or smoke damage, remove all packaging before lighting or operating this appliance.
• Do not heat any unopened plastic, glass or metal containers on or in this appliance. Pressure may build up and cause the
container to burst, resulting in serious personal injury or death, property damage or damage to this appliance.
• Never move this appliance when it is operating or hot.
• Do not use this appliance while under the inuence of alcohol, prescription or non-prescription drugs or any substance
that may impair sound judgment.
• Avoid wearing loose clothing while operating this appliance.
CHILD & PET SAFETY WARNING
• Never let children operate this appliance without close supervision. Children must be supervised while near this unit
• Never leave this appliance unattended while in use. Monitor any child or pet activities around this appliance at all times.
• Gas appliances contain hot working surfaces that, if touched, may cause skin burns or scalding.
• Never leave children or pets unattended in the vicinity of where this appliance is being used.
• Do not store items of interest to children on, around or below this appliance. Children climbing on this appliance, to reach
items, could damage this appliance or be burned or seriously injured.
• Never allow children to sit or stand on any part of this appliance.
• We recommend the use of a re screen or guard to prevent children or pets from coming into direct contact with the
surfaces of this appliance while it is in use or hot.
MAINTENANCE & REPAIR SAFETY WARNINGS
• This appliance should be inspected and cleaned regularly in accordance with the instructions supplied in this manual.
• Always check this appliance prior to each use - do not use this appliance if there is a fault.
• All installation and repair should be done by a qualied service technician.
• Unless specically recommended in this manual, do not attempt to repair or replace any part of the appliance yourself.
• Only use genuine replacement parts.
• Do not operate the product if it has been dropped or damaged in any manner. Call our customer service number for
information on examination or mechanical repair or adjustment of this product.
• Any guard or other protective device removed for servicing the appliance shall be replaced prior to operating the
appliance.
• It is imperative that the control compartment, burners and circulating airways of the appliance are kept clean.
IN THE EVENT OF ACCIDENTAL FIRE
• In the event of an accidental re, if safe to do so, immediately turn this appliance off at the main control and then shut off
the cylinder control valve.
• For emergency purposes, we recommend the installation of an approved re extinguisher in the vicinity of where this
appliance is installed.
UNPACKING YOUR APPLIANCE
• Due to the weight - this product may require two people to lift the components from the carton.
• Place a sheet or blanket on the ground to protect the surfaces of this appliance when unpacking and handling.
• Carefully remove all components from the carton and remove all packaging materials from the product prior to rst use.
• Before beginning assembly of product, make sure all parts are present. Compare parts with components and hardware
contents list. If any part appears to be missing or damaged, don’t use this product and call customer service immediately.
Page 4
Page 5

WHERE TO PLACE YOUR APPLIANCE
Minimum Clearances To Combustibles
Combustible materials are materials such as wood, paper plant bres
some plastics. e.g. any material that is capable of being ignited.
Above this appliance:
Minimum of 610mm to combustible materials. NOTE: DO NOT
use this appliance under any awning or pergola if there is a risk of
the structure or materials igniting or being damaged by the heat.
610 MM
Around this appliance:
Minimum of 1metre to combustible materials.
WHEN CERTAIN MATERIALS OR ITEMS ARE STORED
ABOVE, BESIDE OR UNDER THIS APPLIANCE WHILE IN
USE, THEY WILL BE SUBJECT TO RADIANT HEAT AND
COULD BE SERIOUSLY DAMAGED.
1 MTR 1 MTR
INSTALLATION GUIDELINE
Only use this appliance in an above ground open-air situation with natural ventilation, without stagnant areas, where gas
leakage and products of combustion are rapidly dispersed by wind and natural convection. Any enclosure in which the
appliance is used must comply with one of the following:
1. An enclosure with walls on all sides,
but at least one permanent opening at
ground level and no overhead cover
2. Within a partial enclosure that
includes an overhead cover and no
more than two walls
3. Within a partial enclosure that includes an overhead cover and more than two walls, the following will apply:
(i) at least 25% of the total wall area is completely open, and
(ii) at least 30% of the remaining wall area is open and unrestricted (see Example 4 & 5).
(iii) In the case of balconies, at least 20% of the total wall area shall be and remain open and unrestricted.
Page 5
Page 6

APPLIANCE FEATURES
Protective Cover
Glass
Flame
Tube
Starter
Button
Cylinder
Compartment
Reector
Guard
Burner
Flame Control
Latches
Wheels
Anchoring
Arms / Stabilisers
Anchoring
Spikes
Page 6
Page 7

COMPONENTS AND HARDWARE
Upper
Reflector x 1
Glass Tube
Ring x 1
Burner x 1
Cylinder
Enclosure
Glass
Tube x 1
Protective
Cover
Cylinder
Housing
Support x1
Safety
Guard x 3
Cylinder
Support
Strap
Upper Frame
Support x 3
M5 x 12mm
Screw (x 2)
M6 x 12mm
Screw (x 10)
Wheel
Assembly
1.5V AA
Battery (x 1)
M8 x 16mm
Screw (x 3)
M6 Lock
Nut (x 10)
Anchoring
Arm (x 3)
Spanner (x 1)
Anchoring
Spike (x 3)
Page 7
Page 8

J
CC
DD
BB
FF
D
Step 1.
Flip the cylinder housing (D) upside down and attach
the wheel assembly (J) to the base of the cylinder
housing (D) using 2 M8 x 16 screws (CC).
D
G
CC
D
Step 2.
Attach the anchoring arms (FF) onto the base of the
cylinder housing (D) using 6 M6 x 12 screws (BB) and 6
M6 nuts (DD).
I
AA
Step 3.
Attach the cylinder housing supporter (G) into the
cylinder housing (D) using 1 M8 x 16 screw (CC) and
2 M5 x 12 screws (AA). Do not fully tighten to allow
room for adjustment later in the assembly process.
C
Step 4.
Remove the preassembled M5 screws from the upper
supporters (I), then slide the 3 upper supporters into the
slots at the top of the burner (C). Once fully inserted secure
the upper supporters (I) into the burner (C) by replacing
the M5 screws that were removed at the beginning of this
step.
Note: Be sure that the hooks on the upper supporters (I)
are facing upwards.
Page 8
Page 9

BB
DD
C
B
Step 5.
Align the holes at the bottom of the burner (C) to the
top of the cylinder housing (D) - position to have the
control panel on the burner (C) aligned
with the door on the cylinder housing (D). Through the
aligned screw holes attach the burner (C) to the top of
the cylinder housing (D) using 4 M6 x 12 screws (BB)
and 4 M6 nuts (DD). Be sure to fully tighten.
E
B
Step 6.
Remove the 3 preassembled screws from the top of the
burner (C). Attach the glass tube ring (B) to the top of the
burner (C) using the 3 screws removed at the beginning of
this step. Be sure to fully tighten.
A
Step 7.
Place the glass tube (E) into the top of the
glass tube ring (B).
Step 8.
Remove the 3 preassembled screws from the onto the top
of the upper supporters (I). Replace the 3 screws removed at
the beginning of this step to secure the upper combination
(A) to the upper supporters (I). Be sure to fully tighten.
Page 9
Page 10

F
EE
Step 9.
Attach the 3 mesh guards (F) onto the hooks at
the top of the upper supporters (I).
D
Step 10.
Use the anchoring spikes (EE) to fasten the
product into the ground (Optional).
Cylinder
Valve
Turn anti-clockwise
to connect
Regulator
Step 11.
Open the door on the cylinder housing (D)
and place the gas cylinder (not included) into
the pre-assembled cylinder support. Tighten
the support strap to ensure the gas cylinder
is fully secure. Note: Once the cylinder is
connected to the regulator in the next step, be
sure to close the door prior to use.
Page 10
Step 12.
Connect the appliance hose and regulator to the gas cylinder. POL
tting connectors are left hand threaded and must be turned anti
clockwise to connect.
Tighten the POL regulator connection by hand (only) making sure it is
fastened securely before moving on to the lighting and operating steps
in this manual.
Page 11

OPERATION
Pre-Start Checks
Prior to using the appliance at any time - including rst time and subsequent uses - it is advisable to inspect the appliance, the
hose and regulator and the gas cylinder for leaks or damage.
Appliance, Gas Controls and Burner
Inspect all major components on the appliance:
• Check the burner, glass tube and reector for any damage or build up of carbon, spider webs or nests etc.
• Check the glass ame tube for damage or cracks, do not use the appliance if cracks in the glass are present.
• Check that the wire guard is secured and undamaged.
• Check the appliance controls - (ame adjustment control and starter button) - the ame adjustment control should rotate
smoothly and the starter button, when pressed, should cause a spark to occur at the burner ignition probe.
• Ensure the ignition probe is clear of dust or debris.
Gas Hose & Regulator - Gas Line Connections
• Inspect the appliance gas hose and regulator for abrasion, cuts or other damage. If there are signs of wear, abrasion or
damage, you must replace the hose and regulator.
• If the gas hose / regulator has been disconnected from the appliance for a period of time - inspect the POL connector to
ensure it is free of any dirt, spider webs or nests etc. If not cleared, these elements can cause a blockage that will prevent
the appliance from functioning.
Gas Cylinder & Cylinder Valve
• Inspect the gas cylinder and cylinder valve for any signs of wear or damage.
• The gas cylinder should be clean and show no signs of rust or dents. If the cylinder is corroded or, has been dropped or,
sustained a dent, it will need to be inspected at an authorised cylinder inspection station. (Or swap over your cylinder for
a freshly lled one at your nearest cylinder exchange retailer).
• If the gas cylinder has been disconnected from the appliance for a period of time - inspect the cylinder valve / outlet to
ensure it is free of any dirt, spider webs or nests etc. If not cleared, these elements can cause a blockage that will prevent
the appliance from functioning.
Gas Leak Test
• Before using the appliance, it is advisable to perform a leak
test on each gas line connection.
• Prior to performing a leak test be sure there are no live
ignition sources present such as a naked ame or pilot
light for another gas appliance.
• Never ever check for gas leaks with a naked ame.
Leak Test Procedure
1. Connect the appliance hose & regulator to the gas
cylinder and make sure the valve on the gas cylinder is
turned off.
2. Check that the gas control on the appliance is turned to
the ‘OFF’ position.
3. Turn the gas cylinder valve on. Now, brush or spray
a mixture of detergent and water on all connections
including the Hose, Regulator, POL Connection, Cylinder
Valve - If bubbles form on any connection point along the
gas line or, on the gas hose, this is an indication that a
leak is present.
4. If you smell gas or a leak is discovered, turn the gas
cylinder valve off, disconnect the regulator from the gas
cylinder and do not use the appliance until the leak is
repaired. (For example, either the connection must be
re-tightened or the hose must be replaced).
Bubbles indicate
a leak present
Leak test gas
hose and at each
connection point
Page 11
Page 12

Operation
WARNING: If the lighting instructions are not followed directly a re or explosion may occur
resulting in property damage, personal injury or death.
• The glass ame tube may break if it is wet while in use; never use the appliance while it’s raining or wet
conditions are present.
• Do not splash any liquid on the appliance while it is operating or hot.
• Keep children away from the unit while in use; the glass tube may be extremely hot while in use.
• Do not touch the guard while the appliance is operating or hot.
• Ensure that the heater is on a rm and level surface. The heater may be damaged if the unit tips over.
• Never use the heater if the glass tube shows any cracks.
Operation
Observe ame height when lit.
The ame should be a yellow/blue
colour between 50 - 70cm in height.
To Light
1. Unscrew the ignition button on the burner to see if the battery (H) has already been placed inside. If the battery
(H) is not already within the ignition button on the burner, please place the battery (H) into the ignition button slot.
2. Make sure the ignition control knob is turned to the ‘OFF’ position. Connect gas cylinder and slowly open the valve
on the gas cylinder by turning the knob counterclockwise.
3. Press in and turn the ignition control knob to the “pilot” position; hold down for 1 minute.
4. Push the ignition button, while still holding down control knob down, to generate a spark.
5. Check to see if pilot is alight through the glass tube (E). If there is, turn the control knob to the “low” position.
6. For maximum ame height and heat output, turn the control knob to the “high” position.
To Extinguish
1. Push and turn the ignition control knob clockwise to the ‘OFF’ position.
2. Turn the valve on the gas cylinder to close the gas supply and disconnect the gas cylinder.
Page 12
Page 13

IN THE EVENT OF FAULT
Most problems can be easily solved by using the trouble shooting guide below to determine the cause and solution before
calling our customer service team.
Problem Cause Solution
Burner will not light
(Electric starter faults)
Burner will not light
(Gas supply faults)
Burner emits smoke Flame obstructed at burner ports Check that all burner ports are free of any dust, bugs,
Sudden drop in gas ow No gas ow / no gas Check cylinder valve is turned on / fully open.
Igniter electrode pin and / or burner
are wet
Igniter battery is incorrectly inserted Check which direction the battery is inserted.
Igniter battery is exhausted / dead Replace with a fresh 1.5V AAA battery .
Igniter electrode pin is broken Replace the electrode - Contact Décore.
Igniter electrode wire is loose or
disconnected
Electrode wire is shorting between
valve
No gas ow / no gas Check cylinder valve is turned on.
No gas ow / no gas Rell cylinder (or swap over with a freshly lled
No gas ow / no gas Check appliance ame control is turned fully on. (and
No gas ow / no gas Regulator / hose not connected - check all
Obstructed gas ow Check all hoses for kinks and bends.
Burner ports obstructed - dirt or
debris
Burner injector blocked Clear blockage. Note: do not use any physical object
Burner ports obstructed Bugs, spiders, webs or nests
Loose connection(s) Check all ttings and tighten connections as necessary
Air in gas line
(eg, after tting relled cylinder)
Regulator hose is kinked Check hose and remove any bends or kinks.
No gas ow / no gas Cylinder low or empty - rell or swap over cylinder.
Excess ow or safety shut off device
safety valve has been activated
(If tted)
Dry off with a soft cloth.
Reconnect contact wire to the igniter box.
Check for source of short - replace electrode wire if
faulty - Contact Décore.
cylinder)
then adjust as required)
connections, leak test and resume lighting and
operation procedures.
Turn off appliance ame control and cylinder valve.
Insert an opened paper clip (or similar item) into each
of the burner ports to clear them out.
to clear the injector orice, only use compressed air.
Turn off appliance ame control and cylinder valve.
Insert an opened paper clip (or similar item) into each
of the burner ports to clear them out.
Use caution when clearing any web or nest.
Purge air from gas line for a few seconds while
pushing the starter button repeatedly.
webs or nests or other debris.
Turn the ame control knob to the ‘OFF’ position.
Turn off the cylinder valve.
Check for the reason why the safety device has
activated before resetting the safety device. (Follow
the manufacturers instructions). Then turn on the gas
cylinder valve and restart the appliance as per the
lighting procedure in this manual.
Burner will not stay
alight / Flame blows out
easily
Flame obstructed at burner ports Check that all burner ports are free of any dust, dirt
of debris.
No gas ow / no gas Check cylinder valve is turned on / fully open.
No gas ow / no gas Rell cylinder (or swap over with a freshly lled
cylinder)
Page 13
Page 14

CARE AND CLEANING
• Never clean this appliance when it is hot - always allow
the appliance to cool completely before cleaning or
maintenance.
• Before performing any maintenance always shut off all gas
controls and valves and disconnect the gas cylinder from
the appliance.
• Do not use high pressure water blasting devices to clean
the surfaces of the appliance body as this may damage or
remove the surface coatings.
• Always check any cleaning product on a small area of
the underside of the product to conrm it is safe to
use. Note: Permanent damage may occur if powder or
solvent cleaners come in contact with painted or plastic
components on this appliance.
• Avoid using harsh chemical cleaners, sprays or highly
abrasive cleaning tools.
• Harsh weather conditions may cause stubborn stains,
discoloration and possibly rust pitting.
• Carbon deposits may pose as a re hazard; clean the
reector and inside of the glass tube with soap and water
if any carbon deposits are present.
CLEANING, MAINTENANCE
& SERVICING SCHEDULE
Service Item Recommended
Interval
Major appliance
inspection and service
This appliance should be
inspected and serviced
by a qualied gas service
technician.
Cleaning: Appliance Body,
Glass Flame Tube, Mesh / Wire
Guard, Burner, Reector.
Gas leak test. 1-2 months or,
2 years
6 months or, more
frequently if required.
Whenever gas cylinder is
relled or,
If the hose and regulator
has been disconnected.
Care: Body - Painted Finishes
Wipe the appliance over with a soft damp cloth and mild
detergent if required. Rinse with clean water and dry off all
components with a soft cloth before using appliance.
Care: Glass Components
Regularly clean the glass tube with a glass cleaner and rinse
with clean water and then dry the glass with a soft cloth.
Ensure the glass tube is completely dry before reinstalling
into the appliance.
Care: Stainless Steel / Aluminium Components
Regularly clean the visible stainless steel or aluminium
components with a suitable approved cleaner. Follow the
manufacturers instructions for cleaning and then rinse the
components with clean water and then dry the components
with a soft cloth. Ensure all components are completely dry
before using the appliance.
STORAGE
When not in use, this appliance must be protected from
exposure to the elements: e.g. Sun, Wind, Rain, Dust, Snow
and Ice.
Cover this appliance at all times when not in use or move
this appliance to a covered outdoor space or store the
appliance in a dry environment, for example, a garage or
suitable storage space.
If this appliance is being stored indoors, the gas cylinder
must be turned off at the cylinder valve and the gas cylinder
must be disconnected from the appliance. It is generally
recommended that any gas cylinder - when not in use - be
stored outdoors in a secure, protected and well ventilated
area.
Inspect burner and ame
control operation.
Check ignition / starter
system and battery.
Inspect hose and regulator
for damage, abrasion, cuts or
other damage.
Inspect the POL connector
and ‘O’ Ring.
Inspect the glass ame tube
for damge or cracks.
Inspect appliance guard for
damage - ensure guard is
secured to appliance.
Inspect gas cylinder. Check
for corrosion or damage to
cylinder and valve.
Check valve operation.
12 months.
12 months.
6 months or, whenever
the cylinder is relled.
12 months or, whenever
the cylinder is relled.
6 months.
6 months.
6 months or,
Whenever cylinder is
relled or reconnected
to the appliance.
SPARE PARTS
Where components require replacement these should be
obtained from the original supplier - or as advised by your
gas service technician.
Using non manufacturer approved parts or accessories may
result in a defective condition and void the warranty of this
appliance.
Page 14
Page 15

WARRANTY
Our goods come with guarantees that cannot be excluded under the Australian Consumer Law. You are entitled to a replacement or
refund for a major failure and for compensation for any other reasonably foreseeable loss or damage. You are also entitled to have the
goods repaired or replaced if the goods fail to be of acceptable quality and the failure does not amount to a major failure. The benets
to the consumer given by this warranty are in addition to other rights and remedies of the consumer under the law in relation to the
goods and services to which the warranty relates.
Term
Mayo Hardware Pty Ltd warrants this Décore™ product to be free from manufacturing defects for a period of 12 months
commencing from the date of purchase.
Conditions
• This warranty covers manufacturer’s faults and defects only.
Items not covered by this warranty:
• Working surfaces or components subject to normal wear and tear - unless it is a clear defect or manufacturing fault.
• Deterioration as a result of exposure to the elements.
• Damage caused by adverse weather conditions, fair wear and tear, accidents, misuse, negligence, re, ood, hail, earthquakes
or other natural disasters
• Alternations or repairs undertaken by an unauthorised service person.
• Modication of the appliance and and any of its components.
• Use of any non specied component or replacement part.
• Use or installation of this appliance - other than what is described in the user instructions (instruction manual)
• Removal of any safety device or guard.
• This warranty does not extend to commercial use of the product.
If a defect occurs during the warranty period and you wish to obtain a replacement, please forward to Mayo Hardware Pty
Ltd a written description and photographs of the claimed defect, and a copy of the original receipt or proof of purchase.
Full documentation must be provided within 28 days of the occurrence that leads to a claim. Any expenses incurred by the
consumer in making the warranty claim are at the cost of the consumer.
Mayo Hardware Pty Ltd reserves the right to determine manufacturing faults at their discretion. In the interests of ongoing
product development and improvement the manufacturer reserves the right to discontinue or change specications or
designs at any time without notice and without incurring obligations.
For warranty or technical support, please call Mayo Hardware Pty Ltd.
Customer Service: 1300 360 211 Web: decoreheating.com.au
Page 15
Page 16

Made in China exclusively for Mayo Hardware PTY LTD
4 Secombe Place, Moorebank NSW 2170 Australia
Customer Service: 1300 360 211 Web: decoreheating.com.au
© Copyright 2018 Mayo Hardware Pty Ltd. All rights reserved. All material within this
document is protected under copyright. No part of this document shall be reproduced
for any purpose without the express written consent of Mayo Hardware.
Page 16
Ref: 1FPT_DF102043_vs1
 Loading...