

Page 1
Introduction
Carefully plan your entire deck, from deck boards to rails and
stairs, before cutting your first board or drilling your first hole.
Account for the unique design and dimensions of Deckorators
postcovers and your chosen rail system in the planning stage.
Inventory all necessary postcovers and associated rail connectors
and fasteners at the job site, before getting started. For installations over 4x4 nominal wood posts, you will need (2) 2x4-pieces
of treated or cedar lumber per in-line rail postcover and (4) 2x4
pieces of treated or cedar lumber per corner rail postcover. The
length of the 2x4 depends on the height of the postcover. 42”
postcovers require 41" high 2x4s and the 53" requires 52"
high pieces.
Items you may need to complete the installation :
• Exterior masonry adhesive
(epoxy or silicone caulk)
• Wood shims
• Drill
• 1/8" Masonry drill bit
• Saw (if trimming is required)
• Diamond masonry blade
(if trimming is required)
• Carpenter’s pencil
• 100 grit coarse aluminum
oxide sandpaper
• 2x4s as required
(see introduction section)
• 2-1/2" wood deck screws
as required
• #8 x 3-1/2" exterior grade
screws* (2 per rail bracket)
• Safety glasses
®
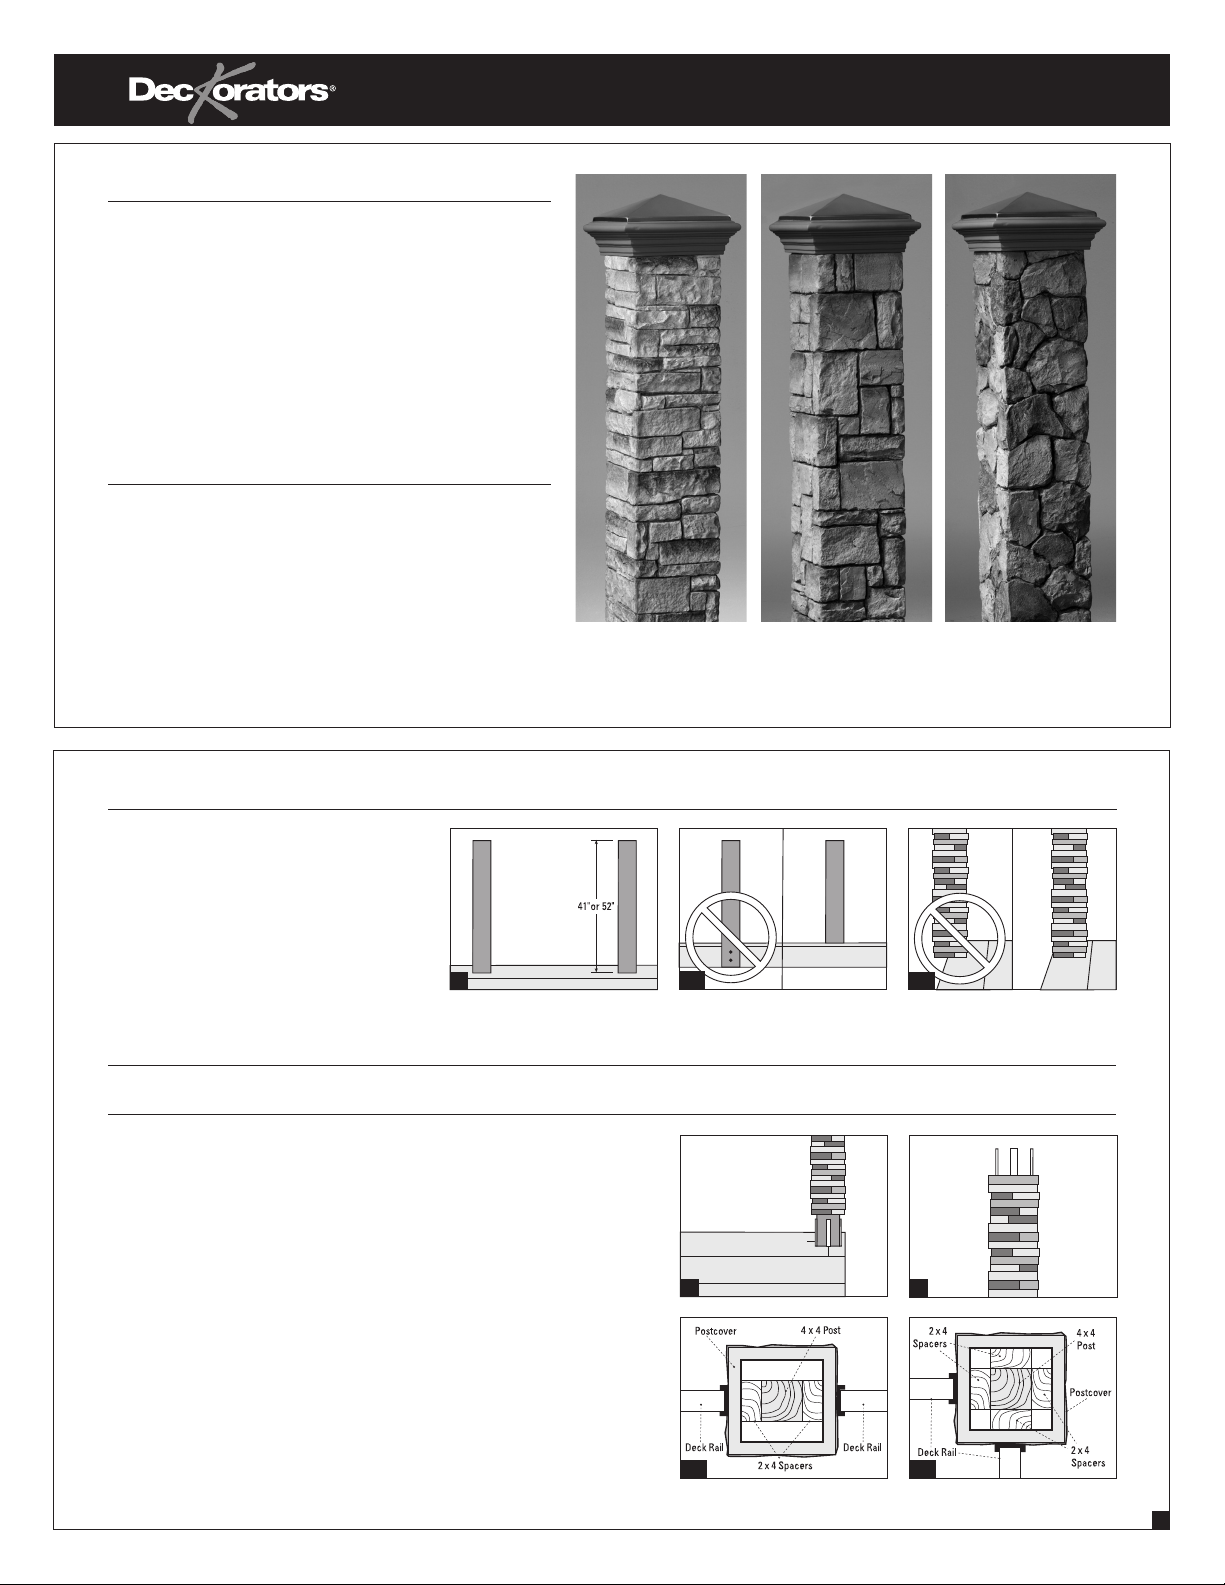
42” and 53” Postcover Installation Instructions
Stacked Stone Cobblestone Fieldstone
Step 1 • Secure 4x4 or 6x6 nominal treated or cedar wood posts
A The deck design will dictate how you
install and secure the deck posts. Be
sure the post extends 41 inches above
the deck surface to ensure a proper fit with
the 42" postcover and 52" above the deck
for a proper fit with the 53" postcover.
B Posts should be installed on the inside
of the deck frame, to allow the postcover
to rest entirely on the decking.
A
Note: Use a saw with a diamond masonry blade if trimming of the postcover is required.
Always trim the bottom of the postcover, which is the side without the lip.
Step 2 • Install postcover
C A 6x6 S4S (smooth four sides) wood
post can vary from 5-1/4" to 5-5/8"
in thickness and may be subject to
slight irregularities. Use wood shims
at the top and bottom of the post to
ensure a snug fit. Shim the bottom
and slide the postcover over the post
to the deck base.
D Shim the top of the post for a tight,
level fit. It is important to shim evenly
on all four sides so the post remains
centered within the postcover.
E If the installation is over a 4x4 nomi-
nal wood post, then wood 2x4s will
need to be added to the sides of the
4x4 post. The number of 2x4s differs
based on the location of the wood
posts. You will need (2) 2x4-pieces
of lumber per in-line rail postcover
and (4) 2x4 pieces of lumber per
corner rail postcover. The length
of the 2x4 depends on the height
of the postcover. 42" postcovers
require 41" high 2x4’s and the 53"
requires 52" high pieces. For inline rail posts, attach the 2x4s to
the sides of the wood post where
the connector and railing will be
installed using 2-1/2" wood deck
screws. For corner posts, install
2x4s to all four sides of the post
using 2-1/2" wood deck screws.
B1
C D
E1
In-line Rail Corner Rail
B2
E2
1
Page 2
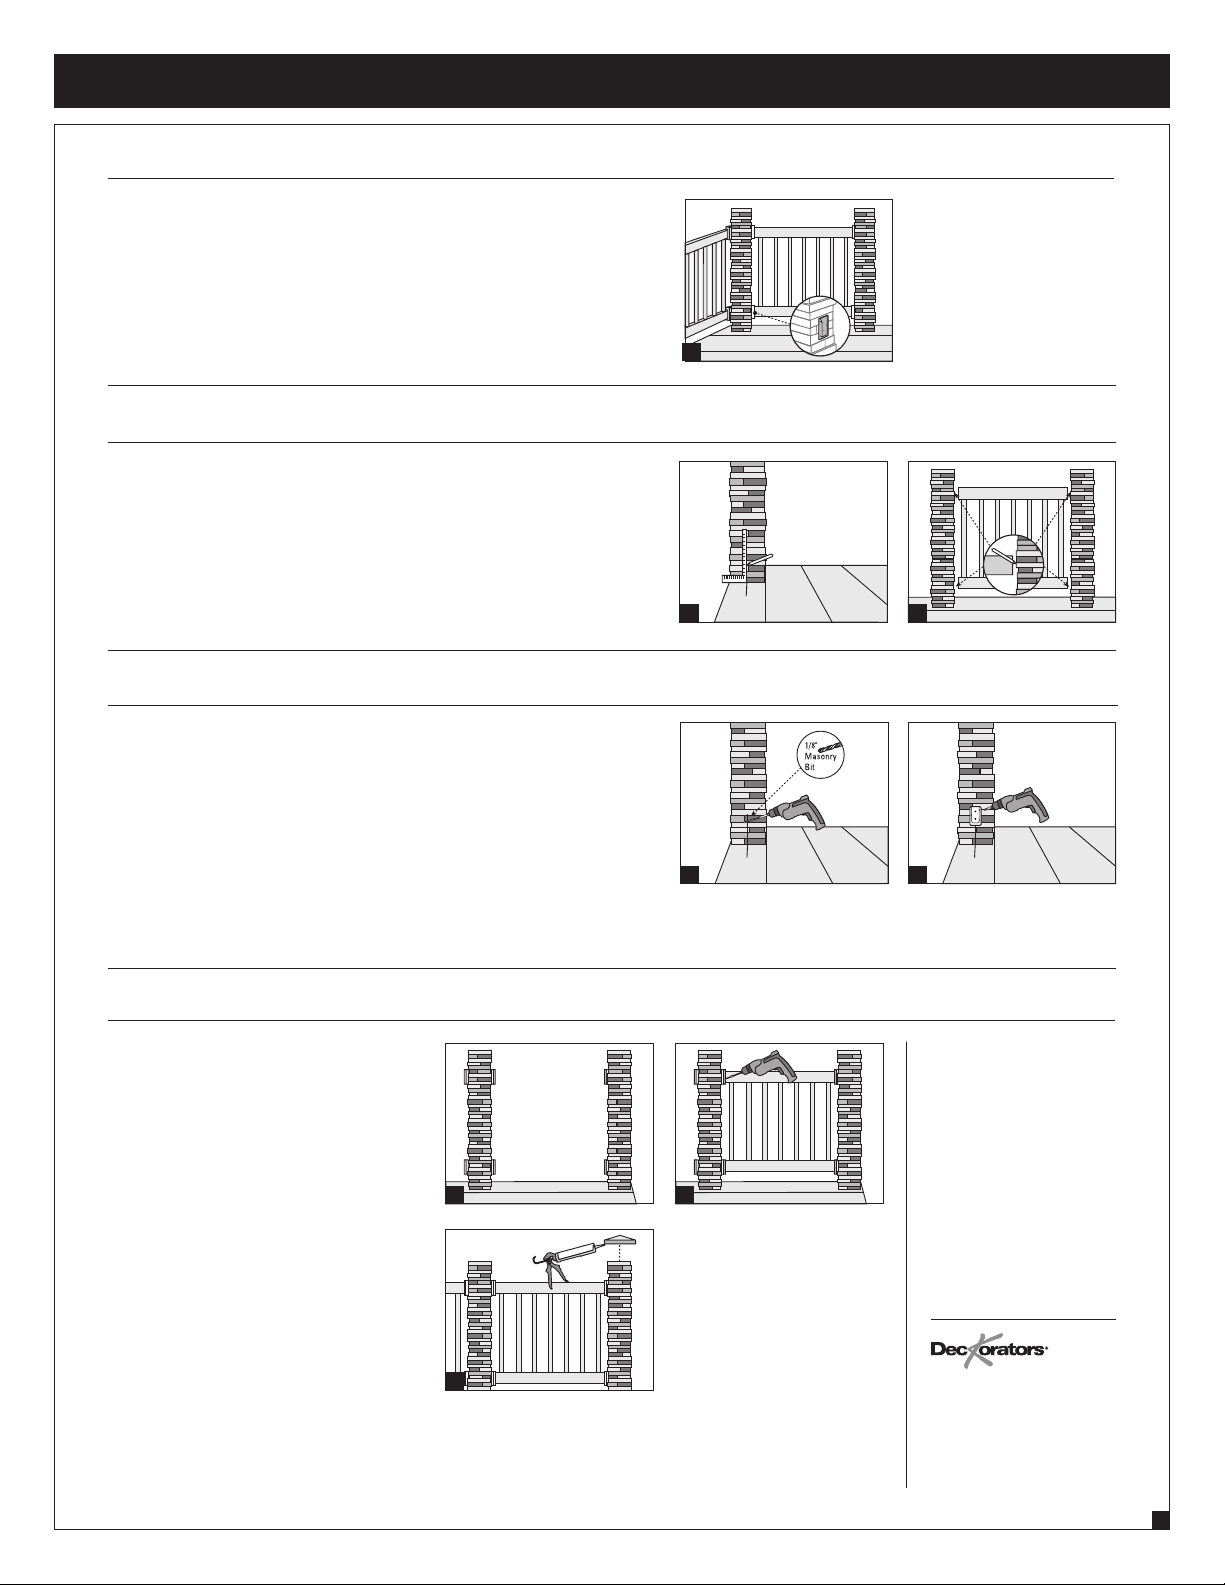
Step 3 • Build rail section
Postcover Installation
F Deckorators Postcovers can be used
with wood, composite material or vinyl
rail sections. Rail connectors
(sold separately) allow for trouble-
free 2x4 rail installation of 90-degree,
22.5-degree and 45-degree rail angles,
and 35-degree stair angles.
Step 4 • Rail connector placement
G Before you install the rail connectors,
you must first mark the center of
the postcover. To do this, make
a vertical mark on the postcover
using a carpenter’s pencil.
Step 5 • Install rail connectors
I Hold the connectors up to the post-
cover in their proper location, mark
the connector holes and pre-drill
using a 1/8" masonry drill bit.
J Fasten the connectors to the
postcover and wood post using
#8 x 3-1/2" exterior grade screws*
(sold separately). The screws
MUST be attached to the wood
post for proper structural support.
If installing any railing besides a
2x4, use the connectors provided
with the railing.
Build your first rail section to use
as a template, before adding the
rail connectors to the postcovers.
H Lift the rail section into place and
line it up with the vertical mark on
the postcover. Make sure it is level
and plumb, and mark where the rail
connectors should go.
The postcover is for decorative
use only. Although the postcover
finish was designed with rail
con nectors in mind, some sanding
may be required for a perfectly
plumb installation. Simply sand the
uneven spot within the location
of the connector bracket using
100 grit coarse aluminum oxide
sandpaper.
F
G
I
H
J
Step 6 • Finish the job
K To complete the first rail section
installation, drill holes and install
connectors on the other side.
L Cut rails to fit and place them as
you go. Secure rails to connectors
with the screws provided. Finish
deck railing.
M If using postcover post caps, use
a strong exterior masonry adhesive
to secure post cap to the postcover.
* Screw must be c ompliant with ANSI/ASME
Standard B18.6.1-1981 with a yield strength
of 90,00 0 psi.
The dia grams and ins truction s in this
broch ure are for illus tration pu rposes onl y
and are n ot meant to re place a licens ed
profe ssional. An y constru ction or use of t he
produ ct must be in ac cordance w ith all local
zoning a nd/or buildi ng codes. Th e consumer
assum es all risks and lia bility asso ciated
with t he constru ction or use o f this produc t.
The co nsumer or con tractor s hould ta ke all
K
L
Note: If any chips or blemishes
have occurred to the finish
of the postcover due to
mishandling, they can
nece ssary ste ps to ensure th e safety of
ever yone involv ed in the proje ct, including,
but not l imited to, wea ring the appr opriate
safe ty equipmen t. Excep t as containe d in
the wr itten limi ted warran ty, the Warr antor
does no t provide any o ther warra nty, either
expr ess or implied, a nd shall not be lia ble
for any d amages, incl uding conse quential
damages.
be touched up using
Deckorators postcover
touch up kits, sold
M
sepa rately.
For mo re inform ation,
visit www.deckorators.com
800.332.5724
© 2010 Univ ersal Fore st Produc ts, Inc.
All righ ts reser ved.
Decko rators is a re gistered t rademark
of Univ ersal Fore st Produc ts, Inc.,
in the Un ited State s. 6257 6/12
2
Page 3

Instructions d’installation du capuchon de poteau de 42 et 53 po
Introduction
Planifiez avec soin toute votre terrasse, des éléments de planchers
aux rampes et escaliers avant de couper votre première planche ou
de percer votre premier trou. Dans la phase de planication, n’oubliez
pas la conception unique et les dimensions des capuchons de poteaux
Deckorators
commencer, faites l’inventaire de tous les capuchons de poteaux nécessaires et les raccords de rampes et attaches associés sur le site du
travail. Pour les installations de poteaux de bois d’une valeur nominale
4x4, vous aurez besoin de (2) pièces 2x4 de bois de cèdre ou traité par
capuchon de poteau de rampe, en ligne et de (4) pièces 2x4 de bois de
cèdre ou traité par capuchon de poteau de rampe de coin. La longueur
de 2x4 dépend de la hauteur du capuchon de poteau. Les capuchons de
poteaux de 42 po exigent des 2x4 de 41 po de hauteur et le modèle de
53 po exige des pièces hautes de 52 po.
Articles dont vous avez besoin pour terminer l’installation :
• Adhésif de maçonnerie extérieure (mastic de silicone ou
époxyde)
• Cales de bois
• Perceuse
• Foret de perceuse de maçonnerie
de 1/8 po
• Scie (s’il faut tailler)
• Lame de maçonnerie de diamant
(s’il faut tailler)
®
et le système de rampes que vous avez choisi. Avant de
• Crayon de menuisier
• Papier d’émeri d’oxyde
d’aluminium 100 grains
• 2x4 au besoin (voir la section
d’introduction)
• Vis de terrasse en bois
2 1/2 poau besoin
• Vis n° 8 x 3 1/2 po de qualité
extérieure* (2 par fixation de
rampe)
• Lunettes de sécurité
Pierres empilées Cailloutis Pierre des champs
Étape 1 • Installez les poteaux de bois de cèdre ou traité nominaux 4x4 ou 6x6
A Le design de la terrasse décidera de votre
installation des poteaux de terrasse. Assurezvous que les poteaux ressortent de 41 pouces
au-dessus de la surface de la terrasse pour
assurer un ajustement approprié avec le capuchon de poteau de 42 po et de 52 po au-dessus
de la terrasse pour un ajustement approprié
avec le capuchon de poteau de 53 po.
B Les poteaux devraient être installés sur le
côté du cadre de la terrasse pour permettre au
capuchon de poteau de reposer entièrement
sur la terrasse.
A
Remarque: Utilisez une scie avec une lame de maçonnerie de diamant s’il faut tailler le capuchon
de poteau. Taillez toujours le bas du capuchon qui est le côté dans le rebord.
B1
Étape 2 • Installez le capuchon de poteau
C Un poteau de bois 6x6 S4S (lisse des
quatre côtés) peut varier de 5 1/4 à 5 5/8
po d’épaisseur et peut être soumis à de
légères irrégularités. Utilisez des cales
de bois sur le dessus et au bas du poteau
pour assurer un ajustement serré. Calez
le bas et glissez le capuchon de poteau
sur le poteau à la base de la terrasse.
D Calez le dessus du poteau pour un ajust-
ement à niveau et serré. Il est important
de caler uniformément les quatre côtés
pour que le poteau reste centré dans le
capuchon de poteau.
E Si l’installation est sur un poteau de bois
nominal de 4x4, alors un 2x4 de bois
devra être ajouté aux côtés du poteau
4x4. Le nombre de 2x4 diffère selon
l’emplacement des poteaux de bois. Vous
aurez besoin de (2) pièces de bois de
2x4 par capuchon de poteau de rampe
en ligne et de (4) pièces de bois de 2x4
selon le capuchon de poteau de rampe
de coin. La longueur de 2x4 dépend
de la hauteur du capuchon de poteau.
Les capuchons de poteaux de 42 po
exigent des 2x4 de 41 po de hauteur et
le modèle de 53 po exige des pièces
hautes de 52 po. Pour les poteaux de
rampe en ligne, installez les 2x4 aux
côtés du poteau de bois où le raccord et
la rampe seront installés en utilisant des
vis de terrasse de bois de 2 1/2 po. Pour
les poteaux de coin, installez les 2x4 aux
quatre côtés du poteau en utilisant des
vis de terrasse de bois de 2 1/2 po.
C D
E1
Rampe en ligne Rampe de coin
B2
E2
1
Page 4

Étape 3 • Construisez la section de la rampe
Installation de capuchon de poteau
F Les capuchons de poteau Deckorators
peuvent être utilisés avec des sections de
rampe de bois, de matériau composite ou
Si vous installez une rampe à côté
d’un 2x4, utilisez les raccords fournis
avec la rampe.
de vinyle. Les raccords de rampe (vendus
séparément) permettent une installation
de rampes de 2x4 sans tracas à des angles
de 90 degrés, 22,5 degrés et 45 degrés et à
des angles d’escaliers de 35 degrés.
Construisez votre première section de
rampe à utiliser comme modèle avant
d’ajouter les raccords de rampe aux
capuchons de poteau.
Étape 4 • Placement du raccord de rampe
G Avant d’installer les raccords de rampe,
vous devez d’abord marquer le centre du
capuchon de poteau. Pour y arriver, placez
une marque verticale sur le capuchon de
poteau avec un crayon de menuisier.
H Soulevez la section de rampe en place
et alignez vers le haut avec la marque
verticale sur le capuchon du poteau.
Assurez-vous qu’il est à niveau et
d’aplomb et marquez où les raccords
de rampe devraient aller.
Étape 5 • Installez les raccords de rampe
I Tenez les raccords vers le haut au ca-
puchon de poteau à leur emplacement
approprié, marquez les trous du raccord
et pré-percez en utilisant un foret de
perceuse de maçonnerie de 1/8 po.
J Attachez les raccords au capuchon du
poteau et au poteau de bois utilisant
des vis n° 8 x 3 1/2 po de qualité
extérieure* (vendues séparément). Les
vis DOIVENT être installées au poteau
de bois pour un support structural
approprié. Le capuchon de poteau est
seulement pour une utilisation décorative. Bien que le fini du capuchon soit
conçu en tenant compte de raccords
de rampe, il faudra peut-être un peu
de ponçage pour une installation
parfaitement d’aplomb. Poncez tout
simplement l’endroit inégal dans
l’emplacement de la xation du raccord
en utilisant un papier d’émeri d’oxyde
d’aluminium 100 grains.
F
G
I
H
J
Étape 6 • Fin du travail
K Pour terminer l’installation de la pre-
mière section de la rampe, percez les
trous et installez les raccords de l’autre
côté..
L Taillez les rampes pour les ajuster et
placez-les au fur et à mesure. Fixez
les rampes aux raccords avec les vis
fournies. Terminez les rampes de la
terrasse.
M Si vous utilisez des chapeaux de
capuchons de poteaux, utilisez un
adhésif de maçonnerie extérieur solide
pour fixer le chapeau au capuchon du
poteau.
* Les vis doivent être co nformes à la norme
ANSI/ASME B18.6,1-1981 avec une limite
d’é lasticité de 90 000 lb /po².
Les dia grammes et in structi ons de cett e
broch ure sont à des ns d’illustr ation
seulem ent et non pas p our remplac er un
profe ssionnel agr éé. Toute cons tructio n ou
utilis ation de ce pro duit doit êtr e conforme
aux cod es locaux de c onstruc tion et/o u de
zonag e. Le client ass ume tous les ris ques et
respo nsabilités a ssociés à la co nstruct ion
ou à l’utilis ation de ce pr oduit. Le co nsom-
K
L
Remarque : S’il y a des copeaux
ou des défauts du
fini du capuchon
de poteau à cause
d’une mauvaise
mateu r ou l’entrepr eneur doit pr endre tout es
les mes ures néces saires pour a ssurer la
sécur ité de toute p ersonne im pliquée dans
le proje t, incluant , mais sans s’y limi ter,
port er un équipem ent de sécuri té appropr ié.
Sauf in dication dan s la garantie li mitée
écrit e, le garant ne f ournit pas d ’autr e
garan tie, expres se ou implicit e, et ne sera
pas re sponsable de t ous dommag es, incluant
des dommages consécutifs.
manipulation, on
peut les retoucher en
utilisant des trousses
M
de retouche de
capuchons de poteaux
Deckorators, vendues
séparément.
Pour pl us d’inf ormatio n,
visitez www.deckorators.com
800.332.5724
© 2010 Univ ersal Fore st Produc ts, Inc.
Tous droit s réserv és.Deckor ators est
une mar que commer ciale déposé e de
Unive rsal Fores t Product s, Inc.
aux Ét ats-Unis . 6257 fre 6 /12
2
Page 5

Instrucciones para la instalación de las cubiertas de poste de 42” y de 53”.
Introducción
Planee cuidadosamente toda la terraza, desde las tablas de la
terraza hasta los pasamanos y escaleras, antes de cortar la primera
tabla o perforar el primer orificio. Tome en cuenta el diseño único
y las dimensiones de las cubiertas para poste Deckorators
sistema de pasamanos elegido en la etapa de planeación. Haga
un inventario de todas las cubiertas para poste necesarias y todos
los conectores de pasamanos y sujetadores en el sitio de trabajo
antes de empezar. Para instalaciones sobre postes nominales de
madera de 4x4, necesitará (2) piezas de 2x4 de madera tratada o
de cedro por cubierta de poste en línea y (4) piezas de 2x4 de cedro
o de madera tratada por esquina de cubierta de poste. La longitud
de la pieza de 2x4 depende de la altura de la cubierta de poste. Las
cubiertas de poste de 42" requieren de piezas 2x4 de 41" de altura
y las de 53" requieren de piezas de 52" de altura.
Artículos que puede necesitar para completar la instalación:
• Adhesivo de albañilería para
exteriores (sellador epóxico
o de silicón)
• Cuñas de madera
• Taladro
• Broca de albañilería para
hormigón de 1/8"
• Serrucho (si se requiere recortar)
• Segueta de diamante para alba-
ñilería (si se requiere recortar)
• Lápiz para carpintero
• Lija de papel de óxido de aluminio
de aspereza del 100
• Piezas 2x4 conforme se requieran
(consulte la sección de introducción )
• Tornillos para terraza de madera
de 2-1/2" conforme se requieran
• Tornillos para exterior*
#8 x 3-1/2” * (2 por abrazadera
para barandal)
• Anteojos de seguridad
®
y su
Piedra apilada Adoquín Piedra de campo
Paso 1 • Fije los postes de madera tratada nominal o de madera de cedro de 4x4 o de 6x6
A El diseño de la terraza dictará la manera en que
instalará y asegurará los postes de la terraza.
Asegúrese de que el poste se extienda 41 pulgadas por encima de la superficie de la terraza
para asegurar que tenga un ajuste adecuado
con la cubierta de poste de 42" y 52" por
encima de la terraza para que tenga un ajuste
adecuado con la cubierta de poste de 53".
B Los postes deberán instalarse dentro del
marco de la terraza para permitir que la
cubierta del poste descanse completamente
sobre el piso de la terraza.
A
Nota: Use una segueta de diamante para albañilería si se requiere recortar la cubierta del poste.
Siempre recorte la parte inferior de la cubierta del poste, que es la parte sin reborde.
B1
Paso 2 • Instale la cubierta para poste
C Un poste de 6x6 S4S (con cuatro lados
lisos) puede tener un grosor variable de
5-1/4" a 5-5/8" y puede estar sujeto a
ligeras irregularidades. Use cuñas de
madera en la parte superior e inferior del
poste para asegurar un ajuste estrecho.
Calce la parte inferior y deslice la cubierta para postes sobre el poste hasta la
base de la terraza.
D Calce la parte superior del poste para
obtener un ajuste ceñido y nivelado. Es
importante calzar uniformemente los
cuatro lados para que el poste
permanezca centrado dentro de la
cubierta del poste.
E Si la instalación se realiza sobre un
poste de madera nominal de 4x4, deberá
añadir madera de 2x4 a los lados del
poste de 4x4. La cantidad de 2x4 difiere
dependiendo de la ubicación de los
postes de madera. Necesitará (2) piezas
de madera de 2x4 por cada cubierta
de poste en línea y (4) piezas de 2x4
de madera por esquina de cubierta de
poste. La longitud de 2x4 depende de
la altura de la cubierta de poste. Las
cubiertas de poste de 42" requieren
de 2x4 de 41" de altura y las de 53"
requieren de piezas de 52" de altura.
Paralos postes en línea, fije los 2x4 a los
lados del poste de madera en donde el
conector y el barandal serán instalados,
usando tornillos para terraza de madera
de 2-1/ 2". Para los postes de esquina,
instale los 2x4 en los cuatro lados del
poste usando tornillos para terraza de
madera de 2-1/2".
C D
E1
Pasamanos en línea Pasamanos de esquina
B2
E2
1
Page 6

Paso 3 • Construya la sección de pasamanos
Instalación de cubierta para postes
F Las cubiertas para poste Deckorators
pueden utilizarse con secciones de pasamanos hechas de madera, material compuesto
Si instala cualquier pasamanos aparte
de uno de 2x4, use los conectores
provistos con el pasamanos.
o vinilo. Los conectores de barandal (se
venden por separado) le permiten la instalación sin problemas del barandal de 2x4 de
los ángulos del pasamanos de 90, 22.5 y 45
grados y de los ángulos de escalera de 35
grados.
Construya la primera sección del
pasamanos para utilizar como plantilla
antes de añadir los conectores de
pasamanos a las cubiertas para
postes.
Paso 4 • Colocación del conector de pasamanos
G Antes de instalar los conectores de pasa-
manos, primero debe encontrar el centro
del poste en relación con la cubierta para
postes. Para hacer esto, haga una marca
vertical en la cubierta de poste usando un
lápiz de carpintero.
H Eleve la sección de pasamanos hasta
su lugar, y alinéela con la marca vertical
sobre la cubierta para poste. Asegúrese
de que esté nivelada, horizontal y
verticalmente, y marque dónde deben
ir los conectores de pasamanos.
Paso 5 • Instale los conectores de pasamanos
I Sostenga los conectores sobre la
cubierta de poste en su ubicación
correcta, marque los orificios del
conector y haga un primera perforación
usando una broca para hormigón de
1/8".
J Asegure los conectores a la cubierta
de poste y al poste de madera usando
tornillos para intemperie # 8 x 3-1/2"
(se venden por separado). Los
tornillos DEBERÁN estar jos al poste
de madera para obtener el soporte
estructural adecuado. La cubierta de
poste sólo es para uso decorativo.
Aunque el terminado de la cubierta de
poste fue diseñado teniendo los
conectores de barandal en mente,
puede ser necesario lijar un poco para
obtener una instalación perfectamente
vertical. Simplemente lije el lugar
desnivelado dentro de la ubicación de
los soportes de balaustres, usando una
lija de óxido de aluminio de aspereza
del 100.
F
G
I
H
J
Paso 6 • Termine el trabajo
K Para completar la instalación de la
primera sección de pasamanos, haga
los orificios e instale los conectores
al otro lado.
L Corte los pasamanos al tamaño y
colóquelos a medida que avance. Fije
los pasamanos a los conectores con los
tornillos provistos. Termine el pasamanos de la terraza.
M Si utiliza topes para poste en las
cubiertas para poste, utilice un
adhesivo exterior fuerte para
albañilería, para asegurar el tope
del poste a la cubierta del poste.
* Los tornillos deb erán cumplir con el
estándar ANS I/ASME b18.6.1-1981
con una fue rza obtenida de 90,0 00 psi
Los dia gramas e inst ruccione s en este follet o
sólo tie nen fines ilust rativos, y n o pretende n
susti tuir a un profe sional con lice ncia. Cualquier co nstrucci ón o uso del prod ucto debe
esta r en conformi dad con todo s los códigos
de cons trucción y /o urbanis mo locales. El
consumidor asume toda la responsabilidad,
así com o los riesgos r elacionado s con la
const rucción o el u so de este pro ducto. El
K
L
Nota: Si el terminado de la
cubierta de poste se astilló
o manchó por mal manejo,
se pueden retocar usando
los kits de retoque para
cubiertas de poste
consu midor o el contr atista de ben tomar
todas l as medidas nec esarias pa ra garanti zar
la segur idad de toda s las persona s que
part icipan en el pr oyecto, inc luyendo, en tre
otro s, el uso de los equi pos de segur idad
adecu ados. Salvo e n los casos qu e figuran
en el esc rito de garan tía limitada , el garante
no ofr ece ninguna ot ra garantí a, expresa
o implíci ta, ni se consi derará resp onsable
de cualq uier daño, inclu yendo los dañ os
resultantes.
Deckorators, los cuales se
venden por separado.
M
Para o btener más i nformac ión,
visite www.deckorators.com
800.332.5724
© 2010 Univ ersal Fore st Produc ts, Inc.
Todos los derechos reservados.
Decko rators es un a marca regi strada
de Univ ersal Fore st Produc ts, Inc.
en los Es tados Unid os. 6257sp a 6/12
2
 Loading...