

Page 1
A
B
B
C C
House
Front of Deck
Side of Deck
Staggered
Blocking
Deck Stone
16" o.c.
Joist Plate
Wood Framing
Member
Add an
additional
2x4
(treated lumber)
nailer cleat to
allow the joist
plate to be
securely fastened
to the framing
member and
maintain 16"
o.c. spacing.
16" o.c.
For more information, visit www.latitudesdeck.com
Installation Instructions
TOOLS
• Measuring Tape
• Pencil
• Power Drill
• String Line
• Rubber Mallet
• Exterior Construction Adhesive
(PL400 or Equivalent)
• Skill Saw with a Diamond Blade
or Tile Saw
• Outdoor Decking Screws –
#7 x 1 5/8”
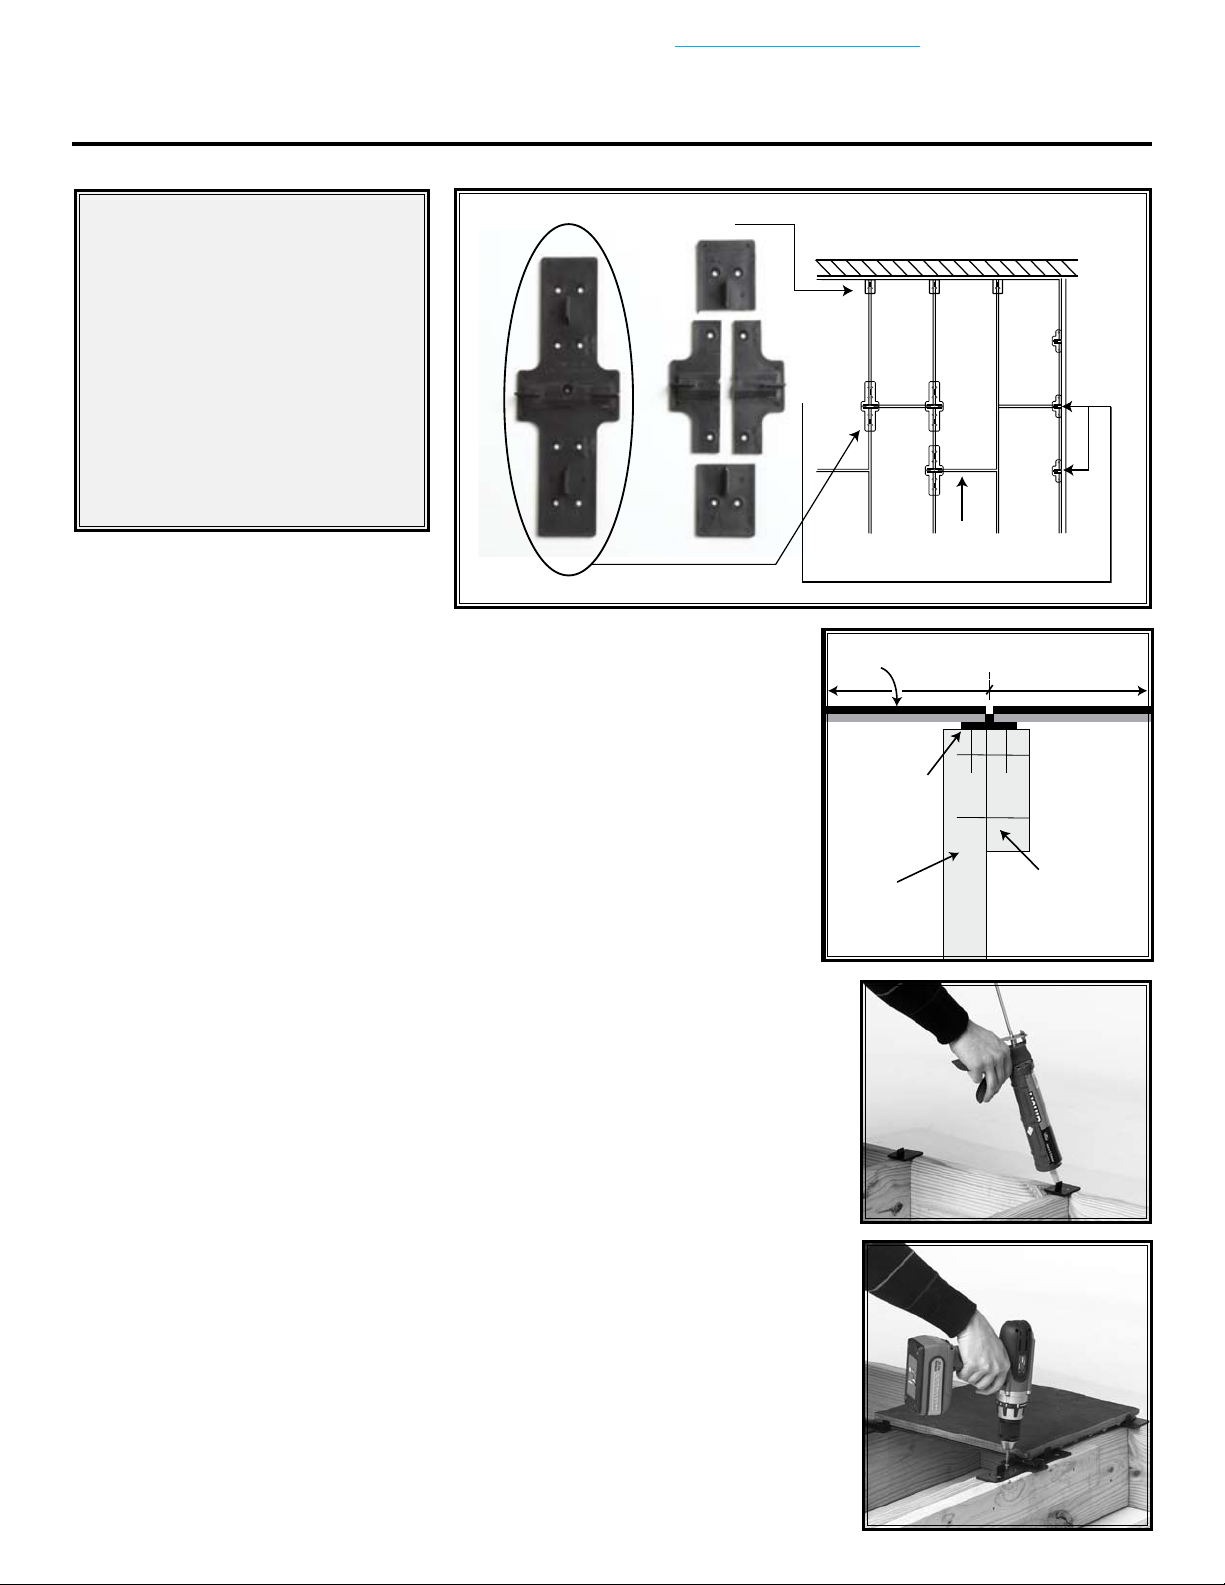
LAYOUT
When installing deck stones, first spend time considering layout possibilities. The
size of each deck stone is approximately 16” square, and 1 1/8” thick with the joist
connector. Each deck stone is made from natural materials therefore and sizes may
vary slightly. Consider this when planning your layout. Allow 1/8” transition space
between the deck stone and any other decking material for expansion and contraction.
We recommend adding an additional joist connector where the different materials
meet. Make sure the deck is framed 16" on-center. Staggered solid blocking between
joists is necessary to ensure square and even joists. Staggered blocking should be
installed at 4-foot spacing intervals. Check to ensure deck frame is square; plane
down any crowns and shim where joist sags are unavoidable. Typically, one would
place the first row of deck stones down on the outside edge and work back toward
the house. This will ensure a full tile at the outside edge and eliminate a cut. There
are, however, many deck configurations that may result in starting in the middle or
at the house.
Figure #1
Figure #2
Figure #3
STRING LINE
It is important to run string lines in both directions of the deck to ensure a straight
line and proper deck stone placement. The joist connector has built-in spacing tabs
that are designed to give the minimum spacing required. Additional spacing may be
necessary to achieve proper 16" on-center spacing.
STARTING
Familiarize yourself with the joist connector and the deck stone panel, and how they
fit together. The ribs on the bottom of the deck stone panel must run from joist to
joist. There are three different functions available with the joist connector by making
field cuts. You will need to have a cutoff saw to accomplish the cuts necessary in
the next procedure. Starting in the center of the outside edge of the deck, take part
“B” (Figure #1) and place on the joist. Screw part “B” down to the joist. *NOTE* If
joist spacing is inconsistent and offset too far, it will need to have a 2x4 sister joist
installed underneath it to provide the proper support (Figure #2).
Figure #4
Figure #4
Page 2
EDGES
When installing along the edge, if the joist connector doesn’t engage with the groove on the deck stone or there isn’t a joist
connector on that piece, apply an exterior construction adhesive on the surface of the joist connector to secure the deck stone
panel to the joist connector (Figure #3). Along the sides of the deck, use part “C” to secure the deck stone panel.
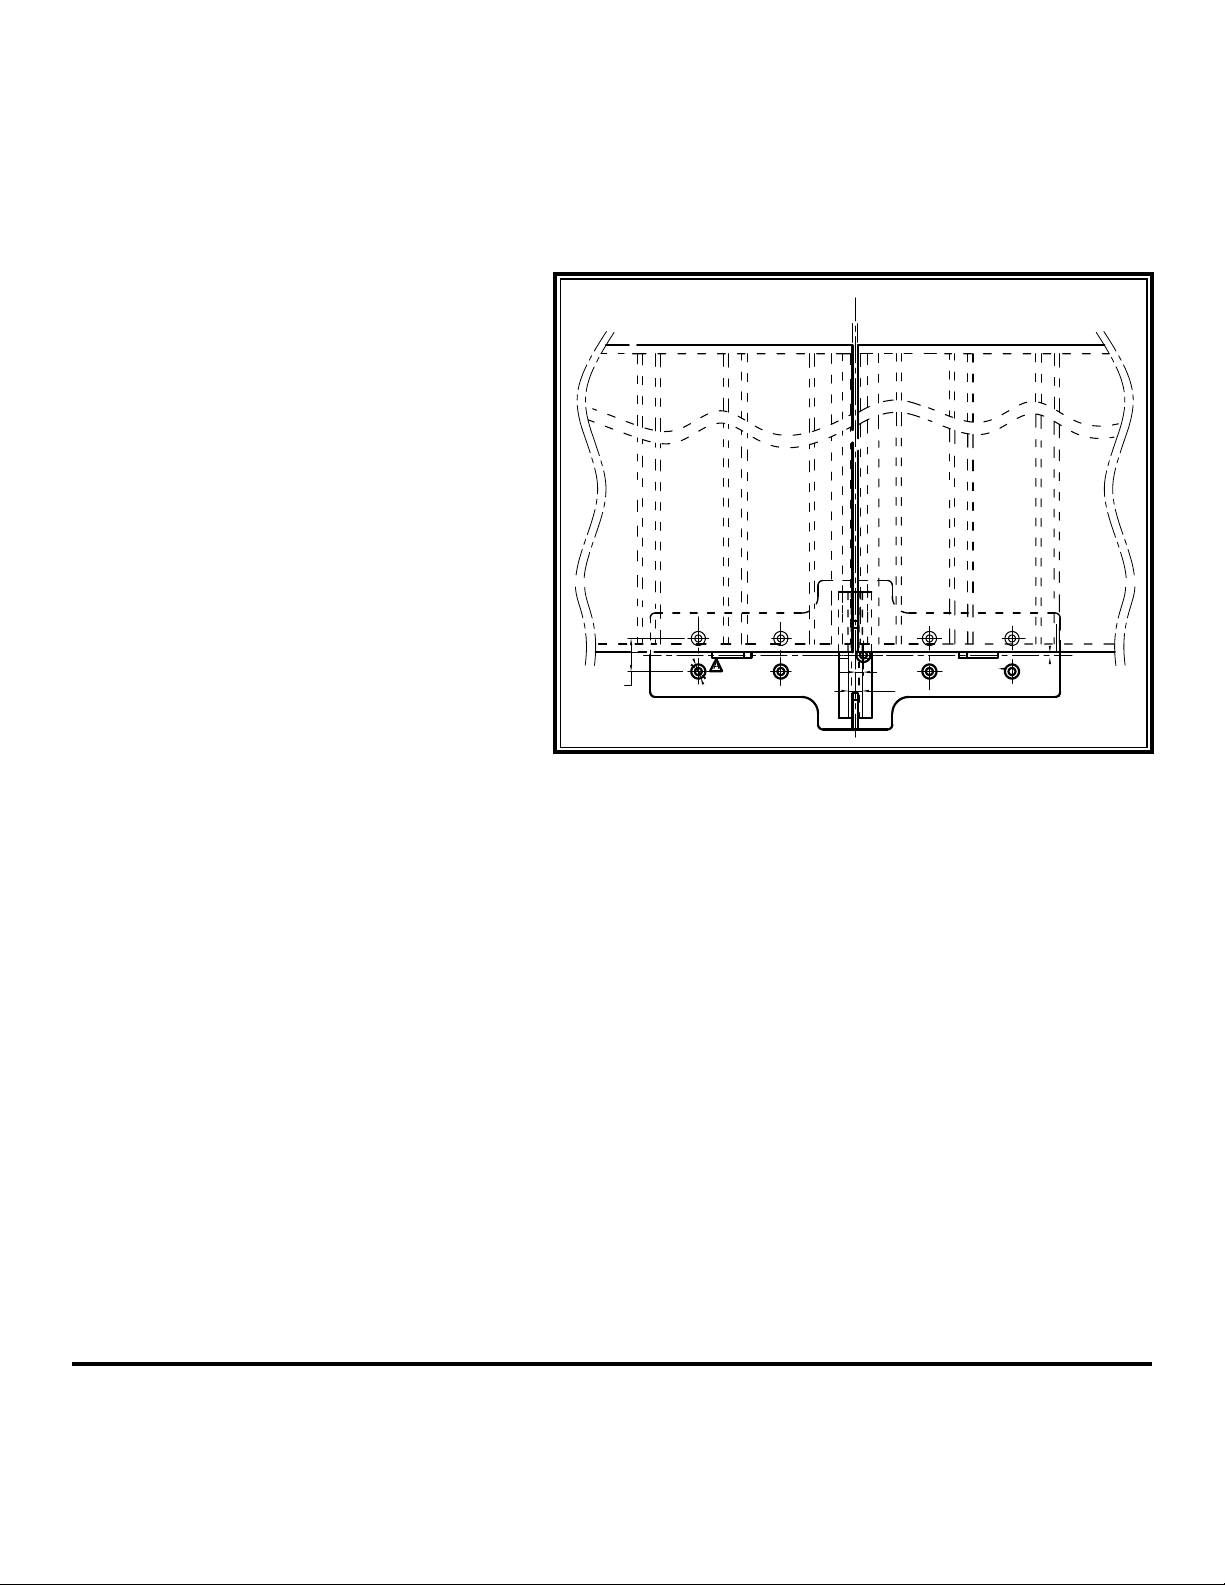
SUBSEQUENT ROWS
Once the first row is installed, the second row of
deck stone panels can be placed. After placing
the second row, joist connector A can be placed
underneath the deck stone panel. Place the joist
connectors so that the countersunk screw hole in
the center of the joist connector is exposed. Put
a screw into the joist connector hole and into the
joist below (Figure #4). Place two more screws,
staggered in remaining exposed holes (three
screws per joist connector). You may now place
subsequent rows (Figure #5).
Figure #5
FINISHING
If you have started on the outside and have worked
back toward the house, you may have a situation
where you need to trim a deck stone panel. Place
joist connector part B up close to the house.
Take exterior construction adhesive and apply
generously to the topside of joist connector part
B. Take the deck stone panel and starting at a 45-degree angle, slide the panel with the grooved end into the joist connector
from the previous row and slowly drop into place. Weight should be applied to the top surface of the cut deck stone panel to
make full contact with the construction adhesive.
MAINTENANCE
Use of an exterior impregnator sealer is required to reduce staining and to protect the stone in freeze-thaw conditions.
We recommend sealing your deck stones once a year as per warranty.
QUESTIONS?
If you have additional questions, please contact customer service at 877.463.8379.
The diagrams and instructions in this brochure are for illustration purposes only and are not meant to replace a licensed professional. Any construction or use of
the product must be in accordance with all local zoning and/or building codes. The consumer assumes all risks and liability associated with the construction or
use of this product. The consumer or contractor should take all necessary steps to ensure the safety of everyone involved in the project, including, but not limited
to, wearing the appropriate safety equipment. EXCEPT AS CONTAINED IN THE WRITTEN LIMITED WARRANTY, THE WARRANTOR DOES NOT PROVIDE ANY
OTHER WARRANTY, EITHER EXPRESS OR IMPLIED, AND SHALL NOT BE LIABLE FOR ANY DAMAGES, INCLUDING CONSEQUENTIAL DAMAGES.
© 2010 Universal Forest Products, Inc. All rights reserved. www.ufpi.com
6017-2/10
Page 3

Instrucciones de instalación
A
B
B
C C
Casa
Frente de la terraza
Lado de
la terraza
Travesaños
escalonados
HERRAMIENTAS
• Cinta métrica
• Lápiz
• Taladro eléctrico
• Cuerda alineadora
• Mazo de caucho
• Adhesivo para construcción
exterior (PL400 o equivalente)
• Sierra técnica con cuchilla
diamante o sierra para losas
• Tornillos para terrazas exteriores
- #7 x 1 5/8 pulgadas
DISEÑO
Cuando instale piedras para terrazas, dése tiempo primero para considerar las
posibilidades de diseño. El tamaño de cada piedra es de aproximadamente 16
pulgadas cuadradas y 1-1/8 pulgadas de grosor con la viga conectora. Cada piedra
para terraza está hecha de materiales naturales y por lo tanto los tamaños pueden
variar un poco. Considere esto cuando planee su diseño. Deje un espacio de
transición de ¼ de pulgada entre la piedra para terraza y cualquier otro material
de terrazas para expansión y contracción. Recomendamos que ponga un conector
adicional de viga donde se unen los diferentes materiales. Asegúrese que la terraza
esté encuadrada a 16 pulgadas en el centro. Es necesario tener travesaños sólidos
escalonados entre las vigas para asegurar vigas iguales y en escuadra. Los travesaños
escalonados se deben poner a intervalos de 4 pies. Compruebe para asegurarse que
el marco de la terraza esté encuadrado, cepille cualquier cornisa y ponga cuñas
donde sea inevitable que la viga se combe. Típicamente se pone la primera hilera
de piedras para terraza en el borde exterior, y se avanza hacia atrás hacia la casa. Esto
asegurará una losa completa en el borde externo y eliminará un corte. Hay, sin embargo,
muchas configuraciones de terrazas que pueden resultar en comenzar en el medio o en
la casa.
Figura #1
Figura #2
Figura #3
CUERDA ALINEADORA
Es importante usar cuerdas alineadoras en las dos direcciones de la terraza para
asegurar una línea recta y una colocación apropiada de las piedras para terraza. El
conector de vigas tiene incorporadas lengüetas espaciadoras que están diseñadas para
dar el mínimo espacio requerido. Se puede necesitar espacio adicional para conseguir
el espacio apropiado de 16 pulgadas en el centro.
COMIENZO
Familiarícese con el conector de vigas y con el panel de piedra para terraza y cómo
se acoplan. Las nervaduras de la parte inferior del panel de piedra para terraza deben
ir de viga a viga. Hay tres diferentes funciones disponibles con el conector de viga al
hacer los cortes. Usted debe tener una sierra tronzadora para realizar los cortes en el
siguiente paso. Comenzando en el centro del borde externo de la terraza, tome la pieza
B (Figura #1) y póngala en la viga. Atornille la pieza B en la viga. *NOTA* Si el espacio
Figura #4
Figure #4
Page 4

entre las vigas no es consistente y está muy descentrado, necesitará una viga gemela de 2x4 instalada debajo para que provea
el soporte apropiado (Figura No. 2).
BORDES
Cuando trabaje a lo largo del borde, si el conector de la viga no se acopla a la ranura de la piedra para terraza o si no hay un
conector de viga en esa pieza, aplique un adhesivo para construcción exterior en la superficie del conector de la viga para
asegurar el panel de piedra para terraza al conector de la viga (Figura #3). A lo largo de los lados de la terraza use la pieza C
para asegurar el panel de piedra para terraza.
Figura #5
HILERAS SUBSIGUIENTES
Una vez colocada la primera hilera, se puede
poner la segunda hilera de paneles de piedra para
terraza. Después de poner la segunda hilera, se
puede colocar el conector de viga A debajo del
panel de piedra para terraza. Ponga los conectores
de vigas de tal forma que se exponga el agujero de
tornillo avellanado en el centro del conector de la
viga. Ponga un tornillo en el agujero del conector
de la viga y en la viga de abajo (Figura #4). Ponga
dos tornillos más, escalonados en los restantes
agujeros expuestos (tres tornillos por conector
de viga). Usted puede ahora poner las siguientes
hileras (Figura #5).
FINALIZACIÓN
Si comenzó en la parte de afuera y tuvo que ir atrás
hacia la casa, usted puede tener una situación en
la que necesitará recortar un panel de piedra para terraza. Coloque el conector de viga pieza B cerca de la casa. Tome el
adhesivo para construcción exterior y aplíquelo generosamente en la parte superior del conector de la viga pieza B. Tome el
panel de piedra para terraza y comenzando a un ángulo de 45 grados deslice el panel con el extremo rasurado en el conector
de viga de la hilera anterior y póngalo despacio en su sitio. Se debe aplicar peso en la superficie superior del panel de piedra
para que haga completo contacto con el adhesivo de construcción.
MANTENIMIENTO
Se requiere el uso de un sellador impregnante para reducir las manchas y para proteger las piedras en condiciones
de descongelamiento. Recomendamos que selle las piedras de su terraza una vez al año como indica la garantía.
¿PREGUNTAS?
Si tiene preguntas adicionales por favor contáctese con el departamento de servicio al cliente llamando al 877.463.8379.
Los diagramas e instrucciones en este folleto son solo con fines ilustrativos y no reemplazan a un profesional certificado. Cualquier construcción o uso de este
producto debe estar de acuerdo con todos los códigos locales de planificación urbana y/o construcción. El consumidor asume todo riesgo y responsabilidad
asociados con la construcción o uso de este producto. El consumidor o contratista debe tomar todos los pasos necesarios para garantizar la seguridad
de todos los involucrados en el proyecto, incluyendo pero no limitándose al uso del equipo apropiado de seguridad. EXCEPTO COMO SE INDICA EN LA
GARANTÍA LIMITADA ESCRITA, UNIVERSAL CONSUMER PRODUCTS, INC. NO OFRECE NINGUNA OTRA GARANTÍA, SEA EXPRESA O IMPLÍCITA, Y NO
SERÁ RESPONSABLE DE NINGÚN DAÑO, INCLUSO DE DAÑOS CONSIGUIENTES.
© 2010 Universal Forest Products, Inc. Todos los derechos reservados. www.ufpi.com
6017-3/10_SPA
Page 5

Directives d’installation
A
B
B
C C
Résidence
Devant de la terrasse
Bordure de
la terrasse
Travers
espacé
OUTILS
• Ruban à mesurer
• Crayon
• Perceuse électrique
• Cordeau
• Maillet de caoutchouc
• Colle mastic extérieure
(PL400 ou l’équivalent)
• Scie rotative avec lame de
diamant ou scie à pavé
• Vis à plancher extérieures n° 7 de x 1 5/8 po
DISPOSITION
Lors de l’installation des pierres à terrasse, prenez d’abord le temps d’en planifier la
disposition. La taille approximative de chaque pierre est de 16 po sur 16 po, pour
une épaisseur de 1 1/8 po au connecteur de solive. Chaque pierre étant fabriquée
de matériau naturel, leur taille peut légèrement varier. Vous devez donc en tenir
compte au moment de la planification de leur disposition. Prévoyez un jeu d’environ
1/4 po entre la pierre et tout autre matériau ou élément de la terrasse, pour laisser
place à l’expansion et à la contraction des matériaux. Nous recommandons d’ajouter
un connecteur de solive additionnel là où les différents matériaux entrent en contact.
Assurez-vous que les solives de la terrasse sont espacées de 16 po au centre. De
solides travers doivent être mis en place entre les solives pour s’assurer qu’elles sont
au carré et de niveau. Ces travers doivent être installés tous les 4 pieds. Assurezvous que les solives de la terrasse sont bien au carré et de niveau; utilisez des cales
là où le fléchissement des solives ne peut être évité. Habituellement, la première
rangée de pierre est placée sur le bord extérieur de la terrasse, la pose se poursuivant
ensuite en direction de la résidence. Ainsi, le rebord extérieur est constitué de pierres
complètes, ce qui évite les coupes inutiles. Quoi qu’il en soit, il se peut que la forme
de la terrasse exige que le premier rang de pierres soit posé au centre ou près de la
résidence.
Figure n° 1
Figure n° 2
Figure n° 2
Figure n° 3
CORDEAU
Il est essentiel de faire des traits perpendiculaires au cordeau, dans les deux directions
sur la terrasse, pour assurer la mise en place des pierres selon des lignes bien droites.
Le connecteur de solive est doté de languettes d’espacement intégrées qui assurent
l’espacement minimum requis. Il pourrait toutefois être nécessaire de laisser de l’espace
additionnel pour assurer un espacement approprié, à raison de 16 po au centre des
solives.
POUR COMMENCER
Familiarisez-vous d’abord avec les connecteurs de solive et les pierres ainsi qu’avec la
manière dont ils s’imbriquent. Les nervures de la partie inférieure des pierres doivent
être installées d’une solive à l’autre. Les connecteurs peuvent être coupés sur place pour
être utilisés à l’une des trois positions possibles sur la terrasse. Vous aurez besoin d’une
scie tronçonneuse pour effectuer les coupes nécessaires à la procédure suivante. En
Figure n° 4
Figure #4
Page 6

vous plaçant au centre de la bordure extérieure de la terrasse, prenez la partie B du connecteur (Figure n° 1) et placez-le sur
la solive. Vissez la partie B sur la solive. *REMARQUE* Si l’espacement de la solive n’est pas uniforme et est trop décalé, il sera
nécessaire d’installer une solive jumelée de 2 po sur 4 po sous la solive pour fournir le support correct (Figure 2).
BORDURES
Lors de la pose le long de la bordure, si le connecteur de solive ne s’engage pas dans la rainure de la pierre ou s’il n’y a pas de
connecteur fixé à la pièce, appliquez un cordon de colle mastic extérieure sur le connecteur pour fixer la pierre au connecteur
(Figure n° 3). Utilisez la partie C du connecteur le long de la bordure pour fixer les pierres.
RANGÉES SUBSÉQUENTES
Lorsque la première rangée de pierre au complet
est installée, vous pouvez passer à la pose de
la seconde rangée. Une fois la seconde rangée
installée, vous pouvez placer la partie A du
connecteur de solive sous les pierres. Placez les
connecteurs de solive de sorte que les chambres
des vis à tête fraisée au centre du connecteur
soient visibles. Vissez le connecteur dans la solive
en dessous (Figure n° 4). Placez deux autres vis,
décalées dans les trous visibles qui restent (à
raison de trois vis par connecteur). Vous pouvez
alors procéder à la pose des autres rangées
(Figure n° 5).
Figure n° 5
FINITION
Si vous avez commencé la pose sur le bord
extérieur de la terrasse pour ensuite vous diriger
vers la résidence, vous pourriez avoir à couper et
à adapter les dernières pierres. Placez la partie B du connecteur de solive près de la résidence. Appliquez généreusement de
la colle mastic extérieure sur le dessus de la partie B du connecteur de solive. En tenant la pierre à un angle de 45 °, faites
glisser le côté rainuré dans le connecteur de joint de la rangée de pierres précédente, puis laissez-la doucement tomber en
place. Appuyez fermement sur la pierre que vous avez coupée pour assurer un bon contact avec la colle mastic.
ENTRETIEN
L’utilisation d’un produit d’imprégnation scellant est nécessaire pour réduire l’apparition de taches et protéger la pierre
soumise au gel/dégel. Nous recommandons l’application d’un tel produit sur les pierres une fois par année conformément à la
garantie.
DES QUESTIONS?
Si vous avez d’autres questions, veuillez communiquer avec le service à la clientèle au 1 877 463-8379.
Les diagrammes et les directives de la présente brochure sont fournis à titre illustratif seulement et ne visent pas à remplacer les services d’un professionnel
accrédité. Les travaux de construction et l’utilisation de ce produit doivent être conformes au zonage local ou au code du bâtiment en vigueur. Le consommateur
assume tous les risques et responsabilités liés aux travaux de construction et à l’utilisation de ce produit. Le consommateur et l’entrepreneur doivent prendre
toutes les mesures nécessaires pour assurer la sécurité de toute personne qui participe au projet, y compris, sans en exclure d’autres, le port de l’équipement
de sécurité approprié. SAUF POUR CE QUI EST STIPULÉ DANS LA GARANTIE LIMITÉE ÉCRITE, LE GARANT N’OFFRE AUCUNE GARANTIE, EXPRESSE
OU IMPLICITE, POUR CE PRODUIT, ET NE PEUT ÊTRE TENU RESPONSABLE DES DOMMAGES, QUELS QU’ILS SOIENT, NOTAMMENT DES DOMMAGES
INDIRECTS.
©2010 Universal Forest Products, Inc. Tous droits réservés. www.ufpi.com
6017-3/10_FRE
 Loading...