

Page 1
®
Centerline
2
3
4
5
Step 1.
Centerline
2
3
4
5
Centerline
Centerline
Centerline
2
3
4
5
Centerline
Centerline
Centerline
Step 6.
Step 5.
Deckorators
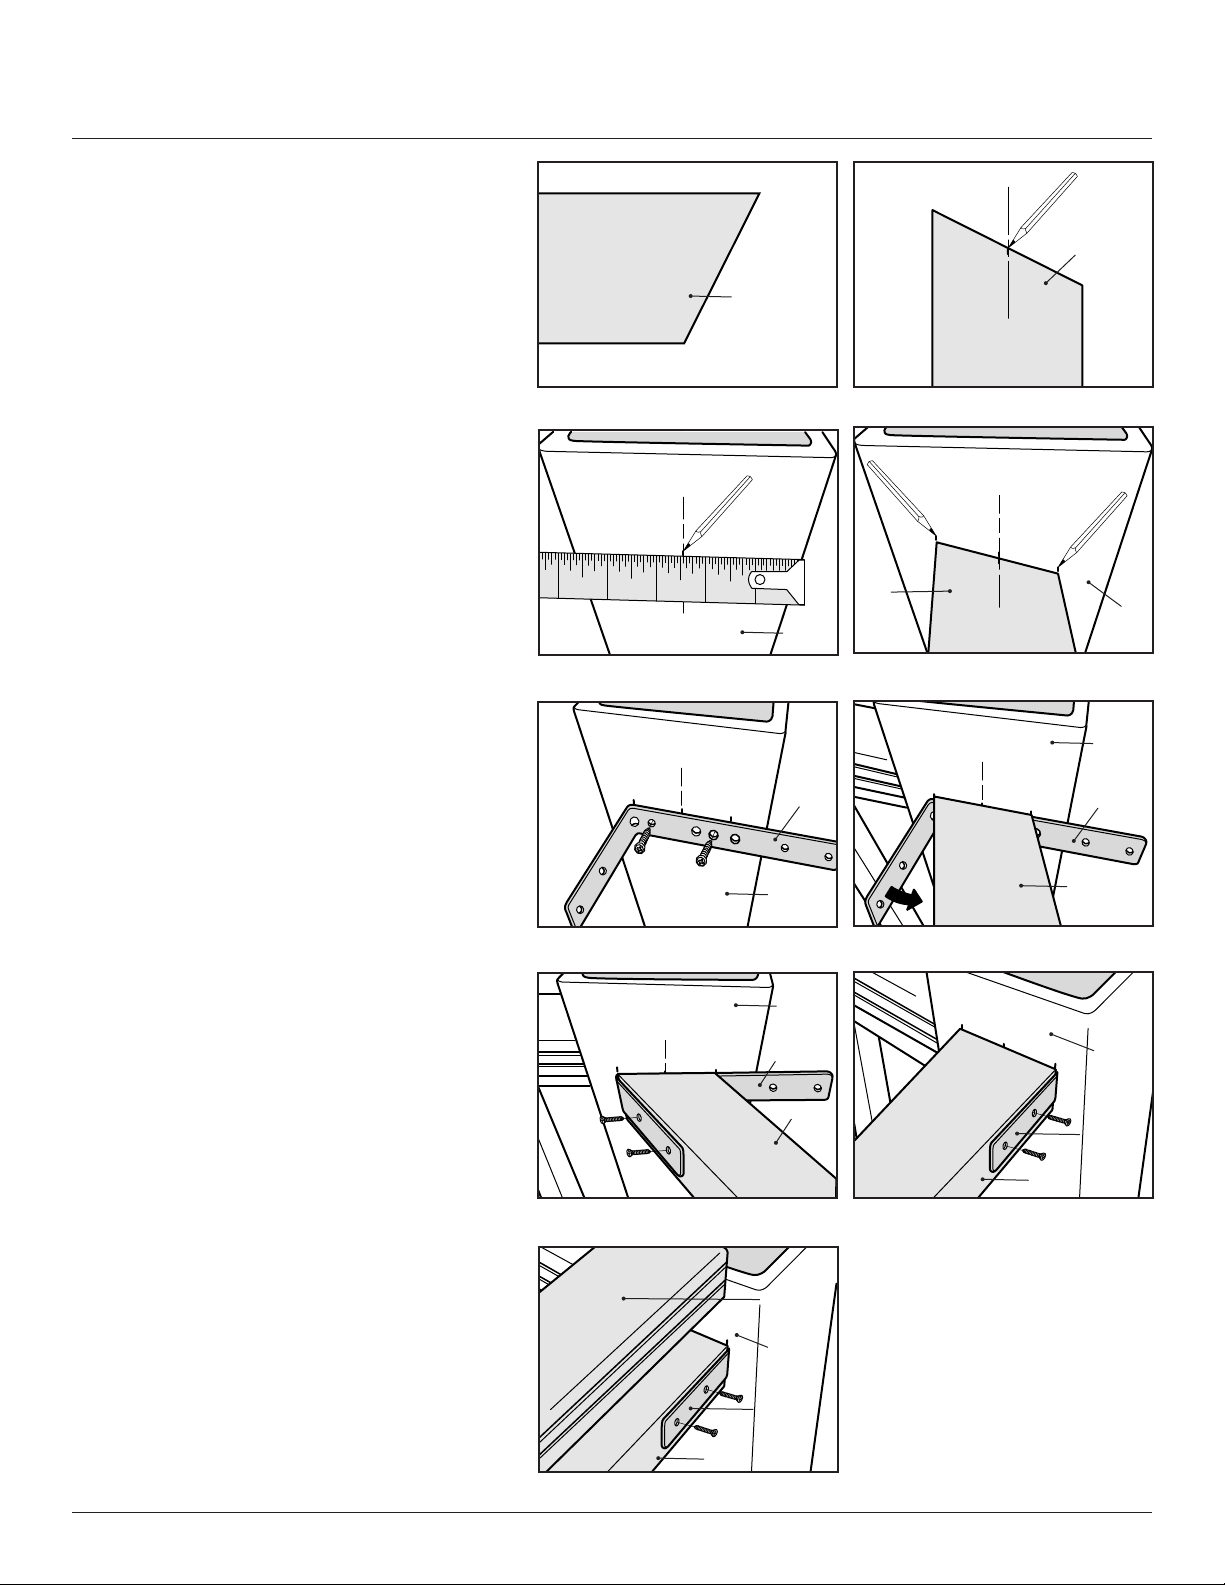
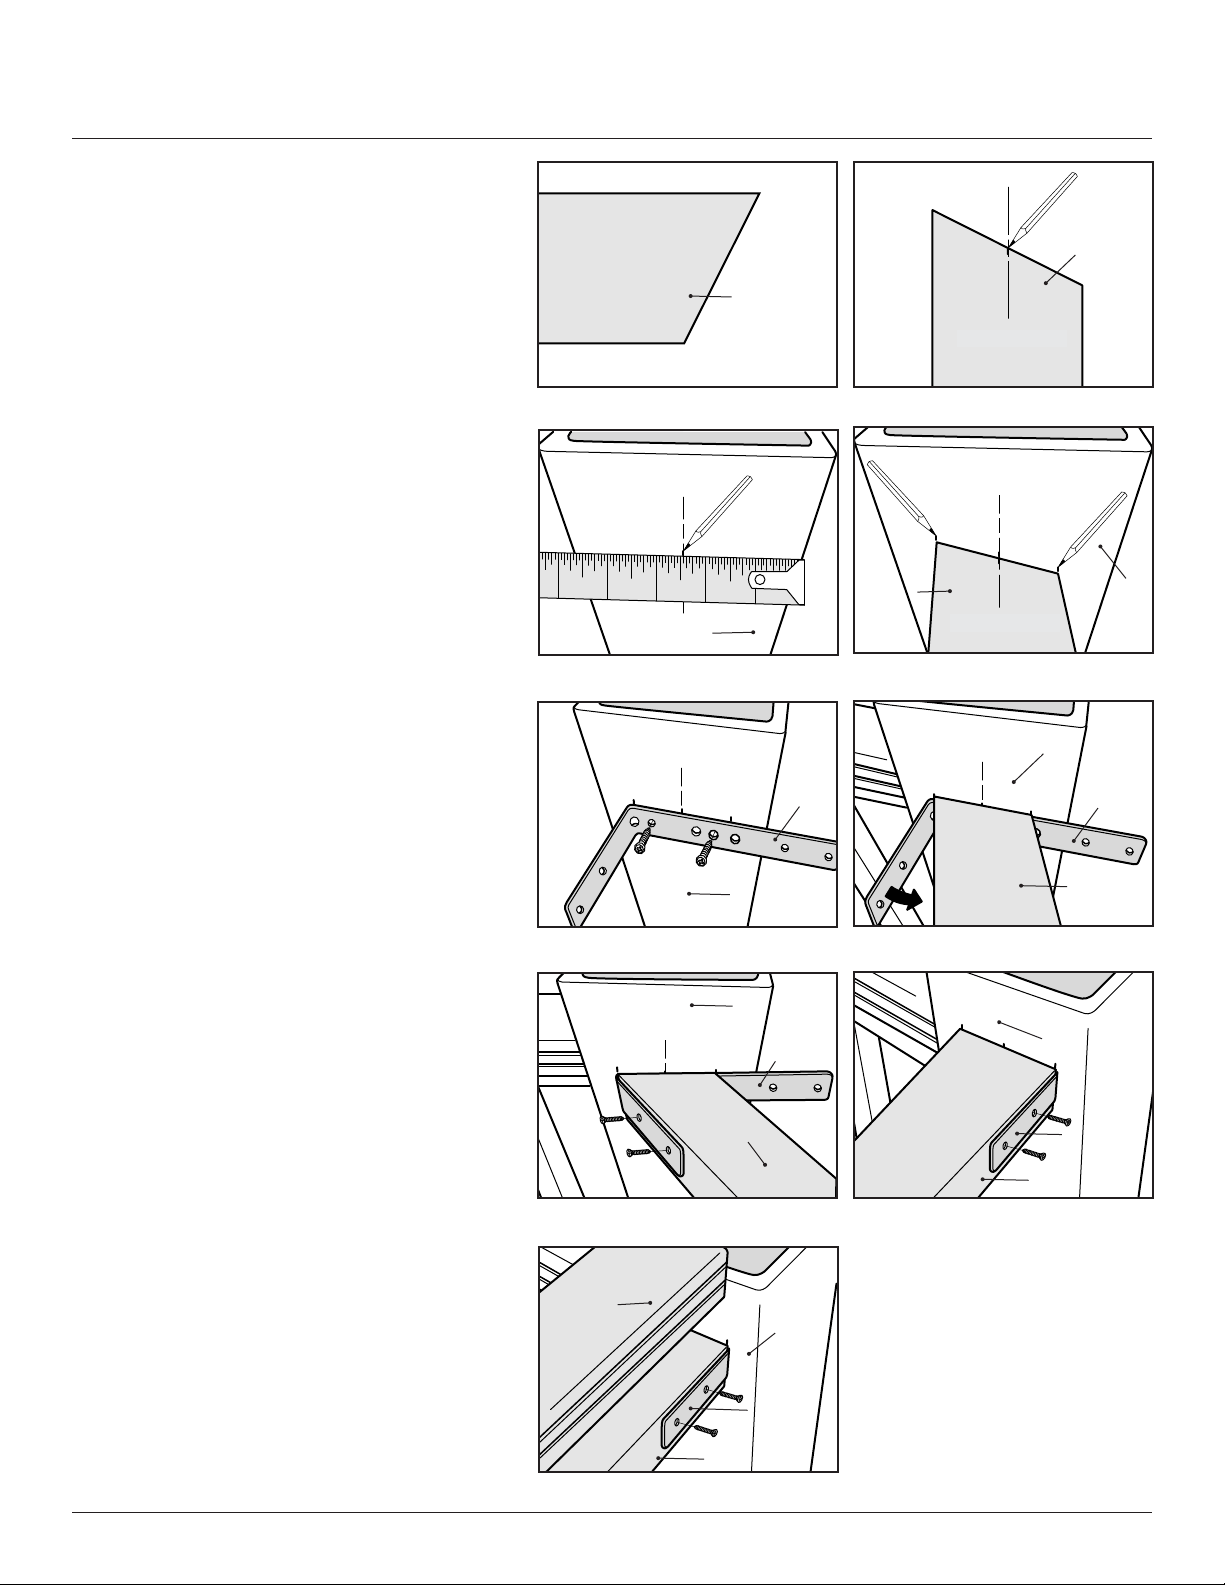
Angle Bracket Installation Instructions
Step 1. Precut the inner rail to
required angle to match post.
(fig. 1)
Inner Rail
Step 2. Mark centerline of rail and
centerline of post sleeve.
(figs. 2 & 3)
Note: The actual length of
the end cut on the rail is
dependent upon the angle
of the cut. (The sharper the
angle, the longer the cut
will be.)
Align the rail to the post center-
line and mark the width of the
rail on the post. (fig. 4)
Step 3. Using the marks as a reference,
install the angle bracket to the
post. Align the inside surface
of the short leg with the width
mark on the post. (fig. 5)
fig. 1
5
fig. 3
Centerline
4
Centerline
Inner Rail
Centerline
fig. 2
Centerline
3
2
Post
Sleeve
Angle
Bracket
Inner
Rail
fig. 4
Centerline
Centerline
Post
Sleeve
Post
Sleeve
Angle
Bracket
Step 4. Set the rail in place and bend
the bracket until it aligns with
the side of the rail. (fig. 6)
Step 5. Pre-drill the two holes in the rail
and fasten to the bracket with
small (1”) screws . (fig. 7)
Step 6. Bend the other leg of the
bracket into position against
the rail. Pre-drill and fasten with
two more small screws (1”).
(fig. 8)
Step 7. Cut the top rail to match the
angle and attach to the inner
rail. (fig. 9)
Post
fig. 5
Centerline
fig. 7 fig. 8
fig. 9
Inner Rail
Deckorators is a registered trademark of Universal Consumer Products, Inc. 6825_3/12
Sleeve
Post
Sleeve
Angle
Bracket
Inner
Rail
Top Rail
Post
Sleeve
Angle
Bracket
Deckorators.com
© 2012 Universal Forest Products, Inc. All rights reserved.
Inner Rail
fig. 6
Post
Sleeve
Angle
Bracket
Inner Rail
Page 2

Instructions d’installation de la fixation de coin Deckorators
Centerline
2
3
4
5
Step 1.
Centerline
2
3
4
5
Centerline
Centerline
Centerline
2
3
4
5
Centerline
Centerline
Centerline
Step 6.
Step 5.
Étape 1. Précoupez votre traverse in-
térieure à l’angle requis pour
correspondre au poteau.
(fig. 1)
traverse
intérieure
®
Étape 2. Marquez la ligne centrale de
la traverse et la ligne centrale
du poteau. (figs. 2 & 3)
Remarque : La longueur
réelle de la coupe finale de la
traverse dépend de l’angle de
coupe. (Plus l’angle est
prononcé et plus longue sera
la coupe.)
Alignez la traverse à la ligne
centrale du poteau et
marquez la largeur de la
traverse sur le poteau. (fig. 4)
Étape 3. Utilisez les marques comme
référence et installez la fixa-
tion sur le poteau. Alignez
la surface intérieure du pied
court avec la marque de
largeur sur le poteau. (fig. 5)
Étape 4. Installez la traverse en place
et pliez la fixation jusqu’à ce
qu’elle s’aligne avec le côté
de la traverse. (fig. 6)
fig. 1
5
fig. 3
Ligne centrale
Centerline
4
3
enveloppe
de poteau
Ligne centrale
Centerline
fig. 5
2
traverse
intérieure
fixation
enveloppe
de poteau
fig. 2
traverse
intérieure
fig. 4
Ligne centrale
Centerline
Ligne centrale
Centerline
Ligne centrale
Centerline
Ligne centrale
Centerline
enveloppe
de poteau
enveloppe
de poteau
fixation
traverse
intérieure
fig. 6
Étape 5. Pré-percez les deux trous
dans la traverse et attachez
la fixation avec les petites vis
(2,54 cm/1 po). (fig. 7)
Étape 6. Pliez l’autre pied de la fixation
en position contre la traverse.
Pré-percez et attachez avec
deux autres petites vis (2,54
cm/1 po). (fig. 8)
Étape 7. Coupez la traverse supérieure
pour correspondre à l’angle
et ajustez à la traverse
intérieure. (fig. 9)
Ligne centrale
Centerline
traverse
intérieure
enveloppe
de poteau
fixation
fig. 7 fig. 8
traverse
supérieure
enveloppe
de poteau
fig. 9
© 2012 Universal Forest Products, Inc. Tous droits réservés. Deckorators est une marque
fixation
traverse intérieure
de commerce déposée d’Universal Consumer Products, Inc. 6825_3/12
enveloppe
de poteau
fixation
traverse intérieure
Deckorators.com
Page 3
Instrucciones de instalación de abrazadera en ángulo Deckorators
Centerline
2
3
4
5
Step 1.
Centerline
2
3
4
5
Centerline
Centerline
Centerline
2
3
4
5
Centerline
Centerline
Centerline
Step 6.
Step 5.
Paso 1. Corte previamente su barandal
interior al ángulo requerido para
que se ajuste al poste. (fig. 1)
barandal
interior
®
Paso 2. Marque la línea central del
barandal y la línea central del
poste. (figs. 2 & 3)
Nota: La longitud real del corte
del extremo en el barandal depende del ángulo del corte.
(Entre más agudo sea el ángulo,
más largo será el corte).
Alinee el barandal con la línea
central del poste y marque el
ancho del barandal en el poste.
(fig. 4)
Paso 3. Usando las marcas como refer-
encia, instale la abrazadera en el
poste. Alinee la superficie interior
de la pata corta con la marca del
ancho del poste. (fig. 5)
fig. 1
5
fig. 3
Línea central
Centerline
4
3
Revestimiento
para postes
Línea central
Centerline
barandal
interior
2
abrazadera
fig. 2
barandal
interior
fig. 4
Línea central
Centerline
Línea central
Centerline
Línea central
Centerline
Línea central
Centerline
Revestimiento
para postes
Revestimiento
para postes
abrazadera
Paso 4. Coloque el barandal en su lugar
y doble la abrazadera hasta que
ésta se alinee con la parte lateral
del barandal. (fig. 6)
Paso 5. Taladre previamente los dos
orificios en el barandal y sujételo
a la abrazadera con dos tornillos
pequeños (1”) . (fig. 7)
Paso 6. Doble la otra pata de la
abrazadera en su posición
contra el barandal. Taladre
previamente y sujete con dos
tornillos pequeños más (1”).
(fig. 8)
Paso 7. Corte el barandal superior con
el mismo ángulo y ajústelo al
barandal interior. (fig. 9)
Revestimiento
fig. 5
Línea central
Centerline
para postes
Revestimiento
para postes
abrazadera
barandal
interior
fig. 7 fig. 8
barandal
superior
fig. 9
© 2012 Universal Forest Products, Inc. Todos los derechos reservados. Deckorators es una marca
Revestimiento
para postes
abrazadera
barandal interior
registrada de Universal Consumer Products, Inc. 6825_3/12
barandal
interior
fig. 6
Revestimiento
para postes
abrazadera
barandal interior
Deckorators.com
 Loading...