

Page 1

Installation Instructions:
MT6 / MT8
TOYOTA TACOMA
6'2” BED LENGTH
MT6 20052018 / MT8 2019CURRENT
TOOLS REQUIRED
• Adjustable wrench (that opens to about 1”)
• 1/2” open end wrench
• #2 Phillips screwdriver,
• Short 7/32” hex wrench
• 7/16” deep socket
• 3/8” socket
Watch short installation videos at www.decked.com/video | Register your system at www.decked.com/warranty
FOLLOW US:
VERSION 1.1
DECKED.COM | 208.806.0251
DECKED.COM | #DECKEDUSA | @DECKEDUSA MT8 | v.1.1 | Page 1
• Electric drill
• 9/64" drill bit
• 1/4” drill bit
• 5/16" drill bit
• Drill stop
• T40 Torx Driver
@DECKEDUSA | #DECKEDUSA
Page 2

CONTENTS
DECKED carton
LEFT deck half - 1
RIGHT deck half - 1
Center vert - 1
Cabside vert - 1
Drawer - 2
Left ammo can - 1
Right ammo can - 1
Left stud - 1
Right stud - 1
Ammo can lid - 2
C-channel - 2
Ruler - 1
Hardware box - 1
Torsion brace - 1
CAB
Hardware box - unbagged components
(inside DECKED carton):
Shims - 2
Weather strips - 2
Bottle opener - 1
▼ ASSEMBLY OVERVIEW ▼
RIGHT DECK
(WIDE)
RIGHT AMMO CAN LID
HARDWARE box - bagged components
PREP-MT6 or MT8 - 1
S1 1
S2 - 1
N1 - 1
J5 - 2
DRAWER 1 1
DRAWER 2 1
WHEELS 1
FINAL MID 1
PREPEXTRA 1
MS WASHERS 1
(MT8 ONLY) TACOMA TD 1
LEFT DECK
(NARROW)
LEFT AMMO
CAN LID
LEFT STUD
RULER
LEFT AMMO
CAN
CENTER VERT
LEFT
CCHANNEL
RIGHT STUD
CABSIDE VERT
RIGHT AMMO
CAN
RIGHT
CCHANNEL
TAILGATE
TORSION
BRACE
DECKED.COM | #DECKEDUSA | @DECKEDUSA MT8 | v.1.1 | Page 2
Page 3
▼ HEY! TORQUE BOY: READ BEFORE YOU INSTALL DECKED ▼
1. DON'T over tighten bolts, get em' good 'ole hand-tight.
2. DON'T use power tools.
3. If you don't follow directions and do use power tools:
1). Set clutch at a very low setting.
2). Don't blow it.
3). If you blow it, see NOTE.*
NOTE* Two extra threaded inserts are included in BAG
PREP-EXTRA. That's all you get.
4). DON'T over tighten J-hooks during installation. Make
'em good and snug enough to keep the system from
moving in the bed.
5). Start all bolts with fingers to avoid cross-threading.
NOTE: In your BAG PREP-MT6 or MT8, you will have two
types of 1" length bolts and flanged nuts. One bolt has
a 1/4" diameter, and the other bolt has a 5/16" diameter.
Don't screw this up! The flanged nuts only fit one type
of bolt, so you better at least get that right...
1"
LENGTH
1/4"
DIAMETER
5/16"
DIAMETER
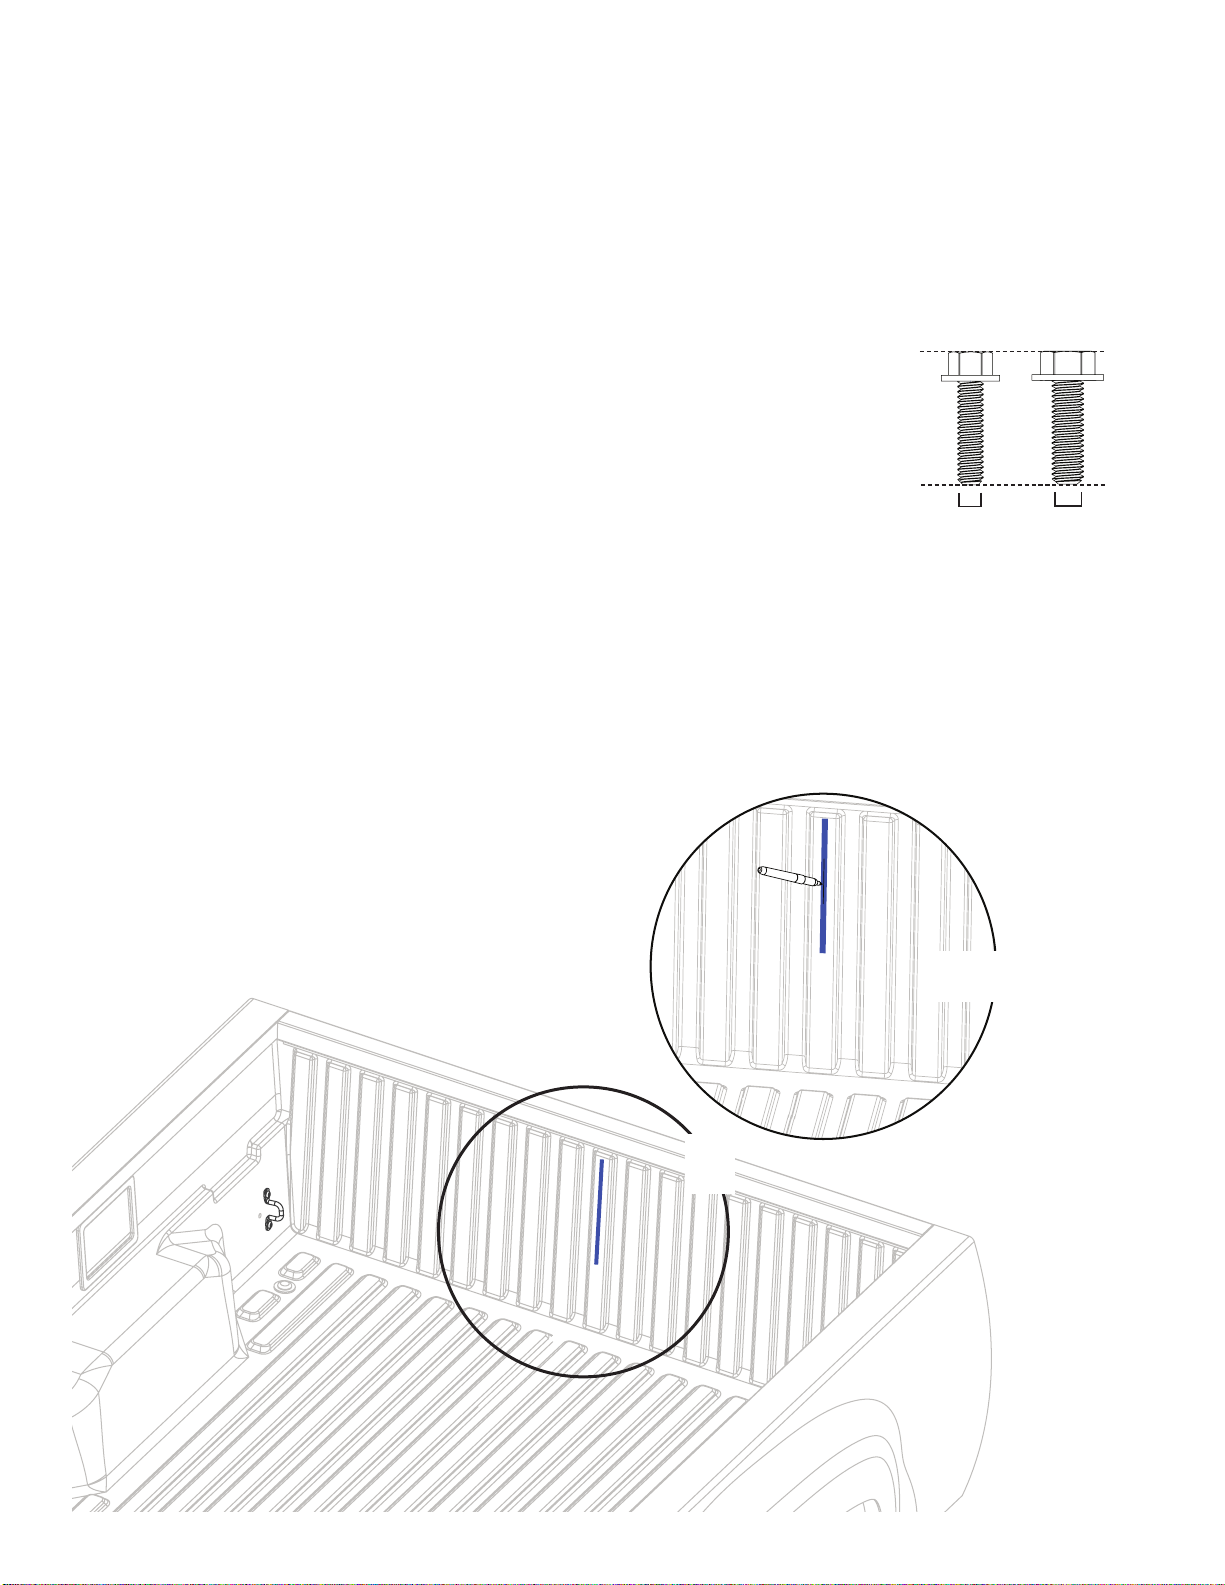
PREP BED: MARK CENTER OF BED
• Use a marking pen or wax pencil to mark
the center of the bed (blue) on the raised bead.
DETAIL A
MAKE SURE MARK SITS AT LEAST
14" HIGH (SO YOU CAN SEE IT)
A
➡
CAB
DECKED.COM | #DECKEDUSA | @DECKEDUSA MT8 | v.1.1 | Page 3
Page 4
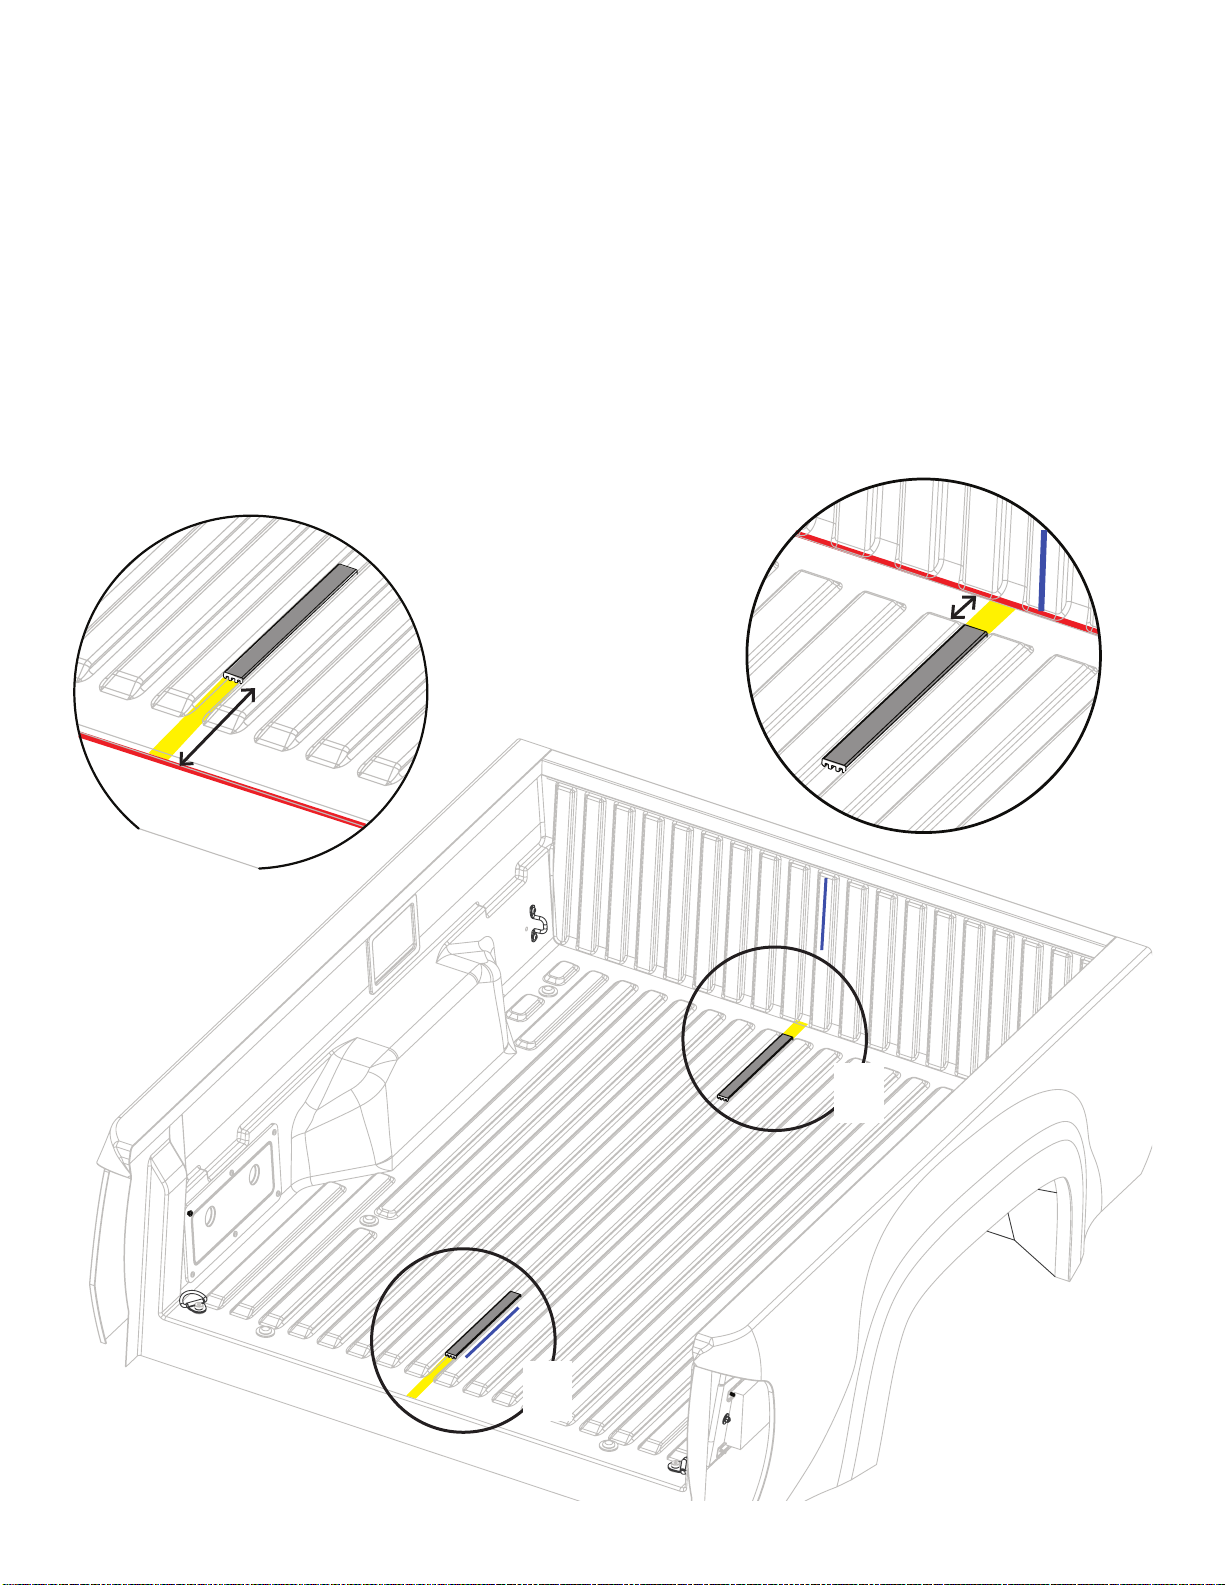
PREP BED: SHIMS
• 2 SHIMS that look like this can be found in your hardware kit.
• Using the information below:
1) Clean the bed surface where the shims will be located. Isopropyl alcohol (do not drink) is recommended.
2) Remove tape film and apply shim with the strength of 1000 men a.k.a push really hard.
DETAIL A
DETAIL B
Align shim to channel in floor shown. Place
shim 8” from rear of bed (edge in red).
Align shim to channel in floor shown 3” from
cabside panel of bed (edge in red).
3”
8”
A
➡
CAB
B
DECKED.COM | #DECKEDUSA | @DECKEDUSA MT8 | v.1.1 | Page 4
Page 5

STOP
IMPORTANT!
Do you have a factory cabside tie down?
NO: GO TO PAGE 6
YES: GO TO PAGE 7
DECKED.COM | #DECKEDUSA | @DECKEDUSA MT8 | v.1.1 | Page 5
Page 6

Double check that you have a Tacoma without a cabside factory tiedown. If you have a model with a cabside factory tie-down (you're
STOP:
stoked!), go directly to page 7.
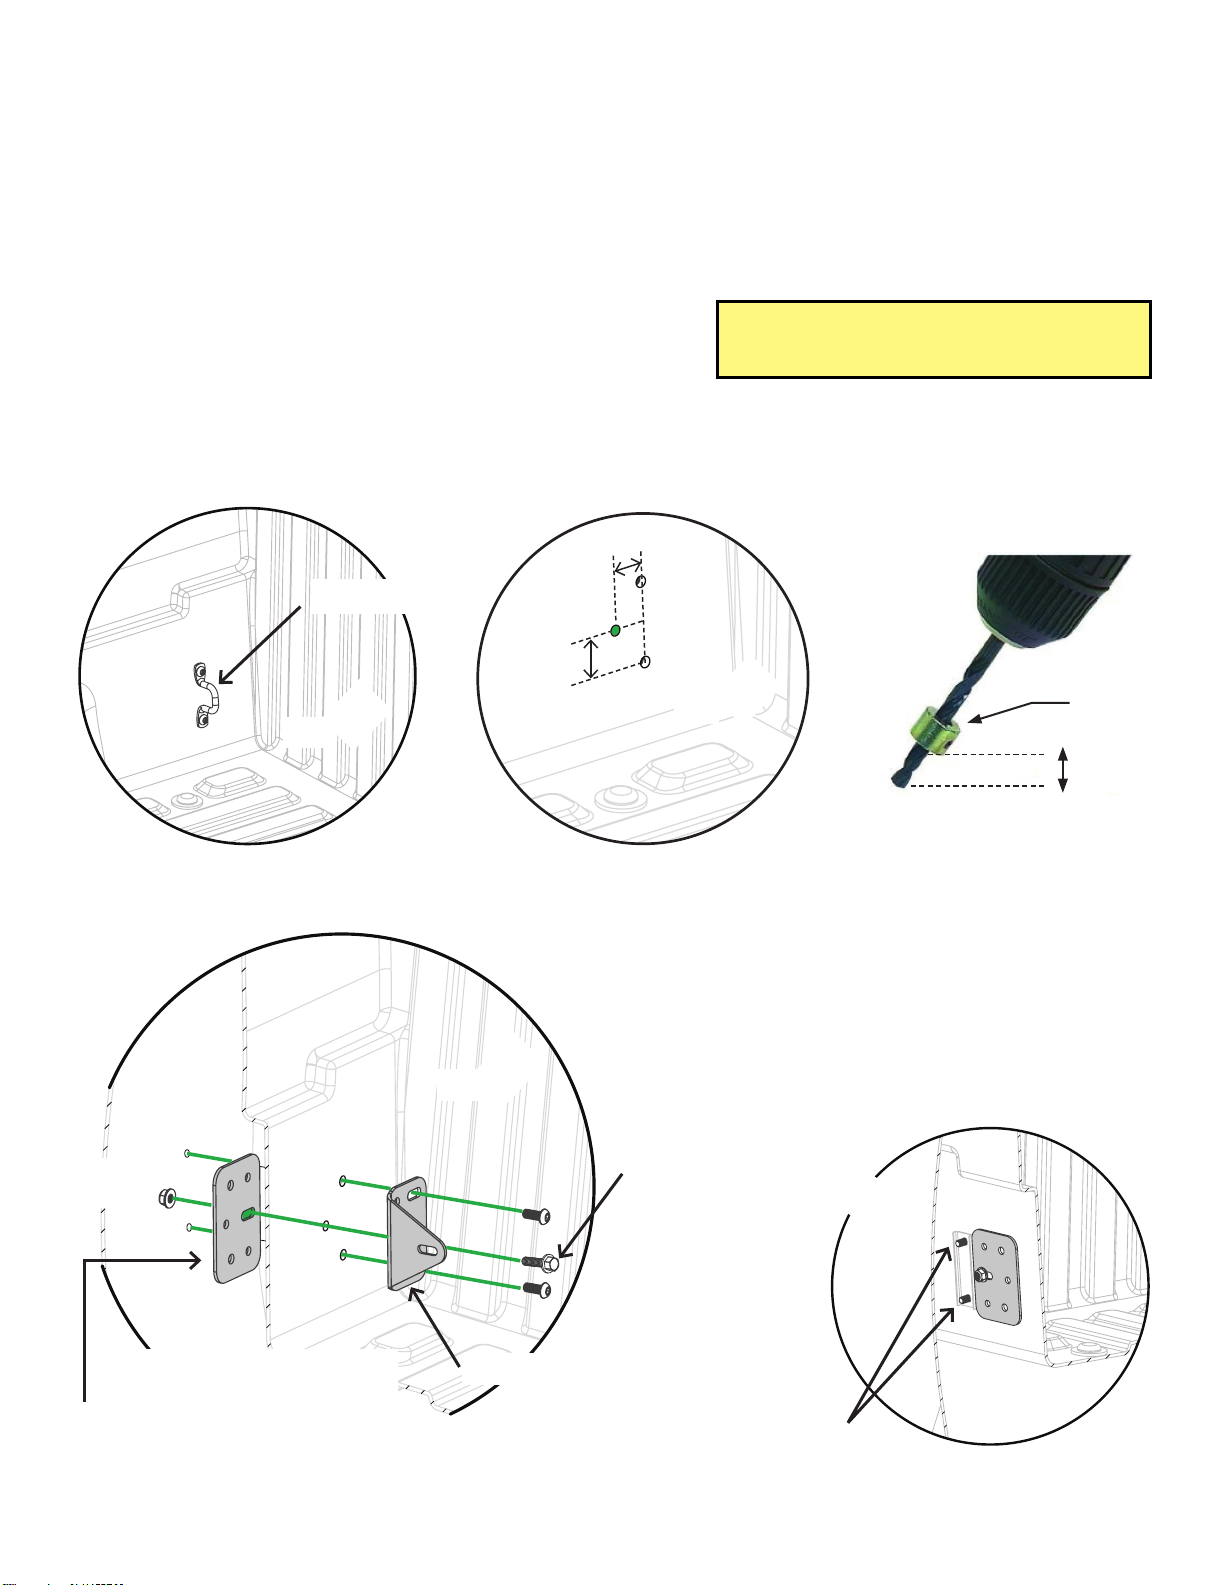
PREP BED: CABSIDE BRACKET
• Follow STEP 1 - STEP 4; BAG PREP-MT6 or MT8.
• Repeat passenger side.
STEP 1
Mark bottom hole location (blue) at 2 1/2" up from floor and
4" from cabside panel of bed. Mark top hole location (red)
2 3/4" up from bottom hole and 4" from cabside panel.
4"
➡
CAB
2 3/4"
Mark center hole (green) 1 3/8" up from lower hole
center. Mark 1 1/8" toward tailgate from top hole
center.
1 3/8"
RECOMMENDED TORQUE:
Bolts in labeled bag PREP-MT6 or MT8 - 27 in-lb.
STEP 2 STEP 3
At all three mark locations, drill a 5/16" hole using
a 1/2" drill stop.
1 1/8"
5/16”
DRILL BIT
➡
CAB
DRILL
STOP
2 1/2"
STEP 4
Play Rock Paper Scissors with your pal. The loser needs to hold the
backing plate inside the wheel well. Grab three 1" length x 5/16"
diameter bolts and place two through the oval cabside bracket holes
and one through the round tailgate side hole bracket. Install through
backing plate holes shown (green). Securely tighten with flanged nuts.
BACKER PLATE GOES OUTSIDE THE
INNER PLASTIC BED ON THE INTERIOR
WHEEL WELL WALL...
THREE TIMES FAST.
TRY SAYING THAT
1/2”
➡
CAB
FLANGED
NUTS
1" LENGTH x
5/16" DIAMETER
BOLTS
CABSIDE BRACKET
NOTE: Do not attempt alone. Rock Paper Scissors for who lays on the ground to hold the backing plate.
DECKED.COM | #DECKEDUSA | @DECKEDUSA MT8 | v.1.1 | Page 6
Page 7
Double check that you have a Tacoma with a cabside factory tie-down.
STOP:
If you don't have a cabside factory tie-down, revert to page 6.
PREP BED: CABSIDE BRACKET
• Follow STEP 1 - STEP 2; BAG PREP-MT6 or MT8.
• Repeat passenger side.
Remove factory cabside tie-down with a T40 torx driver. Keep bolts. Mark 1 3/8" up from lower factory hole center.
STEP 1
Mark 1 1/8" toward tailgate from factory hole centers. At center mark (green), drill a 5/16" hole using a 1/2"drill stop.
FACTORY TIEDOWN
➡
CAB
1 3/8"
1 1/8"
RECOMMENDED TORQUE:
Bolts in labeled bag PREP-MT6 or MT8 - 27 in-lb.
5/16”
DRILL BIT
➡
CAB
DRILL STOP
FLANGED
NUT
CAB
STEP 2
➡
1/2”
Install cabside bracket with the two factory tie-down bolts inserted in the oval
holes. Play Rock Paper Scissors with your pal. The loser needs to hold the backing
plate inside the wheel well. Install one 1" length x 5/16" diameter bolt through
center cabside bracket hole into backing plate and install with flanged nut.
NOTE: You'll have four extra 1" bolts and four nuts that you won't need in your
MT6 or MT8 bag. Do with them as you wish.
VIEW FROM WHEEL WELL
1" LENGTH x
5/16" DIAMETER
BOLT
CAB
➡
BACKER PLATE GOES OUTSIDE THE
INNER PLASTIC BED ON THE INTERIOR
WHEEL WELL WALL...
THREE TIMES FAST.
NOTE: Do not attempt alone. Rock Paper Scissors for who lays on the ground to hold the backing plate.
DECKED.COM | #DECKEDUSA | @DECKEDUSA MT8 | v.1.1 | Page 7
TRY SAYING THAT
CABSIDE BRACKET
FACTORY BOLTS
Page 8

PREP BED: TAILGATE BRACKET
NOTE: You will need to grab a pal for this step (or have incredibly long and flexible arms).
• Remove top rear factory compartment bolt from the passenger side with a T40 Torx Driver. Keep bolt.
• Loosely attach passanger side tailgate bracket with factory bolt in top hole. Make sure the tie down opening is
angled toward the driver, not the tailgate; BAG PREP-MT6 or MT8.
• Align bracket so it's parallel with vertical edge of compartment. Tighten factory bolt at last!
• Using the bottom hole in bracket as a guide, drill a 5/16" hole with a 1/2" drill stop through compartment and bed wall.
• Install a 1" bolt through the bracket and bed wall. Install 1" washer and flanged nut and tighten securely;
BAG PREP-MT6 or MT8.
• Repeat driver side unless you don't have a driver's side cubby. If not, follow the instructions for driver's side on
next page. NOTE: On passenger side ONLY, you will need to add a washer; BAG PREP-MT6 or MT8...
We know it's strange, trust us.
DRIVER SIDE
➡
CAB
FLANGED
NUT
RECOMMENDED TORQUE:
Bolts in labeled bag PREP-MT6 or MT8 - 53 in-lb.
HELPFUL TIP: Feel free to remove doors of cubbies
so you can still somewhat use them. Use will be
compromised, but hey, life ain't always fair, right?!
1" BOLT
ANGLE TIEDOWN
TOWARD DRIVER
REALLY OLD DRILL
WE FOUND ONLINE
PASSENGER SIDE
FACTORY BOLT
CAB
➡
FLANGED
NUT
HELPFUL TIP: The power outlet can still be used if you
insert a flat head pigtail extension cord BEFORE you
install the decks. Make sure to have the outlet capped
to keep water out.
DECKED.COM | #DECKEDUSA | @DECKEDUSA MT8 | v.1.1 | Page 8
1" BOLT
WASHER
Page 9

PREP BED: TAILGATE BRACKET
(FOR TACOMAS WITH NO DRIVER SIDE TAILGATE CUBBY)
NOTE: Disregard this page if you HAVE a driver's side tailgate cubby.
• Referencing dimensional info in DETAIL A mark hole locations and drill (2) 5/16" holes (with drill stop set at .62").
• Referencing DETAIL A install J-hook mounting bracket as shown with bolts, backing plate and nuts.
Tighten bolts securely. BAG PREP-MT8, BAG TACOMA TD.
DETAIL A
DRILL 5/16" HOLE 2 PLACES
2.75"
DETAIL A
DRIVER'S SIDE ONLY
HOLE DRILLING
RECOMMENDED TORQUE:
Bolts in labeled bag PREP-MT8 - 53 in-lb.
7.5" TO
BOTTOM
OF BED
5.75" FROM
REAR OF BED
5/16" DRILL BIT
NUT
BACKING
PLATE
BOLT
DETAIL A
DRIVER'S SIDE ONLY
BOLT INSTALLATION
.62"
DECKED.COM | #DECKEDUSA | @DECKEDUSA MT8 | v.1.1 | Page 9
DRILL STOP
Page 10

ASSEMBLY: CENTER VERT + CABSIDE VERT
NOTE: Perform the next few steps on a flat surface like a garage floor.
• Attach center vert to cabside vert with four bolts. Alternate to tighten; BAG S1.
PLACE HOOK ON CENTER VERT
OVER NOTCH IN CABSIDE VERT
CENTER VERT
RECOMMENDED TORQUE:
Bolts in labeled bag S1 - 27 in-lb.
CABSIDE VERT
S1
HELPFUL TIP: BAG S1, a.k.a "Bunker Hill," is required
for most of the steps, so keep it close! These bolts are
highlighted throughout instructions in RED.
DECKED.COM | #DECKEDUSA | @DECKEDUSA MT8 | v.1.1 | Page 10
Page 11

ASSEMBLY: LOOSELY ATTACH STUDS (YUP)
• LOOSELY attach studs to cabside vert with six bolts; BAG S1.
CENTER VERT
DRIVER
SIDE STUD
CABSIDE VERT
PASSENGER
SIDE STUD
S1
KEEP LOOSE
S1
KEEP LOOSE
(YOGA HELPS)
DECKED.COM | #DECKEDUSA | @DECKEDUSA MT8 | v.1.1 | Page 11
Page 12

ASSEMBLY: ALIGN & TIGHTEN STUDS (YUP)
NOTE: This step ensures the studs are properly located before tightening bolts. It's important.
• Place ammo cans to support tailgate end of deck panels.
• Lift deck panels on center vert + stud + cabside vert assembly.
• Slide studs around L-R until deck panels are seated.
• DETAIL A: Loosely secure four bolts to hold decks onto studs; BAG S1.
• Now you can securely tighten the bolts that hold the studs to the cabside vert.
• Unbolt deck from studs, remove deck panels, save bolts, remove ammo cans and set aside for later assembly.
RECOMMENDED TORQUE:
Bolts in labeled bag S1 - 27 in-lb.
DETAIL A
S1
A
YOU WILL REMOVE AND SAVE THESE BOLTS
AFTER TIGHTENING CABSIDE VERT + SHIM
BOLTS
TIGHTEN AND SECURE
HELPFUL TIP: This step seems like a waste of time,
but Dr. DECKED says it's important...don't skip out.
DECKED.COM | #DECKEDUSA | @DECKEDUSA MT8 | v.1.1 | Page 12
Page 13

ASSEMBLY: STUD BRACKETS
• DETAIL A: Securely attach stud bracket to driver side stud using three 3 1/2" length bolts and flanged nut in holes
shown; BAG PREP-MT6 or MT8.
• DETAIL B: Securely attach stud bracket to passenger side stud using three 3 1/2" length bolts and flanged nut;
BAG PREP-MT6 or MT8.
DETAIL A DETAIL B
FLANGED NUTSFLANGED NUTS
➡
CAB
CAB3 1/2" BOLTS
➡
A
CAB
B
➡
RECOMMENDED TORQUE:
Bolts in labeled bag PREP-MT6 or MT8 - 27 in-lb.
DECKED.COM | #DECKEDUSA | @DECKEDUSA MT8 | v.1.1 | Page 13
Page 14

INSTALL: MOUNTING + CABSIDE ATTACHMENT
• While supporting both ends, lift center vert + stud + cabside vert assembly in truck bed. Position against cabside
panel of bed with stud bracket cabside of cabside bracket.
• DETAIL A: Install a 3/4" length bolt and flanged nut and tighten securely; BAG PREP-MT6 or MT8.
• Repeat passenger side.
RECOMMENDED TORQUE:
Bolts in labeled bag PREP-MT6 or MT8 - 53 in-lb.
DETAIL A
FLANGED NUT
CAB
➡
3/4" BOLT
NOTE: Make sure centerline arrows
on cabside vert are aligned with
your centerline mark (blue).
A
CAB
➡
DECKED.COM | #DECKEDUSA | @DECKEDUSA MT8 | v.1.1 | Page 14
Page 15

INSTALL: CCHANNEL
• Loosely place driver side ammo can at tailgate corner of bed. The axles should be on the tailgate side of the truck.
• Place driver side C-channel on ledge of stud and ammo can with end plate cabside.
• DETAIL A: Insert two bolts through C-channel into ammo can and loosely fasten with nut; BAG S2, BAG N1.
• DETAIL B: Tightly attach C-channel to stud; BAG S1.
• Repeat passenger side.
DETAIL A DETAIL B
KEEP LOOSE TIGHTEN
➡
CAB
RECOMMENDED TORQUE:
Bolts in labeled bag S1 - 27 in-lb.
CCHANNEL
END PLATE
➡
CAB
N1
S2
A
S1
B
➡
CAB
DECKED.COM | #DECKEDUSA | @DECKEDUSA MT8 | v.1.1 | Page 15
Page 16

INSTALL: DECK HALVES
• Loosely place driver side deck panel on driver side stud, center vert and ammo can.
• Shift tailgate ammo can forward, rearward, L-R, as necessary to align with fully seated deck panel.
• Loosely assemble:
• Six bolts (without washers) through deck panel into center vert; BAG S1.
• Four bolts with nylon and rubber washers installed in order shown in DETAIL A through deck panel into
stud; BAG S1, BAG MS WASHERS.
• Eight bolts with nylon and rubber washers installed in order shown in DETAIL A through deck panel into
tailgate ammo can; BAG S1, BAG MS WASHERS.
• Tighten all S1 bolts.
• Securely tighten driver side C-Channel/ammo can nut and bolt.
• Repeat passenger side (make sure you don't forget to securely tighten passenger side C-Channel/ammo can
nut and bolt).
RECOMMENDED TORQUE:
Bolts in labeled bag S1 - 27 in-lb.
NYLON WASHER
RUBBER WASHER
S1
DETAIL A
➡
CAB
DECKED.COM | #DECKEDUSA | @DECKEDUSA MT8 | v.1.1 | Page 16
Page 17

INSTALL: JHOOKS
• Loosely assemble driver side J-hook assembly in order shown through tailgate side hole in ammo can; BAG J5.
• Repeat passenger side.
DRIVER SIDE AMMO CAN PASSENGER SIDE AMMO CAN
KEEP LOOSE KEEP LOOSE
✕
✕
TAILGATE
✕
J5
J5
✕
✕
✕
TAILGATE
HELPFUL TIP: Make sure the hooks
open toward tailgate.
DECKED.COM | #DECKEDUSA | @DECKEDUSA MT8 | v.1.1 | Page 17
Page 18

DRAWERS: BRACKETS + WHEELS
• Each drawer has a left and a right bracket. Bolt brackets into place via bottom two holes in bracket with 3/4"
length bolts. Use the 2" length bolt for the upper cabside wall hole in bracket; BAG DRAWER 1.
• Install a tube brace in each drawer with two 3/4" length bolts; BAG DRAWER 1, BAG DRAWER 2.
• Attach wheels onto drawer brackets with a 7/32" hex wrench; BAG WHEELS.
RECOMMENDED TORQUE:
Bolts in labeled bags DRAWER 1 and DRAWER 2 - 27 in-lb.
TUBE BRACE
GOES HERE
DRAWER 1
Bolts in labeled bag WHEELS - 90 in-lb.
2" BOLT
CORNER
BRACKET
HELPFUL TIP: If you purchased drain
plugs, install now (instructions are
➡
CAB
WHEELS
DRAWER 2
DRAWER 1
included with drain plugs).
DECKED.COM | #DECKEDUSA | @DECKEDUSA MT8 | v.1.1 | Page 18
Page 19

DRAWERS: AXLE WHEELS + WEATHERSTRIPS
• Slide narrow drawer into driver side drawer cavity. NOTE: It is easier to fully install narrow drawer first.
• DETAIL A: Install two tailgate wheels onto narrow drawer axles with a 7/32" hex wrench; BAG WHEELS.
• Repeat with wide drawer.
• DETAIL B: Install weatherstrips on top of drawer edges
IMPORTANT: Facing the weatherstrip the wrong way will funnel water into drawer: DUH!
WITH WIPER BLADE POINTING TOWARD DRIVER.
DETAIL A
RECOMMENDED TORQUE:
Wheel bolts - 90 in-lb.
HELPFUL TIP: To make this step easier, jam a 2" piece of
material under drawer, or get your pal to pinch the drawer
up to the deck to give you better leverage.
HELPFUL TIP: Cut weatherstrips if they overhang.
➡
CAB
DETAIL B
DECKED.COM | #DECKEDUSA | @DECKEDUSA MT8 | v.1.1 | Page 19
Page 20

FINAL STEPS: TORSION BRACE + BOTTLE
OPENER
• Slide torsion brace under center vert and tailgate ammo cans.
NOTE: If you jumped the gun and tightened the J-hooks when installing, loosen them.
• Loosely install:
• Two bolts with nylon washers through the end holes in torsion brace into ammo cans; BAG S1.
• Two bolts with nylon washers through the bottom bottle opener holes and torsion brace into center vert; BAG S1.
• Two 1/2" length bolts through upper holes in bottle opener into center vert; BAG FINAL MID.
• Align bottle opener to edges of center vert and tighten four bottle opener bolts.
• Tighten end bolts into tailgate ammo cans.
• Finally.....Tighten the J-hooks! DO NOT OVER TIGHTEN, just make snug. Make sure the gap between the
sidewall of the bed and the deck is equal on both sides.
1/2" LENGTH
TORSION BRACE
HELPFUL TIP: Bottle opener goes outside
of torsion brace.
DECKED.COM | #DECKEDUSA | @DECKEDUSA MT8 | v.1.1 | Page 20
BOTTLE OPENER
RECOMMENDED TORQUE:
.905” Bolts - 27 in-lb. | J-hooks - 9 in-lb.
1/2” Bolts & 1/4” Ruler screw - 18 in-lb.
BOLTS BAG
FINAL MID
Page 21

BAM BAM: THE RULER
• Center ruler in embossed area and screw three 1/2" length Phillips screws through the tailgate side holes directly
into deck panels; BAG FINAL MID.
NOTE: These are small gauge screws. Tighten to a light snuggle ONLY.
• For the three cabside ruler mounting holes, drill each with a 9/64" bit and a drill stop set to 1/2". There is a lateral
steel tube that runs on the underside of the deck at this location. (SEE UNDERSIDE VIEW OF DECK).
IMPORTANT: Only drill through TOP of steel tube; do not drill through bottom of tube, 'lest you want to pull a
Niagara Falls and funnel water into your drawers.
• Screw three 3/4" length Phillips screws into the cabside ruler holes you just drilled; BAG FINAL MID.
STEEL TUBE RUNS LATERALLY UNDER THESE 3 RULER
HOLES. THEY TAKE THE 3/4" SCREWS.
UNDERSIDE VIEW OF DECK
DO: Drill through the top of steel
tube ONLY.
DO NOT: Drill through both sides
of steel tube = YOU'RE FIRED!
DECKED.COM | #DECKEDUSA | @DECKEDUSA MT8 | v.1.1 | Page 21
9/64” DRILL
BIT
DRILL STOP
1/2”
Page 22

FINAL STEPS: AMMO CAN LIDS
• DETAIL A: Ammo can lids are driver (marked L) and passenger (marked R) side specific.
• DETAIL B: Holding lid in orientation shown, insert tab on tailgate end of ammo can lid and push the cabside end of lid
down to secure. Don't be afraid to give'r the Fonzi to close, it's rugged.
• Insert lock hole plugs, unless you ordered drawer locks! Install drawer locks now (instructions with locks);
BAG FINAL MID.
IMPORTANT: Grab your favorite beverage, crack 'er open in the bottle opener and christen this ship!
You did it. Immediately post a photo of your significant other, child or canine (in no order of significance)
appreciating your accomplishment. Add hashtag #DECKEDUSA | @DECKEDUSA.
DETAIL A
DRIVER SIDE
AMMO CAN LID
PASSENGER SIDE
AMMO CAN LID
DETAIL B
FINAL MID
#DECKEDUSA | @DECKEDUSA
DECKED.COM | #DECKEDUSA | @DECKEDUSA MT8 | v.1.1 | Page 22
Page 23

DECKED 3-YEAR LIMITED WARRANTY
(a.k.a. LEGAL MUMBO JUMBO)
DECKED LLC warrants to the original purchaser of this product that the product will be free from manufacturing defects in
workmanship and materials for a period of three (3) years from the date of the original purchase. If within three (3) years from the
original date of purchase this product fails due to defect in materials or workmanship, DECKED LLC will replace any defective part at
its option.
The original purchaser must contact the DECKED LLC customer service team and provide a description of the defective part,
including digital pictures if requested, with the original purchase documentation as validation of warranty coverage or have
previously activated their warranty online.
This warranty DOES NOT cover or apply to:
• Damage to the product due to misuse, mishandling and abuse.
• Products not used in accordance with the manufacturer’s instructions or recommendations.
• Product not assembled or installed according to manufacturer’s instructions.
• Normal wear and tear.
• Undeclared damage to the system during shipping, acts of God. In addition, consequential damage and incidental
damages (including lost time) such as damage to persons or property are not covered under this warranty.
REGISTER YOUR PRODUCT FOR ANY FUTURE WARRANTY NEEDS. DECKED.COM/REGISTER
#DECKEDUSA | @DECKEDUSA
DECKED.COM | #DECKEDUSA | @DECKEDUSA MT8 | v.1.1 | Page 23
 Loading...