


Installation Instructions:
DG6 / DG7
CHEVY SILVERADO/GMC SIERRA
5’9” or 6’6” BED LENGTH
1500: (2019CURRENT)
TOOLS REQUIRED
• Adjustable wrench (that opens to about 1”)
• 1/2” open end wrench
• #2 Phillip screwdriver
• 3/8” socket
• 7/16” open wrench
Watch short installation videos at www.decked.com/video | Register your system at www.decked.com/warranty
FOLLOW US:
VERSION 4
DECKED.COM | 208.806.0251
• 7/16” deep socket
• 7/32” Allen wrench
• 1/2” drill bit
• Wire cutters
@DECKEDUSA | #DECKEDUSA
CONTENTS
DECKED carton
LEFT/DRIVER deck half - 1
RIGHT/PASSENGER deck half - 1
Center vert - 1
Drawer - 2
Cabside ammo can - 2
Tailgate side ammo can - 2
Ammo can lid - 4
Ammo can window - 2
C-channel - 2
Ruler - 1
Hardware box - 1
Hardware box - unbagged components
(inside DECKED carton):
Weather strips - 2
Handle - 1
Bottle opener - 1
Shims - 4
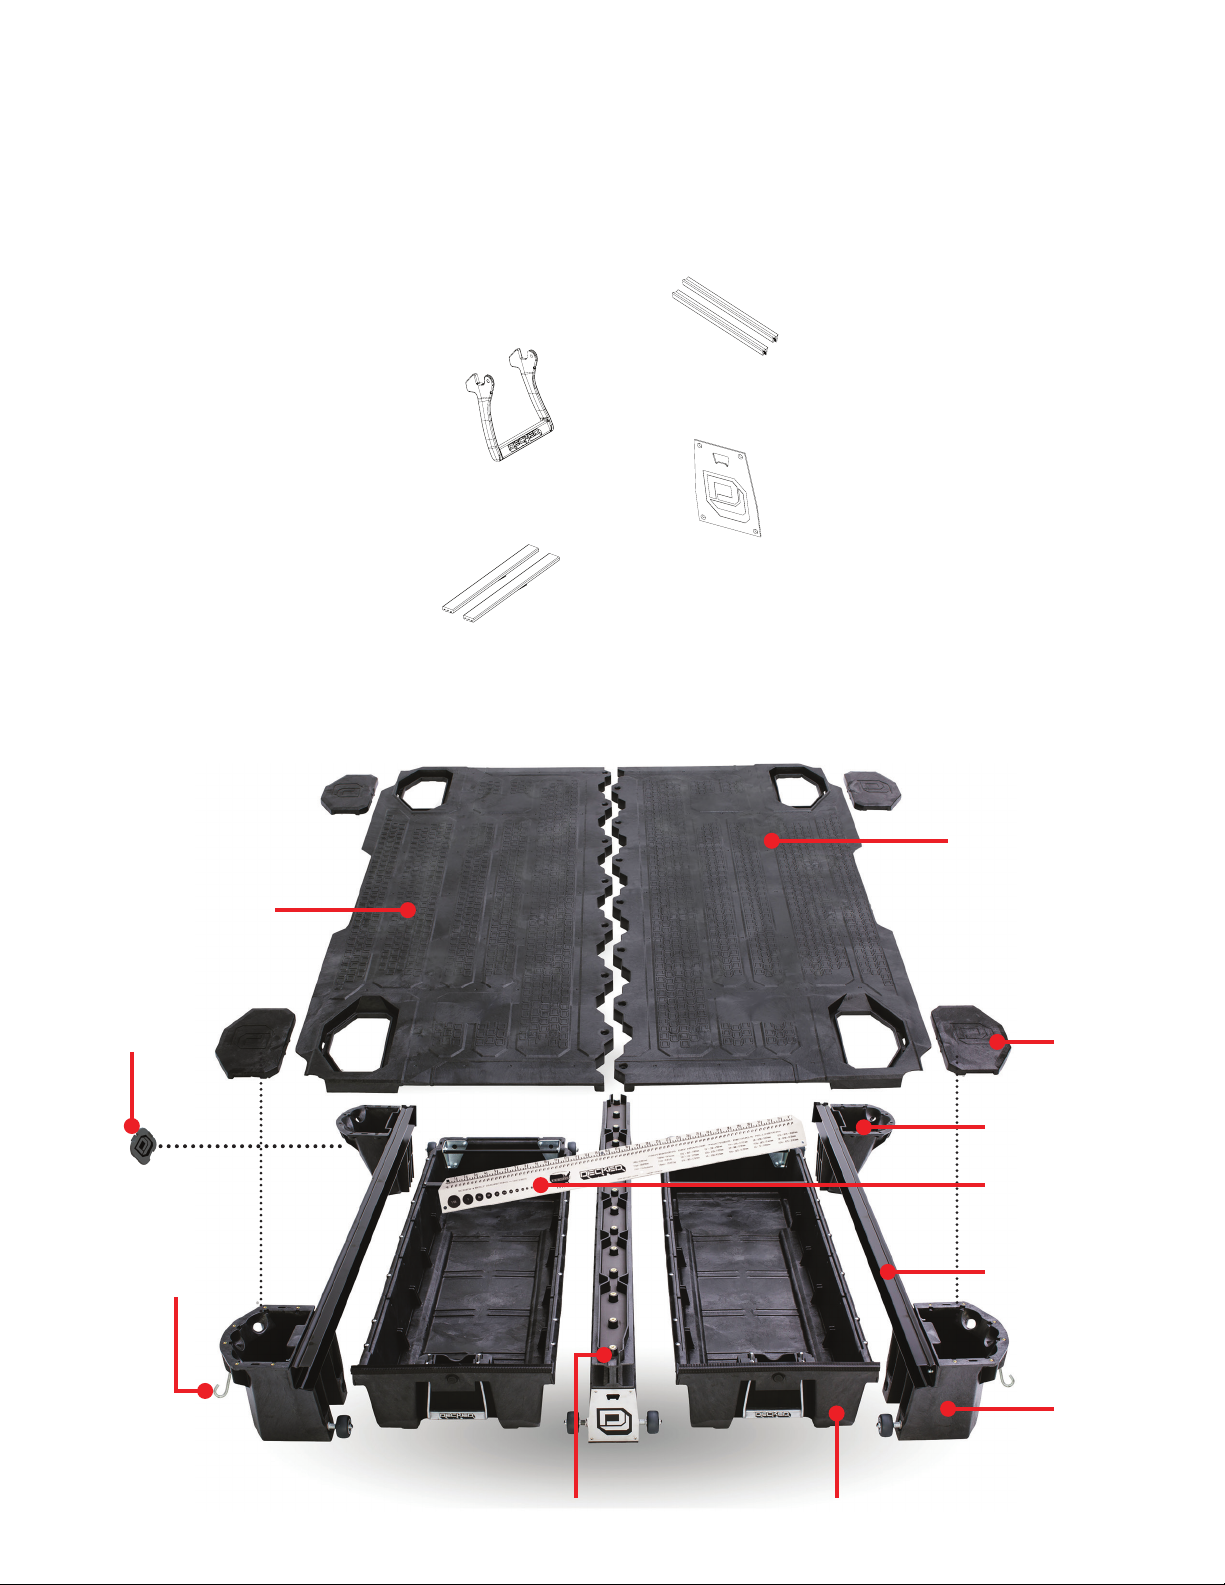
▼ ASSEMBLY OVERVIEW ▼
HARDWARE box - bagged components
CCHANNELS C 1
BOLT 1 FS (B1) - 1
CS AMMO CANS - 1
J5 - 2
J7 - 2
DRAWER 1 1
DRAWER 3 1
HANDLE 1
WHEELS 1
FINAL FS 1
PREPEXTRA 1
PREP DG6/DG7 1
LEFT/DRIVER
DECK HALF
AMMO CAN
WINDOW
COVER
JHOOK
ATTACHMENTS
RIGHT/PASSENGER
DECK HALF
AMMO
CAN LID
CABSIDE AMMO
CAN
RULER
CCHANNEL
TAILGATE
AMMO CAN
CENTER VERT DRAWER
Page 2 | v.4 | DG6 / DG7 DECKED. COM | #DECKEDUSA | @DECKEDUSA

▼ HEY! TORQUE BOY: READ BEFORE YOU INSTALL DECKED ▼
1. DON’T be an idiot read the instructions.
2. DON'T over tighten bolts, get em' hand-tight.
3. DON'T use power tools.
4. If you don't follow directions and do use power tools:
1). Set clutch at a very low setting. 2). If you blow it, see NOTE.*
NOTE* Two extra threaded inserts are included in BAG PREP-EXTRA. That’s all you get. The inserts will replace any
stripped inserts in the tailgate ammo cans, but NOT THE CENTER VERT, so hand tighten until snug only! You can
also screw the inserts back in if dislocated. There is a straight screwdriver slot on the underside of the insert.
TAILGATE ammo cans have wide bottoms; CABSIDE ammo cans have narrow bottoms.
NOTE: You will need a buddy to help with exactly two steps, not including draining the sixpack.
NOTE: Hand thread screws into threaded inserts to get them started. This helps insure they will not cross thread.
Prevent abusive, expletive-filled language, watch our detailed installation video or give us a call.
We’re happy to help!
208.806.0251 | DECKED.COM/INSTALLVIDEO
5. DON'T over tighten J-hooks during installation.
Make 'em good and snug enough to keep the
system from moving in the bed.
6. Nice job if you’re still reading .
AMMO CAN DRAIN HOLES
(TO DRILL OR NOT TO DRILL.)
• Do you use a tonneau or shell over your DECKED system?
There is no need to drill holes.
• Does your DECKED system live outside?
The ammo cans will get water in them. You’ll need to drill holes in the ammo cans.
There are two dimples in the bottom of each ammo can. Drill a 1/2” hole at each dimple. A smaller hole
will get clogged.
DECKED. COM | #DECKEDUSA | @DECKEDUSA DG6 / DG7 | v.4 | Page 3
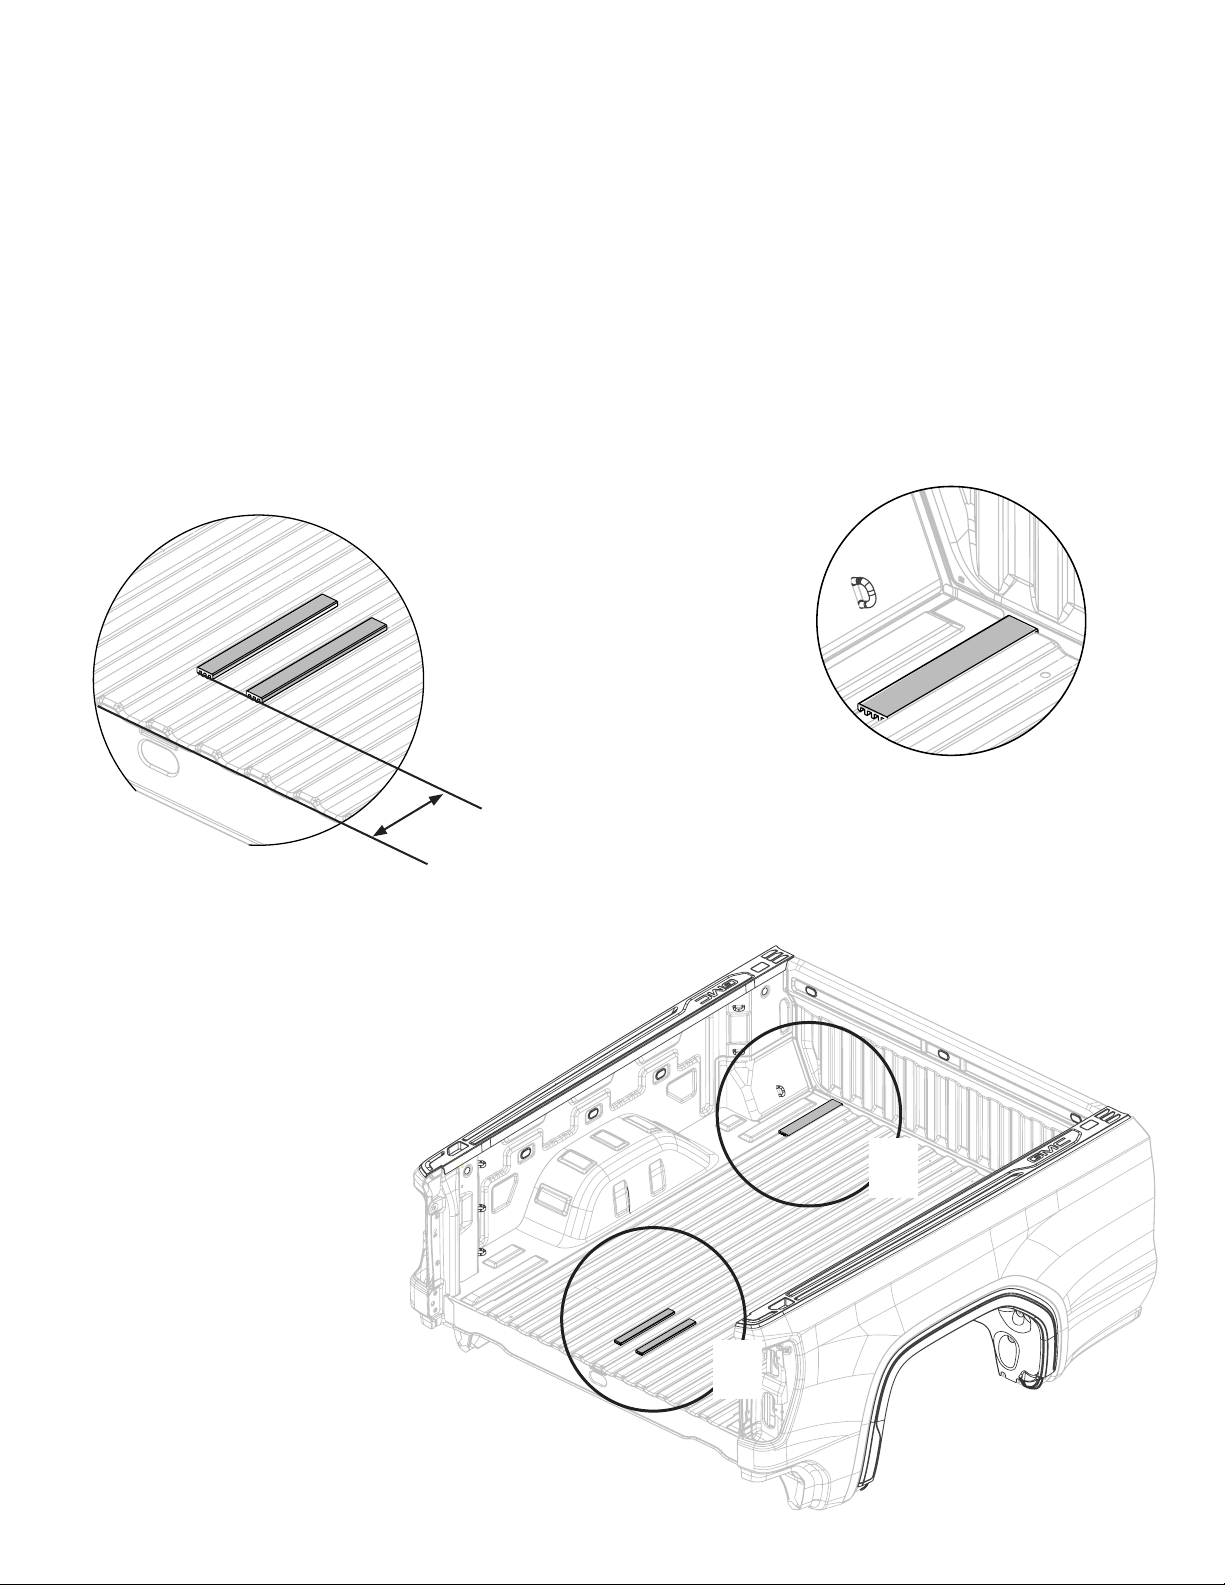
PREP BED: SHIMS
• There are 4 SHIMS provided; 2 narrow (DETAIL A) and 2 wide (DETAIL B).
• Using the information in the respective circular detail views:
a) Clean the surfaces thoroughly where the shims will be located (isopropyl alcohol is recommended).
b) Remove the layer of tape on the bottom of the shim to expose the adhesive surface.
c) Place the shim and apply with pressure.
• Repeat DETAIL B on passenger side.
• DETAIL A will depend on your truck bed length (DG6 or DG7).
DETAIL A
Depending on your truck, place narrow shims
according to the following bed lengths:
DG6 - 5’9” BED:
Align narrow shims on each side of center floor
bead as shown. Place shims 8” from rear of bed.
DG7 - 6’6” BED:
Align narrow shims on each side of center floor
bead as shown. Place shims 7” from rear of bed.
SEE NOTE BELOW
DETAIL B
Align wide shim with cabside panel of bed. Center
shim between longitudinal floor beads .
Repeat on passenger side.
B
A
CAB
Page 4 | v.4 | DG6 / DG7 DECKED. COM | #DECKEDUSA | @DECKEDUSA
➡

STOP
IMPORTANT!
THE NEXT STEP (BRACKET INSTALL) IS DEPENDENT
ON TRUCK BED LENGTH:
DG6 - 5’9” BED LENGTH: GO TO PAGE 6
DG7 - 6’6” BED LENGTH: GO TO PAGE 7
DECKED. COM | #DECKEDUSA | @DECKEDUSA DG6 / DG7 | v.4 | Page 5
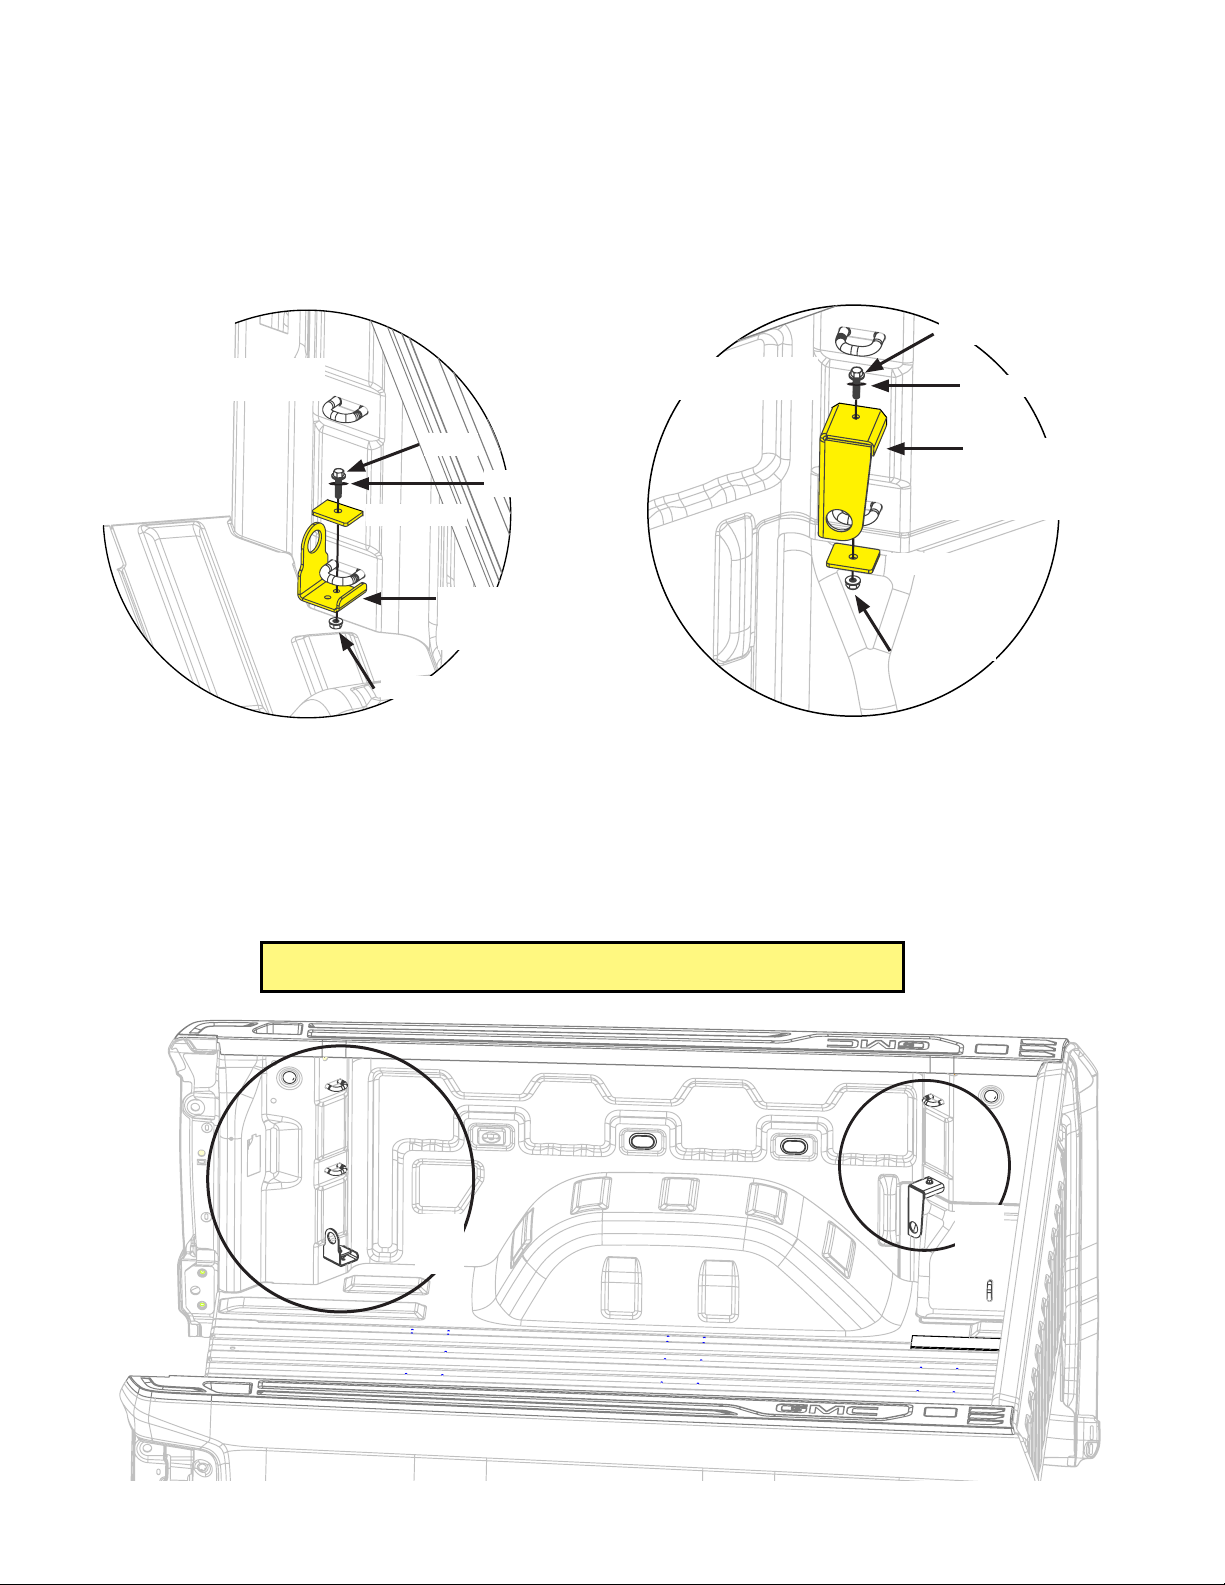
DG6 PREP BED: BRACKET INSTALL
Double check that you have a DG6 Silverado/Sierra with a 5’9” bed. If you
have the DG7 with the 6’6” bed, go to the next page.STOP:
1” BOLT
PREP DG6/DG7
1” BOLT
NYLON WASHER
CLAMP PLATE
TAILGATE BRACKET
(Place hole tailgate side)
FLANGED NUT
DETAIL A
Place tailgate bracket below bottom cargo tie down ring as shown.
Place clamp plate above cargo tie down. Attach with bolt, nylon
washer and nut as shown; BAG: PREP DG6/DG7. Tighten securely.
Repeat on passenger side.
RECOMMENDED TORQUE: Bolts in labeled bags PREP DG6/DG7 - 53 in-lb.
PREP DG6/DG7
Place cabside bracket above bottom cargo tie down ring as
shown. Place clamp plate below cargo tie down. Attach with
bolt, nylon washer and nut as shown; BAG: PREP DG6/DG7.
Tighten securely. Repeat on passenger side.
NYLON WASHER
CABSIDE BRACKET
(There is a L-R bracket, make
sure bracket opens toward cab)
CLAMP PLATE
FLANGED NUT
DETAIL B
A
CAB
Page 6 | v.4 | DG6 / DG7 DECKED. COM | #DECKEDUSA | @DECKEDUSA
➡
B

DG7 PREP BED: BRACKET INSTALL
Double check that you have a DG7 Silverado/Sierra with a 6’6” bed. If you have
the DG6 with the 5’9” bed, go back to the previous page.STOP:
1” BOLT
PREP DG6/DG7
1” BOLT
NYLON WASHER
CLAMP PLATE
TAILGATE BRACKET
(Place hole cabside)
FLANGED NUT
DETAIL A
Place tailgate bracket below bottom cargo tie down ring as shown.
Place clamp plate above cargo tie down. Attach with bolt, nylon
washer and nut as shown; BAG: PREP DG6/DG7. Tighten securely.
Repeat on passenger side.
RECOMMENDED TORQUE: Bolts in labeled bags PREP DG6/DG7 - 53 in-lb.
PREP DG6/DG7
Place cabside bracket above bottom cargo tie down ring as
shown. Place clamp plate below cargo tie down. Attach with
bolt, nylon washer and nut as shown; BAG: PREP DG6/DG7.
Tighten securely. Repeat on passenger side.
NYLON WASHER
CABSIDE BRACKET
(There is a L-R bracket, make
sure bracket opens toward cab)
CLAMP PLATE
FLANGED NUT
DETAIL B
BA
CAB
DECKED. COM | #DECKEDUSA | @DECKEDUSA DG6 / DG7 | v.4 | Page 7
➡

ASSEMBLY: DRIVER’S SIDE DECK
(LET’S DO THIS!)
• There are three pre-installed gaskets – one on the center vert, one on each underside of the decks where they rest
on the center vert. Do yours look weird? See them here: DECKED.COM/GASKETS
• Place C-channel on the inside ledges of a cabside ammo can and a tailgate ammo can.
• The end of the C-channel with the endplate must rest on the cabside ammo can.
• Verify that the tailgate ammo can’s axle is closest to the tailgate; if not, grab the other tailgate ammo can.
• Loosely bolt C-channel to the two ammo cans with (4) nylon washers on
the (4) bolts. Make sure the bolt head is on the C-channel side, not inside
the ammo can; BAG CCHANNELS C. Don’t tighten yet.
• Line up the driver’s side deck (sticker on end of deck panel indicates LEFT/DRIVER) on top of the
C-channel/ammo can assembly and the center vert bosses. NOTE: Tailgate side of the center vert has an axle
installed; the center vert and ammo can axles must be on the tailgate end (not cabside end) of the assembly.
• Bolt the deck to the ammo cans; BAG B1 for the tailgate ammo can, BAG CS AMMO CAN for the cabside ammo can.
• Now go back and tighten the loose bolts connecting the ammo cans to the C-channel.
• Bolt the deck to the center vert; BAG B1: Do not use power tools!
• Grab your buddy to help you lift the assembly into the driver side of the truck bed.
RECOMMENDED TORQUE: Bolts in labeled bags C-CHANNELS C,
DRIVER SIDE DECK HALF
B1
CS AMMO CAN and B1 - 27 in-lb.
CS AMMO CANS
NYLON WASHER
B1
CCHANNELS C
CAB
➡
TAILGATE AMMO CAN AXLE CABSIDE AMMO CAN VERT AXLE CCHANNEL ENDPLATE
Page 8 | v.4 | DG6 / DG7 DECKED. COM | #DECKEDUSA | @DECKEDUSA

ASSEMBLY: PASSENGER’S SIDE DECK
(NOW YOU’RE ACTUALLY GETTING SOMEWHERE!)
• Place C-channel on the inside ledges of a cabside ammo can and a tailgate ammo can.
• The end of the C-channel with the endplate must rest on the cabside ammo can.
• You should have the correct tailgate ammo can for this step. The axle will be on the tailgate side of the system.
If not, swap the tailgate ammo cans now.
• Loosely bolt C-channel to the two ammo cans with (4) nylon washers on
the (4) bolts. Make sure the bolt head is on the C-channel side, not inside
the ammo can; BAG CCHANNELS C. Don’t tighten yet.
• Line up the passenger’s side deck (sticker on end of deck panel indicates RIGHT/PASSENGER) on top of the
C-channel/ammo can assembly.
• Bolt the deck to the ammo cans; BAG B1 for the tailgate ammo can, BAG CS AMMO CAN for the cabside ammo can.
• Now go back and tighten the loose bolts connecting the ammo cans to the C-channel.
• Grab your buddy to help you lift the assembly into the passenger side of the truck bed.
RECOMMENDED TORQUE: Bolts in labeled bags C-CHANNELS C,
CS AMMO CAN and B1 - 27 in-lb.
NYLON WASHER
PASSENGER SIDE DECK HALF
B1
CS AMMO CANS
CAB
➡
CCHANNELS C
TAILGATE AMMO CAN AXLECABSIDE AMMO CANCCHANNEL ENDPLATE
DECKED. COM | #DECKEDUSA | @DECKEDUSA DG6 / DG7 | v.4 | Page 9

INSTALL: DECK HALVES
• Seat passenger side deck on the upstanding vert bosses.
• Bolt the passenger side deck half to the center vert; BAG B1. Make sure all bolts connecting the deck to the center
vert are snug, do not use power tools.
B1
RECOMMENDED TORQUE:
Bolts in labeled bag B1 - 27 in-lb.
STOP
IMPORTANT!
THE NEXT STEPS ARE DEPENDENT ON TRUCK BED LENGTH:
DG6 - 5’9” BED LENGTH: GO TO PAGE 11
DG7 - 6’6” BED LENGTH: GO TO PAGE 12
Page 10 | v.4 | DG6 / DG7 DECKED. COM | #DECKEDUSA | @DECKEDUSA

DG6 INSTALL: JHOOKS
Double check that you have a DG6 Silverado/Sierra with a 5’9” bed. If you have
STOP:
the DG7 with the 6’6” bed, go to the next page.
CABSIDE AMMO CAN J-HOOKS:
• Insert the J-hooks through the tailgate hole on the driver side and passenger side cabside ammo cans and loop J-hook through cabside bracket
orientated as shown. Assemble with black spherical washer, flat washer and nut; BAG J5. IMPORTANT: Leave all J-hook nuts LOOSE until entire deck
is in place. If you tighten the J-hooks, you won’t be able to center the system properly.
J5
✕
✕
✕
J5
✕
CAB
Orient cabside ammo can J-hooks to
open with hook toward tailgate
DRIVER SIDE CABSIDE AMMO CAN
PASSENGER SIDE CABSIDE AMMO CAN
TAILGATE AMMO CAN J-HOOKS:
• Insert the J-hooks through the tailgate holes on the driver side and passenger side tailgate ammo cans and loop J-hook through tailgate bracket.
Assemble with black spherical washer, flat washer and nut; BAG J7. IMPORTANT: Leave all J-hook nuts LOOSE!
J7
✕
✕
✕
CAB
Orient tailgate ammo can J-hooks to
open with hook toward cab
J7
✕
DRIVER SIDE TAILGATE AMMO CAN PASSENGER SIDE TAILGATE AMMO CAN
DECKED. COM | #DECKEDUSA | @DECKEDUSA DG6 / DG7 | v.4 | Page 11

DG7 INSTALL: JHOOKS
Double check that you have a DG7 Silverado/Sierra with a 6’6” bed. If you have
STOP:
the DG6 with the 5’9” bed, go back to previous page.
CABSIDE AMMO CAN J-HOOK INSTALL:
• Insert the J-hooks through the tailgate hole on the driver side and passenger side cabside ammo cans and loop J-hook through cabside bracket.
Assemble with black spherical washer, flat washer and nut; BAG J5. IMPORTANT: Leave all J-hook nuts LOOSE until entire deck is in place. If you
tighten the J-hooks, you won’t be able to center the system properly.
J5
✕
✕
✕
J5
✕
CAB
Orient cabside ammo can J-hooks to
open with hook toward tailgate
DRIVER SIDE CABSIDE AMMO CAN
PASSENGER SIDE CABSIDE AMMO CAN
TAILGATE AMMO CAN J-HOOK INSTALL:
• Insert the J-hooks through the center holes on the driver side and passenger side tailgate ammo cans and loop J-hook through tailgate bracket.
Assemble with black spherical washer, flat washer and nut; BAG J7. IMPORTANT: Leave all J-hook nuts LOOSE!
J7J7
✕
✕
✕
✕
CAB
Orient tailgate ammo can J-hooks to
open with hook toward cab
DRIVER SIDE TAILGATE AMMO CAN PASSENGER SIDE TAILGATE AMMO CAN
Page 12 | v.4 | DG6 / DG7 DECKED. COM | #DECKEDUSA | @DECKEDUSA

DRAWERS: BRACKETS + WHEELS
(SO EASY A CHIMPANZEE CAN DO IT)
• Each drawer has a left and a right bracket. Bolt the brackets into place via bottom two holes in bracket with 3/4"
length bolts. Use the 2" length bolt for the upper cabside wall hole in bracket; BAG DRAWER 1.
• Install a tube brace in each drawer with two 3/4" length bolts; BAG DRAWER 1, BAG DRAWER 3.
• Attach wheels onto the drawer brackets with a 7/32" hex wrench; BAG WHEELS.
RECOMMENDED TORQUE:
Bolts in labeled bags DRAWER 1 and DRAWER 3 - 27 in-lb.
TUBE BRACE
GOES HERE
DRAWER 1
Bolts in labeled bag WHEELS C- 90 in-lb.
2" BOLT
CORNER
BRACKET
➡
CAB
HELPFUL TIP: If you purchased drain
plugs, install now (instructions are
included with drain plugs).
WHEELS
DRAWER 3
DRAWER 1
DECKED. COM | #DECKEDUSA | @DECKEDUSA DG6 / DG7 | v.4 | Page 13

INSTALL: DRAWER HANDLES
• One drawer handle assembly needs to be installed.
• Save yourself the headache, watch this short installation video: DECKED.com/videohandle.
• From the underside of drawer, place the springs into the cavities on either side of the handle slots,
red spring=right spring; BAG HANDLE. NOTE: Each spring arm should point inward, not outward.
• Install a clevis pin through each outside drawer hole and through spring; BAG HANDLE.
• With DECKED logo facing outward, insert the handle ends behind the spring arms. Rotate the arms of the handle toward
the clevis pins, pulling the spring arm downward. When the handle hole is lined up with the clevis pin, push the pin
through the handle hole and through the inside drawer hole. Repeat on the other side of the handle.
• Install a hair pin through the clevis pin; BAG HANDLE.
HANDLE OVERVIEW
HAIR PIN
WRONG:
SPRING ARM IS HERE
(NOT FULLY HORIZONTAL)
TOP VIEW
CORRECT:
SPRING ARM IS HERE
(FULLY HORIZONTAL)
CLEVIS PIN
WRONG:
SPRING ARM OUT
OF HANDLE NOTCH
Page 14 | v.4 | DG6 / DG7 DECKED. COM | #DECKEDUSA | @DECKEDUSA
CORRECT:
SPRING ARM FITS
IN HANDLE NOTCH
SPRING ARMS
POINT INWARD
SPRING
NOTCHES
HELPFUL TIP: MAKE SURE SPRINGS HAVE
THE LONG ARM HORIZONTAL AND SHORT LEG
VERTICAL BEFORE INSERTING HANDLE

INSTALL: DRAWERS
(HOPEFULLY YOU’RE STILL WEARING YOURS.)
• Save yourself the headache, watch this short installation video: DECKED.com/videotailgatewheels.
• Install the drawer by sliding wheels into their two channels (C-channel and center vert), and slide drawer all the
way forward until closed.
• Install the remaining tailgate side wheels onto their axles; BAG WHEELS.
NOTE: Placing a spacer under the drawer to raise it into position makes this easier
(ammo can lids work well, or a small piece of 2x2 or 2x4 is even better).
• Install the weather strips on the tailgate side drawer edge: With the weatherstrip wiper facing cabside, line up one
end with the side of the drawer and place on the top drawer edge, firmly pressing down on the weatherstrip as you
move along the drawer edge.
NOTE: Facing the weather stripping the wrong way will funnel water into drawer: BAD!
• When the weatherstrip is fully seated along the top edge, trim off any that extends beyond the drawer edge with
wire cutters. Watch out for the stainless wire coil inside; it’s sharp!
RECOMMENDED TORQUE: Bolts in labeled bag WHEELS - 90 in-lb.
WHEELS
CABSIDE
WEATHER STRIP
DECKED. COM | #DECKEDUSA | @DECKEDUSA DG6 / DG7 | v.4 | Page 15

INSTALL: THE FUN STUFF
(PARTY TIME!)
• NOW MAKE SURE THE CENTER VERT IS IN THE CENTER OF YOUR BED; the gaps on either sidewall may not be equal because
the world isn’t perfect and neither is your truck bed.
• Alternately and gradually tighten all J-hooks to ensure DECKED is centered and secure. DO NOT OVERTIGHTEN
J-HOOKS! If the DECKED system is noticeably “crowned”, the J-hooks are too tight.
CAUTION: The following are small gauge screws – light, hand-tightening is all that is required.
• Center and screw on the ruler/edge guard; BAG FINAL FS.
• Screw on the bottle opener; BAG FINAL FS.
• Install lock core plugs; BAG FINAL FS, or install locks if purchased.
• Install the window covers in the cabside ammo cans (from inside the ammo can).
IMPORTANT: Grab your favorite beverage, crack ‘er open in the bottle opener and make a toast to your truck.
You did it. Immediately post a photo of your significant other, child or canine (in no order of significance)
appreciating your accomplishment. Add #DECKEDUSA | @DECKEDUSA.
RECOMMENDED TORQUE: Nuts for J-hooks in labeled bags - 10 in-lb.
CABSIDE AMMO CAN
WINDOW COVERS
FINAL FS
FINAL FS
FINAL FS
#DECKEDUSA | @DECKEDUSA
Page 16 | v.4 | DG6 / DG7 DECKED. COM | #DECKEDUSA | @DECKEDUSA

DECKED 3-YEAR LIMITED WARRANTY
(a.k.a. LEGAL MUMBO JUMBO)
LIKE YOUR HIGH SCHOOL GUIDANCE COUNSELOR USED TO SAY, “HELP ME, HELP YOU”. REGISTER YOUR PRODUCT! IT’S QUICK, IT’S
SECURE, AND IT’S THE BEST WAY TO HELP US HELP YOU IN THE RARE EVENT THAT YOUR ACTS OF AWESOMENESS LEAD TO A WARRANTY
ISSUE. PLUS, AS AN ADDED BONUS, YOU WILL BE THE FIRST TO KNOW OF PRODUCT IMPROVEMENTS OR ISSUES SPECIFIC TO YOUR
MODEL. GO TO DECKED.COM/REGISTER
DECKED LLC warrants to the original purchaser of this product that the product will be free from manufacturing defects in
workmanship and materials for a period of three (3) years from the date of the original purchase. If within three (3) years from the
original date of purchase this product fails due to defect in materials or workmanship, DECKED LLC will replace any defective part
at its option.
The original purchaser must contact the DECKED LLC customer service team and provide a description of the defective part,
including digital pictures if requested, with the original purchase documentation as validation of warranty coverage or have
previously activated their warranty online.
This warranty DOES NOT cover or apply to:
• Damage to the product due to misuse, mishandling and abuse.
• Products not used in accordance with the manufacturer’s instructions or recommendations.
• Product not assembled or installed according to manufacturer’s instructions.
• Normal wear and tear.
• Undeclared damage to the system during shipping, acts of God. In addition, consequential damage and incidental
damages (including lost time) such as damage to persons or property are not covered under this warranty.
(This space reserved for crayon drawings, coffee stains or ketchup spills.)
#DECKEDUSA | @DECKEDUSA
DECKED. COM | #DECKEDUSA | @DECKEDUSA DG6 / DG7 | v.4 | Page 17
 Loading...