

Page 1
Portable Water Activity
Measurement System
Operator’s Manual
Ve r. 1.3
Page 2

Decagon Devices, Inc.
950 NE Nelson Court
Pullman , WA 99163
tel: (509) 332-5158
fax: (509) 332-5158
www.decagon.com/pawkit
pawkit@decagon.com
Copyright 2001
Decagon Devices, Inc.
All rights reserved
Page 3

Pawkit
Table of Contents
Contents
1. Introduction . . . . . . . . . . . . . . . . . . . . . . . . . 1
About this Manual . . . . . . . . . . . . . . . . . . . . . 1
Customer Service. . . . . . . . . . . . . . . . . . . . . . 1
Warranty. . . . . . . . . . . . . . . . . . . . . . . . . . . . . 2
Note to our Users . . . . . . . . . . . . . . . . . . . . . 2
Seller’s Liability . . . . . . . . . . . . . . . . . . . . . . . 3
2. About the Pawkit . . . . . . . . . . . . . . . . . . 5
How Pawkit works. . . . . . . . . . . . . . . . . . . . . 5
Accuracy . . . . . . . . . . . . . . . . . . . . . . . . . . . . . 5
Getting Started . . . . . . . . . . . . . . . . . . . . . . . 6
Components of your Pawkit system: . . . . 6
Preparing for Operation . . . . . . . . . . . . . . . 6
3. Operation. . . . . . . . . . . . . . . . . . . . . . . . . . . 8
Features . . . . . . . . . . . . . . . . . . . . . . . . . . . . . . 8
Sample Preparation and Insertion. . . . . . . . 9
Sample Preparation . . . . . . . . . . . . . . . . . . 9
Sample Insertion and
chamber movement . . . . . . . . . . . . . . . . . . 11
Taking Measurements . . . . . . . . . . . . . . . . . 15
Turning it off . . . . . . . . . . . . . . . . . . . . . . . . . 18
Calibration . . . . . . . . . . . . . . . . . . . . . . . . . . 19
Calibration Standards . . . . . . . . . . . . . . . 19
Steps in Calibration . . . . . . . . . . . . . . . . 20
Sampling Precautions. . . . . . . . . . . . . . . . . .23
Pawkit and Temperature . . . . . . . . . . . . . .24
4. Cleaning and Maintenance . . . . . . . . 26
i
Page 4

Pawkit
Table of Contents
Cleaning. . . . . . . . . . . . . . . . . . . . . . . . . . . . . 26
Maintenance . . . . . . . . . . . . . . . . . . . . . . . . .27
Disassembly . . . . . . . . . . . . . . . . . . . . . . 27
Sensor Filter Cleaning/Replacement. . . 30
Chamber Cleaning Instructions . . . . . . . . 31
Battery Replacement . . . . . . . . . . . . . . . 32
5. Repair Instructions . . . . . . . . . . . . . . . . 36
Shipping Directions . . . . . . . . . . . . . . . . . . .36
Repair Costs . . . . . . . . . . . . . . . . . . . . . . . . .37
6. Theory: Water Activity
in Products . . . . . . . . . . . . . . . . . . . . . . . .38
Water content . . . . . . . . . . . . . . . . . . . . . . . 38
Water activity . . . . . . . . . . . . . . . . . . . . . . .39
Effect of Temperature
on water activity . . . . . . . . . . . . . . . . . . . . . 41
Water Potential . . . . . . . . . . . . . . . . . . . . . .42
Factors in determining
Water Potential . . . . . . . . . . . . . . . . . . . . . .42
Sorption Isotherms—relating aw
to water content . . . . . . . . . . . . . . . . . . . . .44
7. Further Reading . . . . . . . . . . . . . . . . . . .47
Water Activity Theory
and Measurement . . . . . . . . . . . . . . . . . . . .47
Food Quality and Safety . . . . . . . . . . . . . .48
Water Activity and Microbiology . . . . . .49
Water Activity in Foods . . . . . . . . . . . . . . .50
Pharmaceuticals/Cosmetics . . . . . . . . . . . .54
Miscellaneous . . . . . . . . . . . . . . . . . . . . . . . .55
Declaration of Conformity. . . . . . . . . . .57
ii
Page 5

Pawkit
Introduction
1. Introduction
Welcome to the Pawkit water activity measurement
system. Pawkit allows you to make quick measurements of water activity to ensure the safety of your
product. We hope you find the contents of this manual useful in understanding your instrument and
maximizing its benefit to you.
About this Manual
This manual includes instructions on the operation,
calibration, and maintenance of your Pawkit water
activity system. Please read these instructions carefully to ensure that your samples are measured
accurately and that you can fully utilize the instrument’s potential.
Customer Service
If you ever need assistance with your Pawkit, or if
you just have questions, there are several ways to
contact us:
Phone:
Our toll-free telephone number is available to
those in the US and Canada, Monday through Fri-
1
Page 6

Pawkit
Introduction
day, between 8 a.m. and 5 p.m. Pacific time at
1-800-755-2751.
For those outside of the US and Canada, call
(509) 332-2756.
Fax:
Our fax number is (509) 332-5158. When you fax
us, please include your instrument’s serial number,
your name, address, phone and fax number along
with a description of your problem.
E-mail:
If you need technical support, or if you have application questions, you can send us messages via
email at pawkit@decagon.com. Again, please
include as part of your message your Pawkit’s serial
number, your name, address, phone, fax number,
and return e-mail address.
Warranty
The Pawkit has a 30-day satisfaction guarantee and
a one-year warranty on parts and labor.
Note to our Users
This manual is written to aid the end user in understanding the basic concepts of water activity,
enabling them to use our instrument with confidence. Every effort has been made to ensure that
2
Page 7

Pawkit
Introduction
the content of this manual is correct and scientifically sound.
Seller’s Liability
Seller warrants new equipment of its own manufacture against defective workmanship and materials
for a period of one year from date of receipt of
equipment (the results of ordinary wear and tear,
neglect, misuse, accident and excessive deterioration due to corrosion from any cause are not to be
considered a defect); but Seller’s liability for defective parts shall in no event exceed the furnishing of
replacement parts F.O.B. the factory where originally manufactured. Material and equipment covered hereby which is not manufactured by Seller
shall be covered only by the warranty of its manufacturer. Seller shall not be liable to Buyer for loss,
damage or injuries to persons (including death), or
to property or things of whatsoever kind (including,
but not without limitation, loss of anticipated profits), occasioned by or arising out of the installation,
operation, use, misuse, nonuse, repair, or replacement of said material and equipment, or out of the
use of any method or process for which the same
may be employed. The use of this equipment constitutes Buyer’s acceptance of the terms set forth in
this warranty. There are no understandings, representations, or warranties of any kind, express,
implied, statutory or otherwise (including, but with-
3
Page 8

Pawkit
Introduction
out limitation, the implied warranties of merchantability and fitness for a particular purpose), not
expressly set forth herein.
4
Page 9

Pawkit
About the Pawkit
2. About the Pawkit
The Pawkit is designed to be a simple, rapid and
portable system for measurement of water activity.
It is easy to use, durable, and requires little maintenance.
How Pawkit works
Pawkit uses a dielectric humidity sensor to measure
the aw of a sample. In an instrument that uses this
technique, a special porous polymer is placed
between two porous electrodes in the headspace of
a sealed chamber. The electrical properties of the
polymer change depending on the relative humidity
of the chamber. The electrodes give a signal based
upon the relative humidity in the closed chamber.
This signal is then translated by the software and
displayed as water activity on the instrument’s
screen. At equilibrium, the relative humidity of the
air in the chamber is the same as the water activity
of the sample.
Accuracy
The Pawkit is accurate to ±0.02 aw. For many applications, this accuracy is more than adequate. If you
5
Page 10

Pawkit
About the Pawkit
require higher accuracy in your measurements, we
recommend you use Decagon’s AquaLab water
activity meter, which is a lab-grade, bench-top
instrument that has an accuracy of ±0.003 aw, and
measures based upon the chilled-mirror dewpoint
method. Contact Decagon for more details.
Getting Started
Components of your Pawkit system:
Your Pawkit should have been shipped to you with
the following items:
• Pawkit main unit
• Durable carrying case
• 110 disposable Sample cups
• 3 spare sensor filters
• 1 cleaning kit
• 1 reusable stainless steel cup
• 2 vials each of the following calibration solutions:
6.0 molal NaCl 0.760 aw
13.41 molal LiCl 0.250 a
w
6
Page 11

Pawkit
About the Pawkit
Preparing for Operation
To ensure that your Pawkit operates correctly and
consistently, always place it on a level surface when
measuring. This reduces the chance that sample
material will spill inside the instrument. To avoid
inaccurate readings, place your Pawkit in a location
where the temperature remains fairly stable. This
location should be well away from air conditioner
and heater vents, open windows, outside doors,
refrigerator exhausts, or other items that may cause
rapid temperature fluctuation.
7
Page 12
Pawkit
Operation
3. Operation
Operation of the Pawkit is very simple. Once you
have ensured that you have a stable working environment, you are ready to begin sampling. Following is a description of the features and operation of
the instrument.
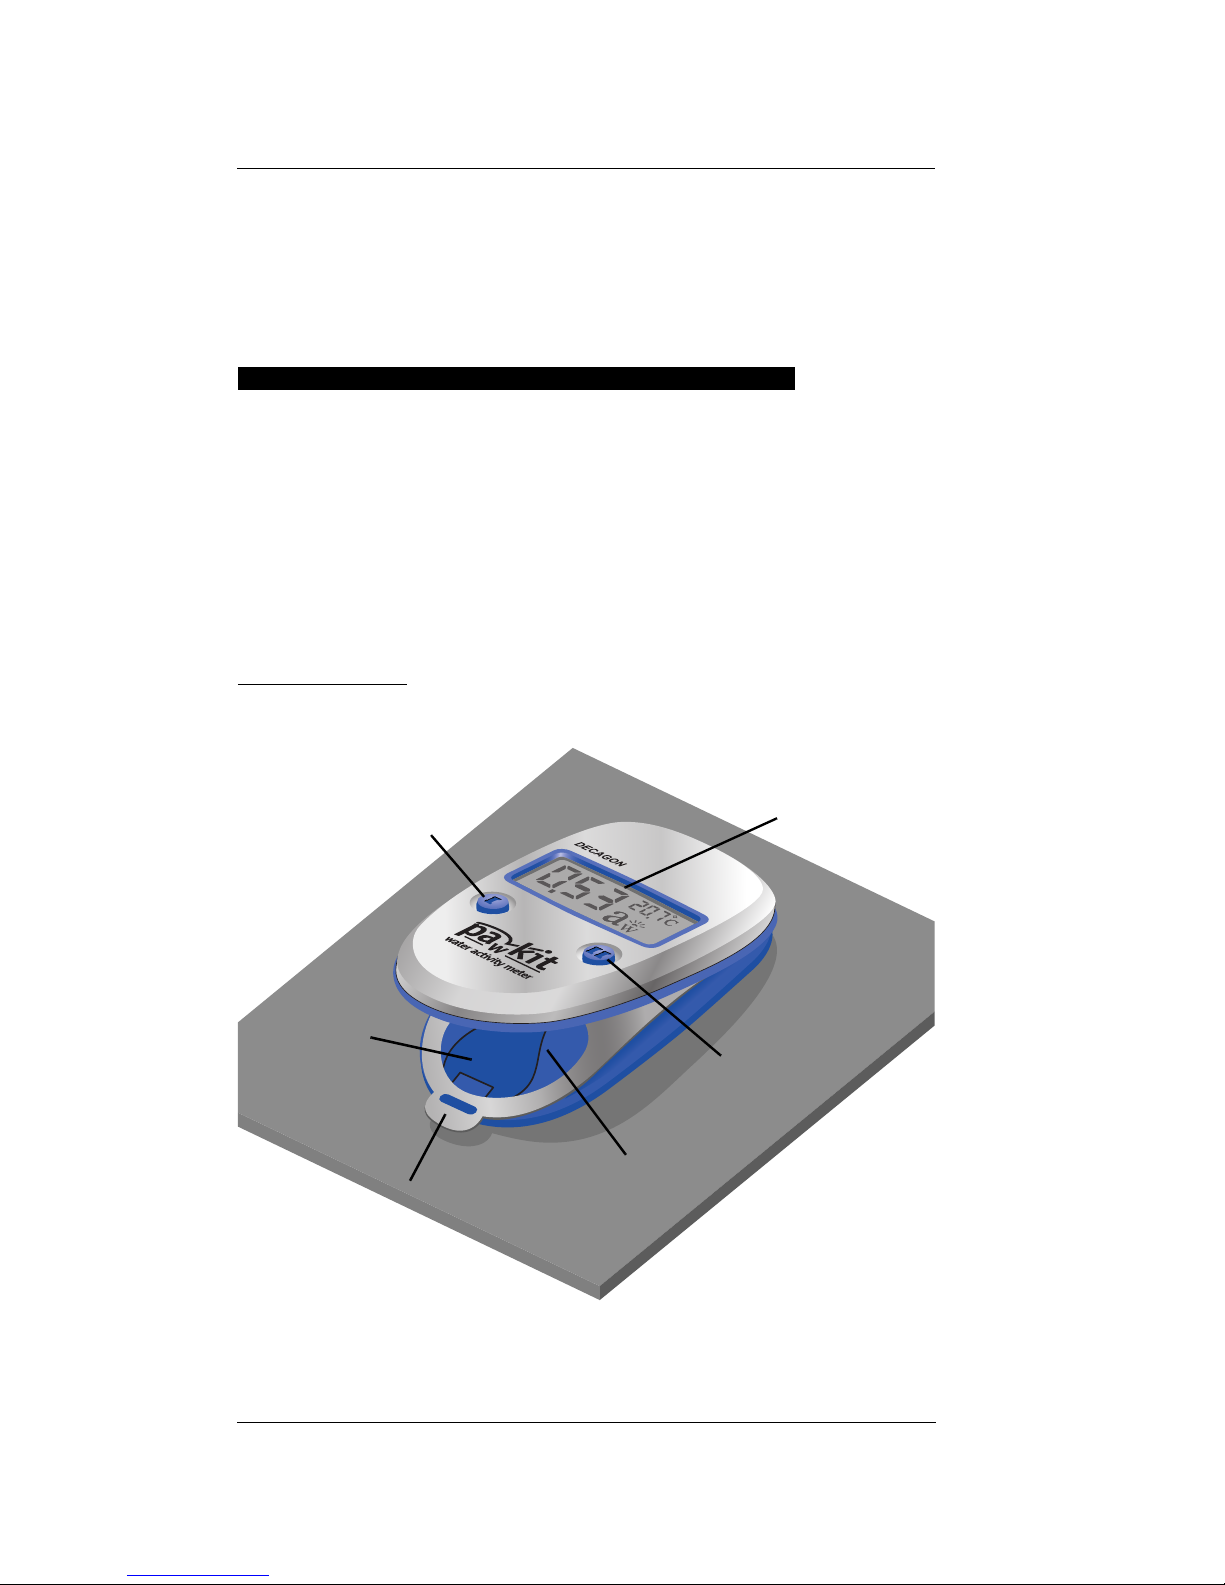
Features
Button I
Temp.
Sensor
Opening
Tab
LCD
Button II
Sample Chamber
Diagram of Pawkit features
8
Page 13

Pawkit
Operation
Sample Preparation and Insertion
Your Pawkit system comes with 110 disposable
plastic sample cups and 1 stainless steel sample
cup. More cups are always available from Decagon
when you run out.
Sample Preparation
Special care should be taken in preparing the sample in order to get the best readings possible. Follow these guidelines when preparing samples.
• Make sure that the sample to be measured is
homogeneous. Multi-component samples (e.g.,
muffins with raisins) or samples that have outside coatings (like deep-fried, breaded foods)
can be measured, but may take longer to equilibrate. Samples like these may require additional
preparation (crushing or grinding) to obtain a
representative sample.
• Completely cover the bottom of the cup with the
sample, if possible. Pawkit is able to accurately
measure a sample that leave small spaces of the
cup bottom exposed. For example, raisins only
need to be placed in the cup and not flattened
to cover the bottom. A larger sample surface
area increases instrument efficiency by shortening the time needed to reach vapor equilibrium.
9
Page 14

Pawkit
Operation
• Fill the cup no more than half-full of the sample.
Pawkit does not require a large sample size to
make its reading. As long as the bottom of the
cup is covered by the sample and that the sample is representative of the product you wish to
measure, you should be able to make accurate
readings. If the sample cup is too full, you risk
contaminating the sensor, which will lead to
inaccurate readings.
• Make sure that the rim and outside of the sample cup are clean. Wipe any excess sample
material from the rim of the cup with a clean tissue. Material left on the rim or the outside of the
cup will be transferred to subsequent samples
and can affect the accuracy of your readings.
The rim of the cup forms a vapor seal with the
sensor. Therefore, any sample material left on
the cup rim may prevent this seal, and contaminate future samples.
• If a sample will be read at some other time, put
the sample cup’s disposable lid on the cup to
restrict water transfer. To seal the lid, place tape
or Parafilm completely around the cup/lid
junction. It is necessary to seal the cup if it will
be a long time before the measurement is made.
10
Page 15
Pawkit
Operation
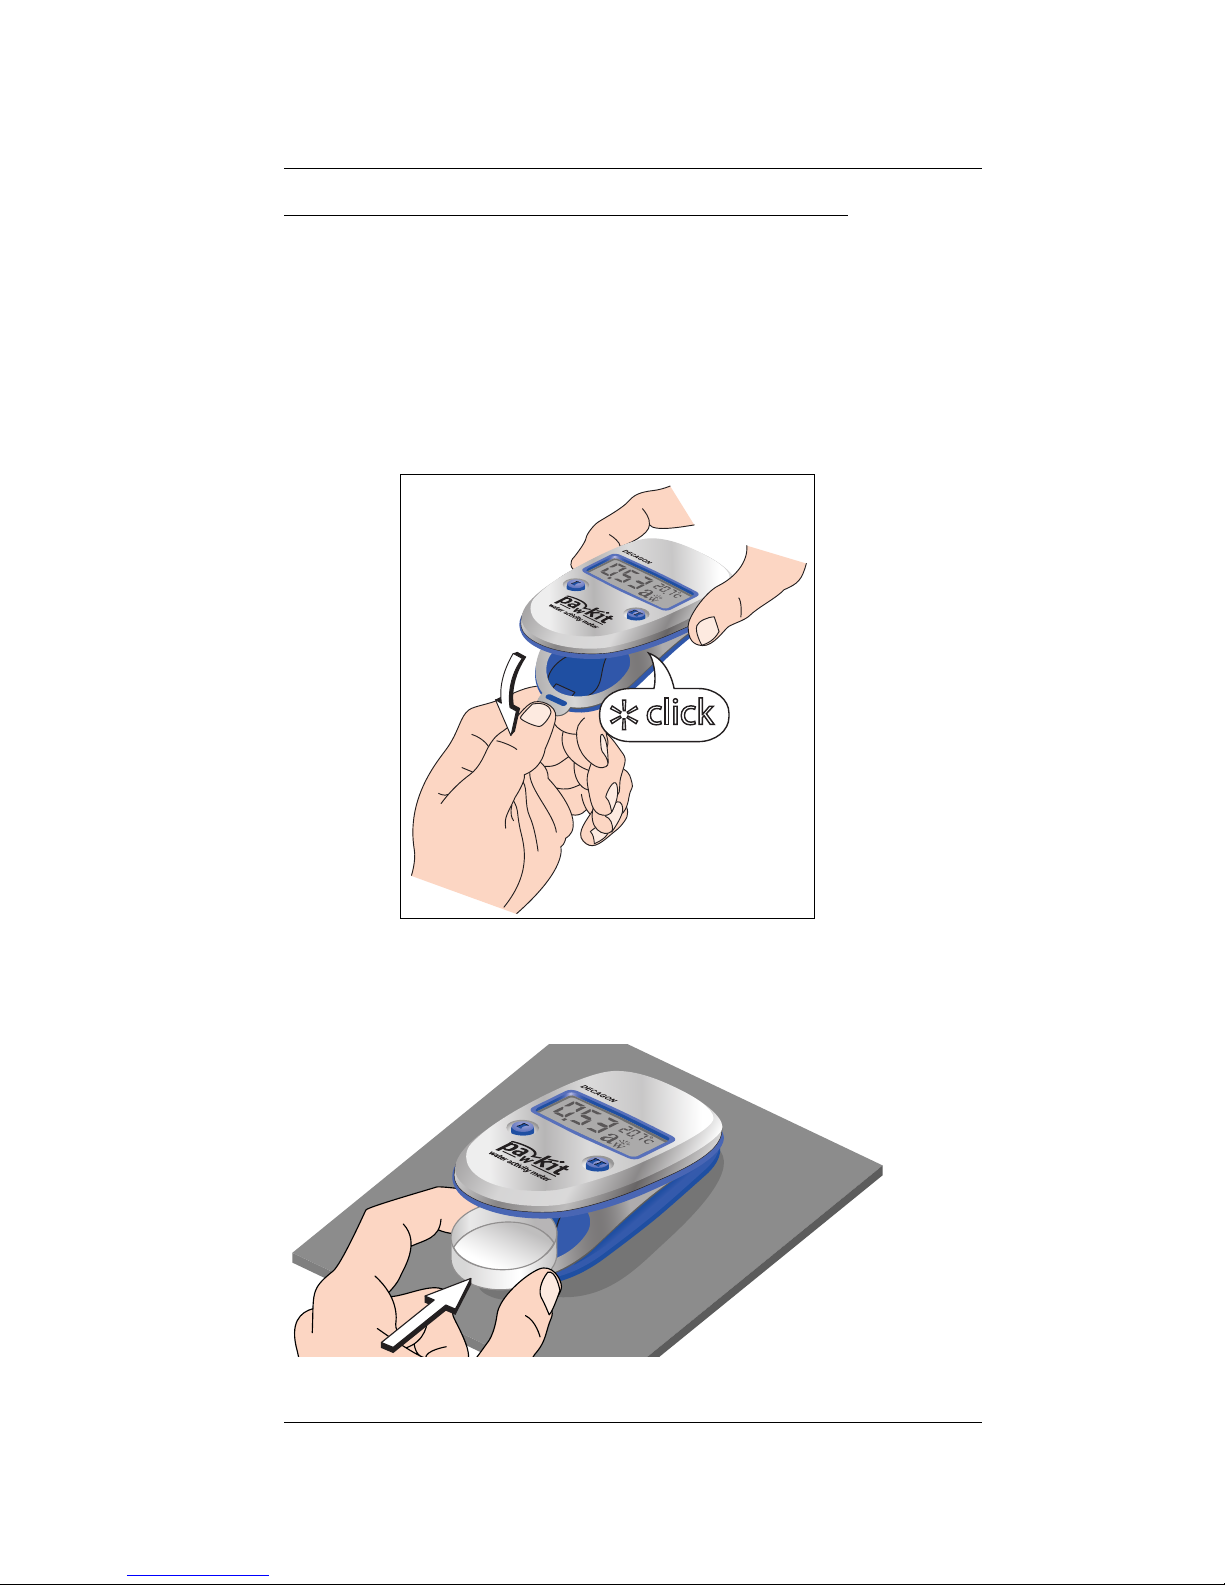
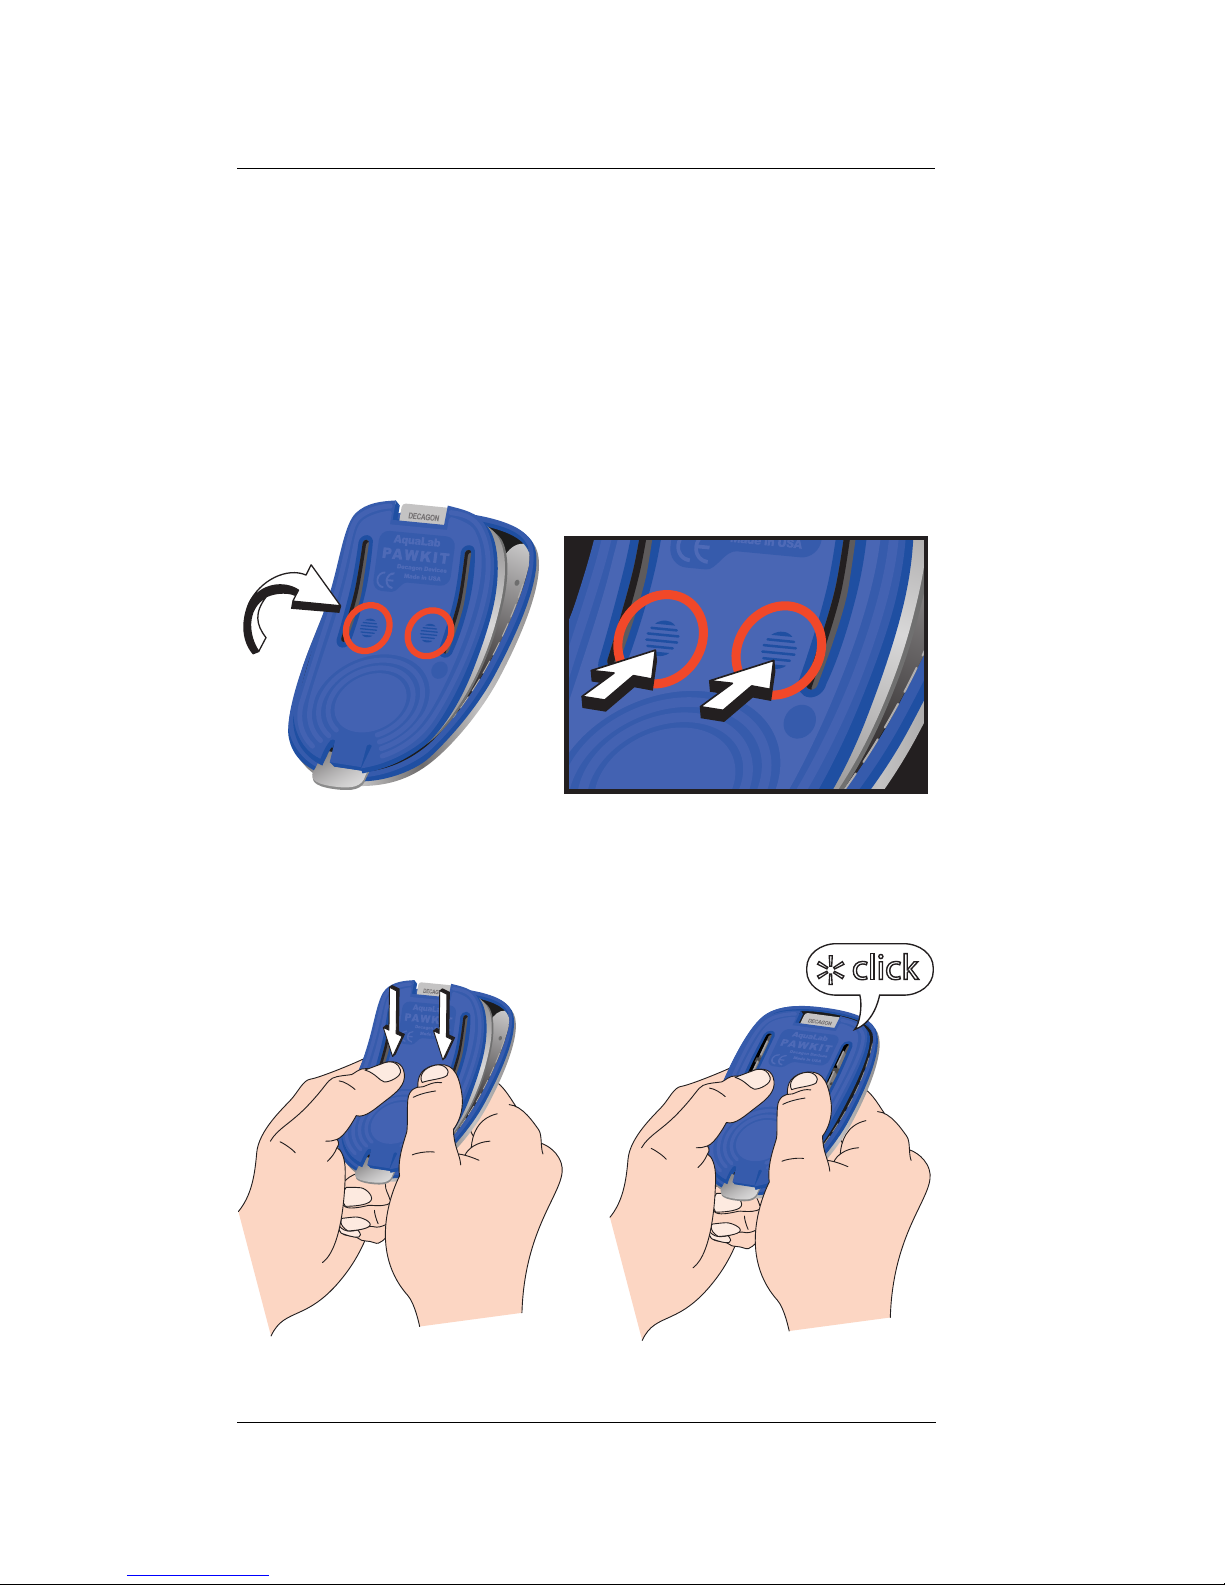
Sample Insertion and chamber movement
1. Open the Pawkit chamber by holding the case
near the LCD with one hand and pulling down
on the metal tab with the other hand. Flex the
base of the instrument until it snaps open, then
lay it on a flat surface.
2. Place your prepared sample cup inside the
instrument in the cup-holder as shown:
Insert cup into area shown
11
Page 16
Pawkit
Operation
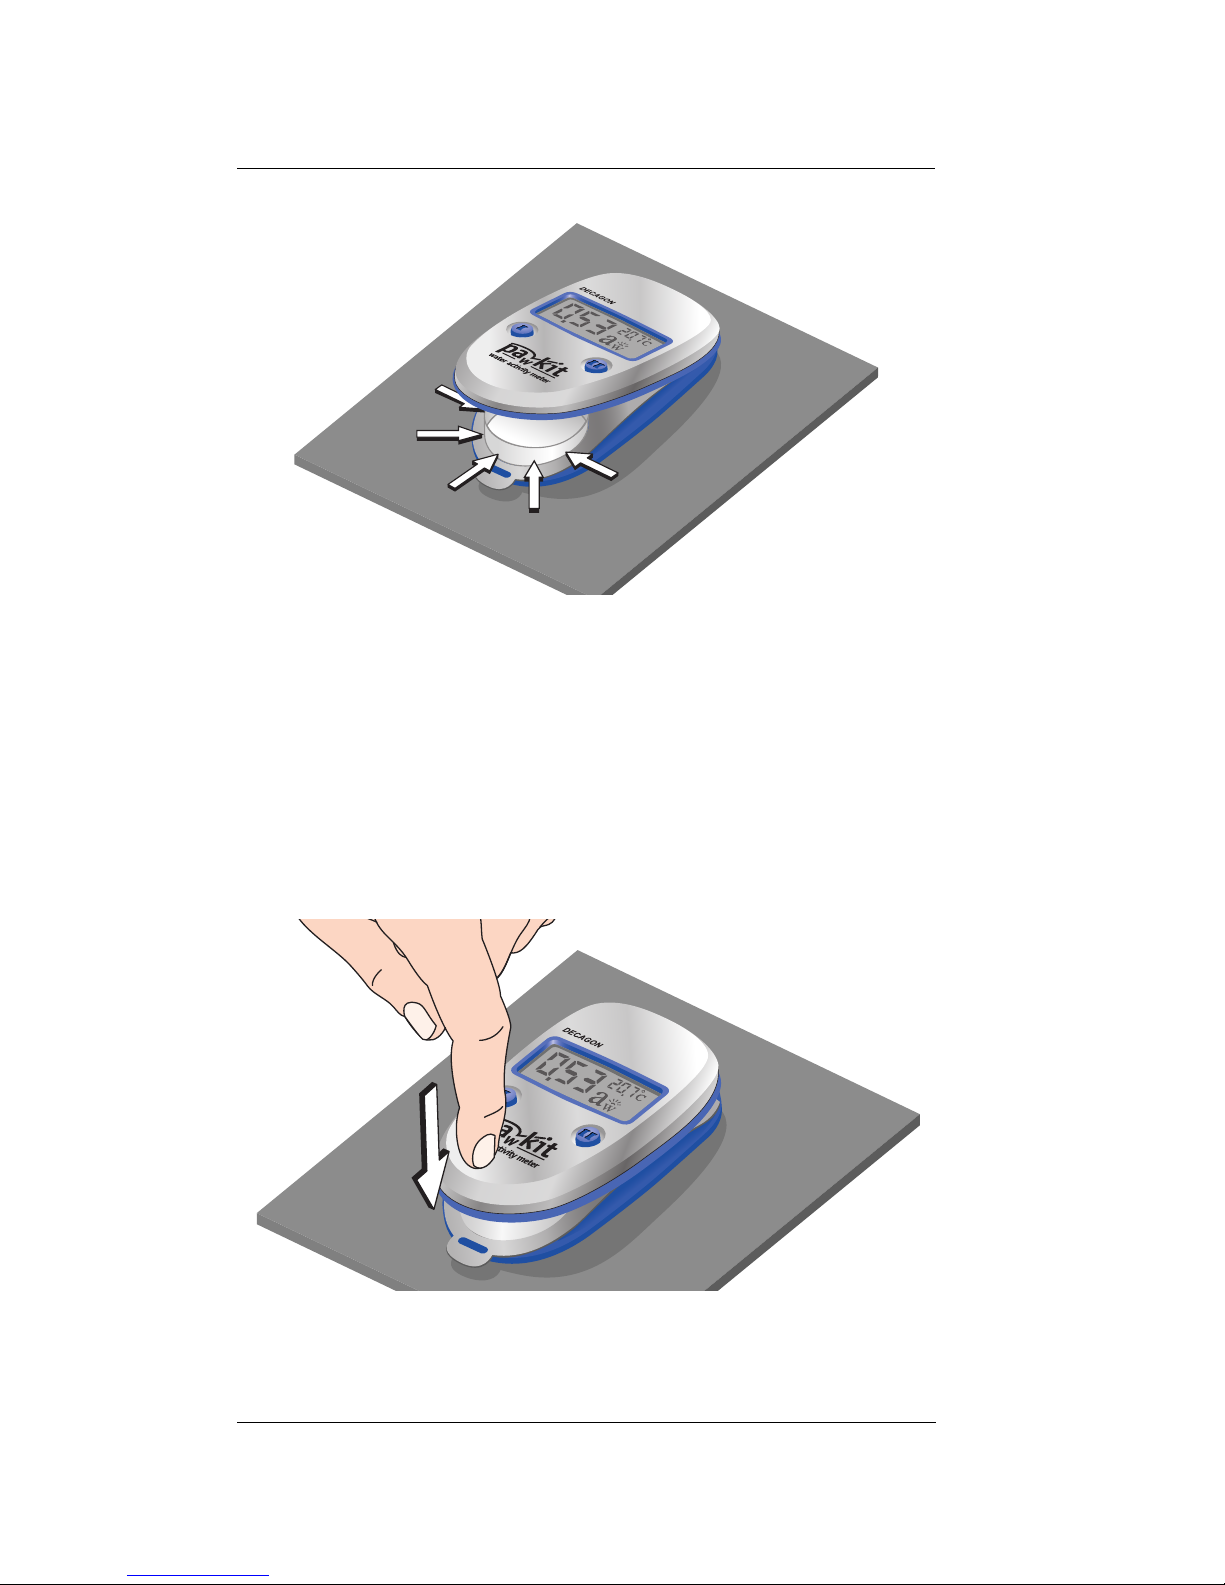
Ensure cup is entirely within the chamber
3. Once the sample cup is properly inserted, press
down on the front end of the case to secure the
cup inside the instrument. You are now ready to
take readings (see “Taking Measurements” section below).
12
Page 17
Operation
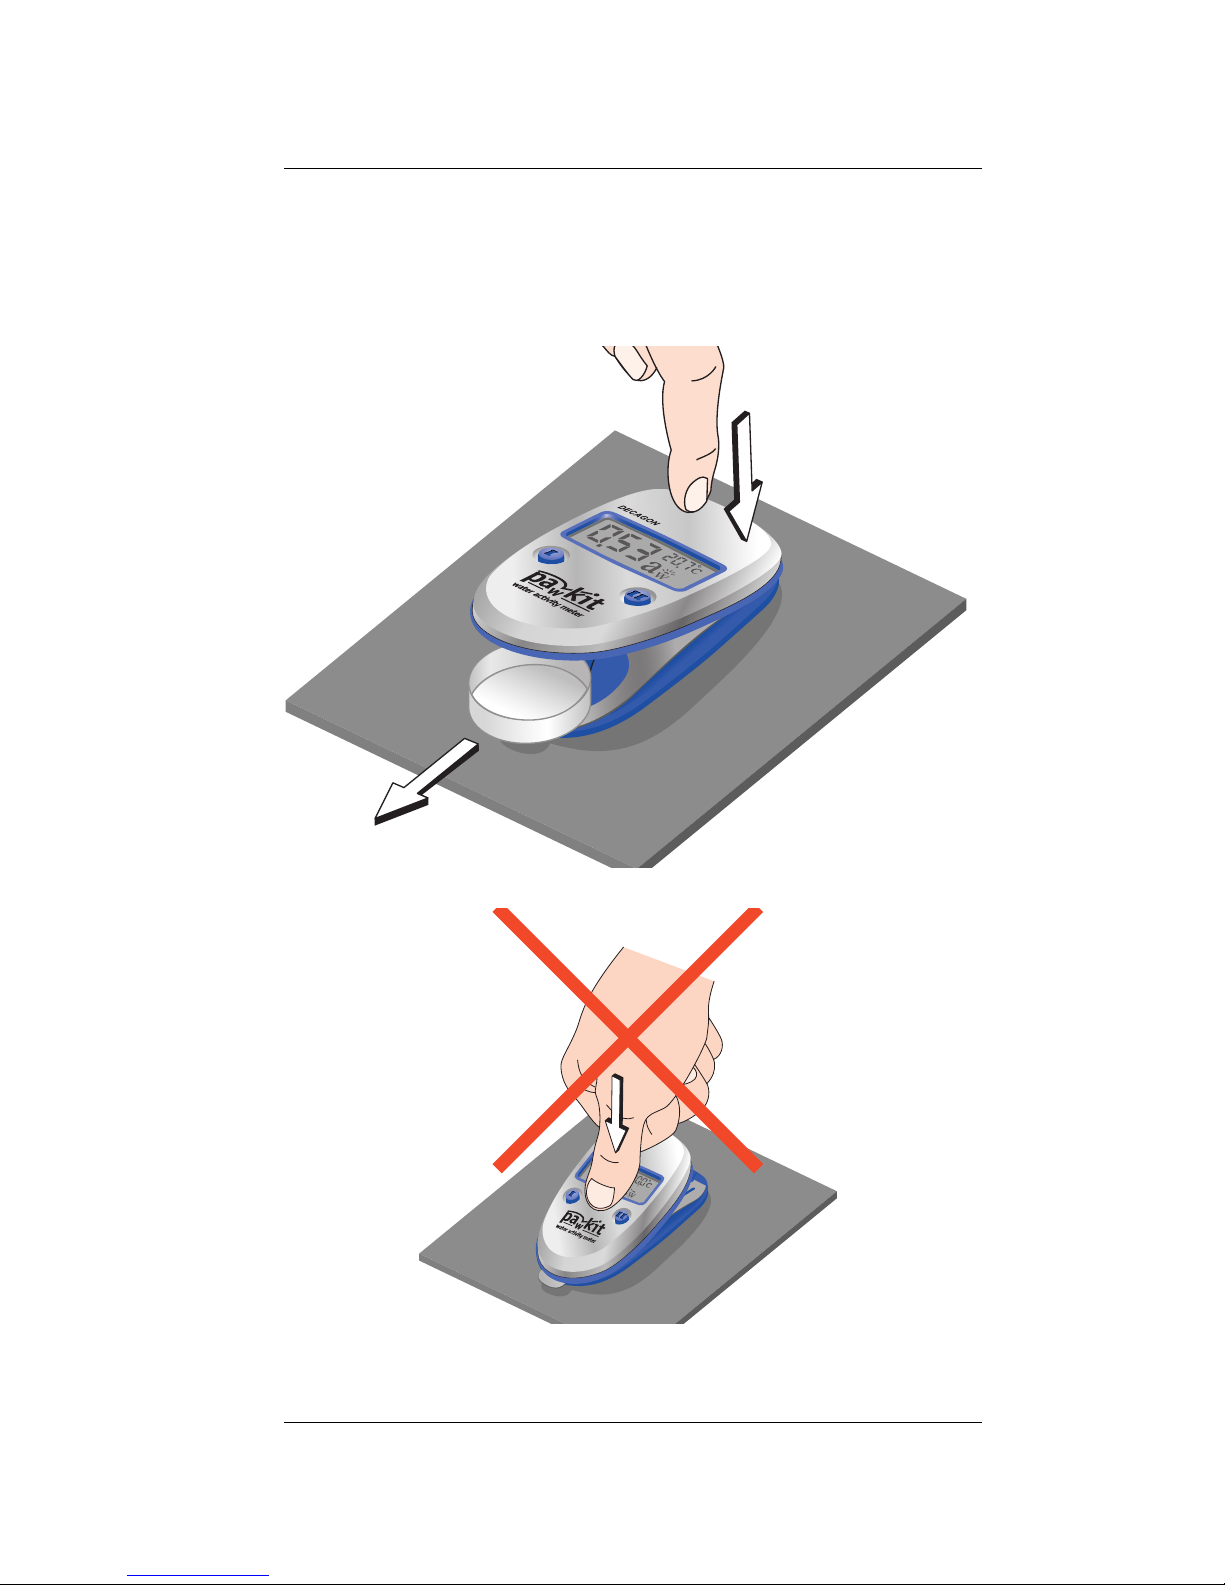
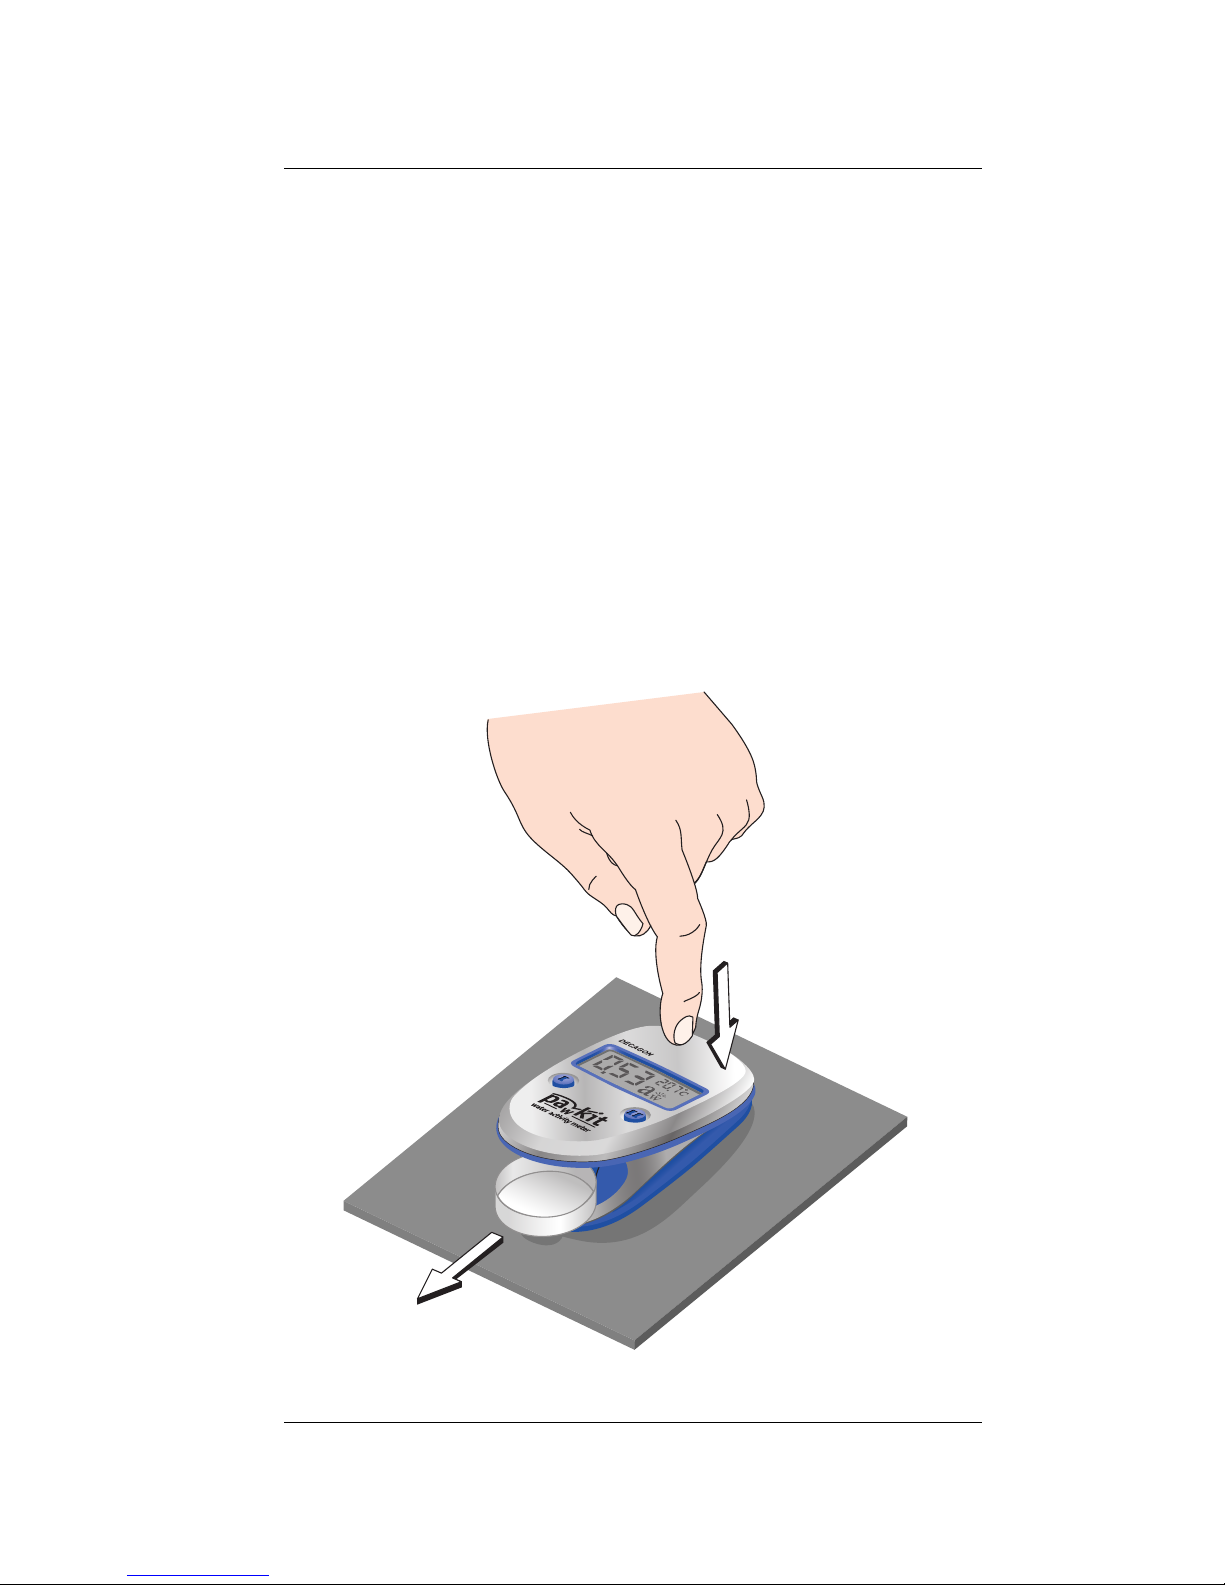
4. When you are finished with the sample, press
on the back of the instrument above the LCD as
illustrated to open the chamber and remove the
cup.
Pawkit
13
Page 18
Pawkit
Operation
Do not press on the middle to close the instrument!
5. To close the instrument, turn it over, then press
on the two points shown with your thumbs until
it snaps closed.
14
Page 19
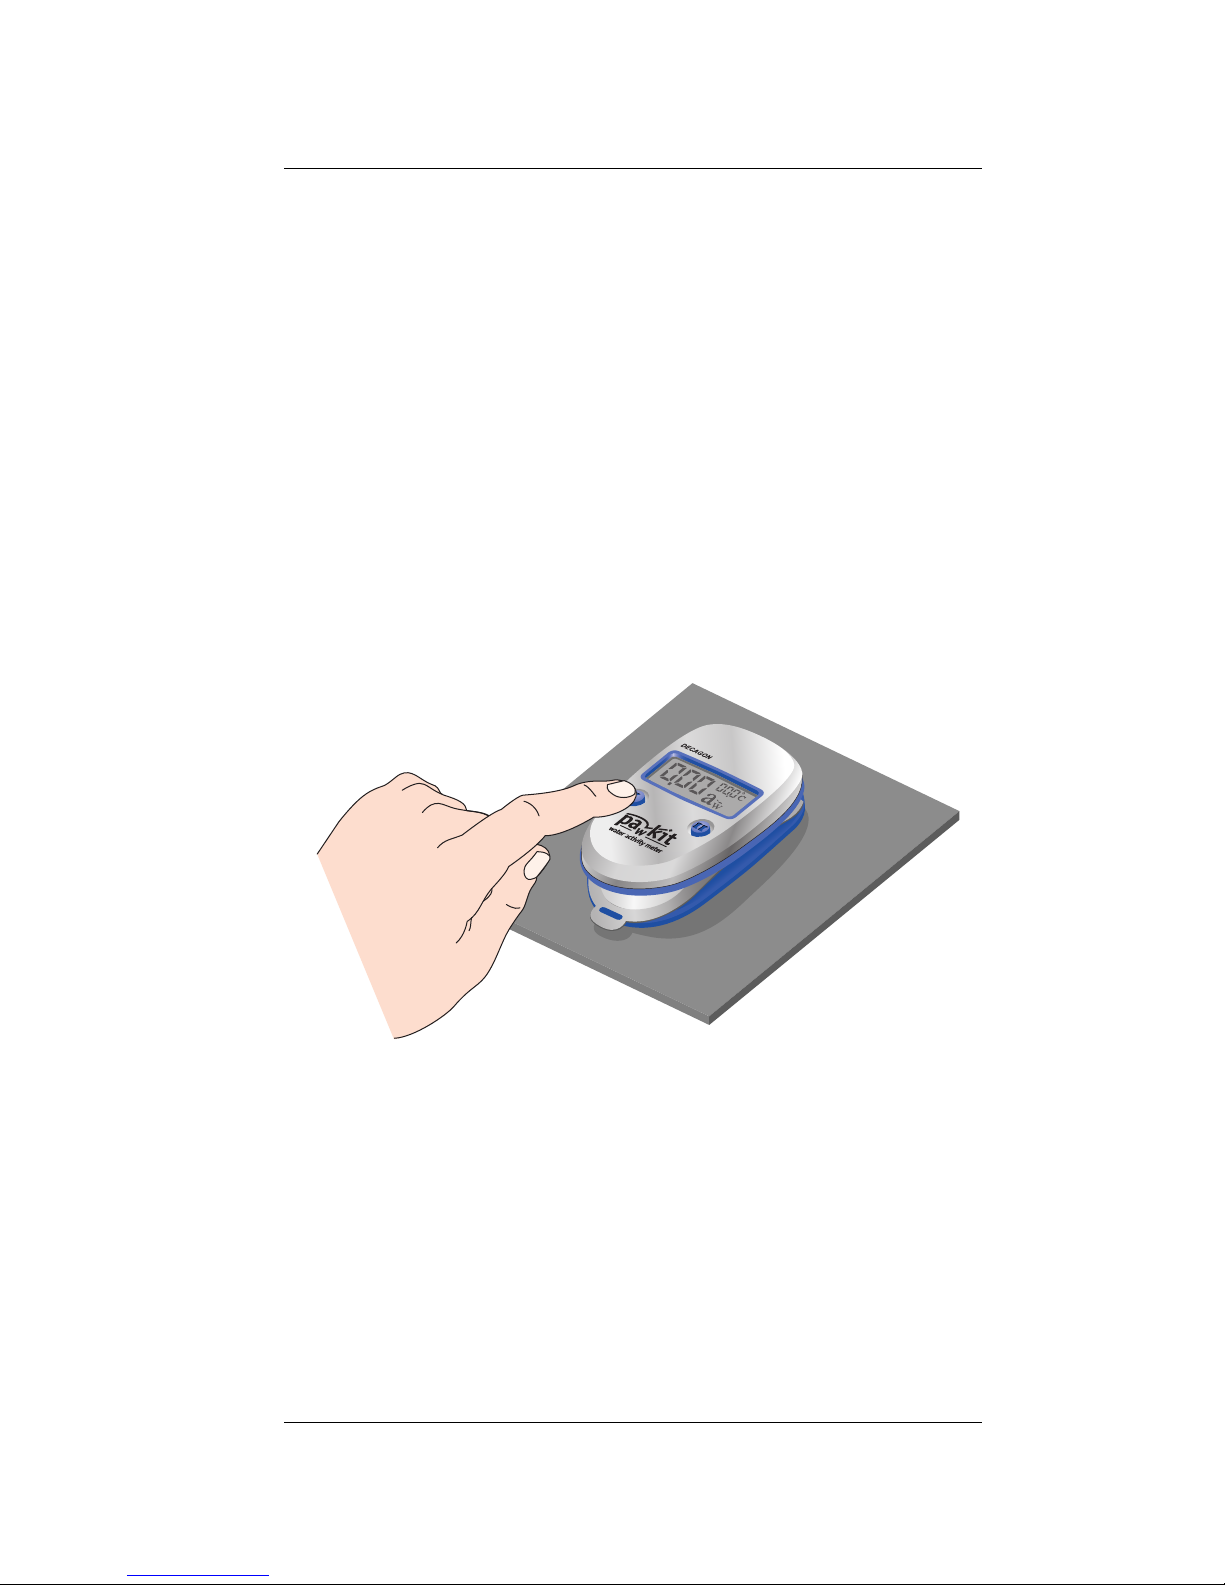
Taking Measurements
1. Make sure the sample cup is inserted as
described in the previous section.
2. Press the left button (I) to turn on the instru-
ment. It will display the last reading taken. This
allows you to begin a measurement and leave
without having to attend the instrument throughout the measurement. If it is already on, proceed
to the next step.
Pawkit
Operation
15
Page 20
Pawkit
Operation
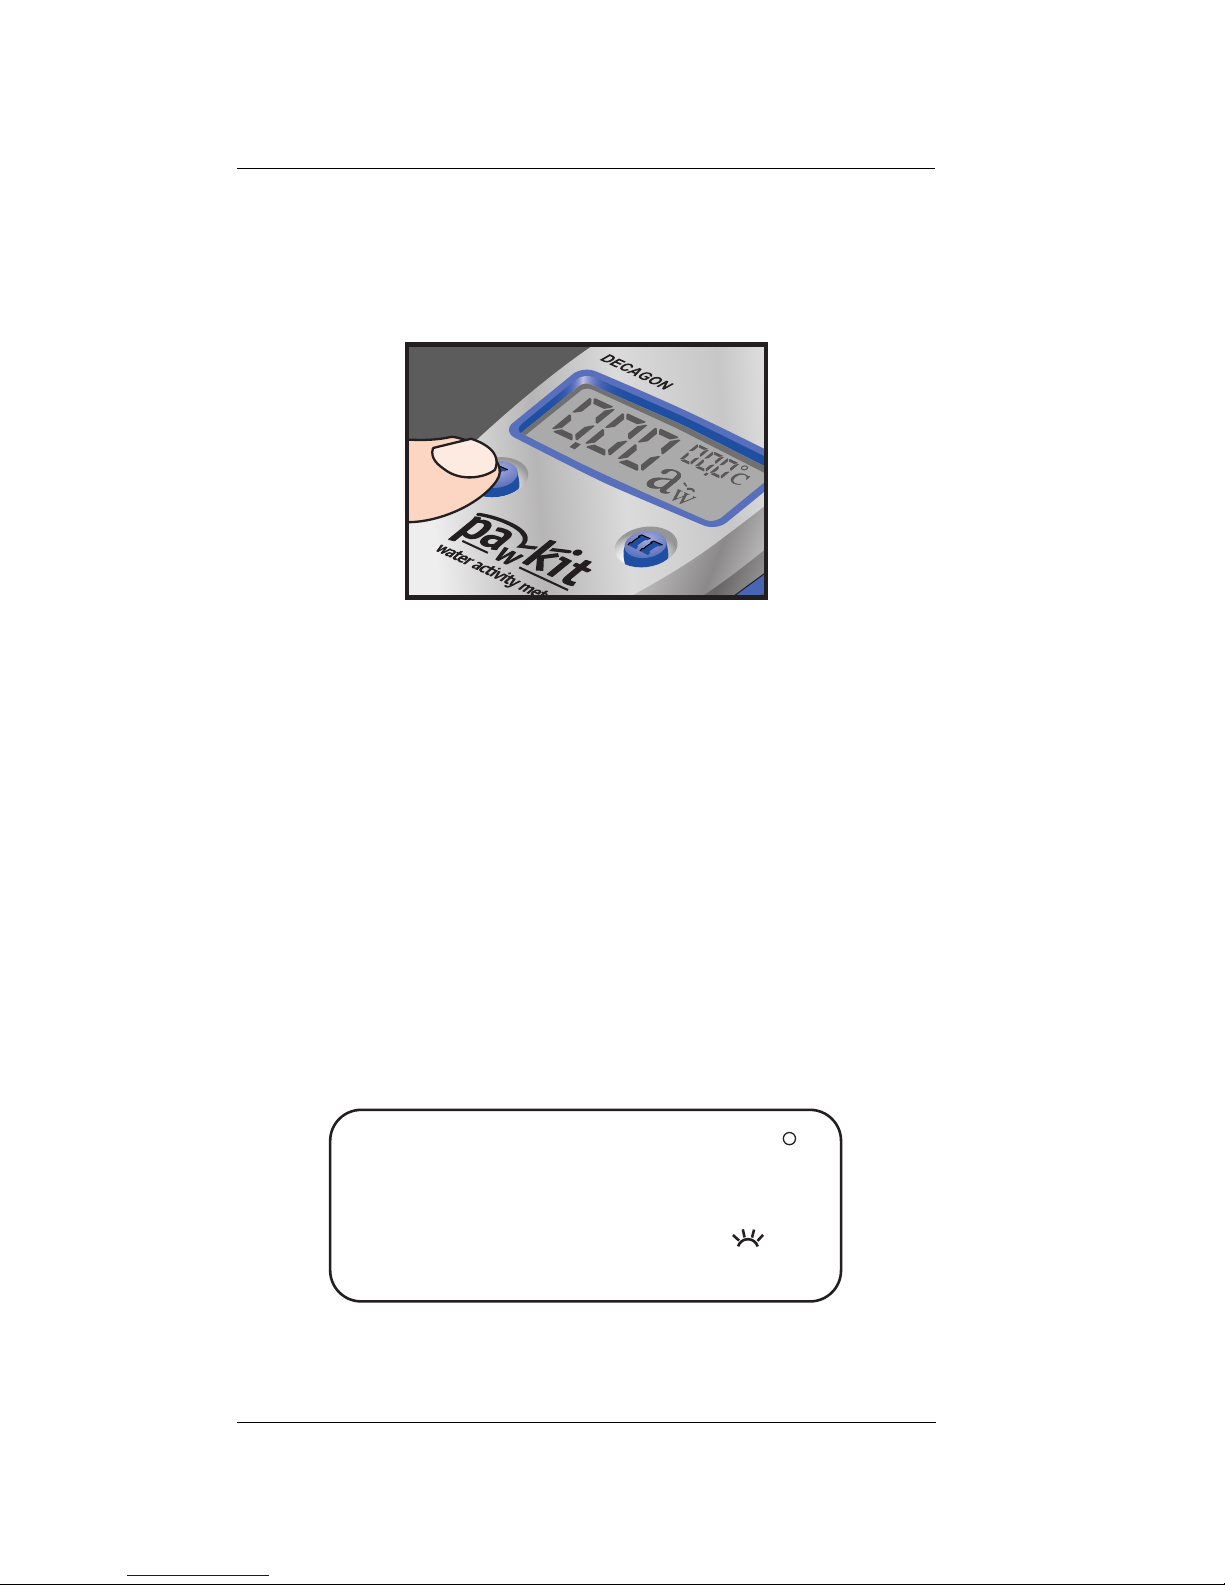
3. Press button I to begin the water activity measurement. The LCD display will be reset to
0.00a
NOTE: Pressing button I any time during a measure-
ment will restart the water activity measurement.
4. Once the measurement process has been
started, it will begin to display water activity
measurements as well as temperature every 30
.
w
seconds. During this time you will be able to see
that it is measuring by looking at the “sunburst”
icon to the right of the water activity value. As it
measures, you will see the “beams” of the sunburst move from left to right:
24.6
C
0.89
a
W
16
Page 21
Pawkit
Operation
5. After 5 minutes, the instrument will display the
final water activity and beep 5 times. The sunburst disappears when the water activity reading
is finished. At this point you can either restart
the measurement by pressing button I again, or
you can record the shown value and take the
sample cup out.
6. To remove the sample, press on the back of the
Pawkit to open the chamber, then remove the
cup as shown:
17
Page 22

Pawkit
Operation
NOTE: If the Pawkit contains a sample, DO NOT lift
or move the instrument. You risk contaminating the
chamber and damaging the sensors.
NOTE: If you are done sampling, Take the sample
out. You risk contaminating the chamber in
transport or damaging sensors through extended
contact with the sample.
Turning it off
To turn off the Pawkit, leave it idle for more than 5
minutes, and it will shut off automatically. If the
Pawkit has automatically shut itself off, pressing
18
Page 23

Pawkit
Operation
button (I) will wake up the instrument and display
the last water activity measurement.
Calibration
As mentioned earlier, the Pawkit takes water activity
measurements by measuring the change in electrical
properties of a special polymer held between two
electrodes. Due to the nature of the dielectric
humidity sensor, there may be times when you may
need to calibrate. This section explains how to do
so. Calibrations should be verified frequently with
salt standards and adjusted as needed.
Calibration Standards
The Pawkit uses 2 calibration standards: 6.0 molal
NaCl (0.760a
), and 13.41 molal LiCl (0.250a
w
). You
w
received a small supply of these standards with your
instrument. These standards are specially prepared
salt solutions at specific concentrations for constant
and accurate water activity measurements. They
have been produced under a strict quality assurance
regime, and their accuracy is verified by an independent third party. They are very accurate, easy to
use, and readily available from Decagon Devices.
Most importantly, they greatly reduce preparation
errors. Because of these reasons, we recommend
using these standards for the most accurate calibration of your Pawkit. The calibration standards are
shelf-stable for one year.
19
Page 24

Pawkit
Operation
If these standards are not available you can make a
saturated Sodium Chloride (NaCl) slurry with a
water activity value of 0.75 aw. To make a salt slurry
of NaCl add water until the salt can absorb no more
water, as evidenced by the presence of free liquid.
The slurry should take the shape of the cup and
flow when tipped with the amount of free liquid at
a minimum.
Steps in Calibration
1. Take a vial of the 0.760 aw NaCl standard and
empty the entire contents of the vial into a sample cup. Place the sample cup into the Pawkit,
and close the chamber.
2. Press the left button (I) to take a reading. If it is
reading the correct water activity ±0.02, your
Pawkit needs no calibration. If not take a second
reading. After the second reading, note the
water activity value shown. If it is reading the
correct water activity ±0.02, your Pawkit needs
no calibration. If it is not reading correctly, proceed to the next step.
3. Once the reading is finished, the right button
(II) will be active. Button II is only active until
20
Page 25

Pawkit
Operation
the Pawkit shuts itself off. Press it once, and you
will see the following screen:
0.76
u0.76
4. This screen shows that you are in the calibration
mode. This one in particular shows that you are
ready to adjust calibration upwards for the 0.76
standard. The numbers in the upper right corner
indicate the a
just read. Press the II button to scroll through
the other selections. They are: d76, u25, d25,
and Sto. Note: After scrolling past Sto, you will
come to two factory calibration settings that say
u10 and d10. Ignore these settings and continue
scrolling to return to the main menu. The “u”
and “d” before each number stand for “up” or
“down” adjustment for each standard. The numbers (e.g. 25 and 76) correspond to the water
activity of a calibration standard (0.76 and 0.25
a
).
w
5. As an example, if your NaCl reading is lower
measurement that your Pawkit
w
than it should be, press the II button to scroll to
“u76” (“adjust up for 0.76 standard”). If it is
21
Page 26

Pawkit
Operation
higher than it should be, scroll to “d76” (“adjust
down for 0.76 standard”).
6. Once you have scrolled to the proper screen for
calibration adjustment, press the I button to
adjust the value to what it should be. Each time
you press the I button, the value in the corner
will change by an increment of 0.01.
7. When you have it set to the correct value, press
the II button to scroll until “Sto” appears in the
lower right corner, then press I. This will store
the new value you have set. You will then return
to the main screen and begin a new measurement.
Note: If you do not press “Sto” no change will be
made to the calibration of the Pawkit.
8. Repeat the above process with the 0.25 standard
to set the calibration for the 0.25 water activity
level.
9. If you inadvertently enter the calibration routine,
keep pressing button II until you scroll back to
the main screen.
Note: The 0.76 standard adjustment adjusts the
calibration intercept, while the 0.25 adjusts the
slope. Changes in the intercept are more likely to
occur than changes in the slope, so the 0.76 veri-
22
Page 27

Pawkit
Operation
fication check is the most important and should
be done more frequently.
Following is a graphical representation of the calibration routine:
Measure 0.76 Standard
Not Correct
Correct
e
l
Adjust 0.76 Calibration
p
m
a
s
OK to
Sample
f
I
w
a
C
o
>
0
5
.
0
r
r
e
c
t
If sample
aw < 0.50
Measure 0.25 Standard
Not Correct
Adjust 0.25 Calibration
Sampling Precautions
Long exposure to a variety of volatile substances or
to samples with water activities near 1.00 can shift
the sensor calibration. Therefore, always remove
samples as soon as the Pawkit is finished sampling
(beeps) to avoid damage to the sensor. If a sample
is accidentally left in the chamber for an extended
period of time, be sure to check the calibration
when the instrument is next used.
23
Page 28

Pawkit
Operation
Pawkit’s sensor can be damaged by long term exposure to high concentrations of ethyl alcohol. Reading samples with alcohol concentrations above
about 10% can shift the calibration. If the instrument
is used to read water activity of extracts and other
samples with high alcohol concentrations, the calibration should be checked frequently to make sure
the readings are accurate. Effects on the sensor can
be reduced by removing the sample immediately
after reading and allowing the Pawkit to stand open
for a time between readings to allow the alcohol to
diffuse out of the sensor chamber, or by measuring
a cup of activated charcoal.
Pawkit and Temperature
Pawkit makes its most accurate measurements when
the sample and instrument temperatures are within
1°C. If the sample is too warm, the thermometer
icon on the left of the screen will appear:
24.6
C
0.89
a
You will see the “mercury” go up the thermometer
and pop out of the top, and the instrument will
W
beep, indicating that the sample’s temperature is too
high and there is danger of condensing water in the
24
Page 29

Pawkit
Operation
sample chamber and on the sensor. If you get this
warning while sampling, remove the sample, place
the cup lid on the sample and wait until it has
reached ambient temperature before attempting to
read again.
If your sample is colder than the ambient temperature of the Pawkit, the accuracy of your reading
after 5 minutes may be questionable. Wait until the
sample’s temperature is similar to that of the Pawkit.
25
Page 30

Pawkit
Cleaning and Maintenance
4. Cleaning and Maintenance
Cleaning
The Pawkit water activity measurement system is
designed to be an easy-to-use, portable, low maintenance instrument. However, it is still important to
keep it clean to ensure its proper working and function. Here are some tips for keeping your Pawkit
clean:
• Use only a soft cotton cloth to clean the LCD.
Tissues can scratch the plastic, causing damage.
• Use a moist cotton cloth to clean the rest of the
outer case.
• For cleaning inside the case and sample chamber, use a cotton swab moistened with water to
clean sample residue. If you have spilled sample
material on the sensor screen and it doesn’t
come off, clean or replace the screen as
explained in the next section. It is important that
contamination to this screen is minimized, as the
relative humidity of the sample is measured via
the screen.
26
Page 31

Pawkit
Cleaning and Maintenance
Maintenance
Disassembly
For some maintenance procedures, you may want
to disassemble the Pawkit in order to facilitate
cleaning and/or replacing parts. Following is a
description on how to take apart and reassemble
the instrument.
1. With the Pawkit open, lift the back of the foot
plate up until the tabs on the foot plate clear the
notches in the retainer and it clicks. Next, pull
the whole foot plate forward until the bottom
disengages and the foot plate comes free.
27
Page 32

Pawkit
;;;
yyy
Cleaning and Maintenance
2. Be careful not to kink or bend the cup temperature sensor, which is in the blue Mylar tab.
3. To re-assemble, the springs in the foot plate
must slid under the rod in the retainer and the
tabs in the foot plate must be re-engaged in the
notches in the retainer. This is done by placing
the foot plate over the retainer with the tabs
aligned with the rod. Press on the contact points
while flexing the front tab upward so the springs
will slide under the rod. Slide the foot plate back
until the tabs click into the notches in the
retainer.
28
Page 33

Cleaning and Maintenance
Align the tabs with the rod.
Pawkit
Press the contact points while lifting on the
front tab of the foot plate.
Push while pressing to click in place.
29
Page 34

Pawkit
Cleaning and Maintenance
4. When the foot plate is in place, open the Pawkit
and carefully insert the blue Mylar sample temperature sensor tab between the front of the foot
plate and the elastomer.
Note: if the Pawkit does not open properly it means
either one of the tabs is not in its retainer notch or
one of the springs is not under the rod in the
retainer. The foot plate must be removed and reas-
sembled as described above.
Sensor Filter Cleaning/Replacement
You may periodically need to clean the porous
white sensor filter if it becomes dirty. To do so,
apply distilled water or isopropyl alcohol to a clean
lint-free cloth or Kimwipe and gently clean the surface of
the filter. Your Pawkit was shipped with 3 spare filters. If
the filter has become contaminated or requires removal
for any reason, contact Decagon for instructions on
removal and replacement. If the filter has come out of the
sensor, contact Decagon for instructions for reinstallation.
30
Page 35

Pawkit
;;
;
;
;
;;
;
yy
y
y
y
yy
y
Cleaning and Maintenance
Note: The sensor is extremely fragile! Do
not touch it.
Chamber Cleaning Instructions
1. Use a moist cloth or Kimwipe® to clean the sur-
rounding chamber area.
2. Re-assemble the instrument as described in the
“Disassembly” section above.
31
Page 36

Pawkit
Cleaning and Maintenance
Battery Replacement
The Pawkit uses two Lithium-ion battery cells, and
they should last for several years. If the battery
charge is getting low, you will see a low-battery
indicator icon appear in the lower right corner of
the screen (an occasional low battery indication
does not mean the battery needs replacing:
24.6
C
+
0.89
a
To replace the battery, follow these steps:
1. Remove the Pawkit bottom completely as
described in the “Disassembly” section above.
2. Turn the top portion of the Pawkit over so you
are looking at the underside. Four tabs on the
retainer engage the rim of the Pawkit case top.
Flex the front arms inward to free their tabs from
W
|
32
Page 37

Cleaning and Maintenance
;;
;
;
;;;;
yy
y
y
yyyy
;
;
;;
y
y
yy
underneath the case rim, then pull the retainer
forward to disengage the rear tabs.
3. Separate the elastomer, circuit board and
retainer from the stainless steel case. Next
Pawkit
remove the retainer and circuit board from the
elastomer, being careful not to kink the temperature sensor flex. You will see the batteries on the
upper portion above the LCD hole.
Retainer
Circuit
Board
Elastomer
Stainless
Steel Case
33
Page 38

Pawkit
Cleaning and Maintenance
4. Replace both batteries in the elastomer pocket
with new CR1632 or equivalent 3V lithium coin
cells. Make sure to orient the batteries so the
positive (+) contact is facing down into the elastomer pocket. Make sure the two small springs
which make contact between the (+) battery terminal and the circuit board are in place.
5. Replace the circuit board and retainer in the
elastomer. Align the buzzer (in the hole between
the batteries) and insert the retainer tabs in their
holes in the elastomer.
6. Place the elastomer assembly in the case top and
seat it fully. Slide the retainer forward and press
on the back of it while sliding it back to engage
the back two tabs. Finally, use a small screwdriver or similar tool to press in and down on
the front tabs until they snap into place. It is
important to make sure that all four tabs are
securely locked into the top.
34
Page 39

Pawkit
Cleaning and Maintenance
7. Attach the bottom of the Pawkit as described in
the “Disassembly” section above.
35
Page 40

Pawkit
Repair Instructions
5. Repair Instructions
If your Pawkit ever needs to be sent in for service
or repair*, call Decagon at 1-800-755-2751 (US and
Canada) or (509) 332-2756, or fax us at (509) 332-
5158. We will ask you for your address, phone
number, and serial number. For non-warranty
repairs, we will also ask for a payment method
(such as a purchase order or credit card number), a
repair budget, and billing address.
*Note: If you purchased your instrument from one
of our international distributors, please contact them
before contacting Decagon. They will be able to
provide you with local service and help you remedy
the problem.
Shipping Directions
When you ship your instrument back to us, please
include with it a document with the complete shipping address, name and department of the person
responsible for the instrument, and (most importantly) a description of the problem. This information will better help our technicians and our
36
Page 41

Pawkit
Repair Instructions
shipping department to expedite repair on your
instrument and ship it back to you in good time.
To safely ship your instrument back to us, pack the
Pawkit in its carrying case, securely in a box that
has styrofoam peanuts or other packing material to
prevent damage in shipment.
Ship to:
Decagon Devices Inc.
ATTN: Repair Department
950 NE Nelson Court
Pullman, WA 99163
Repair Costs
Manufacturer’s defects and instruments within the
one-year warranty will be repaired at no cost. For
non-warranty repairs, costs for parts, labor, and
shipping will be billed to you. We have a $50 minimum repair charge. An extra fee will be charged for
rush work. Decagon will provide an estimated
repair cost, if requested.
37
Page 42

Pawkit
Theory
6. Theory: Water Activity
in Products
Water is a major component of foods, pharmaceuticals, and cosmetics. Water influences the texture,
appearance, taste and spoilage of these products.
There are two basic types of water analysis: water
content and water activity.
Water content
The meaning of the term water content is familiar to
most people. It implies a quantitative analysis to
determine the total amount of water present in a
sample. The primary method for determining water
content is by loss on drying, but secondary methods
such as infrared, NMR, or Karl Fisher titration are
also used. Moisture content determination is essential in meeting product nutritional labeling regulations, specifying recipes and monitoring processes.
However, water content alone is not a reliable indicator for predicting microbial responses and chemical reactions in materials. The limitations of water
content measurement are attributed to differences in
the intensity with which water associates with other
components.
38
Page 43

Pawkit
Theory
Water activity
Water activity (aw) is a measurement of the energy
status of the water in a system. It indicates how
tightly water is bound, structurally or chemically,
within a substance. Water activity is the relative
humidity of air in equilibrium with a sample in a
sealed measurement chamber. The concept of water
activity is of particular importance in determining
product quality and safety. Water activity influences
color, odor, flavor, texture and shelf-life of many
products. Most importantly, it predicts product
safety and stability with respect to microbial growth,
chemical and biochemical reaction rates, and physical properties.
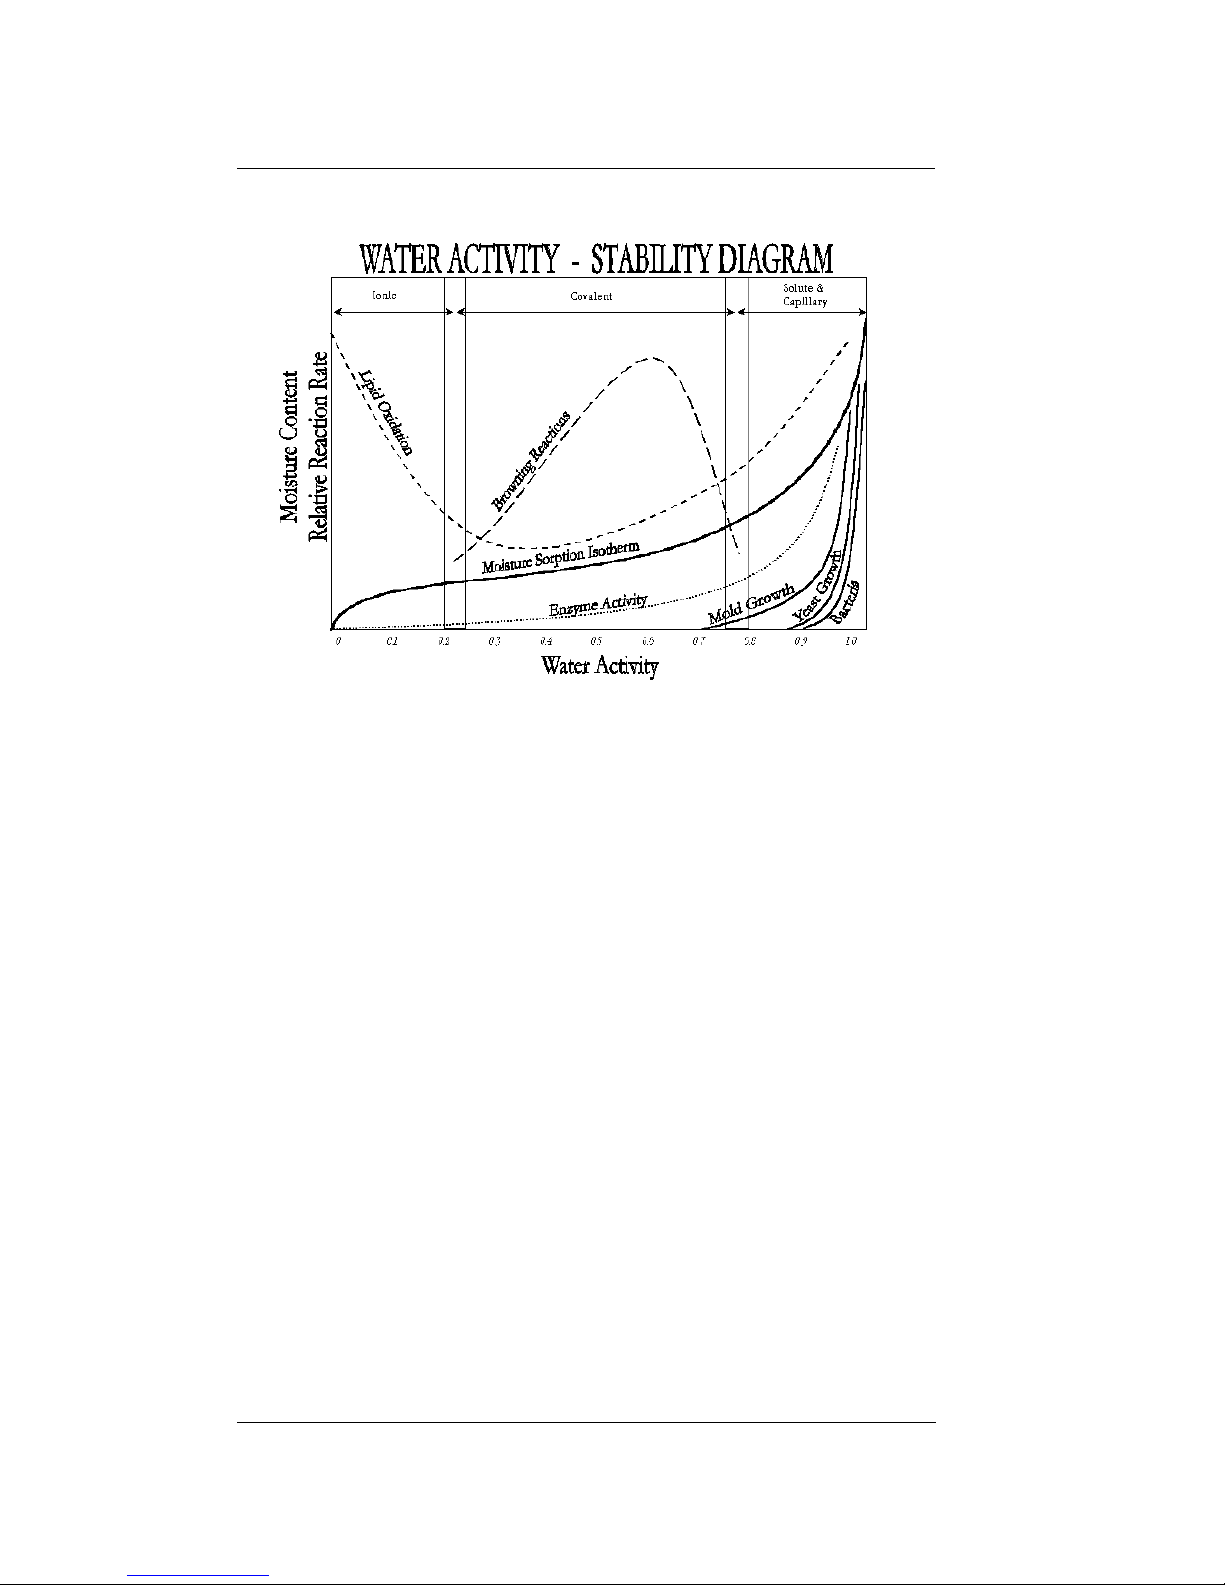
Therefore, water activity is a far better indicator of
perishability than water content. Figure 1 shows
how the relative activity of microorganisms, lipids
and enzymes relate to water activity. While other
factors, such as nutrient availability and temperature, can affect the relationships, water activity is
the best single measure of how water affects these
processes.
39
Page 44
Pawkit
Theory
Figure 1. Water Activity Diagram—adapted from
Labuza
Water activity of a system is measured by equilibrating the liquid phase water in the sample with the
vapor phase water in the headspace and measuring
the relative humidity of the headspace. In the Pawkit, a sample is placed in a sample cup which is
sealed inside a chamber. Inside the sensor block is a
dielectric humidity sensor. Changes in the electrical
conductance of the dielectric sensor occur as the
relative humidity of the chamber changes. By monitoring the change in electrical conductance, the relative humidity of the headspace is computed. When
the water activity of the sample and the relative
humidity of the air are in equilibrium, the measure-
40
Page 45

Pawkit
Theory
ment of the headspace humidity gives the water
activity of the sample.
In addition to equilibrium between the liquid phase
water in the sample and the vapor phase, the internal equilibrium of the sample is important. If a system is not at internal equilibrium, one might
measure a steady vapor pressure (over the period of
measurement) which is not the true water activity of
the system. An example of this might be a baked
good or a multi-component food. Initially out of the
oven, a baked good is not at internal equilibrium;
the outer surface is at a lower water activity than the
center of the baked good. One must wait a period
of time in order for the water to migrate and the
system to come to internal equilibrium. It is important to remember the restriction of the definition of
water activity to equilibrium.
Effect of Temperature on water
activity
Temperature plays a critical role in water activity
determinations. Most critical is the measurement of
the difference between sample and dew point temperature. Best accuracy is therefore obtained when
the sample is near chamber temperature.
41
Page 46

Pawkit
Theory
Water Potential
Some additional information may be useful for
understanding what water activity is and why it is
such a useful measure of moisture status in products. Water activity is closely related to a thermodynamic property called the water potential, or
chemical potential (µ) of water, which is the change
in Gibbs free energy (G) when water concentration
changes. Equilibrium occurs in a system when µ is
the same everywhere in the system. Equilibrium
between the liquid and the vapor phases implies
that µ is the same in both phases. It is this fact that
allows us to measure the water potential of the
vapor phase and use that to determine the water
potential of the liquid phase. Gradients in µ are
driving forces for moisture movement. Thus, in an
isothermal system, water tends to move from
regions of high water potential (high aw) to regions
of low water potential (low aw). Water content is
not a driving force for water movement, and therefore can not be used to predict the direction of
water movement, except in homogeneous materials.
Factors in determining Water
Potential
The water potential of the water in a system is influenced by factors that effect the binding of water.
They include osmotic, matric, and pressure effects.
42
Page 47

Pawkit
Theory
Typically water activity is measured at atmospheric
pressure, so only the osmotic and matric effects are
important.
Osmotic effects
Osmotic effects are well known from biology and
physical chemistry. Water is diluted when a solute is
added. If this diluted water is separated from pure
water by a semi-permeable membrane, water tends
to move form the pure water side through the membrane to the side with the added solute. If sufficient
pressure is applied to the solute-water mixture to
just stop the flow, this pressure is a measure of the
osmotic potential of the solution. Addition of one
mole of an ideal solute to a kilogram of water produces an osmotic pressure of 22.4 atm. This lowers
the water activity of the solution from 1.0 to 0.98 aw.
For a given amount of solute, increasing the water
content of the systems dilutes the solute, decreasing
the osmotic pressure, and increasing the water
activity. Since microbial cells are high concentrations of solute surrounded by semi-permeable
membranes, the osmotic effect on the free energy of
the water is important for determining microbial
water relations and therefore their activity.
Matric effects
The sample matrix affects aw by physically binding
water within its structure through adhesive and
43
Page 48

Pawkit
Theory
cohesive forces that hold water in pores and capillaries, and to particle surfaces. If cellulose or protein
were added to water, the energy status of the water
would be reduced. Work would need to be done to
extract the water from this matrix. This reduction in
energy status of the water is not osmotic, because
the cellulose or protein concentrations are far too
low to produce any significant dilution of water.
The reduction in energy is the result of direct physical binding of water to the cellulose or protein
matrix by hydrogen bonding and van der Waal
forces. At higher water activity levels, capillary
forces and surface tension can also play a role.
Sorption Isotherms—relating aw to
water content
Changes in water content affect both the osmotic
and matric binding of water in a product. Thus a
relationship exists between the water activity and
water content of a product. This relationship is
called the sorption isotherm, and is unique for each
product. Figure 1 shows a typical isotherm. Besides
being unique to each product, the isotherm changes
depending on whether it was obtained by drying or
wetting the sample. These factors need to be kept in
mind if one tries to use water content to infer the
stability or safety of a product. Typically, large
44
Page 49

Pawkit
Theory
safety margins are built in to water content specifications to allow for these uncertainties.
While the sorption isotherm is often used to infer
water activity from water content, one could easily
go the other direction and use the water activity to
infer the water content. This is particularly attractive
because water activity is much more quickly measured than water content. This method gives particularly good precision in the center of the isotherm.
In order to infer water content from water activity,
one needs an isotherm for the particular product;
produced, ideally, using the process that brings the
product to its final water content.
For example, if one were to monitor the water content of dried potato flakes, one would measure the
water activity and water content of potato flakes
dried to varying degrees using the standard drying
process for those flakes. An isotherm would be constructed using those data, and the water content
would be inferred using the measured water activity
of samples and that isotherm.
The importance of the concept of water activity of
foods, pharmaceuticals, and cosmetics cannot be
overly emphasized. Water activity is a measure of
the energy status of the water in a system. More
importantly, the usefulness of water activity in rela-
45
Page 50

Pawkit
Theory
tion to microbial growth, chemical reactivity, and
stability over water content has been shown.
46
Page 51

Pawkit
Further Reading
7. Further Reading
Water Activity Theory and
Measurement
Duckworth, R. (1975). Water Relations of Foods.
Academic Press, New York.
Gomez-Diaz, R. (1992). Water activity in foods:
Determination methods. Alimentaria. 29:77-
82.
Greenspan, L. (1977). Humidity fixed points of
binary saturated aqueous solutions. Journal
of Research of the National Bureau of Standards - A.Physics and Chemistry. 81A:89-96.
Prior, B.A. (1979). Measurement of water activity in
foods: A review. Journal of Food Protection.
42(8):668-674.
Troller, J.A. and J.H.B. Christian. (1978). Water Activ-
ity and Food. Academic Press, New York.
Troller, J.A. and V.N. Scott. (1992). Measurement of
water activity (aw) and acidity. In: Compendium of Methods for the Microbiological
Examination of Foods. Vanderzant, C. and
D.F. Splittstoesser (ed.) American Public
Health Association, Washington, D.C. pp.
135-151.
47
Page 52

Pawkit
Further Reading
van den Berg, C. (1985). Water activity. In: Concen-
tration and Drying of Foods. MacCarthy, D.
(ed.) Elsevier, London. pp. 11-35.
Food Quality and Safety
Brandt, L. (1996). Bound for success. Controlling
water activity gives technologists the edge in
developing safe, shelf-stable foods. Food
Formulating. September:41-48.
Franks, F. (1982). Water activity as a measure of bio-
logical viability and quality control. Cereal
Foods World. 27(9):403-407.
Hardman, T.M. (1988). Water and Food Quality.
Elseiver Press, London.
Kress-Rogers, E. (1993). Food quality measurement.
Food Industry News. September:23-26.
McMeekin, T.A. and T. Ross. (1996). Shelf life pre-
diction: Status and future possibilities. International Journal of Food Microbiology.
33:65-83.
Rockland, L.B. and G.F. Stewart. (1981). Water Activ-
ity: Influences on Food Quality. Academic
Press, New York.
Seow, C.C., T.T. Teng, and C.H. Quah. (1988). Food
Preservation by Moisture Control. Elsevier,
New York.
Taoukis, P., W. Breene, and T.P. Labuza. (1988).
Intermediate moisture foods. Advances in
Cereal Science and Technology. 9:91-128.
48
Page 53

Pawkit
Further Reading
Water Activity and Microbiology
Beuchat, L.R. (1981). Microbial stability as affected
by water activity. Cereal Foods World.
26(7):345-349.
Chen, H.C. (1995). Seafood microorganisms and
seafood safety. Journal of Food and Drug
Analysis. 3:133-144.
Farber, J.M., F. Coates, and E. Daley. (1992). Mini-
mum water activity requirements for the
growth of Listeria monocytogenes. Letters In
Applied Microbiology. 15:103-105.
Garcia de Fernando, G.D., O. Diaz, M. Fernandez,
and J.A. Ordonez. (1992). Changes in water
activity of selected solid culture media
throughout incubation. Food Microbiology.
9:77-82.
Kuntz, L.A. (1992). Keeping microorganisms in con-
trol. Food Product Design. August:44-51.
Miller, A.J. (1992). Combined water activity and sol-
ute effects on growth and survival of Listeria
monocytogenes Scott A. Journal of Food Protection. 55:414-418.
Tokuoka, K. and T. Ishitani. (1991). Minimum water
activities for the growth of yeasts isolated
from high-sugar foods. Journal of General
and Applied Microbiology. 37:111-119.
49
Page 54

Pawkit
Further Reading
Water Activity in Foods
Meat and Seafood
Chen, N. and L.A. Shelef. (1992). Relationship
between water activity, salts of lactic acid,
and growth of Listeria monocytogenes in a
meat model system. Journal of Food Protection. 55:574-578.
Clavero, M.R.S. and L.R. Beuchat. (1996). Survival of
Escherichia coli O157:H7 in broth and processed salami as influenced by pH, water
activity, and temperature and suitability of
media for its recovery. Applied and Environmental Microbiology. 62:2735-2740.
Hand, L. (1994). Controlling water activity and pH
in snack sticks. Meat Marketing and Technology. May:55-56.
Lee, M.B. and S. Styliadis. (1996). A survey of pH
and water activity levels in processed salamis
and sausages in Metro Toronto. Journal of
Food Protection. 59:1007-1010.
Luecke, F.K. (1994). Fermented meat products. Food
Research International. 27:299-307.
Minegishi, Y., Y. Tsukamasa, K. Miake, T. Shimasaki,
C. Imai, M. Sugiyama, and H. Shinano.
(1995). Water activity and microflora in commercial vacuum-packed smoked salmons.
Journal of the Food Hygienic Society of
Japan. 36:442-446.
50
Page 55

Pawkit
Further Reading
Shimasaki, T., K. Miake, Y. Tsukamasa, M.A. Sug-
iyama, Y. Minegishi, and H. Shinano. (1994).
Effect of Water Activity and Storage Temperature on the Quality and Microflora of
Smoked Salmon. Nippon Suisan Gakkaishi.
60:569-576.
Dairy Products
Fresno, J.M., M.E. Tornadijo, J. Carballo, P.J. Gonza-
lez, and A. Bernardo. (1996). Characterization and biochemical changes during the
ripening of a Spanish craft goat's milk cheese
(Armada variety). Food Chemistry. 55:225-
230.
Kombila, M.E. and C. Lacroix. (1991). The effect of
combinations of salt, lactose and glycerol on
the water activity (aw) of cheese spreads.
Canadian Institute of Food Science and Technology Journal. 24:233-238.
Pisecky, J. (1992). Water activity of milk powders.
Milchwissenschaft. 47:3-7.
Vivier, D., R. Ratomahenina, and P. Galzy. (1994).
Characteristics of micrococci from the surface of Roquefort cheese. Journal of Applied
Bacteriology. 76:546-552.
Fruits and Vegetables
Beveridge, T. and S.E. Weintraub. (1995). Effect of
blanching pretreatment on color and texture
51
Page 56

Pawkit
Further Reading
of apple slices at various water activities.
Food Research International. 28:83-86.
Kiranoudis, C.T., Z.B. Maroulis, E. Tsami, and K.D.
Marinos. (1993). Equilibrium moisture content and heat of desorption of some vegetables. Journal of Food Engineering. 20:55-74.
Makower, B. and G.L. Dehority. (1943). Equilibrium
moisture content of dehydrated vegetables.
Industrial and Engineering Chemistry.
35(2):193-197.
Maltini, E., D. Torreggiani, B.R. Brovetto, and G.
Bertolo. (1993). Functional properties of
reduced moisture fruits as ingredients in
food systems. Food Research International.
26:413-419.
Zhang, X.W., X. Liu, D.X. Gu, W. Zhou, R.L. Wang,
and P. Liu. (1996). Desorption isotherms of
some vegetables. Journal of the Science of
Food and Agriculture. 70:303-306.
Baked Goods and Cereals
Aramouni, F.M., K.K. Kone, J.A. Craig, and D.-Y.C.
Fung. (1994). Growth of Clostridium sporogenes PA 3679 in home-style canned quick
breads. Journal of Food Protection. 57:882-
886.
Clawson, A.R. and A.J. Taylor. (1993). Chemical
changes during cooking of wheat. Food
Chemistry. 47:337-343.
52
Page 57

Pawkit
Further Reading
Gómez, R., Fernandez-Salguero J., M.A. Carmona,
and D. Sanchez. (1993). Water activity in
foods with intermediate moisture levels: Bakery and confectionery products: Miscellany.
Alimentaria. 30:55-57.
Michniewicz, J., C.G. Biliaderis, and W. Bushuk.
(1992). Effect of added pentosans on some
properties of wheat bread. Food Chemistry.
43:251-257.
Seiler, D.A.L. (1979). The mould-free shelf life of
bakery products. FMBRA Bulletin.
April(2):71-74.
Beverages/Soups/Sauces/Preserves
Carson, K.J., J.L. Collins, and M.P. Penfield. (1994).
Unrefined, dried apple pomace as a potential
food ingredient. Journal of Food Science.
59:1213-1215.
Durrani, M.J., R. Khan, M. Saeed, and A. Khan.
(1992). Development of concentrated beverages from Anna apples with or without
added preservatives by controlling activity of
water for shelf stability. Sarhad Journal of
Agriculture. 8:23-28.
Ferragut, V., J.A. Salazar, and A. Chiralt. (1993). Sta-
bility in the conservation of emulsified
sauces low in oil content. Alimentaria. 30:67-
69.
53
Page 58

Pawkit
Further Reading
Kusumegi, K., T. Takahashi, and M. Miyagi. (1996).
Effects of addition of sodium citrate on the
pasteurizing conditions in "Tuyu", Japanese
noodle soup. Journal of the Japanese Society
for Food Science and Technology. 43:740-
747.
Sa, M.M. and A.M. Sereno. (1993). Effect of tempera-
ture on sorption isotherms and heats of sorption of quince jam. International Journal of
Food Science and Technology. 28:241-248.
Pharmaceuticals/Cosmetics
Ahlneck, C. and G. Zografi. (1990). The molecular
basis of moisture effects on the physical and
chemical stability of drugs in the solid state.
International Journal of Pharmaceutics.
62:87-95.
Enigl, D.C. and K.M. Sorrels. (1997). Water Activity
and Self-Preserving Formulas. In: Preservative-Free and Self-Preserving Cosmetics and
Drugs: Principles and Practice. Kabara, J.J.
and D.S. Orth (ed.) Marcel Dekker, pp. 45-
73.
Hageman, M.J. (1988). The role of moisture in pro-
tein stability. Drug Development and Industrial Pharmacy. 14(14):2047-2070.
Heidemann, D.R. and P.J. Jarosz. (1991). Performu-
lation studies involving moisture uptake in
54
Page 59

Pawkit
Further Reading
solid dosage forms. Pharmaceutical
Research. 8(3):292-297.
Friedel, R.R. and A.M. Cundell. (1998). The applica-
tion of water activity measurement to the
microbiological attributes testing of nonsterile over-the-counter drug products. Pharmacopeial Forum. 24(2):6087-6090.
Kontny, M.J. (1988). Distribution of water in solid
pharmaceutical systems. Drug Development
and Industrial Pharmacy. 14(14):1991-2027.
Zografi, G. (1988). States of water associated with
solids. Drug Development and Industrial
Pharmacy. 14(14):1905-1926.
Miscellaneous
Bell, L.N. and T.P. Labuza. (1992). Compositional
influence on the pH of reduced-moisture
solutions. Journal of Food Science. 57:732-
734.
Bell, L.N. and T.P. Labuza. (1994). Influence of the
low-moisture state on pH and its implication
for reaction kinetics. Journal of Food Engineering. 22:291-312.
Bell, L.N. (1995). Kinetics of non-enzymatic brown-
ing in amorphous solid systems: Distinguishing the effects of water activity and the glass
transition. Food Research International.
28:591-597.
55
Page 60

Pawkit
Further Reading
Brake, N.C. and O.R. Fennema. (1993). Edible coat-
ings to inhibit lipid migration in a confectionery product. Journal of Food Science.
58:1422-1425.
Fernandez-Salguero J., R. Gómez, and M.A. Car-
mona. (1993). Water activity in selected highmoisture foods. Journal of Food Composition
and Analysis. 6:364-369.
56
Page 61

Pawkit
Declaration of Conformity
Declaration of Conformity
Application of Council 89/336/EEC
Directive:
Standards to which EN55022 : 1987
conformity is declared: EN500082-1 : 1992
Manufacturer’s Name: Decagon Devices, Inc.
950 NE Nelson Court
Pullman, WA 99163
USA
Type of Equipment: Pawkit water activity
meter.
Model Number:
Year of First Manufacture: 2000
This is to certify that the Pawkit water activity meter,
manufactured by Decagon Devices, Inc., a corporation based in Pullman, Washington, USA meets or
exceeds the standards for CE compliance as per the
Council Directives noted above. All instruments are
built at the factory at Decagon and pertinent testing
documentation is freely available for verification.
This certification applies to all Pawkit models.
57
Page 62

Pawkit
Declaration of Conformity
58
Page 63

A
accuracy 5
alcohol 24
AquaLab 6
accuracy 6
B
batteries 32
replacing 32
beeper 17, 23
Pawkit
Index
Index
buttons 15
to begin measurement 16
C
calibration 19
steps 20
calibration standards 6, 19
LiCl 19
NaCl 19
cautions
with sampling 23
CE compliance 57
chamber
cleaning 31
contamination 18
cleaning 26
sensor filter 30
closing
the Pawkit 14
59
Page 64

Pawkit
Index
closing the chamber 11
cold samples 24, 25
customer service 1
D
d25 21
d76 21
Declaration of Conformity 57
disassembling 27
display 16
E
e-mail address 2
email address 2
environment
for sampling 6
enzymes
and water activity 39
equilibrium
of sample aw and rh 40
of temperature 41
ethanol 24
F
fax number 2
features 8
filter
sensor 30
G
Gibbs free energy 42
60
Page 65

H
high temperature 24
hot samples 24
humidity
related to water activity 5
I
inserting samples 11
isotherms 44
L
LCD
cleaning 26
display 16
Pawkit
Index
liability
seller’s 3
LiCl standards 19
lids
for sample cups 10
lipids
and water activity 39
liquid phase water 40
lithium-ion batteries 32
location
for sampling 7
low battery indicator 32
M
maintenance 26, 27
measurement
time 17
measurements
taking 15
61
Page 66

Pawkit
Index
moisture content 38
molality
of calibration standards 19
N
NaCl standards 19
O
off
turning off 18
opening the chamber 11
operation
environment 6
osmotic effects 43
P
Pawkit
accessories 6
closing 14
disassembly and re-assembly 27
features 8
measurement technique 5
operation 8
pharmaceuticals 54
power shutoff 18
preparation
for operation 6
of samples 9
R
references 47
baked goods and cereals 52
beverages, soups, sauces, preserves 53
62
Page 67

dairy products 51
food quality and safety 48
meat and seafood 50
microbiology 49
pharmaceuticals 54
water activity theory 47
relative humidity 39, 40
removing the sample 17
repair
costs 37
shipping 36
repair instructions 36
S
Pawkit
Index
sample
insertion 11
sample cups 6, 9
filling level 10
stainless steel 9
samples
multi-component 9
seller’s liability 3
sensor
damage 23
sensor filter
cleaning and replacing 30
shipping address 37
shipping for repair 36
sorption isotherms
relating water activity to water content 44
Sto 21
63
Page 68

Pawkit
Index
T
telephone number 2
temperature 24
effects on water activity 41
equilibrium 41
theory 38
water activity 39
time for measurement 17
toll-free number 2
U
u25 21
u76 21
V
vapor phase water 40
volatiles 23
W
warranty 2
water activity
definition 39
effect on food 38, 39
related to microbial growth 39
stability diagram 39
water content
definition 38
methods for determining 38
vs. water activity 38, 44
water potential
factors in determining 42
matric effects 43
osmotic effects 43
64
Page 69

relation to water activity 42
wet samples
cautions with 23
Pawkit
Index
65
 Loading...