

Page 1
AquaLab
Water Activity Meter
Operator’s Manual
For Series 4TE, 4TEV, DUO
Version 7
Decagon Devices, Inc.
Page 2

Decagon Devices, Inc
2365 NE Hopkins Court
Pullman WA 99163
(509)332-2756
fax: (509)332-5158
www.aqualab.com
support@decagon.com
sales@decagon.com
Trademarks
AquaLab is a registered trademark of
Decagon Devices, Inc.
©2008-2012 Decagon Devices, Inc.
Page 3

i
Contents
1. Introduction .................................1
About this Manual ....................................1
Customer Support .....................................1
Warranty ...................................................2
Seller’s Liability ..........................................2
2. About AquaLab ...........................4
AquaLab Model and Options ....................4
AquaLab 4 Instrument Speci cations ........4
AquaLab 4 DUO Speci cations .................5
How AquaLab Works ................................6
AquaLab and Temperature ........................6
Chilled Mirror Dewpoint Limitations .......8
3. Water Activity eory ...................9
Moisture Content ......................................9
Water Activity............................................9
Water Potential ........................................12
Sorption Isotherms ..................................13
4. Getting Started ........................... 15
Components of your AquaLab ................. 15
Choosing a Location ............................... 15
Preparing AquaLab for Operation ............16
5. Menus ......................................... 18
Measurement Tab ....................................18
Page 4

ii
Con guration Tab ................................... 19
Admin Settings ........................................25
Data Tab .................................................30
6. Cleaning and Maintenance ........32
Cleaning the Block and Sensors ...............33
Cleaning a Series 4TEV: .......................34
Cleaning Procedure: ...............................34
Veri cation of Calibration .......................36
7. Ve r i cation and Calibration ........37
Water Activity Veri cation .......................37
Veri cation of Calibration .......................39
8. Sample Preparation ....................46
Preparing the Sample ...............................46
Samples Needing Special Preparation ......47
Slow Water-Emitting Samples ..................48
Volatile Samples .......................................49
Low Water Activity ..................................50
Samples Not at Room Temperature .........50
9. Taking a Reading ....................... 52
Measurement Steps ..................................52
How AquaLab Takes Readings ................52
10. Duo Operation (Optional) ....... 55
Obtaining Product Isotherm Models .......56
Loading and Organizing Product Models 56
Moisture Content Adjustment ...............60
Restore Original Moisture Content Model
Setting s .................................................... 6 4
Page 5

iii
How to Delete Models .............................66
11. Computer Interface ...................68
AquaLink RG ..........................................68
Using Windows Hyperterminal .............68
12. Troubleshooting .......................70
13. Support and Repair ..................83
Repair Costs ............................................84
Loaner Service .........................................84
14. Further Reading .......................85
Water Activity eory & Measurement ...85
Food Safety and Microbiology .................89
Appendix A ................................... 111
Preparing Salt Solution .......................... 111
Appendix B ................................... 113
Temperature Correction ........................ 113
Appendix C ................................... 114
AquaLab Veri cation Standards ............ 114
Declaration of Conformity ........... 119
Certi cate of Traceability .............120
Page 6

iv
Page 7

AquaLab
1. Introduction
1
1. INTRODUCTION
Welcome to Decagon’s AquaLab Series 4, 4TE, 4TEV, and DUO,
the industry standard for measuring water activity (aw). AquaLab is
the quickest, most accurate, and most reliable instrument available
for measuring water activity. Whether you are researching or working on the production line, AquaLab will suit your needs. It is easy
to use and provides accurate and timely results.
About this Manual
Included in this manual are instructions for setting up your AquaLab,
verifying the calibration of the instrument, preparing samples, and
maintaining and caring for your instrument. Please read these instructions before operating AquaLab to ensure that the instrument
performs to its full potential.
Customer Support
If you ever need assistance with your AquaLab, or if you just have
questions or feedback, there are several ways to contact us:
NOTE: If you purchased your AquaLab through a distributor, please
contact them for assistance.
E-mail
support@aqualab.com
Please include your name, contact information, instrument serial
number(s), and a description of your problem or question.
sales@aqualab.com
Please include your name, address, phone number, the items you
wish to order and a purchase order number. Credit card numbers
should always be called in.
Page 8

AquaLab
1. Introduction
2
Phone
1-800-755-2751 (USA and Canada Only)
1-509-332-2756 International
Our Customer Support and Sales Representatives are available
Monday thru Friday.
Fax
1-509-332-5158
Warranty
AquaLab has a 30-day satisfaction guarantee and a three-year warranty on parts and labor. Your warranty is automatically validated
upon receipt of the instrument. We will contact you within the rst
90 days of your purchase to see how the AquaLab is working for
you.
Seller’s Liability
Seller warrants new equipment of its own manufacture against defective workmanship and materials for a period of three years from
date of receipt of equipment (the results of ordinary wear and tear,
neglect, misuse, accident and excessive deterioration due to corrosion from any cause are not to be considered a defect); but Seller’s
liability for defective parts shall in no event exceed the furnishing
of replacement parts Freight On Board the factory where originally
manufactured. Material and equipment covered hereby which is
not manufactured by Seller shall be covered only by the warranty of
its manufacturer. Seller shall not be liable to Buyer for loss, damage
or injuries to persons (including death), or to property or things
of whatsoever kind (including, but not without limitation, loss of
anticipated pro ts), occasioned by or arising out of the installation,
Page 9

AquaLab
1. Introduction
3
operation, use, misuse, nonuse, repair, or replacement of said material and equipment, or out of the use of any method or process
for which the same may be employed. e use of this equipment
constitutes Buyer’s acceptance of the terms set forth in this warranty.
ere are no understandings, representations, or warranties of any
kind, express, implied, statutory or otherwise (including, but without limitation, the implied warranties of merchantability and tness
for a particular purpose), not expressly set forth herein.
Page 10

AquaLab
2. About AquaLab
4
2. About AquaLab
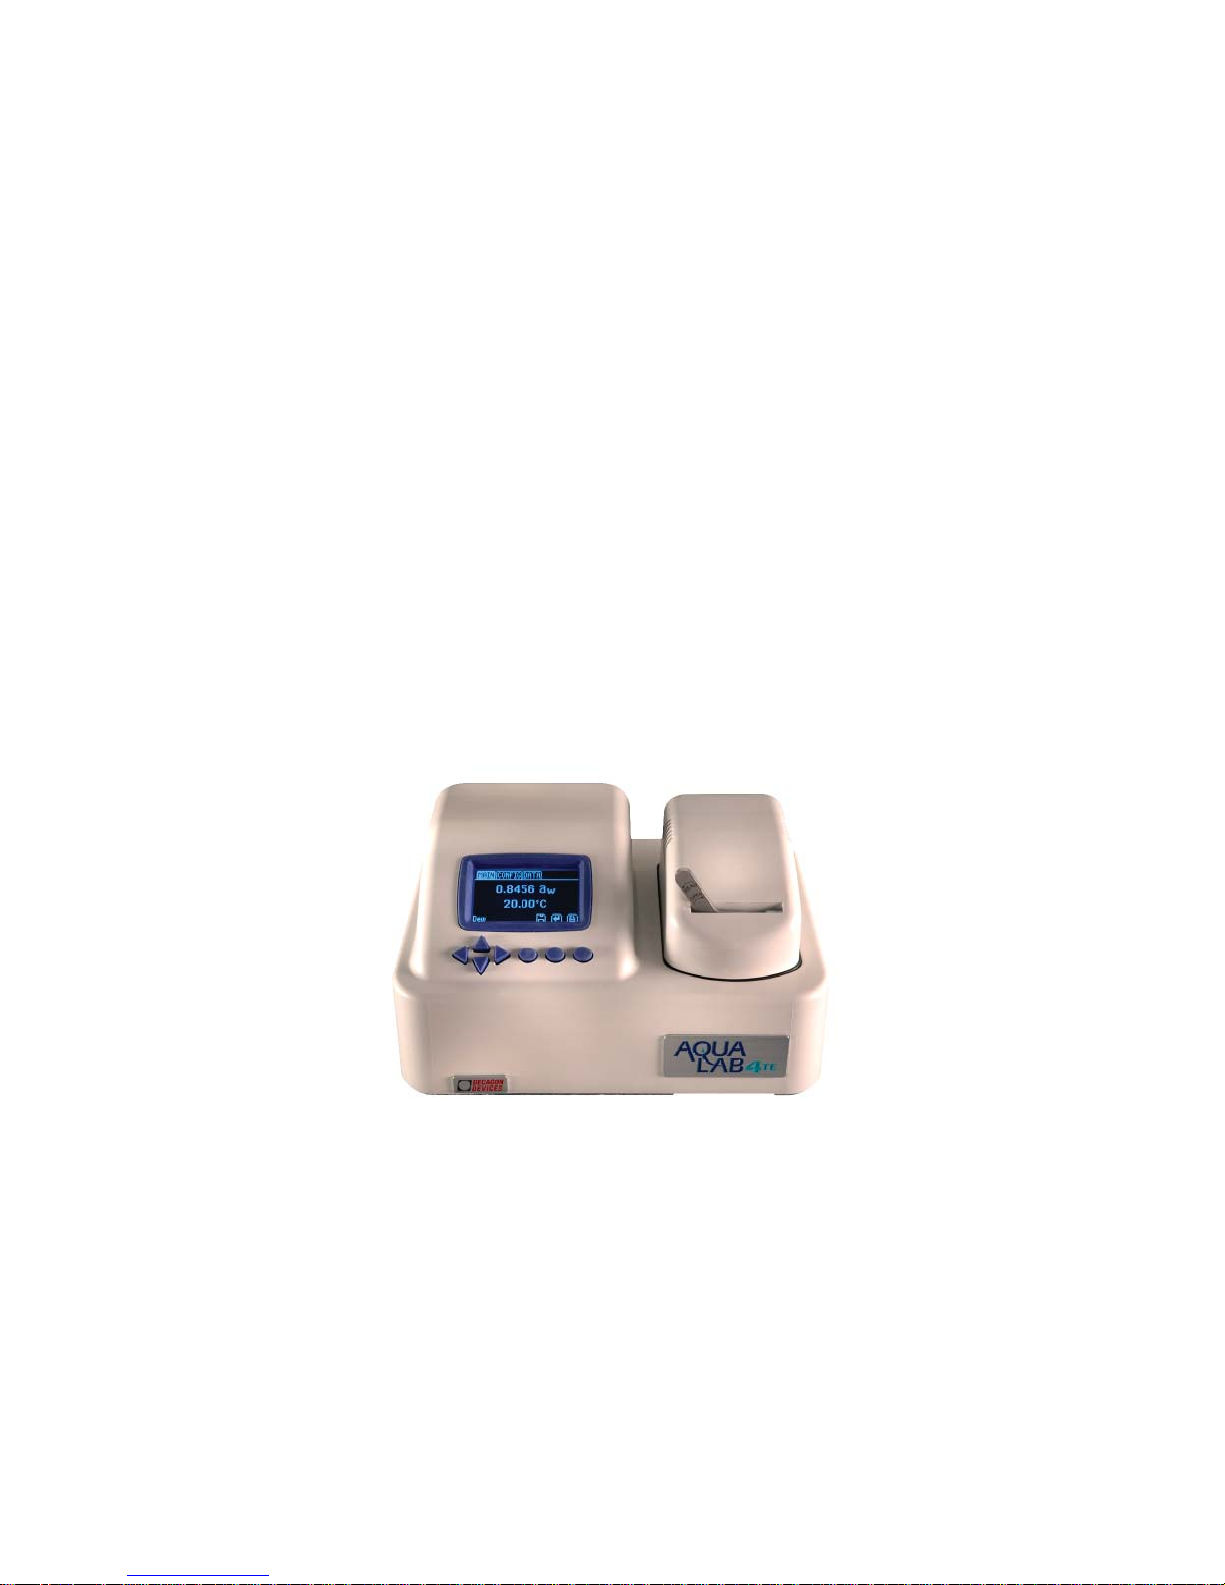
AquaLab is the fastest and most accurate instrument for measuring
water activity, giving readings in ve minutes or less. Its readings
are reliable, providing ±0.003 aw accuracy. e instrument is easy
to clean and checking calibration is simple.
AquaLab Model and Options
Series 4: Uses chilled-mirror dewpoint sensor, but lacks tempera-
ture control features of premium models.
Series 4TE: User-selectable internal temperature control model,
uses thermoelectric (Peltier) components to maintain internal temperature.
Series 4TEV: Uses both a chilled-mirror dewpoint sensor and a capacitance sensor for measuring non-volatile and volatile substances,
respectively. Either sensor is easily selected using the instrument’s
menu system.
Series 4TE DUO: Uses chilled-mirror dewpoint and programmed
models obtained from isotherm data to give the user both water activity and moisture content simultaneously in ve minutes or less.
AquaLab 4 Instrument Speci cations
Water Activity Range: 0.050 to 1.000 a
w
Water Activity Accuracy: ±0.003 (4TE Dew Point Mode)
Water Activity Accuracy: ±0.015 (4TEV Capacitance Mode)
Water Activity Resolution: 0.0001
Page 11

AquaLab
2. About AquaLab
5
Read Time1: ≤5 min.
Sample Temperature Range: 15 to 50° C
Sample Temperature Accuracy: ±0.2° C
Sample Temperature Resolution: 0.01° C
Sample Dish Capacity: 15ml Full
Operating Environment: 5 to 50° C 20 to 80% Humidity
Case Dimensions: 26.7 x 17.8 x 12.7cm
Weight: 3.1 Kg
Case Material: Lustran 433 (ABS) with re retardant
Display: 64 x 128 Graphical
Data Communications: RS232A Serial, 9600 to 115200 baud
Power: 110 to 220 VAC, 50/60Hz
Warranty: 3 year parts and labor
1
On samples with no signi cant impedance to vapor loss
AquaLab 4 DUO Speci cations
Moisture Content Repeatability: 0.02%
Accuracy to Moisture Content Ref.: 0.1% to 0.5%
AquaLab and Water Activity
Water activity (aw) is a measurement of the energy status of the water
in a system. It indicates how tightly water is “bound”, structurally
or chemically, within a substance. Water activity is the relative humidity of air in equilibrium with a sample in a sealed measurement
chamber. e concept of water activity is of particular importance
in determining product quality and safety. Water activity in uences
color, odor, avor, texture and shelf-life of many products. It predicts
safety and stability with respect to microbial growth, chemical and
biochemical reaction rates, and physical properties. For a more detailed description of water activity as it pertains to products, please
refer to Chapter 3 of this manual, titled “ Water Activity eory”.
Page 12

AquaLab
2. About AquaLab
6
How AquaLab Works
AquaLab uses the chilled-mirror dewpoint technique to measure the
water activity of a sample. In an instrument that uses the dewpoint
technique, the sample is equilibrated with the head-space of a sealed
chamber that contains a mirror and a means of detecting condensation on the mirror. At equilibrium, the relative humidity of the air
in the chamber is the same as the water activity of the sample. In
the AquaLab, the mirror temperature is precisely controlled by a
thermoelectric (Peltier) cooler. Detection of the exact point at which
condensation rst appears on the mirror is observed with a photoelectric cell. A beam of light is directed onto the mirror and re ected
into a photo detector cell. e photo detector senses the change
in re ectance when condensation occurs on the mirror. A thermocouple attached to the mirror then records the temperature at which
condensation occurs. AquaLab then signals you by beeping and displays the nal water activity and temperature.
In addition to the technique described above, AquaLab uses an internal fan that circulates the air within the sample chamber to reduce
equilibrium time. Since both dewpoint and sample surface temperatures are simultaneously measured, the need for complete thermal
equilibrium is eliminated, which reduces measurement times to less
than ve minutes.
AquaLab and Temperature
Samples not read at room temperature during the read cycle will
equilibrate with the AquaLab’s temperature before the water activity
is displayed. Large temperature di erences will cause longer reading
times, since a complete and accurate reading will not be made until
the sample and the instrument are within 2°C of each other.
Page 13

AquaLab
2. About AquaLab
7
ere are several advantages in having a temperature-controlled water activity meter. A few major reasons are:
1. Research purposes. Temperature control can be used to study
the e ects of temperature on the water activity
of a sample, make a
comparison of the water activity of di erent samples independent
of temperature, and conduct accelerated shelf-life studies or other
water activity studies where temperature control is critical. ere are
many shelf-life, packaging, and isotherm studies in which temperature control would be very bene cial.
2. To comply with government or internal regulations for speci c
products. ough the water activity of most products varies by less
than ± 0.002 per °C, some regulations require measurement at a speci c temperature. e most common speci cation is 25°C, though
20°C is sometimes indicated.
3. To minimize extreme ambient temperature uctuations. If the
environmental and AquaLab temperatures uctuate by as much as ±
5°C daily, water activity readings will vary by ± 0.01 aw. Temperature
control eliminates variations due to changes in ambient conditions.
Series 4TE/4TEV/4TE-DUO
e AquaLab Series 4TE models have thermoelectric components
installed to allow the instrument to maintain a set chamber temperature. e temperature is set using the con guration menu of any
of the Series 4 models.
Page 14

AquaLab
2. About AquaLab
8
Chilled Mirror Dewpoint Limitations
AquaLab’s limitation is its ability to accurately measure samples with
high concentrations (typically >1%) of certain volatiles such as ethanol or propylene glycol, which can condense on the surface of the
chilled mirror. e extent of the e ect is determined by how readily
the material volatilizes, which is both concentration- and matrixdependent. erefore, even if your sample contains materials that
could volatilize, it may still be possible to make accurate readings
using the chilled mirror dewpoint sensor.
AquaLab Series 4TEV which incorporates both a chilled mirror sensor and a capacitance sensor for measuring volatile substances is
Decagon’s solution for products containing volatile materials. If you
are unsure if you need the TEV model, please call and discuss your
product with a Decagon Representative. Refer to Chapter 8’s section
titled ”Volatile Samples” or call Decagon for more details.
Page 15

AquaLab
3. Water Activity eory
9
3. Water Activity eory
Water is a major component of foods, pharmaceuticals, and cosmetics. Water in uences the texture, appearance, taste and spoilage of these
products. ere are two basic types of water analysis: moisture content
and water activity.
Moisture Content
e meaning of the term moisture content is familiar to most people. It implies a quantitative analysis to determine the total amount
of water present in a sample. Primary methods for determining
moisture content are loss on drying and Karl Fisher titration, but
secondary methods such as infrared and NMR are also used. Moisture content determination is essential in meeting product nutritional labeling regulations, specifying recipes and monitoring processes. However, moisture content alone is not a reliable indicator
for predicting microbial responses and chemical reactions in materials. e limitations of moisture content measurement are attributed
to di erences in the intensity with which water associates with other
components.
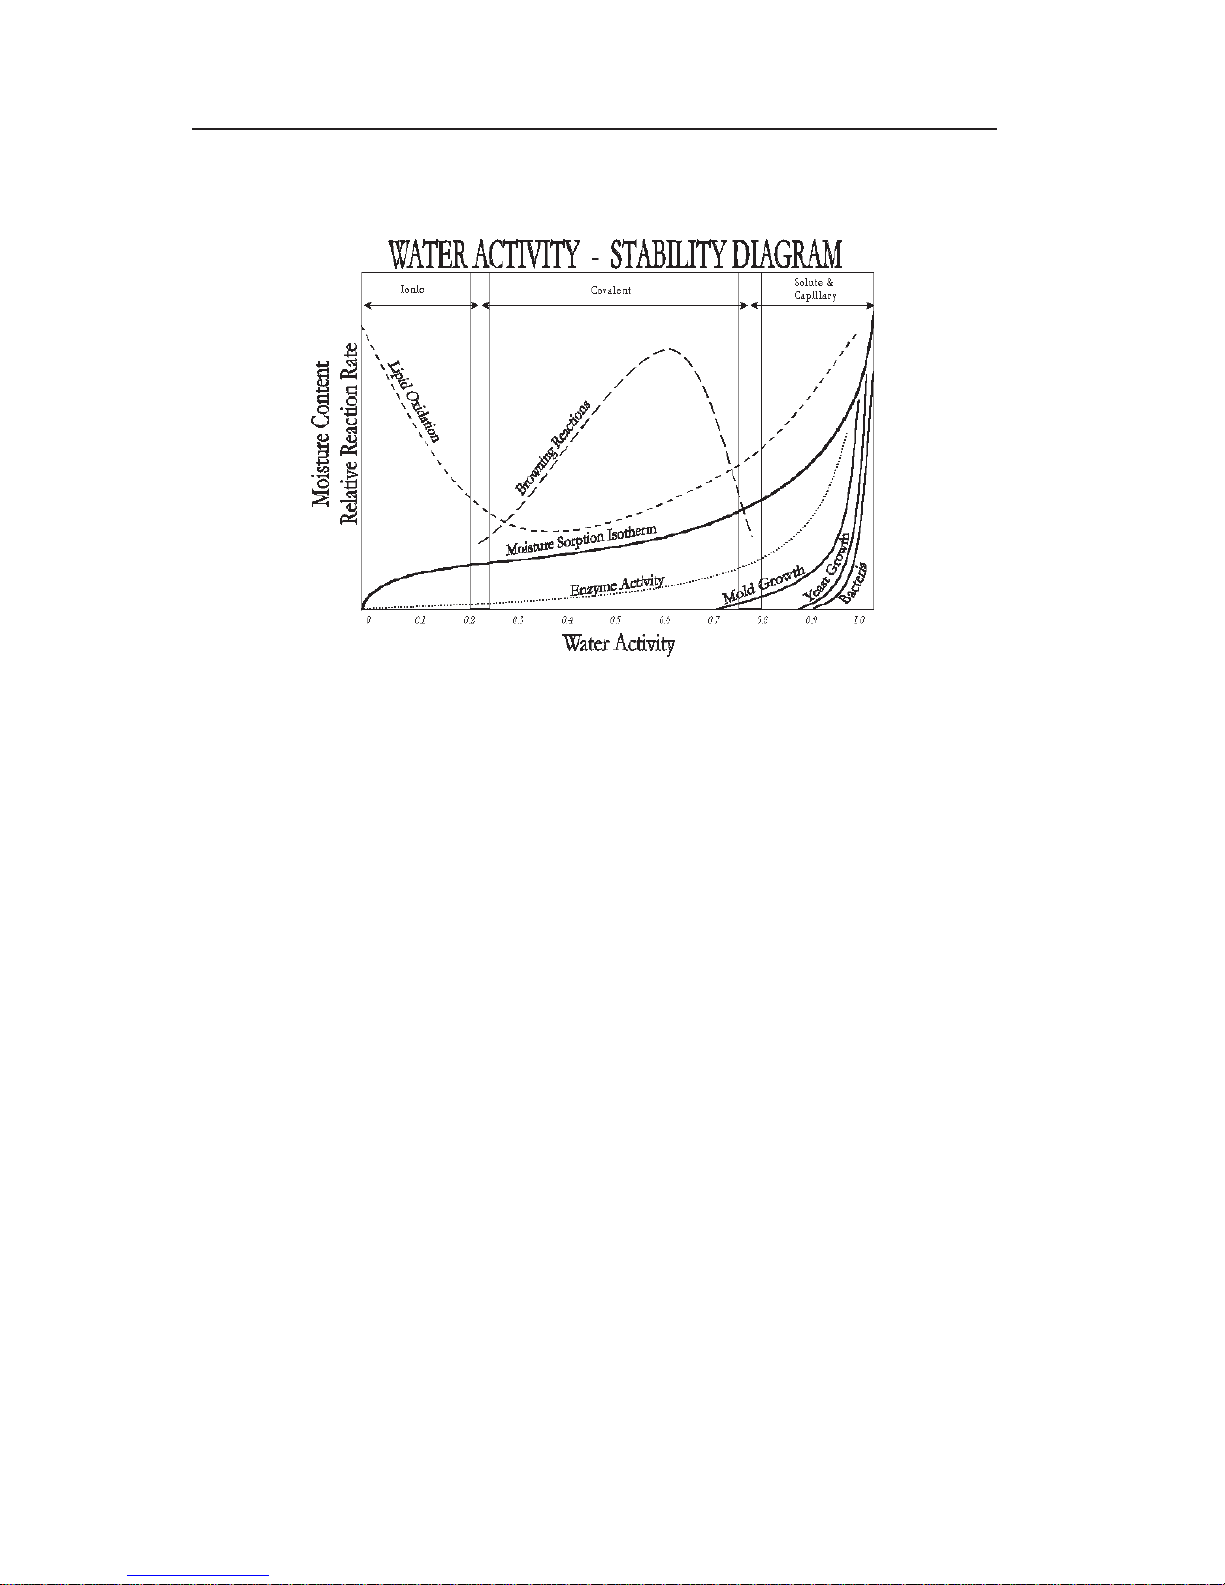
Water Activity
Water activity is a measure of the energy status of the water in a
system, and thus is a far better indicator of perishability than water
content. Figure 1 shows how the relative activity of microorganisms,
lipids and enzymes relate to water activity. While other factors, such
as nutrient availability and temperature, can a ect the relationships,
water activity is the best single measure of how water a ects these
processes.
Page 16
AquaLab
3. Water Activity eory
10
Fig. 1: Water Activity Diagram—adapted from Labuza
Water activity of a system is measured by equilibrating the liquid
phase water in the sample with the vapor phase water in the headspace and measuring the relative humidity of the head-space. In
the AquaLab, a sample is placed in a sample cup which is sealed
inside a sample chamber. Inside the sample chamber is a fan, a dew
point sensor, a temperature sensor, and an infrared thermometer.
e dewpoint sensor measures the dewpoint temperature of the air
in the chamber, and the infrared thermometer measures the sample
temperature. From these measurements, the relative humidity of
the head-space is computed as the ratio of dewpoint temperature
saturation vapor pressure to saturation vapor pressure at the sample
temperature. When the water activity of the sample and the relative humidity of the air are in equilibrium, the measurement of the
head-space humidity gives the water activity of the sample. e purpose of the fan is to speed equilibrium and to control the boundary
layer conductance of the dewpoint sensor.
Page 17

AquaLab
3. Water Activity eory
11
In addition to equilibrium between the liquid phase water in the
sample and the vapor phase, the internal equilibrium of the sample
is important. If a system is not at internal equilibrium, one might
measure a steady vapor pressure (over the period of measurement)
which is not the true water activity of the system. An example of
this might be a baked good or a multi-component food. Initially out
of the oven, a baked good is not at internal equilibrium; the outer
surface is at a lower water activity than the center of the baked good.
One must wait a period of time in order for the water to migrate
and the system to come to internal equilibrium. It is important to
remember the restriction of the de nition of water activity to equilibrium.
Temperature E ects
Temperature plays a critical role in water activity determination.
Most critical is the measurement of the di erence between sample
and dewpoint temperature. If this temperature di erence were in error by 1°C, an error of up to 0.06 aw could result. In order for water
activity measurements to be accurate to 0.001, temperature di erence measurements need to be accurate to 0.017°C. AquaLab’s infrared thermometer measures the di erence in temperature between
the sample and the block. It is carefully calibrated to minimize temperature errors, but achieving 0.017°C accuracy is di cult when
temperature di erences are large. Best accuracy is therefore obtained
when the sample is near chamber temperature.
Another e ect of temperature on water activity occurs when samples are near saturation. A sample that is close to 1.0 aw and is only
slightly warmer than the sensor block will condense water within the
block. is will cause errors in the measurement, and in subsequent
measurements until the condensation disappears. A sample at 0.75 aw
needs to be approximately 4°C above the chamber temperature to
Page 18

AquaLab
3. Water Activity eory
12
cause condensation. e AquaLab warns the user if a sample is more
than 4°C above the chamber temperature, but for high water activity
samples the operator needs to be aware that condensation can occur
if a sample that is warmer than the block is put in the AquaLab.
Water Potential
Some additional information may be useful for understanding what
water activity is and why it is such a useful measure of moisture
status in products. Water activity is closely related to a thermodynamic property called the water potential, or chemical potential (μ)
of water, which is the change in Gibbs free energy (∆G) when water
concentration changes. Equilibrium occurs in a system when (µ) is
the same everywhere in the system. Equilibrium between the liquid
and the vapor phases implies that () is the same in both phases. It
is this fact that allows us to measure the water potential of the vapor
phase and use that to determine the water potential of the liquid
phase. Gradients in (µ) are driving forces for moisture movement.
us, in an isothermal system, water tends to move from regions of
high water potential (high aw) to regions of low water potential (low
aw). Water content is not a driving force for water movement, and
therefore can not be used to predict the direction of water movement, except in homogeneous materials.
Factors In Determining Water Activity
e water activity of the water in a system is in uenced by factors
that e ect the binding of water. ey include osmotic, matric, and
pressure e ects. Typically water activity is measured at atmospheric
pressure, so only the osmotic and matric e ects are important.
Osmotic E ects
Osmotic e ects are well known from biology and physical chemistry. Water is diluted when a solute is added. If this diluted water is
Page 19

AquaLab
3. Water Activity eory
13
separated from pure water by a semi-permeable membrane, water
tends to move from the pure water side through the membrane to
the side with the added solute. If su cient pressure is applied to the
solute-water mixture to just stop the ow, this pressure is a measure
of the osmotic potential of the solution. Addition of one mole of an
ideal solute to a kilogram of water produces an osmotic pressure of
22.4 atm. is lowers the water activity of the solution from 1.0 to
0.98 aw. For a given amount of solute, increasing the water content
of the systems dilutes the solute, decreasing the osmotic pressure,
and increasing the water activity. Since microbial cells are high concentrations of solute surrounded by semi-permeable membranes,
the osmotic e ect on the free energy of the water is important for
determining microbial water relations and therefore their activity.
Matric E ects
e sample matrix a ects water activity by physically binding water
within its structure through adhesive and cohesive forces that hold water
in pores and capillaries, and to particle surfaces. If cellulose or protein
were added to water, the energy status of the water would be reduced.
Work would need to be done to extract the water from this matrix. is
reduction in energy status of the water is not osmotic, because the cellulose or protein concentrations are far too low to produce any signi cant
dilution of water. e reduction in energy is the result of direct physical
binding of water to the cellulose or protein matrix by hydrogen bonding
and van der Waal forces. At higher water activity levels, capillary forces
and surface tension can also play a role.
Sorption Isotherms
Relating Water Activity to Water Content
Changes in water content a ect both the osmotic and matric binding of water in a product. us a relationship exists between the
water activity and water content of a product. is relationship is
Page 20

AquaLab
3. Water Activity eory
14
called the sorption isotherm, and is unique for each product. Besides
being unique to each product, the isotherm changes depending on
whether it was obtained by drying or wetting the sample. ese factors need to be kept in mind if one tries to use water content to infer
the stability or safety of a product. Typically, large safety margins are
built into water content speci cations to allow for these uncertainties.
While the sorption isotherm is often used to infer water activity from
water content, one could easily go the other direction and use the
water activity to infer the water content. is is particularly attractive because water activity is much more quickly measured than water content. is method gives particularly good precision in the
center of the isotherm. In order to infer water content from water
activity, one needs an isotherm for the particular product. Decagon
sells an Isotherm Generator called the AquaSorp IG or you can also
have Decagon run the isotherm for a fee.
For example, if one were using the AquaLab to monitor the water
content of dried potato akes, one would measure the water activity
and water content of potato akes dried to varying degrees using the
standard drying process for those akes. An isotherm would be constructed using those data, and the water content would be inferred
using the measured water activity of samples and that isotherm. We
have an upgrade available to Series 4TE users that would allow you
to determine moisture content and water activity simultaneously.
is instrument is called the Series 4TE DUO.
e importance of the concept of water activity of foods, pharmaceuticals, and cosmetics cannot be over emphasized. Water activity is
a measure of the energy status of the water in a system. More importantly, the usefulness of water activity in relation to microbial growth,
chemical reactivity, and stability over water content has been shown.
Page 21

AquaLab
4. Getting Started
15
4. Getting Started
Components of your AquaLab
Your AquaLab should have been shipped with the following items:
• AquaLab water activity meter
• Calibration Certi cate
• Power cord
• RS-232 interface cable
• 100 disposable sample cups
• Operator’s Manual
• Quick Start guide
• Cleaning Kit
• 3 vials each of the following veri cation solutions:
1.000 a
w
Distilled Water
0.760 a
w
6.0 molal NaCl
0.500 a
w
8.57 molal LiCl
0.250 aw 13.41 molal LiCl
Choosing a Location
To ensure that your AquaLab operates correctly and consistently,
place it on a level surface. is reduces the chance that sample material will spill and contaminate the sample chamber. Also select a
location where the temperature remains fairly stable to avoid temperature changes that can a ect accuracy. is location should be
well away from air conditioner and heater vents, open windows, etc.
Place the AquaLab in a location where cleanliness can be maintained
to prevent contamination of the sample chamber.
Page 22
AquaLab
4. Getting Started
16
Preparing AquaLab for Operation
After nding a good location for your AquaLab, plug the power cord
into the back of the unit. e ON/OFF switch is located on the
lower left corner of the AquaLab’s back panel. When the AquaLab
is turned on, you should see a model name/number screen and then
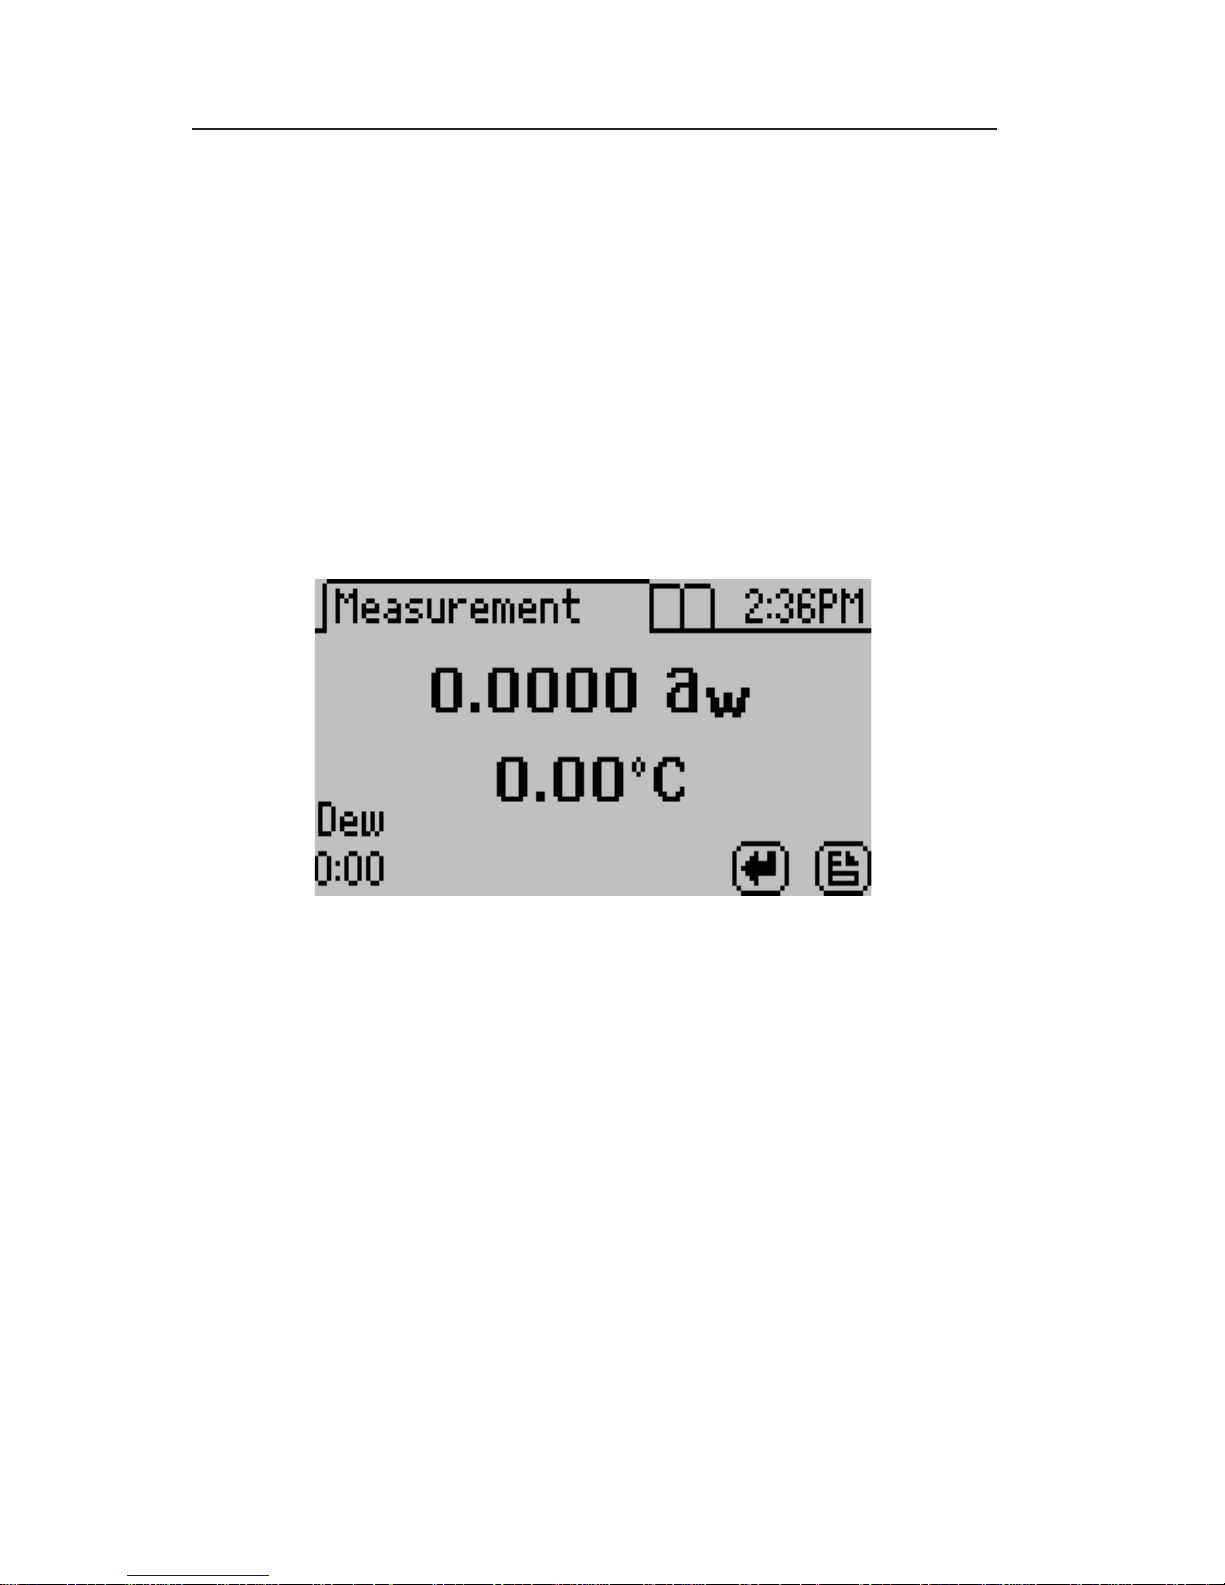
the main screen as shown below.
e main screen shows the water activity (aw) in the middle of the
screen and the sample temperature right below. On the Series 4TEV
model you will also see either DEW or CAP indicating whether you
are using the dewpoint or capacitance sensor respectively.
NOTE: In order to provide the most accurate readings, your AquaLab
should be allowed a 15 minute warm-up period.
Page 23
AquaLab
4. Getting Started
17
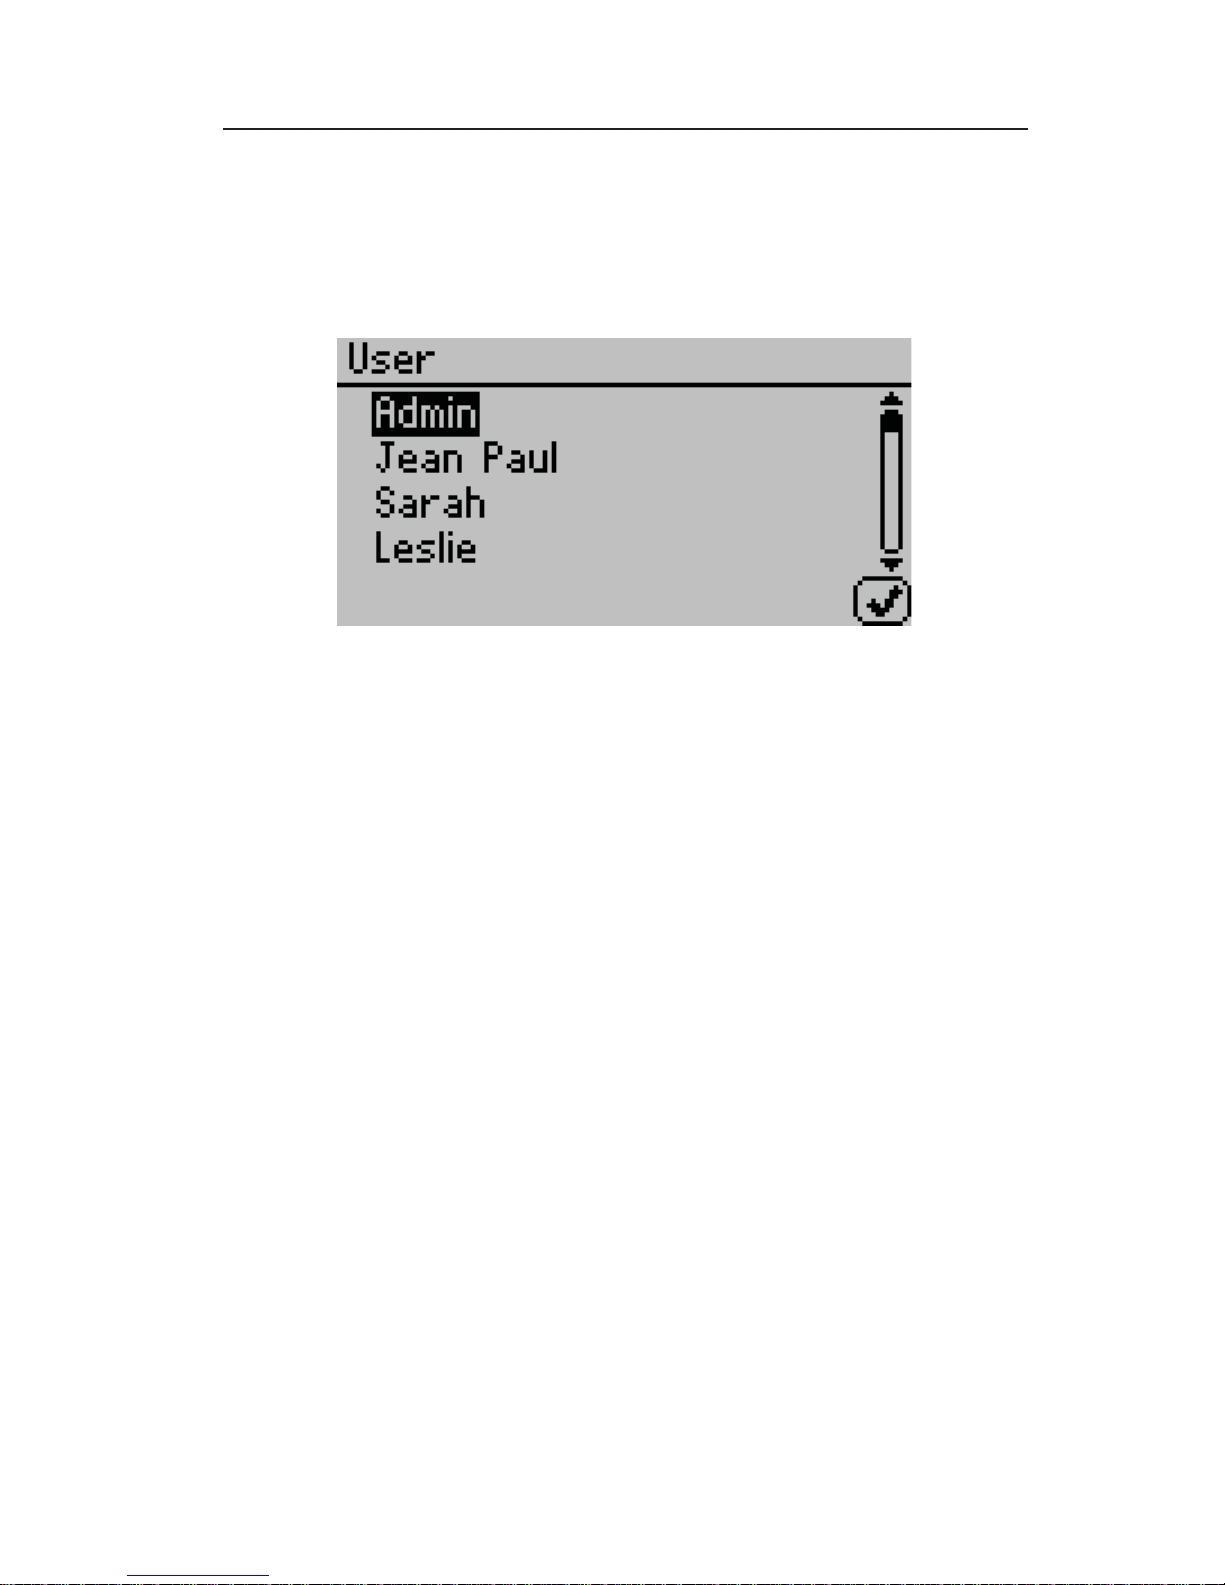
If users have been setup on the instrument, the following screen will
appear instead of the main screen. (See Chapter 5 for more information on administrative settings and user setup).
Select the appropriate user and login to begin.
Page 24
AquaLab
5. Menus
18
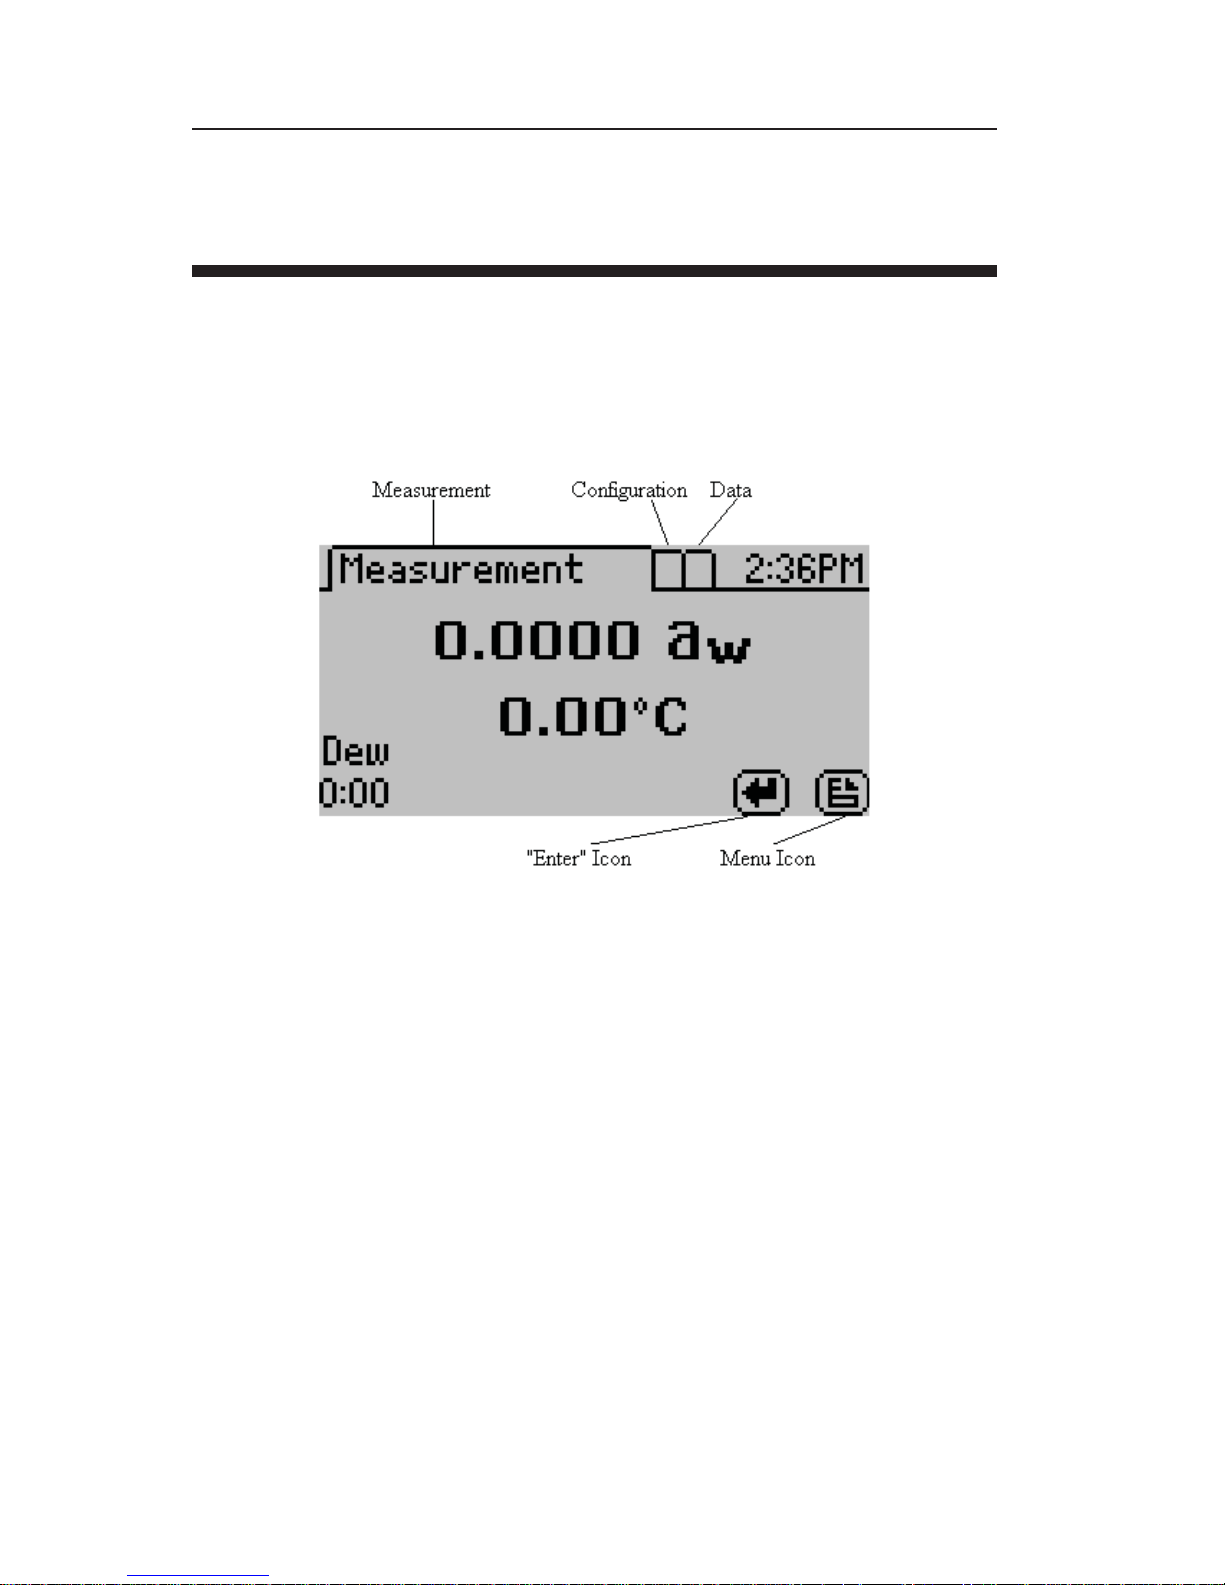
5. Menus
At the top of the display screen there are three tabs: Measurement,
Con guration, and Data. ese tabs indicate the three menus you
can access. To change between the tabs press the right most button
below the document icon.
e enter icon is the read or enter button. Once the latch is set to the
read position, the document icon will switch to an “X” icon, which
allows the user to stop the current reading. During a reading, pressing enter again will restart the reading.
Measurement Tab
e measurement tab, as seen above, is the main screen which displays each time you turn on your AquaLab. If this screen doesn’t
appear, refer to Chapter 12 for troubleshooting instructions. As
mentioned earlier, the water activity and sample temperature are
displayed on the screen.
Page 25
AquaLab
5. Menus
19
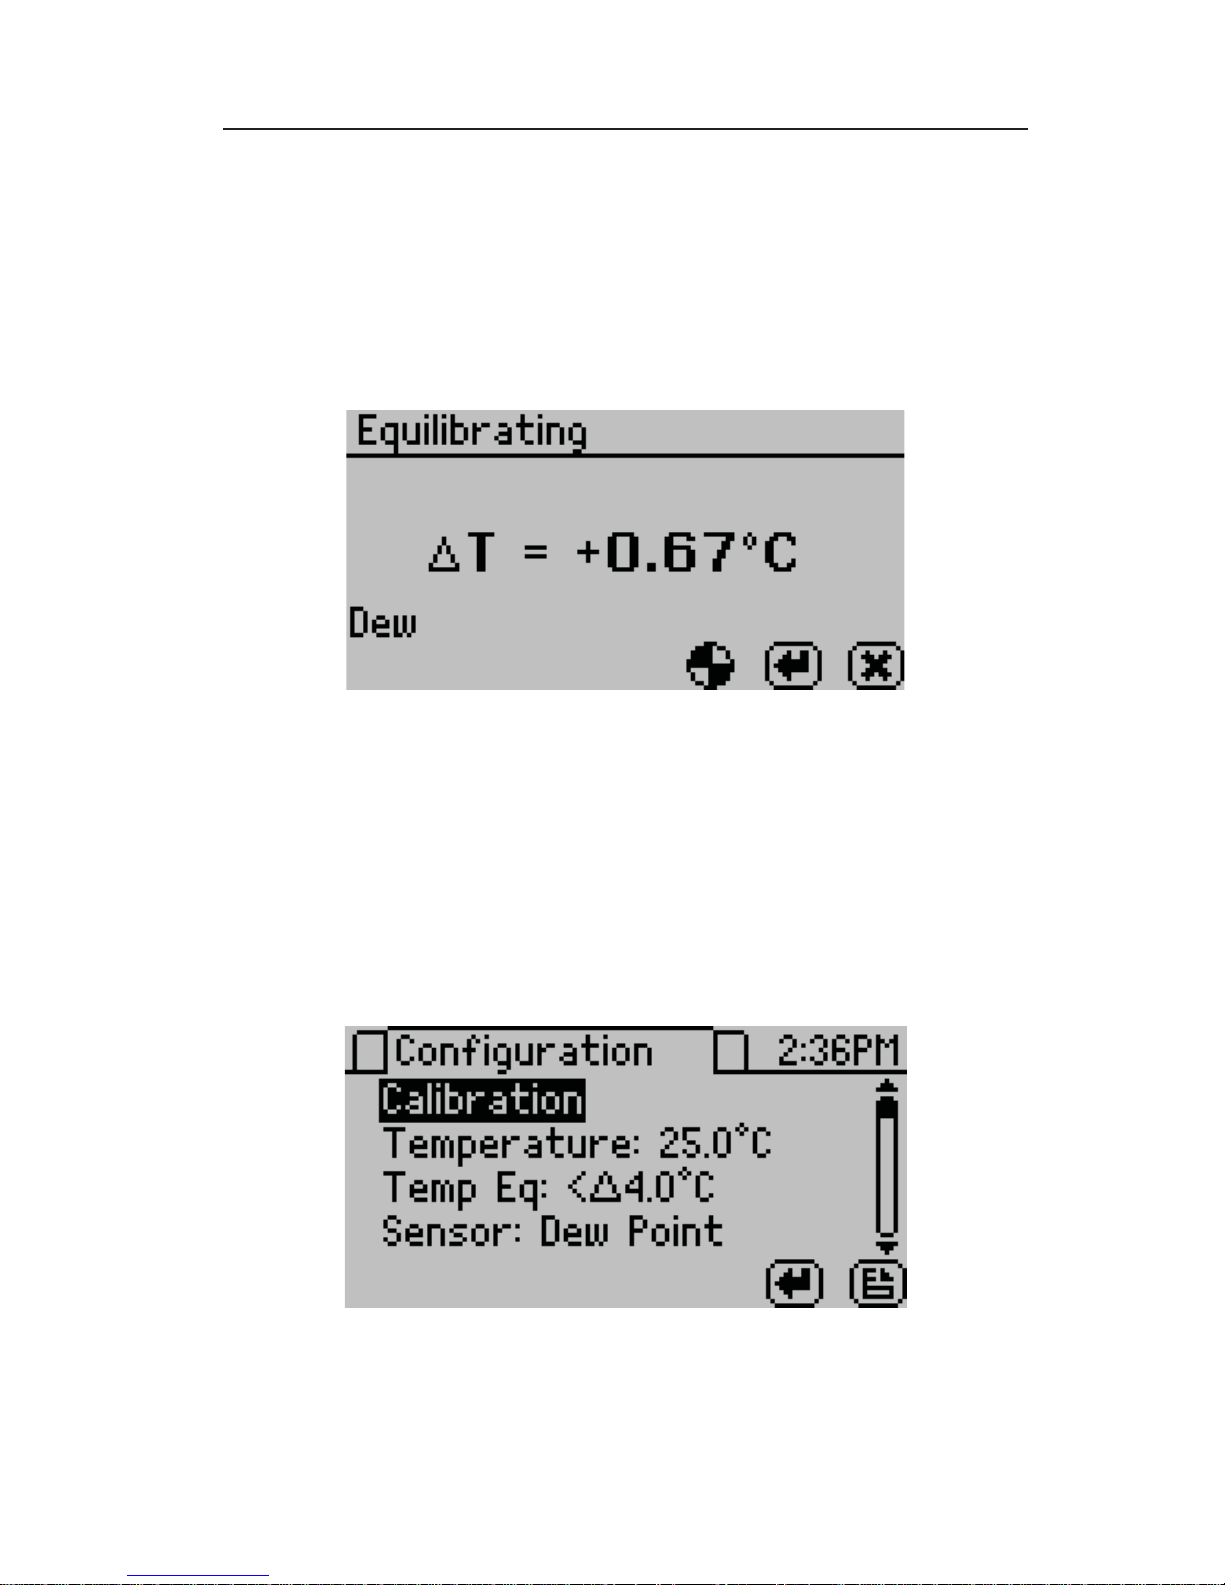
Pushing the right or left arrow keys will change the display to a
temperature equilibration screen shown below. is screen shows
the temperature di erence between the sample temperature and the lid
temperature.
Con guration Tab
When at the con guration screen, pressing the up and down arrow
keys moves the cursor through the various con guration options
Press the left and right arrows to page through the options. e
enter button will allow you to change the highlighted setting.
Page 26
AquaLab
5. Menus
20
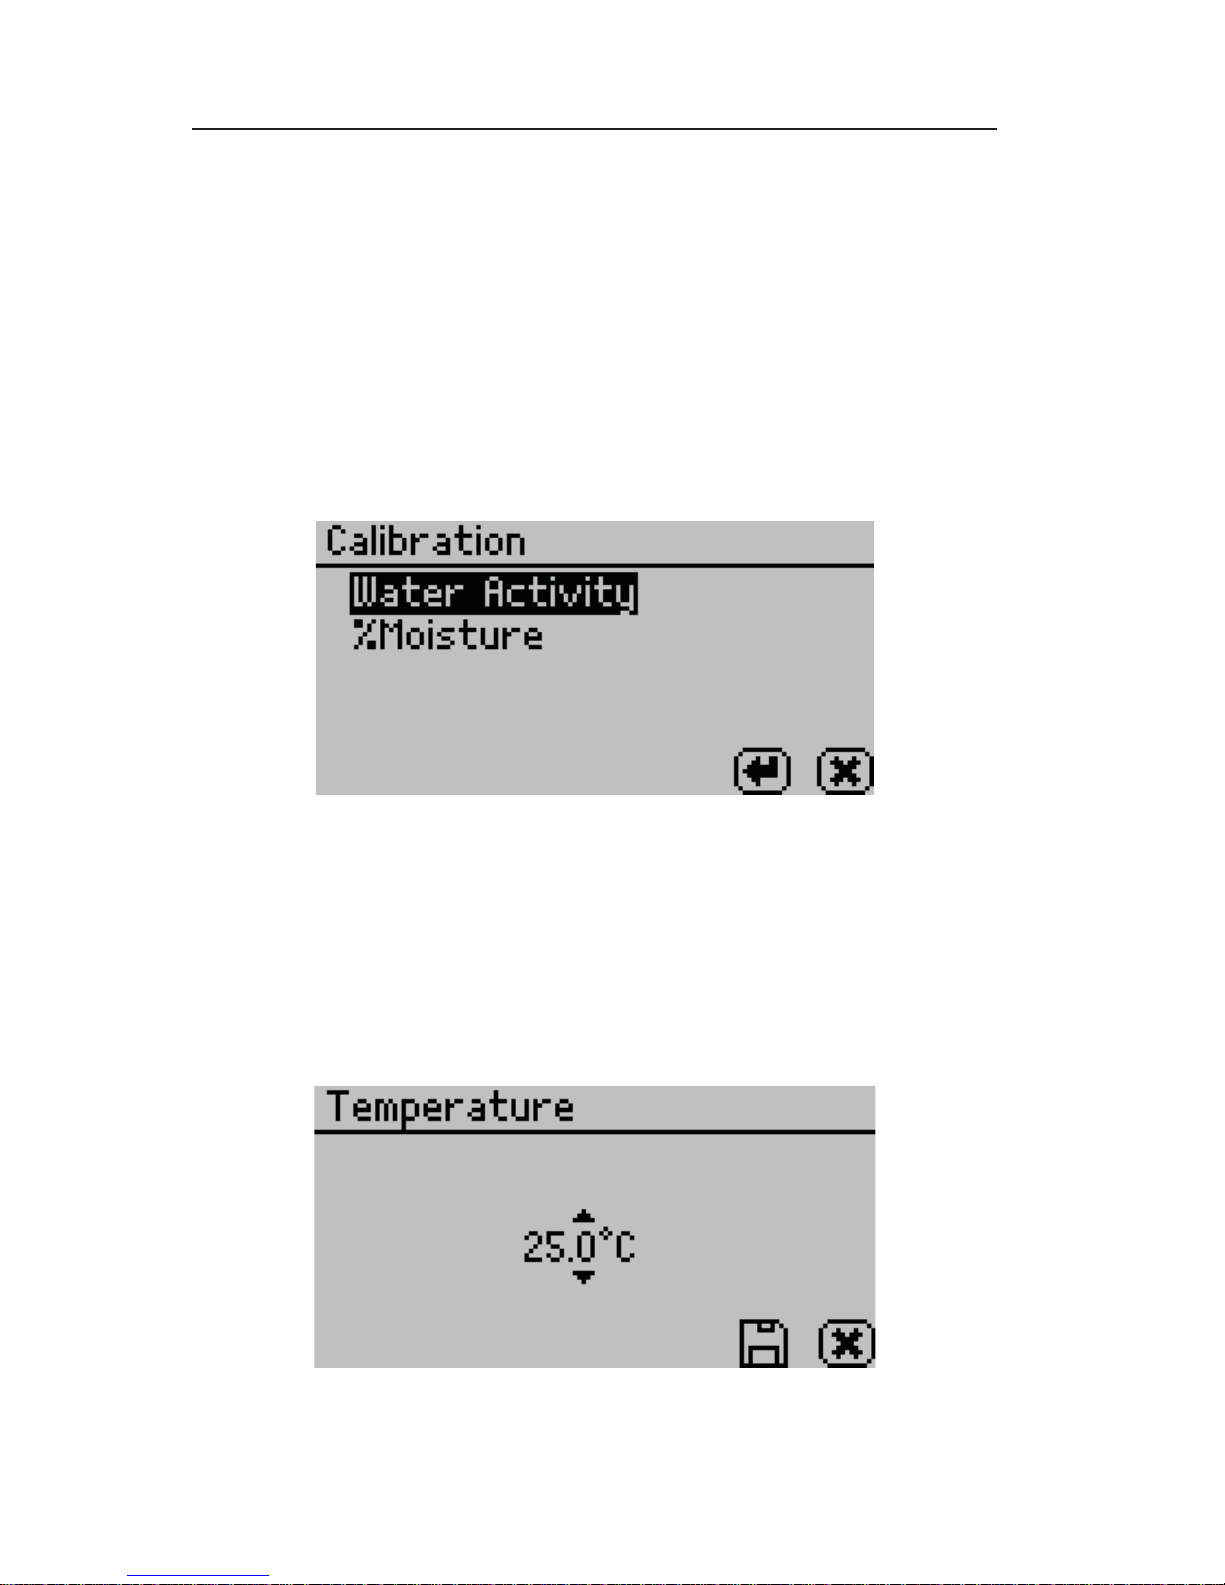
Calibration:
Pressing the Enter button when Calibration is highlighted starts the
veri cation process. For more details on the water activity veri cation procedure refer to Chapter 7. Refer to Chapter 10 for moisture
content veri cation information (Duo model only). You may also
reset the calibration to the factory defaults by highlighting the Defaults option and pressing Enter. is will reset all options to the
way they were when the instrument arrived at your location.
Temperature:
e default temperature is 25°C. Press the enter button to change
the temperature setting. e AquaLab Series 4TE models may be set
between 15 and 50°C by 0.1°C intervals. Using the up and down
arrows, set the AquaLab to your desired temperature and press the
save button.
Page 27

AquaLab
5. Menus
21
Temp Eq:
e Temperature Equilibration option allows you to set the level of
temperature equilibration desired before the water activity measurement begins. e range is 0.5 to 4.0°C. A setting of 4.0°C begins
the measurement immediately (assuming the sample is not >4.0°C
above or below the block temperature). A setting of 0.5 °C will
cause the instrument to wait until the sample temperature is within
<0.5°C of the block temperature before starting the water activity
measurement.
Sensor:
In the AquaLab Series 4TEV model only, this option indicates the
selected sensor type, either dewpoint or capacitance ( e Series 4
and 4TE models will always be Dewpoint). Pressing Enter when the
Sensor option is highlighted allows you to change between a capacitance sensor or chilled mirror dewpoint sensor for sampling with or
without volatiles, respectively.
Page 28

AquaLab
5. Menus
22
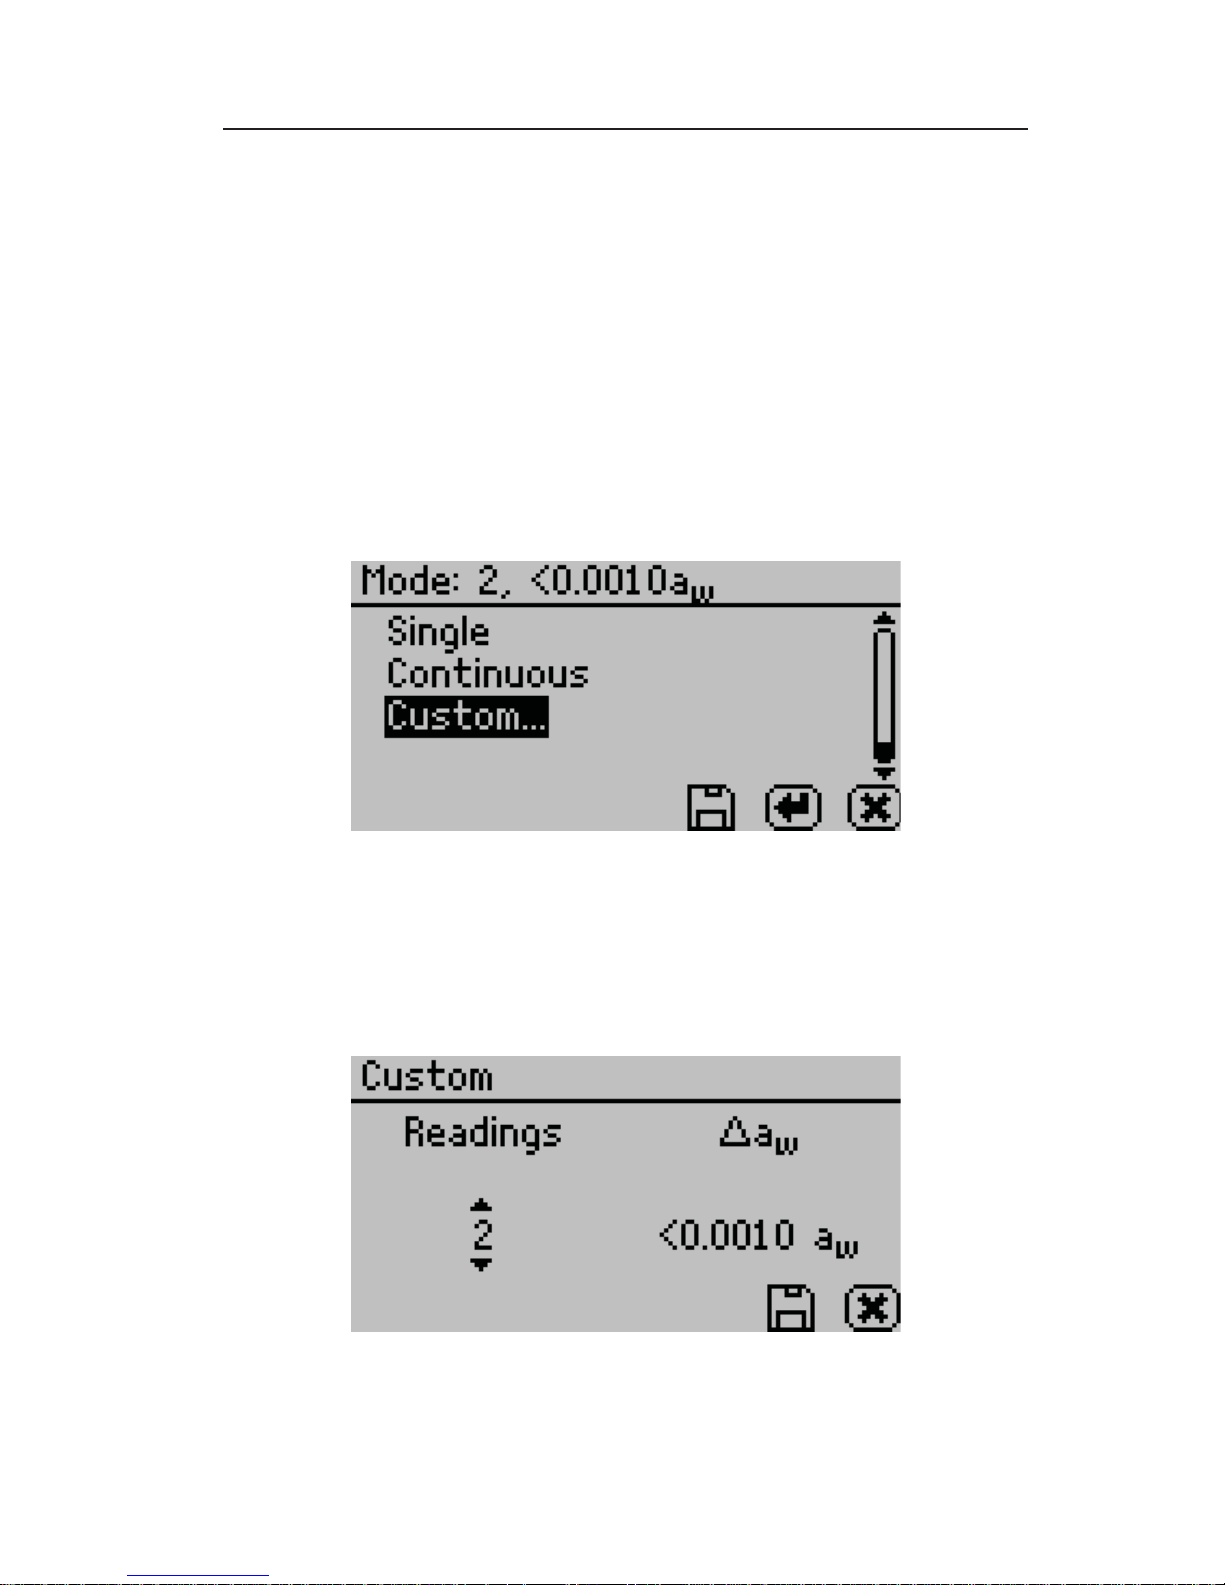
Mode:
Users may choose between single, continuous, or custom mode by
pushing the save button.
Single Mode
Single mode reads the sample once, after which the instrument noti es you that it is nished and the water activity and temperature are
displayed on the screen.
Continuous Mode
Continuous mode reads your sample until you open the chamber
lid or stop the test using the stop button. AquaLab reads the sample,
displays the water activity and temperature, then begins another read
cycle without further input from the user. Between samples, the machine will signal you with beeps. is mode eliminates the possibility
of moisture exchange with the environment outside the chamber in
between readings. A time on the bottom left of the screen tracks the
cumulative read time. All readings taken during continuous mode
are saved on the instrument’s memory if the autosave feature is selected (see Auto Save below). If AquaLab is connected to a computer
using AquaLink RG (See Chapter 11), all readings taken during continuous mode will be downloaded to the AquaLink RG software.
Custom Mode
Custom mode allows a sample to be read multiple times until a desired level of stability is achieved. e user determines how many
consecutive tests they want to be within a given water activity stability setting. For instance, the customer can choose to have 4 consecutive tests be within +/- 0.001aw. e instrument will continue
to run tests until it records 4 consecutive tests that are within +/-
0.001aw and then will stop and report the value of the nal test. If
autosave is turned on, all test readings will be saved to the instru-
Page 29
AquaLab
5. Menus
23
ments memory, but only the nal reading will appear on the main
measurement screen. If AquaLab is connected to a computer using
AquaLink RG (See Chapter 11), all readings taken during a custom mode test will be downloaded to the AquaLink RG software.
On the mode screen, at the top of the page, will appear the current
mode settings with the number of tests appearing rst, followed by the
stability value (∆aw). Pressing enter with the custom mode highlighted will allow the number of tests and stability settings to be changed.
To change the number of readings, use the right/left arrow buttons to highlight the number under Readings, and then use the
up and down buttons to change to any value between 2 and 9.
Page 30
AquaLab
5. Menus
24
To change the stability setting, use the right/left arrow buttons to
highlight the number under ∆a
w
, and then use the up and down buttons to change to any value between 0.0005 and 0.0200. To save the
settings and nish, press the save button (to exit without updating,
press the cancel button). e mode screen will now appear with the
updated custom settings appearing at the top of the screen. Press the
save button to return to the con guration screen and begin using the
custom mode (To exit without updating, press the cancel button).
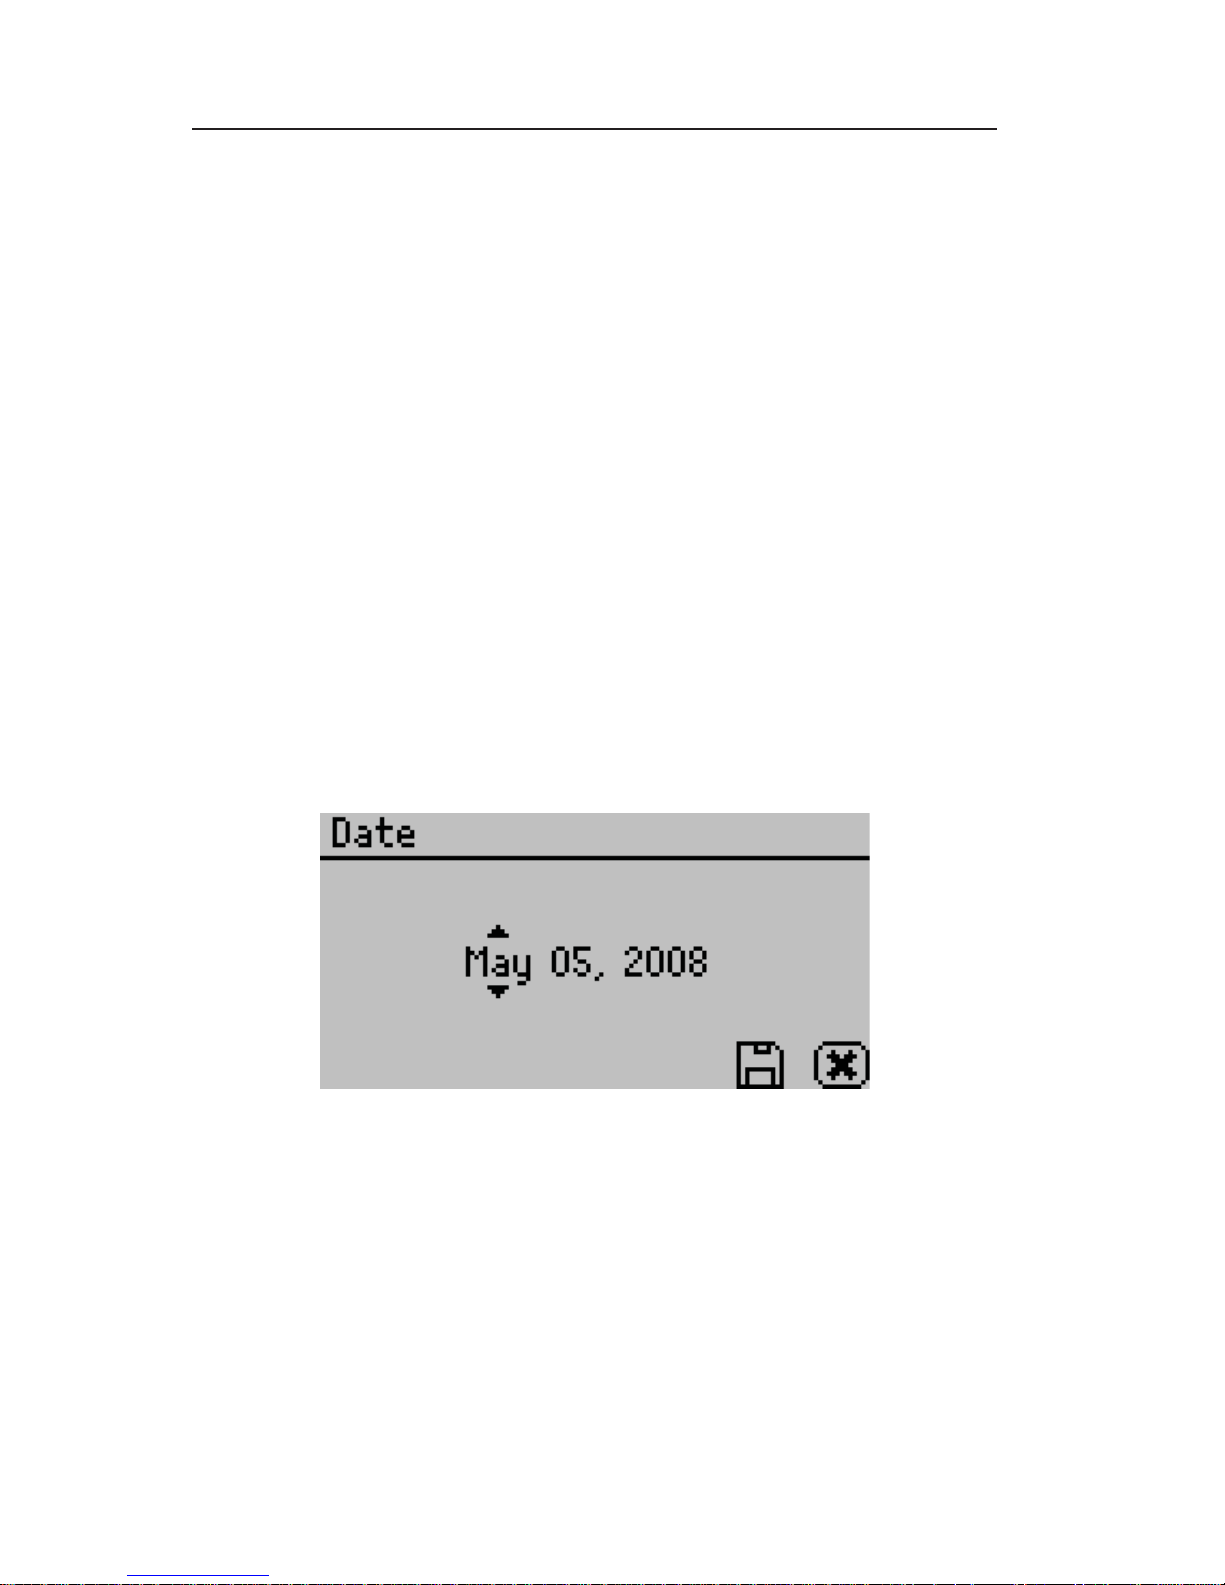
Date:
AquaLab Series 4 models now have an internal calendar and clock.
e time and date are recorded with each water activity reading.
Pressing Enter when the Date option is highlighted allows you to set
the date in the instrument. Press the left and right arrows to change
between the month, day and year. Press the up or down arrows to
change any of the individual values.
Time:
Pressing Enter when the Time option is highlighted allows you to
set the current local time. Press the up or down arrows to change
any of the individual values. Press the left or right buttons to change
between hour and minutes. e hour setting automatically changes
between AM and PM.
Page 31

AquaLab
5. Menus
25
Regional Formatting:
Allows you to con gure how all Series 4 models will display information. You may choose the temperature scale (Celsius vs Fahrenheit), the date display (mm/dd/yy vs. dd/mm/yy), the hour format
(12 vs 24 hour) and the language.
Admin Settings
Allows you to create an administrator password as well as create, edit
and delete additional users.
Page 32

AquaLab
5. Menus
26
e admin option allows the administrator to grant or block access
to some or all of the con guration options in all Series 4 models. For
example: If the administrator wanted to make sure that all samples
were read at 25°C the administrator would set their temperature to
25°C and then would lock all other users out of that con guration
screen. is is accomplished by entering the Access function and selecting the desired option to toggle it on and o . Additionally you
can lock and unlock all of them at once. (For example, if you do not
want John Doe changing the instruments measurement temperature,
the administrator can lock that function for John.)
e areas that can be locked are calibration, temperature, temperature equilibration, sensor selection, mode, date/time, region, password, auto-save, number of beeps, contrast, and delete functions.
Page 33

AquaLab
5. Menus
27
User Setup:
Users can be added, edited or deleted from this screen. An alphabet
screen will appear where a name can be entered using lower case,
upper case and accents.
NOTE: User setup is not required for instrument operation. It is in place
for users wanting to be compliant with 21 CFR Part 11 or who want to
maintain the settings they have selected.
Auto Save:
AquaLab Series 4 models have the ability to store water activity readings within the instrument. By selecting Auto Save “On,” every water activity reading will be automatically stored in the instrument’s
internal memory. AquaLab Series 4 can store up to 8,000 records
before the memory is full. If you select Auto Save “o ” then no
data is automatically stored, although any individual reading may
be manually stored right after the test is completed, before the next
test is started.
To manually store a water activity or append an annotation to the
active reading that has been autosaved, press the save icon button
after the water activity measurement is completed. Pressing the icon
opens a “name” screen. You may give this reading a name by press-
Page 34

AquaLab
5. Menus
28
ing the arrow buttons to highlight the letter and then pressing the
“Check” icon button. Press the save icon to save this data record
with the name you have speci ed.
NOTE: Pressing the save icon button without giving it a name will save
the reading without a name. If the save icon is not pressed after a reading, and the reading is autosaved, it is not possible to give an annotation
later
Beeps:
Allows you to set the reading nished noti cation from 4 beeps to
continuous beeps. You may also turn the audible noti cation o .
Contrast:
Allows you to set the contrast of the screen to your liking. Viewing
the screen from a sitting versus a standing position may require contrast adjustment for the best visibility in that position.
Diagnostics:
For the chilled-mirror dewpoint sensor it provides you with lid,
base, sample and mirror temperatures, optical voltage as well as the
chilled mirror dew point user calibration.
Page 35

AquaLab
5. Menus
29
For the capacitance sensor (TEV Models only) it provides you lid,
base, and sample temperatures, relative humidity, as well as the capacitive sensor calibration.
About:
is screen provides important information including the serial
number and code version of your instrument.
Page 36

AquaLab
5. Menus
30
Data Tab
View:
is selection will allow you to view your stored measurements. e
up/down arrows will move you through the stored data with the
most recent measurements at the top of the table. You may also press
the left and right arrows to page quickly through the data. See Chapter
11: Computer Interface for information about downloading these
readings to a computer.
When you are viewing the summary screen, you may press the enter
button on a highlighted reading to get detailed information on the
reading as shown below.
Page 37

AquaLab
5. Menus
31
e information shown is the water activity of the sample, the temperature, the test time, the user who ran the test (if setup), the date
of the reading, the sensor used (4TEV only), the time the reading
was taken, and the sequence number of the stored reading.
Delete:
Selecting this option will delete all of the information currently
stored in the instrument. If you have not backed up this information with Aqualink RG, you will be reminded of this by the following message:
NOTE: You will NOT be able to recover deleted data.
Page 38

AquaLab
6. Cleaning and Maintenance
32
6. Cleaning and Maintenance
Keeping your AquaLab clean is vital to maintaining the accuracy
of your instrument. Dust and sampling debris can contaminate the
sampling chamber and must therefore be regularly cleaned out. To
clean your instrument, carefully follow these instructions and refer
to the labeled diagram below.
Page 39

AquaLab
6. Cleaning and Maintenance
33
Purpose
e purpose for the cleaning procedure is to remove grease, dirt and
other soluble substances which can absorb/release water during veri cation, calibration, and/or sample testing. For a smooth and even
dew formation, it requires the mirror to be perfectly clean. If there
are any contaminants (e.g. ngerprints) on the mirror, the dew will
form unevenly and thus a ect the accuracy of the reading.
When to Clean
e instrument should be cleaned if visual inspection indicates the
chamber is dirty or as instructed in the veri cation owchart on
page 41.
Materials Needed
• A thin plastic rod or other non-metal implement
• Distilled Water
• Isopropyl Alcohol (IPA) or Decagon Cleaning Solution
• Kimwipes®
You may also purchase the AquaLab Cleaning Kit which comes with
all the above materials except the Isopropyl Alcohol and Distilled
Water.
NOTE: Wash your hands with soap and water and/or use clean lab gloves
before starting the cleaning procedure. is will prevent oils from contaminating the cleaning materials, the sample chamber and/or the sensors.
Cleaning the Block and Sensors
Accessing the Sample Chamber
Turn the power o on your AquaLab. If latched, move the lever
over to the open position. Lift the chamber cover to expose the
Page 40

AquaLab
6. Cleaning and Maintenance
34
sample chamber and sensors. e sample chamber consists of all
surfaces inside the red o-ring when the lid is closed.
Cleaning a Series 4TEV:
If cleaning an AquaLab Series 4TEV, follow the cleaning procedures
listed below being careful not to get cleaning solution or alcohol on
the capacitance sensor lter (see illustration on previous page). Repeated exposure of cleaning materials or contaminants to the lter
may cause inaccurate readings. If the lter appears to be contaminated, it may need to be replaced. (To replace the capacitance sensor
lter, use a tweezer or small knife blade to pry up the edge of the
lter, being careful not to disturb the sensor beneath. Discard the
soiled lter, then with clean hands, press a new lter into place.)
Cleaning Procedure:
Cleaning your AquaLab is a multi-step procedure which involves washing, rinsing, and drying for each speci c area as outlined below (refer to illustration at the beginning of this chapter to identify the location of the components to be cleaned):
1. Cleaning the Sample Chamber
Note: Be extremely careful not to damage the fan blades (see illustration) when cleaning the chamber.
a. Remove any debris that may have collected within or around
the sample chanber.
b. Wrap a NEW Kimwipe around the end of the thin plastic
rod (spatula) and moisten it with isopropyl alcohol or Decagon Cleaning Solution. Note: Do NOT dip a used Kimwipe
into your container of IPA or cleaning solution (the IPA or
cleaning solution will become contaminated).
c. WASHClean upper chamber, o-ring, and all surfaces of the
block within the o-ring. You may need to replace the Kim-
Page 41

AquaLab
6. Cleaning and Maintenance
35
wipe if it becomes too dirty during this process.
d. Clean lower block with a fresh Kimwipe. Be sure to clean
the entire block surface.
e. RINSERepeat steps b-d using new Kimwipes with distilled
water.
f. DRYRepeat steps b-d using new, dry Kimwipes to help
remove any moisture remaining from the cleaning.
g. Visually inspect the sample chamber for cleanliness. Re-clean
if necessary. Note: Do not reuse Kimwipes.
2. Clean the Mirror
a. Wrap a new Kimwipe around the end of the thin plastic rod
(spatula) and moisten it with isopropyl alcohol or Decagon
Cleaning Solution.
b. WASHSwipe the moistened Kimwipe across the mirror
once. (A single swipe is usually su cient to remove contaminants.)
c. RINSERepeat steps a-b using new Kimwipes moisted with
distilled water instead of cleaning solution.
d. DRYRepeat steps a-b using new, dry Kimwipes to help
remove any moisture remaining from the cleaning.
e. Visually inspect the mirror for cleanliness. Re-clean if neces-
sary.
3. Clean the ermopile and Optical Sensor
a. Wrap a new Kimwipe around the end of the thin plastic rod
(spatula) and moisten it with isopropyl alcohol or Decagon
Cleaning Solution.
b. WASHSwipe the moistened Kimwipe across thermopile
and optical sensor. (A single swipe across the sensor is usually su cient to remove contaminants.)
c. RINSERepeat steps a-b using new Kimwipes moistened
with distilled water instead of cleaning solution.
d. DRYRepeat steps a-b but use a new, dry Kimwipe to help
remove any moisture remaining from the cleaning.
Page 42

AquaLab
6. Cleaning and Maintenance
36
e. Visually inspect the thermopile and optical sensor for cleanli-
ness. Re-clean if necessary.
4. Additional Drying Time
a. Visually inspect the sample chamber and sensors for contami-
nants, including moisture. If necessary, repeat the cleaning
process using new Kimwipes.
b. Let stand for about 5 minutes to ensure the sample chamber
is dry.
Veri cation of Calibration
After you have cleaned the chamber and other parts of your AquaLab,
it is important to check the instrument’s performance in order to
correct for any linear o set that may have occurred during the cleaning process.
Before you check the instrument we recommend that you run a
sample of the activated charcoal pellets provided in your AquaLab
cleaning kit. is cleans the air inside the chamber, helping it come
back to a stable sampling environment.
Verify the linear o set against known veri cation standards according to the procedure described in the next chapter. If a linear o set
has occurred, refer to “adjust for linear o set” section in Chapter 7
for directions on how to correct for linear o set. If, after adjusting
for linear o set, your instrument is still not reading samples correctly, please contact Decagon for support.
Page 43

AquaLab
7. Veri cation and Calibration
37
7. Veri cation and Calibration
It is important to verify AquaLab’s water activity calibration against
known standards to guarantee optimal performance and accuracy.
Decagon recommends veri cation daily, once per shift or before
each use.
Water Activity Veri cation
AquaLab uses the chilled-mirror dewpoint technique to determine
water activity. Because this is a primary measurement of relative humidity, no calibration is necessary; however, it is important to verify
for linear o set periodically. e components used by the instrument to measure water activity are subject to contamination which
may a ect the AquaLab’s performance. When this occurs, it changes
the accuracy of the instrument. is is what is called a “linear o set.”
erefore, frequent veri cation assures you that your AquaLab is
performing correctly. Linear o set is checked by using two di erent
veri cation standards.
Veri cation Standards
Veri cation standards are specially prepared unsatuarated salt solutions having a speci c molality and water activity value which are
accurately measurable. e veri cation standards that were sent with
your initial shipment are very accurate and readily available from
Decagon. Using veri cation standards to verify accuracy can greatly
reduce preparation errors. For these reasons, we recommend using
standards available through Decagon for the most accurate veri cation of your AquaLab’s performance.
Performance Veri cation Standards come in ve water activity levels: 1.000, 0.984, 0.760, 0.500, and 0.250 aw. e standards are
Page 44
AquaLab
7. Veri cation and Calibration
38
produced under a strict quality assurance regime. Please contact
Decagon Devices to order additional standards via sales@decagon.
com or 1-800-755-2751.
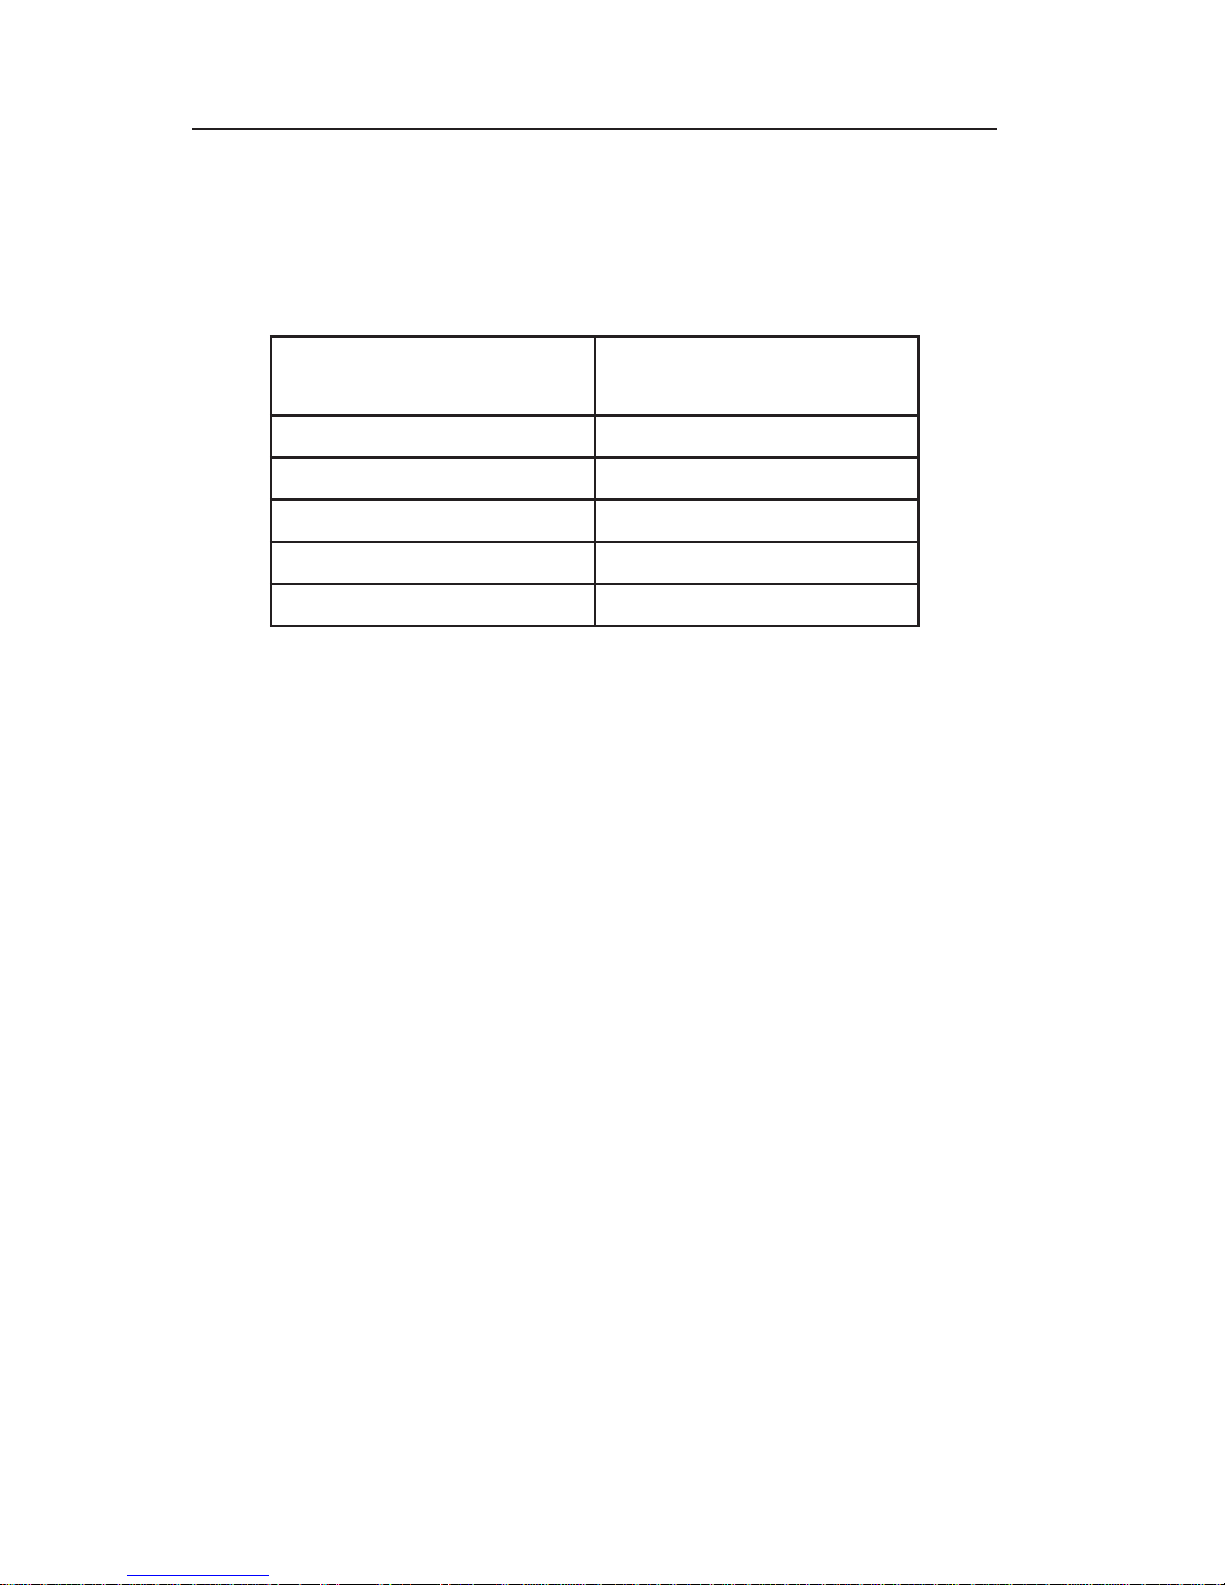
Verifi cation Standard
@ 25°C
Water Activity
13.41m LiCl 0.250 ±0.003
8.57m LiCl 0.500 ±0.003
6.0m NaCl 0.760 ±0.003
0.5m KCl 0.984 ±0.003
Distilled Water 1.000 ±0.003
NOTE: If you need to obtain a Material Safety Data Sheet (MSDS)
for any of these standards, a printable version is available on our website at www.decagon.com/msds.
To use a veri cation standard, remove the twist top and pour the
contents into an AquaLab sample cup. Information about the standard’s value and molality can be found printed on the outside of
the plastic vial. If for some reason you cannot obtain Decagon’s
veri cation standards and need to make a saturated salt solution for
veri cation, refer to Appendix A.
In TEV models, the capacitance sensor can hold a memory of high
water activity samples such as distilled water or the 0.984 a
w
standard. If you verify calibration with one of these high water activity
standards, you will need to wait an hour to allow the capacitance
sensor to dry before testing samples of lower water activity or the
results may be slightly high.
Page 45

AquaLab
7. Veri cation and Calibration
39
Veri cation of Calibration
When to Verify for Linear O set
Linear o set should be checked against two known veri cation
standards daily, either once per shift or before each use. Linear o set
should never be veri ed solely against distilled water, since it does
not give an accurate representation of the linear o set. For batch processing, the instrument should be checked regularly against a known
standard of similar water activity. It is also a good idea to check
the o set with a standard of similar water activity when the general
water activity range of your sample is changing. Checking the water
activity of a standard solution will alert you to the possibility of unit
contamination or shifts in the linear o set from other causes.
NOTE: e veri cation process is the same for both the dewpoint and
capacitance sensors in TEV models except that the accuracy for the capacitance sensor is ± 0.015 a
w
. Also, if using the 1.000 aw or 0.984 a
w
veri cation standards, you must wait an hour before testing other standards or samples in capacitance mode.
Veri cation
To verify for linear o set of your AquaLab do the following:
(refer to the owchart at the end of this section)
1. Choose a veri cation standard that is close to the water activity of
the sample you are measuring. Note: e AquaLab needs to warm
up for approximately 15 minutes to make accurate readings.
2. Empty a vial of solution into a sample cup and place it in the
AquaLab’s testing chamber. Make sure that your standard is as close
to the instrument temperature as possible.
Note: Make sure the rim and outside of the sample cup are clean.
Page 46

AquaLab
7. Veri cation and Calibration
40
3. Carefully close the lid and move the lever to the READ position.
4. Take two readings. e water activity readings should be within
± 0.003 a
w
of the given value for the veri cation standard. See Ap-
pendix B for the correct water activity value of Decagon’s standards
at temperatures other than 25°C.
5. If your AquaLab is reading within ±0.003 aw of the veri cation
standard, chose a second veri cation standard that would border the
range of water activity you plan to test. For example, if you plan
to test for water activity readings ranging between 0.713 and 0.621
you should use the 6.0M, NaCl (0.76aw)standard for your rst veri cation and the 8.57M LiCl (0.50aw) for the second veri cation.
6. Prepare a sample cup of the second veri cation standard and
make two readings. e second water activity reading for the second
veri cation standard should be within ±0.003 aw.
7. If either of the veri cation standards is not correct, it is probably
due to contamination of the sensor chamber. For cleaning instructions, see Chapter 6. After cleaning, repeat veri cation from step
two.
8. If you are consistently getting readings outside the water activity of
your rst veri cation standard by more than ±0.003 aw, a linear o set
has probably occurred. In this case, adjust the reading to match the
veri cation standard’s correct value as outlined in the next section.
Page 47

AquaLab
7. Veri cation and Calibration
41
Correct
Not Correct
Next
Correct
Not
Correct
Measure Verification Standard
Correct
Not Correct
Repeat Process
Go to Linear
Offset Procedure
Go to Sampling
Procedure
Clean Sample
Chamber
Re-Read
Standard
Measure 2nd
Standard
Clean Sample
Chamber
is owchart is a graphical representation of the directions given above
for checking for linear o set.
Page 48

AquaLab
7. Veri cation and Calibration
42
Adjust for Linear O set
1. Once you are certain a linear o set has occurred, toggle to the
Con guration tab by pressing the Menu icon button. Calibration is
the rst option highlighted in the con guration tab. Press the Enter
icon button to begin the veri cation process. You will be guided
through the linear o set routine through on screen commands. e
following screen will appear:
NOTE: e DUO model will show both water activity and moisture
content on this screen. For TEV Models, make sure you have the
correct sensor selected.
.
2. Press the Enter button to start the linear offset process. To
return to the main menu, press the cancel button. After pressing
the enter button, the following screen will appear:
Page 49

AquaLab
7. Veri cation and Calibration
43
3. Empty the whole vial of solution into a sample cup. We recommend using the 6.0 NaCl (0.76a
w
). Do not adjust for the o set using distilled water. Ensure the rim and outside of the cup are clean.
Place the sample cup in the AquaLab’s sample chamber.
NOTE: e same veri cation standard may be used to verify and
adjust the linear o set.
4. Carefully close the lid and move the lever to the READ position.
Press the Check icon button to begin testing.
NOTE: If you decide at this point not to continue with the linear o set
program, just return the lever to the OPEN position or press the cancel
button and you will be returned to the previous screen.
5. After your AquaLab has nished measuring the veri cation standard, it will display the following screen:
6. Press the up and down arrows to adjust the water activity reading
to its proper value for the particular veri cation standard you are
measuring. When the correct value is displayed, press the Save icon
button to store this new value. To cancel and return to the main
menu, press the cancel button and no changes will be made.
Page 50

AquaLab
7. Veri cation and Calibration
44
7. Re-measure the veri cation standard again in normal sampling
mode. It should read the proper value (within ±0.003 a
w
) at a given
temperature for your particular standard (see Appendix B for temperatures other than 25°C ).
Measure the water activity of a second veri cation standard according to the veri cation procedure described above. If both veri cation readings are within ±0.003 a
w
then the instrument is ready to
begin testing.
If you still have incorrect veri cation standard readings after cleaning the chamber and adjusting for linear o set, contact Decagon
by email at support@decagon.com or by phone at 509-332-2756
(800-755-2751 in US and Canada) for further instructions. If you
purchased your Decagon instrument from one of our international
distributors, please contact them for local service and support.
How to Restore Factory Defaults
To restore original calibration settings, do the following:
1. Toggle to the Con guration tab by pressing the Menu icon button. Select Calibration and press the Enter button (Select water
activity for DUO models.).
Page 51

AquaLab
7. Veri cation and Calibration
45
2. Scroll down to Defaults and press the Enter icon button to access
the Restore Factory Defaults routine. To cancel and return to the
main menu, press the Cancel icon button. After pushing the Enter
icon button, the following screen will appear:
NOTE: For TEV models make sure you have the correct sensor selected.
3. To restore the factory calibration values, press the Check icon
button. To cancel and return to the main menu, press the cancel
button. After pressing the Check icon button, the following screen
will appear:
4. To return to the main menu screen, press the Check icon button.
Page 52

AquaLab
8. Sample Preparation
46
8. Sample Preparation
Proper sample preparation is an important step in keeping your
AquaLab clean and achieving repeatable results. Careful preparation
and loading of samples will lengthen time between cleanings and
help you avoid downtime.
Preparing the Sample
1. Make sure the sample to be measured is homogeneous. Multi-
component samples (e.g., mu ns with raisins) or samples that have
outside coatings (like deep-fried, breaded foods) can be measured,
but may take longer to equilibrate. For samples like these, AquaLab
may take more than ve minutes to give an accurate reading, or may
require multiple readings of the same sample. Measuring the water
activity of these types of products is discussed in detail later in this
chapter (see Samples Needing Special Preparation).
2. Place the sample in a disposable sample cup, completely cov-
ering the bottom of the cup, if possible. AquaLab is able to accurately measure a sample that does not (or cannot) cover the bottom
of the cup. For example, raisins only need to be placed in the cup
and not attened to cover the bottom. A larger sample surface area
increases instrument e ciency by providing more stable infrared
sample temperatures. It also speeds up the reading by shortening the
time needed to reach vapor equilibrium.
3. Do not ll the sample cup more than half full. Over lled cups
will contaminate the sensors in the sensor chamber. Filling the
sample cup will not make the readings faster or more accurate. ere
only needs to be enough sample in the cup to allow the water in
the sample to equilibrate with the water in the vapor phase and not
Page 53

AquaLab
8. Sample Preparation
47
change the moisture content of the sample. Covering the bottom of
the sample cup provides enough sample to get an accurate reading.
4. Make sure the rim and outside of the sample cup are clean.
Wipe any excess sample material from the rim of the cup with a
clean Kimwipe. Material left on the rim or the outside of the cup
can contaminate the sensor chamber and be transferred to subsequent samples.
5. If a sample will be read at some other time, put the sample
cup’s disposable lid on the cup to restrict water transfer. For longterm storage, seal the lid by placing tape or Para lm® completely
around the cup/lid junction.
6. Be consistent in sample preparation practices.
If you crush, grind, or slice your sample, be consistent in the method
you use in order to obtain reproducible results.
Samples Needing Special Preparation
AquaLab reads most materials in ve minutes or less. Some samples, however, may require longer reading times, due to their nature. ese materials need additional preparation to ensure quick,
accurate readings. To nd out whether special sample preparation is
necessary, take several readings to see if readings (a
w
and time) stabilize. If continued readings take longer than six minutes, remove the
sample and take a reading of a veri cation standard. is will ensure
the sample itself is causing the long read time, and that there is not a
problem with your instrument. If the veri cation standard also takes
longer than six minutes to test, the chamber may be dirty. Refer to
Chapter 6 for cleaning procedures.
Page 54

AquaLab
8. Sample Preparation
48
Coated and Dried Samples
Samples with high sugar or fat coatings often require multiple readings, because it takes longer for them to equilibrate. If this is the
case for your samples, it is not a problem with your instrument; it
simply means that your particular sample takes longer than most to
equilibrate.
To reduce the time needed to take an water activity reading for coated or dried samples, you can crush or slice the sample before sampling. is increases the surface area of the sample, thus decreasing
reading times. Keep in mind, however, that modifying some samples
may alter their water activity readings.
For example, a candy may have a soft chocolate center and a hard
outer coating. e water activity reading for the center and the outer
coating are di erent, so one would need to evaluate which part of the
sample needed to be measured before crushing it. When the candy is
crushed, the water activity will represent the average water activity of
the entire sample; whereas leaving the candy whole will give a reading for the coating, which may act as a barrier to the center.
Slow Water-Emitting Samples
Some extremely dry, dehydrated, highly viscous water-in-oil (butter), high fat, or glassy compositions may require multiple tests due
to their slow water-emitting properties. is is because the slow
emission of water decreases the change in water activity su ciently
that the instrument determines the test to be complete, even though
changes in water activity are still occuring. e most e ective way to
test these types of samples is to run them in the AquaLab using the
continous or custom mode and wait for the water activity readings
to stablize.
Page 55

AquaLab
8. Sample Preparation
49
For faster reading, it is important to have the water activity of the
chamber at or below the water activity of these type of samples. is
causes the sample to release water to the vapor phase and equilibrate
with the chamber. If the water activity of the head-space is greater
than this type of sample, a long period of time will be required to
reach equilibrium and the water activity of the sample may be a ected.
Volatile Samples
AquaLab will give accurate readings on most samples. However,
samples with certain volatiles in high enough concentrations may
give inaccurate water activity values. is is because the volatiles
condense on the mirror during the reading process, but do not
evaporate from the mirror as water does. As a result, the reading on
samples with volatiles will not be accurate. e concentration of volatiles that will cause interference is variable and matrix dependent.
e most e ective method to determine if volatiles are a problem is
to compare dewpoint readings to capacitance readings. If the dewpoint readings are more than 0.0153 higher than the capacitance
readings, volatiles are likely a problem.
Decagon’s Series 4TEV is designed for measuring volatiles such as
propylene glycol and ethanol. e Series 4TEV contains both a
chilled-mirror dewpoint and a capacitance sensor. Simply choose
the sensor you want to use from the menu in the instrument. e
only di erence in operation is a lower accuracy of ±0.015 aw for
the capacitance sensor. All other operations and features will be the
same, including measurement times and adjusting for linear o set.
After measuring volatiles with the volatiles sensor, it is a good idea
to clean the chamber and run charcoal before switching to the dew
point sensor.
Page 56

AquaLab
8. Sample Preparation
50
Low Water Activity
When a sample’s water activity value is below the cooling capacity of
the Series 4, your AquaLab will display an error message indicating
the lowest reading it attained on that particular sample. See Chapter 12’s
troubleshooting problem #5 for possible solutions.
If your sample is not below 0.03 a
w
but is still getting the error mes-
sage, refer to Chapter 12 for other possible explanations.
Samples Not at Room Temperature
Samples that are 4°C colder or warmer than the instrument (chamber) temperature will need to equilibrate to instrument temperature before a fast, accurate reading can be made. Rapid changes in
temperature over short periods of time will cause the water activity readings to rise or fall until the temperature stabilizes. When
the temperature stabilizes within one or two degrees of the chamber
temperature, you can proceed with normal measurements.
High-water activity samples that are warmer than the chamber temperature can cause condensation inside the measuring chamber, which
will adversely a ect subsequent readings. A warning message appears
(Sample too hot) if the sample temperature is more than 4°C above
chamber temperature. If this message appears, immediately remove
the sample from the instrument, place a lid on the cup, and allow the
sample to cool to within 4°C of the instrument before measuring.
Samples that are lower than 4°C of the instrument’s temperature
will cause long read times. e sample temperature must be within
one or two degrees of the chamber temperature before fast, accurate
readings can be made.
Page 57

AquaLab
8. Sample Preparation
51
NOTE: Powdery substances can be blown by the fan so be sure not to
over ll the sample cup and verify the cleanliness of the sample chamber
before reading a new sample.
Page 58

AquaLab
9. Taking a Reading
52
9. Taking a Reading
Measurement Steps
Once you have veri ed for cleanliness, calibration and prepared
your sample, you are ready to take readings. e process is simple:
• Move the chamber lever to the Open position and lift the chamber lid.
• Check the top lip and outside of the sample cup to make sure
they are free from sample residue and that sample cup isn’t overfilled. (remember, an over-filled sample cup may contaminate
the chamber’s sensors).
• Place your prepared sample cup in the chamber. The sample cup
lid must be removed while in the testing chamber for correct
functionality.
• Close the chamber lid and move the lever to the Read position.
This will seal the chamber and start the reading.
In 1 to 2 minutes, the rst water activity measurement will be displayed on the LCD (this is an intermediate reading and not the
nal water activity). Length of read times may vary depending on
temperature di erences between the chamber and your sample, and
other properties of your sample.
How AquaLab Takes Readings
AquaLab’s reading cycle continues until the rate of change of three
consecutive readings are less than 0.0005 a
w
of each other. e in-
strument crosses the dew threshold numerous times to ensure equi-
Page 59

AquaLab
9. Taking a Reading
53
librium and the accuracy of readings. When the instrument has nished its read cycle, the water activity is displayed, the read time is
displayed, the spinning measurement icon is replaced by the Store
icon and, if enabled, you will hear a series of beeps.
Cautions!
• Never leave a sample in your AquaLab after a reading has
been taken. The sample may spill and contaminate the instrument’s chamber if the instrument is accidentally moved
or jolted.
• Never try to move your instrument after a sample has been
loaded. Movement may cause the sample material to spill
and contaminate the sample chamber.
• If a sample has a temperature that is 4°C higher (or more)
than the AquaLab’s chamber, the instrument will beep and
display a warning as shown below. Remove the sample until
it is at room temperature.
Although the instrument will measure warmer samples, the readings
may be inaccurate. Warm samples can cause condensation in the
Page 60

AquaLab
9. Taking a Reading
54
chamber if they have a high water activity. It is best to remove the
sample from the instrument, place a lid on the cup and allow the
sample to cool before reading.
• The physical temperature of the instrument should be between
15 - 50°C. Between these ambient temperatures, AquaLab will
measure samples of similar temperature quickly and accurately.
The AquaLab Series 4TE and 4TEV have temperature control
capabilities that enable them to read samples at temperatures
different from ambient temperature, but no higher than 50°C.
• If a sample has a water activity lower than about 0.03, AquaLab
will display the < symbol (see below) notifying you that your
sample is too dry to be accurately measured by the AquaLab.
• If you know that your sample’s water activity is above what the
screen is telling you, your instrument’s sensors may have been
contaminated and will need to be cleaned (see Chapter 6) or
serviced (see Chapter 13).
Page 61

AquaLab
10. Duo Operation (Optional)
55
10. Duo Operation (Optional)
Previously, measuring moisture content and water activity required
di erent instruments. Now it is possible to determine both moisture
content and water activity with one machine. e Series 4TE can be
upgraded to Series 4TE DUO which can display moisture content
simultaneously with water activity.
To calculate moisture content using water activity requires an understanding of the relationship between the two parameters. is relationship, referred to as the moisture sorption isotherm, is complex
and unique to each product type. A product’s isotherm can be used
to calculate moisture content based on a water activity measurement.
is is most easily accomplished using a model that characterizes the
isotherm. For additional information about sorption isotherms and
models, please refer to Chapter 3. e DUO generates water activity values just as a Series 4TE, but then it uses preloaded product
speci c isotherm models to calculate moisture content and present it
on the screen with the water activity. For information about upgrading your Series 4TE to a Series 4TE DUO, please contact Decagon
Devices.
Page 62

AquaLab
10. Duo Operation (Optional)
56
Obtaining Product Isotherm Models
Since the isotherm relationship for each product is unique,
each product’s isotherm model must be determined experimentally. is only needs to be done once, but must
be done prior to testing moisture content with the DUO.
ere are several strategies that can be used to generate models.
Please contact Decagon for information on model development.
Loading and Organizing Product Models
A Product’s model must be loaded into the Series 4TE DUO before
it can calculate moisture content. Each product must have its own
model and the model can either be loaded at the factory by Decagon
or by using the AquaLink RG software program. is software is
included with each DUO purchase or upgrade. Product model les
generated by Decagon are sent to customers via email and can then
be loaded into the instrument by connecting to the instrument using the AquaLink RG software. e software uses a model loading
tool to add and remove product models from the Series 4TE DUO,
allowing the user to control and organize their product models. Up
to 100 models can be stored on the instrument. e AquaLink RG
software can also download data (including moisture content) from
the instrument, present the data in table form, lter the data, and
print reports.
Page 63

AquaLab
10. Duo Operation (Optional)
57
Measuring Moisture Content
With the product models loaded into the instrument, the Series
4TE DUO can generate moisture content and water activity simultaneously.
Selecting a Product for Analysis
• With the Series 4TE DUO turned on, toggle to the configura-
tion screen by pressing the menu button.
• At the configuration screen, scroll down and select moisture
content.
Page 64

AquaLab
10. Duo Operation (Optional)
58
• A list of available models will be listed by name.
• Select the model for the product to be analyzed. Selecting “None”
will not select any model.
Taking a Reading
• Readings are taken with the DUO the same as outlined in Chapter 9. First, return to the main screen.
• The product chosen for analysis will be shown in the tab at the top
of the screen. If a different product is desired to be analyzed, it is
possible to scroll through all of the available product models on
the screen by pressing the up and down buttons. This eliminates
Page 65

AquaLab
10. Duo Operation (Optional)
59
the need to return to the configuration screen to change products.
When the tab at the top shows “Measurement”, no model is selected and only water activity will be displayed on the screen.
• Place a sample in the chamber and begin testing by sliding the
lever left to the read position. For information about sample
preparation, please see Chapter 8 and for additional information
about running a test, please see Chapter 9.
• When the test is complete, the screen will display the water activ-
ity and moisture content for the product selected. If the wrong
model was selected by accident, the up and down buttons can be
used to toggle through all of the product models and the moisture content value will adjust based on the model selected.
Page 66

AquaLab
10. Duo Operation (Optional)
60
• The test can be saved to the instrument’s memory by pressing
the button under the save icon. An annotation can be added if
desired. If autosave has been selected, the data will already be
saved but without any annotation.
The results can be viewed by moving to the data screen (press the
right most button, which is below the document icon, to toggle
between tabs) as shown in Chapter 5 under the Data Tab section.
The only difference will be that moisture content data will now appear in the upper right column on the detailed information screen.
Moisture Content Adjustment
AquaLab Duo moisture analyzers calculate moisture content values based on water activity readings by utilizing models stored
within the instrument. Because moisture content results vary between reference methods, it is important to ensure that the model in the instrument correlates well with your reference method
moisture contents (i.e. Karl Fischer titration, oven loss on drying, etc.). Moisture content di erences among various methods
are usually linear and can be easily corrected with a linear o set. erefore, if moisture contents calculated with the AquaLab
Duo instrument are not agreeing with your reference method,
the problem can likely be addressed by adjusting a linear o set.
Page 67

AquaLab
10. Duo Operation (Optional)
61
When to Adjust for Linear O set
Reference methods can di er between labs, so it is a good idea
to check for a linear o set upon receipt of a new isotherm model
from Decagon. In addition, the linear o set should be adjusted if
moisture contents being calculated by the AquaLab Duo instrument are consistently higher or lower for a product than your reference method values over several samples.
How to Adjust for Linear O set or
Create a New Model Based O an Old Model
1. For the product whose model is to be o set, collect 3 subsamples for analysis.
2. Use 2 of the subsamples to run duplicate reference method
moisture contents and determine the average moisture content.
3. Once you’ve obtained a reference moisture content, navigate
to the calibration screen in the Con guration menu of the
AquaLab Duo Moisture Analyzer and select %Moisture from
the list of calibration types.
4. Select Edit to edit and replace an existing model. Select New if
you would like to create a new o set model with this calibra-
Page 68

AquaLab
10. Duo Operation (Optional)
62
tion instead of replacing the existing model. Pressing Enter
opens a model screen listing all models currently loaded on the
instrument.
5. Scroll down to nd the model for the product to be o set and
press Enter. If you selected New, choose a reference model to
use as a basis for your new model.
6. e screen will instruct you to place a sample of the product in
the testing chamber. Place the 3rd subsample from step 1 in a
sample cup, then put the sample cup in the testing chamber of
the AquaLab Duo instrument and close the lid.
7. Press Enter to begin a reading.
Page 69

AquaLab
10. Duo Operation (Optional)
63
8. Once the reading is complete, a screen will display the water
activity measured as well as the moisture content based on the
target model. Adjust the moisture content reading using the
up and down arrows until it matches the moisture content
value obtained from your reference method and click Save.
Note: If you chose to edit an existing model, pressing save updates the
model but keeps the same name. If you chose to create a new model,
pressing save will bring up an annotation screen where you will enter
the new name for the model. Pressing the cancel button will return you
to the Con guration menu and cancel the moisture content adjustment.
9. Re-measure the sample again in normal sampling mode. It
should now read the corrected moisture content value you
provided in the previous step.
If your moisture content readings are still inconsistent, contact
Decagon by email at support@decagon.com or by phone at 509332-2756 (800-755-2751 in US and Canada) for further instructions. If you purchased your AquaLab Instrument from one of our
international distributors, please contact them for local service and
support.
Page 70

AquaLab
10. Duo Operation (Optional)
64
Restore Original Moisture Content Model Settings
To restore the original model settings, do the following:
1. Navigate to the calibration screen in the Con guration menu of
the AquaLab Duo Moisture Analyzer and select %Moisture from
the list of calibration types.
Note: If you don’t see %Moisture as an option you may not have a Duo
model or you may not have any models installed.
2. Scroll down to Edit and press the Enter Button.
3. Select the model that you would like to reset to its original setting and press the Enter button.
Page 71
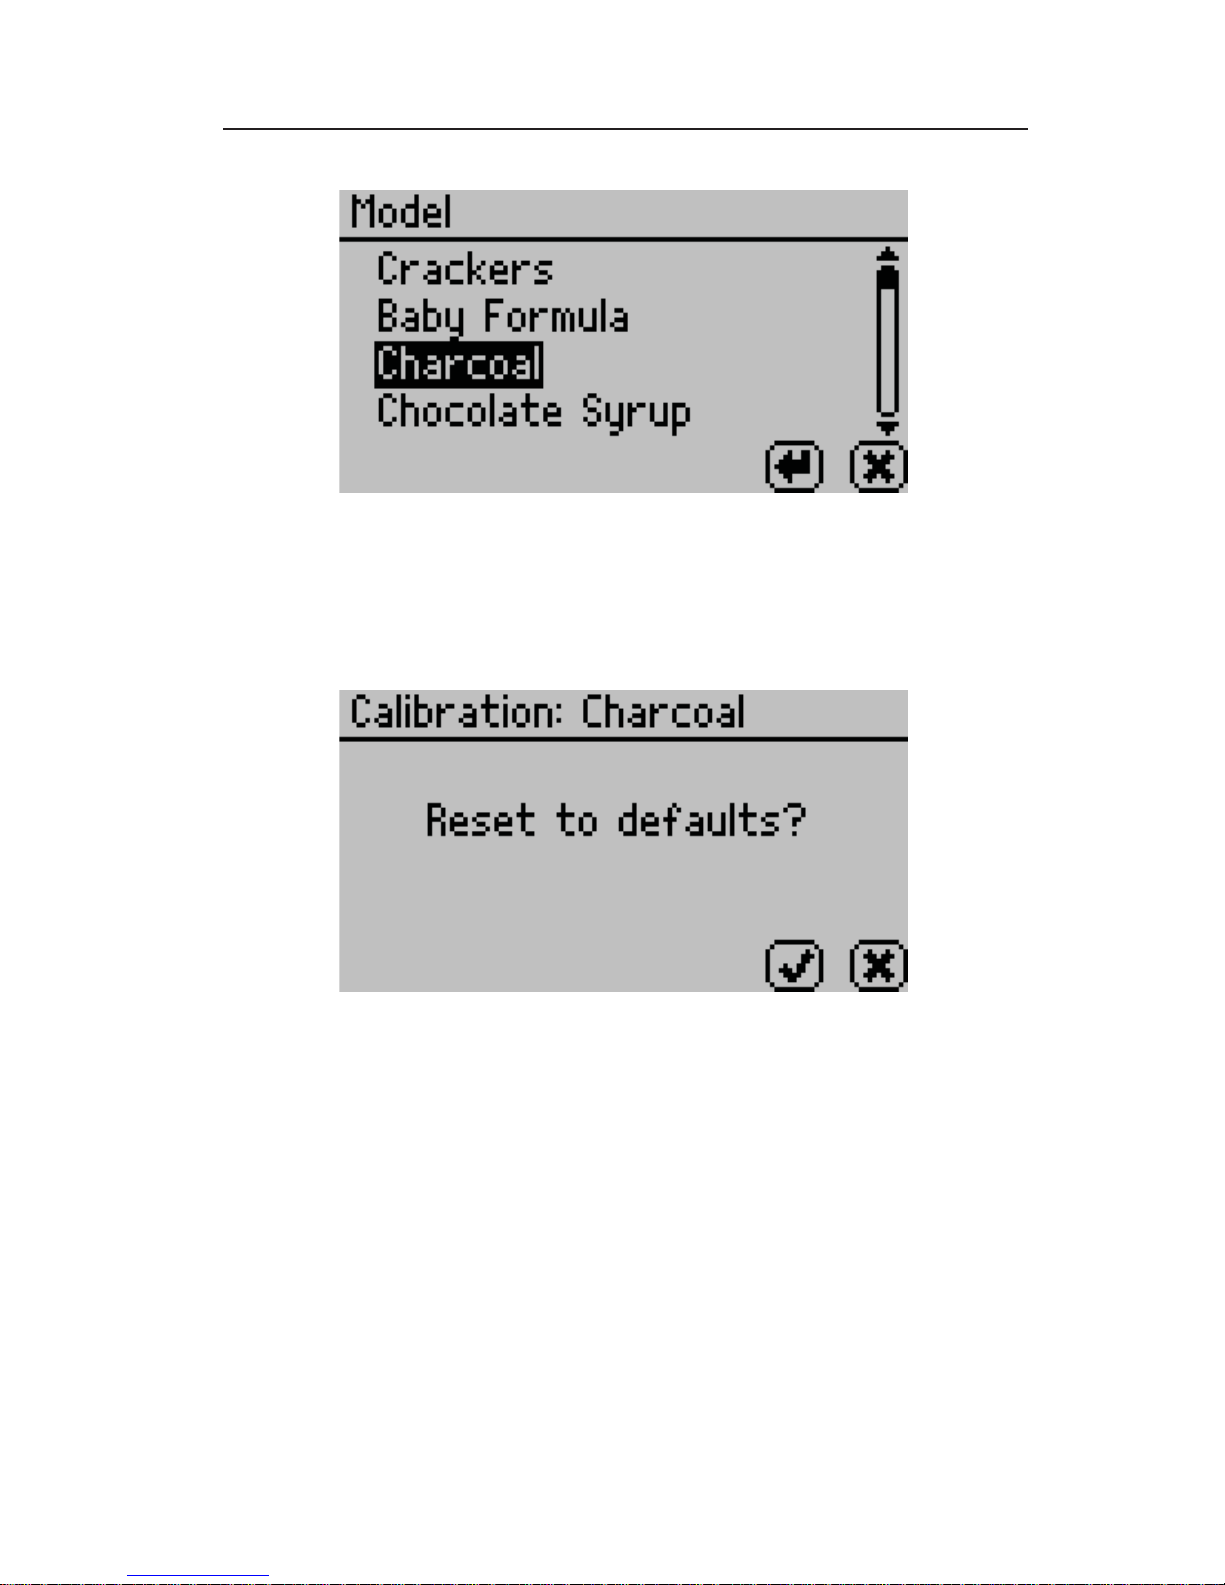
AquaLab
10. Duo Operation (Optional)
65
4. Scroll down to Defaults and press the Enter icon button to
restore to defaults. To cancel and return to the main menu,
press the Cancel icon button. After pushing the Enter icon
button, the following screen will appear:
5. To restore the original model settings, press the Check icon
button. To cancel and return to the main menu, press the
Cancel button. After pressing the Check icon button, the following screen will appear:
Page 72

AquaLab
10. Duo Operation (Optional)
66
6. To return to the main menu screen, press the Check icon button.
How to Delete Models
If you nd that a model is no longer needed, you have the option
of deleting the model directly from the instrument. If the model
is deleted, other users will no longer be able to use it. Also, if the
model hasn’t been backed up with AquaLink RG, you will not be
able to recover the model at a later time.
1. Navigate to the calibration screen in the Con g menu of the
AquaLab Moisture Analyzer and select %Moisture from the list
of calibration types.
Note: If you don’t see %Moisture as an option you may not have a Duo
model or you may not have any models installed.
Page 73

AquaLab
10. Duo Operation (Optional)
67
Scroll down to Delete and press the Enter Button.
2. Select the model you would like to delete and press the Enter
icon button to continue or the Cancel icon button to cancel.
3. Upon pressing Enter, the following screen should appear indicating the model to be deleted. Press the Check icon to delete
the model or press the Cancel icon to cancel the deletion.
Page 74

AquaLab
11. Computer Interface
68
11. Computer Interface
Your AquaLab was shipped to you with a standard RS-232 interface
cable. Using this, you can load data to a computer using Decagon’s
AquaLink RG program or your computer’s terminal program for
further analysis and storage.
AquaLink RG
An optional software program, AquaLink Report Generator (RG),
is available for use with your AquaLab. AquaLink RG is a Windows
based program designed for data collection and customized report
generation for all Series 4 AquaLab models. AquaLink RG logs
water activity, temperature, time of measurement, and date stamps
along with other information. AquaLink RG also has sample identi cation and comment elds that you can use to help annotate the
data your AquaLab is gathering.
A 30 day trial cd of this program is attached to the front cover of
this manual. If you are interested in purchasing the full version of
AquaLink RG, contact Decagon or your local distributor. If you
have purchased the AquaLab 4TE DUO you will automatically
receive the full version of AquaLink RG with your manual.
Using Windows Hyperterminal
To use Hyperterminal with your AquaLab, follow these steps:
• On your computer, press the Start button and select Programs
> Accessories > Hyperterminal and click on the Hyperterminal
icon.
Page 75

AquaLab
11. Computer Interface
69
• At the prompt, choose a name for this program (AquaLab is a
good one) and choose an arbitrary icon above to represent it. In
future downloads, you will be able to click on this icon in have it
already set up for you to download. Click the OK button.
• A pop-up menu labeled “Connect To” will appear. Click on the
scroll bar on the bottom of the screen labeled “Connect Using”
and select the COM Port your RS-232 cable is connected to.
• A pop-up menu labeled “ COM Properties” will appear, showing
the port settings for the COM port you selected. Make sure the
settings are the following: Bits per second, 9600; 8 databits, no
parity, 1 stop bit, and flow control set to “none”. Click OK.
• Plug your RS-232 cable to the COM port you selected and con-
nect it to your AquaLab. Begin sampling. AquaLab’s data will be
displayed on screen as it samples.
• When you are finished sampling, you can print the data in the
terminal session, or cut and paste it to a spreadsheet or text
editor. To save the data, go into the Transfers menu and select
“Capture text,” and designate where it should be saved.
Page 76

AquaLab
12. Troubleshooting
70
12. Troubleshooting
AquaLab is a high performance, low maintenance instrument, designed to have few problems if used with care. Unfortunately, sometimes even the best operators using the best instruments encounter
technical di culties. Below is quick reference guide that will direct
you to detailed solutions of some problems that may occur. If these
remedies still don’t resolve your problem, then please contact Decagon for help (see Customer Support in Chapter 1). Here is a list of
some problems that may occur.
NOTE: If you purchased your Decagon instrument from one of our international distributors, please contact them for local service and support.
Troubleshooting Quick Guide
If this problem occurs: Refer to:
AquaLab won’t turn on ................................................ Problem #1
Readings are slow or inconsistent ................................ Problem #2
Water activity readings on solutions are ....................... Problem #3
too high/low to adjust
Screen displays “Sample too hot” ............................... Problem #4
Screen displays “aw < 0.0” ........................................... Problem #5
Dew point sensor failure ............................................. Problem #6
Veri cation is not correct............................................. Problem #7
Page 77

AquaLab
12. Troubleshooting
71
Troubleshooting Quick Guide (Continued)
If this problem occurs: Refer to:
Screen displays “Crystal failure”................................... Problem #8
Screen displays “Contaminated Mirror” ...................... Problem #9
Screen displays “Firmware is corrupted” .................... Problem #10
Screen displays “Readings are disabled” ..................... Problem #11
How do I activate my Demo? .................................... Problem #12
DUO Model--Test was run with wrong model. ......... Problem #13
DUO Model--%MC displayed is not correct. ........... Problem #14
DUO Model--%MC is not shown on screen ............. Problem #15
DUO Model--Moisture Content is not correct. ........ Problem #16
1. PROBLEM:
AquaLab won’t turn on.
SOLUTIONS:
1) Check to make sure your power cord is securely attached to
the back of the instrument and it is plugged into the power
outlet.
2) A power surge may have caused a fuse to blow. To change the
fuses, follow these instructions:
a. Unplug the power cord.
Page 78

AquaLab
12. Troubleshooting
72
b. Locate the panel where the power cord plugs in. e fuse box
is on the right side of that panel. Press in on the release tab
and pull the fuse-holder out. Pull the broken fuse(s) out and
replace with a 1.25 Amp 250V fuse.
Caution: Do not use any other kind of fuse or you will risk damage to your instrument as well as void your warranty.
c. Replace the fuse-holder and push it into the fuse-well until
the release tab snaps in place.
d. Re-connect the power cord and turn your instrument on. If
the fuse blows again, a failed component may be causing the
problem. Contact Decagon to make arrangements for repairs.
2. PROBLEM:
Readings are slow or inconsistent.
SOLUTIONS:
1) e sample chamber may be dirty. Refer to Chapter 6 for directions on cleaning the sample chamber.
2) e temperature di erence between the sample and the block
chamber may be too great. e sample will need to equilibrate to instrument temperature before a fast, accurate reading can be made. (Refer to Chapter 8, Samples Not at Room
Temperature.)
3) Some products absorb or desorb moisture very slowly, causing measurements to take longer than usual, and nothing can
Page 79

AquaLab
12. Troubleshooting
73
be done to speed up the process. Refer to Chapter 8 for further explanation.
4) Your sample may contain volatiles. Volatiles are known to
cause unstable readings, because they condense on the surface of the chilled mirror and alter readings. Please refer to
the volatiles section in Chapter 8 for hints on reducing di culties with measuring samples with propylene glycol. If you
have further questions regarding the measurement of volatiles contact Decagon.
5) A fan blade in the block chamber may be broken or bent. If
even salt standards take a long time to read, and the sample
chamber is clean, you may have a broken chamber fan blade.
is is especially likely if you have just cleaned the chamber.
If you suspect this may have happened, contact Decagon for
details on replacement.
3. PROBLEM:
Water activity readings on veri cation standards are too high/low
and a linear o set adjustment cannot be made any higher/lower.
SOLUTIONS:
1) e thermopile in your chamber, which measures sample
temperature, may have become contaminated. Refer to Chapter 6 for directions on cleaning.
2) e chamber mirror may be dirty. Refer to Chapter 6 for directions on cleaning.
4. PROBLEM:
Message on screen displays the following:
Page 80

AquaLab
12. Troubleshooting
74
SOLUTION:
Your sample’s temperature is too high for the instrument to equilibrate with it in a reasonable amount of time. e instrument and
sample need to be in temperature equilibrium before accurate
measurements can be made. erefore, very cold samples will take
a very long time to measure for the same reason. To avoid this
problem, make sure to only measure samples that are at the same
temperature as the instrument.
5. PROBLEM:
Message on screen displays the following (example):
Page 81

AquaLab
12. Troubleshooting
75
SOLUTIONS:
1) e sample is too dry for the instrument to read accurately.
If your sample has a water activity that is less than below the
detection limits of the instrument, this message will come up.
Essentially, it means that there is not enough sample moisture to condense on the mirror and provide a reading.
2) e mirror may be dirty. Try cleaning the mirror and chamber and measuring the sample again.
6. PROBLEM:
Message on screen displaying dew point sensor failure.
SOLUTION:
e Cooler is damaged and will need to be serviced by Decagon.
See Chapter 12 for detailed instructions.
Page 82

AquaLab
12. Troubleshooting
76
7. PROBLEM
Veri cation is not correct.
SOLUTIONS:
1) e sample chamber and mirror need to be cleaned. See
Chapter 6 for detailed cleaning instructions. If veri cation is
still not correct, then linear o set has occurred.
2) Verify and Adjust for Linear O set. After you have cleaned
the sample chamber and mirror (Chpt. 7) you will need to
use a Veri cation Standard to verify and adjust for Linear
O set as described in Chapter 7.
8. PROBLEM:
Message on screen displays the following:
SOLUTION:
e crystal that runs the rmware is having trouble starting. Occasionally, cycling the power will solve the problem. If this message continues to appear, the instrument will need to be serviced by Decagon. See Chapter 13 for detailed instructions.
Page 83

AquaLab
12. Troubleshooting
77
9. PROBLEM:
Message on screen displays the following:
SOLUTION:
e mirror used for dewpoint measurements requires cleaning. Follow the instructions outlined in Chapter 6: Cleaning and Maintenance before trying to run your sample again. If this message
continues to appear, contact Decagon for further options.
10. PROBLEM:
Message on screen displays the following:
Page 84

AquaLab
12. Troubleshooting
78
SOLUTION:
e rmware on the instrument is corrupted and needs to be reloaded. To download new rmware to the Series 4 models, the instrument must be serviced by Decagon.
11. PROBLEM:
Message on screen displays the following:
SOLUTION:
e trial period for your Demo Unit has expired. Contact Decagon
Devices for additional options.
12. PROBLEM:
Message on screen displays the following:
Page 85

AquaLab
12. Troubleshooting
79
SOLUTION:
In order to begin your trial period for your AquaLab Series 4 instrument, you will need to contact Decagon Devices for instructions on
how to activate your demo.
13. DUO PROBLEM:
Test was run with wrong model.
SOLUTION:
1) On the measurement screen, toggle to the correct model using the up and down arrow keys. e moisture content value
will be updated to correspond with the model selected.
2) If the correct model is not available, the model may not be
loaded on the instrument.
a. To determine which models are loaded on the instrument,
cycle to the menu tab, select Moisture Content and then the
loaded models will appear.
3) If the correct model is not available, load the appropriate
model using Aqualink RG Software. e AquaLab DUO can
hold a total of 100 models at any one time. You may need to
remove a model using the RG Software or use the delete option in the % moisture calibration menu before you can add
a new one. Any model that is removed from the instrument
with AquaLink RG will be stored and may be reloaded again
later.
Page 86

AquaLab
12. Troubleshooting
80
14. DUO PROBLEM:
Moisture Content displayed is not correct.
SOLUTION:
1) Model selected may not be correct for the product being tested.
a. Toggle through the available models to nd a more appropri-
ate model.
b. If the model is correct but not giving correct moisture con-
tent values it may be necessary to generate a new model for
the product or update an existing model. For information
about generating a model, contact Decagon Devices for updating a model, refer to Chapter 10: Duo Operation.
15. DUO PROBLEM:
Moisture content does not show up on the screen.
SOLUTION:
Moisture content has not been activated.
1) Toggle to menu tab, select moisture content, and select the
appropriate model.
a. If no models appear in moisture content screen, models will
need to be reloaded using AquaLink RG software.
b. If moisture content is not an active selection, the DUO fea-
ture may not be active. Content Decagon Devices to learn
how to activate the DUO feature.
Page 87

AquaLab
12. Troubleshooting
81
16. DUO PROBLEM:
Message on the screen displays the following:
SOLUTION:
1) When a moisture content reading is not shown, the water activity or temperature for that reading is beyond the scope of
the moisture sorption isotherm. is can happen under the
following conditions:
a. e isotherm equation calculates a moisture content that
is less than 0% or greater than 100% with the given water
activity.
b. e control temperature is signi cantly di erent than the
isotherm temperature.
Make sure that the sample’s water activity and the instrument’s
controlling temperature are within the scope of the selected moisture sorption isotherm model.
Page 88

AquaLab
12. Troubleshooting
82
Diagnostic Screen
If, after cleaning your instrument and reading the other troubleshooting hints, you have reason to believe that one of the components of your AquaLab may be causing measurement error, you
may access a screen that will display values for component performance. is is done by navigating to the Con guration tab and
then by scrolling down to the diagnostics option. Press enter and
you will be given a list of components and their values.
is screen shows typical values for the dew point method. Lid,
base and sample temperatures may uctuate but should not change
more than 0.03 degrees. Typical ranges for the lid, base and sample
temperatures is between 24.5 and 25.5 degrees.
If the mirror temperature is at lid temperature, the cooler has failed
and must be replaced. If the mirror is below the lid temperature or
appears to be random, the thermocouple wire is broken and must
be repaired.
A typical optical range is between 500 mV and 2900 mV .
For capacitance mode, not shown here, the RH percentage should
always be between 0 and 100%.
Page 89

AquaLab
13. Support and Repair
83
13. Support and Repair
NOTE: If you purchased your AquaLab from one of our international
distributors, please contact them. ey will be able to provide you with
local support and service.
When encountering problems with your AquaLab (that can’t be resolved with the help of this manual), please contact Decagon Customer Support at support@decagon.com, 800-755-2751 (US and
Canada), 509-332-2756 (International) or fax us at (509) 332-5158.
Please have the serial number and model of the instrument ready.
All AquaLabs returning to Decagon for servicing must be accompanied with a Return Material Authorization (RMA) form. Prior to
shipping the instrument, please contact a Decagon customer support representative to obtain an RMA.
Shipping Directions:
e following steps will help to ensure the safe shipping and processing of your AquaLab.
1) Ship your AquaLab in its original cardboard box with suspension packaging. If this is not possible, use a box that has
at least 4 inches of space between your instrument and each
wall of the box.
2) Place the AquaLab in a plastic bag to avoid dis guring marks
from the packaging.
3) Don’t ship the power cord or serial cable.
4) If the original packaging is not available, pack the box moderately tight with packing material (e.g. styrofoam peanuts or
Page 90

AquaLab
13. Support and Repair
84
bubble wrap), ensuring the instrument is suspended in the packing material.
5) On the RMA form, please verify the ship to and bill to information, contact name, and problem description. If anything
is incorrect please contact a Decagon representative.
6) Tape the box in both directions for added support.
7) Include the RMA number in the attention line on the shipping label.
Ship to:
Decagon Devices Inc.
ATTN: RMA (insert your RMA #)
2365 NE Hopkins Court
Pullman, WA 99163
Repair Costs
Manufacturer’s defects and instruments within the three-year warranty will be repaired at no charge. Non-warranty repair charges for parts,
labor and shipping will be billed to you. An extra fee may be charged for
rush work. Decagon will provide an estimated repair cost, if requested.
Loaner Service
Decagon has loaner instruments to keep you measuring water
activity while your instrument is being serviced. If your AquaLab is still under calibration warranty or you have a service plan
with your instrument, there is no charge for the loaner service.
Page 91

AquaLab
14. Further Reading
85
14. Further Reading
Water Activity eory & Measurement
Bousquet-Ricard, M., G. Qualyle, T. Pharm, and J. C. Cheftel.
1980. Comparative study of three methods of determining water
activity in intermediate moisture foods. Lebensm Wiss Technol
13:169-173.
Cazier, J.B., and V. Gekas. 2001. Water activity and its prediction: a
review. International Journal of Food properties 4(1):35-43.
Chirife, J., G. Favetto, C. Ferro-Fontán, and S.L.Resnik. 1983. e
water activity of standard saturated salt solutions in the range of
intermediate moisture foods. Lebensm Wiss Technol 16:36-38.
Duckworth, R. 1975. Water relations of foods. Academic Press,
New York.
Gómez, R., and J. Fernandez-Salguero. 1992. Water activity and
chemical composition of some food emulsions. Food Chem 45:91-93.
Greenspan, L. 1977. Humidity xed points of binary saturated
aqueous solutions. J Res Nat Bur Stand - A Phys Chem 81A:89-96.
Karmas, E. 1981. Measurement of moisture content. Cereal Foods
World 26:332-334.
Kitic, D., D.C. Pereira-Jardim, G.J. Favetto, S.L. Resnik, and J.
Chirife. 1986. eoretical prediction of the water activity of standard saturated salt solutions at various temperatures. Journal of Food
Science 51:1037-1042.
Page 92

AquaLab
14. Further Reading
86
abuza, T.P., and R. Contreras-Medellin. 1981. Prediction of moisture
protection requirements for foods. Cereal Foods World 26:335-343.
Labuza, T.P., K. Acott, S.R.Tatini, R.Y. Lee, J. Flink, and W. McCall. 1976. Water activity determination: A collaborative study of
di erent methods. Journal of Food Science 41:910-917.
Marcolli, C., and . Peter. 2005. Water activity in polyol/water
systems: new UNIFAC parameterization. Atmospheric Chemistry
and Physics 5:1545-1555.
Ninni, L., M.S. Camargo, and A.J.A. Meirelles. 2000. Water activity in
polyol systems. Journal of Chemical and Engineering Data 45:654-660.
Prior, B.A. 1979. Measurement of water activity in foods: A review.
Journal of Food Protection 42:668-674.
Rahman, M.S. and S.S. Sablani. 2001. Measurement of water activity by electronic sensors. P. A2.5.1-A2.5.4 In R.E.Wrolstad (ed.)
Current Protocols In Food Analytical Chemistry. John Wiley &
Sons, Inc., New York.
Rahman, M.S., S.S. Sablani, N. Guizani, T.P. Labuza, and P.P. Lewicki. 2001. Direct manometic determination of vapor pressure. P.
A2.4.1-A2.4.6. In R.E. Wrolstad (ed.) Current Protocols In Food
Analytical Chemistry. John Wiley & Sons, Inc., New York.
Reid, D.S., A.J. Fontana, M.S. Rahman, S.S. Sablani, T.P. Labuza,
N. Guizani, and P.P. Lewicki. 2001. Vapor pressure measurements
of water p. A2.1.1-A2.5.4. In R.E. Wrolstad (ed.) Current Protocols
In Food Analytical Chemistry. John Wiley & Sons, Inc., New York.
Page 93

AquaLab
14. Further Reading
87
Reid, D.S. 1976. Water activity concepts in intermediate moisture
foods. p. 54-65. In R.Davies, G.G.Birch, and K.J.Parker (ed.) Intermediate Moisture Foods. Applied Science Publishers, London.
Richard, J., and T.P. Labuza. 1990. Rapid determination of the water activity of some reference solutions, culture media and cheese
using a dew point method. Sci. des Aliments 10:57-64.
Roa,V., and M.S.Tapia de Daza. 1991. Evaluation of water activity measurements with a dew point electronic humidity meter. Lebensm Wiss Technol 24:208-213.
Rodel, W. 2001. Water activity and its measurement in food. P. 453-
483. In E. Kress-Rogers, and C.B. Brimelow (ed.) Instrumentation
and sensors for the food industry. CRC Press LLC, Boca Raton, FL.
Roos, K.D. 1975. Estimation of water activity in intermediate moisture foods. Food Tech 29:26-30.
Scott, V.N., and D.T. Bernard. 1983. In uence of temperature on
the measurement of water activity of food and salt systems. Journal
of Food Science 48:552-554.
Snavely, M.J., J.C. Price, and H.W. Jun. 1990. A comparison of
three equilibrium relative humidity measuring devices. Drug Dev.
Ind. Pharm. 16:1399-1409.
Stamp, J.A., S. Linscott, C. Lomauro, and T.P. Labuza. 1984. Measurement of water activity of salt solutions and foods by several electronic methods as compared to direct vapor pressure measurement.
Journal of Food Science 49:1139-1142.
Page 94

AquaLab
14. Further Reading
88
Stolo , L. 1978. Calibration of water activity measuring instruments and devices: Collaborative study. Journal of the Association
of O cial Analytical Chemists 61:1166-1178.
Troller, J.A. 1983. Methods to measure water activity. Journal of
Food Protection 46:129-134.
Troller, J.A., and J.H.B Christian. 1978. Water activity and food.
Academic Press, New York.
Troller, J.A., and V.N. Scott. 1992. Measurement of water activity
(Aw) and acidity. p. 135-151. In C. Vanderzant, and D.F. Splittstoesser
(ed.) Compendium of Methods for the Microbiological Examination
of Foods. American Public Health Association, Washington, D.C.
van den Berg, C. 1986. Water activity. p. 11-36. In D. MacCarthy
(ed.) Concentration and drying of foods. Elsevier Applied Science
Publishers, London.
van den Berg, C. 1991. Food-water relations: Progress and integration, comments and thoughts. In H. Levine, and L. Slade (ed.) Water Relationships in Foods. Plenum Press, New York.
van den Berg, C., and S. Bruin. 1981. Water activity and its estimation in food systems: eoretical aspects. p. 1-61. In L.B. Rockland,
and G.F. Stewart (ed.) Water Activity: In uences on Food Quality.
Academic Press, New York.
Vega-Mercado, H., andG.V. Barbosa-Canovas. 1994. Prediction of
water activity in food systems: A review on theoretical models. Revista Espanola De Ciencia Y Tecnologia De Alimentos 34:368-388.
Page 95

AquaLab
14. Further Reading
89
Vega-Mercado, H., B. Romanach, and G.V. Barbosa-Canovas.
1994. Prediction of water activity in food systems: A computer program for predicting water activity in multicomponent foods. Revista
Espanola De Ciencia Y Tecnologia De Alimentos 34:427-440.
Vos, P.T., andT.P. Labuza. 1974. Technique for measurements of water activity in the high aw range. J. Agric. Food Chem. 22:326-327.
Voysey, P. 1993. An evaluation of the AquaLab CX-2 system for
measuring water activity. F. M. B. R. A. Digest No. 124 24-25.
Food Safety and Microbiology
Bei, Z.H., and R.-M.J. Nout. 2000. E ects of temperature, water activity and gas atmosphere on mycelial growth of tempe fungi
Rhizopus microsporus var. microcporus and R. microsporus var.
oligosporus. World Journal of Microbiology and Biotechnology
16:853-858.
Beuchat, L.R. 1981. Microbial stability as a ected by water activity.
Cereal Foods World 26:345-349.
Brandt, L. 1996. Bound for success. Controlling water activity gives
technologists the edge in developing safe, shelf-stable foods. Food
Formulating 2:41-48.
Chirife, J., andM.P. Buera. 1994. Water activity, glass transition and
microbial stability in concentrated/semimoist food systems. Journal
of Food Science 59:921-927.
Chirife, J., andM.P. Buera. 1995. A critical review of some nonequilibrium situations and glass transitions on water activity values
Page 96

AquaLab
14. Further Reading
90
of foods in the microbiological growth range. Journal of Food Engineering 25:531-552.
Chirife, J., andM.P. Buera. 1996. Water activity, water glass dynamics, and the control of microbiological growth in foods. Critical Rev.
in Food Sci. Nutr. 36:465-513.
Farberm, J.M., F. Coates, and E. Daley. 1992. Minimum water activity requirements for the growth of Listeria monocytogenes. Lett
Appl Microbiol 15:103-105.
Franks, F. 1991. Water activity: a credible measure of food safety and
quality? Trends Food Sci Technol March:68-72.
Garcia de Fernando, G.D., O. Diaz, M. Fernandez, and J.A. Ordonez. 1992. Changes in water activity of selected solid culture media throughout incubation. Food Microbiology 9:77-82.
Gibson, A.M., J. Baranyi, J.I. Pitt, M.J. Eyles, and T.A. Roberts. 1994. Predicting fungal growth: e e ect of water activity on Aspergillus avus and
related species. International Journal of Food Microbiology 23:419-431.
Goaleni, N., J.E. Smith, J. Lacey, and G. Gettinby. 1997. E ects of
temperature, water activity, and incubation time on production of
a atoxins and cyclopiazonic acid by an isolate of Aspergillus avus
in surface agar culture. Appl Environ Microbiol 63:1048-1053.
Hardman, T.M. 1988. Water and food quality. Elseiver Press, London.
Hocking, A.D., and B.F. Miscamble. 1995. Water relations of some
Zygomycetes isolated from food. Mycological Research 99:1113-1118.
Page 97

AquaLab
14. Further Reading
91
Hocking, A.D., B.F. Miscamble, and J.I. Pitt. 1994. Water relations
of Alternaria alternata, Cladosporium cladosporioides, Cladosporium sphaerospermum, Curvulario lunata and Curvulario pallescens.
Mycological Research 98:91-94.
Houtsma, P.C., A. Heuvelink, J. Dufrenne, and S. Notermans. 1994.
E ect of sodium lactate on toxin production, spore germination and
heat resistance of proteolytic Clostridium botulinum strains. Journal
of Food Protection 57:327-330.
Kress-Rogers, E. 1993. Food quality measurement. Food Industry
News September:23-26.
Kuntz, L.A. 1992. Keeping microorganisms in control. Food Product Design August:44-51.
Levine, H., and L. Slade. 1991. Water Relationships in Foods. Plenum
Press, New York.
Li, K.Y., and J.A. Torres. 1993. Water activity relationships for selected mesophiles and psychrotrophs at refrigeration temperature.
Journal of Food Protection 56:612-615.
Lopez-Malo, A., S. Guerrero, and S.M. Alzamora. 2000. Probabilistic modeling of Saccharomyces cerevisiae inhibition under the effects of water activity, pH, and potassium sorbate concentration.
Journal of Food Protection 63:91-95.
Mannheim,C.H., J.X. Liu, and S.G. Gilbert. 1994. Control of water
in foods during storage. Journal of Food Engineering 22:509-532.
Marauska, M., A. Vigants, A. Klincare, D. Upite, E. Kaminska, and
Page 98

AquaLab
14. Further Reading
92
M. Bekers. 1996. In uence of water activity and medium osmolality on the growth and acid production of Lactobacillus casei var.
alactosus. Proceedings of the Latvian Academy of Sciences Section B
Natural Exact and Applied Sciences 50:144-146.
Masana, M.O., and J. Baranyi. 2000. Growth/no growth interface
of Brochothrix thermosphacta as a function of pH and water activity. Food Microbiology 17:485-858.
Mattick, K. L., F. Jorgensen, J.D. Legan, M.B. Cole, J. Porter, H.M.
Lappin-Scott, and T.J. Humphrey. 2000. Survival and lamentation of Salmonella enterica serovar Enteritidis PT4 and Salmonella
enterica serovar Typhimurium DT104 at low water activity. Appl
Environ Microbiol 66:1274-1279.
Mattick, K.L., F. Jorgensen, J.D. Legan, H.M. Lappin-Scott, and
T.J. Humphrey. 2000. Habituation of Salmonella spp. at reduced
water activity and its e ect on heat tolerance. Appl Environ Microbiol 66:4921-4925.
Mattick, K.L., F. Jorgensen, J.D. Legan, H.M. Lappin-Scott, and
T.J. Humphrey. 2001. Improving recovery of Salmonella enterica
Serovar Typhimurium DT104 cells injured by heating at di erent
water activity values. Journal of Food Protection 64:1472-1476.
McMeekin, T.A., and T. Ross. 1996. Shelf life prediction: Status and future possibilities. International Journal of Food Microbiology 33:65-83.
Miller, A.J. 1992. Combined water activity and solute e ects on
growth and survival of Listeria monocytogenes. Journal of Food
Protection 55:414-418.
Page 99

AquaLab
14. Further Reading
93
Nakajo, M., and Y. Moriyama. 1993. E ect of pH and water activity on heat resistance of spores of Bacillus coagulans. Journal of the
Japanese Society for Food Science and Technology 40:268-271.
Nelson, K.A., and T.P. Labuza. 1994. Water activity and food polymer science: Implications of state on arrhenius and WLF models in
predicting shelf life. Journal of Food Engineering 22:271-289.
Nesci, A., M. Rodrigues, and M. Etcheverry. 2003. Control of Aspergillus growth and a atoxin production using antioxidants at different conditions of water activity and pH. Journal of Applied Microbiology 95:279-287.
Nolan, D.A., D.C .Chamblin, and J.A. Troller. 1992. Minimal water activity levels for growth and survival of Listeria monocytogenes
and Listeria innocua. International Journal of Food Microbiology
16:323-335.
Noorlidah, A., A. Nawawi, and I. Othman. 2000. Fungal spoilage
of starch-based foods in relation to its water activity (aw). Journal of
Stored Products Research 36:47-54.
Park,C.M., and L.R.Beuchat. 2000. Survival of Escherichia coli
O157:H7 in potato starch as a ected by water activity, pH and temperature. Lett Appl Microbiol 31(5):364-367.
Petersson, S., and J. Schnuerer. 1995. Biocontrol of mold growth
in high-moisture wheat stored under airtight conditions by Pichia
anomala, Pichia guilliermondii, and Saccharomyces cerevisiae. Appl
Environ Microbiol 61:1027-1032.
Page 100

AquaLab
14. Further Reading
94
Pitt, J.I., and B.F. Miscamble. 1995. Water relations of Aspergillus
avus and closely related species. Journal of Food Protection 58:86-90.
Plaza, P., J. Usall, N. Teixido, and I. Vinas. 2003 E ect of water
activity and temperature on germination and growth of Penicillium
digitatum, P. italicum and Geoteichum candidum. Journal of Applied Microbiology 94:549-554.
Quintavalla, S., and G. Parolari. 1993. E ects of temperature, water
activity and pH on the growth of Bacillus cells and spore: A response
surface methodology study. International Journal of Food Microbiology 19:207-216.
Rockland, L.B., and G.F. Stewart. 1981. Water activity: In uences
on food quality. Academic Press, New York.
Rockland, L.B., and S.K. Nishi. 1980. In uence of water activity on
food product quality and stability. Food Tech 34:42-59.
Saad, R.R. 1992. E ect of water activity on growth and lipids of
xerophilic fungi, Aspergillus repens and Aspergillus amstelodami.
Zentralblatt Fuer Mikrobiologie 147:61-64.
Salter, M.A., D.A. Ratkowsky, T. Ross, and T.A. McMeekin. 2000.
Modelling the combined temperature and salt (NaCl) limits for
growth of a pathogenic Escherichia coli strain using nonlinear logistic
regression. International Journal of Food Microbiology 61:159-167.
Santos,J., T.M.Lopez-Diaz, M.C.Garcia-Lopez, M.C.Garcia-Fernandez, and A.Otero. 1994. Minimum water activity for the growth
of Aeromonas hydrophila as a ected by strain, temperature and humectant. Lett Appl Microbiol 19:76-78.
 Loading...