

Page 1
AccuPAR PAR/LAI
Ceptometer
Mo del LP-80
Operator’s Manual
Decagon Devices, Inc.
Version: December 13, 2013 — 08:29:36
Page 2

AccuPAR LP-80
Decagon Devices, Inc.
2365 NE Hopkins Court
Pullman WA 99163
Phone: 509-332-5600
Fax: 509-332-5158
Website: www.decagon.com
Email: support@decagon.com or sales@decagon.com
Trademarks
AccuPAR and Ceptometer are registered trademarks of
Decagon Devices, Inc.c2006-2013
ii
Page 3

AccuPAR LP-80 CONTENTS
Contents
1 Introduction 1
1.1 Customer Support . . . . . . . . . . . . . . . . . . . . 1
1.2 About This Manual . . . . . . . . . . . . . . . . . . . 1
1.3 Warranty . . . . . . . . . . . . . . . . . . . . . . . . . 2
1.4 Seller’s Liability . . . . . . . . . . . . . . . . . . . . . . 2
2 About the LP-80 3
2.1 AccuPAR LP-80 Instrument Specifications . . . . . . . 3
2.2 Overview of the LP-80 . . . . . . . . . . . . . . . . . . 4
2.3 Components of the LP-80 System . . . . . . . . . . . . 4
2.4 Turning on the instrument . . . . . . . . . . . . . . . . 6
3 Definitions 8
4 PAR/LAI Menu 12
4.1 Taking Measurements . . . . . . . . . . . . . . . . . . 12
4.2 Saving and Annotating Readings . . . . . . . . . . . . 14
5 Log Menu 15
6 Data Menu 17
6.1 View . . . . . . . . . . . . . . . . . . . . . . . . . . . . 17
6.2 Download . . . . . . . . . . . . . . . . . . . . . . . . . 18
6.3 Description of Outputs . . . . . . . . . . . . . . . . . . 20
6.4 Erase . . . . . . . . . . . . . . . . . . . . . . . . . . . . 22
7 LP-80 Utility Software 23
7.1 Downloading Data . . . . . . . . . . . . . . . . . . . . 23
7.1.1 Data File Formats . . . . . . . . . . . . . . . . 23
7.1.2 Data Organization . . . . . . . . . . . . . . . . 24
7.2 Erasing Data . . . . . . . . . . . . . . . . . . . . . . . 25
7.3 Setting the Date and Time . . . . . . . . . . . . . . . 26
7.4 Viewing LP-80 Information . . . . . . . . . . . . . . . 26
7.5 The Preferences Menu . . . . . . . . . . . . . . . . . . 27
7.5.1 Data File Tab . . . . . . . . . . . . . . . . . . . 27
7.6 Communications Tab . . . . . . . . . . . . . . . . . . . 28
7.7 Application Tab . . . . . . . . . . . . . . . . . . . . . 28
7.8 Software and Firmware Updates . . . . . . . . . . . . 29
iii
Page 4

CONTENTS AccuPAR LP-80
8 Config Menu 30
8.1 Calibration . . . . . . . . . . . . . . . . . . . . . . . . 31
8.1.1 Location . . . . . . . . . . . . . . . . . . . . . . 32
8.1.2 Date and Time . . . . . . . . . . . . . . . . . . 33
9 PAR and LAI Theory 37
9.1 PAR (Photosynthetically Active Radiation) . . . . . . 37
9.2 Average and Intercepted PAR . . . . . . . . . . . . . . 37
9.3 Using PAR to determine Leaf Area Index . . . . . . . 40
9.4 Applications and Examples . . . . . . . . . . . . . . . 42
9.5 Extinction Coefficient and Canopy Structure . . . . . 42
9.5.1 Correction of PAR for Sun Angle . . . . . . . . 45
9.6 LAI measurements & Non-Random Distribution . . . 47
9.7 Zenith Angle and Equation of Time . . . . . . . . . . 49
10 Measurement Tips 53
10.1 Above Canopy (External) Sensor . . . . . . . . . . . . 53
10.2 Sample Size . . . . . . . . . . . . . . . . . . . . . . . . 53
10.3 Clumping in Canopies . . . . . . . . . . . . . . . . . . 54
10.4 LAI Sampling in Row Crops . . . . . . . . . . . . . . . 54
11 Care and Maintenance 56
11.1 Batteries . . . . . . . . . . . . . . . . . . . . . . . . . . 56
11.2 Cleaning the Probe and Controller . . . . . . . . . . . 56
11.3 Recalibration . . . . . . . . . . . . . . . . . . . . . . . 57
11.4 General Precautions . . . . . . . . . . . . . . . . . . . 57
12 Troubleshooting 58
13 Support and Repair 67
13.1 Repair Costs . . . . . . . . . . . . . . . . . . . . . . . 68
14 Further Readings 69
15 Declaration of Conformity 74
16 Appendix A 75
16.1 External Sensor Information . . . . . . . . . . . . . . . 75
16.2 Spectral Response . . . . . . . . . . . . . . . . . . . . 75
iv
Page 5

AccuPAR LP-80 1 INTRODUCTION
1 Introduction
Welcome to Decagon’s AccuPAR model LP-80 PAR/LAI Ceptometer. The AccuPAR measures Photosynthetically Active Radiation
(PAR) and can invert these readings to give Leaf Area Index (LAI)
for your plant canopy. This manual is designed to help you accomplish your research goals, and understand how to get the most out
of your AccuPAR.
1.1 Customer Support
If you ever need assistance with your AccuPAR or have any questions
or feedback, there are several ways to contact us. Decagon has Customer Service Representatives available to speak with you Monday
through Friday, between 7am and 5pm Pacific time.
Note: If you purchased your AccuPAR LP-80 through a distributor, please contact them for assistance.
Email:
support@decagon.com or sales@decagon.com
Phone:
509-332-5600
Fax:
509-332-5158
If contacting us by email or fax, please include as part of your message
your instrument serial number, your name, address, phone number,
fax number, and a description of your problem or question.
1.2 About This Manual
This manual includes instructions for setting up your AccuPAR LP80, verifying the calibration of the instrument, preparing samples,
and maintaining and caring for your instrument. Please read these
1
Page 6

1 INTRODUCTION AccuPAR LP-80
instructions before operating the LP-80 to ensure that the instrument
performs to its full potential.
1.3 Warranty
The AccuPAR has a one year warranty on parts and labor. Your
warranty is automatically validated upon receipt of the instrument.
1.4 Seller’s Liability
Seller warrants new equipment of its own manufacture against defective workmanship and materials for a period of three years from the
date of receipt of equipment.
Note: We do not consider the results of ordinary wear and tear,
neglect, misuse, accident and excessive deterioration due to corrosion from any cause as defects.
The Seller’s liability for defective parts shall in no event exceed the
furnishing of replacement parts Freight On Board the factory where
originally manufactured. Material and equipment covered hereby
which is not manufactured by Seller shall be covered only by the
warranty of its manufacturer. Seller shall not be liable to Buyer for
loss, damage or injuries to persons (including death), or to property
or things of whatsoever kind (including, but not without limitation,
loss of anticipated profits), occasioned by or arising out of the installation, operation, use, misuse, nonuse, repair, or replacement of said
material and equipment, or out of the use of any method or process
for which the same may be employed. The use of this equipment
constitutes the buyer’s acceptance of the terms set forth in this warranty. There are no understandings, representations, or warranties
of any kind, express, implied, statutory or otherwise (including, but
without limitation, the implied warranties of merchantability and
fitness for a particular purpose), not expressly set forth herein.
2
Page 7

AccuPAR LP-80 2 ABOUT THE LP-80
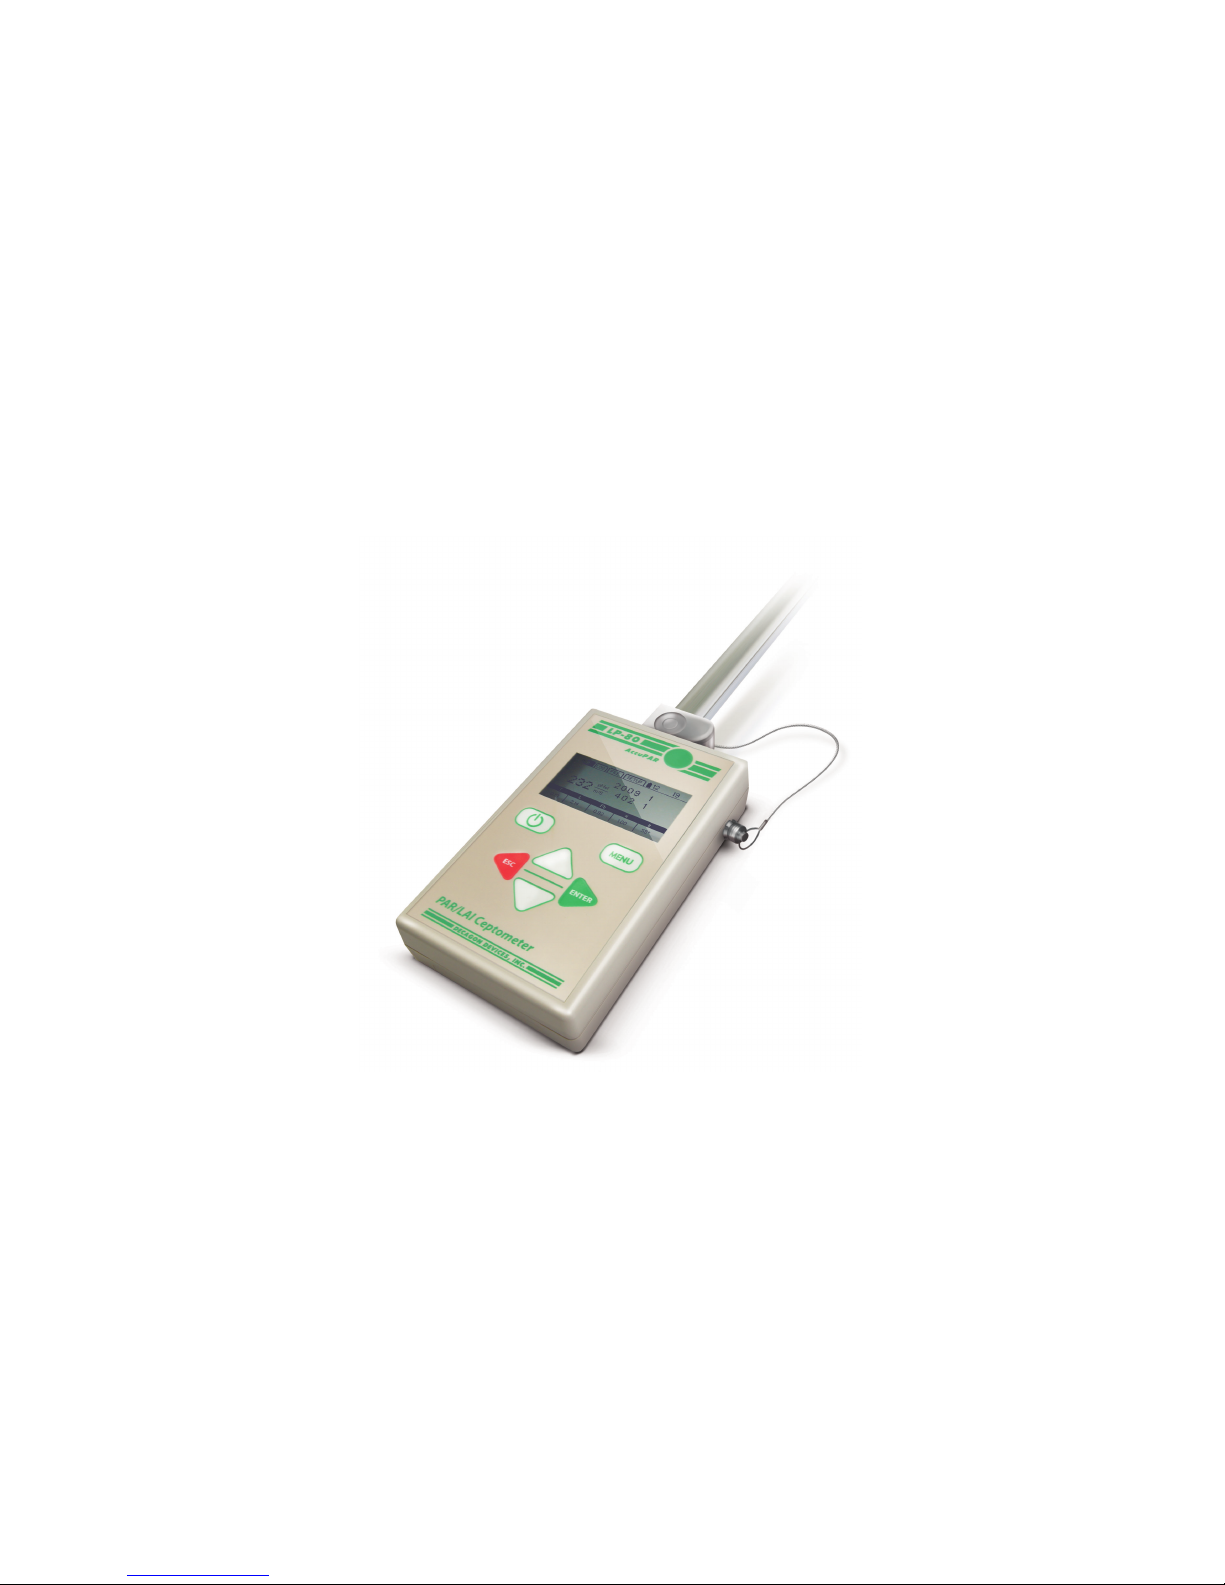
2 About the LP-80
The AccuPAR model LP-80 is a menu-driven, battery-operated linear PAR ceptometer, used to measure light interception in plant
canopies, and to calculate Leaf Area Index (LAI). It consists of an
integrated microprocessor-driven data logger and probe. The probe
contains 80 independent sensors, spaced 1 cm apart. The photosensors measure PAR (Photosynthetically Active Radiation) in the 400
to 700 nm waveband. The AccuPAR displays PAR in units of micromols per meter squared per second (µmol m−2s−1). The instrument
is capable of hand-held or unattended measurement.
2.1 AccuPAR LP-80 Instrument Specifications
Operating Environment:
0◦to 50◦C (32◦− 122◦F)
0 to 100% relative humidity
Probe Length: 86.5 cm
Number of Sensors: 80
Overall Length: 102 cm (40.25 in)
Probe Cross-Section: 19 cm x 9.5 cm (.75 x .375 in)
Micro Controller Dimensions: 15.8 x 9.5 x 3.3 cm (6.2 x 3.75 x 1.3
in)
PAR Range: 0 to 2,500 µmol m−2s
−1
Resolution: 1 µmol m−2s
−1
Minimum Spatial Resolution: 1 cm
Data Storage Capacity: 1 MB Flash
Unattended Logging Interval: User selectable, between 1 and 60
min
Instrument Weight (w/ Batteries): 0.55 kg (1.21 lbs)
Data Retrieval: direct via RS-232
3
Page 8

2 ABOUT THE LP-80 AccuPAR LP-80
Keypad: 7-Key menu-driven
Clock: 24-hour ±1 minute per month
Interface Cable: RS-232 cable
Power: Four AAA Alkaline cells.
External PAR Sensor Connector: Locking 5-pin sealed circular con-
nector
2.2 Overview of the LP-80
Decagon designed the menu-driven LP-80 interface for ease of use.
There are four menus to choose from: the PAR/LAI menu, Log menu,
Data menu, and Config menu. You navigate between the menus by
pressing the MENU button, and select items within each menu using
the up and down arrow keys, and the ENTER or ESC keys.
The AccuPAR can be operated in environments with temperatures
from 0 to 50◦C, and in relative humidities of up to 100%. The instrument ships with an RS-232 interface cable to allow for downloading
data to a computer, an external PAR sensor to allow for calibration,
and simultaneous above and below canopy PAR measurements. The
AccuPAR operates on four AAA alkaline batteries.
2.3 Components of the LP-80 System
The AccuPAR and its accessories arrive in a durable foam-padded
carrying case. Your shipment should arrive with the following items.
• AccuPAR model LP-80
• RS-232 Cable
• Operator’s Manual
• External PAR Sensor
• #1 Phillips Screwdriver
4
Page 9
AccuPAR LP-80 2 ABOUT THE LP-80
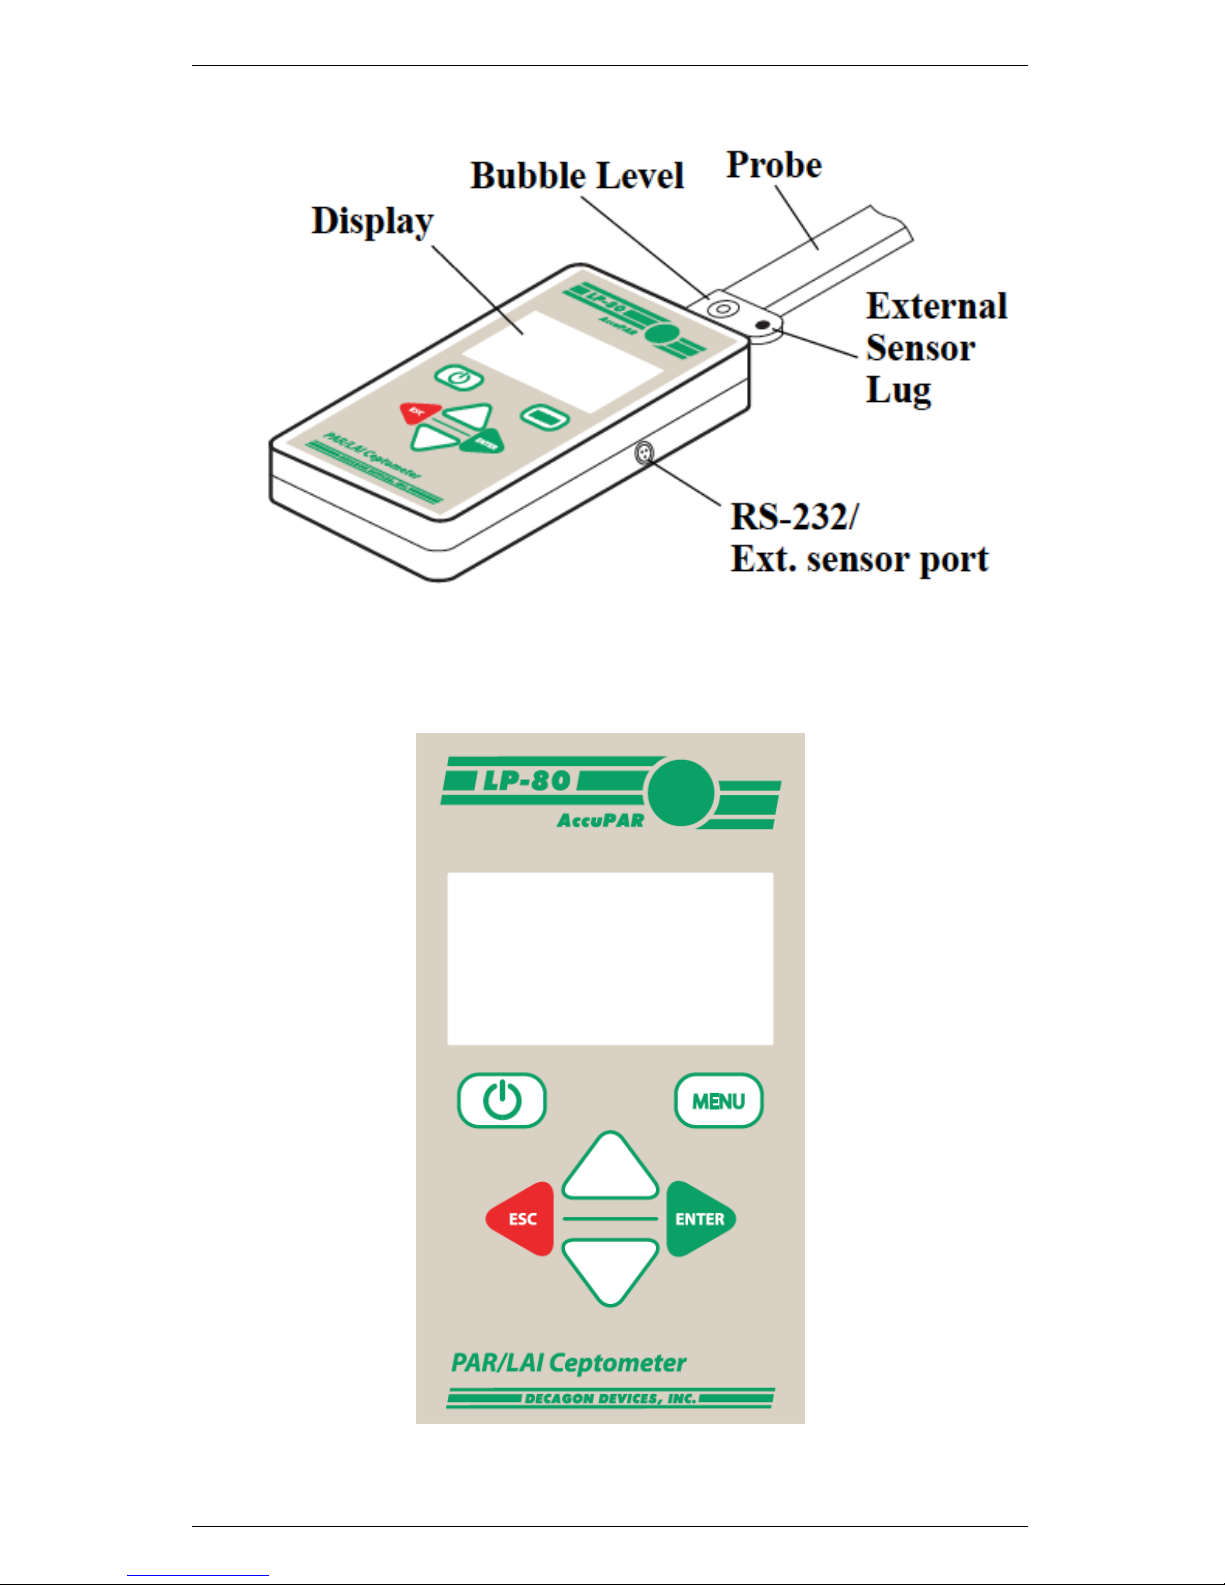
Figure 1: Product Features
Figure 2: LP-80 Keypad
5
Page 10

2 ABOUT THE LP-80 AccuPAR LP-80
The LP-80 keypad is a 7-key panel, designed for ease of use and
intuitive navigability through the operating system. Here is a brief
description of the key functions, refer to Figure 2 for Keypad descriptions.
ON/OFF Key: Located in the upper left corner, it turns the
instrument on or off. The AccuPAR will turn itself off automatically after 10 minutes of inactivity.
MENU Key: Cycles between the four menus.
UP and DOWN ARROW KEYS: In PAR Sampling menu,
they initiate above (up arrow) and below (down arrow) canopy
PAR readings. In other menus, they are used to navigate to
items within those menus and to change numeric values in sub
menus.
Round Green Key: The circular key in the upper right corner
of the keypad (by the AccuPAR logo) also serves the same
function as the Down-arrow key. It is designed as an ergonomic
alternative when taking multiple below-canopy PAR samples
ESC: Cancels the current PAR reading displayed in the lower half
of the PAR sampling menu, cancels out of menu options, and
navigates to the left in the annotation screen.
ENTER: Saves the current PAR readings in the PAR sampling
menu, selects items in other menus, and navigates to the right
in the annotation screen.
2.4 Turning on the instrument
When you first turn on the instrument, it will be in the PAR sampling
menu, in which you will see real-time PAR data displayed in the
center portion of the screen. If you have the external PAR sensor
connected, you will also see its real-time PAR data.
6
Page 11
AccuPAR LP-80 2 ABOUT THE LP-80
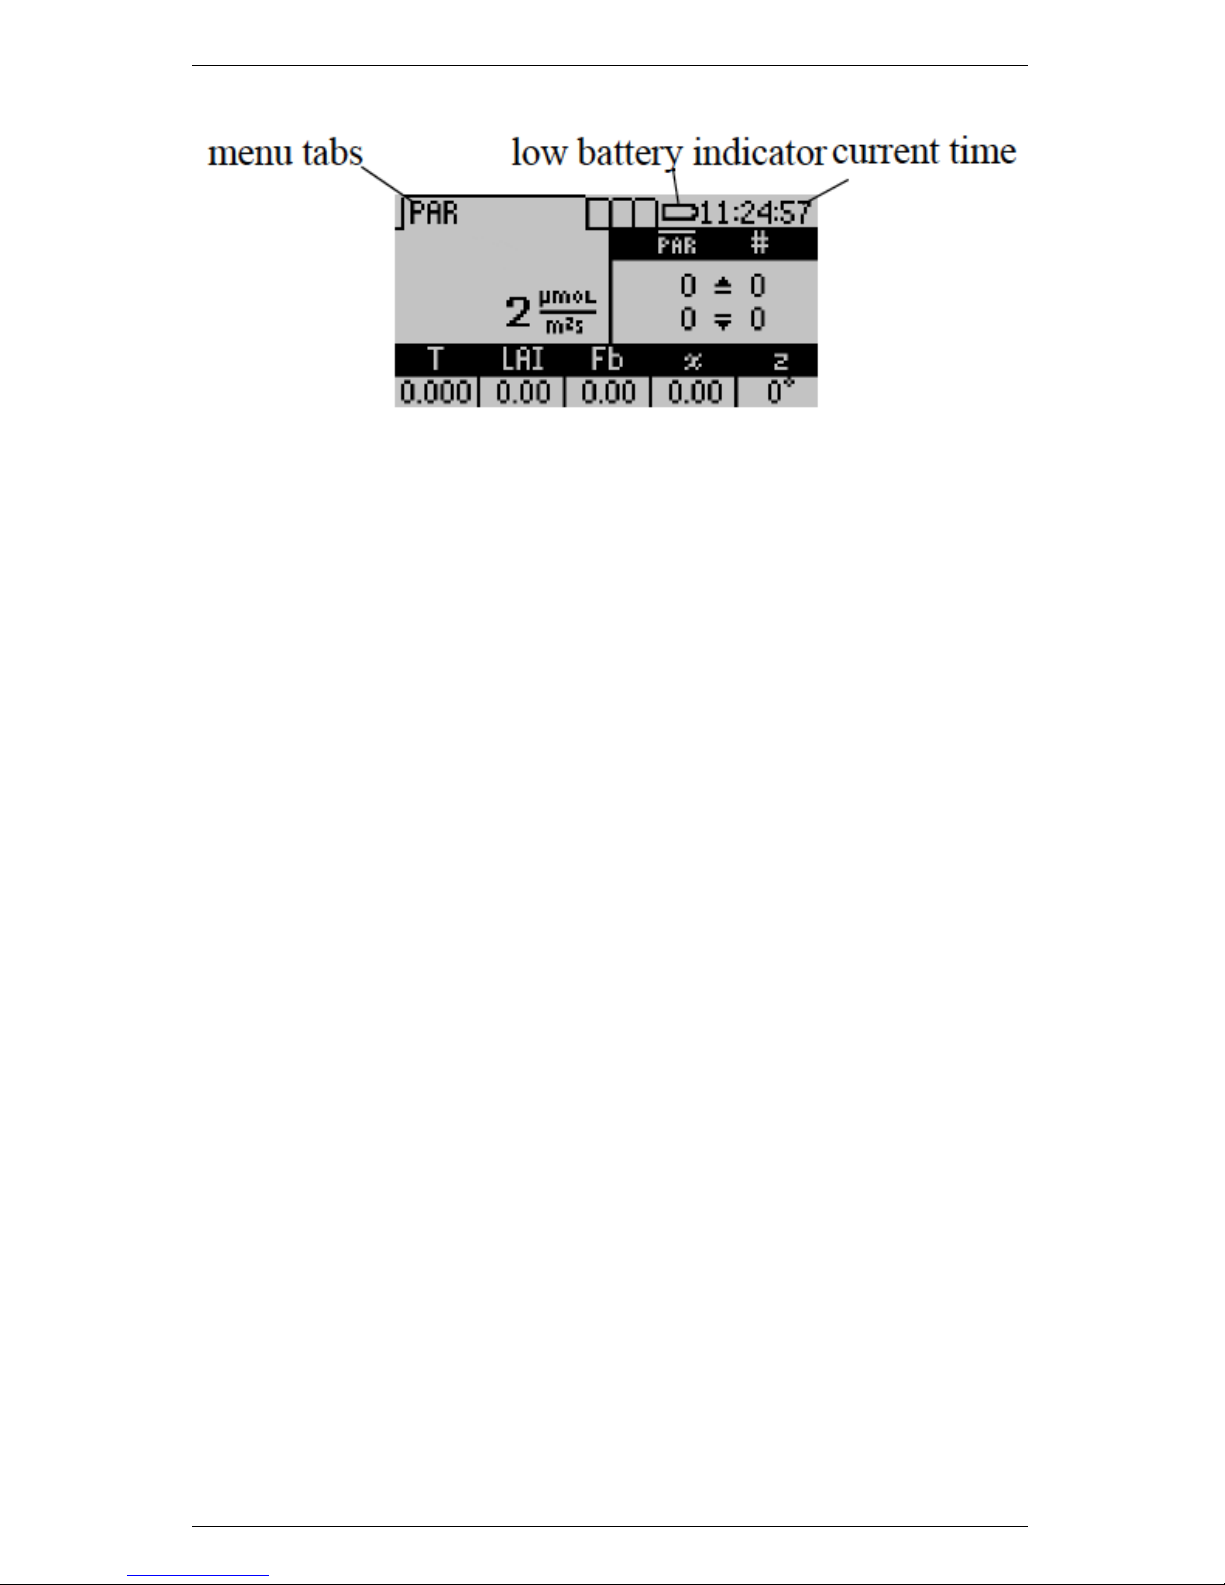
Figure 3: PAR Data Return Screenshot
At any time, you can cycle between the four menus by pressing the
MENU key. The menus are indicated by the tabs on the top of the
screen, with the active menu in the foreground. If the battery is
low, a low battery indicator will appear to the right of the menu
tabs. Later chapters discuss each menu in detail and how to use the
features that each provides.
7
Page 12

3 DEFINITIONS AccuPAR LP-80
3 Definitions
The AccuPAR LP-80 uses several variables to calculate Leaf Area
Index, and displays values for these variables on the screen as measurements are taken. This chapter will discuss these variables and
their definitions. If you are not familiar with them, we recommend
that you review this chapter before proceeding with measurements.
PAR
PAR (photosynthetically active radiation) is the radiation in the 400
to 700 nanometer waveband. It represents the portion of the spectrum which plants use for photosynthesis. Under a plant canopy,
radiation levels can vary from full sun to almost zero over the space
of a few centimeters. Therefore, reliable measurement of PAR requires many samples at different locations under the canopy.
The AccuPAR measures PAR either manually or in unattended logging mode. Intercepted PAR data can be used for determining important parameters of canopy structure and for the calculation of
LAI. An external point sensor may be used to collect instantaneous
above canopy PAR measurements when sampling under or within a
canopy. You also have the option of segmenting the probe to reflect
spatial changes in the plant canopy. This is useful when evaluating
discontinuous and irregular canopies, or to limit the number of active
sensors along the probe.
Tau (τ )
Tau is another variable in the LAI inversion equations. It is defined as the ratio of below canopy PAR measurements to the most
recent above canopy PAR value. It is measured automatically by the
instrument, based upon the PAR readings you make. The current τ
value is displayed and updated in the lower left corner of the screen
in the PAR menu. Chapter 9 provides further explanation of the
significance of Tau.
8
Page 13

AccuPAR LP-80 3 DEFINITIONS
LAI(L)
LAI (Leaf Area Index) is defined as the area of leaves per unit area
of soil surface. It is a valuable measurement in helping to assess
canopy density and biomass. The AccuPAR calculates LAI based on
the above and below-canopy PAR measurements along with other
variables that relate to the canopy architecture and position of the
sun. These variables are the zenith angle, a fractional beam measurement value, and a leaf area distribution parameter (also known as χ)
for your particular canopy. The AccuPAR automatically calculates
both the zenith angle and fractional beam reading, and requires you
to input a value for χ in the setup menu.
External Sensor
An external PAR sensor is provided with the AccuPAR to allow
you to make simultaneous above and below canopy PAR measurements. This is useful if you want to be able to make multiple PAR
measurements under the canopy in variable light conditions without
having to keep moving the instrument in and out of the canopy to
update the above canopy PAR reference. The external sensor is also
the PAR standard to which the wand is calibrated.
Zenith Angle (z)
Zenith angle can be defined as the angle the sun makes with respect
to the zenith, or the point in the sky directly overhead, vertical to
where you stand. The zenith is defined as being 0◦and the horizon
is 90◦. The zenith angle of the sun is necessary for calculation of
certain canopy structure parameters, such as LAI. It is calculated by
the AccuPAR based on your global position and the time of day, and
is displayed in the lower right corner of the screen when taking above
and below PAR measurements. To make sure this value is accurate,
you must first correctly set the longitude, latitude, date, and time of
day in the setup menu.
Fraction of Beam Radiation (Fb)
9
Page 14

3 DEFINITIONS AccuPAR LP-80
Fractional beam radiation is the ratio of direct beam radiation coming from the sun to radiation coming from all ambient sources like the
atmosphere or reflected from other surfaces. A fractional beam radiation value is necessary for calculation of LAI using PAR data. The
AccuPAR obtains this value by comparing the above canopy PAR
measurement to the calculated value of potential incoming solar radiation at your location and zenith angle. The current calculated Fbis
displayed and updated at the bottom of the screen in the PAR menu.
Leaf Distribution Parameter (χ)
Leaf Distribution Parameter (also known as chi, or χ) refers to the
distribution of leaf angles within a canopy. The parameter χ is the
ratio of the length of the horizontal to the vertical axis of the spheroid
described by the leaf angle distribution of a canopy. It can also be
measured as the ratio of the projected area of an average canopy
element (a leaf, for example) on a horizontal plane to its projection
on a vertical plane. The default value for χ is 1.0, which assumes the
canopy angle distribution to be spherical. Onions are a good example of a strongly vertical crop. For onions, χ would be about 0.7. On
the other extreme, strawberries, a crop with a strongly horizontal
nature, would have a χ value of about 3.
Table 1 gives some typical values for χ. In some cases a range of
values is given, indicating the variability that is to be expected for
χ in any canopy. Fortunately, the value of LAI computed is not
strongly dependent on the value of χ chosen. The AccuPAR uses a
value of χ=1.0 as its default.
10
Page 15

AccuPAR LP-80 3 DEFINITIONS
Table 1: Typical χ Values
Crop χ Crop χ
Ryegrass 0.67 to 2.47 Rape 1.92 to 2.13
Maize 0.76 to 2.52 Cucumber 2.17
Rye 0.80 to 1.27 Tobacco 1.29 to 2.22
Wheat 0.96 Potato 1.70 to 2.47
Barley 1.20 Horse Bean 1.81 to 2.17
Timothy 1.13 Sunflower 1.81 to 2.31
Sorghum 1.43 White Clover 2.47 to 3.26
Lucerne 1.54 Strawberry 3.03
Hybrid Swede 1.29 to 1.81 Jerusalem Artichoke 2.16
Sugar Beet 1.46 to 1.88
11
Page 16
4 PAR/LAI MENU AccuPAR LP-80
4 PAR/LAI Menu
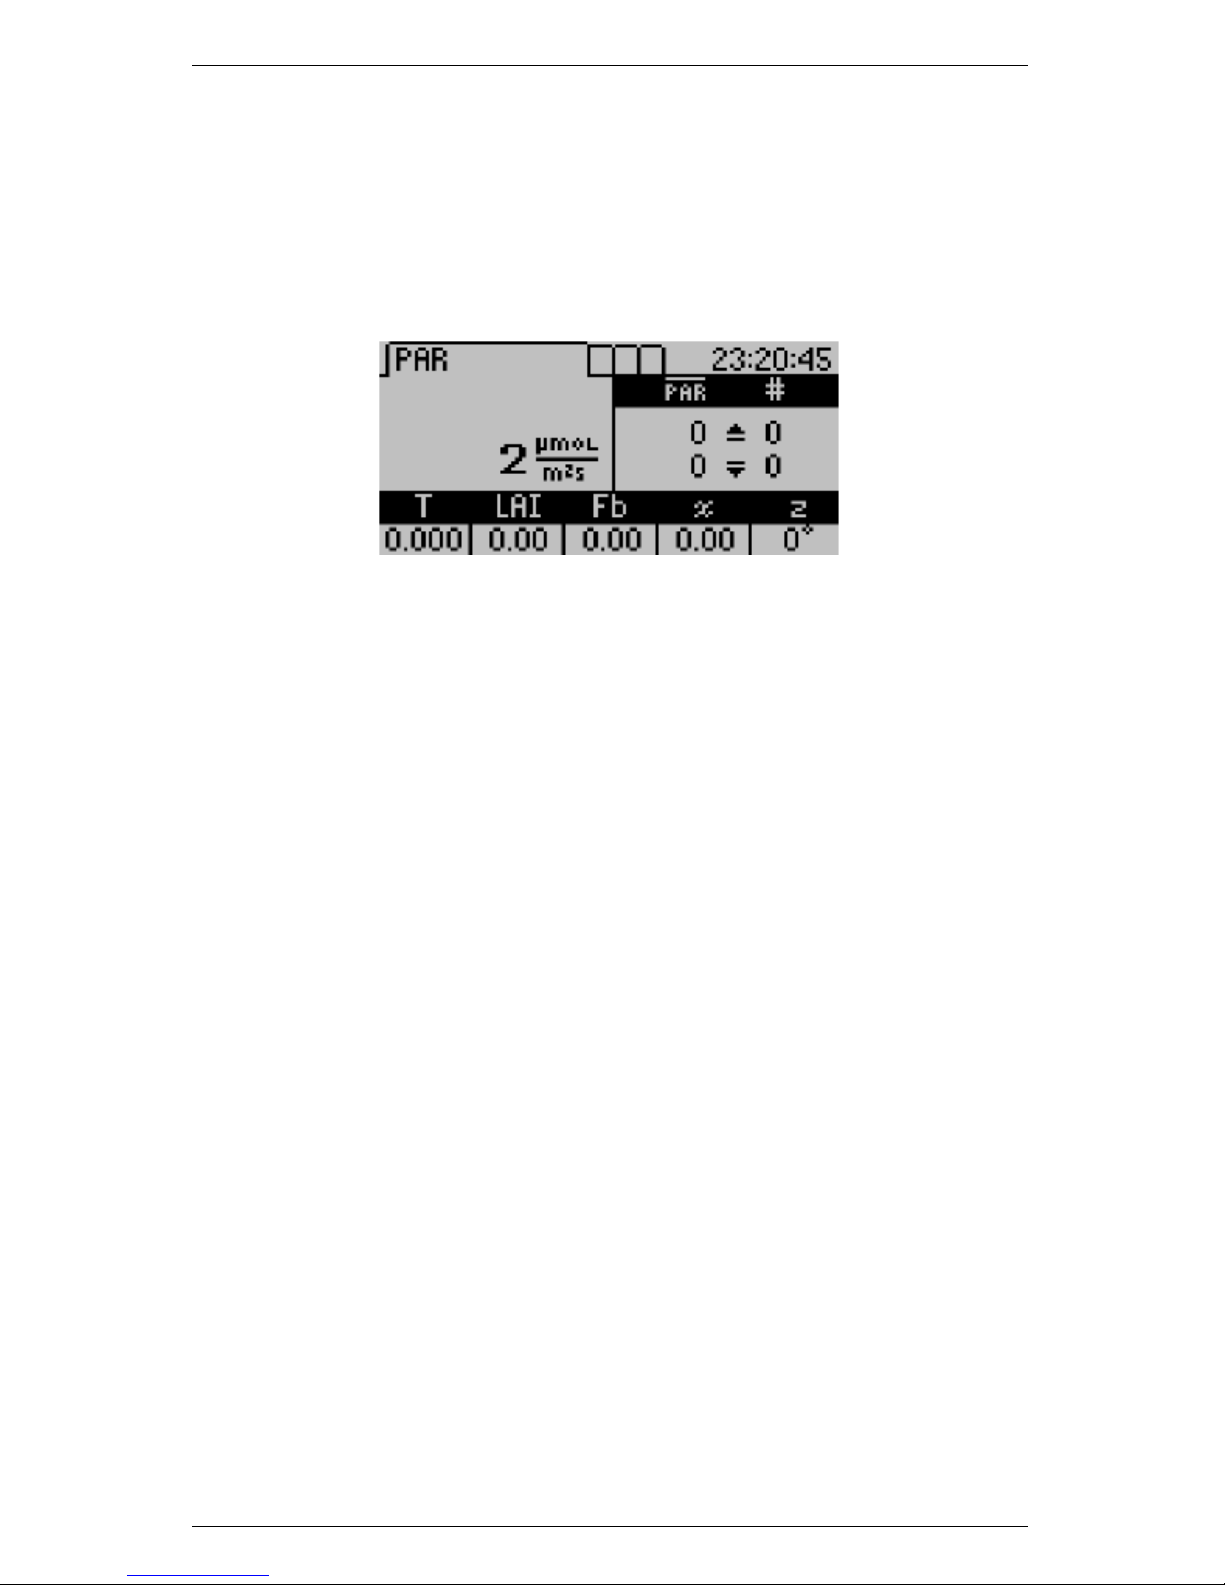
The first menu option is the PAR/LAI sampling menu, which is used
for measurements with the AccuPAR. The default screen is similar
to the PAR screen.
This PAR screen indicates that the current real-time PAR level is
2 µmols/m2s (this example was taken indoors) and that the user
did not take any above or below PAR measurements. If the external
sensor is attached, the real-time PAR value measured by the external
sensor will be also displayed above the real-time light bar PAR data.
4.1 Taking Measurements
To make an above-canopy PAR measurement, press the up-arrow
key in this menu. The resulting value will be displayed in the upper
right section of the screen. To make measurements below the canopy,
press the down-arrow key or the green circular key in the upper right
corner of the keypad. You must plug in a external sensor or take an
above canopy PAR reading first before summary data will update.
The LP-80 recalculates summary data after each below canopy PAR
reading. Other relevant data displays at the bottom of the screen.
12
Page 17
AccuPAR LP-80 4 PAR/LAI MENU
LP-80 updates and displays the current calculated Tau (τ ), LAI
value, beam fraction (Fb), leaf distribution parameter (χ) and zenith
angle (z) values are updated and displayed at the bottom of the
screen with each subsequent below canopy PAR measurement. If
the external sensor is attached and you press an up or down arrow,
the LP-80 records both above and below canopy readings.
Pressing ENTER brings up the Save screen which allows you to save
as is, annotate, or discard. Pressing ESC discards the values. Both
options clear the screen for new data. The values displayed at the
bottom of the screen are dependent on how you have set up your
instrument in the Setup menu. Please refer to chapter 3 Definitions
or chapter 8 Theory for a more detailed description of these variables
and their definitions.
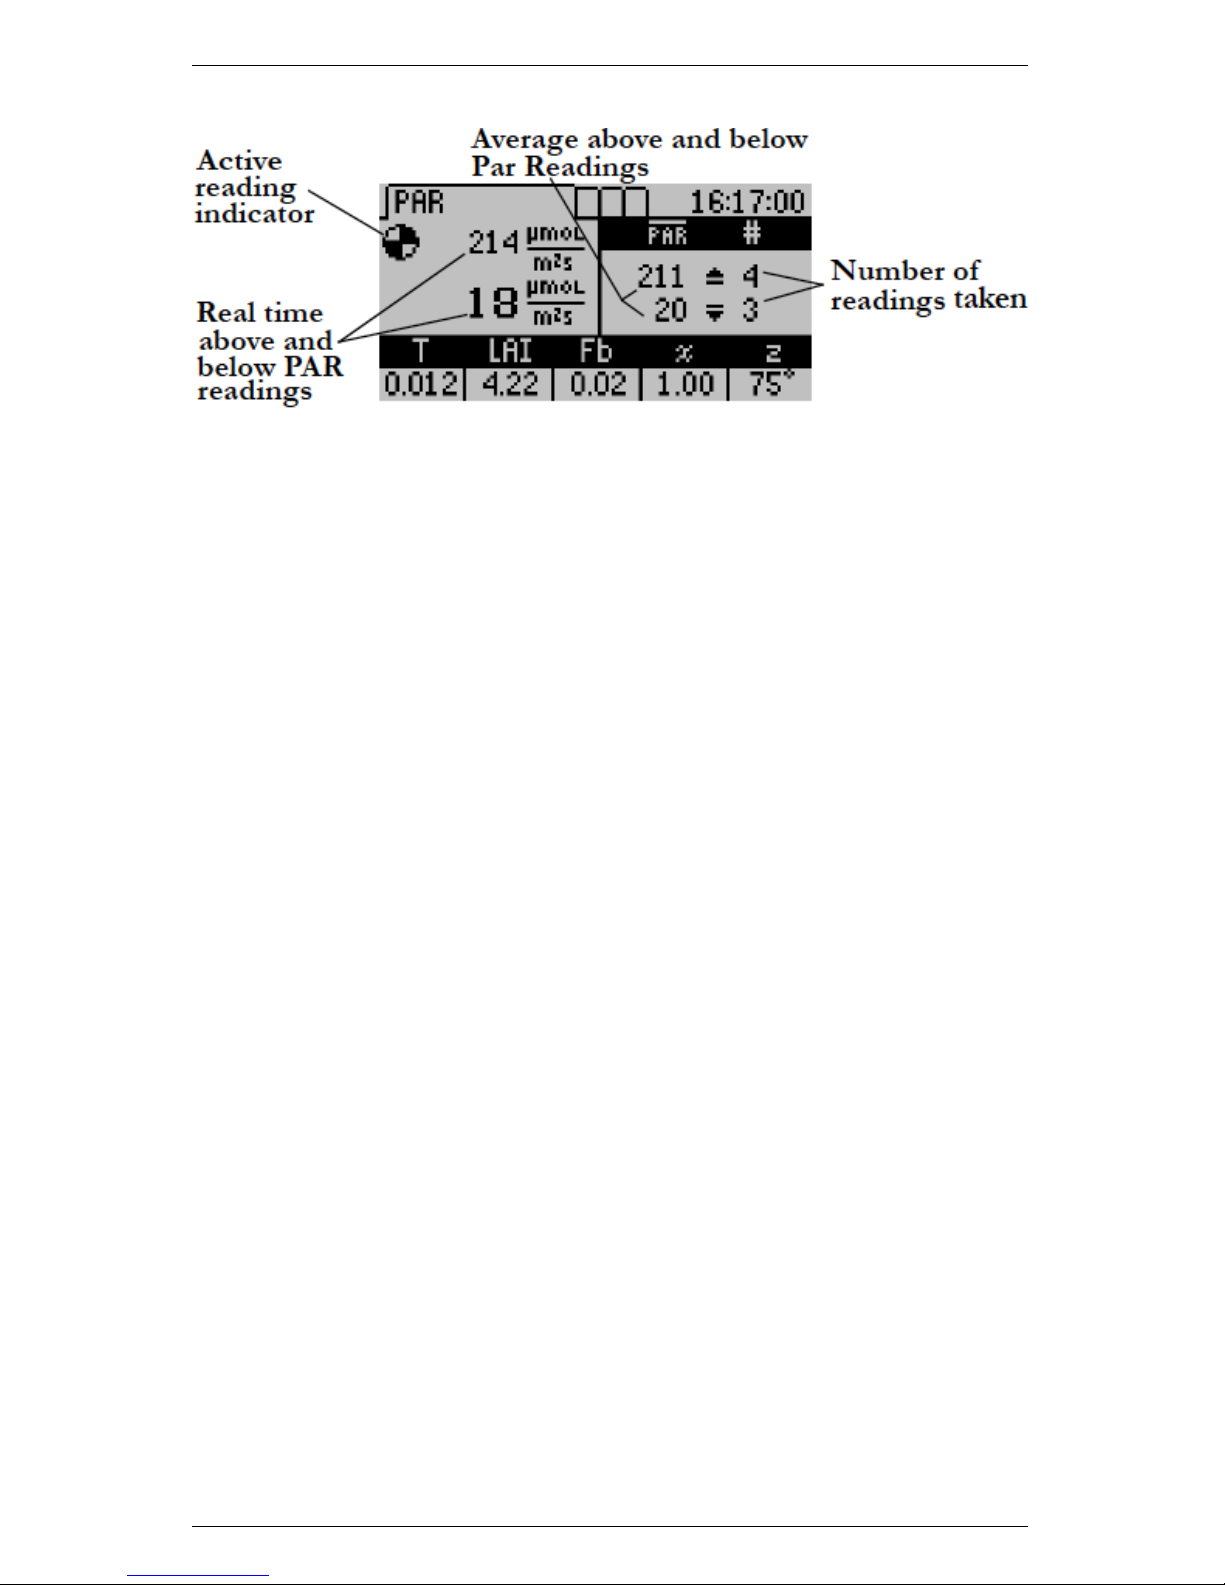
With each above or below canopy measurement, a number appears
to the right of the PAR value that indicates the number of completed
measurements. The displayed PAR value reflects the sample average.
The LP-80 made four above and three below canopy measurements in
the previous PAR screen shot. Therefore, in the above sample screen,
four above and three below canopy measurements have been made,
so the average of the four above-canopy PAR values is 211 µmols,
while the average of the three below-canopy values is 20 µmols.
Note: When you connect the external sensor, the LP-80 uses readings from the external sensor as above PAR readings to calculate LAI.
Summary data on the bottom of the screen are recalculated using the
last above canopy reading with each subsequent below canopy reading.
13
Page 18

4 PAR/LAI MENU AccuPAR LP-80
4.2 Saving and Annotating Readings
To save a reading once you are done taking above and below PAR
data, press ENTER. The Save Method screen appears.
You have three options at the Save Method screen.
1. Select “Save” and press ENTER to save your information.
Data will be stored with the time and date you take the measurement.
2. Select “Discard” and press ENTER to return to the main screen
and start over with a new reading.
3. Select “Annotate” and press ENTER to give your data a file
name or description, e.g. “Plot 1.” Selecting “Annotate” will
cause the Annotate screen to appear.
You will see a series of lines, with a set of arrows above and below
the first, in the Annotate screen. If you have annotated a previous
reading, the old annotation will remain to be changed or deleted.
Use the arrow keys to select a letter or number and press ENTER to
move to the next character. When you finish, keep pressing ENTER
until the screen returns to the PAR menu.
14
Page 19
AccuPAR LP-80 5 LOG MENU
5 Log Menu
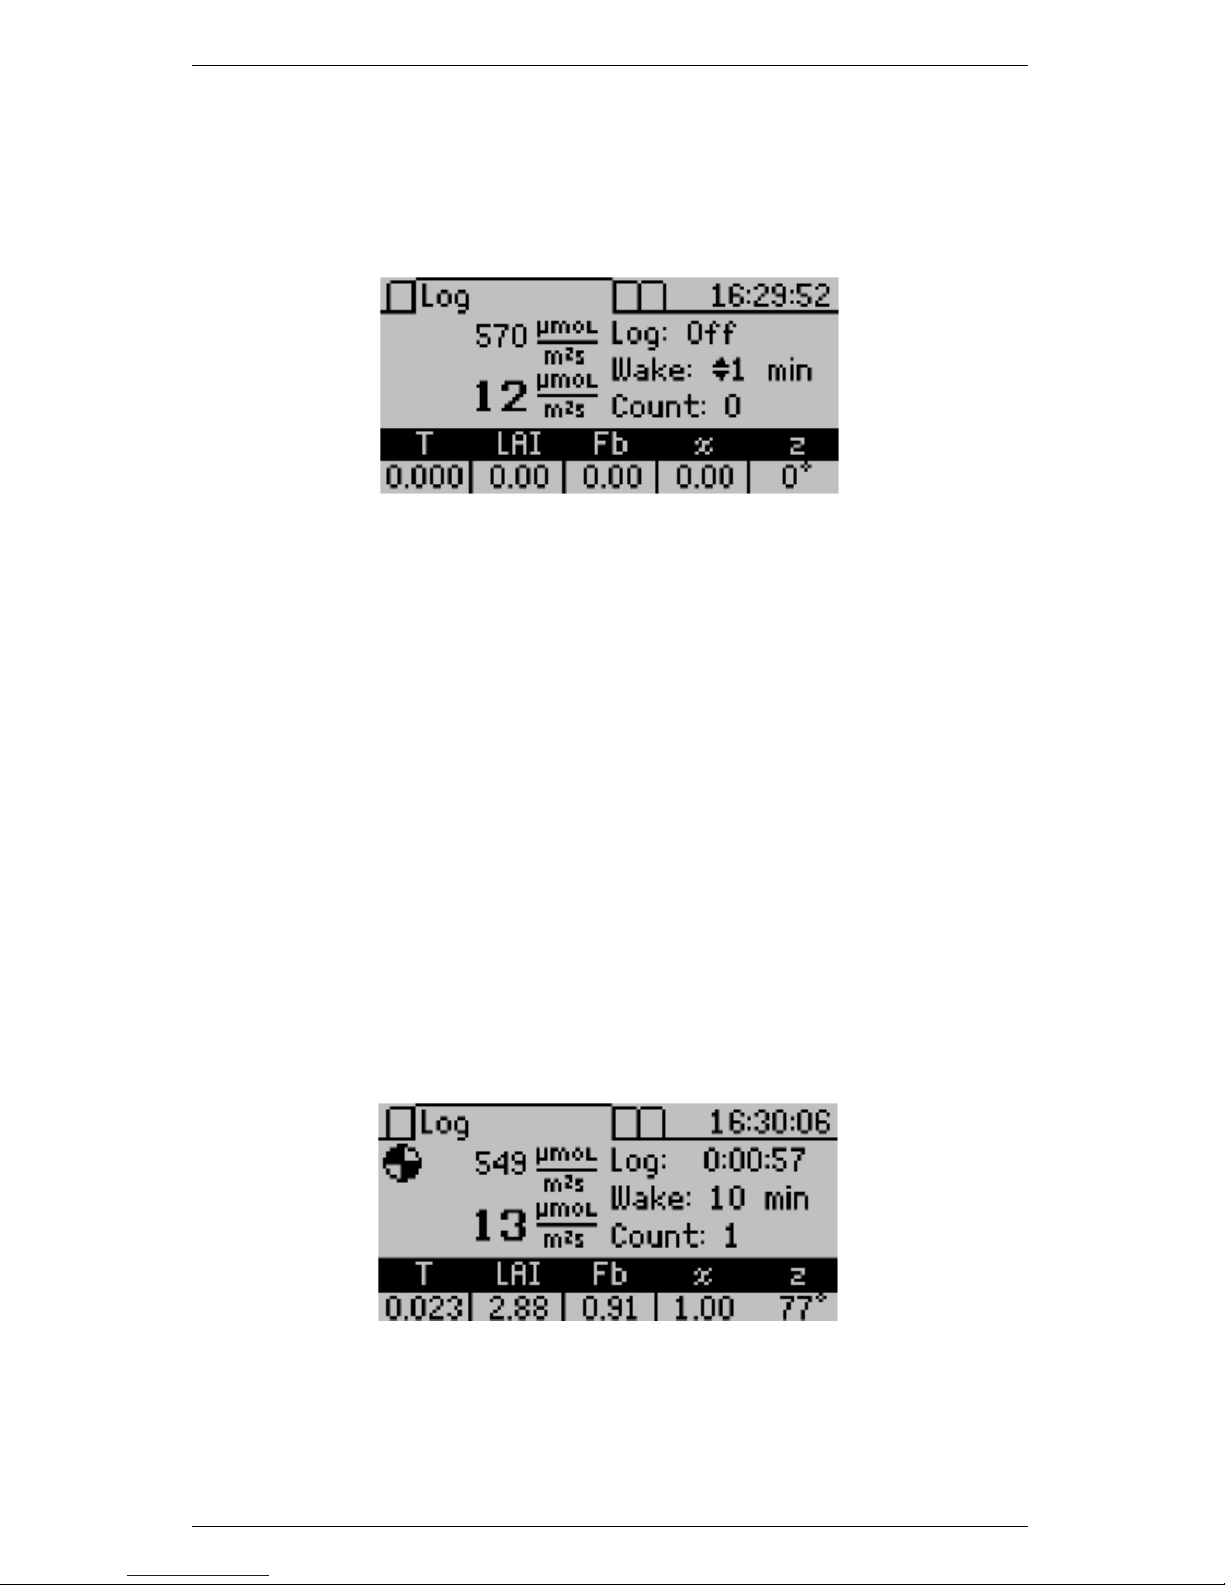
When you advance to the LOG menu, the Log screen appears.
The Log menu allows you to put the instrument in an unattended
PAR data logging mode. In this mode, the AccuPAR will automatically measure and store PAR data at an interval that you specify.
Note: LAI and Tau are calculated more accurately by manually sampling PAR beneath a canopy at random locations, instead of leaving
the LP-80 in one place and collecting data in log mode.
You can select the measurement interval by pressing the up or down
arrows. This will allow you to select any value between 1 and 60
minutes. In the previous Log screen shot, the LP-80 is set to make
and store a measurement every one minute. To activate the logging
mode, press the ENTER button. To cancel the logging mode press
Escape. When you enable the logging mode, the screen will begin to
return data.
The LP-80 will store data taken in this mode automatically without
annotation to memory.
15
Page 20

5 LOG MENU AccuPAR LP-80
Note: You can move from this menu to other menus while the logging
mode is activated. While activated, the LP-80 continues to log data
whether or not the AccuPAR display is on or if you are in a different
menu.
Caution: This mode is for short-term experiments (one or
two days). We did not design the LP-80 to be left in the
field for long periods of time as damage from moisture may
occur.
16
Page 21
AccuPAR LP-80 6 DATA MENU
6 Data Menu
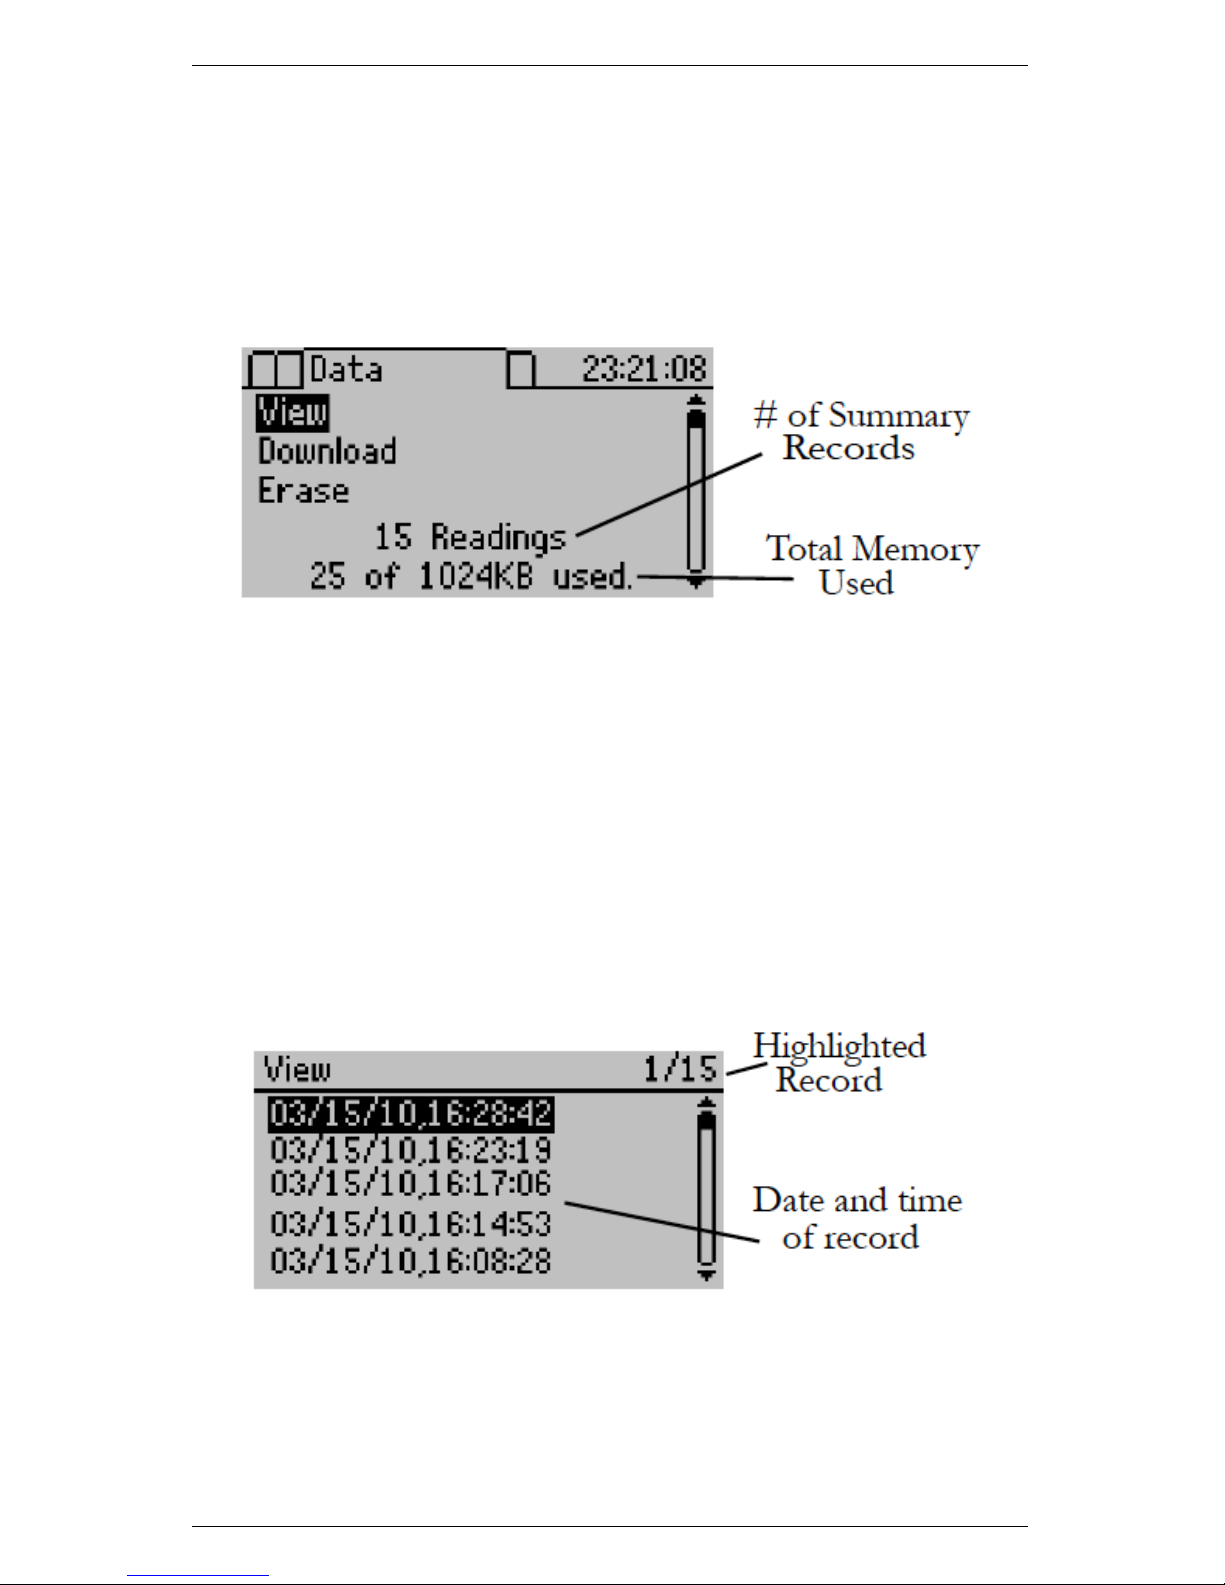
The Data menu allows you to view, download, and erase the data
that you store with your AccuPAR. When you advance to this menu,
the Data screen appears.
You can view summary records and their relevant data, download
the data to your computer terminal for analysis, or erase the data
memory from the Data screen. To select one of the options in this
menu, scroll to the desired item and press the ENTER key.
6.1 View
When you select “View” from the Data menu, you will see the View
screen that shows a list of all the summary readings saved to memory.
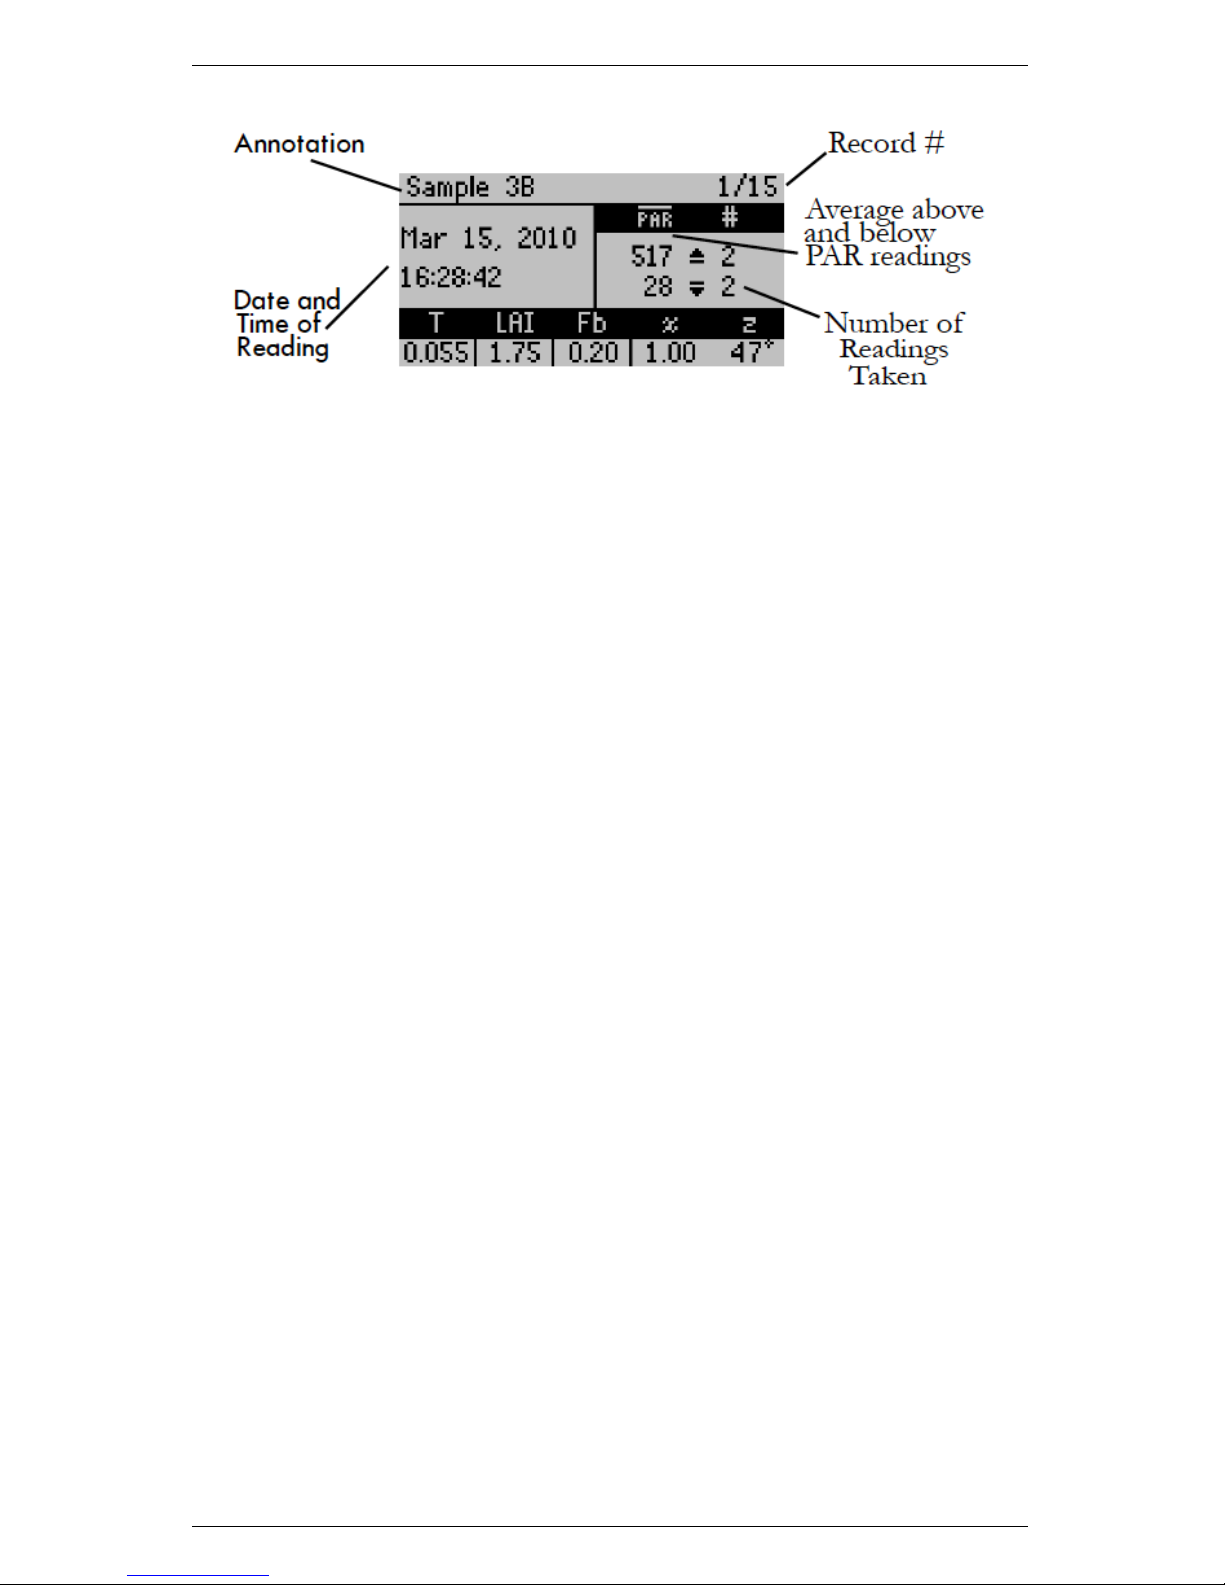
You can scroll between different readings using the up and down arrows. To view detailed data from a selected record, press the ENTER
key while highlighting the record. The LP-80 will display the stored
data.
17
Page 22
6 DATA MENU AccuPAR LP-80
6.2 Download
The download option allows you to download stored data to your
computer via the RS-232 cable that came with your system. You
can download the data using the LP-80 Utility (free software included with your system), Windows Hyperterminal or any similar
terminal software. See Chapter 7 for more information on using the
LP-80 Utility software program.
If you are unable to use the LP-80 Utility, you can use terminal software to transfer the data from your LP-80 to your computer. The
following steps should apply to most terminal software programs.
Downloading using Windows Hyperterminal
Follow steps 1 through 9 for instructions on downloading with Windows Hyperterminal, which comes with Windows XP and earlier
Windows operating systems. (You will need to use a third party terminal program for newer operating systems such as Windows Vista
and Windows 7.)
1. Open Windows Hyperterminal from the Start menu, select
Programs > Accessories > Communications > Hyperterminal.
Click on the Hypertrm.exe icon.
2. At the dialog box prompt, select a name for the new connection,
and an icon (if desired).
3. At the “Connect To” dialog box, select an available COM port
at the bottom of the screen in the “Connect Using” box.
18
Page 23
AccuPAR LP-80 6 DATA MENU
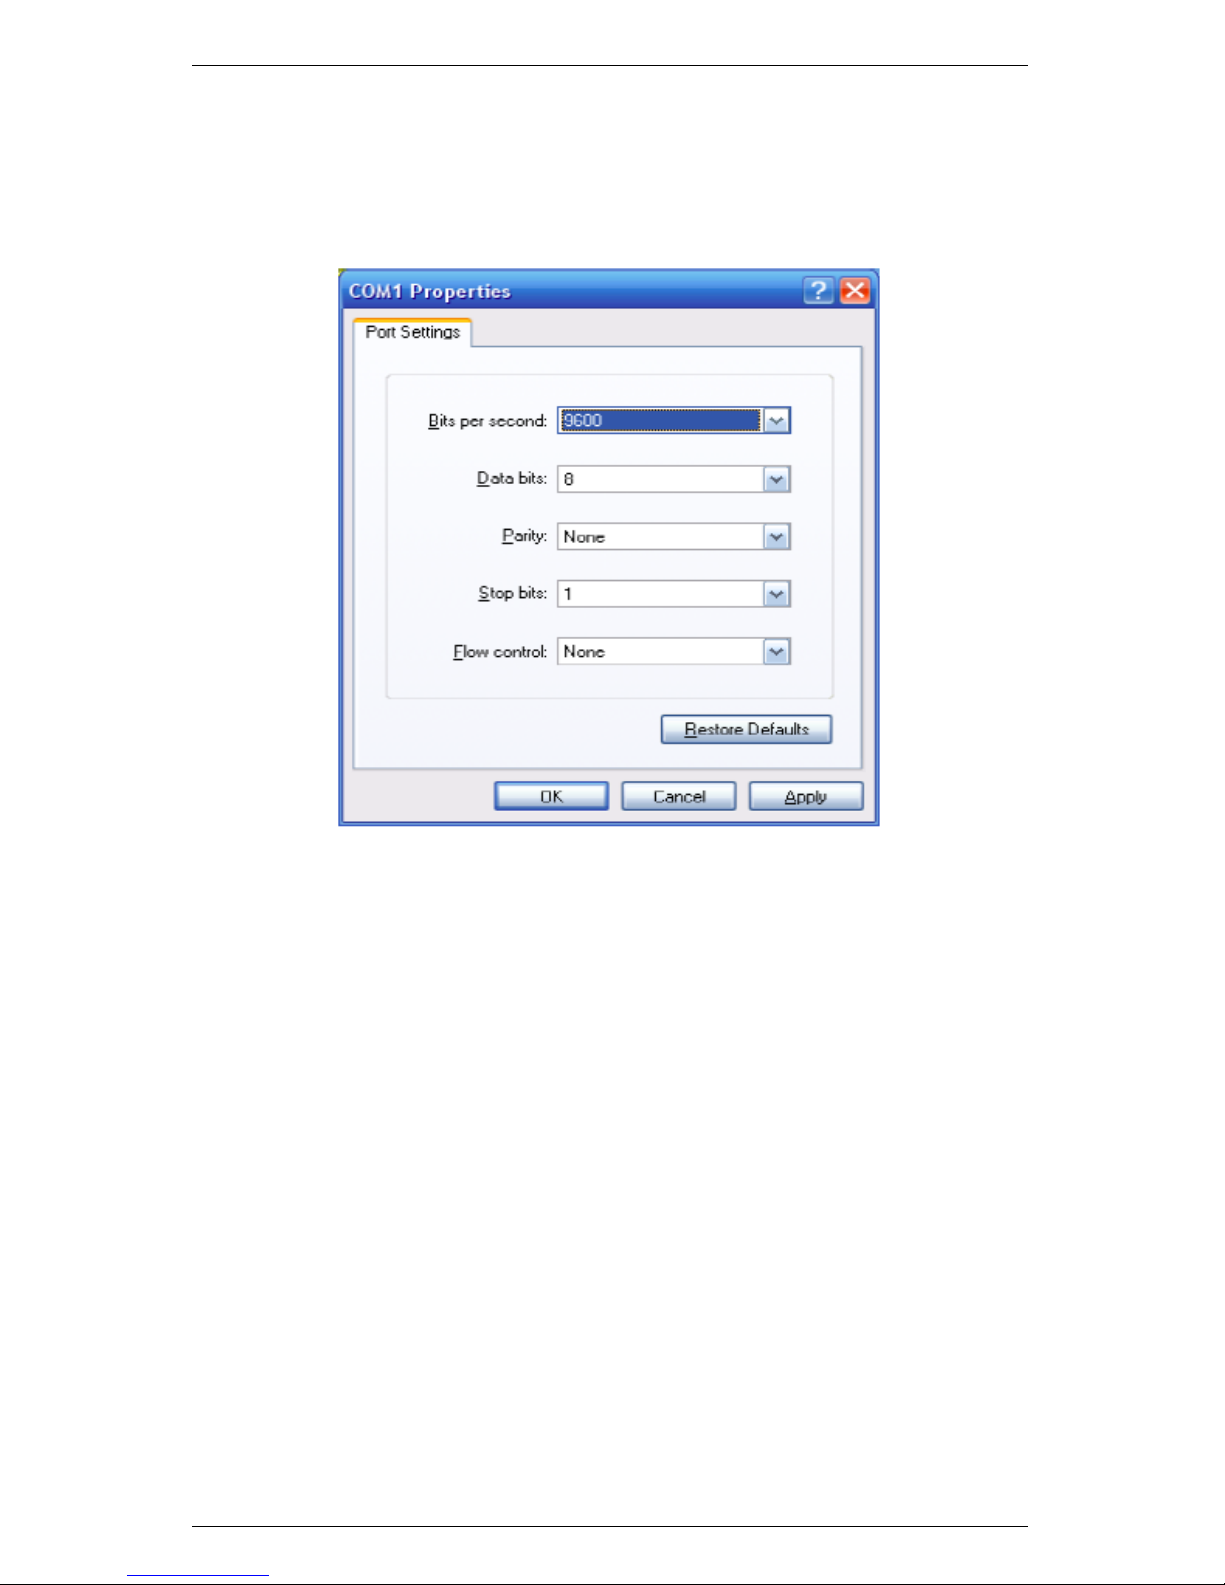
4. In the Communication Properties Dialog box, select these: 9600
bits per second, 8 data bits, no parity, 1 stop bit, and no flow
control.(Figure: 4)
Figure 4: Communication Properties Dialog Box
5. Once the terminal window opens, click on the File menu and
select Properties. Click on the Settings tab, and then click on
the “ASCII Setup” button. Check the box that says “Append
line feeds to incoming line ends,” and the “Wrap lines that
exceed terminal width,” and then click OK.
6. To set up the terminal program to capture the data, click on the
Transfer menu and select “Capture Text.” Select the directory
where you want to place the data text file and then click Start.
7. Select Download from the AccuPAR File menu. The list of
current files will appear as in the View menu. Use the up and
down arrows to select the file you wish to download, then press
the ENTER key to send the data to your computer. The data
will appear on the screen.
8. To finish capturing the text, click on the Transfer menu again
19
Page 24

6 DATA MENU AccuPAR LP-80
and select “Capture Text > Stop.” Before closing Hyperterminal, save the session with a name you will be able to recognize.
The next time you need to download, you will just need to open
the Hyperterminal folder and select the name you saved.
9. You may now open the text file in a word processing program
or a spreadsheet program like Microsoft Excel.
The AccuPAR data output will emerge as a series of numbers, similar
to the following numbers. Please refer to Section 6.3 for a detailed
breakdown of the return items.
1757,ABV,321969922,3.20,2.00,1.60,1.20,1.10,1.20,0.90,
0.70,0.00
1758,BLW,321969937,41.80,58.00,98.70,159.10,325.30,
477.90,669.10,750.30,0.00
1759,SUM,321969941,1.50,322.50,1.000,0.00,1.00,0.02,50,
1757,47,-117,SAMPLE3
6.3 Description of Outputs
RID (1757): The Record ID is a unique identifier for each record.
RID are store sequentially in memory and can be used or downloading data.
Type (ABV): “ABV” or “BLW” – which is used to identify the
data record type.
Time (321969922): Time in Decaseconds. This is the number of
seconds since the epoch date of Jan 1, 2000 00:00:00 To convert
this into excel time use the following formula:
Decaseconds = Excel Time
or 321969941 = DATEVALUE(“1/1/2000”)+A2/86400
Note: Make sure to convert cell B2 to a Data/Time format
Individual PAR readings (3.20...0.70): One from each of the
eight segments. Note: Segment 1 is closest to the controller
Segment 8 is closest to the tip of the light bar.
20
Page 25

AccuPAR LP-80 6 DATA MENU
External Sensor (0.00): PAR reading from the External Sensor
RID (1759): The Record ID is a unique identifier for each record.
RID store sequentially in memory and can be used for keeping
track of downloaded data.
Type (SUM): “SUM” – which is used to identify the data record
type.
Time (321969941): Time in Decaseconds. This is the number of
seconds since the epoch date of Jan 1, 2000 00:00:00 To convert
this into excel time use the following formula:
Decaseconds=Excel Time
or 321969941+=DATEVALUE(“1/1/2000”)+A2/86400
Note: Make sure to convert cell B2 to a Data/Time format
MeanAbv (1.50): The average of all the above canopy PAR read-
ings for the raw records associated with the summary record.
MeanBlw (322.50): The average of all the below canopy PAR read-
ings for the raw records associated with the summary record.
Tau (τ ) (1.000): Tau is the ratio of below canopy PAR measure-
ments.
LAI (0.00): Leaf Area Index (LAI) is the area of leaves per unit
area of soil science.
Chi(χ) (1.00): The leaf distribution parameter Chi or χ is the ratio
of projected area of an average canopy element on a horizontal
plane to its projection on a vertical plane.
Fb(0.02): The Beam Fraction is the ratio of direct beam radia-
tion coming directly from the sun to radiation coming from all
ambient sources.
Zenith Angle (50): The zenith angle is the angle in degrees the
sun makes with respect to the zenith (point in sky directly
overhead).
RawRID (1757): RawRID is the RID of the first raw record as-
sociated with the summary record. Any record between the
21
Page 26

6 DATA MENU AccuPAR LP-80
RawRID and the RID of the summary record is also associated
with the summary record.
Latitude (47): Latitude location in degrees.
Longitude (−117): Longitude location in degrees.
Annotation (SAMPLE3): The annotation is a string used to iden-
tify a record in a user readable format.
6.4 Erase
To erase all data, select “Erase” from the Data menu and press the
ENTER button. To escape, press the ESC button. If you proceed,
you will see the words “Please Wait” while the instrument deletes
the files. This may take a few seconds to complete.
22
Page 27

AccuPAR LP-80 7 LP-80 UTILITY SOFTWARE
7 LP-80 Utility Software
The AccuPar LP-80 comes with the LP-80 Utility software which
allows you to download stored data to your computer via the RS-232
cable that came with your system.
7.1 Downloading Data
Follow steps 1 through 9 to download data.
1. Make sure the RS-232 serial cable is properly connected to your
LP-80, and to a serial port on your computer, or to a USB-toserial adapter.
2. Open the LP-80 Utility Program.
3. Select the appropriate COM port from the drop-down menu on
the main screen.
4. Turn on your LP-80 by pressing the power button.
5. Click the “Download” button in the lower left of the screen, or
click File > Download Data.
6. The “Save LP-80 Data” dialog box will appear.
7. Name your file, and choose a format to save it in, and click
Save. (For more information, see Data File Formats.)
8. A progress bar will appear on the main screen.
9. When the download is finished, you will be prompted to optionally erase the data on the LP-80.
7.1.1 Data File Formats
Data files are saved in one of the following file formats:
Excel (.xls): Saves the file as a workbook that can be directly
opened using Microsoft Excel 97 or newer.
23
Page 28

7 LP-80 UTILITY SOFTWARE AccuPAR LP-80
Note: The Excel format includes column headers by default. These
are titles at the top of each column. These can be disabled by using
the Preferences Menu.
Tab Delimited Text (.txt): Saves the file in tab delimited format, where all values are separated with tabs.
CSV (Comma Delimited) (.csv): Saves the file in comma delimited format, where all values are separated with commas.
7.1.2 Data Organization
Data from the LP-80 saves in several columns.
1. Record Type–The data record type (SUM, ABV, or BLW).
2. Date and Time Measurement–Date and time you take reading.
3. Annotation–The annotation is a string that a user may use to
identify the reading.
4. Average Above PAR–The average of all the above canopy PAR
readings for the raw records associated with the summary record.
5. Average Below PAR–The average of all the below canopy PAR
readings for the raw records associated with the summary record.
6. Tau (τ )–Tau is the ratio of below canopy PAR measurements
(MeanBlw) to the above canopy PAR measurements (MeanAbv).
7. Leaf Area Index (LAI)–LAI or Leaf Area Index is defined as
the area of leaves per unit area of soil surface.
8. Leaf Distribution (χ)–The leaf distribution parameter Chi is
the ratio of projected area of an average canopy element on a
horizontal plane to its projection on a vertical plane.
9. Beam Fraction (Fb)–The Beam Fraction is the ratio of direct
beam radiation coming directly from the sun to radiation coming from all ambient sources.
24
Page 29

AccuPAR LP-80 7 LP-80 UTILITY SOFTWARE
10. Zenith Angle–The zenith angle is the angle the sun makes with
respect to the zenith (point in sky directly overhead).
11. Latitude–Latitude location in degrees.
12. Longitude–Longitude location in degrees.
13. Segment 1-8 PAR–Individual PAR readings from each of the 8
segments.
14. External Sensor PAR–PAR reading from the External Sensor.
15. Record ID–The Record ID is a unique identifier for each record.
16. Raw Record ID–RawRID is the RID of the first raw record
associated with the summary record. Any record between the
RawRID and the RID of the summary record is also associated
with the summary record.
7.2 Erasing Data
You can use the LP-80 Utility to erase the data stored on your LP-80.
Caution: Once data has been erased, it cannot be recovered.
1. Make sure the LP-80 is properly connected to your computer.
2. Click the Erase button in the lower left of the screen, or go
to File > Erase Data. (If you encounter an error message after clicking the Erase button, please see the Troubleshooting
section.)
3. You will be asked if you wish to continue. Click OK to do so,
or Cancel to return to the Main screen.
4. If you click OK, a progress bar will appear on the main screen,
indicating that data is being erased. “Done erasing data stored
in LP-80” will be displayed when all data has been removed
from your LP-80.
25
Page 30

7 LP-80 UTILITY SOFTWARE AccuPAR LP-80
7.3 Setting the Date and Time
You can use the LP-80 Utility to easily set your device date and
time. Make sure you properly connect the LP-80 to your computer.
Then choose “Set LP-80 Date/Time” from the Actions menu. (If you
encounter an error message after click the Download button, please
see Troubleshooting.) By default, the LP-80 Utility automatically
sets the date and time on your LP-80 each time you connect. You
can turn the feature off by using the Application tab under The
Preferences Menu.
7.4 Viewing LP-80 Information
Use the Utility to view information about your LP-80 by choosing
“Actions > View Informati...”
This screen will display the following information:
• LP-80 serial number
• Firmware version (the software that runs your LP-80)
• Firmware checksum status
• Battery level
• Number of stored readings
26
Page 31

AccuPAR LP-80 7 LP-80 UTILITY SOFTWARE
• Current date and time as set in your LP-80
You can also update the time on this screen.
7.5 The Preferences Menu
Use the Preferences Menu to modify aspects of the Utility that relate
to downloading and organizing data. The Preferences menu consists
of three tabs: the Data File, Communications, and Application tabs.
Figure 5 shows each tab.
7.5.1 Data File Tab
Figure 5: Preferences Menu
Downloaded files contain column headers (see Data File Formats).
Uncheck this box to save data files without headers. The date and
time for downloaded readings use the formatting of the Windows
Regional and Language Options (accessible in the Windows Control
Panel). You can set the formatting to use a day/month/year format
with 12- or 24-hour time.
27
Page 32

7 LP-80 UTILITY SOFTWARE AccuPAR LP-80
7.6 Communications Tab
Command Retries: If you are having trouble communicating with
your LP-80, then set the program to automatically re-send commands to the LP-80, up to ten times.
Maximum Baud Rate: Baud rate is the number of bits per second transferred between a device and your computer. By default,
the LP-80 is set to transfer data at 115200 baud. Use a lower baud
rate if you encounter difficulty communicating with your device. (See
Troubleshooting.)
7.7 Application Tab
28
Page 33

AccuPAR LP-80 7 LP-80 UTILITY SOFTWARE
Automatic Internet Version Check: If you selected this box,
the program will automatically check for updates as soon as it starts
(only if you are connected to the Internet).
Automatic Clock Synchronization: Keeps the LP-80 clock synchronized to the time on your computer.
Error Log File: Adds more detail to error files, which can be sent
to Decagon for troubleshooting.
7.8 Software and Firmware Updates
Use Decagon’s version check web engine for updates to the LP-80
Utility or firmware. Your computer must be connected to the Internet for this feature to work. To check for a newer version of the LP-80
Utility, choose “Check for Utility Updates...” from the Help menu.
To check for updates to the firmware in your LP-80, connect your LP80 to your computer, select the appropriate comm port, and choose
“Check for Firmware Updates” from the Help menu. You can also
view the latest information about the LP-80 Utility and firmware by
visiting the Decagon website at http://www.decagon.com/support
/downloads.
29
Page 34

8 CONFIG MENU AccuPAR LP-80
8 Config Menu
The Config menu is where you configure and set most of the parameters that affect the functionality of your AccuPAR. When you scroll
to this menu, the Config screen appears with numerous options.
Scrolling further down.
And further.
Use the up and down arrows to scroll through the menu items.
30
Page 35

AccuPAR LP-80 8 CONFIG MENU
8.1 Calibration
The LP-80 has a calibrated external PAR sensor that it uses for
making simultaneous above and below canopy PAR measurements.
The LP-80 also uses this sensor to calibrate the AccuPAR probe,
ensuring that the PAR response between the external sensor and the
probe are the same. When you select this option, the Calibration
screen appears.
For best results, attach the external PAR sensor to the LP-80 by
inserting the bolt attached to the external sensor through the hole in
the bubble level. This will ensure that the sensor and probe are both
level. The directions state to level the probe and sensor, however
you can also calibrate the AccuPAR on a flat board or platform that
you can prop up at an angle to get more direct light from the sun.
The PAR level must be above 600 µmols m
−1s−1
. Values below
this will not update the calibration, so check the PAR levels before
proceeding with the calibration. In general, a clear day where the
sun is visible will be above 600 µmols. Overcast days are typically
less than 600 µmols.
When you have the instrument ready to calibrate, move out of the
probe area to minimize reflection off your body, and press the ENTER button to perform the calibration (it is important not to affect
light levels on the probe through shading or reflection). The current
probe calibration displays graphically. If you have no external sensor
attached while performing the calibration, the calibration will return
an error.
31
Page 36

8 CONFIG MENU AccuPAR LP-80
Press ENTER again to complete the calibration.
8.1.1 Location
You will need to set the correct longitude and latitude for your location to make accurate LAI calculations. This is due to the fact that
zenith angle calculation is based not only on the time and date, but
the longitude and latitude of the site. When you select the Location
menu item, you will see the currently configured location.
Highlight the item you would like to change and press Enter. In
the next screen, use the up and down arrows to change it and then
press ENTER to save the change. Northern latitudes are designated
positive and Southern latitudes negative, while Eastern longitudes
are positive and Western longitudes negative. To exit the location
menu, press MENU or ESC.
32
Page 37

AccuPAR LP-80 8 CONFIG MENU
8.1.2 Date and Time
Set your current time and date in this menu. The instrument uses
the time and date provided here to calculate its zenith angle and F
b
values, so make sure it is accurate. Use the up and down arrow keys
to change the values of each item, and use the ENTER key to move
to the next item. Time must be entered in 24 hour format (i.e. 3
pm should be entered as 15:00).Once you have set the time and date
correctly, press the Enter key to exit the menu and store the result
in memory.
Daylight Savings Time
Press ENTER to toggle on or off for daylight savings time (summer time). The LP-80 uses this parameter to calculate zenith angles
and Fbvalues, so make sure it is accurate. When adjusting for daylight savings time, the time will automatically adjust.
Leaf Distribution (χ)
Use the χ menu is used to set the χ (leaf distribution) parameter
for the plant canopy you plan to measure. See the next chapter for
further explanation of the χ parameter. To change the value of the
χ parameter, use the up and down arrow keys. When the value is
correct, press ENTER.
External Sensor Const
This menu option stands for “External Sensor Constant.” This menu
is for adjusting the calibration constant of the external sensor. You
should only adjust this value either when using a new external sensor, or after the external sensor has been recalibrated. To make sure
this value is correct, check the tag attached to the external sensor
cable. The value shown should correspond with the value shown in
this menu. If you need to adjust the value, press the up or down
arrow keys to the correct value, then press the ENTER key.
As with most electronic components, the sensitivity of the exter-
33
Page 38

8 CONFIG MENU AccuPAR LP-80
nal sensors drift over time and periodically need recalibration. We
recommend that you have your external sensor recalibrated. If you
use it heavily each year, we suggest this be done on a yearly basis. If
you only make periodic measurements, one recalibration every two
to three years should be adequate. Contact Decagon for more details
about recalibrating the external sensor.
We recommend you calibrate, or match, the LP-80 to the external
sensor at least once an hour to maintain a stable calibration between
the two sensors.
Active Segments
For some measurement purposes, you may not want to use the entire
length of the probe. For such applications, you can turn off sections
of the probe, starting from the base and continuing down the probe
to the end. When you select this menu, the following screen will
appear:
This screen shows that 5 segments are on. To change this number,
press the up or down-arrow keys until you reach the desired number
of active segments. The icon on the right side of the screen will illustrate the active segments as you reduce or increase them. Once
you have selected your desired number of segments, press the ENTER button. If you have selected active segments smaller than eight,
the number of segments will also appear in the PAR/LAI sampling
menus to remind you that it is in segmented mode.
Note: If LP-80 segments are deactivated, those segments will show
zero when they dump their data. These deactivated segment numbers
will not be used in LAI calculation.
34
Page 39

AccuPAR LP-80 8 CONFIG MENU
Power Filter
Artificial lighting uses AC electrical power and can add a significant amount of noise to the AccuPAP LP80 sensor measurements.
We designed the power filter setting to eliminate the electrical noise
that comes from the AC powered light source. You should set the
value of the Power Noise Filter to match the frequency of the power
where you live. In North America and most of Asia, this is 60 Hz
(the default value). In most of Europe the electrical frequency is 50
Hz.
Contrast
The Contrast screen allows you to adjust the contrast of the display to make the display easier to read in sunlight or inside. Use the
up and down arrows to change the contrast. Press ENTER to save
your changes or ESC to cancel.
About Menu
The About menu shows you data about the operating system of the
AccuPAR.
35
Page 40

8 CONFIG MENU AccuPAR LP-80
The About menu provides you with the serial number, firmware version number, and copyright info.
36
Page 41

AccuPAR LP-80 9 PAR AND LAI THEORY
9 PAR and LAI Theory
The AccuPAR is useful for a number of applications, including the
measurement of average and intercepted PAR. The LP-80 calculates
LAI and other attributes of the canopy structure with these measurements.
9.1 PAR (Photosynthetically Active Radiation)
PAR is the radiation in the 400 to 700 nanometer waveband. It represents the portion of the solar spectrum which plants use for photosynthesis. Under a plant canopy, radiation levels can vary from
full sun to almost zero over the space of a few centimeters. Therefore, reliable measurement of PAR requires many samples at different
locations under the canopy.
9.2 Average and Intercepted PAR
Monteith (1977) observed that dry matter production of a plant
canopy is directly related to the amount of photosynthetically useful radiation intercepted by the canopy. Dry matter production is
modeled as the product of three terms:
P = ef S (1)
where P is the amount of dry matter produced, S is the flux density of incident radiation intercepted by the crop, f is the fraction
of incident radiation intercepted by the crop, and e is a conversion
efficiency. Conversion efficiency and fractional interception (f) are
determined by crop physiology and management.
Incident solar radiation is the only environmental factor. If you
monitor f and S over the period of crop growth and measure P
at harvest, you can determine e. You can interpret the results of
experimental treatments or the influence of genetics in terms of their
effect on e and f.
The radiation incident on a canopy can be absorbed by the canopy,
37
Page 42

9 PAR AND LAI THEORY AccuPAR LP-80
transmitted through the canopy and absorbed or reflected at the soil
surface, or reflected by the canopy. In principle, only PAR absorbed
by the canopy is useful in producing dry matter, so f should be the
fractional absorption. If t is the fraction of incident radiation transmitted by the canopy, r is the fraction of incident radiation reflected
to a sensor above the canopy, and rsis the reflectance of the soil
surface, then the absorbed radiation fraction is calculated from:
f = 1 − t − r + tr
s
(2)
The last two terms are often ignored, so approximate fractional interception with equation 3.
f
∼
=
1 − t (3)
The error resulting from this approximation is usually small when
t, r, and rsare measured in the PAR waveband because most of
the PAR is absorbed by a closed canopy. The error becomes much
more significant when measurements of total solar radiation are used
because of large scattering coefficients of leaves for near infrared radiation.
As a first-order estimate of error, assume that
r = (1 − t)rc+ tr
s
(4)
where rcis the reflectance of the vegetation. Equation 2 becomes.
f = (1 − t)(1 −rc) (5)
The error resulting from using equation 3 is approximately equal to
rc, which is typically less than 0.05 in the PAR waveband. Since the
AccuPAR sensors are sensitive only to radiation in the PAR waveband, equation 3 will be fairly accurate for making measurements
of intercepted radiation. However, measurement of the other terms
needed for equation 2 is simple and we will deal with them later.
Sampling for Fractional Interception
The functions needed to perform these calculations are available in
the PAR sampling menu of the AccuPAR. The measurements needed
38
Page 43

AccuPAR LP-80 9 PAR AND LAI THEORY
for fractional interception are those from which you calculate t, r, and
rs. If S is the PAR reading from an upward-facing AccuPAR above
the plant canopy, R is the reflected PAR above the plant canopy (inverted AccuPAR above the crop), T is the upward-facing AccuPAR
below the plant canopy, and U is the reflected PAR from the soil
surface, then t, r, and rscan be calculated with equations 6 through
8.
t = T/S (6)
r = R/S (7)
rs= U/T (8)
Assume you need to know only t and measure S above the crop
canopy. Level the AccuPAR above the canopy and press the uparrow key. The reading displayed in the upper right portion of the
screen is the value for S.
Measure T by placing the AccuPAR below the plant canopy. Carefully place it below all of the leaves and try to keep the instrument
level. Press the down-arrow key to make below-canopy measurements. The resulting values are displayed below the above-canopy
values on the screen. Since the light below the canopy is extremely
variable, several samples at different locations will be necessary for
a reliable reading. The number of necessary samples can be determined by taking, for example, ten individual readings and computing
the coefficient of variation with equation 9.
CV =
s
¯
T
(9)
Where s is the standard deviation of the 10 readings.
s =
s
Σ(Ti−¯T )
2
n − 1
(10)
Where n is the number of samples taken. The fractional error in
the measurement of T will be CV divided by the square root of the
number of samples.
Once you have taken the first below-canopy PAR reading, you will
39
Page 44

9 PAR AND LAI THEORY AccuPAR LP-80
see the current τ value displayed in the lower left corner of the screen.
With each subsequent below-canopy measurement, the τ value will
be updated. After you have taken sufficient measurements, use the
displayed τ value in the lower left corner for t (see equation 6).
To find r, level the AccuPAR above the canopy and press the uparrow. Then invert the AccuPAR at a height of 1 or 2 m above the
crop canopy. Leveling is not critical for this measurement since the
radiation reaching the sensor is not directional. Press the down-arrow
key in the PAR sampling menu. Multiple readings are typically not
necessary, since R is not usually variable. r for equation 7 is shown
in the T location at the bottom of the AccuPAR screen.
To find rs, invert the AccuPAR over the soil below the canopy and
take measurements at several locations. Average and store these
measurements as before. This reading is the value U. Calculate r
s
from equation 8 using U and T . A value in the range of 0.1 to 0.2
should be obtained, but it is possible that the light level below the
canopy will be so low that U will not be accurately measured. If a
value outside of the expected range is obtained, there will be negligible error in f by assuming r = 0.15. As mentioned before, evaluation
of intercepted radiation normally involves the measurement of t.
Only measurements below the canopy have been discussed. Obviously, measurements throughout the canopy are possible. Profiles of
interception with height can be useful in determining at what location most of the photosynthesis occurs in the canopy.
9.3 Using PAR to determine Leaf Area Index
The PAR measured by the AccuPAR within a plant canopy is a combination of radiation transmitted through the canopy and radiation
scattered by leaves within the canopy. A complete model of transmission and scattering is given by Norman and Jarvis (1975), but it
is very complex and not suitable for inversion.
We use the Norman-Jarvis model to test and fit two simpler models
which invert more easily. Equation 11 is a simple light scattering
40
Page 45

AccuPAR LP-80 9 PAR AND LAI THEORY
model suggested by Goudriaan (1988). Equation 11 gives the fraction of transmitted PAR, τ (ratio of PAR measured below the canopy
to PAR above the canopy), below a canopy of LAI, L, as
τ = fbexp(−√a) + (1 − fb)exp(−0.87√a) (11)
where fbis the fraction of incident PAR which is beam, a is the
leaf absorptivity in the PAR band (AccuPAR assumes 0.9 in LAI
sampling routines), and K is the extinction coefficient for the canopy.
The extinction coefficient can be modeled in various ways. If you
assume an ellipsoidal angle distribution function (Campbell 1986),
then
K =
p
χ2+ tanΘ
2
χ + 1.744(χ + 1.182)
−0.733
(12)
where Θ is the zenith angle of the sun and χ is a leaf angle distribution parameter (see Chapter. 3 for definition). When x = 1, the
angle distribution is spherical, and K simplifies to:
K =
1
2cosΘ
(13)
John Norman suggests a different equation for predicting scattered
and transmitted PAR, equation 14.
τ = exp
n
A(1−0.47fb)L
(1−
1
2K
)fb−1
o
(14)
where A = 0.283 + 0.785a − 0.159a2.
Both equations predict canopy PAR within a few percent of values from the complete Norman-Jarvis model. Equation 11 is slightly
more accurate, but equation 14 is much easier to invert to obtain
L. The difference in accuracy of the two equations is smaller than
other uncertainties in the method, so the LP-80 uses equation 14 to
determine LAI. Inverting equation 14 gives the following:
L =
[1 −
1
2K
fb− 1]lnτ
A(1 − 0.47fb)
(15)
41
Page 46

9 PAR AND LAI THEORY AccuPAR LP-80
9.4 Applications and Examples
This section describes the method of manually collecting PAR data
for the determination of LAI in a barley and pea canopy. This example has been included to show how the AccuPAR automatically
calculates LAI in the field. PAR was measured above a barley canopy
of 391 µmol (µmol m−2s−2) on an overcast day. The average of several measurements below the canopy was 62 µmol. The transmission,
τ, is therefore 62/391 = 0.159. Since the day was overcast, fb= 0.
If a = 0.9, then A = 0.86. From equation 15, L = −ln(0.159)/0.86
= 2.14. If you make a measurement under overcast skies, it was not
necessary to have canopy structure information or solar elevation
angle. Measurements on overcast days are the simplest for LAI determination and do not require assumptions about canopy structure.
The next example uses measurements on a sunny day. 1614 µmol
was measured above a pea canopy and 80 µmol under the canopy.
The fraction of PAR transmitted by the canopy was therefore τ =
80/1614 = 0.05. The solar zenith angle was 30◦, and the beam fraction was 0.881. The A value for equation 15 is again 0.86. χ for
the canopy is unknown, but unless leaves have obvious horizontal or
vertical tendencies, a spherical distribution can be assumed and χ
set equal to 1. (The AccuPAR default value for leaf distribution parameter is 1.0, which is applicable for many canopies). For a zenith
angle of 30◦, this gives K = 0.577. Substituting these values into
equation 14 results in L = 5.2. The AccuPAR program utilizes these
same equations when the instrument is used to automatically calculate LAI. In the AccuPAR setup menu, you enter your local time,
date, and leaf distribution parameter, and it automatically calculates
zenith angle and beam fraction. It then couples these parameters
with collected intercepted PAR data to determine LAI.
9.5 Extinction Coefficient and Canopy Structure
If the the elements of a canopy are randomly distributed in space,
then the probability of a ray of light, or other probe, penetrating
the canopy without interception can be calculated from theory. The
probability of penetration without interception is equal to the sun-
42
Page 47

AccuPAR LP-80 9 PAR AND LAI THEORY
fleck fraction, which is the beam transmission coefficient, τ (Θ), for
the canopy. The parameter, Θ, is the zenith angle (angle measured
from the vertical) of the probe or solar beam. τ usually varies with
zenith angle. The transmission coefficient for a canopy of randomly
placed elements is:
τθ = exp(−KL) (16)
where L is the leaf area index of the canopy (area of leaves per unit
area of soil surface) and K is the extinction coefficient for the canopy,
which depends on the leaf angle distribution of canopy elements and
the zenith angle of the probe. A number of expressions have been
proposed for K. The most useful is from Campbell (1986) where the
angle distribution of canopy elements is assumed to be ellipsoidal.
One can picture the angle distribution of area in a plant canopy to
be similar to the angle distribution of area on the surface of oblate
or prolate spheroids, or spheres. The equation for K is
K =
p
χ2+ tanΘ
2
χ + 1.744(χ + 1.182)
−0.733
(17)
The parameter, χ, is the ratio of the length of the horizontal to
the vertical axis of the spheroid, and can be measured as the ratio
of the projected area of an average canopy element on a horizontal
plane to its projection on a vertical plane. See the definition for Leaf
Distribution Parameter in Chapter 3 for more discussion of χ and
typical values for some canopies.
43
Page 48

9 PAR AND LAI THEORY AccuPAR LP-80
Figure 6: Extinction Coefficient vs. Zenith Angle
Figure 1 shows the extinction coefficient plotted as a function of
zenith angle for various values of x. There are two important things
to note. First, at a zenith angle of about 57◦, the extinction coefficient is near unity for all canopies. When leaves are horizontal (large
χ), the extinction coefficient, K, is unity for all elevation angles, but
as χ decreases, K becomes smaller at large zenith angles and larger
at small zenith angles.
Equation 16 can be used in various ways to determine the leaf area
index, and also the leaf angle distribution for a canopy. The simplest
application is that of Bonhomme et al. (1974). Since K = 1 for
zenith angles near 57◦, the inversion of equation 16 is simple and
gives:
L = −ln(τ57) (18)
If a measurement is made when the zenith angle is about 57◦, equation 18 can be used directly to find L. If measurements of the transmission coefficient, τ , are made at several elevation angles, a simple
method from Lang (1987) can be used. The measurements of τ are
used to compute y = cosΘlnτΘ. These are regressed on Θ (in radians), giving a slope, B and intercept, A. The leaf area index is given
44
Page 49
AccuPAR LP-80 9 PAR AND LAI THEORY
by:
L = 2(A + B) (19)
An approximate value for χ is χ = exp(−B/0.4L).
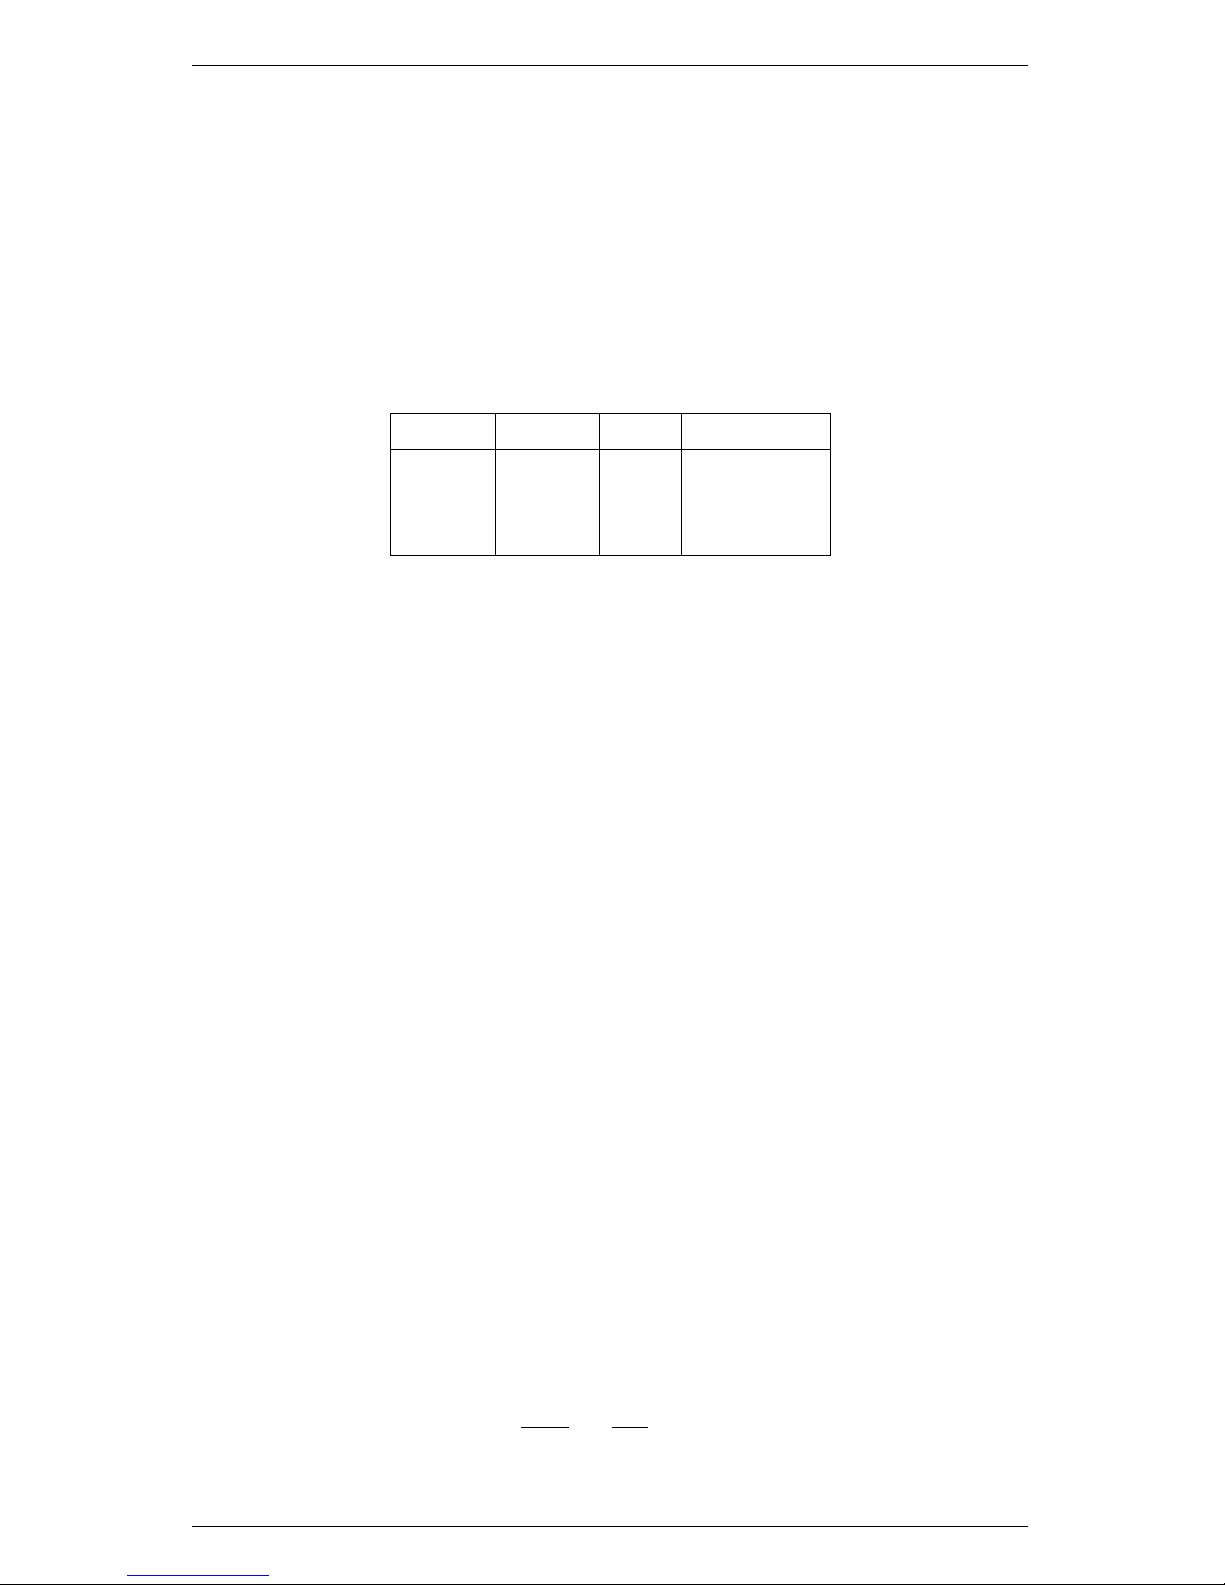
Example: Readings were obtained as follows:
Table 2: Sample Readings
Θ-deg Θ-rad τ -cosΘ lnτ
35 0.61 0.21 1.28
41 0.72 0.18 1.29
55 0.96 0.10 1.32
Linear Regression gives:
A = 1.21
B = 0.12
L = 2(1.21 + 0.12) = 2.64
χ = exp(-0.12 / 0.4 x 2.64) = 0.9
A more precise method for finding χ is as follows. We would like
to find values for χ and L which minimize:
F =
X
(lnτi+ KiL)
2
(20)
subject to the constraint, χ >0, where τiare transmission coefficients
measured at several zenith angles, Θi, and the Kiare the extinction
coefficients for the corresponding angles.
9.5.1 Correction of PAR for Sun Angle
Canopy transmission (τ ), measured at one zenith angle, can be used
to predict transmission or radiation interception for other zenith angles. For example, a measurement might be made at Θ = 32◦from
which cover (1 - transmission at Θ = 0) is to be calculated. From
equation 16:
lnτ
1
lnτ
2
=
K
1
K
2
= p (21)
45
Page 50

9 PAR AND LAI THEORY AccuPAR LP-80
so:
τ(Θ1) = τ(Θ2)
p
(22)
We can calculate p from equation 17:
p =
(χ2+ (tanΘ1)2)
(χ2+ (tanΘ2)2)
1
2
(23)
If Θ1= 0,
p =
(χ2)
(χ2+ (tanΘ2)2)
1
2
(24)
If χ is not known, assume χ = 1. Example: From the measurements
in the previous example, find the canopy cover. Take Θ = 35◦,
τ = 0.21. The χ value is 0.9.
p =
(0.92)
(0.92+ (tan35)2)
1
2
τ(0) = 0.210.79 = 0.29
Cover = −τ (0) = 1 −0.29 = 0.71
Intercepted radiation averaged over an entire day can be estimated
from:
f = 1 − τ
d
(25)
where τdis the transmission coefficient averaged over all elevation
angles τdcan be calculated from:
− lnτd= uL
v
(26)
where u and v are functions of χ which can be calculated from:
u = 1 − 0.33exp(−0.57χ) (27)
v = 1 −0.33exp(−0.97χ) (28)
Table 3 shows typical values.
46
Page 51

AccuPAR LP-80 9 PAR AND LAI THEORY
Table 3: Values of u and v for equation 26
χ u v
0.1 0.69 0.73
0.5 0.75 0.82
1.0 0.81 0.89
2.0 0.90 0.95
4.0 0.96 0.98
8.0 0.99 0.99
Combining equations 16 and 25 gives:
τd= τ(Θ)
q
(29)
where q = uL
v−1
/K
Example: Calculate a value for fractional daily interception for the
crop in the previous two examples.
u = 1 − 0.33exp(−0.57x0.9) = 0.80
v = 1 −0.33exp(−0.97x0.9) = 0.87
K =
(0.92+ (tan35)2)
1
2
0.9 + 1.774(0.9 + 1.182)
−0.733
=
1.14
1.94
= 0.59
q = 0.80 ∗2.64
−0.13
/0.59 = 1.2
τd= 0.21
1.2
= 0.15
f = 1 − τd= 1 − 0.15 = 0.85
9.6 LAI measurements & Non-Random Distribution
There has been much discussion concerning inversion methods to
obtain LAI. Since all inversion methods rely on the assumption that
elements of a canopy are randomly dispersed in space, errors in the
measurement of LAI may result from a non-random arrangement
of canopy elements. This is especially true for canopies with heliotropic leaves, conifer forests, row crops before canopy closure, or
47
Page 52

9 PAR AND LAI THEORY AccuPAR LP-80
for canopies which never close, as in desert vegetation. The degree
of error in measurement is a result of the canopy deviation of the
canopy from this random dispersion assumption.
Past studies use LAI to relate both actual biomass area and the
interception of PAR by a plant canopy. Another proposed view regarding LAI in which L, the actual biomass area, relates to a new
term, Le, which represents the actual orientation of the canopy elements relating to the interception of PAR at a given angle. In situ
measurements of LAI using hemispherical photography were equated
with this new term “effective plant area index” (Le), which was defined as:
Le= ΩL (30)
where Lerepresents the actual leaf area index (equal to a harvested
leaf area measurement) and Ω refers to a clumping index resulting
from the non-random distribution of canopy elements.
When a canopy displays random dispersion, Ω is unity; however,
when a canopy is clumped, Ω is not unity. In a randomly dispersed
canopy, L would be equal to Le(figure 2). In an under-dispersed
canopy (clumped), L would be greater than Le(see figure 3, leaves
preferentially shade the leaves). In an over-dispersed canopy, L would
be less than Le(see figure 4, leaves are in the open spaces). Refer to
the next page for illustrations.
The purpose of this discussion is to expose you to possible errors that
may occur when making LAI measurements in situ. When setting up
an experiment, you should carefully examine the desired end result.
If you are only interested in the interception of PAR within a canopy,
the apparent leaf or plant area index that is calculated through inversion will be an accurate portrayal of the canopy structure and
orientation with respect to light interception. In this instance, while
clumping effects within the canopy remain present, these effects do
not cause error with regard to light interception and the effective
area index for that situation. Alternately, if you are interested in
obtaining the actual biomass represented by L in this discussion, all
measurements should be performed so that the effects of clumping
are minimized. The method used in the LP-80 to compute τ fol-
48
Page 53

AccuPAR LP-80 9 PAR AND LAI THEORY
lows the recommendation of Lang and Yueqin (1986) for minimizing
clumping effects. You can also measure only at certain times of day
or at positions within the canopy that directly minimize clumping
effects.
Figure 7: Randomly Dispersed L=L
e
Figure 8: Under Dispersed L > L
e
Figure 9: Over Dispersed L < L
e
9.7 Zenith Angle and Equation of Time
The formulas for calculating elevation angle are relatively straightforward. The zenith angle is calculated with equation 31
Ψ = arccos(sinLatsinD + cosLcosDcos0.2618(t − t0)) (31)
Lat is the latitude, D is the solar declination, t is the time, and to is
the time of solar noon. The earth turns at a rate of 0.2618 radians
49
Page 54

9 PAR AND LAI THEORY AccuPAR LP-80
per hour, so the 0.2618 factor converts hours to radians. Time, t,
is in hours (local solar time), ranging from 0 to 24. Latitude of a
given site is easily found in an atlas or using a GPS system. Users in
the Southern hemisphere should enter latitude as a negative number.
Solar declination ranges from +0.409 radians (+23.45◦) at summer
solstice to −0.409 radians (−23.45◦) at winter solstice. It can be
calculated from equation 32
D = arcsin[0.39785sin[4.869 + 0.0172J
+0.03345sin(6.224 + 0.0172J)]] (32)
J is the day of the year. Some values are given in Table 4. The time
of solar noon is calculated with equation 33
t0= 12 − LC − ET (33)
LC is the longitude correction and ET is the Equation of Time. LC
is +4 minutes, or +1/15 hour for each degree east of the standard
meridian and -1/15 hour for each degree west of the standard meridian. Standard meridians are at 0◦, 15◦, 30◦...etc. Generally, time
zones run approximately +7.5◦to −7.5◦on either side of a standard
meridian, but this varies depending on political boundaries, so check
an atlas to find both standard meridian and longitude. Typically,
longitudes in the Eastern Hemisphere are given as negative values.
The Equation of Time is a 15 to 20 minute correction which depends
on the day of the year. It can be calculated from:
ET = [−104.7sinφ + 596.2sin2φ + 4.3sin3φ − 12.7
sin4φ − 429.3cosφ − 2.0cos2φ + 19.3cos3φ]/3600 (34)
where φ = (279.575 + 0.986J )π/180. Some values for ET are given
in Table 4.
Example Calculation:
Find the zenith angle for Pullman, WA at 10:45 PDT on June 30.
Convert the time of observation to standard time by subtracting one
hour and convert minutes to decimal hours, so t = 9.75 hours.
50
Page 55

AccuPAR LP-80 9 PAR AND LAI THEORY
June 30 is J = 181.
Pullman latitude is 46.77◦, or 0.816 radians, and longitude is 117.2◦.
The standard meridian for Pullman is 120◦. The local meridian is
2.8◦east of the standard meridian, so LC = 2.8/15 = 0.19 hours.
From Equation 34 or Table 4, ET = −0.06 hours. Equation 33 then
gives to= 12 −0.19 − (−0.06) = 11.87. Declination from Table 4 or
Equation 32 is 0.4 radians. Substituting these values into Equation
31 gives:
Θ = arccossin(0.816)sin(0.4) + cos(0.816)cos(0.4)
cos[0.2618(9.75 − 11.87)]= 0.61 radians, or 34.9
◦
(35)
Table 4: Solar Declination and Equation of Time
Date Day of Year D in Radians ET Hour
Jan 1 1 −0.403 −0.057
Jan 10 10 −0.386 −0.123
Jan 20 20 −0.355 −0.182
Jan 30 30 −0.312 −0.222
Feb 9 40 −0.261 −0.238
Feb 19 50 −0.202 −0.232
Mar 1 60 −0.138 −0.208
Mar 11 70 −0.071 −0.117
Mar 21 80 −0.002 −0.122
Mar 31 90 0.067 −0.072
Apr 10 100 0.133 −0.024
Apr 20 110 0.196 0.017
Apr 30 120 0.253 0.046
May 10 130 0.304 0.060
May 20 140 0.346 0.059
May 30 150 0.378 0.043
Jun 9 160 0.399 0.015
Jun 19 170 0.409 −0.019
Jun 29 180 0.406 −0.055
Jul 9 190 0.392 −0.085
Jun 19 200 0.366 −0.103
Jun 29 210 0.331 −0.107
Aug 8 220 0.286 −0.097
Continued on next page
51
Page 56

9 PAR AND LAI THEORY AccuPAR LP-80
Table 4 – Continued from previous page
Date Day of Year D in Radians ET Hour
Aug 18 230 0.233 −0.065
Aug 28 240 0.174 −0.022
Sep 7 250 0.111 0.031
Sep 17 260 0.045 0.089
Sep 27 270 −0.023 0.147
Oct 7 280 −0.091 0.201
Oct 17 290 −0.157 0.243
Oct 27 300 −0.219 0.268
Nov 6 310 −0.275 0.243
Nov 16 320 −0.324 0.255
Nov 26 330 −0.363 0.213
Dec 6 340 −0.391 0.151
Dec 16 350 −0.406 0.075
Dec 26 360 −0.408 −0.007
Automatic Calculation of Zenith Angle
The AccuPAR automatically determines zenith angle using the above
equation and parameters. However, to get the accurate zenith angle
for your location, you need to enter the site latitude, longitude and
universal time offset in the Setup menu. Once these values are entered, the AccuPAR determines zenith angle without further input.
The zenith of the sun angle will then be calculated and stored at the
end of each data set.
52
Page 57

AccuPAR LP-80 10 MEASUREMENT TIPS
10 Measurement Tips
10.1 Above Canopy (External) Sensor
The AccuPAR is supplied with an external PAR sensor which connects to the port on the right side of the AccuPAR. The external
sensor allows you to take simultaneous above and below canopy PAR
readings without having to move the instrument above and below the
canopy you are measuring.
For above-canopy PAR data collection, consider connecting the external point sensor to the AccuPAR. This ensures an accurate measurement of intercepted PAR, especially on days where radiation levels vary rapidly. You can mount the sensor on a tripod and level it
with a bubble level.
When it is not feasible to use an external point sensor to obtain
above-canopy measurements, such as in timber or tropical crops, you
have two choices:
1. Use a separate data logger with an attached PAR sensor such as
a point quantum sensor, or configure another AccuPAR to log
in the unattended mode (one reading per minute, for example)
in a clearing outside the canopy. After collecting PAR data
within the canopy, you can correlate the data from the two
instruments after downloading it from each to a computer.
2. You can use your AccuPAR as an above-canopy reference by
regularly collecting above-canopy PAR data in a large clearing
within the canopy structure.
10.2 Sample Size
When evaluating experimental protocols for measuring average intercepted PAR and determining average LAI for a large area, make
sure that a sufficient number of samples and sampling locations are
used. This will reduce errors caused by canopy structure variations.
53
Page 58

10 MEASUREMENT TIPS AccuPAR LP-80
10.3 Clumping in Canopies
When evaluating discontinuous canopies or canopies with definite
clumping, the AccuPAR can be configured such that its active sampling area is reduced, or you can download the data collected by the
AccuPAR probe segments. In this way you can gather information
that better describes the changes in canopy structure with regard to
location. To reduce the sampling size of the probe, refer to the “Set
Active Segments” option in the setup menu (see chapter 7). To see
the individual PAR readings for each of the eight probe segments,
download the stored data to the computer (See Download section in
Chapter 6).
10.4 LAI Sampling in Row Crops
One of the common uses for the AccuPAR is measuring the leaf area
index of row crops. When doing so, it is important to take measurements in such a way as to give a good row-to-row representation
of the entire below-canopy PAR environment both under the plants
and between rows. We suggest a sampling regime such as shown
below, where the probe either extends from mid-row to mid-row, or
extends from mid-row to the middle of the open space between rows,
depending on row width and canopy size.
54
Page 59

AccuPAR LP-80 10 MEASUREMENT TIPS
Figure 10: Scenario 1: The two ends of the AccuPAR probe are in
the middle of each row, getting a good representative sample of the
entire area below and between rows.
Figure 11: Scenario 2: The base of the probe is in the center of the
row, while the end is in the center of the open space between rows.
When sampling the next row, the same orientation is maintained,
giving an accurate representation of the overall area.
55
Page 60

11 CARE AND MAINTENANCE AccuPAR LP-80
11 Care and Maintenance
11.1 Batteries
The AccuPAR uses four standard 1.5 V AAA alkaline batteries.
These batteries are easily obtained and should last for at least two
years before they have discharged. If a battery icon appears in the
upper right corner of the screen (to the left of the time) or a low
battery message is displayed, you will need to change your batteries.
Replacing Batteries
If the alkaline batteries require replacement, remove the four screws
on the bottom of the AccuPAR case and lift the cover carefully. The
batteries are located on both sides of the circuit board. Be sure
to orient them properly; placing them the wrong way in the battery
holder can damage the AccuPAR. The battery holders indicate which
direction they should be placed. After replacing the batteries, press
the reset button at the top left corner of the board.
Note: Data will not be lost when the batteries are replaced. The
memory and program sections of the AccuPAR are non-volatile.
11.2 Cleaning the Probe and Controller
The white probe diffuser should always be clean to ensure accurate
readings. To clean the probe, use a small amount of isopropyl alcohol
and a soft cloth. Rub the surface until it is clean.
To clean the controller, use a soft cloth and water to wash heavy
dirt, then use ethyl or isopropyl alcohol to finish cleaning. Make
sure to only use a soft cloth when cleaning the LCD window. Tissues made from wood fiber will scratch the surface.
56
Page 61

AccuPAR LP-80 11 CARE AND MAINTENANCE
11.3 Recalibration
The AccuPAR calibrates its sensors against the external sensor supplied with the instrument. Therefore, provided your external sensor
calibration is good, you simply recalibrate the AccuPAR in the Config menu (see chapter 9) as often as you wish. However, as is the
case with all electronic components, shifts in the external sensor sensitivity will occur over time. As a result, we recommend that you
periodically send your external sensor in to Decagon’s factory for recalibration, depending on how often you use it. If you use it heavily
each year, we suggest once a year. For periodic measurements, one
recalibration every two to three years should be adequate. Before
sending the instrument in, contact Decagon via phone or email so we
can prepare for its arrival.
11.4 General Precautions
The AccuPAR is a low maintenance instrument. There are only a
few suggestions to keep in mind.
Cautions
Keep the probe clean. The accuracy of readings may decline if there is any debris on the probe which prevents
light from entering the sensors.
Although the AccuPAR is splash-resistant, do not immerse
the instrument in water, or leave the it in contact with rain
for long periods of time.
When transporting the AccuPAR, keep the instrument in
its padded hard-sided carrying case to prevent damage.
57
Page 62

12 TROUBLESHOOTING AccuPAR LP-80
12 Troubleshooting
The AccuPAR LP-80 is a high performance, low maintenance instrument, designed to have few problems if used with care. Unfortunately, sometimes even the best operators using the best instruments
encounter technical difficulties. Below is quick reference guide that
will direct you to detailed solutions of some problems that may occur. If these remedies still does not resolve your problem, then please
contact Decagon for help (see Customer Support in Chapter 1). Here
is a list of some problems that may occur.
Note: If you purchased your Decagon instrument from one of our
international distributors, please contact them for local service and
support.
Table 5: Troubleshooting Quick Guide
If this problem occurs: Refer to:
Instrument does not turn on Problem #1
Display is difficult to see Problem #2
I get an error message when I try to calibrate Problem #3
Your LAI output is 0... Problem #4
Low battery message Problem #5
Date and time were reset message Problem #6
Data erase failed message Problem #7
Missing bootstrap loader message Problem #8
Firmware corrupted message Problem #9
Cannot change settings message Problem #10
Only one mode can be run at a time message Problem #11
Memory full message Problem #12
No summary data message Problem #13
By continuing you will lose custom info msg. Problem #14
Communication port is already in use Problem #15
Download data to the Utility failed Problem #16
1. PROBLEM:
Instrument does not turn on.
58
Page 63

AccuPAR LP-80 12 TROUBLESHOOTING
SOLUTION:
Make sure that the batteries are inserted correctly, and/or if they
have enough power to activate the machine.
2. PROBLEM:
The display is difficult to see.
SOLUTION:
Turn off the LP-80 and then turn it on again. If this does not fix
the problem, the LP-80 features a built-in screen for changing screen
contrast. See “Contrast” in Chapter 7 for details. You may be able
to fix the contrast manually, which can be done using a terminal port
program. Contact Decagon for information regarding this procedure.
3. PROBLEM:
Message on screen displays the following:
SOLUTION:
The external sensor must be reading a PAR value of 600µmol/m2s
in order to calibrate. Make sure that the external is attached and is
in full view of the Sun. If the day is overcast, wait to calibration the
sensor on a sunny day when PAR levels are above 600µmol/m2s.
4. PROBLEM:
Your LAI output is 0 even though there is a valid above and below
canopy PAR reading.
SOLUTION:
59
Page 64

12 TROUBLESHOOTING AccuPAR LP-80
Check your zenith angle (Z). If Z is greater than 90 degrees, the
time or latitude/longitude are most likely set incorrectly. Return to
the set date/time menu and double check that:
1. Time is set in 24 hour format.
2. You have the proper sign in your latitude and longitude positions. Positive is East and negative West for longitude, and
positive is North and negative South for latitude.
Zenith angle should now be 0 to 90 degrees, as expected for daylight
hours, and LAI and Fbshould now be calculated correctly.
5. PROBLEM:
Message on screen displays the following:
SOLUTION:
The batteries in the instrument may not be properly inserted in
the battery holder or they may need to be replaced. If the batteries
are not inserted properly, reseat the batteries into the battery holder
and cycle the power on the instrument.
6. PROBLEM:
Message on screen displays the following:
60
Page 65

AccuPAR LP-80 12 TROUBLESHOOTING
SOLUTION:
After changing the batteries or loading new firmware onto an instrument, this message may appear. Navigate to the configuration
menu and verify that the date and time are set properly.
7. PROBLEM:
Message on screen displays the following:
SOLUTION:
This screen will only be displayed when you try to erase the data
memory when the batteries are critically low. Replace the batteries and then press ENTER when powered back on to exit this screen.
8. PROBLEM:
Message on screen displays the following:
61
Page 66

12 TROUBLESHOOTING AccuPAR LP-80
SOLUTION:
The instrument cannot download new firmware updates. To download new firmware to the LP-80, or to stop this message from displaying, the instrument must be serviced by Decagon.
9. PROBLEM:
Message on screen displays the following:
SOLUTION:
This screen means that your firmware was not loaded properly, and
that an update is needed. (The firmware for the LP80 is userupgradeable.) To obtain this, visit Decagon’s website to see if new
updates are available; if not, contact Decagon for the newest firmware
version. Note: You will lose any saved data records when you install
the new firmware. Therefore, download any data you wish to save
before re-loading the new firmware. If this is not an option, contact
Decagon for further help. To obtain new firmware for your LP80, see
the section on “Check for Firmware Updates” in Chapter 4 for more
information.
62
Page 67

AccuPAR LP-80 12 TROUBLESHOOTING
10. PROBLEM:
Message on screen displays the following:
Figure 12: May also say “reading”
SOLUTION:
Anytime a reading or logging mode is activated (indicated by a busy
icon in the upper left hand corner of the PAR or Log menu), configuration settings are locked to prevent inconsistent data from being
saved. To change settings, navigate to the PAR or Log menu and
escape out of the active reading. Once the new settings are changed,
you can then begin a new reading.
11. PROBLEM:
Message on screen displays the following:
Figure 13: May also happen on the log menu
SOLUTION:
Only one mode may be running at a time. If you are logging, this
message will appear on the PAR screen. If you are taking a reading
63
Page 68

12 TROUBLESHOOTING AccuPAR LP-80
on the PAR screen, a message similar to this will appear in the Log
menu. Press ENTER to stop the currently running mode or press
MENU to proceed to the next menu without changing the mode.
12. PROBLEM:
Message on screen displays the following:
SOLUTION:
This message indicates that the data memory is full. You may
continue to view the real-time PAR values, configuration settings,
and previously stored data while the memory is full. No more data
records can be saved until the data records stored in memory are
downloaded to the computer and erased from the LP-80.
13. PROBLEM:
Message on screen displays the following:
SOLUTION:
The view menu only allows you to view summary records. If you
have not saved any records or if you only have saved above and below
records, this message will appear when trying to view or download
64
Page 69

AccuPAR LP-80 12 TROUBLESHOOTING
data. To make this message go away, save a summary record on the
PAR or Log menu by pressing ENTER.
14. PROBLEM:
Message on screen displays the following:
SOLUTION:
If you are trying to change a country or city location and you have
custom configured the longitude, latitude or UTC offset, this message will appear. If you continue it will reset the location information
to the default settings for that city. If you press ESC, your custom
location settings will be preserved.
15. PROBLEM:
The LP80 Utility tells me the communication port I want to use is
not available for selection.
SOLUTION:
Disconnect any other applications that may be using the desired
communications port. Additionally, some PDA synchronization software monitors serial communication ports. Disable Microsoft’s ActiveSync or Palm’s HotSync system software while using the serial
port with the LP80 Utility.
16. PROBLEM:
Downloading data stops in the middle with an error message saying
the Utility lost connection with the LP80.
SOLUTION:
65
Page 70

12 TROUBLESHOOTING AccuPAR LP-80
A noisy serial connection can disrupt the connection between the
Utility and the LP80. If this error happens regularly, you can try
setting your baud rate lower or increasing the number of times a
command is sent to the LP80. Choose the “Communications” tab in
Preferences to alter this.
66
Page 71

AccuPAR LP-80 13 SUPPORT AND REPAIR
13 Support and Repair
Note: If you purchased your LP-80 from one of our international
distributors, please contact them. They will be able to provide you
with local support and service.
When encountering problems with your LP-80 (that you unable to
resolve with the help of this manual), please contact Decagon Customer Support at support@decagon.com, 509-332-5600 or fax us at
509-332-5158. Please have the serial number and model of the instrument ready.
All products returning to Decagon for servicing must be accompanied with a Return Material Authorization (RMA) number. Prior to
shipping the instrument, please contact a Decagon customer support
representative to obtain an RMA.
Shipping Directions
The following steps will help to ensure the safe shipping and processing of your AccuPAR LP-80.
1. Ship your LP-80 in its original cardboard box with suspension
packaging. If this is not possible, use a box that has at least
four inches of space between your instrument and each wall of
the box.
2. Place the LP-80 in a plastic bag to avoid disfiguring marks
from the packaging.
3. Do not ship the power cord or serial cable.
4. If the original packaging is not available, pack the box moderately tight with packing material (e.g. styrofoam peanuts
or bubble wrap), ensuring the instrument is suspended in the
packing material.
5. On the RMA form, please verify the ship to and bill to information, contact name, and problem description. If anything is
incorrect please contact a Decagon representative.
67
Page 72

13 SUPPORT AND REPAIR AccuPAR LP-80
6. Tape the box in both directions for added support.
7. Include the RMA number in the attention line on the shipping
label.
Ship to:
Decagon Devices Inc.
ATTN: RMA (insert your RMA #)
2365 NE Hopkins Court
Pullman, WA 99163
13.1 Repair Costs
Manufacturer defects and instruments within the three-year warranty
will be repaired at no charge. Non-warranty repair charges for parts,
labor and shipping will be billed to you. An extra fee may be charged
for rush work. Decagon will provide an estimated repair cost, if
requested.
68
Page 73

AccuPAR LP-80 14 FURTHER READINGS
14 Further Readings
The following is a list of references that offer more detail concerning
plant canopy characteristics and research.
Anderson, M.C., (1971). Radiation and crop structure. Plant Photosynthetic Production, Manual of Methods (eds. A. Sestak, J. Catsky
and P.G. Jarvis), Junk, The Hague, pp. 412-66.
Andrade, F.H., Calvio, P., Cirilo, A. and P. Barbieri, (2002). Yield
Responses to Narrow Rows Depend on Increased Radiation Interception. Agronomy Journal, 94:975-980.
Bonhomme, R., Varlet-Grancher, C. and Chartier, P., (1974). The
use of hemispherical photographs for determining the leaf area index
of young crops. Photosynthetica, 8 (3), pp. 299-301.
Campbell, G.S., (1977). An Introduction to Environmental Physics,
Springer-Verlag New York Inc., New York, pp. 159.
Campbell, G.S., (1986). Extinction coefficients for radiation in plant
canopies calculated using an ellipsoidal inclination angle distribution.
Agric. For. Meteorol., 36: 317-21.
Campbell, G.S., and J.M Norman., (1988). The description and
measurement of plant canopy structure. in Plant Canopies: Their
Growth, Form and Function (ed. G. Russell), Society for Experimental Biology, Seminar Series 29, Cambridge University Press, New
York.
Chen, H.Y.H., (1997). Interspecific responses of planted seedlings
to light availability in interior British Columbia: survival, growth,
allometric patterns, and specific leaf area. Canadian Journal of For-
est Research 27: 1383-1393.
Chen, Jing M. and Cihlar, Josef. Plant Canopy gap-size theory for
improving optical measurements of leaf-area index. Applied Optics
34(27): 6211-6222.
69
Page 74

14 FURTHER READINGS AccuPAR LP-80
Cohen, S., Striem, M.J., Bruner, M., and I. Klein. Grapevine Leaf
Area Index Evaluation by Gap Fraction Inversion. Proceedings of
the 3rd Intl. Symposium on Irrigation Hort. Crops, Ferreira and
Jones (eds.) Acta Horticulturae. 537, ISHS 2000 pp. 87-91.
Cohen, Shabtai, R. Sudhakara Rao and Yehezkel Cohen. Canopy
transmittance inversion using a line quantum probe for a row crop.
Agricultural and Forest Meteorology 86: 225-234.
Flnet F, J.R. Kiniry, J.E. Board, M.E. Westgate and D.C. Reicosky.,
(1995). Effect of row spacing, time of day, and stage of crop development on light extinction coefficient of corn, sorghum, soybean, and
sunflower. Agronomy Journal.
Goudriaan, J., (1977). Crop Micrometeorology: A Simulation Study,
Center for Agriculture Publication Documentation, Wageningen, The
Netherlands.
Goudriaan, J., (1988). The bare bones of leaf angle distribution
in radiation models for canopy photosynthesis and energy exchange.
Agricultural and Forest Meteorology, 43:155 - 169.
Hyer, E. and S.J. Goetz, (2004). Comparison and sensitivity analysis
of instruments and radiometric methods for LAI estimation: assessments from a boreal forest site. Agricultural and Forest Meteorology,
122 (3/4): 157-174.
Jobidon, Robert., Measurement of Light Transmission in Young Conifer
Plantations: A new Technique for Assessing Herbicide Efficacy. North-
ern Journal of Applied Forestry 9(3): 112-115.
Jobidon, Robert., Light Threshold for Optimal Black Spruce (Picea
mariana) Seedling Growth and Development Under Brush Competition. Canadian Journal of Forest Research Vol. 24, No. 8:1629-1635.
Kiniry, J.R., C.R. Tischler, G.A. Van Esbroeck., (1999). Radiation Use Efficiency and leaf CO2 exchange for diverse C4 Grasses.
70
Page 75

AccuPAR LP-80 14 FURTHER READINGS
Biomass and Bioenergy. 17:95-112.
Kiniry, J.R., J.A. Landivar, M. Witt, T.J. Gerik, J. Cavero, and L.J.
Wade, Radiation-use efficiency response to vapor pressure deficit for
maize and sorghum. European Journal of Agronomy Oct. 1995.
Kiniry, J.R. and D.P. Knievel., Response of Maize Seed Number to
Solar Radiation Intercepted Soon after Anthesis. Agronomy Journal
87(2): 228-234
Kiniry, J.R., Radiation-Use Efficiency and Grain Yield of Maize
Competing with Johnsongrass. Agronomy Journal 86(3): 554-556.
Kiniry, J.R., (1998) Biomass Accumulation and Radiation use Efficiency of Honey Mesquite and Eastern Red Cedar. Biomass and
Bioenergy Vol.15 No. 6: 467-473.
Lang, A.R.G., (1986). Leaf area and average leaf angle from transmission of direct sunlight. Aust. J. Bot., 34:349-355.
Lang, A.R.G., (1987). Simplified estimate of leaf area index from
transmittance of the sun’s beam. Agric. For. Meteorol., 41: 179-186.
Lang, A.R.G., (1991). Application of some of Cauchy’s theorems to
estimation of surface areas of leaves, needles and branches of plants,
and light transmittance. Agric. For. Meteorol., 54: (in press).
Lang, A.R.G., R.E. McMurtrie, and M.L. Benson., (1991). Validity
of leaf area indices of Pinus radiata forests estimated from transmittances of the sun’s beam. Agric. For. Meteorol., (accepted).
Lang, A.R.G., and R.E. McMurtrie., (1991). Total leaf areas of
single trees of Eucalyptus grandis estimated from transmittance of
the sun’s beam. Agric. For. Meteorol., (accepted).
Lang, A.R.G. and Xiang Yueqin, (1986). Estimation of leaf area
index from transmission of direct sunlight in discontinuous canopies.
Agric. For. Meteorol., 37: 229-43.
71
Page 76

14 FURTHER READINGS AccuPAR LP-80
Lang, A.R.G., Xiang Yueqin and J.M. Norman, (1985). Crop structure and the penetration of direct sunlight. Agric. For. Meteorol.,
35: 83-101.
Lemur, R., (1973). A method for simulating the direct solar radiation regime in sunflower, Jerusalem artichoke, corn and soybean
canopies using actual stand structure data. Agric. Meteorol., 12:
229-47.
Levy, P.E. and P.G. Jarvis, (1998). Direct and indirect measurements of LAI in millet and fallow vegetation in HAPEX-Sahel Agric.
For. Meteorol., 97: 199-212.
Maas, S. Cotton canopy structure, light absorption, and growth
in the San Joaquin Valley of California. Proceedings of the 1996
Beltwide Cotton Conferences,(2) 1235-1237.
Martens, Scott N., S.L. Ustin and R.A. Rousseau., (1993) Estimation of tree canopy leaf area index by gap fraction analysis. Forest
Ecology and Management 61 : 91-108
Norman, J.M., (1979). Modeling the complete crop canopy. in Modification of the Aerial Environment of Crops (eds B.J. Barfield and
J. Gerber), American Society of Agricultural Engineers, St. Joseph,
MI, pp. 249-77.
Norman, J.M., and G.S. Campbell., (1989). Canopy structure. Plant
physiological ecology: Field methods and instrumentation. eds. R.E.
Pearcy, J.R. Ehleringer, H.A. Mooney and P.W. Rundel. London,
Chapman and Hall. pp. 301-325.
Norman, J.M. and P.G. Jarvis., (1974). Photosynthesis in Sitka
Spruce (Picea sitchensis (Bong.) Carr.) III. Measurements of canopy
structure and interception of radiation. J. Appl. Ecol., 12:839-878.
Norman, J. M., E.E. Miller, and C.B. Tanner., (1971). Light intensity and sunfleck-size distributions in plant canopies. Agron. J.,
72
Page 77

AccuPAR LP-80 14 FURTHER READINGS
63:743-748.
Norman, J. M. and J.M. Welles., (1983). Radiative transfer in an
array of canopies. Agron. J., 75:481-488.
Norman, J. M., S.G. Perry, A.B. Fraser, and W. Mach., (1979). Remote sensing of canopy structure. Proc. 14th Conf. Agric. For.
Meteor., p.184-185, Am. Meteor. Soc., Boston.
Welles, Jon M., and Shabtai Cohen. Canopy Structure measurement
by gap fraction analysis using commercial instrumentation. Journal
of Experimental Botany. 47(302): 1335-1342.
White, J.D., Running, S.W., Nemani, R., Keane, R.E., and K.C.
Ryan. Measurement and remote sensing of LAI in Rocky Mountain
montane ecosystems. Canadian Journal of Forest Research 27: 1714-
1727 (1997)
Wilhelm, W.W., K. Ruhe, and M.R. Schlemmer, (2000). Comparison of Three Leaf Area Index Meters in a Corn Canopy. Crop Science
40:1179-1183.
73
Page 78

15 DECLARATION OF CONFORMITY AccuPAR LP-80
15 Declaration of Conformity
Application of Council Directive: 89/336/EEC
Standards to which conformity is
declared:
EN500082 : 1998 and EN55022 :
1998
Manufacturer’s Name: Decagon Devices, Inc 2365 NE
Hopkins Ct. Pullman, WA 99163
USA
Type of Equipment: AccuPAR Linear PAR/LAI Cep-
tometer
Model Number: LP-80
Year of First Manufacture: 2003
This is to certify that the AccuPAR model LP-80, manufactured by
Decagon Devices, Inc., a corporation based in Pullman, Washington,
USA meets or exceeds the standards for CE compliance as per the
Council Directives noted above. All instruments are built at the
factory at Decagon and pertinent testing documentation is freely
available for verification.
74
Page 79

AccuPAR LP-80 16 APPENDIX A
16 Appendix A
16.1 External Sensor Information
The external quantum sensor provided with the AccuPAR model LP80 is the Apogee SQ110. It is calibrated to provide an output of 5
µmol m−2s−1per mV. This sensor offers good accuracy, however you
should be aware of potential sources of error. The biggest error is
often caused by small changes in the position of the sensor. The sensor must be exactly horizontal for the most accurate measurements.
Specifications
Output: 5 µmol m−2s−1per mV
Dimensions: 24 mm diameter, 27 mm tall
Cable length: 2 m
Range: 0 to 4000 µmol m−2s−1(full sunlight 2000)
Warranty: 1 year parts and labor.
16.2 Spectral Response
An ideal quantum sensor would give equal emphasis to all photons
between 400 and 700 nm and would exclude photons above and below these wavelengths. Quantum sensors, such as the Apogee, that
approximate the ideal response with filters are accurate to within
±3% for common light sources. The spectral response of the Apogee
sensor is such that it underestimates the 400 to 500 nm wavelengths
(blue light), matches in the 550 to 650 nm wavelengths (yellow and
orange), and has little sensitivity above 650 nm (red light). Fortunately common light sources are mixtures of colors and many spectral
errors offset each other.
Cosine Response
The cosine error for the Apogee external sensor for typical applications is less than 1%.
Long-term stability
75
Page 80

16 APPENDIX A AccuPAR LP-80
The output of all radiation sensors tends to drift over time as the
detector ages. The long term shift of the sensor is less than 3% per
year. We recommend returning the sensor for recalibration at least
every three years.
76
Page 81

Index
About Menu, 35
Accessories, 4
Batteries, 56
Replacing, 56
Type, 56
Beam Fraction, 9
Biomass
Production, 48
Calibration, 31, 57
External Sensor, 33
Canopy
Distribution, 43
Canopy Elements
Non-random Distribution, 47
Canopy Structure
Error Reduction, 53
Care, 56
CE Compliance, 74
Chi, 10
Chi Parameter
Setting, 33
Cleaning, 56
Clumping, 48, 54
Minimizing Effects, 48
Conifer Forests, 47
Customer Support, 1, 67
Data Menu, 17
Date
Setting, 33
Setting with LP-80 Utility, 26
Declaration of Conformity, 74
Downloading Data, 18
with LP-80 Utility, 23
Dry Matter Production, 37
Email, 1, 67
Erase Data, 22
Error
in Readings, 38
Measurement, 38, 40
External Sensor, 9
Calibration Constant, 33
Specifications, 75
Extinction Coefficient, 42
Fb, 9
Fax, 1
File
Deleting Files, 22
Download, 18
View, 17
Fraction of Beam Radiation (Fb),
9
Fractional Interception, 38
Geographical Location
Setting, 32
K (extinction coefficient), 42
Keyboard, 5
LAI
Equation for Calculating, 41
LAI Calculation, 40
Examples, 41
Leaf Angle Distribution, 44
Leaf Distribution
Random, 42
Leaf Distribution Parameter, 10,
13
77
Page 82

INDEX AccuPAR LP-80
Maintenance, 56
Measurement
Taking PAR and LAI Sam-
ples, 12
Overcast Sky Conditions, 42
PAR
and Dry Matter Production,
37
Definition, 37
for LAI, 37
PAR/LAI Sampling Menu, 12
Partitioning Probe, 34
Recalibration, 57
References, 69
Repair
Costs, 68
Instructions, 68
Row Crops, 47
Sample Size, 53
Segment Mode Icon, 34
Seller’s Liability, 2
Set Active Segments, 34
Set Download Options Menu, 31
Set Location, 32
Specifications, 3
Spherical Distribution, 41
Tau, 8
Timber
Studies, 53
Time
Setting, 33
Setting with LP-80 Utility, 26
Viewing Stored Data, 17
Warranty, 2, 68
X (Leaf Distribution Parameter,
43
X (Leaf Distribution Parameter),
10, 41
Zenith Angle, 41
Defined, 9
Equation, 49
Example Calculation, 50
Setting Location of, 32
78
 Loading...