

Page 1

DIGITAL HiNote
Ultra 2000 Series
Service Quick Reference Guide
Part Number: ER-PF1WW-SR. A01
Digital Equipment Corporation
Page 2

October 1997
The information in this document is subject to change without
notice and should not be construed as a commitment by Digital
Equipment Corporation.
Digital Equipment Corporation assumes no responsibility for any
errors that might appear in this document.
The software described in this document is furnished under a
license and may be used or copied only in accordance with the
terms of such license. No responsibility is assumed for the use
or reliability of software or equipment that is not supplied by
Digital Equipment Corporation or its affiliated companies.
Restricted Rights: Use, duplication, or disclosure by the U.S.
Government is subject to restrictions as set forth in
subparagraph (c) (1) (ii) of the Rights in Technical Data and
Computer Software clause at DFARS 252.227-7013.
DIGITAL HiNote Ultra 2000 Series Service
Quick Reference Guide
Copyright © Digital Equipment Corporation.
All Rights Reserved.
DEC, DIGITAL, ThinWire, and the DIGITAL logo are registered
trademarks of Digital Equipment Corporation
ESS is a registered trademark of ESS Corp.
Intel and Pentium are registered trademarks of Intel Corporation
Microsoft, MS-DOS, and Windows are registered trademarks of
Microsoft Corporation.
All other trademarks and registered trademarks are the property
of their respective holders.
Page 3

FCC Notice
This equipment has been tested and found to comply with the
limits for a Class B digital device, pursuant to Part 15 of the FCC
rules. These limits are designed to provide reasonable
protection against harmful interference in a residential
installation.
Any changes or modifications made to this equipment may void
the user's authority to operate this equipment.
This equipment generates, uses, and can radiate radio
frequency energy and, if not installed and used in accordance
with the instructions, may cause harmful interference to radio
communications. However, there is no guarantee that
interference will not occur in a particular installation. If this
equipment does cause harmful interference to radio or television
reception, which can be determined by turning the equipment off
and on, the user is encouraged to try to correct the interference
by one or more of the following measures:
• Reorient or relocate the receiving antenna
• Increase the separation between the equipment and
receiver
• Connect the equipment into an outlet on a circuit
different from that to which the receiver is connected
• Consult the dealer or an experienced radio/TV
technician for help
All external cables connecting to this basic unit need to be
shielded. For cables connecting to PCMCIA cards, see the
option manual or installation instructions.
Page 4

Contents
Preface
1
Overview
Introduction.............................................................................. 1-1
System Overview ....................................................................1-1
CPU and Chip Set................................................................... 1-2
Memory.................................................................................... 1-3
BIOS........................................................................................ 1-3
PCI Bus Devices .....................................................................1-4
ISA Bus Devices...................................................................... 1-6
Docking Options...................................................................... 1-8
Components, Controls and Indicators................................... 1-10
Related Information............................................................... 1-23
2
System Restoration
Introduction.............................................................................. 2-1
Reinstalling and Installing Drivers........................................... 2-2
Creating a Bootable Floppy..................................................... 2-3
Using the Boot Floppy............................................................. 2-3
Re-installing the Operating System......................................... 2-5
System Installation.................................................................. 2-6
Complete System Restoration................................................. 2-7
Using the DIGITAL HiNote System CD................................... 2-9
System Installation................................................................ 2-13
Complete System Restoration............................................... 2-15
i
Page 5

Contents
3
System BIOS
Introduction.............................................................................. 3-1
BIOS Setup Program............................................................... 3-1
System Setup Utility................................................................ 3-2
Updating Your Ultra 2000 Configuration .................................3-3
Power Options......................................................................... 3-4
Advanced Power Options........................................................ 3-6
System Options....................................................................... 3-7
Device Options........................................................................ 3-8
Security Options.................................................................... 3-10
Notebook Computer Security................................................ 3-12
User Password...................................................................... 3-13
Supervisor Password ............................................................3-14
Dock Security........................................................................ 3-16
Default Options...................................................................... 3-17
Exit Options........................................................................... 3-17
Restoring the Flash BIOS...................................................... 3-18
4
Troubleshooting
Introduction.............................................................................. 4-1
Troubleshooting Tips............................................................... 4-2
External Audio Failure........................................................... 4-15
Check Points and Error Messages........................................ 4-15
Beep Codes........................................................................... 4-17
Warning Messages................................................................ 4-23
5
FRU Replacement
Introduction.............................................................................. 5-1
Required Tools........................................................................ 5-1
Field Replaceable Units ..........................................................5-2
Removing the Battery.............................................................. 5-5
Removing the CD/FDD Module............................................... 5-6
Removing the Keyboard.......................................................... 5-7
Removing the HDD Assembly................................................. 5-9
Removing the Keyboard Deck and LCD Assembly............... 5-12
Shell Installation Instructions................................................. 5-20
Tools Required...................................................................... 5-20
ii
Page 6

A
Specifications
System Specifications............................................................. A-1
Hardware Specifications..........................................................A-2
Physical Specifications............................................................A-3
Environmental Specifications.................................................. A-4
B
Device Mapping
Memory Map............................................................................B-1
DMA Channel Assignments ....................................................B-2
Notebook Computer Interrupt Levels ......................................B-3
I/O Address Map .....................................................................B-4
Contents
iii
Page 7

Contents
iv
Page 8

Preface
P
This Service Quick Reference Guide describes how to test,
troubleshoot, remove and replace the DIGITAL HiNote Ultra
2000 series notebook computer Field Replaceable Units (FRUs).
This guide is written specifically for DIGITAL approved on-site
service engineers. On-site repair of systems beyond the
approved FRU list is prohibited and may void warranty.
CAUTION
certified engineers attempt to repair this
equipment. All troubleshooting and repair
procedures are detailed to support
subassembly/module level exchange. Because
of the complexity of the individual boards and
subassemblies, no one should attempt to make
repairs at the component level or make
modifications to any printed circuit board.
Improper repairs can create a safety hazard.
Any indications of component replacement or
circuit board modifications might void any
warranty or exchange allowances.
: Digital recommends that only A+
v
Page 9

Preface
vi
Page 10

Overview
1
Introduction
This chapter introduces the DIGITAL HiNote Ultra 2000 series
notebook computers. It provides a system overview and
describes the controls, indicators, and hot keys.
System Overview
The HiNote Ultra 2000 series are high-performance portable
computers designed for the mobile professional.
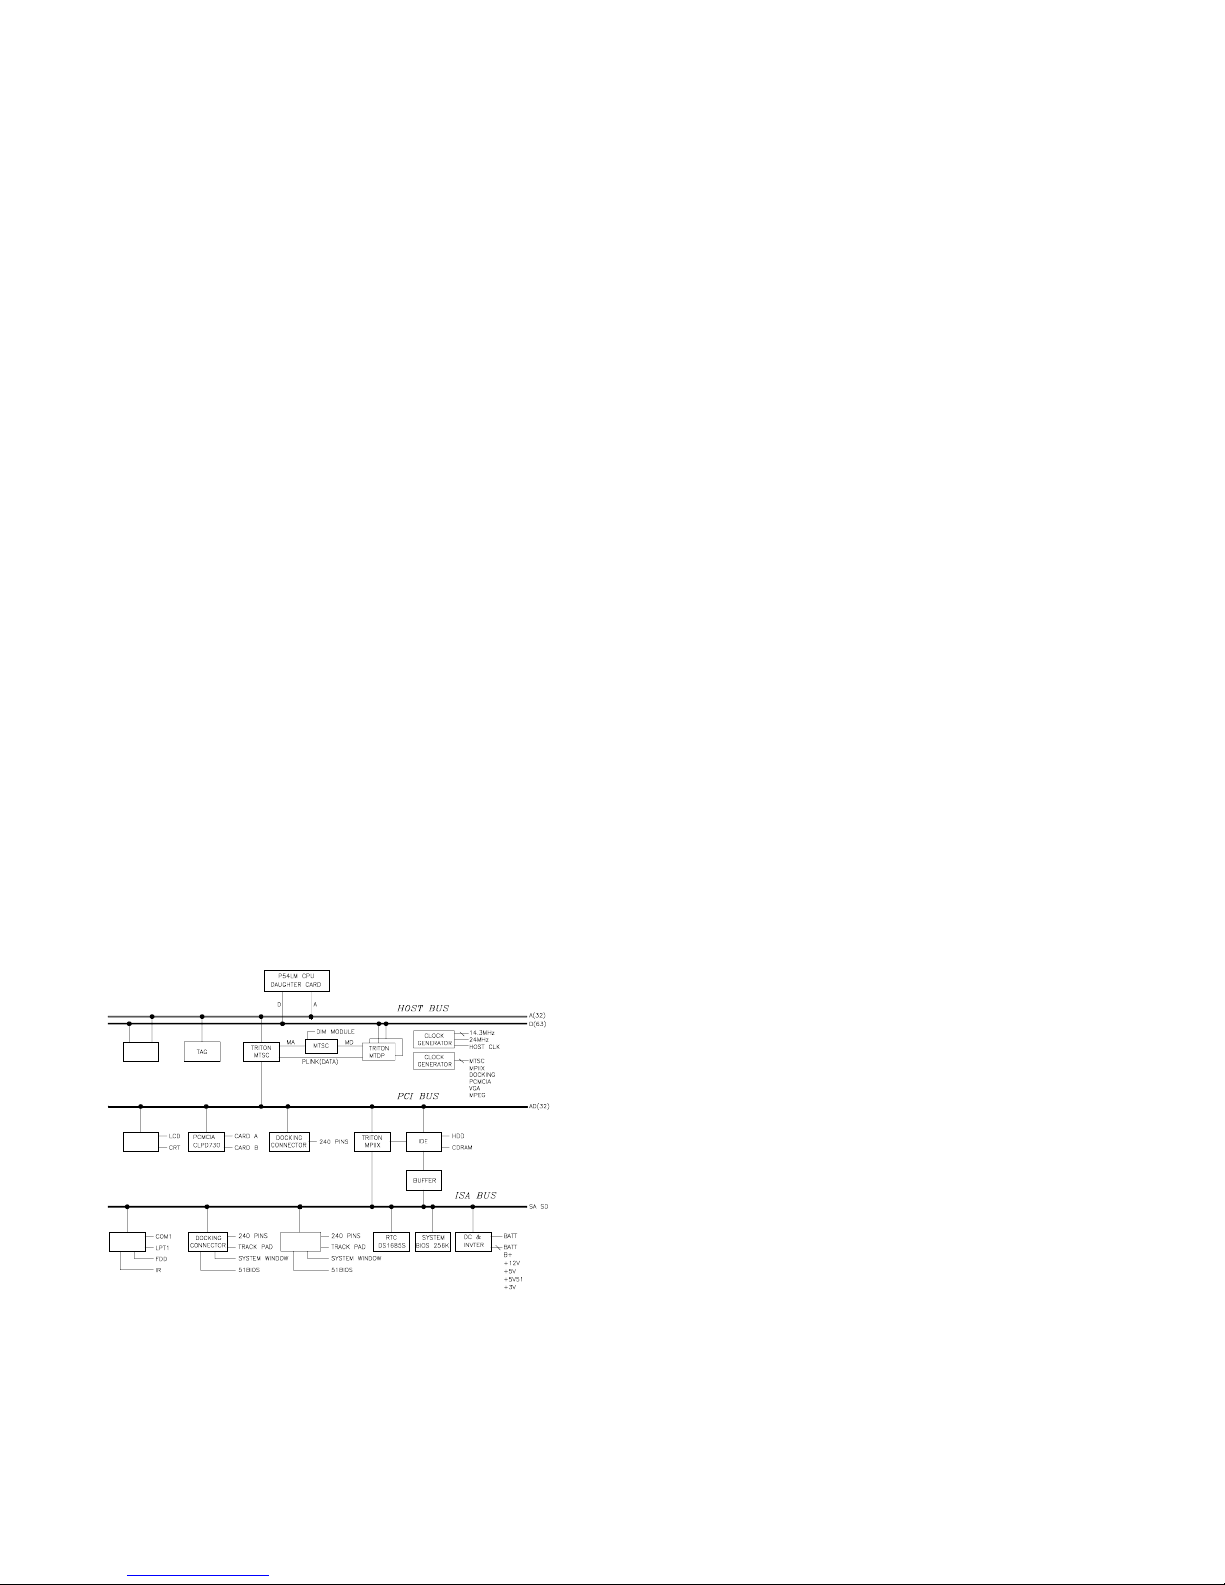
Figure 1-1 shows a functional block diagram of the notebook
computer. The following sections provide an overview of the
different functions.
1-1
Page 11
Overview
CPU and Chip Set
The HiNote Ultra 2000 series notebook computers use the Intel
P54CSLM 120/133 processors and P55C 150/166/175
processors mounted on a daughter card.
The PicoPower Vesuvius chip set is used to implement the core
functions of the syste m.
• The V1 and V2 chips provide the core system functions.
• The V2 chip provides the PCI bus interface and the
interface between the V1 chip and memory.
• The V3 chip provides the PCI to ISA bridge interface.
CACHE
RAM
Selected Models
VGA
NM2093
VGA
NM2093
AUDIO
ESS 1878
Figure 1-1. Functional Block Diagram
1-2
Page 12

Overview
Memory
The system comes with 16 MB o f on-board EDO DRAM for
system memory and 512KB of L2 cache memory.
System memory can be upgraded to a total of 144 MB. The
upgrade is performed by installing 8 MB, 16 MB, 32 MB or 64
MB EDO SO-DIMM modules. There are two slots for additional
memory. Either slot can be populated first.
BIOS
The system has an Inte l 28 F002BX-T 2 MB Boot block Flash
ROM for system BIOS (Phoenix BIOS 4.04). The BIOS
provides support for the following:
• Suspend to RAM
• Full APM 1.2 supported
• Password protection(System and Docking options)
• Auto-configured with docking options
• Windows 95 ready with PnP
• Various hot-ke ys for system co ntr ol
1-3
Page 13

Overview
PCI Bus Devices
The internal PCI bus and PCI components operate at 3.3V. The
PCI bus is also available to supported docking options. These
options contain their own PCI bridge.
Cardbus Controller
Cardbus support is provided by the TI1131 controller. This chip
provides the following functions:
• Support for Zoomed Video.
• Support for two PC Card/Cardbus slots with hot
removal/insertion.
• Burst transfers to maximize data throughput on the
PCI/Cardbus bus.
• Support for serialized ISA IRQs.
• Support for 16-bit distributed DMA.
• Support for Ring Indicate.
1-4
Page 14

Overview
Video Controller Chip
Video support is provided by the C&T 65554 Controller Chip.
This chip provides the following functions:
• 64-bit memory interface.
• 2MB 3.3V 60ns EDO Video DRAM.
• Support for Zoomed Video.
• DDC 2B support for external monitors.
• Advanced power management features minimize power
consumption during:
− Normal operation
− Standby mode
− Panel-off
PCI-IDE Controller
IDE support is provided by the CMD 643 PCI-IDE controller.
This chip provides the following functions:
• PCI bus Master device.
• Supports up to mode 5 timing.
• Supports DMA capable drives.
• Supports two IDE controllers (only one used).
1-5
Page 15

Overview
ISA Bus Devices
The ISA bus interface is provided by the PicoPower V3 chip.
Audio
Audio support is provided by the ES1878 chip. This chip
provides the following functions:
• Monophonic full-duplex operation using two DMA
channels.
2
S interface to internal stereo D/A for external Zoomed
• I
Video port.
• Complete general interrupt mapping including the
sharing of all interrupts.
• Support for 16-bit Stereo, FM Synthesizer, MPU-401,
and MIDI.
• Self-timed joystick port.
• Hot docking 6-pin interface to expansion audio mixer
(ES978).
BIOS
The system BIOS is implem ente d u sing the In tel 2 8F002BX-T
2 MB Boot block Flash ROM.
1-6
Page 16

Overview
System Command Processor
The System Command Processor is implemented using the
Hitachi H8 IKAP II processor. This processor provides the
following functions:
• Simultaneous support of two external PS/2 ports and
the internal Touch pad.
2
C bus master for communication to:
• I
− Status LCD
− EEPROM
− Docking interface components
• Hot Key interface.
• Secure password protection.
• System power plane control and power sequencing.
• Battery management interface for charging and the
Smart battery information.
• Status LCD and device monitoring interface.
• Active thermal interface for CPU thermal management.
• Internal keyboard scanning.
Super I/O
I/O support is provided by the National Semiconductor PC87338
chip. This chip supports the following functions:
• Floppy disk controller with Japanese floppy support.
• IEEE 1284 Parallel port.
• Serial infrared support – IrDa 1.1 (115Kbps and 4Mbps).
• 16550 UARTs.
• Full Plug-and-Play support.
1-7
Page 17

Overview
UMI Controller
The DIGITAL HiNote Ultra 2000 notebook computer has an
internal type II PCMCIA slot that is available as an UMI slot.
This feature provides a flexible method for the support of an
internal modem that minimizes the impact of multi-national
modem approvals. This slot supports only DIGITAL approved
modem cards. The UMI interface is provided by the Cirrus Logic
CL-PD6722 dual slot PCMCIA controller (Only one slot is used.)
This chip provides the following features and functions:
• PCMCIA 2.1 and JEIDA 4.1 compliant.
• Automatic low power mode (improved power
consumption).
• Direct connection to the ISA bus and PCMCIA socket.
• Five programmable memory windows and two I/O
windows.
• DMA support.
Docking Options
The DIGITAL HiNote Ultra 2000 notebook computer supports
docking options. Active docking options are required to have a
NILE PCI-PCI bridge.
DIGITAL HiNote Ultra Multimedia Dock
The DIGITAL HiNote Ultra Multimedia Dock has the following
features:
• Three speakers: two tweeters and one sub-woofer.
• Super I/O duplication for port replication the DIGITAL
HiNote Ultra Enhanced Port Replicator.
• Nile I PCI-PCI bridge.
• PicoPower V3 PCI-ISA bridge.
1-8
Page 18

Overview
• Two Type II or one Type III Cardbus slot.
• Line-in and speaker out support.
• MIDI/Joystick port.
• 3D Sound (ESS398).
• CD-ROM/FDD Module Bay.
• NTSC/PAL video output (switch selectable).
− Composite video using RCA jack
− S-Video
• USB controller and USB port.
• Expansion audio mixer support (ES978).
DIGITAL HiNote Ultra Enhanced Port Replicator
The DIGITAL HiNote Ultra Enhanced Port Replicator has the
following features:
• Battery charger
• Parallel port
• Serial port
• VGA/CRT port
• Two PS/2 connections for keyboard and mouse
• USB port (pass-through from DIGITAL HiNote Ultra
Multimedia Dock)
1-9
Page 19

Overview
Components, Controls and Indicators
This section shows the locations and provides a description of
the different components, controls, and indicators on your
DIGITAL notebook computer.
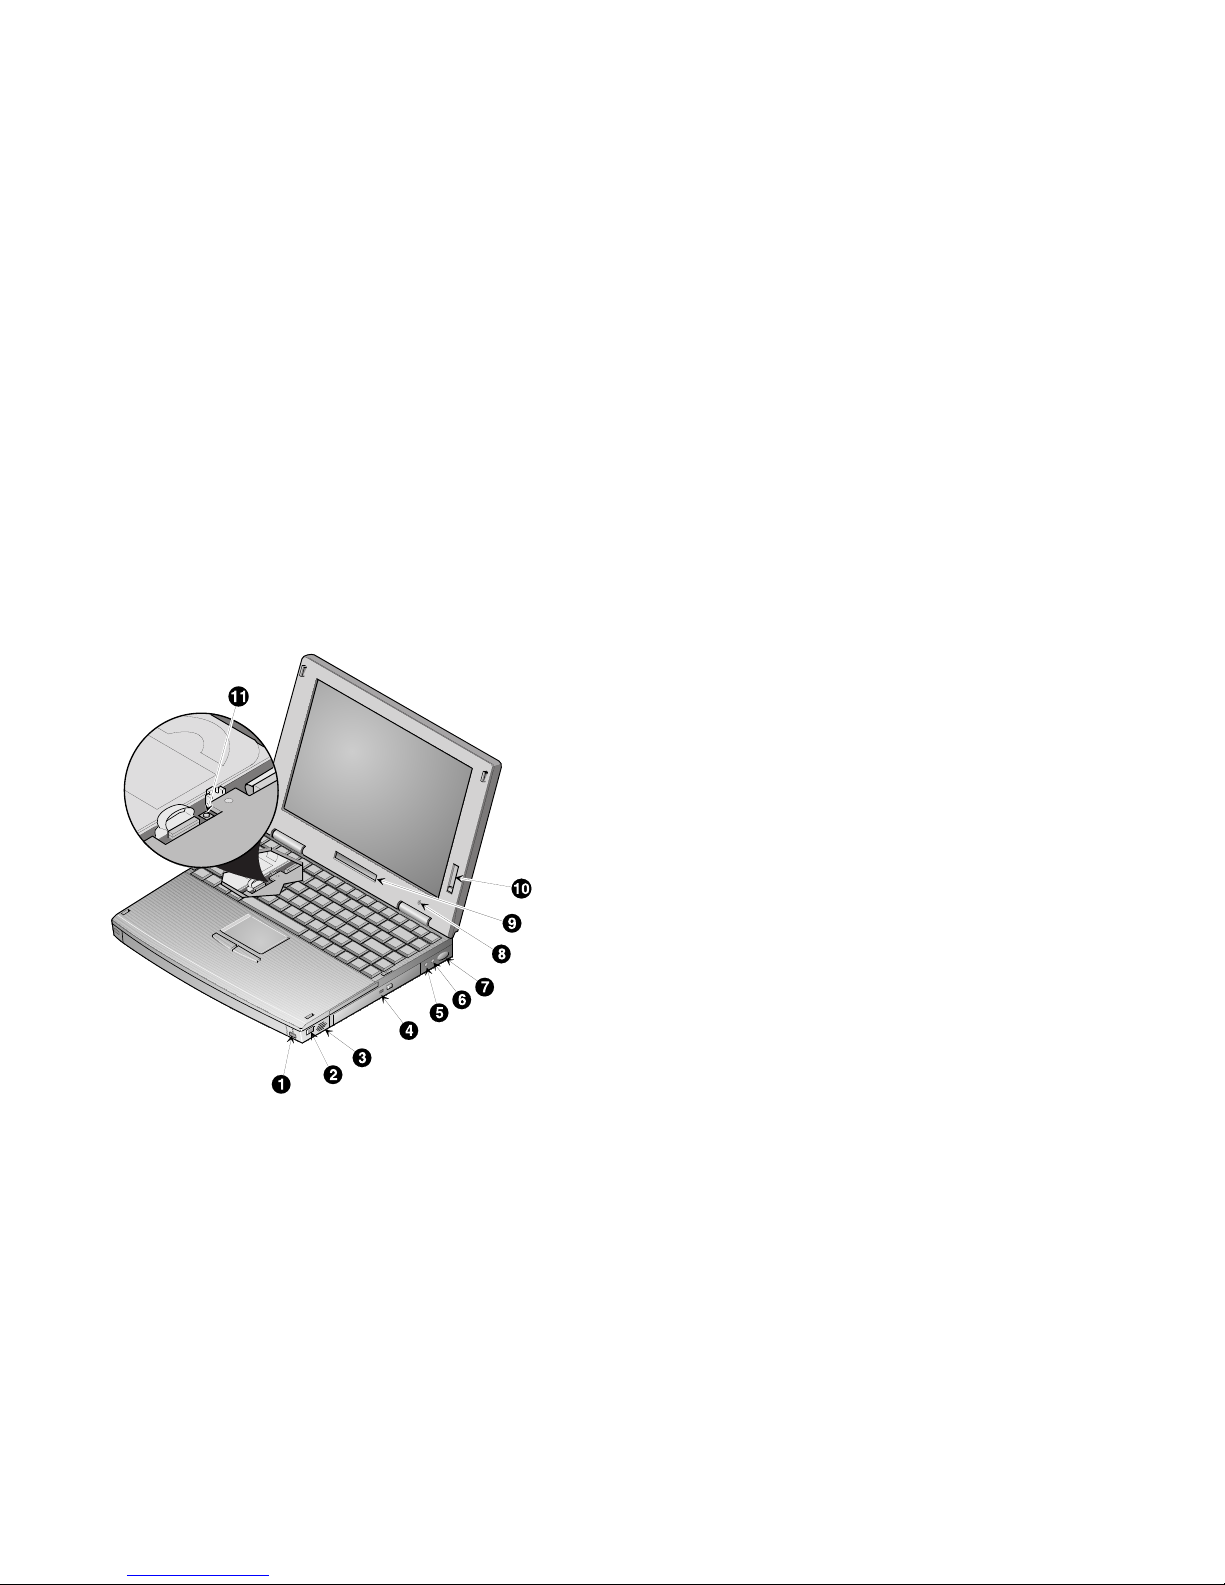
Front and Right Side Components
Key Component Description
Power LED
➊
Battery Charging LED
Lid Release One of two lid releases. Push
➋
Speaker Right stereo speaker used to
➌
CD-ROM/Diskette Drive Bay Supports a CD-ROM drive or
➍
Microphone In
➎
Audio Out
➏
The green Power LED (lower)
lights when the notebook is
On. The amber Battery
Charging LED (upper) lights
when the battery is charging.
in both releases at the same
time to open the LCD panel.
hear sound files and system
sounds.
a Diskette Drive module.
Input connection for external
microphone.
Connection for headphones
or external speakers.
continued
1-10
Page 20

Key Component Description
Suspend/Resume Button Turns the notebook computer
➐
Internal Microphone Used to record voice, music,
➑
Status Display Provides system operating
➒
Contrast Control (ASTN only) Controls the contrast of the
➓
11
Reset button Resets the notebook
On, and Suspends or
Resumes the system. Press
and hold the [fn] +
[Suspend/Resume] for four
seconds to turn the notebook
Off.
and sound files.
status.
LCD display.
computer. All unsaved data
will be lost. Refer to Figure 63 for instructions on how to lift
the keyboard to gain access to
the reset button.
Overview
1-11
Page 21
Overview
Figure 1-2. Front and Right Side View (12.1” Display)
DEC01156
1-12
Page 22

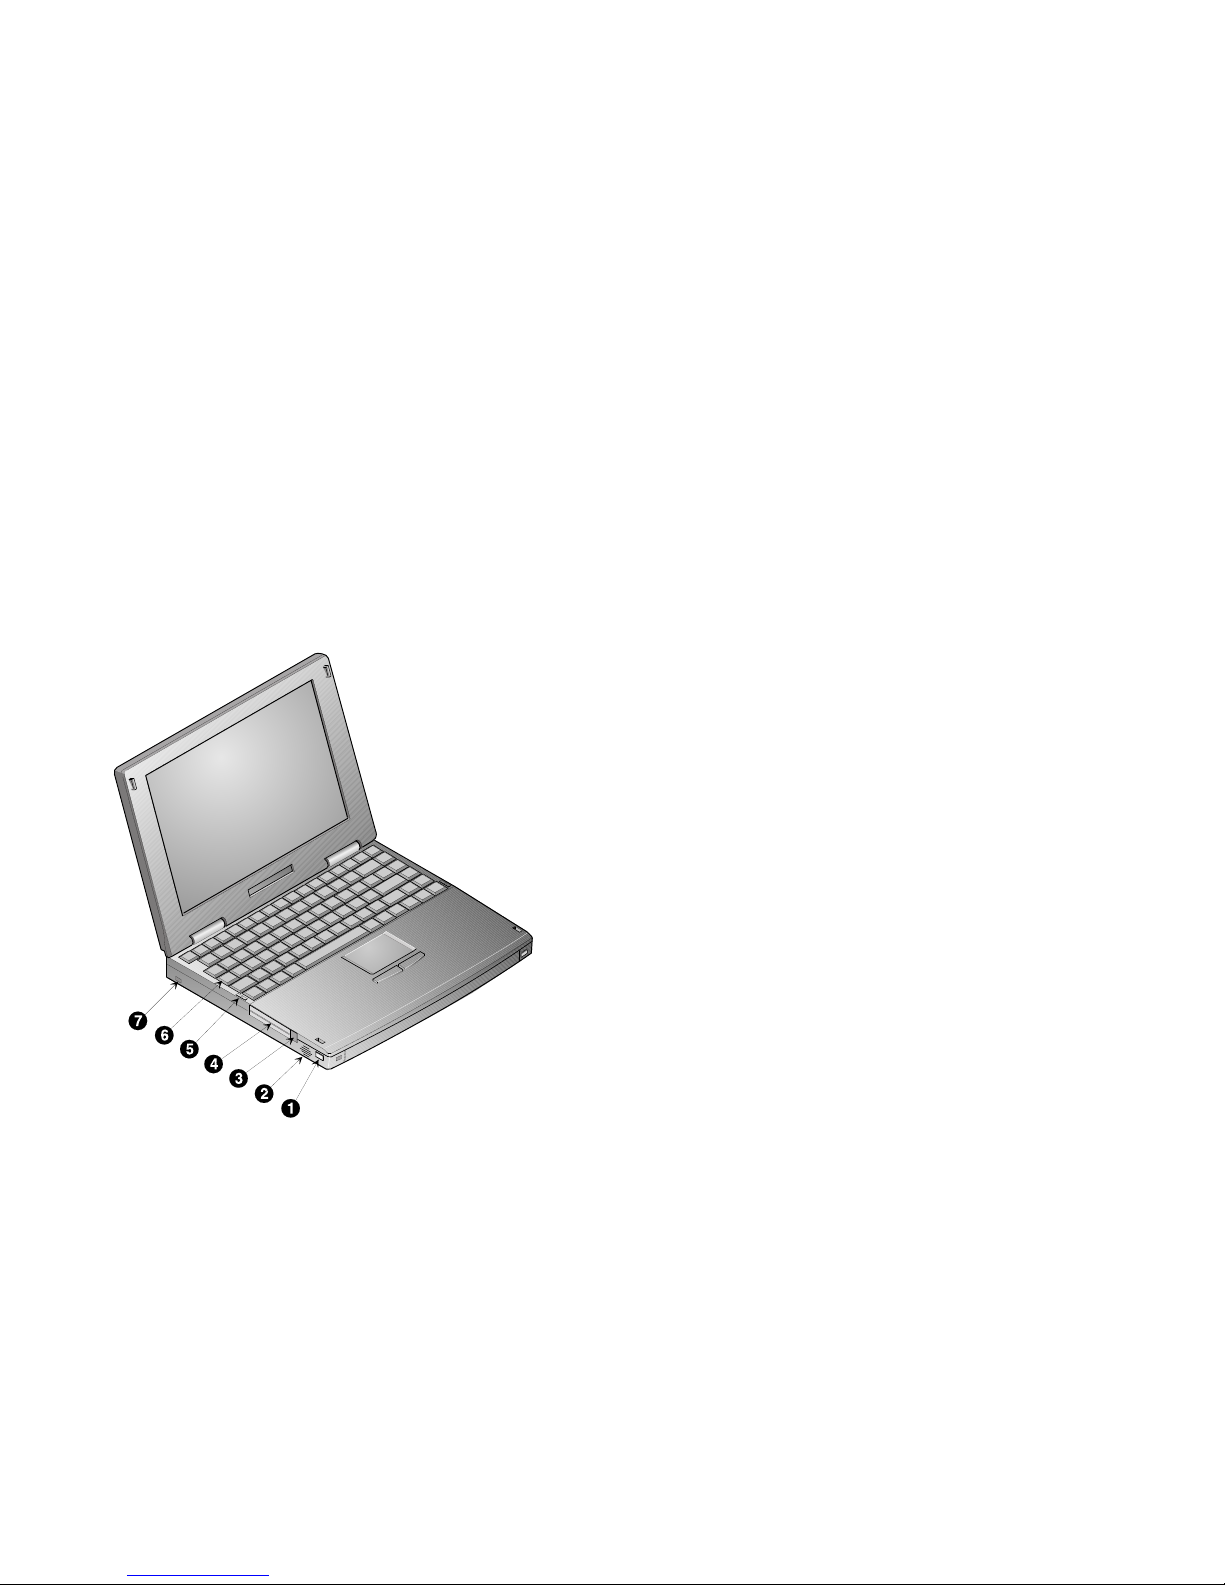
Front and Left Side Components
Key Component Description
Lid Release One of two lid releases.
➊
Speaker Left stereo speaker used to
➋
PC Card Ejectors Ejects a PC Card. Top
➌
PC Card Slots Support two Type I or II
➍
Keyboard Releases These latches release the
➎
Removable Hard Drive Located under the
➏
Security Lock Attach a security locking
➐
Push in both releases at the
same time to open the LCD
panel.
hear sound files and system
sounds.
button releases a PC Card
from the top slot; the bottom
button releases a PC Card
from the bottom slot.
cards or one Type III card.
Zoomed Video cards are
supported in the lower slot
only.
keyboard to allow access to
the removable hard drive
and the system Reset
button.
keyboard, the hard drive is
easily removable and
upgradeable.
device , such as a
Kensington lock, to this port.
Overview
1-13
Page 23
Overview
Figure 1-3. Front and Left Side View (12.1” TFT Display)
DEC01154
1-14
Page 24
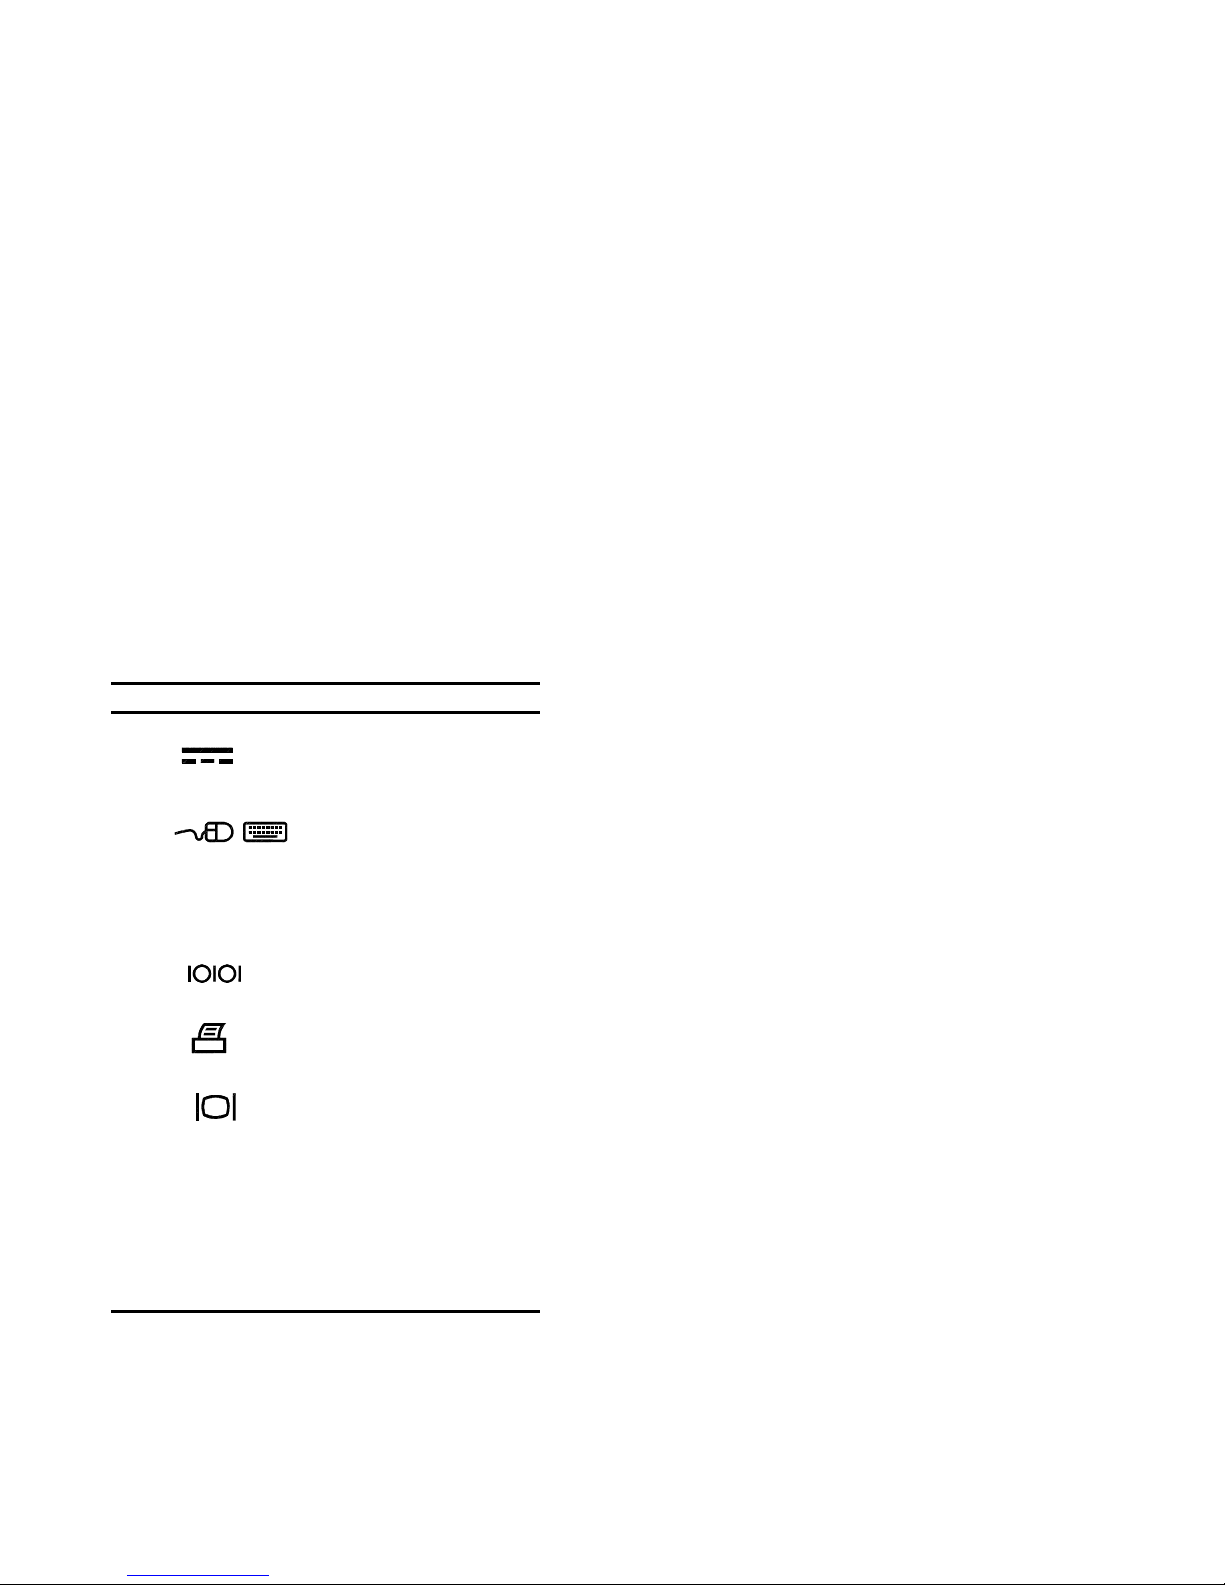
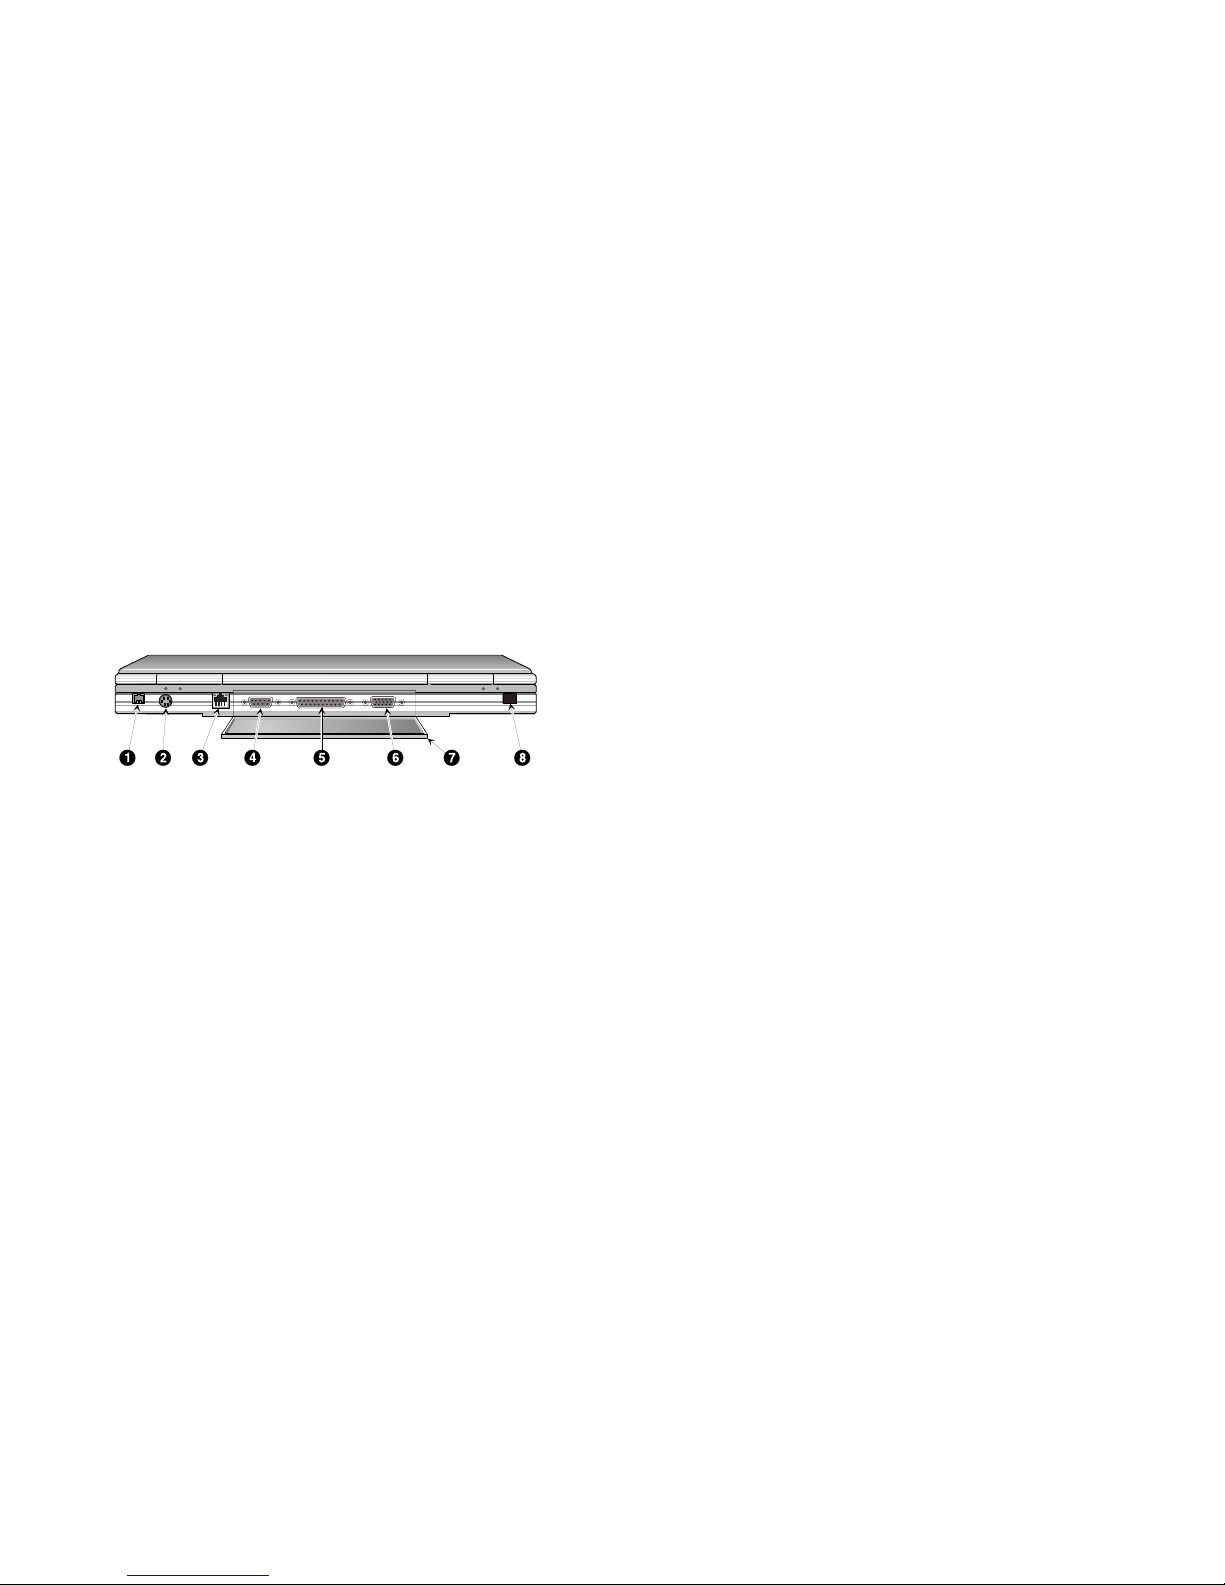
Back Components
Key Component Description
AC In
➊
External Keyboard/ Mouse
➋
Port
RJ11 Modem Port An analog telephone line
➌
Serial Port
➍
Parallel Port
➎
Video Port
➏
I/O Connector Cover and
➐
Keyboard Support
Fast IR Port Fast IR interface allows
➑
The universal AC adapter
connects to this port.
An external keyboard or
PS/2 mouse connects to
this port.
connects to this port
(modem functionality on
selected models only).
A serial device connects to
this port.
A parallel device, such as a
printer, connects to this port.
An external monitor
connects to this port.
Covers I/O connectors.
Can be flipped down to
support the keyboard at a
comfortable typing angle.
wireless data transfer
between the notebook and
another device with an IR
interface.
Overview
1-15
Page 25
Overview
DEC01151
Figure 1-4. Back View
1-16
Page 26

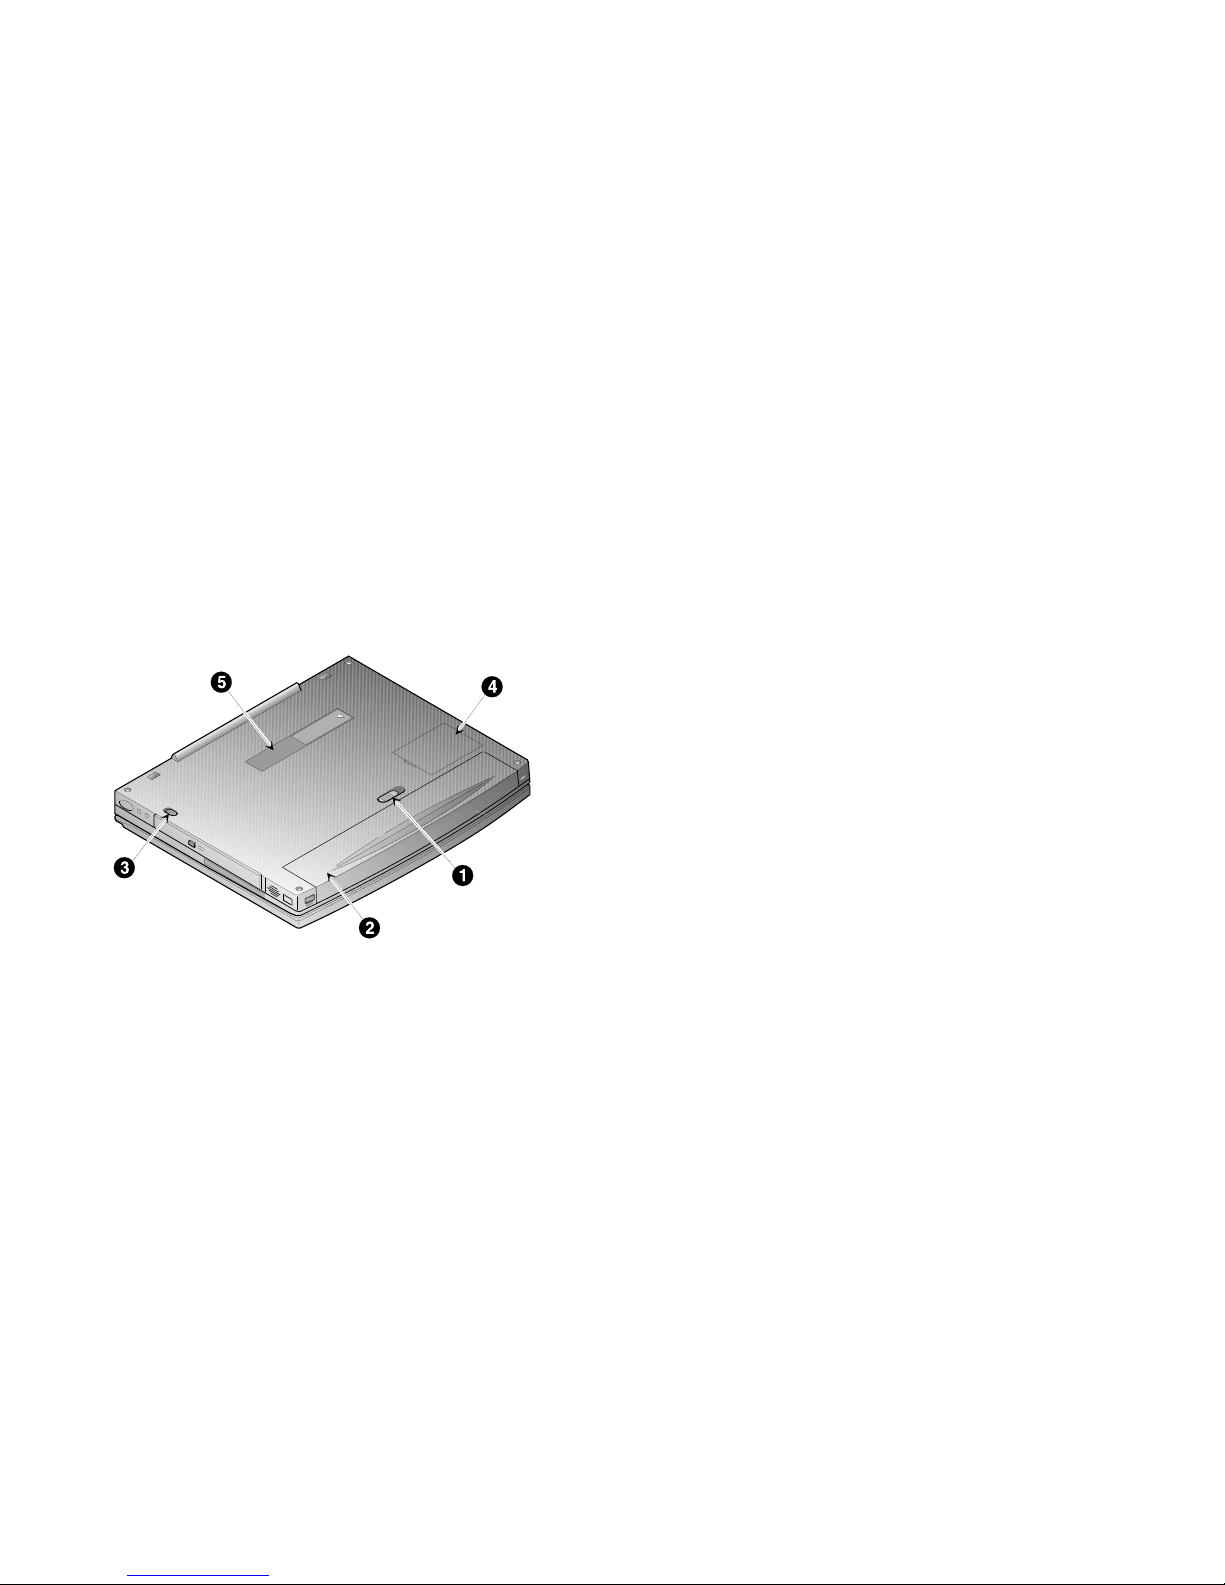
Bottom Components
Key Component Description
Battery Release Releases the LiIon battery
➊
LiIon Battery Provides power to your
➋
CD-ROM/Diskette Drive
➌
Module Release
Memory Door Provides access to
➍
Docking Connector Door Provides access to the
➎
from the notebook computer
for removal.
notebook computer.
Releases either a diskette
or CD-ROM Drive module
from the Diskette/CD-ROM
Drive Bay.
notebook computer’s
memory.
docking connector when
using the DIGITAL HiNote
Ultra Multimedia Dock or
the DIGITAL HiNote Ultra
Enhanced Port Replicator.
Overview
1-17
Page 27
Overview
DEC01152
Figure 1-5. Bottom View
1-18
Page 28
Overview
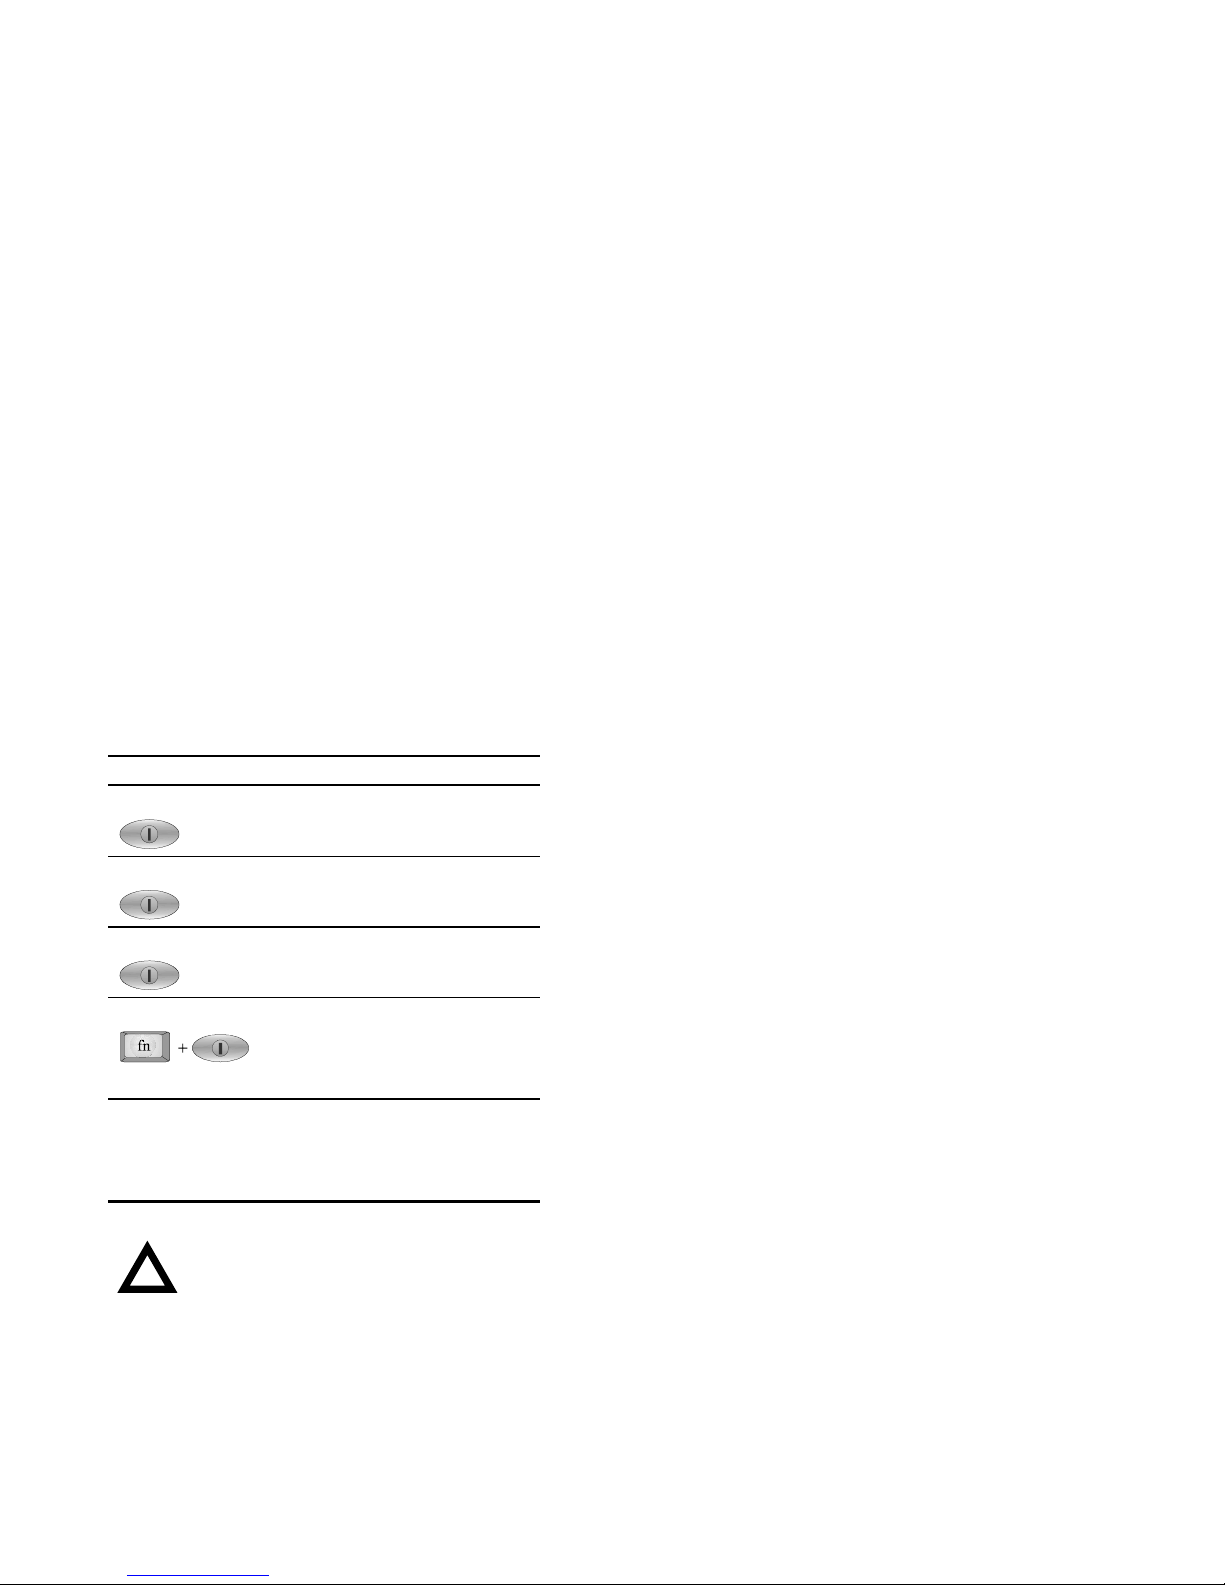
Controlling Power
Unique to DIGITAL notebook’s, the suspend/resume button not
only enables you to take advantage of the built-in power saving
features but also turns the notebook on and off.
Action How to...
On Press the Suspend/Resume button to turn
the system on.
Suspend When the system is on, press this button to
Resume Press the Suspend/Resume button to
Off To completely shut off your notebook,
Suspend
Lid Switch
place your system in Suspend mode.
resume normal operation from the Suspend
mode.
press and hold [fn + suspend/resume]
button until a system beep sounds,
indicating that the system has been
successfully turned off.
In its factory default mode, closing the LCD
lid will also enter the notebook into
Suspend mode. Refer to Chapter 3, in the
section labeled
on how to configure the Lid Switch function.
Power Menu
for instructions
CAUTION
If you turn the notebook computer off without
saving and closing all open files, you may lose
some or all of your work.
1-19
Page 29
Overview
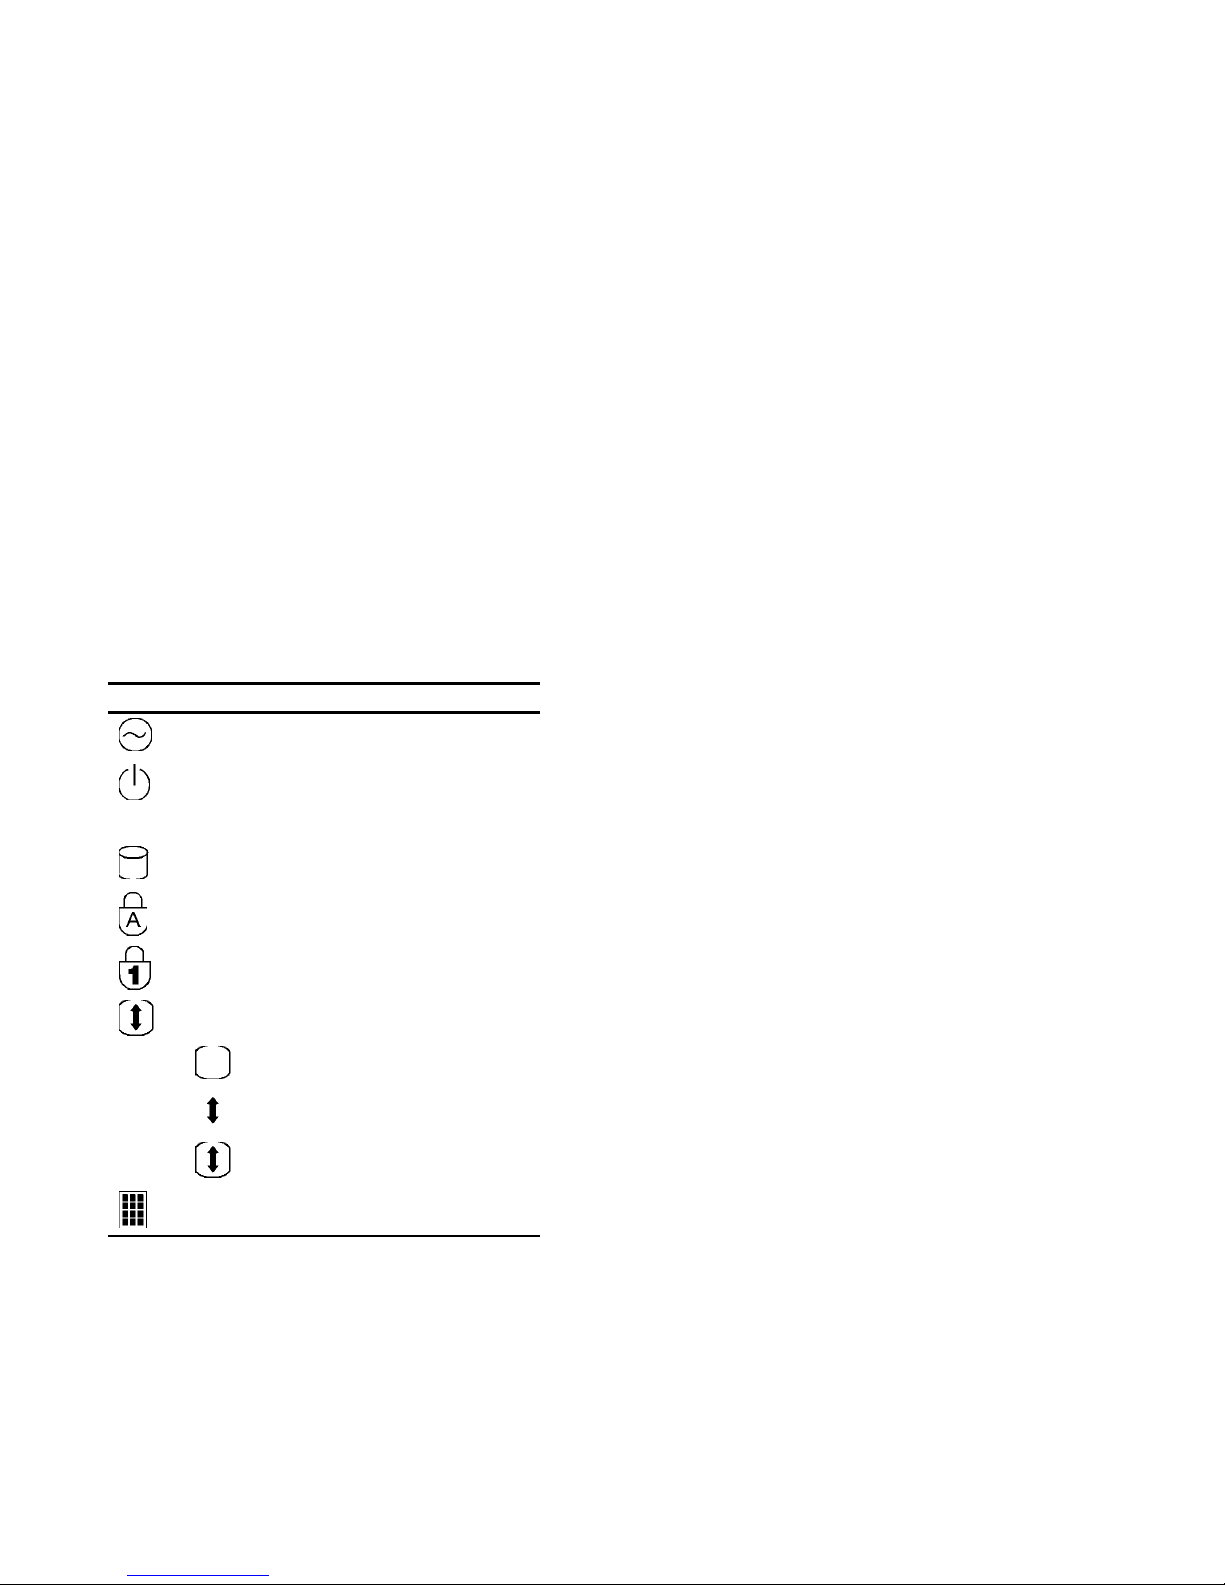
LCD Status Display
Indicator Shows...
AC Power – The computer is connected to and
operating from its external AC power supply.
Standby – The computer is in Standby Mode. Any
system activity such as, pressing a key on the
keyboard, touch pad, mouse, or other system activity
resumes normal operation.
Hard Drive/CD-ROM Activity – The hard drive or CDROM is being accessed.
The Caps Lock function is enabled..
NUM Lock – The NUM Lock function is enabled.
Monitor/Scroll Lock – The external monitor port is
enabled and/or the Scroll Lock function is enabled.
– External Monitor port enabled
– Scroll Lock function enabled
– External monitor and Scroll Lock enabled
Embedded Numeric Key pad – The keyboard’s
embedded key pad is enabled by a keyboard hot-key.
1-20
Page 30

Overview
Keyboard Hot Keys
Hot keys are activated by holding down the [fn] key (located in
the lower left corner of the keyboard) and pressing the desired
function key.
Function
+
Places the computer in Standby Mode.
Sets the computer’s operating mode to maximize
battery life. A single beep is emitted when the
computer switches to this operating mode. If you
Suspend/Resume or Reboot the system, the system
returns to the settings contained in the system BIOS.
Sets the computer’s operating mode to maximize
performance. Two beeps are emitted when the
computer switches to this operating mode. If you
Suspend/Resume or Reboot the system, the system
returns to the settings contained in the system BIOS.
Used during Power Up Self-Test (POST) to enter the
System setup program.
Enables and disables the computers external display
port and the LCD display. There are three display
modes:
LCD Display
LCD Display and External Monitor (simulscan)
External Monitor only
Each time you press this hot key, the computer
changes to the next display setting. The display mode
for the External Monitor is shown on the LCD Status
display.
continued
1-21
Page 31

Overview
Function
+
Turns the battery display information On and Off.
Reserved for future use.
Toggles the system sound between mute and unmute.
Enables and disables the keyboard’s embedded key
pad. The state of this key is shown in the LCD status
display. This hot key is used in conjunction with
hot key to control the embedded key pad.
Toggles NUM Lock On and Off. The state of NUM
Lock is shown in the LCD Status Display. This hot key
is used in conjunction with the
embedded key pad.
Toggles Scroll Lock On and Off. The state of Scroll
Lock is shown in the LCD Status Display.
Depress repeatedly to increase the audio volume.
Depress repeatedly to decrease the audio volume.
Depress repeatedly to decrease the LCD screen
brightness.
Depress repeatedly to increase the LCD screen
brightness.
] hot key to control the
[F8
the [F9]
1-22
Page 32

Related Information
Documentation
DIGITAL HiNote Ultra
2000 Series User’s
Guide
DIGITAL HiNote Ultra
2000 Series Quick
Reference Card
Quick Setup Guide English, French,
AC Adapter Bulletin English, French,
DIGITAL HiNote System
CD
English
French
Italian
German
Spanish
Japanese
Simple Chinese
English
French
Italian
German
Spanish
Japanese
Simple Chinese
Italian, German,
Spanish, Japanese
English, Dutch,
Danish, Swedish,
Norwegian, Finnish
English, Simple
Chinese
Italian, German,
Spanish, Japanese
Overview
ER-PF1WW-UA
ER-PF1WW-UP
ER-PF1WW-UI
ER-PF1WW-UG
ER-PF1WW-US
ER-PF1WW-UJ
ER-PF1WW-U2
ER-PF1WW-BA
ER-PF1WW-BP
ER-PF1WW-BI
ER-PF1WW-BG
ER-PF1WW-BS
ER-PF1WW-BJ
ER-PF1WW-B2
ER-PF1WW-IM
ER-PF1WW-IX
ER-PF1WF-I2
ER-PB1WF-DM
AG-R49UA-BE
1-23
Page 33

Overview
World Wide Web
Information such as drivers, BIOS updates, and on-line
documentation is available from DIGITAL’s World Wide Web
Site.
The URL for the site is:
HTTP://WWW.WINDOWS.DIGITAL.COM/
1-24
Page 34

System Restoration
2
Introduction
This chapter provides information on how to restore the
operating system and drivers on a DIGITAL HiNote Ultra 2000
series notebook computer. It provides instructions on how to
create a bootable floppy for the system and how to restore the
system using the bootable floppy or the DIGITAL HiNote System
CD.
CAUTION
using compression utilities. It will cau se the
notebook computer’s Save to File feature to not
function properly.
: Do not compress the boot drive
2-1
Page 35

System Restoration
Reinstalling and Installing Drivers
Reinstalling Drivers –
drivers over an existing installation is different than installing the
drivers on a clean installation. For information on how to reinstall
drivers, refer to the latest version of the DIGITAL HiNote System
CD.
Installing Drivers –
original DIGITAL factory shipped configuration, you must install
the HiNote Ultra 2000 Series audio, video, track pad and
network drivers (the need to install the network driver depends
upon the individual requirements). If you have installed WinNT,
you will also want to install the EPM (Enhanced Power
Management) driver located in the Driver/WinNT directory.
Please refer to Chapter 5 of the User’s Guide in the section
Installing PC Cards in WinNT 4.0
labeled
EPM features. These drivers are located on the DIGITAL
HiNote System CD. To install any of these drivers, please refer
to the following instructions:
1. Boot to Windows.
2. Insert the DIGITAL HiNote System CD into the CDROM drive.
3. From the Taskbar, click on Start and then Run. In the
Run command box type X:\CDInstall (X represents the
drive letter of the CD-ROM).
4. At the Welcome screen, click on Next. Then at the
Install screen, click on Driver Installation Instructions.
5. Select the driver(s) you wish to install. A README.TXT
file will appear. Print the file(s). These are the
installation instructions to install the selected drivers(s).
The procedures for reinstalling certain
In order to restore the system back to its
, for information on
2-2
Page 36

System Restoration
Creating a Bootable Floppy
To create a bootable floppy, perform the following:
1. Boot to Windows. Insert the DIGITAL HiNote System
CD into the CD-ROM drive. Click on Start and then
Run. In the Run dialog box command line type
X:\CDInstall
(X: represents the drive letter of the CD-ROM).
2. Click through the Welcome screens until the Install
Menu appears.
3. Click on the Utilities box and then click on Next.
4. Click on Create Boot Floppy and click on Next. Click on
Next again.
5. Insert a 3½ inch 1.44 MB floppy into the floppy disk
drive. Follow the on-screen instructions. The utility
(Sysboot.exe) will format the floppy, make the floppy
bootable and copy appropriate system files to the
floppy. Before creating the boot floppy, ensure that the
floppy is NOT write protected. Any previous data on the
diskette will be erased.
6. After the bootable floppy has been created, ensure that
it is write protected. Paste a label onto the diskette and
label it HiNote Ultra 2000 Series Bootable Floppy.
Using the Boot Floppy
The hard drive in the system has been partitioned using the
FDISK utility. The hard drive has also been formatted. A
"SAVETOFILE.BIN" file has been created for the system by
using PHDISKF. Without Save-to-File.bin, it will not be possible
to take advantage of the system's Save to Disk power
management feature.
2-3
Page 37

System Restoration
FDISK, format and PHDISKF are located on both the DIGITAL
HiNote System CD and the bootable floppy, which can be
created from the DIGITAL HiNote System CD.
2-4
Page 38

System Restoration
Re-installing the Operating System
To re-install the Windows Operating System on top of the current
Operating System, perform the following:
1. Insert the bootable floppy into the floppy disk drive.
Power on the system. A l ist of ch oice s appear.
: To exit this menu and go to a DOS prompt,
NOTE
press 2. To re-enter this menu from a DOS prompt,
type AUTOEXEC and press the Enter key.
AUTOEXEC must be typed from the A: prompt.
2. Insert the Microsoft Operating System CD into the CDROM drive.
3. From the bootable floppy Main Menu, choose Option 3
(Re-install).
4. Follow Microsoft's on-screen instructions.
5. Remove the Microsoft Operating System CD and insert
the DIGITAL HiNote System CD. Run CDInstall. Click
on the Next buttons until the Main Install screen
appears.
6. Click on Enhancements and Updates, and then click on
Next. Follow the on-screen instructions. These
enhancements update the Microsoft Operating system.
7. After re-installing the Operating System you should reinstall all drivers. Please refer to the section on
Reinstalling/Installing Drivers for information on
installation procedures.
2-5
Page 39

System Restoration
System Installation
To remove all files from the hard drive and re-install Windows
Operating System but NOT remove the hard drive partitions,
please perform the following.
1. Insert the bootable floppy into the floppy disk drive.
Power on the system. A l ist of ch oice s appear.
: To exit this menu and go to a DOS prompt,
NOTE
press 2. To re-enter this menu from a DOS prompt,
type AUTOEXEC and press the Enter key.
AUTOEXEC must be typed from the A: prompt.
2. Choose Option 4. This Option will Format the hard
disk’s drive C: and then create a 86016 KB Save-tofile.bin This file is created by the PHDISKF Utility and
enables the use of the notebook's Save to Disk feature.
3. Insert the Microsoft Operating System CD into the CDROM drive.
4. Choose Option 5 (Install OS) from the bootable floppy
Main Menu. This will run Microsoft's OEMSETUP
program from the Microsoft Operating System CD.
OEMSETUP runs SCANDISK and then installs the OS.
5. Remove the Microsoft Operating System CD and insert
the DIGITAL HiNote System CD. Run CDInstall. Click
on the Next buttons until the Main Install screen
appears.
6. Click on Enhancements and Updates, and then click on
Next. Follow the on-screen instructions. These
enhancements update the Microsoft Operating system.
2-6
Page 40

System Restoration
7. After re-installing the Operating System you should reinstall all drivers. Please refer to the
“Reinstalling/Installing Drivers” section of this chapter for
information.
8. Create a directory on the hard drive for the operating
system installation file s.
Windows 95: Create a directory on the hard drive under
C:\Windows called Options and then make a directory under that
called Cabs. The new directory path is
C:\Windows\Options\Cabs. Copy the Win95 directory from the
Microsoft CD onto the hard drive’s C:\Windows\Options\Cabs
directory.
Windows NT: After completing the installation of Windows NT,
locate the directory on the Microsoft O/S CD labeled, I386. Copy
this directory to the drive where the operating system is located,
most likely drive C:\. The files in this directory are needed when
installing certain drivers such as network drivers.
Complete System Restoration
To perform a complete system restoration on a new hard drive or
to remove all files and re-partition the hard drive and then install
a Microsoft Operating System, please perform the following:
1. Insert the bootable floppy into the floppy disk drive.
Power on the system. A l ist of ch oice s appear.
NOTE: To exit this menu and go to a DOS prompt,
press 2. To re-enter this menu from a DOS prompt,
type AUTOEXEC and press the Enter key.
AUTOEXEC must be typed from the A: prompt.
2-7
Page 41

System Restoration
2. Choose Option 7 from the bootable floppy Main Menu.
This will initialize the hard disk using FDISK. Running
FDISK will erase all data from the hard drive. During
FDISK, you will be prompted for much information.
When running FDISK, we strongly recommend that you
do not enable large disk support,(choose NO, when
asked). If you choose [YES] you will not be able to
install WinNT or a WIN95 non-SR2 operating system at
a later time. Also make sure you set the Active Partition
flag to make it bootable.
NOTE: Although OEMSETUP does FDISK the hard
drive, the utility is NOT designed to run with hard
drives 2.1 GB or larger. It will cause unexpected
results. Use the FDISK Option provided on the boot
media.
3. Choose Option 4. This Option will Format the disk and
then create a 86016 KB Save-to-file.bin This file was
created by the PHDISKF Utility and enables you to use
the notebook's Save to Disk feature.
4. Insert the Microsoft Operating System CD into the CDROM drive.
5. Choose Option 5 (Install OS) from the bootable floppy
Main Menu. This will run Microsoft's OEMSETUP
program from the Microsoft Operating System CD.
OEMSETUP runs SCANDISK and then installs the OS.
6. Remove the Microsoft Operating System CD and insert
the DIGITAL HiNote System CD. Run CDInstall. Click
on the Next buttons until the Main Install screen
appears.
2-8
Page 42

System Restoration
7. Click on Enhancements and Updates, and then click on
Next. Follow the on-screen instructions. These
enhancements update the Microsoft Operating system.
2-9
Page 43

System Restoration
8. After re-installing the Operating System you should reinstall all drivers. Please refer to the “Installing Drivers”
section of this chapter for information.
9. Create a directory on the hard drive for the operating
system installation file s.
Windows 95: Create a directory on the hard drive under
C:\Windows called Options and then make a directory under that
called Cabs. The new directory path is
C:\Windows\Options\Cabs. Copy the Win95 directory from the
Microsoft CD onto the hard drive’s C:\Windows\Options\Cabs
directory.
Windows NT: After completing the installation of Windows NT,
locate the directory on the Microsoft O/S CD labeled, I386. Copy
this directory to the drive where the operating system is located,
most likely drive C:\. The files in this directory are needed when
installing certain drivers such as network drivers.
Using the DIGITAL HiNote System CD
This section describes the steps used to install a Microsoft
Operating system and drivers onto a new hard drive, or on an
existing drive which needs restoration.
Preparing a New Hard Drive
PHDISKF and FDISK are the two utilities needed in order to
prepare the hard disk for general use. These utilities can be
found on the DIGITAL HiNote System CD. The FDISK utility
formats the hard drive while the PHDISKF utility creates a DOS
file on the hard drive. This DOS file is necessary in order to take
advantage of the notebook’s Save to Disk power management
feature.
2-10
Page 44

System Restoration
FDISK and Format Disk Utility
The DIGITAL HiNote System CD is a bootable CD. It boots to
the A:\ prompt. In the following instructions we will be running
the FDISK Utility on a 1.44 GB hard drive.
1. Insert the DIGITAL HiNote System CD into the CDROM tray. The CD should boot to the A:\ prompt. At
the A:\ type FDISK the command line should read
A:\FDISK.
Press <Enter>.
2. This will execute the FDISK utility. When asked if you
want to enable enlarged disk support, choose [No]. If
you choose [Yes], you will not be able to install WinNT
or a Win95 non-SR2 operating system.
3. At the FDISK Main Menu, choose 1 to create a DOS
partition or logical DOS drive. To choose this option,
type the number 1 and press <Enter>.
4. Choose 1 again to create a primary DOS partition by
typing 1 and pressing <Enter>.
5. If you wish to make the whole hard drive one large
partition, press <Enter> to accept the default Yes.
Continue to press the <esc.> key until you have exited
FDISK and are at the DOS prompt. Restart the system
by pressing Ctrl+Alt+Del. Proceed to step 16. If you
wish to create multiple partitions on the hard drive, press
the N key (signifying No) and then press <Enter>.
Proceed to step 6.
6. FDISK will inform you of the approximate space
available on the hard drive and prompts you to enter the
percent of disk space or the number of MB you wish to
assign for the primary partition. For the purpose of this
example, we have chosen to assign drive C: 500 MB.
2-11
Page 45

System Restoration
7. Type 500 and press <Enter>. FDISK displays the
partition information. Press the <esc.> key to continue.
2-12
Page 46

System Restoration
8. If you wish to make the primary partition C: bootable,
type 2 and then press <Enter>. You will be asked to
enter the number of the partition you wish to make
active (bootable). Type 1, and press <Enter>. Press
<esc.> to return to the FDISK Main Menu.
9. If you wish to make more DOS partitions accessible by
Win95, press 1, Create DOS Partition or Logical DOS
Drive (recommended) at the FDISK Main Menu. If you
do not, press <esc.> to exit the Main Menu and then
press <esc.> again to exit FDISK. We have chosen to
Create a DOS Partition or Logical DOS Drive.
10. Press 2 to create an Extended DOS partition and then
press <Enter>. FDISK will give you the available hard
disk space. On our 1.44 GB drive, the space remaining
is 878 MB.
11. If you wish to assign the remaining space as the
Extended DOS partition, press <Enter>. If you wish to
customize the capacity, type in the amount in MB or
percentage of the available space (for ex, 50%) and
press <Enter>. We will assign the r emain ing d rive
space (878 MB) to and Extended DOS partition.
12. After pressing <Enter> , press <esc.>. FDISK will in form
you that there are no Logical Drives assigned. Define
the size you wish or press <Enter> to accept the default.
If you press <Enter> the entire (878 MB) capacity will be
assigned as drive D:.
13. Type the amount you wish drive D to be assigned. For
our purposes we have chosen to assign drive D 400
MB, so we type 400. Press <Enter>. FDISK will
display the information for drive D: and inform you of the
remaining capacity (478 MB).
2-13
Page 47

System Restoration
14. Press <Enter> to assign the remaining capacity to drive
E:. All Extended DOS partitions have been assigned to
logical drives.
2-14
Page 48

System Restoration
15. Press <esc.> to continue. Press <esc.> again to exit
the FDISK Main Menu. You will be informed that you
need to reboot the system. Press <esc.> to exit FDISK.
At the DOS prompt, press Ctrl+Alt+Del to reboot the
system.
16. The system will reboot to the CD-ROM. You must now
format all partitioned segments of the hard drive.
17. At the DOS prompt, type:
Format C:/S/U and press <Enter>.
(There must be a space between the word “format” and
“C”)
This will format the primary partition C, and copy all
system files to the pr ima ry dr ive . If you h ave created
more than one partition you must format them as well.
To format the D drive for example, at the DOS prompt
type:
Format D:/U and press <Enter> (There must be a space
between the word “format” and “D”.)
18. Continue until all partitions have been formatted. At the
completion of Format Disk, you will be returned to the
DOS prompt. Refer to the following section on how to
run the PHDISKF Utility.
PHDISKF Utility
You will need to create a DOS File segment on the hard drive in
order to take advantage of the Save to Disk Power Management
Feature. The DOS file can be created before or after you install
the operating system. Creating the DOS file after the installation
of the operating system will NOT erase any data from the hard
drive. For the purpose of these instructions, we have decided to
first create the DOS file and then install the operating system.
To use the PHDISKF utility, please r efer to the follow ing
instructions:
2-15
Page 49

System Restoration
2-16
Page 50

System Restoration
1. Insert the DIGITAL HiNote System CD into the CD-
ROM tray. The CD should boot to the A:\ prompt. At
the A:\, type:
PHDISKF /create 86016
There needs to be a space between the words
“PHDISKF” and “/create”
and a space between “/create” and “86016”.
2. Press <Enter>.
86016 represents the size of the DOS file to be create in KBytes.
The equation for determining the DOS file size is 1024 (80 MB +
4 MB). 1024 is the number of KBytes per MegaByte. 80 MB is
the maximum amount of system memory and the additional 4
MB is for overhead.
Before you can load the Microsoft Operating System onto the
hard drive, you must first load the CD-ROM driver from the
DIGITAL HiNote System CD to the hard drive. It is located in the
Driver directory.
System Installation
If you want to remove all files from the hard drive and re-install
Windows Operating System but NOT remove the hard drive
partitions, please perform the following.
1. Insert the DIGITAL HiNote System CD into the CDROM drive and power on the system.
2. Run format and then PHDISKF. Please refer to the
appropriate sections of this chapter.
3. Remove the DIGITAL HiNote System CD and power off
the notebook.
4. Insert the bootable floppy into the floppy drive and turn
on the system.
2-17
Page 51

System Restoration
5. At the list of options choose number 2 (exit to DOS).
Insert the Microsoft CD into the CD-ROM drive.
6. From the DOS prompt, type the letter that represents
the CD-ROM drive, then a colon and a backslash. For
example: D:\
7. Enter the command to start the operating system
installation:
Windows 95:
D:\win95\setup
Windows NT:
D:\winnt \bUse this command string if you do not want
to create an Emergency Backup Repair disk
(recommended). You must include a space between
the “winnt” and the “\b”.
D:\winntUse this command if you want to create an
Emergency Backup Repair Disk as a part of the
installation.
8. Press <Enter> and follow the instructions that appear on
the screen to complete the installation.
9. Remove the Microsoft Operating System CD and insert
the DIGITAL HiNote System CD. Run CDInstall. Click
on the Next buttons until the Main Install screen
appears.
10. Click on Enhancements and Updates, and then click on
Next. Follow the on-screen instructions. These
enhancements update the Microsoft Operating system.
11. After re-installing the Operating System you should reinstall all drivers. Please refer to the “Installing Drivers”
of this chapter for information.
2-18
Page 52

System Restoration
12. Create a directory on the hard drive for the operating
system installation file s.
2-19
Page 53

System Restoration
Windows 95: Create a directory on the hard drive under
C:\Windows called Options and then make a directory under that
called Cabs. The new directory path is
C:\Windows\Options\Cabs. Copy the Win95 directory from the
Microsoft CD onto the hard drive’s C:\Windows\Options\Cabs
directory.
Windows NT: After completing the installation of Windows NT,
locate the directory on the Microsoft O/S CD labeled, I386. Copy
this directory to the drive where the operating system is located,
most likely drive C:\. The files in this directory are needed when
installing certain drivers such as network drivers.
Complete System Restoration
If you have purchased a new hard drive or you want to remove
all files and re-partition the hard drive and then install a Microsoft
Operating System, please perform the following:
1. Insert the DIGITAL HiNote System CD into the CDROM drive and power on the system.
2. Run FDISK, format the hard drive and then run
PHDISKF. These instructions are covered in detail in
Appendix B of the User’s Guide.
3. Remove the DIGITAL HiNote System CD and power off
the notebook.
4. Insert the bootable floppy into the floppy drive and turn
on the system.
5. At the list of options choose number 2 (exit to DOS).
Insert the Microsoft CD into the CD-ROM drive.
6. From the DOS prompt, type the letter that represents
the CD-ROM drive, then a colon and a backslash. For
example: D:\
2-20
Page 54

System Restoration
7. Enter the command to start the operating system
installation:
Windows 95:
D:\win95\setup
Windows NT:
D:\winnt \bUse this command string if you do not want
to create an Emergency Backup Repair disk
(recommended). You must include a space between
the “winnt” and the “\b”.
D:\winntUse this command if you want to create an
Emergency Backup Repair Disk as a part of the
installation.
8. Remove the Microsoft Operating System CD and insert
the DIGITAL HiNote System CD. Run CDInstall. Click
on the Next buttons until the Main Install screen
appears.
9. Click on Enhancements and Updates, and then click on
Next. Follow the on-screen instructions. These
enhancements update the Microsoft Operating system.
10. After re-installing the Operating System you should reinstall all drivers. Please refer to the “Installing Drivers”
section of this chapter for information.
11. Create a directory on the hard drive for the operating
system installation file s.
2-21
Page 55

System Restoration
Windows 95: Create a directory on the hard drive under
C:\Windows called Options and then make a directory under that
called Cabs. The new directory path is
C:\Windows\Options\Cabs. Copy the Win95 directory from the
Microsoft CD onto the hard drive’s C:\Windows\Options\Cabs
directory.
Windows NT: After completing the installation of Windows NT,
locate the directory on the Microsoft O/S CD labeled, I386. Copy
this directory to the drive where the operating system is located,
most likely drive C:\. The files in this directory are needed when
installing certain drivers such as network drivers…
2-22
Page 56

System BIOS
3
Introduction
This chapter provides information related to the system BIOS
and its Setup program.
BIOS Setup Program
The BIOS (Basic Input and Output System) Setup Program is a
utility that enables you to change the system configuration and
tailor the operation of your notebook to suit individual work
needs. It is a ROM-based (Read Only Memory) utility that
displays the system’ s conf iguration status and allows you to set
system parameters. The parameters are stored in non-volatile
battery backed-up CMOS RAM, which saves information even
when power is turned off. When power is restored, the system is
configured with the values found in CMOS.
The CMOS battery receives a charge when the system
:
NOTE
is operated on AC power. If the system is off for more than one
year, the CMOS battery will drain and the ROM data will be lost.
The settings made in the Setup program affect how the
notebook performs. It is important to try to understand all the
Setup options and to make settings appropriate for the way you
use the notebook.
3-1
Page 57

System BIOS
System Setup Utility
To run System Setup:
1. Turn on or reboot your notebook computer.
2. During system boot, press [fn] + [F3] when prompted.
After the prompt appears you have two to three
seconds to press [fn] + [F3] and enter System Setup.
Helpful Hints
When updating your setup information there are several
keyboard keys assigned to help you select menus and submenus, options, and to change option values.
Key Function
→
←
↑
↓
Tab
Esc
Enter
Space
bar
Alt
Cursor keys move the cursor to the right and left
Cursor keys move the cursor up and down
Moves the cursor between menu items
Closes the current menu
Accepts the current selection
Selects the current option or enables (check mark) or
disables (no check mark) the option
Moves the cursor to the menu bar at the top of the screen
3-2
Page 58

System BIOS
Updating Your Ultra 2000 Configuration
There are number of hardware options that can be configured on
your notebook computer.
Feature Selections
Power Disabled
System Date/Time
Device Serial Port
Security Set User Password
Defaults Save User Default Settings
Exit Save
Maximum Battery Life
Maximum Performance
Advanced
Lid Switch
Suspend Beep
CD-ROM Boot
Floppy Boot
Quick Boot
NUM Lock
Infrared Port
Parallel Port
Parallel Port Mode
Audio
Joystick
Set Supervisor Password
Modify Password Mode
Dock Security
Load User Default Settings
Load Factory Default Settings
Quit
About
3-3
Page 59

System BIOS
Power Options
The Ultra 2000 is factory-configured with preset power
management values. If you are not an advanced user, start by
using the default factory-configured power management settings.
If you find that the factory settings do not fit your specific needs,
enter the System Setup Program and make the needed
changes.
Option Settings Comments
Disabled Disables power management options
Maximum
Battery Life
Maximum *
Performance
Advanced Use to set your own power saving
supported by the system. Power
management options are still
available.
Maximizes the time between battery
charges.
Maximize performance while retain ing
some power savings for extending
battery life.
options. Use this option only if
youunderstandthe effects various
settings have on battery life and
system performance. Refer to
Advanced Power Management for a
description of available settings.
3-4
continued
Page 60

Option Settings Comments
Lid Switch Suspend/
Resume*
Desktop
Mode
Suspend Beep Disabled*
(No Check
Mark)
*Factory default setting
Configure how the notebook responds
to opening and closing the LCD
display panel. If Suspend/ Resume is
selected, the computer enters
Suspend Mode when the lid is closed
and Resumes operation when the lid
is opened. With Desktop is selected,
the external video port is enabled
when the lid is closed.
Allows you to enable or disable the
suspend beep option. When enabled,
the notebook emits two quick beeps
before entering Suspend mode.
System BIOS
3-5
Page 61

System BIOS
Advanced Power Options
These options are accessed by selecting the Advanced field.
Field Settings Comments
Hard Disk
Timer
Display
Timer
Standby
Timer
Suspend
Timer
*Factory default setting
Disabled
Selected times
Disabled
Selected times
Disabled
Selected times
Disabled
Selected times
Specify how long the hard disk must be
inactive before it spins down. Press
“Tab” to move between AC and
Batterytimer entries .
Specify how long the system must be
inactive before the LCD backlight is
turned off. Press “Tab” to move
between AC and Batterytimer entries .
Specify how long the system must be
inactive before Standby mode is
entered. Press “Tab” to move between
AC and Batterytimer entries .
Note: The selected period for inactivity
is measured from the last monitored
system activity: a keystroke, mouse
movement, or hard disk activity resets
the timer.
Specifyhow long the system is in
Standby before entering Suspend
mode. Press “Tab” to move between
AC and Batterytimer entries .
To resume operation from Suspend
mode press the Suspend/Resume
button.
3-6
Page 62

System BIOS
System Options
Option Settings Comments
Date/Time Current Date/Time Sets your notebook to a
CD-ROM
Boot
Floppy
Boot
Quick Boot Enabled
NUM Lock Enabled
*Factory default setting
Enabled
Disabled*
(No Check Mark)
Enabled*
(Check Mark)
Disabled
Disabled*
(No Check Mark)
Disabled*
(No Check Mark)
specified date and time.
Enables or disables the ability
to boot from a CD-ROM
installed in the notebook.
When enabled, the CD-ROM
is the first device in the boot
sequence.
Enables or disables the ability
to boot from the Diskette
Drive.
When enabled, the Diskette
Drive is the second device in
the boot sequence if CDROM Boot is enabled. If CDROM Boot is disabled the
Diskette Drive is the first
device in the boot sequence.
Enables or disables a faster
boot sequence. When
enabled certain diagnostic
tests are skipped to speed up
system boot.
Turns the embedded numeric
key pad On or Off every time
the system is booted.
If the CD-ROM (if enabled) and hard disk drive
NOTE:
boot devices are not found at system boot, the Diskette Drive
is enabled as the boot device for the current boot sequence.
3-7
Page 63

System BIOS
Device Options
Option Settings Comments
Serial Port Disabled
Auto*
Manual
InfraRed Port Disabled*
Auto
Manual
Parallel Port Disabled
Auto*
Manual
Disables the onboard Serial Port.
Enables and automatically configures
the port.
Enables and allows you to manually
configure the I/O address and Interrupt
Request (IRQ) line for the port.
Disables the onboard Infrared Port.
Enables and automatically configures
the port.
Enables and allows you to manually
configure the I/O address and Interrupt
Request (IRQ) line for the port.
Enables or disables the onboard
Parallel Port.
Enables and automatically configures
the port.
Enables and allows you to manually
configure the I/O address and Interrupt
Request (IRQ) line for the port.
3-8
continued
Page 64

Option Settings Comments
Parallel
Port Mode
Audio Disabled
Joystick Disabled
*Factory default setting
Standard
Bi-directional (PS/2)*
Enhanced Parallel Port (EPP)
Extended Capabilities Port
(ECP)
Auto*
Manual
Auto*
Manual
Selects proper mode for
your printer or other
parallel port device.
See the device User’s
Guide for details.
Disables onboard
Stereo Audio.
Enables and
automatically configures
the onboard audio.
Enables and allows you
to manually configure
the I/O addresses,
Interrupt Request (IRQ)
line, and DMA channel
for onboard audio.
Enables or disables the
Joystick Port on
Multimedia Dock.
Enables and
automatically configures
the port.
Enables and allows you
to manually configure
the port.
System BIOS
It is recommended that you use Auto configure
NOTE:
settings when available. If you manually configure a device, it
is recommended that you use the “System” application
located in the Windows “Control Panel.”
3-9
Page 65

System BIOS
Security Options
Option Settings Comments
Set User
Password
Set
Supervisor
Password
Enter a password of up
to eight alphanumeric
characters.
Enter a password of up
to eight alphanumeric
characters.
Set a User Password
required during:System
Boot, Resume, and
Undock operations.
Dock Security and
Modify Password Mode
options select
operations that will
require a password.
Be sure to write the
password down and
store it in a safe place.
Set a Supervisor
Password required to
enter System Setup.
This password can also
be used in place of the
User Password.
Be sure to write the
password down and
store it in a safe place.
continued
3-10
Page 66

Option Settings Comments
Modify
Password
Mode
Dock Security Enabled
*Factory default setting
Password on Boot Only
Password on Boot and
Resume
(Requires a User password
to be set.)
Disabled*
When set, you will be
prompted for a password
on each system boot.
When set, you will be
prompted for a password
each time the system
boots or resumes
operation from Suspend
mode.
Enable password
protection for the
undocking mechanism on
docked options. When
enabled and a User
Password is set, the
option cannot be
undocked unless the
system is powered on and
the User or Supervisor
Password is supplied.
If the system is not
powered on, the option
cannot be undocked when
Dock Security is enabled.
System BIOS
3-11
Page 67

System BIOS
Notebook Computer Security
Notebook Computer Security is important to avoid theft or
accidental loss of your computer software and hardware. The
DIGITAL HiNote Ultra 2000 provides the following levels of
protection:
• User Password – Used to prevent unauthorized access
to files on your notebook computer and unauthorized
removal of a docked option.
• Supervisor Password – Used to prevent unauthorized
access to your notebook computer’s System Setup.
• Dock Security – Utilizes the User or Supervisor
password to allow a docked device to be undocked.
Requires a User password be set.
CAUTION
It is important that you remember your User and
Supervisor Password after you have set one on your
notebook computer. If you forget the password and want
to have it reset, you must send the notebook computer
along with proof of ownership to a DIGITAL Service
Center for service.
3-12
Page 68

System BIOS
User Password
Your notebook has a User password that you can set to prevent
unauthorized access to your computer files and unauthorized
removal of a docked option.
Setting/Changing the User Password
Perform the following steps to set or change the User password:
1. Turn on your notebook computer.
2. After POST successfu lly comp lete s, pre ss [fn] + [F3] to
access System Setup.
3. The System Setup main menu appears on the screen.
4. Highlight the Security Setup menu and press [Enter].
5. Highlight the Set User Password field and press [Enter].
6. Type in up to an eight character User password and
press [Enter].
7. To confirm, type in your User password a second time
and press [Enter].
If a password already exists, you will be prompted
NOTE:
to enter the
8. Select the Exit menu and choose Save to save your
new settings and exit System Setup.
Depending on the settings of the Password Mode and
Dock Security features, your notebook computer will
prompt you for a password each time it powers on,
resumes operation, or when you request to remove a
docked option.
old password
before a new one can be set.
3-13
Page 69

System BIOS
Deleting the User Password
To delete a previously set User password and disable the
feature:
1. Open the User password dialog box.
2. With the cursor in the “Enter new password” field,
press [Enter].
3. The cursor will move to the “Re-enter new password”
field. Press [Enter].
4. When the Notice dialog box appears notifying you that
changes have been saved, press [Enter].
5. Select the Exit menu and choose Save to save your
new settings and exit System Setup.
Supervisor Password
Your notebook computer has a Supervisor password option that
you can set to prevent unauthorized access to the System
Setup. If you set a Supervisor password, you need to enter it
each time you want to access the System Setup.
The Supervisor password can be used in place of
NOTE:
the User password.
3-14
Page 70

System BIOS
Setting/Changing the Supervisor Password
Perform the following steps to set or change the Supervisor
password:
1. Turn On your notebook computer.
2. After Power On Self-Test (POST) successfully
completes, press [fn ] + [F 3] to access Syste m Se tup.
3. The System Setup main menu appears on the screen.
4. Highlight the Security Setup menu and press [Enter].
5. Highlight the Set Supervisor Password field and press
[Enter].
6. Type in up to an eight character Supervisor password
and press [Enter].
To confirm, type in your Supervisor password a second time
and press [Enter].
If a password already exists, you will be prompted to
NOTE:
enter the
old password
7. Select the Exit menu and choose Save to save your
new settings and exit System Setup.
When you access System Setup, you are prompted for the
Supervisor password.
before a new one can be set.
3-15
Page 71

System BIOS
Deleting the Supervisor Password
To delete a previously set Supervisor password and disable the
feature:
1. Open the Supervisor Password dialog box.
2. With the cursor in the “Enter new password” field,
press [Enter].
3. The cursor will move to the “Re-enter new password”
field. Press [Enter].
4. When the Notice dialog box appears notifying you that
changes have been saved, press [Enter].
5. Select the Exit menu and choose Save to save your
new settings and exit System Setup.
Dock Security
Setting a User password and enabling Dock Security password
protects the undocking of options from the system. When a
request is made to undock an option such as the DIGITAL
HiNote Ultra Multimedia Dock, you will be prompted for a
password. Enter either the User or Supervisor password (if set)
to complete the undock request and undock the option.
3-16
Page 72

System BIOS
Default Options
Option Settings Comments
Save User Default
Settings
Load User Default
Settings
Load Factory Default
Settings
Stores the current Setup
values as the user default
values in non-volatile
memory.
Loads all values stored under
User Defaults as the new
system values.
Loads all values to their
Factory Default Settings.
Exit Options
Option Settings Comments
Save Saves all Setup values and
Quit Ignores all changes to Setup
About Supplies some BIOS and
exit Setup.
values and exits Setup.
system version information.
3-17
Page 73

System BIOS
Restoring the Flash BIOS
To restore a corrupted Flash BIOS, a Crisis Recovery diskette is
required.
To restore the Flash BIOS:
1. Turn the computer Off by pressing [fn] +
Standby/Resume button.
2. Make sure the Diskette Drive Module is installed in the
computer.
3. Enable Crisis Recovery mode by placing a jumper
across resistor R744. This resistor is located in the
expansion memory compartment on the bottom of the
unit. To locate the resistor:
a) Place the unit in front of you with
the bottom up and the battery
closest to you.
b) Remove the cover on the memory
compartment.
c) The resistor is located in the lower
left corner of the memory
compartment.
4. Place the Crisis Recovery disk in the drive.
5. Turn On the system. When the BIOS is restored, turn
Off the system by pressing [fn] + Suspend/Resume
button.
Remove the jumper across resistor R744.
3-18
Page 74

Troubleshooting
4
Introduction
This chapter provides a systematic method of isolating problems
with the DIGITAL HiNote Ultra 2000 series of notebook
computers. It is assumed that you have a basic understanding of
DOS-based computer systems as well as a knowledge of
standard troubleshooting procedures. This manual is written
under the assumption that the problems are indeed related to the
notebook computer itself. The improper usage of the system and
application software problems are excluded in this chapter.
The system BIOS pow er on self- tests ( POST) are integral to the
system and detect certain errors with the system board. They
use a series of beep codes to identify certain system board
problems.
The troubleshooting procedures when followed step by step, can
help isolate syste m problems.
4-1
Page 75

Troubleshooting
Troubleshooting Tips
In general, troubleshooting involves an organized system of
approach to problem solving. Try to isolate the problem and
identify the defective device (hardware) or improper setting
(software). When you have a problem, you should do a
thorough visual inspection of the notebook computer.
• If none of the indicators are lit and you cannot hear the
HDD spinning, then the notebook computer is probably
not receiving power.
• Make sure the power cord is plugged in, and the AC
adapter is securely connected. The LEDs on the AC
adapter and the system should be on when connected
to a working AC source.
• If you are using a power strip or surge protector, ensure
that these devices are turned on.
Often problems are caused by improperly connected cables.
• If you are using peripherals such as the mouse or
keyboard, make sure they are properly connected to
their respective ports. Ensure that none of the
connectors’ pins are bent or broken.
• Check all cables connected to the notebook computer.
If any are cut, frayed, or damaged in any way, replace
them right away. Never use a damaged cable. A
damaged cable is not only a fire hazard, it may also
cause a short circuit, resulting in irreparable damage to
the notebook computer.
• Check all internal connections to ensure that they are
secure. Often problems can occur because a
connection is loose or backwards.
4-2
Page 76

Troubleshooting
Verify that all test equipment works before using it to test a
malfunctioning component.
Verify that a component is the only malfunctioning part of the
computer by replacing the malfunctioning component with a
properly functioning one, and then try to run the system. For
example, if you have tested an FDD in a test computer and
found it to be bad, you should also try a good FDD in the
malfunctioning FDD’s computer to be sure that another
component (such as the FDD controller) is not bad as well.
As with assembly and disassembly, make sure you have
adequate lighting, the right tools, and a stable clean working
environment.
The examples that follow provide useful tips and information that
will help isolate and solve some of the more common problems
that may be encountered.
System Start Failure
When you turn on the computer, the system hangs before
completing or starting the POST (power on self test). Power
supply failure, post failure, and boot-up failure can result in a
system start failure.
4-3
Page 77

Troubleshooting
Power Supply Failure
Problem Troubleshooting Procedure
You turn on the power
switch and the following
conditions apply:
There is no panel
•
display
There is no noise
•
coming from the
HDD
The power
•
indicator light is off.
If you are operating the notebook
computer using the battery:
The system could be in suspend.
•
Press the Suspend/Resume
button.
The battery connection is loose.
•
Remove and reinstall the battery.
The battery power is depleted.
•
Plug in the AC adapter, or replace
the battery.
The battery needs to be reformed.
•
Reform the battery.
The system could be experiencing
•
a hang. Press the reset button
(Figure 1-3).
If you are operating the notebook
computer using the AC adapter:
Check that the AC adapter is
•
plugged into an operational power
supply.
Check that the AC adapter is connected
securely to the notebook computer’s AC
adapter socket.
4-4
continued
Page 78

Troubleshooting
Problem Troubleshooting Procedure
You turn on the power
switch and the following
conditions apply:
There is no panel
•
display
There is no noise
•
coming from the
HDD
The power indicator light
is off.
Check to see if the Power LED on
•
the computer is lit and the LED on
the AC adapter is lit. If not lit, then
the AC adapter is bad. Replace
the AC adapter, and test the
notebook computer again.
Press the Suspend/Resume
•
button
Press the system's "Reset Button"
•
located on the back of the unit
between the serial and parallel
port connectors.
If the above items are functioning, then
the notebook computer’s internal power
circuit is probably damaged. Check the
power circuit of the notebook computer.
4-5
Page 79

Troubleshooting
Boot-up Failure
Problem Troubleshooting Procedure
You turn on the notebook
computer and the
following conditions
apply:
The notebook
•
computer’s power
is on.
There is no screen
•
display
System in Suspend Mode. Press
•
the Suspend/Resume button.
System hung possibly hung after
•
using a screen saver. Press the
Reset button located on the back
on the unit (Figure 1-3)
Check the DRAM connections to be
sure that they are secure.
Check the LCD connections.
•
Check the system board power
•
circuit.
Post Failure
Problem Troubleshooting Procedure
You turn on the
computer and the
following happens:
There is power to
•
the system.
The HDD seems
•
to be spinning.
The screen is
•
operational, and
error codes and
messages are
displayed.
A POST failure usually indicates a
•
keyboard, memory, or HDD
failure.
Check the error code or message
•
against the error codes and
messages in this chapter.
.
4-6
Page 80

Cardbus Failure
Problem Troubleshooting Procedure
The Cardbus
slots do not
work.
Reseat the Cardbus assembly cable
•
Replace the Cardbus assembly
•
Replace the Motherboard
•
LCD Panel Failure
Problem Troubleshooting Procedure
You turn on the
computer and one of the
following conditions
apply:
The system is
•
working, but there
is no LCD panel
display.
The system is
•
working, but the
LCD panel display
vertical or
horizontal lines.
The backlight
•
comes on, but
there is no display.
There is a display,
•
but you have
garbled characters
on the screen.
Make sure that the LCD cable is
•
securely connected to the
Motherboard.
Make sure that the LCD cables
•
are securely connected to the
inverter.
If the cables are securely
•
connected and the LCD still
doesn’t work, replace the LCD
panel and test the system again.
If the display is garbled, verify the
•
video setup in the operating
system’s Control Panel Display
application. If these are correct,
there is probably a VGA chip
failure. Replace the motherboard.
Troubleshooting
4-7
Page 81

Troubleshooting
CRT Failure
Problem Troubleshooting Procedure
The notebook computer
has power, the notebook
computer’s LCD panel is
working and one of the
following conditions
apply:
The notebook
•
computer’s LCD
panel is working.
There is no display
•
on the CRT.
The color of the
•
CRT is wrong.
There is a display,
•
but the display is
not stable.
Make sure the CRT output is
•
enabled.
Make sure that the CRT’s power
•
is on anf the power cables are
securely connected.
Make sure that the CRT to
•
notebook computer cable
connection is secure. Check the
CRT port on the notebook
computer to make sure the
connection is secure, and that
there are no damaged pins or
connectors.
Make sure the settings in the
•
operating system’s Control Panel
Display application are supported
by the monitor.
If the CRT still doesn’t work,
•
change to a different CRT and try
again.
If the color is bad, adjust the
•
Monitor’s color controls (if any).
4-8
Page 82

Notebook Computer Keyboard Failure
Problem Troubleshooting Procedure
The notebook computer
is fully powered-on.
However, when pressing
any of the keys on the
keyboard, one of the
following events occurs:
Pressing on the
•
key doesn’t have
any effect.
Incorrect
•
characters are
displayed on the
screen.
One stroke of a
•
key produces too
many characters
on the screen.
If incorrect characters are
•
displayed, check the
COUNTRY.SYS settings in the
operating system to see if an
incorrect language is being used
by the system.
Make sure that the keyboard
•
cable is securely connected into
the keyboard connector.
Check the keyboard circuit.
•
Replace the keyboard and check
•
again.
Replace the keyboard controller
•
BIOS chip located in the memory
compartment on the bottom of the
system unit.
Troubleshooting
4-9
Page 83

Troubleshooting
External Keyboard or PS/2 Mouse Failure
Problem Troubleshooting Procedure
The notebook
computer’s power is on,
and the keyboard is
working. One of the
following conditions
occurs:
Pressing keys on
•
the external
keyboard has no
effect.
Pressing the key
•
on the external
keyboard gives
incorrect
characters.
The mouse cursor
•
on the screen
doesn’t move in
conjunction with
the external
mouse.
Make sure that the external
•
mouse or keyboard’s connection
to the notebook computer’s PS/2
mini-DIN connector is secure.
Make sure the mouse trackball
•
and postion sensors are clean and
free of dust.
Replace the external mouse or
•
keyboard and try again.
If the system still doesn’t work,
•
test the mini-DIN keyboard circuit.
If incorrect characters are
•
displayed, check the
COUNTRY.SYS settings in DOS
to see if an incorrect language is
being used by the system.
4-10
Page 84

Troubleshooting
HDD Failure
Problem Troubleshooting Procedure
When you try to access
the HDD, one of the
following conditions
occurs:
There is a
•
message
indicating that the
HDD doesn’t exist.
You can’t read
•
from the HDD.
You can’t write to
•
the HDD.
Check to make sure that the BIOS
•
settings are correct. Refer to
Chapter 2 for BIOS information.
Make sure that the HDD
•
connection is secure.
Install the HDD into another
•
HiNote VP 550, VP 575notebook
computer and test it.
If the HDD works in a test
•
notebook computer, the HDD
controller on the motherboard is
probably bad. Test the
motherboard.
FDD Failure
Problem Troubleshooting Procedure
The notebook computer’s
power is on. The HDD is
functioning correctly. When
you try to access the FDD,
one of the following
conditions occurs:
You can’t read from the
•
FDD.
You can’t write to the
•
FDD.
You can’t hear the
•
FDD motor spinning,
and the LED indicator
light isn’t on.
Make sure the CD-ROM/FDD
•
module is properly seated.
Switch to a different floppy disk and
•
try again. Make sure that the
floppy isn’t write protected.
Clean the FDD’s heads.
•
Change the CD-ROM/FDD module
•
and test again.
If the FDD is OK, than there is
•
probably an I/O chipset failure.
Replace the main board
.
4-11
Page 85

Troubleshooting
CD-ROM Failure
Problem Troubleshooting Procedure
The notebook
computer’s power is on.
The HDD is functioning
correctly. When you try
to access the CD-ROM,
one of the following
conditions occurs:
You can’t read
•
from the CD-ROM.
You can’t hear the
•
CD-ROM motor
spinning, and the
LED indicator light
isn’t on.
Make sure the CD-ROM/FDD
•
module is properly seated.
Switch to a different CD-ROM disk
•
and try again.
Clean the CD-ROM’s lens.
•
Change the CD-ROM/FDD
•
module and test again.
If the CD-ROM is OK, than there
•
is probably an I/O chipset failure.
Replace the main board.
Battery Failure
Problem Troubleshooting Procedure
The notebook
computer’s AC power
works. When trying to
use battery power, the
notebook computer
doesn’t operate.
However, when the AC
Adapter is connected,
the battery charge
indicator flashes.
Make sure that the battery
•
contacts are in good condition.
Make sure that the battery
•
terminals are clean. If need be,
clean the terminals with contact
cleaner.
Form the battery and try again.
•
Change the battery and try again.
•
Make sure the AC power supply
•
adapter and adapter cord) are OK.
If they are not supplying the
correct voltage, it could damage
the system.
4-12
Page 86

Touchpad Failure
Problem Troubleshooting Procedure
The notebook
computer’s Touchpad
does not work.
Check the BIOS settings for the
•
Touchpad. Refer to Chapter 2.
Check the Toucpad settings in the
•
operating system’s Control Panel.
Make sure the UMI cable
•
connection to the Daughtercard is
properly seated. This connector is
located under the Keyboard Deck
behind the Touchpad. Note: If both
the Touchpad and modem do not
work, this cable is most likely not
connected.
Make sure the Touchpad cable is
•
properly seated.
Troubleshooting
4-13
Page 87

Troubleshooting
Internal Modem (UMI) Failure
Problem Troubleshooting Procedure
The internal modem (if
installed) does not work. You
cannot make a connection to
a phone line.
Make sure the Modem Card,
•
UMI adapter are properly
seated.
Make sure the modem
•
software is properly
configured.
Verify that the modem port is
•
enabled. This is done using
the System icon in the
Control Panel of the
operating system.
Make sure the UMI cable is
•
properly connected to the
Daughtercard. This
connector is located under
the Keyboard Deck behind
the Touchpad. Note: If both
the Touchpad and modem do
not work, this cable is most
likely not connected.
4-14
Page 88

Troubleshooting
External Audio Failure
Problem Troubleshooting Procedure
No sound from external
speakers connected to
external audio port.
Make sure the connections are
•
properly seated.
Make sure power is applied to the
•
speakers (if necessary).
Reseat the Audio Connector cable
•
on the Daughtercard. Note: If this
cable is not connected the internal
speakers will not work.
Check Points and Error Messages
At the beginning of each POST routine, the BIOS outputs the
test point error code to I/O address 80h. Use this code during
troubleshooting to establish at what point the system failed and
what routine was being performed.
If the BIOS detects a terminal error condition, it halts POST after:
• Issuing a terminal error beep code and
• Attempting to display the error code on upper left corner
of the screen and on the port 80h LED display
If the system hangs before the BIOS can process the error, the
code displayed at port 80h is that of the last test performed. In
this case, the screen does not display the error code.
4-15
Page 89

Troubleshooting
Beep Codes
The power on self-tests will issue a sequence of short and long
beeps to indicate that an error has occurred. The following is a
list of the beep code sequences and the error condition.
Beep Code Sequence Error Condition
s,s,s,s No RAM detected
s,s,s,l RAM test failed
s,s,l,s BIOS is not shadowed
s,l,s,s BIOS Checksum bad
l,s,l,s No CR code or CR is bad
s,s,s,s,s,s,s,s l,l,l,l l,l,l,l, Crisis Recovery required
s = short beep l = long beep
4-16
Page 90

Troubleshooting
Phoenix BIOS Test Points
The following is a list of the checkpoint codes written at the start
of each test and the beep codes issued for terminal errors:
Code Beeps POST Routine Description
02 Verify Real Mode
04 Get CPU type
06 Initialize system hardware
08 Initialize chipset registers with initial POST
09 Set in POST flag
0A Initialize CPU registers
0C Initialize cache to initial POST values
0E Initialize I/O
0F Initialize the local bus IDE
10 Initialize Power Management
11 Load alternate registers with initial POST
12 Jump to UserPatch0
14 Initialize keyboard controller
16 2-2-3 BIOS ROM checksum
18 8254 timer initialization
1A 8237 DMA controller initialization
1C Reset Programmable Interrupt Controller
20 3-1-1 Test DRAM refresh
22 3-1-3 Test 8742 Keyboard Controller
values
values
continued
4-17
Page 91

Troubleshooting
Code Beeps POST Routine Description
24 Set ES segment register to 4 GB
28 Autosize DRAM
2A Clear 512K base RAM
2C 3-4-1 Test 512K base address lines
2E 3-4-3 Test 512K base memory
30 Base 64K RAM Error
32 Test CPU bus-clock frequency
34 Test CMOS RAM
35 Initialize alternate chipset registers
37 Reinitialize the chipset
38 Shadow system BIOS ROM
39 Reinitialize the cache
3A Autosize cache
3C Configure advanced chipset registers
3D Load alternate registers with CMOS values
40 Set Initial CPU speed
42 Initialize interrupt vectors
44 Initialize BIOS interrupts
46 2-1-2-3 Check ROM copyright notice
47 Initialize manager for PCI Option ROMs
48 Check video configuration against CMOS
49 Initialize PCI bus and devices
4-18
continued
Page 92

Troubleshooting
Code Beeps POST Routine Description
4A Initialize all video adapters in system
4C Shadow video BIOS ROM
4E Display copyright notice
50 Display CPU type and speed
51 Initialize EISA board
52 Test keyboard
54 Set key click if enabled
56 Enable keyboard
58 2-2-3-1 Test for unexpected interrupts
5A Display prompt "Press F2 to enter SETUP"
5C Test RAM between 512 and 640k
60 Test extended memory
62 Test extended memory address lines
64 Jump to UserPatch1
66 Configure advanced cache registers
68 Enable external and CPU caches
6A Display external cache size
6C Display shadow message
6E Display non-disposable segments
70 Display error messages
72 Check for configuration errors
74 Test real-time clock
continued
4-19
Page 93

Troubleshooting
Code Beeps POST Routine Description
76 Check for keyboard errors
7C Set up hardware interrupt vectors
7E Test coprocessor if present
80 Disable onboard I/O ports
82 Detect and install external RS232 ports
84 Detect and install external parallel ports
86 Re-initialize onboard I/O ports
88 Initialize BIOS Data Area
8A Initialize Extended BIOS Data Area
8C Initialize floppy controller
90 Initialize hard-disk controller
91 Initialize local-bus hard-disk controller
92 Jump to UserPatch2
94 Disable A20 address line
96 Clear huge ES segment register
98 Search for option ROMs
9A Shadow option ROMs
9C Set up Power Management
9E Enable hardware interrupts
A0 Set time of day
A2 Check key lock
A4 Initialize typematic rate
4-20
continued
Page 94

Troubleshooting
Code Beeps POST Routine Description
A8 Erase F2 prompt
AA Scan for F2 key stroke
AC Enter SETUP
AE Clear in-POST flag
B0 Check for errors
B2 POST done-prepare to boot operating system
B4 One beep
B6 Check password (optional)
B8 Clear global descriptor table
BC Clear parity checkers
BE Clear screen (optional)
BF Check virus and backup reminders
C0 Try to boot with INT 19
DO Interrupt handler error
D2 Unknown interrupt error
D4 Pending interrupt error
D6 Initialize option ROM error
D8 Shutdown error
continued
4-21
Page 95

Troubleshooting
Code Beeps POST Routine Description
DA Extended Block Move
DC Shutdown 10 error
The following Error Codes are related to the Boot Block in the Flash
ROM:
E2 Initialize the chipset
E3 Initialize refresh counter
E4 Check for Forced Flash
E5 Check HW status of ROM
E6 BIOS ROM is OK
E7 Do a complete RAM test
E8 Do OEM initialization
E9 Initialize interrupt controller
EA Read in the bootstrap code
EB Initialize all vectors
EC Boot the Flash program
ED Initialize the boot device
EE Boot code was read OK
If the BIOS detects error 2C, 2E, or 30 (base 64K RAM error), it displays
an additional word of information reflecting the bit or address line that
failed. For example, if "2C 0002" is displayed, address line 1
(represented by bit one) has failed. If "2E 1020" is displayed, then data
bits 12 and 5 have failed in the upper 16 bits.
The BIOS sends the same information to the port 80h LED display. The
check point code is followed by a delay, the high order byte, another
delay, and then the low order byte of the error. This is be repeated
continuously.
4-22
Page 96

Troubleshooting
Warning Messages
The following is an alphabetic list of error and status messages
which the PhoenixBIOS can generate and an explanation of
each message. Many of the messages below refer to the built in
Setup program.
Message Description
nnnn Cache SRAM
Passed
Diskette drive A error Drive A: is present but fails the BIOS POST
Entering SETUP Starting Setup program
Extended RAM Failed
at offset: nnnn
nnnn Extended RAM
Passed
Failing Bits: nnnn The hex number nnnn is a map of the bits
Fixed Disk 0 Failure
or Fixed Disk 1
Failure or Fixed Disk
Controller Failure
Incorrect Drive A type
run SETUP
nnnn is the amount of system cache in
kilobytes successfully tested.
diskette tests. Check to see that the drive is
defined with the proper diskette type in
Setup and that the diskette drive is
attached correctly.
Extended memory not working or not
configured properly.
nnnn is the amount of RAM in kilobytes
successfully tested.
at the RAM address (in System, Extended,
or Shadow memory) which failed the
memory test. Each 1 (one) in the map
indicates a failed bit.
Fixed disk is not working or not configured
properly. Check to see if fixed disk is
attached properly. Run Setup to ensure
that the fixed-disk type is correctly
identified.
Type of floppy drive A: not correctly
identified in Setup.
continued
4-23
Page 97

Troubleshooting
Message Description
Invalid NVRAM media
type
Keyboard controller
error
Keyboard error Keyboard not working.
Keyboard error nn BIOS discovered a stuck key and displays
Keyboard locked
Unlock key switch
Monitor type does not
match CMOS
Operating system not
found
Parity Check 1 nnnn
Parity error found in
the system bus
Parity Check 2 nnnn
Parity error found in
the I/O bus
Press <F1> to
resume, <F2> to
Setup
Problem with NVRAM access.
The keyboard controller failed test. You
may have to replace keyboard or controller.
the scan code for the stuck key.
Unlock the system to proceed.
Run SETUP Monitor type not correctly
identified in Setup
Operating system cannot be located on
either drive A: or drive C:. Enter Setup and
see if fixed disk and drive A: are properly
identified.
BIOS attempts to locate the address but
failed and display it on the screen.
BIOS attempts to locate the address but
failed and display it on the screen.
Displayed after any recoverable error
message: Press <F1> to start the boot
process or <F2> to enter Setup and
change any settings. <F2> Press <F2> to
enter SETUP Optional message displayed
during POST.
4-24
continued
Page 98

Troubleshooting
Message Description
Previous boot
incomplete
Previous POST did
not complete
successfully
Real time clock error Real-time clock fails BIOS test. May require
Shadow RAM Failed
at offset: nnnn
nnnn Shadow RAM
Passed
System battery is
dead - Replace and
run SETUP
System BIOS
shadowed
System cache error Cache disable RAM cache failed the BIOS
System CMOS
checksum bad - run
SETUP
Default configuration used
POST loads default values and offers to
run Setup. If the failure was caused by
incorrect values and they are not corrected,
the next boot will likely fail.
board repair.
Shadow RAM failed at offset nnnn of the
64k block at which the error was detected.
Where nnnn is the amount of shadow RAM
in kilobytes successfully tested.
The CMOS clock battery indicator shows
the battery is dead. Replace the battery
and run Setup to reconfigure the system.
System BIOS copied to shadow RAM.
test. BIOS disabled the cache.
System CMOS has been corrupted or
modified incorrectly, perhaps by an
application program that changes data
stored in CMOS. Run Setup and
reconfigure the system.
continued
4-25
Page 99

Troubleshooting
Message Description
System RAM Failed
at offset: nnnn
nnnn System RAM
Passed
System timer error The timer test failed. Requires repair of
UMB upper limit
segment address:
nnnn
Video BIOS
shadowed
System RAM failed at offset nnnn of in the
64k block at which the error was detected.
nnnn is the amount of system RAM in
kilobytes successfully tested.
system board.
Displays the address of the upper limit of
Upper Memory Blocks, indicating released
segments of the BIOS which may be
reclaimed by a virtual memory manager.
Video BIOS successfully copied to shadow
RAM.
4-26
Page 100

FRU Replacement
Introduction
This chapter provides detailed procedures for replacing the
DIGITAL HiNote Ultra 2000 series notebook computer Field
Replaceable Units (FRUs). Unless otherwise noted the
replacement procedures for the FRUs are the reverse of the
removal procedures.
5
SHOCK OR STATIC SEN SITIVE:
electricity collects on non-conductors such as
paper, cloth, or plastic. A static discharge can
be damaging even though you often cannot see
or feel it. To prevent damage to circuit boards
and/or components:
• Before touching any circuit board or
component, touch the metal frame of your
workstation to discharge any static
electricity.
• Keep circuit boards and components
away from non-conductors.
Static
5-1
 Loading...