

Page 1
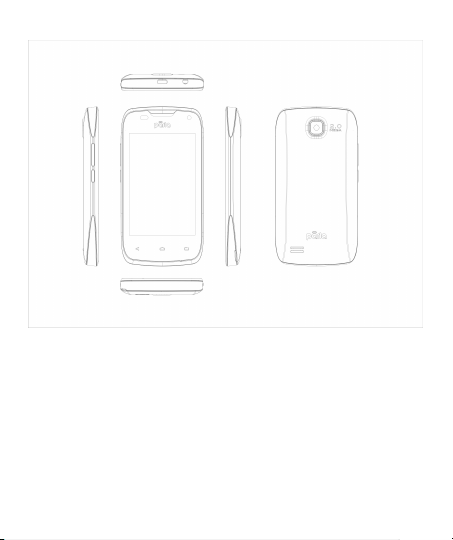
Parla Sonic 3.5
User Guide
Page 2

Welcome
Android
Android
4.1.2
4.1.2
(Gingerbread)
(Gingerbread)
3.5
3.5
full
full
touch
touch
display
display
Dual
Dual
SIM
SIM
22MPMPcamera
camera
11GHz
GHz
processor
processor
Multimedia
Multimedia
External
External
Memory
Memory
(Expandable
(Expandabletoto3232
GB)
GB)
Bluetooth
Bluetooth
2.1
2.1
Gravity
Gravity
Sensor
Sensor
Welcome
Congratulationsonon
Congratulations
mobile
phone.
phone.
spread
spread
features
features
You
You
mobile
customers
customers
exciting
exciting
becomingaa
becoming
have
have
across
across
and
much
and
much
User Guide
proud
ownerofof
proud
joined
joined
Globe.
Globe.
owner
the
the
Your
Your
now
now
the
the
more:
more:
the
the
millionsofof
millions
device
device
offers
offers
Parla
Parla
satisfied
satisfied
you
you
Android
Android
Parla
Parla
these
these
2
Page 3

User Guide
Contents
Contents
1 Phone Layout 5
2 Getting Started 6
2.1 Insert SIM card
2.2 Insert Memory card
2.3 Unlock the phone
3 Placing and Receiving Calls 8
3.1 Make a call
3.2 Conference Call
3.3 End a call
3.4 Disable Phone Calls (Airplane mode)
3.5 Using Touch screen
3.6 Using Phone Buttons
4 The Home Screen 12
4.1 Customize Home Screen
4.1.1
4.1.1
4.2 Open and Close the Launcher
5 Working With Menus 16
5.1 Context Menus
5.2 Options Menus
5.3 Menu Icons
6 Connect to the Internet 18
6.1 Access Internet via WLAN
7 Managing Notifications 19
7.1 Open the Notifications Panel
7.2 Respond to Notifications
........................... ........................... .........
........................... ........................... ..
........................... ........................... .....
........................... ........................... ................
........................... ........................... ........
........................... ........................... ................
........................... ........................... .
........................... .........................
Add
Itemstoto
Add
Items
........................... ........................... .............
........................... ....................
Home
Home
........................... ........................... .......
........................... ........................... .......
........................... ...................
...........................
........................... ......
Screen
Screen
........................... ...........
........................... ..................
........................... .............
3
6
6
7
9
9
10
10
10
11
13
14
14
15
16
17
18
19
20
20
Page 4

User Guide
7.3 Close Notifications Panel
8 Messaging 21
8.1 Create and Send Multimedia Message
8.2 Forward a message
8.3 Lock a Message
8.4 Using the Onscreen Keyboard
8.5 Enter Various Characters
9 Multimedia 26
10Manage Accounts 29
11Connect to Networks and Devices 30
12Applications 32
13Health and Safety Precautions 33
14Taking Care of Your Device 36
........................... ........................... ....................
9.1 Camera
........................... ........................... ....................
9.2 Gallery
9.2.1
Shareanan
9.2.1
Share
........................... ........................... ......................
9.3 Music
9.4 FM Radio
10.1 Why Use a Google Account
11.1 Connect to Internet
11.2 Connect to WLAN Networks
11.3 Pair With Bluetooth Devices
11.4
11.4
11.5 Install Security Certificate from SD Card
........................... ........................... ................
Connecttoto
Connect
Internet
Internet
........................... ...................
........................... ........................... .
........................... ........................... ......
........................... ...................
........................... ........................
Album
Album
........................... ........................
via
your
via
your
.........................
........................... ...........
........................... ............
........................... ...........
........................... ...........
...........................
Phone
Phone
.....................
4
21
22
23
24
24
25
26
27
27
27
27
28
29
30
30
30
31
31
31
Page 5
User Guide
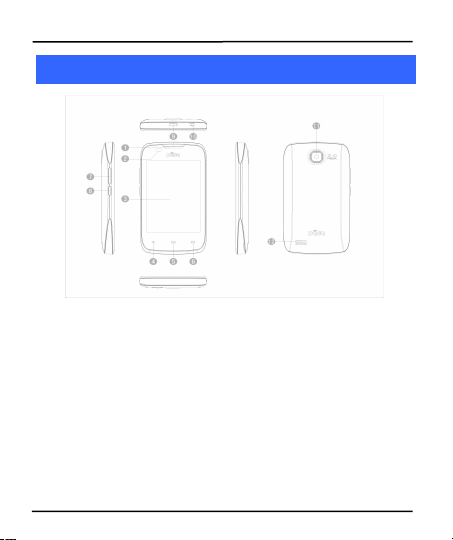
11Phone
Phone
Layout
Layout
1 Earpiece 7 Volume key
2
Distance sensor
8
Power key
3
Screen
9
USB Connector
4
Back key
10
Earphone socket
5
Home key
11
Camera lens
6
Menu key
12
Speaker
5
Page 6

22Getting
Getting
Started
Started
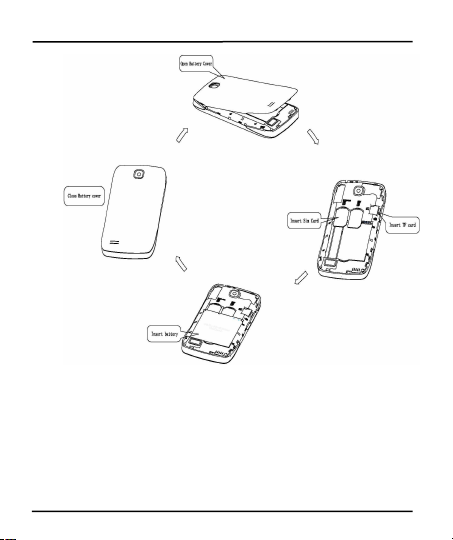
2.1 Insert SIM card
Dual
2.2 Insert Memorycard
ThThisisisisaaDual
two
networks
ofoftwo
networks
insert
SIM
ToToinsert
SIM
Switch
off
1.1.Switch
off
battery.
battery.
Insert
the
2.2.Insert
the
Finally
insert
3.3.Finally
insert
phone.
phone.
Power
off
1.1.Power
off
and
battery.
and
battery.
Insert
the
2.2.Insert
the
Finally
insert
3.3.Finally
insert
phone.
phone.
Use
only
compatible
Use
only
compatible
device.
Incompatible
device.
Incompatible
the
device
the
device
below).
below).
SIM
mobile
SIM
mobile
simultaneously.
simultaneously.
card(s):
card(s):
the
mobile
the
mobile
SIM
card(s)
SIM
card(s)
the
battery
the
battery
the
mobile
the
mobile
memory
memory
the
battery
the
battery
memory
memory
and
corrupt
and
corrupt
User Guide
phone
allowing
phone
allowing
phone
and
remove
phone
and
remove
correctlyinin
correctly
phone
phone
card
card
memory
memory
the
the
into
into
and
and
and
and
the
the
and
and
the
the
the
the
cards
cards
data
data
cards
cards
the
the
rear
rear
then
then
slot.
slot.
rear
rear
approvedbyby
approved
storedinin
stored
youtoto
you
card
card
coverofof
cover
remove
remove
coverofof
cover
may
may
the
rear
the
rear
slot(s)
slot(s)
damage
damage
the
card.
the
card.
use
the
use
the
cover
cover
the
mobile
the
mobile
the
rear
the
rear
the
mobile
the
mobile
MASTER
MASTER
the
the
(See
(See
facilities
facilities
and
and
cover
cover
with
with
cardoror
card
figure
figure
this
this
6
Page 7
User Guide
2.3 Unlock the phone
You
may
needtoto
the
the
need
phone.ToTo
phone.
power
power
provide
provide
unlock
keytoto
key
unlock
You
may
unlock
your
unlock
your
Press
1.1.Press
turnONON
turn
7
PIN,
Password,oror
PIN,
the
the
Password,
screen:
screen:
the
phone.
the
phone.
drawaa
draw
patterntoto
pattern
Page 8

Hold
2.2.Hold
You
You
methodinin
method
set
ToToset
the
1.1.OnOnthe
Touch
2.2.Touch
Choose
3.3.Choose
screen
screen
none.
none.
and
and
maybebe
may
the
the
main
main
setupup
set
the
the
lockonon
lock
dragoror
drag
requiredtoto
required
settings.
settings.
unlock
unlock
menu,
menu,
screen
screen
typeofof
type
the
the
User Guide
slide
the
unlock
slide
the
unlock
unlock
unlock
method:
method:
touch
Settings>>
touch
Settings
locks
locks
screen
lockasas
screen
lock
basisofof
pattern,
basis
pattern,
8
icontoto
icon
your
your
desired.
desired.
open.
open.
phone
phone
Location&&
Location
You
You
PIN
number,
PIN
number,
basedonon
based
Security.
Security.
can
can
passwordoror
password
the
unlock
the
unlock
set
your
set
your
Page 9

33Placing
Placing
and
and
Receiving
Receiving
Calls
Calls
You
can
You
can
Contacts.
Contacts.
You
can
You
can
dialaa
dial
also
also
select
select
phone
phone
from
from
User Guide
numberoror
number
the
Call
log.
the
Call
log.
touchaa
touch
number
number
from
from
your
your
9
Page 10
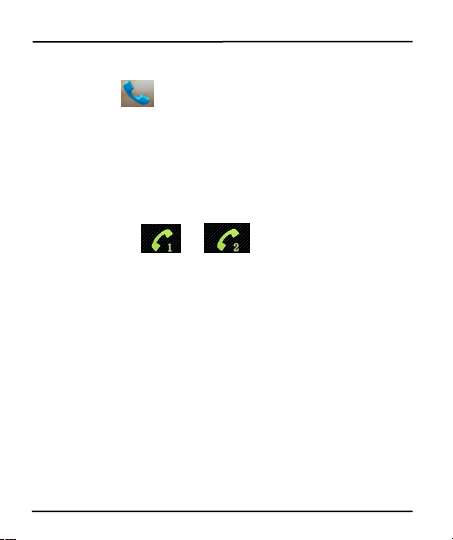
3.1 Make a call
Tap
3.2 Conference Call
the
1.1.Tap
the
dial
the
dial
the
Taponon
2.2.Tap
Tabstoto
Tabs
dialanan
3.3.ToTodial
enter
enter
country
country
Touch
4.4.Touch
Press
5.5.Press
volume.
volume.
you
dialoror
IfIfyou
dial
can
merge
can
merge
Placeaa
1.1.Place
When
2.2.When
participantisis
participant
second
second
Place
3.3.Place
Contacts.
Contacts.
desired
desired
anyofof
any
makeaa
make
international
international
the
Plus
the
Plus
prefix,
prefix,
either
either
the
Volume
the
Volume
acceptaa
accept
the
the
calltoto
call
you
are
you
are
contact.
contact.
the
next
the
next
User Guide
icononon
icon
number.
number.
the
Numbers,
the
Numbers,
call.
call.
(+)
symbol,
(+)
symbol,
followedbyby
followed
oor
Up/Down
Up/Down
new
new
calls
intoaa
calls
into
the
first
the
first
connected,
connected,
putonon
hold
put
hold
call,
using
call,
using
the
main
the
main
Call
Call
number,
number,
and
then
and
then
the
the
r
keyonon
key
call
when
call
when
conference
conference
participant.
participant.
touch
touch
and
you
and
you
the
phone
the
phone
menuoror
menu
Log,
Log,
touch
touch
phone
phone
icontoto
icon
the
the
are
Contacts
Contacts
and
and
enter
enter
number
number
dial
dial
the
lefttoto
the
left
you
are
you
are
call.
call.
Add
call
Add
call
promptedtoto
are
prompted
tab,
the
tab,
the
the
home
the
home
and
and
hold
the00
hold
the
the
international
the
international
the
number.
the
number.
adjust
adjust
alreadyononaa
already
icon,,
icon
Call
log,oror
Call
log,
screentoto
screen
Favorites
Favorites
keytoto
key
the
the
the
first
the
first
dial
the
dial
your
your
the
call
call
call,
call,
you
you
10
Page 11

When
3.3 End a call
3.4 DisablePhoneCalls (Airplane mode)
Press
Press
and
and
hold
hold
the
the
Power
Power
button
button
and
and
then
then
choose
choose
Airplane
Airplane
Drag
Drag
notification
notification
panel
panel
down,
down,
then,
then,
touch
touch
the
the
Airplane
Airplane
mode.
mode.
3.5 Using the Touchscreen
Touch:
Touch:
Tapping
Tappingofof
menus
menusonon
screen,
screen,
such
suchasas
application,
application,
Touch
Touch
and
and
hold:
hold:
Touch
Touch
and
and
hold
holdanan
item
itemonon
the
the
screen
screen
until
untilanan
Drag:
Drag:
Touch
Touch
and
and
hold
holdanan
item
item
and
and
move
move
your
your
finger
fingeronon
the
the
4.4.When
addedtoto
added
You
may
You
may
avail
this
avail
this
While
While
Some
Some
and
Bluetooth
and
Bluetooth
Mode.
Mode.
You
can
You
can
setting
setting
onscreen
onscreen
action
action
you
you
needtoto
need
facility.
facility.
duringaa
during
locations
locations
use
use
icons
icons
keyboard
occurs.
occurs.
are
connected,
are
connected,
the
conference
the
conference
call,
call,
may
may
wireless
wireless
the
touch
the
touch
and
and
keyboard
User Guide
touch
touch
call.
call.
contact
your
contact
your
touch
the
touch
the
require
youtoto
require
you
connections.
connections.
screeninin
the
screen
the
typingofof
typing
through
fingertip.
through
fingertip.
Merge
Merge
network
network
turn
turn
following
following
letters
letters
calls.
calls.
operatortoto
operator
icon.
icon.
off
off
and
and
The
The
your
your
ways:
ways:
symbols
symbols
participantisis
participant
activate
activate
mobile,WW
mobile,
using
using
and
and
LAN,,
LAN
the
the
11
Page 12

User Guide
Swipe
Swipeoror
slide:
slide:
Quickly
Quickly
slide
slide
your
your
finger
finger
across
across
the
the
surface
surfaceofof
the
the
Double-tap:
Double-tap:
Quickly,
Quickly,
tap
tap
twice
twiceononaa
webpage,
webpage,
map,
map,oror
other
other
Pinch:
Pinch:InIn
some
some
applications
applications
(such
(suchasas
Maps,
Maps,
Browser,
Browser,
and
and
Gallery)
Gallery)
Rotate
Rotate
the
the
screen:
screen:OnOn
most
most
screens,
screens,
the
the
orientation
orientationofof
the
the
3.6 Using the PhoneButtons
screen
until
you
reach
the
target
screen
until
you
reach
screen,
(without
(without
downtoto
zoom.
zoom.
also
also
applications.
applications.
zoominin
zoom
and
pinching
and
pinching
apart
(to
apart
(to
changesasas
changes
and
and
dragginganan
dragging
scroll
the
scroll
the
For
example,
For
example,
zoom
that
zoom
that
double-taptoto
double-tap
and
and
them
them
zoom
in).
zoom
in).
you
you
soft
key
soft
key
screen,
upuporordown
screentoto
screen
Browsertoto
ininBrowser
You
can
You
can
other
ininother
you
can
you
can
once
once
them
them
screen
screen
off.
off.
The
phone
The
phone
shortcuts.
shortcuts.
Button Press Press and Hold
the
list.
list.
outbyby
out
rotate
rotate
target
item).
item).
double-tapaa
double-tap
sectiontoto
section
control
control
placing
placing
together
together
it.
it.
buttons
buttons
position.
position.
For
For
fit
fit
the
the
two
two
(to
(to
You
can
You
can
offeraa
offer
example,
example,
sectionofofaa
section
the
the
camera
camera
fingersonon
fingers
zoom
zoom
turn
turn
lotofof
lot
slide
slide
widthofof
width
zoominin
zoom
out)oror
out)
this
this
the
the
the
the
the
the
featureonon
feature
functions
functions
screen
screen
webpage
webpage
screen.
screen.
maps
and
maps
and
screenatat
screen
spreading
spreading
and
and
and
and
12
Page 13
User Guide
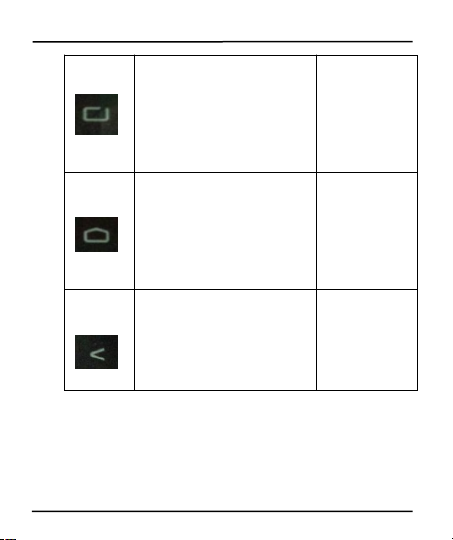
Menu key: Opens a context
menu related with current
screen or application.
Home key: Opens the Home
screen.
Back key: Opens the previous
screen you were working on
13
.
Opens the
search bar
Opens
recently used
applications.
Page 14

44The
The
Home
Home
Screen
Screen
When
The status bar shows the time,
signal strength, battery status,
and notification icons.
Touch the menu icon to open
the menus on the screen
such as home screen, main
menu, and so on.
you
sign
in,
sign
in,
the
the
When
you
User Guide
home
screen
home
screen
14
opens.
opens.
Page 15

User Guide
The
The
main
main
menu
menu
screen
screenisis
your
your
starting
starting
point
pointtoto
access
access
all
all
the
the
AAttthe
the
top
topofof
the
the
screen,
screen,
the
the
Status
Status
Bar
Bar
displays
displays
the
the
time,
time,
Touch
Touch
the
the
main
main
menu
menu
icon
iconatat
the
the
bottom
bottomofof
the
the
screen
screentoto
view
view
4.1 CustomizeHomeScreen
4.11
4.11
featuresonon
features
status,
status,
all
all
You
You
any
partofof
any
part
Add
Add
Press
1.1.Press
installed
installed
can
can
and
and
add
applications,
add
applications,
the
Home
the
Home
itemstoto
items
your
phone.
your
phone.
notifications.
notifications.
applications.
applications.
screenoror
screen
the
Home
the
Home
open
the
totoopen
the
shortcuts,
shortcuts,
change
change
screen
screen
Home
Home
widgets,
widgets,
screen.
screen.
the
wallpaper.
the
wallpaper.
and
and
2. Click the shortcuts, an d WIDGETS to choose need long click the shortcut
is added to the s tandby
15
other
other
itemstoto
items
Page 16

User Guide
Shortcuts:
Shortcuts:
Add
Add
shortcuts
shortcutstoto
applications,
applications,aa
bookmarked
bookmarked
webpage,aa
webpage,
play
list,
play
list,
etc..
etc
favorite
favorite
contact,aa
contact,
16
destinationinin
destination
Maps,aa
Maps,
music
music
Page 17

Widgets:
Widgets:
Add
Add
any
any
application
application
(widgets)
(widgets)toto
your
your
Home
Home
screen,
screen,
including
4.2 Openand Closethe Launcher
The status bar shows the time,
signal strength, battery status,
and notification icons.
Slide the Launcher left
or right to view more
icons.
clock,
including
clock,
download
widgets
download
widgets
Touch
the
Launcher
Touch
the
Launcher
You
can
addanan
You
can
add
and
holdingitit
holding
your
your
Home
Home
untilitit
until
finger.
finger.
iconoror
icon
and
release
release
Press
Press
User Guide
music
player,
music
player,
from
Android
from
Android
Icon
Icon
application
application
vibrates
vibrates
Back
icontoto
Back
icon
17
totoopen
icontoto
icon
and
and
close
close
pictures
pictures
Market..
Market
open
the
the
the
Home
the
Home
enters
enters
the
Launcher.
the
Launcher.
andsoso
and
main
main
Home
Home
on.
on.
menu..
menu
screenbyby
screen
screen
screen
You
You
can
can
pressing
pressing
and
and
also
also
then
then
Page 18

55Working
Working
With
With
Menus
Menus
The
5.1 Optionsmenus
5.2 MenuIcons
phone
The
phone
accessing
accessing
Options
Options
screen.
screen.
the
screen.
ononthe
screen.
When
you
When
you
menu
opens.
menu
opens.
You
have
You
have
important
important
the
the
menu
menu
You
You
the
the
features:
features:
provides
provides
can
can
touch
touch
User Guide
you
you
featuresininanan
features
contains
contains
openanan
open
Not
all
items
Not
all
items
and
hold
and
hold
following
following
Opens messaging
with
with
intuitive
intuitive
tools
tools
optionbyby
option
have
have
some
some
menu
menu
Context
Context
that
that
options
options
iconstoto
icons
and
and
way.
way.
applytoto
apply
touching
touching
menu.
menu.
itemsononaa
items
easily
easily
Options
Options
specific
specific
and
and
screen,anan
screen,
let
let
menus
menus
itemsonon
items
holdinganan
holding
you
access
you
access
the
the
item
item
option
option
for
for
its
its
18
Page 19

User Guide
Opens the dialer
Opens the contacts
Opens the main menu
Opens Search bar. Needs Internet
connectivity for this feature.
19
Page 20

66Connect
Connecttoto
the
the
Internet
Internet
configure
1.1.GoGototoSettings>
Settings>
More
More
settings>Mobile
settings>Mobile
Networks>
Networks>
Tap
Tap
Data
Data
2.2.GoGototoSettings
Settings>>
More
More
settings
settings
>Mobile
>Mobile
Network
Network>>
Dual
Dual
SIM
SIM
6.1 Access Internetvia WLAN
Enabled.
Enabled.
settings>>
settings
default,
settings
via
settings
via
set
these
totoset
these
access
point
access
point
default,
please
default,
please
After
you
you
Settings>
totoSettings>
service
providerofof
service
provider
Similarly,
Similarly,
your
SIM
your
SIM
browse
the
the
Menu>
Next,gogototo
select
theWW
select
the
Internet:
have
have
you
you
card.
card.
ToToconfigure
2.2.ByBydefault,
3.3.After
ToTobrowse
1.1.GoGototoMenu>
2.2.Next,
Internet:
Access
Access
your
network
your
network
SMS,ororitit
SMS,
settings.
settings.
names.IfIf
names.
contact
contact
selectedoror
selected
SIM
SIM
can
can
Internet
Internet
settings>WW
settings>
Menu>
Menu>
LAN
LAN
Management
Management
perform
perform
connection
connection
User Guide
Point
Names
Names
provider
provider
this,
this,
access
access
your
your
configured
configured
SIMtoto
SIM
step33toto
step
LAN::
LAN
LAN
LAN
with
with
you
you
point
point
network
network
>Data
>Data
enable
enable
and
and
LAN>>WW
LAN
listed
listed
(select,
(select,
sends
sends
your
your
then
then
underWW
Point
comes
comes
After
After
the
the
your
your
viaWW
via
settings>WW
settings>
the
the
SIM
SIM
can
choose
can
choose
names
names
provider.
provider.
the
the
Connection
Connection
Internet
Internet
enable
enable
tapWW
tap
under
addoror
add
access
access
card.
card.
access
access
data
data
LAN
LAN
LAN
LAN
are
are
LAN..
LAN
change
change
point
name
point
name
You
may
You
may
from
the
listed
from
the
listed
not
listedbyby
not
listed
point
name,gogo
point
name,
and
tap
and
tap
connection.
connection.
connectiononon
connection
Settings
and
Settings
and
networks.
networks.
APN)
need
need
the
the
APN)
then
then
20
Page 21

User Guide
77Managing
Managing
Notifications
Notifications
7.1 Openthe Notifications Panel
Notification
Notification
When
When
along
along
Drag
Drag
below.
below.
you
you
withaa
with
the
the
icons
inform
icons
inform
receiveaa
receive
summary
summary
status
bar
down
status
bar
down
youofof
you
notification,
notification,
that
appears
that
appears
from
from
21
the
the
new
new
its
its
messages
messages
icon
icon
only
only
topofof
top
and
and
appearsinin
appears
briefly.
briefly.
the
screenasas
the
screen
events.
events.
the
status
the
shown
status
shown
bar,
bar,
Page 22

User Guide
7.2 Respondto Notifications
1.1.Open
Open
the
the
notification
notification
panel
panel
and
and
touch
touchtoto
respond.
respond.
2.2.What
What
happens
happens
next
next
depends
dependsonon
the
the
notification.
notification.
7.3 Close NotificationsPanel
88Messaging
Messaging
The
Notifications
The
Notifications
listofof
list
Drag
1.1.Drag
the
ofofthe
when
you
when
you
You
can
You
can
with
your
with
your
your
current
your
current
the
tabatat
the
tab
screen.OrOr
screen.
touchaa
touch
use
Messagingtoto
use
Messaging
friends.
friends.
panel
panel
notifications.
notifications.
the
the
just
just
notificationtoto
notification
displays
displays
bottomofof
bottom
press
press
the
the
exchange
exchange
22
your
network
your
network
the
Notifications
the
back
back
respondtoto
respond
text
text
provider
provider
Notifications
button.
The
button.
The
it.
it.
and
multimedia
and
multimedia
paneltoto
panel
panel
panel
name
name
also
also
messages
messages
andaa
and
the
the
closes
closes
top
top
Page 23

Touch to compose a new text
or multimedia message.
Touch to open a
messaging conversation
User Guide
23
Page 24

User Guide
8.1 Createand Send MultimediaMessage
Message
multimedia
multimedia
Touch
1.1.Touch
Enteroror
2.2.Enter
Touch
3.3.Touch
becomesanan
becomes
compose
compose
selectaa
select
the
the
AAMessage
add
add
media
file(s).
media
file(s).
new
new
mobile
mobile
composition
composition
MMSifif
MMS
message.
message.
phone
phone
text
text
24
box
box
you
you
number.
number.
and
and
senditittotoanan
send
enter
enter
your
your
email
email
message
message
address,oror
address,
body.
body.
Page 25

Touch
8.2 Forward a message
Tap to lock the message
.
Touch to forward the
message.
4.4.Touch
Touch
5.5.Touch
Send
the
6.6.Send
the
Openaa
1.1.Open
conversation
conversation
Touch
2.2.Touch
the
the
icontoto
icon
MMS.
MMS.
message
message
window.
window.
Forwardinin
Forward
User Guide
keytoto
open
attach
attach
then
then
menu.
menu.
25
open
various
various
touch
touch
the
the
key
and
and
the
the
context
context
typesofof
types
that
messageininaa
that
message
menu.
menu.
files.
files.
message
message
Page 26

Addaa
8.3 Locka Message
8.4 Using the OnscreenKeyboard
3.3.Add
Touch
4.4.Touch
You
can
You
can
message
message
You
can
You
can
storage
storage
Touch
1.1.Touch
Touch
2.2.Touch
and
and
Some
applications
Some
applications
touchaa
touch
keyboard.
keyboard.
contact.
contact.
Sendtoto
Send
also
Copy
also
Copy
details
details
lockaa
lock
limits.
limits.
and
hold
and
hold
Lock
Lock
holdingitit
holding
text
field
text
field
User Guide
send
the
send
the
message
message
and
delete
and
delete
messagesosoitit
message
messageininaa
message
messageinin
message
and
then
and
then
display
display
where
where
message..
message
text,
text,
message.
message.
won’’ttbebe
won
the
menu.
the
menu.
touch
touch
the
keyboardbyby
the
keyboard
you
you
save
save
message
message
Unlock
Unlock
wanttoto
want
messagetoto
message
deletedifif
deleted
window.
window.
Unlockaa
Unlock
message.
message.
default.
default.
enter
enter
SIM
card,
SIM
card,
you
reach
you
reach
messagebyby
message
For
For
text,toto
text,
your
your
touching
touching
others,
others,
open
open
view
view
you
you
the
the
26
Page 27

Use
Use
the
the
icon
icontoto
erase
erase
characters.
characters.
After
After
typing,
typing,
press
press
icon
icontoto
close
close
the
the
keyboard.
keyboard.
8.5 Enter VariousCharacters
Press
Press
the
the
symbols
symbols
key
keytoto
switch
switchtoto
the
the
numbers
numbers
and
and
symbols
symbols
keyboard.
Tap this icon to select
desired contact from
phonebook
Touch once to capitalize the
next letter you type. Touch
Press space or a punctuation
mark to enter the
keyboard.
User Guide
27
Page 28

Touch
Touch
and
and
hold
hold
the
the
text
text
field
fieldtoto
open
openaa
menu
menu
and
andtoto
copy/cut
copy/cut
text.
99Multimedia
Multimedia
9.1 Camera
Touch to change settings
Touch to toggle between
video/camera modes
text.
Your
camera
Your
camera
must
insert
insert
from
from
onetoto
one
theSDSD
must
videos
videos
pictures
pictures
the
use
use
cardtotoaaPCPC
card
User Guide
and
videos
canbebe
and
videos
can
the
Camera.
Camera.
28
and
and
You
You
the
storedininSDSD
stored
can
can
vice
versa.
vice
versa.
copy
copy
card,soso
card,
pictures
pictures
you
you
and
and
Page 29

9.2 Gallery
You
9.2.1
9.2.1
Share
Shareanan
Album
Album
9.3 Music
Touch
Touch
the
the
intuitive
intuitive
buttons
buttons
and
and
icons
iconsonon
the
the
phone
phoneinin
music
music
can
You
can
files.
files.
Touch
1.1.Touch
Touchanan
2.2.Touch
Touchaa
3.3.Touch
Open
1.1.Open
Tap
2.2.Tap
Check
3.3.Check
Touch
4.4.Touch
touch
touch
You
can
You
can
You
can
You
can
card
and
card
and
music.
music.
use
the
use
the
the
Gallery
the
albumtoto
album
pictureororaa
picture
the
main
the
main
the
the
the
photo
the
Share
Share
the
the
share
share
easily
easily
experienceaa
experience
User Guide
Gallerytoto
Gallery
iconinin
Gallery
icon
open
open
videoininanan
video
Gallery
Gallery
key
and
key
and
you
wanttoto
photo
you
againatat
again
applicationtoto
application
via
email,
via
email,
transfer
your
transfer
your
whole
whole
view
view
the
the
and
and
window.
window.
then
then
want
the
context
the
context
usetoto
use
Bluetooth,
Bluetooth,
favorite
favorite
worldofof
world
pictures
pictures
main
main
view
view
albumtoto
album
touch
touch
share.
share.
share
share
Gmail
Gmail
and
and
menu..
menu
its
contents.
its
contents.
Share.
Share.
menu.InIn
menu.
the
the
messaging
messaging
music
music
interesting
interesting
play
play
view
view
the
the
selected
selected
from
from
videos
videos
it.
it.
menu
menu
albums.
albums.
andsoso
and
yourPCPCtoto
your
and
melodious
and
melodious
and
and
that
that
share
share
opens,
opens,
on.
on.
theSDSD
the
interfacetoto
interface
enjoy
enjoy
the
featuresofof
the
29
features
your
music
your
music
player.
player.
Page 30

Press
Press
the
the
phone
phone
volume
volume
up/down
up/down
keys
keysonon
the
the
left
left
side
sideofof
the
the
mobile
Touch
Touch
the
the
intuitive
intuitive
buttons
buttons
and
and
icons
iconsonon
the
the
phone
phoneinin
Radio
Radio
Press
Press
the
the
phone
phone’’ss
volume
volume
up/down
up/down
keys
keysonon
the
the
right
right
side
sideofof
1010Manage
Manage
Accounts
Accounts
phonetoto
mobile
phone
9.4 FM Radio
You
can
listentoto
You
can
listen
receiverofof
your
receiver
your
User Guide
adjust
adjust
your
favoriteFMFM
your
favorite
phone.
phone.
the
the
volume.
volume.
channels
channels
using
using
the
the
built-inFMFM
built-in
interfacetoto
interface
the
mobile
the
mobile
You
can
setupupaa
You
can
corporate,
set
corporate,
enjoy
the
enjoy
the
phonetoto
phone
Google
Google
30
featuresofof
features
adjust
adjust
account,
account,
your
your
the
volume.
the
volume.
built-inFMFM
built-in
etc.toto
etc.
your
your
radio.
radio.
device.
device.
You
You
can
can
Page 31

thisbyby
10.1 Why Use a GoogleAccount
dodothis
.
.
tapping
tapping
Your
Google
Your
Google
applications
applications
Maps,
Navigation,
Maps,
Navigation,
Settings>
Settings>
Account
Account
and
services
and
services
and
and
User Guide
Add
Account:
Add
Account:
lets
you
take
lets
you
take
that
you
may
that
you
various
various
may
applications.
applications.
full
advantageofof
full
advantage
wanttoto
want
use,
use,
suchasas
such
Google
Google
Gmail,
Gmail,
31
Page 32

User Guide
11
11
Connect
Connecttoto
Networks
Networks
and
and
Devices
Devices
11.1 Connect to Internet
11.2 Connect to WLAN Networks
11.3 PairWith Bluetooth Devices
Your
phone
can
Your
includingWW
including
also
also
Refertoto
Refer
Refertoto
Refer
1.1.GoGototoSettings
Bluetoothisis
2.2.IfIfBluetooth
scans
scans
the
3.3.IfIfthe
discoverable.
discoverable.
your
4.4.IfIfyour
discoverable,
discoverable,
Type
5.5.Type
you
you
device
device
devicetotobebe
device
connectstoto
connects
connecttotoaa
phone
can
connect
LAN
and
LAN
transfer
transfer
and
files
to/from
files
to/from
section66
section
Section
Section
Settings>>
off,
off,
and
displays
and
displays
device
you
device
you
phone
stops
phone
stops
touch
touch
theIDIDofof
the
the
the
are
prompted
are
prompted
and
enter
and
enter
paired.),IfIf
paired.),
the
the
Bluetooth
Bluetooth
for
details.
for
details.
6.1
6.1
Bluetooth
Bluetooth
check
check
the
the
wanttoto
want
scanning
scanning
Scan
Scan
other
other
foraa
for
the
same
the
same
device.
device.
varietyofof
variety
devices
devices
yourPCPC
through
your
through
for
details.
for
details.
settings.
settings.
Bluetoothtoto
Bluetooth
Bluetooth
Bluetooth
pair
withisis
pair
with
before
before
for
devices.
for
devices.
deviceinin
device
password,
password,
password
password
the
pairingisis
the
pairing
32
networks
networks
suchasas
such
the
turnitit
turn
devicesinin
devices
notinin
not
you
you
the
Settingstoto
the
Settings
enter
enter
you
you
successful,
successful,
headsets.
headsets.
data
the
data
on.
on.
range.
range.
the
the
make
make
any
passwordonon
any
password
enteredinin
entered
and
devices,
and
devices,
cable.
cable.
Your
phone
Your
phone
list,
makeitit
list,
make
the
other
the
other
pair
them.IfIf
pair
them.
the
the
your
phone
your
phone
You
You
can
can
device
device
one
one
other
other
Page 33

11.4 Connect to Internet via your Phone
You
11.5 Install SecurityCertificatefromSD Card
can
browse
You
can
browse
this:
ToTododothis:
Connect
your
1.1.Connect
your
Settings>
2.2.GoGototoSettings>
and
then
touch
and
then
touch
prompt
for
caseofof
obtain
obtain
may
may
Copy
card.
card.
installation
for
installation
Linux,,
Linux
caseofof
case
VPNororWW
VPN
the
the
before
before
your
your
needtoto
need
the
certificate
the
certificate
installed.
installed.
you
you
AAprompt
suggested.
suggested.
InIncase
automatically
automatically
However,inin
However,
drivers.
drivers.
your
IfIfyour
must
must
storage,
storage,
facilitiesofof
facilities
You
You
1.1.Copy
User Guide
the
Internetonon
the
Internet
mobile
phonetoto
mobile
phone
More
settings>>
More
settings
Bluetooth
Bluetooth
will
will
Windows77
Windows
Windows
Windows
LAN
Network
LAN
Network
certificates
certificates
can
configure
can
configure
phone.
phone.
download
download
from
from
yourPCPC
your
Tethering.
Tethering.
appearonon
appear
and
Vista
and
Vista
XP,
you
XP,
you
reliesonon
relies
and
store
and
store
the
certificates
the
certificates
your
computertoto
your
computer
yourPCPC
your
Tethering&&
Tethering
OS,
OS,
needtoto
need
theminin
them
accessofof
access
using
using
via
via
your
your
the
the
secured
secured
the
the
from
from
your
your
the
USB
the
USB
Portable
Portable
PC.
Proceedasas
PC.
Proceed
drivers
drivers
manually
manually
certificates,
certificates,
your
your
VPNororWW
VPN
the
the
the
rootofof
the
root
mobile
mobile
adaptor.
adaptor.
get
get
install
install
phone’’ss
phone
website.
website.
phone.
phone.
Hotspot
Hotspot
you
you
LAN
LAN
theSDSD
the
the
the
33
Page 34

Touch
1212Application
Applicationss
Settings>
Settings>
Install
Install
the
file
the
file
name
name
comes
comes
more
more
that
that
Security.
Security.
fromSDSD
from
nameofof
name
that
that
enter
enter
for
for
withaa
with
convenient.
convenient.
come
come
2.2.Touch
Touch
3.3.Touch
Touch
4.4.Touch
certificates
ofofcertificates
displayed.
displayed.
prompted,
5.5.IfIfprompted,
Enteraa
6.6.Enter
You
phone
You
phone
easier
and
easier
and
the
features
the
features
advantage.
advantage.
User Guide
card
under
card
under
the
certificatetoto
the
certificate
you
have
already
you
have
already
the
certificate’’ss
the
certificate
the
certificate
the
certificate
hostofof
applicationstoto
host
applications
Explore
Explore
with
your
handset
with
your
handset
34
Security
Security
password
password
and
and
the
the
Settings.
Settings.
install.
install.
installedinin
installed
touch
OK.
touch
OK.
various
various
and
and
Only
Only
your
your
and
touch
and
touch
make
make
applications
applications
enjoy
the
enjoy
the
the
the
your
your
names
names
phone
phone
OK.
OK.
life
life
and
and
are
are
Page 35

1313Health
Health
and
and
Safety
Safety
Precautions
Precautions
Please
Your
Your
phone
phoneisis
designed
designed
not
nottoto
exceed
exceed
the
the
limits
limitsofof
emission
emissionofof
SAR
SAR
(Specific
(Specific
Absorption
Absorption
Rate)
Rate)isis
the
the
measurement
measurementofof
The
The
SAR
SAR
value
valueofof
the
the
phone
phone
may
may
depend
dependonon
factors
factors
such
suchasas
The
The
highest
highest
SAR
SAR
value
valueofof
the
the
device
deviceinin
the
the
head
head
and
and
body
body
are
are
Use
Useaa
wireless
wireless
hands-free
hands-free
system
system
(headphone,
(headphone,
headset)
headset)
with
withaa
low
low
Make
Make
sure
sure
the
the
cell
cell
phone
phone
has
has
low
low
SAR.
SAR.
SAR
SAR
Compliance
Compliance
SAR
SAR
Recommendations
Recommendations
read
Please
read
dangerousoror
dangerous
radio
waves
radio
waves
User Guide
these
simple
simple
guidelines.
these
illegal.
illegal.
recommendedbyby
recommended
guidelines.
international
international
Not
Not
following
following
guidelines.
guidelines.
them
them
maybebe
may
body-absorbedRFRF
body-absorbed
ascertained
ascertained
laboratory
laboratory
proximitytoto
proximity
accessories.
accessories.
0.657
0.657
human
human
power
power
accordingtoto
according
tests.
tests.
the
the
W/kg
and
W/kg
and
tissue.
tissue.
bluetooth
bluetooth
quantity
quantity
network
network
1.24
W/kg
1.24
W/kg
emitter.
emitter.
35
when
when
the
highestRFRF
the
highest
tower,
tower,
respectively
respectively
the
phoneisisinin
the
phone
useofof
use
use.
use.
level
generated
level
generated
accessoriesoror
accessories
averaged
averaged
SAR
valueisis
SAR
value
during
during
other
other
over11gmgmofof
over
Page 36

User Guide
Please
Please
keep
keep
your
your
calls
calls
short
short
and
and
use
use
SMS
SMS
whenever
whenever
more
more
Prefer
Prefertoto
use
use
your
your
cell
cell
phone
phone
when
when
the
the
signal
signal
quality
qualityisis
good.
good.
People
People
having
having
active
active
medical
medical
implants
implants
should,
should,
advisably,
advisably,
keep
keep
the
the
Maintain
Maintainaa
preferable
preferable
distance
distanceofof1515mmmm
from
from
the
the
device.
device.
DoDonot
not
use
use
the
the
phone
phone
while
while
driving.
driving.
When
When
you
you
need
needtoto
use
use
the
the
Please
Pleasedodo
not
not
put
put
the
the
phone
phoneonon
any
any
passenger
passenger
seat
seatoror
any
any
place
place
Flight
Flightisis
influenced
influencedbyby
interference
interference
caused
causedbyby
the
the
phone.
phone.ItItisis
illegal
illegal
Your
Your
Phone
Phone
radio
radio
waves
waves
may
may
interfere
interfere
with
with
the
the
functioning
functioningofof
Safe
Safe
Driving
Driving
During
During
Flight
Flight
InInHospitals
Hospitals
convenient.
convenient.
and
and
cell
cell
phone,
phone,
from
from
braking.
braking.
useaa
totouse
flight.
flight.
inadequately
inadequately
manufacturerofof
manufacturer
pregnant
pregnant
phoneatat
phone
please
please
whichitit
which
phoneinin
phone
This
advice
This
advice
women.
women.
least1515cmcm
least
use
the
use
the
may
may
the
the
shielded
shielded
the
the
applies
applies
away
from
away
from
personal
hands-free
personal
hands-free
fallinin
caseofof
fall
case
airplane.
Please
airplane.
Please
medical
devices.
medical
devices.
medical
devicetoto
medical
device
36
especiallytoto
especially
the
implant.
the
implant.
vehicular
vehicular
turn
turn
Consultaa
Consult
determine
determine
children,
children,
kit.
kit.
collisionoror
collision
off
your
off
your
adolescents
adolescents
emergency
emergency
phone
phone
physicianoror
physician
whether
whether
duringaa
during
they
they
the
the
are
are
Page 37

adequately
ToToavoid
avoid
potential
potential
interference
interference
with
with
implanted
implanted
medical
medical
devices
devices
such
such
Always
Always
keep
keep
your
your
phone
phoneatat
least
least
15.3
15.3
centimeters
centimeters(6(6
inches)
inches)
from
from
DoDonot
not
carry
carry
the
the
wireless
wireless
device
deviceininaa
dress-breast
dress-breast
pocket.
pocket.
Turn
Turn
off
off
the
the
phone
phoneifif
there
thereisis
any
any
suspicion
suspicion
that
that
interference
interferenceisis
taking
taking
Follow
Follow
the
the
manufacturer
manufacturer
directions
directions
for
for
the
the
implanted
implanted
medical
medical
IfIfyou
you
have
have
any
any
question
question
about
about
using
using
your
your
wireless
wireless
device
device
with
withanan
Please
Please
turn
turn
off
off
your
your
phone
phone
when
when
you
you
are
are
close
closetotoaa
gas
gas
station
stationororinin
Unsafe
Unsafe
Areas
Areas
adequately
device
when
device
when
shielded
shielded
regulations
regulations
User Guide
from
external
from
external
posted
instruct
posted
instruct
Radio
Radio
Frequency.
Frequency.
youtotododo
you
so.
so.
Switch
Switch
off
your
off
your
asaspacemaker
the
the
place.
place.
device.
device.
implanted
implanted
the
the
dangerous
dangerous
pacemakeroror
medical
medical
medical
medical
vicinity
vicinity
goods
goods
cardioverter
cardioverter
device.
device.
device,
device,
where
fuel
where
fuel
are
stored.
are
stored.
defibrillator:
defibrillator:
consult
consult
and
chemical
and
chemical
37
your
health
your
health
care
provider.
care
provider.
preparations,oror
preparations,
any
any
other
other
Page 38

1414Taking
Taking
Care
Careofof
Your
Your
Device
Device
Your
Keep
Keep
the
the
device
device
dry.
dry.
Precipitation,
Precipitation,
humidity,
humidity,
and
and
all
all
types
typesofof
liquid
liquid
DoDonot
not
store
store
the
the
device
deviceinin
high
highoror
cold
cold
temperature.
temperature.
High
High
DoDonot
not
use
useoror
store
store
the
the
device
deviceinin
dusty
dustyoror
dirty
dirty
areas.
areas.
Its
Its
moving
moving
DoDonot
not
attempt
attempttoto
open
open
the
the
device
device
other
other
than
thanasas
instructed
instructedinin
this
this
DoDonot
not
drop,
drop,
knock,
knock,oror
shake
shake
the
the
device.
device.
Rough
Rough
handling
handling
can
can
break
break
DoDonot
not
use
use
harsh
harsh
chemicals,
chemicals,
cleaning
cleaning
solvents,
solvents,oror
strong
strong
DoDonot
not
store
store
your
your
device
device
near
near
magnetic
magnetic
areas
areasoror
allow
allow
your
your
device
device
deviceisisaa
Your
device
shouldbebe
should
protect
protect
orormoisture
your
your
turningonon
turning
center.
center.
handled
handled
your
phone:
your
phone:
moisture
device
device
productofof
product
with
with
can
contain
can
contain
gets
gets
the
device,
the
device,
User Guide
superior
design
superior
The
The
minerals
minerals
remove
remove
design
following
following
that
that
with
dry
with
dry
care:
care:
wet,
wet,
wipeitit
wipe
the
the
will
will
cloth
cloth
and
craftsmanship
and
craftsmanship
suggestions
suggestions
rust
electronic
rust
electronic
battery
and
battery
and
and
takeitit
and
take
will
will
refrain
refrain
the
the
and
and
help
you
help
you
circuits.IfIf
circuits.
from
from
service
service
temperature
temperature
batteries.
batteries.
parts
and
electronic
parts
and
electronic
guide.
Repairingofof
guide.
Repairing
authorized
authorized
internal
circuit
internal
circuit
detergentstoto
detergents
clean
the
surfaceofof
clean
the
surface
can
can
service
service
boards
boards
clean
clean
shorten
shorten
components
components
phonebyby
phone
agent/centerisis
agent/center
and
and
the
the
the
device.
the
device.
38
the
lifeofof
the
life
fine
fine
device.
device.
electronic
electronic
maybebe
may
yourself
yourself
against
against
mechanics.
mechanics.
Useaa
Use
damaged.
damaged.
and
and
the
the
soft,
clean
soft,
clean
devices
devices
others
others
warranty
warranty
and
and
and
and
rules.
rules.
dry
dry
damage
damage
than
than
clothtoto
cloth
our
our
Page 39

totocome
Please
Please
put
put
the
the
battery
batteryininaa
cool
cool
and
and
well-ventilated
well-ventilated
place
place
out
outofof
Batteries
Batteries
have
have
life
life
cycles.
cycles.AtAt
times
times
that
that
the
the
battery
battery
power
power
Use
Use
manufacturer
manufacturer’’ss
approved
approved
batteries,
batteries,
chargers,
chargers,
accessories
accessories
and
and
DoDonot
not
discharge
discharge
the
the
battery
battery
with
with
household
household
trash.
trash.
Dispose
Dispose
used
used
Battery
Battery
Recommendations:
Recommendations:
Recycle
Recycle
Your
Your
Phone
Phone
time.
time.
direct
direct
temperature
temperature
becomes
becomes
Replace
Replace
specifications.
specifications.
supplies.
supplies.
resultofof
aaresult
battery
battery
and
and
comeinin
contact
contact
sunlight.WeWe
sunlight.
range.
range.
much
much
the
the
MASTER
MASTER
using
using
accordingtoto
according
guidelines.
guidelines.
User Guide
with
with
recommend
recommend
shorter
shorter
battery
withaa
battery
with
will
notbebe
will
not
unauthorized
unauthorized
your
your
magnetic
magnetic
than
than
local
local
39
matters
matters
youtoto
you
usual,
the
usual,
the
new
oneofof
new
one
held
responsible
held
responsible
accessoriesoror
accessories
government
government
for
for
charge
charge
battery
battery
extended
extended
the
batteryatat
the
battery
lifeisisatat
life
the
same
the
same
for
any
for
any
supplies.
supplies.
environmental
environmental
periodofof
period
room
room
its
end.
its
end.
brand
and
brand
and
incidentasas
incident
laws
laws
Page 40

The
The
colors
colors
and
and
specifications
specifications
shown/mentioned
shown/mentionedinin
the
the
user
user
manual
MASTER
MASTER
reserves
reserves
the
the
right
righttoto
make
make
modifications
modificationstoto
any
anyofof
the
the
Disclaimers
Disclaimers
The
The
WEEE
WEEE
logo
logo
(shown
(shownatat
the
the
left)
left)
appears
appears
ononthe
the
product
product
(battery,
(battery,
handset,
handset,
and
and
charger)
charger)
indicates
indicates
that
that
such
such
item
item
must
must
not
not
bebedisposed
disposed
off
offoror
dumped
dumped
with
with
other
other
household
household
waste
waste
materials.
materials.
You
You
are
are
responsible
responsibletoto
dispose
dispose
all
all
your
your
electronic
electronic
ororelectrical
electrical
waste
waste
equipment
equipment
through
through
the
the
specified
specified
disposal
disposaloror
collection
collection
point
pointofof
hazardous
hazardous
waste.
waste.
Collection
Collection
and
and
proper
proper
recovery
recoveryofof
your
your
electronic
electronic
waste
waste
materials
materialsatat
the
the
time
timeofof
disposal
disposal
will
will
allow
allowusustoto
help
help
preserve
preserve
the
the
environment.
environment.
Recycling
Recyclingofof
the
the
electronic
electronic
waste
waste
equipment
equipment
will
will
ensure
ensure
safety
safetyofof
human
human
health
health
and
and
environment.
environment.
manual
representation
representation
names
names
respective
respective
contentinin
content
advance.
advance.
content
content
shall
shall
govern.
govern.
may
differ
may
differ
purposes
purposes
mentioned
mentioned
owners.
owners.
this
this
The
contentofof
The
content
displayedinin
displayed
User Guide
from
the
from
the
only.
only.
herein
maybebe
herein
may
user
guide
user
guide
this
this
the
mobile
the
mobile
40
actual
product.
actual
product.
Other
product
Other
product
trademarksoror
trademarks
without
public
without
public
manual
may
manual
may
phone.InIn
phone.
Images
shown
Images
shown
logos
and
logos
and
trade
trade
announcementinin
announcement
vary
from
vary
from
suchaa
case,
such
case,
are
are
company
company
namesofof
names
the
actual
the
actual
the
the
latter
latter
for
for
Page 41

All
Copyrights
Copyrights
rights
All
rights
partoror
part
prior
written
prior
written
FCC
Caution:
FCC
Caution:
the
party
the
party
authoritytoto
authority
Operationisis
Operation
device
device
must
must
that
may
that
may
comply
comply
part1515ofof
part
reasonable
reasonable
residential
residential
radiate
radiate
accordance
accordance
interferencetoto
interference
guarantee
guarantee
installation.IfIf
installation.
reserved.
reserved.
allofof
all
Any
Any
This
This
may
may
accept
accept
cause
cause
Note:
Note:
with
with
radio
radio
Reproduction,
Reproduction,
the
contentsinin
the
contents
permissionofof
permission
Changesoror
Changes
responsible
responsible
operate
operate
device
device
subjecttoto
subject
not
cause
not
cause
any
interference
any
interference
undesired
undesired
This
This
the
limits
the
limits
the
FCC
the
FCC
protection
protection
installation.
installation.
frequency
frequency
with
with
radio
radio
that
interference
that
interference
this
equipment
this
equipment
User Guide
this
this
MASTERisis
MASTER
modifications
modifications
for
compliance
for
compliance
the
equipment.
the
equipment.
complies
with
complies
with
the
following
the
following
harmful
harmful
received,
received,
operation.
operation.
equipment
equipment
Rules.
Rules.
has
has
foraa
ClassBB
for
Class
These
These
against
against
This
equipment
This
equipment
energy
and,ifif
energy
the
the
and,
instructions,
instructions,
communications.
communications.
will
will
does
does
41
transfer,
distributionoror
transfer,
distribution
documentinin
document
strictly
strictly
not
not
could
could
part1515ofof
part
two
two
interference,
interference,
including
including
been
been
digital
digital
limits
are
limits
are
harmful
harmful
generates,
generates,
not
not
may
may
However,
However,
not
occurininaa
not
occur
cause
cause
storageofof
and
and
the
the
form
without
form
without
approvedbyby
approved
void
the
void
the
FCC
FCC
(2)
this
(2)
this
interference
interference
and
and
pursuanttoto
pursuant
uses
uses
and
and
cause
cause
thereisisnono
there
interference
interference
storage
user's
user's
Rules.
Rules.
(1)
(1)
device
device
foundtoto
found
provide
provide
and
and
usedinin
used
harmful
harmful
particular
particular
any
any
prohibited.
prohibited.
expressly
expressly
conditions:
conditions:
tested
tested
device,
device,
designedtoto
designed
interferenceininaa
interference
installed
installed
harmful
harmful
the
the
This
This
can
can
Page 42

radiooror
totoradio
turning
the
turning
the
correct
totocorrect
measures:
measures:
——Reorient
——Increase
receiver.
receiver.
——Connect
different
different
——Consult
technician
technician
Specific
Specific
SAR
SAR
positions
positions
phone
phone
all
tested
all
tested
the
the
level,
the
level,
the
while
while
general,
general,
wireless
wireless
output.
output.
Beforeaa
Before
public,itit
public,
television
television
equipment
equipment
the
interferencebyby
the
interference
Reorientoror
Increase
Connect
from
thattoto
from
that
Consult
for
help.
for
help.
Absorption
Absorption
tests
tests
acceptedbyby
accepted
transmittingatat
transmitting
frequency
frequency
SARisis
SAR
actual
SAR
actual
SAR
operating
operating
the
closer
the
closer
base
base
new
new
mustbebe
tested
must
tested
User Guide
reception,
reception,
off
and
on,
off
and
on,
relocate
the
relocate
the
the
separation
the
separation
the
equipment
the
equipment
which
the
which
the
the
dealerororanan
the
dealer
Rate
Rate
are
conducted
are
conducted
the
FCC
the
FCC
its
its
bands,
although
bands,
although
determinedatat
determined
levelofof
the
level
the
canbebe
well
can
aretotoaa
are
station
station
model
model
and
and
42
well
phoneisisaa
phone
certifiedtoto
certified
you
you
which
which
the
userisis
the
user
oneoror
one
receiving
receiving
between
between
intoanan
into
receiverisis
receiver
(SAR)
(SAR)
using
using
with
the
with
the
highest
highest
the
the
phone
phone
below
below
antenna,
antenna,
canbebe
can
encouragedtoto
encouraged
moreofof
more
antenna.
antenna.
the
the
outletononaa
outlet
connected.
connected.
experienced
experienced
information
information
standard
standard
certified
certified
highest
highest
the
maximum
the
maximum
the
lower
the
lower
available
available
determinedbyby
determined
the
following
the
following
equipment
equipment
power
certified
certified
power
the
for
for
circuit
circuit
radio/TV
radio/TV
operating
operating
levelinin
level
power
power
value,inin
value,
power
the
power
saletoto
sale
and
and
the
the
try
try
Page 43

the
FCC
the
establishedbyby
established
the
the
tested
tested
this
this
minimumofof1.1.cmcm
minimum
violationofofRFRF
violation
FCC
phone
phone
ear
and
wornonon
ear
and
worn
requiredbyby
required
For
body
For
body
and
meets
and
meets
guidelines
guidelines
productoror
product
Containsnono
Contains
Non-compliance
Non-compliance
the
the
are
are
when
when
0
exposure
exposure
User Guide
thatitit
does
that
does
FCC,
Tests
FCC,
Tests
performedinin
performed
the
body)as
the
body)as
the
FCC.
the
FCC.
worn
operation,
worn
operation,
the
FCCRFRF
the
FCC
when
used
when
used
used
withanan
used
with
metal
metal
from
the
from
the
with
with
guidelines
guidelines
43
not
not
for
for
positions
positions
exposure
exposure
withanan
with
and
and
body.
body.
the
the
exceed
exceed
each
each
this
this
accessory
accessory
accessory
accessory
that
positions
that
above
above
the
the
and
and
model
model
that
that
positions
restrictions
restrictions
exposure
exposure
locations
locations
phone
phone
designated
designated
the
the
may
may
limit
limit
(e.g.atat
(e.g.
has
been
has
been
handsetaa
handset
resultinin
result
for
for
 Loading...