

Page 1
DD Milli
User Guide
G18 - alpha
DD Dev. Group
2018.06
Page 2

Product Overview
DDMilli is the second released product of DD series Keyboard. From the name you can see it is
DDMicro’s bigger brother, 60% size. It is sharing the mechanical layout with the most popular
60% PCB - GH60, with a lot more optional key positions. This means you can easily fit is in
most of GH60 cases and plates. And not like DDMicro, you can purchase the PCB individually.
The firmware is developed based on DDMicro, with a lot of new features.
•
Bluetooth Low Energy 4.0 connection, supporting up to 8 paired devices, user can define
customised hot key to switch between devices, also support to define hot keys to reset/
add devices.
•
USB Type C connection. You can connect the keyboard directly to your computer’s USB
Type C port.
•
Lithium-ion battery connector onboard, also connected to a build-in charging circuit.
•
Fully NKRO support(Max report keys are limited by USB protocol of 6).
•
Standard Cherry MX switch footprint fit most of the switches in the market.
•
Individual surface mounted RGB backlights, up to nine light effects, and configurable
color setting. Brightness and effects can be adjusted with customised hot keys.
•
6 bottom RGB backlight mounting pads, with an extra RGB light strip port for extension,
support up to 60 SK6812 or equivalent light strip module.
•
Up to 8 layers of fully configurable key mapping on all key positions. Support layer
switch/lock/reset with customised hot keys.
•
Support most of GH60 layouts, with extra 0.25u shifted forth row and split space layout
on last row.
•
Easy configuration tool with DDConf. The new version of DDConf can change the
configuration without rebooting the keyboard. You can update the key definition at any
time when USB cable is connected.
•
Support mouse control and volume control hot keys.
1
Page 3

Out Looking
DDMilli’s layout is based on GH60. The top left corner has a USB Type C connector, that can be
connected to a USB 1.1/2.0/3.0/3.1 port. On the left of the USB connecter.
ATTENTION: do not connect DDMilli to USB Type C PD charger. Voltage over 5.0V might
cause damage on PCB hardware!
There is a red LED as charging indicator. It will lit up while it is charging, and turns off when
battery is full.
In the middle left, there is a power switch position. It is using 6pin footprint, and can be soldered
with self-lock switch, or standard SMT slide switch. It will turn on/off the battery connection. If
you don’t want to use a switch, please solder a short wire between the middle hole of two rows.
Then the battery will permanently connected.
The battery connector is right above the power switch, provided as a PH2.0 connector.
Please notice that the antenna is on the left side of PCB. The area close to the antenna should
not be completely covered with metal or carbon fibre material. Otherwise the signal quality will
be affected.
Because of more processors are used on board, DDMilli may not fit in some cases that has
critical PCB thickness requirement.
Reserved Keys
The first key on top row(‘Esc’ key in default definition) is Bluetooth Erase Band Key. Turn on
keyboard while holding this key can reset paired device list and re-enable Bluetooth advertising.
The second key on top row(‘q’ key in default definitions) is Bluetooth Add Band Key. Turn on
keyboard while holding this key can temporarily enable Bluetooth advertising for adding a new
device to paired list.
The forth key on top row(‘e’ key in default definitions) is Test Mode Key. Turn on keyboard while
holding this key can switch keyboard into test mode. This mode is used to detect any shortcut
happened on switches, and all RGB LED are working correctly.
The first key on second row(‘Tab’ key in default definitions) is Wakeup Key. If there is no
connection in Bluetooth mode for 3 minutes, the keyboard will switch to sleep mode to save
power. Then press this key can wakeup the keyboard again.
2
Page 4
Battery
DDMilli PCB supports to connect a Lithium-ion rechargeable battery. We recommend you to
select a battery with build-in safety protection IC. When assemble your keyboard, please pay
enough attention on battery protection from the switch pins. Don’t screw too tight with extra
pressure on the pins. Any packaging damage on battery is very dangerous.
When the battery voltage becomes too low, the keyboard will automatically switch off. Please
connect the USB cable to charge the battery. Don’t forget to turn on the power switch while
charging, otherwise the battery will not be connected to power. The keyboard is designed in
dual modes. Connecting USB cable to your computer, the keyboard can be used in USB mode
while charging.
A red LED indicator close to the USB port can show the charging status.It will turn on while
charging, and switch off after the battery is full.
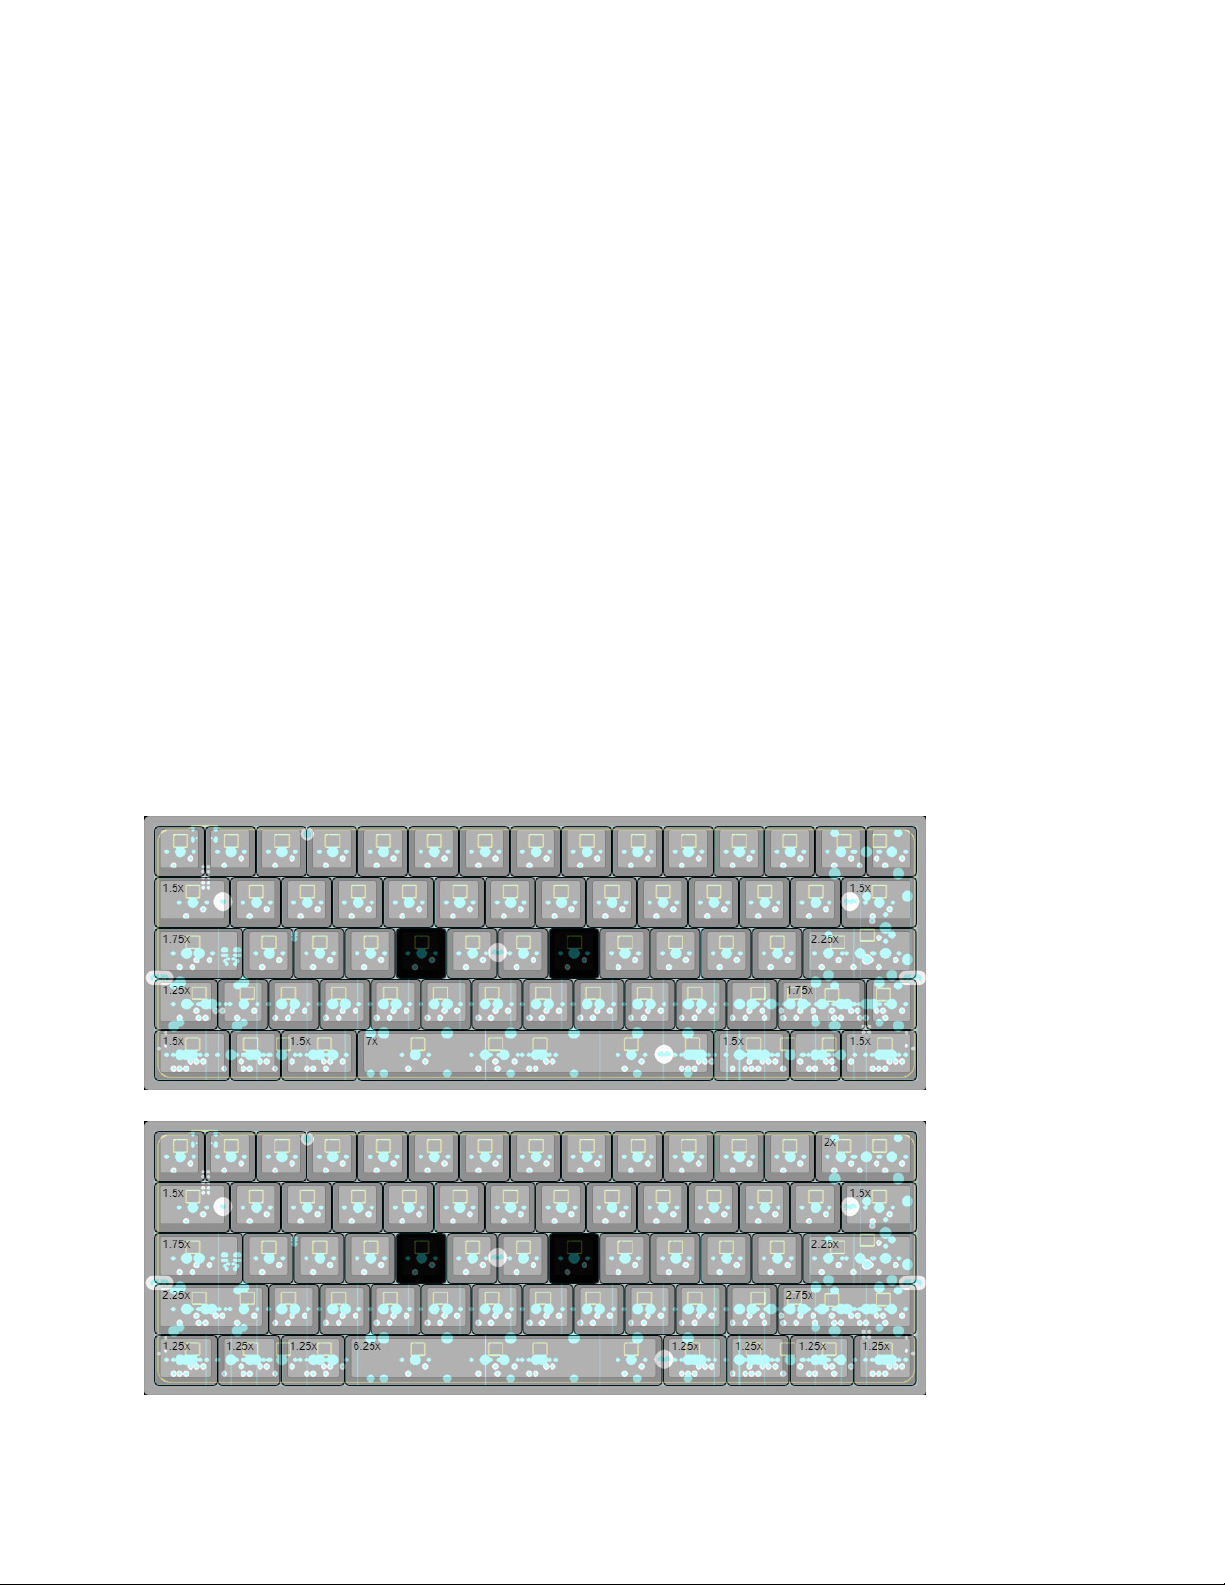
Keys Layout
DDMilli supports may layout options, only some popular ones are listed below. Feel free
to switch them and create your own layout.
3 4
Page 5

Page 6

Bluetooth Pairing
Following the steps below to connect DDMilli to a host device.
1. Make sure the battery has not run out. Turn off power switch, and make sure that USB
cable is not plugged.
2. Hold on Bluetooth Erase Band Key( the most left key in top row ), or Bluetooth Add
Band Key( the second left key in top row ), and turn on power switch.
3. Turn on Bluetooth searching on your host device (smartphone/Laptop/PC).
4. Wait for seconds and a device named as “DD Milli Keyboard” will show up in the list.
Select it to connect.
5. If the device is not visible after 10 seconds, please re-do step 1-2, and check your
Bluetooth setup in host device. If you have any other paired host device, may need to turn
their Bluetooth off first for pairing a new device.
PS: If you have configured Bluetooth device erase/add hot keys, you can replace step 1&2
with press or trigger that hot key.
5
Page 7

Customize Your Key Definition
DDMilli supports up to eight independent key definitions on every key position. They are
organised based on “Definition Layers”. The key definitions for DDMilli can be single key codes (
characters, symbols, function keys, etc ), and also support simple micro key combinations (
modifier keys + a basic key, for example Ctrl + v ).
To customize your key definitions, you need to download DD series keyboard configuration
application called “DDConf” and run it on a Windows/Mac computer. It does not require
installation nor any driver. It is provided as a Zip file. Unzip it to any place, you will get three files
in the folder:
•
dd_configuration.txt: key definition file. You could change key definitions by editing this
file in text editor, like Notepad. (UTF-8 encoding is required)
•
ddconf.exe: a Windows command line tool for downloading dd_configuration.txt content
to your DDMilli keyboard via USB port.
•
ddconf: a Mac OSX command line tool for downloading dd_configuration.txt content to
your DDMilli keyboard via USB port.
The file dd_configuration.txt should be written in a specific structure, otherwise the configuration
tool cannot parse it correctly. This configuration file is case sensitive, which means ‘a’ and ‘A’
give different result. And this file is parsed based on each line. One line to present a case
description, or a set of key definitions for a keyboard row. Use one or more whitespace or TAB
mark to separate description segments or the definition for each key position. Here a screenshot
shows the typical content of it.
6
Page 8

The first line is always tagged with “ENCODE”. It describes the keyboard language layout of this
configuration. Currently it supports “EN” (US standard layout) and “SV” (Swedish layout). This is
marked in red box in the screenshot.
The lines in yellow box are backlight configuration. The backlight default mode (with tag
“BACKLIGHT_MODE”), backlight color (with tag “BACKLIGHT_COLOR”) and backlight default
brightness(with tag “BACKLIGHT_BRIGHTNESS”) can be set separately. backlight color is only
used in single color modes. With rainbow modes, the color will enumerate all RGB colors. The
default mode should be set to a mode ID 1 ~ 9. It will be set after the keyboard is powered on.
The backlight color is set with a standard RGB color code, use a 6-digit HEX number starts with
a ‘#’ symbol to indicate the color. Please check the actual value with RGB color picker.
The green box in the screenshot is layer declaration. They should start with tag “LAYER” and
followed by a number from 0 to 7. Layer 0 is default layer, which means after power on, or reset
layer, DDMilli will switch to this layer.
The lines marked in blue box are key definition lines. Each line refers to a row of keys on
DDMilli. Attention that in this file, all possible key positions should be explicitly defined. It might
be not mounted to a dedicated key in your setup, but you still have to define it in
dd_configuration.txt file. You could use the empty tag(…) as place holder for the empty
positions. For how to set the definition for each key position, please refer the “Tag list in
configuration file” chapter and “What’s more you should know” chapter.
The image below shows the key position groups. The positions in the same green box shares
the same key definition in configuration file.
7
Page 9

Download Your Key Configuration
After preparing dd_configuration.txt file, you could follow the steps below to download it to your
DDMilli keyboard:
1.Connect keyboard with USB cable to computer.
2.Double click ddconf.exe (or ddconf file in Mac OSX) to run the download tool. Or type in
the application name in Command Line(or Terminal in Mac OSX) to execute it, but this
requires you to browse to the executable file’s folder first. Make sure the dd_configuration.txt
file is saved in the same folder with ddconf application.
3.Following the instructions shown on your screen. You may need another keyboard to
help you press any key to continue, or use the on screen keyboard or any tools to simulate
some key press events.
4.The download progress may take about 2-5 seconds, this is based on how many layers
you have. Do not type the keyboard while flashing the configuration, it might has risk to
interrupt the download procedure.
5.After download progress finishes, DDMilli will switch to keyboard mode automatically.
Press any key to exit download tool and try with your new key definitions!
8
Page 10

Tag List in Configuration File
Tag Na m e
Tag
Comment
Empty key position
…
do nothing
Change layer
FN_?
replace ‘?’ with 0-7
Stick on layer
FN@?
replace ‘?’ with 0-7
Reset to default layer
FN_X
reset to default layer
Alt
ALT
Control
CTRL
Win/Command
WIN
Shift key
SHIFT
Tab ke y
TAB
Backspace
BS
Delete
DEL
Escape key
ESC
Space
SPACE
white space bar
Enter
ENTER
UpUParrow key ‘↑’
Down
DOWN
arrow key ‘↓’
Left
LEFT
arrow key ‘←’
Right
RIGHT
arrow key ‘→’
Page up
PGUP
Page down
PGDN
Home
HOME
End
END
Insert
INS
Print screen
PTSC
Pause
PAUSE
F1 – F12
F1 – F12
Function key 1-12
9
Page 11

Caps Lock
CPLK
Num Lock
NMLK
Scroll Lock
SCLK
Backlight Mode
BLM_?
replace ‘?’ with 1-9
Backlight Brightness Up
BL_UP
Increase brightness 1 step
Backlight Brightness Down
BL_DN
Decrease brightness 1 step
Backlight Brightness Off
BL_OFF
Numpad operator
n?
replace ‘?’ with + - * /
Numpad number
n?
replace ‘?’ with 0-9
Numpad Enter
n=
Numpad dot
n.
Numpad operator
n?
replace ‘?’ with + - * /
BLE Device Selection
BT_?
replace ‘?’ with 1-8
Swap CTRL/WIN keys
SWAP_CW
Erase Bluetooth
Paired Devices
BTRST
Add New Bluetooth Device
BTADD
Mouse left key
MOSKL
Mouse middle key
MOSKM
Mouse right key
MOSKR
Mouse forward key
MOSKF
Mouse backward key
MOSKB
Mouse scroll up
MOSSU
Mouse scroll down
MOSSD
Mouse scroll left
MOSSL
10
Page 12

Mouse scroll right
MOSSR
Mouse move up
MOSMU
Mouse move down
MOSMD
Mouse move left
MOSML
Mouse move right
MOSMR
Volume Up
MMAVUP
Volume Down
MMAVDN
Mute
MMAMUT
11
Page 13

What’s More You Should Know
•
Because the macro key definitions are supported, so the configuration file is case
sensitive. Which means the definition ‘a’ and ‘A’ will give different output. ‘a’ equals press key
‘a’ on ordinary keyboard. And ‘A’ equals press ‘Shift’ and ‘a’ at the same time.
•
If you want to type micro key definition with modifier keys, use a character ‘+’ to combine
them. In micro definition, modifier keys should use their short names. You could combine one
or more modifier keys to one character/number/function/arrow key.
▪ Short names: C (Control), A(Alt), S(Shift), W(Win/Command)
▪ Example: ‘CR+RIGHT’ means press Control, Alt and right arrow keys at the
same time. Modifier keys’ sequence can be shuffled, this equals to ‘AC+RIGHT’.
•
With the micro key definitions, you could define symbol keys individually. Which means
you could map number key ‘1’ with symbol key ‘!’ to different key positions. Firmware will help
you to press ‘Shift’ if needed.
•
Because the keyboard typing mechanism applied for computer, the modifier key’s state
will be inherited until all keys are released. So please pay extra attention when typing micro
key definitions. We recommend to leave a clean time between typing micro keys and other
keys. You might saw some wrong characters send out while typing micro keys to fast.
▪ Example: When typing key definition ’!’, actually keyboard send out key
combination with ‘1’ and a ‘Shift’ press. If you type ‘a’ before you release key ‘!’,
the ‘Shift’ key will be automatically inherited by your driver, then you will get an ‘A’
instead. So we strongly recommend you to slow down while using micro keys.
12
 Loading...