

Page 1

dCS Rossini Transport
Upsampling CD / SACD Transport
User Manual
Software Release 1.0x
September 2018
Part No: DCS453659 V01
© Data Conversion Systems Ltd. 2018
All rights reserved. No part of this publication may be reproduc ed, stored in or introduced into a retrieval s ystem,
or transmitted in any form, or by any means (electronic, mechanical, photocopying, recording or otherwise)
without the prior written permission of dCS
publication may be liable to criminal prosecution and civil cla ims for damages.
Information contained in this manual is subject to change without notice, and whilst it is checked for accuracy, no
liabilities can be accepted for errors.
1
dCS is Data Conversion Systems Ltd. Company registered in England No. 2072115.
1
F
F. Any person who does any unauthorised act in relation to this
Page 2

dCS Rossini Transport User Manual Software Issue 1.0x
September 2018
Rossini Transport Manual v1_0x Page 2 English version
Page 3

dCS Rossini Transport User Manual Software Issue 1.0x
September 2018
Contents
Using the dCS Rossini Transport for the first time ............................................................................ 5
What’s in the box? 5
Positioning the unit 5
Important Safety Instructions 6
Condensation 6
FCC Compliance Statement 7
Safety Notice 8
Laser Radiation 9
Which types of disc can be played? 9
Which types of disc can NOT be played? 9
Step-by-Step Guide .............................................................................................................................. 10
Preliminaries 10
STEP 1 – Connecting a Digital Output 11
Connecting the Dual AES interface 11
Connecting the AES3 or an SPDIF output 11
STEP 2 – Choosing a Sync Mode 12
Using the DAC in Master Mode 12
Using a Master Clock 13
STEP 3 – Playing a Disc 14
Controlling Disc playback with the app 14
Further suggestions 15
Front Panel ............................................................................................................................................ 16
Display 16
Remote Control Receiver 17
CD Tray 17
Stop / Eject Button 17
Play / Pause Button 17
Rwd Button 17
Fwd Button 17
Menu Button 17
Power Button 18
Rear Panel ............................................................................................................................................. 19
AES Digital Outputs 19
SPDIF Digital Outputs 19
Word Clock Input / Output 19
IR Remote Receiver 19
RS232 interface 20
Mains inlet 20
Label 20
The Menu ............................................................................................................................................... 21
Using the Menu 22
INFORMATION Menu 23
Unit Status 23
Version 23
Contact 23
Update 23
TRANSPORT SETTINGS Menu 24
Layer 24
PCM Enable 24
Upsampling Mode 24
RS232 Mode 24
CONFIGURATION Menu 25
Settings Lock 25
Save Configuration 25
Restore Configuration 25
Factory Reset 25
DISPLAY SETTINGS Menu 26
Brightness 26
Display On/Off 26
Logo On/Off 26
Rossini Transport Manual v1_0x Page 3 English version
Page 4

dCS Rossini Transport User Manual Software Issue 1.0x
September 2018
GENERATOR Menu 26
Channel Check 26
Phase Check 26
Burn In 26
Specification ......................................................................................................................................... 27
Maintenance and Support .................................................................................................................... 28
Service and Maintenance 28
Replacing a Blown Mains Fuse 28
Cleaning the case 28
Limited Warranty 29
If you need more help 30
Software History 30
Index ...................................................................................................................................................... 31
Rossini Transport Manual v1_0x Page 4 English version
Page 5
dCS Rossini Transport User Manual Software Issue 1.0x
September 2018
USING THE dCS ROSSINI TRANSPORT FOR THE FIRST TIME
Congratulations on purchasing your dCS Rossini Transport.
Before using your unit, please read this section and the Step by Step Guide. This will enable you to
set the unit up quickly and safely with your hi-fi system.
From time to time, dCS will release updated software on CD that you can install yourself using the
Update feature. Please check our web-site occasionally to see if new Rossini Transport software is
available, or consult your dealer.
What’s in the box?
Check that the box contains the following items:
• dCS Rossini Transport
• Manual and Menu Guide
• Power cable
• 2x AES cable
• BNC cable
• 2 spare fuses
• dCS Universal IR remote control with 2 batteries
Notify your dealer as soon as possible if anything is missing or damaged. We suggest that you retain
the original packaging for possible future use. If this is not possible, replacement packaging can be
ordered from dCS or our distributors. Details can be found on our web site at www.dcsltd.co.uk
Positioning the unit
For best sound quality, the units in the Rossini range are designed to be mounted on separate shelves
of a rack, although they may be stacked directly on top of each other if this is absolutely necessary.
Place each unit on a firm, vibration free base, allowing convenient connection to the other parts of
your system. To prevent overheating, we recommend that you leave some free space around the unit
to allow for ventilation.
With all feet screwed fully home, the unit will sit level on a flat surface. If you need to do
any levelling, you can unscrew any of the feet up to 3 complete turns, to give up to 3mm
(1/8”) of height adjustment.
H.
Rossini Transport Manual v1_0x Page 5 English version
Page 6
dCS Rossini Transport User Manual Software Issue 1.0x
September 2018
Important Safety Instructions
The following statements are required to comply with U.S. safety standard UL60065.
• Read these instructions.
• Keep these instructions.
• Heed all warnings.
• Follow all instructions.
• Do not use this apparatus near water.
• Clean only with dry cloth.
• Install in accordance with the manufacturer’s instructions.
• Do not install near any heat sources such as radiators, heat registers, stoves, or other apparatus
(including amplifiers) that produce heat.
• Do not defeat the safety purpose of the grounding-type plug. A grounding type plug has two blades
and a third grounding prong. The third prong is provided for your safety. If the provided plug does
not fit into your outlet, consult an electrician for replacement of the obsolete outlet.
• Protect the power cord from being walked on or pinched particularly at plugs, convenience
receptacles, and the point where they exit from the apparatus.
• Only use attachments/accessories specified by the manufacturer.
• Unplug this apparatus during lightning storms or when unused for long periods of time.
• Refer all servicing to qualified service personnel. Servicing is required when the apparatus has
been damaged in any way, such as power-supply cord or plug is damaged, liquid has been spilled
or objects have fallen into the apparatus, the apparatus has been exposed to rain or moisture, does
not operate normally, or has been dropped.
Condensation
If the Transport is cold and is moved into a warm room, condensation will form inside the unit. This
interferes with normal operation. Remove the Transport from its packaging and let it stand for 1-2
hours, to allow it to reach room temperature and the condensation to evaporate.
Rossini Transport Manual v1_0x Page 6 English version
Page 7

dCS Rossini Transport User Manual Software Issue 1.0x
September 2018
FCC Compliance Statement
This equipment has been tested and found to comply with the limits for a Class B digital
device, pursuant to part 15 of the FCC Rules.
These limits are designed to provide reasonable protection against harmful interference in a
residential installation. This equipment generates, uses and can radiate radio frequency energy and, if
not installed and used in accordance with the instructions, may cause harmful interference to radio
communications. However, there is no guarantee that interference will not occur in a particular
installation.
You can determine whether this equipment is causing interference by turning it off. If the interference
stops, it was probably caused by the equipment or a peripheral device.
If your equipment does cause interference to radio or television reception, try to correct the
interference by one or more of the following measures:
• Turn the television or radio antenna until the interference stops.
• Move the equipment to one side or the other of the television or radio.
• Move the equipment farther way from the television or radio.
• Plug the equipment into an outlet that is on a different circuit from the television or radio. (That is,
make certain the equipment and the television or radio are on circuits controlled by different circuit
breakers or fuses.)
(USA only) If necessary consult dCS Americas or an experienced radio / television technician for
additional suggestions.
Changes or modifications not expressly approved by dCS Americas Inc. could void the manufacturer’s
warranty.
This product has demonstrated electromagnetic interference compliance under conditions that
included the use of compliant peripheral devices and shielded cables between system components. In
order to maintain compliance with FCC regulations, shielded cables (including Ethernet network
cables) must be used with this equipment. Operation with non-approved equipment or unshielded
cables is likely to result in interference to radio and TV reception.
Responsible party (contact for FCC matters only):
dCS Americas Inc.
Attn: FCC liaison
310A River Road
Waltham, MA 02453
Rossini Transport Manual v1_0x Page 7 English version
Page 8
dCS Rossini Transport User Manual Software Issue 1.0x
September 2018
Safety Notice
In the event of the unit developing a fault, please contact your dealer in the first instance.
If you decide to remove safety covers for any reason, disconnect the power cable first. Note that
removing covers voids the warranty.
To maintain protection from electric shock, the unit MUST be connected to mains earth (ground) via
the power cable. Also, unearthed systems do not give the best sonic performance.
Protect the product from dripping or splashing liquids. Liquid-filled objects such as vases must not be
placed on the product.
This product is not suitable for operation at altitudes above 2000m.
This product is lead-free and complies with the RoHS directive.
Before connecting the power cable to the unit for the first time, please check that it has been set to the
correct operating voltage for your mains supply. The unit’s voltage setting is shown on the serial
number label. If this does not match your local supply voltage, DO NOT attempt to use the unit.
Contact your dealer to have the unit reset. Using the unit with the wrong mains setting for your local
supply may result in serious damage to the unit and will invalidate the warranty. Do not attempt to
reset the voltage yourself.
We do not recommend the use of mains regenerators. However, if you do wish to use a mains
regenerator with variable voltage and frequency, we recommend that you set the voltage to match
your local voltage and the frequency to either 50Hz or 60Hz ONLY.
Damage caused to your Rossini Transport by misuse of a mains regenerator or by a
!
malfunctioning mains regenerator is not covered by the warranty.
Disposal at end-of-life - the symbol indicates that this product should not be treated as
normal household waste. It should be recycled, so please take it to an approved
collection facility.
Rossini Transport Manual v1_0x Page 8 English version
Page 9
dCS Rossini Transport User Manual Software Issue 1.0x
September 2018
Laser Radiation
dCS Rossini Transport is a Class 1 Laser Product, it complies with U.S. FDA 21CFR
subchapter J. In normal use, there is no risk of exposure to laser radiation.
!
The case should only be opened by authorised service personnel. The case protects the
user from indirect exposure to visible and invisible laser radiation, as well as risk of
electric shock.
Which types of disc can be played?
Commercially manufactured CDs can be played if they:
• are 12cm or 8cm round discs
• are recorded with linear PCM digital audio data
• carry the Compact Disc Digital Audio logo and meet the “Red-Book” standard.
Commercially manufactured single-layer SACDs or hybrid SACD/CD discs can be
played if they:
• are 12cm or 8cm round discs
• are recorded with DSD digital audio data on the SACD layer
• carry the Super Audio CD logo and meet the “Scarlet-Book” standard.
CD-R
CD-RW
CD-R or CD-RW discs recorded with audio data in CD format may be playable, but
this depends on the disc, the software and the burner used to record on the disc.
Similarly, DVD-R discs burned with an SACD image may be playable. dCS cannot
accept responsibility for any difficulty encountered while attempting to play such
discs.
Which types of disc can NOT be played?
dCS cannot accept responsibility for any difficulty encountered while attempting to play the following
types of disc:
• Scratched, damaged or dirty discs.
• Non-circular “discs”, such as square or h eart-shaped.
• Printed or labelled CD-Rs or discs contaminated with glue or other sticky substances.
Contaminated discs may get stuck to the turntable inside the unit. If this happens, a
!
• DVD, CD-G, CD-EXTRA, PHOTO CD, CD-ROM or DVD-ROM.
• Discs recorded with digital audio data that is not in CD-format or SACD-format (e.g. FLAC or WAV
files).
• Copy-protected discs that do not conform to the “Red-Book” CD standard may not play correctly or
may not play at all. Such discs are not CDs – they are optical discs that have been recorded with
digital audio data. They should not carry the Compact Disc Digital Audio logo – but some do. If you
encounter any difficulty playing such discs, please contact the disc manufacturer and demand a
genuine CD in exchange.
service charge will be made for removing the disc and repairing any damage.
Rossini Transport Manual v1_0x Page 9 English version
Page 10
dCS Rossini Transport User Manual Software Issue 1.0x
September 2018
STEP-BY-STEP GUIDE
This section guides you through setting up the unit for basic operation.
Preliminaries
The Menu Guide sheet details the menu structure.
For digital interfaces, use with cables designed for digital audio:
• for AES/EBU interfaces use 110Ω screened, twisted pair cables fitted with one male XLR
connector and one female XLR connector.
• for Word Clock or SPDIF BNC interfaces, use 75Ω coax cables fitted with BNC plugs.
Word Clock interfaces require a simple DC-coupled connection. The interfaces may
!
• for SPDIF RCA interfaces, use 75Ω coax cables fitted with RCA Phono plugs.
Connect the power cable supplied to the power inlet on the Transport rear panel, plug the other end
into a convenient power outlet.
malfunction or not work at all if capacitor coupled cables or cables with built-in networks
are used.
Please do not use an excessively heavy or inflexible power cable as this may damage
!
Set the rocker switch near the mains inlet to the I position. Press the Power button – the unit will
display Rossini Transport. Wait about 30 seconds while the Transport configures itself.
If the unit is likely to be set in an unfamiliar state, you can run the Factory Reset routine by pressing
the buttons in this sequence: Menu, ►, ►, Menu, ◄, ◄, Menu.
Wait a few seconds while the unit resets itself.
the power inlet connector.
The cables supplied with the unit are “commercial grade”, because most owners will
have their own “audiophile grade” cables or will prefer to make their own cable choices.
Rossini Transport Manual v1_0x Page 10 English version
Page 11
dCS Rossini Transport User Manual Software Issue 1.0x
September 2018
STEP 1 – Connecting a Digital Output
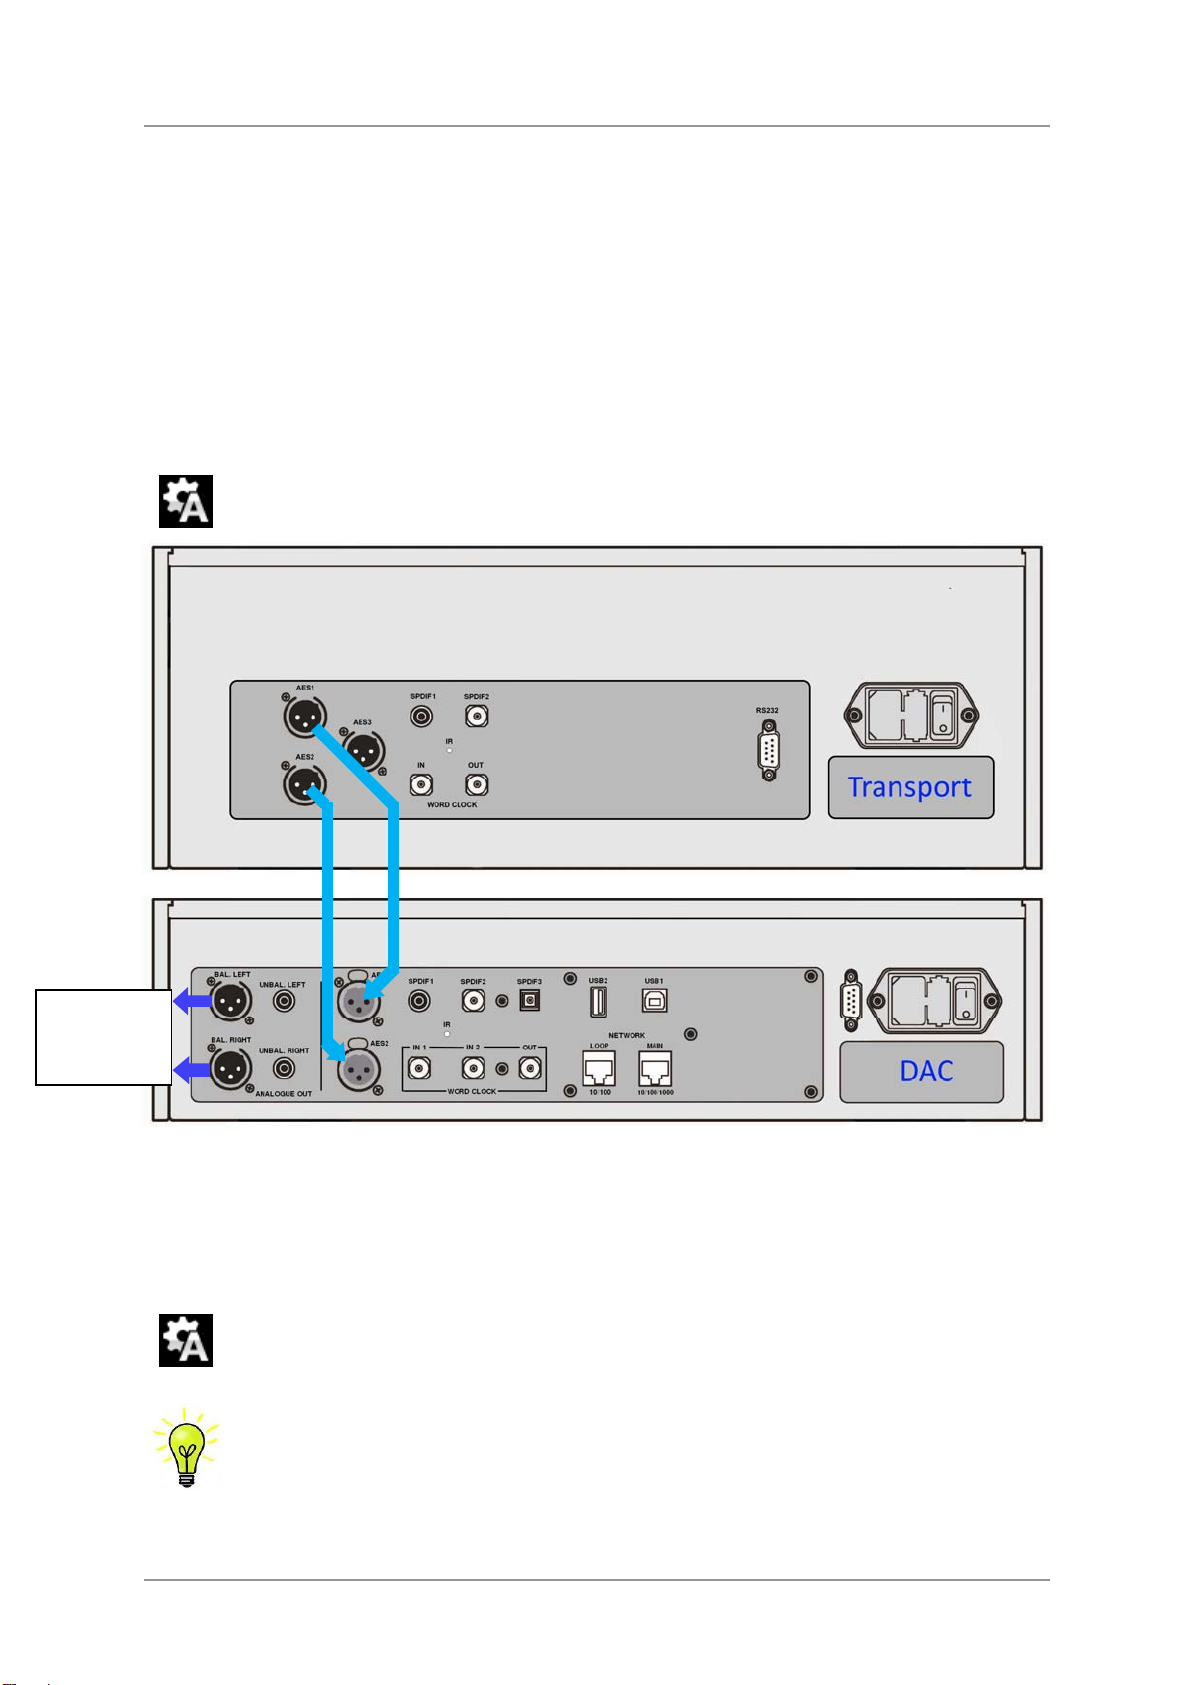
While playing an SACD, the AES1+2 interface carries DSD data. While playing a CD, the AES1+2
rate is set by the Upsampling menu page – we will assume it is set to DSD. The AES3, SPDIF1 and
SPDIF2 outputs carry 16/44.1 PCM data with either disc type. Most owners connect the AES1+2
interface only, but some prefer to listen to CDs in the native 16 bit 44.1kS/s format.
Connecting the Dual AES interface
When used with a Rossini DAC, AES1+2 is the main output.
• Connect the AES1 output on the Transport to the AES1 input on the Rossini DAC rear panel and
the AES2 output to the AES2 input, using two XLR cables. Ensure the cables are not swapped.
• Press the DAC’s Input button repeatedly until AES1+2 is displayed.
The DAC will lock to the source, displaying the Audio Sync icon and DSD.
Analogue
outputs
to Amplifier
Connecting the AES3 or an SPDIF output
• Connect one of the single-wire outputs on the Transport to the matching input on the DAC using a
• Press the DAC Input button repeatedly until your chosen input is displayed.
Proceed to Step 2.
suitable cable.
The DAC will lock to the source, displaying the Audio Sync icon and 0/44.1.
Why does the DAC display 0/44.1? Is the Transport faulty?
No, the Transport is working correctly. When a CD is loaded but is not playing, a
44.1kS/s carrier signal is being transmitted but there is no data – just digital silence. The
DAC correctly reports zero active data bits until the disc starts playing, then it detects 16
active bits and updates the display. 0/44.1 may be displayed briefly between tracks also.
Figure 1 – Basic setup
Rossini Transport Manual v1_0x Page 11 English version
Page 12
dCS Rossini Transport User Manual Software Issue 1.0x
September 2018
STEP 2 – Choosing a Sync Mode
So far, the system has been set up to lock to the clock generated by the source. This is the simplest
arrangement, but it does not give the best sonic performance due to clock jitter.
Using the DAC in Master Mode
If you have a Rossini Clock, go to the next page.
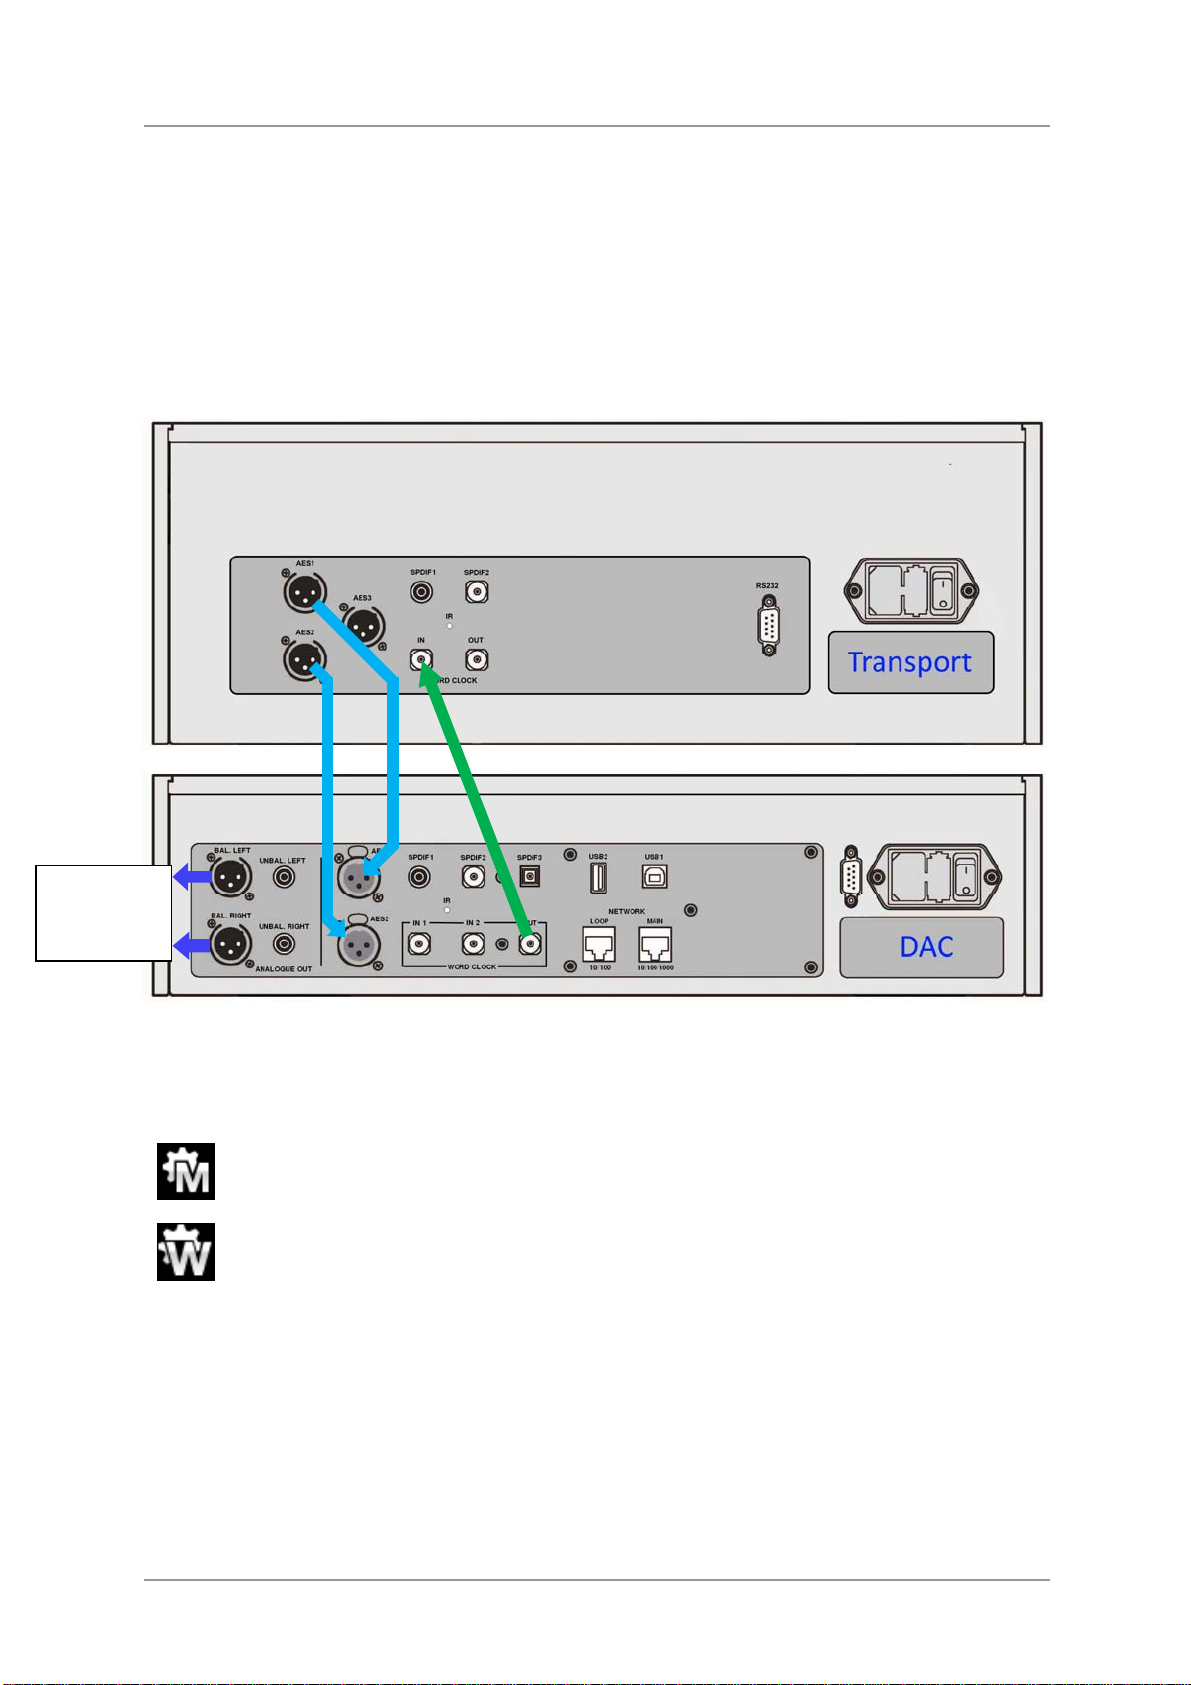
You can reduce the jitter in your system by using the Rossini DAC in Master mode and slaving the
Transport to it.
Analogue
outputs
to Amplifier
• Use the DAC’s Input button to select the input you want to use (AES1+2 in the example).
• Connect the DAC’s Word Clock Out connector to the Transport’s Word Clock In connector.
Figure 2 – Using the Rossini Transport with the Rossini DAC in Master Mode
Set the DAC’s Settings > Sync Mode menu page to Master mode.
The Transport will lock to the Word Clock and display this icon.
Rossini Transport Manual v1_0x Page 12 English version
Page 13
dCS Rossini Transport User Manual Software Issue 1.0x
September 2018
Using a Master Clock
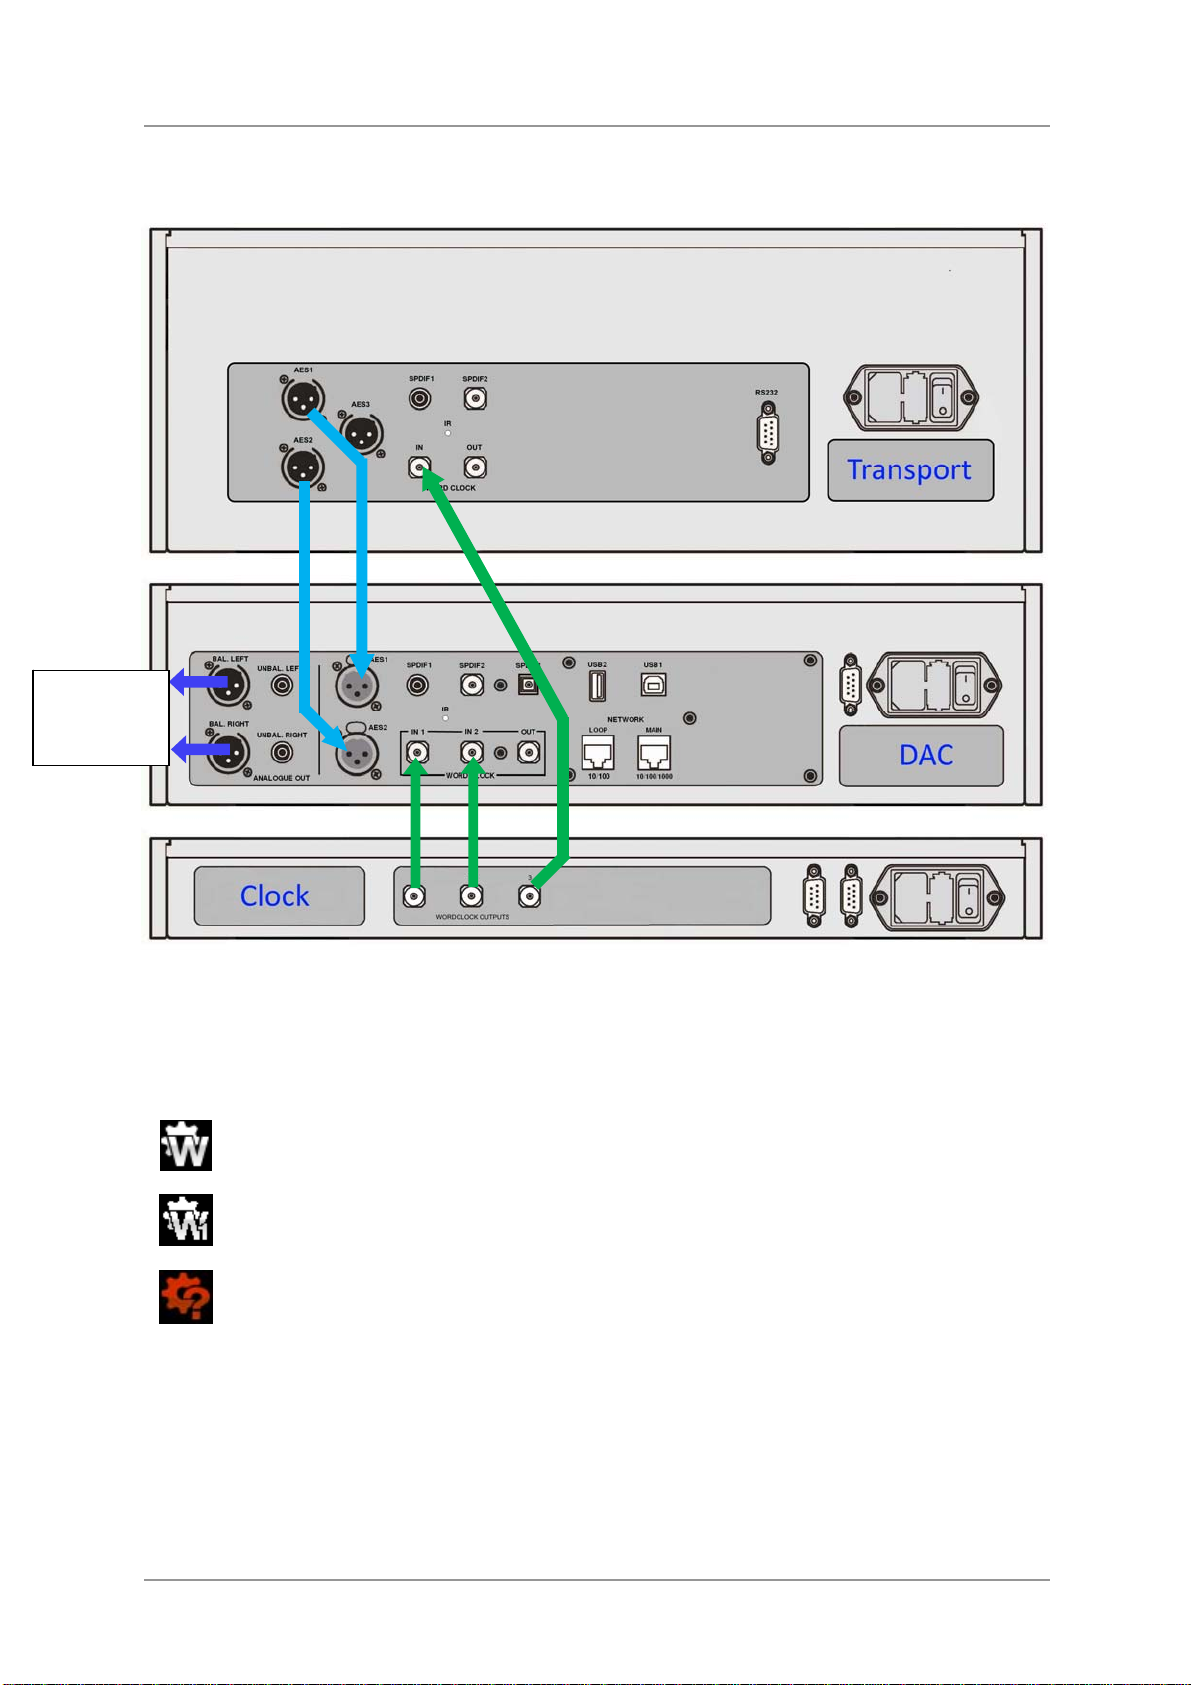
The performance can be improved further by adding a Rossini Master Clock to the system.
Analogue
outputs
to Amplifier
Figure 3 – Using the Rossini Transport, DAC and Clock together
• Use the DAC’s Input button to select the input you want to use (AES1+2 in the example).
• Connect the Clock’s Output 1 to the DAC’s Word Clock In1.
• Connect the Clock’s Output 3 to the Transport’s Word Clock Input.
The Transport will lock to the Word Clock and display this icon.
Set the DAC’s Settings > Sync Mode menu page to Word Clock In1 and allow the
system to re-lock.
The “Bad clock” icon indicates that the Transport is receiving word clock at a frequency
other than 44.1, 88.2 or 176.4kHz and it cannot lock to it.
• If you intend to use other sources with the DAC, connect the Clock’s Output 2 to the DAC’s Word
Clock In2.
• Make sure that the Clock is mechanically isolated from the other units, especially from the
Transport.
Proceed to Step 3.
Rossini Transport Manual v1_0x Page 13 English version
Page 14
dCS Rossini Transport User Manual Software Issue 1.0x
September 2018
STEP 3 – Playing a Disc
• Press the Stop/Eject button.
The display will show OPEN.
• Load a CD or SACD into the tray with the label upwards and either push the tray in gently or press
the Stop/Eject button again.
The display will show CLOSE, then LOADING. The disc type will be identified, either CD or the SACD
logo will appear on the display, along with the number of tracks and the total playing time. The
Transport will play the SACD layer of a hybrid disc by default, but if you wish, you can select the CD
layer instead by pressing the Layer button.
• Press the Play button. Turn up the Volume to a comfortable level.
You should have audio. For all discs, the disc type and elapsed time will be displayed.
• Press the Play/Pause button to pause playing, press again to resume playing.
• Press the Fwd or Rwd button to skip to the next track or the previous track.
• Hold down the Fwd or Rwd button to jog through the track - the speed will increase the longer you
hold the button down. Most owners will use the remote control for this.
• Press the Stop/Eject button to stop the disc. Press it again to open the tray.
The IR Remote Control gives access to other features, such as track number selection, repeat track or
disc and programming a track sequence.
To program the track sequence 6 - 8, stop the disc and press the remote Program button – the
Transport will display P00. As an example, press 6 or 06 – the display will change to P01. Press 8 or
08 – the display will change to P02. Start the disc to play the track sequence. Press the remote
Program button to toggle in/out of program mode. Press the Clear button to cancel program mode. or
open the CD tray.
The next step is crucial – sit back and enjoy the music.
When you have finished listening, you can either keep the system warm by setting it to Sleep mode
(press the Power button briefly) or switch off (hold down the Power button until SWITCHING OFF is
displayed, then release).
Controlling Disc playback with the app
App control is not implemented in the initial release for the Rossini Transport (v1.00), the
current versions of the Rossini Player / DAC (v1.10) or the Rossini app (v1.4.8). We
!
You can use the Rossini app to control the Transport via a Rossini DAC or Player.
• Connect the DAC / Player to the Transport with Dual AES.
• Connect the DAC / Player to the Transport with an RS232 “null modem” cable between the RS232
ports.
intend to add this feature in the next set of updates. Please see www.dcsltd.co.uk for
news.
Set the RS232 Mode on the Transport and DAC / Player to Binary.
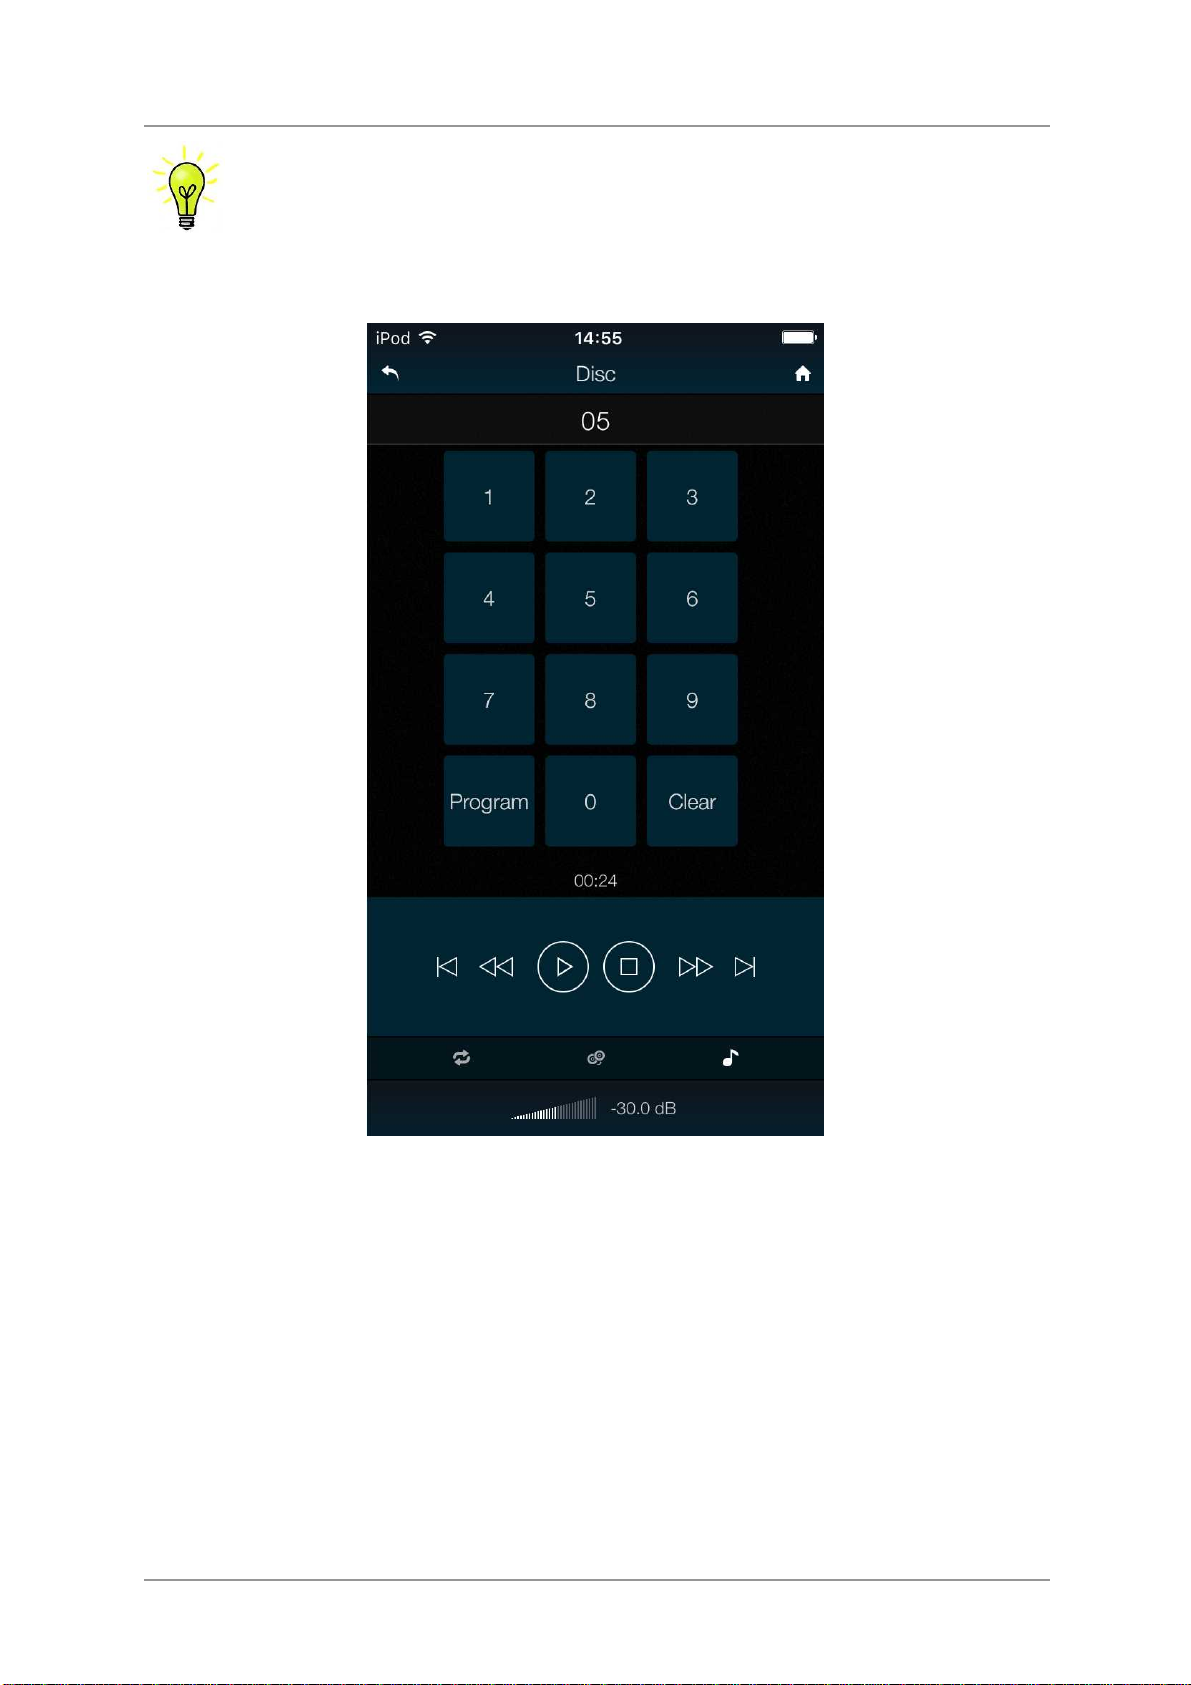
Go to the app’s Home page and tap Disc.
The Rossini app will then give access to the same features as on the IR remote control.
Rossini Transport Manual v1_0x Page 14 English version
Page 15
dCS Rossini Transport User Manual Software Issue 1.0x
September 2018
When set up in this way, the Transport’s IR receiver is active only if the Rossini DAC /
Player’s Dual AES input is selected. This prevents control conflicts.
The app’s CD page is replaced by the Disc page when the Transport is connected to Player / DAC.
Playback information will be displayed on the Player / DAC’s front panel.
Further suggestions
• If you wish, you can set the Transport’s AES1+2 output to generate DXD data (24/352.8) or DSDx2
(1/5.644M) when playing a CD instead of DSD, by changing the Settings > Upsampling Mode
menu page (see page
• If you are using the AES1+2 output only, try setting the PCM Enable menu page to Off (see page
X24X).
• If you are using a Rossini Master Clock, try turning the Dither feature on. Please refer to the
Rossini Master Clock manual for more information.
Rossini Transport Manual v1_0x Page 15 English version
X24X).
Page 16
dCS Rossini Transport User Manual Software Issue 1.0x
September 2018
FRONT PANEL
A
B
C
D E F G H I
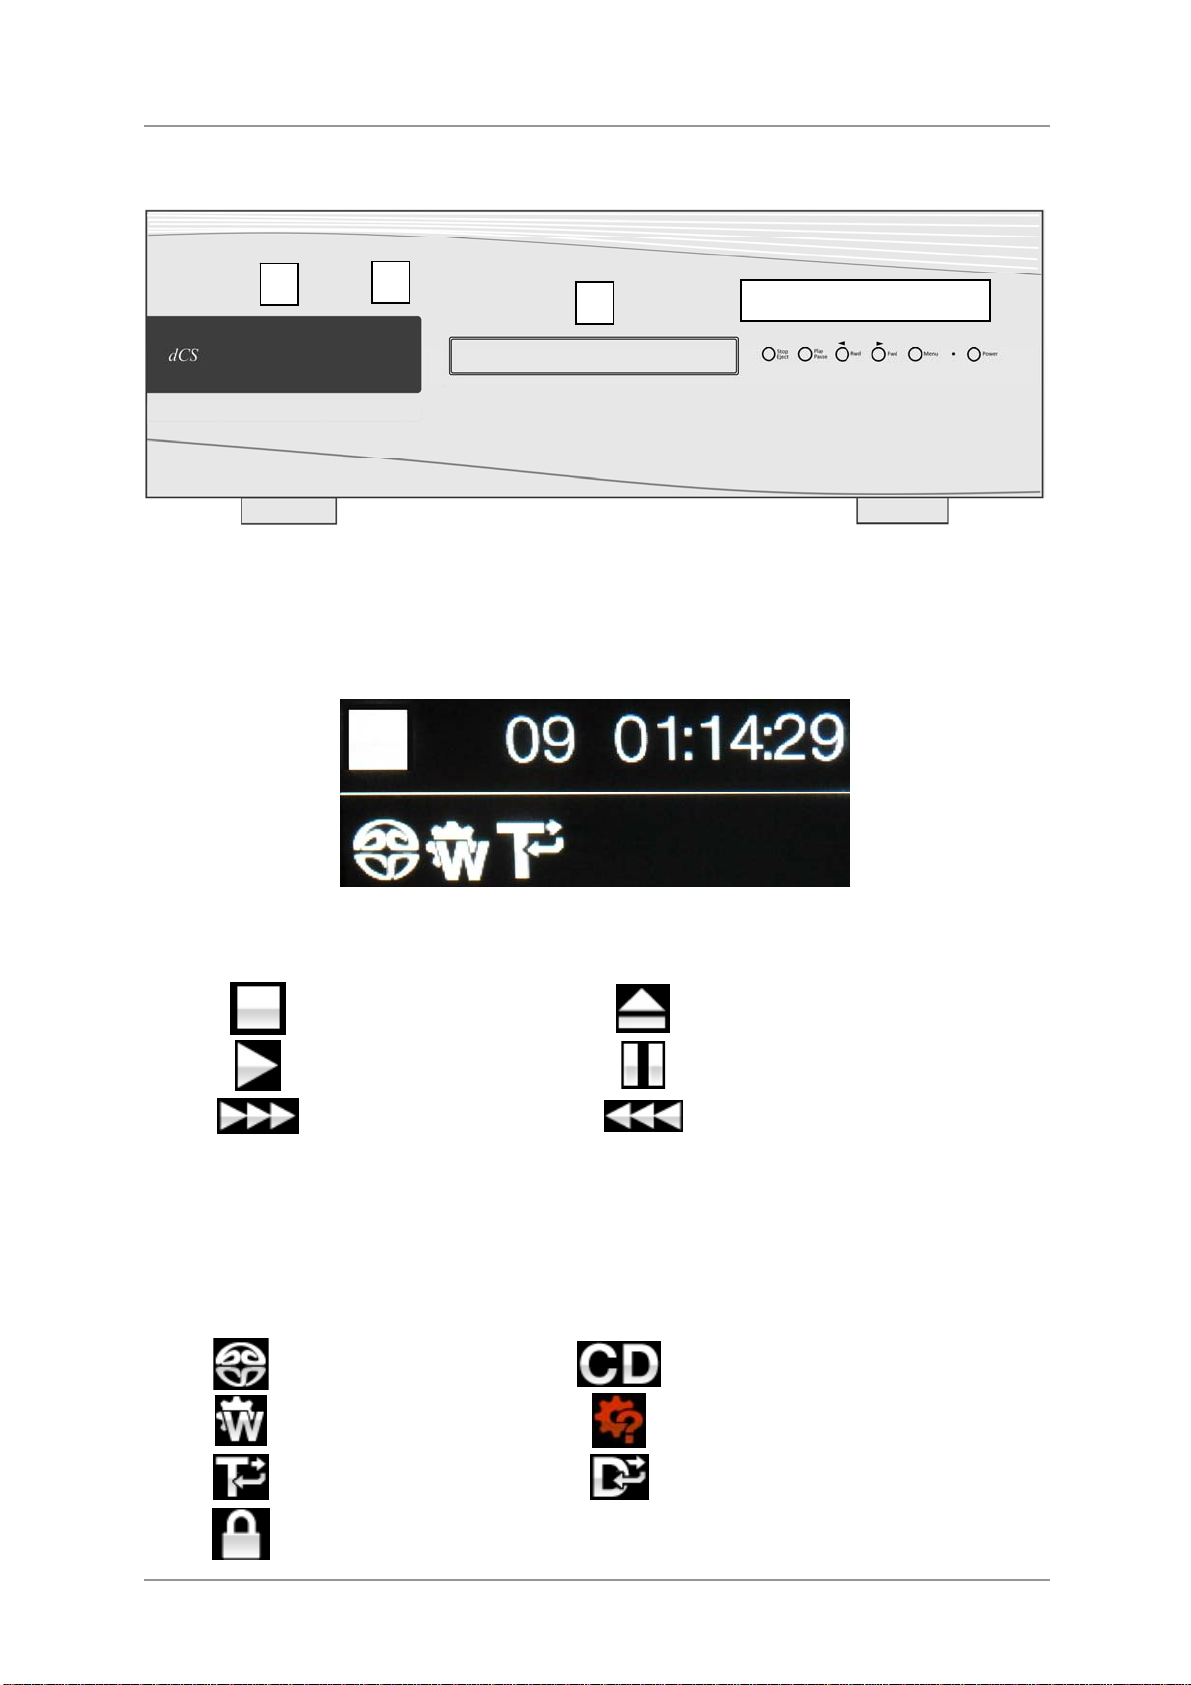
Figure 4 – Front panel
Display
In normal use, the display (A) is split into 4 areas:
1 -----------------------2-------------------------
--------------3-------------
Area 1: The symbol indicates the mechanism status:
Stop
Play
Fast Forward
Eject
Pause
Fast Reverse
Area 2: When in play or pause modes, the current track number & track/disc time (hours, minutes,
seconds) is shown.
When stopped, the number of tracks & total disc time is shown.
Pxx is displayed here when a track sequence is programmed and the disc is stopped. For example,
P03 indicates that a sequence of 3 tracks has been programmed.
Area 3: The status icons are displayed here:
SACD loaded
CD loaded
Locked to Word Clock input
Wrong clock detected
Repeat the current track
Settings are locked
Repeat the whole disc
Rossini Transport Manual v1_0x Page 16 English version
Page 17
dCS Rossini Transport User Manual Software Issue 1.0x
September 2018
When a track is selected by remote control, the track number is displayed in large text briefly.
Details of the menu displays are shown in the Menu section on page
X21X.
To avoid unnecessary display wear, we recommend switching off or setting the unit to
Sleep mode at the end of the listening session.
Remote Control Receiver
Aim the remote control handset towards the receiver (B) for best sensitivity.
CD Tray
When loading a CD or SACD into the CD tray (C), ensure the disc is central with the label upwards
and is seated correctly. The tray will close if you press the Stop/Eject button or press the Play button
or gently push it in a little. Let the tray close by itself, do not force it in.
Stop / Eject Button
Press the Stop / Eject button (D) to stop playing a disc. Press again to open the CD tray. Press again
to close the CD tray.
Play / Pause Button
After a disc has been read, press the Play / Pause button (E) to start playing. Press again to pause
and again to resume playing.
Rwd Button
When a disc is playing, press the Rwd (rewind) button (F) briefly to select the previous track. Release
the button to return to play mode.
When the menu is open, the Rwd button changes to the ◄ button, used to page backwards through
the menu.
Fwd Button
When a disc is playing, press the Fwd (forward) button (G) briefly to select the next track. Release the
button to return to play mode.
When the menu is open, the Fwd button changes to the ► button, used to page forwards through the
menu.
Menu Button
Press the Menu button (H) to open the menu, select menu pages and change settings. See the Menu
section on page X21 for information on using the menu features.
Rossini Transport Manual v1_0x Page 17 English version
Page 18

dCS Rossini Transport User Manual Software Issue 1.0x
September 2018
Power Button
To switch on, ensure the rear panel power switch is set to I and press the Power button (I) on the front
panel once. Note that the unit cannot be turned on from the remote control.
To set the unit to sleep mode, press the Power button once. The main display will turn off, the LED
beside the button will illuminate and the mechanism will stop, but the unit will remain close to running
temperature. Press again to return to normal operation.
To switch off, hold down the Power button for about 5 seconds until SWITCHING OFF appears on the
display, then release it.
When the menu is open, press the Power button to close the menu.
Rossini Transport Manual v1_0x Page 18 English version
Page 19
dCS Rossini Transport User Manual Software Issue 1.0x
September 2018
REAR PANEL
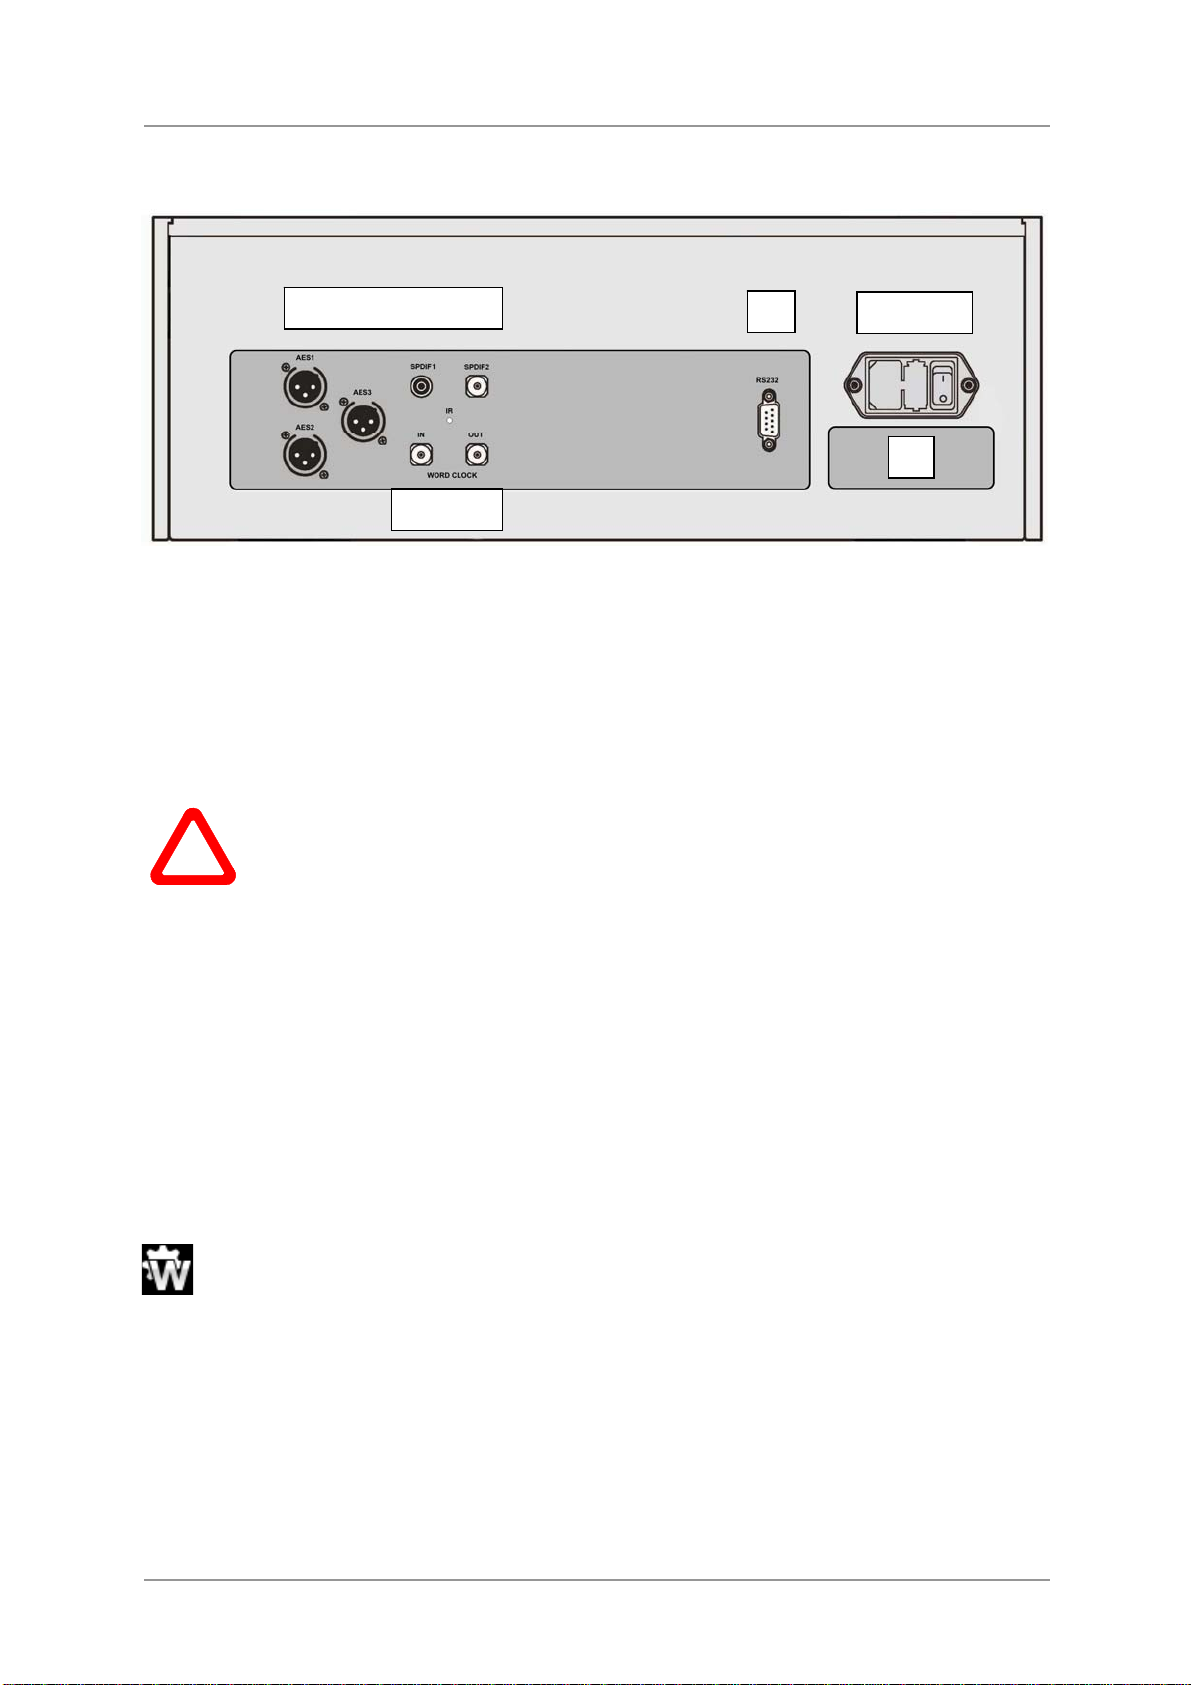
J K L M
Q
R S T
U
N O P
Figure 5 – Rear panel
AES Digital Outputs
The AES1 and AES2 outputs (J) form a Dual AES pair. They output encrypted DSD data when an
SACD is playing. When playing a CD, the outputs can be set to output either encrypted DSD or DXD
(24 bits at 352.8kS/s) or DSDx2 (1 bit at 5.644MS/s), depending on the setting of the Settings >
Upsample Mode menu page. AES1+2 is the main output.
The DSD and DXD output modes are compatible with the Vivaldi DAC, Rossini DAC,
Rossini Player, Scarlatti DAC v1.30, Paganini DAC v1.30 or Debussy DAC v2.30.
!
Encrypted DSD mode is unlikely to be compatible with other manufacturer’s products.
The DSDx2 output mode is compatible with Vivaldi DAC v2.00 onwards, Rossini DAC,
Rossini Player or Debussy DAC v2.30.
The AES3 output carries 16/44.1 data whether a CD or SACD is playing.
SPDIF Digital Outputs
The unit features two co-ax SPDIF outputs, labelled SPDIF1 (L – RCA connector) and SPDIF2 (M –
BNC connector). Both output 16/44.1 format data, whether a CD or SACD is playing.
Word Clock Input / Output
The Word Clock In connector (N) will accept standard word clock at 44.1 or 88.2 or 176.4kHz from a
master clock or a DAC in master mode.
Once the unit has locked to the external clock, this icon appears on the display.
The Word Clock Out connector (P) ca rries a 44.1kHz word clock.
Word clock is used for synchronisation only, it does not carry digital data.
IR Remote Receiver
This secondary IR remote receiver (O) is intended to be used with a household automation system, as
an alternative to RS232.
Rossini Transport Manual v1_0x Page 19 English version
Page 20

dCS Rossini Transport User Manual Software Issue 1.0x
September 2018
RS232 interface
This RS232 interface (Q) has two modes, set by the Settings > RS232 menu page.
• Binary mode is used to remotely control the unit during automated production testing at dCS.
• Text mode is for use with a Rossini DAC or Player with the control app. If you would like to use a
household automation system, please download the list of remote control commands from
www.dcsltd.co.uk
H.
The interface is designed to be used with a “straight through” cable, wired pin 1 to pin 1, etc.
The pin connections are:
• Pin 2 – dCS unit transmit
• Pin 3 – dCS unit receive
• Pin 5 – ground
• Shell – cable screen & drain wire
Mains inlet
Power is connected via a standard IEC320 connector (R), protected by a fuse (S) and isolated by a 2pole power switch (T).
Label
The label (U) states the unit’s serial number and the nominal voltage to which the unit is set. It is
important to quote the serial number if you need assistance.
Rossini Transport Manual v1_0x Page 20 English version
Page 21
dCS Rossini Transport User Manual Software Issue 1.0x
September 2018
THE MENU
MENU
Infor matio n
Settings
Config
Unit Statu s
►
Displays the
unit status.
Layer
►
Selects the
format for
playing hybrid
(CD/SACD).
►
discs
Lock
Version
►
Displays the
software
issues.
PCM
►
Enable
Turns the PCM
outputs on/off.
Save
►
Contact
►
Displays dCS
contact details.
Upsample
►
Upsamples CD
data to DSD,
DSD/2 or DXD
on AES1+2.
Restore
►
►
Loads new
software from
a dCS CD.
►
Select RS232
Text Mode or
Binary Mode.
Factory
►
Upd ate
RS232
Mode
Res et
Display
Settings
Signal
Generator
Locks some
Brightness
►
brightness.
Channel
►
Outputs tone
on L channel
only then R
channel only.
important
settings.
Sets the
display
Check
Saves the
current config
to memory.
Display
►
On/Off
Turns the main
display on/off.
Phase
►
Check
Outputs noise
on both
channels then
inverts R.
Loads the
previously
saved config
from memory.
Logo
►
Turns the dCS
illumination
on/off
Burn In
►
Outputs
modulated pink
noise to burn-
in your
system.
Logo
Restores
standard
factory
settings.
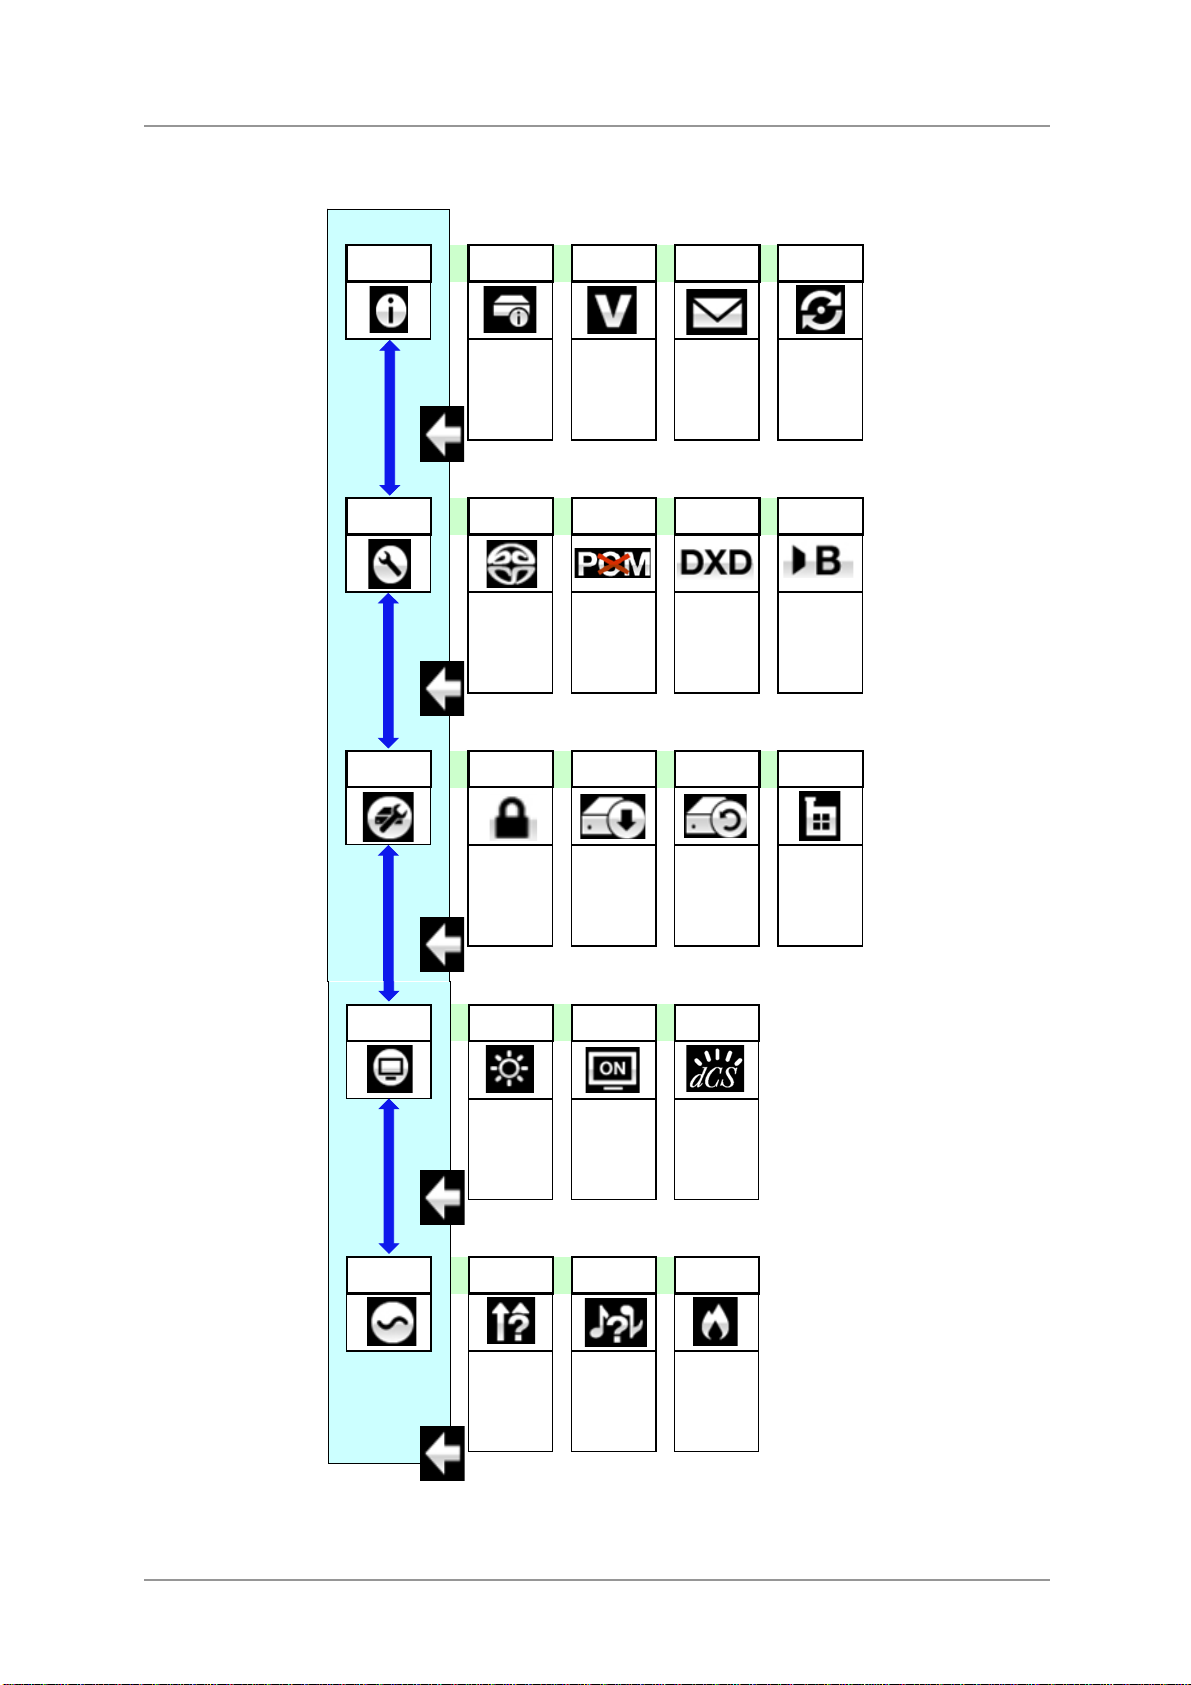
Figure 6 – The menu sequence
Rossini Transport Manual v1_0x Page 21 English version
Page 22
dCS Rossini Transport User Manual Software Issue 1.0x
September 2018
Using the Menu
The menu gives the user access to a range of additional features. It also allows new features and
performance enhancements to be added later by software updates.
The menu is controlled by four buttons.
• Press the Menu button to open the menu or select a setting.
• Press the ► button to page forward through the menu.
• Press the ◄ button pages backward through the menu.
• Press the Power button to close the menu or just wait 10 seconds.
Use the Menu Guide sheet to help you find the right menu page.
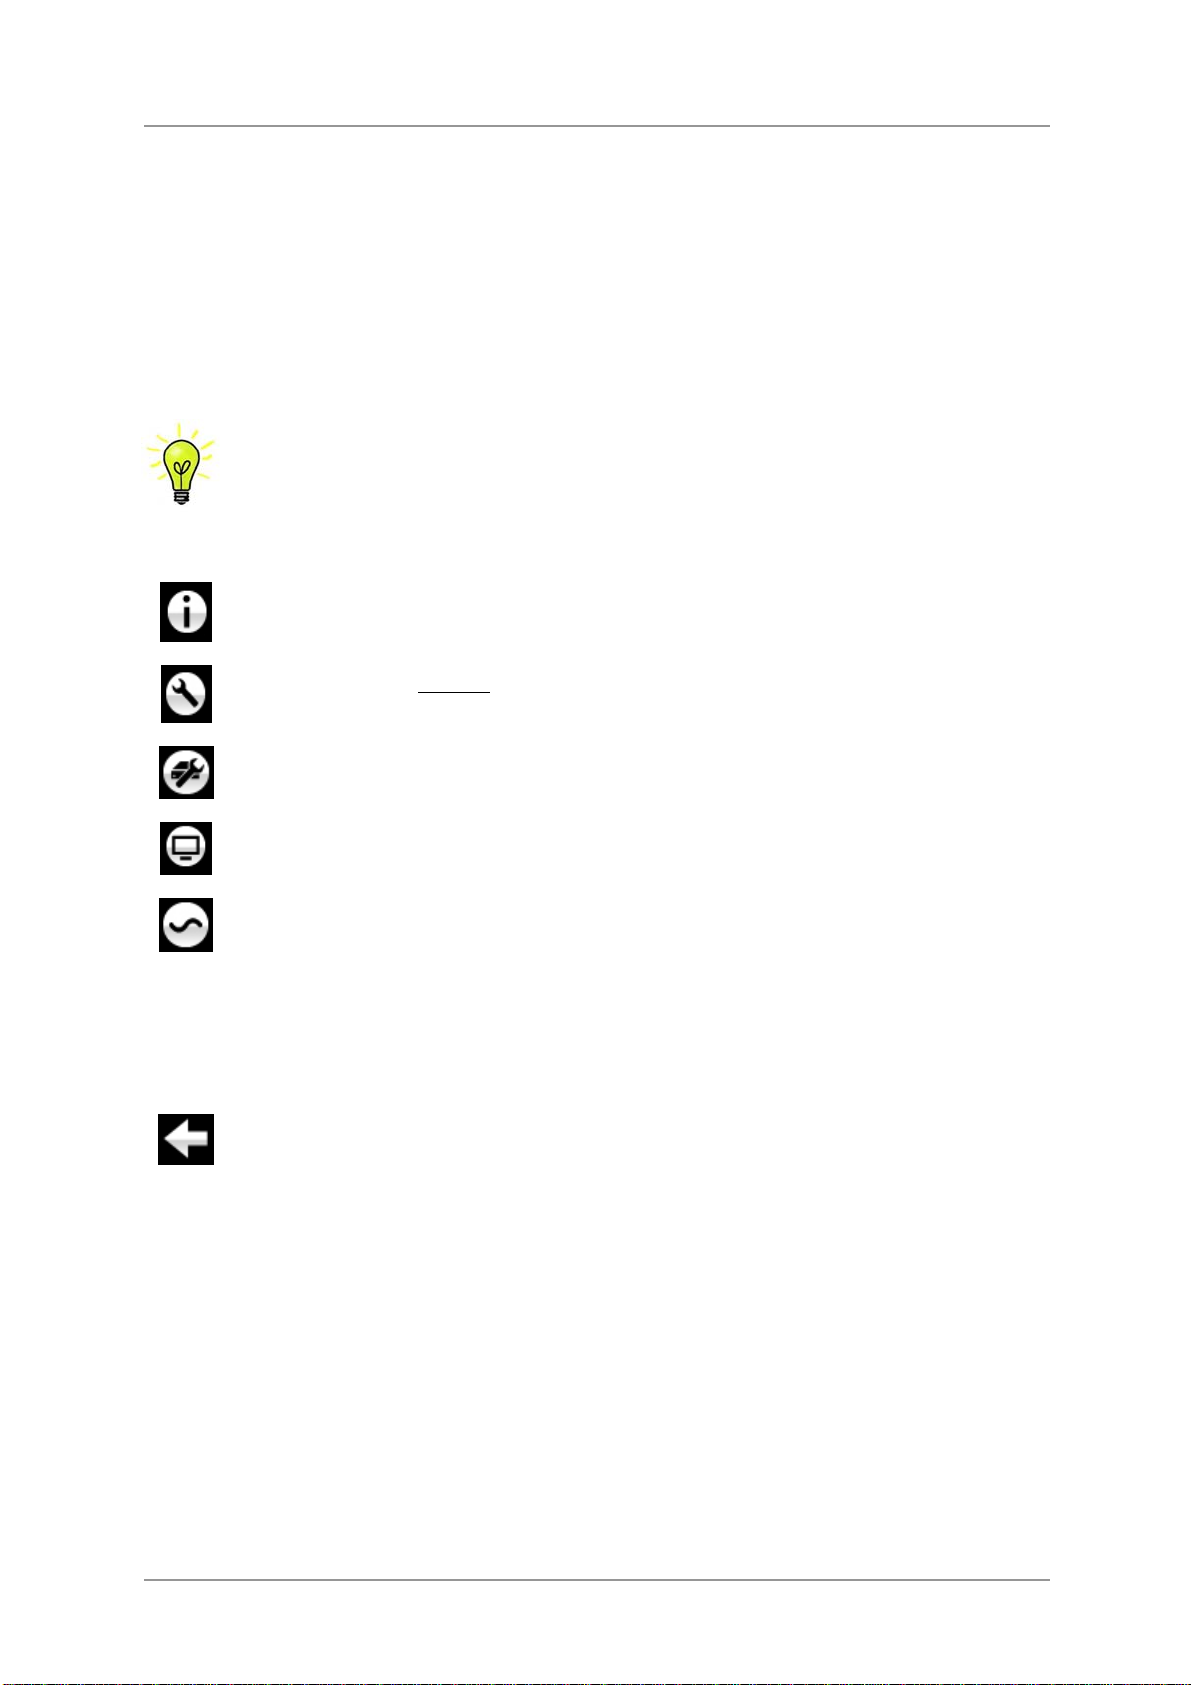
Each unit in the range has either four or five top-level menu pages:
The INFORMATION menu gives unit set-up details, software issues, serial number and
contact details.
Each model has a different SETTINGS menu, which allows you to set some features that
are not directly accessible from the front panel.
The CONFIGURATION menu allows you to lock important settings, save a standard
setup and reset the unit.
The DISPLAY SETTINGS menu is used to adjust the display.
The SIGNAL GENERATOR menu contains test and set-up routines.
Use the ► button to move the blue highlight to the menu you want, then press the Menu button to
select it. The next menu level down is displayed. Use the ► button to move the highlight to the menu
page you want, then press the Menu button to display the information or change the setting.
Select the return icon to go back to the previous menu level.
Rossini Transport Manual v1_0x Page 22 English version
Page 23
dCS Rossini Transport User Manual Software Issue 1.0x
September 2018
INFORMATION Menu
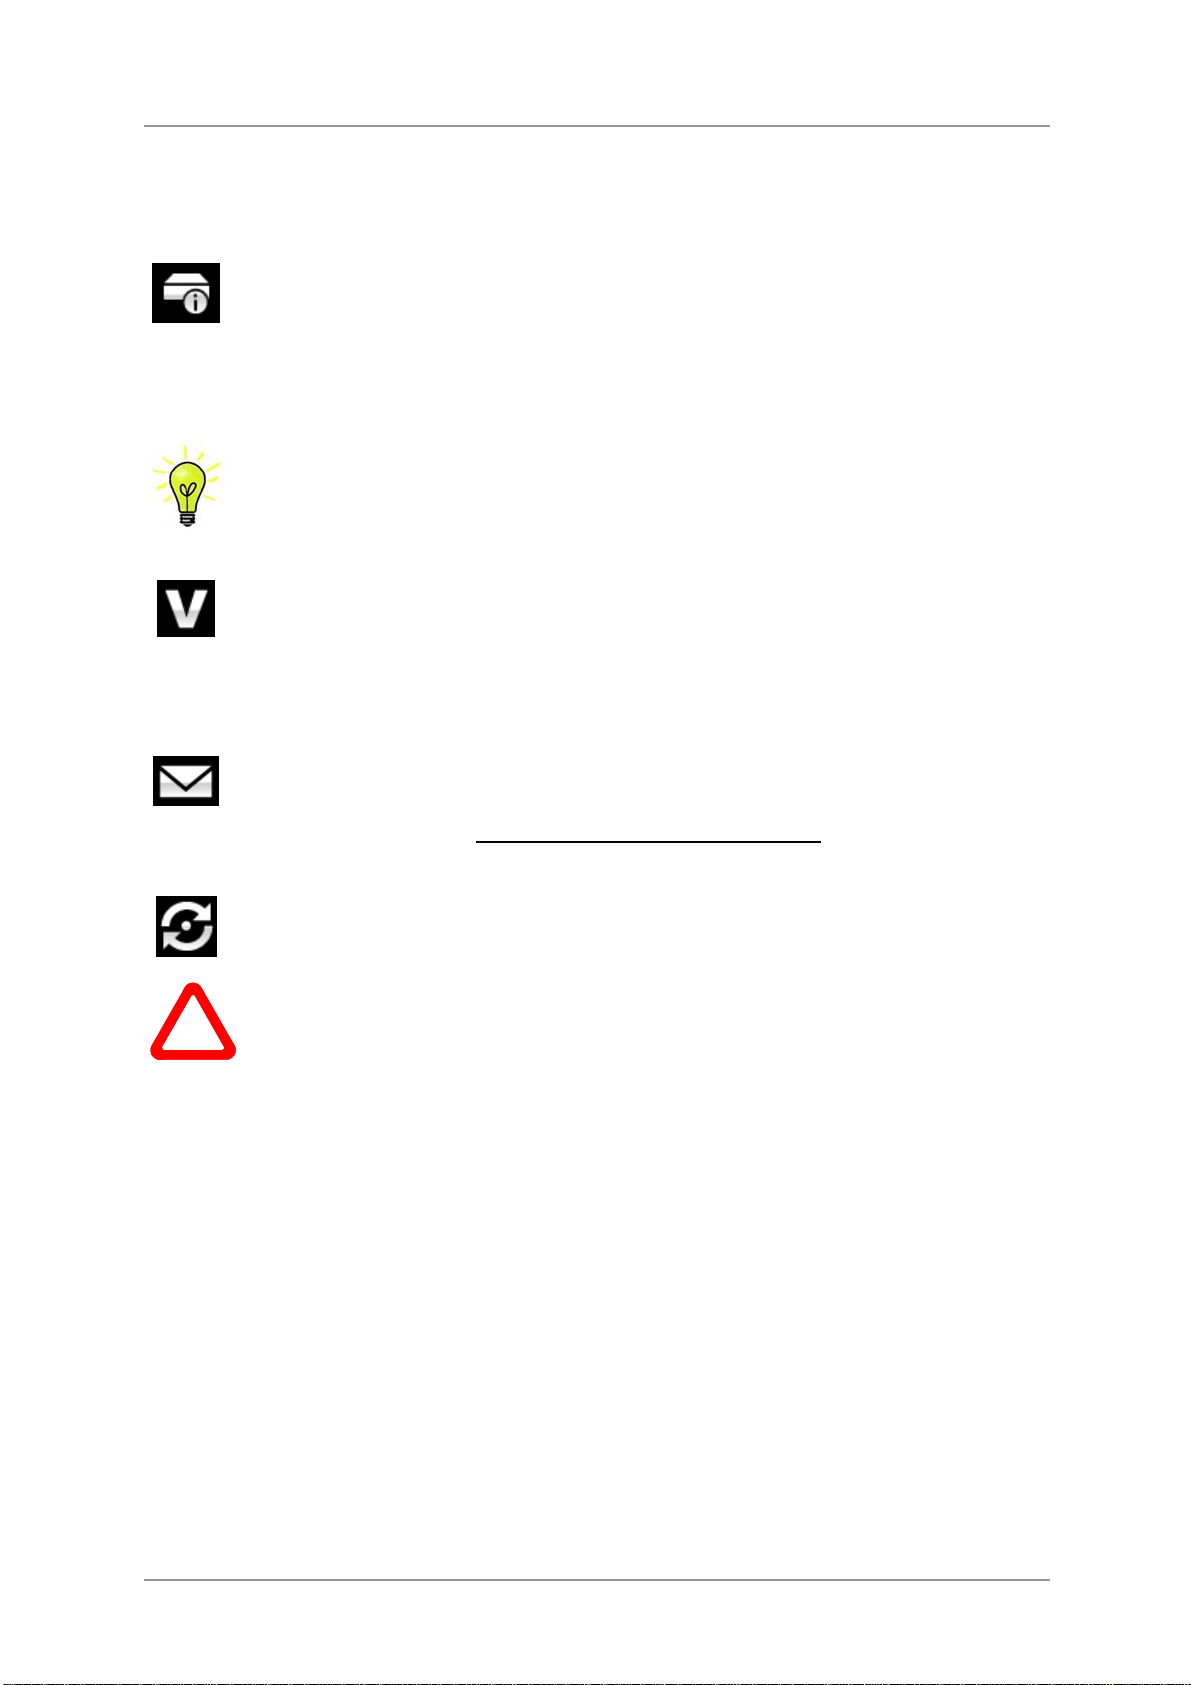
Unit Status
The Unit Status page displays:
• The long version of the serial number, including the hardware configuration code.
Version
• Internal temperature ....°C
• The clock frequency detected on the Word Clock Input ……Hz
Use the ◄ ► buttons to scroll up or down the list. This page does not time out, press the
Menu button to exit.
If your system is not behaving as you expect, the Unit Status page can help you find setup or connection errors.
The Version page displays the software versions loaded in the unit. Please have this
information ready if you contact your dealer for any reason.
• Main: 1.xx
Contact
Update
!
This page does not time out, press the Menu button to exit.
The Contact page displays the dCS web-site URL and support email address. This page
does not time out, press the Menu button to exit.
If you have any difficulty, please contact your dealer for help first.
The Update feature allows you to load new software into your Transport. Please follow
the instructions supplied with the update disc carefully.
If you accidentally start an Update, do not worry. The unit will automatically detect it is
not receiving updated software and will abort the process. The software will not have
been changed.
Rossini Transport Manual v1_0x Page 23 English version
Page 24
dCS Rossini Transport User Manual Software Issue 1.0x
September 2018
TRANSPORT SETTINGS Menu
Layer
When a hybrid disc is loaded but is not playing, the Layer page allows you to select
either the SACD layer…
…or CD layer. While changing layers and re-reading the disc, Changing Layer - Please
Wait is displayed.
PCM Enable
This page turns the 16/44.1 AES3, SPDIF1 and SPDIF2 outputs on…
…and off. This gives a quieter electrical environment when you are using the AES1+2
interface only.
Remember to turn the PCM outputs on again if you want to use them!
Upsampling Mode
While playing a CD, this page sets the format of the AES1+2 Dual AES interface to
either encrypted DSD (1 bit at 2.822MS/s)…
…or DXD (24 bits at 352.8kS/s)…
…or DSDx2 (1 bit at 5.644MS/s) in DoP format.
There is no need for an “Upsampling Off” setting.
If you want to listen to the 16/44.1 data unprocessed, connect the AES3 output or one of
the SPDIF outputs directly to the DAC and select that input.
RS232 Mode
Sets the RS232 interface to either Text mode for use with a 3
or…
…dCS production Binary mode, which is intended for factory use or when linked to a
Rossini Player / DAC.
rd
-party control system
Rossini Transport Manual v1_0x Page 24 English version
Page 25
dCS Rossini Transport User Manual Software Issue 1.0x
September 2018
CONFIGURATION Menu
Settings Lock
When set to Locked, this icon is displayed and the following settings cannot be changed:
• PCM Enable
• Upsample Mode
• Save Configuration is disabled
• Restore Configuration is disabled
• Factory Reset is disabled
Set to Unlocked if you need to change these settings.
Save Configuration
Once the unit is set up the way you want it, select Save to store the settings in memory.
If you deliberately change the setup later and want to keep it, select Save again to store
the changes.
Restore Configuration
If the unit settings are accidentally changed, select Restore to reload the settings you
saved earlier.
Factory Reset
Resets the unit to standard settings. These are:
• Layer to SACD (hybrid loaded)
• PCM Enable to On.
• Upsample Mode to DSD.
• Brightness to maximum.
• Display to On.
• Logo to On.
• RS232 Mode to Binary.
Rossini Transport Manual v1_0x Page 25 English version
Page 26
dCS Rossini Transport User Manual Software Issue 1.0x
September 2018
DISPLAY SETTINGS Menu
Brightness
Set the display Brightness to a comfortable level using the ◄ or ► buttons. Press the
Menu button to exit.
Display On/Off
This page is usually set to On.
When set to Off and the menu closes, the display will turn off after a few seconds. The
display will turn on briefly when a control setting is changed. The display will stay on if
Logo On/Off
the CD tray is open or the menu is open.
When set to On, the dCS logo at the left side of the display is illuminated.
When set to Off, the logo is not illuminated.
GENERATOR Menu
Channel Check
A routine to test the system for swapped channels. A tone is output on the left channel
only while the display shows Left, then the right channel only while the display shows
Right. If these are the wrong way around, the left and right channels are swapped
Phase Check
somewhere in your system.
A routine to test the system for phase reversals. Noise is output in phase on both
channels while the display shows In Phase. Press the Menu button, the noise on the
right channel is inverted while the display shows Out of Phase. The first burst should
produce a central image, the second burst should not. If these are the wrong way
around, one channel in your system is phase inverted. Press the Power button to stop
the test and return to the menu.
Burn In
A procedure to condition your system. The unit displays Burn In Caution! Loud, then
outputs modulated pink noise that ramps up and down slowly in level. Press the Menu or
◄ or ► buttons to stop the procedure.
Please ensure that the volume level is reasonable, as careless use of the Burn In feature
!
can damage your amplifiers and loudspeakers. dCS will not be liable for such damage.
Rossini Transport Manual v1_0x Page 26 English version
Page 27
dCS Rossini Transport User Manual Software Issue 1.0x
September 2018
SPECIFICATION
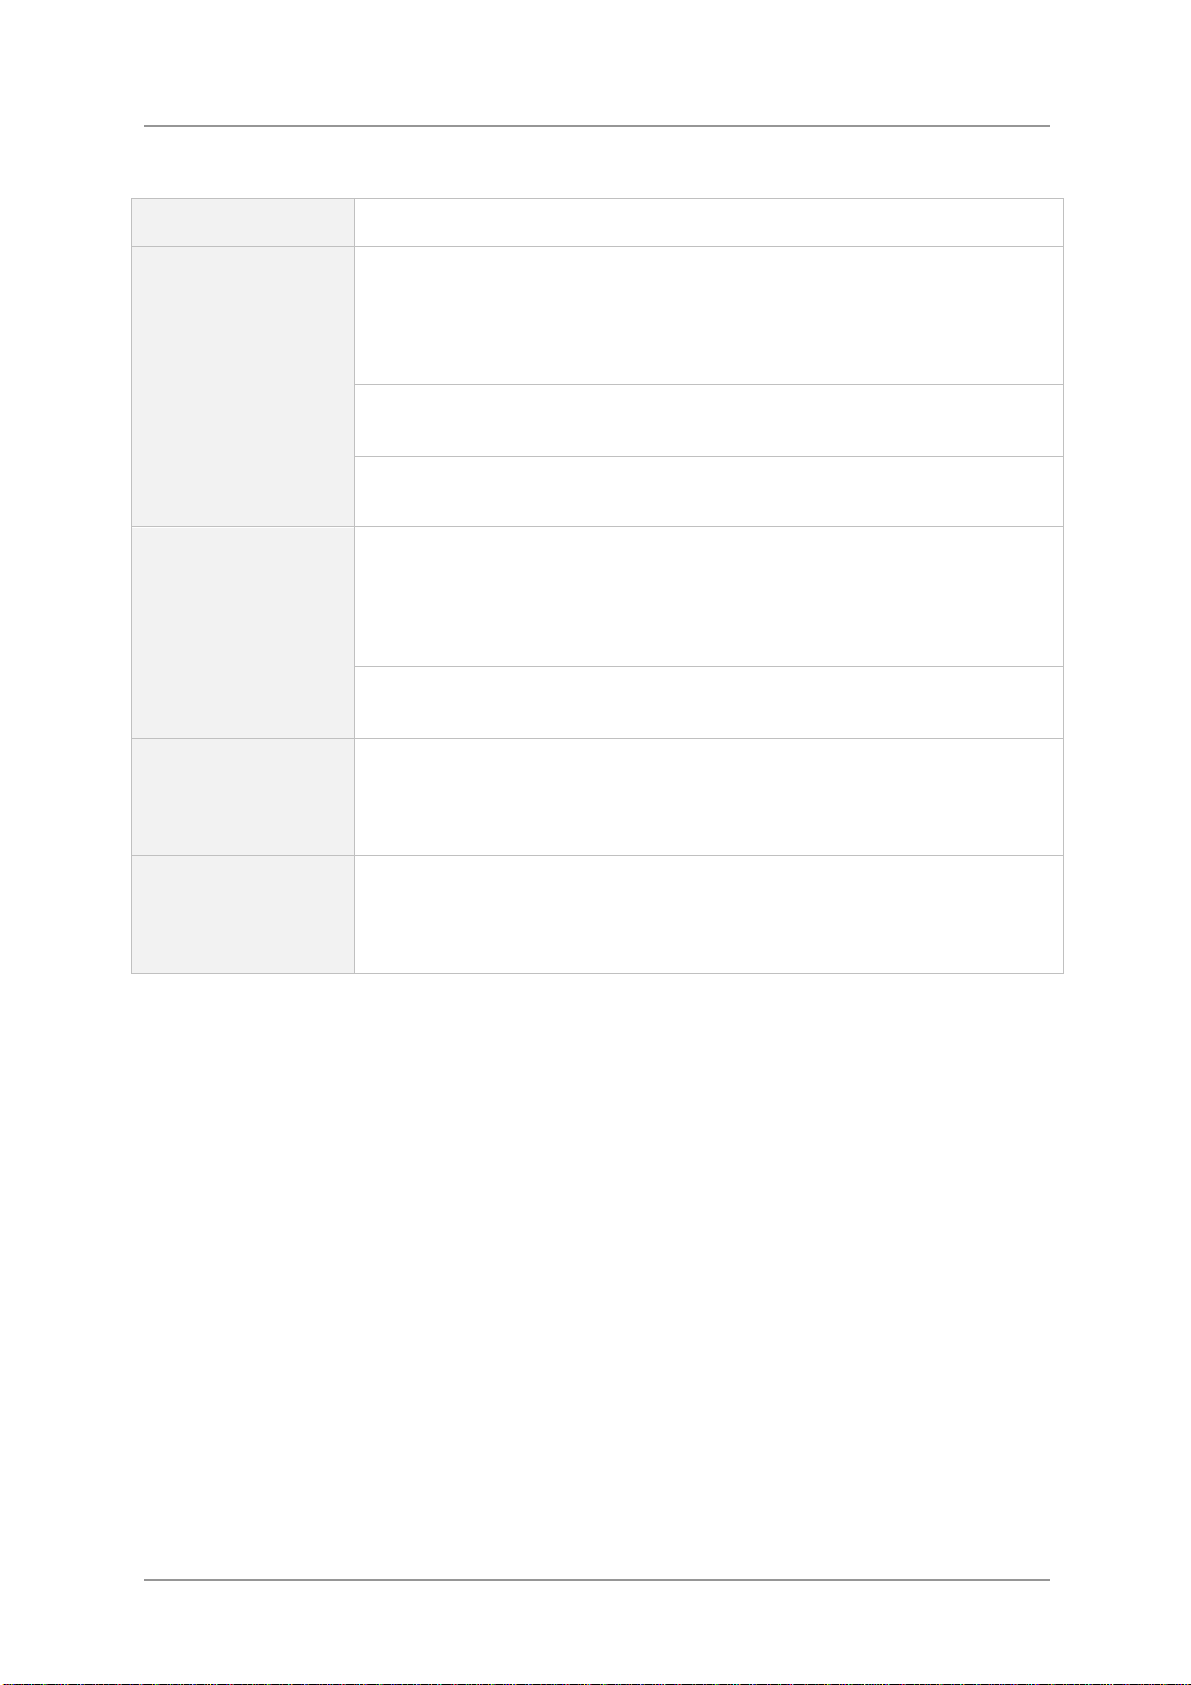
Mechanism type
Digital outputs
Dual laser CD/SACD mechanism.
Dual AES interface on 2x 3-pin male XLR connectors (AES1+2).
While an SACD is playing, the interface outputs encrypted DSD data.
While a CD is playing, the Settings > Upsample Mode menu page sets the
interface to output either encrypted DSD data (1 bit at 2.822MS/s) or DXD
data (24 bits at 352.8kS/s) or DSDx2 data (1 bit at 5.644MS/s in DoP format).
AES interface on 3-pin male XLR connector (AES3), outputs 16/44.1 data,
whether a CD or SACD is playing.
2x SPDIF on 1x RCA Phono and 1x BNC connectors. Each outputs 16/44.1
data, whether a CD or SACD is playing.
Clocking
Word Clock Output on 1x BNC connector. With the Transport in Master
mode, a TTL-compatible 44.1kHz word clock derived from the internal crystal
oscillator is available on this output. The calibration accuracy when shipped is
+/-10ppm, not temperature compensated. Calibration usually remains stable
for several years.
Word Clock Input on 1x BNC connector, accepts standard word clock at
44.1, 88.2 or 176.4kHz. Sensitive to TTL levels. Lock range is +/-300ppm.
Size and weight
444mm (17.5”) long x 435mm (17.2”) deep x 178mm (7.0”) high. Allow extra
depth for cable connectors. Allow space for air flow around the unit.
20.6kg (45.3lbs).
Power requirements
Internally set to either 100, 115/120, 220 or 230/240V AC, 50/60Hz.
Power consumption: 16W typical, 50W maximum.
Consumes less than 0.5W when powered down from the front panel.
These specifications are subject to change without notice.
Rossini Transport Manual v1_0x Page 27 English version
Page 28
dCS Rossini Transport User Manual Software Issue 1.0x
September 2018
MAINTENANCE AND SUPPORT
Service and Maintenance
dCS audio products are designed not to need regular maintenance, and contain no user serviceable
parts apart from the mains fuse. If your unit is damaged in any way, please contact your dealer.
Replacing a Blown Mains Fuse
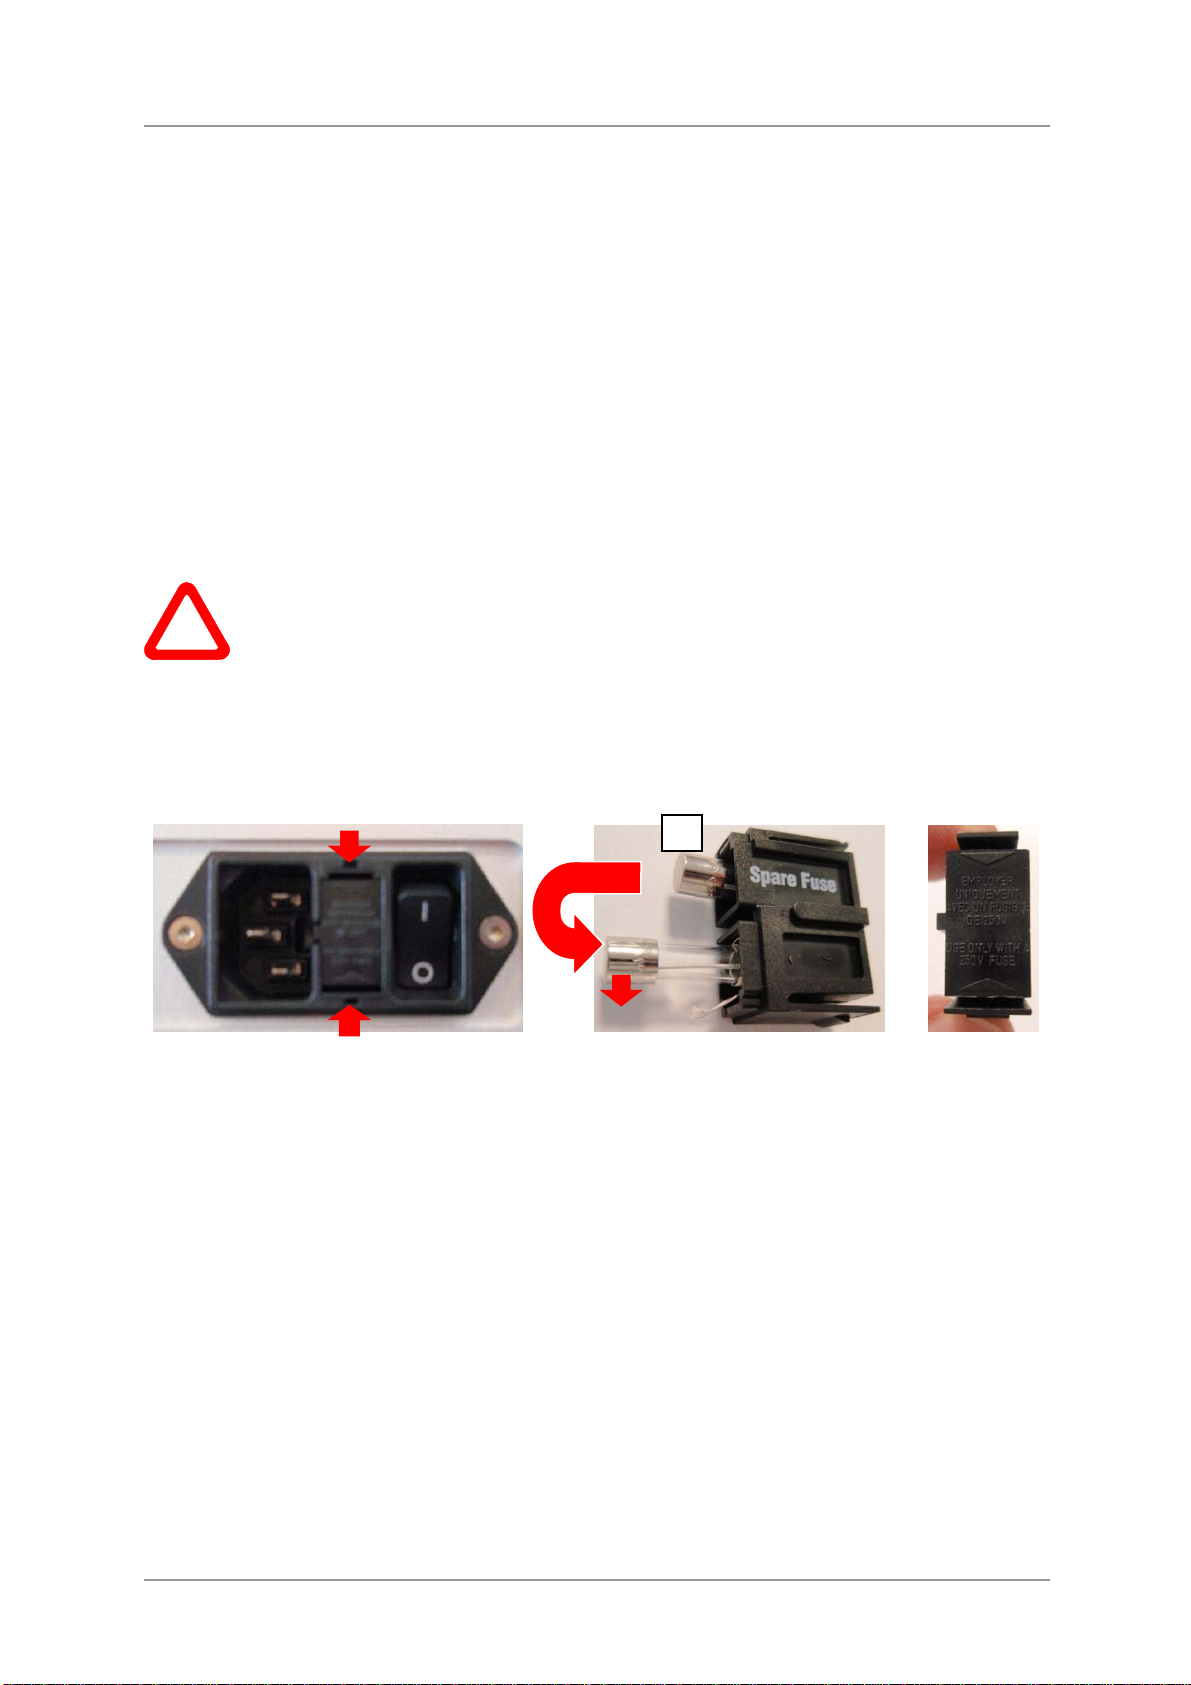
There is a mains fuse below the power inlet, accessible from the outside of the unit. If the fuse blows,
it may be changed by the user. The current consumption of the unit is very low, so it only blows if
power surges occur, or there is a fault in the unit. Usually power surges cause no other damage, but if
the fuse blows repeatedly on replacement, some other damage will have been done - contact your
dealer to arrange repair.
Fuse type: 20 x 5mm T 1A L fuse
If the fuse should fail, it is essential that it is replaced with one of the same type and
!
rating. Failure to do so could result in damage to th e un it, risk of fire or electric shock and
will invalidate the warranty. Fuse failure is rare!
Referring to the diagram below, remove the power cable, use your fingernails to catch the two tabs of
the fuse holder (A), push them together to release the clips and pull the fuse holder out. Pull out the
blown fuse from the lower position (B) and discard it. Either move the Spare Fuse (C) to the lower
position or fit one of the fuses from the manual pack. Orient the fuse holder as shown (D) and push
the holder back into the power inlet so that it clicks home.
C
A B D
Cleaning the case
The front and back panels of your dCS equipment are machined from very high grade aluminium.
Great care has been taken to create the finish of the aluminium throughout the engineering process
from the raw solid material to the finished piece.
To remove loose dust or finger marks from the case, we recommend that you use a clean, dry, lintfree cloth.
To restore the finish, we recommend applying small quantities of a lanolin based cleaner, using a
clean, dry, lint-free cloth and then wiping off. Do not allow lanolin to collect around the buttons.
Small amounts of glass cleaner containing ammonia may be used to clean other surfaces, but avoid
spraying onto the connector contacts.
Rossini Transport Manual v1_0x Page 28 English version
Page 29

dCS Rossini Transport User Manual Software Issue 1.0x
September 2018
Limited Warranty
General
dCS warrants this product against defects in materials and workmanship for a period of 3 years from
the date the unit was originally shipped from dCS. If the product is purchased and registered with dCS
within 6 months of the date the unit was originally shipped from dCS, we will start the warranty on the
purchase date. For units registered later than 6 months from the ship date, we will start the warranty
from the ship date unless the registration is supported by the original sales invoice. During the
warranty period, dCS will repair or, at our absolute discretion, replace a faulty product. Warranty
repairs must only be carried out by dCS or our authorised service agents. Please contact your dealer if
your unit requires service.
To register this product, either register online at www.dcsltd.co.uk
H or complete the Product
Registration form within 30 days of the sale and return it to dCS. On receipt of the registration, dCS
will add your contact details to our customer database. dCS will use this information for warranty
purposes only, we will not contact you directly for reasons relating to sales and marketing.
This warranty applies to the original owner, it is not transferable.
Warranty Exclusions
The Warranty does not cover wear and tear.
The Warranty on this product will be void if:
• the product is misused in any way.
• any unauthorised modifications or repairs are carried out.
• the product is not used in accordance with the Operating Conditions stated in this manual.
• the product is serviced or repaired other than by dCS or our authorised service agents.
• the product is operated without a mains earth (or ground) connection.
• the unit is returned inadequately packed.
dCS reserve the right to apply a service charge if a product returned for warranty repair is found to be
operating correctly, or if a product is returned without a returns number being issued.
This warranty covers parts and labour only, it does not cover shipping charges or tax/duty.
Our dealers or distributors are NOT authorised to extend the terms of this warranty, dCS cannot accept
responsibility for any attempt to do so.
Products re-sold by dCS on a “used” basis may be subject to reduced warranty terms.
Obtaining Service
Should you encounter a problem, contact your authorised dCS dealer for advice, quoting the model,
the full serial number, software version number, and giving a detailed description of the fault. Your
dealer will advise you fully on actions that need to be taken. When returning a unit, the original
packaging should be used to avoid transit damage. Replacement packaging sets may be purchased
from dCS.
During the Warranty period, there will normally be no charge for parts or labour.
Operating Conditions
• The supply voltage must remain within +/-10% of the A.C. voltage specified on the back panel.
• The supply frequency must be in the range 49Hz to 62Hz.
• Ambient temperature range: 0°C (32°F) to 45°C (113°F), non-condensing.
• Do not install the unit near heat sources such as radiators, air ducts, power amplifiers or direct
strong sunlight.
• If in doubt, the easy test is – the unit is happy to work anywhere a human is.
Rossini Transport Manual v1_0x Page 29 English version
Page 30
dCS Rossini Transport User Manual Software Issue 1.0x
September 2018
If you need more help
In the first instance, you should contact your dealer. If they cannot resolve the issue, contact your
national distributor.
Manufactured by:
Data Conversion Systems Ltd.
Unit 1, Buckingway Business Park,
Anderson Road,
Swavesey,
Cambridgeshire. CB24 4AE
UK
Hwww.dcsltd.co.uk
This user manual may be downloaded free of charge from our web-site.
A bound copy of this manual may be ordered from dCS.
Software History
dCS products make extensive use of software configurable chips – FPGAs and DSPs. This gives us
the ability to update our products to add extra features, update digital interface standards or make
performance improvements by loading new software. Occasionally, a hardware upgrade may be
necessary also to increase the “capacity” of the electronics, add extra connectors or extra front panel
controls.
Please note that not all software updates produce an audible improvement. We recommend that you
keep your software up to date. Check the dCS web-site occasionally for news of the latest software
updates.
Update discs are available from our distributors. Before requesting an update disc,
please open the Info > Version menu page and check the Main version to verify that an
update is actually needed.
This manual is for Rossini Transport software version 1.0x.
Issue 1.00 The first issue.
Rossini Transport Manual v1_0x Page 30 English version
Page 31

dCS Rossini Transport User Manual Software Issue 1.0x
September 2018
INDEX
0
0/44.1 display .................. 11
A
acceptable disc types ........ 9
AES output ...................... 19
AES3 output .................... 11
B
basic operation ................ 14
burn in .............................. 26
C
cables .............................. 10
CD tray ............................. 17
channel check .................. 26
cleaning ........................... 28
condensation ..................... 6
configuration
restore .......................... 25
save .............................. 25
configuration menu .......... 25
contact ............................. 23
D
DAC master mode ........... 12
display .............................. 16
brightness .................... 26
off ................................. 26
display menu ................... 26
Dual AES output ........ 11, 19
F
fast forward button ........... 17
front panel ........................ 16
fuse, replacing ................. 28
G
generator menu ............... 26
I
information menu ............. 23
L
layer ................................. 24
lock .................................. 25
logo off ............................. 26
M
menu ................................ 21
close ............................. 18
configuration ................ 25
display .......................... 26
generator ...................... 26
information ................... 23
PCM enable ................. 15
settings ......................... 24
upsampling mode ........ 15
using ............................ 22
menu back button ............ 17
menu button ..................... 17
menu forward button ....... 17
O
operating conditions ........ 29
output
AES .............................. 19
AES3 ............................ 11
connecting .................... 11
Dual AES ............... 11, 19
SPDIF .................... 11, 19
P
PCM enable ..................... 24
phase check .................... 26
play/pause button ............ 17
playing a disc ................... 14
positioning ......................... 5
power button .................... 18
power off .......................... 18
power up .......................... 10
R
rear panel ........................ 19
remote control ........... 17, 19
reset ................................. 25
restore configuration ........ 25
rewind button ................... 17
Rossini app ...................... 15
RS232.................. 14, 20, 24
S
safety ............................. 6, 8
save configuration ........... 25
serial number ............. 20, 23
service ............................. 28
settings menu .................. 24
setup guide ...................... 10
sleep ................................ 18
software ..................... 23, 30
SPDIF output ............. 11, 19
specification ..................... 27
status ............................... 23
stop/eject button .............. 17
sync mode ....................... 12
sync to Master Clock ....... 13
U
update........................ 23, 30
upsampling mode ............ 24
V
version ............................. 23
voltage ............................. 20
W
wake ................................ 18
warranty ........................... 29
word clock input ............... 19
word clock output ............ 19
Rossini Transport Manual v1_0x Page 31 English version
 Loading...