

Page 1

THE OUTDOOR REFRIGERATED
DRAWER
Use and Care and Installation Guide
MODELS:
RF24-D
Page 2

Page 3

A MESSAGE TO OUR CUSTOMERS
Thank you for selecting this DCS Outdoor Refrigerated Drawer. Because of these appliances’ unique features we
have developed this Use and Care and Installation Guide. It contains valuable information on how to properly
install, operate and maintain your new appliance for years of safe and enjoyable operation.
To help serve you better, please fill out and submit your Product Registration by visiting our website at
www.dcsappliances.com and selecting “Customer Care” on the home page and then select “Product
Registration”. In addition, keep this guide handy, as it will help answer questions that may arise as you use your
new appliance.
For your convenience, product questions can be answered by a DCS Customer Care Representative at
1-888-936-7872, or email:
NOTE: Please write the Model, Code, and Serial Numbers on this page for references (the serial plate is located on
the upper left side, inner wall).
MODEL NUMBER CODE SERIAL NUMBER
customer.care@fisherpaykel.com
.
SERIAL PLATE LOCATION
NOTE: Inspect the product to verify that there is no shipping damage. If any damage is detected, call the shipper
and initiate a damage claim. DCS by Fisher & Paykel is not responsible for shipping damage.
DO NOT discard any packing material (box, pallet, straps) until the unit has been inspected.
PLEASE RETAIN THIS MANUAL FOR FUTURE REFERENCE.
1
Page 4

TABLE OF CONTENTS
SAFETY PRACTICES AND PRECAUTIONS 3
INSTALLATION - ESSENTIAL REQUIREMENTS 4
INSTALLATION
Electrical connection 5
How to install your outdoor refrigerated drawer 6
Anti-tip installation instructions 7
USING THE REFRIGERATED DRAWER
Startup 9
Set temperature 9
Set controls 9
Adjust temperature control 9
Interior light 9
Warning alarm 9
Door ajar alarm 9
High and low temperature 9
Power failure 10
Reset alarm 10
Holiday mode 10
Defrosting instructions 10
MOVING OR STORING YOUR REFRIGERATED DRAWER 11
CARE AND MAINTENANCE
Replace interior light bulb 12
Things to remember 12
Energy saving tips 12
How to clean and maintain your unit 13
TROUBLESHOOTING 14
SERVICE 15
WARRANTY 16-17
2
Page 5

SAFETY PRACTICES & PRECAUTIONS
To reduce the risk of fire, electric shock, or injury to persons read these SAFETY PRACTICES AND PRECAUTIONS
before installing or operating this appliance. Use this appliance only for its intended purpose as described in this
Use and Care and Installation Guide.
WARNING
When using this appliance always exercise basic safety precautions including the following:
DANGER!
■ This appliance is not intended for use by young children or infirm persons without supervision. Young children
should be supervised to ensure they do not play with the appliance.
■ Risk of child entrapment. Before you throw away your old refrigerated drawer:
1. Take off the doors.
2. Leave the shelves in place so that children may not easily climb inside.
ELECTRICAL
■ This appliance must be properly installed in accordance with the installation instruction before it is used.
■ Never unplug your refrigerated drawer by pulling on the power cord. Always grip the plug firmly and pull straight
out from the outlet.
■ Repair or replace immediately all electric service cords that have become frayed or otherwise damaged. Do not
use a cord that shows cracks or abrasion along its length or at either the plug or appliance end. If the power
supply cord is damaged, it must only be replaced by your Fisher & Paykel Appliances Authorized Service Center
because special purpose tools are required.
■ Unplug your refrigerated drawer before cleaning, or replacing the light bulb.
STORING FOOD AND DRINKS
■ Never store volatile or flammable materials in your refrigerated drawer as they may explode.
■ Never freeze liquids in glass containers. Liquid expands during freezing which may cause the container to explode.
■ Do not consume food if it is too cold. Food removed from the freezer compartment may be cold enough to cause
damage when brought into contact with bare skin, e.g. frozen ice cubes.
POWER FAILURE – FOOD SAFETY
■ Do not refreeze foods that have thawed completely. Follow the recommendations below if you discover food
that has thawed:
1. Ice crystals still visible – f
2. Thawed but refrigerator cold – r
refrozen but use as soon as possible.
Meat, fish, poultry – use immediately or cook, then refreeze.
Vegetables – discard as they usually go limp and soggy.
3. Thawed but warmer than 4ºC/40ºF – red meat can be cooked immediately to well done and refrozen but use as
soon as possible. Discard all other frozen foods.
■ Do not refreeze frozen foods that have thawed completely. The food may be dangerous to eat.
ood may be refrozen but should be stored for a shorter period than recommended.
efreezing generally not recommended. Fruits and some cooked food can be
CLEANING
■ Many commercially available cleaning products contain solvents which may attack plastic components of your
refrigerated drawer and cause them to crack. Please refer to the Care and Maintenance section of this booklet for
further advice (see pages 11-12).
DISPOSAL
■ Extreme care must be taken when disposing of your old appliance to avoid hazards. The refrigerant gas must be
safely removed.
■ Your Fisher & Paykel Appliances Authorized Service Center will be able to give advice on environmentally friendly
methods of disposing of your old refrigerated drawer.
3
Page 6
INSTALLATION – ESSENTIAL REQUIREMENTS
POWER
■ The appliance must be installed so the power plug is accessible.
■ To ensure that the appliance is not accidentally switched off, connect your refrigerated drawer to its
o
wn power point. Do not plug in any other appliance at this power point or use extension cords, or double
adapters, as the combined weight of both power cords can pull the double adapter from a wall outlet socket.
■ For power requirements, refer to the information on the serial plate located at the upper left side, inner wall
when the door is open.
■ It is essential that the appliance be properly grounded (earthed) with a three prong receptacle. Never cut or
eak off the grounding prong to fit a two-prong outlet.
br
SELECT LOCATION
■ The proper location will ensure peak performance of your appliance. Choose a location where the unit will be out
of direct sunlight, away from heat sources and moisture.
■ Units with fan cooled condensers can be built into an under counter cabinet or freestanding.
■ Your refrigerated drawer should be operated in a properly ventilated area with ambient temperatures not to
exceed below 40 degrees and above 100 degrees Fahrenheit.
■ Installation should be such that the unit can be moved for servicing if necessary.
CABINET CLEARANCE
■ Ventilation is required from the bottom front section of the unit. Keep this area open and
clear of any obstructions.
■ The adjacent cabinets and counter top can be built around the unit as long as no top trim
ounter top is installed lower than the top of the upper drawer.
or c
STABILITY
■ It is important that all four corners of the refrigerated drawer base are supported firmly on
a solid level surface to eliminate any cabinet movement.
■ Installing the appliance on a soft or uneven or unlevel floor may result in twisting of the cabinet and poor
sealing of the doors. If the doors do not seal properly, warm air will enter the food storage areas causing the
temperature to increase, resulting in food spoilage and food loss.
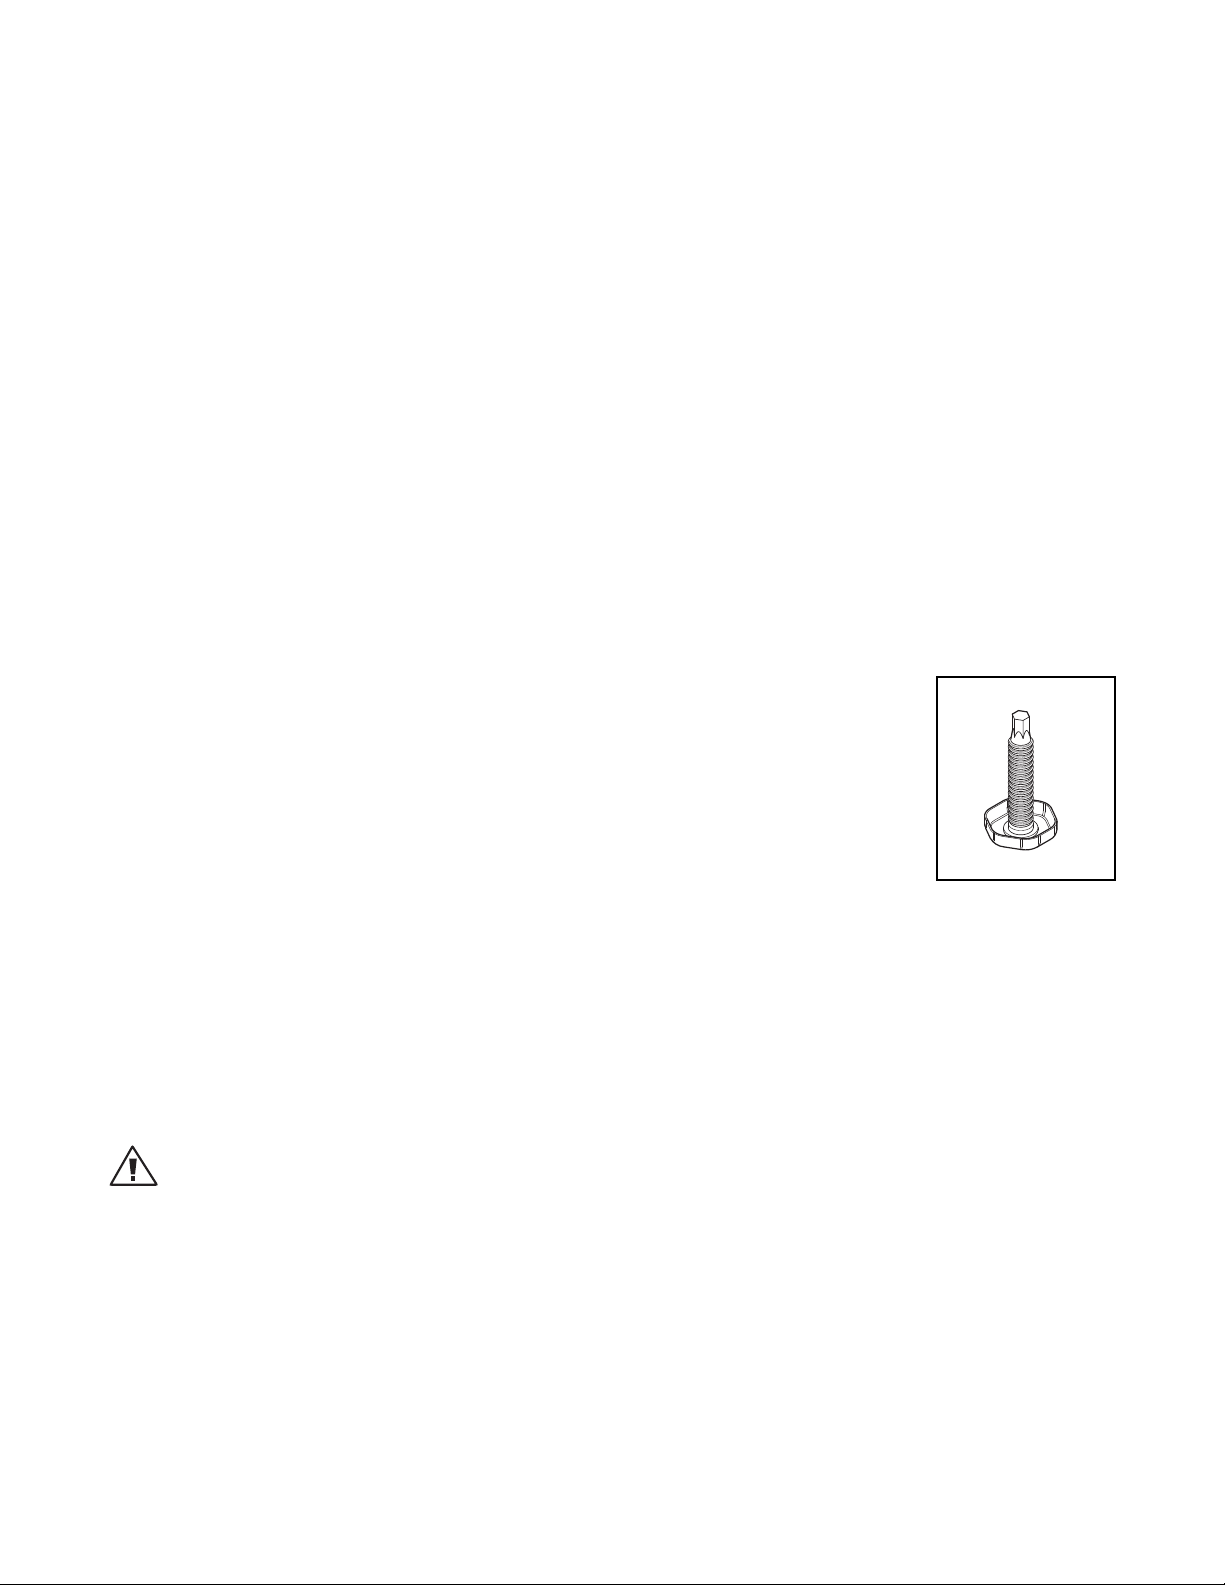
■ Position your refrigerated drawer. Turn front leveling legs clockwise (Fig. 01) to lower the front leveling leg. Raise
the front of the appliance until it is stable and level.
■ The front leveling legs should take the majority of the weight of the cabinet and the cabinet should be stable,
i.e. cabinet should not rock or wobble.
Fig. 01 Leveling Leg
WARNING
A free standing refrigerated drawer must have an anti-tip device installed for safety.
■ See anti- tip bracket installations (page 7 and 8).
BEFORE PLACING FOOD IN THE FRESH FOOD COMPARTMENTS
■ Remove all packaging. Ensure that all transit tape is removed from the refrigerated drawer.
■ Clean the inside of the appliance with warm water and a little liquid detergent to remove manufacturing and
transportation dust.
■ Allow the refrigerated drawer to run empty for 2 - 3 hours to allow each compartment to cool to the
appr
opriate temperature.
■ The appliance may have an odor on its initial operation, but this will go away when the refrigerated drawers have
ooled sufficiently.
c
4
Page 7

INSTALLATION
Grounding Type
Wall Receptacle
Power Supply Cord
with 3-Prong
Grounding
Plug
HOW TO INSTALL YOUR OUTDOOR REFRIGERATED DRAWER
ELECTRICAL CONNECTION:
Check serial plate for correct power supply. Use only electrical power supply as specified on your appliance
serial nameplate. Do not use an extension cord!
WARNING!
Do not splash or spray water from a hose onto the refrigerated drawer! Doing so may cause an electrical shock,
which may result in severe injury or death.
GROUNDING METHOD
This product is factory equipped with a power supply cord that has a three-pronged grounded plug. It must be
plugged into a mating grounding type receptacle in accordance with the National Electrical Code and applicable
local codes and ordinances. If the circuit does not have a grounding type receptacle, it is the responsibility and
obligation of the customer to exchange the existing receptacle in accordance with the National Electrical Code
and applicable local codes and ordinances. The third ground prong should not, under any circumstances, be cut
or removed. All UL listed refrigerated products are equipped with this type of plug.
A ground fault circuit interrupter (GFI) electrical receptacle is to be used to supply electrical power to the refrigerated drawer for outdoor applications. Contact an electrician if you need to install one to supply electrical
power to your outdoor refrigerated drawer.
POWER REQUIREMENTS:
24” Outdoor Refrigerated Drawer
■ 120V 60Hz
■ 1800 watt
■ 3 wire outlet
■ 15 amp circuit
AC Interface
Note:
The plug shown is for 120V units.
Fig. 02
Fig. 03
5
Page 8
INSTALLATION
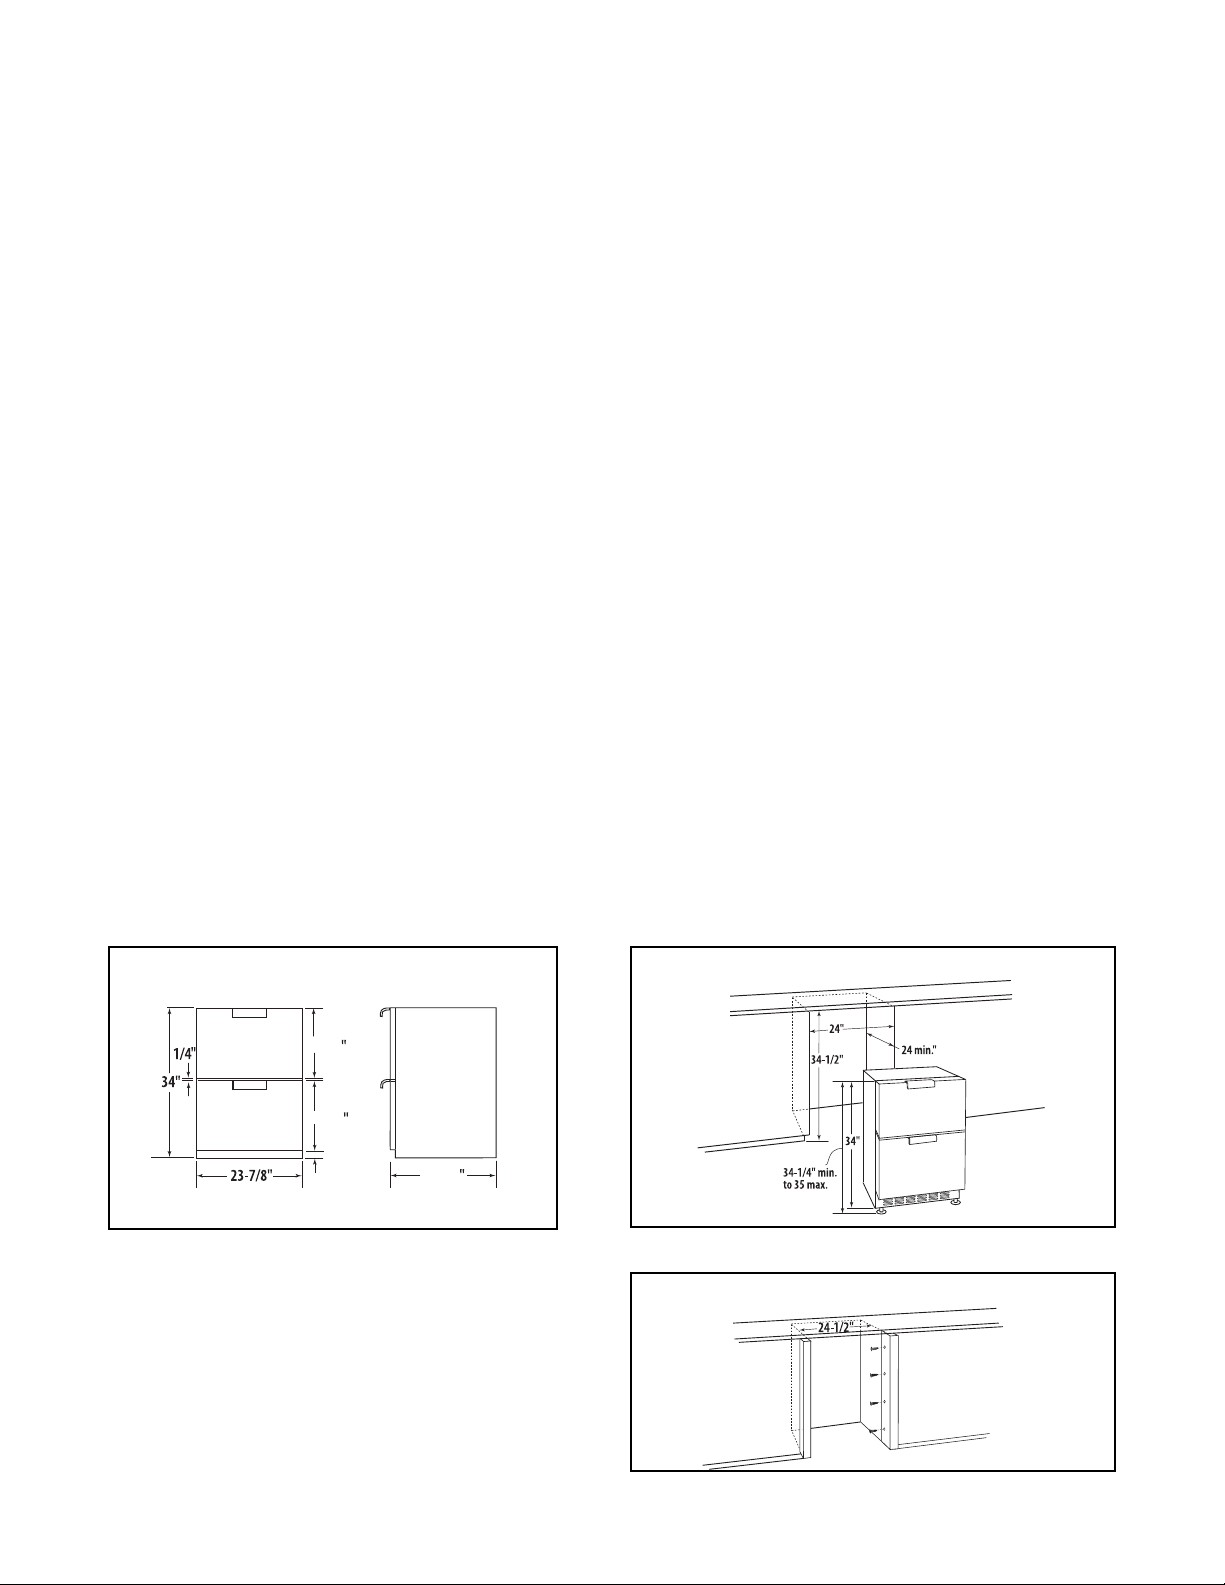
15-1/8
15-1/8
3-1/2”
24-1/8
HOW TO INSTALL YOUR OUTDOOR REFRIGERATED DRAWER
SELECT LOCATION:
The proper location will ensure peak performance of your appliance. Choose a location where the unit will be out
of direct sunlight, away from heat sources and moisture. Units with fan cooled condensers can be built in. Unit
should be operated in a properly ventilated area with ambient temperatures above 40 degrees and below 100
degrees Fahrenheit.
Installation should be such that the cabinet can be moved for servicing if necessary.
CABINET CLEARANCE
■ Ventilation is required from the bottom front section of the unit. Keep this area open and clear of any obstructions.
■ The adjacent cabinets and counter top can be built around the unit as long as no top trim or counter top is
installed lower than the top of the upper drawer. See Fig. 04a.
SIDE TRIM INSTALLATION:
Prior to installation, align trim with the refrigerated drawer height and mark the screw hole locations. Attach side
trim to the inner side of the cabinet so that the trim faces outward (away from the appliance’s door) and fasten
with appropriate screws suitable for the type of cabinet material (Fig. 05).
INSTALLING DRAWERS
■ Place the unit in front of the counter opening. Make sure that the floor is protected when sliding the drawer unit
into place.
■ Det
■ Lower the front and rear leveling legs (Fig. 04a) so the top of the drawer cabinet is 1/8” lower in the back of the
■ Make the electrical connection by plugging the unit into the power outlet and locating the power cord so it will
■ Slide the refrigerated drawer into cabinet location and adjust the front legs until the unit is level and there is the
ermine the minimum height of the counter top opening (Fig. 04a).
cabinet and 1/2” lower in the front of the cabinet than the counter top opening.
not be damaged when the refrigerated drawer is installed.
same amount of load on each leg.
24” Outdoor Refrigerated Drawers
DIMENSIONS
Fig. 04
ISLAND PREPARATION WITH NO SIDE TRIM
Fig. 04a
ISLAND PREPARATION WITH SIDE TRIM INSTALLATION
Mounting
screw not
provided
Fig. 05
6
Page 9
INSTALLATION
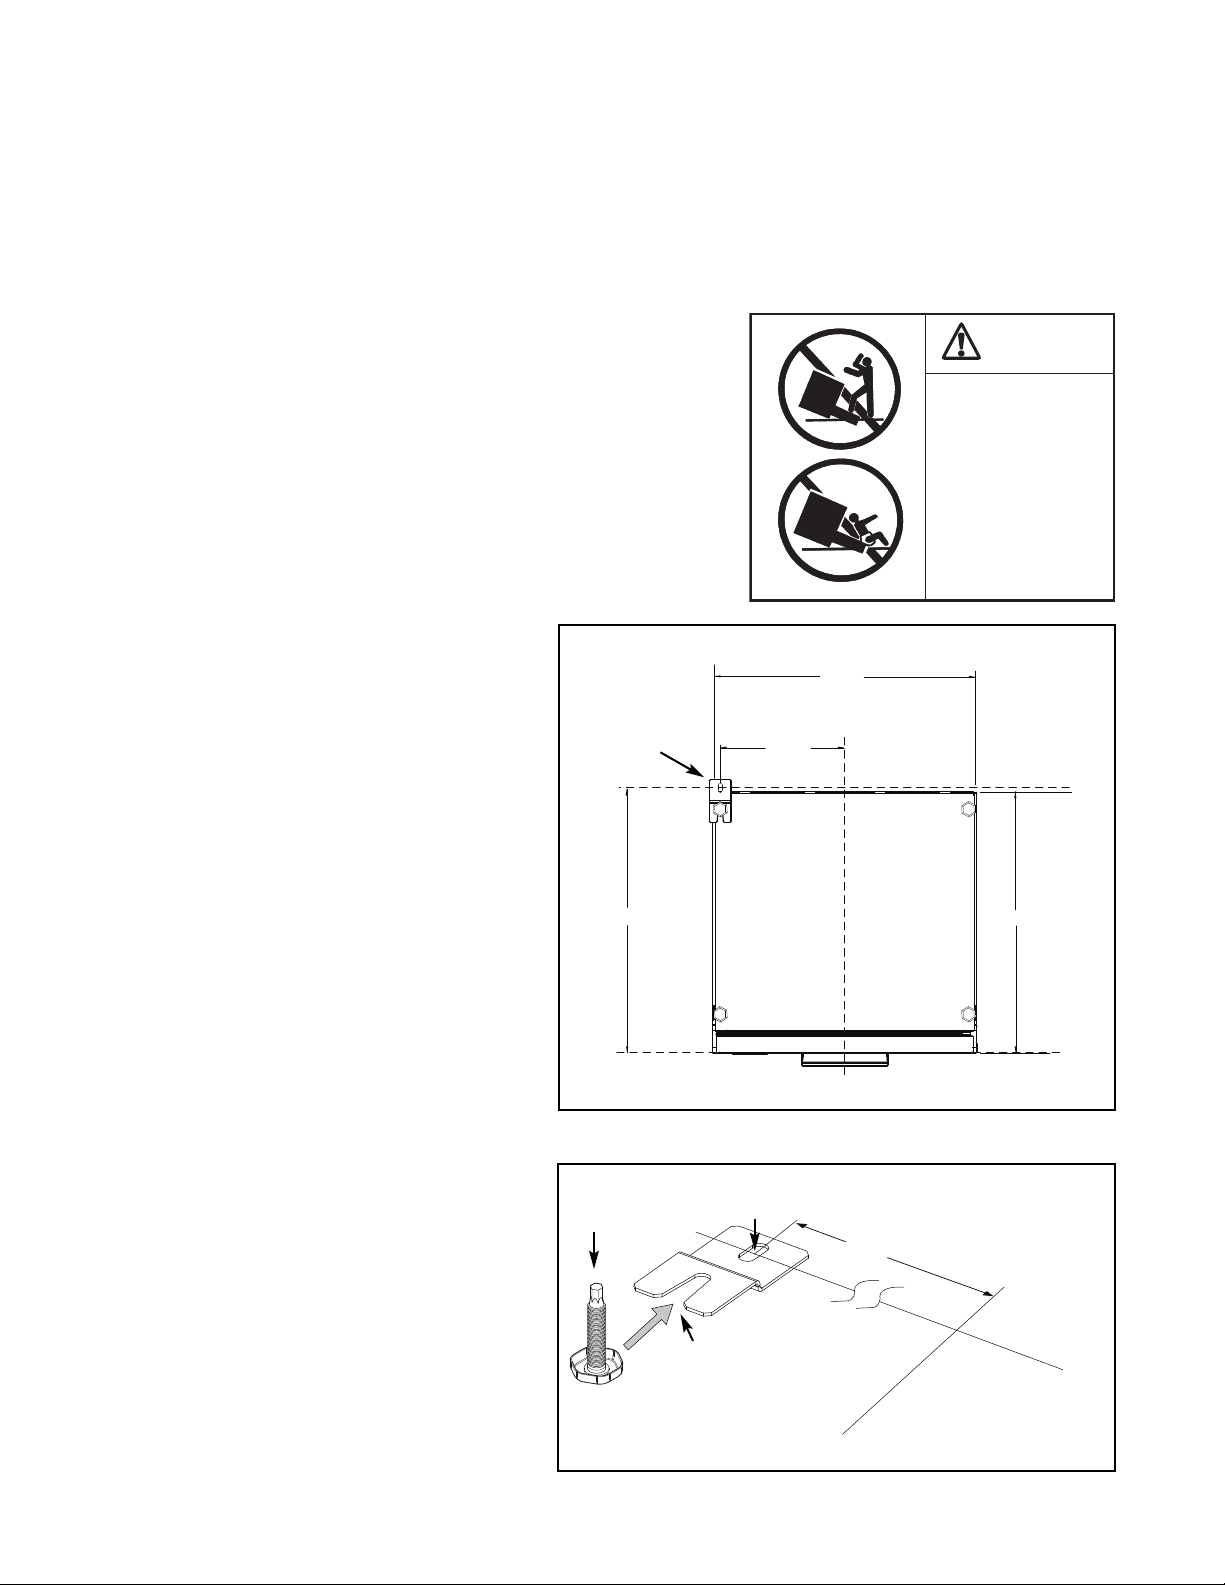
WARNING
• ALL DRAWERS CAN TIP
• INJURY COULD RESULT
• INSTALL ANTI-TIP
BRACKET PACKED
WITH UNIT
• SEE INSTRUCTIONS
11-1/2”
24-1/2”
23-7/8”
Center line
24”
11-1/2”
CENTER LINE
PERPENDICULAR LINE
ANTI-TIP INSTALLATION INSTRUCTIONS
A free standing refrigerated drawer must have an anti-tip device installed as per these instructions. If the drawer is
removed from its location for any reason, make sure that the device is properly engaged when you push the drawer
back into the original location. If device is not properly engaged, there is a risk of the drawer tipping over, causing
property or personal injury if you or a child stand, sit, or lean on an open drawer.
FLOOR MOUNT INSTALLATION
The anti-tip bracket can be located on the floor in the left or right
rear corner of the refrigerated drawer as shown in Figure 06.
Step by step instructions for locating the position of the
bracket:
1. Decide where you want to place the Drawer. Make a temporary
line on the floor in line with the drawer face, “A” as shown in
Figure 06.
2. At the center point where the drawer will be, draw a center line
“B” (Fig. 06) perpendicular to line “A” to the rear of the unit. Make
a mark on line “B “ 24-1/2 inches from line “A”.
3. Then make another perpendicular line “C”at
this mark. Make a mark on line “C” 11-1/2
inches from line “B” either right or left.
4. At this mark, drill 1/8” diameter pilot hole in
the floor.
5. Fasten the bracket to the floor thru the slotted
hole (see Fig. 07) using the appropriate
fasteners for the type of floor.
6. Position the unit so that the leveling leg
engages into the anti-tip bracket (Fig. 07).
7. Check for proper installation of the drawer and
anti-tip device by grasping the back of the
unit and carefully attempting to tilt the drawer
forward.
Anti-tip Bracket
A
Leveling Leg
BOTTOM VIEW OF DRAWER
C
Refrigerated
Drawer
B
Front
Fig. 06
Slotted hole for
floor installation
C
Open slot
B
Fig. 07
7
Page 10
INSTALLATION
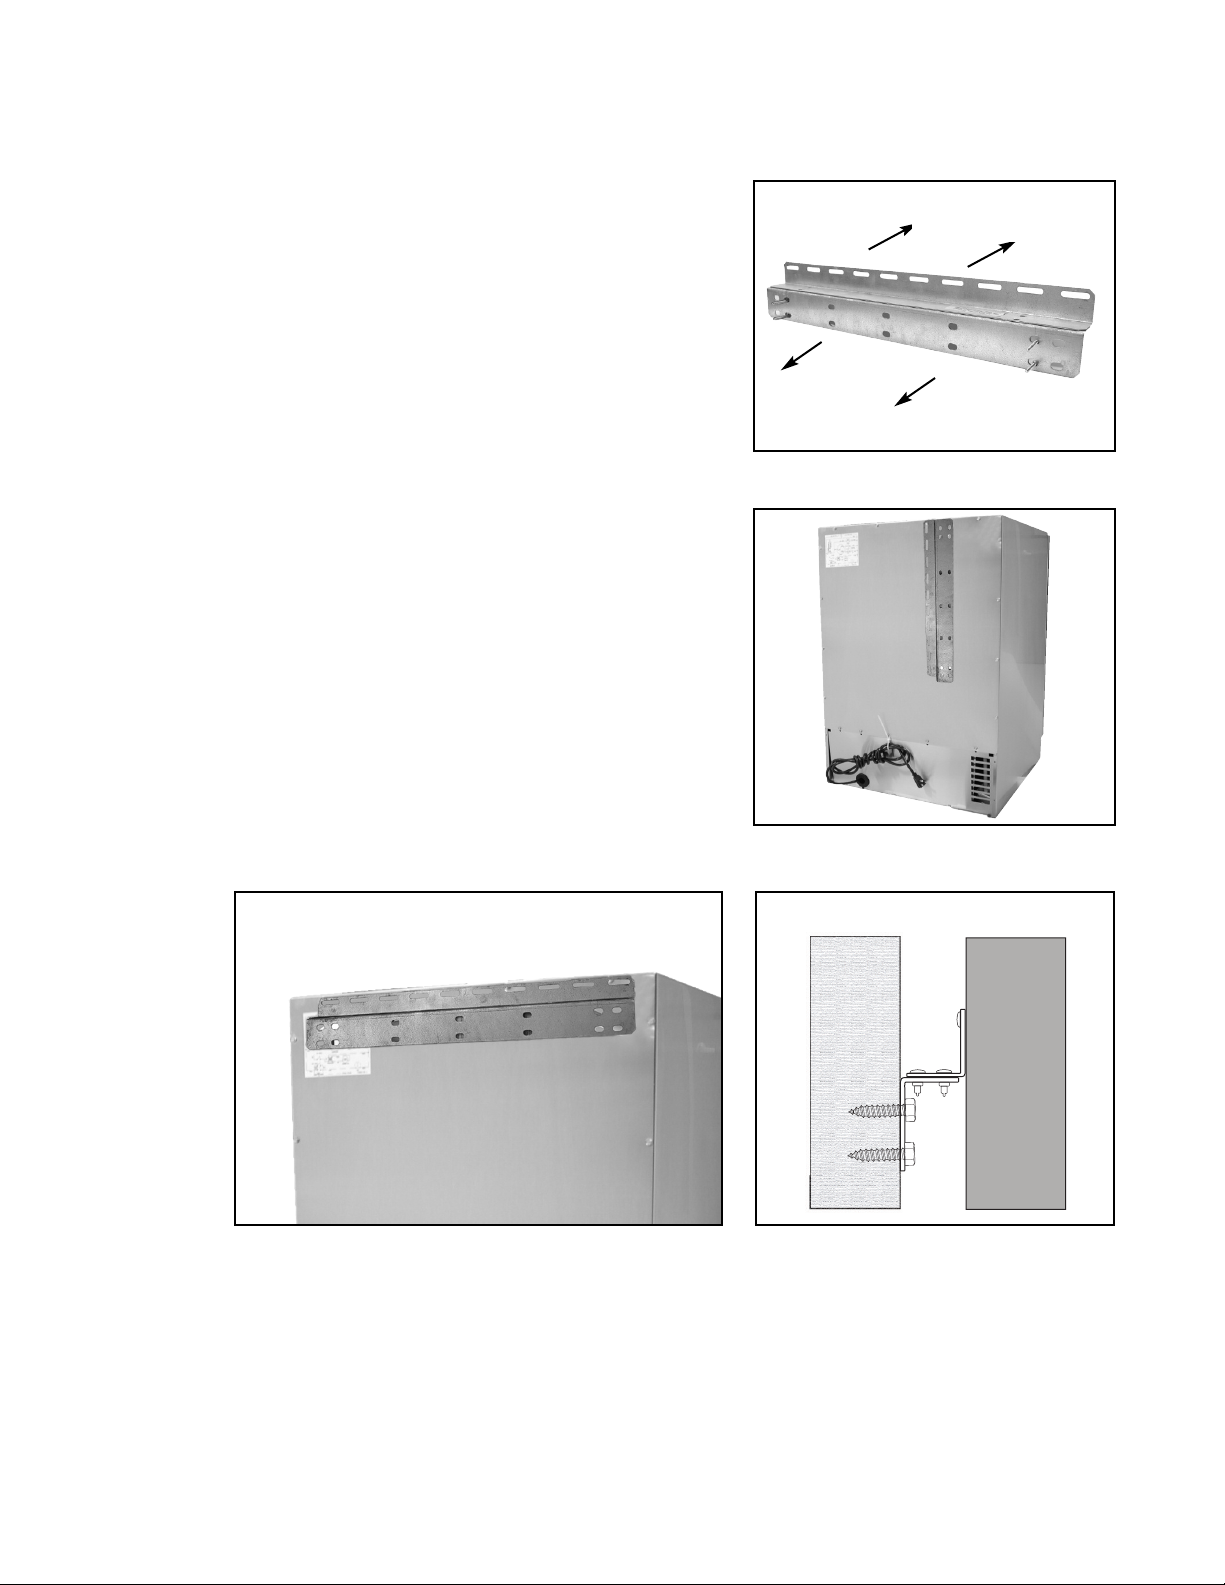
ANTI-TIP INSTALLATION INSTRUCTIONS
WALL MOUNT
1. Remove the bracket from its original shipping position on the
back of the unit (Fig. 08 and 09).
2. Reattach the bracket to the back of the unit using the existing
screws from the unit’s back panel (Fig 10).
3. Push the unit against the wall so the bracket is flush with the
wall adjacent to the back panel.
4. Using a pencil and the bracket as a template, trace the bracket
on the wall, making sure 2 of the screw holes are aligned with a
stud in the wall.
5. Pull the unit away from the wall.
6. Remove the screws that connect the upper and lower sections of the
Anti-Tip Bracket. Mount the lower section of the bracket that is not
attached to the unit to the wall where you had marked and drilled
pilot holes in the wall/wall stud for mounting. Attach the lower
bracket to wall.
7. Push the unit back against the wall and align the upper section with
the lower section of the Anti-Tip Bracket such that you can refasten
the original screws that secure the upper and lower sections of the
Anti-Tip Bracket (Fig. 11). Your installation is now complete.
To
Drawer Refrigerator
To Wall
Fig. 08
Fig. 10
Fig. 09
SIDE VIEW
ADJACENT WALL
DRAWER REFRIGERATOR
Fig. 11
8
Page 11

FAULT
Power Failure -
+/- Temp -
Alarms Off -
Press ON/OFF to Reset
ON
OFF
SET
WARMER
COOLER
F/C
PRESS and HOLD
USING THE REFRIGERATED DRAWER
START YOUR APPLIANCE
Your appliance will start upon initial plug-in. The LED will flash amber upon initial plug-in due to your unit
being powered-on at the factory to verify performance and then powered-off. The Fault System has sensors to
inform you that a power outage has occurred when you initially power-up your appliance. This is normal and
pressing the “ON/OFF” button will reset this alarm function.
If your appliance’s control has been shut-off, i.e., unit plugged in, interior lights operate, display blank, unit must
be turned on. To turn on your appliance, push and hold for 5 seconds the “ON/OFF” button located on the
display panel (see Fig. 12).
Once products are loaded, allow at least 24 hours for the unit to stabilize before making any adjustments to the
initial setting.
SET YOUR TEMPERATURE MODE
This product can display either Fahrenheit or Celsius. To do so, press the “ºF/C” button on the display panel.
SET THE CONTROLS
The available temperature range of the unit is from 33 to 47 degrees F. The temperature set point is initially set
in the factory at 38 degrees F. The temperature set point can be lowered or raised by first pushing the “SET”
button on the display pad. A “SET” icon will be displayed. Pushing either the “WARMER” or “COOLER” buttons
located on the display pad will raise or lower the set temperature by one degree F or C (depending on your
setting)(Fig. 12). As with any refrigeration product, there is a slight temperature variance at different locations
within the cabinet.
Fig. 12
ADJUSTABLE TEMPERATURE CONTROL
The temperature control is fully adjustable from 33 to 47 degrees F. The range allows flexibility of temperature
preferences and provides the ideal storing and serving temperatures.
INTERIOR LIGHT
The upper and lower interior lights make it easy to view your food and beverages. The light will always come on
when either drawer is opened in normal mode.
WARNING ALARMS
Your refrigerated drawers have been fitted with a “Fault” refrigeration monitor system . This will let you know if
your drawers are not functioning properly for optimum food and beverage storage.
DOOR AJAR ALARM
If the door has been left open for over 5 minutes, the alarm will sound and the LED will flash green. This will
stop as soon as the door is closed.
HIGH AND LOW TEMPERATURE
If your unit reaches temperatures outside normal operating temperatures for your set point for approximately
one hour, an alarm will sound and the LED will flash red. This will warn you that your contents have seen
temperatures that may not be conducive for long-term storage.
9
Page 12

USING THE REFRIGERATED DRAWER
POWER FAILURE
If your unit experiences a power failure, the LED will flash amber until the alarm is reset.
RESET ALARMS
Press the “ON/OFF” button for approximately one second. This will reset all audible and display alarms.
HOLIDAY MODE
Your refrigerated drawers are equipped with a Holiday Mode feature. By activating this mode, you will be
disabling all displays, audible alarms and lights. The system will be overridden with a random control. To
activate the Holiday Mode, press and hold the “SET” button while pressing the “ºF/C” button 7 times within 7
seconds. To disable the Holiday Mode, repeat the process. The Holiday Mode will deactivate after 36 hours.
DEFROSTING INSTRUCTIONS (IF NEEDED)
Never use a scraper or any tool that might scratch or pierce the cooling plate. Follow these steps whenever 1/4
inch or more of frost accumulates;
1. Disconnect the power cord and set the cold control knob to “OFF” position.
2. Remove contents.
3. Place pans of hot water on the shelf under cooling plate if you wish to speed up defrosting.
Note:
Place a clean cloth under the hot pan of water to protect the glass shelf from breaking.
4. Wipe out the interior and replace contents.
5. Connect power cord to outlet.
6. Set temperature control to desired level.
AUTOMATIC DEFROST
The models automatically defrost their cooling plate during each compressor off cycle. No manual
defrosting is required.
HELP PREVENT TRAGEDIES. . .
Each year children die because they climb inside a discarded refrigeration product, get trapped inside and
suffocate. Take precautions to prevent such tragedies by removing the door, taping or chaining it shut before
discarding.
10
Page 13

MOVING OR STORING YOUR REFRIGERATED DRAWER
If your refrigerated drawer is turned off for any reason, wait 10 minutes before turning it back on. This will allow
the refrigeration system pressures to equalize before restarting.
MOVING YOUR REFRIGERATED DRAWER
■ Turn off the appliance and unplug from the power point. Remove all food.
■ Retract the adjustable feet in as far as they will turn (see page 4, Stability).
■ Ease the refrigerated drawer out of its position. Tuck the power cord away and tape the drawers closed. Tape the
storage containers in place. If the cabinet needs to be placed at an angle or laid down, carefully lay it on its side
(the right hand side when viewed from the front).
■ Always transport in its upright position only.
■ Relocate and install. If the appliance has been left on its side for any length of time, leave it standing upright
for at least 12 hours before turning on.
STORING YOUR REFRIGERATED DRAWER
■ When storing your cleaned appliance, leave the drawers open. This allows air to circulate and prevents the
build up of bacteria and molds.
■ Before using again, clean well using a mixture of warm water and baking soda (add 1 teaspoon of baking soda
o each 1 pint [500 ml] of water). Rinse with clean water.
t
VACATION TIME
■ We recommend you leave your refrigerated drawer protected from all weather and operating while you are on
vacation. It will prevent mold and odors from building up.
CAUTION!
Never transport a refrigerated drawer on it back or side for any distance. This may damage the cooling components.
11
Page 14

CARE AND MAINTENANCE
LIGHT REPLACEMENT
For light replacement, contact DCS Customer Care at (888) 936-7872.
THINGS TO REMEMBER. . .
1. Allow 24 hours for your refrigerator to reach a new temperature setting.
2. The motor will start and stop often. It must do this to maintain the temperature you select.
3. Keep your refrigerator reasonably level.
4. Unplug the refrigerator before working on anything with the electrical system.
5. Exercise caution when sweeping, vacuuming, or mopping near the front of the unit. Damage to the grill and/or
the light fixture switch can occur.
6. For all cleaning of the refrigerator interior, mix 2 tablespoons baking soda with 1 quart warm water or use mild
soap. Do not use strong cleaners or scouring powder or pads.
7. Keep your refrigerator out of direct sunlight.
8. Do not splash or spray water on or under the refrigerator.
9. Clean your refrigerator’s condenser periodically to maintain proper cooling performance.
ENERGY SAVING TIPS
1. Reduce door openings.
2. Close the door as soon as you can.
3. Keep the coils on bottom of the refrigerator clean.
4. Adjust the temperature control to a warmer setting when practical.
5. Don’t put hot foods in the refrigerator.
6. Keep unit away from the stove or other heat sources.
12
Page 15

CARE AND MAINTENANCE
HOW TO CLEAN AND MAINTAIN YOUR UNIT
Condenser
The condenser coil under the cabinet for forced air units does require frequent cleaning. Satisfactory cooling
depends on adequate ventilation over the condenser coil. Be sure that nothing obstructs the air flow openings
in the lower front of the cabinet. At least once or twice a year brush or vacuum lint and dirt from the condenser
coil for efficient performance by unscrewing the grill on the bottom front of the cabinet.
Cabinet
The stainless steel cabinet can be washed with mild soap and water and thoroughly rinsed with clear water.
Never use abrasive scouring powders.
Interior
It is important to keep the interior of the refrigerated drawers
clean to help prevent food from becoming contaminated during
storage. The amount and types of food stored determines how
often cleaning should be carried out (ideally once every 1 or 2
weeks) in the refrigerator. Remove the drawer from the unit.
Begin by pulling out the drawer. Locate the drawer lock which
can be found on the outside of the cabinet slide (Fig. 13). Push
the back of the drawer lock forward and then down, releasing
the drawer from the cabinet slide
(Fig. 13). Repeat this on the opposite side of the drawer. Lift the
drawer up from the slides at 90ºto fully extricate the drawer
from the cabinet (Fig. 14). Wash interior compartment with mild
soap and water. Wipe over the interior surfaces with warm
water and detergent or baking soda dissolved in warm water
(add 1 teaspoon of baking soda to each 1 pint [500 ml] of
water). Do not use an abrasive powder, solvent, polish cleaner,
abrasive cloths, highly perfumed, strong smelling cleaners or
undiluted detergent on any part of the refrigerator. Rinse with
clean water. To help remove “old stale refrigerator” smells, add a
few drops of vanilla essence or vinegar to the water before
cleaning.
Reinstall the drawer by extending the inner slides out, carefully
aligning and engaging the ends of the drawer slides. Slide the
drawer inward until the drawer is secure. Close and open the
drawer to assure it is properly latched.
Drawer lock
Drawer lock
released
Fig. 13
Exterior – Stainless Exterior Door
It is important when cleaning the exterior door surface of your
refrigerated drawers, to only use liquid dishwashing detergent,
dissolved in warm water. Dry the door with a clean, lint-free
cloth. The use of any abrasive or stainless steel cleaners and solvents will damage the door surface.
Other Exterior Surfaces and Door Gasket
Clean all other exterior surfaces with warm water and detergent. If necessary, clean the magnetic door gasket
with an old toothbrush, warm water and detergent.
Fig. 14
Important Note:
Many commercially available cleaning products contain solvents that may attack the plastic components of your
refrigerator and cause them to crack. It is important to use only warm water and a small amount of liquid dishwashing
detergent on any plastic components inside and outside your refrigerator. Avoid using anti-bacterial cleaning products
on either the interior or exterior of the cabinet as they may cause rusting of metal components and cracking of plastic
components.
13
Page 16

TROUBLESHOOTING
PROBLEM POSSIBLE CAUSE/SOLUTIONS
Odor in cabinet Interior needs cleaning
Noisy operation
Cabinet vibrates
Cabinet light not working Call for service
Appliance will not run
Appliance runs too long
Moisture collects inside
Moisture collects on outside surface
Cabinet not level
Fan blade damaged/ call for service
Cabinet not level
Fan blade damaged/ call for service
Temperature control turned to “OFF”
Line cord not plugged in
No power at electrical outlet
House fuse blown
Prolonged door openings
Control set too cold
Condenser needs cleaning
Too many door openings
Prolonged door openings
Hot, humid weather increases condensation
Control improperly set
Hot, humid weather increases condensation. As humidity
decreases, moisture will disappear.
Control improperly set
Interior too hot/too cold
Fault System activated
Control improperly set
Faulty thermometer
Condenser needs cleaning
Air leaking into unit
See “Warning Alarms” on page 9
See “Fault ‘Basic’ Function Quick Reference” sheet
Temperature alarm may occur after user selected temperature
set-point changes in excess of 10ºF or during heavy usage
conditions. This is normal and not a fault of the appliance. The
Fault System is monitoring the duration of large swings in
temperature to protect your contents, and may alert you to this
event. See “Reset Alarms” section on page 10.
14
Page 17

SERVICE
HOW TO OBTAIN SERVICE:
For warranty service, please contact your local service provider or DCS Customer Care at (888) 936-7872. Before
you call, please have the following information ready:
■ Model Number (the serial plate is located on the upper left side, inner wall).
■ Serial Number (the serial plate is located on the upper left side, inner wall).
■ Code (the serial plate is located on the upper left side, inner wall).
■ Date of installation
■ A brief description of the problem
Your satisfaction is of the utmost importance to us. If a problem cannot be resolved to your satisfaction, please
write or email us at:
Write:
Fisher & Paykel Appliances, Inc.
Attention: DCS Customer Care
5900 Skylab Road
Huntington Beach, CA 92647
customer.care@fisherpaykel.com
Email:
BEFORE YOU CALL FOR SERVICE:
Check troubleshooting on page 14.
15
Page 18

WARRANTY
LIMITED WARRANTY
When you purchase any new DCS Refrigeration Product, you automatically receive a One Year Limited Warranty
covering parts and labor for servicing within the 48 mainland United States, Hawaii, Washington, D.C. and
Canada. In Alaska the Limited Warranty is the same except that you must pay to ship the Product to the service
shop or for the service technician’s travel to your home. Products for use in Canada must be purchased through
the authorized Canadian distribution channel to ensure regulatory compliance.
You receive an additional Four Year Limited Warranty (for a total of Five Years) covering parts for the sealed
refrigeration system (compressor, evaporator, condenser, filter dryer, and connecting tubing) within the 48
mainland United States, Hawaii, Washington, D.C. and Canada. In Alaska, the Limited Warranty for the sealed
refrigeration system is the same except that you must pay to ship the Product to the service shop or the service
technician’s travel to your home.
FISHER &PAYKEL UNDERTAKES TO:
Repair without cost to the owner either for material or labor any part of the Product, the serial number of which
appears on the Product, which is found to be defective. In Alaska, you must pay to ship the Product to the
service shop or for the service technician’s travel to your home.
If we are unable to repair a defective part of the Product after a reasonable number of attempts, at our option
we may replace the part or the Product, or we may provide you a full refund of the purchase price of the Product
(not including installation or other charges).
This warranty extends to the original purchaser and any succeeding owner of the Product for products
purchased for ordinary single-family home use.
All service under this Limited Warranty shall be provided by Fisher & Paykel Appliances Inc. or its Authorized DCS
Service Agent during normal business hours.
LIMITED WARRANTY
How Long Does this Limited Warranty Last?
Our liability under this Limited Warranty expires One Year from the date of purchase of the Product by the first
consumer.
Our liability for repair of defects in any sealed refrigeration system (compressor, evaporator, condenser, filter
dryer, and connecting tubing) extends an additional Four Years, for a total of Five Years from the date of
purchase of the Product by the first consumer.
Our liability under any implied warranties, including the implied warranty of merchantability (an unwritten
warranty that the Product is fit for ordinary use) also expires One Year (or such longer period as required by
applicable law) from the date of purchase of the Product by the first consumer. Some states do not allow
limitations on how long an implied warranty lasts, so this limit on implied warranties may not apply to you.
THIS WARRANTY DOES NOT COVER
A. Service calls that are not related to any defect in the Product. The cost of a service call will be charged if the
problem is not found to be a defect of the Product. For example:
1. Correct faulty installation of the Product.
2. Instruct you how to use the Product.
3. Replace house fuses, reset circuit breakers, correct house wiring or plumbing, or replace light bulbs.
4. Correct fault(s) caused by the user.
5. Change the set-up of the Product.
6. Unauthorized modifications of the Product.
16
Page 19

WARRANTY
7. Noise and vibration that is considered normal e.g. drain sounds, regeneration noises and user warning beeps.
8. Correcting damage caused by pests e.g. rats, cockroaches etc.
9. Used in commercial applications.
B. Defects caused by factors other than:
1. Normal domestic use or
2. Use in accordance with the Product’s Use and Care Guide.
C. Defects to the Product caused by accident, neglect, misuses, fire, flood or Act of God.
D. The cost of repairs carried out by non-authorized repairers or the cost of correcting such unauthorized repairs.
E. Travel Fees and associated charges incurred when the product is installed in a location with limited or restricted
access.(i.e. airplane flights, ferry charges, isolated geographic areas).
F. Normal recommended maintenance as set forth in the Product’s Use and Care Guide.
If you have an installation problem contact your dealer or installer. You are responsible for providing adequate
electrical, exhausting and other connection facilities.
We are not responsible for consequential or incidental damages (the cost of repairing or replacing other
property damaged if the Product is defective or any of your expenses caused if the Product is defective). Some
states do not allow the exclusion or limitation of incidental or consequential damages, so the above limitation or
exclusion may not apply to you.
HOW TO GET SERVICE
Please read this Use and Care Guide. If you then have any questions about operating the Product, need the name
of your local DCS Authorized Service Agent, or believe the Product is defective and wish service under this
Limited Warranty, please contact your dealer or call us at:
TOLL FREE 1-888-936-7872 or contact us through our web site: www.dcsappliances.com
You may be required to provide reasonable proof of the date of purchase of the Product before the Product will
be serviced under this Limited Warranty.
COMMERCIAL USE
This warranty applies to appliances used in residential applications; it does not cover their use in commercial
situations.
NO OTHER WARRANTIES
This Limited Warranty is the complete and exclusive agreement between you and Fisher & Paykel Appliances Inc.
regarding any defect in the Product. None of our employees (or our Authorized Service Agents) are authorized to
make any addition or modification to this Limited Warranty.
Warrantor: Fisher & Paykel Appliances, Inc.
If you need further help concerning this Limited Warranty, please call us at the above number, or write to:
Fisher & Paykel Appliances, Inc.
5900 Skylab Road, Huntington Beach, CA 92647
This Limited Warranty gives you specific legal rights, and you may also have other rights which vary from state to
state.
Fisher & Paykel Appliances Inc. is a leading manufacturer of premium quality cooking and specialty appliances
under the Fisher & Paykel and DCS brands.
17
Page 20

NOTES
18
Page 21

LE TIROIR FRIGORIFIQUE
D'EXTÉRIEUR
Manuel d'utilisation, d'entretien et d'installation
MODÈLES :
RF24-D
19
Page 22

À L'INTENTION DE NOS CLIENTS
Merci d'avoir sélectionné ce Tiroir frigorifique d'extérieur DCS. Nous avons conçu ce Manuel d'utilisation et d'entretien
pour expliquer les fonctions uniques de ces appareils. Ce manuel contient des informations extrêmement utiles sur la
façon correcte de les installer, les faire fonctionner et en faire l'entretien. Vous pourrez ainsi en profiter pendant des
années en toute sécurité.
Aidez-nous à mieux vous servir en remplissant l'enregistrement
Web à www.dcsappliances.com. Sélectionnez « Customer Care » sur la page d'accueil puis « Product Registration ». De
plus, gardez ce manuel à portée de main afin de rapidement trouver réponse à vos questions durant l'utilisation de
votre nouvel appareil.
Si vous avez des questions au sujet de notre produit, communiquez avec un représentant du centre de service à la
clientèle DCS par téléphone :1-888-936-7872, ou par courriel :
REMARQUE : Veuillez noter les numéros de modèle, code, et de série sur cette page pour information (la plaque du
numéro de série se trouve sur la paroi interne supérieure gauche).
NUMÉRO DE MODÈLE CODE NUMÉRO DE SÉRIE
de produit
customer.care@fisherpaykel.com
et en nous le soumettant depuis notre site
.
Emplacement de la plaque de
numéro de série
REMARQUE : Inspecter le produit pour vérifier qu’il n’a pas été endommagé pendant l’expédition. En cas de
dommages, contacter le transporteur et entamer une déclaration pour dommage. DCS by Fisher & Paykel n’est en
aucun cas responsable des dommages pendant l’expédition.
Ne pas jeter le mat
ériau d’emballage (boîte, palette, sangles) avant d’avoir inspecté l’unité.
VEUILLEZ CONSERVER CE MANUEL À TITRE DE RÉFÉRENCE.
1
Page 23

TABLE DES MATIÈRES
MESURES DE SÉCURITÉ ET DE PRÉCAUTION 3
INSTALLATION - CONFIGURATION ESSENTIELLE 4
INSTALLATION
Connexion électrique 5
Installation du tiroir frigorifique d'extérieur 6
Instructions d'installation antibasculement 7-8
UTILISATION DU TIROIR FRIGORIFIQUE
Mise en marche de l'appareil 9
Réglage du mode Température 9
Réglage des commandes 9
Commande de température réglable 9
Éclairage intérieur 9
Alarmes d'avertissement 9
Alarme de porte entrebâillée 9
Températures haute et basse 9
Panne de courant 9
Réinitialisation des alarmes 10
Mode vacances 10
Instructions relatives au dégivrage (le cas échéant) 10
DÉPLACEMENT OU REMISAGE DU TIROIR FRIGORIFIQUE 11
ENTRETIEN ET MAINTENANCE
Remplacement des ampoules 12
À ne pas oublier. . .12
Conseils d’économie d'énergie 12
Nettoyage et maintenance de l’appareil 13
DÉPANNAGE 14
SERVICE 15
GARANTIE 16-17
2
Page 24

MESURES DE SÉCURITÉ ET DE PRÉCAUTION
Afin de réduire le risque d'incendie, de choc électrique ou de blessures, lisez les IMPORTANTES CONSIGNES DE SÉCURITÉ
avant de faire fonctionner l'appareil. Employez cet appareil uniquement selon l'usage prévu tel que décrit dans ce Guide
de l'utilisateur.
AVERTISSEMENT
Durant l'utilisation de cet appareil, respectez toujours les consignes de sécurité élémentaires y compris ce qui suit :
DANGER!
■ Cet appareil n'est pas prévu pour être utilisé par de jeunes enfants ou des personnes handicapées sans supervision.
Surveiller les jeunes enfants pour s'assurer qu'ils ne jouent pas avec l'appareil.
■ Les enfants peuvent rester pris. Avant de jeter votre ancien tiroir frigorifique :
1. Enlev
2. Laisser les étagères en place pour empêcher les enfants de se loger à l'intérieur.
CARACTÉRISTIQUES ÉLECTRIQUES
■ Cet appareil doit être correctement installé avant toute utilisation conformément aux instructions d'installation.
■ Ne débranchez jamais votre tiroir frigorifique en tirant sur le cordon d'alimentation.
■ Saisissez fermement la fiche et tirez dessus pour la sortir de la prise électrique.
■ Réparez ou remplacez immédiatement tout cordon électrique effiloché ou endommagé de quelque façon. N'utilisez pas
de c
sur l'appareil. Si le cordon d'alimentation est endommagé, il doit être remplacé par un centre de service autorisé
d'appareils électroménagers Fisher & Paykel uniquement car cela nécessite des outils spéciaux.
■ Débranchez votre tiroir frigorifique avant de nettoyer ou de remplacer l'ampoule.
ez les portes.
ordon présentant des fissures ou des éraflures sur sa longueur ou au niveau de la fiche ou de l'extrémité branchée
ENTREPOSAGE
■ N'entreposez jamais de matières volatiles ou inflammables dans votre tiroir frigorifique car elles pourraient exploser.
■ Ne jamais congeler de liquides dans des conteneurs en verre. Le liquide qui s'expanse pendant la congélation risque de
e exploser le conteneur.
fair
■ Ne pas consommer d'aliments trop froids. Les aliments retirés du congélateur risquent d'être suffisamment froids pour
provoquer des dommages dès leur c
ontact avec la peau nue, par ex. des glaçons.
PANNE DE COURANT – SÉCURITÉ ALIMENTAIRE
■ Ne pas recongeler des aliments qui ont été complètement décongelés. Si des aliments ont été décongelés, suivre les
recommandations ci-dessous :
1. Cristaux de glace encore visibles – les aliments peuvent être recongelés mais doiv
longtemps qu'il ne l'est recommandé.
2. Décongelés mais froids du réfrigérateur – il est génér
aliments cuits peuvent être recongelés mais utilisés le plus rapidement possible.
Viande, poisson, volaille – utiliser immédia
Légumes – jeter car ils deviennen
3. Décongelés mais d'une température supérieure à 4 ºC/40 ºF – la viande r
recongelée pour être utilisée dès que possible. Jeter tous les autres aliments congelés.
■ Ne pas recongeler des aliments congelés qui ont été complètement décongelés. Il peut être dangereux de consommer
es aliments.
c
t généralement mous et ramollis.
tement ou faire cuire, puis recongeler.
alement déconseillé de recongeler. Les fruits et certains
ouge peut être cuite immédiatement et
ent être conservés pendant moins
NETTOYAGE
■ De nombreux produits de nettoyage vendus dans le commerce contiennent des solvants pouvant attaquer les
composants en plastique présents dans le tiroir frigorifique ou le congélateur et provoquer des fissures. Reportez-vous à
la section de nettoyage de ce guide pour davantage de conseils (voir page 12-13).
MISE AU REBUT
■ Faire preuve d'extrême prudence lors de la mise au rebut d'un appareil ménager ancien et ce, pour éviter tout risque. Le
gaz réfrigérant doit être évacué en toute sécurité.
■ Le centre de service agréé Fisher & Paykel Appliances peut donner ces conseils sur les méthodes respectueuses de l'envi-
onnement de mettre un ancien tiroir frigorifique au rebut.
r
3
Page 25

INSTALLATION – CONFIGURATION ESSENTIELLE
ALIMENTATION
■ L'appareil doit être installé de manière à ce que la fiche secteur soit accessible.
■ Pour s'assur
point d'alimentation. Ne pas brancher d'autre appareil à ce point d'alimentation ni utiliser de rallonges ou d'adaptateurs doubles étant donné que le poids combiné des deux cordons d'alimentation peut tirer l'adaptateur double
d'une prise de courant murale.
■ Pour connaître la configuration électrique, consulter l'information figurant sur la plaque d'identification de numéro de
sér
ie située sur le côté droit inférieur avant du tiroir frigorifique lorsque la porte est ouverte.
■ Il est essentiel mettre correctement l'appareil à la terre à l'aide d'une prise triphasée. Ne jamais couper ou casser la
oche de masse pour accommoder une prise de courant à deux trous.
br
SÉLECTION DE L'EMPLACEMENT
■ Le bon emplacement garantira une performance de pointe de l'appareil. Sélectionner un emplacement où l'unité sera
hors de la lumière directe du soleil, à l'écart de toute source de chaleur et d'humidité.
■ Les unités munies de condensateurs refroidis par ventilateur peuvent être encastrées dans un élément ou autopor-
tes.
tan
■ Le tir
ni moins 40 degrés ni 100 degrés Fahrenheit.
■ L'installation doit permettre de pouvoir déplacer l'unité pour toute réparation le cas échéant.
DÉGAGEMENT DE L'ÉLÉMENT
■ Une ventilation est requise à partir de la section inférieure avant de l'unité. Conserver cette
zone ouverte et exempte de toute obstruction.
■ Les éléments adjacents et le plan de travail peuvent être aménagés autour de l'unité à
condition de ne pas installer de baguette supérieur
du tiroir supérieur.
STABILITÉ
■ Il est important de supporter les quatre coins de la base du tiroir frigorifique fermement sur une surface solide et
nivelée et ce, pour éliminer tout mouvement de l'élément.
■ Installer l'appar
étanchéité des portes. Si les portes ne sont pas correctement hermétiques, de l'air chaud pénètrera dans les zones de
conservation des aliments entraînant ainsi une hausse de la température provoquant une altération et une perte des
aliments.
■ Positionner le tiroir frigorifique
pour abaisser le pied réglable avant. Soulever le devant de l'appareil jusqu'à ce qu'il soit stable et de niveau.
■ Le pied réglable avant sur le côté charnières doit recevoir la majorité du poids de l'élément et l'élément doit être
stable, en d'autres t
er de ne pas mettre l'appareil hors tension par inadvertance, connecter le tiroir frigorifique à son propre
oir frigorifique doit fonctionner dans un endroit correctement ventilé avec une température ambiante n'excédant
e ou de plan de travail en dessous du haut
Fig. 01 Pied Réglable
eil sur un sol mou, irrégulier ou non nivelé risque d'entraîner une torsion de l'élément et une mauvaise
. Faire tourner les pieds réglables avant dans le sens des aiguilles d'une montre (Fig. 01)
ermes l'élément ne doit ni se balancer ni osciller.
AVERTISSEMENT
Un tiroir frigorifique autoportant doit être muni d'un dispositif antibasculement par mesure de sécurité.
■ Voir installations du support antibasculement (pages 7 et 8).
AVANT DE METTRE DES ALIMENTS DANS LES COMPARTIMENTS
D'ALIMENTS FRAIS
■ Retirer tout l'emballage. Veiller à retirer tout le ruban autocollant de transport du réfrigérateur.
■ Nettoyer l'intérieur de l'appareil à l'eau chaude et avec un peu de détergent liquide pour éliminer toute la poussière de
ication et de transport.
fabr
■ Laisser le réfrigérateur/la tireuse de bière fonctionner pendant 2 ou 3 heures pour permettre à chaque compartiment
efroidir à la température appropriée.
de se r
■ L'appareil peut a
tireuse de bière se seront suffisamment refroidis.
voir une odeur lors de son fonctionnement initial mais celle-ci se dissipera lorsque le réfrigérateur/la
4
Page 26

INSTALLATION
188 cm (74 po.) corde
14 cm
(5-1/2 po.)
3,8 cm
(1-1/2 po.)
Prise murale
mise à la terre
Cordon d'alimentation
avec fiche
bipolaire avec
terre
INSTALLATION DU TIROIR FRIGORIFIQUE D'EXTÉRIEUR
CONNEXION ÉLECTRIQUE :
Voir la plaque signalétique pour le bon type d'alimentation. L'alimentation utilisée doit impérativement être conforme
aux spécifications de la plaque signalétique de l'appareil. N'utilisez pas de rallonge!
AVERTISSEMENT!
Évitez d'asperger ou d'arroser le tiroir frigorifique avec de l'eau au moyen d'un tuyau! Cela pourrait causer un choc
électrique qui pourrait entraîner des blessures graves ou la mort.
MÉTHODE DE MISE À LA TERRE
Cet appareil est équipé d'un cordon d'alimentation à fiche bipolaire avec terre. La fiche doit être branchée dans une
prise avec mise à la terre correspondante conformément au Code national de l'électricité et aux codes et réglementations en vigueur. Si le circuit ne possède pas ce genre de prise, le client a la responsabilité et le devoir de faire
remplacer la prise existante conformément au Code national de l'électricité et aux codes et réglementations en
vigueur. La troisième broche de terre ne doit en aucun cas être coupée ou enlevée. Tous les produits de réfrigération
homologués UL sont équipés de ce genre de prise.
Une prise électrique à disjoncteur de fuite à la terre permet (GFI) de fournir du courant électrique au tiroir frigorifique
pour une utilisation extérieure. Contactez un électricien si vous avez besoin d'en installer une pour alimenter votre
tiroir frigorifique extérieur.
BESOINS EN ALIMENTATION :
■
120 V 60 Hz
■
1800 watts
■
3 fils
■
Circuit de 15 A
Interface c.a.
Fig. 02
Remarque :
La prise indiquée est prévue pour
les appareils de 120 V.
Fig. 03
5
Page 27

INSTALLATION
38,4 cm
(15-1/8 po)
8,9 cm
(3-1/2 po)
61,3 cm
(24-1/8 po)
38,4 cm
(15-1/8 po)
60,6 cm
(23-7/8 po)
86,4 cm
(34 po)
6,3 mm
(1/4 po)
61 cm min.
(24 po min.)
61 cm
(24 po)
87 cm min. à
89 cm max.
(34-1/4 po min.
to 35 po max.)
86,4 cm
(34 po)
87,6 cm
(34-1/2 po)
62,2 cm
(24-1/2 po)
INSTALLATION DU TIROIR FRIGORIFIQUE D'EXTÉRIEUR
SÉLECTIONNEZ L'EMPLACEMENT :
Un bon emplacement assurera une performance optimale de l'appareil. Choisissez un endroit où l'appareil sera à l'abri
de la lumière directe du soleil, de sources de chaleur et de l'humidité. Les appareils dotés de condensateurs ventilés
peuvent être encastrés. L'appareil doit fonctionner dans un lieu correctement aéré où la température ambiante est
supérieure à 4 °C (40 °F) et inférieure à 38 °C (100 °F).
Effectuez l'installation de telle sorte que l'armoire puisse être déplacée facilement en cas d'entretien.
DÉGAGEMENT DE L'ÉLÉMENT
■ La section avant inférieure de l'appareil a besoin d'être ventilée. Gardez cette zone ouverte et libre de toute
obstruction.
■ Les éléments adjacents et le plan de travail peuvent être aménagés autour de l'unité à condition de ne pas installer de
baguett
INSTALLATION DE LA BAGUETTE LATÉRALE :
Avant l'installation, aligner la baguette avec la hauteur du tiroir frigorifique et marquer les emplacements des trous de
vis. Fixer la baguette latérale sur l'intérieur de l'élément de manière à ce que celle-ci soit dirigée vers l'extérieur (dans
le sens opposé de la porte de l'appareil) et fixer avec les vis appropriées convenant au type de matériau de l'élément.
INSTALLATION DES TIROIRS
■ Placer l'unité devant l'ouverture du comptoir. Veiller à protéger le sol avant de faire glisser l'unité de tiroir en place.
■ Déterminer la hauteur minimum de l'ouverture du plan de travail (Fig. 04a).
■ Abaisser les pieds réglables avant et arrière (Fig. 04a) de manière à ce que le haut de l'élément du tiroir se trouve à
1/8” de moins sur le dos de l'élément et à 1/2”
■ Effectuer le branchement électrique en branchant l'unité dans une prise de courant et en plaçant le cordon d'alimentation de manière à ne pas l'
■ Faire glisser le tiroir frigorifique dans l'élément et régler les pieds avant jusqu'à ce que l'unité soit de niveau et qu'il y
ait la même quan
e supérieure ou de plan de travail en dessous du haut du tiroir supérieur. Voir Fig. 04a.
de moins sur le devant de l'élément que l'ouverture du plan de travail.
endommager lors de l'installation du tiroir frigorifique.
tité de charge sur chaque pied.
Dimensions
Fig. 04
Préparation de l'îlot sans la baguette latérale
Fig. 04a
Préparation de l'îlot avec Installation de la baguette latérale
Vis de
fixation non
fournies
Fig. 05
6
Page 28

INSTALLATION
WARNING
• ALL DRAWERS CAN TIP
• INJURY COULD RESULT
• INSTALL ANTI-TIP
BRACKET PACKED
WITH UNIT
• SEE INSTRUCTIONS
29,2 cm
(11-1/2 po)
62,2 cm
(24-1/2 po)
60,6 cm
(23-7/8 po)
trait central
61 cm (24 po)
29,2 cm (11-1/2 po)
Trait central
Trait perpendiculaire
INSTRUCTIONS D'INSTALLATION ANTIBASCULEMENT
Un tiroir frigorifique autoportant doit être muni d'un dispositif antibasculement installé conformément à ces
instructions. Si le tiroir est retiré de son emplacement pour une raison quelconque, s'assurer de bien enclencher le
dispositif avant de repousser le tiroir dans son emplacement d'origine. Si le dispositif n'est pas correctement
enclenché, le tiroir risque de basculer, provoquant ainsi des dégâts matériels ou des blessures corporelles lorsque
quelqu'un monte, s'assied ou s'appuie sur le tiroir ouvert.
INSTALLATION AU SOL
Le support antibasculement peut être situé sur le sol dans le coin
arrière gauche ou droit du tiroir frigorifique comme l'indique la Figure
06.
Instructions étape par étape pour positionner le support :
1. Décider de l'emplacement du tiroir. Faire un trait provisoire sur le sol
aligné sur la face du tiroir, « A » comme l'indique la Figure 06.
2. Au niveau du point central où se trouvera le tiroir, faire un trait central
« B » (Fig. 06) perpendiculaire au trait « A » sur l'arrière de l'unité. Faire
une marque sur le trait « B » à 24-1/2 pouces du trait « A ».
3. Ensuite, faire un autre trait perpendiculaire « C » à cette marque. Faire
une marque sur le trait « C » à 11-1/2 pouces du trait « B » soit à droite
soit à gauche.
4. À cette marque, percer un avant-trou de 1/8”
dans le sol.
5. Fixer le support au sol à travers le trou ovalisé
(voir Fig. 07) à l'aide de fixations appropriées
pour le type de sol.
6. Positionner l'unité de manière à ce que le pied
réglable s'enclenche dans le support antibasculement (Fig. 07).
7. Vérifier que l'installation du tiroir et du dispositif
antibasculement est correcte en saisissant le dos
de l'unité et en tentant soigneusement de faire
basculer le tiroir vers l'avant.
Antibasculement
VUE DE DESSOUS DU TIROIR
C
Tiroir
frigorifique
B
Devant
Fig. 06
Trou ovalisé pour
installation au sol
Pied réglable
C
Encoche ouverte
B
Fig. 07
7
Page 29

INSTALLATION
INSTRUCTIONS D'INSTALLATION ANTIBASCULEMENT
FIXATION MURALE
1. Retirer le support de son emplacement d'expédition original sur le
dos de l'unité (Fig. 08 et 09).
2. Rattacher le support sur le dos de l'unité à l'aide des vis existantes
provenant du panneau arrière de l'unité (Fig 10).
3. Pousser l'unité contre le mur de manière à ce que le tiroir soit à
fleur du mur adjacent au panneau arrière.
4. À l'aide d'un crayon et du support comme gabarit, tracer le
support sur le mur en veillant à aligner 2 des trous de vis sur un
poteau mural.
5. Dégager l'unité du mur.
6. Retirer les vis connectant les sections supérieure et inférieure du
support antibasculement. Fixer la section inférieure du support qui n'est
pas attachée à l'unité sur le mur aux endroits marqués et avant-trous
percés dans le mur ou poteau mural. Attacher le support inférieur au
mur.
7. Repousser l'unité contre le mur et aligner la section supérieure sur la
section inférieure du support antibasculement de manière à pouvoir
revisser les vis originales qui maintiennent les sections supérieure et
inférieure du support antibasculement (Fig. 11). L'installation est
maintenant terminée.
Vers le tiroir frigorifique
Vers le mur
Fig. 08
Fig. 10
Fig. 09
VUE LATéRALE
MUR ADJACENT
TIROIR FRIGORIFIQUE
Fig. 11
8
Page 30

UTILISATION DU TIROIR FRIGORIFIQUE
FAULT
Power Failure -
+/- Temp -
Alarms Off -
Press ON/OFF to Reset
ON
OFF
SET
WARMER
COOLER
F/C
PRESS and HOLD
MISE EN MARCHE DE L'APPAREIL
L'appareil se mettra en marche dès son branchement initial. Le voyant DEL clignotera (ambre) dès le branchement
initial en raison de la mise sous tension de l'unité en usine afin de vérifier sa performance et de sa mise hors tension
successive. Le système de détection de défaillances indique qu'une panne de courant s'est produite lors de la mise
sous tension initiale de l'appareil. Ceci est normal et il suffit d'appuyer sur le bouton « ON/OFF » pour réinitialiser
cette fonction d'alarme.
Si la commande de l'appareil a été mise hors tension, par ex., l'unité est branchée, l'éclairage intérieur fonctionne,
l'affichage est vierge, l'unité doit être allumée. Pour allumer l'appareil, appuyer sur le bouton « ON/OFF », situé sur le
panneau d'affichage (voir Fig. 12) et le maintenir enfoncé pendant 5 secondes.
Une fois les produits chargés, prévoir au moins 24 heures pour que l'unité se stabilise avant d'effectuer tout réglage
des paramètres initiaux.
RÉGLAGE DU MODE TEMPÉRATURE
Ce produit peut afficher la température en degrés Fahrenheit ou Celsius. Pour ce faire, appuyer sur le bouton « º F/C »
sur le panneau d'affichage.
RÉGLAGE DES COMMANDES
La plage de températures disponibles de l'unité va de 33 à 47 degrés F. La température de consigne est initialement
réglée en usine à 38 degrés F. La température de consigne peut être abaissée ou augmentée en appuyant d'abord sur
le bouton « SET » sur le pavé d'affichage. Une icône « SET » s'affichera. Appuyer sur le bouton « WARMER » [plus
chaud] ou « COOLER » [plus froid] situé sur le pavé d'affichage pour augmenter ou abaisser la température réglée de
un degré F ou C (en fonction de la configuration choisie) (Fig. 12). Comme avec tout produit frigorifique, il existe une
légère variation de température aux différents endroits à l'intérieur de l'élément.
Fig. 12
COMMANDE DE TEMPÉRATURE RÉGLABLE
La commande de température est entièrement réglable de 33 à 47 degrés F. La plage permet une flexibilité de
préférences de température et offre des températures idéales pour l'entreposage et le service.
ÉCLAIRAGE INTÉRIEUR
Les lampes intérieures en haut et en bas permettre de voir facilement les aliments et les boissons. L'éclairage
s'allumera toujours quand l'un des tiroirs est ouvert en mode normal.
ALARMES D'AVERTISSEMENT
Les tiroirs frigorifiques sont munis d'un système de surveillance de « défaillances » de réfrigération. Ceci indiquera si
les tiroirs ne fonctionnent pas correctement pour un entreposage optimal des aliments et des boissons.
ALARME DE PORTE ENTREBÂILLÉE
Si la porte a été laissée ouverte pendant plus de 5 minutes, l'alarme retentira et le voyant DEL clignotera (vert). Ceci
s'arrêtera dès la fermeture de la porte.
TEMPÉRATURES HAUTE ET BASSE
Si l'unité atteint des températures en dehors des températures de fonctionnement normales du point de consigne
pendant approximativement une heure, une alarme retentira et le voyant DEL clignotera (rouge). Ceci pour avertir que
le contenu risque d'être à des températures défavorables à l'entreposage à long terme.
PANNE DE COURANT
En cas de panne de courant, le voyant DEL clignotera (ambre) jusqu'à réinitialisation de l'alarme.
9
Page 31

UTILISATION DU TIROIR FRIGORIFIQUE
RÉINITIALISATION DES ALARMES
Appuyer sur le bouton « ON/OFF » pendant approximativement une seconde et ce, pour réinitialiser les alarmes
sonores et visuelles.
MODE VACANCES
Les tiroirs frigorifiques sont munis d'une fonction Mode Vacances. En activant ce mode, l'ensemble des affichages, des
alarmes sonores et des voyants est désactivé. Le système sera neutralisé par une commande aléatoire. Pour activer le
mode Vacances, appuyer sur le bouton « SET » et le maintenir enfoncé tout en appuyant sur le bouton « ° F/C » à 7
reprises en 7 secondes. Pour désactiver le mode Vacances, répéter ce processus. Le mode Vacances se désactivera au
bout de 36 heures.
INSTRUCTIONS RELATIVES AU DÉGIVRAGE (LE CAS ÉCHÉANT)
Ne jamais utiliser de racloir ou tout autre outil susceptible de rayer ou de percer la plaque de refroidissement. Suivre
ces étapes dès l'accumulation d'au moins 1/4 pouce de givre :
1. Déconnecter le cordon d'alimentation et régler le bouton de commande de froid en position « OFF ».
2. Retirer le contenu.
3. Mettre des bacs d'eau chaude sur la clayette sous la plaque de refroidissement pour accélérer le dégivrage.
Remarque :
Placer un chiffon propre sous le bac d'eau chaude pour empêcher la clayette en verre de casser.
4. Essuyer l'intérieur et remettre le contenu en place.
5. Brancher le cordon d'alimentation dans la prise.
6. Régler la commande de température au niveau désiré.
DÉGIVRAGE AUTOMATIQUE
Les modèles dégivrent automatiquement leur plaque de refroidissement durant chaque cycle d'arrêt du compresseur.
Aucun dégivrage manuel n'est nécessaire.
PRÉVENIR DES TRAGÉDIES. . .
Chaque année, des enfants meurent parce qu'ils montent dans un produit frigorifique mis au rebut, restent coincés à
l'intérieur et suffoquent. Prendre les précautions nécessaires pour prévenir de telles tragédies en retirant la porte, ou
en la collant ou en l'attachant fermée avant la mise au rebut.
10
Page 32

DÉPLACEMENT OU REMISAGE DU TIROIR
FRIGORIFIQUE
Si le tiroir frigorifique sont éteints pour une raison quelconque, patienter 10 minutes avant de les remettre en marche.
Ceci permettra aux pressions du système de réfrigération de s'équilibrer avant de se remettre en marche.
DÉPLACEMENT DU TIROIR FRIGORIFIQUE
■ Éteindre l'appareil et le débrancher du point d'alimentation. Retirer tous les aliments.
■ Rentrer les pieds réglables aussi loin que possible (voir page 4, Stabilité).
■ Sortir le tiroir frigorifique de son emplacement. Rentrer le cordon d'alimentation et fermer les portes avec du ruban
ocollant. Fixer les conteneurs d'entreposage en place avec du ruban autocollant. Si l'élément doit être penché ou
aut
couché, le coucher soigneusement sur son côté (le côté droit quand vu du devant.)
■ Toujours transporter en position verticale uniquement.
■ Mettre dans son nouvel emplacement et installer. Si l'appareil est resté sur son côté pendant une durée quelconque, le
laisser en position v
REMISAGE DU TIROIR FRIGORIFIQUE
■ Lors du remisage de l'appareil nettoyé, laisser la porte ouverte et ce, pour permettre à l'air de circuler et pour
empêcher tout dépôt de bactéries et de moisissures.
■ Avant de l'utiliser à nouveau, bien nettoyer avec une solution d'eau chaude et de bicarbonate de soude (ajouter 1
e à café de bicarbonate de soude pour chaque pinte [500 ml] d'eau). Rincer à l'eau propre.
cuillèr
erticale pendant au moins 12 heures avant de le mettre en marche.
VACANCES
■ Il est recommandé de laisser le réfrigérateur/la tireuse de bière fonctionner lorsque l'on est en vacances et ce, pour
éviter la formation de moisissure et d'odeurs.
ATTENTION !
Ne jamais transporter un tiroir frigorifique sur son dos ou son côté sur une distance quelconque et ce, pour éviter
d'endommager les composantes du système de refroidissement.
11
Page 33

ENTRETIEN ET MAINTENANCE
REMPLACEMENT DES AMPOULES
Pour remplacer les ampoules, contacter le Service à la clientèle DCS au (888) 936-7872
À NE PAS OUBLIER. . .
1. Prévoyez une période de 24 heures avant que le réfrigérateur n'atteigne la nouvelle température que vous avez réglée.
2. Le moteur démarrera et s'arrêtera souvent. Ceci est nécessaire pour qu'il puisse maintenir la température que vous
avez sélectionnée.
3. Gardez votre réfrigérateur raisonnablement de niveau.
4. Débranchez le réfrigérateur avant de travailler sur tout élément du système électrique.
5. Faites attention lorsque vous balayez, passez l'aspirateur ou la lavette près de l'avant de l'appareil. La grille ou l'interrupteur de la lampe pourraient être endommagés.
6. Pour nettoyer l'intérieur du réfrigérateur, mélangez deux cuillères à soupe de bicarbonate de soude avec 1 litre d'eau
chaude ou bien utilisez un savon doux. N'utilisez pas de nettoyants forts ni de poudre ou de tampons à récupérer.
7. Gardez votre réfrigérateur à l'abri de la lumière directe du soleil.
8. Évitez d'asperger ou d'arroser de l'eau sur ou sous le réfrigérateur.
9. Nettoyez le condensateur de votre réfrigérateur périodiquement afin de maintenir une bonne capacité de
refroidissement.
CONSEILS D'ÉCONOMIE D'ÉNERGIE
1. Réduisez au maximum les ouvertures de porte.
2. Fermez la porte le plus vite possible.
3. Gardez les bobines au bas du réfrigérateur en état propre.
4. Si cela est pratique, réglez le bouton de température à un niveau plus élevé.
5. Ne mettez pas d'aliments chauds dans le réfrigérateur.
6. Gardez l'appareil éloigné du réchaud ou d'autres sources de chaleur.
12
Page 34

ENTRETIEN ET MAINTENANCE
NETTOYAGE ET MAINTENANCE DE L'APPAREIL
Condensateur
La bobine du condensateur sous l'armoire (appareils à air pulsé) n'a pas besoin d'être nettoyée fréquemment;
toutefois, un bon refroidissement dépend d'une ventilation adéquate de la bobine du condensateur. Assurez-vous que
les ouvertures d'air dans la partie avant inférieure de l'armoire ne sont pas obstruées par quoi que ce soit. Au moins
une ou deux fois par an, dévissez la grille sur la partie avant inférieure de l'armoire et nettoyez la charpie et la saleté
de la bobine du condensateur à l'aide d'une brosse ou d'un aspirateur pour assurer le bon rendement de l'appareil.
Armoire
L'armoire en acier inoxydable peut être lavée avec de l'eau et un
savon doux puis bien rincée à l'eau claire. N’utilisez jamais de
poudres à récupérer abrasives.
Intérieur
Il est important de conserver l'intérieur du réfrigérateur/de la
tireuse de bière propre pour éviter toute contamination des
aliments pendant l'entreposage. La quantité et le type d'aliments
entreposés déterminent la fréquence du nettoyage (idéalement
une fois par semaine ou toutes les deux semaines) du réfrigérateur.
Retirer le tiroir de l'unité. Commencer par sortir le tiroir. Repérer le
dispositif de verrouillage du tiroir qui se trouve sur l'extérieur de la
coulisse de l'élément (Fig. 13). Appuyer le dos du dispositif de
verrouillage de tiroir vers l'avant puis vers le bas, en libérant le
tiroir de la coulisse de l'élément (Fig. 13). Répéter sur le côté
opposé du tiroir. Relever le tiroir des coulisses à 90º pour sortir
complètement le tiroir de l'élément (Fig. 14). Laver le compartiment intérieur à l'eau savonneuse. Essuyer les surfaces
intérieures à l'eau chaude et avec un détergent ou du bicarbonate
de soude dissous dans de l'eau chaude (ajouter une cuillère à café
de bicarbonate de soude pour 500 ml d'eau). Ne pas utiliser de
poudre abrasive, de solvant, de nettoyant de vernis, de chiffons
abrasifs, de nettoyants au parfum et à l'odeurs forts ni de
détergent dilué sur aucune partie du tiroir frigorifique. Rincer à
l'eau propre. Pour éliminer les odeurs de « réfrigérateur rances »,
ajouter quelques gouttes d'essence de vanille ou de vinaigre à
l'eau avant de nettoyer.
Dispositif de verrouillage
de tiroir
Fig. 13
Dispositif de verrouillage
de tiroir relâché
Réinstaller le tiroir en faisant sortir les coulisses, en alignant
soigneusement et en engageant les extrémités des coulisses de
tiroir. Faire glisser le tiroir vers l'intérieur jusqu'à ce que le tiroir
soit bien en place. Fermer et ouvrir le tiroir pour s'assurer qu'il est
correctement bloqué.
Fig. 14
Extérieur – Porte extérieure en acier inoxydable
Il est important, lors du nettoyage de la surface de porte extérieure du tiroir frigorifique, de n'utiliser que du
détergent à vaisselle liquide, dissous dans de l'eau chaude. Essuyer la porte à l'aide d'un chiffon propre, non
pelucheux. L'emploi de tout nettoyant abrasif ou pour acier inoxydable et de tout solvant endommagera la surface de
la porte.
Autres surfaces extérieures et joint de porte
Nettoyer toutes les autres surfaces extérieures à l'eau chaude et avec un détergent. Le cas échéant, nettoyer le joint de
porte magnétique à l'aide d'une brosse à dents usagée, du détergent et de l'eau chaude.
Remarque importante :
De nombreux produits nettoyants disponibles dans le commerce contiennent des solvants susceptibles d'attaquer les
composants en plastique du réfrigérateur et de les fissurer. Il est important de n'utiliser que de l'eau chaude et une petite
quantité de détergent à vaisselle liquide sur tous les composants en plastique à l'intérieur et à l'extérieur du réfrigérateur.
Éviter d'utiliser des produits nettoyants antibactériens sur l'intérieur ou l'extérieur de l'élément et ce, car ils risquent de
faire rouiller les composants en métal et de fissurer les composants en plastique.
13
Page 35

DÉPANNAGE
PROBLÈME CAUSE POSSIBLE/SOLUTIONS
Présence d'odeur dans l'armoire L'intérieur a besoin d'être nettoyé
Fonctionnement bruyant
L'armoire vibre
La lumière de l'armoire ne fonctionne pas Appelez un technicien
L'appareil ne fonctionne pas
L'appareil fonctionne trop longtemps
Accumulation de vapeur d'eau à l'intérieur
Accumulation de vapeur d'eau sur la surface
extérieure
L'armoire n'est pas de niveau
Lame de ventilateur endommagée / appelez un technicien
L'armoire n'est pas de niveau
Lame de ventilateur endommagée / appelez un technicien
Bouton de contrôle de température éteint (OFF)
Cordon d'alimentation non branché
Pas de courant au niveau de la prise électrique
Fusible de la maison grillé
La porte est ouverte trop longtemps
Le niveau de température est trop froid
Le condensateur a besoin d'être nettoyé
La porte est ouverte trop souvent
La porte est ouverte trop longtemps
Un temps chaud et humide augmente l'effet de condensation
Commande mal réglée
Un temps chaud et humide augmente l'effet de condensation.
La vapeur d'eau disparaît à mesure que l'humidité faiblit.
Contrôle mal réglé
Intérieur trop chaud/trop froid
Système de détection de défaillances activé
Contrôle mal réglé
Thermomètre défectueux
Le condensateur a besoin d'être nettoyé
La fuite d'air dans l'
Voir « Alarmes d'avertissement » à la page 9
Voir la fiche de référence rapide des fonctions
« fondamentales » de défaillances
L'alarme de température peut se produire lorsque la
température de consigne sélectionnée par l'utilisateur
change de plus de 10 ºF ou pendant des conditions d'utilisation excessive. Ceci est normal et non pas une défaillance
de l'appareil. Le système de détection de défaillances
surveille la durée de grandes oscillations de température
pour protéger le contenu et peut avertir de cette situation.
Voir « Réinitialisation des alarmes » à la page 10.
14
appareil
Page 36

POUR L'OBTENTION DE SERVICE
POUR L'OBTENTION DU SERVICE DE GARANTIE :
Pour le service sous garantie, contactez votre distributeur ou le Centre de service à la clientèle DCS au
(888) 936-7872. Avant d'appeler, veuillez avoir les informations suivantes à portée de main :
■
Numéro de modèle (la plaque du numéro de série se trouve sur la paroi interne supérieure gauche).
■
Numéro de série (la plaque du numéro de série se trouve sur la paroi interne supérieure gauche).
■
Code (la plaque du numéro de série se trouve sur la paroi interne supérieure gauche).
■
Date d'installation
■
Brève description du problème
Votre satisfaction revêt la plus grande importance pour nous. Si un problème n'est pas résolu à votre entière
satisfaction, veuillez communiquer avec nous par courrier.
Écrivez-nous à l'adresse suivante :
Fisher & Paykel Appliances, Inc.
Attention : DCS Customer Care
5900 Skylab Road
Huntington Beach, CA 92647 États-Unis
www.dcsappliances.com
AVANT D'APPELER LE SERVICE TECHNIQUE
Consultez la section de dépannage à la page 14.
15
Page 37

GARANTIE
GARANTIE LIMITÉE
À l'achat d'un nouveau produit de réfrigération DCS, vous bénéficiez automatiquement d'une garantie limitée
d'un an sur les pièces et la main-d'oeuvre valide dans les 48 états continentaux des États-Unis, l'état de Hawaï, la
ville de Washington, DC, et au Canada. La garantie limitée est la même en Alaska sauf que vous devez payer les
frais d'expédition du produit à un centre de service ou les frais de déplacement d'un technicien dans le cas d'une
visite à domicile. Les produits destinés à une utilisation au Canada doivent être achetés auprès d'un distributeur
canadien autorisé afin de respecter la réglementation en vigueur.
Vous recevez une garantie limitée supplémentaire de quatre ans (pour un total de cinq ans) couvrant les pièces
du système de réfrigération scellé (compresseur, évaporateur, condensateur, déshydrateur-filtre et tube de
raccord) valide dans les 48 états continentaux des États-Unis, l'état de Hawaï, la ville de Washington, DC, et au
Canada. La garantie limitée est la même en Alaska pour le système de réfrigération scellé sauf que vous devez
payer les frais d'expédition du produit à un centre de service ou les frais de déplacement d'un technicien dans le
cas d'une visite à domicile.
FISHER & PAYKEL S'ENGAGE À :
entreprendre à ses frais (pièces et main-d'oeuvre) toutes réparations du produit (sur lequel figure le numéro de
série) jugé défectueux. En Alaska, vous devez payer les frais d'expédition du produit à un centre de service ou les
frais de déplacement d'un technicien dans le cas d'une visite à domicile.
Si nous sommes dans l'incapacité de réparer une pièce défectueuse du produit après un nombre raisonnable de
tentatives, nous pourrons, à notre choix, remplacer la pièce ou le produit, ou vous rembourser entièrement le
prix d'achat du produit (à l'exclusion des frais d'installation ou autres frais.)
Cette garantie s'applique à l'acheteur initial et à tous les propriétaires successifs du produit dans la mesure où il
s'agit d'un produit acheté pour une utilisation à domicile normale. Tout service couvert par cette garantie limitée
sera assuré par Fisher & Paykel Appliances Inc. ou son agent de service DCS agréé durant les heures d'ouverture
normales.
QUELLE EST LA DURÉE DE CETTE GARANTIE LIMITÉE?
Notre responsabilité en vertu de cette garantie limitée concernant l'intégralité du produit expire UN AN à partir de la
date d'achat du produit par le premier acheteur.
Notre responsabilité pour les réparations de défauts affectant le système de réfrigération scellé (compresseur,
évaporateur, condensateur, déshydrateur-filtre et tube de raccord) est prolongée de QUATRE ANNÉES
SUPPLÉMENTAIRES, pour un total de cinq années, à partir de la date d'achat du produit par le premier acheteur.
Notre responsabilité en vertu de toute garantie implicite, y compris la garantie implicite de qualité marchande
(la garantie tacite selon laquelle le produit est approprié pour un usage normal) expire également UN AN (ou
une période plus longue si requis par la loi) à partir de la date d'achat du produit par le premier acheteur.
Certaines juridictions ne permettent pas la limitation de la garantie implicite, il est donc possible que la
limitation ci-dessus sur les garanties implicites ne s'applique pas à vous.
NE SONT PAS COUVERTS PAR LA GARANTIE :
A. Les appels de service n'ayant aucun rapport avec un défaut éventuel du produit. Le coût de l'appel de service
sera facturé s'il se trouve que le problème n'est pas dû à un défaut du produit. Par exemple :
1. Corriger une mauvaise installation du produit.
2. Montrer comment utiliser le produit.
3. Remplacer des fusibles à domicile, réarmer les disjoncteurs, réparer les fils électriques ou la plomberie du
domicile, ou remplacer des ampoules.
4. Corriger des anomalies causées par l'utilisateur.
5. Changer la configuration du produit.
6. Modifications non autorisées du produit.
7. Bruits ou vibrations considérés comme normaux, par exemple les bruits de drain, les bruits de régénération ou
les signaux d'avertissement à l'intention de l'utilisateur.
16
Page 38

GARANTIE
8. Corriger des dommages causés par des animaux nuisibles, par exemple des rats, des coquerelles, etc.
9. Utilisé dans le cadre d'une application commerciale.
B. Défauts causés par des facteurs autres que :
1. Utilisation domestique normale ou
2. Utilisation conformément aux indications du guide d'utilisation et d'entretien du produit.
C. Défauts du produit pour cause d'accident, négligence, mauvaise utilisation, incendie, inondation ou calamité
naturelle.
D. Les coûts des réparations effectuées par des techniciens non autorisés ou le coût de correction de ces
réparations non autorisées.
E. Les frais de voyage et les frais connexes encourus lorsque le produit est installé dans un lieu à accès illimité ou
restreint (déplacement par avion ou par bateau, régions géographiques isolées, etc.).
F. Entretien normal recommandé par le manuel d'utilisation et d'entretien du produit.
Contactez votre distributeur ou votre installateur en cas de problème d'installation. Il vous incombe d'assurer
une installation électrique, une ventilation et toute autre connexion appropriées. Nous ne sommes pas responsables des dommages indirects ou accessoires (coût de réparation ou de remplacement d'autres biens
endommagés parce que le produit était défectueux ou tout autre coût que vous auriez encouru parce que le
produit était défectueux). Certaines juridictions interdisent l’exclusion ou la restriction de la responsabilité des
dommages indirects ou accessoires; l’exclusion ou la restriction indiquée ci-dessus peut donc ne pas s'appliquer
à votre cas particulier.
POUR OBTENIR DES RÉPARATIONS
Veuillez consulter le manuel d'utilisation et d'entretien. Si vous avez des questions concernant l'utilisation du
produit, que vous cherchez le nom de l'agent de service DCS agréé local ou que pensez que le produit est
défectueux et désirez le faire réparer dans le cadre de cette garantie limitée, veuillez contacter votre distributeur
ou nous appeler au numéro suivant :
(NUMÉRO SANS FRAIS) 1-888-936-7872 ou contactez-nous par l'intermédiaire de notre site Web :
www.dcsappliances.com.
Vous devrez peut-être présenter une preuve raisonnable de la date d'achat du produit avant de pouvoir
bénéficier d'une réparation dans le cadre de cette garantie limitée.
UTILISATION COMMERCIALE
Cette garantie s'applique à des appareils électroménagers utilisés à domicile; elle ne couvre pas les cas d'utilisation commerciale.
AUCUNE AUTRE GARANTIE
Cette garantie limitée constitue l'accord entier et exclusif entre vous et Fisher & Paykel Appliances Inc. en ce qui
concerne tout défaut du produit. Aucun de nos employés (ou agents de service agréés) n'est autorisé à apporter
des ajouts ou des modifications à cette garantie limitée.
Garant : Fisher & Paykel Appliances, Inc.
Si vous avez besoin d'aide au sujet de cette garantie limitée, veuillez nous appeler au numéro ci-dessus
ou nous écrire à l'adresse suivante :
Fisher & Paykel Appliances, Inc.
Attention : DCS Customer Care
5900 Skylab Road, Huntington Beach, CA 92647 États-Unis
Cette garantie limitée vous donne des droits juridiques spécifiques et vous pouvez bénéficier d'autres droits qui
varient d'une juridiction à l'autre.
Fisher & Paykel Appliances inc. est un fabricant de pointe d'appareils de cuisson et d'appareils spécialisés, sous
les marques Fisher & Paykel et DCS.
17
Page 39

Page 40

Fisher & Paykel Appliances, Inc.
5900 Skylab Road, Huntington Beach, CA 92647
Customer Care: 888.936.7872
Fax: 714.372.7003
www.dcsappliances.com
As product improvement is an ongoing process, we reserve
the right to change specifications or design without notice.
Nous améliorons constamment ses produits et se réserve
le droit de modifier les spécifications ou la conception de
ses produits sans aucun préavis.
Part No. 241586 Rev. D
Litho in USA 09/2008
19
 Loading...