

DCS RF15IL1 Installation Manual

INSTALLATION INSTRUCTIONS
USER GUIDE
Outdoor Ice Maker
RF15I models
US CA


CONTENTS
Introduction 3
Safety and warnings 4
Installation instructions 6
Electrical connection 10
Drain pump 13
Operating instructions 16
Operation (turning on the ice maker) 16
Care and cleaning instructions 19
Cleaning the ice maker 19
Energy saving tips 22
Preparing the ice maker for storage 23
Drain pump removal instructions 25
Troubleshooting 27
Drain pump problems 30
Limited Warranty 31
IMPORTANT!
SAVE THESE INSTRUCTIONS
The models shown in this user guide may
not be available in all markets and are
subject to change at any time. For current
details about model and specification
availability in your country, please go to our
website www.dcsappliances.com or contact
your local DCS by Fisher&Paykeldealer.
Registration
Register your product with us so we can
provide you with the best service possible.
To register your product visit our website:
www.dcsappliances.com
1

INTRODUCTION
Thank you for buying this DCS by Fisher & Paykel Outdoor Ice Maker.
This detailed Installation instructions and User guide contains valuable information on
how to properly install, operate and maintain your new refrigerator.
This refrigerator has many unique features so following the instructions outlined in this
book is essential to safe and enjoyable operation.
We hope you enjoy your new Outdoor Ice Maker.
3

SAFETY AND WARNINGS
!
WARNING!
Electric Shock Hazard
Read and follow the safety and warnings outlined in this user guide
before operating this appliance.
Failure to do so can result in death, electric shock, fire or injury to persons.
Use this appliance only for the intended purpose as described in the user guide.
IMPORTANT SAFETY INSTRUCTIONS
WARNING!
When using this appliance always exercise basic safety precautions including the
following:
This appliance is not intended for use by persons (including children) with reduced
physical, sensory or mental capabilities, or lack of experience and knowledge, unless
they have been given supervision or instruction concerning use of the appliance by a
person responsible for their safety.
Children should be supervised to ensure they do not play with the appliance.
The manufacturer’s installation instructions for product and cabinetry ventilation must
be followed when installing the appliance.
To avoid hazard due to instability of the appliance, it must be fixed in accordance with
installation instructions.
Keep ventilation openings, in the appliance enclosure or in the built-in structure, clear
of obstruction.
Do not use mechanical devices or other means to accelerate the defrosting process,
other than those recommended by the manufacturer.
Do not damage the refrigerant circuit.
In case of damage to the refrigerant circuit, ventilate the area by opening all windows.
Do not operate electrical equipment or any other equipment that may produce
arcs, sparks or flames in the area. Contact your DCS by Fisher & Paykel trained and
supported service technician immediately to arrange for the appliance to be repaired.
Do not use electrical appliances inside the food storage compartments of the
appliance, unless they are of the type recommended by the manufacturer.
Electrical
This appliance must be installed in accordance with the installation instructions
beforeuse.
To allow disconnection of the appliance from the supply after installation, incorporate
a switch in the fixed wiring in accordance with the wiring rules.
Never unplug your appliance by pulling on the power cord. Always grip the plug firmly
and pull straight out from the outlet.
Do not plug in any other appliance at the same power point as your appliance or use
extension cords or double adapters or ungrounded (two prong) adapters.
Repair or replace immediately all electric service cords that have become frayed or
otherwise damaged. Do not use a cord that shows cracks or abrasion along its length
or at either the plug or appliance end.
4

SAFETY AND WARNINGS
If the power supply cord is damaged, it must only be replaced by your DCS by
Fisher&Paykel trained and supported service technician because special purpose
tools are required.
When moving your appliance away from the wall, be careful not to roll over or
damage the power cord.
Follow the National Electrical Code and all local codes and ordinances when installing
this product.
Warning: Ground Fault Circuit Interrupters (GFCI) may trip during normal operation
of your refrigerator and interrupt the power supply. The use of a GFCI is not
recommended with this product.
IMPORTANT!
Your appliance is designed to operate for many years without the need for service
checks. However, if your appliance is malfunctioning, have it attended to by your DCS
by Fisher & Paykel trained and supported service technician as soon as possible. All
electrical repairs must be carried out by an adequately trained service technician or
qualified electrician.
Cleaning
Many commercially available cleaning products contain solvents that may attack the
plastic components of your appliance and cause them tocrack.
Avoid using anti-bacterial cleaning products on either the interior or exterior
of the cabinet as they may cause rusting of metal components and cracking of
plasticcomponents.
Please refer to the ‘Care and cleaning instructions’ section of this user guide for
further information.
Disposal
Extreme care must be taken when disposing of your old appliance to avoid hazards:
– The flammable refrigerant gas must be safely removed.
– The thermal insulation foam in this appliance contains flammable insulation
blowing gases, any exposed foam may be highly flammable and must be
carefully treated during disposal.
Your DCS by Fisher & Paykel trained and supported service technician will be able to
give advice on environmentally friendly methods of disposing of your old refrigerator
or freezer.
Intended use
This product is not intended for storage of food or drinks.
Do not store explosive substances such as aerosol cans with a flammable propellant in
this appliance.
Never store volatile or flammable materials in your appliance as they may explode.
5
INSTALLATION INSTRUCTIONS
B
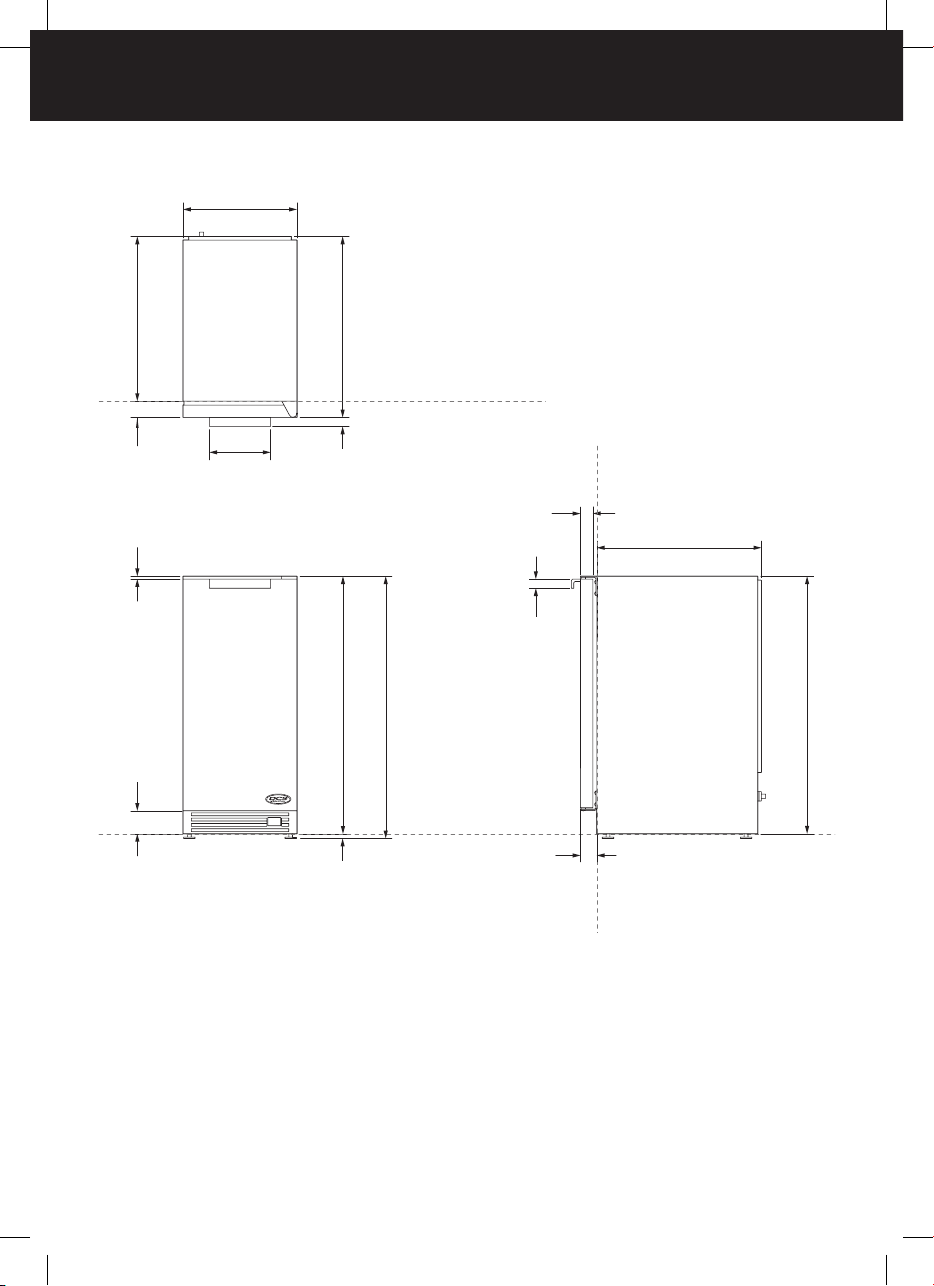
Product dimensions
e
f
i
h
j
C
Datum: front of chassis
k
Ad
Datum: bottom of chassis
m
Datum: front of chassis
g
e
l
D
f
6

INSTALLATION INSTRUCTIONS
PRODUCT DIMENSIONS
Overall height of product * 33 3/4”–343/4” (857 – 883)
A
Overall width of product 147/8” (378)
B
Overall depth of product (excluding handles) 23 5/8” (600)
C
Height of chassis 33 5/8” (854)
D
Depth of chassis 211/2” (546)
E
Depth from front of chassis to door front 2 1/8” (54)
F
Thickness of door panel 15/8” (41)
G
Height of front grille panel 3” (76)
H
Height from top of door to top of chassis 3/8” (10)
I
Width of handle 8” (203)
J
Depth of handle 13/16” (30)
K
Height of handle 13/16” (30)
L
Height of adjustable feet 5/8” – 13/8” (16–35)
M
* Includes mounted feet.
CLEARANCE DIMENSIONS
Overall height of cutout min. 341/2” (min. 876)
Overall width of cutout
Overall width of cutout
Depth of cavity ** min. 24” (min. 610)
** Depth dimension varies depending on individual installation.
(with optional DCS side trim kit)
151/2” (394)
inches (mm)
inches (mm)
15” (381)
7
INSTALLATION INSTRUCTIONS
Installing your ice maker
Select location
The proper location will ensure peak performance of your appliance. We recommend a
location where the ice maker will be out of direct sunlight and away from heat sources.
To assure your product performs to specifications the recommended installation location
temperature range is from 55 – 80°F (13 – 27°C) for built in ice makers, 55 – 90°F
(13– 32°C) for freestanding ice makers. Ice maker will not perform correctly in ambient
temperatures less than 55°F (13°C).
IMPORTANT!
Outdoor installation
Building codes may require a ground fault circuit interrupter electrical receptacle
to supply electrical power to the ice maker for outdoor applications, (see ‘Electrical
connection’ in the ‘Installation instructions’ section).
Do not install in a location where the ice maker will be exposed to direct sun exposure
as this may result in unsatisfactory performance.
Winterizing your outdoor ice maker
For instructions on winterizing your ice maker see ‘Preparing the ice maker for storage’.
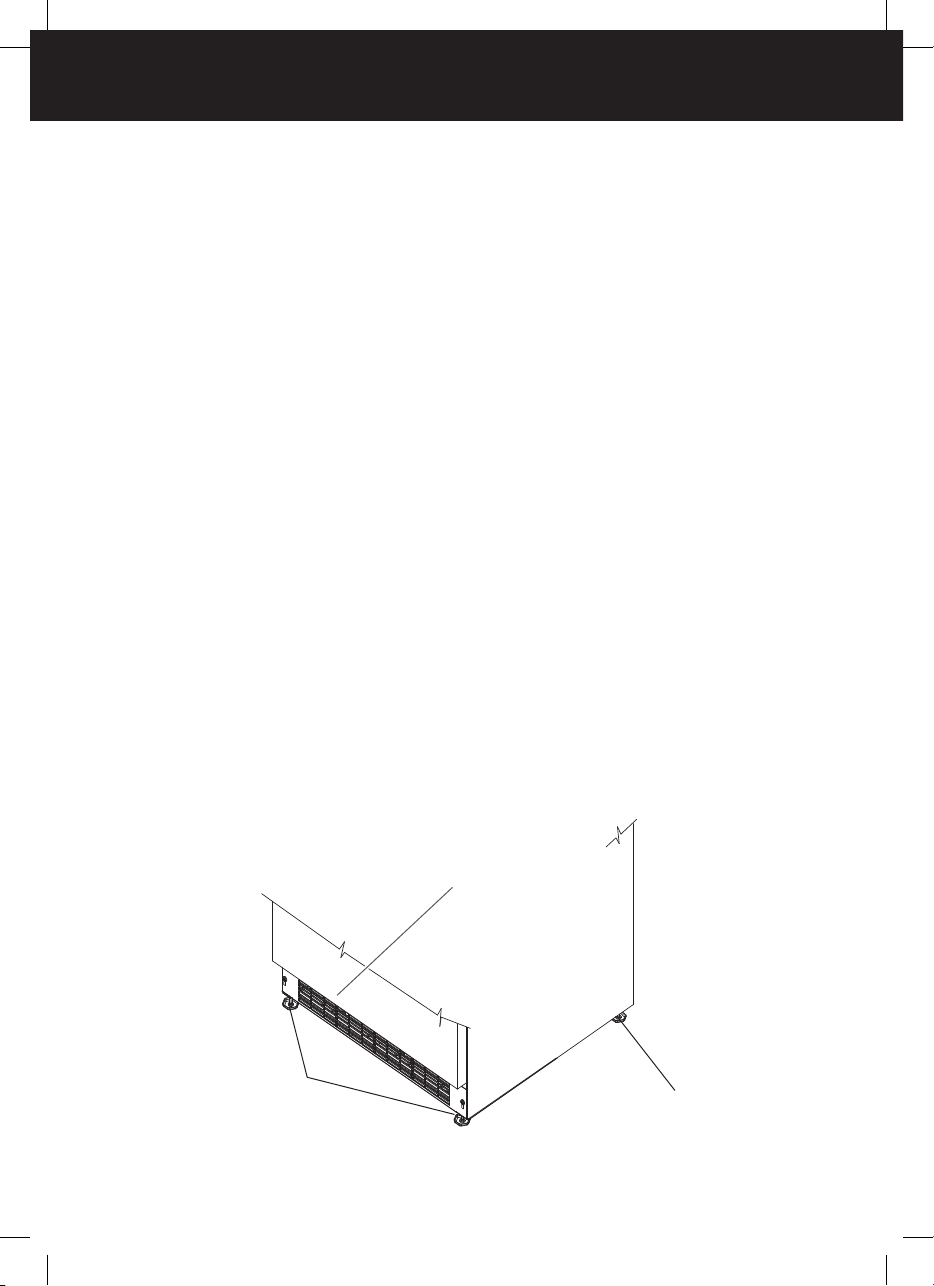
Cabinet clearance
Ventilation is required from the bottom front section of the ice maker. Keep this area
open and clear of any obstructions. Adjacent cabinets and counter top can be installed
around the ice maker as long as the front grille remains unobstructed.
Front grille
Do not obstruct the front grille. The openings within the front grille allow air to flow
through the condenser heat exchanger. Restrictions to this air flow will result in
increased energy usage and loss of cooling capacity. For this reason it is important this
area to not be obstructed and the grille openings kept clean. DCS by Fisher & Paykel
does not recommend the use of a custom made grille as air flow may be restricted
because of inadequate openings.
Front grille, keep
this area open
Front leveling legs
8
Rear leveling legs
INSTALLATION INSTRUCTIONS
Leveling legs
Adjustable legs at the front and rear corners of the ice maker should be set so the ice
maker is firmly positioned on the floor and level from side to side and front to back. The
overall height of your DCS ice maker may be adjusted from 33 3/4” (857mm) with the
leveling legs turned in, and up to 34 3/4” (883mm) with the leveling legs extended.
To adjust the leveling legs, place the ice maker on a solid surface and protect the floor
beneath the legs to avoid scratching the floor. With the assistance of another person,
lean the ice maker back to access the front leveling legs. Raise or lower the legs to the
required dimension by turning the legs. Repeat this process for the rear by tilting the ice
maker forward using caution to prevent the door from opening. On a level surface check
the ice maker for levelness and adjust accordingly.
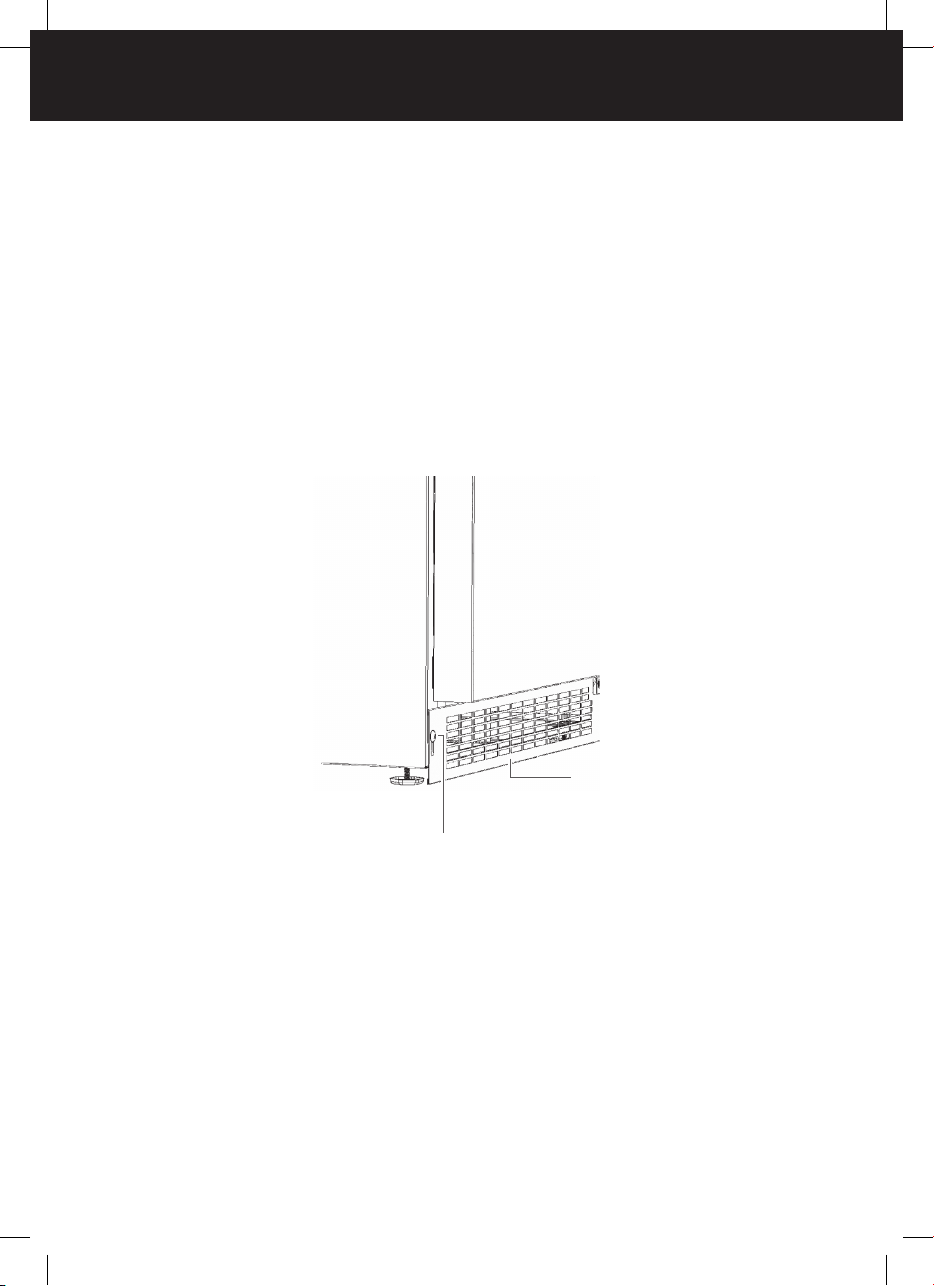
The front grille screws may be loosened and the front grille adjusted to the desired
height. When adjustment is complete tighten the two front grille screws.
Front grille screw
Front grille
9
 Loading...