

Page 1
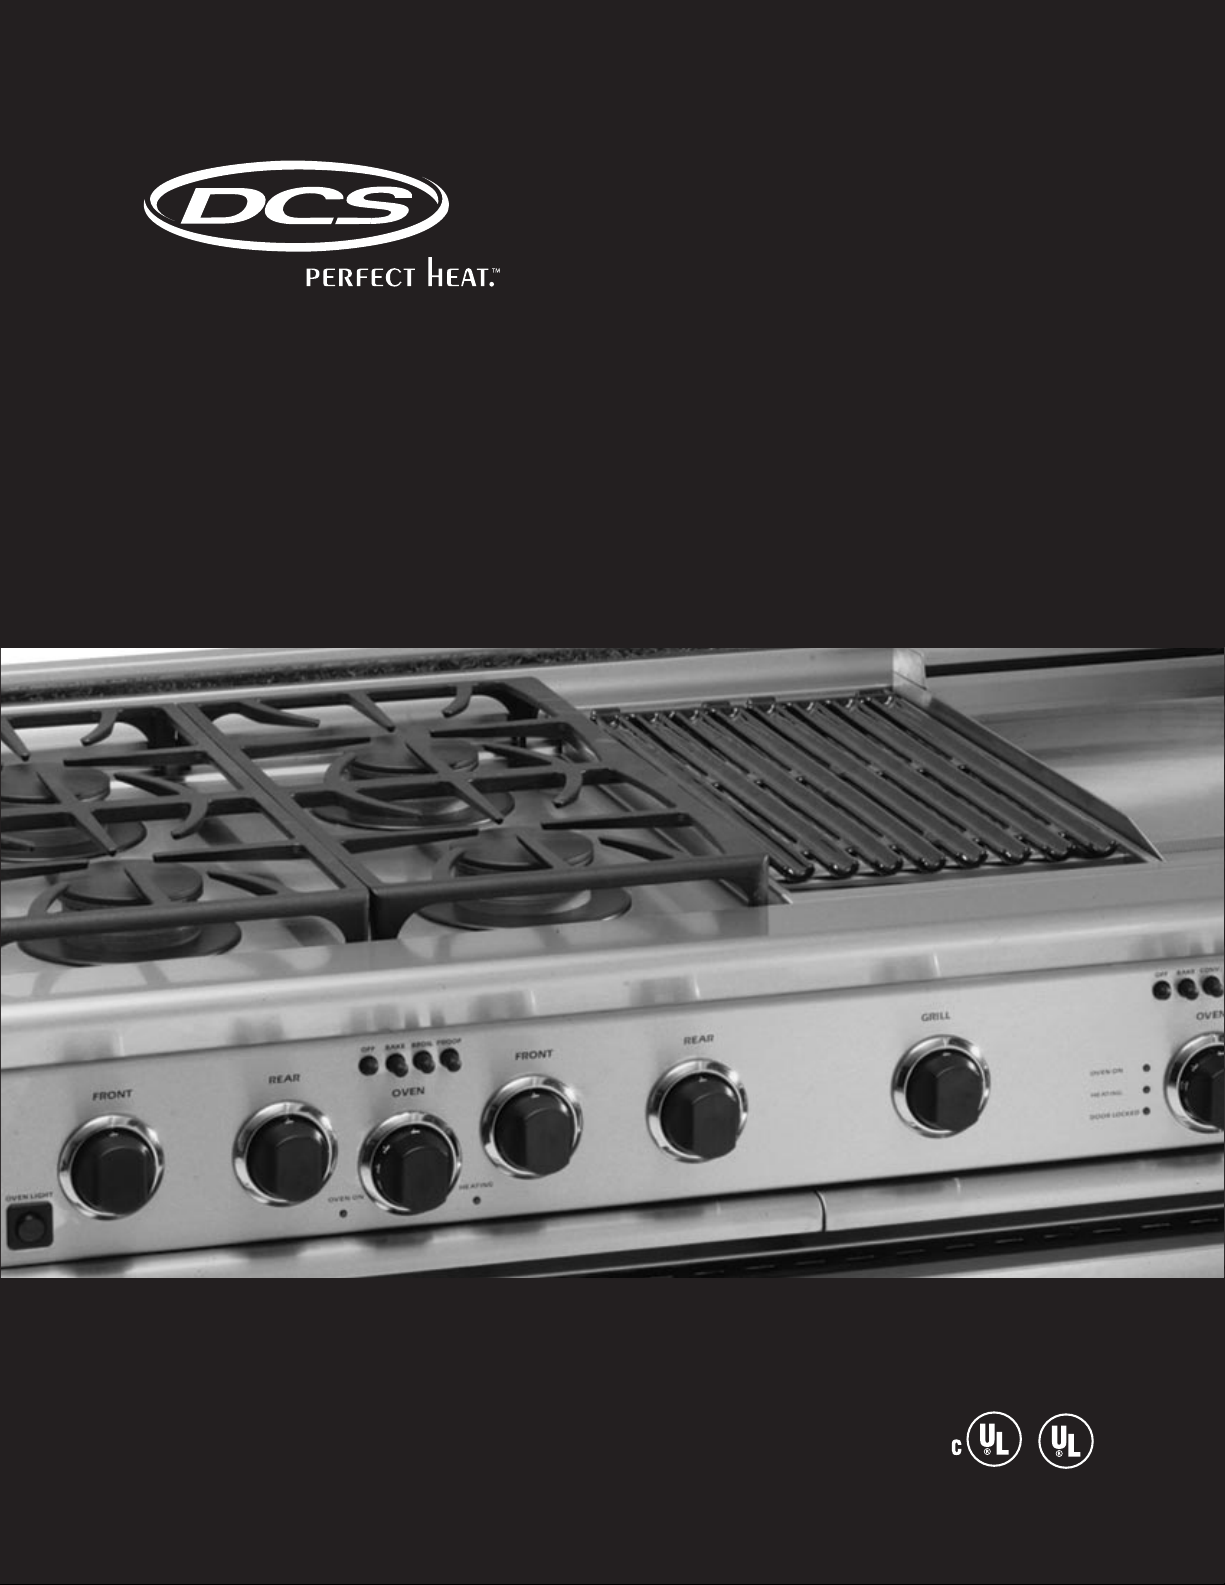
THE PROFESSIONAL RDS RANGE
Use and Care Guide
MODÈLS:
RDS-305
RDS-366
RDS-364GL
RDS-364GD
RDS-484GG
RDS-485GD
RDS-486GL
RDS-486GD
Page 2

1
Thank you for selecting this DCS Dual Fuel Range. Because of this appliance’s unique features we have
developed this Use and Care Guide. It contains valuable information on how to properly operate and
maintain your new appliance for years of safe and enjoyable cooking.
To help serve you better,please fill out and submit your Ownership Registration Card by visiting our website
at www.dcsappliances.com and selecting “Customer Service”on the home page and then select “Ownership
Registration” or submit the enclosed Ownership Registration Card to the address below. In addition, keep
this guide handy,as it will help answer questions that may arise as you use your new appliance.
For your convenience, product questions can be answered by a DCS Customer Service Representative by
phone: 1-888-281-5698, Fax: 714-372-7004, email: support@dcsappliances.com,or by mail:
PLEASE RETAIN THIS MANUAL FOR FUTURE REFERENCE.
DCS
Attention: Customer Service
5800 Skylab Road
Huntington Beach, CA 92647
www.dcsappliances.com
A MESSAGE TO OUR CUSTOMERS
WAR NING
If the information in this manual is not followed exactly, a fire or explosion
may result causing property damage, personal injury or death. Do not store or
use gasoline or other flammable vapors and liquids in the vicinity of this or any
other appliance.
WAR NI NG
To re d u ce the risk of injury to persons in the event of a rangetop grease fire,
observe the following: Smother flames with a close-fitting lid, cookie sheet, or
metal tray, then turn off the burner. Be careful to prevent burns. If the flames
do not go out immediately evacuate and call the fire department. Never pick
up a flaming pan - You may be burned. DO NOT USE WATER, including wet
dishcloths or towels - a violent steam explosion will result. Use an extinguisher
ONLY if:
1) You know you have a Class ABC extinguisher,and you already know
how to operate it.
2) The fire is small and contained in the area where it started.
3) The fire department is being called.
4) You can fight the fire with your back to an exit.
FOR YOUR SAFETY
If You Smell Gas:
Do not try to light any appliance.
Do not touch any electrical switch; do not use any phone in your building.
Immediately call your gas supplier from a neighbor’s phone. Follow the gas
supplier’s instructions.
If you cannot reach your gas supplier, call the fire department.
Installation and service must be performed by a qualified installer, service
agency or the gas supplier.
Page 3

TABLE OF CONTENTS
2
SAFETY PRACTICES......................................................................................................................................................3-5
MODEL IDENTIFICATION.............................................................................................................................................6
BEFORE USING YOUR APPLIANCE ...................................................................................................................7-8
COOKTOP USE ...............................................................................................................................................................9-12
Burner Use . . . . . . . . . . . . . . . . . . . . . . . . . . . . . . . . . . . . . . . . . . . . . . . . . . . . . . . . . . . . . . . . . . . . . . . . . . . .9
Burner Efficiency and Flame Characteristics . . . . . . . . . . . . . . . . . . . . . . . . . . . . . . . . . . . . . . . . . . . .10
Wok Ring . . . . . . . . . . . . . . . . . . . . . . . . . . . . . . . . . . . . . . . . . . . . . . . . . . . . . . . . . . . . . . . . . . . . . . . . .11-12
GRILL USE .......................................................................................................................................................................12-13
GRIDDLE USE...............................................................................................................................................................14-15
OVEN USE .......................................................................................................................................................................15-25
Convection Baking . . . . . . . . . . . . . . . . . . . . . . . . . . . . . . . . . . . . . . . . . . . . . . . . . . . . . . . . . . . . . . . . . . .16
Regular Baking . . . . . . . . . . . . . . . . . . . . . . . . . . . . . . . . . . . . . . . . . . . . . . . . . . . . . . . . . . . . . . . . . . . . . . .16
Broiling . . . . . . . . . . . . . . . . . . . . . . . . . . . . . . . . . . . . . . . . . . . . . . . . . . . . . . . . . . . . . . . . . . . . . . . . . . . . . .16
Converting Recipes to Convection Baking . . . . . . . . . . . . . . . . . . . . . . . . . . . . . . . . . . . . . . . . . . . . . .16
Selecting Utensils for Convection Baking . . . . . . . . . . . . . . . . . . . . . . . . . . . . . . . . . . . . . . . . . . . .16-17
Preheating . . . . . . . . . . . . . . . . . . . . . . . . . . . . . . . . . . . . . . . . . . . . . . . . . . . . . . . . . . . . . . . . . . . . . . . . . . .18
Setting Oven for Baking . . . . . . . . . . . . . . . . . . . . . . . . . . . . . . . . . . . . . . . . . . . . . . . . . . . . . . . . . . . . . . .18
Oven Racks . . . . . . . . . . . . . . . . . . . . . . . . . . . . . . . . . . . . . . . . . . . . . . . . . . . . . . . . . . . . . . . . . . . . . . .18-19
Broiling . . . . . . . . . . . . . . . . . . . . . . . . . . . . . . . . . . . . . . . . . . . . . . . . . . . . . . . . . . . . . . . . . . . . . . . . . . .20-21
Slow Cooking / Low Temperature Cooking . . . . . . . . . . . . . . . . . . . . . . . . . . . . . . . . . . . . . . . . . . . . .21
Suggested Temperatures to Keep Food Hot . . . . . . . . . . . . . . . . . . . . . . . . . . . . . . . . . . . . . . . . . . . .22
PROOFING AND SELF-CLEANING MODES ...........................................................................................23-25
Setting the 12” Oven for Proofing . . . . . . . . . . . . . . . . . . . . . . . . . . . . . . . . . . . . . . . . . . . . . . . . . . . . . .23
Oven Door Lock During Self-clean . . . . . . . . . . . . . . . . . . . . . . . . . . . . . . . . . . . . . . . . . . . . . . . . . . . . .24
Before Self-cleaning the Oven . . . . . . . . . . . . . . . . . . . . . . . . . . . . . . . . . . . . . . . . . . . . . . . . . . . . . . . . .24
Oven Rack Slide Assembly . . . . . . . . . . . . . . . . . . . . . . . . . . . . . . . . . . . . . . . . . . . . . . . . . . . . . . . . . . . .24
Setting the Oven for Self-clean . . . . . . . . . . . . . . . . . . . . . . . . . . . . . . . . . . . . . . . . . . . . . . . . . . . . . . . .25
At the End of the Clean Cycle . . . . . . . . . . . . . . . . . . . . . . . . . . . . . . . . . . . . . . . . . . . . . . . . . . . . . . . . . .25
CARE AND MAINTENANCE ...............................................................................................................................26-30
Cleaning Range, Cooktop,Burners, Igniters,Drip Trays, Griddles,Grills, Control Knobs
and Backguard . . . . . . . . . . . . . . . . . . . . . . . . . . . . . . . . . . . . . . . . . . . . . . . . . . . . . . . . . . . . . . . . . . . .26-29
Oven and Door Interior . . . . . . . . . . . . . . . . . . . . . . . . . . . . . . . . . . . . . . . . . . . . . . . . . . . . . . . . . . . . . . .29
Oven Light Bulb Replacement . . . . . . . . . . . . . . . . . . . . . . . . . . . . . . . . . . . . . . . . . . . . . . . . . . . . . . . . .30
Power Failure . . . . . . . . . . . . . . . . . . . . . . . . . . . . . . . . . . . . . . . . . . . . . . . . . . . . . . . . . . . . . . . . . . . . . . . .30
PAR T S ID E N TIFICATION.......................................................................................................................................31-32
HOW TO OBTAIN SERVICE........................................................................................................................................33
WAR RANT Y..........................................................................................................................................................................34
Page 4

When properly cared for, your new DCS Appliance has been designed to be a safe, reliable cooking
appliance. When using this restaurant caliber appliance, use it with extreme care, as this type
appliance provides intense heat and can increase the accident potential. Basic safety precautions
must be followed when using kitchen appliances,including the following:
Read this Use and Care Manual thoroughly before using your new appliance. This will help to
reduce the risk of fire,electric shock, or injury to persons.
Begin by insuring proper installation and servicing.Follow the installation instructions which came
with this appliance. Be sure to have a qualified technician install and ground this appliance before
using.
Have the installer show you where the gas supply shutoff valve is located so you will know how and
where to turn off the gas to the appliance.
If you smell gas, the installer has not done a proper job of checking for leaks. You can have a small
leak and therefore a faint gas smell if the connections are not completely tight. Finding a gas leak
is not a “do-it-yourself” procedure. Some leaks can only be found with the burner control in the ON
position and for your protection it must be done by a qualified service technician.
If by some chance a burner goes out and gas escapes, open a window or a door to let the room air
out. Do not attempt to use the appliance until the gas has had time to dissipate. Follow the
instructions on page 1,“For your safety – if you smell gas”.
This appliance has been factory assembled for natural or LP gas. It should be correctly adjusted
from the factory for the type of gas that is used.
Do not repair or replace any part of this appliance unless it is specifically recommended in this
manual. All other servicing should be referred to a qualified technician.
Children should not be left alone or unattended in an area where appliances are in use. They
should never be allowed to turn knobs, push buttons, sit or stand on any part of an appliance.
Children in walkers, or children crawling can be attracted to the round oven door handle and may
grab and open the oven door. This can result in injury from the door being pulled open on a child,
or severe burns if the oven is in use and hot.
CAUTION:
Do not store items of interest to children above or at the back of any appliance.
Children could be seriously injured if they should climb onto the appliance to
reach these items.
Never store anything in the oven or on the cooktop. Flammable materials can catch fire, plastic
items may melt or ignite and other types of items could be ruined.
Do not hang articles from any part of the appliance or place anything against the oven. Some
fabrics are quite flammable and may catch on fire.
If the appliance is near a window be certain the curtains do not blow over or near the cooktop
burners; they could catch on fire.
Do not use water on grease fires. Turn all burners OFF, then smother fire with baking soda or use a
dry chemical or foam-type fire extinguisher.
Never let clothing,pot holders, or other flammable materials come in contact with, or too close to,
any burner or burner grate until it has cooled. Fabric may ignite and result in personal injury.
SAFETY PRACTICES AND PRECAUTIONS
3
Page 5

Be certain to use only dry pot holders: moist or damp pot holders on hot surfaces may cause burns
from steam. Do not use a towel or other bulky cloth in place of pot holders. Do not let pot holders
touch hot burners, or burner grates.
For personal safety, wear proper apparel. Loose fitting garments or hanging sleeves should never
be worn while using this appliance. Some synthetic fabrics are highly flammable and should not
be worn while cooking.
Do not use aluminum foil to line any part of the oven or cooktop. Using a foil liner could result in
a fire hazard, or the obstruction of the flow of combustion and ventilation air. Foil is an excellent
heat insulator and heat will be trapped underneath it. This trapped heat can upset the cooking
performance and can damage the finish of the oven or the cooktop parts.
WAR NING:
This appliance is for cooking. Based on safety considerations, never use the
oven or cooktop to warm or heat a room. Also, such use can damage the
cooktop or oven parts.
When using the cooktop:Do not touch the burner grates or the immediate surrounding area. Areas
adjacent to the burners may become hot enough to cause burns.
When using the oven: Do not touch the interior surfaces of the oven,the exterior area immediately
surrounding the door or the back trim. The surfaces directly above the oven door may be hot if the
oven has been operated with the door open, or if something has prevented the door from sealing.
Never leave the cooktop unattended when using high flame settings. Boil overs cause smoking
and greasy spill overs that may ignite. More importantly, if the burner flames are smothered by a
severe boil over which effects the igniter, unburned gas will escape into the room.
Only certain types of glass, heat-proof glass-ceramic, ceramic, earthen ware,or other glazes utensils
are suitable for cooktop use. This type of utensil may break with sudden temperature changes. Use
only on low or medium flames settings according to the manufacturer’s directions.
Do not heat unopened food containers; a build up of pressure may cause the container to burst.
During cooking,set the burner control so that the flame heats only the bottom of the pan and does
not extend beyond the bottom of the pan. This could heat and/or melt the handles.
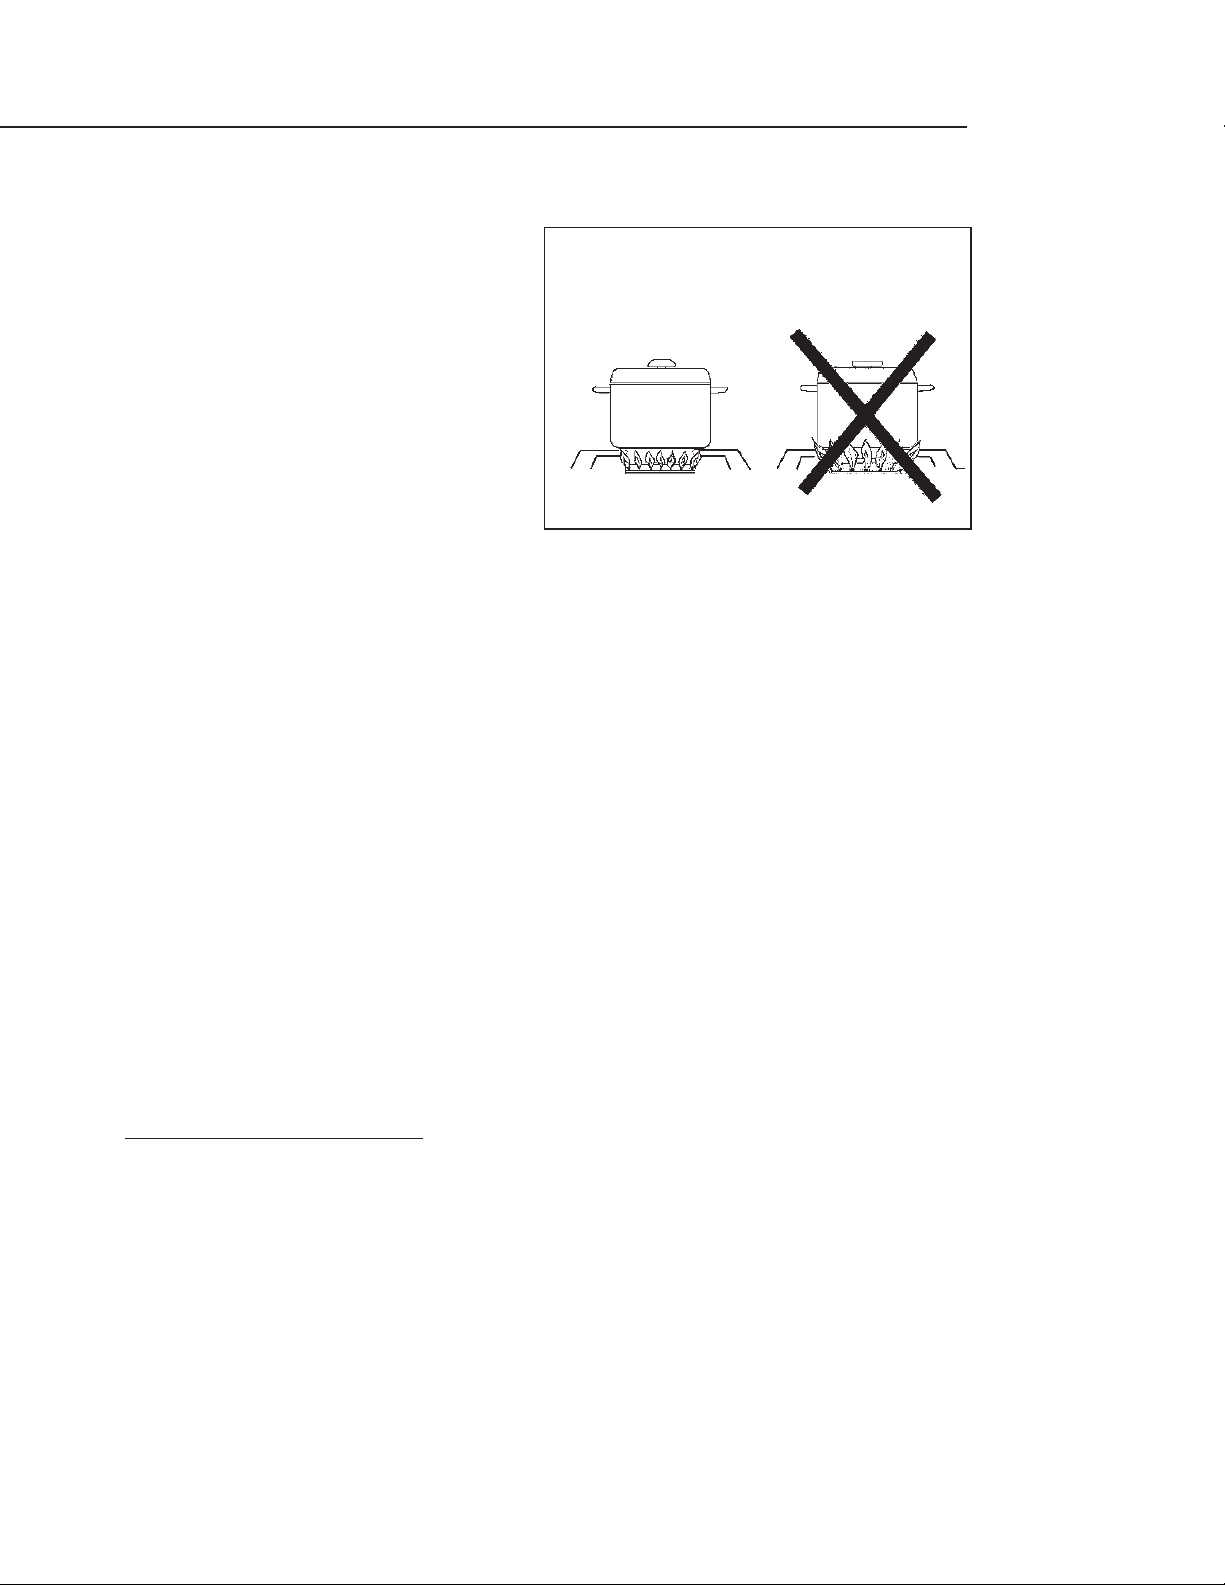
Always use utensils that have flat bottoms large enough to cover the burner.The use of undersized
utensils will expose a portion of the flame to direct contact and may result in ignition of clothing.
To minimize burns, ignition of flammable materials and unintentional spill overs, position handles
of utensils inward so they do not extend over adjacent work areas,cooking areas,or the edge of the
cooktop.
Hold the handle of the pan to prevent movement of the utensil when stirring or turning food.
Grease Is Flammable. Let hot grease cool before attempting to handle it. Avoid letting grease
deposits collect around the cooktop burners. Clean after each use or boil over.
For proper lighting and performance of the cooktop burners, keep the burner ports clean. It may
be necessary to clean these when there is a boil over or when the burner does not light, even
though the electronic igniters click.
SAFETY PRACTICE AND PRECAUTIONS
4
Page 6

Clean the cooktop with caution. Avoid steam burns; do not use a wet sponge or cloth to clean the
cooktop while it is hot. Some cleaners produce noxious fumes if applied to a hot surface. Follow
directions provided by the cleaner manufacturer.
Be sure all the range and/or cooktop controls are turned off and the appliance is cool before using
any type of aerosol cleaner on or around the appliance. The chemical that produces the spraying
action could, in the presence of heat, ignite or cause metal parts to corrode.
Place oven racks in desired position while the oven is cool.If a rack must be moved while the oven
is hot, do not let the pot holders contact the hot interior of the oven.
Use care when opening the oven door; let hot air or steam escape before removing or replacing
foods.
Do not rub,damage, move or remove the door gasket. It is essential for a good seal during baking.
Clean the ventilator hood and filters above the range or cooktop frequently so grease from
cooking vapors does not accumulate on them.
Turn the ventilator OFF in case of fire or when intentionally “flaming”liquor or other spirits on the
cooktop. The blower,if in operation, could unsafely spread the flames.
DO NOT obstruct the flow of combustion or ventilation air to the appliance. Be sure a fresh air
supply is available.
For safety reasons and to avoid damage to the appliance never sit, stand, or lean on the oven door
or cooking surface.
Service should only be done by authorized technicians. Technicians must disconnect the power
supply before servicing this appliance.
WAR NING:
California Proposition 65 - The burning of gas cooking fuel generates some
by-products which are known by the State of California to cause cancer or
reproductive harm. California law requires businesses to warn customers of
potential exposure to such substances. To minimize exposure to these
substances,always operate this unit according to the instructions contained in
this booklet and provide good ventilation to the room when cooking with gas.
SAFETY PRACTICES AND PRECAUTIONS
5
Page 7
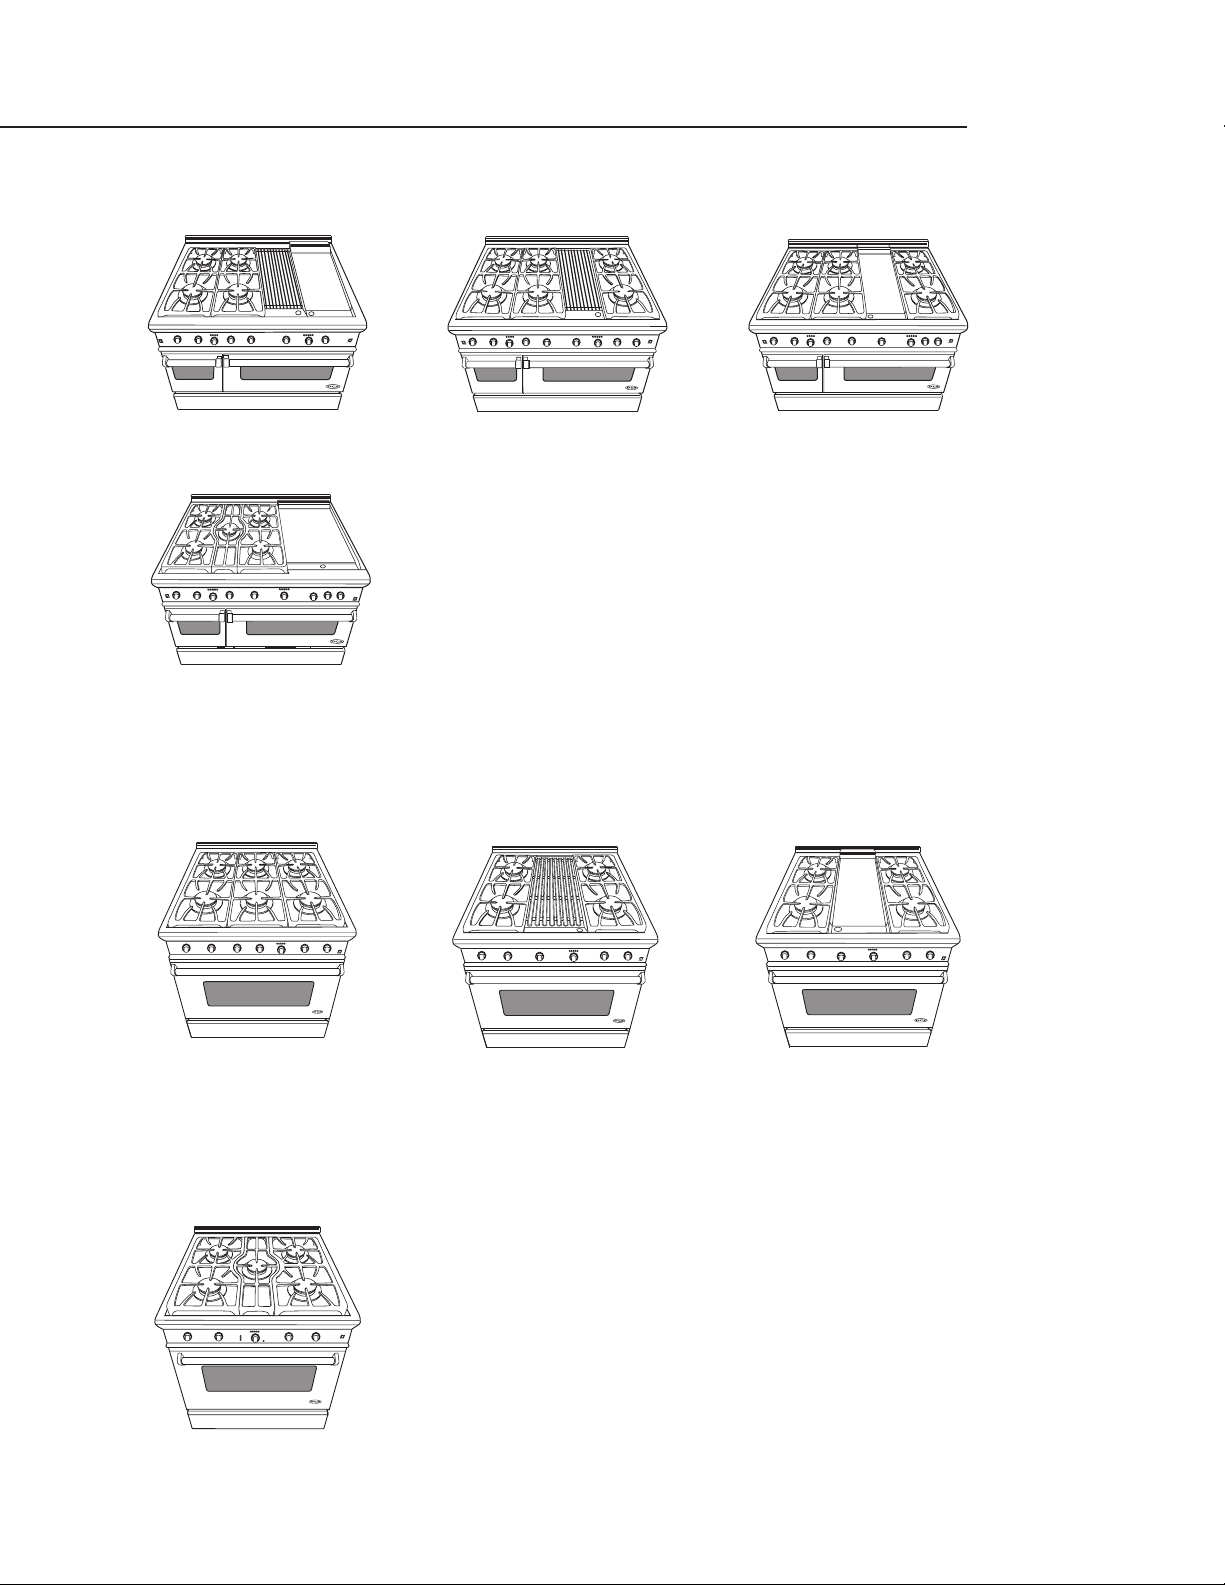
MODEL IDENTIFICATION
6
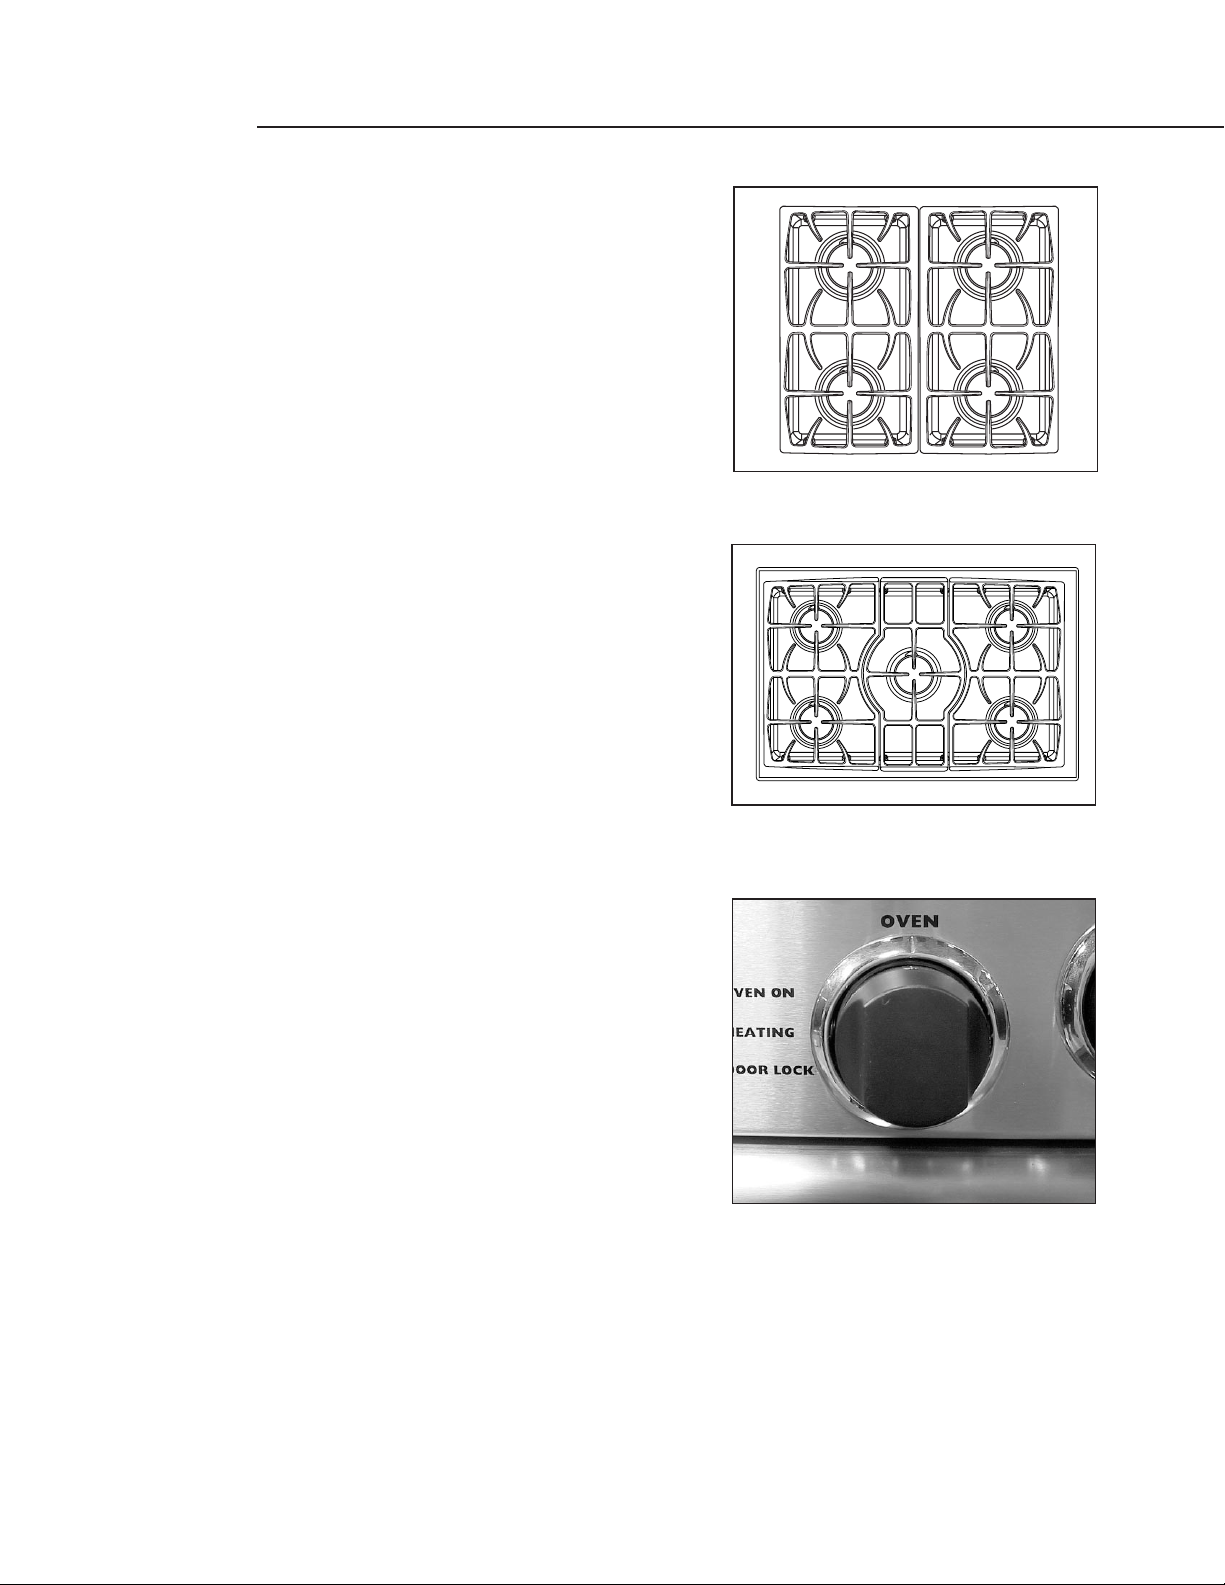
48” RDS RANGE MODELS
RDS-484GG
36” RDS RANGE MODELS
RDS-366
30” RDS RANGE MODELS
RDS-305
RDS-486GL RDS-486GD
RDS-485GD
RDS-364GL RDS-364GD
OVEN ON
HEATING
HEATING
DOOR LOCKED
Page 8
BEFORE USING YOUR APPLIANCE
7
1) Remove all packaging materials and labels from your appliance. If the installer has not set up your
appliance, do it now. Check that you have the following items:
COOKTOP:
Griddle - (RDS-364GD, RDS-486GD, RDS-484GG,and RDS-485GD Models Only)
Grill racks, 2 pieces - (RDS-364GL, RDS-486GL & RDS-484GG Models Only)
5 burner head assemblies, burner caps and grates (RDS-305 and RDS-485GD Models Only)
Radiant tray - to hold ceramic rods for grill - (RDS-364GL, RDS-486GL & RDS-484GG
Models Only)
One removable drip tray (griddle and grill models have drip tray liners,for catching grease)
27” & 24” OVEN:
Two removable Stainless Steel 3 position Rack Slide Assemblies
One,Two-piece broil pan
Three Oven Racks
12” OVEN:
Two oven racks
Two removable Rack Supports
One,Two-piece broil pan
2) Place the oven racks in the proper position before turning on the oven. For correct rack position
check your recipe. The most frequently used position is number 2. The rack positions are numbered
from the bottom as in the floors of a building.
Fig. 1
Rack Positions
3
2
1
3
2
1
Page 9

Do not use aluminum foil to cover the oven racks or to line the oven. Heat can be trapped beneath
the foil, this can cause damage to the oven and the food may not cook correctly.
3) Before baking or broiling:
One at a time turn the oven and broiler burners for 20 to 30 minutes each. This burns off the
manufacturing oils used by the factory. Turn the oven burner on to 450ºF and the broiler burner on
to “Broil”.Turn on the ventilator above your range while these burners are on,as there will be
an odor.
TO INSERT THE OVEN RACKS:
1) Hold the rack with the back safety rail in the up position and towards the rear of the oven. Slip it
into the oven so the rack slides are between the rack and the rack guides.
2) As you slide the rack into the oven tip the front of the rack up slightly, so that the safety stops on
the back of the rack,clear the rack slides. The safety stops keep the rack from sliding out of the oven
when pulled forward.
TO REMOVE OR REPOSITION THE RACKS:
1) Pull the rack forward.
2) Lift the front of the rack up so the safety stops clear the rack slides.
3) Pull the rack forward.
BEFORE USING YOUR APPLIANCE
8
Page 10
COOKTOP USE
9
BURNERS
Your new professional gas range is equipped with
burners typical of those used in restaurants. These
burners are designed for maximum cleanability and
controllability. The large cap spreads the simmer heat out
to avoid too much heat being concentrated on the center
of the pan. The simmer flame is always on when the
burner is in use. The burner should never be operated if
the cap is not in place. All the cooktop burners have
electronic spark ignition to eliminate continuously
burning pilots; when the burner is on and the flame is
blown out, it will relight.
SIMMERING
Your new professional cooktop has exceptionally low
simmering capabilities. The large cap serves as a heat
diffuser to spread out the heat to avoid having a center
hotspot. Keep in mind that because of the high heat
capacity of the outer burner,and the mass of the cast iron
burner grates (they retain heat longer than lighter,
conventional grates) some foods may continue to cook
by retained heat after the burner has been turned off.
Should a strong draft or boil over extinguish the simmer
flame it will relight automatically as the main burner
would.
ELECTRONIC IGNITERS
If a burner does not ignite,
listen for the clicking sound.
If the igniter is not clicking,
TURN OFF THE BURNER.
Check the circuit breaker for
a blown fuse or a tripped
circuit breaker. If the igniter
still fails to operate,see
page 33, “Before Calling For
Service”.To light the burner
manually,see page30,
“Power Failure”.
NOTE: If you are using propane gas, a slight pop or flash
may occur at the burner ports a few seconds after
the burner has been turned “off”. This “extinction
pop”is normal for propane gas.
Simmer
Flame
Cap
Brass
Port
Ring
1
3
4
5
2
RDS-305 COOKTOP SECTION SHOWN
Fig. 2
Fig. 3
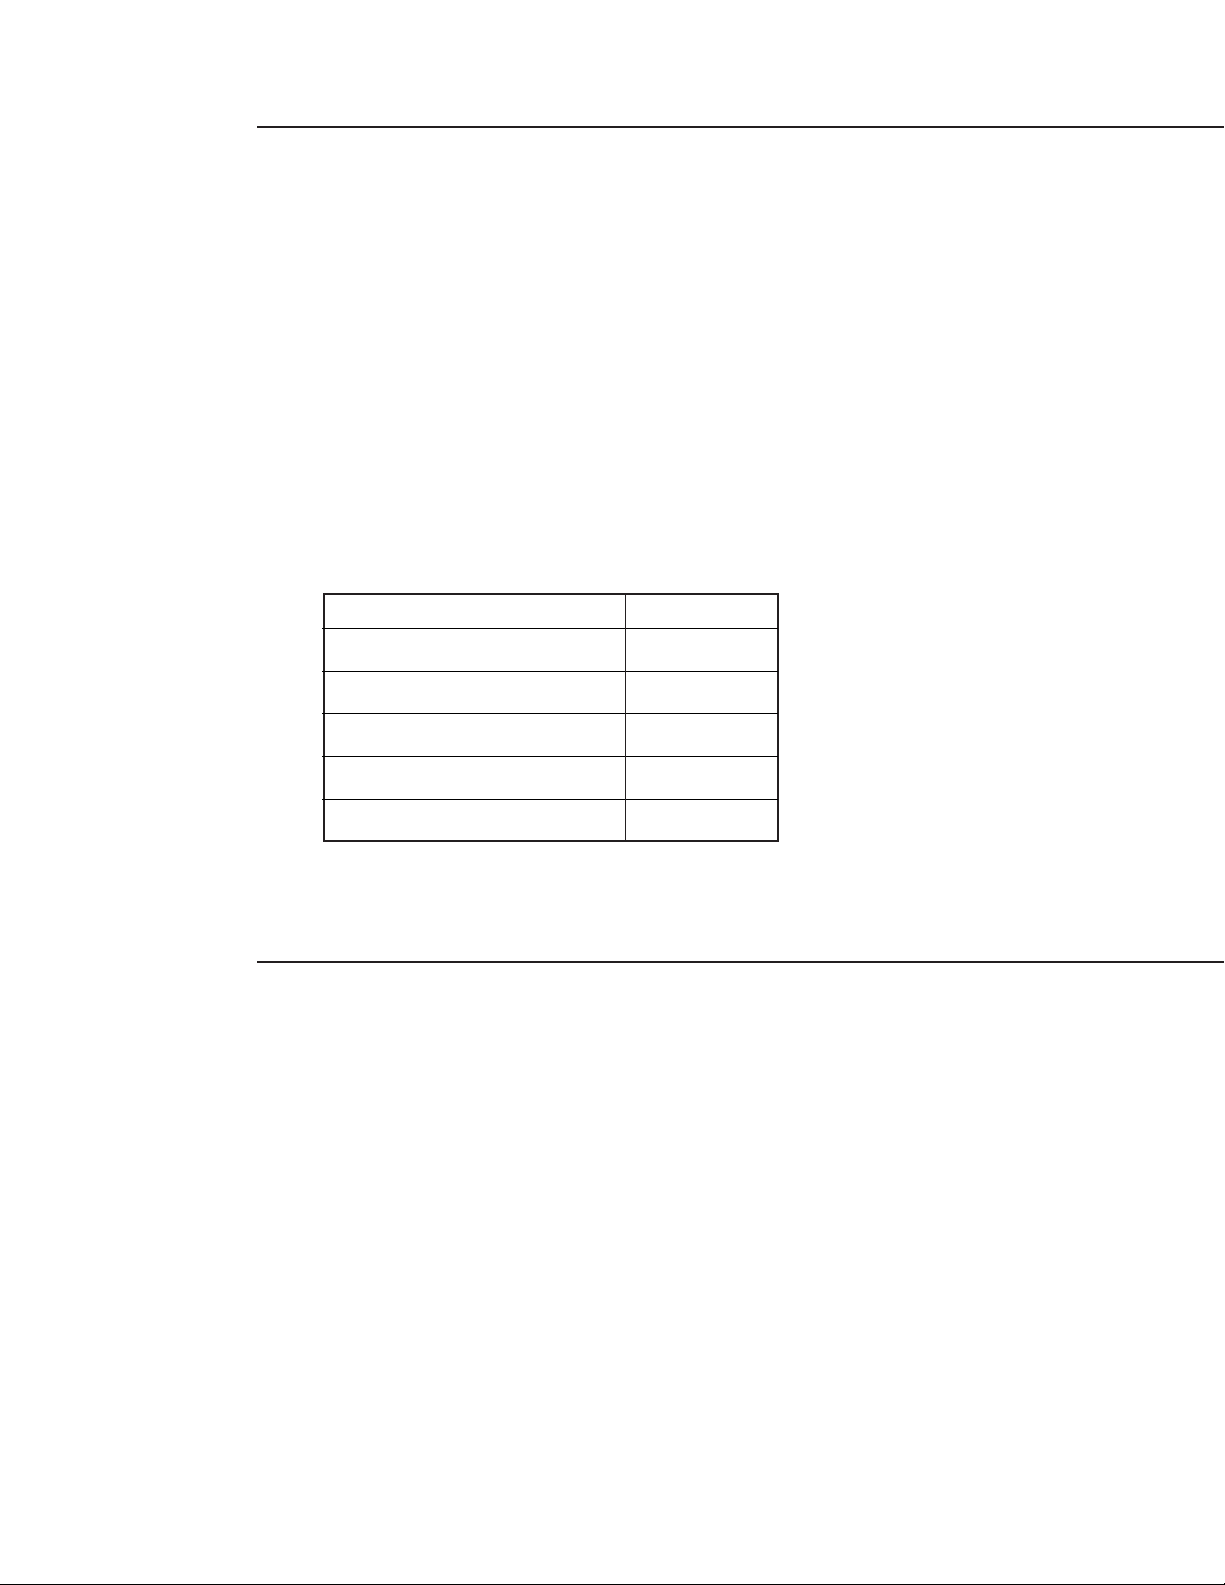
Burner Max. Simmer/Low
Location Btu/hr Btu/hr
305 Nat 36”/48”Nat* LP Nat LP
1 16,000 17,500 14,000 500-1,200 500-1,200
2 16,000 17,500 14,000 500-1,200 500-1,200
3 17,500 17,500** 14,000 500-1,200 500-1,200
4 16,000 17,500 14,000 500-1,200 500-1,200
5 16,000 17,500 14,000 500-1,200 500-1,200
*Note - All burners on 36 & 48 models (except 485 models) rated at
17,500 Btu/hr for Nat. &14,000Btu/hr for LP.
**485 Model only.No location #3 on 36 & other 48 models.
Igniter (Keep Clean)
Page 11
BURNER EFFICIENCY AND FLAME CHARACTERISTICS
It is necessary to keep the burner ports and the
igniters clean for proper lighting and efficient
performance of the cooktop burners. The
burner flame should burn completely around
the burner with no excessive noise or lifting.The
flame should be blue in color and stable with no
yellow tips. An improper air-gas mixture may
cause either a burner flutter or a yellow tipped
flame. A technician should adjust the flame.
During initial use, foreign particles in the gas
line,or dust in the air around the appliance may
cause an orange flame.This will disappear with
use.
FLAME HEIGHT
The correct height of the flame mainly depends
on the size of the bottom of the cooking utensil, the material of the cooking utensil, the amount and
type of food and the amount of liquid in the utensil. Following are some basic rules for selecting flame
height.
For safety reasons the flame must never extend beyond the bottom of the cooking utensil. Never
allow flames to curl up the side of the pan (see Fig.4).
Utensils which conduct heat slowly (such as glass-ceramic) should be used with medium to low
flame. If you are cooking with a large amount of liquid,a slightly larger flame can be used.
SEALED TOP BURNERS
The sealed top burners must be kept clean. Cleaning of the sealed top burners should include the
igniter. The cooktop burners have an infinite number of heat settings and there are no fixed positions
on the control knobs between HI and LO. To turn the cooktop burner on,push in on the control knob
and turn it counterclockwise to the “LITE”position. An audible clicking sound will be heard. When the
gas has been ignited by the electronic spark igniter, turn the knob to the desired setting. (The clicking
sound should stop as soon as the burner is lit).
NOTE: The igniter will continue to click as long as a control knob is in the “LITE”position.
CAUTION:
When turning on any cooktop burner, be sure to stop at the “LITE” position
before turning the burner to a flame setting for cooking. If the burner is not lit
and it is turned beyond the “LITE” position,to HI, MEDIUM,or LO,there could be
a burst of flame when the burner does light. This could cause burns or damage
to the surrounding countertop.
COOKTOP USE
10
Proper Flame Height
Fig. 4
Page 12
COOKTOP USE
11
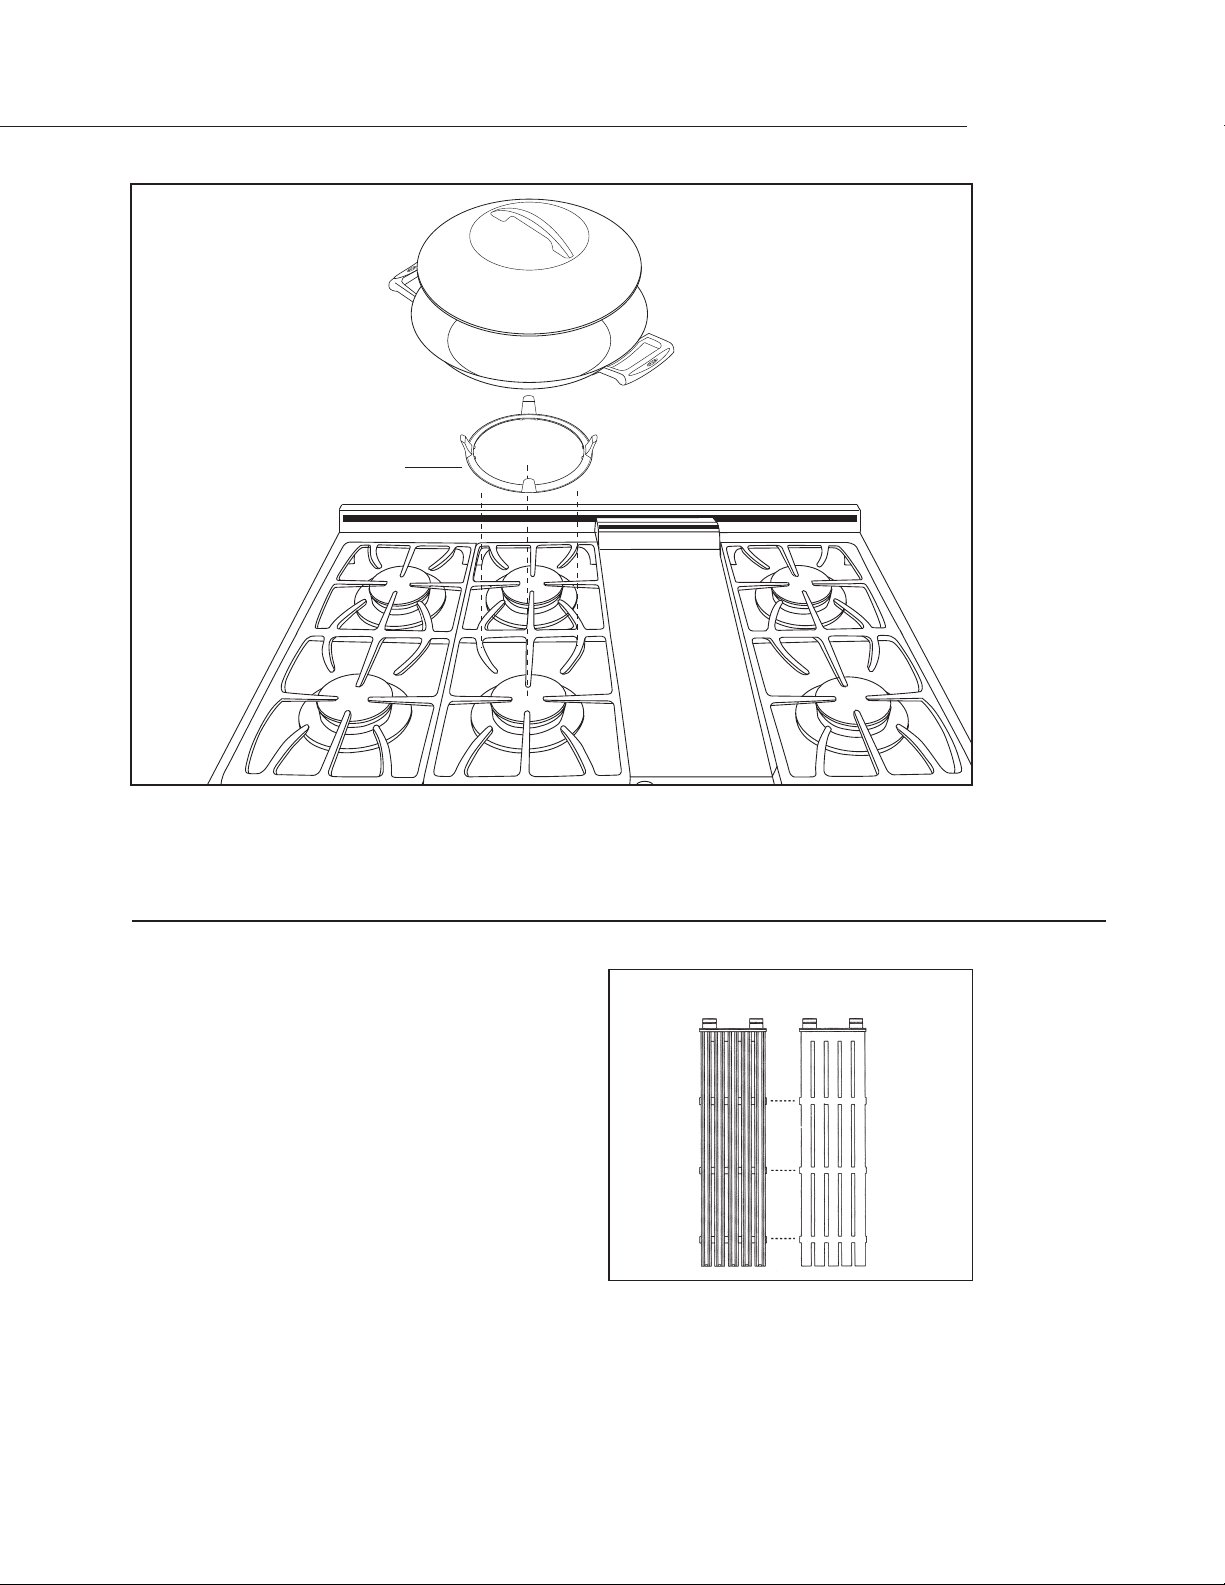
BURNER GRATES
The burner grates are heavy cast iron. They were
designed in sections to make them easier to remove
and clean. (See fig. 5 & 6)
COOKWARE
For best results we recommend using professional
cookware.This type of utensil can be found at your finer
department stores, specialty cooking shops, or
restaurant supply stores. If using regular cookware, be
very careful if the pans have plastic handles, as these
large professional size burners can flame up on the
outside of the pan and melt or bubble the handles.
CONTROL KNOBS
The control knobs are readily associated with the
burners they control. The cooktop control knobs are
labeled and in front of the burners. The oven control is
placed slightly lower than the other control knobs. This
is due to the physical size of the commercial type
thermostats used on the product (see fig. 7).
WOK RING
A Wok ring is provided with your new DCS appliance.
The ring is cast iron, and has a porcelain enamel finish.
It can be used with the DCS model CW wok and most
commercially available woks. To use the ring, place it on
the grate over the desired burner. The vertical tabs on
the ring should be aligned with the main fingers of the
grate. The small protrusions on the bottom surface of
the ring should straddle the grate fingers to prevent the
ring from rotating during cooking. See fig. 8 page 12.
The bottom of the wok should be supported and
retained by the vertical tabs of the ring.
For best performance on 30” ranges, the ring and wok
should be used on the center burner, as it has the
highest output on the top section. On 36” and 48”
ranges and cooktops,the ring and wok may be used on
any surface burner. To clean the wok ring,place it in the
dishwasher after use. Stubborn food deposits may be
removed by soaking to loosen the soil,then washing as
usual.
Fig. 5 (36” & 48” models)
Fig. 6 (305 & 485 models)
Fig. 7
Page 13
GRILL
The two grill grates are reversible (see fig. 9). Place the
side with the two grooved tabs towards the back of the
cooktop. The grill grates are made of durable porcelain
enameled cast iron. One side of the grate is ridged (side
A) and should be used for foods where you want the fat
to run off, such as steak or hamburger patties. The
ridges are slopped so the fat runs toward the front of
the grill and can easily run down to the cooler area of
the drip tray and away from the intense heat of the
burner. The other side of the grate (side B) is designed
for foods that need more support while cooking, such
as fish. Food cooked on the grill section achieves the
same flavor as food cooked on an outdoor grill. The
intense radiant heat from the ceramic rods caramelizes
the fats and juices that are brought to the surface of the
food,giving it the barbecued flavor.
NOTE: This gas grill may cook slightly faster than you are used to.
GRILL USE
12
COOKTOP USE
Fig. 9
Fig. 8
Top View of
Wok Ring
Side A
Side B
Page 14

GRILL USE
13
CERAMIC RODS
The layer of ceramic rods, under the grill racks, will last for many years with proper care. They are
shipped from the factory pre-assembled on the radiant tray,ready to be set in place into the fire box,
under the grill racks. Be sure to remove any packaging material from the radiant tray and rods before
using the grill. Burned food particles and ash can be emptied off the radiant tray when cool by
shaking over a waste receptacle.Chipping or cracking of the ceramic rods may occur as they may get
brittle with age, depending on frequency of use. This is normal and does not affect the cooking. Do
not replace the radiant tray/ceramic rods with alternates. Contact DCS for genuine factory-direct
replacement parts.
USE OF THE GRILL
Before starting to cook on the grill, be sure the drip tray and liners are in place and that you have the
grill racks turned to the side you want for cooking. Preheat the grill for 10 minutes with the control
knob set on HI. When the grill is preheated, turn the knob down to medium to low, place the food on
the grill. Cook it to the doneness desired. During cooking, it may be necessary to adjust the heat
setting. The control knob may be set to any position between HI and LO. For proper searing and
browning,the grill requires high to medium heat. When cooking,you will use medium to low heat the
entire cooking time. With large pieces of meat or poultry,you may need to turn the heat to low setting
after the food has been seared. This lower heat setting will allow the food to cook through without
burning the outside. When using a sugary marinade or barbecue sauce, it may be necessary to turn
the heat setting down near the end of the cooking time. Do not leave the grill unattended while it
is turned on. When you are finished cooking, allow the grill and the drip trays to cool before cleaning
them. They should be cleaned each time they are used.
NOTE: The longer you preheat the grill, the darker the grill marks.
EXCESSIVE FLARE UPS AND FLAMING
Occasionally grease drippings ignite. These drippings will create minor puffs of flame for a second or
two. This is normal when cooking on a grill. You may find it handy to have a spray bottle filled with
water to lightly spray the flare-up. If the flame becomes excessive, remove the food from the grill.
Lower the heat setting. Replace the food when the flare-up subsides. To prevent flare-ups from
happening, trim the fat from around the edges of steaks and chops, use hamburger that is lean,
remove the fat that is on poultry, etc. When turning any kind of meat or poultry, the melted fat will
drop onto the ceramic rods and it may create a flare-up. If this happens,use a long handled spatula to
move the food to another area.
GRILLING HINTS
The doneness of meat is affected by the thickness of the cut. It is impossible to cook a thin piece of
meat to a rare doneness. A steak should be at least 1-inch thick to have it turn out rare and juicy.The
cooking time is affected by the temperature of the meat when you start to cook it, the size and shape
of the cut and the kind of meat you are cooking. The degree of doneness desired also affects the time.
When turning the meat over, always use a spatula or tongs as it will not puncture the meat allowing
the juices to run out. This will help to keep the meat juicy. Turn the meat only once, as juices are lost
when the meat is repeatedly turned. Be sure to trim any excess fat from meat or poultry. To prevent
steaks or chops from curling while they are being cooked,slit the fat around the edges at about 2-inch
intervals. To test for doneness,make a small cut in the center of the meat.
Page 15
GRIDDLE USE
14
The built-in griddle on your cooktop is made
from Type 304 stainless steel, highly polished to
provide a smooth cooking surface. It is normal for
it to darken with use as oils cook onto the surface
to provide a stick resistant base or “seasoning”.
Since the griddle is made from stainless steel,the
surface will not rust. The griddle burner is
thermostatically controlled and cycles on and off
to maintain the set temperature. The “Heating”
light indicates that the burner is “on”.The griddle
assembly is not to be removed for cleaning and is
held in place by two front screws and one rear
screw. These are mainly there to keep the griddle
from shifting in transit and positioning, thus
avoiding breakage of any ignition components.
Once the unit is in position, the rear shipping
screw can be removed. It is located beneath the
griddle flue cover which is removed by lifting off
(be careful not to scratch your backguard during
removal of the cover). Remove the center
shipping screw. The two outer screws are
leveling screws. They can be turned to level the
griddle or to provide a forward slope to help
grease and oils to drain away from the food
being cooked. After using the griddle a few
times, you will be able to judge the slope best for
the foods you are cooking and your personal
preference.
BEFORE USING THE GRIDDLE FOR THE FIRST TIME OR TO RE-SEASON
1) Clean the griddle thoroughly with hot, soapy water to remove any protective coating.
2) Rinse with a mixture of 1 quart water and 1 cup white vinegar. Dry thoroughly.
3) Pour 1 teaspoon vegetable oil into the center of the griddle (do not use corn oil as it gets sticky).
Rub the oil over the entire surface of the griddle using a heavy cloth.
4) Turn the control knob to a Medium setting (350ºF).Turn the heat Off when the oil begins to smoke.
Allow the griddle to cool.
5) Repeat Step 3. Be sure to cover the entire surface with the oil.
6) Repeat Step 4. Allow the griddle to cool. Wipe the entire surface of the griddle using a heavy cloth.
Apply a very thin layer of vegetable oil.The griddle is now ready to use. If the griddle is not used for
a period of time, re-season it occasionally.
NOTE: It is normal for the griddle to darken with use.
Shipping Screw
(remove)
Outer Leveling
Screws (2)
Griddle Flue
Cover
Fig. 10
Page 16
USE OF THE GRIDDLE
Before starting to cook on the griddle, be sure the drip tray and liners are in place. Preheat griddle for
15 minutes with the control knob set to the temperature suggested on the cooking chart. When the
griddle is preheated,the HEATING light will turn off. Place the food on the griddle and cook to desired
doneness.
NOTE: When the griddle is properly seasoned it can be used without any additional
shortening. However, it can be used for flavor. A light mist of non-stick vegetable
spray,applied before cooking to a cool griddle, makes delicate foods easier to turn.
GRIDDLE COOKING CHART
OVEN COOKING ELEMENTS
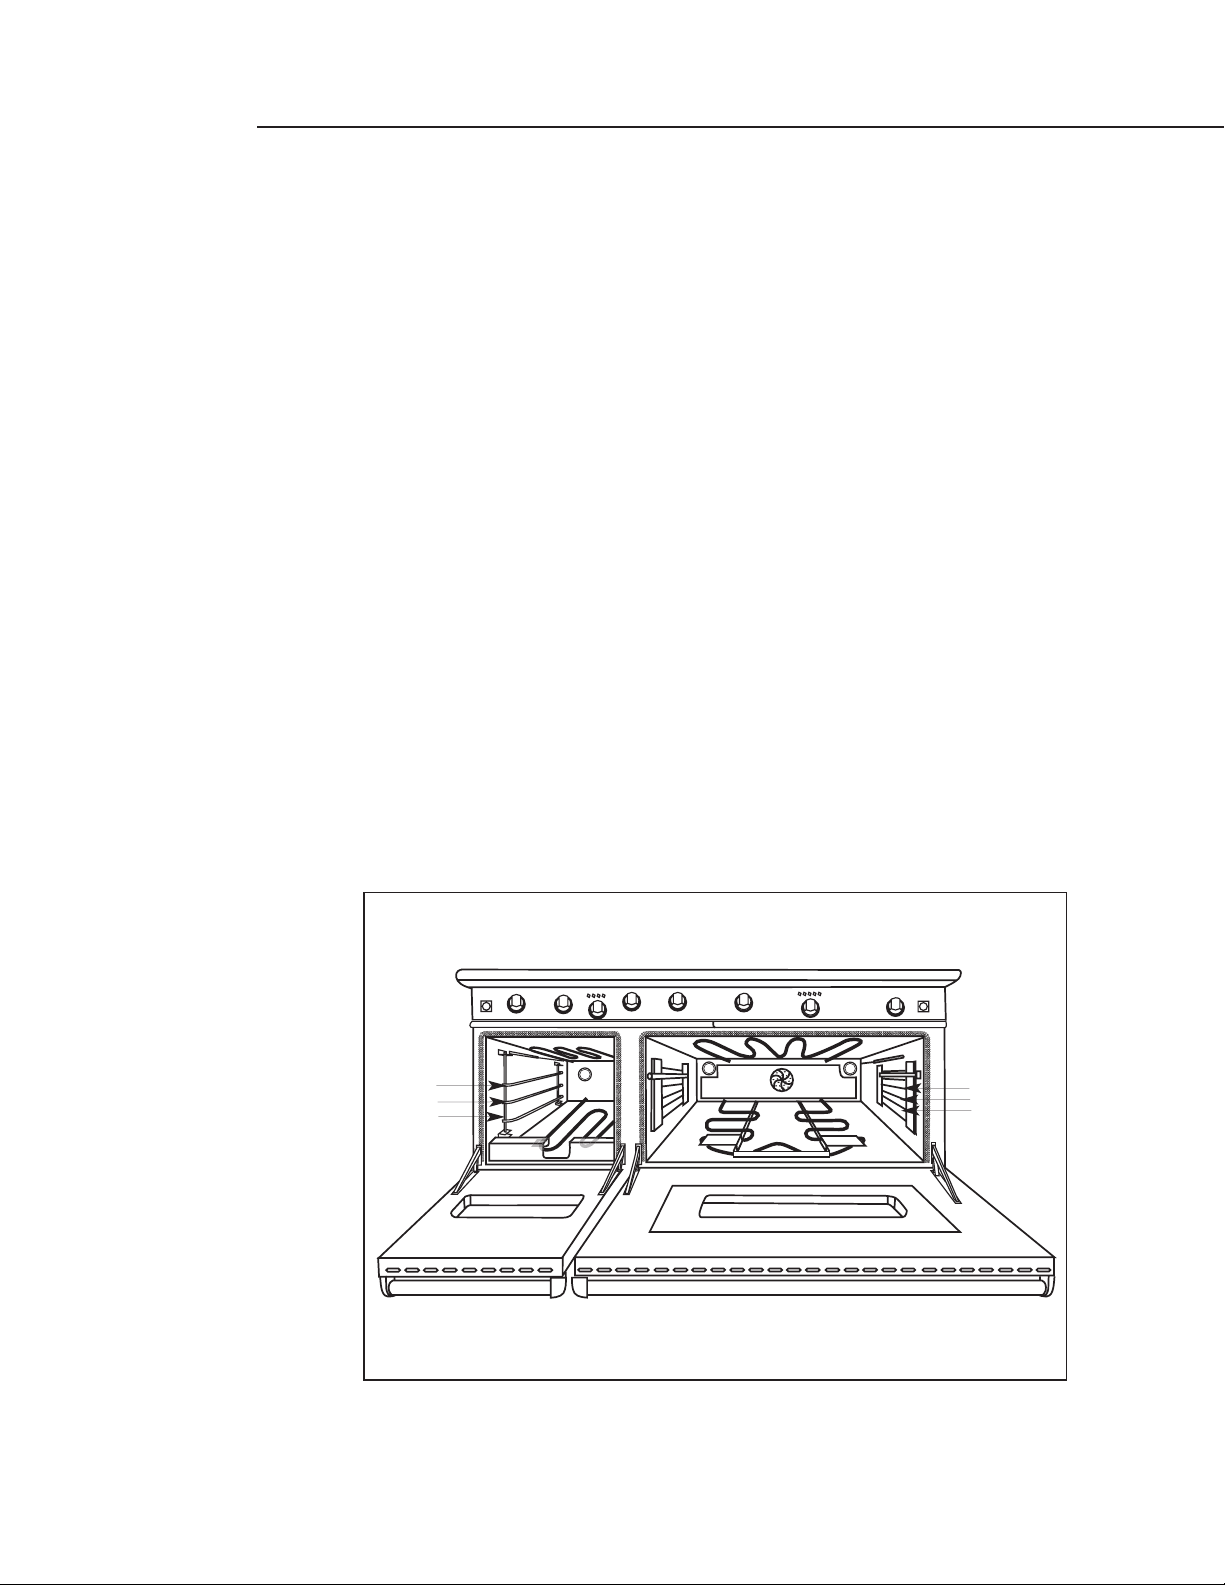
Your new professional RDS range is equipped with bake and broil cooking elements. The 27” oven
bakes at 6,000 Watts while the 27”and 24” ovens broil at 4,000 Watts. On the (RDS 305 models) the 24”
oven bakes at 3,700 watts. The 12” proofing oven (RDS 48 models only) bakes at 3,700 Watts and broils
at 3,600 Watts.
OVEN
Your new oven can be used in three cooking modes; convection bake, regular bake, and regular broil.
To help you decide which way to cook your food read this information first. Remember this is a new
oven and the thermostat has been checked for accuracy.Your old oven may have had a thermostat
that over the years got a little hot or a little cold. Check your recipes for the correct time and
temperature. Use caution when using your old ovens time or temperature. You may have been
compensating for your old oven being out of calibration. Models RDS-484GG, RDS-485GD, & RDS486GL and RDS-486GD have two ovens. The 27” oven on the right side can be used for standard
baking, fan assisted convection baking, and broiling. It is also self-cleaning. The 12” oven on the left
side, can be used for standard baking, broiling, and proofing baked goods. It is also ideal for baking
small amounts of food when you don’t want to heat the large oven.
GRIDDLE USE
OVEN USE
15
Eggs
Bacon, Ham, Pork Chops
Pancakes, French Toast
Sausage, Grilled Cheese Sandwiches
FOOD TEMPERATURE
225ºF to 250ºF
300ºF to 325ºF
325ºF to 350ºF
350ºF to 375ºF
400ºF to 425ºF
Hash Brown Potatoes
Page 17

OVEN USE
16
CONVECTION BAKING
Convection baking is baking with a fan at the back of the oven circulating the hot air in a continuous
pattern around the food. This circulating hot air heats and browns the surface of the food more
effectively than in a standard oven. This allows most foods to be cooked at lower oven temperatures
or in less time, if baked at the regular temperature. The air is recirculated and reheated. Uncovered,
longer cooking foods such as large pieces of meat or other foods that can be cooked in low sided
baking utensils or air leavened foods, are where you will see the most savings in cooking time.
Using multiple racks at the same time will achieve a good time saving,as you can cook more food at
the same time.
Foods Suitable for Convection
Appetizers Breads Oven Meals (1 to 3 racks)
Cookies Main Dishes Roasts
Pies Poultry
Air Leavened Foods (Angel Food Cake, soufflés, cream puffs,meringue shells)
REGULAR BAKING
Bake is baking with hot air; there is no fan. The air movement comes from natural convection. As the
air heats, it moves to the top of the oven. This oven mode is the same as you have been using for
baking on one or two racks.
Foods Suitable for Bake
Appetizers Pies, Cakes Breads Poultry Roasts
Desserts Main Dishes Oven Meals (1 to 2 racks)
BROIL
Broiling is cooking by intense infrared radiation supplied by the broil burner element located at the
top of the oven. Since broiling is cooking by radiant heat it is not necessary to use the convection fan
in the broil mode.
Foods Suitable for Broil
Top Browning: Casseroles, Breads
Appetizers Meats Poultry Fish
CONVERTING RECIPES TO CONVECTION BAKING
Low sided baking utensils will give the best results as the hot air can reach all sides of the food easier.
The oven temperature can be left the same as the recipe and the food cooked a shorter period of time.
The temperature can be lowered 25ºF and the food will probably take the same length of time to cook
as the recipe states. If you find that food is adequately browned on the outside, but not done in the
center, lower the temperature another 25ºF and add to the baking time. When reducing the
temperature always check the food for doneness, a minute to two before the minimum time stated in
the recipe,as time can always be added. Some recipes will cook faster than others. There is no way to
predict exactly how long each recipe will take when you convert it to convection. Convection will be
easier to use after you have used it a few times as you will begin to understand the way it bakes.
SELECTING UTENSILS FOR CONVECTION BAKING
Cooking by convection does not require any specially designed baking utensils. You probably have
many utensils in your kitchen that are suitable to use. When choosing a baking utensil, consider the
material, the size and the shape as they all affect the baking time, the palatability and the appearance
of the finished product. Metal bakeware (aluminum,steel and cast iron) all result in the fastest cooking
time and the best end product.
Page 18

OVEN USE
17
Aluminum pans work best for all types of baked goods. For the best browning, use a pan with a dark
or dull finish that absorbs heat, when baking pies and breads. A shiny finish works best for cakes and
cookies, since it reflects some of the heat and provides a more tender surface. Cookie sheets with only
one lip will give the best results, as the heated air can circulate all around the sides of the food. For
roasting use the bottom of the broil pan and elevate the meat on a metal roasting rack. Glass-ceramic
or glass utensils do not conduct heat as well as metal, but they can be used. Use them for foods that
do not require a dark brown crust or crisping,such as soufflés.
Baked items cook more quickly and evenly if they are individually smaller in size,i.e. two or three small
foods do better than one large piece. When single food items are baked,always center the food on the
rack. If several foods are being baked,space them evenly on the rack or racks.
CONDENSATION
During any cooking process there is a certain amount of moisture that evaporates from the food. The
amount of moisture that condenses on the oven depends on the moisture content of the food. The
moisture will condense on any surface that is cooler than the inside of the oven, such as the control
panel or the top of the door.
TO GET THE BEST RESULTS
Baking:
Follow the recipe amounts and ingredients, including the size and shape of the baking utensil
recommended in the recipe.
Do not open the open door “just to peek”, use the interior oven light and look through the window.
Do not use the oven for storage, especially when baking in the oven. Extra utensils, not being used
for baking, can affect the food product, the baking time, the browning and end result.
If you are using glass utensils, lower the temperature 25ºF.
Use a minute timer,set for the minimum time suggested in the recipe.
Convection Baking:
Follow the first three recommendations above.
Metal utensils give better results, in convection, than do glass baking utensils. If you use glass, it
usually is not necessary to lower the temperature an additional 25ºF.
Use a minute timer,set for less than the minimum time suggested in the recipe,the first time you use
a recipe in the convection mode.Be sure to note the new baking time on your recipe, for future
reference.
Be sure to read the basic information on convection before using the oven for the first time.
Keep in mind that convection baking results vary, depending on type of product. In many cases,
standard bake yields superior results over convection.
Page 19

OVEN USE
18
PREHEATING
Preheating takes about 10 to 15 minutes depending on the temperature set. Preheating is usually
necessary for foods baked at high temperature for a short period of time, i.e. drop cookies. The oven
heating light will turn off when the oven has reached temperature.
SETTING THE 12” OVEN FOR BAKING (48” Models Only)
To use the 12” Proofing Oven to bake (smaller oven on left side), simply push in the “BAKE”switch on
the valve panel, above the oven knob over the small oven and turn the control knob to the
temperature used in the recipe.
1) With the thermostat knob “OFF”,Press BAKE selector button.
2) Set desired temperature on thermostat dial.
The “OVEN ON”light turns on.
The “HEATING” light turns on.
Once the “HEATING” light cycles off the first time, the Oven is preheated.
The “OVEN ON”light remains on until the “OFF”Selector button has been
pushed, or the Thermostat has been turned to the “OFF”position.
SETTING THE 27” & 24” OVEN FOR BAKING
Decide if you are going to use BAKE or CONVECTION BAKE. These cooking modes are for baking,
roasting or warming using one,two or three racks. If you are going to use regular Bake simply push in
the “BAKE” switch on the valve panel, above the large oven knob and turn the control knob to the
temperature used in the recipe. To use convection Bake push the convection switch (located on the
control panel) and turn the control knob to the temperature desired.
1) Press BAKE or CONVECTION BAKE Selector button.
The convection fan will turn on if “CONVECTION BAKE”is selected.
2) Set desired Temperature on Thermostat Dial.
The “OVEN ON”light turns on.
The “HEATING” light turns on.
Once the “HEATING” light cycles off the first time, the oven is preheated.
The “OVEN ON”light remains on until the “OFF”Selector button has been
pushed, or the Thermostat has been turned to the “OFF”position.
Page 20

OVEN USE
19
27” & 24” OVENS
The larger 27" self cleaning convection oven is located on the right side of a 48" RDS Range or is the
only oven on a 36" Range. The oven comes standard with (3) oven racks and three position roller
assisted rack supports. A porcelainized steel broiler pan is included with this oven.
NOTE: About the roller assisted rack supports (27" and 24" oven only):
Specifically engineered from high temperature materials for in oven use, they will stand up to years of
use. They are especially functional when the oven racks are supporting the heavy food products
associated with this high capacity oven. They must be removed before the oven can be put into self
clean. See page 30 for care of the rack supports. All three dual fuel ovens come with a 2-pc. broil pan.
12" OVEN (48" RANGES ONLY)
The 12" oven comes equipped with (2) oven racks and three position rack supports. The rack supports
are removable for cleaning. Also included is an aluminum broil pan and porcelainized steel bottom
pan for easy cleaning.
OVEN RACKS
CAUTION:
Aluminum foil should never be used to cover the oven racks or to line the oven
bottom.The trapped heat can damage the porcelain and the heated air cannot
adequately reach the food being baked.
Baking
One or two racks can be used simultaneously during bake. Place the rack(s) in the desired position
before turning the oven on. Store any unused rack(s) out of the oven. Rack position 2 (second from
bottom) will probably be used the most, for single rack baking. If you are using two racks simultaneously,be sure to check the food on the bottom rack sooner than the minimum time. The food on the
lower rack position may cook slightly faster than the food on the upper rack, particularly if you are
using large baking utensils.
If you are using two racks simultaneously, be sure to stagger the baking utensils so that one is not
directly above the other and the heated air can circulate freely around each pan. Allow at least 1” of
space between the oven walls and the pans. If using large or commercial size baking utensils,the food
may take a few extra minutes as the air cannot circulate as freely as it does with a smaller pan. When
using commercial size baking utensils, use only one rack as the heat does not have the room to
circulate.
Convection Baking
All racks can be used simultaneously during convection baking. Place the racks in the desired position
before turning the oven on. Store the unused racks out of the oven. Rack position 2 (second from
bottom) will probably be used the most, for single rack baking. When baking on more than one rack
you do not need to stagger the pans. However,allow at least one inch of space between the oven walls
and the pans so the heated air can circulate.
Page 21

OVEN USE
20
HIGH ALTITUDE BAKING
Recipes and baking times vary if you are baking at a high altitude. For accurate information write to
the Agriculture Extension Service, Colorado State University,Fort Collins, Colorado 80521. Specify the
type of information and the baking mode (convection bake or bake) you need i.e. cakes, cookies,
breads, etc. There may be a cost for the bulletins.
SETTING THE OVEN FOR BROILING
When the "Broil" selector button is pressed you will hear a cooling fan begin to operate and feel an air
current above the oven door. This air current serves to keep the control area above the oven cooler
during open door broiling. The cooling fan must be running for the broiler to operate. NEVER “OPEN
DOOR BROIL” WITH CHILDREN NEARBY.
Preheating
The broiler does not need to be preheated for most broiling. However, fast cooking foods such as thin
strips of meat or fish may require a short preheating period of 2 to 3 minutes (on RDS 305 models
preheat broiler 10 minutes,closed door suggested for best results) to allow the food surface to brown
in the same time the food takes to be cooked throughout.
To G e t the Best Results
Defrost the food before starting to cook.
Leave the door ajar at the broil stop.
NOTE: If the door is closed during broiling, the oven cavity may get hot enough to cycle the
broil element on and off, producing food that tastes baked/roasted instead of
broiled.
Set a minute timer for the minimum time to check the food. Steaks should be at least one inch
thick if a rare doneness is desired.It is difficult to get rare with meat that is thinner, or to get a nice
brown piece of meat.
After half the total cooking time, turn the food over only once. It is not necessary to turn over thin
foods (filet of fish, ham slices, etc.) Liver slices must be turned over.
When top browning, use metal or glass-ceramic bakeware. DO NOT use heat-proof glass or pottery
as this type of glassware cannot withstand the intense heat of the broiler burner.
NOTE: You cannot use the broiler burner and the bake burner at the same time. When one is
on, the other cannot be turned on. Do not use the convection fan in the broil mode.
Page 22

OVEN USE
21
Using a Meat Thermometer to Broil
To accurately determine the doneness of a thick steak or chop (1-1/2 inches thick or more), use a meat
thermometer. Insert the point of the thermometer into the side of the meat to the center. Cook the
first side to 90ºF for rare meat. Cook the first side to 100ºF for medium to well done. Cook the second
side to the desired degree for the doneness you want, 135ºF to 140ºF for rare, and 150ºF to 155ºF for
medium and 160ºF to 165ºF for well done. If you are cooking pork, cook to 170ºF. A large two-piece
broil pan comes with your new range. When you are broiling,always use both pieces. Do not cover the
grid with aluminum foil. This slotted grid allows the grease drippings to flow into the bottom of the
pan keeping it away from the intense heat of the infra-red broiler burner. This helps to minimize the
smoking and spattering of the grease.
NOTE: When the oven is used for an extended period of time at a high temperature, the
cooling blower may turn on. This is normal. The cooling blower will also operate
during Broil and the Self-Cleaning cycle. If the blower is not running during these
modes, do not use the oven. Call a qualified appliance technician to repair the unit.
Oven Rack Position
The rack position depends on the type and thickness of the food. Thick pieces of meat or poultry
would typically be broiled on rack position 2, steaks, chops and hamburger, would be broiled on rack
position 3. If top browning casseroles or bread the thickness of the food would indicate the rack
position. Casseroles and bread would typically be browned on rack position 2 or 3.
USING THE OVEN FOR SLOW COOKING OR LOW TEMPERATURES
The oven can be used to keep hot food hot,to dehydrate food,to warm plates, for slow cooking (as in
a crock pot), and to defrost foods.
You can keep hot, cooked food at serving temperature. Set the oven to the temperature suggested in
the chart. Rare meat must be eaten when it is removed from the oven,as it continues cooking from its
own heat.
To keep food moist, it must be covered with aluminum foil or a lid.
To dehydrate food, follow suggestions in a recipe.
To warm plates, check with the dishware manufacturer for the recommended temperature.
To use the oven as a slow cooker set the oven control knob to 225ºF, place the food in the oven in
a pan with a tight fitting lid. Follow recipes for this type of cooking.
To thaw uncooked frozen food, set the oven control knob to “warm”.Be sure the food is tightly
wrapped in foil. Thaw the food just enough to handle it. Cook immediately. Do not refreeze.
To thaw frozen cooked food,set the oven control knob to 170ºF. Loosen the freezer wrapping.
Do not use plastic wrap or wax paper in the oven.
FOOD SAFETY:
According to the United States Department of Agriculture you should not
hold foods at temperatures between 40ºF to 140ºF for longer than 2 hours.
Page 23

OVEN USE
22
SUGGESTED TEMPERATURES TO KEEP FOOD HOT
INTERNAL COOKING TEMPERATURES
Food Oven
Tem pe rature
Beef
Rare 150º - 155ºF
Medium 155º - 170ºF
Well Done 170º - 180ºF
Bacon 200º - 225ºF
Biscuits and Muffins 170º - 185ºF
(covered)
Casserole (covered) 170º - 200ºF
Fish and Seafood 170º - 200ºF
French Fried Foods 200º - 225ºF
Gravy or Cream Sauces 170º - 180ºF
(covered)
Food Oven
Tem pe rature
Egg and Egg Dishes
Eggs Cook until yolk
and white are firm
Egg Casseroles 160º F
Egg Sauces, Custards 160º F
Ground Meat and Meat Mixtures
Turkey, Chicken 165°F
Beef,Veal, Lamb,Pork 160°F
Fresh Beef,Veal, Lamb
Medium Rare 145°F
Medium 160°F
Well Done 170°F
Fresh Pork
Medium 160°F
Well Done 170°F
Roast Beef
Cooked commercially, 140°F
vacuum sealed,and
ready-to-eat
Food Oven
Tem pe rature
Poultry
Chicken,Turkey-whole 180°F
Chicken,Turkey-dark meat 180°F
Poultry-breast 170°F
Duck and Goose 180°F
Stuffing
Cooked alone or in bird 165°F
Sauces, Soups,Gravies,Marinades
Used with raw meat, Bring to a boil
poultry, or fish
Seafood
Fin Fish Cook until opaque and
flakes easily with a fork
Shrimp, Lobster, Should turn red and flesh
Crab should become pearly
opaque.
Scallops Should turn milky white
or opaque and firm.
Clam, Mussels, Cook until shells open.
Oysters
Leftovers 165°F
Food Oven
Tem pe rature
Lamb and Veal Roasts 170º-200ºF
Pancakes and Waffles 200º - 225ºF
(covered)
Potatoes
Baked 200ºF
Mashed (covered) 170º - 185ºF
Pies and Pastries 170ºF
Pizza (covered) 225ºF
Pork 170º - 200ºF
Poultry (covered) 170º - 200ºF
Vegetables (covered) 170º - 175ºF
Page 24

PROOFING / SELF CLEANING MODE
23
12” OVEN PROOF MODE
This feature of the 12” Proofing Oven maintains a warm, draft free environment useful for proofing
yeast leavened products.
SETTING THE 12” OVEN FOR PROOFING
1) Place dough in dish in the small oven.
2) Press “PROOF” Selector button
The “OVEN ON” light and oven interior lights turn on.
The “HEATING” light will not turn on in the proofing mode. The thermostat dial setting
does not effect the proof temp.
The ideal temperature for proofing will be maintained until the “OFF” button is depressed.
3) Set a Minute timer for less than the minimum proof time.
NOTES: A) Do Not Open the Oven Door unnecessarily as doing so will lower the oven
temperature and lengthen proofing time.
B) Proofing time may be decreased when using the large oven at the same time you
are proofing. Check bread product early to avoid over-proofing. If you are using
the large oven for extended periods of time, we recommend, for optimum results,
that you complete the proofing before turning the large oven on.
DO NOT use the proofing oven for warming food or keeping food hot. The proofing oven
temperature is not hot enough to hold foods at safe temperatures (above 1400F).
OVEN SELF-CLEANING MODE
The self-cleaning oven of your new range features pyrolytic self-cleaning. When set in the clean mode,
the oven reaches a high temperature that burns off the food soil. When the oven is set for clean, only
the cooktop burners may be used. The 12” Electric Proofing Oven, the griddle and/or the grill cannot
be used. It is common to see smoke and/or flames during the clean cycle, depending on the content
and amount of soil remaining in the oven. If a flame persists, turn off the oven and allow it to cool
before opening the door to wipe up the excessive food soil. At the end of the clean cycle, some gray
ash or burned residue may remain inside the oven. This is a mineral deposit that does not burn or melt.
The amount of ash depends on how heavily soiled the oven was before the oven was cleaned. It is
easily removed, once the oven has cooled, using a damp paper towel, sponge, or cloth. Wipe off any
smoke residue that remains on the front frame with Formula 409® or Fantastik®. If stain remains, use a
mild liquid cleanser. The amount of smoke stain is directly related to the amount of food soil left in the
oven at the time of self-cleaning. Clean the oven often.
Page 25

OVEN SELF CLEANING MODES
24
OVEN DOOR LOCK DURING
SELF-CLEAN
When the clean cycle starts, the lock light turns
on, and the automatic door lock cycle begins.
Do Not attempt to open the door when the lock
light is on. You can stop the cycle by pushing
the off button. The lock light will turn off only
after the oven has cooled below 550ºF, and the
automatic door lock has completed its cycle to
the open position.
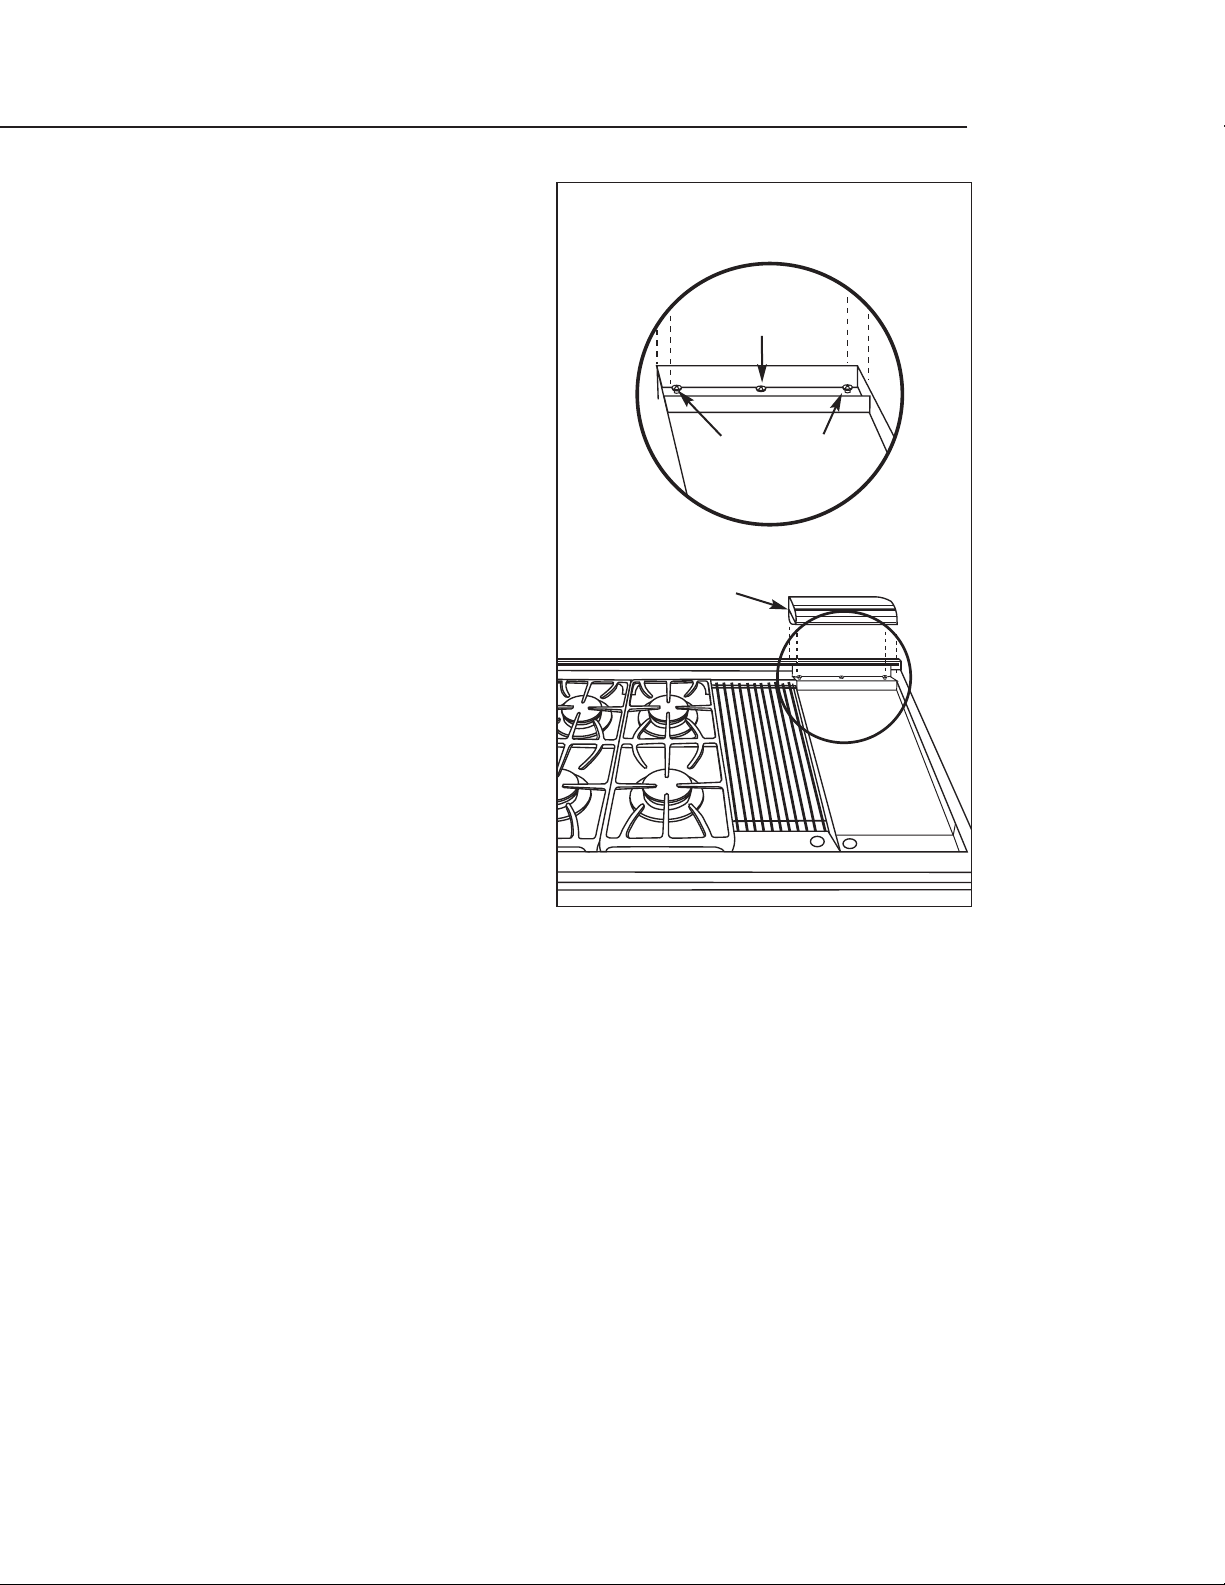
BEFORE SELF-CLEANING THE OVEN:
Remove all utensils and racks
Clean the oven front frame and outer
door edges. Wipe up large spillovers
and grease. (see fig. 11)
Be sure the light bulbs and glass covers
are in place.
Turn on the ventilator hood above the
range and leave it on until after the
oven has completed the self-clean
cycle.
Remove Oven Racks and Rack Slide
Assemblies.
NOTE: An Interlock System has been
designed so that the Self-Clean
Cycle will not engage until the Rack Slide Assemblies have been removed. The roller
assisted rack supports are designed to withstand the temperature range of the
standard baking thermostat. They will not withstand the extreme temperatures of
pyrolytic self cleaning. To remove the Assemblies:
A) For each side,Remove the retaining screw,
B) Lift up slightly and pull the entire Assembly out. Set aside.
Replace the assemblies and retaining screws after the Self-Clean
cycle has finished.
27” OVEN RACK SLIDE ASSEMBLY
Wipe out puddles of grease and any loose soil that can be easily removed. Remove any soil that is
outside the door seal area. This appliance is designed to clean the oven interior and that portion of the
door that is inside the oven. The outer edges of the door and the oven cavity are not in the cleaning
zone. Wipe this area clean before setting the oven to self-clean.
Oven front
frame
Outer door
edge
Fig. 11
Fig. 12
Page 26

OVEN SELF CLEANING MODE
25
Turn on the ventilator hood above the range and leave it on until after the oven has completed the
self-clean cycle.
SETTING THE OVEN FOR SELF CLEAN
1) Push the “CLEAN” Selector Button.
2) Set Oven Control Knob to “CLEAN”.
Cooling Blower turns on,
OVEN ON light and HEATING light turn on,
LOCK light turns on,
The door closing process takes approximately 60 seconds to complete, at which
time the door becomes locked.
AT T H E END OF THE CLEAN CYCLE:
The clean cycle takes 5 hours to complete. The OVEN ON
light turns off once the cycle has finished.
1) Push the OFF selector button. The door latch will open
automatically after the oven temperature falls below
550ºF and the automatic door lock completes its
60 sec. cycle to the OPEN position.
2) Turn the oven control knob to OFF. Wipe white ash
with a damp cloth or sponge (after oven has cooled)
before placing oven racks.
3) Replace the oven rack slide assemblies by:
A) Guiding the rear of the rack slide assembly into the bottom rear bracket of the
oven side,
B) Guide the top rear of the rack slide assembly into the top U-shaped bracket of
the oven side,
C) Lift up the Push Rod so that it rests on the “ledge” of the side support of the
assembly,and
D) Screw the assembly secure to the oven through the hole in the front middle
section of the side support. Repeat for the other side of the oven.
4) Replace the oven racks.
CAUTION:
The interior of the oven will still be at baking temperatures when the lock light
turns off and the oven door can be opened. Use caution as the oven may be hot
enough to cause burns.
Fig. 13
Page 27

CARE AND MAINTENANCE
26
WHEN CLEANING THE RANGE OR COOKTOP:
Be careful cleaning any part of this appliance while hot.
All parts of the appliance can be cleaned with hot soapy water,rinsed, dried and buffed to a shine with
a soft, heavy pile cloth. Always try this first, as it is the mildest cleaning procedure.
1) Use the mildest cleaning procedure first. Some brands of cleaners of the same type are harsher than
others, read their directions. A scent or a propellant can make a difference in the product, read the
ingredients. Try on a small area first.
2) To avoid marring the surface always rub metal finishes in the direction of the polish lines. The
cleaner will be more effective when used in the direction of the polish lines.
3) Use only clean sponges, soft cloths, paper towels, plastic non-metal or steel wool soap pads for
cleaning or scouring (use only soap pads with soap still in them, an empty pad can scratch), as
recommended in this section.
4) Be sure to rinse all parts thoroughly and to wipe dry to avoid water marks.
BRAND NAMES
In this section on cleaning, the use of name brands is intended only to indicate a type of cleaner.
This does not constitute an endorsement. The omission of any name brand cleaner does not imply
its adequacy or inadequacy. Many products are regional in distribution and can be found in local
markets and department stores.
COOKTOP
Turn off all the burners and allow the grates to cool, before starting to clean the cooktop. If you wipe
off any part of the cooktop while it is hot do so carefully as using a wet sponge or cloth can result in
steam burns.
BURNER GRATES
When lifting the grates be careful as they are heavy. Place them on a protected surface, so they won’t
scratch the surface they are laid on. The burner grates are matte porcelain enamel over cast iron.When
cool they may be placed in the dishwasher, or wiped clean while on the cooktop using hot soapy water,
then rinsed and wiped dry. The burner grates will not rust as they are matte porcelain enamel on both
sides for durability.
The occasional use of mild abrasive cleansers such as Bon-Ami®,Soft Scrub® or a soap-filled steel wool
pad is okay. Abrasive cleansers, used vigorously or too often, can eventually harm the enamel. Apply
with a damp sponge, rinse thoroughly and dry. The porcelain may pop off the edge of the grates due
to rapid temperature change when the burners are turned on. Do not be concerned as this does not
result in the deterioration of the grates. The cast iron soon darkens to blend with the porcelain enamel.
Be careful when wiping an area where the porcelain has popped off, as the edges may be sharp.
Page 28

CARE AND MAINTENANCE
27
BURNERS
For proper lighting and performance
keep the burners clean. It is necessary
to clean the burners if they do not
light even though the igniter clicks, if
there has been a severe boil over, or
when the flame does not burn blue.
Be certain all burner knobs are in the
off position before attempting to
clean the burners. The burners have
been designed for ease in cleaning.
When the grates and burners are cool,
remove the grate. The burner cap and
the brass port ring can easily be lifted
off. Wash these parts in hot soapy
water, rinse and dry thoroughly. The
burner caps are porcelain enamel,
follow the directions on the previous
page that were given for the burner
grates. A bristle brush can be used to
clean out the toothed burner ports, if
necessary. Disassembly of the simmer
ring is not recommended, however, it
may become necessary to do so if the
ports remain clogged after normal
cleaning. If it is necessary to disassemble the simmer ring from the base,remove the hex nut at the top
of the simmer ring.Clean the simmer ring with hot soapy water using a soft wire or plastic bristle brush
then dry thoroughly. Re-assemble the parts using the hex nut. After cleaning, it is important to make
sure the locating pin on the bottom side of the simmer ring is properly aligned with the corresponding
hole in the base and that the locating pin (see insert) in the bottom side of the brass port ring is
properly aligned with the locating notch on the top side of the simmer ring. Incorrect alignment will
produce a potentially dangerous flame and poor burner performance (see fig.14).
IGNITERS
Wipe with a water dampened cotton swab. Be careful
not to damage the igniter (see fig.15).
Cap
Main
Burner
Port
Ring
Burner
Base
Simmer
Ring
Electrode
Venturi
Locating
Notch
Locating Pin
Hole Inside
Brass Ring
Locating Pin
Locating Pin
Hex Nut
Fig. 14
Fig. 15
IGNITER (KEEP CLEAN)
Page 29

CARE AND MAINTENANCE
28
DRIP TRAYS & DRAIN TUBES
If you have a griddle or a grill there will be a tray liner.
The drip trays are made of stainless steel. The drip
trays are on rollers so they are easy to remove and
replace. To remove,pull the tray forward. If something
has spilled into the trays it should be cleaned up as
soon as possible to prevent “baked on” food soil.
Grease from the griddle or the grill drains through the
drain tube into the tray and liner below. Do not allow
the grease to accumulate in the tray as it can be a fire
hazard. Clean the tube and tray as soon as they are
cool. Clean with hot soapy water. For the tube use a
soapy bottle brush. A mild abrasive cleaner such as
Bon-Ami or Soft Scrub can be used. For stubborn stains use a soap filled steel wool pad, or a harsh
abrasive such as: Comet® or Ajax®, rubbing lightly. Rinse all parts thoroughly.
GRIDDLE
Thoroughly clean the griddle of grease and food particles,using a square edged spatula, while it is still
hot. Once the griddle has cooled to a lukewarm temperature rub the surface lightly with vegetable oil
(do not use corn oil, it gets sticky). Thoroughly wipe the griddle with a heavy coarse cloth or burlap to
remove any remaining residue and food particles. If you have a grease build-up use one tablespoon of
vinegar in a 1/2 cup of water,clean with a scouring cloth such as a Chore Boy® Scouring Cloth. For heat
discoloration use a stainless steel cleaner for heat stains such as Revere Ware® Stainless Steel Cleaner.
Wash with hot soapy water, rinse and dry. If food soil or residue is cooked onto the griddle,use a griddle
stone (fine grained pumice),or a griddle pan and screen cleaner (these are both available at restaurant
supply store), following the manufacturers’ directions. Wash with hot soapy water,rinse and dry. If hot
soapy water,vinegar,scouring powder, steel wool or metal scouring pads are used to clean the griddle,
it must be re-seasoned. Follow the directions on page 14 to reseason the griddle.
NEVER FLOOD THE HOT GRIDDLE WITH COLD WATER. This could cause the
griddle to crack or warp.
GRILL
Clean the grill immediately after cooking. Turn off the burner. To protect your hand from steam and
heat, wear a barbecue mitt. Scrub the grill by dipping a brass bristle barbecue brush frequently into a
bowl of water. The steam created softens the food particles and assists the cleaning process. The food
particles will drop into the drip tray or into the radiant tray holding the radiants. Be sure to clean the
drain tube, drip tray and liner after they have cooled. Follow directions above. The radiant tray and
radiants,should be removed periodically (when cool) and shaken over a layer of newspaper, which can
be thrown away.
CONTROL KNOBS - COOKTOP AND OVEN
These are plastic and can be cleaned in hot,soapy water. To remove the knobs from the control panel,
grasp the knob and pull straight back towards you and away from the grill. Wash, do not soak. Rinse
and dry thoroughly. It is important to replace these knobs on the correct gas valve, on the control
panel. The cooktop and grill control knobs are similar, the cooktop knobs have a setting for “Simmer”,
the grill does not. The oven and griddle control knobs are similar, they both have temperatures on
them, oven knob has a “Broil” setting, the griddle does not.
DRAIN
TUBES
DRIP TRAY AND LINER
Fig. 16
Page 30

CARE AND MAINTENANCE
29
BACKGUARD
This is made of stainless steel. Use the mildest cleaning procedure first. Hot soapy water,rinse and dry.
If the panel has food soil remaining,try a general kitchen cleaner,such as Fantastik®, Simple Green® or
Formula 409®. For hard to clean soil use a stainless steel cleaner such as, Bon-Ami, Cameo®, or Bar
Keepers Friend. Apply cleaner with a damp sponge, rinse thoroughly and dry. Always scrub lightly in
the direction of the grain. Do not use a steel wool pad, it will scratch the surface. To touch up
noticeable scratches in the stainless steel, sand very lightly with dry 100 grit emery paper, rubbing in
the direction of the grain. After cleaning use a stainless steel polish, such as Stainless Steel Magic®. If
the rear top burners are used extensively on high it is possible for the vertical stainless steel panel to
discolor from the burner heat. This discoloration can be removed by using Revere Ware Stainless Steel
Cleaner.
OVEN AND DOOR INTERIOR
If in the event the oven door comes off track, or becomes
misaligned, realignment can be achieved by following
this simple procedure: Open the door and hold it all the
way open.Close the hinge latches (see fig.16). Once both
hinges are locked, gently lift the door up and partially
out until the door is evenly aligned. Evenly slide the door
back into place and check to assure the hinges rest in the
center of each door hinge roller. With the oven door fully
open,unlock hinge latches and the door is ready to close
again. Be sure the oven and door are cool before you
start to clean them. They are matte porcelain enamel. It
is acid resistant,but not acid proof. Therefore,acid foods,
such as vinegar, rhubarb, alcohol, citric juices or milk,
should be wiped and not allowed to bake on. Try mild
cleaners, such as: Bon-Ami, ammonia or ammonia and
water or Soft Scrub. Apply the powders on a damp
sponge or cloth. Rub lightly. Rinse thoroughly and dry.
If food has burned onto the oven and is difficult to
remove, soak the spots with a cloth saturated with
household ammonia. Allow it to soak for an hour or two,
with the door closed. The food soil should be easy to
remove with a damp soapy cloth or mild abrasive. A
solution of 3 tablespoons ammonia in a 1/2 cup of water
may be placed in a warm (not hot) oven over night. This
loosens the spills and hardened residue so they are easily wiped up with a clean damp sponge or cloth.
For stubborn stains a soap filled steel wool pad can be used. The occasional use of abrasive cleaners is
okay, if used too often or vigorously they can eventually harm the enamel. Dampen the pad, rub the
surface lightly,rinse thoroughly and dry. Commercial oven cleaners,such as Easy Off® or Dow® can be
used on the oven interior. Follow the manufacturer’s directions. Commercial oven cleaners are
corrosive to the thermostat bulb and infrared broiler burner. Do not spray or wipe this type cleaner
onto the oven thermostat bulb or broiler burner. If some cleaner gets onto the bulb or broiler burner,
wipe it off immediately with a clean damp cloth.
Fig. 16
Door Hinge Roller
Lock
(close)
Un-Lock
DOOR HINGE ROLLER
LOCK
(CLOSE)
UN-LOCK
Page 31

CARE AND MAINTENANCE
30
OVEN RACKS AND RACK SUPPORTS
All of the oven racks and 12” rack supports are chrome plated steel. The roller assisted rack supports
in the main oven are stainless steel. To remove the 12”Oven rack supports, first remove the oven racks,
then grasp the rack supports and pull up and out. To replace the rack supports, put the top in first. See
page 25 for removal of the self cleaning Oven Roller Assisted Rack Support Assemblies. Do Not
immerse the self cleaning Rack Slide Assemblies or wash in a dishwasher. Use a damp sponge, cloth,or
steel wool with a mild detergent to clean. Chrome cleaners, such as Soft Scrub,Cameo or Bar Keepers
Friend can be applied with a damp sponge following package directions. Rinse and dry. Powdered
cleaners such as Bon-Ami or Comet are applied with a damp sponge or cloth,rubbed lightly,rinsed and
dried. For hard to remove food soil use a dampened soap filled steel wool pad, rinsed and dried. Harsh
Cleaners which are commercial oven cleaners, such as Easy Off or Dow can be used on the racks, but
are not recommended for use on the self cleaning oven rack slide assemblies or oven interiors.
Additionally, some commercial oven cleaners cause darkening and discoloration. Test the cleaner on a
small part of the rack and check for any discoloration before cleaning the entire rack. Apply a
generous coating. Allow to stand for 15 to 20 minutes. Rinse thoroughly and dry. After being cleaned,
if the racks do not slide easily, pour a small amount of cooking oil on a paper towel and rub it lightly
over the side rails.
FRAME, SIDES, DOOR EXTERIOR, HEAT DEFLECTOR
These parts are made of stainless steel, follow the directions for the Backguard. Take care when
cleaning the door top, and do not let water or cleaners run down the vents. If water or cleaners spill
into the vents, they may streak the glass inside the door.
DOOR GASKET
Use a general kitchen spray cleaner, such as Formula 409® or Fantastik®.Spray it on and blot dry with a
cloth. Do not rub. Do not remove or damage the mesh.
OVEN LIGHT BULB REPLACEMENT
For oven light bulb replacement use only a 40 watt, 120 volt appliance light bulb. These are available
in supermarkets. DO NOT use a standard light bulb in any oven, the heat will break it.
To Repl ace the Light Bulb
1) Be sure the oven light bulb switch is in the off position. The bottom of the switch is pressed in. Let
the cover and the bulb cool completely.
2) Remove the light cover. Turn the cover to the left (counterclockwise) to unscrew it.
3) Remove the burnt out bulb. Replace it with a 40 watt appliance light bulb only.
4) Replace cover. Turn circuit breaker back on, if turned off. (See Caution).
CAUTION:
Be sure the Oven light switch is in the OFF position and the cover is cool. If the
bulb comes loose from the base, turn off the power to the oven at the circuit
breaker panel, before attempting to remove the bulb base from the socket.
POWER FAILURE
The broiler and oven burners cannot be turned on during a power failure. To light the open top
burners,turn the control knob to “LITE”, hold a lighted match to the port ring. After the flame is burning
all the way around the burner, adjust the flame. It is necessary to light each burner separately,each time
you want to use it.
Page 32

PARTS ID E N TIFICATION
31
2
12
13
14
15
16
17
18
21
22
24
23
20
9
8
26
7
6
5
3
4
11
11
10
25
19
* Rating Plate Located
on the back of the unit.
Page 33

PARTS ID E N TIFICATION
32
ITEM DESCRIPTION
1Grill
2Burner Grates
3Griddle
4Drain Tubes
5 27” Oven Control Knob
6Griddle Control Knob
7Oven Light Switch
8Oven Rack Slides
9Oven Door Gasket
10 Oven Heating Element
11 Grill Control Knob
12 Proofing Control Knob
13 Burner Control Knob
14 Thermostat Bulb
15 Oven Rack Slides
ITEM DESCRIPTION
16 12”Oven Crumb Catch Tray
17 Oven Heating Element
18 12”Oven Door
19 12” Oven Window
20 27”& 24” Oven Window
21 Endcap
22 12”Oven Door Handle
23 27”& 27” Oven Door Handle
24 12”Oven Rack
25 27”& 24” Oven Racks
26 Drip Tray
27 Oven Light
28 Oven Heating Element
29 Convection Fan Baffle
28
27
29
27
28
Page 34

HOW TO OBTAIN SERVICE
33
BEFORE YOU CALL FOR SERVICE
Is the circuit breaker tripped or the fuse blown?
Is there a power outage in the area?
IF THE COOKTOP BURNERS DO NOT LIGHT
Is the two piece burner put together correctly?
Is the burner head assembly aligned correctly?
Is the manual shut-off valve open? This is usually located where the gas comes out of the wall.
For warranty service,contact DCS Customer Service at (888) 281-5698. Before you call, please have the
following information ready:
Model Number (located on rating plate backside of kickpanel).
Serial Number
Date of installation
A brief description of the problem
Your satisfaction is of the utmost importance to us. If a problem cannot be resolved to your satisfaction,
please write, fax, or email us at:
Write:
DCS
Attention: Consumer Relations
5800 Skylab Road
Huntington Beach, CA 92647
Fax us at:(714) 372-7004
email: support@dcsappliances.com
Page 35

WARRANT Y
34
Length of Warranty:
One (1) Year Full parts and Labor. Covers the entire product.
Five (5) Year Surface burners, griddle burners,grill burner, oven burners.
Ten (10) Year Limited Porcelain oven liner,porcelain inner door panel.
DCS Will Pay For
All repair labor and parts found to be defective due to materials or workmanship for one full year “IN
HOME” warranty during the first year of ownership. This does not apply if the unit was subjected to
other than normal household use. Service must be provided by Authorized Factory Agent during
normal working hours. No charges will be made for repair or replacement at the location of initial
installation or factory for parts returned pre-paid, through the dealer and claimed within the warranty
period, and found by DCS to be defective.
Replacement will be F.O.B. DCS, and DCS will not be liable for any transportation costs, labor costs, or
export duties. This warranty shall not apply, nor can we assume responsibility for damage that might
result from failure to follow manufactures instructions or local codes, where the appliance has been
tampered with or altered in anyway or which, in our judgement, has been subjected to misuse,
negligence, or accident. Implied warranty shall not extend beyond the duration of this written
warranty. This warranty is in lieu of all warranties expressed or implied and all other obligations or
liability in connection with the sale of this appliance.
DCS Will Not Pay For
Installation or start-up.
Shipping damage.
Service by an unauthorized agency.
Damage or repairs due to service by an unauthorized agency or the use of unauthorized parts.
Service during other than normal working hours.
Improper installation, such as improper hook-up, etc.
Service visits to teach you how to use the appliance; correct the installation; reset circuit
breakers or replace home fuses.
Repairs due to other than normal household use.
Damage caused from accident, abuse,alteration, misuse,incorrect installation or installation not
in accordance with local codes.
Units installed in non-residential application such as day care centers, bed and breakfast
centers, churches, nursing homes, restaurants, hotels, schools, etc.
This warranty applies to appliances used in residential applications; it does not cover their use in
commercial situations. This warranty is for products purchased and retained in the 50 states of the
U.S.A., the District of Columbia and Canada. This warranty applies even if you should move during the
warranty period. Should the appliance be sold by the original purchaser during the warranty period,
the new owner continues to be protected until the expiration date of the original purchaser’s warranty
period. This warranty gives you specific legal rights.You may also have other rights which vary from
state to state.
Page 36

NOTES
35
Page 37

NOTES
36
Page 38

CUISINIÈRE PROFESSIONNELLE RDS
Manuel d'utilisation et d'entretien
MODÈLES :
RDS-305
RDS-366
RDS-364GL
RDS-364GD
RDS-484GG
RDS-485GD
RDS-486GL
RDS-486GD
Page 39

À NOTRE CLIENTÈLE
1
Nous vous remercions d'avoir choisi cette cuisinière mixte DCS.Nous avons conçu ce Manuel d'utilisation et
d'entretien pour expliquer les fonctions uniques de cet appareil. Ce manuel contient des informations
extrêmement utiles sur la façon correcte de faire fonctionner votre nouvelle cuisinière mixte DCS et d'en
faire l'entretien.Vous pourrez ainsi cuisiner pendant des années en toute sécurité.
Aidez-nous à mieux vous servir en remplissant la Carte d'enregistrement du propriétaire et en nous la
soumettant depuis notre site Web à www.dcsappliances.com. Sélectionnez « Service à la clientèle » sur la
page d'accueil puis « Enregistrement du propriétaire », ou envoyez-nous par courrier la Carte d'enregistrement du propriétaire à l'adresse ci-dessous. De plus, gardez ce manuel à portée de main afin de
rapidement trouver réponse à vos questions durant l'utilisation de votre nouvel appareil.
Si vous avez des questions au sujet de notre produit,communiquez avec un représentant du service à
la clientèle DCS par téléphone : 1-888-281-5698,ou par télécopieur : 714-372-7004, ou email :
support@dcsappliances.com, ou par courrier :
DCS
Attention : Customer Service
5800 Skylab Road, Huntington Beach,CA 92647 États-Unis
AV ER TI SSEMENT
Si les informations de ce manuel ne sont pas suivies à la lettre, un incendie ou
une explosion peuvent se produire et causer des dommages matériels, des
blessures ou la mort. Évitez de stocker ou d'utiliser de l'essence ou toutes
autres vapeurs et liquides inflammables à proximité de cet appareil
électroménager ou de tout autre.
AV ER TI SSEMENT
Pour réduire les risques de blessures en cas de feu graisse sur la cuisinière
respectez les consignes suivates : étouffez les flammes à l'aide d'un couvercle
hermétique, d'une plaque à biscuits ou d'un plateau métallique, puis éteignez
le brûleur. Évitez de vous brûler. Si les flammes ne s'éteignent pas immédiatement, Évacuez les lieux et appelez les pompiers. Ne soulevez jamais un
récipient en feu - Vous pourriez vous brûler. N'UTILISEZ PAS D'EAU, y compris
des serviettes mouillées - une explosion de vapeur violente pourrait en
résulter.Utilisez un extincteur SEULEMENT si :
1. Vous êtes sûr qu'il s'agit d'un extincteur de classe ABC et savez
comment le faire fonctionner.
2. Le feu est limité et restreint à la zone où il s'est déclenché.
3. Le service des pompiers a été appelé.
4. Vous pouvez combattre l'incendie le dos tourné vers une sortie.
CONSIGNES DE SÉCURITÉ SI VOUS SENTEZ UNE ODEUR DE GAZ
N'essayez pas d'allumer aucun appareil électroménager.
Ne touchez aucun interrupteur électrique; n'utilisez aucun téléphone dans
l'édifice.
Appelez immédiatement votre fournisseur de gaz de chez un voisin. Suivez
les instructions du fournisseur de gaz.
Si vous n'arrivez pas à joindre votre fournisseur de gaz, appelez les
pompiers. Toute installation ou service doit être confié à un installateur
qualifié, un organisme de service ou le fournisseur de gaz.
VEUILLEZ CONSERVER CE MANUEL À TITRE DE RÉFÉRENCE.
Page 40

TABLE DES MATIÈRES
2
CONSIGNES DE SÉCURITÉ ......................................................................................................................................3-5
IDENTIFICATION DU MODÈLE.................................................................................................................................6
AVANT D ' UTI L ISER VOTRE APPAREIL.............................................................................................................7-8
UTILISATION DE LA TABLE DE CUISSON ..................................................................................................9-12
Utilisation du brûleur . . . . . . . . . . . . . . . . . . . . . . . . . . . . . . . . . . . . . . . . . . . . . . . . . . . . . . . . . . . . . . . . . .9
Efficacité des brûleurs et caractéristiques de la flamme . . . . . . . . . . . . . . . . . . . . . . . . . . . . . . . . . .10
Anneau de Wok . . . . . . . . . . . . . . . . . . . . . . . . . . . . . . . . . . . . . . . . . . . . . . . . . . . . . . . . . . . . . . . . . . .11-12
UTILISATION DU GRIL ...........................................................................................................................................12-13
UTILISATION DE LA PLAQUE CHAUFFANTE........................................................................................14-15
UTILISATION DU FOUR ........................................................................................................................................15-25
Cuisson par convection . . . . . . . . . . . . . . . . . . . . . . . . . . . . . . . . . . . . . . . . . . . . . . . . . . . . . . . . . . . . . . .16
Cuisson normale . . . . . . . . . . . . . . . . . . . . . . . . . . . . . . . . . . . . . . . . . . . . . . . . . . . . . . . . . . . . . . . . . . . . .16
Grillage . . . . . . . . . . . . . . . . . . . . . . . . . . . . . . . . . . . . . . . . . . . . . . . . . . . . . . . . . . . . . . . . . . . . . . . . . . . . . .16
Conversion des recettes pour la cuisson par convection . . . . . . . . . . . . . . . . . . . . . . . . . . . . . .16-17
Sélection des ustensiles pour la cuisson par convection . . . . . . . . . . . . . . . . . . . . . . . . . . . . . . . . .17
Préchauffage . . . . . . . . . . . . . . . . . . . . . . . . . . . . . . . . . . . . . . . . . . . . . . . . . . . . . . . . . . . . . . . . . . . . . . . . .18
Réglage du four pour la cuisson . . . . . . . . . . . . . . . . . . . . . . . . . . . . . . . . . . . . . . . . . . . . . . . . . . . .18-19
Grilles du Four . . . . . . . . . . . . . . . . . . . . . . . . . . . . . . . . . . . . . . . . . . . . . . . . . . . . . . . . . . . . . . . . . . . . . . .19
Grillage . . . . . . . . . . . . . . . . . . . . . . . . . . . . . . . . . . . . . . . . . . . . . . . . . . . . . . . . . . . . . . . . . . . . . . . . . . .20-21
Cuisson lente / Cuisson à basse température . . . . . . . . . . . . . . . . . . . . . . . . . . . . . . . . . . . . . . . . . . .21
Températures suggérées pour garder les aliments chauds . . . . . . . . . . . . . . . . . . . . . . . . . . . . . . .22
MODE D'APPRÊT ET D'AUTONETTOYAGE.............................................................................................23-24
Réglage du four de 12 po pour l'apprêt des aliments . . . . . . . . . . . . . . . . . . . . . . . . . . . . . . . . . . . .23
Verrouillage de la porte du four durant l'autonettoyage . . . . . . . . . . . . . . . . . . . . . . . . . . . . . . . . .24
Avant l'autonettoyage du four . . . . . . . . . . . . . . . . . . . . . . . . . . . . . . . . . . . . . . . . . . . . . . . . . . . . . . . . .24
Ensemble des coulisses des grilles du four . . . . . . . . . . . . . . . . . . . . . . . . . . . . . . . . . . . . . . . . . . . . . .24
Réglage du four pour l'autonettoyage . . . . . . . . . . . . . . . . . . . . . . . . . . . . . . . . . . . . . . . . . . . . . . . . .25
À la fin du cycle de nettoyage . . . . . . . . . . . . . . . . . . . . . . . . . . . . . . . . . . . . . . . . . . . . . . . . . . . . . . . . .25
ENTRETIEN ET MAINTENANCE ......................................................................................................................26-30
Nettoyage de la cuisinière,de la table de cuisson, des allumeurs,des brûleurs, des lèchefrites,
de la plaque chauffante, du gril, des boutons de réglage et du dosseret . . . . . . . . . . . . . . .26-29
Intérieur du four et de la porte . . . . . . . . . . . . . . . . . . . . . . . . . . . . . . . . . . . . . . . . . . . . . . . . . . . . . . . .29
Remplacement de l'ampoule de lampe du four . . . . . . . . . . . . . . . . . . . . . . . . . . . . . . . . . . . . . . . . .30
Panne d’alimentation . . . . . . . . . . . . . . . . . . . . . . . . . . . . . . . . . . . . . . . . . . . . . . . . . . . . . . . . . . . . . . . . .30
PIÈCES DE RECHANGE..........................................................................................................................................31-32
POUR L'OBTENTION DE SERVICE.......................................................................................................................33
GARANTIE .............................................................................................................................................................................34
Page 41

MESURES DE SÉCURITÉ ET DE PRÉCAUTION
3
Votre nouvel appareil DCS fonctionnera de manière sûre et fiable pendant des années si vous en
prenez bien soin. Faites extrêmement attention quand vous utilisez cet appareil de niveau professionnel, car il dégage une chaleur intense et peut augmenter les risques d'accidents. Vous devez
respecter des consignes de sécurité élémentaires durant l'utilisation d'appareils de cuisine, dont
celles-ci :
Veuillez lire attentivement ce manuel d'utilisation et d'entretien avant d'utiliser votre nouvel
appareil. Ceci vous permettra de réduire les risques d'incendie, de choc électrique ou de
blessures.
Commencez par vous assurer que l'installation et l'entretien sont effectués correctement.
Suivez les instructions d'installation fournies avec cet appareil.Avant d'utiliser l'appareil,confiez
son installation et sa mise à la terre à un technicien qualifié.
Demandez-lui de vous montrer l'emplacement du robinet d'arrêt de l'alimentation de gaz afin
de savoir comment couper l'arrivée de gaz.
Si vous sentez une odeur de gaz, cela signifie que l'installateur n'a pas vérifié correctement s'il
y avait des fuites. Si les connexions ne sont pas complètement étanches, une petite fuite
pourrait se produire et laisser s'échapper une faible odeur de gaz. La détection des fuites n'est
pas une procédure à faire soi-même. Certaines fuites ne peuvent être détectées que si la
commande du brûleur est sur ON. Dans l'intérêt de votre sécurité, confiez cette procédure à un
technicien qualifié.
Si jamais un brûleur s'éteint et laisse s'échapper du gaz, ouvrez la fenêtre ou la porte pour
évacuer l'air.N'essayez pas d'utiliser l'appareil avant que le gaz ne se soit complètement dissipé.
Suivez les instructions de la page 1, « Pour votre sécurité - Si vous sentez une odeur de gaz ».
Cet appareil électroménager a été monté en usine pour être utilisé avec du gaz naturel ou
propane. Il doit être réglé correctement en usine selon le type de gaz utilisé.
Ne réparez pas ni ne remplacez aucune pièce de cet appareil, sauf indication contraire du
manuel.Tout autre travail d'entretien doit être confié à un technicien qualifié.
Les enfants ne doivent pas être laissés seuls ou sans surveillance dans un endroit où l'on utilise
ce type d'appareil. Il ne faut jamais les laisser tourner ou enfoncer des boutons, ni s'asseoir ou
se tenir debout sur ces appareils.
Des enfants en marchette ou à quatre pattes peuvent être attirés par la poignée ronde de la
porte et la saisir pour ouvrir la porte du four.Ils pourraient alors se blesser si la porte est ouverte
ou se brûler sérieusement si le four fonctionne et qu'il est chaud.
MISE EN GARDE :
évitez de ranger sur les appareils ou à l'arrière des articles pouvant attirer les
enfants. Les enfants peuvent être blessés sérieusement s'ils grimpent sur
l'appareil pour atteindre ces articles.
Ne rangez jamais rien dans le four ni sur la table de cuisson. Des matériaux inflammables
pourraient prendre feu, des éléments en plastique pourraient fondre ou s'enflammer et
d'autres types d'objets pourraient être détruits.
Ne suspendez aucun article sur l'appareil et ne placez aucun objet contre le four. Certains
matériaux sont très inflammables et pourraient prendre feu.
Si l'appareil se trouve près d'une fenêtre, assurez-vous que les rideaux sont suffisamment
éloignés des brûleurs de la table de cuisson; ils pourraient prendre feu sinon.
Ne versez pas d'eau sur les feux de graisse. ÉTEIGNEZ tous les brûleurs, puis étouffez le feu avec
du bicarbonate de soude ou à l'aide d'un extincteur à poudre ou à mousse.
Page 42

MESURES DE SÉCURITÉ ET DE PRÉCAUTION
4
Ne laissez jamais des vêtements, gants ou autres matériaux inflammables en contact ou à
proximité d'un brûleur ou d'une grille de brûleur tant que ces derniers n'ont pas refroidi. Les
tissus peuvent s'enflammer et causer des blessures.
Utilisez seulement des gants isolants secs : les gants humides sur des surfaces chaudes peuvent
provoquer des brûlures causées par la vapeur. N'utilisez pas de serviette ou de linge épais à la
place de gants isolants. Ne laissez pas les gants isolants toucher les brûleurs ou leurs grilles.
Pour assurer votre propre sécurité, habillez-vous de façon appropriée. Ne portez jamais de
vêtements ou de manches lâches lorsque vous utilisez l'appareil. Certains tissus synthétiques
sont extrêmement inflammables et ne doivent pas être portés pendant la cuisson.
Ne recouvrez aucune partie du four ou de la table de cuisson avec du papier aluminium.
L'utilisation de papier aluminium peut créer un risque d'incendie ou empêcher la circulation du
flot d'air de combustion et de ventilation. C'est un excellent isolant thermique qui peut
emprisonner la chaleur, laquelle peut alors affecter la performance de la table de cuisson et
endommager la finition du four ou des pièces de la table de cuisson.
AV ERTISSEMENT :
cet appareil électroménager est destiné à la cuisson. Pour des raisons de
sécurité, n'utilisez jamais le four ou la table de cuisson pour chauffer une pièce.
De plus,une telle utilisation peut endommager les pièces de la table de cuisson
ou du four.
Durant l'utilisation de la table de cuisson : ne touchez pas les grilles des brûleurs ou les surfaces
adjacentes.Ces surfaces peuvent devenir suffisamment chaudes pour provoquer des brûlures.
Durant l'utilisation du four, évitez de toucher les surfaces intérieures du four, la surface
extérieure autour de la porte et la garniture arrière. Les surfaces situées directement au-dessus
de la porte du four peuvent être chaudes si le four a fonctionné avec la porte ouverte ou si
quelque chose a empêché la porte de se fermer.
Ne laissez jamais la table de cuisson sans surveillance lorsque vous cuisinez à flamme haute.Un
débordement par bouillonnement pourrait produire de la fumée et un déversement graisseux
qui pourrait prendre feu.Et, ce qui est plus grave,si les flammes des brûleurs sont étouffées par
un débordement important affectant l'allumeur,le gaz non brûlé s'échappera dans la pièce.
Seuls certains types d'ustensiles en verre, vitrocéramique calorifugée, céramique, poterie ou
émaillés sont appropriés pour être utilisés sur la table de cuisson. Ce genre d'ustensile peut se
briser à la suite de changements de température soudains.Utilisez-les seulement à feu doux ou
moyen selon les instructions du fabricant.
Ne chauffez pas de contenant de nourriture fermé car la pression pourrait s'accumuler et le
faire exploser.
Durant la cuisson, réglez la commande du brûleur de sorte que la flamme ne chauffe que le
fond du récipient et ne le dépasse jamais. Cela pourrait sinon chauffer ou faire fondre les
poignées.
Servez-vous toujours d'ustensiles à fond plat suffisamment larges pour couvrir les brûleurs.
L'utilisation d'ustensiles trop petits risque d'offrir un contact direct à la flamme et de mettre le
feu aux vêtements.
Afin de réduire le risque de brûlures, d'allumage de matériaux inflammables et de déversement
involontaire, tournez les poignées des ustensiles vers l'intérieur afin qu'elles ne surplombent
pas les surfaces de travail adjacentes, les zones de cuisson et le bord extérieur de la table de
cuisson.
Tenez la poignée du récipient afin d'empêcher tout mouvement de l'ustensile lorsque vous
retournez ou remuez la nourriture.
Page 43

MESURES DE SÉCURITÉ ET DE PRÉCAUTION
5
La graisse est inflammable. Laissez toute graisse chaude refroidir avant d'essayer de la
manipuler. Évitez de laisser la graisse s'accumuler autour des brûleurs de la table de cuisson.
Nettoyez après chaque utilisation ou déversement.
Pour assurer un bon allumage et une bonne performance des brûleurs de la table de cuisson,
gardez leurs ports dans un état propre. Il peut s'avérer nécessaire de nettoyer ceux-ci en cas de
débordement ou lorsque le brûleur ne s'allume pas, même si les allumeurs électroniques
cliquent.
Nettoyez la table de cuisson avec précaution. Évitez de vous brûler à la vapeur : n'utilisez pas
d'éponge ou de linge mouillé pour nettoyer l'appareil alors qu'il est encore chaud. Certains
produits de nettoyage dégagent des vapeurs nocives au contact d'une surface chaude.
Respectez le mode d'emploi du fabricant du produit de nettoyage.
Assurez-vous que les boutons de la cuisinière ou de la table de cuisson sont fermés et que
l'appareil est froid avant d'utiliser des nettoyants aérosol sur l'appareil ou à proximité. L'élément
chimique qui produit le jet de vaporisation peut, en présence de chaleur, s'enflammer ou
provoquer la corrosion des parties métalliques.
Placez les grilles de four à la position voulue quand le four est froid.Si vous devez déplacer une
grille alors que le four est encore chaud, ne laissez pas les gants isolants toucher l'intérieur
chaud du four.
Faites attention lorsque vous ouvrez la porte du four; laissez s'échapper l'air chaud ou la vapeur
avant de retirer ou remplacer les aliments.
Évitez de frotter, endommager, déplacer ou enlever le joint de la porte, car il est essentiel à
l'obtention d'une bonne cuisson.
Nettoyez fréquemment la hotte et les filtres de ventilation surplombant la cuisinière ou table
de cuisson afin d'empêcher toute accumulation de graisse provenant des vapeurs de cuisson.
ÉTEIGNEZ le ventilateur en cas d'incendie ou si vous flambez intentionnellement des liqueurs
ou des spiritueux sur la table de cuisson. Si le ventilateur est en marche, il pourrait en effet
répandre les flammes.
ÉVITEZ de bloquer la circulation de l'air de combustion ou de ventilation. Assurez toujours un
apport d'air frais.
Pour des raisons de sécurité et pour ne pas endommager l'appareil, évitez de vous asseoir, de
vous tenir debout ou de vous appuyer contre la porte du four ou la surface de cuisson.
Les réparations doivent être effectuées par des techniciens agréés uniquement. Ceux-ci
doivent débrancher le bloc d'alimentation avant de travailler sur l'appareil.
AV ERTISSEMENT :
Proposition 65 de la Californie - L'incinération de gaz de cuisson génère des
sous-produits considérés par l'État de Californie comme pouvant causer le
cancer ou des malformations congénitales. Les lois de Californie exigent que
les entreprises avertissent leurs clients qu'ils risquent d'être exposés à de telles
substances. Pour minimiser l'exposition à ces substances, faites toujours
fonctionner l'appareil conformément aux instructions contenues dans ce
manuel et assurez une bonne ventilation lorsque vous cuisinez au gaz.
Page 44

IDENTIFICATION DU MODÈLE
6
MODÈLES DE CUISINIÈRES RDS DE 48 PO
RDS-484GG
MODÈLES DE CUISINIÈRES RDS DE 36 PO
RDS-366
MODÈLES DE CUISINIÈRES RDS DE 30 PO
RDS-305
RDS-486GL RDS-486GD
RDS-364GL RDS-364GD
RDS-485GD
OVEN ON
HEATING
HEATING
DOOR LOCKED
Page 45

AVANT D'UTI L ISER VOTRE APPAREIL
7
1) Retirez tout le matériel d'emballage et les étiquettes de l'appareil. Si un technicien n'a pas installé
votre appareil, faites-le maintenant.Vérifiez que vous disposez de tous les éléments suivants :
TAB L E D E CUISSON :
Plaque chauffante - (modèles RDS-364GD, RDS-486GD, RDS-484GG et RDS-485GD
seulement)
Grilles de gril, 2 morceaux - (Modèles RDS-364GL, RDS-486GL et RDS-484GG seulement)
5 ensembles de brûleurs, capuchons de brûleur et grilles (Modèles RDS-305 et
RDS-485GD seulement)
Plateau radiant - contient les tiges en céramique du gril - (modèles RDS-364GL,
RDS-486GL et RDS-484GG seulement)
Une lèchefrite amovible (les modèles à plaque chauffante et gril sont dotés d'une cuve
de lèchefrite qui recueille la graisse)
FOUR DE 27 ET 24 POUCES :
Deux ensembles amovibles en acier inoxydable de coulisses à grilles à 3 positions
Une lèchefrite en deux morceaux
Trois grilles du four
FOUR DE 12 POUCES :
Deux grilles de four
Deux supports de grille amovibles
Une lèchefrite en deux morceaux
2) Placez les grilles du four dans la bonne position avant d'allumer le four. Consultez votre recette
pour connaître la bonne position de la grille.La position la plus fréquente est la position numéro 2.
Les positions des grilles sont numérotées de bas en haut comme les étages d'un bâtiment.
N'utilisez pas de papier aluminium pour recouvrir les grilles ou le four. Il peut
emprisonner la chaleur,ce qui peut endommager le four et empêcher la bonne cuisson
des aliments.
Positions des grilles
FIG. 1
Page 46

AVANT D'UTI L ISER VOTRE APPAREIL
8
3) Avant de rôtir ou de griller :
Allumez un par un le four et les brûleurs du grilloir pendant 20 à 30 minutes chaque. Cela permet
de brûler les huiles de fabrication utilisées en usine. Mettez le brûleur du four sur 450 ºF et celui du
grilloir sur « Broil » (griller). Allumez le ventilateur au-dessus de la cuisinière lorsque ces brûleurs
sont allumés, car ils dégagent une certaine odeur.
POUR INTRODUIRE LES GRILLES DU FOUR :
1) Tenez la grille avec le rail de sécurité arrière relevé en direction du fond du four. Glissez-la dans le
four de manière à ce que les coulisses de la grille se trouvent entre la grille et les guides de celleci.
2) Tout en glissant la grille dans le four, inclinez légèrement le devant de la grille vers le haut de façon
à dégager les butées de sécurité, situées à l'arrière de la grille, des coulisses de la grille. Les butées
de sécurité empêchent la grille de sortir complètement du four lorsqu'on la tire vers l'extérieur.
POUR RETIRER OU REPOSITIONNER LES GRILLES :
1) Tirez la grille vers l'avant.
2) Soulevez le devant de la grille de façon à dégager les butées de sécurité des coulisses de la grille.
3) Tirez la grille vers l'avant.
Page 47

UTILISATION DE LA TABLE DE CUISSON
9
BRÛLEURS
Votre nouvelle cuisinière à gaz professionnelle est
équipée de brûleurs similaires à ceux que l'on utilise
dans les restaurants. Ces brûleurs sont conçus pour
être extrêmement faciles à nettoyer et régler. Le gros
capuchon répand la chaleur du brûleur de mijotage
pour éviter une trop forte concentration de chaleur au
centre du récipient.Le brûleur de mijotage est toujours
allumé lorsque le brûleur est en cours d'utilisation. Ne
faites jamais fonctionner le brûleur sans son capuchon.
Tous les brûleurs sont dotés d'un système de
rallumage électronique, ce qui évite d'avoir des
veilleuses toujours allumées. Si la flamme s'éteint alors
que le brûleur principal est allumé, elle se rallume
automatiquement.
CUISSON À PETIT FEU
Votre nouvelle table de cuisson professionnelle est
dotée d'une capacité de cuisson à petit feu
exceptionnelle. Le gros capuchon agit comme
diffuseur évitant la concentration de chaleur en un seul
point. N'oubliez pas que, du
fait de la forte capacité
calorifique du brûleur
extérieur et de la masse des
grilles de brûleurs en fonte
(celles-ci conservent la
chaleur plus longtemps que
les grilles conventionnelles,
plus légères), certains
aliments peuvent continuer à
cuire par l'action de la
chaleur retenue après que le
brûleur est éteint. Lorsque
vous allumez le brûleur de mijotage, tournez le bouton du brûleur principal vers la position de
mijotage. Si un courant d'air ou un débordement par bouillonnement venait à éteindre la flamme,
celle-ci se rallumerait automatiquement en même temps que le brûleur principal.
ALLUMEURS ÉLECTRONIQUES
Si un brûleur ne se rallume pas, écoutez s'il y a un déclic.
Si l'allumeur ne clique pas, ÉTEIGNEZ LE BRÛLEUR.
Vérifiez dans le panneau à disjoncteurs si un fusible est
grillé ou un disjoncteur s'est déclenché. Si l'allumeur ne
fonctionne toujours pas, consultez la page 33, " Avant
d'appeler le service technique ". Pour allumer le brûleur
manuellement, consultez la page 30« Panne d'alimentation ».
ALLUMEUR (DOIT ÊTRE GARDÉ PROPRE)
Flamme
de mijotage
Capuchon
Couronn
e en
laiton
*Remarque - Tous les brûleurs des modèles de 36 et 48 pouces sont prévus pour 17 500 BTUH pour
le gaz naturel et 14 000 BTUH pour le gaz propane.
**Pas d'emplacement no. 3 sur les modèles de 36 et 48 pouces.
1
3
4
5
2
Ta ble de cuisson modéle RDS -305
Fig. 2
Empl. BTUH BTUH pour cuisson
du max. à petit feu/mijotage
brûleur
30 po Nat. 36/48 po Nat. Prop. Nat. Prop.
1 16 000 17 500 14 000 500-1 200 500-1 200
2 16 000 17 500 14 000 500-1 200 500-1 200
3 17 500 S/O** 14 000 500-1200 500-1200
4 16 000 17 500 14 000 500-1 200 500-1 200
5 16 000 17 500 14 000 500-1 200 500-1 200
Fig. 3
Page 48

10
UTILISATION DE LA TABLE DE CUISSON
REMARQUE :
il se peut qu'un léger crépitement ou flash se produise au niveau des ports
de brûleur quelques secondes après que le brûleur soit éteint. Ce bruit
d'extinction est normal pour le gaz propane.
EFFICACITÉ DES BRÛLEURS ET
CARACTÉRISTIQUES DE LA FLAMME
Il est nécessaire de maintenir les ports des brûleurs
et les allumeurs dans un état de propreté afin
d'assurer l'allumage correct et le rendement
optimal des brûleurs de la table de cuisson. La
flamme doit encercler complètement le brûleur
sans bruit ou élévation excessive. Les flammes
doivent être bleues et stables, sans pointe jaune.
Un mauvais mélange d'air et de gaz peut entraîner
un fonctionnement irrégulier du brûleur ou
produire une flamme à l'extrémité jaune.Confiez le
réglage de la flamme à un technicien. Durant l'utilisation initiale, la présence de particules étrangères dans la conduite de gaz ou de poussière dans
l'appareil ou dans l'air à proximité de l'appareil peut produire une flamme orange. Ceci disparaît
avec l'usage.
HAUTEUR DE LA FLAMME
La hauteur correcte de la flamme dépend essentiellement de la taille du fond de l'ustensile de
cuisson, du matériau de l'ustensile, de la quantité et du type de nourriture, et de la quantité de
liquide dans l'ustensile.Voici quelques règles de base pour sélectionner la hauteur de flamme.
Pour des raisons de sécurité, la flamme ne doit jamais dépasser le fond du récipient. Ne
laissez jamais les flammes lécher les parois de l'ustensile de cuisson (voir fig.04).
Les ustensiles qui conduisent lentement la chaleur (tels que ceux en vitrocéramique)
doivent être utilisés avec un feu doux ou moyen.Vous pouvez augmenter légèrement le feu
si le volume de liquide est important.
BRÛLEURS À TÊTE SCELLÉE
Les brûleurs à tête scellée doivent être gardés propres. Le nettoyage des brûleurs à tête scellée doit
comprendre l'allumeur. Les brûleurs à tête scellée de la table de cuisson permettent un réglage
continu de la flamme et leurs boutons de réglage ne comportent pas de position fixe entre les
niveaux HI et LO. Pour allumer le brûleur à tête scellée de la table de cuisson, enfoncez le bouton
de réglage et tournez-le vers la gauche à la position " LITE ".Vous devriez entendre un déclic. Une
fois le gaz allumé par l'allumeur électronique, tournez le bouton au réglage voulu. (Cette étape
éteint l'allumeur; le déclic devrait donc s'arrêter.)
REMARQUE : l'allumeur continue à cliquer tant que le bouton de réglage est sur la position « LITE ».
MISE EN GARDE :
quand vous allumez un brûleur de table de cuisson, prenez soin de vous
arrêter à la position « LITE » avant de sélectionner un niveau de flamme
pour la cuisson. Si le brûleur n'est pas allumé et qu'il est tourné au-delà de
la position « LITE », sur HI, MEDIUM ou LO, un éclat de flamme se produit
lorsque le brûleur finit par s'allumer. Cela peut causer des blessures ou
endommager le comptoir adjacent.
Fig. 4
Page 49

UTILISATION DE LA TABLE DE CUISSON
11
GRILLES DES BRÛLEURS
Les grilles des brûleurs sont en fonte robuste. Elles sont
constituées en sections, ce qui facilite leur retrait et leur
nettoyage.(Voir fig. 05 et 06)
USTENSILES
Nous vous recommandons d'utiliser des ustensiles
professionnels pour obtenir les meilleurs résultats
possibles.Vous en trouverez dans les grands magasins de
qualité, les boutiques spécialisées ou les fournisseurs en
restauration. Si vous utilisez des ustensiles ordinaires,
faites très attention s'ils possèdent des manches en
plastique, car ces brûleurs de format professionnel ont
une puissance de feu capable de faire fondre ou d'enfler
les manches.
BOUTONS DE RÉGLAGE
Les boutons de réglage sont clairement associés aux
brûleurs qu'ils contrôlent. Les boutons de réglage de la
table de cuisson sont étiquetés et situés à l'avant des
brûleurs. La commande du four est placée légèrement
plus bas que les autres boutons de réglage. Ceci est dû
aux dimensions physiques des thermostats de type
commercial utilisés sur ce produit (voir fig.07).
ANNEAU DE WOK
Votre nouvel appareil électroménager DCS comporte un
anneau de Wok. Cet anneau est en fonte avec une finition
en émail de porcelaine. Il peut être utilisé avec le wok
DCS modèle CW ainsi que la plupart des woks vendus
dans le commerce. Pour utiliser l'anneau, placez-le sur la
grille du brûleur choisi. Les languettes verticales de
l'anneau doivent être alignées avec les doigts principaux
de la grille. Les petites protubérances sur la surface
inférieure de l'anneau doivent surmonter les doigts de la
grille pour empêcher l'anneau de tourner durant la
cuisson. Voir fig. 8, page 12. La partie inférieure du wok
doit être soutenue et retenue par les languettes
verticales de l'anneau.
Pour assurer un rendement optimal sur les cuisinières de 30 po, placez l'anneau sur le brûleur central
car c'est le plus puissant de la section supérieure.En ce qui concerne les cuisinières et tables de cuisson
de 36 et 48 pouces, vous pouvez placer l'anneau et le wok sur n'importe quel brûleur de surface. Pour
nettoyer l'anneau de Wok, mettez-le dans le lave-vaisselle après utilisation. Pour éliminer les
éclaboussures et aliments séchés, laissez tremper pour les ramollir, puis lavez comme d'habitude.
Fig. 05 (modèles 36 et 48 po)
Fig. 06 (modèles 305 et 485)
Fig. 07
Page 50

UTILISATION DU GRIL
12
GRIL
Les deux grilles du gril sont réversibles (voir fig.9). Placez
le côté avec deux languettes rainurées vers l'arrière de la
table de cuisson. Les grilles du gril sont faites d'émail de
porcelaine sur fonte très durable. Un côté de la grille
comporte des arêtes (côté A); il est conçu pour laisser
passer la graisse provenant d'aliments gras (ex. bifteck
ou galettes de hamburger).Les arêtes sont inclinées afin
que le gras s'écoule vers l'avant du gril et se dirige
facilement vers la section la plus froide de la lèchefrite,à
l'écart de la chaleur intense du brûleur.L'autre côté de la
grille (côté B) est conçu pour les aliments qui exigent un
plus grand support durant la cuisson (du poisson p. ex.).
Les aliments cuits sur le gril ont la même saveur que
ceux que l'on cuit sur un gril de plein air. La chaleur
intense produite par les tiges en céramique caramélise
les matières grasses et les jus qui sont amenés à la surface des aliments, et leur donnent une saveur de
barbecue.
REMARQUE : la cuisson à l'aide de ce gril à gaz peut être un peu plus rapide que vous n'en avez
l'habitude.
TIGES EN CÉRAMIQUE
À condition d'être bien entretenue,la rangée de tiges en céramique sous les grilles du gril peut durer
de nombreuses années. Celles-ci sont montées sur le plateau radiant en usine, prêtes à être installées
dans le foyer, sous les grilles du gril. Prenez soin de retirer tout le matériel d'emballage du plateau
radiant et des tiges avant d'utiliser le gril.Vous pouvez vider les résidus d'aliments brûlés et les cendres
Fig. 8
Anneau de Wok -
Vue de haut
Fig. 9
Page 51

UTILISATION DU GRIL
13
du plateau radiant, une fois refroidis, en les secouant dans une poubelle à déchets. Les tiges en
céramique peuvent s'écailler ou se fissurer à mesure qu'elles deviennent cassantes avec l'âge, selon la
fréquence d'utilisation.Ceci est tout à fait normal et n'affecte pas la cuisson. Ne remplacez pas le
plateau radiant et les tiges en céramique par d'autres produits.Communiquez avec DCS pour obtenir
des pièces de rechange d'origine.
UTILISATION DU GRIL
La cuisson sur gril exige un feu vif pour rôtir les aliments et les braiser correctement. Vous devez
généralement régler le feu sur HI durant la cuisson.Cependant, pour griller de gros morceaux de
viande ou de volaille, il peut s'avérer nécessaire de baisser le feu après le braisage initial.Cela permet
de cuire la nourriture sans en brûler l'extérieur. Pour les aliments arrosés d'une marinade sucrée ou
d'une sauce barbecue, il est bon de réduire le feu vers la fin du temps de cuisson. ÉVITEZ de laisser le
gril sans surveillance s'il est allumé. Avant d'entamer la cuisson sur le gril, assurez-vous que la lèchefrite
et sa cuve sont en place et que les grilles du gril sont tournées vers le côté que vous désirez cuire.
Mettez le bouton de réglage sur HI et préchauffez le gril pendant 15 minutes. Une fois le gril
préchauffé, placez les aliments dessus.Cuisez selon le degré de cuisson voulu. Il peut s'avérer
nécessaire d'ajuster le niveau du feu durant la cuisson. Le bouton de réglage peut être réglé à
n'importe quelle position entre HI et LO. Une fois la cuisson terminée, laissez refroidir le gril et la
lèchefrite avant de les nettoyer. Vous devez les nettoyer après chaque utilisation.
REMARQUE : plus le gril est préchauffé, plus les marques du gril sont prononcées.
ÉRUPTIONS DE FLAMMES EXCESSIVES
Les gouttes de graisse peuvent parfois prendre feu. Dans ce cas, elles produisent de petites flammes
pendant une ou deux secondes.Ceci est normal quand on cuit sur le gril. Conservez une bouteille
d'eau munie d'un vaporisateur afin de pouvoir arroser les flammes en cas de besoin. Si les flammes
sont excessives,retirez les aliments du gril.Réduisez le niveau du feu. Replacez les aliments une fois les
flammes maîtrisées. Pour éviter les éruptions de flammes, coupez le gras autour des bords de bifteck
et de côtelette,utilisez du hamburger maigre,enlevez le gras de la volaille, etc. Lorsque vous retournez
une sorte de viande ou de volaille quelconque, la graisse fondue s'égoutte sur les tiges en céramique
et peut produire une éruption de flammes.Si cela se produit,servez-vous d'une spatule à long manche
pour déplacer les aliments.
CONSEILS DE CUISSON
Le degré de cuisson d'une viande dépend de l'épaisseur des morceaux. Il est impossible d'obtenir un
degré de cuisson saignant avec un morceau de viande mince.Un bifteck doit avoir une épaisseur d'au
moins 2,5 cm (1 po) pour qu'il soit saignant et juteux. Le temps de cuisson est affecté par la
température de la viande au début de la cuisson,les dimensions et la forme du morceau et la sorte de
viande cuite. Le degré de cuisson désiré affecte également le temps de cuisson.
Utilisez toujours une spatule pour retourner la viande car elle ne perce pas la viande et ne laisse pas
le jus s'échapper.Ceci permet de conserver le jus de la viande.Retournez la viande une fois seulement
car le jus se perd si la viande est retournée plusieurs fois.Ajoutez des épices ou du sel à la viande après
la cuisson car ils ont tendance à sécher la viande.Veillez à enlever l'excès de gras de la viande et de la
volaille.Pour empêcher les biftecks ou les côtelettes de se replier durant la cuisson,faites des entailles
dans le gras,le long des bords, par intervalles de 5 cm (2po).Pour vérifier le degré de cuisson, faites un
petit trou au centre de la viande.
Page 52

UTILISATION DE LA PLAQUE CHAUFFANTE
14
La plaque chauffante intégrée de votre table de
cuisson est faite en acier inoxydable de type 304
hautement poli pour offrir une surface de cuisson
lisse. Il est normal qu'elle noircisse à l'usage car les
huiles cuisent en surface et forment une base
antiadhésive (" conditionnement "). Comme la
plaque chauffante est en acier inoxydable, sa
surface ne rouille pas.Le brûleur de la plaque
chauffante comporte un réglage thermostatique
et s'allume et s'éteint de façon à maintenir la
température choisie.Le voyant " Heating " indique
que le brûleur est allumé. Ne retirez pas la plaque
chauffante pour le nettoyage ; elle est retenue par
deux vis à l'avant et une à l'arrière qui servent
surtout à empêcher la plaque de bouger durant le
transport et l'installation et éviter que des
éléments d'allumage ne se brisent. Une fois
l'appareil installé, vous pouvez retirer la vis arrière.
Elle est située sous le couvercle du carneau de la
plaque chauffante; soulevez-le pour le retirer (en
faisant attention de ne pas égratigner le dosseret).
Retirez la vis de transport centrale. Les deux vis
extérieures sont des vis d'inclinaison.Vous pouvez
les visser pour mettre de niveau la plaque
chauffante ou l'incliner vers l'avant pour faciliter
l'évacuation des graisses et des huiles des aliments
en train de cuire.Après quelques ajustements,vous
pourrez juger de la meilleure inclinaison à donner
en fonction des aliments cuits.
AVANT D' UTILISER LA PLAQUE CHAUFFANTE POUR LA PREMIÈRE FOIS OU POUR
LA CONDITIONNER DE NOUVEAU
1) Nettoyez la plaque chauffante avec de l'eau savonneuse chaude afin d'éliminer toute couche de
protection.
2) Rincez avec un mélange de 1 litre d'eau et 1 tasse de vinaigre blanc. Séchez soigneusement.
3) Versez 1 c. à t. d'huile végétale au centre de la plaque chauffante (évitez l'huile de maïs car elle
devient collante). Frottez l' huile sur toute la surface de la plaque chauffante à l'aide d'un gros
chiffon.
4) Mettez le bouton de réglage à niveau moyen (175 ºC/350 ºF). Coupez le feu lorsque l'huile
commence à dégager de la fumée. Laissez la plaque chauffante refroidir.
5) Répétez l'étape 3.Veillez à bien couvrir d'huile toute la surface.
6) Répétez l'étape 4. Laissez la plaque chauffante refroidir.Essuyez toute la surface de la plaque
chauffante avec un gros chiffon.Appliquez une très mince couche d'huile végétale. Vous pouvez à
présent utiliser la plaque chauffante. Si vous n'utilisez pas la plaque chauffante pendant une
période prolongée, conditionnez-la de nouveau.
REMARQUE : il est normal que la plaque chauffante noircisse à l'usage.
Vis de transport
(à enlever)
2 vis extérieures d'in-
clinaison
couvercle du carneau de
la plaque chauffante
Fig. 10
Page 53

15
UTILISATION DE LA PLAQUE CHAUFFANTE
Avant d'entamer la cuisson sur la plaque chauffante, assurez-vous que la lèchefrite et sa cuve sont en
place. Préchauffez la plaque chauffante pendant 15 minutes en mettant le bouton de réglage à la
température suggérée sur le tableau de cuisson. Le voyant HEATING s'éteint une fois le gril
préchauffé.Placez les aliments sur la plaque chauffante et faites-les cuire jusqu'à obtenir le degré de
cuisson désiré.
REMARQUE : si la plaque chauffante a été conditionnée correctement, elle peut être utilisée sans
aucun shortening supplémentaire.Vous pouvez toutefois en utiliser pour ajouter de
la saveur.L'application d'une mince couche d'huile végétale sur la plaque chauffante
froide avant la cuisson permet de tourner les aliments délicats plus facilement.
TAB LE AU DE CUISSON DE LA PLAQUE CHAUFFANTE
Œufs
Bacon, jambon, côtelettes de porc
Crêpes, pain doré
Saucisse, sandwiches au fromage fondant
ALIMENTS TEMPÉRATURE
de 105 à 120 ºC (de 225 à 250 ºF)
de 150 à 165 ºC (de 300 à 325 ºF)
de 165 à 175 ºC (de 325 à 350 ºF)
de 175 à 190 ºC (de 350 à 375 ºF)
de 205 à 220 ºC (de 400 à 425 ºF)
Pommes de terre rissolées
UTILISATION DU FOUR
UTILISATION DE LA PLAQUE CHAUFFANTE
ÉLÉMENTS DE CUISSON DU FOUR
Votre nouvelle cuisinière RDS professionnelle est équipée d'éléments de cuisson et de grilloir. Le four
modèle 27 po cuit à 6000 W alors que les fours à gril modèles 27 et 24 po grillent à 4000 W.Sur les
modèles RDS 305,le four de 24 po cuit à 3700 W.Le four d'apprêt de 12 po (modèles RDS 48 seulement)
cuit à 3700 W et grille à 3600 W.
FOUR
Votre nouveau four offre trois modes de cuisson; cuisson par convection, cuisson normale et grillage
par convection. Lisez d'abord ces informations afin de déterminer le type de cuisson approprié.
Rappelez-vous que ce four est neuf et que la précision de son thermostat a été vérifiée. Il se peut que
le thermostat de votre ancien four soit devenu plus chaud ou plus froid avec le temps. Utilisez la durée
de cuisson et la température indiquées sur vos recettes. Faites attention si vous utilisez la durée de
cuisson et la température de votre ancien four. Il se peut que vous compensiez pour son mauvais
réglage. Les modèles RDS-484GG, RDS-486GL et RDS-486GD comportent deux fours. Le four de 27 po
sur le côté droit sert à la cuisson normale, la cuisson par convection assistée par ventilateur et la
grillade. Il est également autonettoyant. Le four de 12 po sur le côté gauche sert à la cuisson normale,
la grillade et l'apprêt des aliments cuits. Il est également idéal pour la cuisson de petites quantités de
nourriture si vous ne désirez pas chauffer le grand four.
Page 54

UTILISATION DU FOUR
16
CUISSON PAR CONVECTION
La cuisson par convection consiste en un mode de cuisson où le ventilateur à l'arrière du four fait
circuler l'air chaud en continu autour des aliments. Cet air chaud réchauffe et cuit la surface des
aliments de manière plus efficace qu'un four standard.Cela permet de cuire la plupart des aliments à
des températures inférieures ou en moins de temps que ne le ferait une cuisson à température
normale. L'air est maintenu en mouvement et réchauffé. Vous remarquerez une économie de temps
particulièrement avec des aliments non couverts nécessitant une plus longue cuisson (gros morceaux
de viande par ex.),des aliments pouvant être cuits dans des ustensiles de cuisson peu profonds ou des
aliments soufflés. Vous pouvez également sauver du temps en utilisant plusieurs grilles en même
temps, car cela permet de cuire plus d'aliments à la fois.
Aliments appropriés pour la cuisson par convection
Hors-d'œuvre Pains Repas au four (1 à 3 grilles)
Biscuits Plats principaux Rôtis
Ta rt es Volaille
Aliments soufflés (gâteau des anges, soufflés, choux à la crème, coquilles de meringue)
CUISSON NORMALE
La cuisson se fait à l'air chaud sans ventilateur. Le mouvement d'air provient d'une convection
naturelle : as mesure que l'air se réchauffe, il s'élève vers le plafond du four.C'est le même mode que
celui que vous utilisiez pour une cuisson sur une ou deux grilles.
Aliments appropriés pour la cuisson au four
Hors-d'œuvre Ta rtes, gâteaux Pains
Desserts Plats principaux Repas au four (1 à 2 grilles)
Volaille Rôtis
GRILLAGE
Le grillage est un type de cuisson qui emploie le chauffage par rayonnement infrarouge intense
procuré par le brûleur du grilloir situé en haut du four. Comme l'on emploie le chauffage par
rayonnement, il n'est pas nécessaire d'utiliser le ventilateur à convection en mode de grillage.
Aliments appropriés pour le grillage
Brunir : ragoûts, pains Hors-d'œuvre Viandes
Volaille Poisson
CONVERSION DES RECETTES POUR LA CUISSON PAR CONVECTION
Les meilleurs résultats sont obtenus avec des ustensiles de cuisson peu profonds, car l'air chaud peut
atteindre les aliments de tous les côtés plus facilement. Laissez la température du four identique à
celle de la recette mais faites cuire les aliments pendant une durée moindre. La cuisson prendra
probablement autant de temps que l'indique la recette même si vous baissez la température de 25 ºF.
Si vous trouvez que les aliments ont suffisamment brunis à l'extérieur mais qu'ils ne sont pas cuits au
centre, abaissez de nouveau la température de 25 ºF et augmentez la durée de cuisson. Si vous
réduisez la température,vérifiez toujours le degré de cuisson, une minute ou deux avant l'écoulement
de la durée minimum indiquée sur la recette,car vous pouvez toujours augmenter la durée de cuisson.
Certaines recettes prennent moins de temps que d'autres.
Page 55

UTILISATION DU FOUR
17
Il n'est pas possible de prédire exactement la durée de cuisson de chaque recette lorsqu'on les
convertit pour la cuisson par convection. Il vous sera plus facile d'utiliser la convection après quelques
essais à mesure que vous comprendrez mieux son fonctionnement.
SÉLECTION DES USTENSILES POUR LA CUISSON PAR CONVECTION
La cuisson par convection n'exige pas d'ustensiles de cuisson particuliers. Vous disposez
probablement de plusieurs ustensiles appropriés dans votre cuisine.Pour en choisir un, tenez compte
de son matériau, de ses dimensions et de sa forme, car tout cela affecte la durée de cuisson, la saveur
et l'aspect du produit fini. Les plats de cuisson en métal (aluminium, acier et fonte) réduisent la durée
de cuisson et donnent un meilleur résultat final. Les plats en aluminium sont les mieux appropriés
pour tout type d'aliment cuit au four.Pour obtenir le meilleur brunissage dans la cuisson de tartes et
de pains, utilisez un plat au fini foncé ou terne capable d'absorber la chaleur. Un fini brillant est mieux
approprié pour les gâteaux et les biscuits, car il reflète une partie de la chaleur et donne une surface
plus tendre. Les plaques à biscuits à une seule lèvre donnent les meilleurs résultats, car elles
permettent à l'air chaud de circuler tout autour des aliments.Pour rôtir,utilisez le fond du lèchefrite et
élevez la viande sur une grille à rôtir métallique. Les ustensiles en vitrocéramique ou en verre ne
conduisent pas la chaleur aussi bien que le métal,mais vous pouvez les employer.Utilisez-les pour des
aliments tels que les soufflés qui n'exigent pas une croûte brun foncé ni d'être croustillants.
La cuisson au four est plus rapide et uniforme si les portions sont plus petites : deux ou trois petits
morceaux donnent un meilleur résultat qu'une seule grosse portion. S'il s'agit d'un aliment en un seul
morceau, placez-le toujours au centre de la grille. S'il y a plusieurs morceaux, espacez-les uniformément sur la ou les grilles.
CONDENSATION
Une certaine quantité d'humidité s'évapore de la nourriture durant toute cuisson. L'humidité
contenue dans les aliments détermine la quantité d'humidité qui se condense dans le four. L'humidité
se condense sur toute surface qui est plus froide que l'intérieur du four, tel que le panneau de contrôle
ou le dessus de la porte.
POUR OBTENIR LES MEILLEURS RÉSULTATS
Cuisson :
Utilisez les quantités et les ingrédients de la recette, y compris les dimensions et la forme
d'ustensile de cuisson recommandées dans la recette.
Évitez d'ouvrir la porte du four " pour jeter un coup d'oeil "; allumez plutôt la lampe intérieure
du four et regardez par la fenêtre.
Évitez d'utiliser le four comme lieu de stockage, particulièrement si vous cuisez au four. Tout
ustensile supplémentaire qui ne sert pas à la cuisson peut affecter les aliments, la durée de
cuisson, le brunissage et le résultat final.
Si vous utilisez des ustensiles en verre, diminuez la température de 25 ºF.
Utilisez un minuteur et réglez-le à la durée minimum suggérée sur la recette
Convection Baking:
Suivez les trois premières recommandations ci-dessus.
Les ustensiles en métal donnent de meilleurs résultats que ceux en verre pour la cuisson par
convection. Si vous utilisez du verre, vous n'avez généralement pas besoin de diminuer la
température de 25 ºF de nouveau.
Page 56

UTILISATION DU FOUR
18
Utilisez un minuteur et réglez-le à une durée inférieure à la durée minimum suggérée sur la
recette la première fois que vous utilisez une recette en mode de convection. Prenez soin de
noter la nouvelle durée de cuisson sur la recette pour consultation future.
Prenez soin de lire les informations de base au sujet de la convection, à la page 15, avant
d'utiliser le four pour la première fois.
N'oubliez pas que les résultats en matière de cuisson par convection varient selon le type de
produit.La cuisson normale donne, dans de nombreux cas, de meilleurs résultats que la cuisson
par convection.
PRÉCHAUFFAGE
Le préchauffage dure 10 à 15 minutes selon la température choisie. C'est généralement requis pour
les aliments cuits à haute température pendant une courte durée, par ex. des biscuits à la cuiller. Le
voyant de chauffage s'éteint lorsque le four atteint sa température.
RÉGLAGE DU FOUR DE 12 PO POUR LA CUISSON (modèles 48 po seulement)
Pour utiliser le four d'apprêt de 12 po pour la cuisson,(petit four du côté gauche),enfoncez le sélecteur
de cuisson (BAKE) situé sur le panneau de contrôle,au-dessus du bouton du four sur le petit four,puis
tournez le bouton de réglage du four à la température recommandée sur la recette.
1) Le bouton du thermostat étant éteint (OFF), appuyez sur le bouton de sélection BAKE.
2) Réglez le thermostat a la température voulue.
Le voyant « OVEN ON » s'allume.
Le voyant « HEATING » s'allume.
Dès que le voyant « HEATING » s'éteint pour la première fois, le four est préchauffé.
Le voyant « OVEN ON " reste allumé jusqu'à ce que le bouton de sélection « OFF » est
enfoncé ou que le thermostat est mis sur « OFF ».
RÉGLAGE DU FOUR DE 27 ET 24 PO POUR LA CUISSON
Décidez du mode d'utilisation : BAKE ou CONVECTION BAKE (cuisson ou cuisson par convection). Ces
modes de cuisson permettent de cuire, rôtir ou réchauffer avec une, deux ou trois grilles. Pour utiliser
la cuisson normale,enfoncez le sélecteur de cuisson BAKE, situé sur le panneau de contrôle,au-dessus
du bouton du grand four, puis tournez le bouton de réglage du four à la température recommandée
sur la recette.Pour utiliser la cuisson par convection, enfoncez le sélecteur de convection (CONV BAKE,
situé sur le panneau de contrôle), puis tournez le bouton de réglage du four à la température voulue.
1) Appuyez sur le bouton de sélection BAKE ou CONVECTION BAKE (cuisson ou cuisson par
convection)
Le ventilateur à convection s'allume si « CONVECTION BAKE » est sélectionné.
2) Réglez le thermostat à la température voulue.
Le voyant « OVEN ON » s'allume.
Le voyant « HEATING » s'allume.
Dès que le voyant « HEATING » s'éteint pour la première fois, le four est préchauffé.
Le voyant « OVEN ON » reste allumé jusqu'à ce que le bouton de sélection « OFF » est
enfoncé ou que le thermostat est mis sur « OFF ».
Page 57

UTILISATION DU FOUR
19
FOURS 27 ET 24 PO
Le four à convection autonettoyant de 27 po est situé sur le côté droit de la cuisinière RDS de 48 po ou
est le seul four d'une cuisinière de 36 po. Le four comprend trois grilles et des supports de grille à
roulettes à trois positions. Une lèchefrite en acier vitrifié est incluse avec le four.
REMARQUE : à propos des supports de grille à roulettes (four de 27 et 24 po seulement) :
Spécialement fabriqués à base de matériaux résistants à des hautes températures conçus pour le four,
ils sont capables d'assurer des années de service.Ils sont particulièrement utiles lorsque les grilles du
four supportent des aliments lourds que l'on utilise généralement avec ce type de four à haute
capacité. Ils doivent être retirés avant l'autonettoyage du four. Voir la page 30 au sujet de l'entretien
des supports de grille. Les trois fours à carburant mixte sont livrés avec une lèchefrite en deux
morceaux.
FOUR DE 12 PO (CUISINIÈRES DE 48 PO SEULEMENT
Le four de 12 po comprend deux grilles de four et des supports de grille à trois positions.Les supports
de grille peuvent être enlevés pour le nettoyage.Il comporte également une lèchefrite en aluminium
et une cuve inférieure en acier vitrifié qui facilite le nettoyage.
GRILLES DU FOUR
MISE EN GARDE :
n'utilisez jamais de papier aluminium pour recouvrir les grilles ou le fond du
four.La chaleur emprisonnée peut endommager la porcelaine et l'air chaud ne
peut atteindre adéquatement la nourriture qui cuit.
Cuisson
Vous pouvez utiliser une ou deux grilles simultanément durant la cuisson. Placez les grilles dans la
bonne position avant d'allumer le four. Rangez les grilles inutilisées hors du four. La position de grille
numéro 2 (deuxième à partir du bas) sera probablement plus souvent utilisée pour une cuisson à une
grille. Si vous utilisez deux grilles en même temps, vérifiez les aliments de la grille inférieure avant que
la durée minimum ne s'écoule. Les aliments placés sur la grille inférieure peuvent cuire un peu plus
rapidement que ceux de la grille supérieure,en particulier si vous utilisez de gros ustensiles de cuisson.
Si vous utilisez deux grilles simultanément,prenez soin de décaler les ustensiles de cuisson pour qu'ils
ne soient pas directement l'un au-dessus de l'autre et pour que l'air chaud puisse circuler librement
autour de chaque plat. Laissez au moins 2,5 cm (1 po) d'espace entre les parois du four et les plats. Si
vous utilisez des ustensiles de cuisson de grand taille ou de format commercial,les aliments prendront
peut-être plus de temps à cuire, car l'air ne peut circuler aussi librement qu'avec un petit plat. Si vous
employez des ustensiles de cuisson de format commercial,utilisez une grille seulement car la chaleur
n'a pas assez d'espace pour circuler.
Cuisson par convection
Il est permis d'utiliser toutes les grilles simultanément durant la cuisson par convection. Placez les
grilles dans la bonne position avant d'allumer le four. Rangez les grilles inutilisées hors du four. La
position de grille numéro 2 (deuxième à partir du bas) sera probablement plus souvent utilisée pour
une cuisson à une grille. Nul besoin de décaler les plats si vous cuisinez avec plusieurs grilles. Laissez
toutefois au moins 2,5 cm (1 po) d'espace entre les parois du four et les plats afin que l'air chaud puisse
circuler.
Page 58

UTILISATION DU FOUR
20
RÔTIR À HAUTE ALTITUDE
Les temps de cuisson et ceux indiqués sur les recettes varient si vous cuisinez à haute altitude. Pour
obtenir des informations précises à ce sujet,écrivez à l'adresse suivante :Agriculture Extension Service,
Colorado State University, Fort Collins, Colorado 80521. Indiquez le type d'informations recherchées et
le mode de cuisson (par convection ou normale) voulu, par ex. gâteaux, biscuits, pains, etc. Vous
pourriez encourir des frais pour l'obtention de ces informations.
RÉGLAGE DU FOUR POUR LE GRILLAGE
Lorsque vous appuyez sur le bouton de sélection « Broil », vous entendez le ventilateur de
refroidissement démarrer et vous sentez un courant d'air au-dessus de la porte du four.Le courant d'air
permet de refroidir le panneau de contrôle au-dessus du four durant le grillage avec la porte du four
ouverte. Le ventilateur de refroidissement doit être en marche pour que le grilloir puisse fonctionner.
NE GRILLEZ JAMAIS AVEC LA PORTE OUVERTE EN PRÉSENCE DES ENFANTS.
Préchauffage
Il n'est pas nécessaire de préchauffer le grilloir dans la plupart des cas.Toutefois, un court préchauffage
de 2 à 3 minutes peut être nécessaire pour des aliments qui cuisent vite,tel que des tranches de viande
ou poisson minces (préchauffez le grilloir pendant 10 minutes sur les modèles RDS 305,de préférence
avec la porte fermée pour obtenir les meilleurs résultats), afin de permettre à la surface des aliments
de brunir durant le laps de temps requis pour une cuisson complète des aliments.
Pour obtenir les meilleurs résultats
Décongelez les aliments avant la cuisson.
Laissez la porte entrouverte à la fin du grillage.
REMARQUE : si la porte est fermée durant le grillage, la cavité du four peut devenir suffisamment
chaude pour allumer et éteindre successivement l'élément de grillage, donnant lieu
à des aliments qui semblent être cuits ou rôtis plutôt que grillés.
Utilisez un minuteur et réglez-le à la durée minimum suggérée pour vérifier la nourriture.
Les biftecks doivent avoir au moins un pouce d'épaisseur si vous les voulez saignants. Il est
difficile d'atteindre un tel degré de cuisson avec une viande plus mince ou d'obtenir des
morceaux de viande bien brunis.
Après que la moitié de la durée totale de cuisson se soit écoulée, retournez les aliments une fois
seulement.Il n'est pas nécessaire de retourner les aliments minces (filet de poisson, tranches de
jambon, etc.). Les tranches de foie doivent être retournées.
Si vous voulez brunir les aliments, utilisez des plats de cuisson en métal ou en vitrocéramique.
ÉVITEZ d'utiliser du verre ou de la poterie calorifugée :ce type d'ustensiles ne peut supporter la
chaleur intense du brûleur du grilloir.
REMARQUE : vous ne pouvez pas utiliser le brûleur du grilloir et le brûleur de cuisson en même
temps. Si l'un fonctionne,l'autre ne peut être allumé.
Utilisation d’un thermomètre à viande pour griller avec et sans convection
Pour déterminer précisément le degré de cuisson d'un bifteck ou d'une côtelette épaisse (1-1/2 po
d'épaisseur ou plus), utilisez un thermomètre à viande. Introduisez la pointe du thermomètre par le
côté de la viande jusqu'au centre. Cuisez le premier côté à 90 ºF pour obtenir une viande saignante.
Cuisez le premier côté à 100 ºF pour obtenir une viande à point ou bien cuite. Cuisez le second côté
selon le degré de cuisson voulu; saignant : de 135 ºF à 140 ºF; à point :de 150 ºF à 155 ºF; bien cuit :de
Page 59

UTILISATION DU FOUR
21
160 ºF à 165 ºF. La cuisson du porc se fait à 170 ºF. Votre nouvelle cuisinière est livrée avec une grand
lèchefrite en deux morceaux. Utilisez toujours les deux morceaux lorsque vous grillez. Évitez de
recouvrir la grille de papier d'aluminium. Cette grille perforée permet aux gouttes de graisse de
s'écouler vers le fond du lèchefrite, loin de la chaleur intense du brûleur infrarouge du grilloir. Cela
contribue à minimiser les vapeurs et éclaboussures provenant des matières grasses.
REMARQUE : il se peut que le ventilateur de refroidissement s'allume si le four fonctionne à haute
température pendant une période prolongée. C'est normal. Le ventilateur de
refroidissement se met en marche également durant le grillage et l'autonettoyage.Si
le ventilateur ne fonctionne pas dans ces modes, n'utilisez pas le four.Faites venir un
technicien qualifié pour réparer l'appareil.
Position des grilles du four
La position des grilles dépend du type et de l'épaisseur des aliments. Les morceaux de viande ou de
volaille épais sont généralement grillés à la position de grille numéro 2, les biftecks, côtelettes et
hamburgers à la position de grille numéro 3. S'il s'agit de brunir un ragoût ou du pain, l'épaisseur des
aliments vous indiquera la position de grille à utiliser. Les ragoûts et pains sont généralement brunis à
la position de grille numéro 2 ou 3.
UTILISATION DU FOUR POUR UNE CUISSON LENTE OU À BASSE
TEMPÉRATURE
Le four peut servir à garder les aliments chauds, les déshydrater, réchauffer les plats, faire une cuisson
lente (dans une mijoteuse par ex.) et décongeler les aliments.
Vous pouvez gardez des aliments cuits et chauds à la température de consommation. Réglez le four à
la température suggérée sur le tableau. La viande saignante doit être consommée dès son retrait du
four,car elle continue à cuire sous l'effet de sa propre chaleur.
Pour garder les aliments humides,couvrez-les de papier d'aluminium ou d'un couvercle.
Pour déshydrater les aliments, suivez les suggestions de la recette.
Pour réchauffer les plats,consultez leur fabricant au sujet de la température recommandée.
Pour utiliser le four pour une cuisson lente, réglez le bouton de réglage du four à 225 ºF ; placez
la nourriture dans le four dans un plat à couvercle étanche.Suivez les recettes pour ce type de
cuisson.
Pour décongeler des aliments non cuits congelés, réglez le bouton de réglage du four à « warm
»
(réchauffer). Assurez-vous que les aliments sont bien enroulés dans du papier aluminium.
Décongelez les aliments juste assez pour pouvoir les manipuler. Faites-les cuire immédiatement. Évitez de les congeler de nouveau.
Pour décongeler des aliments cuits congelés, mettez le bouton de réglage du four sur 170 ºF.
Desserrez l'emballage du congélateur.
ÉVITEZ d'utiliser des enveloppes de plastique ou du papier ciré dans le four.
SALUBRITÉ ALIMENTAIRE :
le Département de l'agriculture américain stipule que l'on ne doit pas
maintenir des aliments entre 40 ºF et 140 ºF pendant plus de 2 heures.
Page 60

UTILISATION DU FOUR
22
Œufs et plats aux œufs
Œufs
Mets aux œufs 160 °F
Sauces aux œufs, crèmes 160 °F
Viande hachée et mélanges de viandes
Dinde, poulet 165 °F
Bœuf,veau, agneau,porc 160 °F
Bœuf, veau, agneau frais
Mi-saignant 145 °F
À point 160 °F
Bien cuit 170 °F
Porc frais
À point 160 °F
Bien cuit 170 °F
Rôti de bœuf
Cuisson commerciale, 140 °F
scellé sous vide et prêt
à consommer
Aliments Température du four
Rôtis d'agneau et de veau 170 - 200 ºF
Crêpes et gaufres (recouvertes) 200 - 225 ºF
Pommes de terre
au four 200 ºF
en purée (recouvertes) 170 - 185 ºF
Tartes et pâtisseries 170 ºF
Pizza (recouverte) 225 ºF
Porc 170 - 200 ºF
Volaille (recouverte) 170 - 200 ºF
Légumes (recouverts) 170 - 175 ºF
Aliments Température du four
Bœuf
Saignant 150 - 155 ºF
À point 155 - 170 ºF
Bien cuit 170 - 180 ºF
Bacon 200 - 225 ºF
Biscuits et muffins (recouverts) 170 - 185 ºF
Ragoût (recouvert) 170 - 200 ºF
Poisson et fruits de mer 170 - 200 ºF
Plats avec frites 200 - 225ºF
Sauce d'arrosage ou sauces à
la crème (recouvertes) 170 - 180 ºF
Volaille
Poulet, dinde entière 180 °F
Poulet, dinde-viande brune 180 °F
Volaille-blanc 170 °F
Canard et oie 180 °F
Farce
Cuite seule ou dans la volaille 165 °F
Sauces, soupes, sauces d'arrosage, marinades
Utilisées avec viande,
volaille ou poisson cru
Fruits de mer
Poisson à nageoires
Crevettes,homard,
crabe
Coquilles
Saint-Jacques
Myes, moules,
huîtres
Restes 165 °F
TEMPÉRATURES SUGGÉRÉES POUR GARDER LES ALIMENTS CHAUDS
TEMPÉRATURES DE CUISSON INTERNES
Cuire jusqu’à ce que le
jaune et le blanc
d’œuf soient fermes.
Porter à
ébullition
Cuire jusqu’à ce qu’il
devienne opaque et
s’écaille facilement à
l’aide d’une fourchette
Doit devenir rouge et
la chair doit devenir
blanche opaque
Doivent devenir
blanches laiteuses ou
opaques et fermes
Cuire jusqu’à ce que
les coquilles s’ouvrent.
Page 61

MODE D'APPRÊT ET D'AUTONETTOYAGE
23
MODE D'APPRÊT - FOUR DE 12 PO
Cette fonction du four d'apprêt de 12 po maintient un environnement chaud sans courant d'air, utile
pour l'apprêt des aliments levés à la levure.
RÉGLAGE DU FOUR DE 12 PO POUR L'APPRÊT DES ALIMENTS
1) Placez la pâte dans un plat dans le petit four.
2) Appuyez sur le bouton de sélection « PROOF ».
Le voyant « OVEN ON » et les lumières intérieures du four s'allument.
Le voyant » HEATING » ne s'allume pas en mode d'apprêt.Le bouton de réglage du
thermostat n'affecte pas la température d'apprêt.
La température d'apprêt idéale est maintenant jusqu'à ce que l'on appuie sur le bouton
« OFF ».
3) Utilisez un minuteur et réglez-le à une durée inférieure à la durée d'apprêt minimum.
REMARQUES : A) Évitez d'ouvrir la porte du four pour rien car cela fait baisser la température du
four et rallonge la durée d'apprêt.
B) Il se peut que la durée d'apprêt soit diminuée si vous utilisez le grand four en
même temps que vous faites l'apprêt. Vérifiez tôt le pain produit pour éviter un
apprêt excessif. Si vous utilisez le grand four pendant de longues périodes, nous
vous recommandons, pour obtenir des résultats optimum, de terminer l'apprêt
avant d'allumer le grand four.
ÉVITEZ d'utiliser le four d'apprêt pour réchauffer les aliments ou les garder chauds.La
température du four d'apprêt n'est pas assez élevée pour conserver les aliments à la bonne
température (au-dessus de 140 °F).
MODE D'AUTONETTOYAGE DU FOUR
Votre nouvelle cuisinière est doté d'un four autonettoyant pyrolytique.En mode de nettoyage CLEAN,
le four, porté à une température élevée, réduit en cendres toutes les salissures. Lorsque le four est en
mode CLEAN, seuls les brûleurs de la table de cuisson peuvent être utilisés.Le four d'apprêt électrique
de 12 po,la plaque chauffante et le gril ne peuvent être utilisés.On observe fréquemment de la fumée
ou des flammes durant le cycle de nettoyage en fonction du contenu du four et de la quantité de
salissures encore présentes. Si des flammes persistent, éteignez le four et laissez-le refroidir avant
d'ouvrir la porte pour essuyez les déchets restants. Il se peut que des cendres grises ou des résidus
brûlés demeurent à l'intérieur du four à la fin du cycle de NETTOYAGE. Il s'agit de dépôts minéraux qui
ne brûlent et ne fondent pas. La quantité de cendres dépend du degré de saleté du four avant le
nettoyage.Elle peut être facilement éliminée, une fois le four refroidi, à l'aide d'une serviette en papier,
éponge ou linge humide. Essuyez tout résidu de fumée sur le cadre avant à l'aide de Formula
Page 62

MODES D'AUTONETTOYAGE DU FOUR
24
VERROUILLAGE DE LA PORTE DU
FOUR DURANT L'AUTONETTOYAGE
Au démarrage du cycle de nettoyage, le
voyant de verrouillage s'allume puis le cycle
de verrouillage automatique de la porte
s'active. Évitez d'ouvrir la porte lorsque le
voyant de verrouillage est allumé.Pour arrêter
le cycle, appuyez sur le bouton Off. Le voyant
de verrouillage s'éteint seulement après que
le four refroidit à moins de 550 ºF et que le
verrouillage automatique de la porte conclut
son cycle et revient à sa position d'ouverture.
AVANT D'EFFECTUER L'AUTONETTOYAGE DU FOUR :
Retirez tous les ustensiles et grilles
Nettoyez le cadre avant du four et les bords
extérieurs de la porte. Essuyez les gro
débordements et dépôts graisseux. (Voir
fig. 11.)
Assurez-vous que les ampoules et les vitres
couvrantes sont en place.
Allumez la hotte de ventilation au-dessus de
la cuisinière et laissez-la en marche jusqu'à
ce que le four termine son cycle d'aut
toyage.
Retirez les grilles et les coulisses à grilles.
REMARQUE : un système de verrouillage a été conçu afin que le cycle d'autonettoyage ne s'ac-
tive pas avant que les ensembles de coulisses à grilles ne soient retirés.Les supports de grille à roulettes sont conçus pour supporter la plage de température du
thermostat de cuisson. Ils ne peuvent supporter les températures extrêmes de
l'autonettoyage pyrolytique.Pour retirer les ensembles de coulisses :
A) Retirez, de chaque côté,la vis de retenue.
B) Soulevez légèrement puis tirez l'ensemble entièrement. Mettez-le de côté.
Replacez les ensembles et leurs vis de retenue une fois le cycled'autonet
toyage terminé.
ENSEMBLE DE COULISSE DE GRILLE DU FOUR DE 27 PO
Essuyez les flaques de graisse et les salissures faciles à enlever. Éliminez les salissures à l'extérieur du
joint de la porte. Cet appareil est conçu pour nettoyer l'intérieur du four et la partie de la porte qui se
trouve à l'intérieur du four. Les bords extérieurs de la porte et la cavité du four ne font pas partie de la
zone de nettoyage.Essuyez cette zone avant de régler le four sur autonettoyage.
Allumez la hotte de ventilation au-dessus de la cuisinière et laissez-la en marche jusqu'à
ce que le four termine son cycle d'autonettoyage.
Cadre avant du
four
Bord
extérieur
de la porte
Fig. 11
Fig. 12
Page 63

MODES D'AUTONETTOYAGE DU FOUR
25
RÉGLAGE DU FOUR POUR L'AUTONETTOYAGE
1) Enfoncez le bouton de sélection « CLEAN ».
2) Réglez le bouton de réglage du four sur « CLEAN ».
Le ventilateur de refroidissement s'allume;
Les voyants OVEN ON et HEATING s'allument;
Le voyant LOCK s'allume.
Le processus de fermeture de la porte prend environ 60 secondes, après quoi la porte est
verrouillée.
À LA FIN DU CYCLE DE NETTOYAGE :
Le cycle de nettoyage dure 5 heures. Le voyant OVEN
ON s'éteint une fois le cycle terminé.
1) Enfoncez le bouton de sélection OFF. Le verrou de la
porte s'ouvre automatiquement après que la
température du four tombe au-dessous de 550 ºF et
que le cycle de verrouillage automatique de la porte
de 60 secondes s'achève à la position OPEN.
2) Mettez le bouton de réglage du four sur OFF. Essuyez
les résidus de cendre blanche avec un linge ou une
éponge humide (après que le four ait refroidi) avant
de replacer les grilles du four.
3) Replacez les ensembles de coulisses à grilles de la façon suivante :
A) Guidez la partie arrière de l'ensemble de coulisse dans le support arrière inférieur sur le côté
du four;
B) Guidez la partie arrière supérieure de l'ensemble de coulisse dans le support en U sur le côté
du four;
C) Soulevez la tige-poussoir pour qu'elle repose sur le " rebord " du support latéral de
'ensemble, et
D) Vissez bien l'ensemble au four à travers le trou situé sur la section avant centrale du support
latéral. Faites de même pour l'autre côté du four.
4) Replacez les grilles du four.
MISE EN GARDE :
l'intérieur du four est encore à la température de cuisson lorsque le voyant de
verrouillage s'éteint et que la porte du four peut être ouverte. Soyez prudent
car le four peut être suffisamment chaud pour provoquer des brûlures.
Fig. 13
Page 64

ENTRETIEN ET MAINTENANCE
26
DURANT LE NETTOYAGE DE LA CUISINIÈRE OU TABLE DE CUISSON :
Faites très attention lorsque vous nettoyez les parties de l'appareil lorsqu'il est
chaud.
L'appareil tout entier peut être nettoyé avec de l'eau savonneuse chaude, puis rincé, séché et bien poli
à l'aide d'un chiffon à poils épais et doux. Essayez cela en premier, c'est la façon la plus douce de le
nettoyer.
1) Employez la méthode de nettoyage la plus douce d'abord. Certains produits de nettoyage de
même type sont plus forts que d'autres.Lisez leur mode d'emploi. La présence de parfum ou de
gaz propulseur peut avoir un effet significatif;veuillez lire la liste des ingrédients. Faites un essai
sur une petite surface au préalable.
2) Pour ne pas gâcher la surface,frottez toujours la finition du métal dans le sens du polissage; de
plus, le nettoyant est plus efficace dans ce sens.
3) Pour nettoyer ou récurer,utilisez uniquement des éponges propres,des tissus doux, des essuietout, des tampons à récurer savonneux non-métalliques en plastique (utilisez uniquement des
tampons contenant encore du savon; un tampon sec peut égratigner la surface), tel que
recommandé dans cette section.
4) Rincez soigneusement et séchez en essuyant pour éviter de laisser des marques d'eau.
NOMS DE MARQUE
La référence à des noms de marques dans cette section est donnée à titre indicatif et ne saurait
constituer un acte de promotion. L'omission d'une marque de nettoyant particulière ne signifie pas
qu'elle est adéquate ou non. De nombreux produits sont distribués dans certaines régions seulement
et sont disponibles dans les marchés et grands magasins locaux.
TAB L E D E CUISSON
Éteignez tous les brûleurs et laissez les grilles refroidir avant de nettoyer la table de cuisson. Si vous
essuyez une partie de la table de cuisson alors qu'elle est chaude, faites-le avec précaution car vous
pourriez vous brûler à la vapeur si vous utilisez une éponge ou un linge humide.
GRILLES DES BRÛLEURS
Faites attention lorsque vous soulevez les grilles car elles sont lourdes. Placez-les sur une surface
protégée pour qu'elles n'égratignent pas celle-ci. Les grilles des brûleurs sont faites d'émail de
porcelaine mat sur fonte.Une fois les grilles refroidies, vous pouvez les placer dans le lave-vaisselle ou
les nettoyer à l'aide d'une solution savonneuse chaude et les essuyer pendant qu'elles sont sur la table
de cuisson. Les grilles des brûleurs ne rouillent pas car elles sont couvertes d'émail de porcelaine mat
des deux côtés pour une durabilité accrue.
L'utilisation occasionnelle de nettoyant abrasif doux tel que Bon-AmiMD,Soft ScrubMD ou un tampon
à récurer métallique savonneux est acceptable. L'utilisation vigoureuse ou trop fréquente de
nettoyants abrasifs peut finir par endommager l'émail.Appliquez le produit avec une éponge humide,
rincez abondamment puis séchez. À cause des changements de température rapides qui se
produisent lorsque les brûleurs sont allumés, la porcelaine recouvrant les bords des grilles pourrait
éclater en morceaux. Ne vous en faites pas car ceci n'entraîne pas une détérioration des grilles. Le
métal en fonte devient foncé en peu de temps et se fond à l'émail de porcelaine. Essuyez avec
précaution les endroits où l'émail a éclaté, car les bords peuvent être tranchants.
Page 65

ENTRETIEN ET MAINTENANCE
27
BRÛLEURS
Pour assurer un bon allumage et une
bonne performance des brûleurs,
gardez-les dans un état propre. Vous
devez nettoyer les brûleurs s'ils ne
s'allument pas même si l'allumeur
clique, après chaque débordement
important ou si la flamme ne devient
pas bleue. Assurez-vous que tous les
boutons des brûleurs sont en position
OFF avant d'essayer de nettoyer les
brûleurs. Les brûleurs ont été conçus
pour être faciles à nettoyer. Une fois les
grilles et brûleurs refroidis, retirez les
grilles. Les capuchons de brûleur et les
couronnes en laiton peuvent être
facilement enlevés. Lavez ces pièces
dans de l'eau savonneuse chaude,
rincez et séchez soigneusement. Les
capuchons de brûleur sont en émail
de porcelaine; suivez les instructions
données à la page précédente
concernant les grilles des brûleurs.
Utilisez au besoin une brosse en soies
pour nettoyer les ports dentés des brûleurs. Le démontage de la couronne de mijotage n'est pas
recommandé; cela peut toutefois s'avérer nécessaire si les ports restent bouchés après un nettoyage
normal. Si vous devez retirer la couronne de mijotage de sa base, enlevez l'écrou hex de la partie
supérieure de la couronne de mijotage. Nettoyez la couronne de mijotage avec de l'eau savonneuse
chaude à l'aide d'une brosse en soies douce métallique ou en plastique, puis séchez soigneusement.
Réassemblez les pièces à l'aide de l'écrou hex.Après le nettoyage, il est important de vous assurer que
la broche de position au bas de la couronne de mijotage est correctement alignée avec le trou
correspondant de la base et que la broche de position (voir encart) au bas de la couronne en laiton est
correctement alignée avec l'encoche de position en haut de la couronne de mijotage. Un mauvais
alignement produira une flamme potentiellement dangereuse et entraînera un mauvais fonctionnement du brûleur (voir fig.14).
ALLUMEURS
Essuyez avec un coton-tige imbibé d'eau en faisant
attention de ne pas endommager l'allumeur (voir fig.15).
LÈCHEFRITES ET TUBES D'ÉGOUTTEMENT
Les modèles à plaque chauffante et gril sont dotés d'une
cuve de lèchefrite.Les lèchefrites sont en acier
inoxydable et supportées par des roulettes, ce qui
permet de les retirer et de les replacer facilement.Il suffit
de tirer la lèchefrite pour l'enlever.Nettoyez immédiatement de la lèchefrite tout déversement pour éviter que les salissures ne " cuisent " sur place.La
graisse provenant de la plaque chauffante ou du gril s'écoule du tube d'égouttement dans la lèchefrite
et la cuve en dessous. ÉVITEZ de laisser la graisse s'accumuler dans la lèchefrite car elle peut poser un
risque d'incendie. Nettoyez le tube et la lèchefrite dès qu'ils ont refroidi. Nettoyez-les avec de l'eau
Capuchon
Couronne
de brûleur
principale
Base DU
BRÛLEUR
Couronne
de mijotage
Électrode
Venturi
Encoche
de
position
Trou de broche
de position à l'intérieur
Broche de position
de couronne en laiton
Broche de
position
Écrou hex
Fig. 14
ALLUMEUR (DOIT ÊTRE GARDÉ PROPRE)
Fig. 15
Page 66

savonneuse chaude. Utilisez un flacon à brosse à détergent pour
nettoyer le tube.Utilisez un nettoyant abrasif doux tel que BonAmi ou Soft Scrub. Pour les taches difficiles, utilisez un tampon à
récurer métallique savonneux ou un nettoyant abrasif, tel que
CometMD ou AjaxMD, en frottant légèrement. Rincez
soigneusement toutes les pièces.
PLAQUE CHAUFFANTE
Pendant que la plaque est encore chaude, éliminez
soigneusement la graisse et les salissures à l'aide d'une spatule à
angles vifs. Une fois la plaque chauffante tiède, frottez sa surface
légèrement avec de l'huile végétale (évitez l'huile de maïs car elle devient collante). Essuyez
soigneusement la plaque chauffante à l'aide d'une toile ou d'un linge épais et rugueux pour nettoyer
les restes de résidus et de particules. En cas d'accumulation de graisse, utilisez une c. à s. de vinaigre
dans une demi-tasse d'eau; nettoyez avec un linge à récurer tel que Chore BoyMD.En cas de coloration
sous l'effet de la chaleur, utilisez un nettoyant pour acier inoxydable tel que Revere WareMD. Lavez
dans de l'eau savonneuse chaude,rincez puis séchez. Si des salissures ou résidus d'aliments sont cuits
sur la plaque chauffante, utilisez une pierre ponce fine ou un produit de dégraissage (tous deux
disponibles chez les fournisseurs en restauration) en respectant le mode d'emploi du fabricant. Lavez
dans de l'eau savonneuse chaude, rincez puis séchez. Si vous nettoyez la plaque chauffante avec de
l'eau savonneuse chaude, du vinaigre, de la poudre à récurer, de la laine d'acier ou des tampons à
récurer métalliques, vous devez la conditionner de nouveau.Suivez les instructions de la page 13
concernant le conditionnement de la plaque chauffante.
N'ASPERGEZ JAMAIS UNE PLAQUE CHAUFFANTE CHAUDE AVEC DE L'EAU FROIDE. Cela peut
fissurer ou déformer la plaque chauffante..
GRIL
Nettoyez le gril immédiatement après la cuisson.Éteignez le brûleur.Portez un gant de barbecue pour
vous protéger la main de la chaleur et de la vapeur. Frottez le gril en trempant fréquemment une
brosse à poils fins en laiton dans un bol d'eau. La vapeur produite au contact de l'eau facilite le
nettoyage en ramollissant les particules d'aliments. Les particules tombent dans la lèchefrite ou le
plateau radiant contenant les radiants. Prenez soin de nettoyer le tube d'égouttement, la lèchefrite et
la cuve une fois refroidis.Suivez le mode d'emploi ci-dessus.Retirez périodiquement le plateau radiant
et les radiants (une fois refroidis) et secouez-les au-dessus d'une couche de papier journal à jeter.
BOUTONS DE RÉGLAGE DE LA TABLE DE CUISSON ET DU FOUR
Ceux-ci sont en plastique et peuvent être nettoyés dans de l'eau chaude savonneuse. Pour retirer les
boutons du panneau de contrôle, saisissez-les et tirez vers vous. Lavez-les sans les laisser tremper.
Rincez et séchez soigneusement. Il est important de remettre les boutons sur la bonne valve à gaz du
panneau de contrôle. Les boutons de réglage de la table de cuisson et du gril sont similaires; ceux de
la table de cuisson comportent un réglage « Simmer » (mijotage) contrairement à ceux du gril. Les
boutons de réglage du four et de la plaque chauffante sont également similaires;tous deux indiquent
des températures; le bouton du four comporte un réglage « Broil » (griller) contrairement à celui de la
plaque chauffante.
DOSSERET
Il est en acier inoxydable. Employez la méthode de nettoyage la plus douce d'abord. Lavez dans de
l'eau savonneuse chaude,rincez puis séchez. S'il y a encore des souillures alimentaires sur le panneau,
ENTRETIEN ET MAINTENANCE
28
TUBES
D'ÉGOUTTEMENT
Fig. 16
LÈCHEFRITE ET CUVE
Page 67

ENTRETIEN ET MAINTENANCE
29
essayez un nettoyant de cuisine d'usage général tel que FantastikMD, Simple GreenMD ou Formula
409MD. Pour les salissures plus coriaces, utilisez un nettoyant pour acier inoxydable tel que BonAmiMD, CameoMD ou Bar Keepers Friend. Appliquez le produit avec une éponge humide, rincez
abondamment puis séchez.Frottez toujours dans le sens du grain.N'utilisez pas de laine d'acier car elle
peut égratigner la surface. Pour réparer des égratignures visibles à l'œil nu, frottez très légèrement
avec du papier de verre fin, dans le sens du grain. Après le nettoyage, utilisez un produit à polir pour
acier inoxydable tel que Stainless Steel MagicMD. Il est possible que le panneau en acier inoxydable
vertical se décolore sous l'effet de la chaleur du brûleur si les brûleurs supérieurs arrière sont utilisés
très souvent à haute température. Cette décoloration peut être éliminée à l'aide du nettoyant pour
acier inoxydable Revere Ware.
INTÉRIEUR DU FOUR ET DE LA PORTE
Si la porte du four devient mal alignée, remettez-la en place en
suivant cette procédure toute simple :ouvrez grand la porte.Fermez
les verrous de charnière (voir fig. 17). Une fois les deux charnières
verrouillées, soulevez doucement la porte en la sortant légèrement
de son axe jusqu'à ce qu'elle soit bien alignée sur toute la ligne.
Remettez la porte à sa place en la glissant de manière uniforme et
assurez-vous que les charnières sont bien centrées sur leur rouleau.
La porte du four étant grande ouverte, déverrouillez les verrous de
charnière; vous pouvez à présent fermer la porte. Assurez-vous que
le four et la porte sont froids avant de les nettoyer. Ils sont couverts
d'émail de porcelaine mat. C'est un matériau qui résiste mais n'est
pas à l'épreuve de l'acide. Par conséquent, les aliments acides tels
que le vinaigre, la rhubarbe, l'alcool, les jus citriques ou le lait
doivent être essuyés avant qu'ils ne puissent durcir sous l'effet de la
cuisson. Essayez des nettoyants doux tels que Bon-Ami, de l'ammoniaque,une solution d'ammoniaque et d'eau, ou Soft Scrub.Appliquez les poudres sur une éponge ou
un linge humide. Frottez légèrement. Rincez abondamment puis séchez. Si les aliments ont brûlé sur
le four et sont difficiles à enlever, trempez les taches à l'aide d'un linge saturé d'ammoniaque ménager.
Laissez tremper pendant une heure ou deux avec la porte fermée. Vous devriez pouvoir éliminer
facilement les salissures à l'aide d'un linge imbibé d'eau savonneuse ou d'un produit abrasif doux.
Pendant la nuit, appliquez sur le four tiède (et non pas chaud) une solution de trois c. à s. d'ammoniaque dans une demi-tasse d'eau. Cela permet de ramollir les déversements et les résidus endurcis
afin de pouvoir les essuyer facilement avec une éponge ou un linge humide propre. Pour les taches
difficiles, utilisez un tampon à récurer métallique savonneux. L'utilisation occasionnelle de nettoyant
abrasif est acceptable; cependant, une utilisation trop fréquente ou trop vigoureuse peut finir par
endommager l'émail. Mouillez le tampon, frottez la surface légèrement, rincez abondamment puis
séchez.Vous pouvez utiliser des nettoyants commerciaux prévus pour les fours,tels que Easy OffMD ou
DowMD, pour nettoyer l'intérieur du four. Suivez le mode d'emploi du fabricant. Les nettoyants
commerciaux pour les fours sont corrosifs pour l'ampoule du thermostat et le brûleur de grilloir à
infrarouge : évitez de les utiliser pour vaporiser ou essuyer ces deux éléments. Si un nettoyant atteint
l'ampoule ou le brûleur de grilloir,essuyez-les immédiatement à l'aide d'un linge humide propre.
GRILLES DU FOUR ET SUPPORTS DE GRILLE
Toutes les grilles du four et les supports des grilles du four de 12 po sont en acier chromé. Les supports
de grille à roulettes sont en acier inoxydable.Pour retirer les supports, enlevez d'abord les grilles, puis
saisissez les supports et tirez-les vers le haut pour les extraire.Pour replacer les supports, remettez le
haut en premier.Voir la page 23 au sujet du retrait des ensembles de supports de grille à roulettes du
Fig. 17
ROULEAU DE CHARNIÈRE DE PORTE
VERROUILLER
(FERMER)
DÉVERROUILLER
Page 68

ENTRETIEN ET MAINTENANCE
30
four autonettoyant.Évitez d'immerger les ensembles de coulisses à grilles ou de les laver dans un lavevaisselle. Nettoyez-les à l'aide d'une éponge, d'un linge ou d'une laine d'acier humide avec un
détergent doux. Les nettoyants de chrome, tel que Soft Scrub, Cameo ou Bar Keepers Friend peuvent
être appliqués avec une éponge humide suivant le mode d'emploi inscrit sur l'emballage.Rincez puis
séchez. Appliquez un nettoyant en poudre tel que Bon-Ami ou Comet à l'aide d'une éponge ou d'un
linge humide,frottez légèrement, rincez, puis séchez.Pour les souillures alimentaires difficiles à enlever,
utilisez un tampon à récurer métallique savonneux,rincez et séchez. Vous pouvez utiliser sur les grilles
des nettoyants forts commerciaux prévus pour les fours,tels que Easy Off ou Dow.Ces produits ne sont
toutefois pas recommandés pour les ensembles de coulisses à grilles ou l'intérieur du four. De plus,
certains produits commerciaux à nettoyer les fours tendent à produire un noircissement et une
décoloration.Testez le nettoyant sur une petite section de la grille et vérifiez s'il y a de la décoloration
avant de nettoyer la grille toute entière.Appliquez le produit amplement. Laissez reposer pendant 15
à 20 minutes. Rincez abondamment puis séchez. Si les grilles ne glissent pas facilement après le
nettoyage, versez une petit quantité d'huile de cuisson sur une serviette en papier et frottez
légèrement sur les rails latéraux.
CADRE,CÔTÉS, EXTÉRIEUR DE PORTE, DÉFLECTEUR
Ces pièces sont en acier inoxydable; suivez les instructions du dosseret. Faites attention lorsque vous
nettoyez le dessus de porte et ne laissez pas l'eau ou les nettoyants s'écouler par les évents, car ils
pourraient strier le verre à l'intérieur de la porte.
JOINT DE PORTE
Utilisez un nettoyant de cuisine en aérosol d'usage général, tel que Formula 409MD ou FantastikMD.
Vaporisez puis séchez avec un linge. Évitez de frotter.Évitez d'enlever ou d'endommager la maille.
REMPLACEMENT DE L'AMPOULE DE LAMPE DU FOUR
Pour remplacer l'ampoule de la lampe du four, utilisez une ampoule de 40 watts, 120 volts, pour
appareil électroménager uniquement. Celles-ci sont disponibles dans les supermarchés. ÉVITEZ
d'utiliser des ampoules normales dans les fours car elles casseront sous l'effet de la chaleur.
1. Assurez-vous que l'interrupteur de la lampe du four est en position OFF (éteint). Son bouton
doit être enfoncé. Laissez le couvercle et l'ampoule refroidir complètement.
2. Retirez le couvercle de la lampe.Tournez le couvercle vers la gauche (dans le sens contraire des
aiguilles d'une montre) pour le dévisser.
3. Retirez l'ampoule brûlée. Remplacez-la par une ampoule de 40 watts pour appareil
électroménager uniquement.
4. Replacez le couvercle.Remettez le disjoncteur s'il était coupé. (Voir la mise en garde.)
MISE EN GARDE :
assurez-vous que l'interrupteur de la lampe du four est en position OFF et que
le couvercle est froid. Si l'ampoule se détache de sa base, coupez le courant du
four par le panneau à disjoncteurs avant d'essayer de retirer la base de
l'ampoule de la douille.
PA NNE D'ALIMENTATION
Les brûleurs du grilloir et du four ne peuvent être allumés durant une panne d'alimentation. Pour
allumer les brûleurs à tête ouverte,mettez le bouton de réglage sur « LITE »ù, allumez une allumette et
approchez-la de la couronne. Dès que la flamme s'allume tout autour du brûleur, réglez-la. Il est
nécessaire d'allumer chaque brûleur séparément chaque fois que vous voulez l'utiliser.
Page 69

IDENTIFICATION DES PIÈCES
31
*La plaque signalétique
est située à l'arrière de l'appareil
2
12
13
14
15
16
17
18
21
22
24
23
20
9
8
26
7
6
5
3
4
11
11
10
25
19
Page 70

IDENTIFICATION DES PIÈCES
32
28
27
29
27
28
ARTICLE DESCRIPTION
1Gril
2Grilles des brûleurs
3Plaque chauffante
4Tubes d'égouttement
5Bouton de réglage du four de 27 po
6Bouton de réglage de la plaque chauffante
7Bouton d'éclairage du four
8Coulisses des grilles du four
9Joint de porte du four
10 Élément de chauffage du four
11 Bouton de réglage du gril
12 Bouton de réglage d'apprêt
13 Bouton de réglage du brûleur
14 Ampoule du thermostat
15 Coulisses des grilles du four
ARTICLE DESCRIPTION
16 Cuve ramasse-miettes du four de 12 po
17 Élément de chauffage du four
18 Porte du four de 12 po
19 Fenêtre du four de 12 po
20 Fenêtre des fours de 27 et 24 po
21 Capuchon d'extrémité
22 Poignée de la porte du four de 12 po
23 Poignée de la porte du four de 27 et 24 po
24 Grille du four de 12 po
25 Grilles du four de 27 et 24 po
26 Lèchefrite
27 Lampe de four
28 Élément de chauffage du four
29 Déflecteur du ventilateur à convection
Page 71

POUR L'OBTENTION DE SERVICE
33
AVAN T D'APPELER LE SERVICE TECHNIQUE
Est-ce que le disjoncteur s'est déclenché ou que le fusible est grillé?
Y a-t-il une coupure de courant dans le secteur?
SI LES BRÛLEURS DE LA TABLE DE CUISSON NE S'ALLUMENT PAS
Est-ce que le brûleur à deux morceaux est monté correctement?
Est-ce que la tête du brûleur est alignée correctement?
Est-ce que le robinet d'arrêt manuel est ouvert? Il est généralement situé là où le gaz provient
du mur.
Pour le service sous garantie, contactez le centre DCS agréé le plus proche au (888) 281-5698. Avant
d'appeler,veuillez avoir les informations suivantes à portée de main :
Numéro de modèle
Numéro de série
Date d'installation
Brève description du problème
Votre satisfaction revêt la plus grande importance pour nous. Si un problème n'est pas résolu à votre
entière satisfaction, veuillez communiquer avec nous par courrier, fax ou courriel :
Écrivez-nous à l'adresse suivante :
DCS
Attention :Consumer Relations
5800 Skylab Road
Huntington Beach, CA 92647
Faxez-nous au numéro suivant : (714) 372-7004
Email : support@dcsappliances.com
Page 72

GARANTIE
34
DURÉE DE LA GARANTIE
Un (1) an, pièces et main-d'œuvre sur tout le produit.
Cinq (5) ans de garantie limitée sur les brûleurs de surface, plaque chauffante, gril et four
Dix (10) ans de garantie limitée sur le four en porcelaine et le panneau de porte intérieur en
porcelaine
DCS COUVRE LES FRAIS SUIVANTS :
Frais de main-d'œuvre et de réparation de pièces jugées défectueuses pour cause de vice de matière
ou de fabrication, et ce pendant une année complète avec garantie « À DOMICILE » pendant la
première année d'achat. Cette garantie ne s'applique pas si l'appareil a été soumis à une utilisation
autre qu'une utilisation domestique normale. Le service doit être fourni par un agent agréé de l'usine
durant les heures ouvrables normales. Il n'y aura pas de frais facturés pour les réparations ou
remplacements effectués sur le site de l'installation initiale ou en usine pour des pièces renvoyées port
payé, par l'intermédiaire du distributeur, pendant la période de garantie, et jugées défectueuses par
DCS.
Les remplacements sont effectués franco à bord DCS;DCS n'est pas responsable des frais de transport,
de main-d'œuvre ou des tarifs douaniers s'appliquant à l'exportation. Cette garantie ne saurait
s'appliquer,et nous n'assumons aucune responsabilité pour les dommages pouvant résulter du fait de
ne pas avoir respecté les consignes du fabricant ou des codes en vigueur, ou d'avoir trafiqué ou altéré
l'appareil de quelque façon, ou d'avoir, selon nous, soumis l'appareil à une mauvaise utilisation,à de la
négligence ou à un accident.Tout garantie implicite ne pourra s'étendre au-delà de la durée de cette
garantie écrite. Cette garantie remplace toutes les autres garanties, explicites ou implicites, ainsi que
toutes les autres obligations ou responsabilités relatives à la vente de cet appareil.
DCS NE COUVRE PAS LES FRAIS SUIVANTS :
Installation ou démarrage
Dommages subis durant le transport.
Service effectué par un centre non agréé.
Dommages ou réparations causés par un service effectué par un centre non agréé ou par l'util-
isation de pièces non autorisées.
Service effectué en dehors des heures ouvrables normales
Mauvaise installation, telle qu'un branchement incorrect, etc.
Visites de service pour vous apprendre comment utiliser l'appareil, corriger l'installation,
réarmer les disjoncteurs ou remplacer les fusibles de la maison
Réparations dues à une utilisation autre qu'une utilisation domestique normale.
Dommages causés par accident, abus, altération, mauvaise utilisation, installation incorrecte ou
installation non conforme aux codes en vigueur
Appareils installés dans le cadre d'applications non résidentielles telles que garderies, auberges,
lieux de culte, maisons de soin, restaurants, hôtels, écoles, etc.
Cette garantie s'applique aux appareils utilisés dans des applications résidentielles.Elle ne couvre pas
les utilisations commerciales.Cette garantie couvre les produits achetés et utilisés dans les 50 états des
États-Unis, le District de Columbia et au Canada.La garantie s'applique même si vous déménagez
durant la période de garantie.Si l'appareil est vendu par l'acheteur initial durant la période de garantie,
le nouveau propriétaire continue de bénéficier de la protection jusqu'à la date d'expiration de la
période de garantie de l'acheteur initial.Cette garantie vous donne des droits juridiques spécifiques. Il
se peut que vous ayez d'autres droits pouvant varier d'une juridiction à l'autre.
Page 73

NOTES
35
Page 74

5800 Skylab Road, Huntington Beach, CA 92647
Tel:714.372.7000 • Fax: 714.372.7001
Customer Service: (888) 281-5698
www.dcsappliances.com
DCS améliore constamment ses produits et se réserve le droit
de modifier les spécifications ou la conception de ses produits
sans aucun préavis.
As product improvement is an ongoing process at DCS, we
reserve the right to change specifications or design without
notice.
Réf.17434 Rév. C
Lithographie aux États-Unis 01/2003
 Loading...