

Page 1

CoolDrawer
User guide (EN)
Guía de usuario (SP)
Guide de l’utilisateur (FR)
RB36S, RB90S
US CA NZ AU UK IE
™
Page 2

WARNING!
Electric Shock Hazard
Read and follow the IMPORTANT SAFETY INSTRUCTIONS outlined in this
User Guide before operating this appliance, pages 3 – 4.
Failure to do so can result in death, electric shock, fire or injury to persons.
English Page 1 – 53
Español Pág 54 – 107
Français Page 108 – 161
As an ENERGY STAR® Partner Fisher & Paykel Limited has determined
that this product meets ENERGY STAR® guidelines for energy efficiency.
Page 3

Contents
Introduction 2
Important safety instructions 3
Before you start 5
Getting started quickly 6
Customizing the storage environment 8
Freezer mode 9
Additional Freezer mode functions 10
Chill mode 12
Fridge mode 13
Pantry mode 15
Wine mode 17
Which storage mode should I use? 19
General operating instructions 25
Temperature adjustment 25
Key Lock 26
Sabbath mode 26
Fault alarm 27
Control panel beeps 27
Customizable storage containers 28
Normal operating sounds 29
Food storage tips 30
Why food spoils 31
Keeping food fresh 32
Fruit and vegetable care 35
Frozen food care 38
Keeping food safe 41
Caring for your appliance 43
Cleaning 43
Before you call for service 44
Manufacturer’s warranty (NZ, AU, UK, IE) 49
Limited warranty (USA, CA) 50
How to get service 53
1
Important!
SAVE THESE INSTRUCTIONS
The models shown in this User Guide may not be available in all markets and are subject to
change at any time. For current details about model and specification availability in your country,
please go to our website www.fisherpaykel.com or contact your local Fisher & Paykel dealer.
Page 4

2
Introduction
Thank you for buying a Fisher & Paykel CoolDrawer™ food care system.
At Fisher & Paykel we aim to provide innovative products that are simple to use, ergonomic and
kind to the environment.
Thousands of hours of food care research and over 75 years of refrigeration experience has been
programed into your appliance, to provide you with the best possible performance.
Your appliance will be unlike any refrigeration system you have previously owned, offering you a
new level of flexibility, ergonomics and performance.
Your appliance provides you with the ability to customize its storage environment to suit your
changing needs. It can be a refrigerator one day, and a freezer or wine cellar the next.
You can also create temperature controlled storage zones where you need them; under the
counter of the kitchen, in the living room, or even in the den. The choice is yours.
It is important that you take the time to read these instructions carefully to ensure that you have
all the information that you need. This will allow you to take full advantage of the unique food
care features this system has to offer you and to receive the best possible food preservation
performance.
We hope you enjoy your new food care system, we have certainly enjoyed designing it for you.
Important!
It is important that this User Guide should be retained with your appliance for future reference.
Should the appliance be sold or transferred to another owner, please ensure that the User Guide
is left with the appliance. This will ensure that the new owner can familiarize themselves with the
information and warnings contained within the Guide.
Page 5

Important safety instructions
WARNING!
Electric Shock Hazard
Follow the IMPORTANT SAFETY INSTRUCTIONS outlined in this
User Guide, before operating this appliance.
Failure to do so can result in death, electric shock, fire or injury to
persons.
To reduce the risk of fire, electric shock, or injury to persons read the IMPORTANT SAFETY
INSTRUCTIONS before operating this appliance.
Use this appliance only for its intended purpose as described in this User Guide.
READ ALL INSTRUCTIONS CAREFULLY BEFORE USING THE APPLIANCE
When using this appliance always exercise basic safety precautions including the following:
Danger
This appliance is not intended for use by young children or infirm persons without supervision.
Young children should be supervised to ensure they do not play with the appliance.
Risk of child entrapment. Before you throw away your old refrigerator or freezer:
– Take off the doors
– Leave the shelves in place so that children may not easily climb inside.
3
Disposal
Extreme care must be taken when disposing of your old appliance to avoid hazards. The refrigerant
gas must be safely removed and for the safety of young children, remove doors.
Your Fisher & Paykel Appliances Authorized Service Center will be able to give advice on
environmentally friendly methods of disposing of your old refrigerator or freezer.
Electrical
This appliance must be properly installed in accordance with the installation instructions before it is used.
Never unplug your appliance by pulling on the power cord.
Always grip the plug firmly and pull straight out from the outlet.
Do not plug in any other appliance at its power point or use extension cords or double adapters.
Repair or replace immediately all electric service cords that have become frayed or otherwise
damaged. Do not use a cord that shows cracks or abrasion along its length or at either the plug or
appliance end.
If the power supply cord is damaged, contact your Fisher & Paykel Appliances Authorized Service
Center to purchase a replacement spare part.
Care should be taken when the appliance is installed or removed, to reduce the likelihood of damage
to the power supply cord.
Disconnect power to appliance before cleaning.
Page 6

4
Important safety instructions
Storing food and drinks
Never store volatile/flammable materials or solvents in your appliance as they may explode or
adversely react with materials in this appliance.
Never freeze liquids in glass containers. Liquid expands during freezing, which may cause the
container to explode.
Never freeze carbonated drinks. They may explode.
Do not consume food if it is too cold. Frozen food may be cold enough to cause damage when
brought into contact with bare skin, eg. frozen ice cubes.
Power failure – food safety
Do not refreeze frozen foods that have thawed completely. Follow the recommendations below if
you discover food in your freezer has thawed:
1) Ice crystals still visible – food may be refrozen but should be stored for a shorter period than
recommended.
2) Thawed but refrigerator cold – refreezing generally not recommended. Fruits and some
cooked food can be refrozen but use as soon as possible. Meat, fish, poultry – use immediately or
cook then refreeze. Vegetables – discard as they usually go limp and soggy.
3) Thawed but warmer than 40°F (4°C). Red meat can be cooked immediately and refrozen but
use as soon as possible. Discard all other frozen foods.
Do not refreeze frozen foods that have thawed completely. The food may be dangerous to eat.
Cleaning
Many commercially available cleaning products contain solvents which may attack plastic
components of your appliance and cause them to crack. Please refer to the cleaning care section
of this guide for further advice.
Always keep the floor around the toe-kick area clean, to limit the amount of dirt or dust that may
enter the condenser cooling circuit of the product.
SAVE THESE INSTRUCTIONS
Page 7
Before you start
Before placing food in the compartment
Ideally, allow the compartment to run empty overnight, or for at least 5 hours, to allow it to cool
to the appropriate temperature before placing food inside.
Clean the inside of the appliance with warm water and a little liquid detergent to remove
manufacturing and transportation dust.
The appliance may have an odor initially, but this will go when the compartment has cooled
sufficiently.
Energy efficiency
Do not leave the drawer open for any longer than is necessary.
For better energy performance, do not overfill the product as this may restrict cold air distribution
in some areas.
Regularly clean and check the drawer seal (gasket) to ensure a good seal.
If your appliance is turned off for any reason, wait 10 minutes before turning it back on. This will
allow the refrigeration system pressures to equalize before restarting.
The compartment temperature is accurately controlled and does not change with the
temperature or humidity of the surroundings; whether summer or winter.
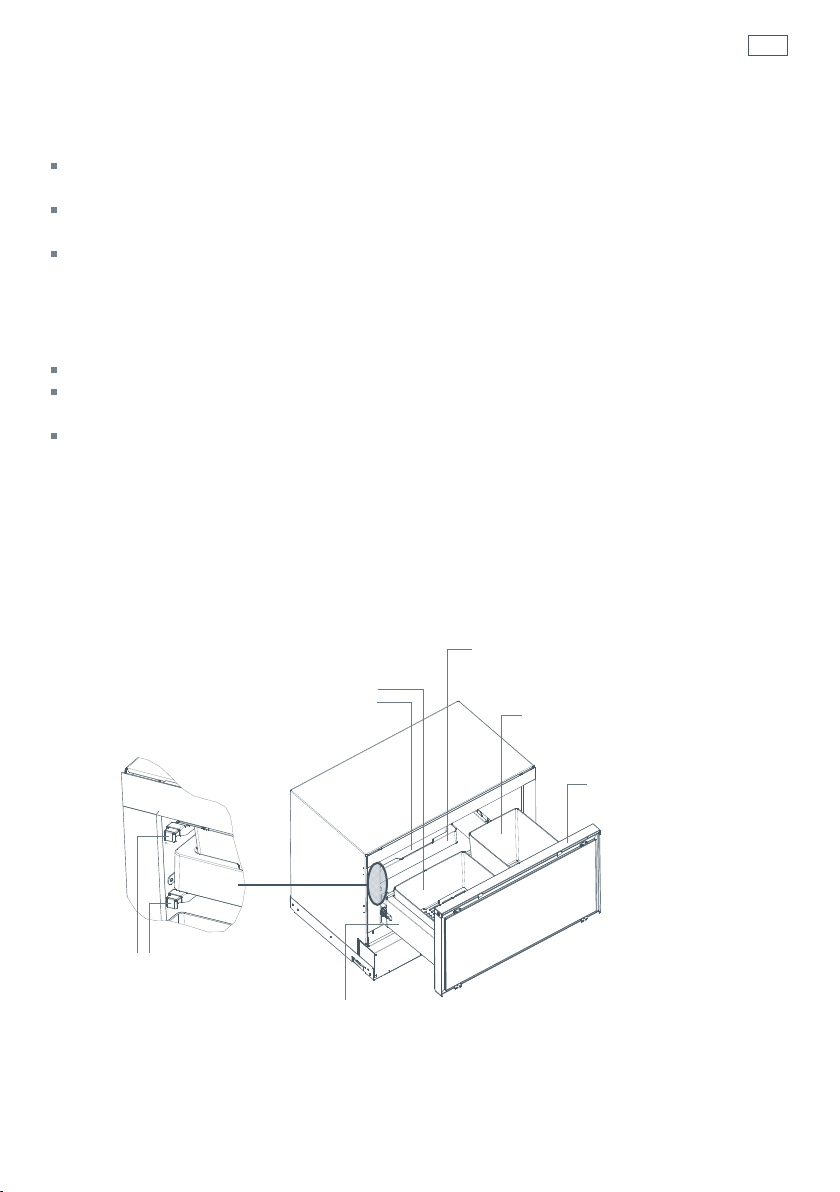
5
Storage bins featuring humidity
control system (refer to page 13)
Humidity control buttons
(refer to pages 13 and 14)
Main storage tray
Compact storage tray
Tall storage bin
Control panel (refer to page 6)
Fig. 1 Compartment layout
Page 8
6
Getting started quickly
Operating instructions
Important!
Before placing food into the cabinet for the first time, it is important that you ideally, allow the
cabinet to run empty overnight, or for at least 5 hours, to allow it to cool to the appropriate
temperature before placing food inside.
Control panel features
A
Sabbath mode, Control panel beeps, Fault alarm
B
Key Lock
C
Temperature adjustment
D
Mode select
E
Storage modes
F
Function select
G
Additional Freezer functions (only active once Freezer mode is selected)
AB C
Fig.2 CoolDrawer™ control panel
D
Page 9

Getting started quickly
Important!
Your cabinet will default to ‘Freezer mode’ when you first turn it on. If you do not wish to use the
appliance as a freezer, simply select another option from the other four storage modes displayed
on the control panel.
To use the control panel
1
Unlock the control panel by pressing and holding the LOCK button for 3 seconds. A beep will
sound and the Key Lock light will go out.
2
Simply match the type of items that you wish to store in the compartment to the relevant
storage environment (refer to page 8).
3
Press the MODE SELECT button to scroll to the desired mode, which best represents the food
items you wish to store.
4
The storage mode icon selected will flash until the compartment reaches a suitable temperature
for food to be added into the compartment (this will take between 1 – 6 hours approximately).
7
F GE
Page 10
8
Customizing the storage environment
The CoolDrawer™ has a wide range of operating modes, from a deep freezer, freezer, chiller,
fridge, pantry and even a wine cooler.
To change the storage mode:
1
Press and hold the LOCK button for 3 seconds to unlock the control panel.
2
Press the MODE SELECT button.
3
Scroll to the required storage mode.
4
The storage mode icon will flash until the compartment is at a suitable
temperature for food to be added into the compartment (this will take
between 1 – 6 hours).
Storage modes
Freezer mode (0°F / -18°C)
For general frozen food storage (refer to page 9).
Chill mode (31°F / -0.5°C)
Premium extra-cold storage for highly perishable fresh meat, fish and poultry (refer
to page 12).
Fridge mode (37°F / 3°C)
General storage for fresh food, dairy and leftovers ( refer to page 13).
Pantry mode (54°F / 12°C)
Ideal for tropical fruit and temperature sensitive foods that require extra care,
eg. bananas, tomatoes. Also perfect for foods recommending storage in a ‘cool,
dark place’ (refer to page 15).
Wine mode (45 – 59°F / 7 – 15°C)
Provides ideal long term cellaring for wine, as well as 2 additional customized
short term storage environments (refer to page 17).
Page 11

Customizing the storage environment
Freezer mode
The use of temperatures of 0°F / -18 °C or colder to store food means that the food can be kept
for longer periods than when refrigeration temperatures are used. This is because the growth
of bacteria, moulds and yeasts are stopped, and chemical and physical reactions are severely
restricted at such low temperatures. This results in food staying fresher for longer.
To use Freezer mode:
1
Press and hold the LOCK button for 3 seconds to unlock the control panel.
2
Press the MODE SELECT button.
3
Scroll to FREEZER mode.
4
The Freezer mode icon will flash until the compartment is at a suitable
temperature for food to be added into the compartment (this will take
between 1 – 6 hours).
Recommended freezer storage times for food stored on freezer mode
These times should not be exceeded.
1 Bacon, casseroles, milk
9
Bread, ice-cream, sausages, pies (meat and fruit), prepared
2
shellfish, oily fish
3 Non oily fish, shellfish, pizza, cakes and muffins
4 Ham, beef and lamb chops, poultry pieces
Months
For optimum freezing results we recommend removing storage bins from the compartment and
placing packaged food directly on the trays.
Butter, vegetables (blanched), eggs whole and yolks, cooked
6
crayfish, minced meat (raw), pork (raw)
Fruit (dry or in syrup), egg whites, beef (raw), whole chicken,
12
lamb (raw), fruit cakes
Page 12
10
Customizing the storage environment
Additional freezer mode functions
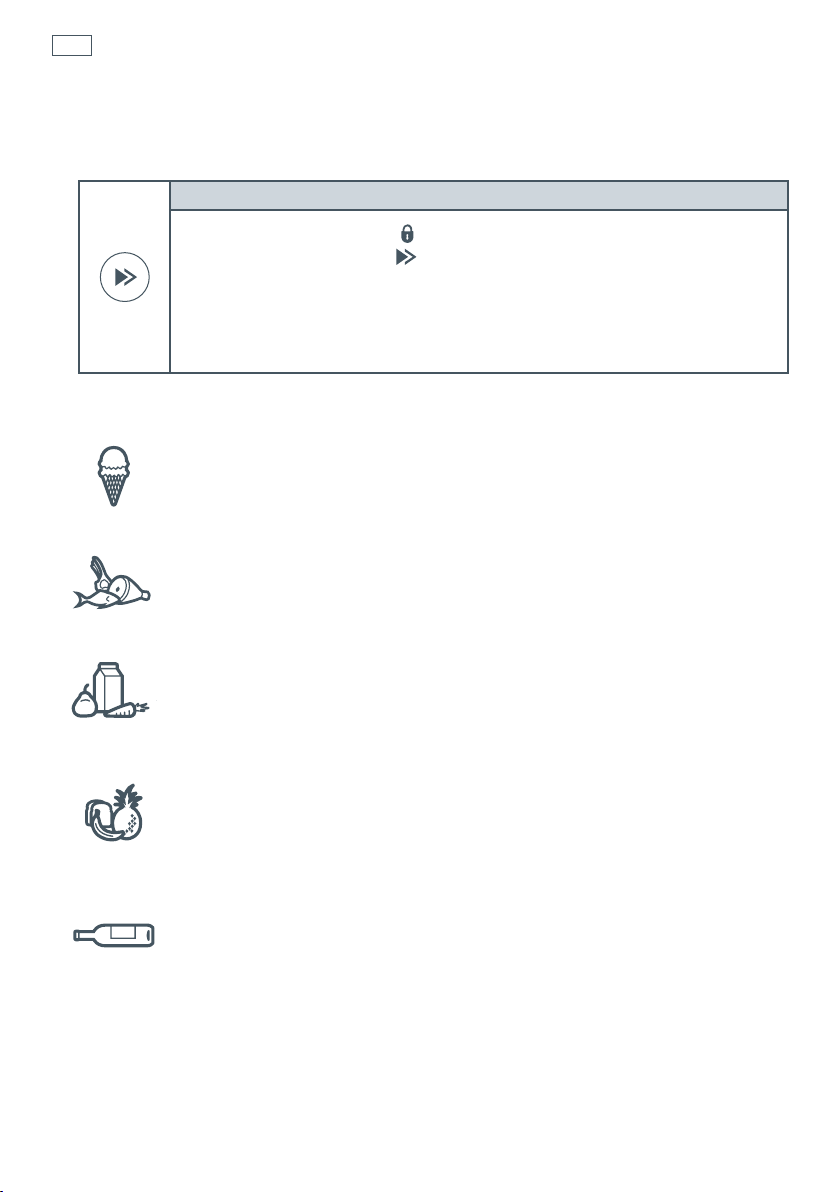
Note: Only one Freezer mode function may be operated at any one time.
Bottle Chill
This function allows you to rapidly chill your beverages in the freezer without the worry of
forgetting about them. Activating Bottle Chill drops the freezer down to its coldest setting for
a 15 minute time period. After 15 minutes, an alarm will sound to remind you to remove your
beverage. The user alarm will continue to sound until the drawer is opened and the display panel
is unlocked. The Bottle Chill light will also flash.
Remember to remove your beverage when the alarm sounds, to ensure the liquid does not
freeze.
Important!
This function can only be activated when the compartment is already set to ‘Freezer’ setting.
To use the Bottle Chill function:
1
Press and hold the LOCK button for 3 seconds to unlock the control panel.
2
Press the FUNCTION SELECT button to select BOTTLE CHILL. The Bottle
Chill timer will start automatically.
3
Place your beverage into the compartment.
To turn Bottle Chill off at any time, press the FUNCTION SELECT
three times until no Freezer function lights are displayed.
button
The Temperature adjustment light will scroll back and forth over the 15 minute period to remind
you that Bottle Chill is active.
Fast Freeze
The Fast Freeze function has been designed to assist in preserving fresh food quality by freezing
food at a faster rate than the normal freezer setting. Activating Fast Freeze drops the freezer
temperature down to its coldest temperature for a 24 hour time period. You may wish to use this
when freezing meat or when you are making frozen desserts. It is also good to use when arriving
home from the supermarket and adding fresh food into the freezer.
Important!
This function can only be activated when the compartment is already set to ‘Freezer’ setting.
Page 13

Customizing the storage environment
11
Additional freezer mode functions
To use the Fast Freeze function:
1
Press and hold the LOCK button for 3 seconds to unlock the control panel.
2
Press the FUNCTION SELECT button to select FAST FREEZE. Fast Freeze
will start automatically.
3
Place your fresh food to be frozen into the compartment.
4
Fast Freeze will automatically switch off after 24 hours and return to
Freezer mode.
To turn Fast Freeze off at any time, press the FUNCTION SELECT
twice until no Freezer function lights are displayed.
The Temperature adjustment light will scroll back and forth over the 24 hour period to remind
you that Fast Freeze is active.
For best results, we recommend that you activate this function approximately 2 hours before it is
required. Alternatively, activate it when placing food into the freezer.
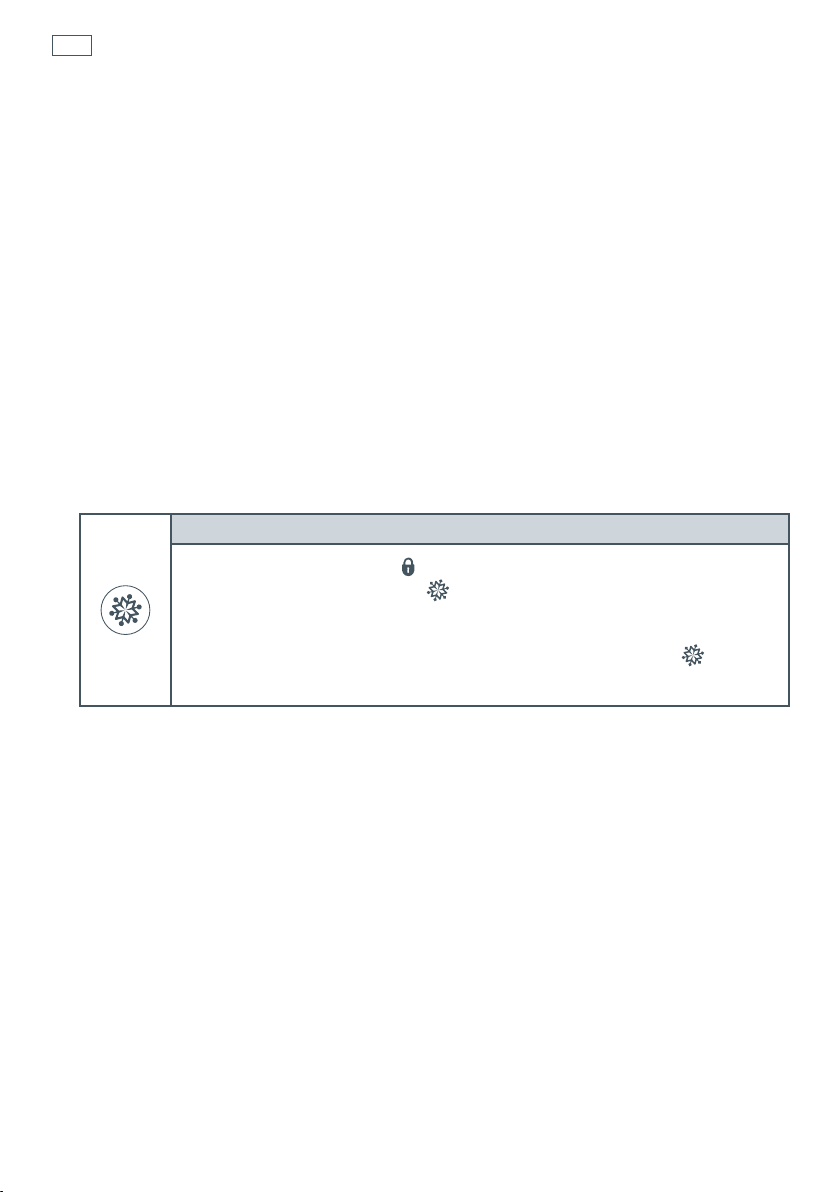
Deep Freeze
The key to long term frozen storage is low temperature. The lower the temperature, the longer
frozen food will retain vital flavor and quality.
button
The reduced temperature of Deep Freeze will keep frozen food at its best for longer periods.
Deep Freeze sets the compartment at -13°F / -25°C.
Ensure that food is placed in thick freezer proof packaging.
Important!
This function can only be activated when the compartment is already set to ‘Freezer’ mode.
To use the Deep Freeze function:
1
Press and hold the LOCK button for 3 seconds to unlock the control panel.
2
Press the FUNCTION SELECT button to select DEEP FREEZE.
To turn Deep Freeze off at any time, press the FUNCTION SELECT
once until no Freezer function lights are displayed.
Note:
Deep Freeze function has no additional temperature adjustment.
While Deep Freeze is active no lights will be displayed on the temperature adjustment area.
button
Page 14

12
Customizing the storage environment
Chill mode
The Chill mode sets the compartment at a temperature that is ideal for the storage of highly
perishable fresh meats, poultry and fish products. It is ideal to hold highly perishable food at a
temperature as close to freezing as possible to retain their vital freshness.
This mode sets the compartment at 31°F / -0.5°C, just above the freezing temperature for meat.
This reduces the amount of microbial activity and slows physical changes, ensuring that meat
stays fresher for longer.
The quality of the perishable food that is placed in Chill mode will be critical to successful
storage. Ensure that meat is fresh when purchased and stored.
The Chill mode can also be used for chilling alcoholic beverages.
Important!
This setting is not recommended for any other food or non-alcoholic drink items.
To use Chill mode:
1
Press and hold the LOCK button for 3 seconds to unlock the
control panel.
2
Press the MODE SELECT button.
3
Scroll to CHILL mode.
4
The Chill mode icon will flash until the compartment is at a suitable
temperature for food to be added into the compartment (this will take
between 1 – 6 hours).
Research tells us that highly perishable food stored on Chill mode will last 2 – 3 times longer
than when stored at normal fridge temperatures.
Page 15

Customizing the storage environment
Fridge mode
The Fridge mode is the ideal storage environment for most fresh foods.
When storing fresh fruits and vegetables, we recommend that they are stored in either the bin
on the top tray or the bin on the left-hand side of the main tray. Both of these bins are humidity
controlled. This will help to preserve the quality of the fruits and vegetables, therefore increasing
their storage life.
If possible, separate fruit and vegetables for optimum storage life.
Ensure all food is well wrapped (except for fruit and vegetables stored in the vegetable bins),
covered or placed in a container before it is stored.
To use Fridge mode:
1
Press and hold the LOCK button for 3 seconds to unlock the
control panel.
2
Press the MODE SELECT button.
3
Scroll to FRIDGE mode.
4
The Fridge mode icon will flash until the compartment is at a suitable
temperature for food to be added into the compartment (this will take
between 1 – 6 hours).
13
Fruit and vegetable Humidity Control System (HCS)
Humidity control cover
The vegetable bins feature a unique hidden cover which provides two functions:
The humidity cover seals the bins and provides a humid micro climate to extend storage times of
fruits and vegetables.
The humidity cover prevents condensation, which forms at high humidity, from dripping down
onto the fruit and vegetables by retaining the moisture droplets in the lid. The ability to maintain
high humidity in the fruit and vegetable bins may produce small amounts of water in the bottom
of the fruit and vegetable bins. This can be wiped out as necessary.
Fig 3. Humidity control buttons
Page 16
14
Customizing the storage environment
Humidity control
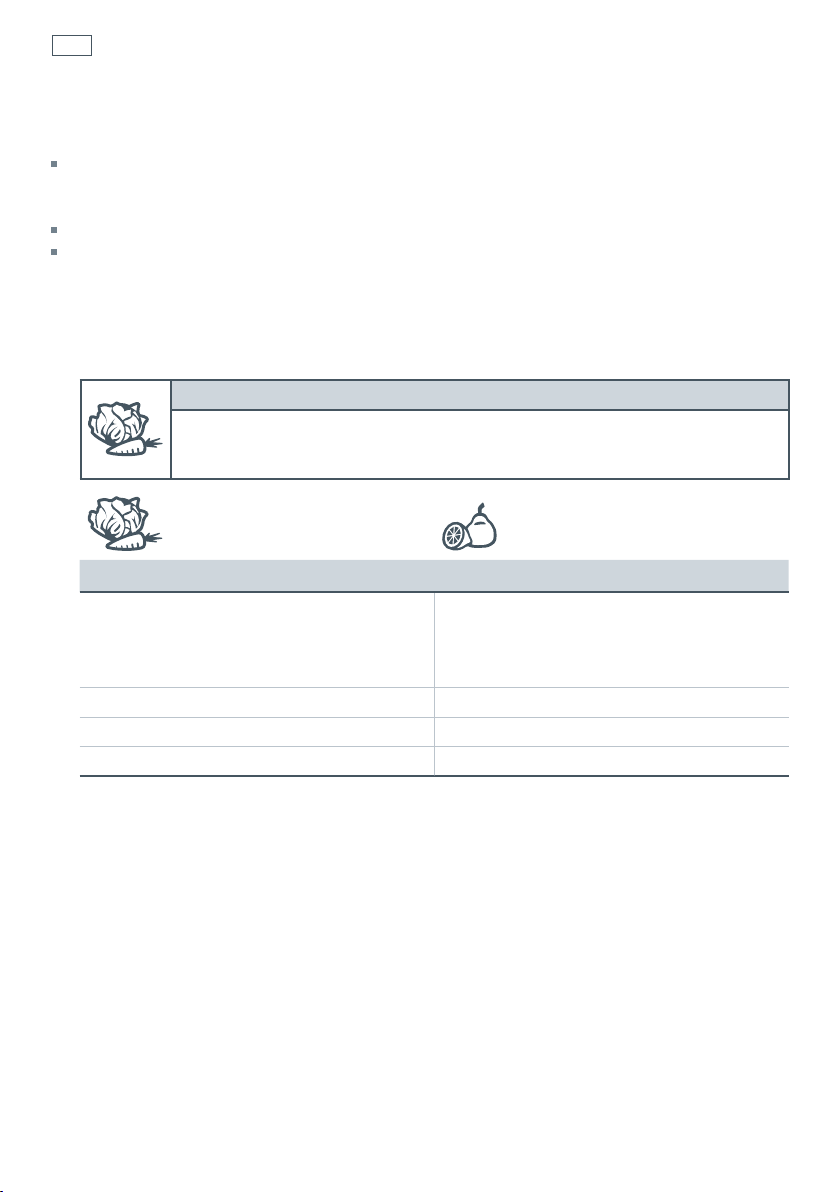
Each fruit and vegetable bin has a humidity control button that can be adjusted to care for fruit
or vegetables depending on what is stored in the bins. The humidity controls are located on the
left hand side of the compartment (as shown in fig 3, on the previous page).
If possible, try to store fruit and vegetables separately. This will help to extend their storage life.
If there is too much water in the bins, the control can be adjusted to the FRUIT setting.
Remember a small amount of water in the bins is beneficial for fruit and vegetable storage. The
vegetable screens, in the bottom of the bins, will ensure that fresh produce is held above any
moisture in the bottom of the bins to retain optimum freshness.
To adjust the humidity setting:
The picture on the top of the humidity control button will show the current
setting. To change the setting, simply push the adjustment button.
Suitable for: Suitable for:
Salad greens (high humidity)
– Lettuce
– Spinach
Broccoli
Cabbage
Carrots
Fruit with skin/ peel (reduced humidity)
– Apples
– Pears
– Kiwifruit
For a more detailed list please refer to pages 22 – 24.
Page 17

Customizing the storage environment
15
Pantry mode
The Pantry mode finally provides a solution for all those foods that you didn’t previously know
what to do with, and have always resorted to storing on the bench or in the cupboard.
The Pantry mode is designed specifically for foods that require a 'cool, dark place' for storage.
Sensitive food
There are a wide variety of foods that often perish quickly if stored at room
temperature but can be damaged by normal refrigerator temperatures, eg.
bananas and tomatoes.
The Pantry mode provides a stable storage environment at 54°F / 12°C,
making it an ideal environment for sensitive food items. Pantry mode
also allows tropical fruits, eg. avocados, melons and pineapples, to ripen
slowly under controlled conditions, without the risk of damage from low
temperatures.
A cool cupboard
Freshly baked items such as cakes and breads can quickly turn mouldy when placed in the
cupboard but become hard and stale when placed in a conventional refrigerator. The Pantry
mode provides ideal storage for these items so that they remain fresher for longer. It is also a
great place to store dried goods, cereals and other items that can become a target for mould and
insects when stored at room temperature.
Important!
The Pantry mode is not suitable for highly perishable fresh dairy and meat items,
or pre-cooked foods.
To use Pantry mode:
1
Press and hold the LOCK button for 3 seconds to unlock the control panel.
2
Press the MODE SELECT button.
3
Scroll to PANTRY mode.
4
The Pantry mode icon will flash until the compartment is at a suitable
temperature for food to be added into the compartment (this will take
between 1 – 6 hours).
Page 18

16
Customizing the storage environment
The following table shows some examples of food items that are suitable for the Pantry mode.
Fruits Vegetables General Foods
Avocado
Bananas
Feijoas
Grapefruit
Guava
Lemons
Limes
Mangos
Passionfruit
Papaya/ Pawpaw
Pineapple
Tomatoes
Watermelons
Basil
Courgettes/zucchinis
Cucumbers
Eggplant/aubergine
Potatoes
Pumpkin
Squash
Tar o
Baked goods
Breads
Chocolate
Cereals
Dried goods
Dried Herbs
Nuts
Additional uses for Pantry mode
Keep your natural cosmetic and skin care products in Pantry mode to keep them fresher
for longer.
When the weather is hot, keep your moisturiser, toner and spritzer cool for a refreshing lift when
applied.
Use Pantry mode to ripen moulded cheeses, eg. brie, camembert, blue cheese. Ensure that
cheeses are well wrapped, and once ripened, place back into Fridge mode.
Keep dry goods out of reach of insects and high humidity in summer months.
Page 19

Customizing the storage environment
17
Wine mode
The conditions in which wine is stored can have large effects on its overall taste and aroma.
Warmer temperatures can cause premature aging of wines and loss of quality. Cold temperatures
can be just as bad, causing irreversible damage to the flavor. Temperature fluctuation can also
have a negative impact on wine quality. Typical household fluctuations in temperature from day
to night can cause harm to wine over time.
The Wine mode provides an ideal controlled environment for the long and short-term storage of
both red and white wines.
Long-term storage
For long-term storage (longer than one week) of both red and white wines, the ideal
recommended storage temperature is 54°F / 12°C. When Wine mode is selected, the
compartment is automatically set to this ideal, constant temperature, to provide the optimum
conditions for long term storage.
Short-term storage / serving
Wine mode is also ideal for short-term storage (less than one week) of wines. Both red and white
wines require different serving temperatures to ensure an optimum taste experience. White
wines should be served at cooler temperatures (approximately 45°F / 7°C) whereas red wines
are better served at warmer temperatures (approximately 59°F / 15°C). The Wine mode can be
customized to provide these two optimum serving temperatures.
Serving temperature Wine type
45°F / 7°C Suitable for the majority of white wines including
Chardonnay, Sauvignon Blancs, Rieslings, Chenin Blancs
and Pinot Gris. If white wines are served too cold, the
aromas and flavors will be minimized and you won’t get
full enjoyment.
59°F / 15°C Suitable for red wines including Merlot, Bordeaux,
Zinfandel, Cabernet Sauvignon and Syrah/Shiraz. If red
wines are served too warm the alcohol can produce an
unpleasant bite on the palate.
Page 20

18
Customizing the storage environment
To use Wine mode:
1
Press and hold the LOCK button for 3 seconds to unlock the control panel.
2
Press the MODE SELECT button.
3
Scroll to WINE mode.
4
The Wine mode icon will flash until the compartment is at a suitable
temperature for wine bottles to be added to the compartment (this will take
between 1 – 6 hours).
To customize the storage environment for ideal serving temperatures:
Use the Temperature adjustment control to change the temperature.
Cellar (Default Setting)
Automatically selected when Wine mode is selected.
Long term wine storage for red and white wine cellaring
White wine
For white wine short term storage and serving press the
COLDER button to select the white wine (-) setting.
Fig.4 Adjusting temperature
Red wine
For red wine short term storage and serving press the
WARMER button to select the red wine (+) setting.
Page 21

Which storage mode should I use?
Important!
These times are intended as a guide only. If products have a “best-before” or “use-by” date,
always refer to this for storage times. Always check food for signs of spoilage before consumption.
Approximate storage time Recommended storage mode
Frozen Fresh
(Freezer mode)
Meat, fish and poultry
Meat
Beef (roasts, steaks) 6 – 12 months 1 week ** *
Pork (roasts, steaks) 4 – 8 months 3 – 7 days ** *
Lamb (chops, roasts) 8 – 12 months 5 – 12 days ** *
Other meat (eg.
Kidneys, Liver etc)
Ground meat
Beef hamburger
(ground)
Pork, Lamb, Veal,
Turkey (ground)
Processed meat products
Ham (lean) 1 – 2 months 3 – 5 days ** *
Bacon 1 month 2 – 3 weeks ** *
Sausage (raw) 1 – 2 months 1 – 7 days ** *
Sausage (smoked
links or patties)
Poultry
Chicken or Turkey
(pieces)
Chicken or Turkey
(whole)
Goose or Duck 6 months 2 – 5 days ** *
Fish and shellfish
Haddock, Cod, Hake,
Tuna
Oily fish (eg. Salmon,
Mackerel)
Shellfish (prepared) 6 months 1 – 5 days ** *
Lobster, Crayfish
(cooked)
3 – 5 months 3 – 5 days
3 – 4 months 1 – 2 days ** *
3 – 4 months 1 – 2 days ** *
1 – 2 months 1 – 3 weeks ** *
4 – 6 months 2 – 5 days ** *
8 – 12 months 2 – 7 days ** *
3 – 4 months 2 – 7 days ** *
3 – 6 months 3 – 8 days ** *
2 – 3 days 6 months ** *
19
** Longer term frozen storage
* Shorter term frozen storage
Fresh storage
Page 22

20
Which storage mode should I use?
Approximate storage time Recommended storage mode
Frozen Fresh
(Freezer mode)
Dairy products, cooked foods and deli items
Dairy products
Butter 6 months
Fresh cheeses (eg.
ricotta, mozzarella
or cottage)
Cheese, (eg. cheddar) ns 3 months
Grated cheese
(airtight)
Moulded cheeses
(to ripen)
Milk, low fat 1 month
Yogurt ns 1 month
Ice Cream 2 – 6 months ns ** *
ns
ns
ns
1 – 3
months
1 – 2
weeks
1 – 2
weeks
1 – 4
weeks
1 – 2
weeks
** *
** *
** *
Eggs
Fresh eggs (in shell) 6 months
Cooked eggs (hard) ns 1 week
2 – 4
weeks
** *
Deli items
Store brought
salads (eg. pasta,
tuna, chicken, ham,
egg)
Lunch meats (thinly
sliced)
Pre-prepared
convenience meals
ns 1 – 3 days
ns 1 – 3 days
ns 1 – 2 days
Cooked foods and leftovers
Leftovers – reheat
until steaming
before consuming
Cooked meat and
meat dishes
Pies (meat and fruit) 1 – 2 months 2 – 4 days ** *
ns 1 – 2 days
1 – 2 months 2 – 4 days ** *
** Longer term frozen storage
* Shorter term frozen storage
Fresh storage
ns Not suitable
Page 23

Which storage mode should I use?
Approximate storage time Recommended storage mode
Frozen Fresh
(Freezer mode)*
Other
Bread 2 months 2 – 7 days ** *
Baked goods 3 months 2 – 7 days ** *
Vegetables
(blanched)
Fruit (dry or in
syrup)
Oil (salad and
cooking)
Beverages (general) – –
Alcoholic beverages
(to be chilled)
Wine – –
** Longer term frozen storage
* Shorter term frozen storage
Fresh storage
ns Not suitable
6 months ns ** *
12 months ns ** *
––
––
21
Page 24

22
Which storage mode should I use?
Recommended storage mode
Fresh vegetables
Artichokes 1 – 2 weeks
Asparagus 2 – 3 weeks
Avocado 2 – 4 weeks
Beans (snap, green) 7 – 10 days
Bean Sprouts 7 – 10 days
Beets (topped) Up to 4 months
Belgian endive 2 – 4 weeks
Bok Choy 3 weeks
Broccoli 1 – 2 weeks
Brussel sprouts 3 – 5 weeks
Cabbage 1 – 2 months
Carrots (topped) 1 – 3 months
Cauliflower 3 – 4 weeks
Celery 1 – 2 months
Chard 1 – 2 weeks
Corn (sweet and baby) 1 week
Cucumber 1 – 2 weeks
Daikon Up to 4 months
Eggplant (aubergine) 1 – 2 weeks
Garlic 6 months
Ginger 6 months
Herbs 1 – 2 weeks
Horseradish 10 – 12 months
Leafy greens, general 1 – 2 weeks
Leek 1 – 2 months
Lettuce 2 – 3 weeks
Mushrooms 1 – 2 weeks
Approximate storage
time
Page 25

Which storage mode should I use?
Recommended storage mode
23
Fresh vegetables
Okra 7 – 10 days
Onion Up to 6 months
Parsnips 1 – 3 months
Peas (in pods) 1 – 2 weeks
Peppers 2 – 3 weeks
Potato 2 – 7 months
Pumpkin (uncut) 1 – 3 months
Radicchio 4 – 8 weeks
Radish 1 – 2 months
Rhubarb 2 – 4 weeks
Rutabaga 4 – 6 months
Shallot 1 – 2 weeks
Spinach 1 – 2 weeks
Squash (summer) 1 – 2 weeks
Sweet potato or yam 2 – 7 months
Taro Up to 4 months
Turnip 2 – 5 months
Watercress 2 – 3 weeks
Approximate storage
time
Recommended humidity setting:
Select VEGETABLE humidity setting for storage bin (refer to page 14).
Page 26

24
Which storage mode should I use?
Recommended storage mode
Fresh fruit
Apples 1 – 3 months
Apricots 1 – 2 weeks
Bananas 1 – 4 weeks
Berries 3 – 18 days
Cherries (sweet) 2 – 4 weeks
Cranberries 2 – 4 months
Dates Up to 6 months
Feijoa 2 – 3 weeks
Fig, fresh 7 – 10 days
Gooseberry 3 – 4 weeks
Grapes 1 – 4 weeks
Guavas 2 – 3 weeks
Lemons 1 – 6 weeks
Limes 1 – 6 weeks
Mandarins 1 – 6 weeks
Mangos 2 – 4 weeks
Melons 2 – 4 weeks
Nashi (Asian pear) 1 – 3 months
Nectarines 2 – 4 weeks
Oranges 1 – 6 weeks
Olives, fresh 4 – 6 weeks
Papayas 1 – 3 weeks
Passionfruit 3 – 4 weeks
Peaches 2 – 4 weeks
Pears 1 – 3 months
Persimmons 1 – 3 months
Pineapples 2 – 4 weeks
Plums and prunes 2 – 5 weeks
Pomegranates 2 – 3 months
Tomatoes 1 – 5 weeks
Watermelon 2 – 3 weeks
Quince 2 – 3 months
Approximate storage
time
Recommended humidity setting:
Select FRUIT humidity setting for storage bin (refer to page 14).
Page 27

General operating instructions
Temperature adjustment
Each of the storage modes will automatically default to
an ideal temperature setting. This setting provides the
recommended temperature for this storage environment.
However, if you want to increase or decrease the
temperature of the compartment, this can be done using
the Temperature adjustment control.
The recommended temperature is always the center light.
To adjust the temperature
The pre-set temperature for each storage environment will
show one illuminated light in the center of the scale
To increase the temperature, simply touch the ‘warmer’
icon (+).
Each light displayed will increase the temperature setting
slightly. When all four lights on the right are showing, you
have reached the warmest setting.
25
To decrease the temperature, simply touch the ‘colder’
icon (-).
Each light displayed will decrease the temperature setting
slightly. When all four lights on the left are showing, you
have reached the coldest setting.
Fig.5 Adjusting temperature
Page 28

26
General operating instructions
Key Lock
The Key Lock mode disables the control panel so that the storage environment cannot
accidentally be changed.
The display will automatically lock after 15 seconds of the display not being used or when the
drawer is closed. The red lock icon will appear above the Lock button when the panel is locked.
To use the Key Lock mode:
Press the LOCK
button for 3 seconds to lock or unlock the control panel.
Sabbath mode
To use the Sabbath mode:
Press and hold the LOCK
To activate and deactivate the Sabbath mode press and hold the LOCK
MODE SELECT
is displayed.
When the appliance is in Sabbath mode:
The light will not operate when the drawer is opened.
The drawer alarm will not operate.
The display will not be illuminated.
Opening the drawer will not affect the compressor or fans.
If the power to the refrigerator is turned off whilst in this mode, the appliance will continue in
Sabbath mode when the power is restored.
Sabbath mode will automatically de-activate 80 hours after activation.
To de-activate earlier than 80 hours press and hold the LOCK and MODE SELECT buttons for 4 seconds.
buttons for 4 seconds until the Sabbath mode icon
button for 3 seconds to unlock the control panel.
and
Page 29

General operating instructions
27
Fault Alarm
If the electronic controller detects a fault which may affect operation, an alarm
will sound and the fault icon on the display panel will flash. The audible alarm
will stop when any button is pressed but the lights will continue flashing.
If such a fault occurs, call your Fisher & Paykel Appliances Authorized Service Center immediately;
the fault alarm sound will help the service person find and remedy the cause of failure.
Important!
Your refrigerator is designed to operate for many years without the need for service checks.
However, if your refrigerator is malfunctioning, have it attended to by your Fisher & Paykel
Appliances Authorized Service Center as soon as possible. All electrical repairs must be carried
out by an adequately trained service technician or qualified electrician.
Control panel beeps
The control panel beeps can easily be silenced, if you prefer quiet operation.
To turn control panel beeps on or off:
Press the LOCK button for 3 seconds to unlock the control panel.
Press and hold the LOCK
icon turns off or on.
and COLDER buttons for 4 seconds until the beep
Drawer alarms
If the drawer is left open an alarm will sound after 60 seconds.
If the drawer remains open, subsequent beeps will sound every 30 seconds until the drawer
is closed.
After 5 minutes the alarm will sound continuously and the compartment light will turn off.
Page 30

28
General operating instructions
Customizable storage containers
The CoolDrawer™ allows you to adjust the storage space, to meet your needs.
Remove bins to provide open flexible storage space
Multi-level storage provides segregation of food items. The compact upper storage tray provides
safe storage for delicate items or segregation for small items.
Fig. 6 Mix and match storage containers to customize the compartment
Page 31

General operating instructions
Normal operating sounds
CoolDrawer™ with its excellent energy ratings and cooling performance, can produce sounds
that may be different to your old refrigerator.
Normal operational sounds include:
Fan, airflow sound. The CoolDrawer™ has a fan which circulates air around the compartment to
provide cooling. This produces some air flow sound. This is quite normal.
The CoolDrawer™ also has a condenser fan to discharge heat through the condenser. This also
produces some airflow sound. This is normal.
Cracking or popping which may sound like ice breaking or falling. This occurs when the defrost
function is operating.
Running water sound. This is the liquid refrigerant in the system, and can be heard as a boiling
or gurgling noise.
An audible hissing sound after closing the drawer. This is due to the pressure difference
between the warm air that has entered the cabinet and suddenly cooled, and the outside
air pressure.
29
A humming sound. This is normal as the motor operates for long periods of time. This appliance
uses an energy efficient, variable speed compressor that saves energy by running for long
periods of time on a low speed. This is more energy efficient than the conventional on/off
method.
Other sounds may be heard for the following reasons:
– Floor or cabinetry uneven or weak.
– Bottles or jars rattling.
– Appliance not installed correctly.
Page 32

30
Food storage tips
Never before have we had better food available or a wider choice than we have today. We are
more aware of quality and we are more aware of health.
We are rediscovering the anti-aging properties of food, their ability to lower cholesterol, increase
lifespan, and improve general well being. We pay handsomely for exotic flavors and speciality
foods. All these valuable food qualities can be damaged if subjected to temperatures and
conditions which are not ideal.
These sensitive, fresh foods need to be treated with care if they are to retain their critical storage
life, flavor, nutrients and quality beyond our expectations.
We are passionate about food and want to ensure you are able
to enjoy all the flavor and goodness your food has to offer. The
following pages have been included to offer you some helpful
advice on how to keep your food fresher, tastier, nutritious and
safer for longer, and how to get the best out of your CoolDrawer™
food care system.
Page 33

Food storage tips
Why do foods spoil?
The essence of optimum food storage is excellent food care.
The fundamental principle of improving food care is minimizing the quality losses associated
with storage, including physical, chemical and microbiological changes, eg. moisture loss,
bacterial growth, quality deterioration; and reducing the effects of undesirable factors, eg. dry
air, light, unwanted moisture, odors, vibration and temperature fluctuations.
Foods spoil or deteriorate in quality for one or more of the following reasons:
The growth of bacteria, moulds or yeasts.
Chemical or biochemical reactions
Moisture loss
Absorption of foreign odors or flavors
How can you slow down food spoilage?
Temperature control
Cold temperatures will slow down bacteria, mould and yeast growth. Remember the faster you
chill or freeze your food the safer it will be from microbial growth and the better quality it will
retain for longer. Once chilled to below 39°F / 4°C or frozen to 0°F / -18°C the temperature must
be kept constant and accurate without large temperature fluctuations.
31
Chemical and biochemical reactions
Such reactions occur naturally in fresh produce and are what cause foods to ripen and eventually
to decay. Chemical reactions are slowed down at colder temperatures. This means your fruits
and vegetables will ripen more slowly and therefore last longer when stored at refrigerator
temperatures. The colder the temperature the slower this reaction will occur.
Moisture loss
Most food contains at least 60% moisture. The air in a refrigerator is very cold and therefore
will dry out foods over a period of time. It is recommended that food is covered or wrapped to
prevent unnecessary moisture loss.
Absorption of foreign odors and flavors
Exchange of odors can occur in many foods. Food such as eggs, butter and milk will absorb
odors readily from fish. Fruit and eggs will also absorb flavor from onions. It is important to wrap
odorous food to prevent this flavor transfer.
Your CoolDrawer™ has constant and accurate temperature control, providing a stable
environment for your food. This combined with rapid cooling and freezing rates reduces the rate
at which food will deteriorate.
Page 34

32
Food storage tips – fresh food
Keeping food fresh
The quality of food before it is placed in the refrigerator is critical to successful storage.
For best results:
Select foods that are very fresh and of good quality.
Buy only the amount that you will use within the recommended storage time. If you buy extra,
plan to freeze it.
Cover
Ensure that food is well wrapped or covered before it is stored. This will prevent food from
dehydrating, deteriorating in color or losing taste and will help maintain freshness. It will also
prevent odor transfer. Vegetables and fruit need not be wrapped provided they are stored in the
vegetable bins of the refrigerator.
Make sure that strong smelling foods are wrapped or covered and stored away from foods such
as butter, milk and cream which can be tainted by strong odors.
Separate
Store raw and cooked food in separate containers or packaging to prevent cross contamination.
Store fruit and vegetables separately.
Chill
Refrigerate fresh, perishable foods as soon as possible after purchase. If left at room temperature
for any length of time the rate of deterioration will be accelerated.
Make sure that there is enough room for air to circulate freely around food items. Cold air needs
to circulate to maintain safe food storage.
Avoid opening the refrigerator drawer unnecessarily.
Cool hot foods down before placing them in the refrigerator. This should be done quickly. It can
be aided by placing the container of food in a bowl of ice and water; renew the ice as necessary.
(Note also that hot containers may damage storage bins or trays in the appliance).
In addition:
Keep the compartment clean. Wipe the inside walls and shelves frequently and place only clean
containers in the compartment.
Check the quality of the food in your appliance regularly. Discard any food that shows signs of
spoilage. Pay particular attention to meat, fish and poultry, as these foods are highly perishable.
Use food within the recommended storage times.
Page 35

Food storage tips – fresh food
Dairy foods and eggs
Most pre-packed dairy foods have a recommended use by / best before
/ best by date stamped on them. Store them using Fridge mode and
use within the recommended time.
Vacuum packed cheese should be kept unopened in the original
packaging. Once opened, place in a sealed plastic bag, or wrap in foil
to prevent drying out.
Butter can become tainted by strong smelling foods so it is best stored
in a sealed container.
Eggs should be stored in the refrigerator. For best results, especially
when baking, remove the eggs from the refrigerator two hours before
they are to be used.
Red meat
Place fresh red meat in a covered container or loosely cover with waxed
paper or plastic wrap or foil.
Store cooked and raw meat separately. This will prevent any juices from
the raw meat contaminating the cooked product.
Delicatessen meats should be used within the recommended storage time.
For best results, store fresh red meat using Chill mode.
Poultry
Fresh whole birds should be rinsed inside and out with cold running
water. Dry and place on a plate. Cover loosely with plastic wrap or foil.
Poultry pieces should also be stored this way. Whole poultry should
never be stuffed until just before cooking, otherwise food poisoning
may result.
Cool and refrigerate cooked poultry quickly. Remove stuffing from
poultry and store separately.
For best results, store fresh poultry using Chill mode.
33
Fish and seafood
Whole fish and fillets should be used on the day of purchase. Until
required, refrigerate covered with plastic wrap, waxed paper or foil.
If storing overnight or longer, take particular care to select very
fresh fish. Whole fish should be rinsed in cold water to remove loose
scales and dirt and then patted dry with paper towels. Place whole
fish or fillets in a sealed plastic bag.
Keep shellfish chilled at all times. Use within 1 – 2 days.
For best results, store fresh seafood using Chill mode.
Important!
Always store raw meat, poultry, fish separately in the refrigerator to stop them dripping on or
touching other foods.
Page 36

34
Food storage tips – fresh food
Precooked foods and leftovers
These should be stored in suitable, covered containers so that the
food will not dry out.
Storage containers should be shallow to assist in rapid cooling.
Keep for only 1 – 2 days.
Reheat leftovers only once and until steaming hot.
How should cooked meats be stored?
Cover all cooked meats to prevent drying and contamination from raw foods.
Do not put piping hot meats in the refrigerator. Cool left-over cooked meat quickly after cooking,
then refrigerate.
Well cooked roasts will keep longer than very rare roasts.
Leave a roast whole, loosely covered with foil, in a cool place until it has partly cooled. Then wrap
securely with foil and place in the fridge.
Leaving pieces whole prevents meat drying out.
To limit contamination and bacterial growth, do not slice meat until just before use.
Cured and smoked meats are less perishable than fresh meats. Leave pre-packaged items in
their original wrappings or vacuum packs and refrigerate promptly. Once opened, keep tightly
covered in the compartment set on Fridge mode and use before the expiry date.
Herbs and spices
Fresh herbs should be stored using Fridge mode.
Dried herbs and spices, which gradually lose their strength and flavor when exposed to heat,
light and air can be stored using Pantry mode.
You can also seal fresh herbs in a freezer bag and keep them frozen for several months.
Salad dressings and sauces
Store opened jars of commercial mayonnaises on Fridge mode – make sure they are tightly
sealed and they will keep for a number of months.
Products such as mayonnaise, mustard and tomato sauce may develop brown or black crusts
around the rim of the bottle as a result of oxidation. It’s not harmful and doesn’t mean the food is
going off. Just wipe it off before use.
Dried goods
Seal packaging well before placing it into the compartment.
Store dried goods, eg. flour, rice, cereal in Pantry mode in the warm months to reduce risk of
insect infestation.
Page 37

Food storage tips – fresh food
Fruit and vegetable care
The consumption of fresh vegetables and fruit continues to rise.
Busy lifestyles mean we shop less often and buy a greater range of
fresh foods. It is important that these fresh foods, including fruit and
vegetables, retain their flavor, texture and nutrients and stay safe to
eat for as long as possible.
There are three main reasons why fruit and vegetables deteriorate:
Respiration
Fruit and vegetables are highly perishable food products. They continue to ripen or respire
after harvest. They use oxygen from the air to convert their natural sugars to heat energy,
carbon dioxide and water. This causes the product to lose quality and food value. Refrigeration
temperatures are the best method to slow down this natural respiration process. The colder the
temperature the slower most fruit and vegetables will ripen.
Micro-organism growth
Fruit and vegetables are usually covered with micro-organisms which will cause decay given
the right conditions. When vegetables are bruised, or the skin is broken, decay organisms enter
the product. Decay and rotting will then occur if it is exposed to warm temperatures. Adequate
refrigeration is the best method of controlling decay because low temperatures slow down the
growth of most micro-organisms.
35
Moisture Loss
Another reason why fruit and vegetables deteriorate is loss of moisture which causes them to
wilt and shrivel. Vegetables contain approximately 90% water and water loss is a major cause of
deterioration. If vegetables are exposed to dry, refrigerator air, they will quickly dry out.
A high humidity, cold air environment is therefore necessary to extend the storage life of fruit
and vegetables. This type of environment can be achieved by sealing the bins from the dry air in
the refrigerator. This significantly increases the storage life of fruit and vegetables, ensuring they
retain their crispness and remain a good source of essential vitamins, minerals and dietary fibre.
Page 38

36
Food storage tips – fresh food
How the Humidity Control System (HCS) extends the storage life of fruit and vegetables
A specially designed lid seals the storage bins to create a controlled micro-climate. The lid has
the following unique features:
It completely seals off the bins from the refrigerator air. The respiration of fruit and vegetables
provide a high humidity environment in the bin and the lid prevents them from drying out.
It allows the temperatures in the bin to remain between 32 – 39°F / 0 – 4°C. These temperatures
are required to slow down respiration and the growth of micro-organisms.
It has long narrow grooves on the underside to capture and retain condensation which has
accumulated. This prevents the moisture from dripping back down onto the fruit and vegetables
which would cause them to rot.
The storage life of fruit and vegetables varies enormously, being influenced by the maturity and
quality of the produce at purchase and also the particular variety.
You can change the environment your fruit and vegetables are stored in simply by pressing the
humidity control button.
Temperature sensitive fruits and vegetables
Not all fruit and vegetables enjoy the same temperature. For some, temperatures that are too
cold can actually cause damage to flavor, texture and freshness. For example chill injury can
result in watery, tasteless tomatoes, stringy avocados and discolored bananas.
It is important to care for these food items and Pantry mode does just that. It provides a cool
(54°F /12°C) environment ideal for temperature sensitive foods. This temperature also allows fruit
to ripen slowly under controlled conditions.
Some examples of temperature sensitive produce best stored
using Pantry mode:
Tomatoes
Cucumber
Avocado
Bananas
For more examples refer to page 16.
Points to remember:
Fruits and vegetables not fully ripe when purchased will have a longer storage life especially
when refrigerated.
Root vegetables should be kept in the dark. Light slowly turns their surface green, which makes
them taste bitter and means they contain solanine, a chemical which is toxic in large doses. You
can peel off small green patches, but if they are green all over, throw them away.
Store root vegetables in brown paper bags on PANTRY mode.
Store soft, small fruit in the compact storage tray.
Page 39

Food storage tips – fresh food
Ethylene Gas
Ethylene is an odorless, colorless, gas produced naturally by fruit and vegetables. This gas plays
an important role in accelerating the ripening process. Some fruit and vegetables produce large
amounts of ethylene, while others are very sensitive to the gas. You may have noticed that when
you place an apple into the fruit bowl with bananas, the bananas will ripen more quickly. This is
due to the ethylene gas given off by the apple.
By separating those items that produce high levels of ethylene from those that are most
sensitive, you can prevent food from spoiling too quickly. As a general rule, separating fruit and
vegetables will help reduce the effects of ethylene.
Examples:
Food sensitive to ethylene Foods that produce high levels of ethylene
Avocados (unripe) Apples
Brussel sprouts Apricots
Broccoli Avocados (ripe)
Cabbage Cantaloupe
Carrots Cherimoya (custard apple)
Cucumber Passionfruit
Eggplant Peaches
Kiwifruit Pears
Lettuce Tomatoes (ripe)
Persimmons
Quince
Spinach
Tomatoes (unripe)
Watermelon
37
Page 40

38
Food storage tips – frozen food
Frozen food care
Freezing temperatures allow food to be kept for longer periods
than when refrigeration temperatures are used. This is because:
The growth of bacteria, moulds and yeasts is stopped
Chemical and biochemical reactions are severely restricted.
Fast freezing of food
The faster you freeze your fresh food, the better the quality of the end product. During the
freezing process ice crystals form within fresh food cells. These crystals can expand to a point
where they break down the cell walls. This can cause ‘drip loss’ on thawing. Freezing food rapidly
ensures that these ice crystals are kept as small as possible to retain quality of frozen foods.
Less drip loss means a more moist, more tender product on thawing, therefore retaining more of
its nutritional value.
Important!
Freezer storage times are dependent not only on temperature but also on the quality of food
being stored and the use of the correct moisture and vapor-proof packaging.
Page 41

Food storage tips – frozen food
For best results:
Choose only high quality foods that freeze well.
For optimum freezing results we recommend removing storage bins from the compartment and
placing food directly on the trays.
Temperature
Store at 0°F / -18°C or colder. Take care to maintain this low storage temperature, eg. try to avoid
opening the drawer unnecessarily.
If your ice cream is soft you are running Freezer mode too warm.
For general freezer storage select Freezer mode.
For longer term storage select the Deep Freeze function. The lower temperature will preserve
food for longer.
Packaging
Use good quality freezer proof packaging to maintain food quality. If food is only covered in
plastic film, place inside a freezer-proof plastic bag.
Leave space at the top of containers, glass jars or plastic bags containing liquids or semi-solid
foods. These expand as they freeze. Usually 1 – 2 inches (20 – 50 mm) head space is recommended.
Remove all the air from the packaging and seal tightly before freezing.
When using the Deep Freeze function, ensure that freezer packaging is thick and airtight to
reduce risk of freezer burn.
39
Time
Freeze immediately or as quickly as possible. For best results activate the Fast Freeze function.
Keep a constant turnover of food. Use older items of food first. Do not exceed recommended
storage times.
Keeping food frozen past the recommended time will not affect food safety but will adversely
affect the quality of the food.
Amount
Freeze only small quantities of food at any one time. For best results we recommend that only
2.2 lb (1 kg) food per 0.9 cu. Ft (25 L) of storage volume capacity.
Do not pile frozen food around the air delivery vents at the rear of the compartment. It can
prevent adequate air circulation.
Thawing
Thaw foods preferably in a refrigerator, or using a microwave oven or multifunction oven.
Page 42

40
Food storage tips – frozen food
Meat, poultry and game
Meat must be frozen quickly in order to maintain its texture.
Do not stuff poultry before freezing.
Red meat can be cooked from frozen, or from the partly or completely
thawed states. Remember to allow extra cooking time if cooking from
frozen.
Always thaw poultry completely before cooking.
Fish
Fish is best frozen commercially. If however you do want to freeze fish at
home, make sure the fish is very fresh and of high quality.
Clean, scale and preferably leave whole. All fish should be wrapped
in two layers of packaging as depending on the type of fish, odors
and flavors can be readily transferred either to or from it. Seal
packaging well.
For best results, cook from either the frozen or partly thawed state.
Vegetables
Most vegetables freeze well, although salad vegetables are not
recommended as they will lose their crispness.
Other vegetables, eg. celery, onion and tomatoes should only be
used in cooked dishes as they soften on freezing.
Freeze only high quality, mature, ready-to-eat vegetables.
Sort and discard any that are damaged.
It is necessary to blanch most raw vegetables prior to freezing.
Blanching involves a short cooking period during which vegetable
enzymes are destroyed. If these enzymes are not destroyed they cause
undesirable physical and chemical changes during freezer storage.
Vegetables can be blanched in boiling water, steam or in a microwave
oven. If using boiling water, boil vegetables for 2 – 4 minutes and
cool quickly.
In general, frozen vegetables are best cooked from their frozen state.
Prepared and cooked foods
Most cooked foods can be frozen but it is not recommended to freeze
the following:
Cooked egg white, custards, cream fillings and milk puddings, gelatine
or jelly-like dishes, mayonnaise and similar salad dressings, meringue
toppings. These tend to separate on thawing.
Fruit
Choose high quality, mature, and ready to eat fruit. Preferably select
varieties recommended for freezing.
Avoid unripe and over-ripe fruit.
The way fruit is packed depends on how it is to be used. Fruits packed
in syrup are ideal for desserts, whereas fruits packed without sugar are
better used for cooking. Most fruits can be stored for 8 – 12 months.
Page 43

Food storage tips – food safety
Keeping food safe
Important!
If highly perishable fresh food is not cooled and frozen quickly, harmful bacteria can grow and
may cause food poisoning – anything from stomach upset to serious illness.
41
Boiling point
Suitable for temperature
sensitive foods that are
not highly perishable,
eg. bread, tropical fruit
SAFE STORAGE ZONE
Freezing point
212°F (100°C)
158°F (70°C)
unsafe food
53°F (12°C)
50°F (10°C)
39°F (4°C)
32°F (0°C)
10°F (-12°C)
0°F (-18°C)
Fig. 7 Identifying safe storage temperatures
for highly perishable fresh food
storage zone
Bacteria gradually killed above
Rapid growth of food poisoning organisms
Slow growth of food
poisoning organisms
No growth of food spoilage organisms,
ie. slow quality spoilage without danger
to health
No growth of food spoilage organisms but
some texture, flavor and odor changes
Ideal food freezing temperature
(39 to 50°F)
158°F
(32 to 10°F)
(10 to 0°F)
Page 44

42
Food storage tips – food safety
The bacteria that cause foodborne illness like Campylobacter and Salmonella multiply rapidly in
warm, moist conditions. Fortunately the illnesses these bacteria cause are avoidable. By simply
following the easy food handling tips below you could be helping to keep your family and
friends safe from illnesses caused by foodborne bacteria.
Clean
Thoroughly wash and dry hands and work surfaces before preparing food.
Keep cooked and raw food separate during preparation and storage, and use separate chopping
boards and utensils to avoid cross contamination.
After preparing food, clean all surfaces that have come into contact with food.
Cook
Defrost frozen foods in the refrigerator thoroughly before cooking.
Minced meat and sausages should be cooked right through, and pork and poultry juices should
run clear – use a meat thermometer to check temperatures.
Pre-cook ground/minced meat, sausages and poultry before barbecuing.
Put leftovers into the refrigerator as soon as they’re cool.
Reheat leftovers until steaming hot throughout and do not reheat more than once.
Do not put cooked meat back on the same plate that held raw meat.
Cover
Always cover stored food – even in the fridge or cupboard.
Keep raw meat and poultry covered in the bottom of the fridge and away from ready-to-eat
food, fruit and vegetables to avoid dripping juices.
When cooking or eating out doors, ensure that all food remains covered and cool until ready to
cook or eat.
Remember - the only time your food should be uncovered is when you’re eating it!
Chill
Bacteria that cause foodborne illness thrive at room temperature - keep food very cold or very hot.
Use shallow containers to chill food quickly.
Keep all perishable foods in the fridge until you are ready to use them.
A chiller bag is a good way of keeping chilled and frozen products cold when taking them home
from the supermarket.
While picnicking, keep food cool by using a frozen chilly pad or drink bottle.
Defrost frozen foods in the fridge or microwave, and marinate food in the fridge, not on the
bench.
Page 45

Caring for your appliance
Cleaning
Important!
Many commercially available cleaning products contain solvents that may attack the plastic
components of your appliance and cause them to crack and may cause rusting of metal
components (antibacterial and citrus cleaners are especially harsh). It is important to use only
warm water and a small amount of liquid dishwashing detergent on any components inside or
outside your appliance.
It is important to keep the interior of the compartment clean to help prevent food from becoming
contaminated during storage.
The amount and types of food stored determines how often cleaning should be carried out (ideally
once every 1 to 2 weeks).
Do not use harsh, abrasive cloths or cleaner, or highly perfumed, strong smelling cleaners or solvents
on any part of your appliance.
Interior
Remove the storage bins from the compartment and wash in
a solution of warm water and liquid dishwashing detergent.
Rinse the bins with clean water and dry before replacing in the
compartment.
The main storage tray can also be removed for cleaning. To
remove the tray, slide the clips, located on the back sides of the
tray, into the center of the tray (refer to fig 6). Ensure that the
clips are pushed back to the sides once the tray is placed back
into the cabinet.
Wipe the control panel with a soft, damp, lint-free cloth.
Wipe trays and interior surfaces with a soft, damp cloth and a
solution of baking soda dissolved in warm water (1 teaspoon of
baking soda to each pint (500 mls) of water).
To help remove any lingering smells add a few drops of vanilla
essence or vinegar to the water before cleaning.
Fig. 8 Removal of storage tray
Slide the clips
to the middle, to
unlock the tray
43
Exterior
Clean exterior surfaces with warm water and detergent.
Use a toothbrush for the magnetic door gasket.
The air inlet duct located on the bottom (refer to fig 7), left hand
side of the product (accessed from the toe-kick area) should be
cleaned at least once every 6 months with a cloth or vacuum
cleaner. This will help prevent dirt or dust from blocking the inlet
duct and reducing the efficiency of the product.
Vacation time
We recommend you leave your appliance operating while
you are on vacation. Remove all perishable food from the
compartment.
Fig. 9 Air inlet duct
Page 46

44
Before you call for service45Before you call for service
Please read the following pages before you call for service.
You can correct many of your appliances problems yourself using the checklists on the following
pages.
Your appliance is capable of diagnosing its own problems. If it has a problem it will beep and
display the service (spanner) icon to alert you.
Also check that:
Your appliance is correctly installed.
You are familiar with its normal operation.
If your appliance beeps for help and the service light (spanner) is
flashing:
1
Turn your appliance off at the wall.
2
Wait 5 minutes and turn it back on.
3
Check your appliance is level and installed correctly (refer to installation
instructions).
4
If the fault re-occurs call your Fisher & Paykel Dealer
If the appliance will still not work, call your Fisher & Paykel Dealer or Authorized Service Agent to
arrange a service visit (refer to page 53).
Page 47

Solving operating problems
Problem Possible causes What to do
Appliance does
not operate.
Interior light and/
or control panel
not working.
Motor operates
for long periods
No electricity at power outlet. Check that the plug is correctly connected
to outlet and that power is switched on.
Could the household supply be at fault?
Try plugging in another appliance at the
same outlet.
Power cord not attached at rear
of appliance.
No electricity at power outlet. Check that appliance is connected to
Sabbath mode may be
activated.
Light not functioning. The light cannot be serviced by the user.
Key Lock mode may be
activated.
Note: This is normal. This appliance uses an energy efficient variable speed
compressor that saves energy by running for long periods of time on a low
speed. This is more energy efficient than the conventional on/off method.
Has the appliance just been installed?
Check your installation instructions to
ensure the installer signed saying the
product was working after installation
then call an authorized service agent.
power and power is switched on.
Press and hold the Lock and Mode Select
buttons together for 4 seconds, until
candle icon disappears.
Contact your Fisher & Paykel Dealer or
Authorized Service Agent.
Is the Lock light on? If so, press and hold
the Lock button for 3 seconds until the
Lock light goes out.
Page 48

46
Before you call for service47Before you call for service
Solving operating problems
Problem Possible causes What to do
Unfamiliar noises
coming from
appliance.
Condensation
inside fresh food
compartment.
Drawer hard to
open or close.
Tray or bin hard
to pull out.
Slides not
extending fully.
Freezer is defrosting. This is normal.
Refrigerant noises, eg. cracking,
popping, hissing, running water,
humming.
Frequent or long drawer
openings.
Drawer not sealing or closing
properly.
High humidity environment. May occur during periods of high
Appliance may not be level. Refer to installation instructions.
Slides not extending fully. Hold onto sides of drawer or tray, extend
Food or packaging trapped. Move items in compartment so drawer can
Drawer not sealing or closing
properly.
Note: When compartment is set to Freezer mode slides will not move as freely
as they will when set to the Fridge modes due to low temperature.
This is normal. Refer to Operating Sounds
section.
Minimize drawer openings.
Move items in compartment so drawer can
close tightly.
Check that seal is sitting flat and sealing
tightly.
Check that drawer skin is not clashing with
surrounding cabinetry.
humidity. Wipe dry.
the slides fully and evenly by using a
firm pull on both sides. This will reset the
slides.
close tightly.
Check that seal is sitting flat and sealing
tightly.
Hold onto sides of drawer or tray, extend
the slides fully and evenly by using a
firm pull on both sides. This will reset the
slides.
Page 49

Solving operating problems
Problem Possible causes What to do
Drawer skin not
sitting flush with
cabinetry.
Storage
compartment too
warm or too cold.
Food freezing
when set to
Fridge mode.
Food freezing
when set to Chill
mode.
Ice buildup
inside freezer
compartment.
Drawer skin not fitted or
adjusted correctly.
Temperature setting not correct. Refer to Temperature adjustment section.
Frequent drawer openings. Minimize drawer openings to allow
Warm, humid weather. Minimize drawer openings to allow
Drawer not sealing or closing
properly.
Large amount of food recently
added.
The storage mode of the
compartment has recently been
changed.
Temperature setting not correct. Refer to Temperature adjustment section.
Food placed directly in front of
air outlets.
Temperature setting not correct. Refer to Temperature adjustment section.
Items with high water content
may freeze.
Drawer not sealing correctly. Move items in compartment so drawer can
Frequent drawer openings. Minimize drawer openings.
High humidity environment. Not unusual during periods of high
Adjust drawer skin. Refer to Installation
instructions.
temperature to stabilize.
temperature to stabilize.
Move items in compartment so drawer can
close tightly.
Check that seal is sitting flat and sealing
tightly.
Check that drawer skin is not clashing with
surrounding cabinetry.
Minimize drawer openings to allow
temperature to stabilize.
Wait for the storage mode icon on control
panel to stop flashing and recheck
temperature.
Move chill sensitive foods away from the
back wall of the appliance.
Select Fridge storage mode.
close tightly.
Check that drawer seal (gasket) is sitting
flat and sealing tightly.
humidity. Wipe out.
Page 50

48
Before you call for service
Solving operating problems
Problem Possible causes What to do
Small amount
of frost on the
inside, bottom
left-hand side of
the compartment.
Water in the
storage bins.
Odor coming
from appliance.
Condensation is formed from
the water vapor produced by
fruit and vegetables.
Initial ‘new’ smell from
manufacturing.
Strong smelling food that has
not been covered or contained.
Expired food. Clear out old food from compartment. If in
Spills. Clean up all spills as soon as they occur.
This is normal.
A small amount of condensation is
beneficial for fruit and vegetable storage.
If there is too much water, set humidity
control button to fruit
fruit and vegetables loosely wrapped in
plastic bags.
Wipe out water with a cloth.
This is normal and will disappear once the
compartment is in operation.
Cover all strong smelling and odorous
foods carefully with food wrap or place
food into sealed containers.
Wipe compartment out with a mix of
water and vanilla essence to reduce
residual odor.
doubt, throw it out.
Clean compartment with a mix of warm
water and liquid dishwashing detergent.
If a spill has escaped from large bottom
tray and into the compartment, mop up
as much of the spill as you can. If odor
persists call an authorized service agent.
setting or store
If problems persist, please contact your Fisher & Paykel Dealer, Customer Care Center or Authorized
Service Agent to arrange service.
Page 51

Manufacturer’s warranty (NZ, AU, UK, IE)
For New Zealand, Australia, United Kingdom & Ireland markets only
You automatically receive a 2 year Manufacturer’s Warranty with the purchase of this Product
covering parts and labour for servicing within the country of purchase.
Fisher & Paykel undertakes to:
Repair or, at its option, replace without cost to the owner either for material or labour any part of
the Product, the serial number of which appears on the Product, which is found to be defective
within TWO YEARS of the date of purchase.
This warranty DOES NOT cover:
A
Service calls that are not related to any defect in the Product. The cost of a service call will be
charged if the problem is found not to be a Product fault. For example:
1. Correcting the installation of the Product.
2. Instructing the user how to use the Product.
3. Replacing house fuses or correcting house wiring or plumbing.
4. Correcting fault(s) caused by the user.
5. Noise or vibration that is considered normal, eg. drain/fan sounds, refrigeration noises
or user warning beeps.
6. Correcting damage caused by pests, eg. rats, cockroaches etc.
B
Defects caused by factors other than:
1. Normal domestic use or
2. Use in accordance with the Product’s User Guide.
C
Defects to the Product caused by accident, neglect, misuse or Act of God.
D
The cost of repairs or service carried out by non-authorised service providers or the cost of
correcting such unauthorised repairs or service.
E
Normal recommended maintenance as set out in the Product’s User Guide.
F
Pick-up and delivery.
G
Transportation or travelling costs involved in the repair when the Product is installed outside the
authorised service provider’s normal service area.
49
Service under this manufacturer’s warranty must be provided by an Authorised Fisher & Paykel
Service Provider (refer to the Service Contacts section at the start of this book). Such service
shall be provided during normal business hours. This warranty certificate should be shown when
making any claim.
Note:
This Warranty is an extra benefit and does not affect your legal rights.
Please keep this User Guide in a safe place.
Page 52

50
Limited warranty (USA, CA)
For USA and Canadian markets only
When you purchase any new Fisher & Paykel whiteware product for personal or consumer use
you automatically receive a two year limited warranty covering parts and labor for servicing
within the 48 mainland United States, Hawaii, Washington DC and Canada. In Alaska the limited
warranty is the same except that you must pay to ship the product to the service shop or the
service technician’s travel to your home. Products for use in Canada must be purchased through
the Canadian distribution channel to ensure regulatory compliance.
If the product is installed in a motor vehicle, boat or similar mobile facility, you receive the same
two year limited warranty, but you must bring the vehicle, boat or mobile facility containing the
product to the service shop at your expense or pay the service technician’s travel to the location
of the product.
Fisher & Paykel undertakes to:
Repair without cost to the owner either for material or labor any part of the product, the serial
number of which appears on the product, which is found to be defective. In Alaska, you must
pay to ship the product to the service shop or for the service technician’s travel to your home.
If the product is installed in a motor vehicle, boat or similar mobile facility, you must bring it to
the service shop at your expense or pay for the service technician’s travel to the location of the
product. If we are unable to repair a defective part of the product after a reasonable number of
attempts, at our option we may replace the part or the product, or we may provide you a full
refund of the purchase price of the product (not including installation or other charges).
This warranty extends to the original purchaser and any succeeding owner of the product for
products purchased for ordinary single-family home use.
All service under this limited warranty shall be provided by Fisher & Paykel or its Authorized
Service Agent during normal business hours.
How long does this limited warranty last?
Our liability under this limited warranty expires TWO YEARS from the date of purchase of
the product by the first consumer.
Our liability under any implied warranties, including the implied warranty of merchantability
(an unwritten warranty that the product is fit for ordinary use) also expires ONE YEAR (or such
longer period as required by applicable law) from the date of purchase of the product by the
first consumer. Some states do not allow limitations on how long an implied warranty lasts, so
this limit on implied warranties may not apply to you.
Page 53

Limited warranty (USA, CA)
This warranty does not cover:
A
Service calls that are not related to any defect in the product. The cost of a service call will be
charged if the problem is not found to be a defect of the product. For example:
1. Correcting faulty installation of the product.
2. Instructing you how to use the product.
3. Replacing house fuses, resetting circuit breakers, correcting house wiring or plumbing, or
replacing light bulbs.
4. Correcting fault(s) caused by the user.
5. Changing the set-up of the product.
6. Unauthorized modifications of the product.
7. Noise or vibration that is considered normal, for example, drain/fan sounds, refrigeration
noises or user warning beeps.
8. Correcting damage caused by pests, for example, rats, cockroaches etc.
B
Defects caused by factors other than:
1. Normal domestic use or
2. Use in accordance with the product’s User Guide.
C
Defects to the product caused by accident, neglect, misuse, fire, flood or Act of God.
D
The cost of repairs carried out by non-authorized repairers or the cost of correcting such
unauthorized repairs.
E
Travel fees and associated charges incurred when the product is installed in a location with
limited or restricted access. (eg. airplane flights, ferry charges, isolated geographic areas).
F
Normal recommended maintenance as set forth in the product’s User Guide.
51
If you have an installation problem contact your dealer or installer. You are responsible for
providing adequate electrical, exhausting and other connection facilities.
We are not responsible for consequential or incidental damages (the cost of repairing or
replacing other property damaged if the product is defective or any of your expenses caused
if the product is defective). Some states do not allow the exclusion or limitation of incidental
or consequential damages, so the above limitation or exclusion may not apply to you.
Page 54

52
Limited warranty (USA, CA)
Commercial use
If you are using the product in a commercial setting (any use other than a single family dwelling),
we agree to repair or replace, without cost to you for parts only, any defective parts, the serial
number of which appears on the product. Our liability for these repairs expires ONE YEAR from
the date of original purchase.
At our option we may replace the part or the product, or we may provide you a full refund of
the purchase price of the product (not including installation or other charges). All service under
this limited warranty shall be provided by Fisher & Paykel or its Authorized Service Agent during
normal business hours.
No other warranties
This limited warranty is the complete and exclusive agreement between you and Fisher & Paykel
regarding any defect in the product. None of our employees (or our Authorized Service Agents)
are authorized to make any addition or modification to this limited warranty.
Warrantor: Fisher & Paykel Appliances, Inc.
If you need further help concerning this limited warranty, please call us at above number, or
write to: Fisher & Paykel Appliances, Inc. 5900 Skylab Road, Huntington Beach, CA 92647
This limited warranty gives you specific legal rights, and you may also have other rights which
vary from state to state.
Page 55

How to get service
Before you call for service
Please read your User Guide. If you then have any questions about operating the product,
need the name of your local Fisher & Paykel Authorized Service Agent, or believe the product is
defective and wish service under this limited warranty, please contact your dealer or call us at:
USA
TOLL FREE 1.888.9.FNP.USA (1.888.936.7872)
or contact us through our web site: www.fisherpaykel.com
Canada
TOLL FREE 1.888.9.FNP.USA (1.888.936.7872)
or contact us through our web site: www.fisherpaykel.ca
Australia
TOLL FREE 1300 650 590
or contact us through our web site: www.fisherpaykel.com.au
New Zealand
TOLL FREE 0800 FP CARE or 0800 37 2273
or contact us through our web site: www.fisherpaykel.co.nz
United Kingdom
TOLL FREE (0845) 066 2200
or contact us through our web site: www.fisherpaykel.co.uk
Ireland
TOLL FREE 01800 625 174
or contact us through our web site: www.fisherpaykel.ie
For the rest of the world
Call your Fisher & Paykel Retailer/Dealer from whom you purchased the product. They are
trained to provide information on your appliance. If we can be of any further help, please
contact us on:
TOLL FREE +64 9 273 0660
or contact us through our web site: www.fisherpaykel.co.nz
53
You may be required to provide reasonable proof of the date of purchase of the product before
the product will be serviced under this limited warranty.
Page 56

162
Copyright © Fisher & Paykel 2008. Tous droits réservés.
Les spécifications de produit contenues dans ce livret
s’appliquent aux produits et aux modèles qui y sont décrits
en date de la publication. En vertu de notre politique
d’amélioration continue, ces spécifications peuvent changer
à tout moment. Vous devriez donc vérifier auprès du centre
de service à la clientèle pour vous assurer que ce livret décrit
correctement les modèles présentement offerts.
Derechos de autor © Fisher & Paykel 2008. Todos los
derechos reservados
Las especificaciones de los productos en este folleto
aplican para los productos y modelos específicos descritos
a la fecha de su emisión. De acuerdo con nuestra
política de mejora continua de nuestros productos,
estas especificaciones pudieran modificarse en cualquier
momento. Por lo tanto, le invitamos a acercarse a nuestro
Centro de Atención a Clientes para asegurarse de que
este folleto describa en forma correcta el producto que
acaba de adquirir.
Copyright © Fisher & Paykel 2008. All rights reserved.
The product specifications in this booklet apply to the
specific products and models described at the date
of issue. Under our policy of continuous product
improvement, these specifications may change at any
time. You should therefore check with our Customer Care
Center to ensure this booklet correctly describes the
product currently available.
www.fisherpaykel.com
www.fisherpaykel.com.au
www.fisherpaykel.co.uk
www.fisherpaykel.co.nz
www.fisherpaykel.ca
US CA NZ AU UK IE IT
CoolDrawer™
Guide de l’utilisateur / Guía del Usuario / User guide
Publié / Fecha de publicación / Published: 03/2008
Nº de pièce / Pieza No. / Part No. 840505
 Loading...