

Page 1

dCS P8i
Upsampling SACD/CD Player
User Guide
Software Release 1.1x
July 2006
© dCS Ltd. 2005, 2006 Price UK £8.00 / Euro 12.00
All rights reserved. No part of this publication may be reproduced, stored in or introduced into a retrieval system,
or transmitted in any form, or by any means (electronic, mechanical, photocopying, recording or otherwise)
without the prior written permission of dCS
publication may be liable to criminal prosecution and civil claims for damages.
Information contained in this manual is subject to change without notice, and whilst it is checked for accuracy, no
liabilities can be accepted for errors.
1
. Any person who does any unauthorised act in relation to this
1
dCS is Data Conversion Systems Ltd. Company registered in England No. 2072115.
Page 2

dCS P8i User Guide Guide for Software Issue 1.1x
dCS Ltd August 2006
SING THE
U
Congratulations on purchasing your dCS P8i.
Before using your un it, please read this section and the Step by Step Guid e. This will enable you to
set the unit up quickly and safely with your hi-fi system.
From time to time, dCS will rel ease upd ated softwar e on CD th at you can ins tall yours elf us ing th e CD
Update feature. Please check our web-site occasionally to see if new P8i software is available, or
consult your dealer.
dCS P8i
FOR THE FI R ST TIME
What’s in the box?
Check that the box contains the following items:
• dCS P8i
• Control Summary
• Power cable
• 2 spare fuses
• Remote control unit
• Remote control guide
• 3 x AAA batteries
• 1.5mm Allen Key for the remote control unit
Check the contents of the inner carton against the lis t above . Notif y your dealer as soon as possib le if
anything is missing or damaged. W e suggest that you retain the ori ginal pack aging for poss ible future
use. If this is not possible, replac em ent pack aging ca n be or dered f rom dCS or our distribut ors . Details
can be found on our web site at www.dcsltd.co.uk.
Safety Notice
Your dCS P8i contains no user serviceable parts. DO NOT attempt to open the case as there are
potentially dangerous voltages present inside. In the event of the unit developing a fault, please
contact your dealer in the first instance. If you need more help, contact dCS.
Laser Radiation Hazard
The dCS P8i is a Class 1 Laser Product, it com plies with U.S. FDA 21CFR subchapter J. In normal
use, there is no risk of exposure to laser radiation.
IMPORTANT!
The metal top cover must only be removed by authorised service personnel.
The cover protects the user from indirect exposure to visible and invisible
laser radiation, as well as risk of electric shock.
Manual filename: dCS P8i User Guide v1_1x~.doc
English version web-site: www.dcsltd.co.uk
Page 2
email: mailto:support@dcsltd.co.uk
Page 3
dCS P8i User Guide Guide for Software Issue 1.1x
dCS Ltd August 2006
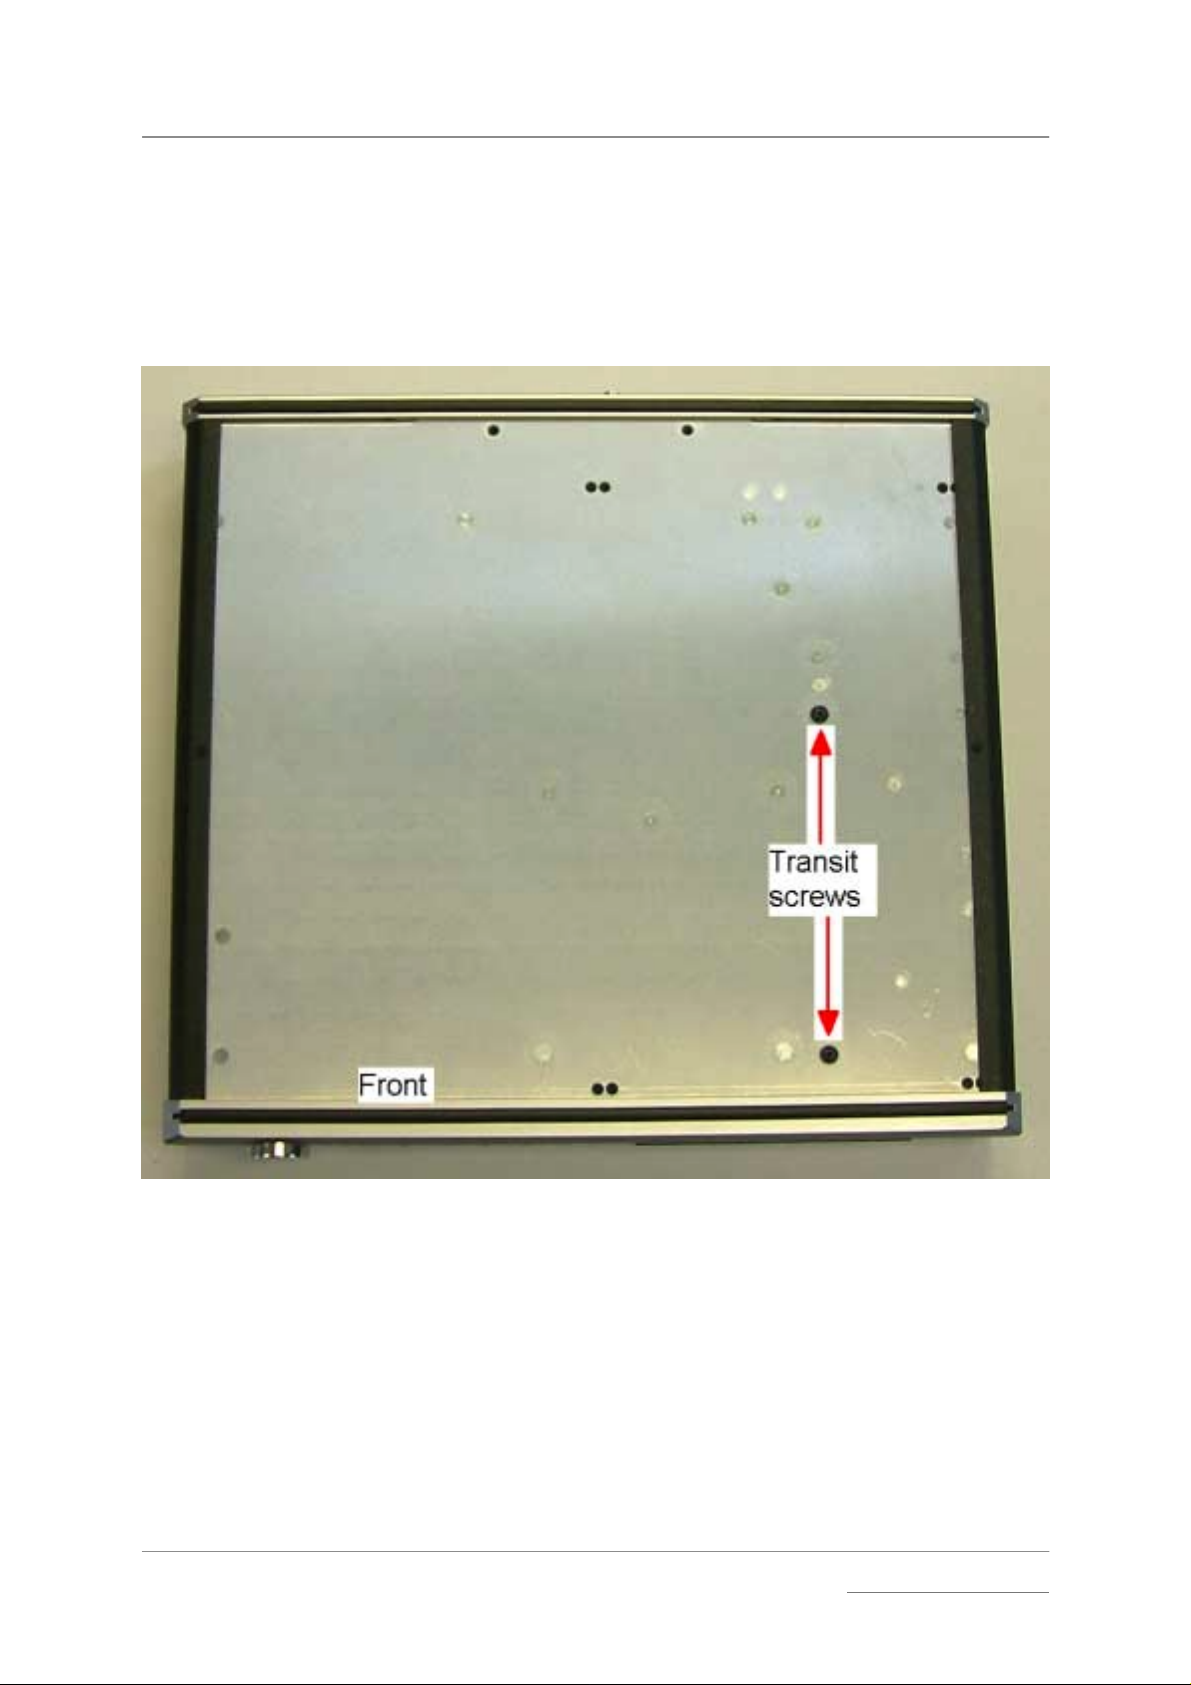
Removing the Transit Screws
The transit screws clamp the mechanism to reduce the risk of shipping damage. They must be
removed before the unit is used.
Lift the unit out of the packaging, turn it ups i de-do wn a nd pl ac e it on a ta bl e to p. Id ent ify the two transit
screws from the following drawing.
Using a flat headed screwdriver, unscrew the two transit screws and put them in a safe place.
IMPORTANT!
If you intend to transport the unit further than the next room, replace the
transit screws – they need to be secure BUT NOT OVER-TIGHT. Units that
are returned for repair without transit screws correctly fitted will be subject
to a repair charge.
Manual filename: dCS P8i User Guide v1_1x~.doc
English version web-site: www.dcsltd.co.uk
Page 3
email: mailto:support@dcsltd.co.uk
Page 4

dCS P8i User Guide Guide for Software Issue 1.1x
dCS Ltd August 2006
Mains Voltage Setting
Before connecting th e power cable to your P8i for the fir st time, please check that it has been set to
the correct operating volt age for your mains supply. The un it’s voltage setting is sho wn on the label
beneath the mains inlet on the rear panel. If this does not matc h your local supply volt age, DO NOT
attempt to use the unit. Contact your de aler to h ave th e unit r eset. Usi ng the P8i with the wrong m ains
setting for your loca l supply m ay result in serio us damage to the unit and will invalidate t he warrant y.
Do not attempt to reset the voltage yourself.
Power Cables
If you wish to use a power cable other than the one suppl ied, please ensure that it is a good f it to the
mains inlet, is not too fat, too stiff or too heavy.
Mains Conditioners
We do not recommend the use of mains conditioners. However, if you do wish to use a mains
conditioner with variable voltage and frequency, we recommend that you s et the v olt age to match your
local voltage and the frequency to either 50 or 60Hz ONLY.
IMPORTANT!
Damage caused to your P8i by misuse of a mains conditioner or by a
malfunctioning mains conditioner is not covered by the warranty.
Positioning the unit
Place the P8i on a firm, vibration f ree base, allo wing convenient c onnection to the oth er parts of your
system. For best results avoid siting the P8i either direct l y on or underne ath pr eamplifiers or tuners . T o
prevent overheating, we recommend that you leave some free space around the unit to allow for
ventilation.
Manual filename: dCS P8i User Guide v1_1x~.doc
English version web-site: www.dcsltd.co.uk
Page 4
email: mailto:support@dcsltd.co.uk
Page 5

dCS P8i User Guide Guide for Software Issue 1.1x
dCS Ltd August 2006
STEP-BY-STEP GUIDE
This section guides you through setting up the unit for basic operation.
Preliminaries
The Control Summary sheet details the menu structure and outlines the use of the front panel
controls. A comprehensive user manual will be available free of charge from our web-site at
www.dcsltd.co.uk or a bound copy can be ordered from our web site.
STEP 1 – Connecting the P8i using the Analogue Outputs
If you prefer to use an external DAC, go to step 2.
Most owners will make use of the P8i’s internal Ring DAC to drive the power amplifier directly.
The P8i has one pair of balanced analogue outputs on XLR connect ors (Left and Right) and one pair
of unbalanced analogue outputs on two RCA phono connector (Left and Right).
• Connect either the bal anced or the u nbala nced a nalogue outputs on the P8i to the m atching inputs
on your preamplif ier / p ower am plif ier with suit able a udio c ables. Both s ets of outputs m a y be used
simultaneously, if required.
• Connect the power amplifier to your loudspeakers.
STEP 2 – Connecting the P8i using the Digital Outputs
If you are using the P8i’s internal DAC, go to step 3.
When playing CDs, 16bit / 44.1kS/s digital data will appear on the AES OUT and RCA OUT
connectors, which can be used to drive an external DAC.
• Connect one of the AES or RCA digital outputs on the P8i rear pan el to the m atching inputs of the
DAC using suitable screened digital cables.
• Press the MENU button and use the arro w buttons to scr oll to the Digita l Out page. If this is set to
Off, press the MENU button to change to On.
• Connect the analogue outputs of your DAC to the m atching inputs on your preamplifier / power
amplifier.
• Connect the power amplifier to your loudspeakers.
STEP 3 – Connecting to the Digital Inputs
You can use the P8i’s inter nal Ring DAC to co nvert digital data from an external source to analogue.
In this release, the unit will lock to 32, 44.1 or 48kS/s and process word lengths up to 24 bits.
• Connect the external sour ce (such as a DAB rad io or DVD pl ayer) to e ither th e AE S IN or RCA IN
connector on the P8i back panel, using suitable screened digita l cables. You can use bo th digital
inputs if you wish.
• Connect the analogue outputs of your DAC to the m atching inputs on your preamplifier / power
amplifier.
• Connect the power amplifier to your loudspeakers.
Manual filename: dCS P8i User Guide v1_1x~.doc
English version web-site: www.dcsltd.co.uk
Page 5
email: mailto:support@dcsltd.co.uk
Page 6

dCS P8i User Guide Guide for Software Issue 1.1x
dCS Ltd August 2006
STEP 4 – Powering up
• Connect the power c ab le sup pl ie d to the po wer in let on the P8i rear pane l. If you are using a power
cord other than the one supplied with the P8i, make sur e that it is a good fit to t he mains inlet and is
not too large or heavy as to cause damage (see “P o wer ca bl es ” on page 4). Plug the ot her end into
a convenient power outlet. Set the power switch beside the power inlet to the on position (I).
• Press the Standby button briefly. W ait several s econds while th e P8i configur es itself . The butto ns
light up in blue sho wing that th e unit is bo oting up. Af ter a f e w seconds t he blue lig hts turn of f. Unit
displays dCS P8i, Welcome and then Loading. Once booted up, the colour of the buttons
changes to green, signifying that there is no disc in the player, and the unit should display No Disc.
• Make sure the volume on your P8i and amplifier is set to a low level before operation.
The first time you use the unit, it is a good idea to ensure it is set to a known state, as follows:
• Press the MENU button and use the ar r o w butto ns to sc rol l to the Factory page of the m enu. Pr ess
the MENU button again to select this option. The unit will reset itself.
STEP 5 – Inserting and playing a Disc
• Press the Stop/Eject button. The display will show Opening, the drawer will open and the n the
display will sho w Open.
• Place the disc onto the tr ay and pr ess the Stop/Eject button a gain. T he d ispla y will s ho w Closing,
Loading, Read TOC, Check ing and will then build a tab le of contents displaying 1-5, 6-10, etc.
The disc will be iden tified as CD or SACD. Either the CD or the SACD indicator will light. In this
release, the unit will play the SACD layer of a hybrid disc by default. The colour of the buttons
changes depending on the t ype of dis c you cho ose to pla y, red for a CD la yer or lilac f or an SACD
layer.
• Press the Play/Pause button. Turn the volume to a comfortable level. You should have audio.
• Press the Play/Pause button to pause playing, press again to resume playing.
• Press the Next Track or Previous Track buttons to skip to another track.
IMPORTANT!
• Press the Stop/Eject button to stop the disc. Press it again to open the tray.
• Enjoy the music!
Oops! There is a disc stuck inside!
If you load a disc tha t cannot be read (such as a CD upside-down, a DVD or a damaged/dirty dis c),
don’t worry. The P8i will displa y Reading and will tr y to read the disc for abo ut 40 seconds. W ait until
the display changes to No Disc, then open the tray with the Stop/Eject button.
Please be patient, do not overload the unit with commands. If too many
Previous Track commands are sent, the unit may freeze at track 1. To
correct this, press the Next Track button once to go to track 2.
STEP 6 – Using an external so urce
If you connected an external source to the P8i in STEP 3, turn it on and select it as follows:
• Press the MENU button and use the arrow buttons to scroll to the Source m enu page. Press the
MENU button again to select either the AES or RCA input.
Either the AES or RCA indicat or will il luminate. T he unit will d etect the sam ple rate of the source ( 32,
44.1 or 48kS/s only), then display the source word length and sample rate on the left side of the
display (e.g. 16/44.1k).
• Turn the volume to a comfortable level. You should have audio.
• Enjoy the music!
IMPORTANT!
Manual filename: dCS P8i User Guide v1_1x~.doc
English version web-site: www.dcsltd.co.uk
When using the digital inputs, the CD controls are disabled.
Page 6
email: mailto:support@dcsltd.co.uk
Page 7

dCS P8i User Guide Guide for Software Issue 1.1x
dCS Ltd August 2006
THE HARDWARE – CONTROLS AND CONNECTORS
This section briefly explains the layout of the front and the rear panel and what the symbols stand for.
Front Panel
A B C D E F GHJI
Key to the front panel
A - Standby Button
B - Stop / Eject Button
C - Play / Pause Button
D - Previous Track / Menu Step Back Button
E - Next Track / Menu Step Forward Button
F - Menu / Select Button
G - Rotary Control
H - Remote Control Sensor
I - SACD / CD Drawer
J - Main Display
A – Standby
• To power up or switch out of standby mode, press the Standby button briefly.
• When you have f inis he d l isten ing , pres s th e Standby button br ief ly to set the unit to standby mode.
The Standby button will glow red and the rest of the display will turn off.
• To switch off completel y, hold down the Standby but ton for a fe w seconds unti l it glo ws lilac, then
release it. Please wait at least 10 seconds bef or e switch ing on aga in.
B – Stop / Eject
• When there is no disc in the player, or if the disc is stopped, press this button to open the tray.
• When the tray is open, press this button to close the tray.
• When a disc is playing, press this button to stop the disc.
C – Play / Pause
• With a disc loaded, press this button to start playing.
• Press it to pause and press again to resume playing.
Manual filename: dCS P8i User Guide v1_1x~.doc
English version web-site: www.dcsltd.co.uk
Page 7
email: mailto:support@dcsltd.co.uk
Page 8

dCS P8i User Guide Guide for Software Issue 1.1x
dCS Ltd August 2006
D – Previous Track / Menu Step back
• Press the Previous Track button briefly to skip to the previous track.
• If the disc is playing, the first touch on this button will return to the start of the current track, a
second push on this button wi ll take you to the beginn ing of the pre vious track . It is recom mended
to use the numeric keypad on the rem ote control to select trac ks e.g. If track 5 on a disc is being
played but you want to go back to track 3, just press 3 on the remote control keypad.
• When the menu is open, this button is used for paging backwards through the menu.
E – Next Track / Menu Step Forward
• Press the Next Track button briefly to skip to the next track.
• When the menu is open, this button is used for paging forwards through the menu.
F – Menu / Select
? /
• Press the Menu button to open the menu and change or select settings in the menu.
• When the Menu button is pressed, the light pipes s witch off, exc ept the menu button, a nd the two
buttons used to page forward and backwards through the menu.
G – Rotary Control
• Use the Rotar y Control to turn the volume up or down
• While the menu is open, use the Rotary Control to page forwards and backwards through the
menu.
• When the Balance option has been selected, use the Rotary Control to change the balance
settings.
H – Remote Control Sensor
The remote control sensor is an infra- red receiver and requ ires a direc t line of s ight to recei ve signals
from the remote control transmitter.
I – SACD / CD Tray
If the tray is open when the unit is on and you press the Standby button, the tray will close
automatically before the unit enters standby mode.
J – Main Display
The main display tells you what the P8i is doing.
• While playing a disc, the track number, the track time and the volume setting are usually displayed.
• While adjusting the channel balance, the track time and the L/R balance settings are displayed.
• When accessing the menu, menu options are displayed.
Manual filename: dCS P8i User Guide v1_1x~.doc
English version web-site: www.dcsltd.co.uk
Page 8
email: mailto:support@dcsltd.co.uk
Page 9

dCS P8i User Guide Guide for Software Issue 1.1x
dCS Ltd August 2006
Rear Panel
K LMNOPQRSTV/WU
Key to the Rear Panel
K – Balanced analogue outputs L & R on XLR male connectors
L - Unbalanced analogue outputs L & R on RCA phono connectors
M – AES Digital Input on XLR female connector
N – AES Digital Output on XLR male connector
O – SPDIF Digital Input on RCA connector
P – SPDIF Digital Output on RCA connector
Q – Word clock Digital Input
R – Word clock Digital Output
S – Power link In and Out
T – Software Upgrade connector, 9-way ‘D’ type
V – Mains Fuse Holder
W – IEC Power Inlet
U – Power Switch
Manual filename: dCS P8i User Guide v1_1x~.doc
English version web-site: www.dcsltd.co.uk
Page 9
email: mailto:support@dcsltd.co.uk
Page 10

dCS P8i User Guide Guide for Software Issue 1.1x
g
g
y
dCS Ltd August 2006
THE MENU
The menu gives you acc ess to a range of additional f eatures. It also allows acces s to new features
and performance enhancements that can be added at a later date by software upgrades.
Using the menu
The menu is controlled by 3 buttons:
• The Menu button opens the menu and with the menu open acts as the Select button.
• The Step Forward button pages forward thro ugh the m enu.
• The Step Back button pages backward through the menu.
When the Menu button is pressed, the light pipes switch off , except the Menu button itself, and th e
two buttons that drive the menu.
You can also use the Rotary con trol to page bac kwards a nd forwards through th e m enu. Successi ve
presses of the Step Fo rward or Step Back bu tton page t hrough the m enu. You cannot go direct ly to
any particular page.
There are two ways to close the menu:
• You can use either Step button until the display shows Exit and then press Select.
• 5 seconds after your last command the menu will time-out and the P8i will revert to normal
operation.
Menu Sequence
The following explanatio n briefly deals with the Menu pa ges in the sequenc e they occur in th e Menu,
and this summarised in the Control Summary.
? /
Press to open the
Menu and Sel ect or
change options .
Upsampling Digital Outs Output Level
Turns the DSD
for CDs
upsamplin
on and off
On On 2V 1.10
Off Off 6V
Source CDUpdate Exit
Selects disc mode
or a digital input.
Filter Phase Brightness W Clk Layer
es the output
Selects an optional
filter if available
1 … 4 Normal 0 …. 15 SACD
Turns the digital
outputs on and off.
Starts software
update from a dCS
CD
Chan
phase for both
channels
Inverted only in this release
Sets the analogue
output levels
Closes the Menu
Sets the display
brightness
Contact Details Serial Number
s dCS email
Displa
address
Displays "Locked"
when slaved to
Word Clock In,
"Inactive" if not.
Displays the unit full
serial number
Selects format for
playing hybrid discs
Issue
Displays the
software version
number
Disc
AES
RCA
Manual filename: dCS P8i User Guide v1_1x~.doc
Page 10
email: mailto:support@dcsltd.co.uk
English version web-site: www.dcsltd.co.uk
Page 11

dCS P8i User Guide Guide for Software Issue 1.1x
dCS Ltd August 2006
Filter
While upsampling a CD or playing an SACD, the P8i offers a choice of 4 interpolation f ilter s . The filters
offer different trade-offs between signal bandwidth and out-of-band noise level (which is inherent in the
1-bit nature of DSD).
Filter 1 gives the wides t bandwidth (about 70kHz) with th e highest level of out-of-band no ise.
This is the usual setting.
Filter 2 gives a slightly narrower bandwidth with a lower level of out-of-band noise.
Filter 3 gives a slightly narrower bandwidth again and less out-of-band noise than Filter 2.
Filter 4 is intended for troubleshooting, not listening – it has a very low level of out-of-band noise
and a 20kHz bandwidth.
Selecting the best filter for yo ur system is simpl y a matter of c ycling through F ilters 1, 2 and 3 as you
play a disc and cho osing the one that you think sounds b est. The best choice will depend on your
system, the tonal qualities of the music and your taste.
To choose a filter pr ess the Menu button and cycle through the m enu with the Step Back or Step
Forward button until Filter is displa yed. Now press the Select button r epeatedly to scrol l through the
different filter options.
Phase
This option allows you to invert (reverse the phase of) both channels to correct a system phasing
error.
Brightness
This adjusts the bright ness of the main d isplay, with settin gs between 15 (brightest) and 0 (off, unless
something is touched).
The light pipes around the buttons turn off when the display brightness is set to 0 and stay on at
settings 1 to 15.
Word Clock (WClk)
This shows the stat us of the Word Clock Input, displayi ng WClk : Locked wh en the un it is lock ed to
an external Word Clock signal or WClk : Inactive if not.
Layer (CD, SACD)
IMPORTANT!
The
Layer
feature is not active in this software release. Th e SACD layer of
hybrid discs will be played.
Issue – Software Issue State
This displays the is s ue number of the software f itte d to your unit. You will n eed to check this if you are
considering a software upgrade.
Serial Number – Unit Serial Number
This displays the full serial number, including the hardware configuration code. We will need this
information to assemble upgraded software to suit your unit.
Contact Details – Contact Information
This displays dCS email address and web-site URL.
Manual filename: dCS P8i User Guide v1_1x~.doc
English version web-site: www.dcsltd.co.uk
Page 11
email: mailto:support@dcsltd.co.uk
Page 12

dCS P8i User Guide Guide for Software Issue 1.1x
dCS Ltd August 2006
Output Level
The Output levels should be set to sui t your syst em – there are t wo leve ls: 6V (high) or 2V (low). T he
difference between the two settings is 9.5dB.
For best results, the P8i volume control should be set to no lower tha n –20.00dB for norm al listening
levels with typical music. We suggest that you start with 2V and increase the level to 6V if this is
inadequate.
Before changing the output le vel to 6V, please insure you are not pl aying music at a h igh level – the
extra 9.5dB is noticeably louder.
Digital Output
This option allows you to turn the Digital & W/Clock Outputs Off or On.
Upsampling
This option allows you to turn the DSD upsampling Off or On when playing CDs.
Source
This page allows you to use the P8i as a DAC to convert data from external sources ( such as a DVD
player or DAB radio) to analogue. There are 3 settings:
• Disc – the unit operates as a CD/SACD player.
• AES – the unit accepts digital data at 32, 44.1 or 48kS/s from the AES input.
• RCA - the unit accepts digital data at 32, 44.1 or 48kS/s from the RCA input.
IMPORTANT!
When the unit is set to AES or RCA, the CD controls are disabled. If you
want to open the CD tray, set the Source page to Disc first.
IMPORTANT!
In this release, external sources are not upsampled.
When the external inputs are in use, the following pages disappear from the menu: Filter, WClk, Layer,
Digital Outputs, Upsampling and CD Update.
CDUpdate – Software Update by CD
Future releases of software can be loaded via a CD using this menu page.
Detailed instructions will be supplied with the software update CD.
Exit – End of the Menu
Select this page to come out of the menu and return to the normal display.
Manual filename: dCS P8i User Guide v1_1x~.doc
English version web-site: www.dcsltd.co.uk
Page 12
email: mailto:support@dcsltd.co.uk
Page 13

dCS P8i User Guide Guide for Software Issue 1.1x
dCS Ltd August 2006
EMOTE CONTROL
R
Fitting or replacing the Batteries in the Remote Control
For safety reasons, the remote control is supplied with the 3 batteries packed separately. Any
replacement batteries must be type AAA, MN2400 or equivalent alkaline leak-proof batteries.
Opening the battery compartment and removing the batteries
Turn the Remote Control unit over a nd rem ove the 2 s crews s ho wn in the f igur e belo w using t he Al len
key supplied. Lift off the battery cover.
To remove discharg ed batteries, pres s the + end bac k against the spr ing and pull tha t end out of the
unit. A small k ey or screwdriver may be used if the batte ry is a tight fit. Dispose of the discharged
batteries safely
Fitting new batteries and closing the case
To fit a new batter y, press the – end (the flat end) agai nst one of the spring cont acts in the batter y
holder then press the b attery into its slot. Batter y polarity is indicat ed on t he batter y holder and o n th e
diagram below. Always fit a complete set of 3 new batteries.
AAA
1.5V
1.5V
AAA
AAA
1.5V
To re-assemble the case, fit the batter y cover, ensuring the side with the recessed hol es is outward.
Replace the 2 screws, d o not over-tight en them as this can dam age the scr ew heads and th e remote
case. The Remote Control is ready to use.
Manual filename: dCS P8i User Guide v1_1x~.doc
English version web-site: www.dcsltd.co.uk
Page 13
email: mailto:support@dcsltd.co.uk
Page 14

dCS P8i User Guide Guide for Software Issue 1.1x
dCS Ltd August 2006
Using the Remote Control
Standby Menu
A
SACD/CD
G
B
//
C
D
E
F
Displa y Vo l/Bal
2
13
456
789
0
dCS
H
I
A – Standby button
Pressing the Standby button normally sets the P8i to standb y mode. Press again to restore normal
operation.
B – SACD / CD button
IMPORTANT!
Manual filename: dCS P8i User Guide v1_1x~.doc
English version web-site: www.dcsltd.co.uk
The SACD/CD feature is not active in this software relea se. The SA CD layer
of hybrid discs will be played.
Page 14
email: mailto:support@dcsltd.co.uk
Page 15

dCS P8i User Guide Guide for Software Issue 1.1x
dCS Ltd August 2006
C – Player Controls
The Pla y / Pause, Sto p / Eject, Previous T rack and Next Track buttons control the pla yer in the
same way as the buttons on the front panel.
The Previous Track and Next Track buttons also double as Fast Forward and Fast Reverse
buttons on the remote control.
D – Display Button
In SACD mode, pressing this button displays the track number being played for approximately 5
seconds and then reverts back to Track time. This button is used when playing an SACD as the
elapsed time is dis played but not the tr ack number . When a red-book CD is pla yed the tr ack num ber
and the elapsed time are displayed simultaneously and therefore this button is not used.
E – Vol/Bal Button
Switches between Volume mode and Balance mode.
F– 0 – 9 Buttons
The ten numbered buttons are used to select track numbers. We recommend using the numeric
keypad for selecting tr ac k s . E.g. If tr ack 5 on a disc is being played but you want to g o back to trac k 3,
just press 3 on the remote control keypad.
G – Menu Button
Opens the menu. Use the ↑↑↑↑ and ↓↓↓↓ buttons to page throu gh the m enu and pres s Menu again to select
a function. Note that the menu may time out if there is no activity for 5 seconds.
H – Up and Down Buttons
Use these keys to alter th e settings when in volume or balance mode or to scroll up and d own the
menu when the menu is open.
I – Mute Button
Press this button to mute or un-mute the analogue outputs of the player.
Manual filename: dCS P8i User Guide v1_1x~.doc
English version web-site: www.dcsltd.co.uk
Page 15
email: mailto:support@dcsltd.co.uk
Page 16

dCS P8i User Guide Guide for Software Issue 1.1x
dCS Ltd August 2006
MAINTENANCE AND SUPPORT
Service and Maintenance
dCS audio products are desig ned not to need regular m aintenance, and contain n o user serviceabl e
parts apart from the main fuse. If your unit is damaged in any way, please contact your dealer or dCS.
Mains Fuse
There is a mains f use below th e power inl et, access ible from the outside of the unit. If the fuse blows,
it may be changed by the user. T he current consumption of the unit is very low, so it only blows if
power surges occur, or there is a fault in the un it. Usu all y power s urges c ause no oth er dam age, but if
the fuse blows repeatedly on replacement, some other damage will have bee n done and the unit mus t
be returned to dCS for repair.
Fuse type: 20 x 5mm 0.5 amp T HRC fuse
IMPORTANT!
Replacing a Blown Fuse
Referring to the diagram belo w, rem ove th e po wer cab le, use a sm all f lat blad ed scre wdriver t o pr y up
the tab on the fuse carrier (A) and pull it out. Push the blown fuse o ut of the clip i n the carrier (B) and
dispose of it. Fit a new fuse in the clip ( C) a nd push the carrier back into t he uni t s o th at it cl ic ks home.
Spare fuses are provided with the unit.
If the fuse should fail, it is essential that it is replaced with one of the same
type and rating. Failure to do so could result in damage to the unit, risk of
fire or electric shock and will invalidate the guarantee.
B
A
C
Manual filename: dCS P8i User Guide v1_1x~.doc
English version web-site: www.dcsltd.co.uk
Page 16
email: mailto:support@dcsltd.co.uk
Page 17

dCS P8i User Guide Guide for Software Issue 1.1x
dCS Ltd August 2006
Limited Warranty
General
dCS Ltd. warrants this product against defects in m aterials and workmanship f or a period of 3 years
from receipt by the fir st owner. T he warra nty on CD m echanism s and relate d parts is lim ited to 1 year
from receipt by the first owner. D ur in g th e warran t y perio d, dCS wil l repair or, at our abs ol ute disc r etio n
replace, a faulty prod uct. Warranty repair s must only be c arried out by dCS or our auth orised servic e
agents. Please contact dCS for details of your nearest service agent.
Your dealer should have com pleted on your behalf an Owner Registration form at the tim e of sale
and returned it to dCS. If you do not receive a Warranty Certificate within 30 days of purchase,
please contact dCS., stating your name, address, unit serial number and date of purchase.
In the absence of a Wa rranty Certificate, dCS reserve the right to us e the original date of s hipping
from dCS as the start date for the warranty.
This warranty is not transferable.
Warranty Exclusions
The Warranty on this product will be void if:
• the product is misused in any way.
• any unauthorised modifications or repairs are carried out.
• the product is not used in accordance with the Operating Conditions stated in this manual.
• the product is serviced or repaired other than by dCS or our authorised service agents.
• the product is operated without a mains earth (or ground) connection.
• the unit is returned inadequately packed.
• the unit is shipped without the transit screws in place.
This warranty covers parts and labour only, it does not cover shipping charges or tax/duty.
Obtaining Service
Should you encounter a problem, contact your authoris ed dCS dealer for advice, quoting t he model,
the full serial number, software version number, and g iving a detailed description of the fault. Your
dealer will advise you fully on actions that need to be taken. When returning a unit, the original
packaging should be used to avoid transi t damage. Replacement pack aging sets may be purchased
from dCS.
During the Warranty period, there will normally be no charge for parts or labour.
Operating Conditions
• The supply voltage must remain within +/-10% of the A.C. voltage specified on the back panel.
• The supply frequency must be in the range 49Hz to 62Hz.
• Ambient temperature range: 0°C (32°F) to 40°C (104°F), non-condensing.
• Do not install the unit near heat sources such as radiators, air ducts, power amplifiers or direct
strong sunlight.
• If in doubt, the easy test is – the unit is happy to work anywhere a human is.
Manual filename: dCS P8i User Guide v1_1x~.doc
English version web-site: www.dcsltd.co.uk
Page 17
email: mailto:support@dcsltd.co.uk
Page 18

dCS P8i User Guide Guide for Software Issue 1.1x
dCS Ltd August 2006
If you need more help
In the first instance, you sho uld con tact your dea ler. If the y cannot res olve the iss ue, co ntact dCS. Our
office hours are 8.30 a.m . to 5.00 p.m. Monday to Fr iday, UK time (GMT in winter or GMT + 1hr in
summer). Contact us by phone or fax on:
Inside the UK Outside the UK
Telephone
Fax
You can write to us at:
dCS Ltd
Mull House
Great Chesterford Court
Great Chesterford
Saffron Walden CB10 1PF
UK
01799 531 999 +44 1799 531 999
01799 531 681 +44 1799 531 681
Our email address:
support@dcsltd.co.uk
Our web-site is: www.dcsltd.co.uk
This user guide may be downloaded free of charge from our web-site.
A bound copy of this guide may be ordered from dCS.
Manual filename: dCS P8i User Guide v1_1x~.doc
English version web-site: www.dcsltd.co.uk
Page 18
email: mailto:support@dcsltd.co.uk
Page 19

dCS P8i User Guide Guide for Software Issue 1.1x
dCS Ltd August 2006
Software History
dCS products make extensive use of s oftware configurable chips – FPGAs and DSPs. Th is gives us
the ability to update our products to add extra features, update digital interface standards or m ake
performance improvements by loading new software. Occasionally, a hardware update may be
necessary also to increase the “capac ity” of the electronic s, add extra co nnectors or extra f ront panel
controls.
Please note that not all soft ware updates mak e an earth-shattering chan ge. You should ha ve a clear
idea of what you exp ect to gain bef ore updating to the lat est issue. It is rec ommended you k eep your
P8i software up to date. Check the dCS web-site or contact dCS for the latest software updates.
This manual is for P8i software version 1.1x.
Issue 1.10 changes the following:
• Activates the AES and RCA digital inputs, allowing the unit to be used as a DAC.
• Changes the menu sequence, adding the Source page.
Issue 1.05 changes the following:
• Allows the DSD upsampling to be turned off.
• Changes the menu sequence adding the Upsampling option.
Issue 1.04 changes the following:
• Activates the Word Clock Input.
• Allows the Digital Outputs to be turned off.
• Improves the remote handset response.
• Changes the menu sequence adding the WClk and Digital Output option.
Issue 1.03 changes the following:
• Allows the track number to be displayed briefly by pressing the Display button on the remote
control.
• Changes the menu sequence.
• Corrects the behaviour when a disc is paused.
Issue 1.02 - Update for internal dCS use.
Issue 1.01 - The first issue.
Manual filename: dCS P8i User Guide v1_1x~.doc
English version web-site: www.dcsltd.co.uk
Page 19
email: mailto:support@dcsltd.co.uk
 Loading...