

DCS DW-24SS User Manual
THE PROFESSIONAL DISHWASHER
Use and Installation Guide
Models:
■
DW-24SS
D y namic Cooking S y stems , I nc .

A Message To Our Customers
1
Thank you for selecting this DCS Professional Dishwasher.Because of its unique features, we have developed
this Use and Installation Guide. It contains valuable information on how to properly operate and maintain your
new Dishwasher for years of safe and enjoyable cooking.
To help ser ve you better,please fill out and return the Ownership Registration Card and keep this guide handy,
as it will help answer questions that may arise as you use your Dishwasher.
For your convenience,product questions can be answered by a DCS Customer Service
Representative by phone:1-888-281-5698, or Fax:714-372-7003,
or by mail:
DCS
Attention Customer Service,
5800 Skylab Road,Huntington Beac h, C A 92647
WARNING
BEFORE USING THE APPLIANCE:
Carefully read all the instructions contained in this manual. Installation must be performed by a qualified
technician, in compliance with the regulations in force. This appliance is intended for domestic use , and
complies with the EEC Directives 73/23,89/336 (inc luding 92/31 and 93/68) currently in force including
the prevention and elimination of radio frequency interference. The appliance is designed for the following
purpose: Washing and drying of dishes; any other use shall be considered improper. The manufacturer
declines all responsibility for uses other than those described above.
WARNING
The plug on the power cord and the corresponding socket outlet must be of the same type , and must
conform to the regulations in force. Check that the voltage and frequency of the electrical power supply
match the ratings on the name plate. Avoid using adapters or shunt connections. Never unplug the
appliance by pulling the power cord.
• After installation,the plug must remain accessible.
• In the event of damage to the power cord,have it replaced by a qualified tec hnician.
• After replacing the power cord,make sure that the terminal block compartment cover is
closed correctly.
PLEASE RETAIN THIS MANUAL
FOR FUTURE REFERENCE.

Tab le O f Contents
2
SAFETY PRACTICES & PRECAUTIONS
...............................................................................3
INSTALLATION INSTRUCTIONS
..............................................................................................4
USER INSTRUCTIONS
................................................................................................................5-22
Description of the Controls...............................................................................................5
Program Cycle Chart............................................................................................................6
Program Features...............................................................................................................7-8
Energy Savings Tips,Peekaboo Feature.............................................................................9
Moving the Facing Panel.....................................................................................................10
Detergents and Rinse Aids..........................................................................................11-12
Dish Loading Tips and Warnings................................................................................13-17
Cleaning and Maintenance
.................................................................................................18-19
Troubleshooting
.....................................................................................................................20-22
WARRANTY
............................................................................................................................................23
SERVICE
.....................................................................................................................................................24

S afety P ractices & P recautions
3
The appliance must be provided with an ground connection in accordance with the electrical safety
regulations in force. The manufacturer declines all responsibility for damage to persons or property
resulting from the failure to ground the appliance or from a defective ground connection. If the
appliance is not connected to the electrical power supply by means of a plug,it is necessary to install
an isolation switch with a contact opening gap of at least 3mm. If the appliance is installed on a
carpeted or covered floor,ensure that the openings on its underside are not obstructed.
• The NAME PLATE featuring the technical data, serial number and markings are visibly positioned
on the inner edge of the door.The name plate on the inner edge of the door must never be
removed.
• If the appliance is not connected to the electrical power supply by means of a plug,it is
necessary to install an ISOLATION SWITCH with a contact opening gap of at least 0.118 in.
• The PLUG on the power cord and the corresponding socket outlet must be of the same type,
and must conform to the regulations in force. Check that the voltage and frequency of the
electrical power supply match the ratings on the name plate. Avoid using adapters or shunt
connections.NEVER UNPLUG THE APPLIANCE BY PULLING THE POWER CORD.
• If the appliance is connected to a circuit protected by fuse,15 A FUSES have to be used.
• After installation, the plug must remain accessible.In the event of DAMAGE TO THE POWER
CORD,have it replaced by a qualified technician.After replacing the power cord,make sure that
the terminal block compartment cover is closed correctly.
• If the appliance is INSTALLED ON A C ARPETED OR COVERED FLOOR, ensure that the
openings on its underside are not obstructed.
• DO NOT leave the discarded packaging materials unsupervised within the home.
• Always switch off the dishwasher after each use to avoid wasting electricity.
• DO NOT use appliances which have been damaged during transit, if in doubt consult your dealer.
The appliance must be installed and connected in accordance with the instructions provided by
the manufacturer or by a qualified technician.
• DO NOT introduce solvents such as alcohol or turpentine which may cause an explosion.
• DO NOT load dishes that are soiled with ash,wax or paints.
• DO NOT lean or sit on the open door. This may cause the dishwasher to overturn.
• DO NOT drink the water residues which may be present inside the dishes or dishwasher at the
end of the washing program and before the drying cycle.
Obsolete appliances must be rendered unusable. Cut off the mains power cord after unplugging it
from the wall outlet,and make safe any components which might be dangerous for children (locks,
doors,etc.). The appliance must then be taken to a sor ted waste collection site. In the event of a fault,
disconnect the dishwasher from the electrical power supply and shut off the water tap. Then call a
qualified technician.
The appliance is intended for use by adults. Do not allow children to come near or play with the
dishwasher. Keep children away from detergents and from the open dishwasher door. The packaging
materials (plastic bags,polystyrene, metal bars,etc .) must not be left within the reach of children. Keep
children away from the open dishwasher. The appliance may contain residues of detergent which can
cause irreversible damage to the eyes,mouth, and throat,as well as possible death by suffocation.
I ns tallation I ns tructions
4
INSTALLATION AND HOOK UP
Remove the polystyrene basket retainers. Position the appliance in the desired place of installation.
The back or sides of the dishwasher may be placed up against walls or other furniture units. If the
dishwasher is installed near a heat source,fit the special insulating panel to prevent overheating and
malfunction of the appliance. To ensure stability, install integrated or built-under dishwashers only
under continuous countertops, and screw them to adjacent units. To facilitate the installation procedure,the intake and drain hoses can be positioned in any direction;make sure that the hoses are not
kinked,crushed or pulled too tightly. Level the appliance on the floor using its adjustable feet. This
operation is essential for ensuring correct operation of the dishwasher.
NOTE - Some models are equipped with only one adjustable foot at the rear,which can be adjusted by
turning the screw on the lower front part of the appliance.
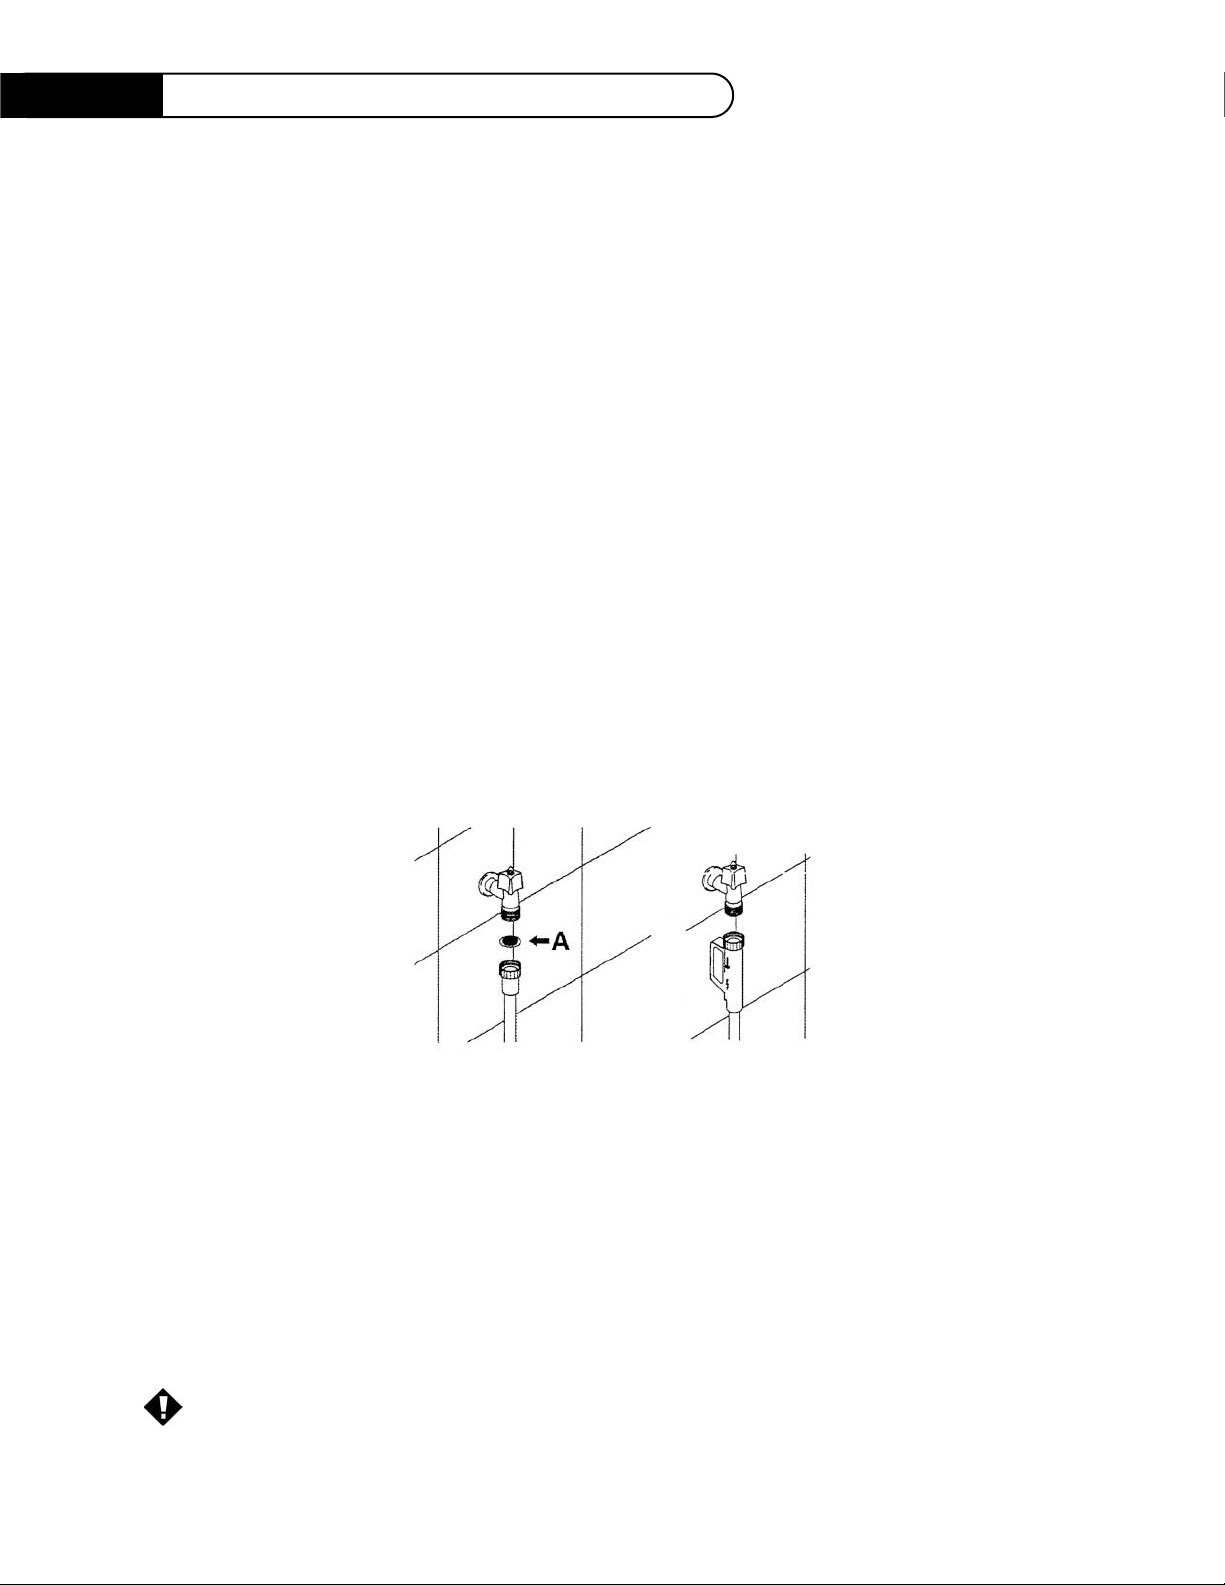
WATER SUPPLY CONNECTION
Connect the intake hose to a cold water supply with 3/4” gas thread.Inserting the filter A supplied
with the dishwasher, and taking care to screw it firmly into the tap. In dishwashers equipped with the
aquastop device,the filter is already fitted inside the threaded ring. The dishwasher can also be connected to a hot water supply not exceeding 140°F. Supplying the appliance with hot water cuts down
the washing time by approximately 20 minutes,but slightly reduces its effectiveness. Make the connection to the domestic hot water supply using the same procedure described for connecting to the cold
water supply.
DRAIN CONNECTION
Insert the dishwasher’s drain hose into a drain pipe having a diameter of at least 1-9/16 in., or alternatively, place it inside the kitchen sink using the plastic support provided,taking care not to crush or
excessively bend the hose. It is important to prevent the hose from coming loose and falling. For this
purpose, the plastic support is equipped with a hole for tying it to the pipe or water tap. The free end
should be positioned at a height of between 11-13/16 in.and 39-3/8 in., and should never be submerged
in water. If a horizontal drain extension hose is used (for a maximum of 9.84 ft.) the drain hose can be
placed at a maximum height of 33-7/16 in.from the ground.
CAUTION: Preventing the risk of clogging or damage: If the water pipe is new or has not been used
for a long period of time, before connecting to the water supply check that the water is
clear and free of impurities to prevent damage to the appliance.
Us er I ns tructions
5
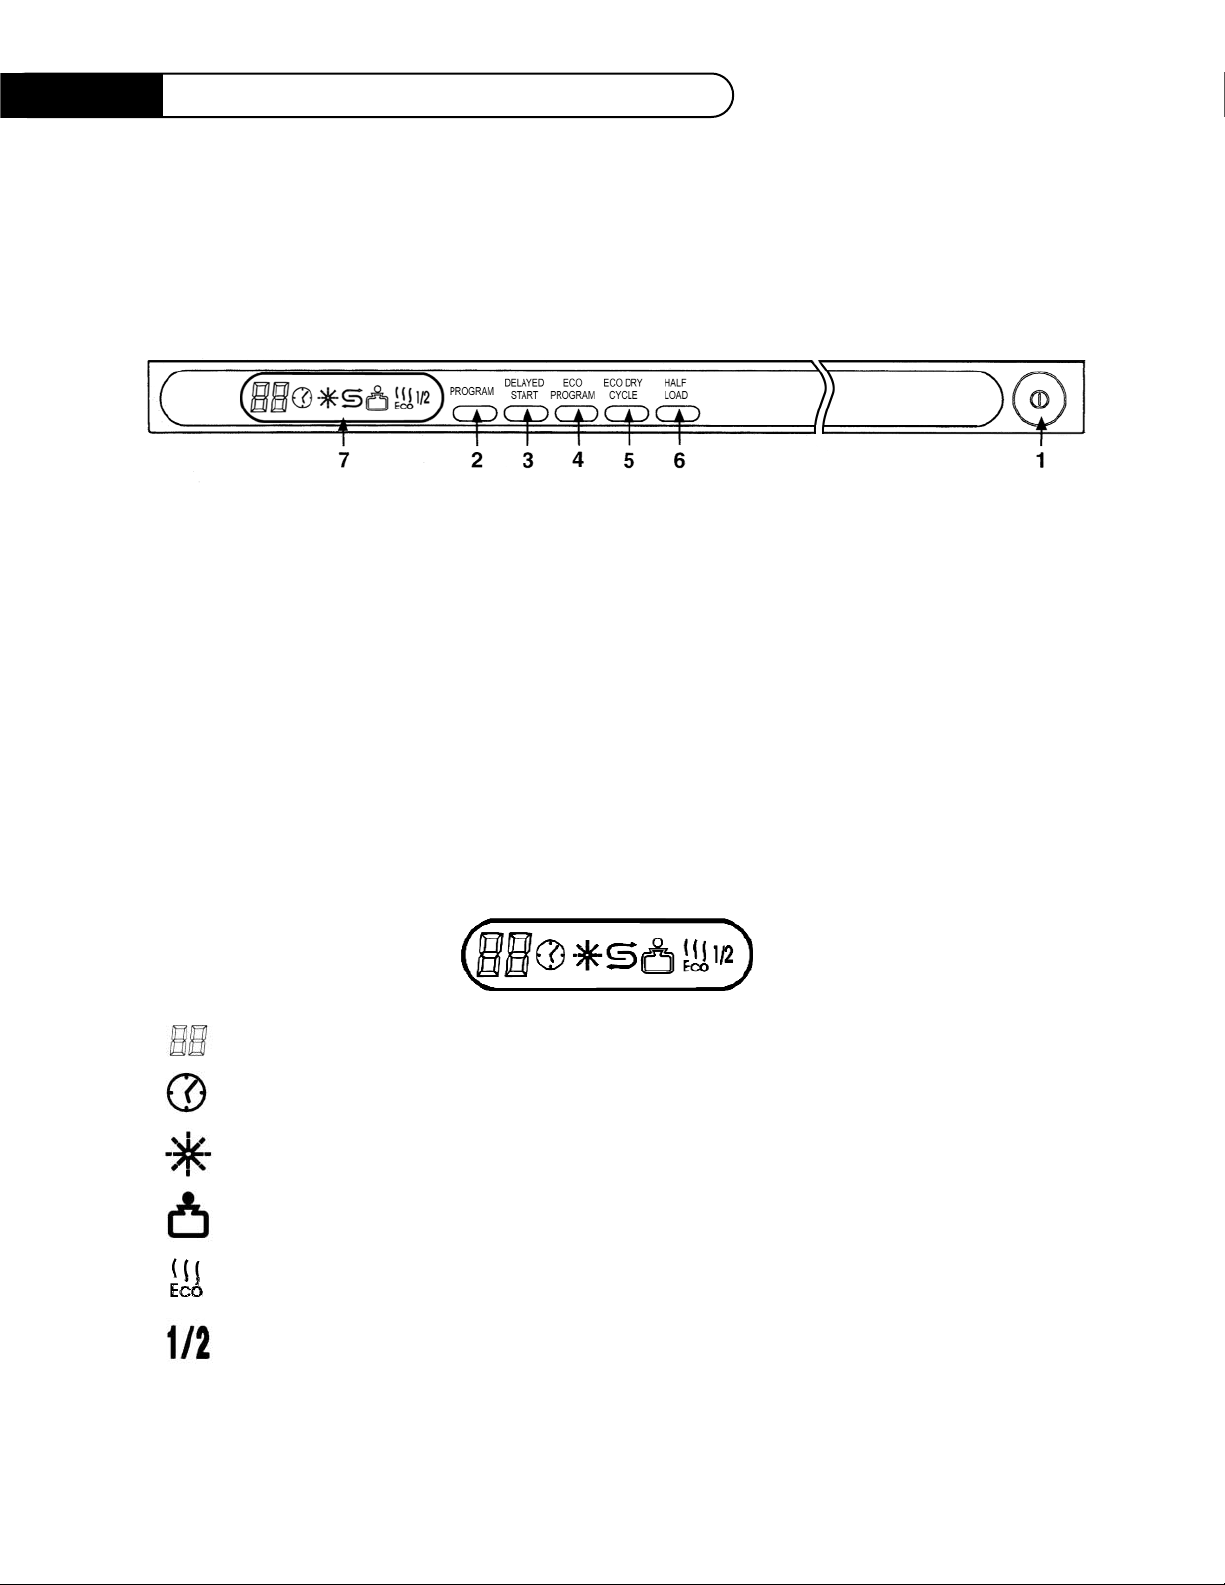
DESCRIPTION OF THE CONTROLS
Upper panel
All the dishwasher controls are grouped on the upper panel.
1 ON/OFF BUTTON
2 PROGRAM SELECTION BUTTON
3 DELAYED START BUTTON
4 ECONOMY PROGRAM SELECTION BUTTON
5 ECO DRYING CYCLE BUTTON
6 1/2 LOAD WASH SELECTION BUTTON (on some models only)
7 INFORMATION DISPLAY
INFORMATION DISPLAY
The dishwasher is equipped with a practical DISPLAY which provides information on the programmed
dishwasher functions.
CURRENT PROGRAM INFORMATION
(remaining time indication and warnings for the most common problems)
DELAYED START INDICATOR LIGHT
RINSE AID W ARNING LIGHT
ECONOMY PROGRAM SELECTION LIGHT
ECO DRYING CYCLE LIGHT (on some models only)
HALF-LOAD INDICATOR LIGHT (on some models only)
SETTING THE WASHING PROGRAM AND SWITCHING ON
To select the most suitable program for the dishes to be washed refer to the table below, which
indicates the most appropriate program according to dish type and degree of soiling.
6
After choosing the most suitable washing program using the table provided:
• Press the ON/OFF key (1) and wait for the information display (7) to come on.
• Press the Program selection button (2) several times, until the information display (7) shows
the number corresponding to the program of choice.
• Close the door; the machine will automatically begin the washing program after the sounding
of the acoustic device.
NOTE: “P0” on the display means than no washing program has been selected. This message remains
until the program selection button (2) is pressed;at this point the number of the last program
used will appear. Eac h time the button is pressed again, the program numbers will move on
from that point forward.
All programming operations are accompanied by a short confirmatory beep;if you do not hear
anything when you press a button,the function concerned is not available in the program selected.
Only run the soak program with half loads. The half load option (6) is available for all programs except
the soak program. Before starting program (8) check that the door of the detergent dispenser is open.
NOTE: The ECO dr ying c yc le option is available . This activates the ventilation system which allows the
dishes to be dried at lower temperatures (energy saving). With this option enabled, the
program takes longer
Us er I ns tructions
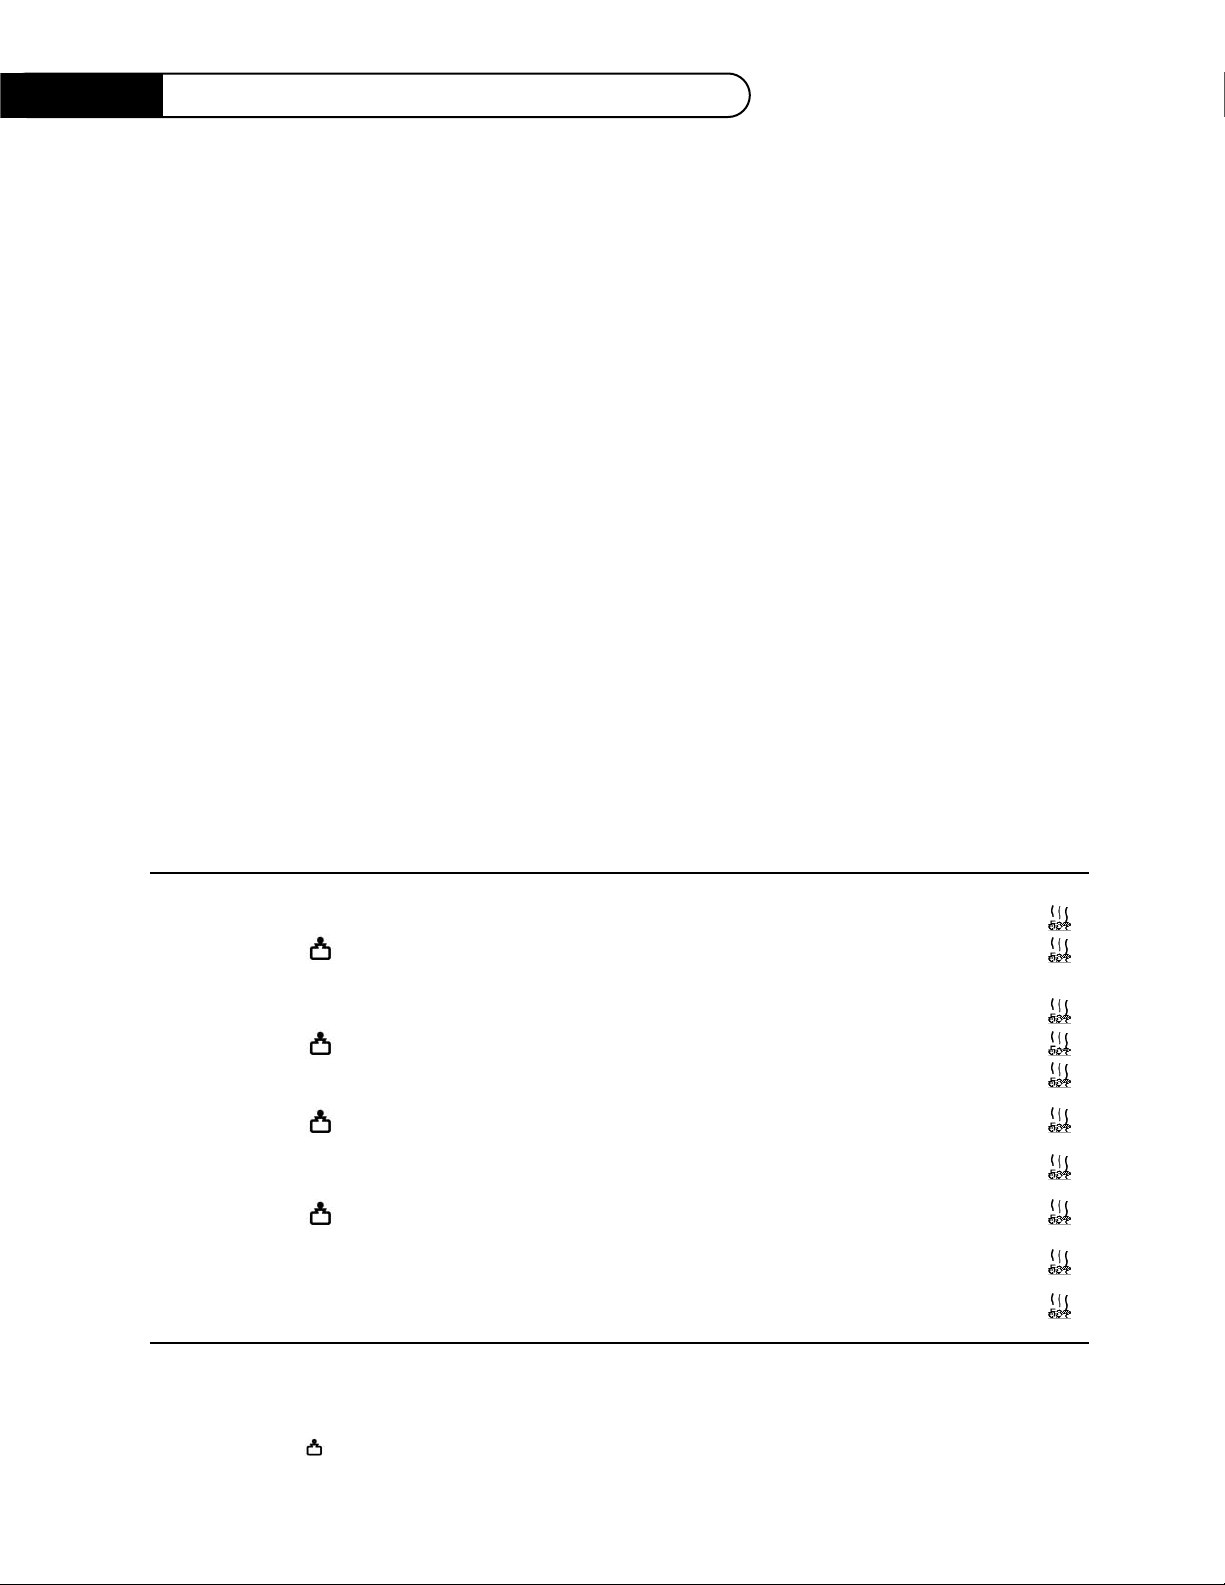
CYCLE N. ECO TYPE AND DEGREE AMOUNT OF PROGRAM SEQUENCE
BUTTON OF DIRT ON DISHES DETERGENT
TBS PREWASH WASH COLD RINSE HOT RINSE DRYING ECO DRYING
SOAK 1 - PANS AND DISHES PENDING - COLD - - - - DELICATE 2 - DISHES WITH LIGHT DIRT 1 - 113°F 1 149°F YES
DELICATE (ECO) 2 SLIGHTLY SOILED DELICATE ITEMS 1 - 113°F 1 131°F YES
LIGHT 3 - DISHES WITH LIGHT DIRT 1 - 113°F2 - - -
NORMAL 4 - NORMALLY SOILED PANS AND DISHES 1 COLD 149°F 1 149°F YES
NORMAL (ECO) 4 NORMALLY SOILED DISHES 1 - 149°F 1 149°F YES
ECO WASH 5 - NORMALLY SOILED PANS AND DISHES, 1 COLD 131°F 1 149°F YES
INCLUDING DRIED-ON RESIDUE
ECO WASH (ECO) 5 SLIGHTLY SOILED DISHES WITH 1 COLD 154°F 2 154°F YES
DRIED-ON RESIDUE
HEAVY 6 - VERY DIRTY PANS AND DISHES, 1 - 154°F 2 154°F YES
EVEN WITH DRIED-ON DIRT
HEAVY (ECO) 6 NORMALLY SOILED PANS AND DISHES 1 - 154°F 2 154°F YES
WITH DRIED-ON STARCH DEPOSITS
POTS N PANS 7 - HEAVILY SOILED PANS AND DISHES 1 113°F 158°F 2 154°F YES
WITH DRIED-ON STARCH DEPOSITS
RINSE 8 - DISHES THAT NEED “FRESHENING UP” - - - 1 149°F YES
(**)
PROGRAM CYCLE CHART
Only run the soak program with half loads.
The HALF LOAD option (6) is available for all programs except the soak program.
(*) Reference program as per EN 50242 standard (program recommended when using “new generation” detergents containing enzymes).
(**) Before starting program
8 check that the door of the detergent dispenser is open.
(
−) not present.
In programs containing the symbol,the ECO dr ying cycle option is available.This activates the ventilation system which allow the dishes to be dried at lower temperatures
(energy saving).With this option enabled, the program takes longer.
Please note that the amount of detergent suggested is to be used as guideline only. Please follow your packaging instructions.

7
DISABLING THE ACOUSTIC DEVICE
The dishwasher’s electronic system allows you to:
• Disable the acoustic device which confirms all dishwasher programming and operating steps.
• Adapt the dishwasher’s water filling system to the mains water pressure.
PROGRAMMING PROCEDURE:
• Press the PROGRAM SELECTION (2) and DELAYED START (3) buttons simultaneously for 3
seconds until the
DISPLAY (7) shows the symbol of the parameter to be modified.
• Press the
DELAYED START BUTTON (3) to modify the parameter.
• Press the
PROGRAM SELECTION BUTTON (2) to change the parameter for modification
and/or to exit from the procedure.
DISPLA Y P ARAMETER ADJUST ABLE V ALUE EFFECT
ACOUSTIC DEVICE 0 OFF
1ON
WATER PRESSURE 0 NORMAL
1LOW
Us er I ns tructions
TABLE FOR CERTIFICATION BODIES
Reference standard IEC 436 EN 50242
Reference program NORMAL program (4) (*) ECO BIO program (5)
Load 12 place-setting 12 place-setting
Type of detergent A B
Amount of detergent 1 tablespoon 1 tablespoon
Rinse aid setting Depending on the model 3/4 or 4/6
EN 50242
 Loading...