

Page 1

PROFESSIONAL DEL REY HEATER
Use and Care Guide and Installation Instructions
MODELS:
DCS-DRH48N
Page 2

Thank you for selecting DCS Professional Del Rey Heater. Because of this appliance’s unique features we
have developed this Use and Installation Guide. It contains valuable information on how to properly
operate and maintain your new appliance for years of safe and enjoyable use.
To help serve you better,please fill out and submit your Ownership Registration Card by visiting our website
at www.dcsappliances.com and selecting “Customer Service”on the home page and then select “Ownership
Registration” or submit the enclosed Ownership Registration Card to the address below. In addition, keep
this guide handy,as it will help answer questions that may arise as you use your new appliance.
For your convenience, product questions can be answered by a DCS Customer Care Center by phone:
1-888-396-2665 or by mail:
DCS
Attention: Customer Care Center
5800 Skylab Road
Huntington Beach, CA 92647
www.dcsappliances.com
PLEASE RETAIN THIS MANUAL FOR FUTURE REFERENCE.
A MESSAGE TO OUR CUSTOMERS
1
WAR NI NG
Improper installation, adjustment alteration, service or maintenance can
cause property damage, injury or death. Read the installation, operating and
maintenance instructions thoroughly before use, installing or servicing this
equipment. For outdoor use only.
WAR NING
Do Not store or use gasoline or any other flammable vapors and liquids in the
vicinity of this or any other appliance.
FOR YOUR SAFETY
IF YOU SMELL GAS:
1. Shut off gas to the appliance.
2. Extinguish any open flames.
3. If odor continues, immediately call your gas supplier.
Page 3

TABLE OF CONTENTS
2
SAFETY PRACTICES AND PRECAUTIONS ...................................................................................................3-4
CLEARANCES / INSTALLATION SPECIFICATIONS .................................................................................5-8
INSTALLATION...............................................................................................................................................................9-10
LEAK TESTING....................................................................................................................................................................11
LIGHTING INSTRUCTIONS........................................................................................................................................12
CARE AND CLEANING/ TROUBLESHOOTING ...........................................................................................13
SERVICING............................................................................................................................................................................14
GAS VALVE REPLACEMENT...............................................................................................................................15-16
HEATER ASSEMBLY PARTS LIST...........................................................................................................................17
WIRING DIAGRAM..........................................................................................................................................................18
WIRING SCHEMATIC .....................................................................................................................................................19
WAR RANT Y..........................................................................................................................................................................20
OBTAINING SERVICE.....................................................................................................................................................21
Page 4
When properly cared for, your Del Rey Heater will give safe, reliable service for many years.However,
extreme care must be used since the heater produces intense heat and can increase accident
potential. When using this appliance basic safety practices must be followed, including the
following:
Read this Care and Use Guide carefully and completely before using your heater to reduce the risk
of fire,burn hazard or other injury. Begin by ensuring proper installation and servicing. Do not repair
or replace any part of the heater unless specifically recommended in this manual. All other service
should be referred to a qualified technician.
WAR NING
Do not try lighting this appliance without reading the
“LIGHTING INSTRUCTIONS” section of this manual.
Do not use in an explosive atmosphere, keep heater away from areas where gasoline or other
flammable liquids or vapors are stored or used.
Before each use check for damaged parts such as hoses, or burner.
Do not attempt to alter unit in any manner.
It is imperative that the control compartment,burners, and circulation air passageways of the heater
must be kept clean. The heater should be inspected before each use, and at least annually by a
qualified service person, for the presence of spiders, webs or other insects. The burner area is a
common and desired spider haven.
INSECT WARNING
Spiders and insects can nest in the burner of this and any other heater. Spider
webs can present a dangerous condition which can damage the heater and
render it unsafe for use.
SAFETY PRACTICES AND PRECAUTIONS
3
Page 5

Children should not be left alone or unattended in an area where the heater is being used. Never
allow them to sit, stand or play on or around the heater at any time. When in use, portions of the
heater get hot enough to cause severe burns.
Never let clothing, or other flammable materials come in contact with or too close to any part of
heater or hot surface until it has cooled. Fabric may ignite and result in personal injury.
Begin by insuring proper installation and servicing. Follow the installation instructions provided
with this product. Have your heater installed by a qualified technician. Have the installer show you
where the gas supply shut off valve is located so that you know where to shut off the gas to the
heater. If you smell gas, your installer has not done a proper job of checking for leaks. If the
connections are not perfectly seated and tightened, you can have a small leak and therefore a faint
gas smell. Finding a leak is not a “do-it-yourself” procedure. Some leaks can only be found with the
heater in operation mode and for your protection it must be done by a qualified service technician.
Never use an open flame to locate leak.
Clean the heater with caution. Avoid steam burns; do not use a wet sponge or cloth to clean the
heater while it is hot. Some cleaners produce noxious fumes or can ignite if applied to a hot surface.
Be sure all heater controls are turned off and the heater is cool before using any type of aerosol
cleaner on or around the heater. The chemical that produces the spraying action could, in the
presence of heat, ignite or cause metal parts to corrode.
Do not operate the heater under unprotected combustible construction, maintain clearances. Use
only in well ventilated areas.
Keep the area surrounding the heater free from combustible materials, trash, or combustible fluids
and vapors such as gasoline or charcoal lighter fluid. Do not obstruct the flow of combustion and
ventilation air.
To avoid the risk of burns or accidental cloth ignition, do not touch the heater anywhere near the
burner assembly during operation.
Do not touch the burner assembly until after the heater has cooled.
Carefully monitor young children in the vicinity of any operating heater.
Do not hang clothing or any other flammable materials from, on, or near the heater.
All leak tests should be done with a soap solution. Matches should never be used for this purpose.
This outdoor heater is primarily for temporary heating of outdoor patios,decks, spas, pool,and work
areas.
SAFETY PRACTICES AND PRECAUTIONS
4
Page 6

00INSTALLATION
MINIMUM CLEARANCES TO COMBUSTIBLE MATERIAL.
CLEARANCES/INSTALLATION SPECIFICATIONS
5
Side View
Combustible
Surface
14"
(MIN)
Utilize 2
bolts (min)
per bracket.
Gas Pipe
(installer supplied)
1/2" Conduit
(installer supplied)
Drip Leg
7-3/4"
Gas Shut-off
Valve
(installer supplied)
Utilize 2
bolts (min)
per bracket.
Four Bolts Two
On Each Side
(installer supplied)
96"
(MIN)
10-1/4"
FLOOR
21"
(MIN)
Page 7
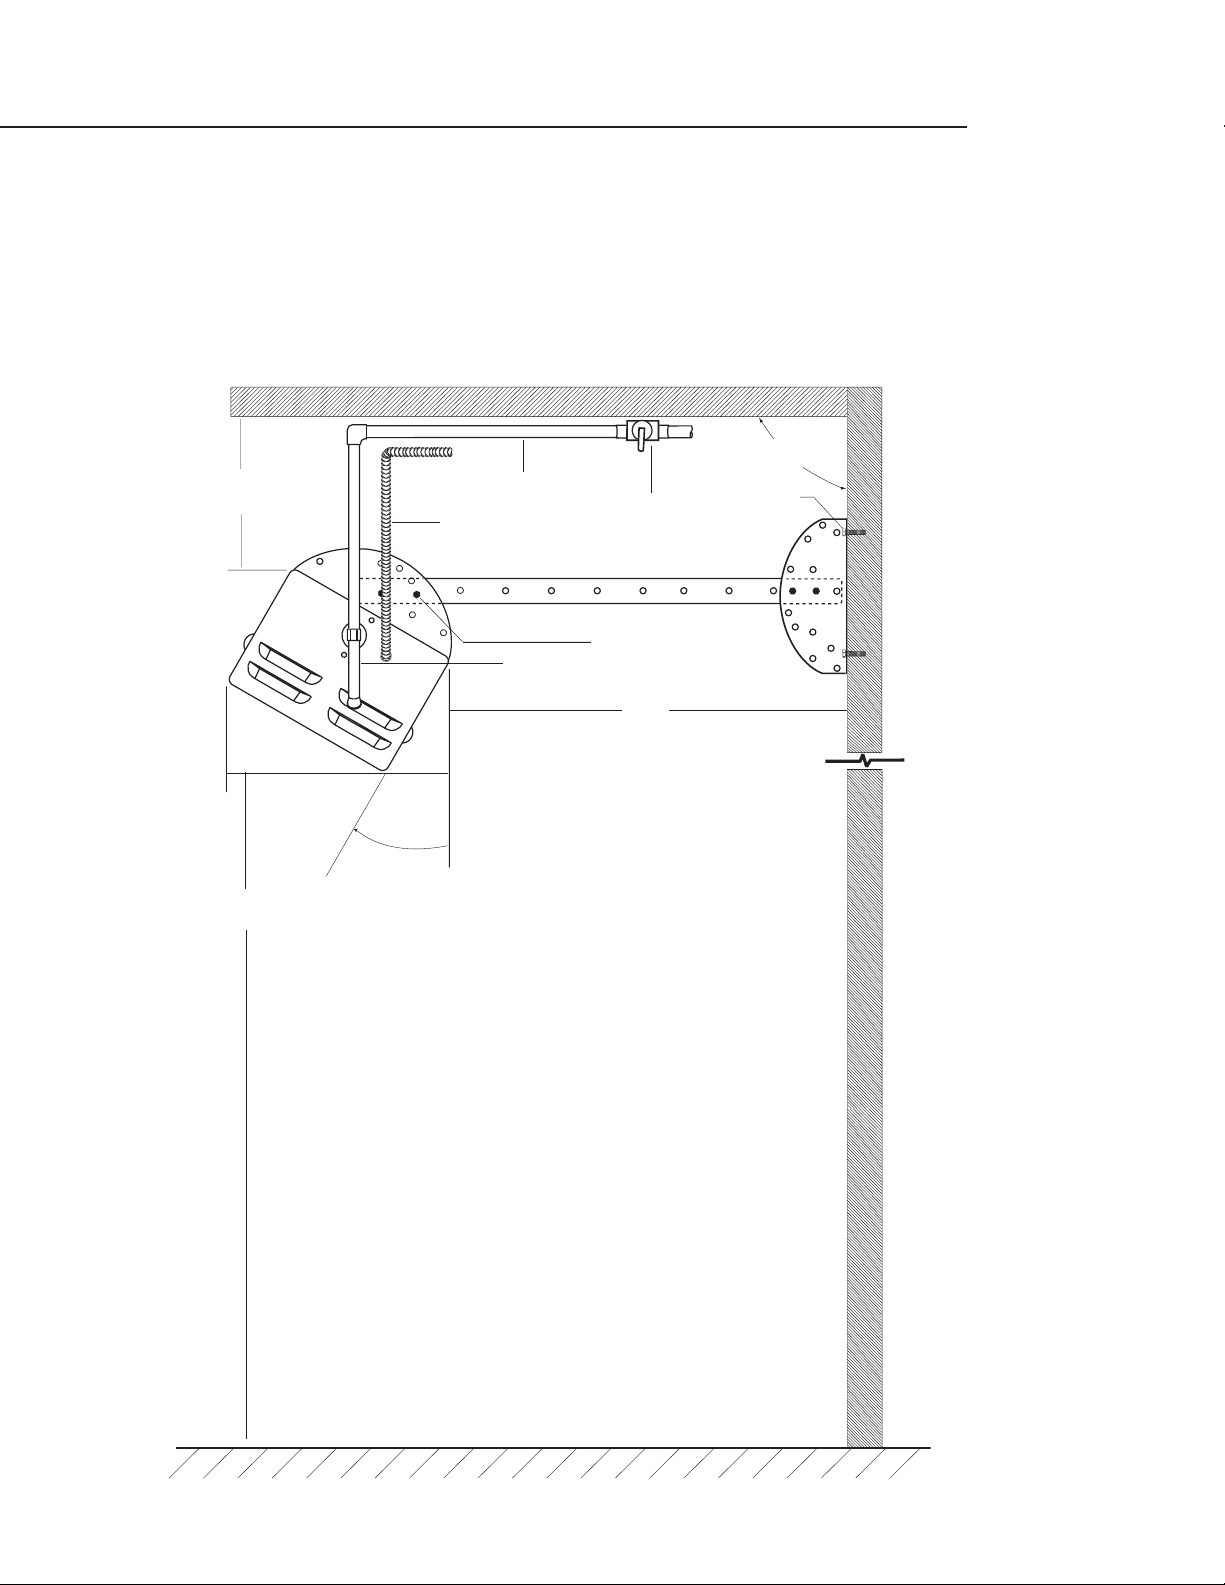
CLEARANCES
6
300INSTALLATION
MINIMUM CLEARANCES TO COMBUSTIBLE MATERIAL.
Note: Mounting channels can be hacksawed 13” for use in 300installations.
SIDE VIEW
23"
min.
1/2" Conduit
(installer supplied)
Gas Pipe
(installer supplied)
Drip Leg
Gas Shut-off
Val ve
(installer supplied)
Utilize 2
bolts (min)
per bracket.
Combustible
Surface
4 bolts per
bracket
(installer supplied)
96"
Min
30
max.
10"
0
FLOOR
Page 8

CLEARANCES
7
00INSTALLATION (MINIMUM CLEARANCES TO NON-COMBUSTIBLE MATERIAL).
00& 300INSTALLATION (MINIMUM CLEARANCES TO COMBUSTIBLE MATERIAL).
Front View
Wall
(Combustible
Surface)
Heater Mounting
Body Assy.
Wall
(Combustible
Surface)
18"
min
48"
18"
min
SIDE VIEW
Four Bolts
Per Bracket
Utilize 2
bolts (min)
per bracket.
Make sure heater is level
(see warning on page 9)
Gas Pipe
(installer supplied)
Drip Leg
Non Combustible
Gas Shut-off
Val ve
(installer supplied)
1/2" Conduit
(installer supplied)
Surface
96"
min.
FLOOR
Page 9

CLEARANCES
8
300INSTALLATION
MINIMUM CLEARANCES TO NON-COMBUSTIBLE MATERIAL.
SIDE VIEW
Four Bolts
Per Side
30
0
96"
min
Utilize 2
bolts (min)
per bracket.
30
max.
(installer supplied)
Drip Leg
0
Gas Pipe
(installer supplied)
1/2" Conduit
(installer supplied)
Non Combustible
Surface
Gas Shut-off
V alve
FLOOR
Page 10

INSTALLATION
9
INSTALLATION:
The Del Rey Heater provides radiant warmth *indoors (commercial applications only) or outdoors with
a powerful 58,000 Btu/hr natural gas. All units are equipped with hot surface ignition and 100%
shutoff valve for safety. Del Rey Heaters to be installed in Aircraft Hangers must be installed in
accordance with American National Standards for Aircraft Hangers, ANSI/NFPA No.409. Heaters to be
installed in public garages must be installed in accordance with NFPA No. 88A standards for parking
structures. Heaters must be installed so that minimum clearances marked on the heater will be
maintained from vehicles parked below the heater.
The installation must conform with ANSI standard No. Z223.1 National Fuel Gas Code and any
applicable local codes. In Canada, the installation must conform with local building codes or, in the
absence of local codes, with National Standards of Canada CAN/CGA-B 149.1 & 2-M86. Each heater
must be electrically grounded in accordance with the National Electrical Code,ANSI/NFPA 70 when an
external electrical source is utilized. In Canada, the CSA Canadian Electrical Code,C22.1, Part 1 applies.
The gas inlet supply and normal operating manifold pressure for each heater are as follows. For gas
supply line pressures in excess of 1/2 psig,contact your dealer or the factory.
GAS INLET PRESSURE
maximum: pressure Natural Gas: 1/2 psig
minimum: pressure Natural Gas: 6 W.C.
manifold: pressure Natural Gas: 5 W.C.
The heater has an internal 5”W.C. regulator.
Note: This unit is for use with natural gas only.
WAR NING:
1. This product must be installed by a licensed plumber or gas fitter when
installed within the Commonwealth of Massachusetts.
2. When installing Mounting Body Assembly, make sure left hand and right
hand Body Assembly are level. If not, escaping heat could easily cause damage
to the components inside the compartment.
Page 11

INSTALLATION
10
Do not locate either the gas or electrical supply line directly over the flue outlet of the heater. Electrical
supply line shortage and / or control overheating may occur. The heater must be installed in a location
such that it is accessible for servicing and have no restriction of air flow to the air inlet of the heaters
casing.
MOUNTING
Each heater must be installed such that the minimum clearance to combustibles are maintained.
Combustible materials are defined as wood,paper,foliage, plastic, plexiglass or other materials capable
of being ignited and burned. Such materials shall be considered combustible even though flameproofed, fire retardant treated or plastered. Additional clearances may be required for glass, painted
surfaces and other materials which may be damaged by radiant or convection heat.
ELECTRICAL
A 24 VAC, 40 VA transformer has been included with the product. The on-off control of the heater
should be controlled from 120 VAC side of the transformer. A UL approved outdoor wall switch must
be used for this purpose. The transformer must be mounted a minimum of 12” from the heater in a
weather protected cover. Do not put the transformer in the heater (this will damage the unit.) A step
down transformer approved as having at least a 40 VA rating must be utilized for each connected
heater. Control wires used to electrically connect one or more heaters together must have both
adequate capacity and insulation temperature ratings for the total connected load. Use at least 18 ga.
wire up to 50 ft. from heater to transformer or wall switch. Use 16 ga. over 50 ft.distance. If the original
wires supplied should need replacement, they must be replaced with wiring material having a
temperature rating of at least 105 degrees Centigrade.
GAS PIPING
A minimum pipe size of 1/2”is required for inlet piping. A 1/2”lever
handled shut-off gas cock should be installed within 6 feet of the
appliance for servicing the unit. Check with local and state
plumbing and heating codes regarding sizing of the gas lines.
Installation of a drip leg in the gas supply line going to each heater
is required to minimize the possibility of any loose scale or dirt
within the gas supply line from entering the heater’s control
system.
1/2" Conduit
Page 12

LEAK TESTING
11
IMPORTANT:
VENTILATION
A minimum building ventilation rate of 4 CFM per 1,000 BTU’s of installed heater input must be
provided. This rate of ventilation may be obtained through either gravity or mechanical ventilation of
the building. In conjunction with building ventilation system,adequate fresh air into the building must
be provided through fresh air inlets and/or building inlets. It is recommended local code be checked
to assure the ventilation system and heat installation are in compliance with local and/or state codes.
When checking for gas leaks, do not use an open flame. Use a soap and water solution. Installation of
1/8”NPT plugged tapping, accessible for test gage connections, is required upstream of the gas supply
connection to the heater.
NOTE: Gas connections on the heater are leak tested at the factory prior to shipment.
PRECAUTIONS:
Periodically check the whole gas system for leaks or immediately check if the smell of gas is
detected. Extinguish all open flames.
Never leak test while smoking.
Do not use heater until all connections have been leak tested and do not leak.
When leak testing, refer to the connections diagrams.
Only those parts recommended by the manufacturer should be used.
Substitution can void warranty.
LEAK TEST:
Make a soap solution of one part liquid
detergent, and one part water. The soap
solution can be applied with a spray bottle,
brush or rag, soap bubbles will appear where a
leak is present.
Turn the gas supply “ON”check for leaks at leak
points. If a leak is present, turn off supply,
tighten any leaking fittings, turn gas on and
recheck.
Note: There is a manual shut-off lever on
the internal heater control valve/regulator. This lever is shipped in the
“ON” position (Default position).
"OFF"
"ON" POSITION
FACTORY DEFAULT
Page 13

LIGHTING/OPERATION INSTRUCTIONS
12
LIGHTING INSTRUCTIONS
Upon installation of the heater and completion of the gas line and electrical supply to each heater,
follow the steps below for Lighting Instructions. Lighting instructions are also provided on the control
panel of the heater.
Turn gas and power to “ON”.The igniter should light within the first 4 seconds. If not, the electrode
sensor will shut off the hot surface igniter. The igniter will attempt to light 3 times before “locking out”.
During initial installation, this will happen if the gas line is not purged. To reset the control,shut off the
power to the unit and wait 5 seconds. Turn power back to “ON” position. This will allow for 3 more
lighting attempts.
TO START HEATER
1. Turn manual gas valve to “ON”position.
2. Turn electrical supply “ON”.
TO SHUT DOWN HEATER
1. Turn electrical supply “OFF”.
2. Turn manual gas valve to “OFF”position.
WARNING
If burner fails to ignite, shut down electrical power and wait 5 minutes before
turning power “ON” to allow any gas to dissipate.
Page 14

CARE & CLEANING / BASIC TROUBLESHOOTING
13
CARE AND CLEANING
To k eep your Del Rey Heater in maximum performance, we recommend the following to be perform
annually.
1. With an air hose regulated to 30 psig,blow off any dust and dirt that has accumulated
around the burner and inside the control compartment of the heater. Proper eye protection
required.
2. From the front of the heater, direct the air hose from a distance of approximately 12 inches
over the entire exposed area of each burner's ceramics.
3. Do not insert air hose into the inlet of the burner.
4. Remove main burner orifice, clean and re-install.
5. Check to insure heater is securely mounted and the clearance from combustible materials
is maintained.
6. If additional service to the heater is required contact your local dealer or the factory.
BEFORE CALLING FOR SERVICE – BASIC TROUBLESHOOTING
If no glow from hot surface igniter:
a) Check power supply, should have 24 volts between power wires. Use volt meter between
inlet wire and ground terminal inside heater control box to measure 24 volts.
b) Check continuity by using an ohmmeter. Check resistance between valve wire and ground.
Ohmmeter should read almost no resistance or (# ohms) through valve. If high resistance,
check wire connectors.
c) Be sure connectors are fully inserted into ignition control.
If insufficient gas flow:
a) Manual gas valve not fully to “ON” position. Turn valve handle to full “ON”position. Also
ensure internal lever is in the “ON”position (as shown on page 11).
b) Burner orifice plugged. Remove service panel, remove burner orifice (7/16” wrench) and
thoroughly clean. Insects may crawl into orifice hole and block the orifice.
Page 15

SERVICING
14
REMOVAL OF BURNER
Turn off gas and electrical before attempting any service to this appliance. Heater may be serviced by
following instructions below:
a. Remove the four screws on the control service panel.
b. Remove the hex nut that is holding the orifice fitting to the infrared burner’s bracket.
c. Remove the burner windscreen by removing the screw on the windscreen’s frame. Then pull
the windscreen down and slowly slide it out.
d. Remove the collector box, then loosen both screws on the igniter and the electrode sensor.
e. Last, pulling infrared burner out of the heater, extreme care should be taken.To prevent the
burner from contacting the fragile electrode sensor or the igniter when removing or
reinstalling the burner. Unscrew the four screws that are holding the infrared burner to the
burner and channel baffles. Remove the four screws holding the burner in place. Be careful
not to let the burner fall out.
f. Lift up the left side of the infrared burner by the burner channel and slide it out of the heater.
g. To r einstall burner, reverse procedure.
Page 16

GAS VALVE REPLACEMENT
15
Turn off gas supply.
Turn off electrical supply.
Disconnect gas & electrical supply.
Remove unit from hangers.
Remove screws securing the rear panel and remove the panel.
Use a 7/8” open end wrench to hold orifice nut.
Remove the existing black pipe and install it in the new valve.
Reverse disassembly order to install new valve.
Page 17

GAS VALVE REPLACEMENT
16
Reinstall (4) screws securing valve to case.
Re-connect leads to valve.
Be sure valve switch is on (in the up position).
The transformer must be mounted outside of unit to protect it from the heat and ensure long service
life. Refer to page 10.
Do not install transformer inside unit.
Page 18

HEATER PARTS LIST
17
ITEM DESCRIPTION PART NO.
1) Wall Plate R/H 22019
2) Mounting Channel 22014
3) Body Plate R/H 22012
4) Screws 15001-26
5) Back Panel 22002
6) Wall Plate L/H 22019
7) Mounting Channel 22014
8) Body Plate L/H 22012
9) Collector Box 22016
10) Mini Ingiter 16325
11) Control Valve 18270
12) Ignition Module Cover 22022
13) Remote Sensor Bracket 22015
ITEM DESCRIPTION PART NO.
14) Remote Sensor 13055-5
15) Ignition Module 18271
16) Wiring Harness 18272
17) Service Panel 22006
18) Frame Windscreen Bottom 22007-02
19) Frame Windscreen Top 22007-01
20) Egg Crate 22010
21) I/R Burner 18227
22) Transformer 16381
23) Nipple Blk 1/2 NPT x 3-1/4 18018-21
24) Reducer 1/2 x 3/8 NPT 18130
25) Orifice Fitting 13024
26) Orifice Spud Type #29 13025-29
27) Flue Spacer 22003
1
2
4
27
3
5
9
10
4
7
19
21
18
20
17
13
14
15
26
25
23
12
16
8
24
11
22
6
Page 19

WIRING DIAGRAM
18
969 FIG09.EPS
Valve
Ground
2
4
3
1
2
6
17
IGNITION MODULE
ELECTRODE SENSOR
MINI IGNITER
120 VAC
120 VAC
24 VAC
60 Hz
60 Hz
NOTE:
1. PURPLE, FLAME SENSE (ELECTRODE SENSOR)
2. GREEN, GROUND
3. BLUE, TO VALVE HOT (LOCATION 1)
4. ORANGE, THERMOSTAT
5. KEY
6. BLACK, L1-24 VAC
7. RED IGNITER
Page 20

19
WIRING SCHEMATIC
PURPLE
BL
BK
YELLOW
WT
YELLOW
BK
RED
Page 21

20
WARRANTY
LENGTH OF WARRANTY
This warranty applies to appliances used in residential and commercial applications.
One (1) Year Full parts and Labor Covers the entire product.
Five (5) Year limited warranty on all stainless steel components (not including surface corrosion and
discoloration).
DCS WILL COVER:
All repair labor and parts found to be defective due to materials or workmanship for one full year from
date of purchase. Service must be provided by an Authorized Factory Service Agent during normal
working hours.
DCS WILL NOT COVER:
Installation or start-up
General maintenance
Shipping damage
Service by an unauthorized agency
Damage or repairs due to service by an unauthorized agency or the use of unauthorized parts.
Service during other than normal working hours
Improper installation, such as improper hook-up,etc.
Service visit to teach you how to use the appliance;correct the installation; reset circuit breakers
or replace home fuses
Repairs due to other than normal household use.
Damage caused from accident,abuse, alteration,misuse, incorrect installation or installation not
in accordance with local codes
This warranty is for products purchased and retained in the 50 states of the U.S.A., the District of
Columbia and Canada. This warranty applies even if you should move during the warranty period.
Should the appliance be sold by the original purchaser during the warranty period, the new owner
continues to be protected until the expiration date of the original purchaser’s warranty period.
This warranty gives you specific legal rights. You may also have other rights which vary from state to
state.
Page 22

21
SERVICE
HOW TO OBTAIN SERVICE:
For warranty service, please contact your local service provider or DCS Customer Care Center at
(888) 281-5698, Monday thru Friday, 6:00 am – 4:30 pm PST. Before you call, please have the
following information ready:
Model Number
Serial Number
Date of installation
A brief description of the problem
Your satisfaction is of the utmost importance to us. If a problem cannot be resolved to your
satisfaction, please write:
Write:
DCS
Attention: Customer Care Center
5800 Skylab Road
Huntington Beach, CA 92647
www.dcsappliances.com
BEFORE YOU CALL FOR SERVICE:
1. Is the circuit breaker tripped or the fuse blown?
2. Is there a power outage in the area?
3. Check power to transformer (circuit breaker tripped).
4. Check for any sounds like clicking or humming coming from the heater unit with power
turned on.
5. Make sure all gas valves are in the open position.
6. Is there a windy condition not allowing the unit to light?
7. Turn off the power supply for 5 minutes and restart.
Page 23

NOTES
22
Page 24

NOTES
23
Page 25

NOTES
24
Page 26

5800 Skylab Road, Huntington Beach, CA 92647
Tel:714.372.7000 • Fax: 714.372.7001
Customer Care Center: (888) 281-5698
www.dcsappliances.com
As product improvement is an ongoing process at DCS, we
reserve the right to change specifications or design without
notice.
P/N 10955 Rev.B
Litho in USA 01/2004
 Loading...