

Page 1
PROFESSIONAL DROP-IN COOKTOPS
• 36” – 5 BURNER COOKTOP
• 30” – 4 BURNER COOKTOP
Use and Care Manual
MODELS:
CTD-365 (shown)
CTD-304
Page 2

Page 3

A MESSAGE TO OUR CUSTOMERS
hank you for selecting this DCS Professional Drop-In Cooktop. Because of this appliance’s unique features we
T
have developed this Use and Care Manual. It contains valuable information on how to properly operate and
aintain your new appliance for years of safe and enjoyable cooking.
m
To help serve you better, please fill out and submit your Ownership Registration by visiting our website at
www.dcsappliances.com and selecting “Customer Service” on the home page and then select “Ownership
Registration” or submit the enclosed Ownership Registration Card to the address below. In addition, keep this
manual handy, as it will help answer questions that may arise as you use your new appliance.
For your convenience, product questions can be answered by a DCS Customer Care Representative
by phone: 1-888-281-5698 , email: support@dcsappliances.com,
or by mail:
Fisher & Paykel Appliances, Inc.
Attention: DCS Customer Care
5900 Skylab Road
Huntington Beach, CA 92647
www.dcsappliances.com
NOTE: Please write the Model and Serial Number on this page for references (located at the bottom of the
chassis, right corner).
MODEL NUMBER
SERIAL NUMBER
WARNING
Improper installation, adjustment alteration, service or maintenance can cause property damage, injury or death.
Read the installation, operating and maintenance instructions thoroughly before use, installing or servicing this
equipment.
WARNING
e or use gasoline or any other flammable vapors and liquids in the vicinity of this or any other appliance.
Do Not st
or
DANGER
ou smell gas:
f y
I
1 Do not turn on any electrical switch; do not use any phone in your building.
Immediately call your gas supplier from a neighbor’s phone. Follow the gas supplier’s instructions.
2.
3. If you cannot reach your gas supplier, call the fire department. Installation and service must be performed by a
qualified installer, service agency or the gas supplier.
PLEASE RETAIN THIS MANUAL FOR FUTURE REFERENCE.
1
Page 4

TABLE OF CONTENTS
SAFETY PRACTICES AND PRECAUTIONS 3-5
COOKTOP USE 6-7
Control Knobs 6
Cooking Utensils 6
Burners 6
Electronic Igniters 7
Burner Efficiency 7
Flame Height 7
Burner Grates 7
CARE AND MAINTENANCE 8-9
Cleaning the Cooktop 8
Cleaning the Burner Grates 8
Cleaning the Burners 9
Cleaning the Igniters 9
PRODUCT MEASUREMENT SPECIFICATIONS 10-11
SERVICE 12
WARRANTY 13-14
2
Page 5

SAFETY PRACTICES & PRECAUTIONS
When properly cared for, your new DCS Appliance has been designed to be a safe, reliable cooking appliance.
When using this restaurant caliber appliance, use it with extreme care, as this type appliance provides intense
eat and can increase the accident potential. Basic safety precautions must be followed when using kitchen
h
appliances, including the following:
■
Read this Use and Care Manual thoroughly before using your new appliance. This will help to reduce the risk of
fire, electric shock, or injury to persons.
■
Begin by insuring proper installation and servicing. Follow the installation instructions which came with this
appliance. Be sure to have a qualified technician install and ground this appliance before using.
■
Have the installer show you where the gas supply shut-off valve is located so you will know how and where to
turn off the gas to the appliance.
■
If you smell gas, the installer has not done a proper job of checking for leaks. You can have a small leak and
therefore a faint gas smell if the connections are not completely sealed. Finding a gas leak is not a
“do-it-yourself” procedure. Some leaks can only be found with the burner control in the ON position and for your
protection it must be done by a qualified service technician.
■
If by some chance a burner goes out and does not re-ignite and gas escapes, open a window or a door to let the
room air out. Do not attempt to use the appliance until the gas has had time to dissipate.
■
This appliance has been factory assembled for Natural Gas or Liquid Propane as indicated by the model number.
■
Do not repair or replace any part of this appliance unless it is specifically recommended in this manual. All other
servicing should be referred to a qualified service technician.
WARNING:
Children should not be left alone or unattended in an area where appliances are in use. They should never be
wed to turn knobs, push buttons, sit or stand on any part of an appliance.
allo
WARNING:
Do not store items of interest to children on or ar
ould be seriously injured if they should climb onto or reach across the appliance to reach these items.
en c
Childr
■
Never store anything on the cooktop. Flammable materials can accidentally catch fire, plastic items may melt or
ignite and other types of items could be ruined.
■
Do not hang articles from any part of the appliance. Some fabrics are quite flammable and may catch on fire.
■
If the appliance is near a window be certain the curtains do not blow over or near the cooktop burners; they
could catch on fire.
■
Never let clothing, pot holders, or other flammable materials come in contact with, or too close to any burner or
burner grate until it has cooled. Fabric may ignite and result in personal injury.
ound the Drop-In Cooktop.
3
Page 6

SAFETY PRACTICES & PRECAUTIONS
■
Be certain to use only dry pot holders; moist or damp pot holders on hot surfaces may cause burn injury from
team. Do not use a towel or other bulky cloth in place of pot holders. Do not let pot holders touch hot burners,
s
or burner grates.
■
For personal safety, wear proper apparel. Loose fitting garments or hanging sleeves should never be worn while
using this appliance. Some synthetic fabrics are highly flammable and should not be worn while cooking.
■
Do not use aluminum foil to line any part of the cooktop. Using a foil liner could result in a
fire hazard.
WARNING:
This appliance is for cooking. Based on safety considerations, never use the cooktop to warm or heat a room.
WARNING:
When using the cooktop: Do not touch the burner grates or the immediate surrounding area. Areas adjacent to the
burners may become hot enough to cause burns.
■
Never leave the cooktop unattended when using high flame settings. A possible boil over could cause smoking
or greasy spill overs may ignite. More importantly, if the burner flames are smothered by a severe boil over
which effects the igniter, the unburned gas will escape into the room, which would be extremely dangerous.
■
Only certain types of glass, heat-proof glass-ceramic, ceramic, earthen ware, or other glazed utensils are suitable
for use on the open flame of the cooktop. Utensils that are not thermally heat safe may break with sudden
temperature changes.
■
Do not heat unopened food containers; a build up of pressure may cause the container to burst.
■
During cooking, set the burner control so that the flame heats at the bottom of the pan and does not curl
around the bottom edges of the pan. This could heat and/or melt the handles.
■
Always use utensils that have flat bottoms large enough to cover the burner. The use of undersized utensils will
expose a portion of the flame to direct contact and may result in ignition of clothing.
■
To minimize burns, ignition of flammable materials and accidental spill overs, position handles of utensils inward
so they do not extend over adjacent work areas, cooking areas, or the outside edges of the cooktop.
■
Hold the handle of the pan to prevent movement of the utensil when stirring or turning food.
■
Grease is flammable. Do not use water on grease fires. Turn OFF the burner, then smother the fire with baking
soda or use a dry chemical or foam-type fire extinguisher. Let hot grease cool before attempting to handle it.
Avoid letting grease deposits collect around the base of the cooktop burners. Clean after each use or boil over.
■
Use splatter screens over pans when frying foods to minimize possible grease burns. Be sure not to use a flame
that is too high.
■
For proper lighting and performance of the cooktop burners, keep the burner ports clean. It may be necessary to
clean these when there is a boil over or when the burner does not light, even though the electronic igniters
click.
■
Clean the cooktop with caution. Avoid steam burns; do not use a wet sponge or cloth to clean the cooktop while
it is hot. Some cleaners produce noxious fumes if applied to a hot surface. Follow directions provided by the
cleaner manufacturer.
4
Page 7
SAFETY PRACTICES & PRECAUTIONS
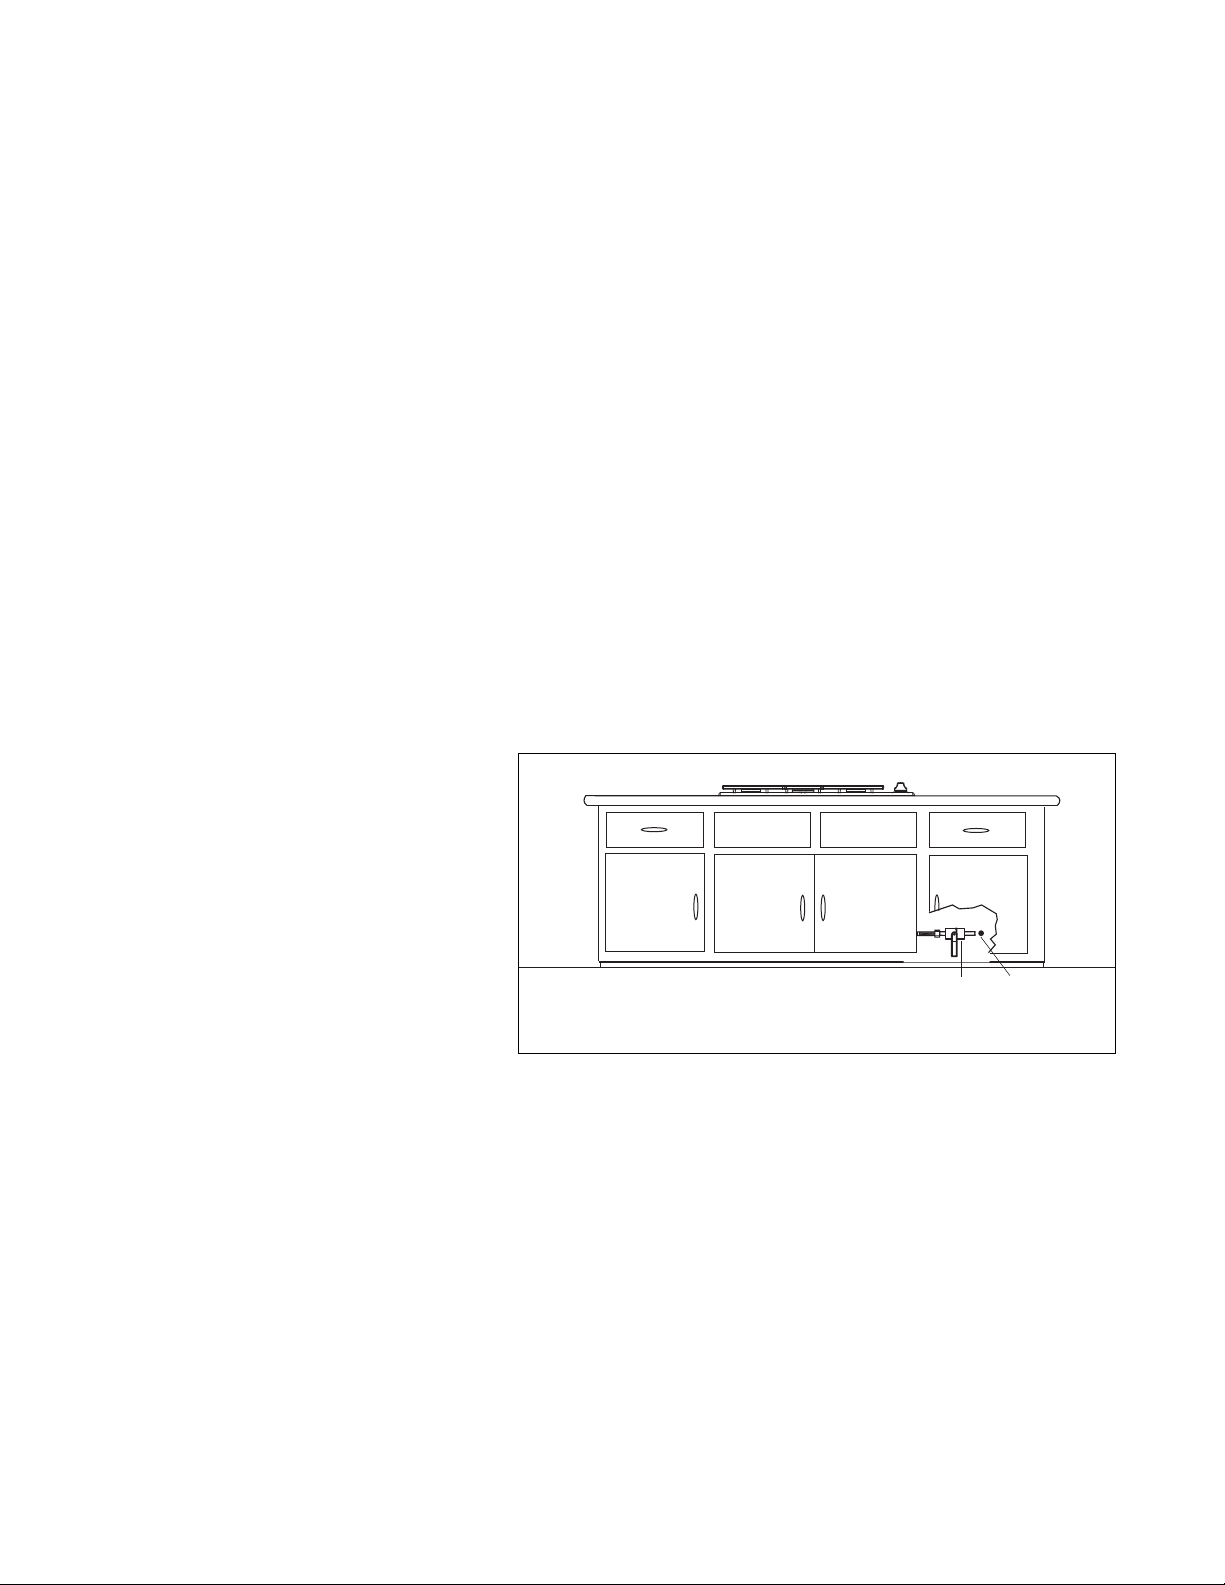
Installer supplied
shut-off valve
must be easily
accessible inside
cabinetry.
Gas Supply
■
Be sure all the cooktop controls are turned off and the appliance is cool before using any type of aerosol cleaner
on or around the appliance. The chemical that produces the spraying action could, in the presence of heat,
ignite or cause metal parts to corrode.
■
Clean the ventilator hood and filters above the cooktop frequently so grease from cooking vapor does not
accumulate.
■
Turn the ventilator OFF in case of fire. The blower, if in operation, could unsafely spread the flames.
■
Do not obstruct the flow of combustion or ventilation air to the appliance. Be sure a fresh air supply is available.
■
For safety reasons and to avoid damage to the appliance never sit, stand, or lean on the cooking surface.
■
Service should only be done by authorized technicians. Service technicians must disconnect the power supply
before servicing this appliance.
■
California Proposition 65 - Warning: The burning of gas cooking fuel generates some by-products which are
known by the State of California to cause cancer or reproductive harm. California law requires businesses to
warn customers of potential exposure to such substances. To minimize exposure to these substances, always
operate this unit according to the instructions contained in this booklet and provide good ventilation to the
room when cooking with gas.
Note:
This product must be installed by a licensed plumber or gas fitter when installed within the Commonwealth of
Massachusetts.
5
Page 8
COOKTOP USE
CAUTION:
For warranty coverage, DCS requires that burner adjustments be made by a qualified technician at the time of installation. Extreme care should be used when adjustments are made after installation.
CONTROL KNOBS:
The control knobs and knob bezels are readily associated with the burners they control and are located on the
right hand side of the Cooktop. The sealed top burners have an infinite number of heat settings and there are no
fixed positions on the control knobs between HI and SIM (with the exception of LOW). To light the burner push
control knob in and rotate counterclockwise. An audible clicking sound will be heard and the burner should light
immediately. To use, turn the knob to the desired setting.
COOKING UTENSILS:
For best results we recommend using Professional Cookware.
These can be found at your finer department stores, specialty
cooking shops, or restaurant supply stores. If using regular
cookware be very careful if the pans have plastic handles, as these
large professional size burners can flame up on the outside of the
pan and melt or bubble the handles.
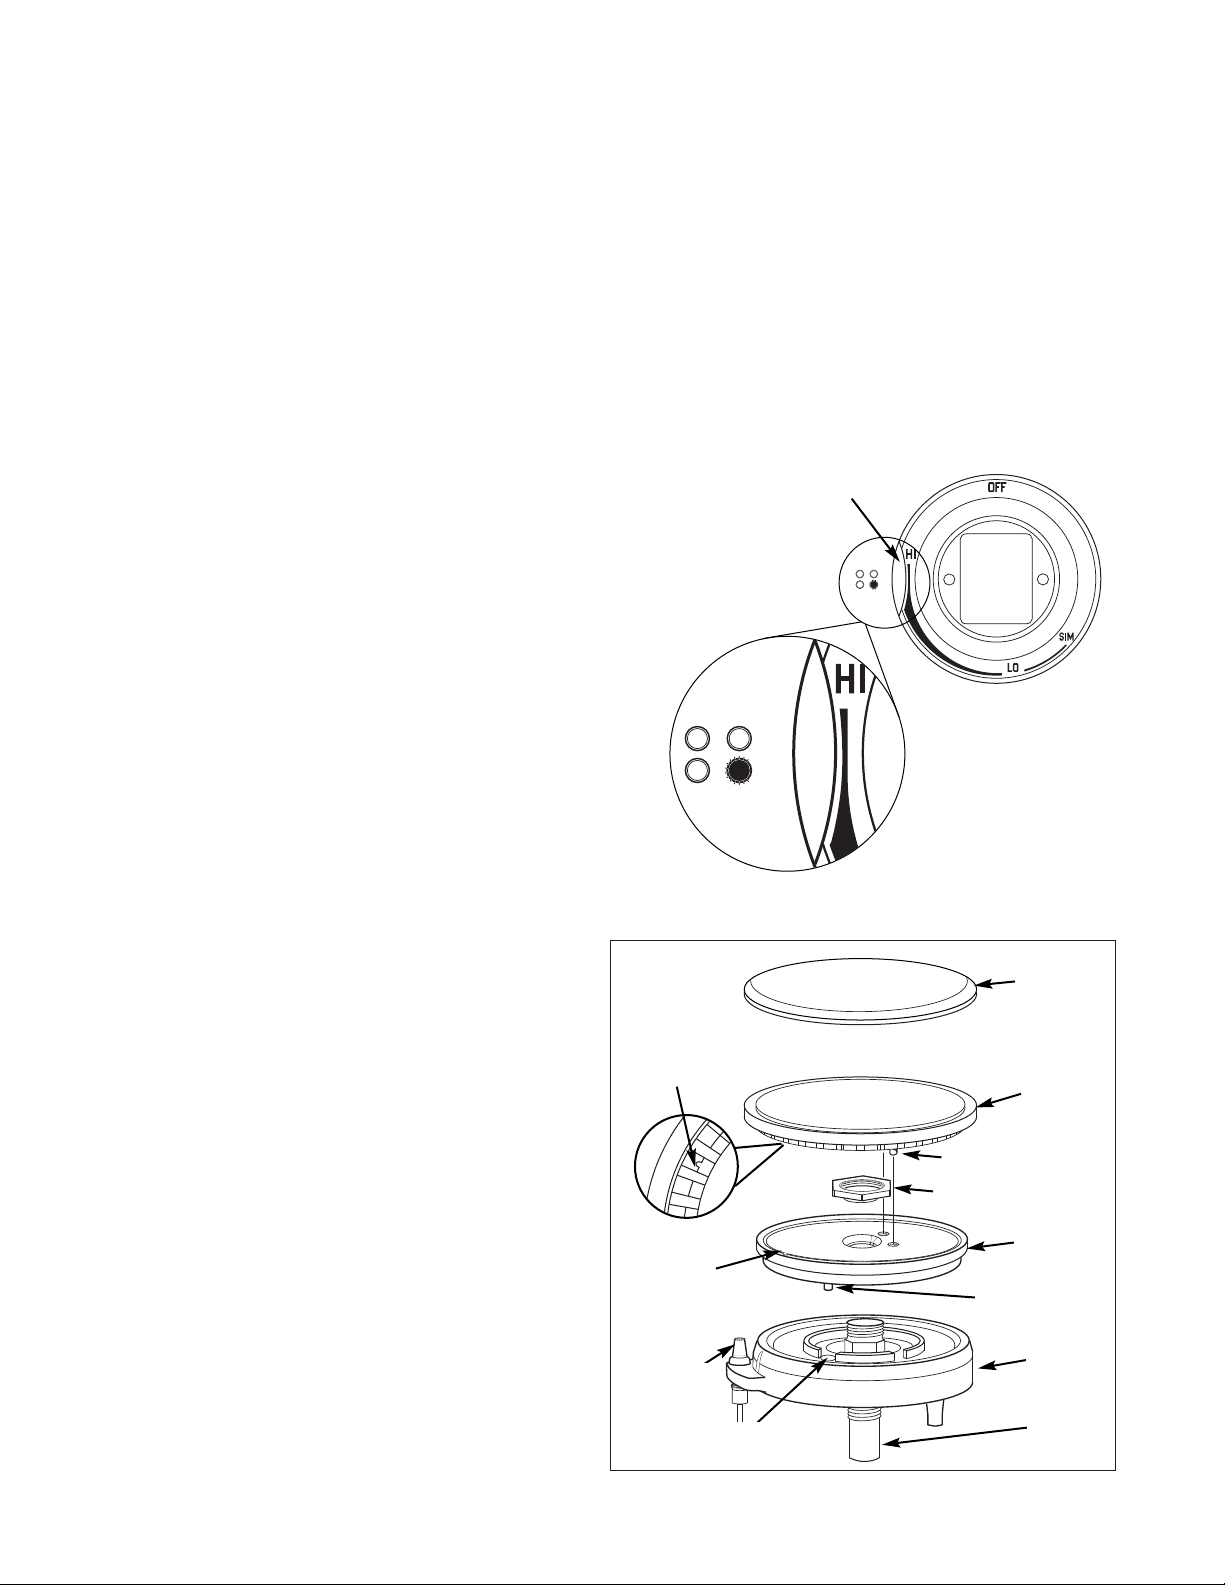
“ON”
INDICATOR LIGHT
TOP VIEW OF KNOB BEZEL
THESE GRAPHICS
SHOW BURNER
LOCATION:
RIGHT FRONT
BURNER
BURNERS:
Your new Drop-In Cooktop is equipped with burners
typical of those used in restaurants. These restaurant
style burners are comprised of high strength die cast
aluminum burner bases and simmer port rings,
precision forged brass port rings, and cast iron
burner caps.
Model CTD-365 cooktop is equipped with 4 burners
rated at 11,000 Btu/hr, and one high-output burner
rated at 17,500 Btu/hr. Model CTD-304 is equipped
with 2 burners rated at 11,000 Btu/hr, 1 burner rated
at 10,000 and 1 high-output burner rated at 15,500
Btu/hr (for natural gas). All Drop-In Cooktop burners
have exceptionally low simmer capabilities (See chart
on page 7). The burner system is designed for
maximum cleanability and control. All the cooktop
burners have electronic spark re-ignition to eliminate
continuously burning pilot; if the flame is blown out,
it will relight.
Brass Ring
Locating Pin
Locating
Notch
Electrode
Cap
Main Burner
Port Ring
Locating Pin
Hex Nut
Simmer Ring
Locating Pin
Burner Base
Locating Pin
Hole Inside
Venturi
6
Page 9
COOKTOP USE
ELECTRONIC IGNITERS:
f a burner does not light or re-ignite, listen for the clicking sound. If all the igniters are not clicking, turn off the
I
burner. Check the circuit panel for a blown fuse or a tripped circuit breaker. If one burner is not lighting, see
page 9 for cleaning instructions.
BURNER EFFICIENCY:
It is necessary to keep the burner ports and the igniters clean for proper lighting and efficient performance. The
burner flame should burn completely around the burner with no excessive noise or lifting. The flame should be
blue in color and stable with no yellow tips.
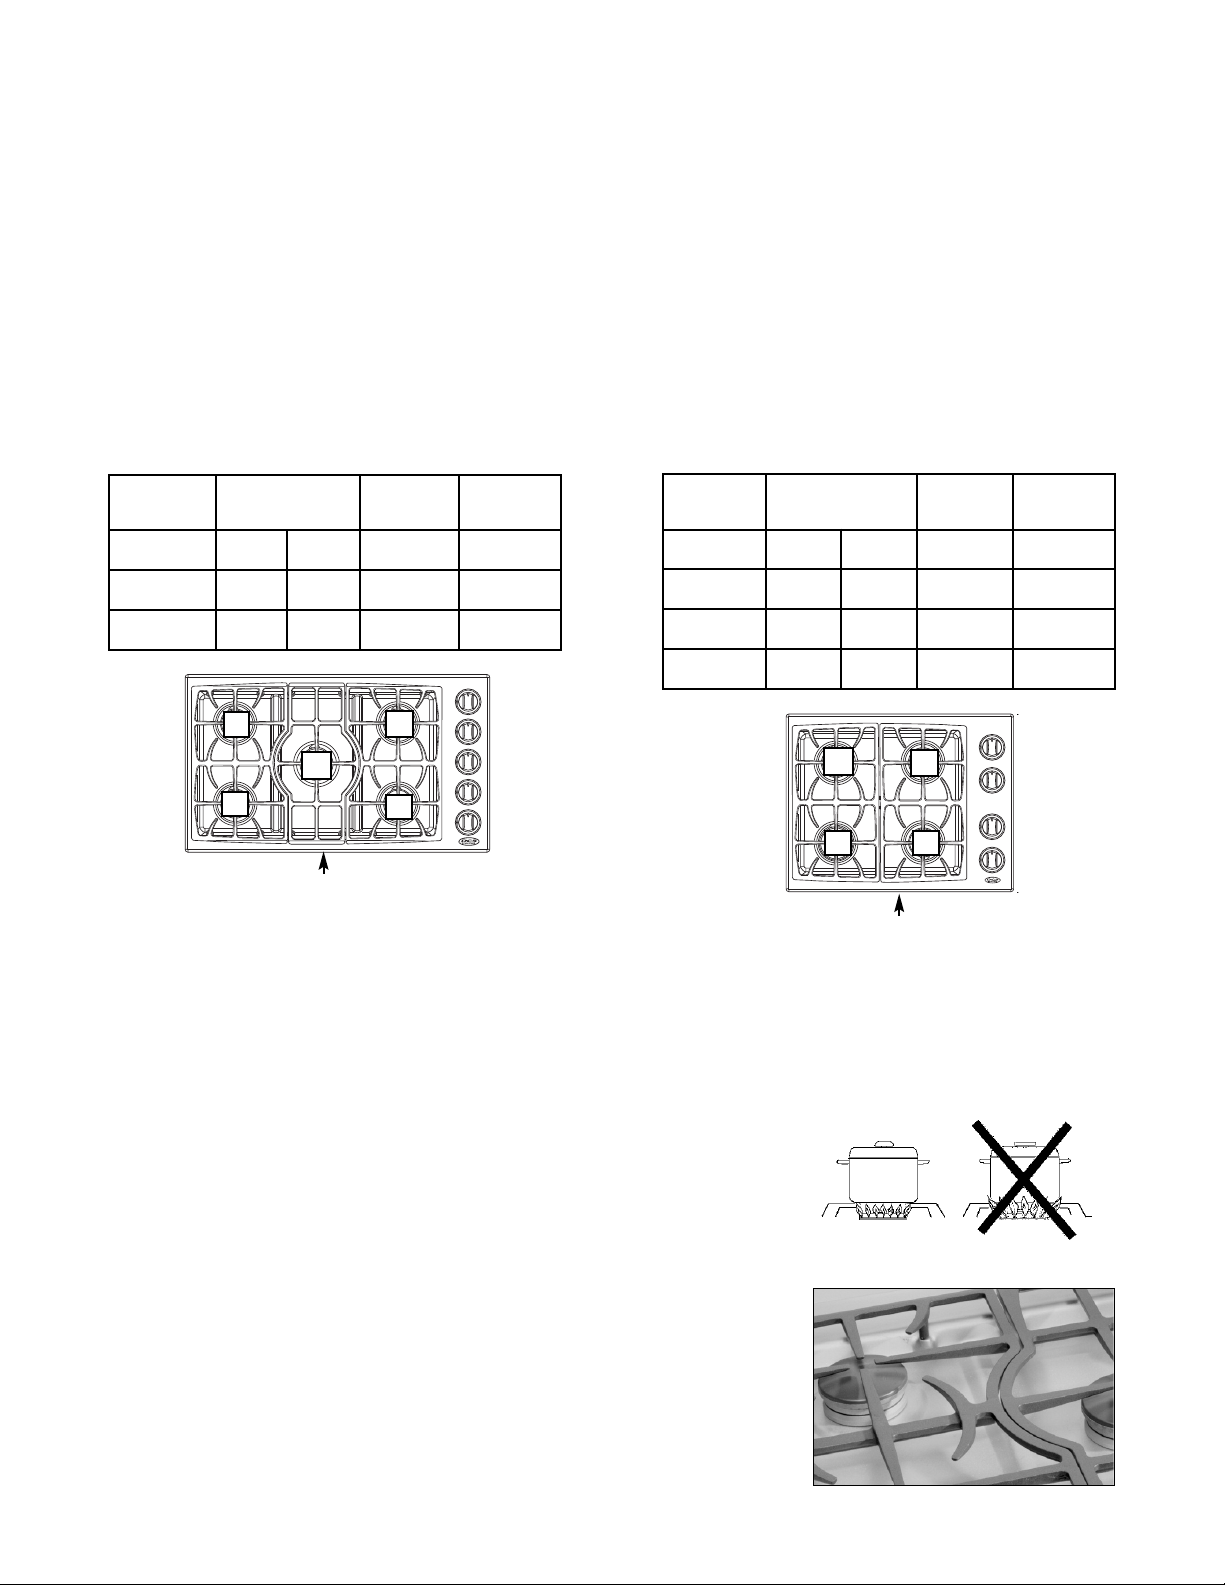
CTD-365
Burner
Location
1, 2, 4, 5 11,000 10,000 3,000 1,200
3 17,500 15,000 3,000 1,200
MAX. Btu/hr
NAT LP NAT &
4
LOW
Btu/hr
2
LP
SIMMER
Btu/hr
NAT &
LP
Burner
Location
1 10,000 10,000 3,000 1,200
2, 3 11,000 10,000 3,000 1,200
4 15,500 15,000 3,000 1,200
3
5
Cabinet front
1
FLAME HEIGHT:
The correct height of the flame mainly depends on the size of the bottom
of the cooking utensil, the material of the cooking utensil, the amount
and type of food and the amount of liquid in the utensil. Following are
some basic rules for selecting flame height.
■
For safety reasons the flame must never extend beyond the bottom of the
cooking utensil.
CTD-304
MAX. Btu/hr
NAT LP NAT & LP NAT & LP
3
4
Cabinet front
PROPER FLAME HEIGHT
LOW
Btu/hr
2
1
SIMMER
Btu/hr
■
Never allow flames to curl up the side of the pan.
■
Utensils which conduct heat slowly (such as glass-ceramic) should be
used with medium to low flames. If you are cooking with a large amount
of liquid a slightly larger flame can be used.
BURNER GRATES:
The cast iron burner grates are fully porcelain coated for long life and
rust prevention. Hi-Temperature cushions allow the grate to rest softly on
the cooktop without scratching. The grates are designed for easy sliding
of pots across the grate tops. They were designed in interlocking sections
to make them safer, easier to remove and clean. For additional cleaning
tips see the care and maintenance section.
7
Page 10

CARE AND MAINTENANCE
CLEANING THE COOKTOP
WARNING:
Be careful cleaning any part of this appliance while hot.
All parts of the appliance can be cleaned with a small amount of hot soapy water, rinsed, dried
and buffed to a shine with a soft, heavy pile cloth. Always try this first, as it is the mildest
cleaning procedure.
1. Use the mildest cleansers first. Some brands of cleaners are harsher than others and may cause
metal parts to discolor or corrode, read their directions. Be sure all the cooktop controls are
turned OFF and the appliance is COOL before using any type of aerosol cleaner on or around the
appliance. The chemical that produces the spraying action could, in the presence of heat, ignite.
2. To avoid marring the surfaces, always rub metal finishes in the direction of the polish lines.
The cleaner will be more effective when used in the direction of the polish lines.
3. Use only clean sponges, soft cloths, paper towels, and plastic non-metal for cleaning or scouring
(use only soap pads with soap still in them, an empty pad can scratch), as recommended in this
section.
4. Be sure to rinse all parts thoroughly and wipe dry to avoid water marks.
5. If stains remain on the bottom of the cooktop sump, use this easy procedure. Place a paper collar
around the burner and igniter, tape it together. This will cover the aluminum under the burner
cap and the igniter. Spray the dirty area with Easy Off® or SOS Oven Cleaner® when cool. Cover
with paper towel. Leave on for 4 hours or overnight. With a warm wet sponge, wipe clean and
polish with a lint free soft towel. You should never use anything stronger than a sponge or a
plastic non-metal sponge on your cooktop.
BRAND NAMES:
In this section, the use of name brands is intended only to indicate a type of cleaner. This does
not constitute an endorsement. The omission of any name brand cleaner does not imply its
adequacy or inadequacy. Many products are regional in distribution and can be found in the
local markets and department stores.
CLEANING THE BURNER GRATES:
Turn off all the burners and allow the grates to cool before starting to clean the cooktop.
Rapid cooling of the grates, for instance, placing hot grates in cool or tepid water to clean, can
thermally shock the porcelain coating and cause cracking or chipping. If you wipe off any part of
the cooktop while it is hot, do so carefully as using a wet sponge or cloth can result in steam
burns.
Once the grates are cool they may be wiped clean while on the cooktop using hot soapy water,
then rinsed and wiped dry or they may be placed in the dishwasher for easy cleaning. The
occasional use of mild abrasive cleansers such as Bon-Ami®, Soft Scrub® or a soap-filled plastic or
non-metal pad is okay. Abrasive cleansers, used vigorously or too often, can eventually harm the
enamel. Apply with a damp sponge, rinse thoroughly and dry.
8
Page 11

CARE AND MAINTENANCE
CLEANING THE BURNERS:
For proper lighting and performance, keep the burners
lean and dry. It is necessary to clean the burners if they do
c
not light although the igniter clicks, whenever there has
been a severe boil over or when the flame doesn’t burn
blue.
Be certain all burner knobs are in the
attempting to clean the burners. The burners have been
designed for ease of cleaning. When the grates and burners
are cool, remove the grate. The Burner Cap and the Brass
Port Ring can easily be lifted off. Wash these parts in hot
soapy water, rinse and dry thoroughly. The Burner Caps are
porcelain enamel, follow the directions on page 8 that were
given to clean the burner grates. A bristle brush can be
used to clean out the toothed burner ports, if necessary.
Disassembly of the Simmer Ring is not recommended,
however, it may become necessary to do so if the ports
remain clogged after normal cleaning. If it is necessary to
disassemble the Simmer Ring from the Base, remove the
Hex Nut at the top of the Simmer Ring. Clean the Simmer
Ring with hot soapy water using a soft wire or plastic
bristle brush then dry thoroughly. Re-assemble the parts
using the Hex Nut.
OFF position before
Brass Ring
Locating Pin
Locating
Notch
Electrode
Locating Pin
Hole Inside
Cap
Main Burner
Port Ring
Locating Pin
Hex Nut
Simmer
Ring
Locating
Pin
Burner
Base
Venturi
After cleaning, it is important to make sure the Locating Pin on the bottom side of the Simmer Ring is properly
aligned with the corresponding hole in the Base and that the Locating Pin (see above) in the bottom side of the
Brass Port Ring is properly aligned with the Locating Notch on the top side of the Simmer Ring. Incorrect
alignment will produce a potentially dangerous flame and poor burner performance. See the illustration above.
CLEANING THE IGNITERS:
Be certain all burner knobs are in the OFF position before attempting to clean the igniters. Gently wipe with an
alcohol dampened cotton swab and be careful not to damage the igniter.
COOKTOP BURNER
IGNITER
Center Burner Base shown
9
Page 12

PRODUCT MEASUREMENT SPECIFICATIONS
36"
Top View
Front View
Right Side View
21"
19-1/2"
5-1/2"
4
"
34-1/2"
2-3/4"
2-7/8"
Dimensions shown below are for product reference only. REFER TO THE PRODUCT INSTALLATION
GUIDE FOR CABINET PREPARATION AND CUTOUT SPECIFICATIONS.
CTD-365
Grate (P/N 12368)(2 pcs)
‘D’ Burner Cap (P/N 12272)(1 pcs)
‘C’ Burner Cap
(P/N 12273)(4 pcs)
Grate (P/N 12369)
Knob (P/N 14301)(5 pcs)
10
Page 13

PRODUCT MEASUREMENT SPECIFICATIONS
30"
Top View
Front View
21"
19-1/2"
5-1/2"
4"
28-5/16"
Right Side View
1-1/2"
2-11/16"
Dimensions shown below are for product reference only. REFER TO THE PRODUCT INSTALLATION GUIDE FOR
ABINET PREPARATION AND CUTOUT SPECIFICATIONS.
C
CTD-304
‘C’ Burner Cap
Grate (P/N 12325)(2 pcs)
(P/N 12273)(3 pcs)
Knob (P/N 14301)(4 pcs)
‘D’ Burner Cap (P/N 12272)(1 pcs)
11
Page 14

SERVICE
HOW TO OBTAIN SERVICE:
or warranty service, contact our DCS Customer Care Representative at (888) 281-5698. Before you call, please
F
have the following information ready:
odel Number (located at the bottom of chassis, right corner)
■
M
■
Serial Number (located at the bottom of chassis, right corner)
■
Date of installation
■
A brief description of the problem
Your satisfaction is of the utmost importance to us. If a problem cannot be resolved to your satisfaction, please
write to Customer Care or email: support@dcsappliances.com
Write:
Fisher & Paykel Appliances, Inc.
Attention: DCS Customer Care
5900 Skylab Road
Huntington Beach, CA 92647
12
Page 15

WARRANTY
LIMITED WARRANTY
When you purchase a new DCS Drop-in Cooktop you automatically receive a One Year Limited Warranty covering
parts and labor for the entire product, and a Five Year Limited Warranty on the structural integrity of the exterior
and interior body parts for servicing within the 48 mainland United States, Hawaii, Washington D.C. and Canada.
In Alaska the Limited Warranty is the same except that you must pay to ship the Product to the service shop or
the service technician’s travel to your home. Products for use in Canada must be purchased through the Canadian
distribution channel to ensure regulatory compliance. Should rusting occur to the degree of non-performance,
replacement parts will be furnished. This does not apply if the unit was subjected to other than normal
residential use.
If the Product is installed in a motor vehicle, boat or similar mobile facility, you receive the same One Year
Limited Warranty, but you must bring the vehicle, boat or mobile facility containing the Product to the service
shop at your expense or pay the service technician’s travel to the location of the Product.
FISHER & PAYKEL UNDERTAKES TO:
Repair without cost to the owner either for material or labor any part of the Product, the serial number of which
appears on the Product, which is found to be defective. In Alaska, you must pay to ship the Product to the service
shop or for the service technician’s travel to your home. If the Product is installed in a motor vehicle, boat or
similar mobile facility, you must bring it to the service shop at your expense or pay for the service technician’s
travel to the location of the Product.
If we are unable to repair a defective part of the Product after a reasonable number of attempts, at our option we
may replace the part or the Product, or we may provide you a full refund of the purchase price of the Product
(not including installation or other charges).
This warranty extends to the original purchaser and any succeeding owner of the Product for products purchased
for ordinary single-family home use. All service under this Limited Warranty shall be provided by Fisher & Paykel
Appliances Inc. or its Authorized Service Agent during normal business hours.
HOW LONG DOES THIS LIMITED WARRANTY LAST?
Our liability under this Limited Warranty for the entire product expires One Year from the date of purchase of the
Product by the first consumer. Our liability under this Limited Warranty for the structural integrity of the exterior
and interior body parts expires Five Years from the date of purchase of the Product by the first consumer.
Our liability under any implied warranties, including the implied warranty of merchantability (an unwritten
warranty that the Product is fit for ordinary use) also expires One Year (or such longer period as required by
applicable law) from the date of purchase of the Product by the first consumer. Some states do not allow
limitations on how long an implied warranty lasts, so this limit on implied warranties may not apply to you.
THIS WARRANTY DOES NOT COVER:
Service calls that are not related to any defect in the Product. The cost of a service call will be charged if the
A.
problem is not found to be a defect of the Product. For example:
Correct faulty installation of the Product.
1.
2. Instruct you how to use the Product.
3. Replace house fuses, reset circuit breakers, correct house wiring or plumbing, or replace light bulbs.
4. Correct fault(s) caused by the user.
Change the set-up of the Product.
5.
6. Unauthorized modifications of the Product.
7. Noise or vibration that is considered normal, for example, drain/fan sounds, regeneration noises or user warning beeps.
13
Page 16

WARRANTY
8. Correcting damage caused by pests, for example, rats, cockroaches etc.
B. Defects caused by factors other than:
1. Normal domestic use or
2. Use in accordance with the Product’s Use and Care Guide.
C. Defects to the Product caused by accident, neglect, misuse, fire, flood or Act of God.
D. The cost of repairs carried out by non-authorized repairers or the cost of correcting such unauthorized repairs.
E. Travel Fees and associated charges incurred when the product is installed in a location with limited or restricted
access (i.e. airplane flights, ferry charges, isolated geographic areas).
F. Normal recommended maintenance as set forth in the Product’s Use and Care Guide.
If you have an installation problem contact your dealer or installer. You are responsible for providing adequate
electrical, exhausting and other connection facilities. We are not responsible for consequential or incidental
damages (the cost of repairing or replacing other property damaged if the Product is defective or any of your
expenses caused if the Product is defective). Some states do not allow the exclusion or limitation of incidental or
consequential damages, so the above limitation or exclusion may not apply to you.
HOW TO GET SERVICE
Please read your Use and Care Guide. If you then have any questions about operating the Product, need the
name of your local DCS Authorized Service Agent, or believe the Product is defective and wish service under this
Limited Warranty, please contact your dealer or call us at:
TOLL FREE 1-888-281-5698 or contact us through our web site: www.dcsappliances.com
You may be required to provide reasonable proof of the date of purchase of the Product before the Product will
be serviced under this Limited Warranty.
COMMERCIAL USE
This warranty applies to appliances used in residential applications; it does not cover their use in commercial
situations.
NO OTHER WARRANTIES
This Limited Warranty is the complete and exclusive agreement between you and Fisher & Paykel Appliances Inc.
regarding any defect in the Product. None of our employees (or our Authorized Service Agents) are authorized to
make any addition or modification to this Limited Warranty.
Warrantor: Fisher & Paykel Appliances, Inc.
If you need further help concerning this Limited Warranty, please call us at the above number, or write to:
Fisher & Paykel Appliances, Inc.
Attention: DCS Customer Care
5900 Skylab Road, Huntington Beach, CA 92647
This Limited Warranty gives you specific legal rights, and you may also have other rights which vary from state
to state.
Fisher & Paykel Appliances Inc. is a leading manufacturer of premium quality cooking and specialty appliances
under the Fisher & Paykel and DCS brands.
14
Page 17

TABLE DE CUISSON SUSPENDUE
PROFESSIONNELLE
• 36 PO À 5 BRÛLEURS
• 30 PO À 4 BRÛLEURS
Manuel d'utilisation et d'entretien
MODÈLES :
CTD-365 (indiqué)
CTD-304
Page 18

À NOTRE CLIENTÈLE
Nous vous remercions d'avoir choisi cette table de cuisson suspendue professionnelle DCS. Nous avons conçu ce
Manuel d'utilisation et d'entretien pour expliquer ses fonctions uniques. Il contient des informations
extrêmement utiles sur la façon de faire fonctionner et d'entretenir correctement votre nouvel appareil. Vous
pourrez ainsi en profiter pendant des années en toute sécurité.
Aidez-nous à mieux vous servir en remplissant l'enregistrement du propriétaire et en nous la soumettant depuis
notre site Web à www.dcsappliances.com. Sélectionnez « Service à la clientèle » sur la page d'accueil puis
« Enregistrement du propriétaire », ou envoyez-nous par courrier la Carte d'enregistrement du propriétaire à
l'adresse ci-dessous. De plus, gardez ce manuel à portée de main afin de rapidement trouver réponse à vos
questions durant l'utilisation de votre nouvel appareil.
Si vous avez des questions au sujet de notre produit, contactez le Centre de service à la clientèle DCS par
téléphone : 1-888-281-5698 par courrier ou email : support@dcsappliances.com, ou écruvez nous l’adresse
suivante:
Fisher & Paykel Appliances, Inc.
Attention: DCS Customer Care
5900 Skylab Road
Huntington Beach, CA 92647
États-Unis
REMARQUE : Veuillez noter les numéros de modèle et de série sur cette page pour information (bas du châssis,
coin droit)
NUMÉRO DE MODÈLE
NUMÉRO DE SÉRIE
AVERTISSEMENT
Toute installation, ajust
ou la mort. Veuillez lire soigneusement ces instructions d'installation, d'utilisation et d'entretien avant d'utiliser,
installer ou effectuer l'entretien de cet appareil.
ement, altération ou entretien incorrect peut causer des dommages matériels, des blessures
AVERTISSEMENT
Évitez de stocker ou d'utiliser de l'essence ou tous autres liquides et vapeurs inflammables à proximité de cet
appar
eil ou de t
out autr
e appareil électroménager.
DANGER
Si vous sentez une odeur de gaz :
1. N'allumez aucun interrupteur électrique; n'utilisez aucun téléphone dans l'édifice.
Appelez immédiatement votre fournisseur de gaz de chez un voisin. Suivez les instructions du fournisseur de gaz.
2.
3. Si vous n'arrivez pas à joindre votre fournisseur de gaz, appelez les pompiers. Toute installation ou service doit
être confiée à un installateur qualifié, un organisme de service ou le fournisseur de gaz.
VEUILLEZ CONSERVER CE MANUEL À TITRE DE RÉFÉRENCE.
1
Page 19

TABLE DES MATIÈRES
MESURES DE SÉCURITÉ ET DE PRÉCAUTION 3-5
UTILISATION DE LA TABLE DE CUISSON 6-8
Boutons de réglage 6
Ustensiles de cuisson 6
Brûleurs 7
Allumeurs électroniques 7
Efficacité des brûleurs 8
Hauteur de la flamme 8
Grilles des brûleurs 8
ENTRETIEN ET MAINTENANCE 9-10
Nettoyage de la table de cuisson 9
Nettoyage des grilles des brûleurs 9
Nettoyage des brûleurs 10
Nettoyage des allumeurs 10
SPÉCIFICATIONS DES DIMENSIONS DU PRODUIT 11-12
SERVICE 13
GARANTIE 14-16
2
Page 20

MESURES DE SÉCURITÉ ET DE PRÉCAUTION
Votre nouvel appareil DCS fonctionnera de manière sûre et fiable pendant des années si vous en prenez soin.
Faites extrêmement attention quand vous utilisez cet appareil de cuisson de niveau professionnel car il dégage
ne chaleur intense et peut augmenter les risques d'accidents. Vous devez respecter des consignes de sécurité
u
élémentaires durant l'utilisation d'appareils de cuisine, dont celles-ci :
■
Veuillez lire attentivement ce manuel d'utilisation et d'entretien avant d'utiliser votre nouvel appareil. Ceci vous
permettra de réduire les risques d'incendie, de choc électrique ou de blessures.
■
Commencez par vous assurer que l'installation et l'entretien sont effectués correctement. Suivez les instructions
d'installation fournies avec cet appareil. Avant d'utiliser l'appareil, confiez son installation et sa mise à la terre à
un technicien qualifié.
■
Demandez-lui de vous montrer l'emplacement du robinet d'arrêt de l'alimentation de gaz afin de savoir comment
couper l'arrivée de gaz.
■
Si vous sentez une odeur de gaz, cela signifie que l'installateur n'a pas vérifié correctement s'il y avait des fuites.
Si les connexions ne sont pas complètement étanches, une petite fuite pourrait se produire et laisser s'échapper
une faible odeur de gaz. La détection des fuites n'est pas une procédure à faire soi-même. Certaines fuites ne
peuvent être détectées que si la commande du brûleur est sur ON. Dans l'intérêt de votre sécurité, confiez cette
procédure à un technicien qualifié.
■
Si jamais un brûleur s'éteint sans se rallumer et laisse s'échapper du gaz, ouvrez la fenêtre ou la porte pour
évacuer l'air. N'essayez pas d'utiliser l'appareil avant la dissipation complète du gaz.
■
Cet appareil électroménager a été monté en usine pour être utilisé avec du gaz naturel ou propane tel qu'indiqué
par le numéro de modèle.
■
Ne réparez pas ni ne remplacez aucune pièce de cet appareil, sauf indication contraire du manuel. Tout autre
travail d'entretien doit être confié à un technicien qualifié.
AVERTISSEMENT :
Les enfants ne doivent pas être laissés seuls ou sans surveillance dans un endroit où l'on utilise des appareils
électroménagers. Il ne faut jamais les laisser tourner ou enfoncer des boutons, ni s'asseoir ou se tenir debout sur ces
appareils.
AVERTISSEMENT :
ne rangez pas sur ou autour de la table de cuisson d'objet pouvant attirer l'attention des enfants. Ceux-ci peuvent se
rimpent sur l'appareil ou s'étirent par dessus pour atteindre l'objet en question.
blesser sérieusemen
■
Ne rangez jamais rien sur la table de cuisson. Des matériaux inflammables pourraient prendre feu acciden-
tellement, des éléments en plastique pourraient fondre ou s'enflammer et d'autres types d'objets pourraient être
détruits.
■
Ne suspendez aucun objet sur aucune partie de l'appareil. Certains matériaux sont très inflammables et
pourraient prendre feu.
■
Si l'appareil se trouve près d'une fenêtre, assurez-vous que les rideaux sont suffisamment éloignés des brûleurs
de la table de cuisson; ils pourraient prendre feu sinon.
t s'ils g
■
Ne laissez jamais des vêtements, gants ou autres matériaux inflammables en contact ou à proximité d'un brûleur
ou d'une grille de brûleur tant que ces derniers n'ont pas refroidi. Les tissus peuvent s'enflammer et causer des
blessures.
3
Page 21

MESURES DE SÉCURITÉ ET DE PRÉCAUTION
■
Utilisez seulement des gants isolants secs : l'emploi de gants humides sur des surfaces chaudes peut provoquer
es brûlures causées par la vapeur. N'utilisez pas de serviette ou de chiffon épais à la place de gants isolants. Ne
d
laissez pas les gants isolants toucher les brûleurs ou leurs grilles.
■
Pour assurer votre propre sécurité, habillez-vous de façon appropriée. Ne portez jamais de vêtements ou de
manches lâches lorsque vous utilisez l'appareil. Certains tissus synthétiques sont extrêmement inflammables et
ne doivent pas être portés pendant la cuisson.
■
Ne recouvrez aucune partie de la table de cuisson avec du papier aluminium. L'utilisation de papier aluminium
peut créer un risque d'incendie.
AVERTISSEMENT :
cet appareil électroménager est destiné à la cuisson. Pour des raisons de sécurité, n'utilisez jamais la table de
cuisson pour chauffer une pièce.
AVERTISSEMENT :
ant l'utilisation de la table de cuisson : ne touchez pas les g
Dur
surfaces peuvent devenir suffisamment chaudes pour provoquer des brûlures
■
Ne laissez jamais la table de cuisson sans surveillance lorsque vous cuisinez à flamme haute. Un
débordement par bouillonnement pourrait produire de la fumée ou un déversement graisseux pourrait prendre
feu. Et, surtout, si les flammes des brûleurs sont étouffées par un débordement important affectant l'allumeur, le
gaz non brûlé s'échappera dans la pièce, ce qui serait extrêmement dangereux.
rilles des brûleurs ou les surfaces adjacentes. Ces
■
Seuls certains types d'ustensiles en verre, vitrocéramique calorifugée, céramique, poterie ou émaillés sont
appropriés pour être utilisés sur la flamme vive de la table de cuisson. Les ustensiles non thermorésistants
peuvent se briser à la suite de changements de température soudains.
■
Ne chauffez pas de contenant de nourriture fermé car la pression pourrait s'accumuler et le faire exploser.
■
Durant la cuisson, réglez la commande du brûleur de sorte que la flamme ne chauffe que le fond du récipient et
ne lèche pas ses rebords inférieurs. Cela pourrait chauffer ou faire fondre les poignées.
■
Servez-vous toujours d'ustensiles à fond plat suffisamment larges pour couvrir les brûleurs. L'utilisation
d'ustensiles trop petits risque d'offrir un contact direct à la flamme et de mettre le feu aux vêtements
■
Afin de réduire le risque de brûlures, d'allumage de matériaux inflammables et de déversement accidentel,
tournez les poignées des ustensiles vers l'intérieur afin qu'elles ne surplombent pas les surfaces de travail
adjacentes, les zones de cuisson et les bords extérieurs de la table de cuisson.
■
Tenez la poignée du récipient afin d'empêcher tout mouvement de l'ustensile lorsque vous retournez ou remuez
la nourriture.
■
La graisse est inflammable. Ne versez pas d'eau sur les feux de graisse. ÉTEIGNEZ le brûleur, puis étouffez le
feu avec du bicarbonate de soude ou à l'aide d'un extincteur à poudre ou à mousse. Laissez toute graisse chaude
refroidir avant d'essayer de la manipuler. Évitez de laisser la graisse s'accumuler autour de la base des brûleurs
de la table de cuisson. Nettoyez après chaque utilisation ou déversement.
4
Page 22

MESURES DE SÉCURITÉ ET DE PRÉCAUTION
Le robinet d'arrêt fourni
par l'installateur doit
être facilement accessible de
l'intérieur du boîtier.
Alimentation en gaz
■
Recouvrez les poêles à frire de grilles anti-éclaboussures pour éviter les risques de brûlures à l'huile. Prenez soin
e ne pas utiliser une flamme trop haute.
d
our assurer un bon allumage et une bonne performance des brûleurs de la table de cuisson, gardez leurs ports
■
P
dans un état propre. Il peut s'avérer nécessaire de nettoyer ceux-ci en cas de débordement ou lorsque le brûleur
ne s'allume pas, même si les allumeurs électroniques cliquent.
■
Nettoyez la table de cuisson avec précaution. Évitez de vous brûler à la vapeur : n'utilisez pas d'éponge ou de
chiffon mouillé pour nettoyer l'appareil alors qu'il est encore chaud. Certains produits de nettoyage dégagent
des vapeurs nocives au contact d'une surface chaude. Respectez le mode d'emploi du fabricant du produit de
nettoyage.
■
Assurez-vous que les boutons de l'appareil sont fermés et que celui-ci est froid avant d'utiliser des nettoyants
aérosol à proximité. L'élément chimique qui produit le jet de vaporisation peut, en présence de chaleur,
s'enflammer ou provoquer la corrosion des parties métalliques.
■
Nettoyez fréquemment la hotte et les filtres de ventilation surplombant la table de cuisson afin d'empêcher
toute accumulation de graisse provenant des vapeurs de cuisson.
■
ÉTEIGNEZ le ventilateur en cas d'incendie. Si le ventilateur est en marche, il pourrait en effet répandre les
flammes.
■
Ne bloquez pas la circulation de l'air de combustion ou de ventilation. Assurez toujours un apport d'air frais.
■
Pour des raisons de sécurité et pour ne pas endommager l'appareil, évitez de vous asseoir, de vous tenir debout
ou de vous appuyer contre la surface de cuisson.
■
Les réparations doivent être effectuées par des techniciens agréés uniquement. Ceux-ci doivent débrancher le
bloc d'alimentation avant de travailler sur l'appareil.
■
Avertissement concernant la proposition 65 de la Californie : l'incinération de gaz de cuisson génère des sous-
produits considérés par l'État de Californie comme pouvant causer le cancer ou des malformations congénitales.
Les lois de Californie exigent que les entreprises avertissent leurs clients qu'ils risquent d'être exposés à de telles
substances. Pour minimiser l'exposition à ces substances, faites toujours fonctionner l'appareil conformément
aux instructions contenues dans ce manuel et assurez une bonne ventilation lorsque vous cuisinez au gaz
REMARQUE :
Ce produit doit être installé par un plombier ou ajusteur d'appareils à gaz agréé si l'installation a lieu au sein du
Commonwealth du Massachusetts.
5
Page 23

UTILISATION DE LA TABLE DE CUISSON
MISE EN GARDE :
Aux fins de la garantie, DCS exige que le réglage des brûleurs soit effectué par un technicien qualifié au moment de
l'installation. Faites extrêmement attention quand les réglages sont effectués après l'installation. La garantie sera
annulée si les réglages sont effectués incorrectement ou pas du tout.
BOUTONS DE RÉGLAGE :
Les boutons de réglage et leurs cadrans sont facilement associés aux brûleurs qu'ils contrôlent et sont situés sur
le côté droit de la table de cuisson. Les brûleurs à tête scellée permettent un réglage continu de la flamme et
leurs boutons de réglage ne comportent pas de position fixe entre les niveaux HI et SIM (à l'exception de LOW).
Pour allumer le brûleur, enfoncez le bouton de réglage et tournez-le vers la gauche. Vous devriez entendre un
déclic et voir le brûleur s'allumer immédiatement. Réglez le bouton au niveau désiré.
USTENSILES DE CUISSON :
Nous vous recommandons d'utiliser des ustensiles professionnels pour obtenir les meilleurs résultats possibles.
Vous en trouverez dans les grands magasins de qualité, les boutiques spécialisées ou les fournisseurs en restauration. Si vous utilisez des ustensiles ordinaires, faites très attention s'ils possèdent des manches en plastique car
ces brûleurs de format professionnel ont une puissance de feu capable de
faire fondre ou de gonfler les manches.
INDICATEUR
D'ALLUMAGE
CADRAN DE BOUTON VU DE HAUT
CES GRAPHIQUES MONTRENT
L'EMPLACEMENT DES BRÛLEURS
BRÛLEUR ARRIÈRE GAUCHE
6
Page 24

UTILISATION DE LA TABLE DE CUISSON
BRÛLEURS :
Votre nouvelle table de cuisson suspendue est équipée de
rûleurs similaires à ceux que l'on utilise dans les
b
restaurants. Ces brûleurs comportent des bases et des
couronnes de mijotage en aluminium moulé haute
résistance, des couronnes en laiton forgées avec précision et
des capuchons en fonte.
Votre table de cuisson modèle CTD-365 est équipée de 4
brûleurs prévus pour 11 000 BTU/H et d'un brûleur haute
performance prévu pour 17 500 BTU/H. Le modèle CTD-304
est équipé de deux brûleurs prévus pour 11 000 BTUH, d'un
brûleur prévu pour 10 000 BTUH, et d'un brûleur haute
performance prévu pour 15 500 BTUH (pour le gaz naturel).
Votre nouvelle table de cuisson est dotée d'une capacité de
cuisson à petit feu exceptionnelle. (Voir tableau ci-dessous.)
Le système des brûleurs est conçu pour être extrêmement
facile à nettoyer et régler. L'ensemble des brûleurs est doté
d'un système de rallumage électronique, ce qui évite d'avoir
des veilleuses toujours allumées. Si la flamme s'éteint, elle
se rallume toute seule.
Broche de position
de couronne en
laiton
Encoche de
position
Électrode
Trou de broche de
position à l'intérieur
Capuchon
Couronne
de brûleur
principale
Broche de position
Écrou hex
Couronne
de mijotage
Broche de
positionpin
Base de
brûleur
Venturi
ALLUMEURS ÉLECTRONIQUES :
Si un brûleur ne s'allume ou ne se rallume pas, écoutez s'il y a un déclic. Si tous les allumeurs ne cliquent pas,
éteignez le brûleur. Vérifiez dans le tableau des disjoncteurs si un fusible est grillé ou un disjoncteur s'est
déclenché. Si un brûleur ne s'allume pas, consultez la page 10 en ce qui concerne les instructions de nettoyage.
EFFICACITÉ DES BRÛLEURS :
Il est nécessaire de maintenir les ports des brûleurs et les allumeurs en état de propreté afin de permettre un
allumage correct et un rendement optimal. La flamme doit encercler complètement le brûleur sans bruit ou
élévation excessive. Les flammes doivent être bleues et stables, sans pointe jaune.
CTD-365
4
3
5
Devant du boîtier
EMPLACEMENT
ÛLEUR
2
1
DU BR
1, 2, 4, 5 11,000 10,000 3,000 1,200
3 17,500 15,000 3,000 1,200
CTD-365
MAX. BTU/H
NAT. PROP. NAT &
FAIBLE
B
TU/H
PROP.
MIJOTAGE
TU/H
B
PROP.
NAT &
7
Page 25

UTILISATION DE LA TABLE DE CUISSON
CTD-304
3
4
Devant du boîtier
2
1
EMPLACEMENT
DU BRÛLEUR
1 10,000 10,000 3,000 1,200
2, 3 11,000 10,000 3,000 1,200
4 15,500 15,000 3,000 1,200
MAX. BTU/H
NAT. PROP. NAT & PROP. NAT & PROP.
CTD-304
FAIBLE
BTU/H
MIJOTAGE
BTU/H
HAUTEUR DE LA FLAMME :
La hauteur correcte de la flamme dépend essentiellement de la taille du fonds de l'ustensile de cuisson, du
matériau de l'ustensile, de la quantité et du type de nourriture et de la quantité de liquide dans l'ustensile. Voici
quelques règles de base pour sélectionner la hauteur de flamme.
■
Pour des raisons de sécurité, la flamme ne doit jamais dépasser le fond
du récipient.
■
Ne laissez jamais les flammes lécher les parois du récipient.
■
Les ustensiles qui conduisent lentement la chaleur (tels que ceux en
vitrocéramique) doivent être utilisés avec un feu doux ou moyen. Vous
pouvez augmenter légèrement le feu si le volume de liquide est
important.
HAUTEUR CORRECTE DE LA FLAMME
GRILLES DES BRÛLEURS :
Les grilles des brûleurs en fonte sont entièrement recouvertes d'émail
de porcelaine, ce qui leur assure une longue durée de vie et empêche
la rouille. Des coussins pour haute température soutiennent les grilles
pour éviter qu'elles n'égratignent la table de cuisson. Les grilles sont
conçues pour permettre de glisser facilement les chaudrons par dessus
les grilles. Elles forment des sections imbriquées qui les rendent plus
sécuritaires et plus faciles à enlever et nettoyer. Vous trouverez
d'autres conseils de nettoyage à la section d'entretien et de nettoyage.
8
Page 26

ENTRETIEN ET MAINTENANCE
NETTOYAGE DE LA TABLE DE CUISSON
AVERTISSEMENT :
Faites très attention lorsque vous nettoyez les parties de l'appareil lorsqu'il est chaud.
L'appareil tout entier peut être nettoyé avec une petite quantité d'eau savonneuse chaude, puis rincé, séché et
bien poli à l'aide d'un chiffon à poils épais et doux. Essayez cela en premier, c'est la façon la plus douce de le
nettoyer.
1. Employez les produits de nettoyage les plus doux d'abord. Certains produits de nettoyage sont plus durs que
d'autres et peuvent provoquer la décoloration ou la rouille des parties métalliques. Lisez leur mode d'emploi au
préalable. Assurez-vous que les boutons de l'appareil sont FERMÉS et que celui-ci est FROID avant d'utiliser des
nettoyants aérosol à proximité. L'élément chimique qui produit le jet de vaporisation peut s'enflammer en
présence de chaleur.
2. Pour ne pas gâcher les surfaces, frottez toujours la finition du métal dans le sens du polissage, ce qui donne plus
d'efficacité au nettoyant.
3. Pour nettoyer ou récurer, utilisez uniquement des éponges propres, des tissus doux, des essuie-tout et des
tampons à récurer non-métalliques en plastique (uniquement des tampons contenant encore du savon car un
tampon sec peut égratigner la surface), tel que recommandé dans cette section.
4. Rincez soigneusement et séchez en essuyant pour éviter de laisser des marques d'eau.
5. S'il reste des tâches au fond de la table de cuisson, utilisez cette procédure toute simple. Placez une couronne de
papier autour du brûleur et de l'allumeur, et retenez le tout d'une bande adhésive. Ceci permettra de recouvrir
l'aluminium sous le capuchon du brûleur et l'allumeur. Vaporisez la zone sale de Easy Off
CleanerMD(produits à nettoyer les fours) une fois l'appareil refroidi. Recouvrez d'une serviette en papier. Laissez
ainsi pendant 4 heures ou toute la nuit. Nettoyez soigneusement à l'aide d'une éponge mouillée chaude et
essuyez avec une serviette douce non pelucheuse. N'utilisez jamais sur la table de cuisson un objet plus rugueux
qu'une éponge ni une laine d'acier.
D
M
ou de SOS Oven
NOMS DE MARQUE :
La référence à des noms de marques dans cette section est donnée à titre indicatif et ne saurait constituer un
acte de promotion. L'omission d'une marque de nettoyant particulière ne signifie pas qu'elle est adéquate ou
non. De nombreux produits sont distribués dans certaines régions seulement et sont disponibles dans les
marchés et grands magasins locaux.
NETTOYAGE DES GRILLES DES BR
Éteignez tous les brûleurs et laissez les grilles refroidir avant de nettoyer la table de cuisson. Toute tentative
pour refroidir rapidement des grilles, en les immergeant par exemple dans de l'eau froide ou tiède, peut
constituer un choc thermique pour le revêtement en porcelaine, ce qui peut le fissurer ou l'écailler. Si vous
essuyez une partie de la table de cuisson alors qu'elle est chaude, faites-le avec précaution car vous pourriez
vous brûler si vous utilisez une éponge ou un chiffon humide.
Une fois les grilles refroidies, vous pouvez les nettoyer à l'aide d'une solution savonneuse chaude pendant
qu'elles sont sur la table de cuisson, puis les rincer et les essuyer pour les sécher, ou les placer dans le lavevaisselle pour un nettoyage facile.
ÛLEURS :
9
Page 27

ENTRETIEN ET MAINTENANCE
L'utilisation occasionnelle de nettoyant abrasif doux tel que Bon-AmiMD, Soft ScrubMDou un tampon à récurer non
étallique ou en plastique rempli de savon est acceptable. L'utilisation vigoureuse ou trop fréquente de
m
nettoyants abrasifs peut finir par endommager l'émail. Appliquez le produit avec une éponge humide, rincez
abondamment puis séchez.
NETTOYAGE DES BRÛLEURS
Pour assurer un bon allumage et une bonne performance
des brûleurs, gardez-les dans un état propre et sec. Vous
devez nettoyer les brûleurs s'ils ne s'allument pas alors que
l'allumeur clique, après chaque débordement important ou
lorsque la flamme ne devient pas bleue.
Broche de position
de couronne en
laiton
Assurez-vous que tous les boutons des brûleurs sont en
position
brûleurs ont été conçus pour être faciles à nettoyer. Une fois
les grilles et brûleurs refroidis, retirez les grilles. Les
OFF avant d'essayer de nettoyer les brûleurs. Les
Broche de position
Écrou hex
capuchons de brûleur et les couronnes en laiton peuvent
être facilement enlevés. Lavez ces pièces dans de l'eau
savonneuse chaude, rincez et séchez soigneusement. Les
capuchons de brûleur sont en émail de porcelaine; suivez les
Encoche de
position
instructions données à la page 8 concernant le nettoyage
des grilles des brûleurs. Utilisez au besoin une brosse en
Électrode
soies pour nettoyer les ports dentés des brûleurs. Le
démontage de la couronne de mijotage n'est pas
recommandé; cela peut toutefois s'avérer nécessaire si les
Trou de broche de
position à l'intérieur
ports restent bouchés après un nettoyage normal. Si vous
devez retirer la couronne de mijotage de sa base, enlevez
l'écrou hex de la partie supérieure de la couronne de mijotage. Nettoyez la couronne de mijotage avec de l'eau
savonneuse chaude à l'aide d'une brosse en soies douce métallique ou en plastique, puis séchez soigneusement.
Réassemblez les pièces à l'aide de l'écrou hex.
Capuchon
Couronne
de brûleur
principale
Couronne
de mijotage
Broche de
positionpin
Base de
brûleur
Venturi
Après le nettoyage, il est important de vous assurer que la broche de position au bas de la couronne de mijotage
est correctement alignée avec le trou correspondant de la base et que la broche de position au bas de la
couronne en laiton est correctement alignée avec l'encoche de position en haut de la couronne de mijotage. Un
mauvais alignement produira une flamme potentiellement dangereuse et entraînera un mauvais fonctionnement
du brûleur. Voir l'illustration ci-dessus.
NETTOYAGE DES ALLUMEURS :
Assurez-vous que tous les boutons des brûleurs
BRÛLEUR DE TABLE DE CUISSON
ALLUMEUR
sont en position off avant d'essayer de nettoyer
les allumeurs. Essuyez doucement à l'aide d'un
coton-tige imbibé d'alcool en faisant attention de
ne pas endommager l'allumeur.
Base du brûleur central
10
Page 28

SPÉCIFICATIONS DES DIMENSIONS DU PRODUIT
36 po
Vue de dessus
Vue de face
Vue latérale
21
po
19-1/2 po
5-1/2 po
4"
34-1/2 po
Les dimensions indiquées ci-dessous sont données à titre de référence uniquement.
REPORTEZ-VOUS AU GUIDE D'INSTALLATION DU PRODUIT EN CE QUI CONCERNE LA
RÉPARATION DU BOÎTIER ET LES SPÉCIFICATIONS DE DÉCOUPE.
P
CTD-365
Grate (P/N 12368)(2)
D-Capuchon de brûleur (P/N 12272)(1) C-Capuchon de brûleur
Grate (P/N 12369)
(P/N 12273)(4)
Bouton (P/N 14301)(5)
11
Page 29

SPÉCIFICATIONS DES DIMENSIONS DU PRODUIT
30 PO
21 PO
19-1/2 PO
5-1/2 PO
4 PO
28-5/16 PO
1-1/2 PO
2-11/16 PO
Vue de dessus
Vue de face
Vue latérale
es dimensions indiquées ci-dessous sont données à titre de référence uniquement.
L
REPORTEZ-VOUS AU GUIDE D'INSTALLATION DU PRODUIT EN CE QUI CONCERNE LA
PRÉPARATION DU BOÎTIER ET LES SPÉCIFICATIONS DE DÉCOUPE.
CTD-304
C-Capuchon de brûleur
Grate (P/N 12268-01)(2)
(P/N 12273)(3)
Bouton (P/N 14301)(4)
D-Capuchon de brûleur (P/N 12272)(1)
12
Page 30

SERVICE
POUR L'OBTENTION DE SERVICE :
Pour le service sous garantie, contactez le Centre de service à la clientèle DCS par téléphone :
-888-281-5698. Avant d'appeler, veuillez avoir les informations suivantes à portée de main :
1
■
Numéro de modèle (bas du châssis, coin droit)
■
Numéro de série (bas du châssis, coin droit)
■
Date d'installation
■
Brève description du problème
Votre satisfaction revêt la plus haute importance pour nous. Si un problème n'est pas résolu à votre entière
satisfaction, veuillez communiquer par courrier avec notre Centre de service à la clientèle ou email :
support@dcsappliances.com
Écrivez-nous à l'adresse suivante :
Fisher & Paykel Appliances, Inc.
Attention: DCS Customer Care
5900 Skylab Road
Huntington Beach, CA 92647
U.S.A.
13
Page 31

GARANTIE
GARANTIE LIMITÉE
Lors de l'achat d'une table de cuisson suspendue professionnelle neuve DCS, vous bénéficiez automatiquement
d'une garantie limitée d'un an couvrant les pièces et la main d'œuvre pour l'intégralité du produit, et d'une
garantie limitée de cinq ans sur l'intégrité structurelle des pièces extérieures et intérieures valide dans les 48
tats continentaux des États-Unis, ainsi que Hawaï, Washington D.C. et le Canada. La garantie limitée est la même
é
en Alaska sauf que vous devez payer les frais d'expédition du produit à un centre de service ou les frais de
déplacement d'un technicien dans le cas d'une visite à domicile. Les produits destinés à une utilisation au
Canada doivent être achetés auprès d'un distributeur canadien afin de respecter la réglementation en vigueur.
S'il y a de la corrosion au point où le produit ne fonctionne plus correctement, des pièces de rechange seront
fournies. Cette garantie ne s'applique pas si l'appareil a été soumis à une utilisation autre qu'une utilisation
résidentielle normale.
Si le produit est installé dans un véhicule ou bateau à moteur, ou une installation mobile similaire, vous
bénéficiez de la même garantie limitée d'un an, mais vous devrez acheminer à vos frais ledit véhicule, bateau ou
installation mobile contenant le produit jusqu'au centre de service ou payer les frais de déplacement du
technicien jusqu'à l'emplacement où se trouve le produit.
FISHER & PAYKEL S'ENGAGE À :
Entreprendre à ses frais (pièces et main-d'oeuvre) toutes réparations du produit (sur lequel figure le numéro de
série) jugé défectueux. En Alaska, vous devez payer les frais d'expédition du produit à un centre de service ou les
frais de déplacement d'un technicien dans le cas d'une visite à domicile. Si le produit est installé dans un
véhicule ou bateau à moteur, ou une installation mobile similaire, vous devrez acheminer à vos frais ledit
véhicule, bateau ou installation mobile contenant le produit jusqu'au centre de service ou payer les frais de
déplacement du technicien jusqu'à l'emplacement où se trouve le produit.
Si nous sommes dans l'incapacité de réparer une pièce défectueuse du produit après un nombre raisonnable de
tentatives, nous pourrons, à notre choix, remplacer la pièce ou le produit, ou vous rembourser entièrement le
prix d'achat du produit (à l'exclusion des frais d'installation ou autres frais.)
Cette garantie s'applique à l'acheteur initial et à tous les propriétaires successifs du produit dans la mesure où il
s'agit d'un produit acheté pour une utilisation à domicile normale. Tout service couvert par cette garantie limitée
sera assuré par Fisher & Paykel Appliances Inc. ou son agent de service DCS agréé durant les heures d'ouverture
normales.
QUELLE EST LA DURÉE DE CETTE GARANTIE LIMITÉE ?
Notre responsabilité en vertu de cette garantie limitée concernant l'intégralité du produit expire UN AN à partir
de la date d'achat du produit par le premier acheteur. Notre responsabilité en vertu de cette garantie limitée
concernant l'intégrité structurelle des pièces extérieures et intérieures expire CINQ ANS à partir de la date
d'achat du produit par le premier acheteur.
Notre responsabilité en vertu de toute garantie implicite, y compris la garantie implicite de qualité marchande (la
garantie tacite selon laquelle le produit est approprié pour un usage normal) expire également UN AN (ou une
période plus longue si requis par la loi) à partir de la date d'achat du produit par le premier acheteur. Certaines
juridictions ne permettent pas la limitation de la garantie implicite, il est donc possible que la limitation cidessus sur les garanties implicites ne s'applique pas à vous.
NE SONT PAS COUVERTS PAR LA GARANTIE :
A. Les appels de service n'ayant aucun rapport avec un défaut éventuel du produit. Le coût de l'appel de service
sera facturé s'il se trouve que le problème n'est pas dû à un défaut du produit. Par exemple :
1. Corriger une mauvaise installation du produit.
2. Montrer comment utiliser le produit.
3. Remplacer des fusibles à domicile, réarmer les disjoncteurs, réparer les fils électriques ou la plomberie du
domicile, ou remplacer des ampoules.
14
Page 32

GARANTIE (suite)
4. Corriger des anomalies causées par l'utilisateur.
5. Changer la configuration du produit.
6. Modifications non autorisées du produit.
7. Bruits ou vibrations considérés comme normaux, par exemple les bruits de drain ou de ventilateur, les bruits
de régénération (vibrations, sifflements) ou les signaux d'avertissement à l'intention de l'utilisateur.
8. Corriger des dommages causés par des animaux nuisibles, par exemple des rats, des coquerelles, etc.
B. Défauts causés par des facteurs autres que :
1. Utilisation domestique normale ou
2. Utilisation conformément aux indications du guide de l'utilisateur.
C. Défauts du produit pour cause d'accident, négligence, mauvaise utilisation, incendie, inondation ou calamité
naturelle.
D. Les coûts des réparations effectuées par des techniciens non autorisés ou le coût de correction de ces
réparations non autorisées.
E. Les frais de voyage et les frais connexes encourus lorsque le produit est installé dans un lieu à accès illimité ou
restreint (déplacement par avion ou par bateau, régions géographiques isolées, etc.).
F. Entretien normal recommandé par le guide l'utilisateur.
Contactez votre distributeur ou votre installateur en cas de problème d'installation. Il vous incombe d'assurer
une installation électrique, une ventilation et toute autre connexion appropriées. Nous ne sommes pas responsables des dommages indirects ou accessoires (coût de réparation ou de remplacement d'autres biens
endommagés parce que le produit était défectueux ou tout autre coût que vous auriez encouru parce que le
produit était défectueux). Certaines juridictions interdisent l’exclusion ou la restriction de la responsabilité des
dommages indirects ou accessoires; l’exclusion ou la restriction indiquée ci-dessus peut donc ne pas s'appliquer
à votre cas particulier.
POUR OBTENIR DES RÉPARATIONS
Veuillez consulter le guide de l'utilisateur. Si vous avez des questions concernant l'utilisation du produit, que
vous cherchez le nom de l'agent de service DCS agréé local ou que pensez que le produit est défectueux et
désirez le faire réparer dans le cadre de cette garantie limitée, veuillez contacter votre distributeur ou nous
appeler au numéro suivant :
(NUMÉRO SANS FRAIS) 1-888-281 5698 ou contactez-nous par l'intermédiaire de notre site Web :
www.dcsappliances.com.
Vous devrez peut-être présenter une preuve raisonnable de la date d'achat du produit avant de pouvoir
bénéficier d'une réparation dans le cadre de cette garantie limitée.
UTILISATION COMMERCIALE
Cette garantie s'applique à des appareils électroménagers utilisés à domicile; elle ne couvre pas les cas d'utilisation commerciale.
15
Page 33

GARANTIE (suite)
AUCUNE AUTRE GARANTIE
ette garantie limitée constitue l'accord entier et exclusif entre vous et Fisher & Paykel Appliances Inc. en ce qui
C
concerne tout défaut du produit. Aucun de nos employés (ou agents de service agréés) n'est autorisé à apporter
des ajouts ou des modifications à cette garantie limitée.
Garant : Fisher & Paykel Appliances, Inc.
Si vous avez besoin d'aide au sujet de cette garantie limitée, veuillez nous appeler au numéro ci-dessus
ou nous écrire à l'adresse suivante :
Fisher & Paykel Appliances, Inc.
Attention : DCS Customer Care
5900 Skylab Road, Huntington Beach, CA 92647 États-Unis
Cette garantie limitée vous donne des droits juridiques spécifiques et vous pouvez bénéficier d'autres droits qui
varient d'une juridiction à l'autre.
Fisher & Paykel Appliances inc. est un fabricant de pointe d'appareils de cuisson et d'appareils spécialisés, sous
les marques Fisher & Paykel et DCS.
16
Page 34

REMARQUE
17
Page 35

Page 36

Fisher & Paykel Appliances, Inc.
5900 Skylab Road, Huntington Beach, CA 92647
Customer Care: 888.281.5698
Fax: 714.372.7003
www.dcsappliances.com
As product improvement is an ongoing process, we reserve the
right to change specifications or design without notice.
Nous améliorons constamment ses produits et se réserve le droit
de modifier les spécifications ou la conception de ses produits
sans aucun préavis.
Part No. 239355 Rev. B
Litho in USA 06/2008
 Loading...