

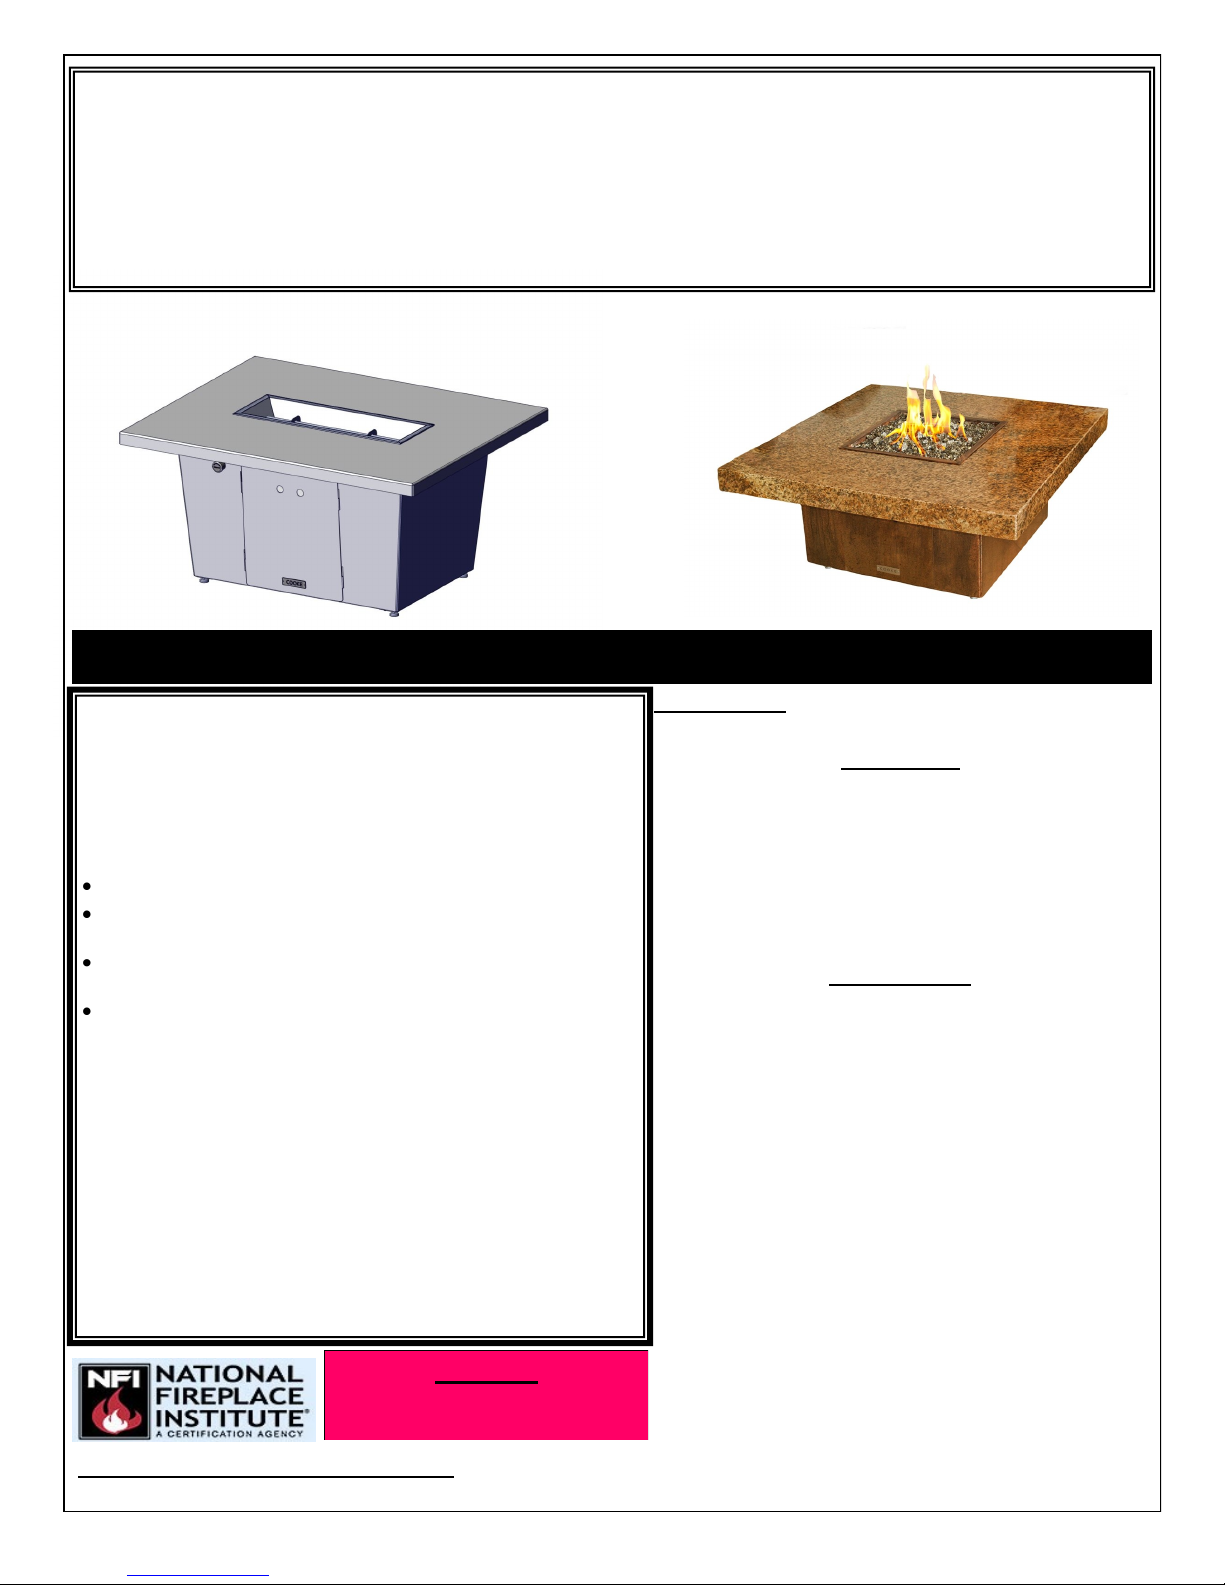
COOKE FIRE PIT TABLE INSTRUCTIONS
GENERAL GUIDE FOR LEG LESS PALISADES, PARKWAY, MONTECITO
Owner’s Manual
INSTALLLER AND CONSUMER: These instruction MUST be retained with this Fire Pit for Future reference
AND OTHER MODELS
Rev. DC0813
Warning– If these instructions are not followed, a fire or
explosion may result causing property damage, personal
injury and/or loss of life.
Do not store or use gasoline or other flammable liquids
in the vicinity of your fire pit or fire pit table.
WHAT TO DO IF YOU SMELL GAS:
Do not try to light the appliance
Do not touch any electrical switch; do not use any
phone in your building.
Immediately call your gas supplier from a neighbor
phone. Follow the gas supplier’s instructions.
If you cannot contact reach your gas supplier call the
fire department
CAUTION: Installation and maintenance must be done
by an NFI Certified or other qualified professional installer. Installer must read and understand these instructions and safety precautions prior to installing this fire
pit/table.
We highly recommend our products to be installed and
serviced by professionals who are certified in the U.S.
by NFI (National Fireplace Institute) as a Gas Specialist.
Installer must follow all instructions herein carefully, to
ensure proper product performance and safety. David
Cooke Industries LLC is not responsible for improper installation or use of this product.
WARNING
FOR OUTDOOR USE ONLY
Important: Read these instructions care-
fully before installing your fire pit /table.
WARNING
Improper installation, adjustment,
alteration, service or maintenance of your
fire pit or fire pit table may cause property damage, personal injury or loss of
life. Read the installation, operating and
maintenance instructions thoroughly before installing or servicing this appliance.
IMPORTANT
For safe operation, proper product performance and to comply with certification, listing, and building codes, use ONLY
supplied controls, parts, and accessories
that have been specifically listed or certified for use with the supplied burner system. Use of other controls, parts, or accessories is prohibited and will void all
warranties, certifications, listings, and/or
building code approvals.
A responsible adult must be present while
this unit is operating. This appliance must
never be left unattended while the fire
feature is lit. If this product is left burning
unattended, it may cause property damage and/or serious injury.
Code and supply requirements: Fire pit/table installation must conform with local codes & ordinances, or, in the absence of local codes, with the latest National Fuel Gas Code, ANSI Z223.1
DCI LLC All Rights Reserved: For technical support call (951)-805-0314 1
SAFETY FIRST- PRE-INSTALLATION AND IMPORTANT WARNINGS
A. Make sure none of the components were damaged during shipping before installing this outdoor fire pit
or fire pit table. Refer to the FIRE PIT/TABLE CLEARANCE TO COMBUSTIBLES section on pg.4, to ensure
the surrounding area is properly sized for safe installation.
B. The fire pit/table is for outdoor use only. Do not install or use this appliance inside a building, garage, or
any other enclosed area, including recreational vehicles and/or boats. This unit must be installed so that
the vent opening at the base of the unit remains clear and free of any obstruction at all times.
C. CHECK GAS TYPE (natural gas or propane): Check the unit burner components to verify that the gas sup-
ply you intent to use is compatible with the components supplied with the unit. If the gas supply is different, please contact David Cooke Industries LLC.
D. DO NOT INSTALL THIS UNIT IF MINIMUM PRESSURE IS NOT AVAILABLE OR IF MAXIMUM PRESSURE IS
EXCEEDED. Gas type and pressure must be checked prior to installation and use as follows:
For a natural gas fire pit/table: Supply Pressure: Minimum: 3.5” W.C.; Maximum: 7.0” W.C.
Outlet Pressure: 3.5” to 5.0” W.C.
For a propane gas fire pit/table: Supply Pressure: Minimum: 8.0” W.C.; Maximum: 15.0” W.C.
Outlet Pressure: 10.0” to 12.0” W.C.
E. Gas piping system must be sized to provide minimum inlet pressure at the maximum flow rate (Btu/hr)
for the unit’s respective gas type.
F. All natural gas fire pits/tables must have an emergency gas shut-off valve located on the premises
(commonly located on the gas supply line for the building—please refer to local Building Code). An additional gas supply shut-off valve should be installed in or near the fire pit/table for maintenance and safety
(it is recommended to shut off supply gas when fire pit/table is not in use).
G. The fire pit/table and its flame height adjustment valve must be disconnected from the gas supply piping
system during any pressure testing of that system at pressure in excess of 1/2 psi (3.5 kPa). This is necessary to ensure that the fire pit/table valve, regulator and components are not damaged.
H. Gas-Supply plumbing requirements: Apply only joint compounds (i.e., yellow plumber’s tape) that are re-
sistant to all gasses on all male pipe fittings. Make sure to tighten every joint securely. Do not use joint
compound to connect flare fittings, as it is not necessary and could compromise functionality. Bring the
gas supply pipe up from beneath the table base near it’s center (if applicable to unit).
I. Select a location with good drainage that allows easy access for installation and maintenance of the fire
pit/table.
WARNING: It is the installer’s responsibility to ensure a safe installation and to educate the end user as to
proper operation of the unit. This manual shall be left with the owner/operator of this unit for reference.
WARNING: FOR REMOTE CONTROL USE: To prevent accidental start-up from unwanted RF (radio frequency)
signals it is the responsibility of the end user to turn off power to electric outlet (via wall switch or breaker)
for the remote control receiver when the fire-pit/table is not in use .
WARNING: It is the responsibility of the installer to follow ALL LOCAL CODES concerning the installation and
operation of the fire pit. In the absence of local codes, please follow:
Fixed piping system: The National Fuel Gas Code, ANSI Z223.1/NFPA 54 or International Fuel Gas Code.
Electrical ground: The National Electrical Code, ANSI/NFPA 70.
OPERATING THE FIRE PIT/TABLE SAFELY AND IMPORTANT WARNINGS
A. This appliance should be inspected before use. It is imperative that the control compartment, burner and
circulating air passageways of the appliance are kept clean.
B. Improper installation and placement of the fire pit/table and decorative media WILL IMPAIR ITS EFF-
CEINCY AND MAY CAUSE THE UNIT TO MALFUNCTION.
C. This appliance is only intended for operation in temperatures above 32 degrees F. Do not operate fire pit
in windy or poor weather conditions. Temperate, calm weather conditions are optimal for fire pit/table
use.
D. When shutting off the fire pit/table ensure the CONTROL VALVE IS IN THE FULL OFF POSITION.
E. DO NOT sit or place any part of the body, clothing, or other flammable material on or near the fire pit/
table. Every time you use the unit, make sure that the area around the unit is clear and free from com-
bustible materials. The Fire Pit should never be covered when lit.
DCI LLC All Rights Reserved: For technical support call (951)-805-0314 2

OPERATING THE FIRE PIT/TABLE SAFELY AND IMPORTANT WARNINGS
WARNING: Both children and adults should be alerted to the hazards of high surface temperatures and
should avoid flames to prevent burns and/or clothing ignition. Fire pits/tables create very high temperatures, so combustibles must be located far enough away that there is no risk of ignition.
IMPORTANT: To prevent damage or cracking it is recommended that material such as granite, marble or
other dense stone be kept away from excessive heat and especially direct flame contact, which can result
from use during windy conditions.
WARNING: If your fire pit/table is making the surrounding stone surface hot, turn it down or off immedi-
ately. Your fire pit is not intended to be operated at maximum output for extended periods of time. Large
and/or quick temperature variations may cause stone to crack.
WARNING: For electronic ignition models there must be an electrical shut off ( wall switch or breaker ) on
the exterior of the fire pit or on an adjacent wall to allow for emergency shutdown and maintenance.
WARNING: This product is not intended to be a starter for wood or any other combustible material. Never
alter this product or configuration in any way.
A. SOLID FUEL MUST NOT BE BURNED in the fire pit/table.
B. DO NOT continue using if you smell unusual odors, or have headaches, nausea ,or dizziness.
C. DO NOT store any combustible material, gasoline, and any other flammable vapors/liquids in the vicinity
of the fire pit/table.
D. Matches, paper, garbage, or any other material must not be thrown onto the fire pit/table.
E. DO NOT use the fire pit/table if any part of it that has been submerged in water. Immediately call a quali-
fied professional service technician to inspect the fire pit/table and to replace any part of the control system
that has been submerged in water.
CLEANING AND MAINTENANCE
A. Always shut off the gas to the fire pit/table while performing service work.
B. Allow the fire pit/table to cool before servicing.
C. The Fire Pit should be inspected regularly by the owner/operator. Excessive debris can build up on this
fire pit/table system including leaves, dirt and other materials. It is critical that all control components,
propane air mixer, and burner are maintained free of internal obstructions, and for the surrounding area
to be kept clean of debris.
D. The burner assembly must be replaced prior to the fire pit/table being put into operation if it is evident
that the burner is damaged. Contact (951)-805-0314
E. The owner/operator should perform periodic visual checks of the burner flames and pilot flames (if appli-
cable). The burner flames should be blue at the base with a combustion of blue/yellow at the body and
tips. The pilot (if applicable) should be a steady flame, touching the electrode/thermocouple. Contact a
qualified service person for maintenance. This appliance should be inspected before use and at least an-
nually by a qualified service person
Note: Keep the surrounding area at the base of the Fire pit clean and free of obstructions at all times. Keep
the burner pan, decorative media (fire glass) and other items clean and free of debris that may cause
obstruction.
Caution: HOT DURING OPERATION AND AFTER USE. Children must be supervised when in the vicinity of
this fire pit/table. Serious injury may occur!
DCI LLC All Rights Reserved: For technical support call (951)-805-0314 3
IMPORTANT INFORMATION BEFORE OPERATION
WARNING: DO NOT OPERATE THE FIRE PIT/TABLE IN THE RAIN!!!
WARNING: Flame adjustment valves are not on all models and may vary in location and style. Owner/
operator must become familiarized with the controls before operation.
CAUTION: Installation and maintenance must be done by an NFI Certified or other qualified professional in-
staller. Read these instructions before installing this fire pit/table. Owner/operator must understand all
safety precautions and warnings contained in this manual.
A. FOR OUTDOOR USE ONLY.
B. When shutting the fire pit/table off; be sure to turn the control valve to the full off position.
C. WARNING: CARBON MONOXIDE POISON MAY LEAD TO DEATH. DO NOT MODIFY THIS FIRE PIT/TABLE OR
ITS CONTROLS, EXCEPT AS PROVIDED FOR IN THIS MANUAL. Any other un-approved modification may be
dangerous. Improper installation or use of the Fire Pit can cause serious injury or death from fire, burns,
explosions, or carbon monoxide poisoning.
BE CAREFUL
If not installed and used correctly per these instructions,
this product may cause serious injury.
D. Check state and local codes to determine if the fire pit/table is allowed in your area before installation.
E. The manual valve allows adjustable flame height and heat output. During operation, the flame height set-
ting must always be high enough for the flame to be clearly visible.
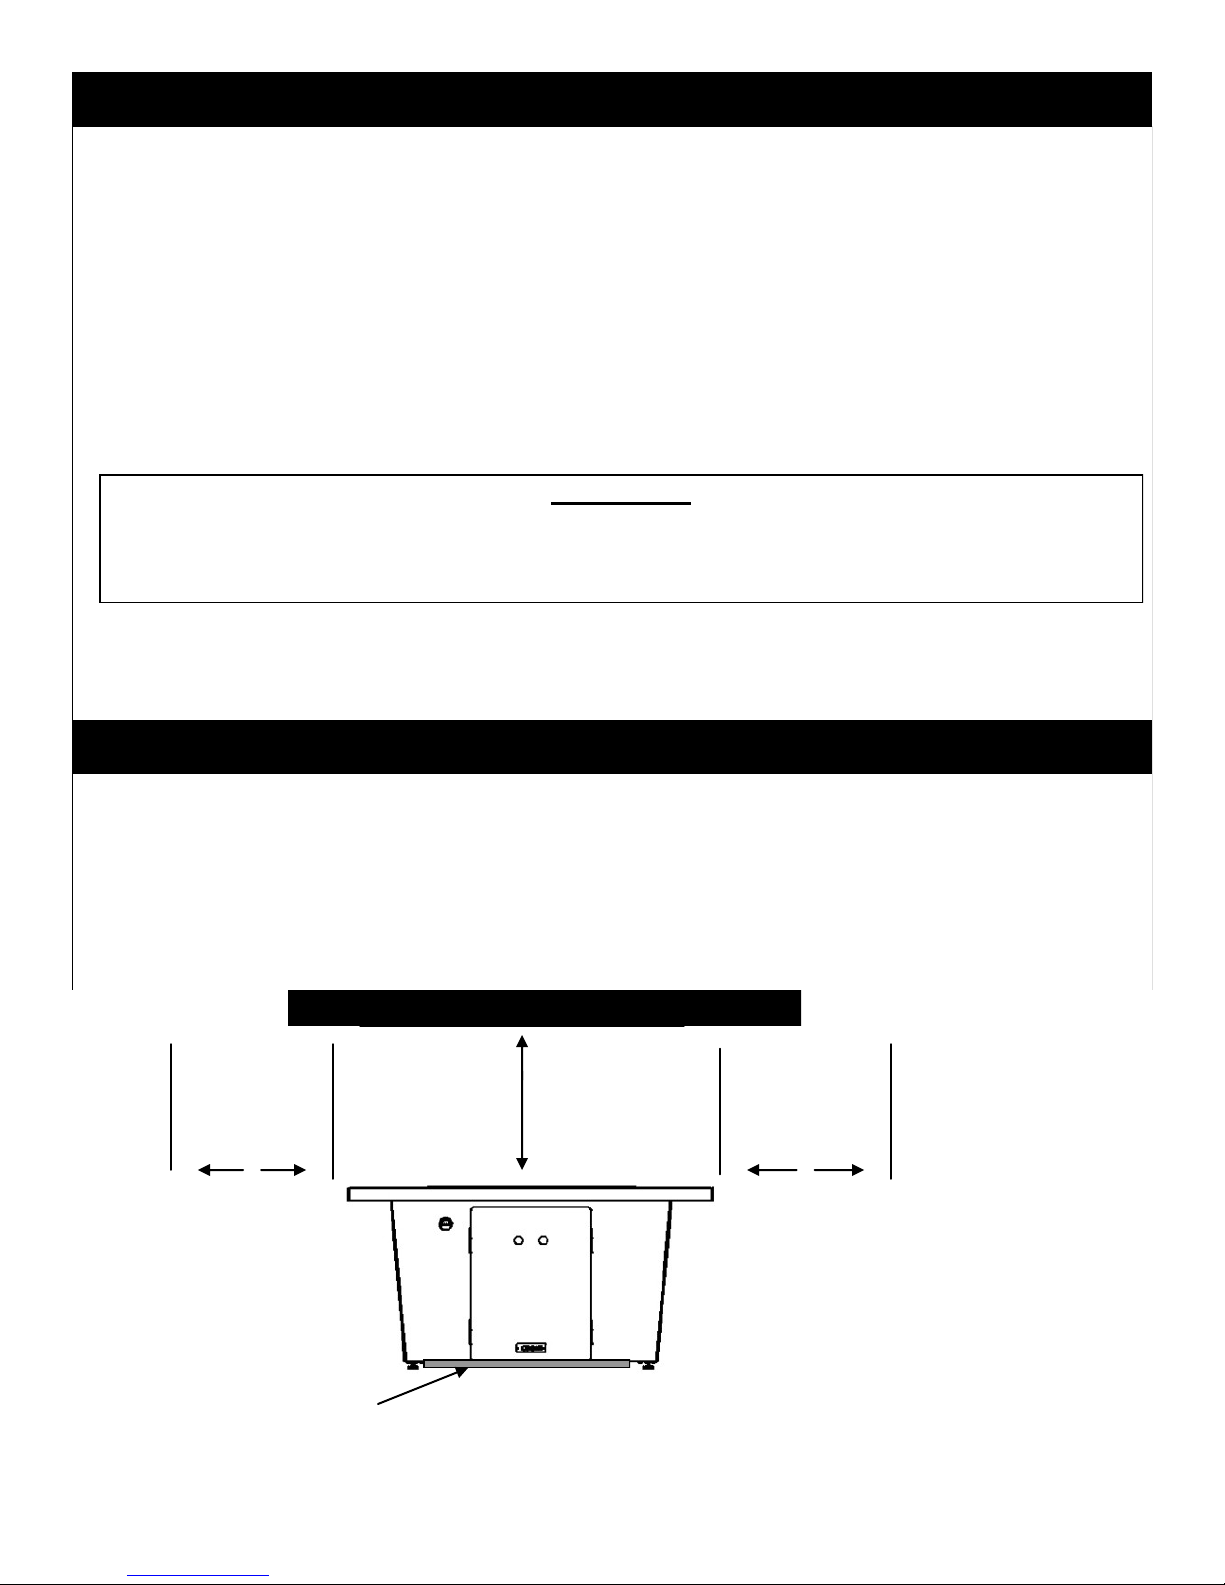
FIRE PIT CLEARANCE TO COMBUSTIBLES AND OVERALL DIMENSIONS
Side walls and fire pit/table surroundings: 48” from each side of the Fire Pit Table
Ceiling: Nothing should be located above the fire pit/table
Flooring: 0” (This unit may be installed on a concrete slab, wood deck, or other level floor type).
Note: Nothing should be above the Fire Pit Table
48”
CLEARANCE
48”
CLEARANCE
NOTE: Keep vent opening at the base of the unit clear on all sides for proper
ventilation beneath the fire pit/table.
DCI LLC All Rights Reserved: For technical support call (951)-805-0314 4

FIRE PIT TABLE ASSEMBLY INSTRUCTIONS
Check hardware provided with Fire pit/table: 28 bolts, 32 nuts, 8 rubber bumpers. Tools required for assembly: 5/32 HEX wrench, 7/16 open end wrench or socket wrench, crescent wrench (i.e., adjustable wrench).
1. Attach (1) short side to (1) long
side panel using (3) screws and
nuts.
1 Side Panel
1 Side Panel
3 Screw
3 Nut
Figure 2
3. Slide door panel into position
and attach using (3) screws and
Figure 1
2. Attach (1) another side panel
using (3) screws and nuts.
1 Side Panel
3 Screw
3 Nut
nuts.
1 Door Panel
3 Screw
3 Nut
DCI LLC All Rights Reserved: For technical support call (951)-805-0314 5
Figure 3

FIRE PIT TABLE ASSEMBLY INSTRUCTIONS CONTINUES
4. Make sure all 4 sides have 3
bolts in each corner .
4 Corners
12 Screw
12 Nut
Figure 4
Figure 5
6. Attach (4) foot plates using
(4) screws and nuts to bottom
of table. Screw in leveling feet.
1 Leveling foot
5. flip base upside down to
locate the 4 bolt holes in each
corner to attach foot plates.
4 Screw
4 Nut
DCI LLC All Rights Reserved: For technical support call (951)-805-0314 6
Figure 6

FIRE PIT TABLE ASSEMBLY INSTRUCTION
7. Upright the table and adjust
leveling feet to level the top
surface
4 Leveling feet
Figure 7
Figure 8
9. Attach (1) Propane regulator
hose to top (shorter) stem of flow
control valve. For Natural gas units
connect 1/2 psi. gas source which
should be shut off at emergency
valve at this time.
8. Insert (1) flow control valve into
hole on front panel. Attach using
(1) Jam nut and (1) control Knob
tighten set screw on knob.
1 Flow Control Valve
1 Locknut
1 Control Knob
1
Propane regulator with
attached hose
Turn on the gas supply, ignite the burner, and test at all connections for leaks using soapy
water solution. If bubbles appear, a leak is present. Turn off the gas and tighten at all
connections. Repeat until no leaks are present. If a leak persist, turn off the gas supply and
contact the local gas company. NEVER USE A FLAME TO CHECK FOR LEAKS!!!!
DCI LLC All Rights Reserved: For technical support call (951)-805-0314 7
Figure 9
Leak Test

FIRE PIT TABLE ASSEMBLY INSTRUCTIONS
10. connect (1) stainless steel flex
hose into lower valve stem. Firmly
tighten all gas fittings.
1 Stainless steel flex
Hose
Figure 11
Figure 10
11. Insert rubber grommets into
holes on top of panels. Glue can be
used here to hold granite or other
tops that do not bolt to base.
8 Rubber Grommets
12. If top has studs bolt (1) table
top to base. Lower pan and burner
into top hole, attach inlet of (1)
burner to SS flex hose and tighten
1
4
1 Burner
Table Top
Nuts
Figure 12
Leak Test
Turn on the gas supply, ignite the burner, and test at all connections for leaks using soapy
water solution. If bubbles appear, a leak is present. Turn off the gas and tighten at all
connections. Repeat until no leaks are present. If a leak persist, turn off the gas supply and
contact the local gas company. NEVER USE A FLAME TO CHECK FOR LEAKS!!!!
DCI LLC All Rights Reserved: For technical support call (951)-805-0314 8

FIRE PIT TABLE ASSEMBLY INSTRUCTIONS
FIREPIT TABLE ASSEMBLY INSTRUCTIONS
13. Connect propane tank (not
included) to propane regulator using
standard propane tank connection
process. For Natural gas units turn
on gas from emergency shut off
valve.
Figure 14
15. Make sure flow valve is off in the
lock out position, turn on propane tank,
Keep Vents Clear on all sides
Figure 13
14. Attach (1) door panel by
aligning tabs with slots and
releasing, door hooks should fit
into slots on front panel.
1 Door Panel
slight push in will allow knob to turn on
gas flow then light fire pit immediately
with hand held fire source/lighter. If
you smell gas DO NOT use, turn off tank
then call a professional!
Warning: Read all instructions before
operation
Turn on the gas supply, ignite the burner, and test at all connections for leaks using soapy
water solution. If bubbles appear, a leak is present. Turn off the gas and tighten at all
connections. Repeat until no leaks are present. If a leak persist, turn off the gas supply and
contact the local gas company. NEVER USE A FLAME TO CHECK FOR LEAKS!!!!
DCI LLC All Rights Reserved: For technical support call (951)-805-0314 9
Keep Vents Clear
Figure 15
Leak Test

FIRE PIT DECORATIVE MEDIA OPTIONS
CAUTION: Decorative media will remain hot for some time after use. If you need to reposition
any decorative media, use heat - resistant gloves or allow to cool before handling.
Note: Lava media OR Fire glass is always placed on the burner first in each option.
This provides an important base for the diffusion of gas and air. Depending on fire-pit size,
more lava than supplied may be required.
MANUAL (MATCH LIT) LIGHTING INSTRUCTIONS
1. STOP! Confirm ignition option of your unit, lighting instructions can vary.
2. Lay a lighted long-stem match (See Figure 16) on the surface of the
decorative media near the burner ring (do not hold match in your hand) or use a lighted long-necked bu-
tane lighter.
3. Push in and then slowly turn the control knob (See Figure 17) to the ON position. You should hear the gas
flowing and your burner should light in a few seconds.
4. If the burner does not light before the match goes out, immediately turn the control knob to the OFF po-
sition.
5. Wait, approximately five (5) minutes to clear out any gas, and repeat steps 1-4 above.
6. If your burner fails to light again, turn the control knob to the OFF position (Figure 17) and contact your
dealer or gas supplier.
7. To extinguish your gas burner, turn the control knob to the OFF position. Be sure the control knob is
turned fully off in the lock out position to avoid any gas leakage.
Figure 16
Note: Push in then turn the knob
counter-clockwise to turn the Fire Pit
to ON.
To lower the flame or to turn OFF turn
the knob clockwise.
Never turn down gas flow where you
can’t see the flame unless to the
Keep Vents Clear Keep Vents Clear on all sides
complete off position!
Figure 17
OPERATION
Each installation site for any fire pit/table presents its own unique combustion environment. Specific factors
such as weather, wind currents, yard debris, altitude, drafts, and the size of the surrounding area, all have an
influence on the proper operation of the Fire Pit table. A normally operating fire will demonstrate the
following characteristics: A) A lively, realistic yellow flame. B) Odor-Free (If the flame is not clean (identifiable
by excessive sooting on the decorative media), refer to the Cleaning and maintenance section on page 11.)
DCI LLC All Rights Reserved: For technical support call (951)-805-0314 10

WARRANTY
David Cooke Industries, LLC warrants this fire pit/table, controls, and accessories against defects in material and workmanship for the following periods of time:
1. Burner media, Fire Pit Logs, Fire Glass and other objects are guaranteed against the manufacturer’s war-
ranty from the date of purchase. (6 months)
2. Burner, control and other components are guaranteed against the manufacturer’s warranty from the
date of purchase. (1 year)
Commercial installation warranty period shall be (3) months. Warranty does not extend to corrosion of parts
used in commercial and living locations within 5 miles of a beach environment.
THIS WARRANTY IS FOR THE BENEFIT OF THE ORIGINAL PURCHASER.
WARRANTY ADJUSTMENT:
David Cooke Industries, LLC agrees to repair or furnish a replacement for, but not remove or install any
product or component which proves defective within the above warranty and appropriate time periods
stated.
BUYER shall notify David Cooke Industries, LLC of any defect covered within this warranty no later than
thirty (30) days after a defect is discovered.
No product will be accepted for return or replacement without written authorization of David Cooke In-
dustries, LLC . Before returning merchandise, write to David Cooke Industries, LLC giving us full details of
the complaint and a copy of the sales receipt or other evidence of the purchase date. Merchandise re-
turned without proof of purchase date will be serviced out-of-warranty at our prevailing service and parts
rates. If merchandise was damaged in transit, the file claim must be with the freight company.
Shipping charges must be pre-paid by the buyer. REPAIR OR REPLACMENT UNDER THIS WARRANTY
WILL BE SHIPPED FREIGHT COLLECT.
The foregoing warranty is limited solely as set forth herein and applies only for the designated products
and components identified above.
David Cooke Industries, LLC shall not be liable for any loss, damage, incidental or consequential damage of
any kind weather based upon warranty, contract, or negligence arising in connection with the sale, use or
repair of the product.
The maximum liability of David Cooke Industries, LLC in connection with this limited warranty shall not in
any case exceed the contact price paid for the product claimed to be defective or unsuitable.
This warranty does not extend to any product manufactured by David Cooke Industries, LLC which has
been subjected to misuse, neglect, accident, improper installation, or use in violation of instructions.
This warranty does not extend to or apply to any unit which has been repaired or altered in any place
other than approved facilities or by persons not expressly approved by David Cooke Industries, LLC.
Components manufactured by any supplier other than David Cooke Industries, LLC shall bear only that
warranty made by the manufacturer of that product.
Freight damage and color changes occur from causes beyond manufacturer’s control and are not
covered by any warranty.
THIS WARRANTY GIVES YOU SPECIFIC LEGAL RIGHTS, AND YOU MAY ALSO HAVE OTHER RIGHTS WHICH VARY
FROM STATE TO STATE.
FOR CONSUMER RECORD CARD ONLY:
DO NOT SEND THIS CARD TO David Cooke Industries LLC
FIRE PIT TABLE
MODEL:
BURNER / CONTROL:
DATE OF PURCHASE:
DCI LLC All Rights Reserved: For technical support call (951)-805-0314 11
 Loading...