

DCE 7204A-NRD User Manual

Wireless-N ADSL2+
Firewall Router
User Manual
Last Revised Date: March 20, 2015

Table of Contents
Chapter 1 ................................................................................................................................................................ 1
1.1 Introducing the Router ................................................................................................................................. 1
Express Internet Access .................................................................................................................................. 1
Firewall Security and Smooth Traffic .............................................................................................................. 1
Easy Network Management ........................................................................................................................... 1
IPv6 Ready - Pathway to the Future ............................................................................................................... 1
Quick Start Wizard .......................................................................................................................................... 2
Firmware Upgradeable ................................................................................................................................... 2
1.2 Features of the Router ................................................................................................................................. 3
Network Protocols and Features .................................................................................................................... 3
Firewall ........................................................................................................................................................... 4
Quality of Service Control ............................................................................................................................... 4
Wireless LAN ................................................................................................................................................... 4
IPTV Applications ............................................................................................................................................ 4
Management .................................................................................................................................................. 4
1.3 Hardware Specifications ............................................................................................................................... 5
Physical Interface ............................................................................................................................................ 5
1.4 Applications for the Router .......................................................................................................................... 6
Chapter 2 ................................................................................................................................................................ 7
Installing the Router ............................................................................................................................................... 7
2.1 Important note for using the Router ........................................................................................................... 7
2.2 Package Contents ......................................................................................................................................... 8
2.3 The Front LEDs .............................................................................................................................................. 9
2.4 The Rear Ports ............................................................................................................................................ 10
2.5 Cabling ........................................................................................................................................................ 11
Chapter 3 .............................................................................................................................................................. 12
3.1 Before Configuration .................................................................................................................................. 12
3.1.1 Configuring a PC in Windows 7/8 ........................................................................................................ 13
3.1.2 Configuring a PC in Windows Vista ...................................................................................................... 16
3.1.3 Configuring a PC in Windows XP ......................................................................................................... 18
3.2 Factory Default Settings ............................................................................................................................. 20
3.2.1 Username and Password ..................................................................................................................... 20
3.3 LAN Port Addresses .................................................................................................................................... 21
3.4 Information from your ISP ......................................................................................................................... 21
Chapter 4 .............................................................................................................................................................. 22
4.1 Configuring the Router with your Web Browser ....................................................................................... 22

4.2 Status .......................................................................................................................................................... 24
4.2.1 Device Info ........................................................................................................................................... 25
4.2.2 System Log ........................................................................................................................................... 27
4.2.4 Statistics ............................................................................................................................................... 28
4.2.5 DHCP Table .......................................................................................................................................... 31
4.2.5 ADSL Status .......................................................................................................................................... 32
4.3 Quick Start .................................................................................................................................................. 33
4.4 Configuration .............................................................................................................................................. 36
4.4.1 Interface Setup .................................................................................................................................... 37
4.4.1.1 Internet ......................................................................................................................................... 38
4.4.1.2 LAN ................................................................................................................................................ 42
4.4.1.3 Wireless ......................................................................................................................................... 46
4.4.1.4 Wireless MAC Filter ...................................................................................................................... 57
4.4.2 Advanced Setup ................................................................................................................................... 58
4.4.2.1 Firewall .......................................................................................................................................... 59
4.4.2.2 Routing .......................................................................................................................................... 60
4.4.2.3 NAT ................................................................................................................................................ 62
4.4.2.4 Static DNS ...................................................................................................................................... 67
4.4.2.5 ADSL .............................................................................................................................................. 68
4.4.2.6 QoS ................................................................................................................................................ 69
4.4.2.7 Interface Grouping ........................................................................................................................ 72
4.4.2.8 Time Schedule ............................................................................................................................... 74
4.4.2.9 Remote System Log ...................................................................................................................... 75
4.4.3 Access Management ............................................................................................................................ 76
4.4.3.1 Device Management ..................................................................................................................... 77
4.4.3.2 SNMP ............................................................................................................................................. 78
4.4.3.3 Universal Plug & Play .................................................................................................................... 79
4.4.3.4 Dynamic DNS ................................................................................................................................. 80
4.4.3.5 Access Control ............................................................................................................................... 82
4.4.3.6 Packet Filter .................................................................................................................................. 84
4.4.3.7 CWMP (TR-069)............................................................................................................................. 88
4.4.3.8 Parental Control ............................................................................................................................ 90
4.4.4 Maintenance ........................................................................................................................................ 91
4.4.4.1 User Management ........................................................................................................................ 92
4.4.4.2 Time Zone ..................................................................................................................................... 96
4.4.4.3 Firmware & Configuraion.............................................................................................................. 97
4.4.4.4 System Restart .............................................................................................................................. 99
4.4.4.5 Diagnostics Tool .......................................................................................................................... 100
Chapter 5 ............................................................................................................................................................ 101
Problems starting up the router ............................................................................................................. 101
Problems with the WAN Interface .......................................................................................................... 101
Problems with the LAN Interface ............................................................................................................ 101
APPENDIX ........................................................................................................................................................... 102

1
Chapter 1
Introduction the Router
1.1 Introducing the Router
This Router is an economical ADSL2+ router ideal for Home and SOHO users to enjoy improved Wireless
Access Speed with a maximum operational speed of 150Mbps.It delivers the highest level of security with
higher speed and better coverage of wireless-n solutions. With an integrated 802.11n wireless access point, the
router enables faster wireless speeds of up to 150Mbps. The SOHO Firewall is integrated to provide protection
against hacker attacks while the Quality of Service prioritizes queues and traffic for applications such as music
downloads, online gaming, video streaming and file sharing.
Express Internet Access
Complying with worldwide ADSL standards, the Router supports downstream data transmission rates of up to
12/24 Mbps with ADSL2/2+, 8 Mbps with ADSL, and performs at upstream rates of up to 1 Mbps. Moreover, the
Router includes Annex M technology that supports the latest ADSL2/2+ standard for higher upload speeds by
increasing the upstream operation rate to approximately 2.5Mbps (up to 3Mbps under ideal conditions). With
this technology, you can enjoy even higher-speed broadband multimedia applications such as interactive
gaming, video streaming and real-time audios that run faster and easier than ever.
Firewall Security and Smooth Traffic
With the built-in NAT default firewall, the advanced anti-hacker pattern-filtering protection features automatically
detect and block Denial of Service (DoS) attacks. In addition, packet filtering provides high-level security for
access control. Quality of Service control prioritizes the traffic and allows users to enjoy smooth traffic while
running applications such as IPTV, VoIP calls or interactive game through the Internet.
Easy Network Management
The Web-based user interface of the Router makes it extremely easy for users to install and manage the
network. The router supports both DHCP client and server, enabling system administrators to easily integrate
this router into existing network environments, as well as manage IP assignment without having to reconfigure
other stations.
IPv6 Ready - Pathway to the Future
The Router fully supports IPv6 (Internet Protocol Version 6), launched as the current IPv4 range is filling up, and
IPv6 is gradually becoming the indispensable addressing system for savvy cloud computing users. Dual stack
means the router is capable of running IPv4 and IPv6 in parallel during the transition period. With IPv6 enabled
devices, three major transition mechanisms such as Dual-Stack, Dual-Stack Lite, and 6RD (IPv6 rapid
deployment) are supported to be adapted easily into service provider’s IPv4/IPv6 network.

2
Quick Start Wizard
Support a WEB GUI page to install this device quickly. With this wizard, end users can enter the information
easily which they get from ISP, then surf the Internet immediately.
Firmware Upgradeable
Device can be upgraded to the latest firmware through the WEB based GUI.

3
1.2 Features of the Router
• IPv6 ready (IPv4/IPv6 dual stack)
• 4-port 10/100Mps Fast Ethernet switch
• Multiple wireless SSIDs with wireless guest access and client isolation
• IEEE
802.11 b/g/n compliant Wireless Access Point with Wi-Fi Protected Setup (WPS)
•
Wi-Fi Protected Access (WPA-PSK/ WPA2-PSK) and Wired Equivalent Privacy (WEP)
•
Wireless speed up to 150Mbps and 3 times the coverage of standard 802.11g
•
SOHO Firewall Security with DoS Preventing and Packet Filtering
•
Quality of Service Control for traffic prioritization management
•
Universal Plug and Play (UPnP) Compliance
• Ease of Use with Quick Installation Wizard
•
TR-069*2 for remote management
• Ideal for SOHO, office and home users
ADSL Compliance
• Compliant with ADSL2+ standards
- G.dmt.bis plus (ITU G.992.5)
- ADSL2+ Annex M (ITU G.992.5 Annex M)
• Compliant with ADSL2 standards
- G.dmt.bis (ITU G.992.3)
- ADSL2 Annex M (ITU G.992.3 Annex M)
• Compliant with ADSL standards
- Full-rate ANSI T1.413 Issue 2
- G.dmt (ITU G.992.1)
- G.lite (ITU G.992.2)
- G.hs (ITU G.994.1)
• Support G.inp (ITU G.998.4)
Network Protocols and Features
•
PPPoE (RFC 2516), PPPoA (RFC 2364), DHCP Client, Static IP
•
IPv4, IPv6, IPv4 / IPv6 dual stack
•
Dual-Stack Lite and 6RD (IPv6 Rapid Deployment)
•
NAT, static routing and RIP v1/v2
•
Universal Plug and Play (UPnP) compliant
•
Virtual server and DMZ
•
SNTP, DNS proxy
•
Dynamic Domain Name System (DDNS)
•
IGMP proxy and IGMP snooping
•
MLD proxy and MLD snooping

4
Firewall
•
Built-in NAT Firewall
•
Stateful Packet Inspection (SPI)
• DoS attack prevention including Land Attack, Ping of Death, etc
• Access Control
• IP&MAC filter, URL Content Filter
• Password protection for system management
• VPN pass-through
Quality of Service Control
•
Traffic prioritization management based-on Protocol, Port Number and IP Address (IPv4/ IPv6)
Wireless LAN
•
Compliant with IEEE 802.11 b/ g standards
•
2.4 GHz - 2.484GHz radio band for wireless
•
Up to 150 Mbps wireless operation rate
•
64/ 128 bits WEP supported for encryption
•
WPS (Wi-Fi Protected Setup) for easy setup
•
Wireless Security with WPA-PSK/ WPA2-PSK support
•
Multiple wireless SSIDs
•
WDS repeater function support
IPTV Applications*3
•
IGMP Snooping and IGMP Proxy
• MLD Snooping and MLD Proxy
•
Virtual LAN (VLAN)
•
Quality of Service (QoS)
Management
• Quick Installation Wizard
•
Web-based GUI for remote and local management (IPv4/ IPv6)
• Web GUI permission
•
Firmware upgrades and configuration data upload and download via web-based GUI
•
Supports DHCP Server/ Client/ Relay(WAN port)
•
TR-069*2 supports remote management
• Diagnostic tool

5
1. This router may require firmware modification for certain ADSL2/2+/Annex M DSLAMs
2. On request for Telco / ISP projects
3. IPTV application may require subscription to IPTV services from a Telco / ISP.
4. Specifications on this datasheet are subject to change without prior notice.

5
1.3 Hardware Specifications
Physical Interface
•
WLAN: 1 detachable antenna
•
DSL: ADSL port
•
Ethernet: 4-port 10/ 100 auto-crossover (MDI/ MDI-X) Switch.
•
Factory default reset button
• WPS& Wi-Fi ON/OFF button
• Power
jack
• Power switch

6
1.4 Applications for the Router
Diagram on how to connect your router:
7
Chapter 2
Installing the Router
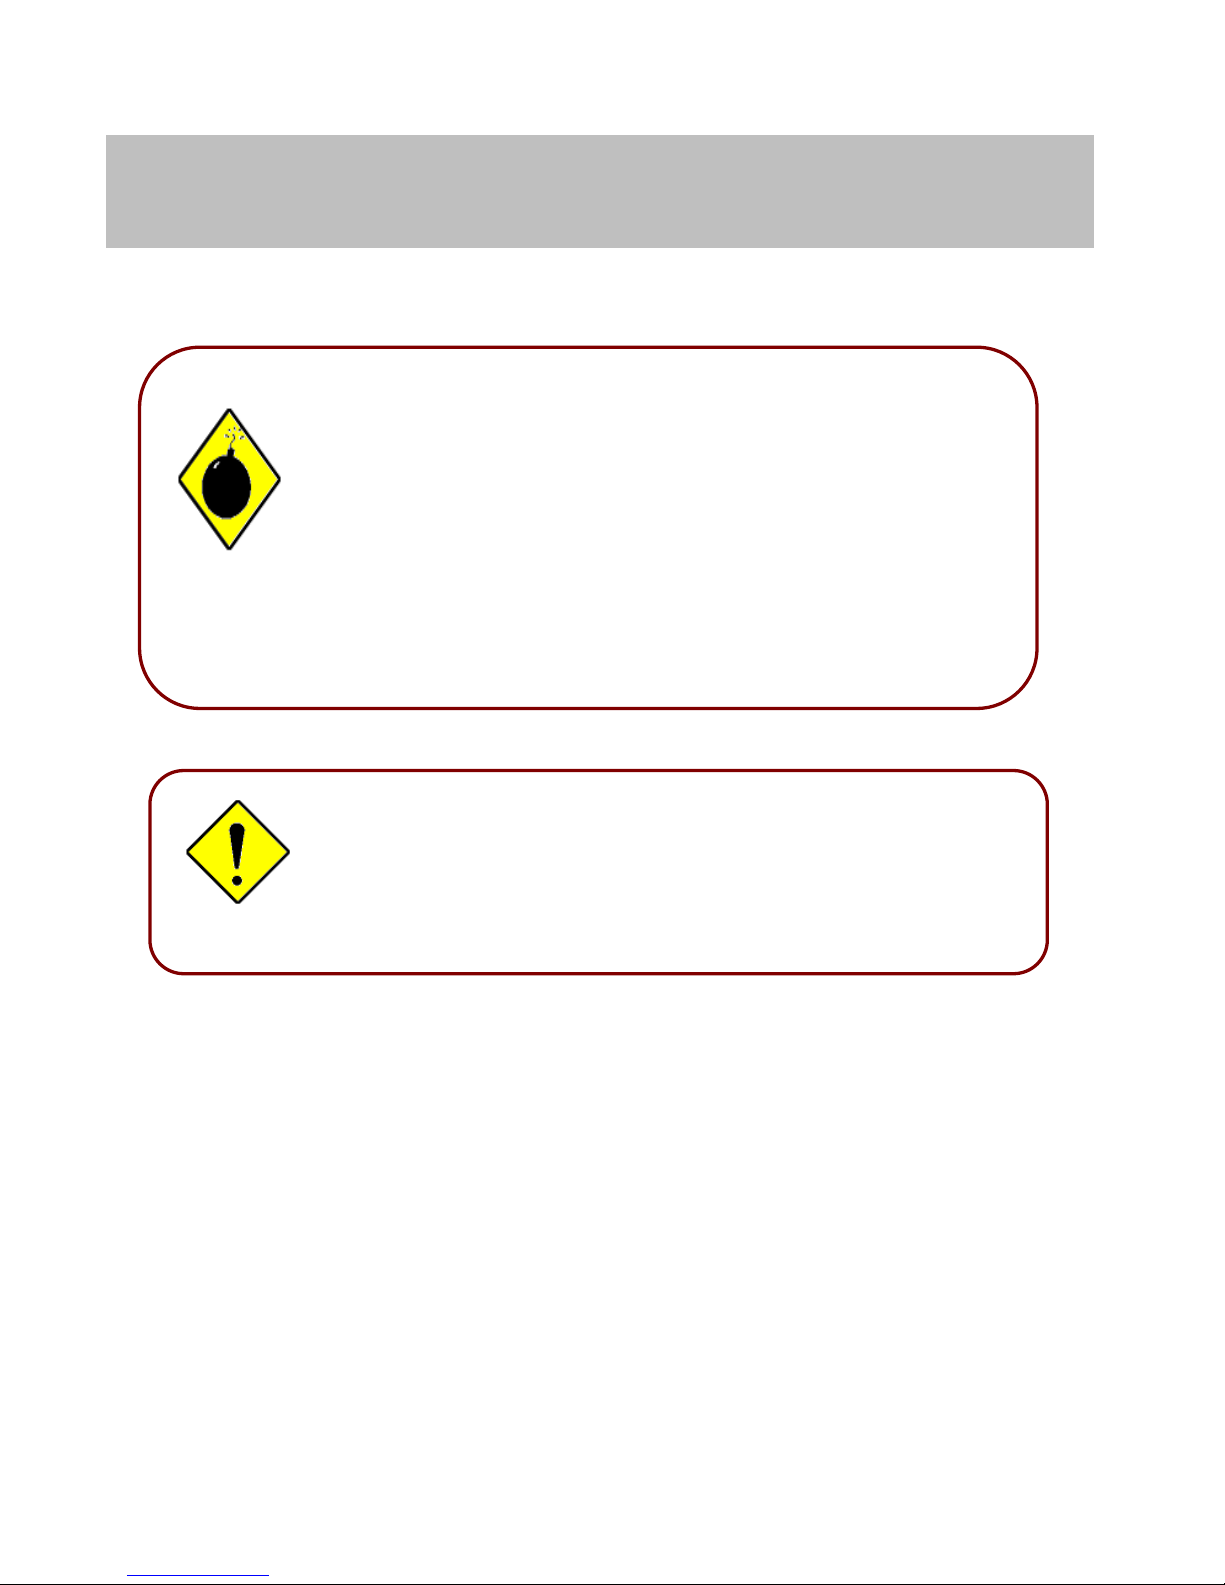
2.1 Important note for using the Router
Place the Router on a stable surface.
Only use the power adapter that comes with the package. Using a
different voltage rating power adaptor may damage the router.
Attention
Do not use the Router in high humidity or high temperatures.
Do not use the same power source for the Router as other
equipment.
Do not open or repair the case yourself. If the Router is too hot, turn
off the power immediately and have it repaired at a qualified service
center.
Avoid using this product and all accessories outdoors.
Warning
8
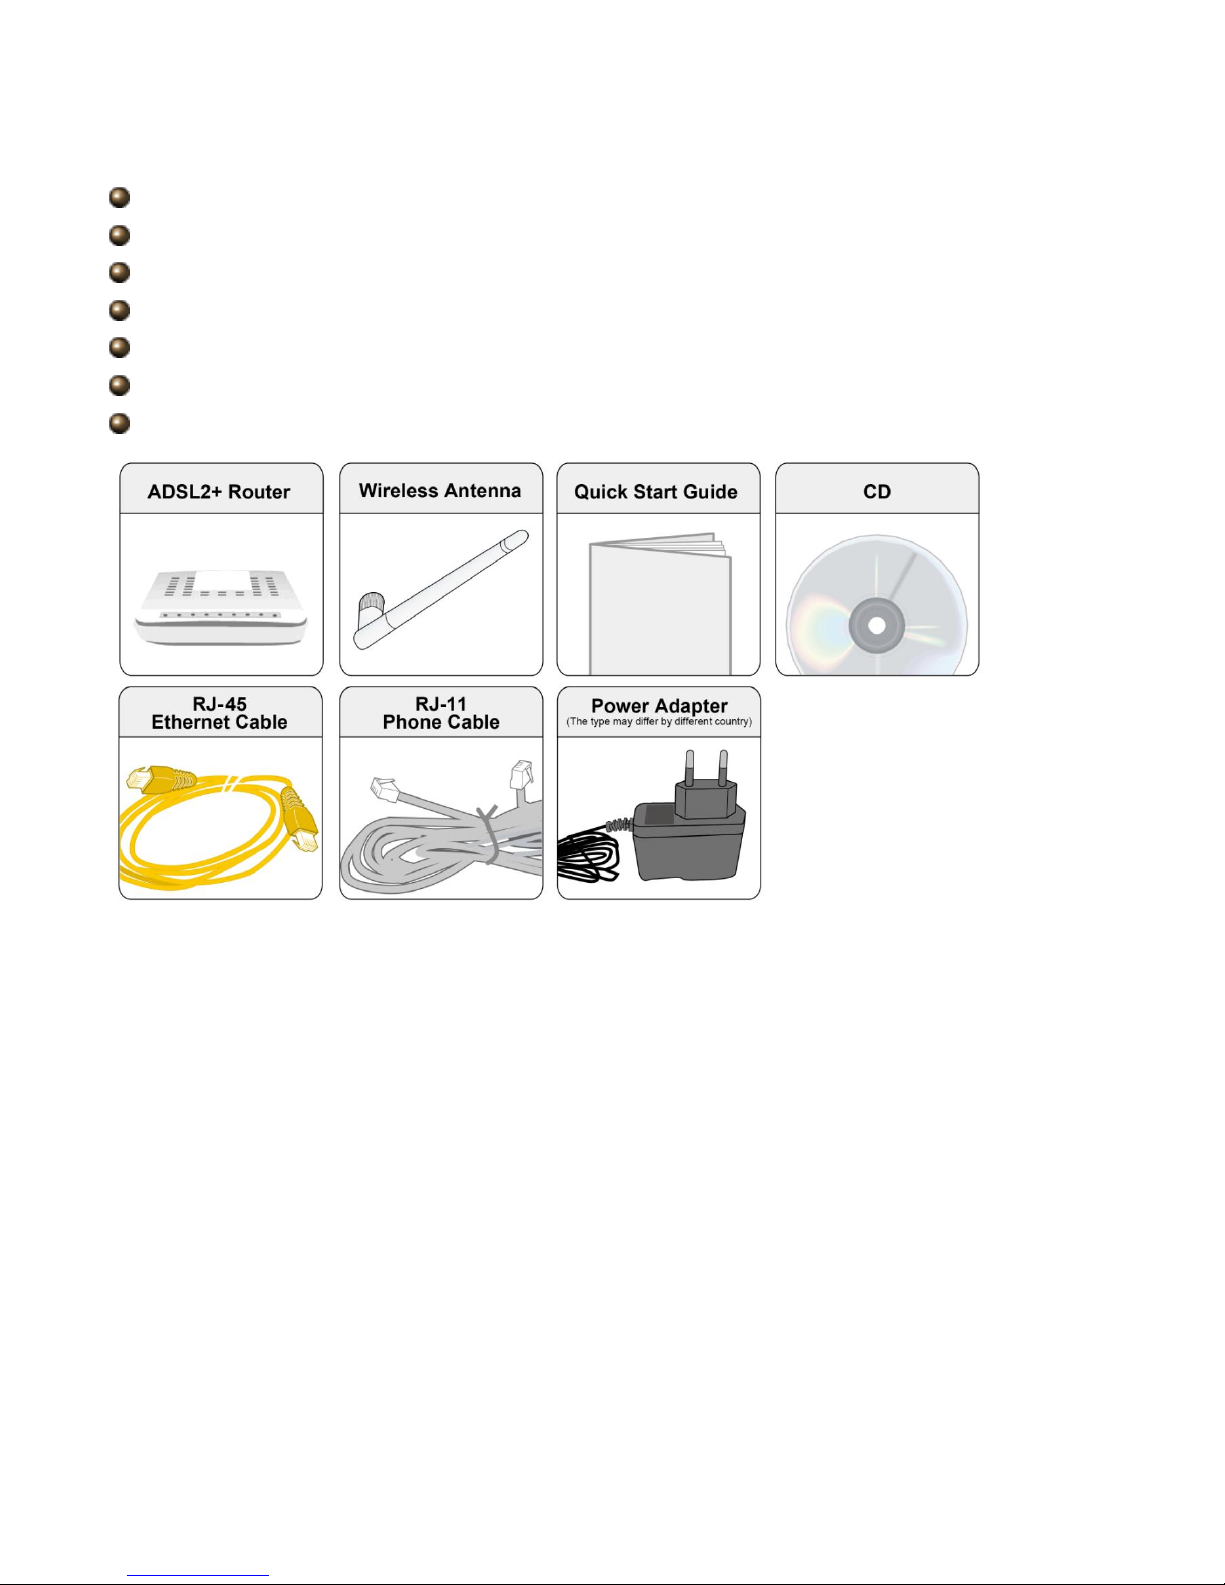
2.2 Package Contents
Wireless-N ADSL2+ Firewall Router
One detachable antenna
Quick Start Guide
CD containing user manual
Ethernet (RJ-45 CAT-5) cable
RJ-11 ADSL/telephone cable
Power adapter
9
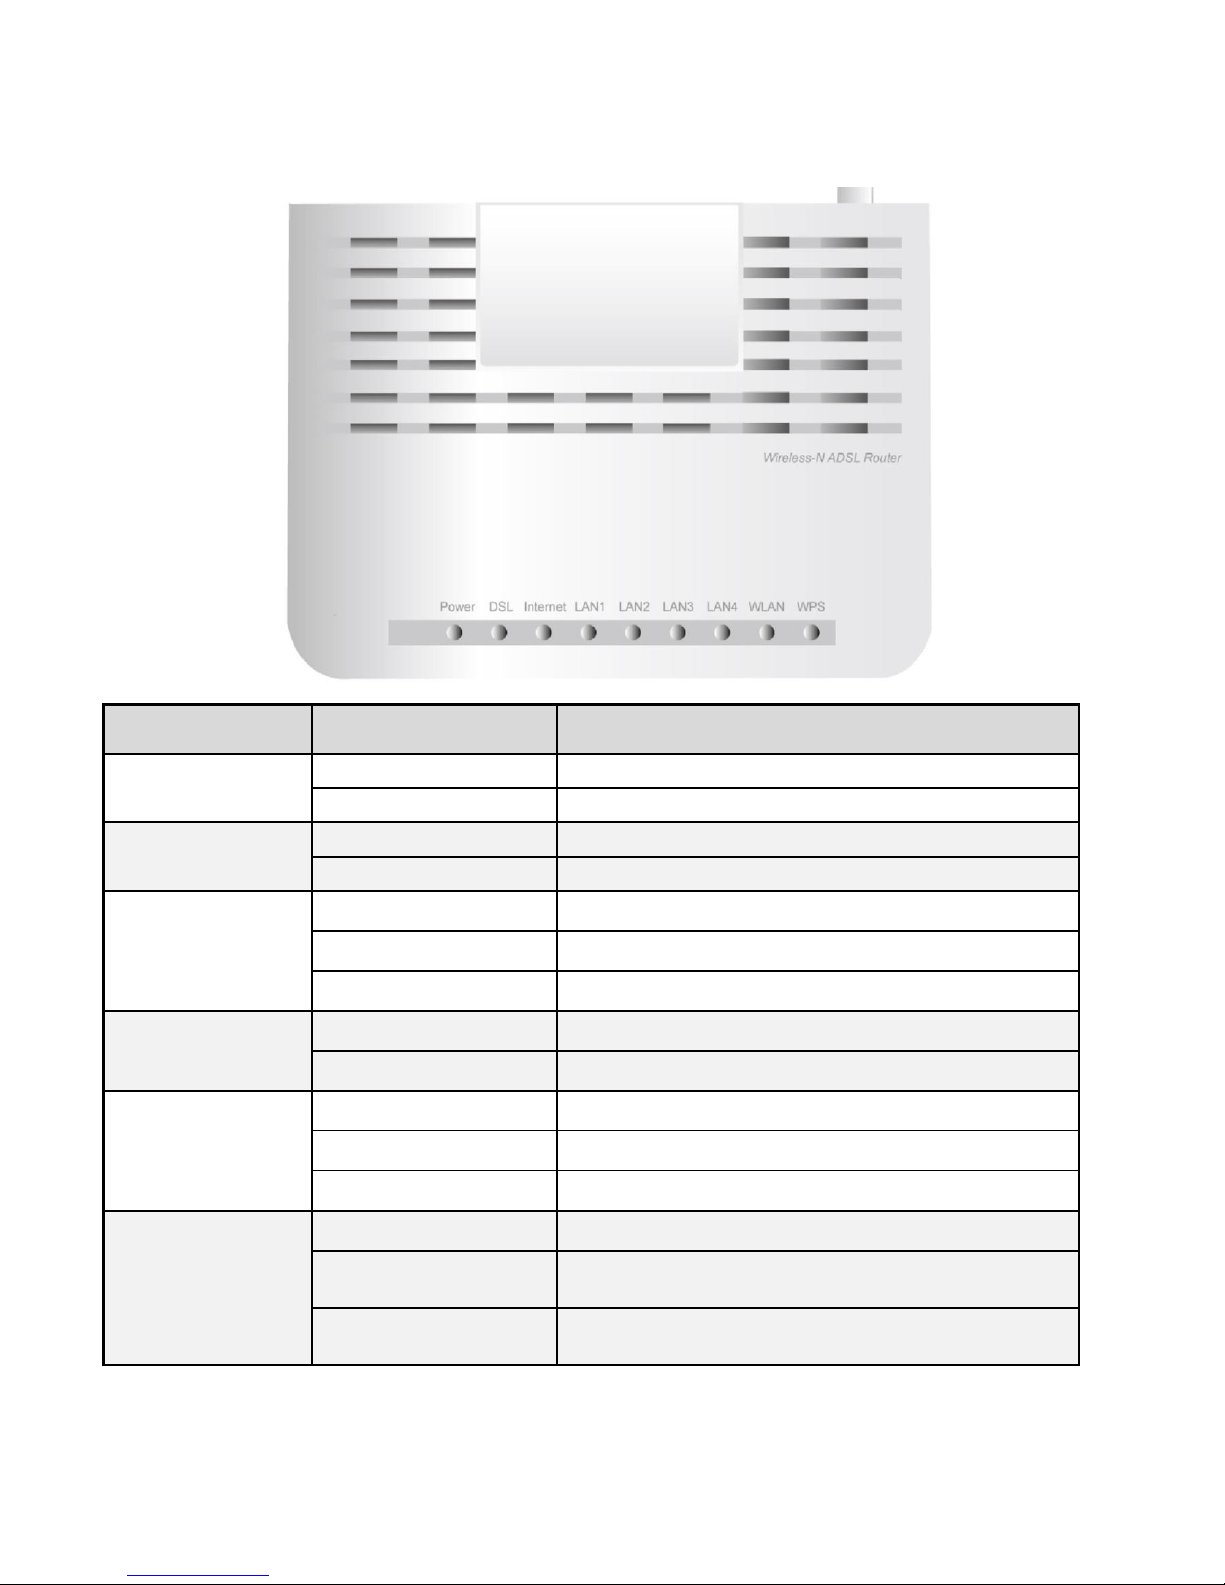
2.3 The Front LEDs
LED
Status
Description
Power
Green
System is up and ready
Red
Boot failure
DSL
Green
Successfully connected to an ADSL line
Green blinking
Waiting for ADSL synchronization
Internet
Green
IP connected and traffic is passing through the device
Red
IP request failed
Off
Either in bridged mode or WAN connection not present
LAN1~4
Green
Transmission speed is at 10/100Mbps
Green blinking
Data being transmitted/received
WLAN
Green
Wireless connection established
Green blinking
Data being transmitted / received
Off
The wireless function is disabled
WPS
Green blinking
WPS configuration being in progress
Lit up brightly and then
goes off in 5 seconds
WPS established
Flash for 2 mins and then
goes off
WPS establishment failure
10
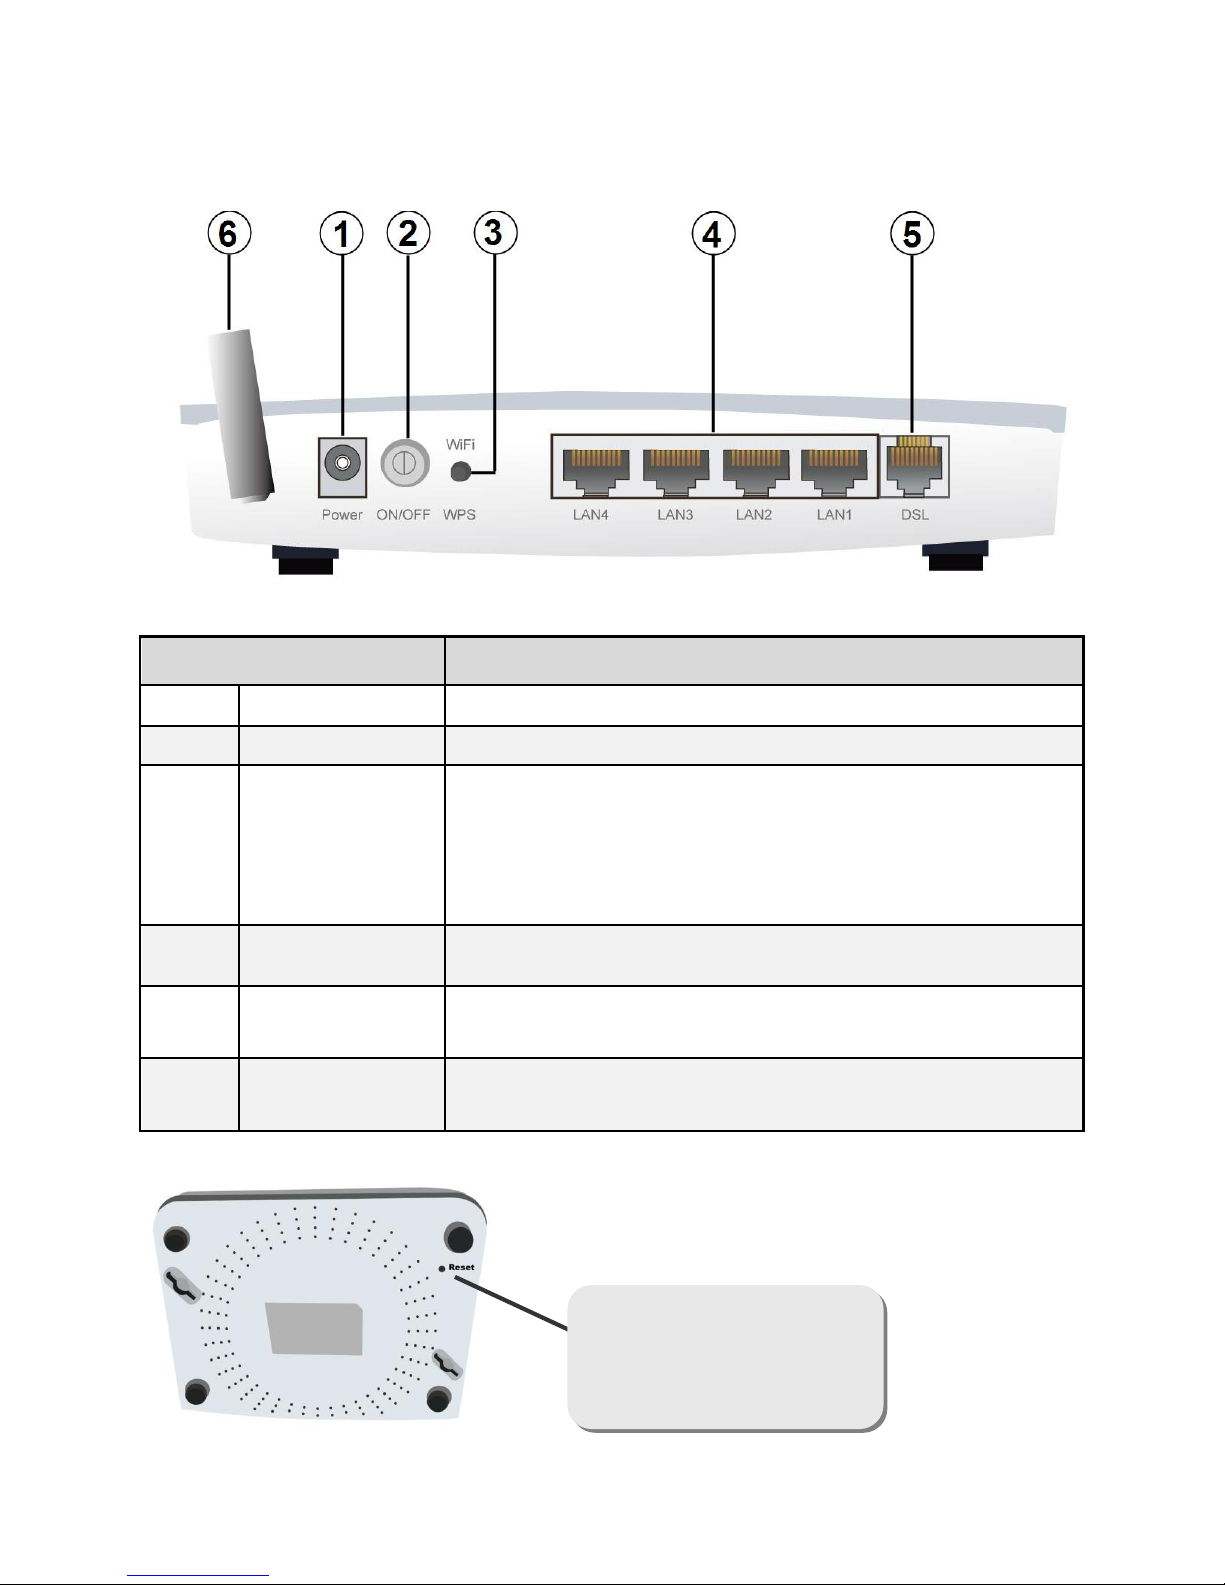
2.4 The Rear Ports
Port
Description
1
Power Jack (DC)
Connect the supplied Power Adapter to this jack.
2
Power Switch
Power on/off switch button
3
WPS &
WiFi On/Off
By controlling the pressing time, users can achieve two different
effects:
(1) WPS: Press &hold the button for less than 6 seconds to trigger
WPS function.
(2) Wireless On/Off: Press & hold the button for more than 6
seconds to On/Off the wireless.
4
Fast Ethernet
LAN 1 ~ 4
Connect the LAN port of the router to your computer.
5
DSL
Connect this port to the DSL network with the RJ-11 cable (telephone)
provided.
6
WiFi Antenna
Connect the detachable antenna to this port
After the device is powered on,
press it 6 seconds or above: to
restore to factory default settings
(this is used when you cannot
login to the router, e.g. forgot
your password)

11
2.5 Cabling
One of the most common causes of problems is bad cabling. Make sure that all connected devices are turned
on. On the front panel of the product is a bank of LEDs. Verify that the LAN Link and LEDs are lit. If they are not,
verify that you are using the proper cables.
Make sure that all other devices (e.g. telephones, fax machines, analogue modems) connected to the same
telephone line as your router have a line filter connected between them and the wall socket (unless you are
using a Central Splitter or Central Filter installed by a qualified and licensed electrician), and that all line filters
are correctly installed in a right way. If the line filter is not correctly installed and connected, it may cause
problems to your connection or may result in frequent disconnections.

12
Chapter 3
Basic Installation
The router can be configured with your web browser. A web browser is included as a standard application in the
following operating systems: Windows XP/Vista/Win7/8, Linux, Mac OS, etc. The product provides an easy and
user-friendly interface for configuration.
3.1 Before Configuration
PCs must have an Ethernet interface installed properly and be connected to the router either directly or through
an external repeater hub, and have TCP/IP installed and configured to obtain an IP address through a DHCP
server or a fixed IP address that must be in the same subnet as the router. The default IP address of the router
is 192.168.1.254 and the subnet mask is 255.255.255.0 (i.e. any attached PC must be in the same subnet, and
have an IP address in the range of 192.168.1.1 to 192.168.1.253). The best and easiest way is to configure the
PC to get an IP address automatically from the router using DHCP. If you encounter any problems accessing the
router’s web interface it may also be advisable to uninstall any kind of software firewall on your PCs, as they
can cause problems accessing the 192.168.1.254 IP address of the router. Users should make their own
decisions on how to best protect their network.
Please follow the steps below for your PC’s network environment installation. First of all, please check your PC’s
network components. The TCP/IP protocol stack and Ethernet network adapter must be installed. If not, please
refer to your Windows-related or other operating system manuals.
Any TCP/IP capable workstation can be used to communicate with or
through the Router. To configure other types of workstations, please consult
the manufacturer’s documentation.
13
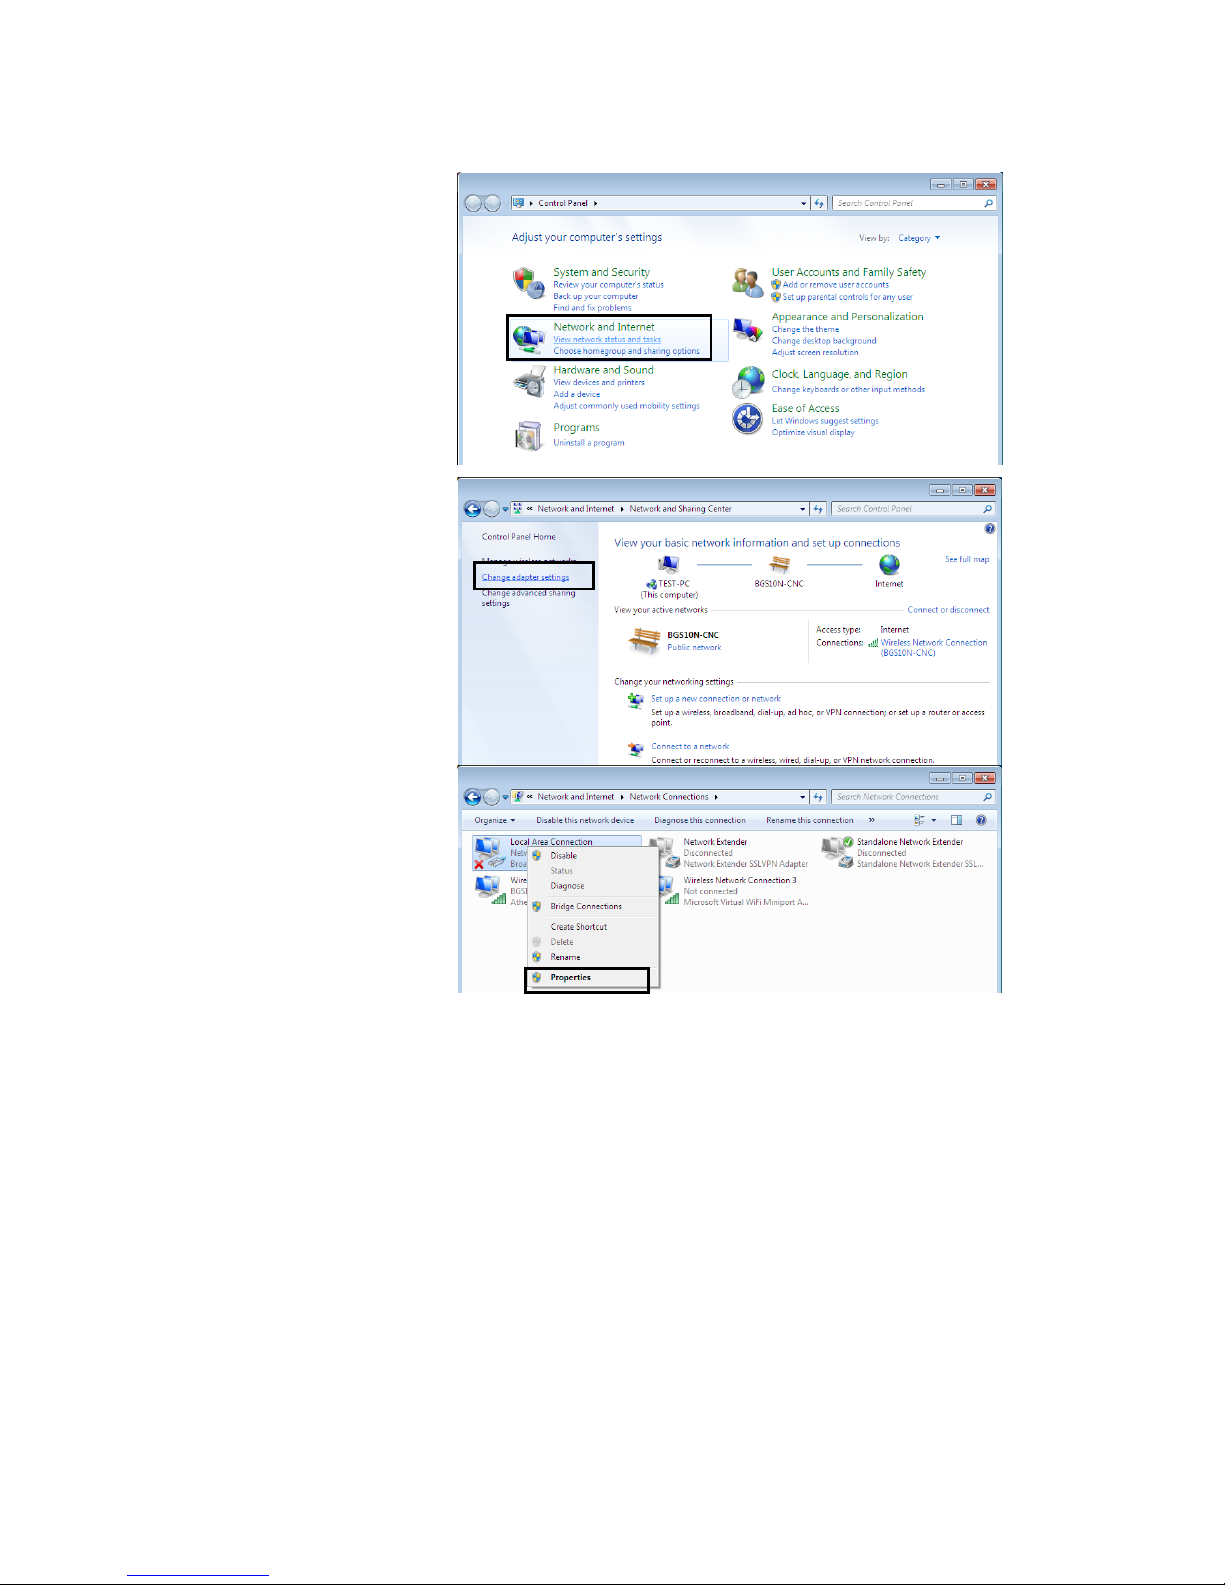
3.1.1 Configuring a PC in Windows 7/8
1. Go to Start. Click on Control
Panel. Then click on Network
and Internet.
2. When the Network and
Sharing Center window pops
up, select and click on Change
adapter settings on the left
window panel.
3. Select the Local Area
Connection, and right click the
icon to select Properties.
14
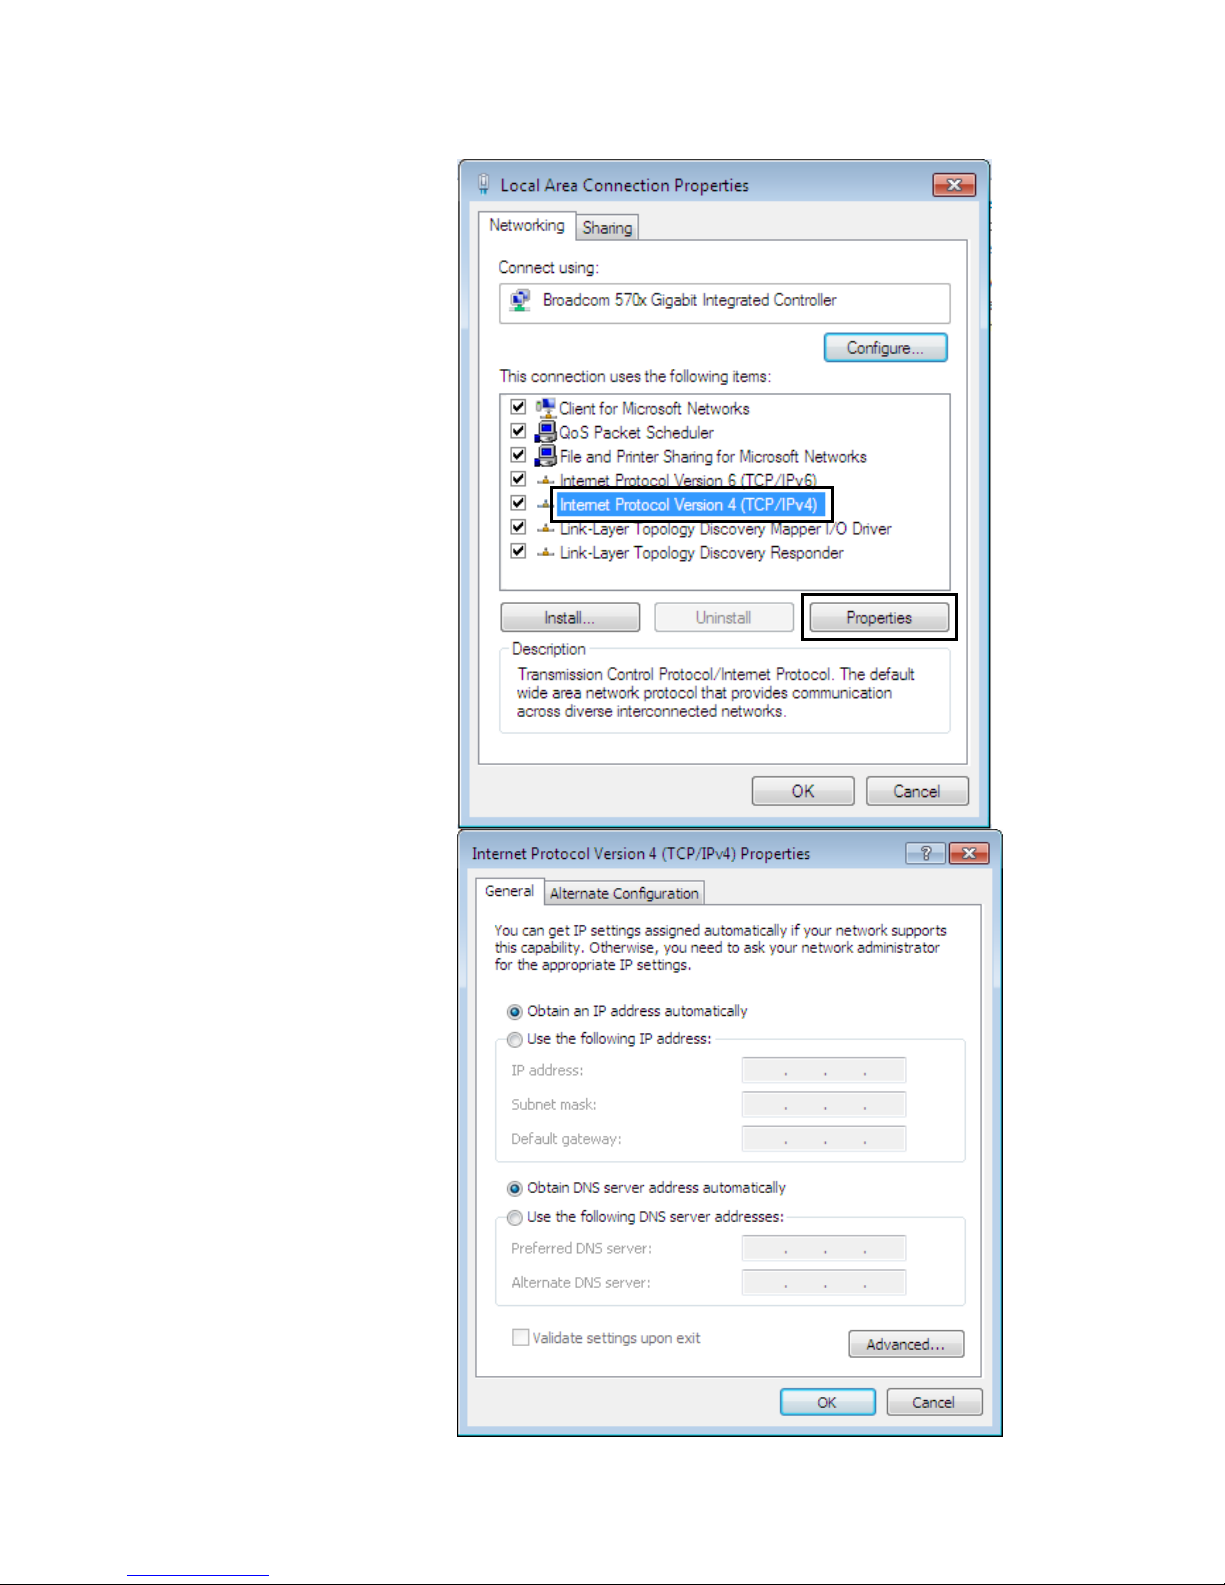
IPv4:
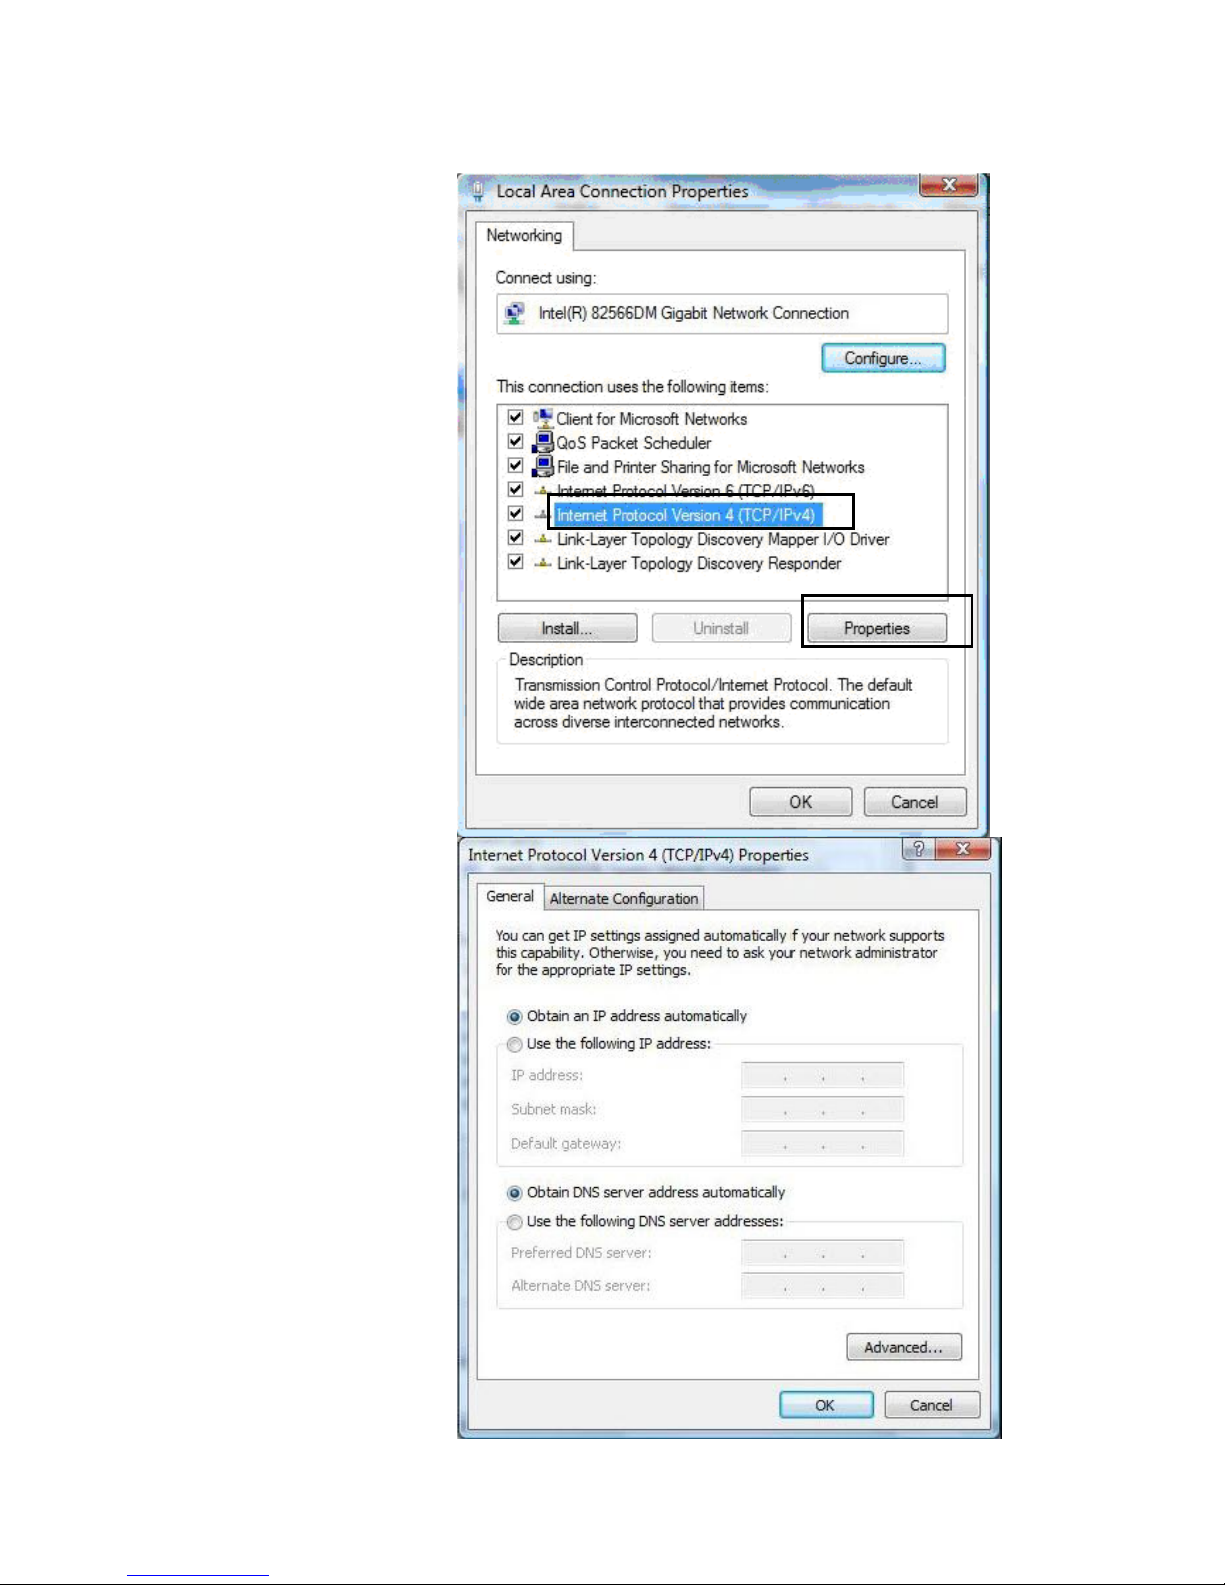
4. Select Internet Protocol
Version 4 (TCP/IPv4) then
click Properties
5. In the TCP/IPv4 properties
window, select the Obtain an IP
address automatically and
Obtain DNS Server address
automatically radio buttons.
Then click OK to exit the
setting.
6. Click OK again in the Local
Area Connection Properties
window to apply the new
configuration.
15
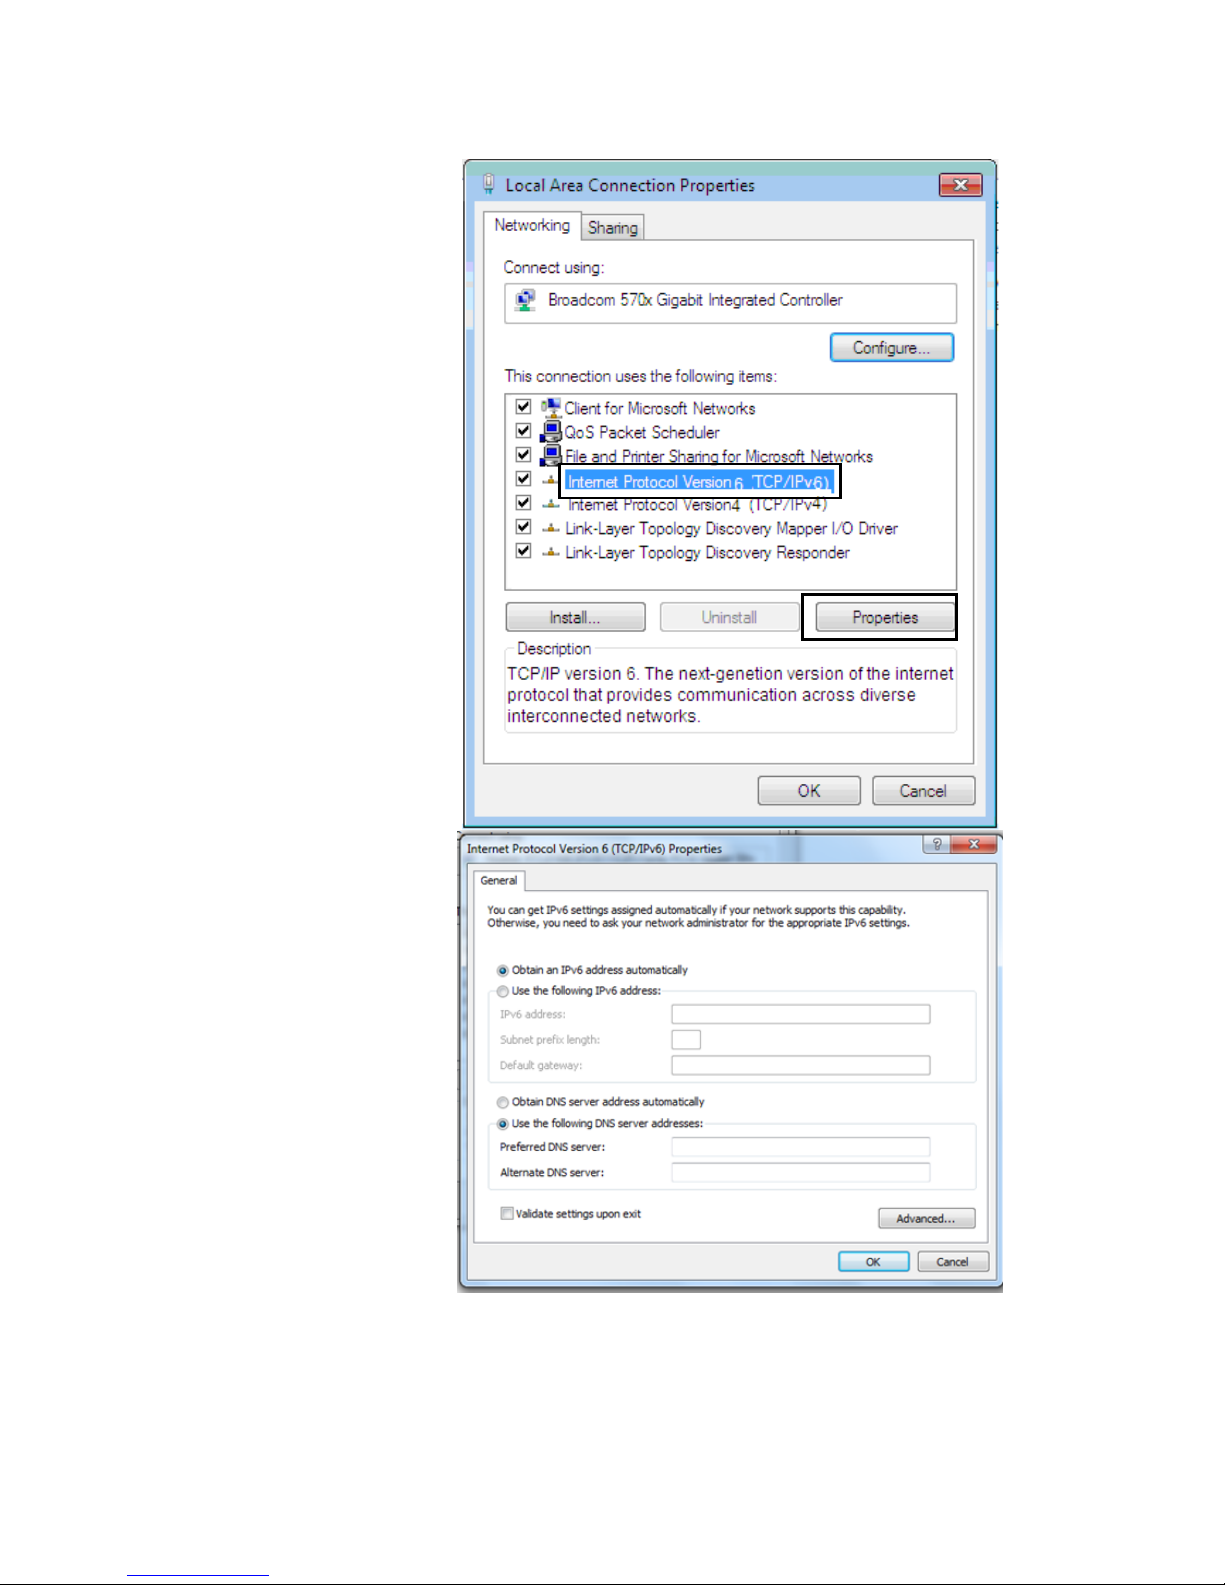
IPv6:
4. Select Internet Protocol
Version 6 (TCP/IPv6) then
click Properties
5. In the TCP/IPv6 properties
window, select the Obtain an
IPv6 address automatically
and Obtain DNS Server
address automatically radio
buttons. Then click OK to exit
the setting.
6. Click OK again in the Local
Area Connection Properties
window to apply the new
configuration.
16
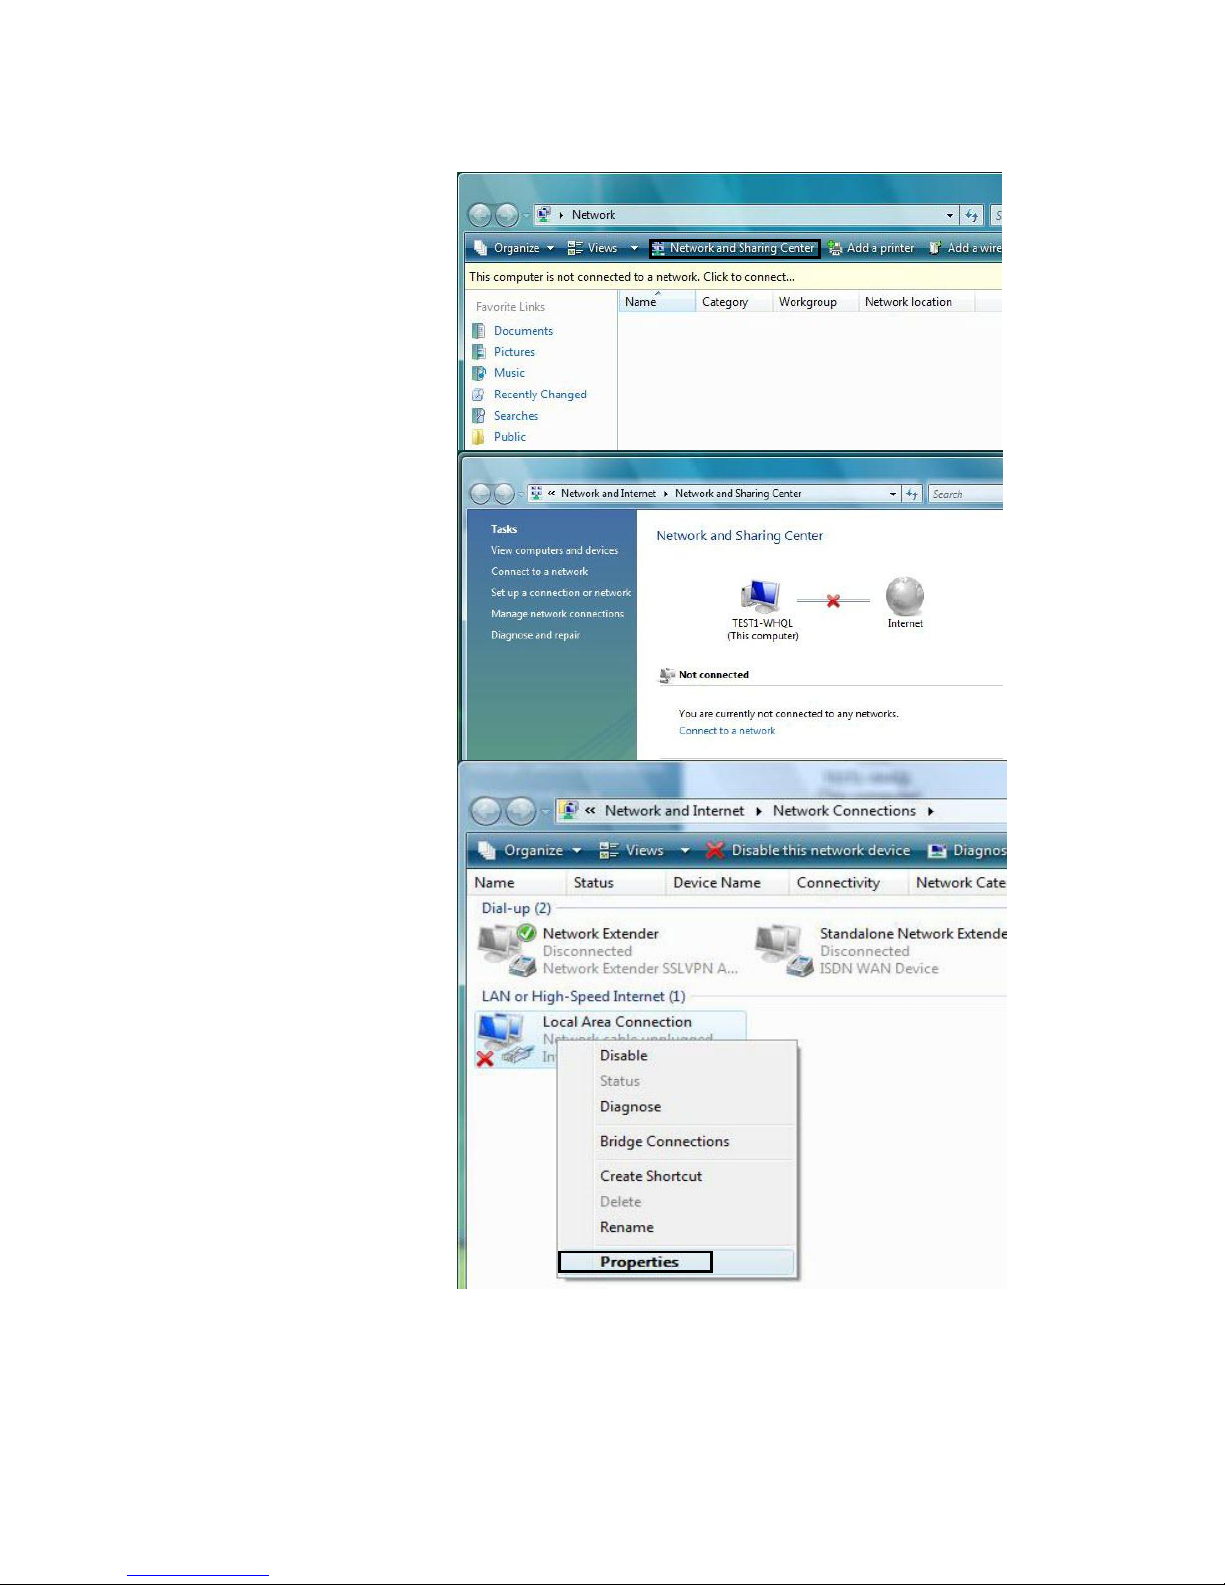
3.1.2 Configuring a PC in Windows Vista
1. Go to Start. Click on Network.
Then click on Network and
Sharing Center at the top bar.
2. When the Network and
Sharing Center window pops
up, select and click on Manage
network connections on the
left window pane.
3. Select the Local Area
Connection, and right click the
icon to select Properties.
17
IPv4:
4. Select Internet Protocol
Version 4 (TCP/IPv4) then click
Properties.
5. In the TCP/IPv4 properties
window, select the Obtain an IP
address automatically and
Obtain DNS Server address
automatically radio buttons.
Then click OK to exit the setting.
6. Click OK again in the Local
Area Connection Properties
window to apply the new
configuration.
18
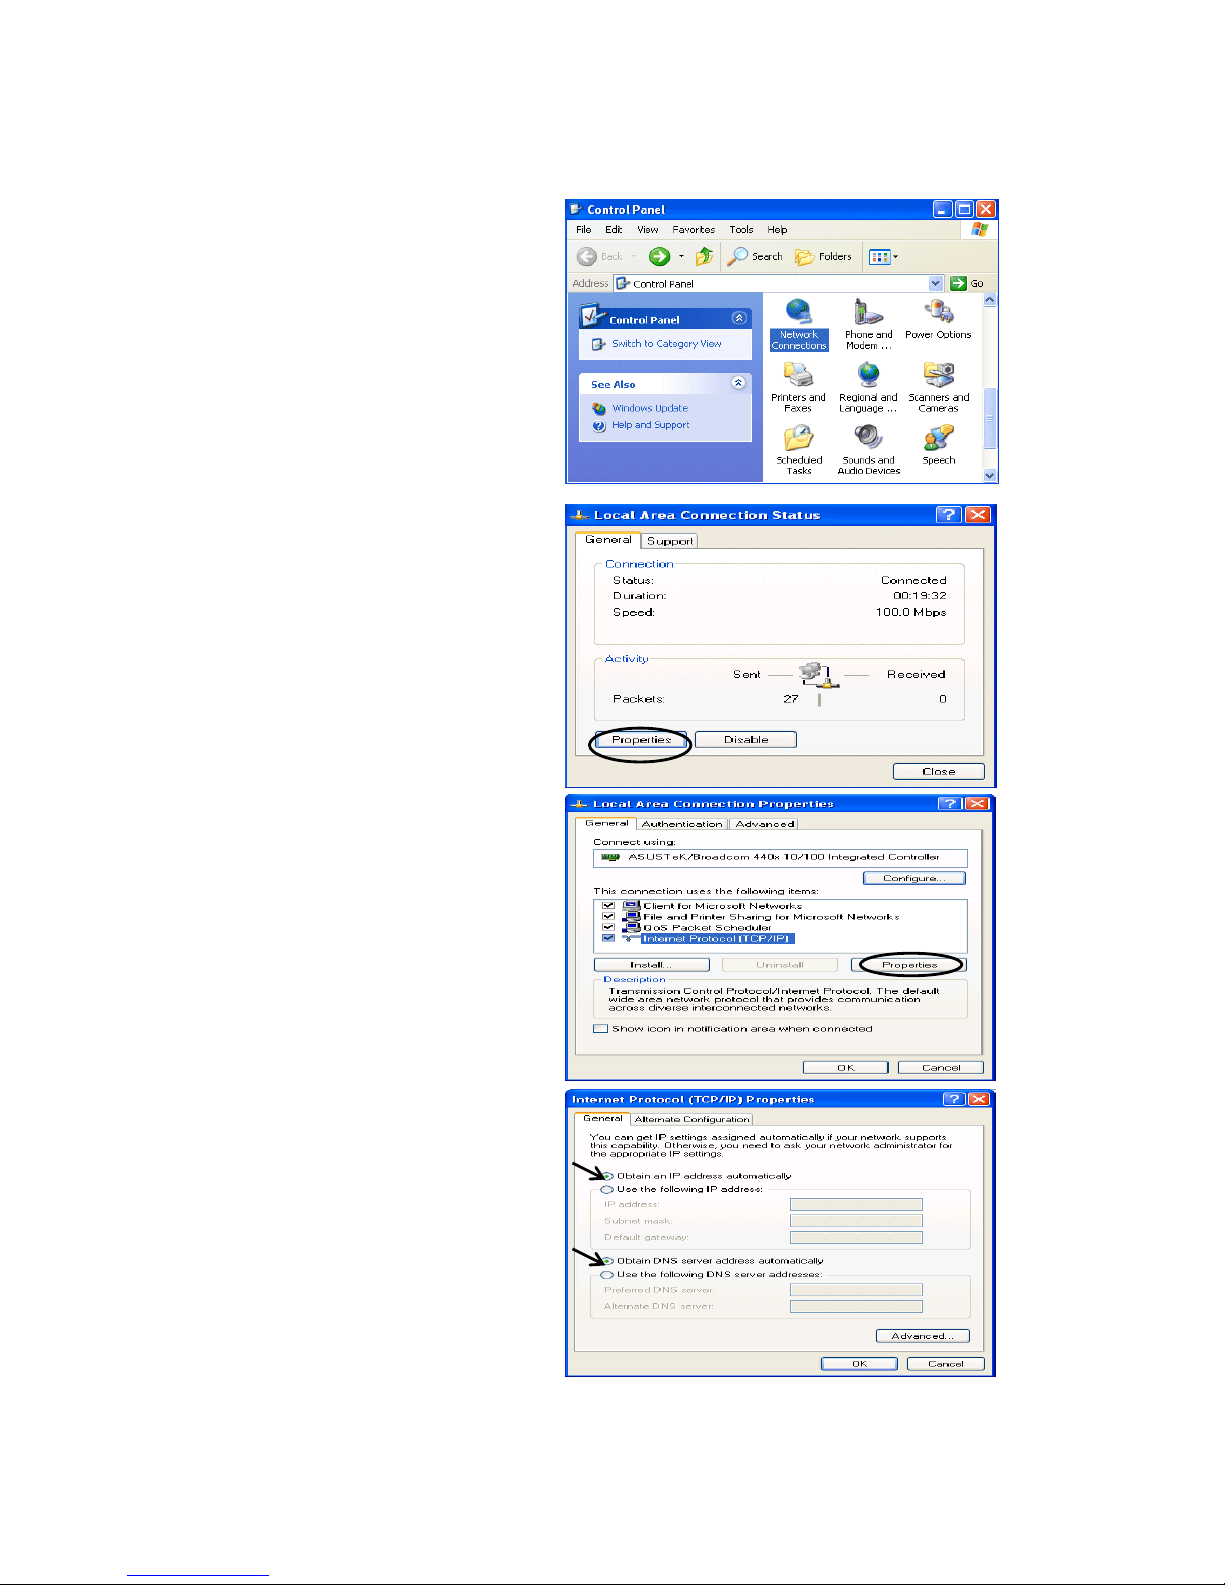
3.1.3 Configuring a PC in Windows XP
IPv4:
1. Go to Start / Control Panel (in Classic
View). In the Control Panel, double-click on
Network Connections
2. Double-click Local Area Connection.
3. In the Local Area Connection Status
window, click Properties.
4. Select Internet Protocol (TCP/IP) and click
Properties.
5. Select the Obtain an IP address
automatically and the Obtain DNS server
address automatically radio buttons.
6. Click OK to finish the configuration.

19
IPv6:
IPv6 is supported by Windows XP, but you should install it first.
Act as shown below:
1. On the desktop, Click Start > Run, type cmd, then press Enter key in the keyboard, the following screen
appears.
2. Key in command ipv6 install
Configuration is OK now, you can test whether it works ok.

20
3.2 Factory Default Settings
Before configuring your router, you need to know the following default settings.
Web Interface:
Username: admin
Password: admin
LAN Device IP Settings:
IP Address: 192.168.1.254
Subnet Mask: 255.255.255.0
DHCP server:
DHCP server is enabled.
Start IP Address: 192.168.1.100
IP pool counts: 20
3.2.1 Username and Password
The default username and password are “admin” and “admin” respectively.
Attention
Attention
If you ever forget the password to log in, you may press the RESET button
up to 6 seconds to restore the factory default settings.

21
3.3 LAN Port Addresses
The parameters of LAN ports are pre-set in the factory. The default values are shown below.
IPv4:
IP address
192.168.1.254
Subnet Mask
255.255.255.0
DHCP server function
Enabled
IP addresses for distribution to PCs
20 IP addresses continuing from 192.168.1.100 through
192.168.1.119
3.4 Information from your ISP
Before configuring this device, you have to check with your ISP (Internet Service Provider) what kind of
service is provided such as ADSL(Dynamic IP Address, Static IP Address, PPPoE, PPPoA, Bridge Mode)
Gather the information as illustrated in the following table and keep it for reference.
ADSL:
PPPoE
VPI/VCI, VC-based/LLC-based multiplexing, Username, Password, Service Name,
and Domain Name System (DNS) IP address (it can be automatically assigned by
your ISP when you connect or be set manually).
PPPoA
VPI/VCI, VC-based/LLC-based multiplexing, Username, Password, and Domain
Name System (DNS) IP address (it can be automatically assigned by your ISP
when you connect or be set manually).
Dynamic IP
Address
RFC1483
Bridged IP
VPI/ VCI, LLC-based/ VC-based multiplexing, and Domain Name
System (DNS) IP address (it can be automatically assigned by your
ISP when you connect or be set manually).
RFC1483
Routed IP
VPI/ VCI, LLC-based/ VC-based multiplexing, and Domain Name
System (DNS) IP address (it can be automatically assigned by your
ISP when you connect or be set manually).
Static IP
Address
RFC1483
Bridged IP
VPI/ VCI, LLC-based/ VC-based multiplexing, Static IP Address, IP
Subnet Mask, Gateway IP Address, and Domain Name System
(DNS) IP address.
RFC1483
Routed IP
VPI/ VCI, LLC-based/ VC-based multiplexing, Static IP Address, IP
Subnet Mask, Gateway IP Address, and Domain Name System
(DNS) IP address.
Bridge Mode
1483 Bridged
Only
VPI/ VCI, LLC-based/ VC-based multiplexing.

22
Chapter 4
Configuration
4.1 Configuring the Router with your Web Browser
Open your web browser, enter the IP address of your router, which by default is 192.168.1.254, and click “OK”,
a user name and password window prompt will appear. The default username and password are “admin” and
“admin”.
Congratulation! You are now successfully logged on to the Router!

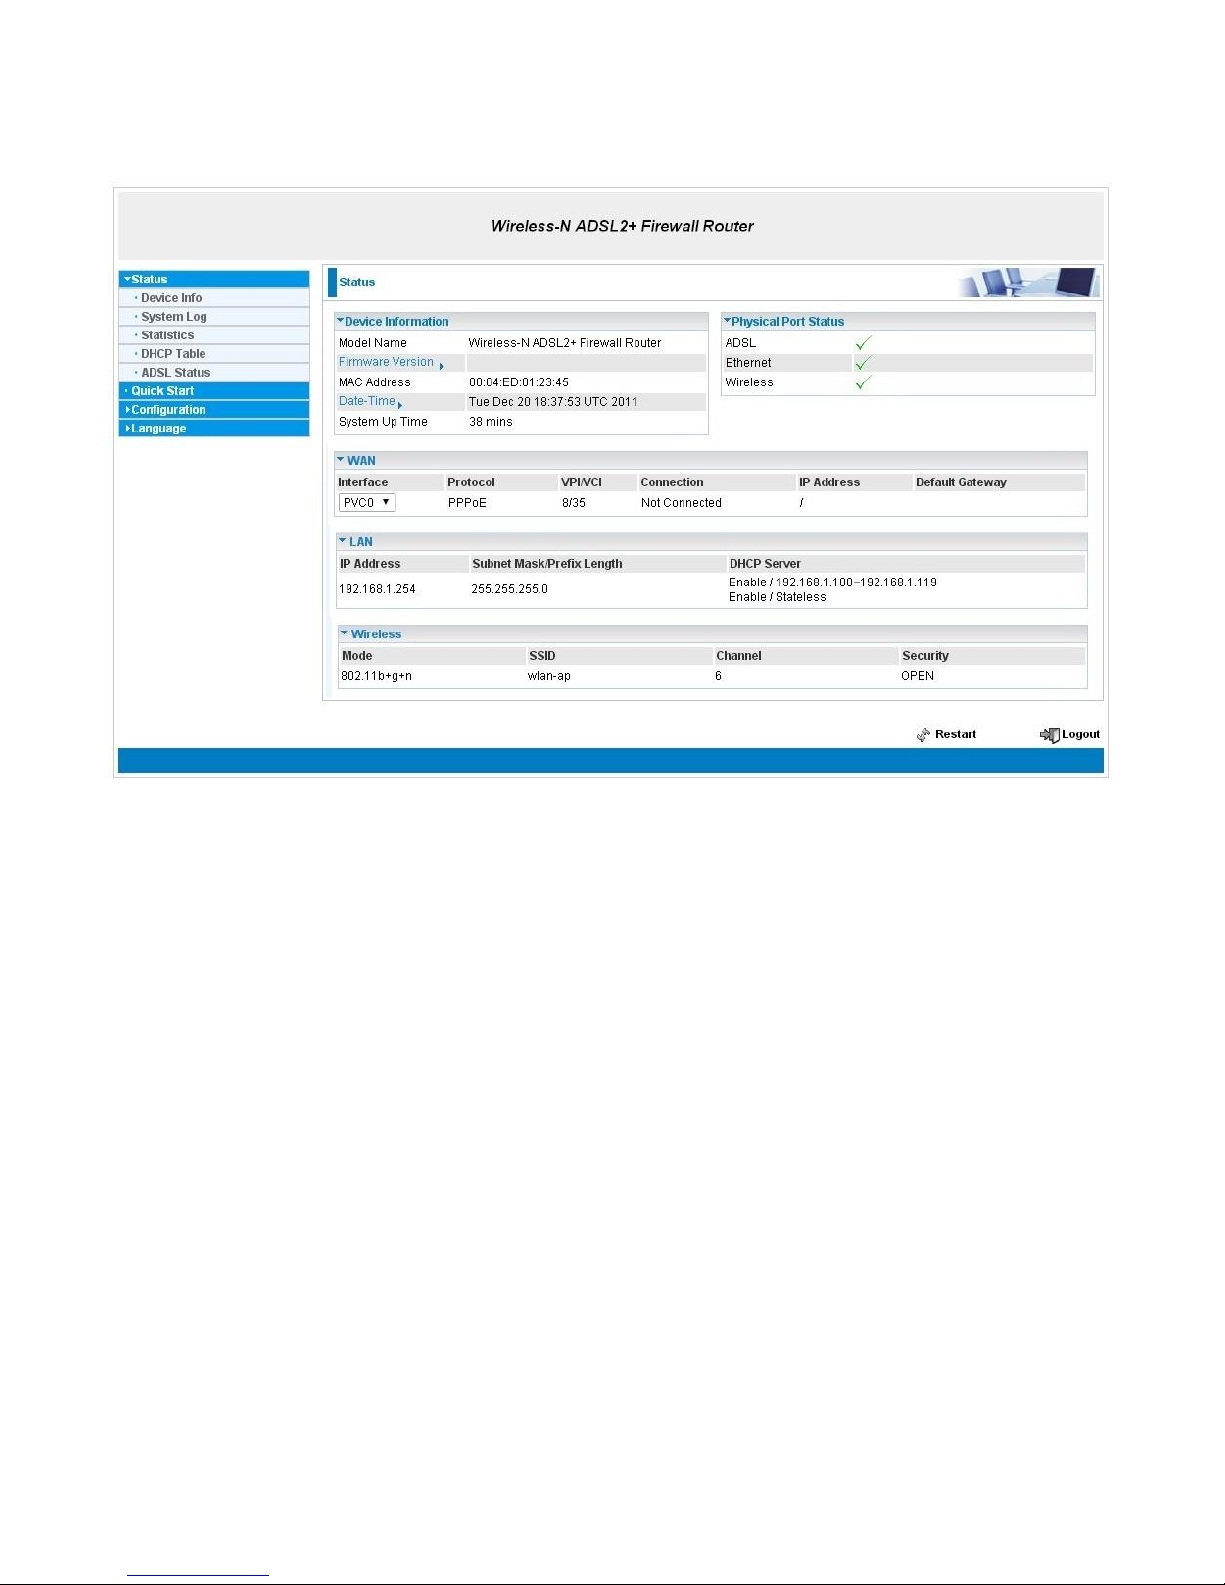
23
At the configuration homepage, the left navigation pane where bookmarks are provided links you directly to the
desired setup page, including:
Status(Device Info, System Log, Statistics, DHCP Table, ADSL Status)
Quick Start (Wizard Setup)
Configuration (Interface Setup, Advanced Setup, Access Management, Maintenance)
Language
Please see the relevant sections of this manual for detailed instructions on how to configure your router.
24
4.2 Status
In this section, you can check the router working status, including Device Info, System Log, Statistics, DHCP
Table, ADSL Status.
25
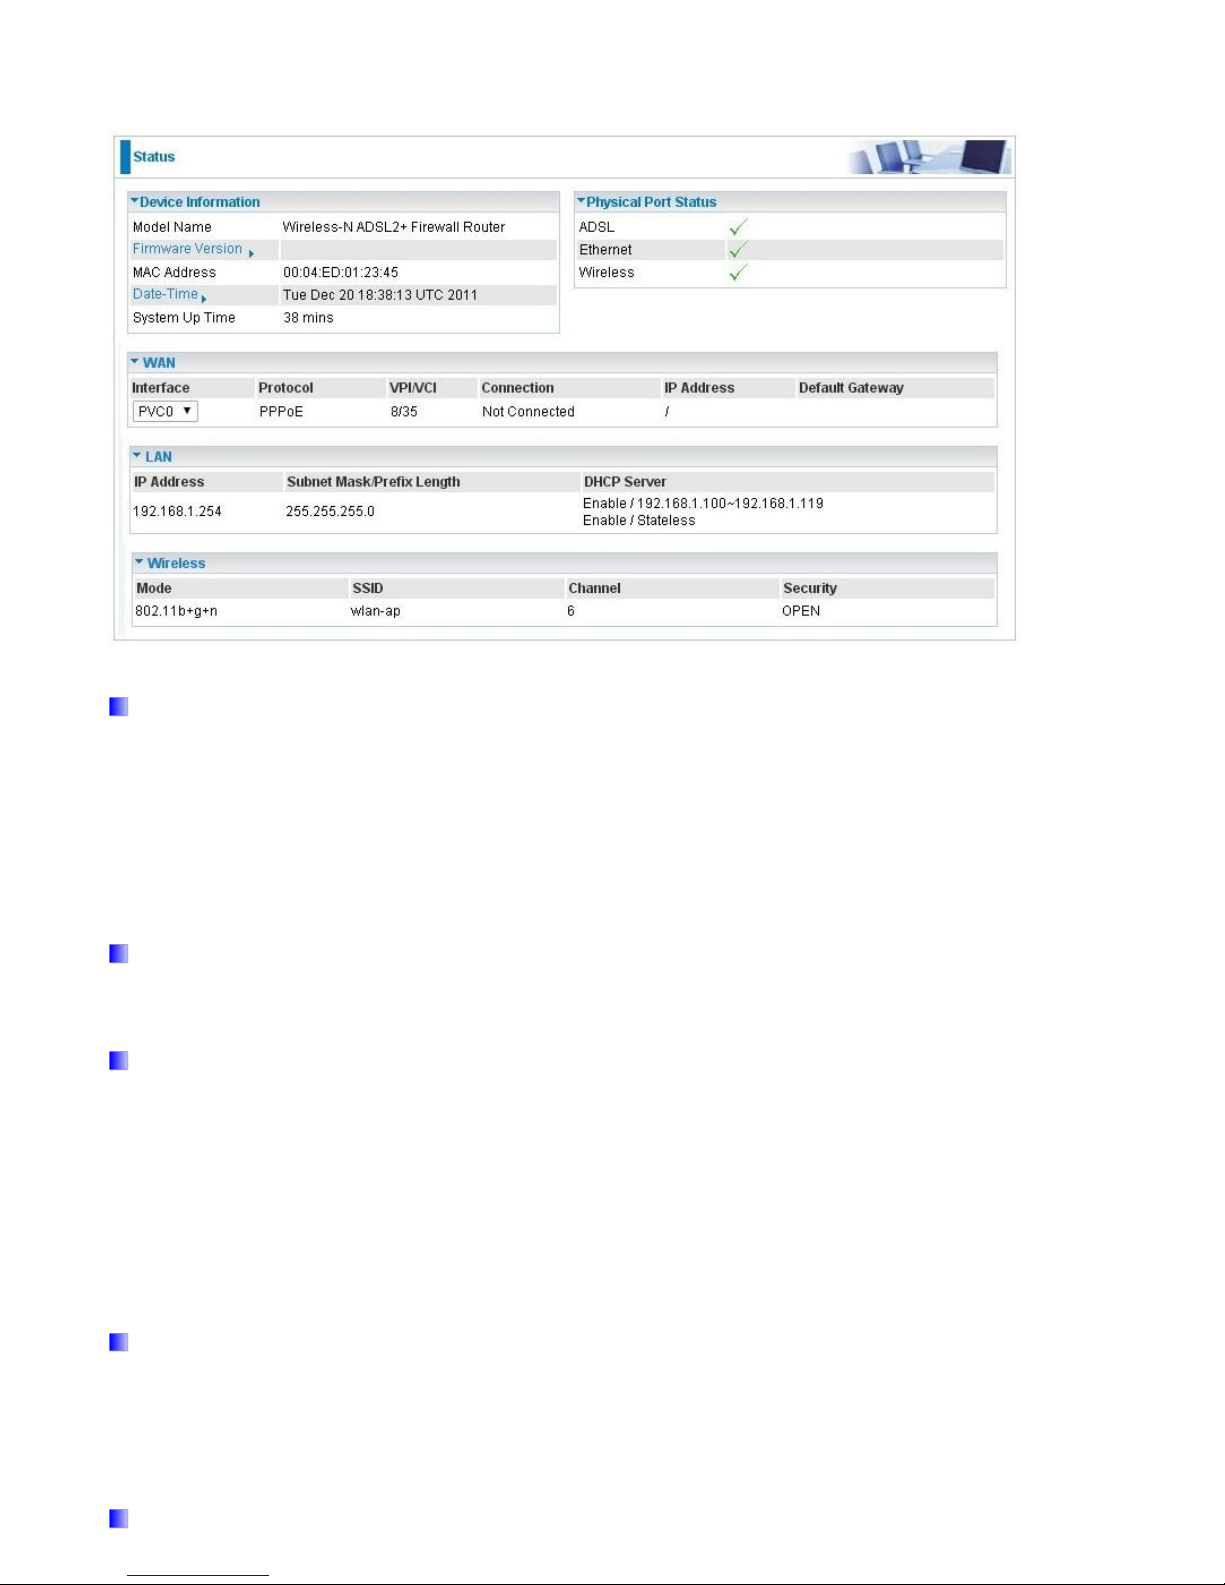
4.2.1 Device Info
Users will see device's basic information in this page.
Device Information
Model Name: Show model name of the router
Firmware Version: This is the Firmware version
MAC Address: This is the MAC Address
Date Time: The current day time.
System Up Time: The duration since system is up.
Physical Port Status
Here the page shows the status of physical port of ADSL, Ethernet and Wireless.
WAN
Interface: The now used connection method, "ADSL(PVC0-PVC70)".
Protocol: The protocol in use.
VPI/VCI: The VPI/VCI in use.
Connection: The status of the link.
IP Address: The WAN interface IP address obtained.
Default Gateway: The default gateway address.
LAN
IP Address: LAN port address.
Subnet Mask/Prefix Length: LAN port IP subnet mask for IPv4 and Prefix length for IPv6..
DHCP Server: LAN port DHCP information.
Wireless

26
Mode: The wireless mode in use.
SSID: The SSID.
Channel: The current channel.
Security: The wireless security setting, authentication type.
 Loading...