

Page 1

EPS8
8-Inch Low Profile Amplified Subwoofer
USER MANUAL
Installation Instructions | Owners Manual
DB Research L.L.P. - 302 Hanmore Industrial Parkway - Harlingen, TX 78550
Ph: (877) 787-0101 - Fax: (956) 421-4513 - www.dbdrive.net
Due to continuous improvement of the product, specifications are subject to change without notice.
Page 2
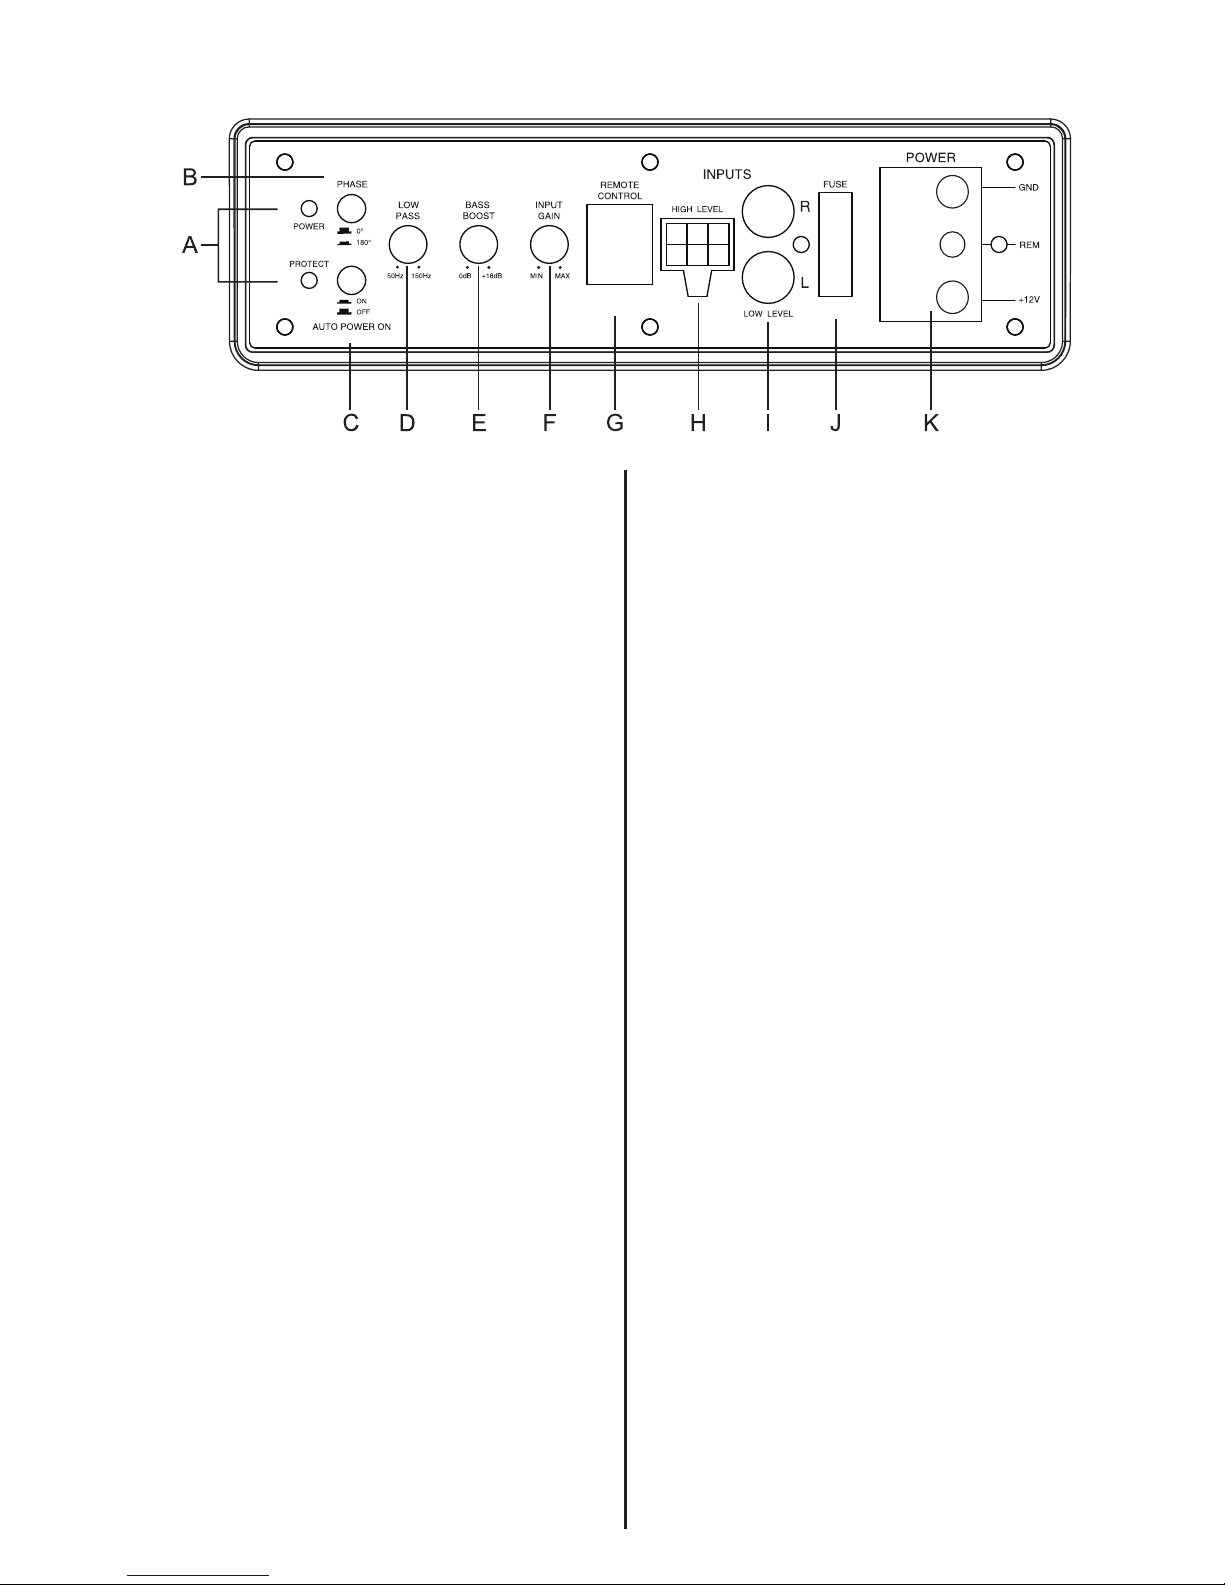
Panel controls and features
T
1
A.POWER STATUS LED
B.PHASE SHIFT
Use this switch to help compensate for time
alignment problems in the system. Such
problems usually result from having the
subwoofer at a different distance from the
listener than the other speakers in the system.
C.AUTO POWER ON
D.LOW PASS FILTER
his control alows you fine tune the frequency
range you want the subwoofer amplifier will
receive.
F.INPUT GAIN CONTROL
After you have installed your system, turn this
control to minimum.
Turn the head unit on (and the subwoofer will
turn on via the remote connection). Turn the
head unit volume to about 2/3 full level.
Slowly turn up the subwoofer input gain control
until you hear a small amount of distortion. Then
reduce the level until the distortion is completely
gone. Level the control at this setting.
G.REMOTE LEVEL CONTROL
Attach the included remote level control to
control the volume level of the subwooer
independently.
H.HIGH LEVEL (speaker level) INPUTS
If your head unit does not have RCA outputs
you can use the speaker outputs for the audio
source for the subwoofer. Use the supplied
cable and wire harness and connect the
outputs properly as shown in the connection
diagram in this manual.
I.LOW LEVEL RCA INPUTS
Low level inputs are the recommended way
to introduce the audio signal into your subwoofer.
J.FUSE
K.POWER INPUT TERMINAL
This bi-color LED glows green when power is
on and no problems are present. If one of the
protection circuits comes on, it will change to
red.
Do not use a fuse with a different value
other than the origional value.
T
E.BASS BOOST
he BASS BOOST feature will increase the
sound level in the bass frequencies.
The AUTO POWER ON(ON/OFF) is for high
level(speaker-level) connections. When the
switch is in the “ON” position, the subwoofer
will AUTO POWER ON when there is signal
input. If the amplifier detects no signal input,
the amplifier will auto power off. If you prefer
to use the remote turn on/off connection,
leave switch in the “OFF” position.
If RCA outputs are present on your head unit
Page 3
2
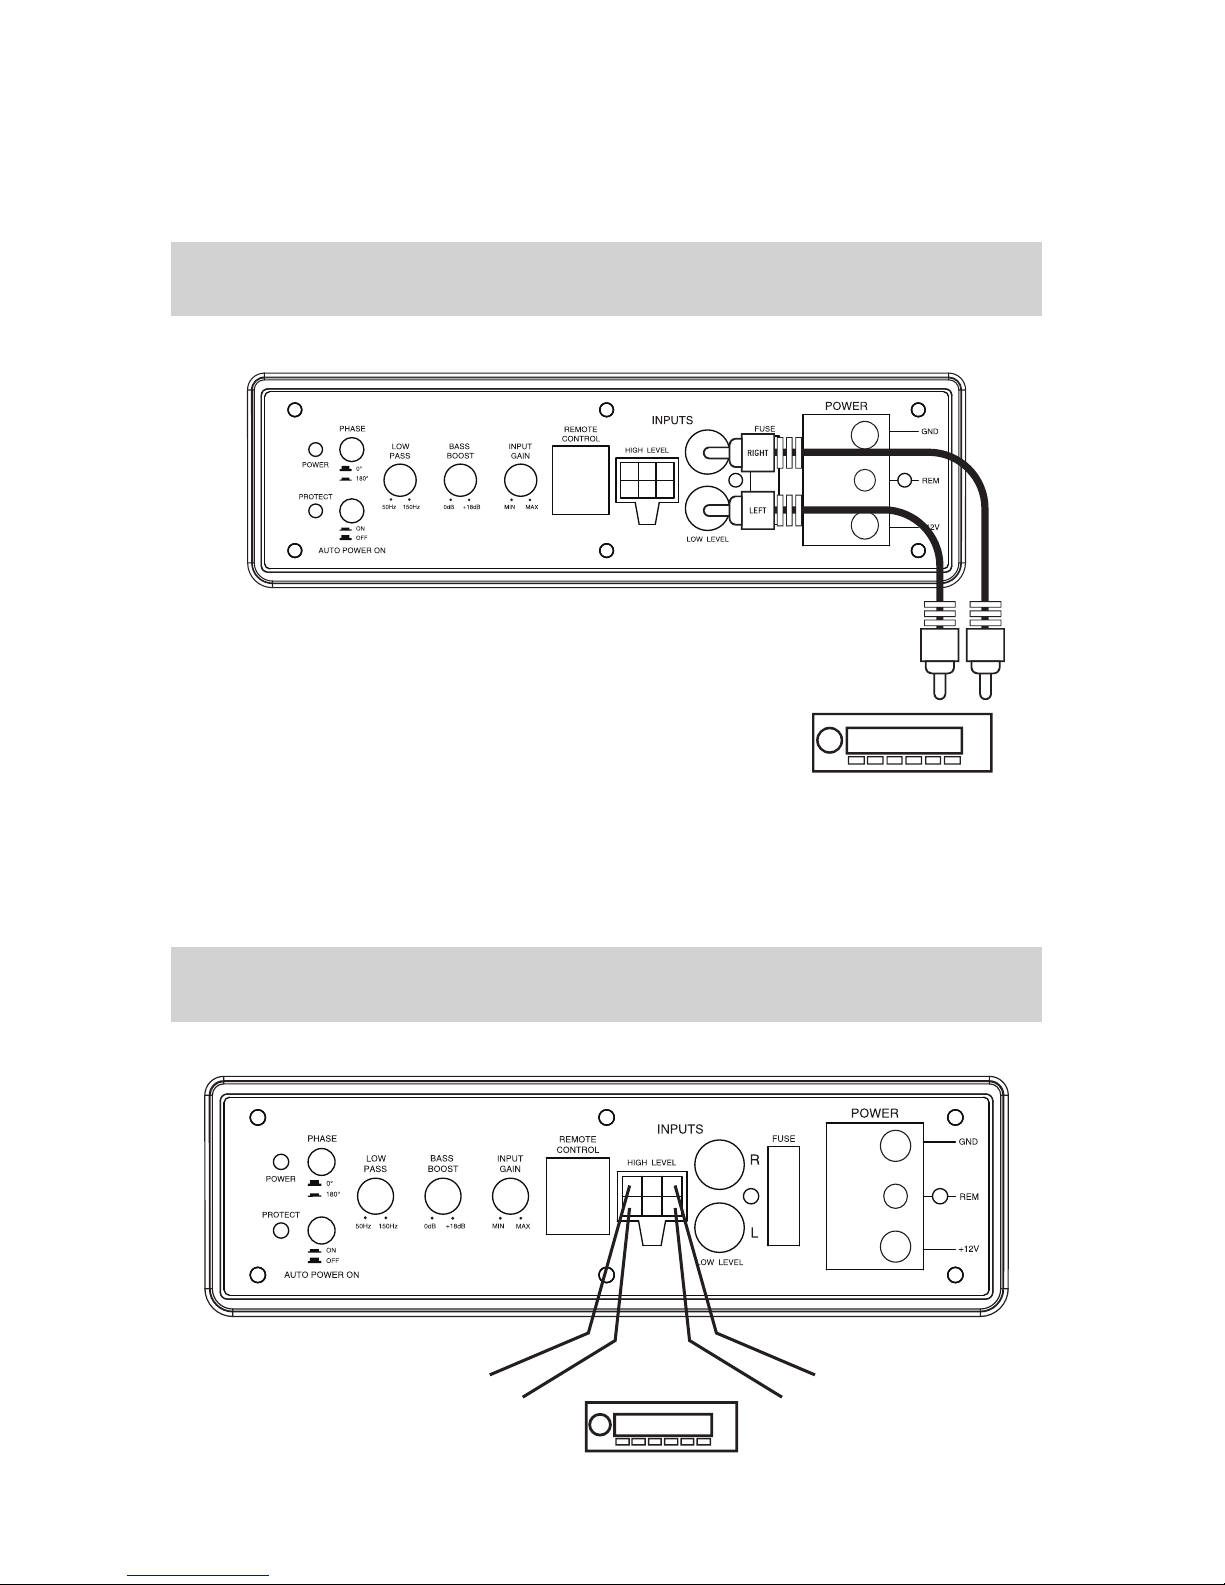
Low Level Input Wiring
Low-level (RCA) input wiring is preferred for best audio performance. Most trunk
or hatchback installations will require a 15-20 feet RCA cable, while pickup trucks
and under-seat installations will require a 6-12 feet RCA cable. Always use a
high quality cable.
NOTE: Do not connect BOTH the high level and low level inputs from your
receiver to your amplifier at the same time!
T
High Level Input Wiring
he high level input(s) should only be used when your receiver lacks RCA outputs.
If the RCA outputs are not present, connect the speaker outputs from the receiver
to the high level input connector of the amplifier. Be sure to observe polarity to
avoid audio phase
problems.
NOTE: Do not connect BOTH the high level and low level inputs from your
receiver to your amplifier at the same time!
To Audio outputs of head
unit or signal processor
Fig.1
Fig.2
WHITE L+
GREY R+ R- GREY/BLACK
L- WHITE/BLACK
To Speaker Terminals
of head unit
Page 4
3
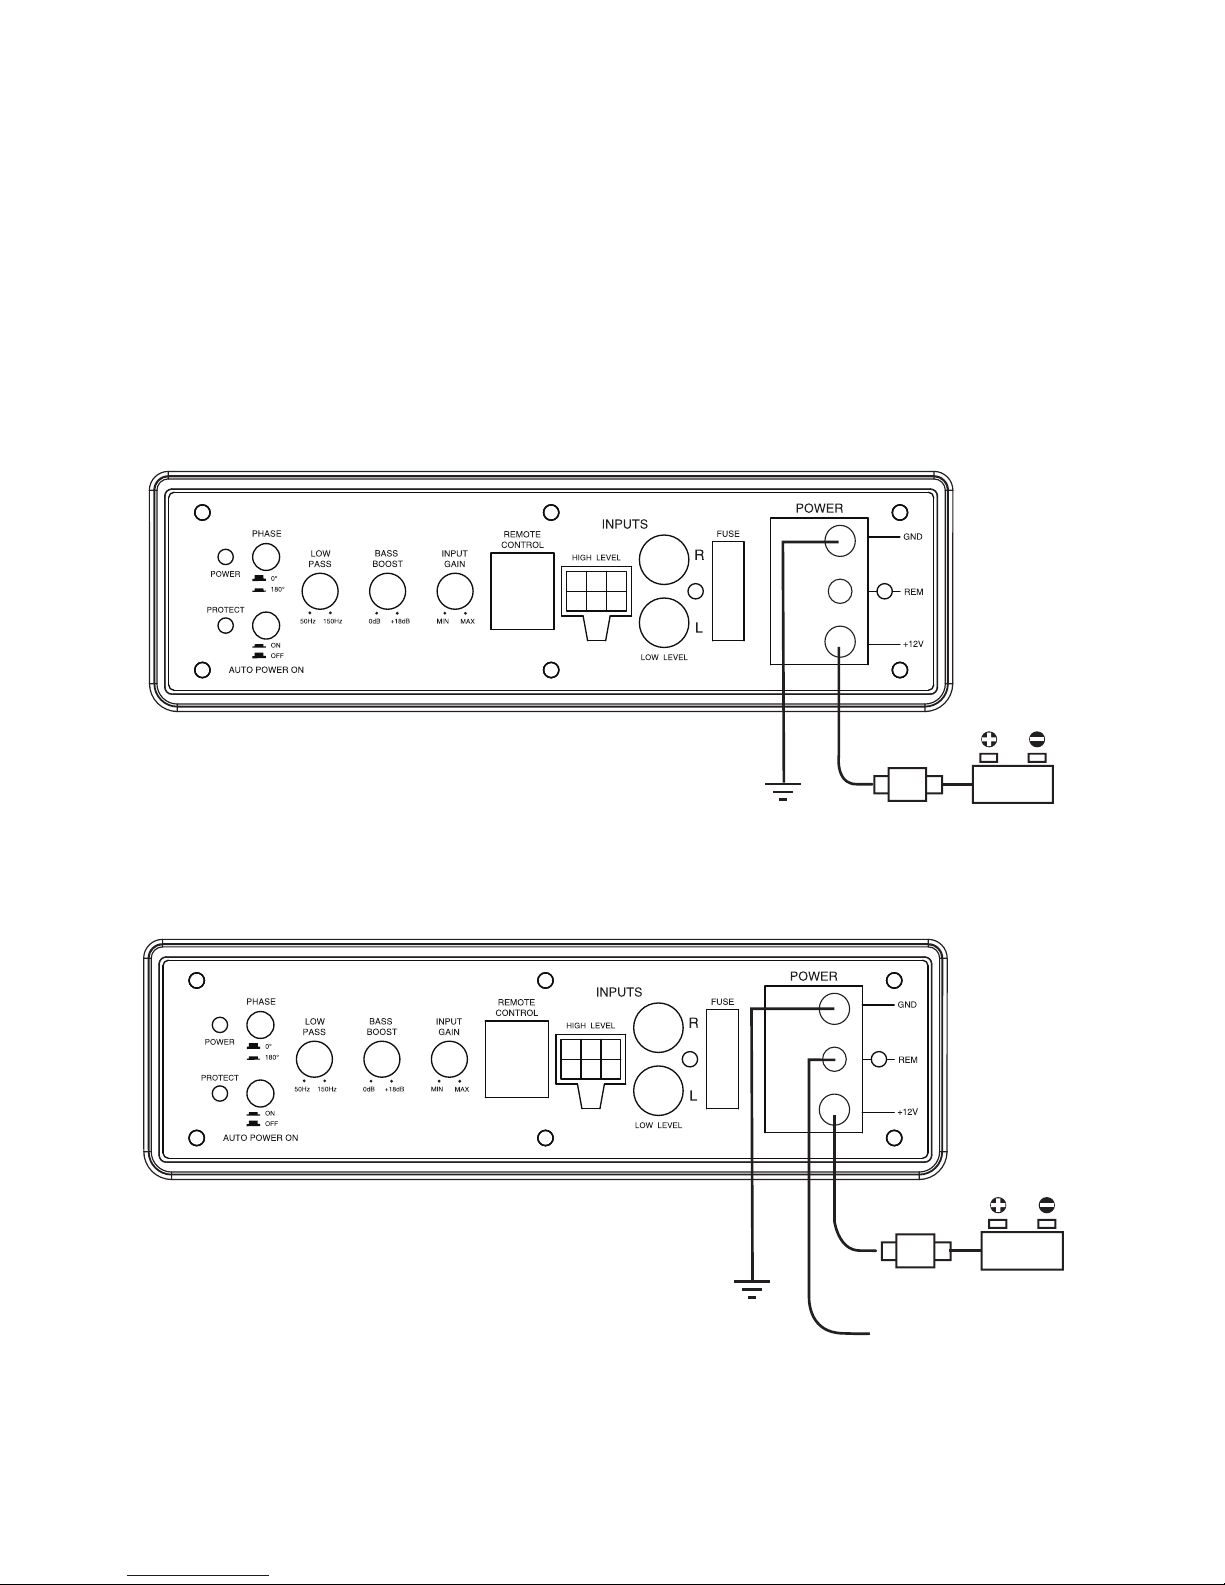
Power Connections
Connect the ground terminal to the closest point on the chassis of the vehicle.
Keep this ground wire to less than 12" (30.5 cm) in length. Use 8 gauge
(or heavier) wire.
Connect the remote terminal to the remote output of head unit using 16 gauge
( or heavier ) wire.
Connect an fuse holder within 18" (45 cm) of the car battery, and run 8 gauge
(or heavier) cable from this fuse to the amplifier location. Then connect the fuse
holder to the "BATT+" (+12V) connection on the subwoofer rear panel.
Fig.4
Fig.3
Chassis
ground
point
Battery
FUSE
Chassis
ground
point
to REMOTE TURN-ON
terminal of head unit
Battery
FUSE
NOTE: In this connection, the
AUTO POWER ON switch is
in the ON position.
NOTE: In this connection, the
AUTO POWER ON switch is
in the OFF position.
Page 5
4
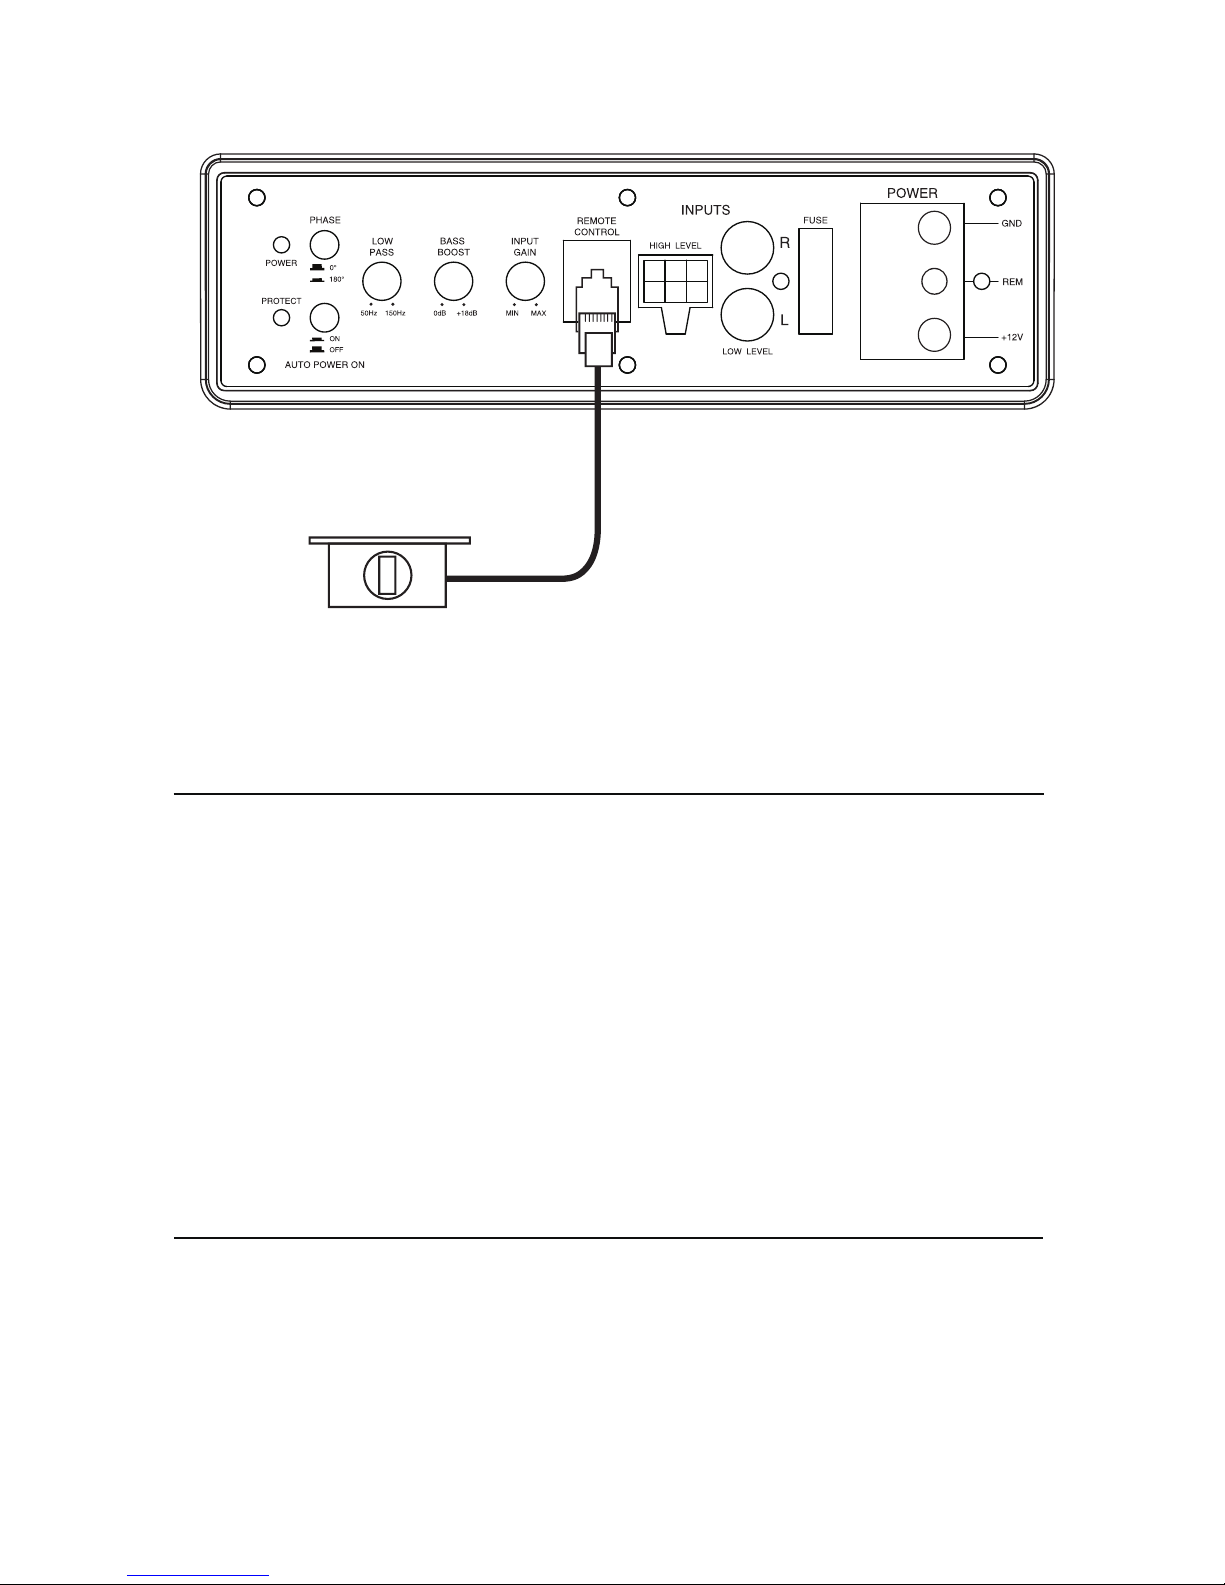
Remote Level Control Connection
Install the remote control securely under the
dash or in a similar location where using it will
not distract the driver.
Remote
Level Control
EPS8
Fig.5
All specifications subject to change without notice.
RMS power
THD
Signal-to-noise ratio
Frequency response
Input sensitivity, high level
Input sensitivity, low level
Low Pass Filter
Bass Boost
Subsonic Filter
Subwoofer
Passive Radiator
Fuse rating
Dimensions(L x W x H) mm
MODEL:
8inch,2ohm
185x52mm(2PCS)
225W
<0.4%
>90dB
20Hz - 150Hz
0.5V
110mV
50Hz - 150Hz
0 to + 18dB
20Hz
25A
345 x 245 x 70
Page 6
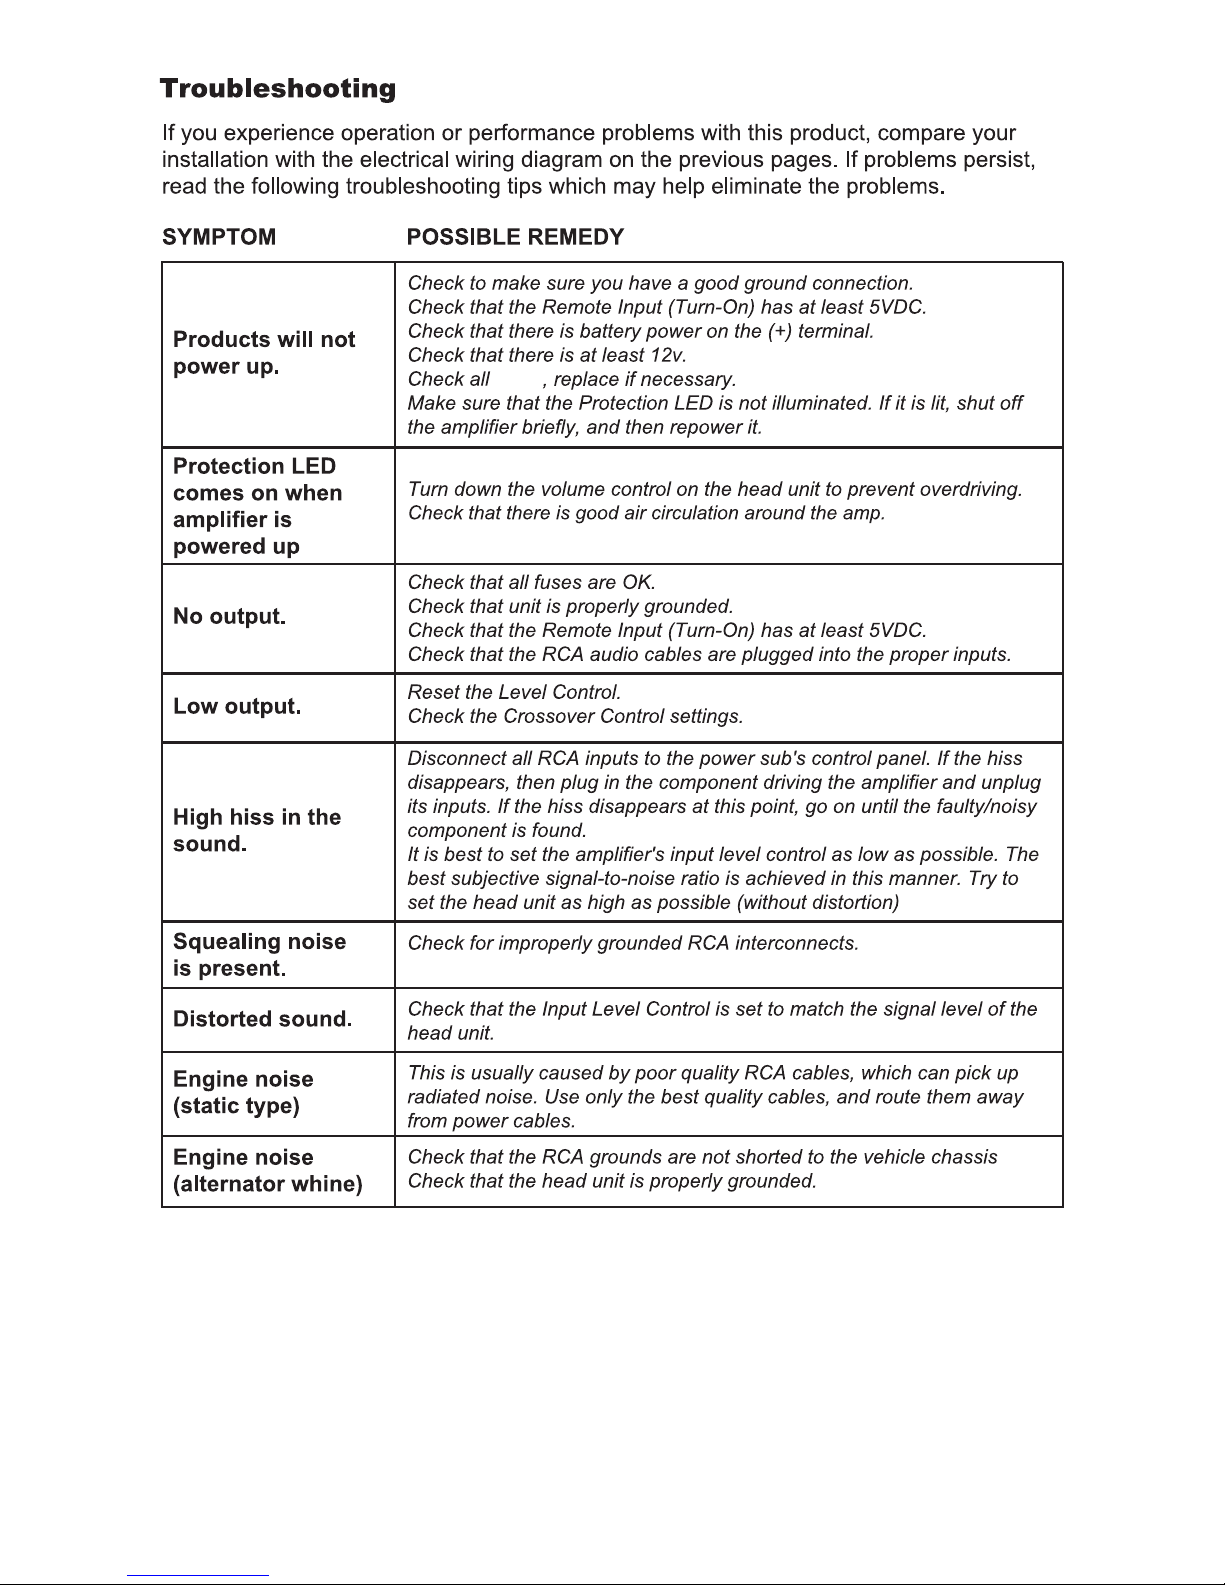
5
fuses
Page 7

LIMITED WARRANTY
DB Drive warrants any Euphoria products purchased in the
U.S.A. from an authorized DB Drive Euphoria dealer. All products
are warranted to be free from defects in material and
workmanship under normal use and service for a period of one
(1) year when purchased over the counter. This warranty applies
to the original purchase only.
DB Drive will either repair or replace (as its option) any unit that
had been found to be defective and under warranty provided the
defect occurs within the one (1) year warranty period.
DB Drive Euphoria products installed by an authorized
DB Drive Euphoria dealer will receive (2) years of warranty.
Either limited warranty periods do not extend to units having
been subjected to misuse, abuse, neglect, or accident. In DB
Drive’s judgment, products that show evidence of having been
altered, modified, or serviced without DB Drive’s authorization,
will be ineligible under this warranty.
To obtain warranty services please contact your retailer or visit
our website at www.dbdrive.net for more details.
Page 8

GARANTÍA LIMITADA
DB Drive™ garantiza cualquier Euphoria producto comprado
en USA de un vendedor autorizado por DB Drive™ Euphoria.
Todos los productos están garantizados de nó tener defectos en
material y manufactura bajo un uso normal y servicio por un
período de un año a partir de la fecha de a la compra.
DB Drive™ reparará o reemplazará (según su discreción) cualquier
unidad que haya sido encontrada con algún defecto dentro del
limite de garantia de un año.
Los productos DB Drive Euphoria instalados por un
distribuidor de DB Drive Euphoria recibirá (2) años de garantía.
Esta Garantía limitada nó se extiende a unidades que hayan sido
sujetas a un mal uso, abuso, negligencia, o accidente. Productos
que según DB Drive™ muestran evidencias de haber sido alterados, modificados, o utilizados sin la autorización de DB Drive™
serán rechazados de cualquier tipo de garantía.
Para obtener servicio de garantía, favor de comunicarse con su
proveedor o visítenos a nuestro sitio www.dbdrive.net para màs
detalles.
 Loading...