

DBL Technology VP-102, VP-202 User Manual
1
User Manual
VoIP Phone
VP-102/VP-202
DBL Technology Co.,Ltd.
Http://www.dbltek.com
Support@dbltek.com
Sales@dbltek.com
Release 1.0

Http://www.dbltek.com VP-102 / VP-202 User manual
2
Table of Contents
Overview.................................................................................................................................................................3
1.1 Key Features ................................................................................................................................................. 3
1.2 Shipping Contents.........................................................................................................................................4
1.3 Appearance....................................................................................................................................................5
1.4 VP-202 Keypad Layout ................................................................................................................................8
1.5 Hardware Setup........................................................................................................................................... 11
1.5 Connection Diagram...................................................................................................................................11
Web Configuration ..............................................................................................................................................13
2.1 Starting Up.................................................................................................................................................. 13
2.2 Obtaining the VoIP Phone IP Address........................................................................................................13
2.3 Accessing the Web Configuration Menu....................................................................................................14
2.4 Configuring the VoIP Phone.......................................................................................................................15
2.4.1 Preference............................................................................................................................................16
2.4.2 Network Configuration........................................................................................................................19
2.4.3 Call Settings.........................................................................................................................................21
2.4.3.1 H.323 Phone .................................................................................................................................21
2.4.3.2 SIP Phone .....................................................................................................................................24
2.4.3.3 Media Settings..............................................................................................................................29
2.4.4 Phone Settings .....................................................................................................................................31
2.4.5 Phone Book..........................................................................................................................................33
2.4.5 Tools....................................................................................................................................................34
2.4.5 .1 Online Upgrade.............................................................................................................................34
2.4.5 .2 Change Password..........................................................................................................................35
2.4.5 .3 Backup/Restore Configurations....................................................................................................35
2.4.5 .4 Reset Configuration......................................................................................................................36
2.4.5 .5 Reboot...........................................................................................................................................36
2.5 Gain Settings................................................................................................................................................36
VoIP Phone Operation.........................................................................................................................................38
3.1 Making a call...............................................................................................................................................38
3.2 Making a Handsfree Call (Speakerphone / Headset)..................................................................................38
3.3 Answering an Incoming Call ......................................................................................................................39
3.4 Dialing from Phonebook .............................................................................................................................39
3.5 Viewing / Dialing from Call History...........................................................................................................39
3.6 Redialing the Last Number (For VP-102 only)...........................................................................................40
3.7 Putting a Call on Hold.................................................................................................................................40
3.8 Transferring a Call......................................................................................................................................40
3.9 Setting up a Call Conference.......................................................................................................................40
3.10 Accessing Voice Messages.......................................................................................................................41
3.11 Answering a Call Waiting Call (For Model VP-202 only).......................................................................41
3.12 Setting the the Ring Type..........................................................................................................................41
3.13 Adjusting the Ring Volume ......................................................................................................................41
3.14 Adjusting the Handset Receiver Volume..................................................................................................42
3.15 Adjusting the Speaker Volume ..................................................................................................................42
3.16 Adjusting the LCD Contrast.......................................................................................................................42
3.17 Resetting the Phone Configuration ............................................................................................................42
Appendix A Phone Menu.................................................................................................................................43

Http://www.dbltek.com VP-102 / VP-202 User Manual
3
1
Overview
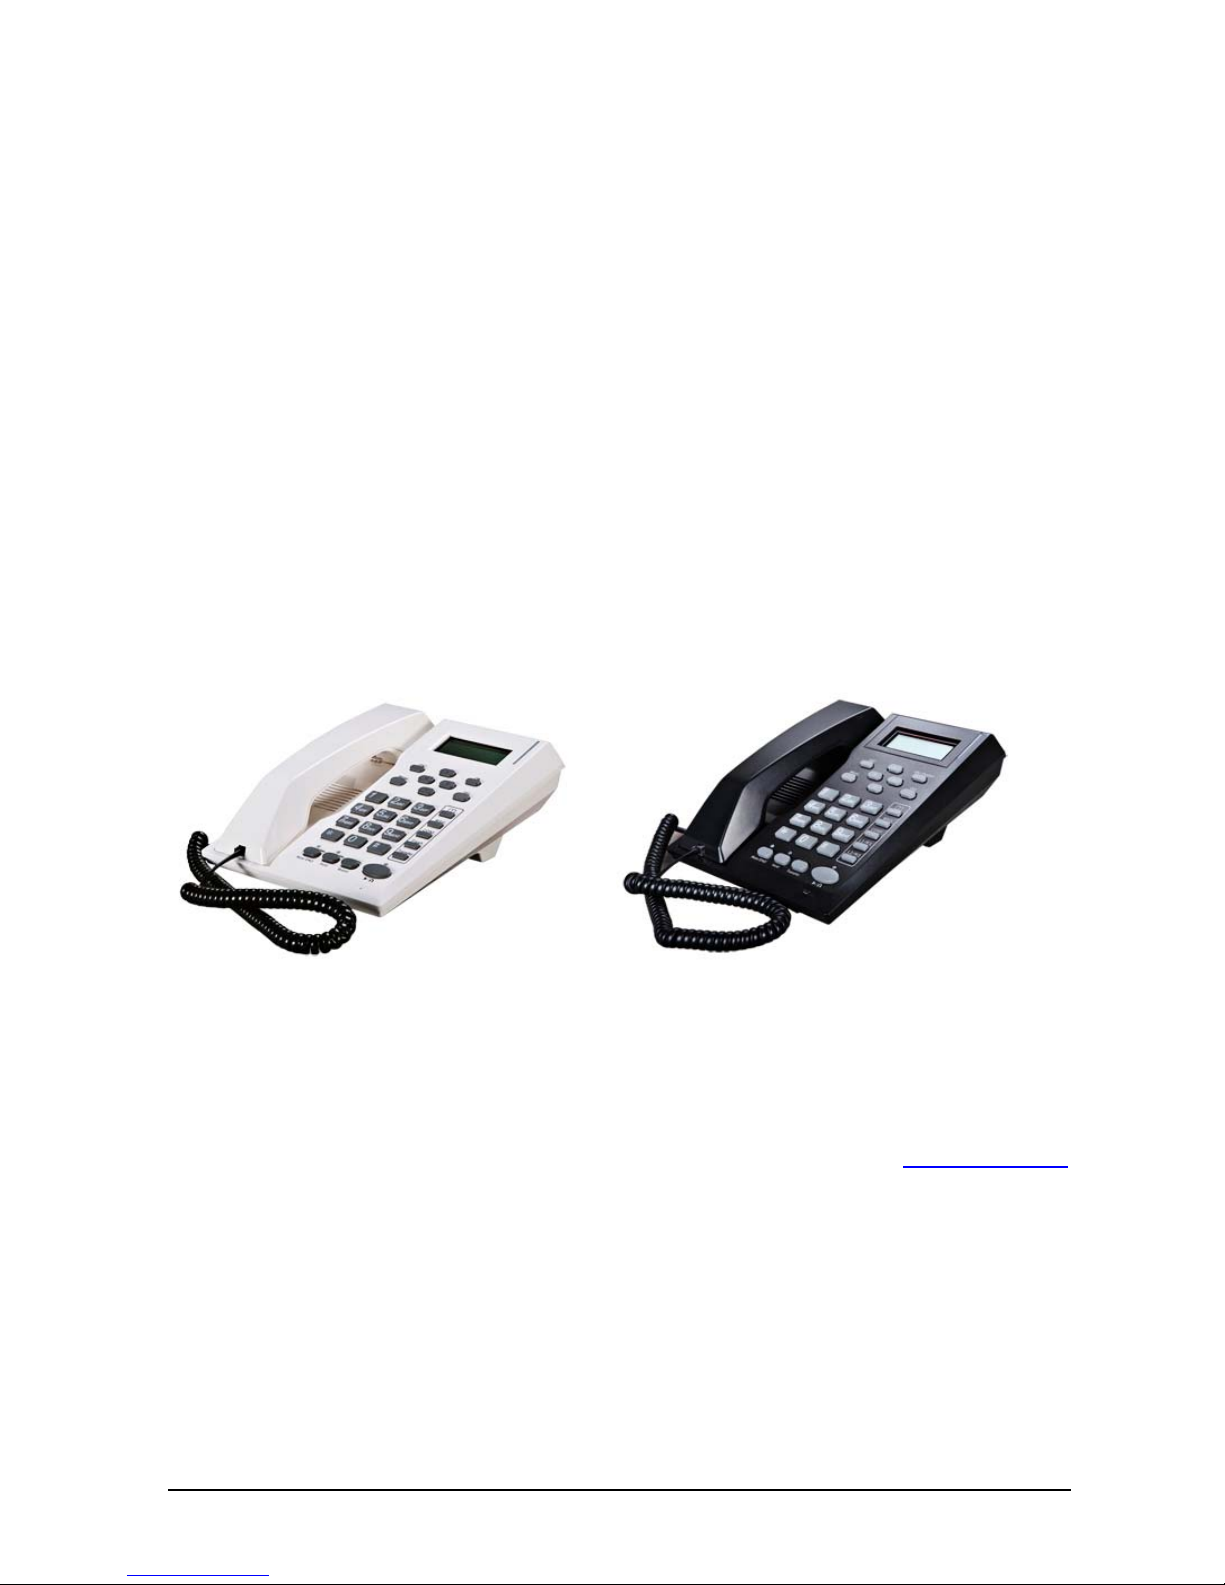
The VP-100 Series VoIP Phone is designed as a low cost and high performance VoIP phones which
supports both H.323 and SIP standards. It offers lots of features and works seamlessly with most of the
existing VoIP systems. It is an ideal solution for both residential and business market to replace the
traditional analog and digital (pbx) phones.
1.1 Key Features
The major features of VP-102 / VP-202 VoIP Phones are:
• Supports both H.323 V4.0 and SIP 2.0
• Supports TCP/UDP/IP, RTP, HTTP, HTTPS, ARP, DNS, DHCP, NTP/SNTP, FTP, TFTP, and
SSL protocols
• Supports H.225 V4, H.235 (MD5, HMAC-SHA1), H.245 Standards
• Interoperable with various 3rd party VoIP end user devices, Proxy/Registrar/Server, and gateway
products
• VP-102 supports single line
• Vp-202 supports dual lines modes.
• Supports popular vocoders including G.711 a-law and u-law, GSM, G.723.1, G.729a/b/ab
• Supports standard voice features such as Caller ID Display or Block, Call Waiting, Call Hold,
Call Transfer, Call Forward, in-band and out-of-band DTMF (RFC2833/SIP INFO), and Dial
Plans
• Supports conferencing, hands-free loudspeaker, phonebook, last number redial, call log, volume
control, and voicemail message indicator
• Supports BASIC and DIGEST authentication (MD5, MD5-sess)
• Provides easy configuration through automatic configuration, Web browser-based Graphical User
Interface (GUI), or, if desired, manual operation (phone keypad interface)

Http://www.dbltek.com VP-102 / VP-202 User manual
4
• Supports NTP and redundant DNS servers
• NAT-friendly remote upgrade capability (via HTTP) even from behind firewall/NAT router.
• Proprietary Firewall-Pass-Through Technology
1.2 Shipping Contents
Table 1 below shows the contents of the Phone package.
Item Description
1 VP-102 / VP-202 Main body
2 Handset
3 Coiled cord
4 Ethernet Straight cable
5
Power Supply (optional) - 12VDC/500mA Output
External Power Supply. This is not required if your
network switch supports POE.
6 Phone warranty registration card
Http://www.dbltek.com VP-102 / VP-202 User Manual
5
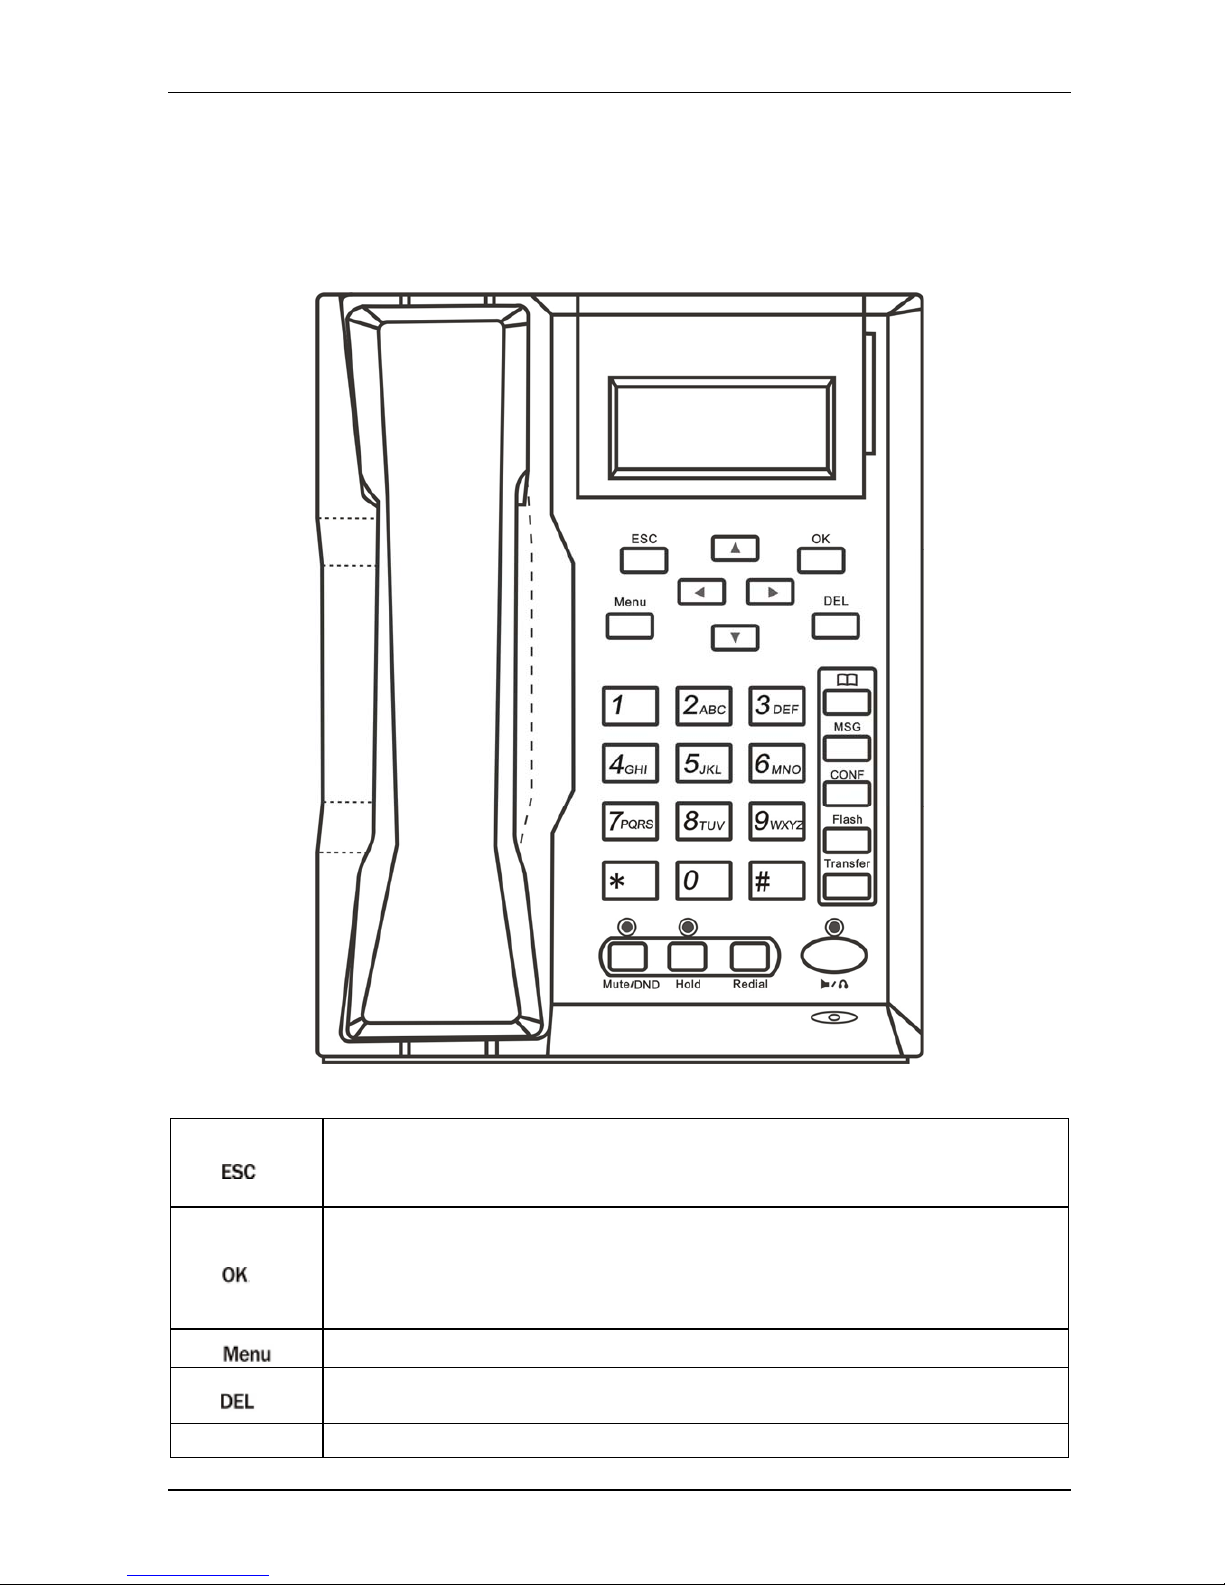
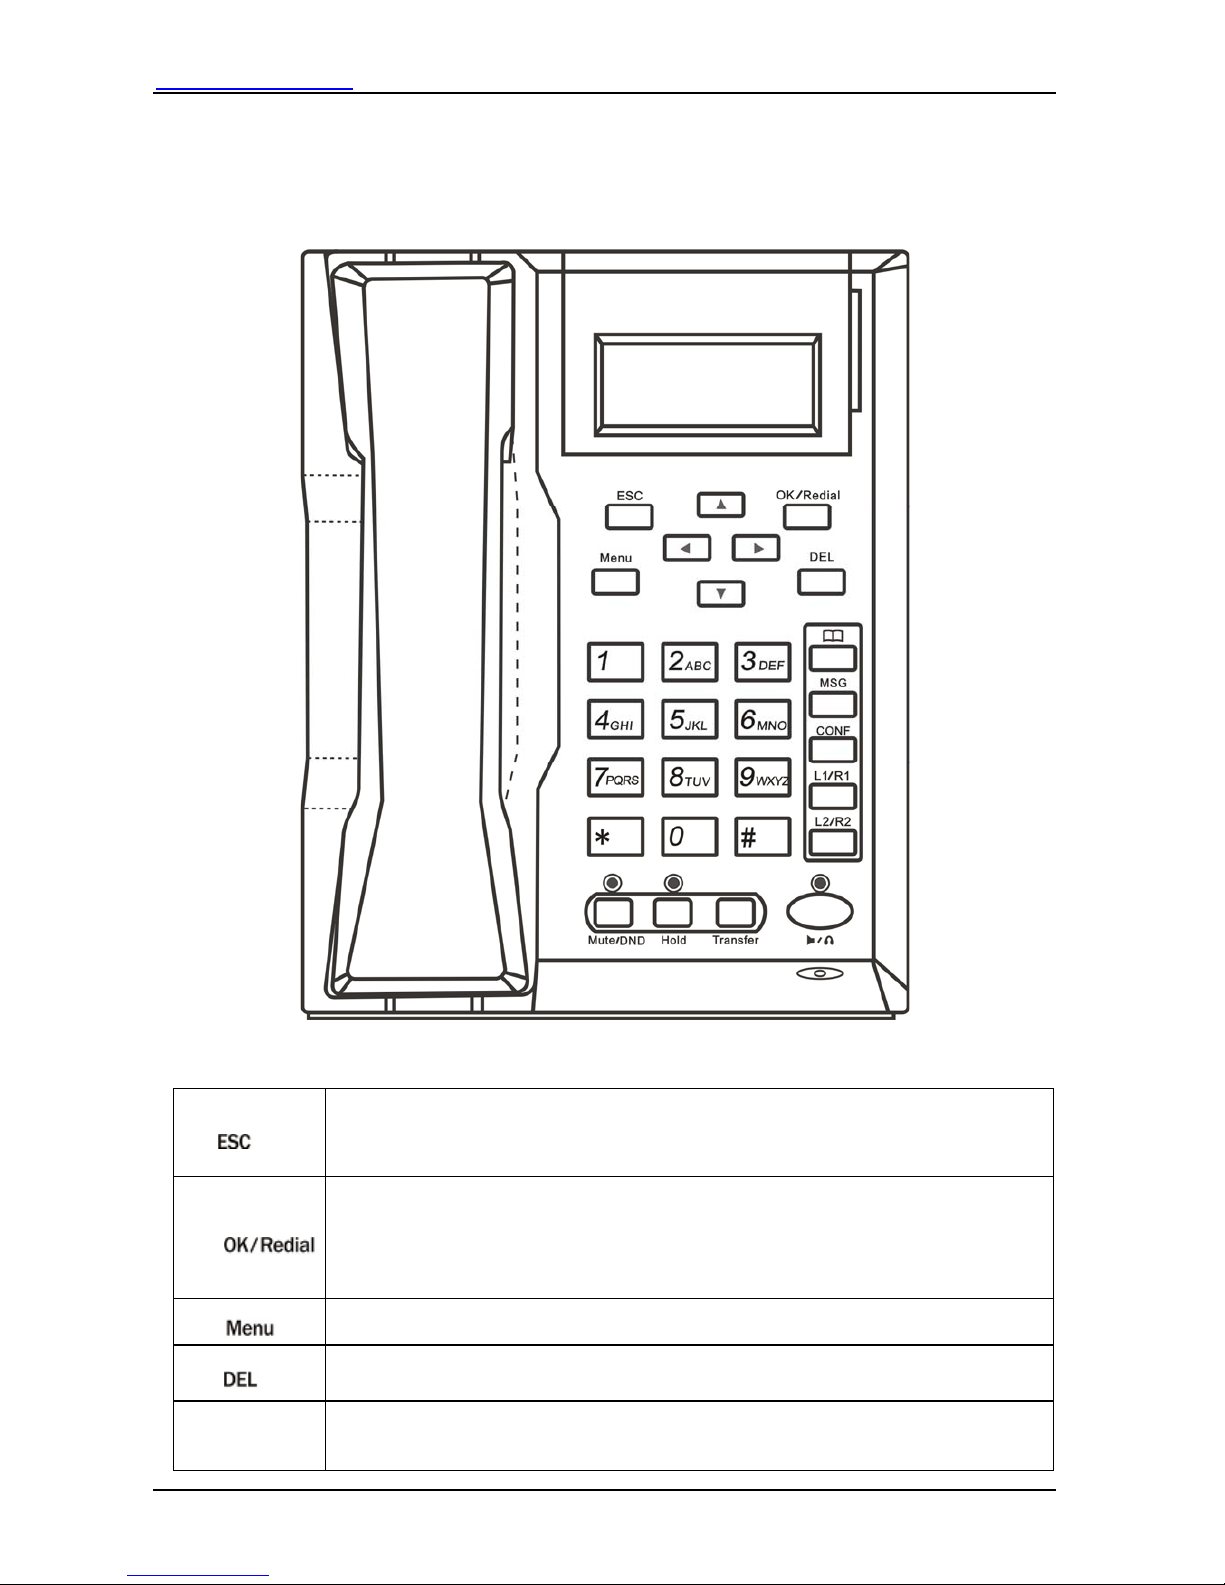
1.3 Appearance
The VP-102 keypad layout is shown and described below.
VP-102 Front View
1.
– If Menu mode is not active, press this key to cancel the current operation and resumes to idle
LCD display.
– If Menu mode is active, press this key to return to the last menu screen.
2.
– While the phone is in menu mode. Press this key to confirm the selection or entry.
– While the phone is not in a call and a number is entered, press this key to dial the number.
– While the phone is in idle, press this key to view the Dialed Call List while the LCD is in
idle screen.
3.
– Press this key to access the Menu mode.
4.
– Press this key to delete the last digit or alphabet entered (not active when the phone is in
menu selection mode).
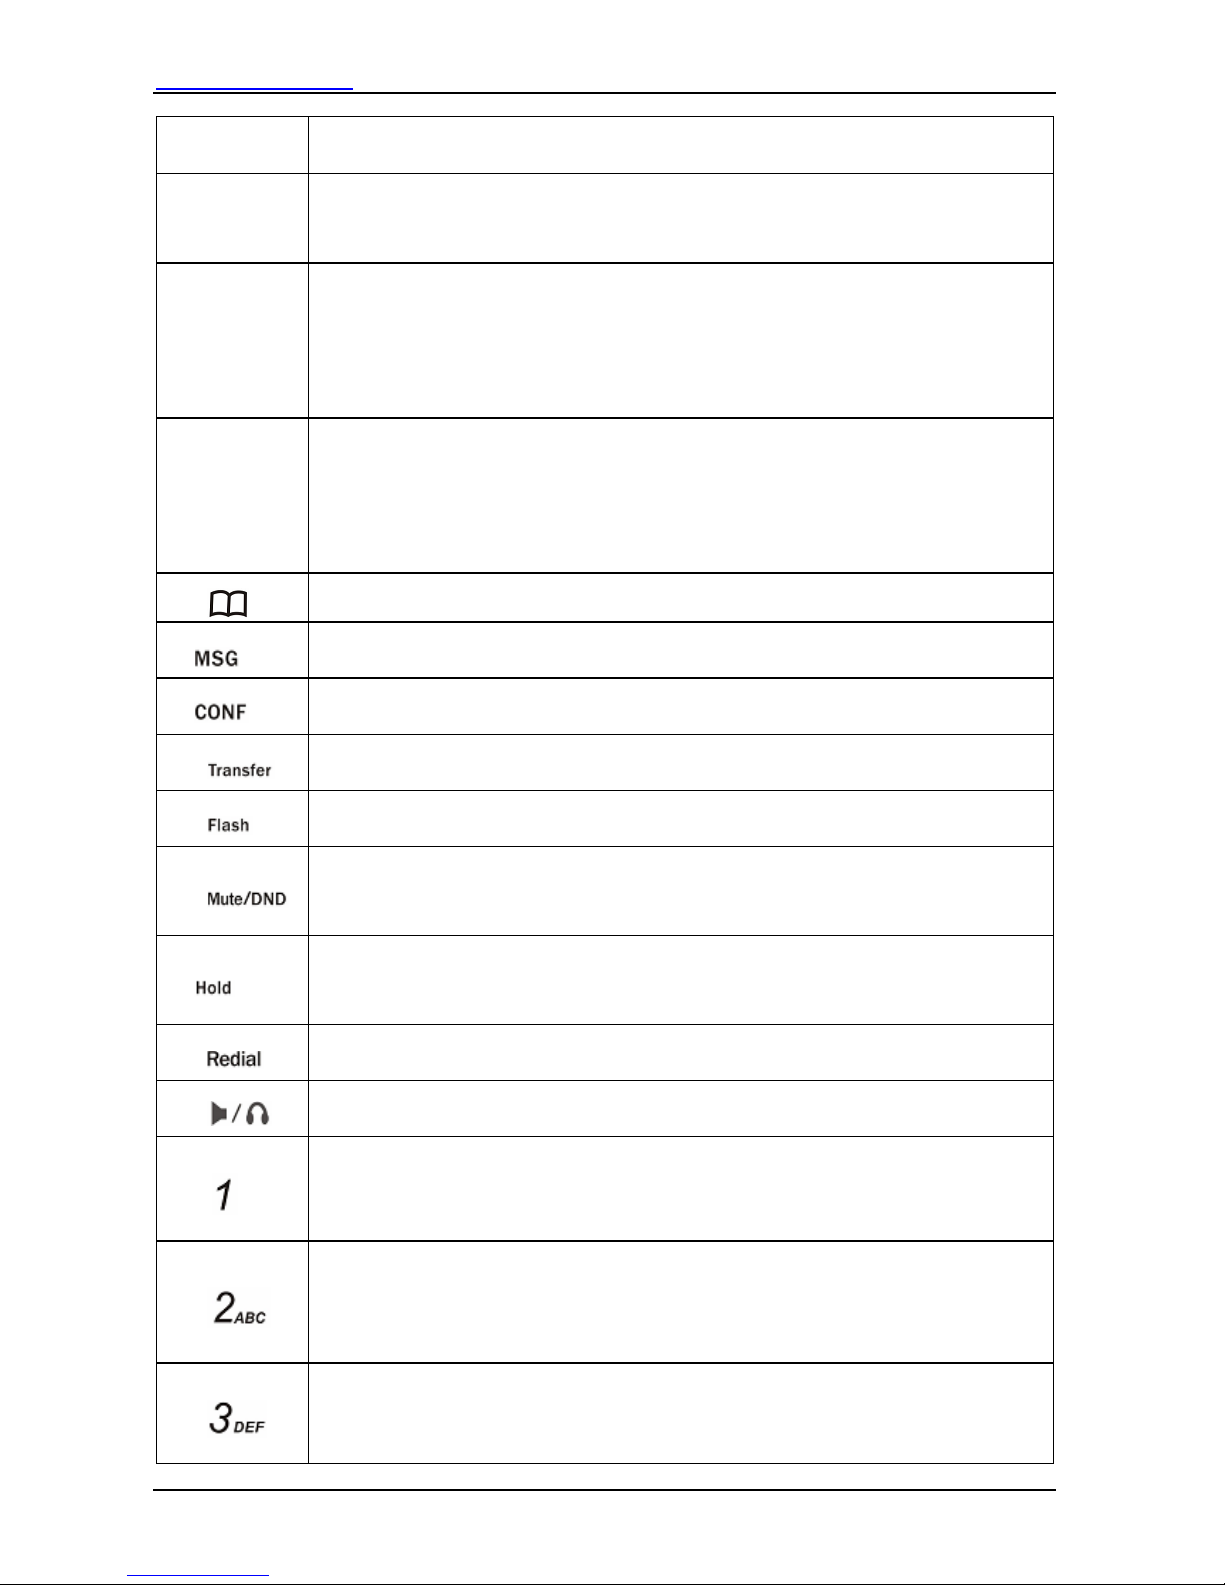
5. Up
– While the phone is in idle mode, press this key to view the Missed Call List.
Http://www.dbltek.com VP-102 / VP-202 User manual
6
– While the phone is displaying phone entries or text, press this key to scroll the LCD screen
up one line till the top of the screen is reached.
6. Down
– While the phone Is in idle mode, press this key to view the Answered Call List.
– While the phone is displaying phone entries or text, press this key to scroll the LCD screen
down one line till the bottom of the screen is reached.
7. Left
– While the LCD is in idle display, press this key to increase the LCD contrast.
– While viewing Call Lists or Phone Book, press this key to scroll the LCD screen up one line
till the top of the screen is reached.
– While the phone is ringing, press this key to increase the ringer volume.
– While the phone is in use, press this key to increase the speaker volume.
8. Right
– While the LCD is in idle display, press this key to decrease the LCD contrast.
– While viewing Call Lists or Phone Book, press this key to scroll the LCD screen down one
line till the top of the screen is reached.
– While the phone is ringing, press this key to decrease the ringer volume.
– While the phone is in use, press this key to decrease the speaker volume.
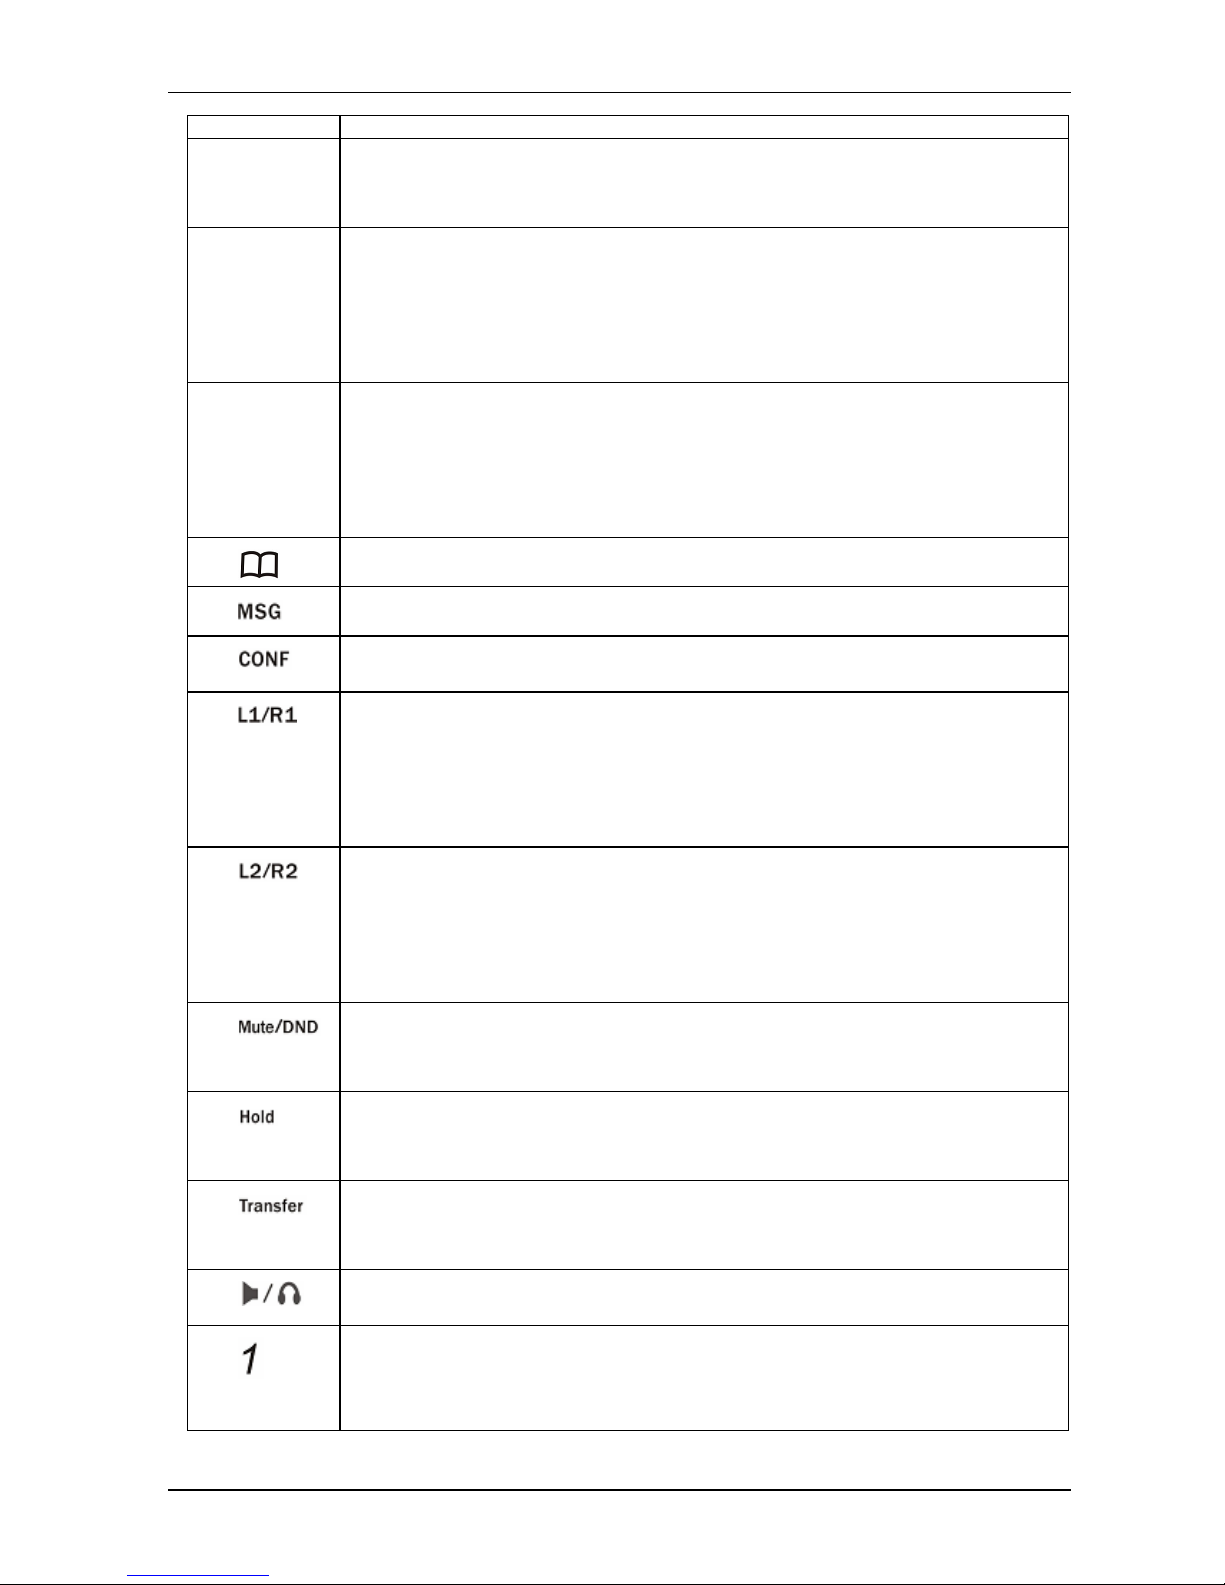
9.
– Press this key to access the phone book while the phone is in idle.
10.
– Press this key to access the voice mail server directly.
11.
– Press this key to activate the CONFERENCE mode while there is an active call and a call on
hold.
12.
– Press this key and dial a phone number to transfer the current call to this number. Both
attended and unattended modes are supported.
13.
– Press this key to answer a call waiting call or to switch between an active call and a call on
hold.
14.
– While the phone is in use, press this key to mute the handset microphone.
– While the phone is in idle mode, DND (DO NOT DISTURB) function is active. Press this
key to enable DND if DND is not active. Press this key to disable DND if DND is active.
15.
– While the phone is in an active call, press this key to hold the call.
– While there is a call on hold (LED flashes and Hold Warning tone is heard), press this key to
release the call on hold and resume as an active call.
16.
– While the phone is in idle, press this key to access the Redial Call List.
17.
– Depending on the phone setting, press this key to turn on either the Speakerphone or the
headset mode.
18.
– For DTMF dialing, press this key to dial the digit “1” .
– For menu selection, press this key to select the menu item 1 (if available).
– For text input, press this key to enter one of the following characters:
[blank] 1.
19.
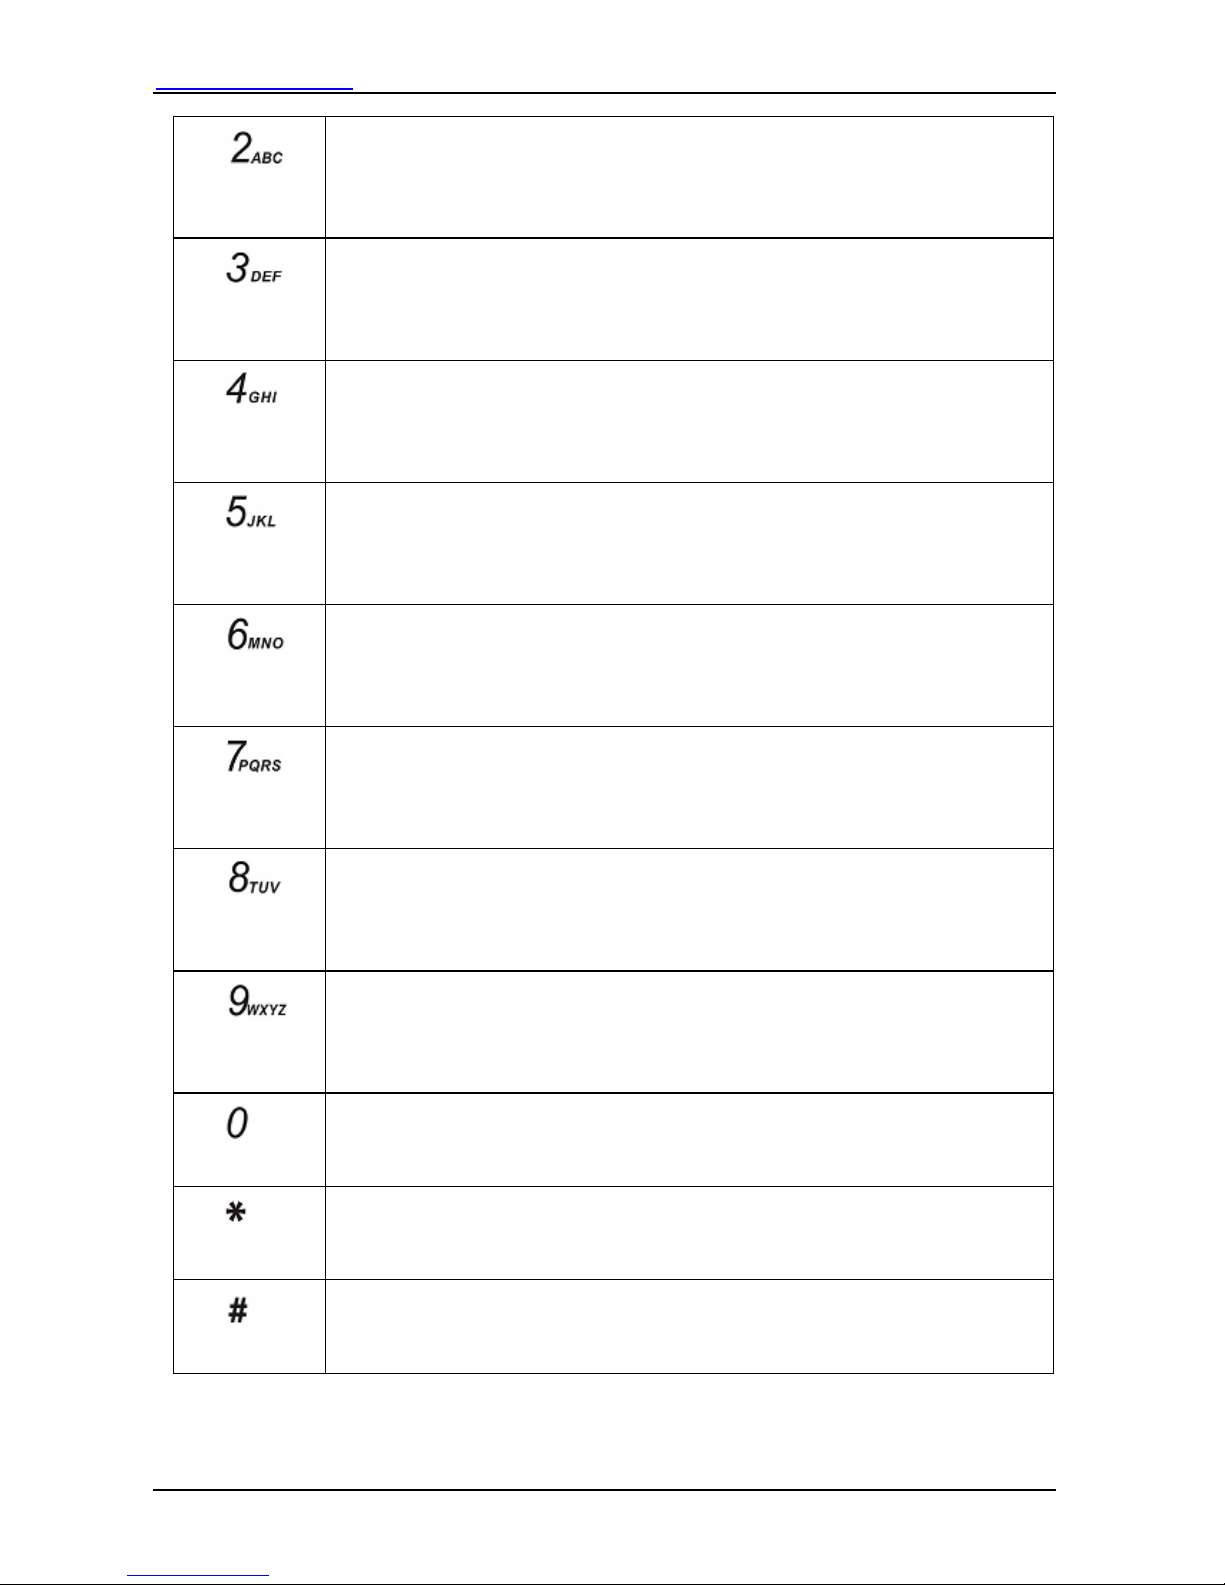
– For DTMF dialing, press this key to dial the digit “2” .
– For menu selection, press this key to select the menu item 2 (if available).
– For text input, press this key one or multiple times to enter either one of the following
characters: 2 A B C a b c.
20.
– For DTMF dialing, press this key to dial the digit “3” .
– For menu selection, press this key to select the menu item 3 (if available).
– For text input, press this key one or multiple times to enter either one of the following
Http://www.dbltek.com VP-102 / VP-202 User Manual
7
characters: 3 D E F d e f.
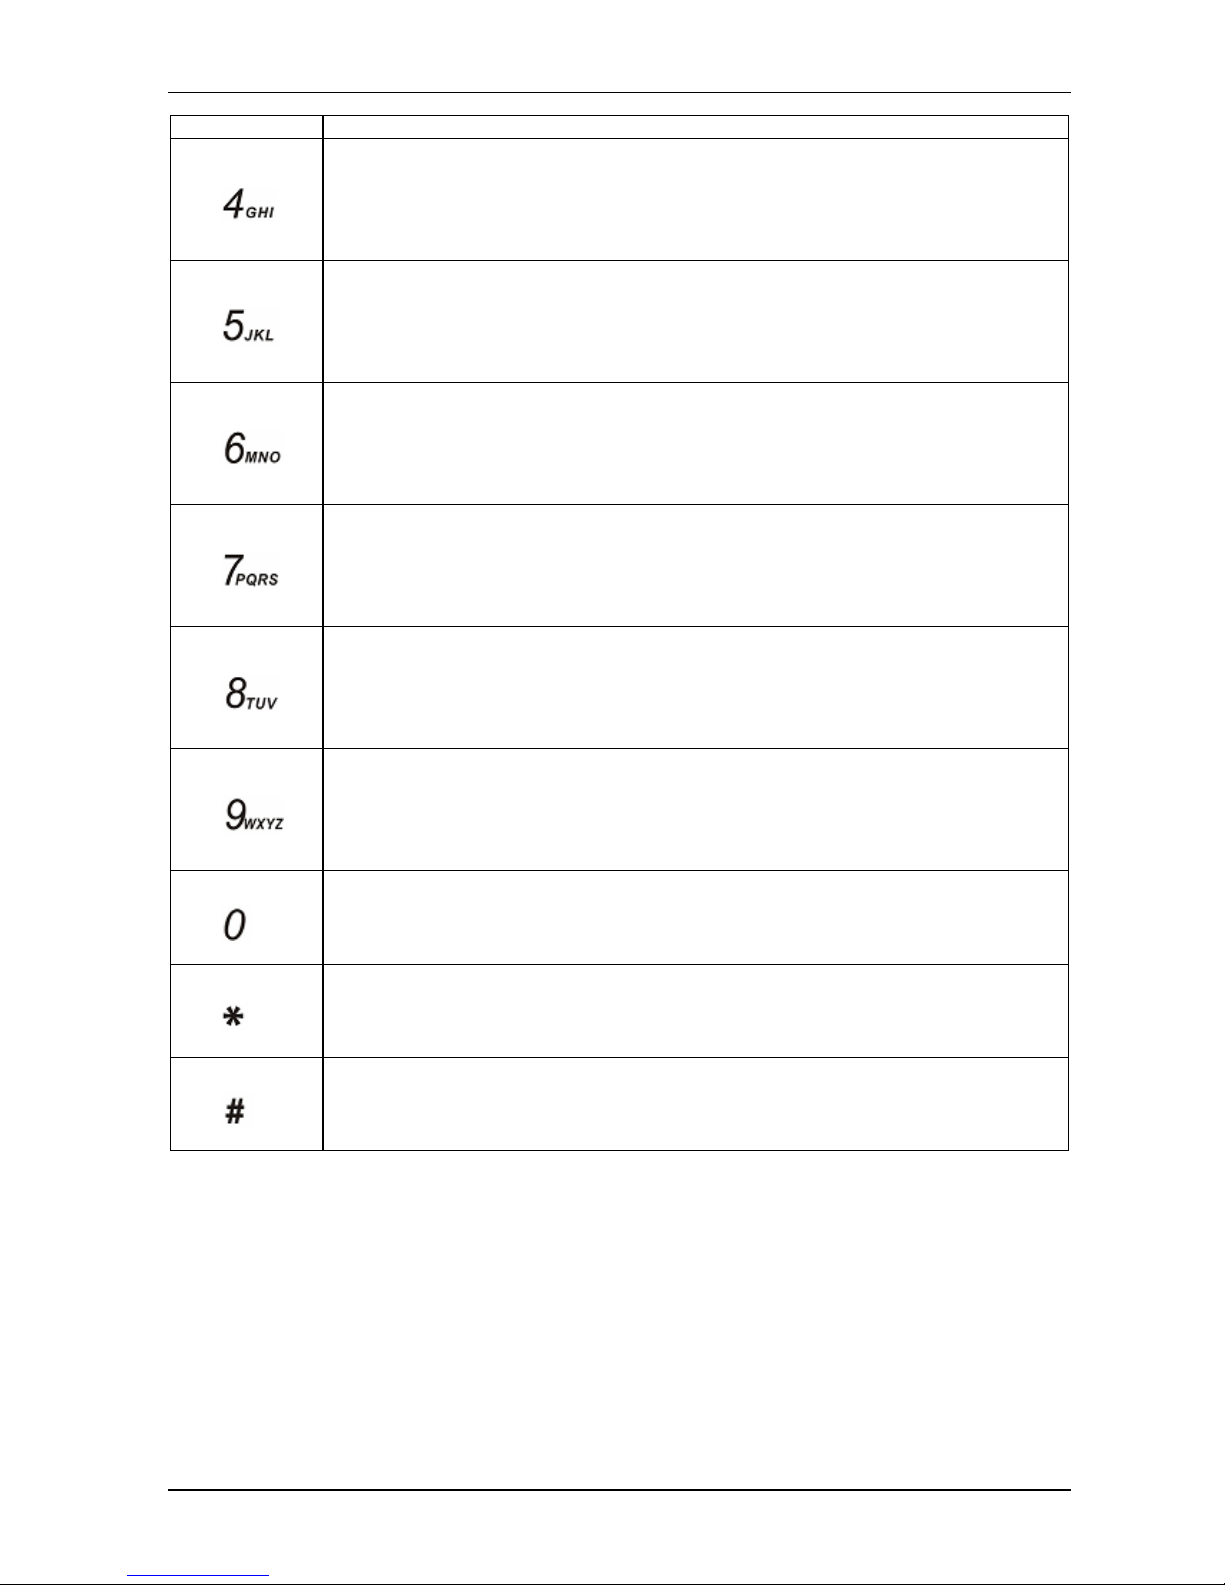
21.
– For DTMF dialing, press this key to dial the digit “4” .
– For menu selection, press this key to select the menu item 4 (if available).
– For text input, press this key one or multiple times to enter either one of the following
characters: 4 G H I g h i.
22.
– For DTMF dialing, press this key to dial the digit “5” .
– For menu selection, press this key to select the menu item 5 (if available).
– For text input, press this key (one or multiple times) to enter either one of the following
characters: 5 J K L j k l.
23.
– For DTMF dialing, press this key to dial the digit “6” .
– For menu selection, press this key to select the menu item 6 (if available).
– For text input, press this key (one or multiple times) to enter either one of the following
characters: 5 J K L j k l.
24.
– For DTMF dialing, press this key to dial the digit “6” .
– For menu selection, press this key to select the menu item 6 (if available).
– For text input, press this key (one or multiple times) to enter either one of the following
characters: 7 P Q R S p q r s.
25.
– For DTMF dialing, press this key to dial the digit “8” .
– For menu selection, press this key to select the menu item 8 (if available).
– For text input, press this key one or multiple times to enter either one of the following
characters: 8 T U V t u v.
26.
– For DTMF dialing, press this key to dial the digit “9” .
– For menu selection, press this key to select the menu item 9 (if available).
– For text input, press this key one or multiple times to enter either one of the following
characters: 9 W X Y Z w x y z.
27.
– For DTMF dialing, press this key to dial the digit “0” .
– For text input, press this key one or multiple times to enter either one of the following
characters:
0 + -.
28.
– For DTMF dialing, press this key to dial the digit “*” .
– For text input, press this key one or multiple times to enter either one of the following
characters:
* . : , ! ?.
29.
– For DTMF dialing, press this key to dial the digit “#” .
– For text input, press this key one or multiple times to enter either one of the following
characters:
# @ % &.
Http://www.dbltek.com VP-102 / VP-202 User manual
8
1.4 VP-202 Keypad Layout
The VP-202 keypad layout is shown and described below.
VP-202 Front View
1.
– If Menu mode is not active, press this key to cancel the current operation and resumes to
idle LCD display.
– If Menu mode is active, press this key to return to the last menu screen.
2.
– While the phone is in menu mode. Press this key to confirm the selection or entry.
– While the phone is not in a call and a number is entered, press this key to dial the number.
– While the phone is in idle, press this key to view the Dialed Call List while the LCD is in
idle screen.
3.
– Press this key to access the Menu mode.
4.
– Press this key to delete the last digit or alphabet entered (not active when the phone is in
menu selection mode).
5. Up
– While the phone is in idle mode, press this key to view the Missed Call List.
– While the phone is displaying phone entries or text, press this key to scroll the LCD screen
Http://www.dbltek.com VP-102 / VP-202 User Manual
9
up one line till the top of the screen is reached.
6. Down
– While the phone Is in idle mode, press this key to view the Answered Call List.
– While the phone is displaying phone entries or text, press this key to scroll the LCD screen
down one line till the bottom of the screen is reached.
7. Left
– While the LCD is in idle display, press this key to increase the LCD contrast.
– While viewing Call Lists or Phone Book, press this key to scroll the LCD screen up one
line till the top of the screen is reached.
– While the phone is ringing, press this key to increase the ringer volume.
– While the phone is in use, press this key to increase the speaker volume.
8. Right
– While the LCD is in idle display, press this key to decrease the LCD contrast.
– While viewing Call Lists or Phone Book, press this key to scroll the LCD screen down
one line till the top of the screen is reached.
– While the phone is ringing, press this key to decrease the ringer volume.
– While the phone is in use, press this key to decrease the speaker volume.
9.
– Press this key to access the phone book while the phone is in idle.
10.
– Press this key to access the voice mail server directly.
11.
– Press this key to activate the CONFERENCE mode while there is an active call and a call
on hold.
12.
– This is a Line 1 selection key.
– If no number is entered (shown on LCD), press this key will select Line 1 for making a
call.
– If a number is entered (shown on LCD), press this key choose Line 1 to dial the number.
– This key can also be redefined if the phone is set to set to connect to only one server.
13.
– This is a Line 2 selection key.
– If no number is entered (shown on LCD), press this key will select Line 2 for making a
call.
– If a number is entered (shown on LCD), press this key choose Line 2 to dial the number.
– This key can also be redefined if the phone is set to set to connect to only one server.
14.
– While the phone is in use, press this key to mute the handset microphone.
– While the phone is in idle mode, DND (DO NOT DISTURB) function is active. Press this
key to enable DND if DND is not active. Press this key to disable DND if DND is active.
15.
– While the phone is in an active call, press this key to hold the call.
– While there is a call on hold (LED flashes and Hold Warning tone is heard), press this key
to release the call on hold and resume as an active call.
16.
– Press this key and dial a phone number to transfer the current call to this number. Both
attended and unattended modes are supported.
–
17.
– Depending on the phone setting, press this key to turn on either the Speakerphone or the
headset mode.
18.
– For DTMF dialing, press this key to dial the digit “1” .
– For menu selection, press this key to select the menu item 1 (if available).
– For text input, press this key to enter the characters:
[blank] 1.
Http://www.dbltek.com VP-102 / VP-202 User manual
10
19.
– For DTMF dialing, press this key to dial the digit “2” .
– For menu selection, press this key to select the menu item 2 (if available).
– For text input, press this key (one or multiple times) to enter either one of the following
characters: 2 A B C a b c.
20.
– For DTMF dialing, press this key to dial the digit “3” .
– For menu selection, press this key to select the menu item 3 (if available).
– For text input, press this key (one or multiple times) to enter either one of the following
characters: 3 D E F d e f.
21.
– For DTMF dialing, press this key to dial the digit “4” .
– For menu selection, press this key to select the menu item 4 (if available).
– For text input, press this key (one or multiple times) to enter either one of the following
characters: 4 G H I g h i.
22.
– For DTMF dialing, press this key to dial the digit “5” .
– For menu selection, press this key to select the menu item 5 (if available).
– For text input, press this key (one or multiple times) to enter either one of the following
characters: 5 J K L j k l.
23.
– For DTMF dialing, press this key to dial the digit “6” .
– For menu selection, press this key to select the menu item 6 (if available).
– For text input, press this key (one or multiple times) to enter either one of the following
characters: 6 M N O m n o.
24.
– For DTMF dialing, press this key to dial the digit “6” .
– For menu selection, press this key to select the menu item 6 (if available).
– For text input, press this key (one or multiple times) to enter either one of the following
characters: 7 P Q R S p q r s.
25.
– For DTMF dialing, press this key to dial the digit “8” .
– For menu selection, press this key to select the menu item 8 (if available).
– For text input, press this key one or multiple times to enter either one of the following
characters: 8 T U V t u v.
26.
– For DTMF dialing, press this key to dial the digit “9” .
– For menu selection, press this key to select the menu item 9 (if available).
– For text input, press this key one or multiple times to enter either one of the following
characters: 9 W X Y Z w x y z.
27.
– For DTMF dialing, press this key to dial the digit “0” .
– For text input, press this key one or multiple times to enter either one of the following
characters:
0 + -.
28.
– For DTMF dialing, press this key to dial the digit “*” .
– For text input, press this key one or multiple times to enter either one of the following
characters:
* . : , ! ?.
29.
– For DTMF dialing, press this key to dial the digit “#” .
– For text input, press this key one or multiple times to enter either one of the following
characters:
# @ % &.
Http://www.dbltek.com VP-102 / VP-202 User Manual
11
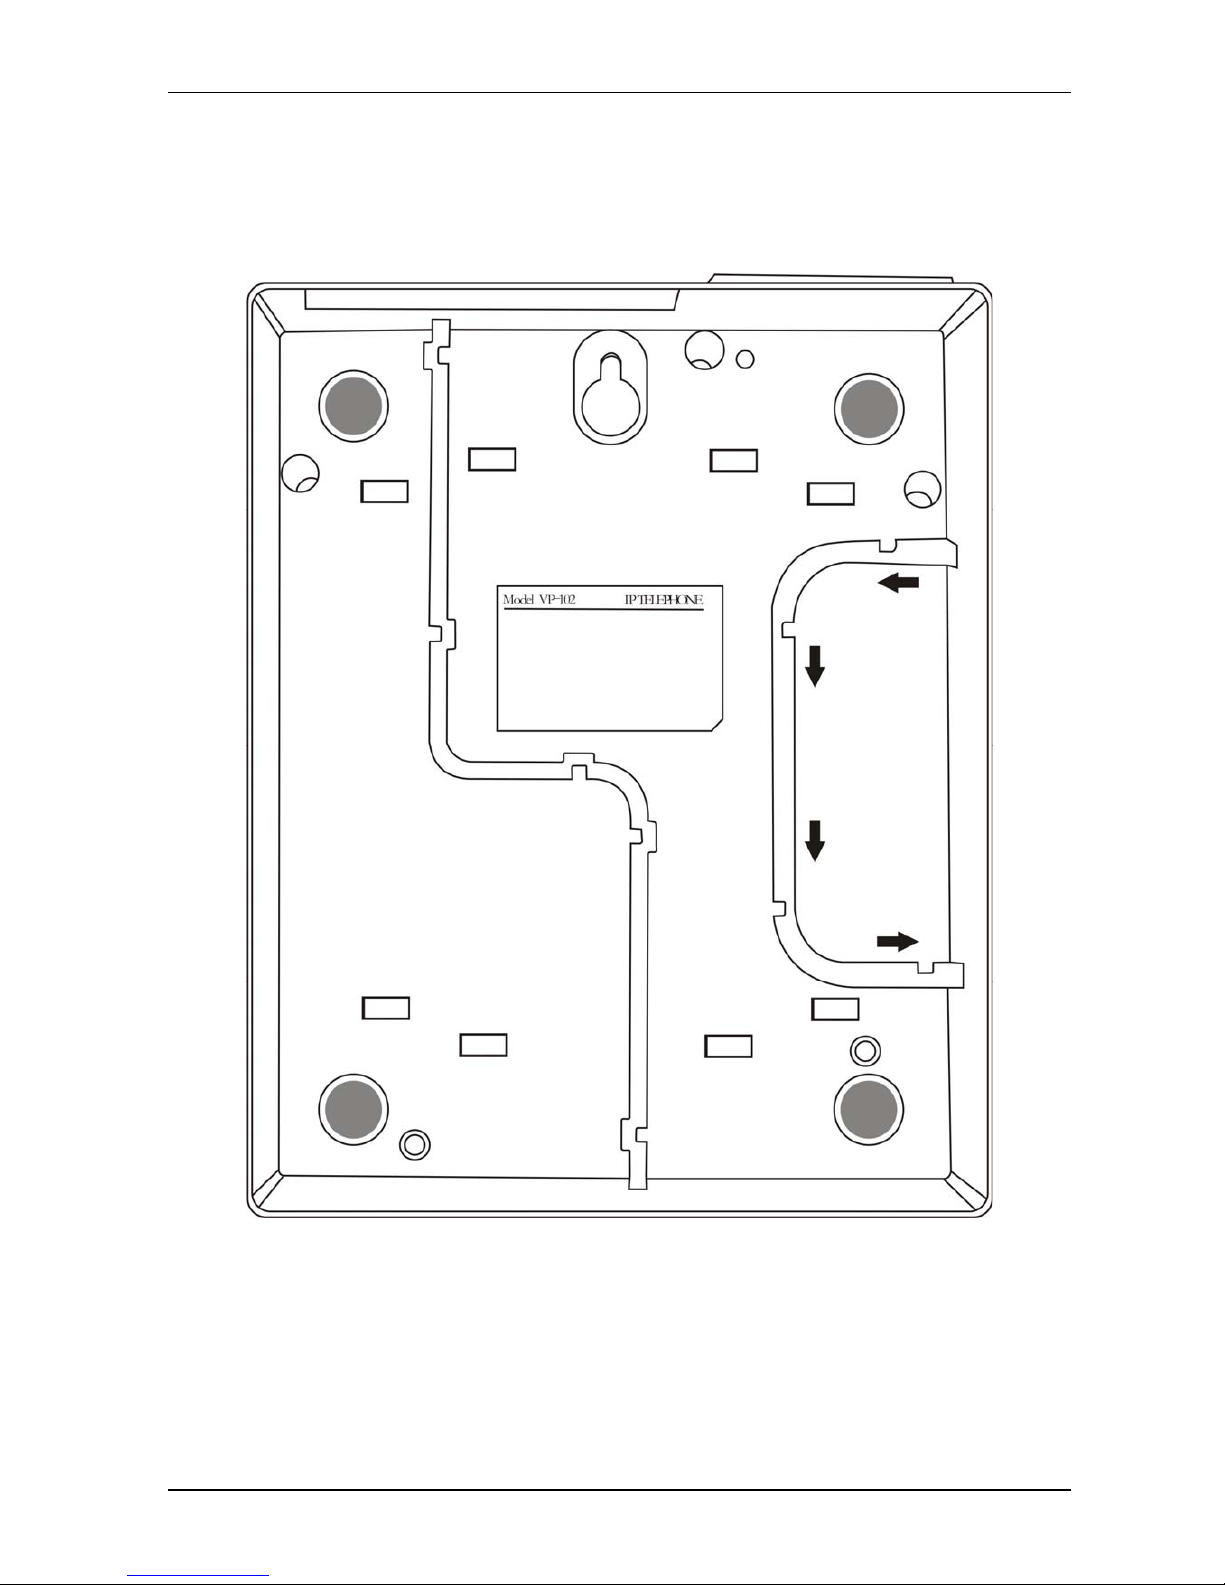
1.5 Hardware Setup
Connect the handset cord to the handset and the base. The handset cord should be wired to the bottom of
the base as shown below. The base stand should be snapped on to the based for desktop or wall mount
application.
VP-102 Bottom View
1.5 Connection Diagram
The diagram below shows a typical installation of the device and the installation steps are:
1. Connect an Ethernet cable between the LAN port and a WAN network device (XDSL/Cable Modem,
router or gateway) for external network access.

Http://www.dbltek.com VP-102 / VP-202 User manual
12
2. Optional: Connect an Ethernet cable between the PC port and a computer or network device. It is
intended to build a new local network segment (Fixed IP mode) or extend the existing network segment
(Bridge mode).
3. Optional: The MIC and EAR ports are intended headset operation. Connect a standard computer headset
to these ports.
4. Connect the AC/DC Adapter to the DC12V port and then the AC wall plug.

Http://www.dbltek.com VP-102 / VP-202 User Manual
13
2
Web Configuration
2.1 Starting Up
Upon powering up for the first time, the VP-102 scans for available services for network connections. It will
then display the services available and prompt for user input.
1. DHCP service – This means that a local DHCP host is detected. Select this service to enable the phone to
obtain IP address and related information for the LAN port from the DHCP host.
2. PPPoE Dial Up – This service is intended for ADSL / Cable Modem user. Select this and the phone will
prompt for Username and Password for the PPPoE Dial Up.
3. Fixed IP – When the above two services are not available, this method can be used to access the network.
When this option is chosen, the phone will prompt for IP Address, Gateway Address, and Netmask. Please
contact your network administrator or ISP if you do not have the information required.
2.2 Obtaining the VoIP Phone IP Address
Once the LAN / PC port is setup properly, you are now ready to access the built-in web server for phone
configuration. To access the web server, you first need to retrieve the IP address using the following steps:
1. Press Menu (during on-hook or off-hook states)
2. Press 3 to select System Tools
3. Press 1 to select Phone Status
4. Press 1 to select LAN Port or 2 to select PC Port
5. Press 1 to select IP
The phone then d isplays LAN / PC port IP address:
xxx.xxx.xxx.xxx
where xxx is a number between 0 and 255.

Http://www.dbltek.com VP-102 / VP-202 User Manual
14
2.3 Accessing the Web Configuration Menu
Once the IP Address is obtained in Section 2.2, you are now ready to access the built-in web server via a web
browser (IE, Firefox, etc.)
Enter the IP in the address field to login to the phone web server as shown below.
The web browser pops up a login window as shown below.
Both VP-102 and VP-202 support two login levels. For Administrator, please enter User name = “admin” and
Password = “admin” (factory default). For User, please enter User name = “user” and the Password = “1234”
(factory default). Both passwords can be changed in the Administrator mode. Only user password can be
changed in the User mode. Please keep a record of the new passwords if changed.
The Administrator mode allows full access to the built-in Web Server whereas the User mode restricts the user
from accessing the Call Settings page.
Once the login is successful, the Web Browser brings up the Status page as shown below.
 Loading...