

DBL Technology EP-636 User Manual

DBL Technology EP-636 User Manual
CONTENTS
1 OVERVIEW ........................................................................................................................................4
1.1 GENERAL INFORMATION..................................................................................................................4
1.2 COMPLIANCE...................................................................................................................................4
1.3 HARDWARE CHARACTERISTICS .......................................................................................................5
1.4 SOFTWARE CHARACTERISTICS ........................................................................................................5
1.5 UNPACKING THE IP PHONE PACKAGE ..............................................................................................5
1.6 FRONT VIEW ...................................................................................................................................7
1.7 REAR VIEW .....................................................................................................................................8
2 INSTALLING THE IP PHONE ............... ..........................................................................................8
2.1 PREPARING THE IP PHONE ...............................................................................................................8
2.2 CONNECTION DIAGRAMS ................................................................................................................9
2.2.1 Home User with ADSL/Cable Broadband Connection (PPPOE) ...........................................9
2.2.2 Office User in a LAN Environment... .....................................................................................10
2.3 STARTING THE IP PHONE ...............................................................................................................10
3 USING THE IP PHONE .................. ................................................................................................. 11
3.1 KEYPAD......................................................................................................................................... 11
3.1.1 Number Keys ................ ......................................................................................................... 11
3.1.2 Function Keys............. ...........................................................................................................12
3.2 VIEWING THE LCD IN IDLE STATE.................................................................................................12
3.3 CALL STATUS DISPLAY ..................................................................................................................12
3.4 How to Make a Call ...................... .................................................................................. .........13
3.4.1 Normal ..................................................................................................................................13
3.4.2 Speakerphone ........................................................................................................................13
3.4.3 Switching between Normal and Speakerphone .....................................................................13
3.4.4 Making a Phone Call with the Up/Down Scroll Keys ...........................................................13
3.4.5 Making a Phone Call via Call List........................................................................................14
3.4.6 Making a Phone Call via the Phone Book.............................................................................14
3.5 ANSWERING AN INCOMING CALL ..................................................................................................14
3.6 ANSWERING A WAITING CALL .......................................................................................................15
3.7 CALL HOLD ...................................................................................................................................15
3.8 CALL CONFERENCE .......................................................................................................................15
3.9 CALL TRANSFER............................................................................................................................16
3.10 VOICE MAIL ................................................................................................................................16
4 PHONE MENU ................ .................................................................................................................17
4.1 PHONE MENU OPERATION .............................................................................................................17
4.2 MENU CONTENT............................................................................................................................17
4.2.1 Call List................. ................................................................................................................17
4.2.2 Phone Book ...........................................................................................................................18
4.2.3 System Tools ..........................................................................................................................19
4.2.3.1 Phone Status................................................................................................................................... 19
•
1

DBL Technology EP-636 User Manual
4.2.3.2 SYSTEM VERSION...................................................................................................................... 19
4.2.3.3 RING VOLUME............................................................................................................................ 19
4.2.3.4 LCD CONTRAST.......................................................................................................................... 20
4.2.3.5 RESET CONFIG............................................................................................................................ 20
4.2.4 DEVICE CONFIG.............. ...................................................................................................20
4.2.5 VOICE MAIL.........................................................................................................................20
5 CONFIGURATION ............................................. .. ...........................................................................21
5.1 START CONFIGURATION .................................................................................................................21
5.1.1 To Retrieve an IP Address ............. ........................................................................................21
5.1.2 To Login to the Phone ...........................................................................................................21
5.2 PHONE STATUS ..............................................................................................................................22
5.2.1 Phone Information ................................................................................................................23
5.2.2 Network Information ............. ................................................................................................23
5.3 PREFERENCE..................................................................................................................................23
5.3.1 Language...............................................................................................................................24
5.3.2 User Password ................. .....................................................................................................24
5.3.3 Administrator Password........ ................................................................................................24
5.3.4 Time Zone ..................... .........................................................................................................24
5.3.5 Auto Dial Time ......................................................................................................................25
5.3.6 Title........................................................................................................................................25
5.3.7 Disable # as Dial Key ...........................................................................................................25
5.3.8 Auto Configurations ..............................................................................................................25
5.3.9 Advance… ............ .................................................................................................................25
5.4 CALL SETTINGS.............................................................................................................................26
5.4.1 H.323 Phone..........................................................................................................................27
5.4.1.1 Gatekeeper Mode ........................................................................................................................... 28
5.4.1.2 Direct Mode ................ ................................................................................................................... 28
5.4.1.3 Advance Settings.......... .................................................................................................................. 28
5.4.2 SIP Phone..............................................................................................................................30
5.4.2.1 SIP Proxy .................... ................................................................................................................... 31
5.4.2.2 SIP Registrar ........................................................................................................................... .. ..... 31
5.4.2.3 SIP Phone Number ............................................................................................................ ............. 31
5.4.2.4 Display Name......................................................................................................................... ........ 31
5.4.2.5 Home Domain ................................................................................................................................ 32
5.4.2.6 Authentication ........ ........................................................................................................................ 32
5.4.2.6 Advance settings.......... ........................................................................................................... ........ 32
5.4.3 Codec Preference ............ ......................................................................................................35
5.4.4 NAT Traversal ................. ......................................................................................................35
5.4.4.1 None............................................................................................................................................... 36
5.4.4.2 Port-forwarding............. .. ............................................................................................................... 36
5.4.4.3 Relay Proxy.................................................................................................................................... 36
5.5 PHONE SETTINGS...........................................................................................................................37
5.5.1 Prefix Dial Timer......... ..........................................................................................................38
5.5.2 F1 Key Redefine ........ ............................................................................................................38
•
2

DBL Technology EP-636 User Manual
5.5.2.1 Prefix.................. ............................................................................................................................ 38
5.5.2.2 Speed Dial.............. .. ...................................................................................................................... 38
5.5.2.3 Calling Function............................................................................................................................. 39
5.5.3 F2 Key Redefine ........ ............................................................................................................39
5.5.4 Hold Key Redefine.................................................................................................................39
5.5.5 Transfer Key Redefine ...........................................................................................................39
5.5.6 User Command Timer ...........................................................................................................39
5.5.7 Enable User Command .........................................................................................................39
5.6 NETWORK CONFIGURATIONS.........................................................................................................40
5.6.1 LAN Port Configuration............... .........................................................................................40
5.6.1.1 Obtain an IP Address Automatically... ............................................................................................ 41
5.6.1.2 Specify an IP Address Manually ............ ........................................................................................ 41
5.6.1.3 PPPOE.............................................................................................................................. .. ............ 41
5.6.1.4 Advance Configurations............ ..................................................................................... ................ 41
5.6.2 PC Port Configurations ............. ...........................................................................................42
5.6.2.1 Bridge Mode ................. .. ............................................................................................................... 42
5.6.2.2 Specify an IP Address Manually ............ ........................................................................................ 42
5.6.2.3 Disable ................. .............................................................................................................. ............ 43
5.6.2.4 Advance Configurations............ ..................................................................................... ................ 43
5.6.3 Primary DNS................ .........................................................................................................43
5.6.4 Secondary DNS .....................................................................................................................43
5.6.5 Timer Server ..........................................................................................................................44
5.7 PHONE BOOK.................................................................................................................................44
5.7.1 View the Phone Number Record............................................................................................44
5.7.2 Maintain Phonebook .............................................................................................................45
5.8 ONLINE UPGRADE .........................................................................................................................46
5.9 SAVE CONFIGURATION ..................................................................................................................47
•
3

DBL Technology EP-636 User Manual
1 Overview
1.1 General Information
EP-636 is a low-priced IP telephone developed by DBL Technology himself. It is compatible
with H.323 V4 and SIP V2, possessing single file of English letters and single file of digital LCD
displayer and achieving full dulplex hands-free call. When it is disposed into H.323, EP-636 can
cooperate with GK and GW of most H.323. It also has perfect H.450 protocol to complete all
telecom value-added services such as call transfer, call forward, call waiting, etc.. Cooperating
with soft exchange system, it can totally replace traditional PBX or KEY LINE PHONE. It can
also be used as LAN phone or hot-line phone. When it is disposed into SIP, EP-636 can cooperate
with most SIP system. Besides having popular g.723 and g.729, it can use low-priced GSM voice
compression algorithms. This model is the first-selected one for telecom operators and the main
type exported by
DBL Technology.
1.2 Compliance
SIP 2.0
H323 V4 Standard
Transmission Control Protocol/ User Datagram Protocol/ Internet Protocol (TCP/UDP/IP)
Real Time Protocol (RTP)
Hyper Text Transfer Protocol (HTTP)
Address Resolution Protocol (ARP)
Domain Name System (DNS)
Dynamic Host Control Protocol (DHCP)
Network Time Protocol (NTP)
G.711 a-law and u-law, GSM, G.723, G.729a/b/ab Voice Codec
Caller ID Display or Block, Call Waiting, Call Hold, Call Transfer, Call Forward, in-band and
out-of-band DTMF (RFC2833), and Dial Plans
Conferencing, hands-free loudspeaker, phonebook, last number redial, call log, volume
control, and voicemail message indicator
BASIC and DIGEST authentication (MD5, MD5-sess)
Proprietary Firewall-Pass-Through Technology
Simple Traversal of UDP over NAT (STUN)
Web-base Management
PPP over Ethernet (PPPoE)
PPP Authentication Protocol (PAP)
Internet Control Message Protocol (ICMP)
TF TP Client
User account authentication using MD5
Out-band DTMF Relay: RFC 2833 and SIP Info
•
4

DBL Technology EP-636 User Manual
1.3 Hardware Characteristics
ARM9 133MHZ Processor for high performance
DSP for voice codec and voice processing
Two 100BaseT Ethernet ports in comply with IEEE 802.3 for both LAN and PC connection.
LEDs for Ethernet port status
128x64 dot-matrix LCD display for manual access and phone operation.
Ethernet Bridge
RAM (16M)
FLASH (4M)
Power Adaptor (120V DC/500mA)
Working Temperature (0-45 degree centigrade)
Working Humidity (40%-90% not congealed)
Weight (650g)
Authentication (FCC CE)
1.4 Software Characteristics
LINUX OS
Built-in HTTP, TELNET, COM Port, Phone Manual for accessing internal parameters
PPPoE dial up
NAT Broadband Router functions
DHCP Client
DHCP Server
Firmware On-line upgrade
Phone Book
Memory Dial
Caller ID
Multiple Language Support
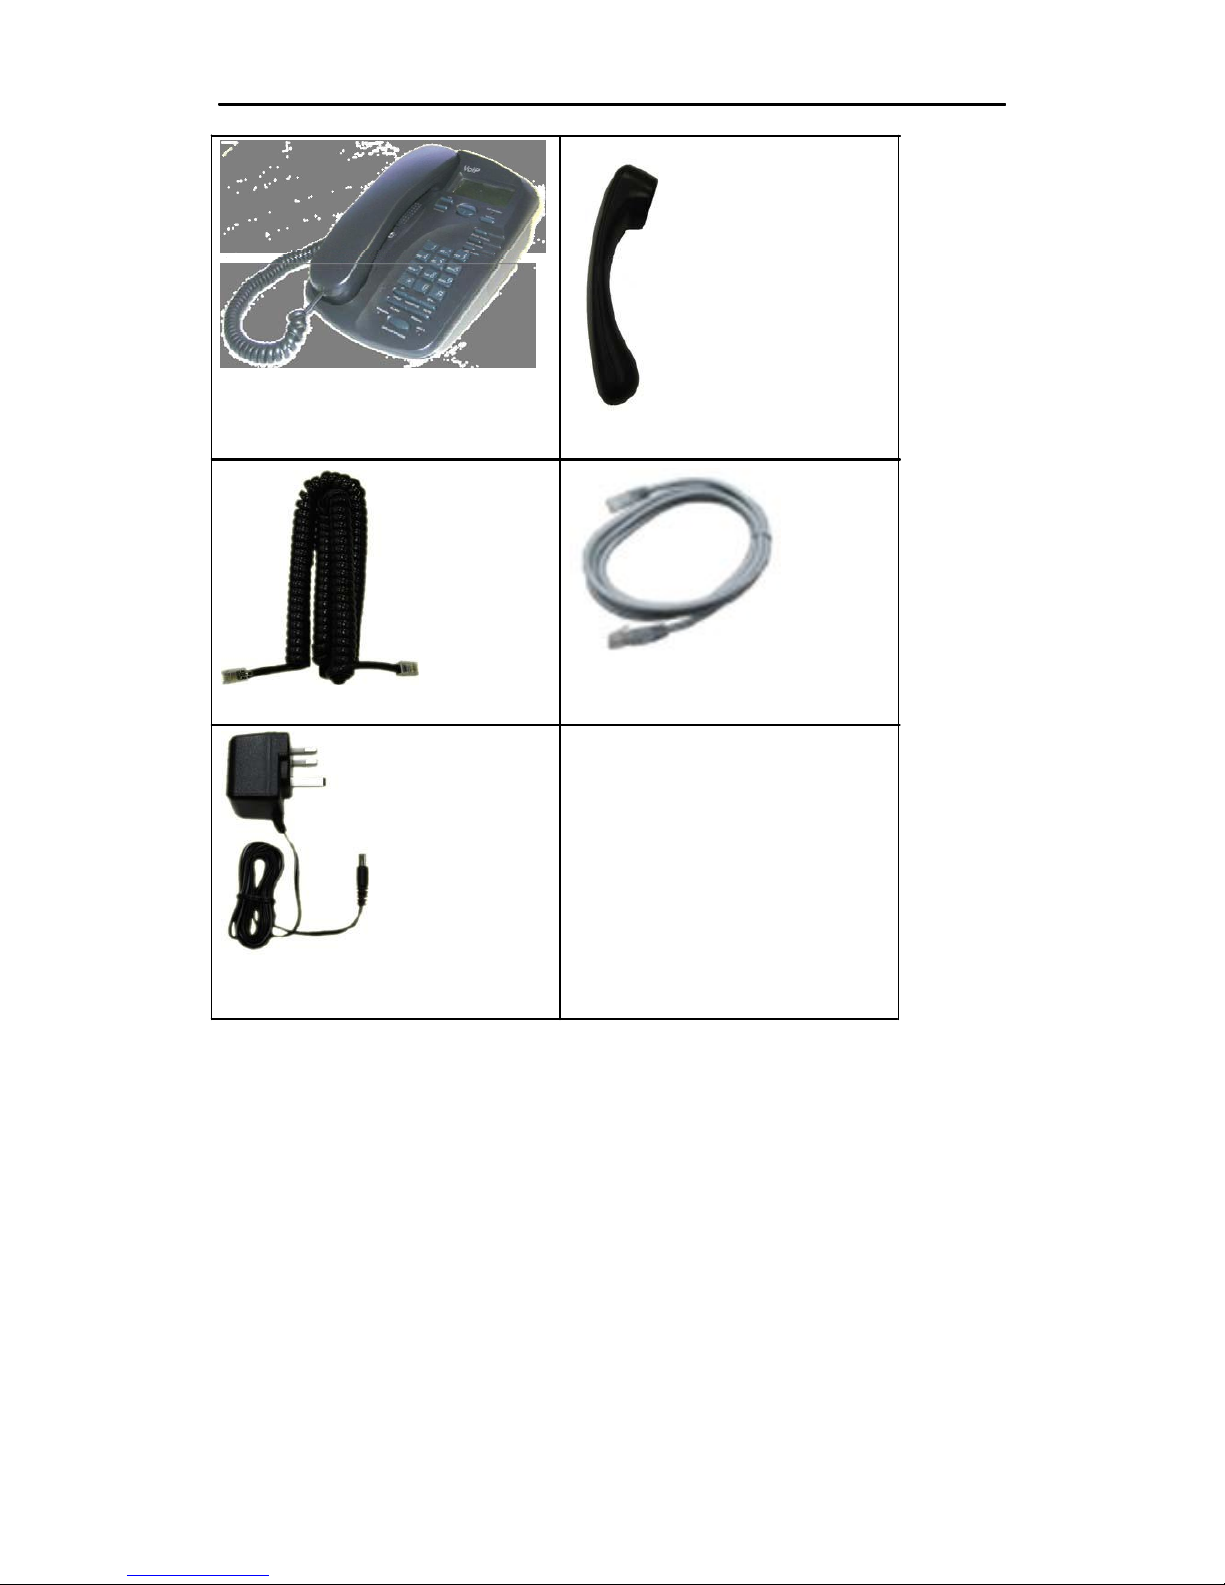
1.5 Unpacking the IP Phone Package
Your IP phone box should include the following items:
•
5
DBL Technology EP-636 User Manual
EP-636 Main Unit
Coiled Phone Cord
Power Adaptor: IN: AC100-240V;
OUT: DC12V,500mA
EP-636 Handset
One Ethernet Cable (Straight Type)
IP Phone Warranty Card, User Manual
and CD
•
6
DBL Technology EP-636 User Manual
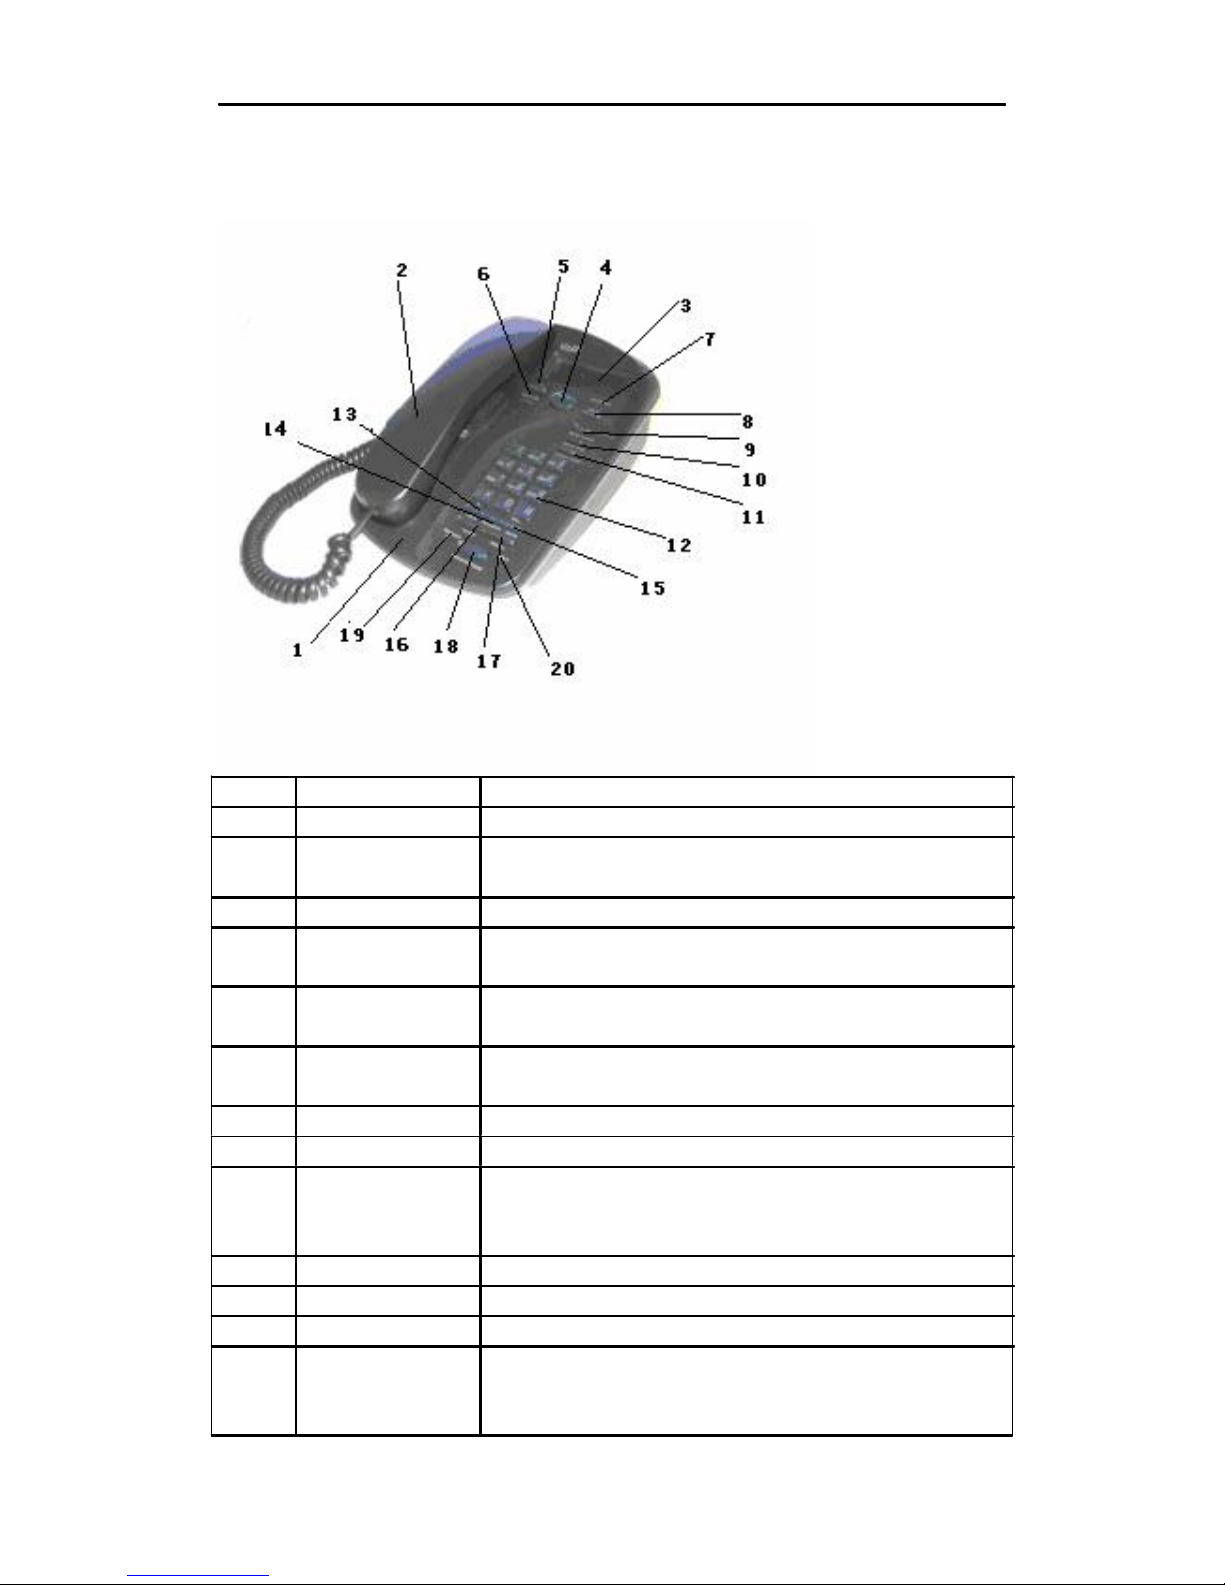
1.6 Front View
Number
1
2
3
4
5
6
Name
Main Unit
Handset
LCD
Up/Down
OK
ESC
Description
This is the main unit of the EP-636.
This part is the hardest receiver and microphone, used for phone
conversation.
This is the LCD of the IP phone.
The scroll keys are used to browse the menu list. Press Up key
to view outgoing calls.
This key is used to confirm information input or phone
operation.
Press this key to exit the current menu selection or entry and
return to the previous condition.
7 MESSAGE(LED) It illuminates when there is an unanswered call or voicemail.
8 MENU Press this key to enter Menu mode.
9
10
11
12
F1(BACKSPACE) Press this key to move the cursor on the LCD one position
backward. This key is used for deleting a phone number entry or
other phone setup entry.
F2(CONFERENCE) Press this key to initiate a three-way conference.
PHONEBOOK Press this key to view and edit the phonebook.
Number/Letter key Refer to Section 3.1.1.
13 HOLD When endpoint type uses SIP Phone, press this key to hold the
current call. When endpoint type uses H323 Phone, press this
key to answer a waiting call or hold the current call and enter
• 7

DBL Technology EP-636 User Manual
dial mode.
14
15
16
17
18
TRANSFER
MUTE
FLASH
REDIAL
MONITOR
Press this key to transfer a call to another phone terminal.
Press this key to mute the voice signal transmitting to the other
part. LCD shows “Mute” status. Press this key again to resume
the voice signal transmission.
When endpoint type use SIP Phone, Press this key to answer a
waiting call or hold the current call and enter dial mode.
Press this key to redial the last outgoing call.
Press this key for hands free dial or call monitoring.
19 SPEAKER(LED) It illuminates while the call is in “speakerphone” status.
20 HOLD (LED) It illuminates when a call is in hold.
1.7 Rear View
2 Installing the IP Phone
2.1 Preparing the IP Phone
It is important to follow the installation procedures below in order to make sure the correction of
operation and to avoid damages to the IP Phone.
1) Connect the Coiled Phone Cord to the Handset and to the IP Phone Main Unit as shown in
the Front View.
2) Plug the AC Power Adaptor supplied to the Power Port of the IP Phone Main Body. Plug the
other end of the AC Power Adaptor to a wall outlet. Make sure that the wall outlet voltage
matches the specified input voltage on the Adaptor. Incorrect AC Voltage supply may damage
the Adaptor or cause the IP Phone not to function properly.
3) Connection to the LAN port allows the IP Phone to access the internet. You need to prepare
an Ethernet Cable for this connection.
Depending on your network environment, the IP Phone can be set to function as one of the
following two modes:
1) Non-Router Mode – Connect the LAN port to your broadband router or broadband
HUB/Switch.
2) Router Mode – Connect the LAN port to your broadband modem (ADSL/Cable), LAN
Hub/Switch or Virtual PC port.
For more detailed information, refer to the connection diagrams as shown below.
•
8
DBL Technology EP-636 User Manual
2.2 Connection Diagrams
There are mainly two modes of connection: home environment and office environment as follows:
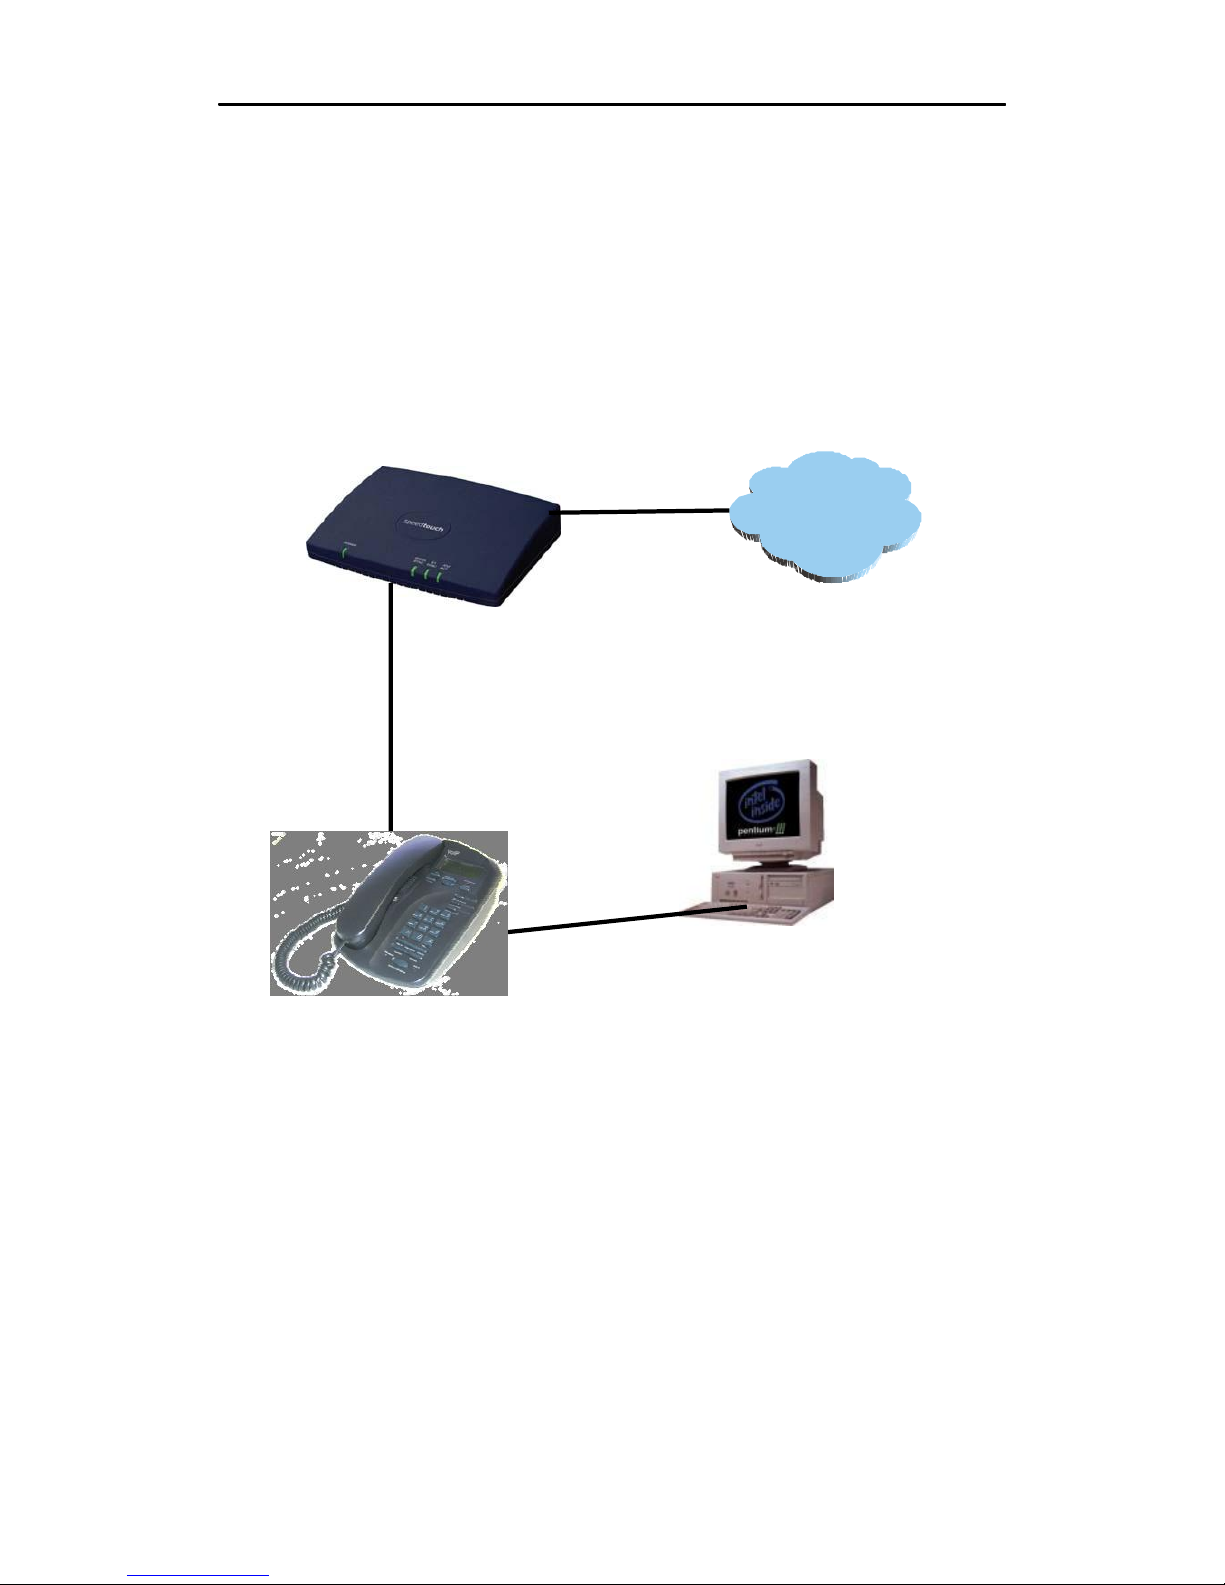
2.2.1 Home User with ADSL/Cable Broadband Connection
(PPPOE)
INTERNE
Broadband Modem
LAN Port
PC Port
PC or Laptop
IP Phone
A. LAN Port
This configuration is very typical for home environment whereas a Broadband modem (ADSL or
Cable) is installed and PPPOE dialup is used to connect to the ISP. Use Ethernet cable to connect
the LAN port of your IP phone to broadband modem (ADSL/Cable), which is connected to
internet directly. Configure it into PPPOE.
B. PC Port
Use Ethernet cable to connect the PC port of your IP phone to a PC or Laptop. Configure it into
“Obtain a Fixed IP Mode” and enable DHCP service.
•
9
DBL Technology EP-636 User Manual
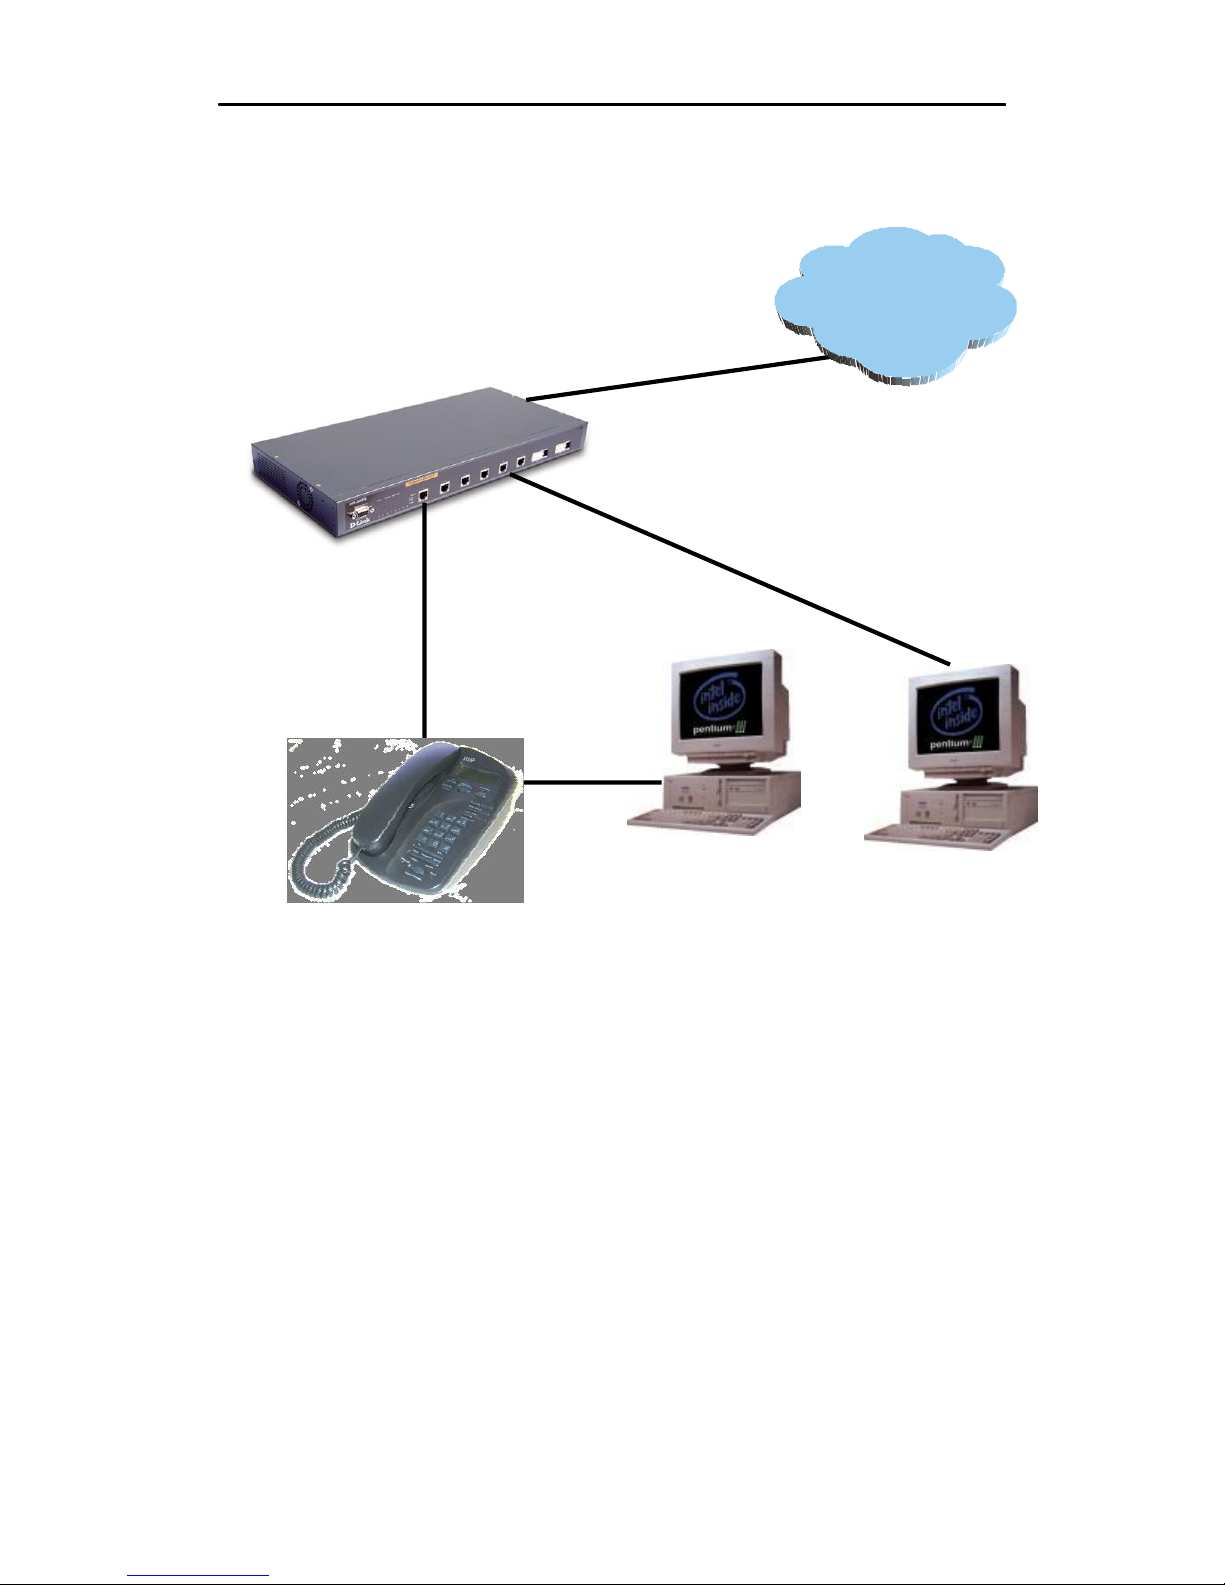
2.2.2 Office User in a LAN Environment
INTERNET
Router
LAN Port
PC Port
A. LAN Port
PC or Laptop
PC or Laptop
This is a very typical office environment with a Broadband Router and Switch Hub already
installed. Normally, DHCP service of the router is also enabled. Use Ethernet cable to connect the
LAN Port of your IP phone to a Router or Switch Hub, which is connected to internet directly.
Enable “Obtain an IP Address Automatically”.
B. PC Port
Use Ethernet cable to connect the PC port of your IP phone to a PC or Laptop. Bridge Mode is the
recommended setting for the IP Phone. In the Bridge Mode, the IP Phone allows a PC connected
to the phone to pass through to the network.
Note: NAT Traversal in Call Settings mode has to be enabled.
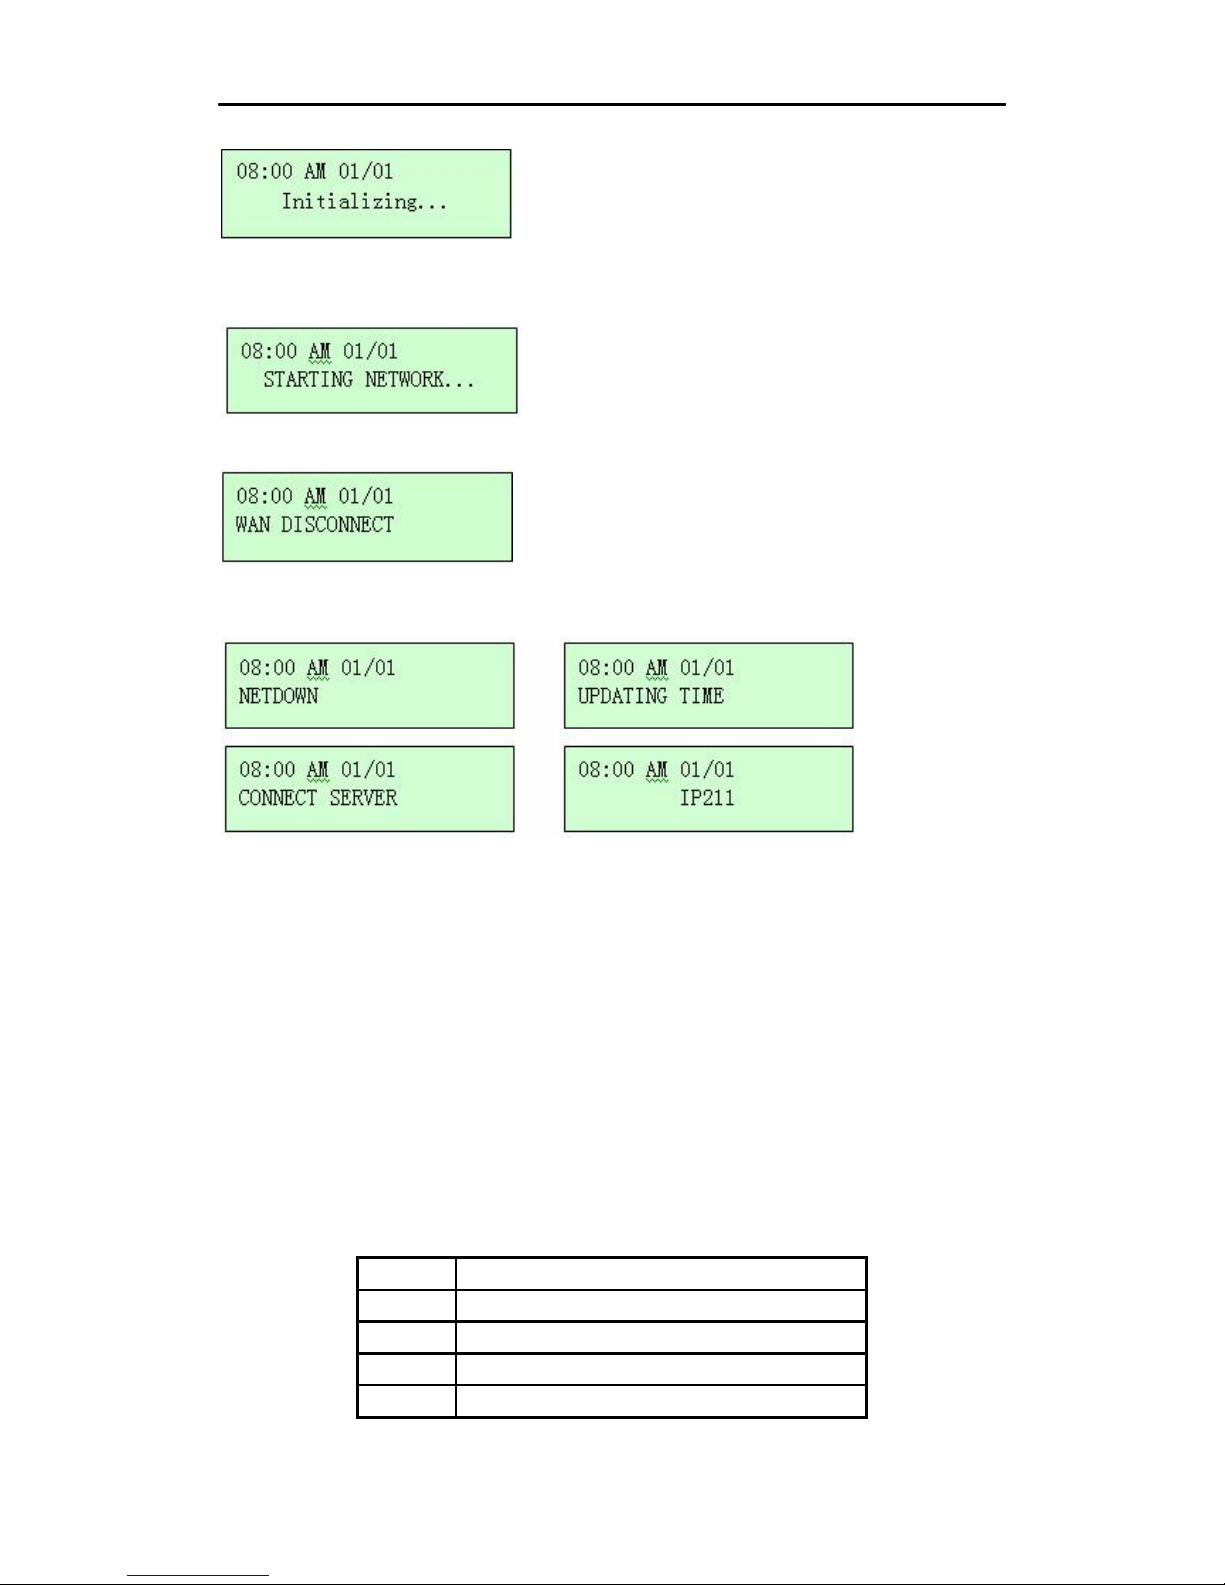
2.3 Starting the IP Phone
After connecting all the cables and ports, the IP phone LCD will display the following screen:
•
10
DBL Technology EP-636 User Manual
If it’s the first time to start the phone, the following screen will appear.
The phone is trying to detect your network environment.
If your phone is not connected with network, the LCD will display:
If your phone is connected with network, the LCD will display the following information orderly
instead:
Note: the options may be varied in different environment.
3 Using the IP Phone
3.1 Keypad
3.1.1 Number Keys
The following table presents the number keys and their definition. If you need to select numbers,
press the number key one time. If you need to select the letters and other symbols displayed on the
keys, press the key continuously within 1.5 seconds until the one you need appears.
Key
0
1
2
3
Representation
0、+、1
2、a、b、c、A、B、C
3、d、e、f、D、E、F
•
11
DBL Technology EP-636 User Manual
4
5
6
7
8
9
*
#
4、g、h、I、G、H、I
5、j、k、l、J、K、L
6、m、n、o、M、N、O
7、p、q、r、s、P、Q、R、S
8、t、u、v、T、U、V
9、w、x、y、z、W、X、Y、Z
* . , ! ? : Space
# @ % &
3.1.2 Function Keys
Refer to the table in Section 1.6 for the description of the function keys.
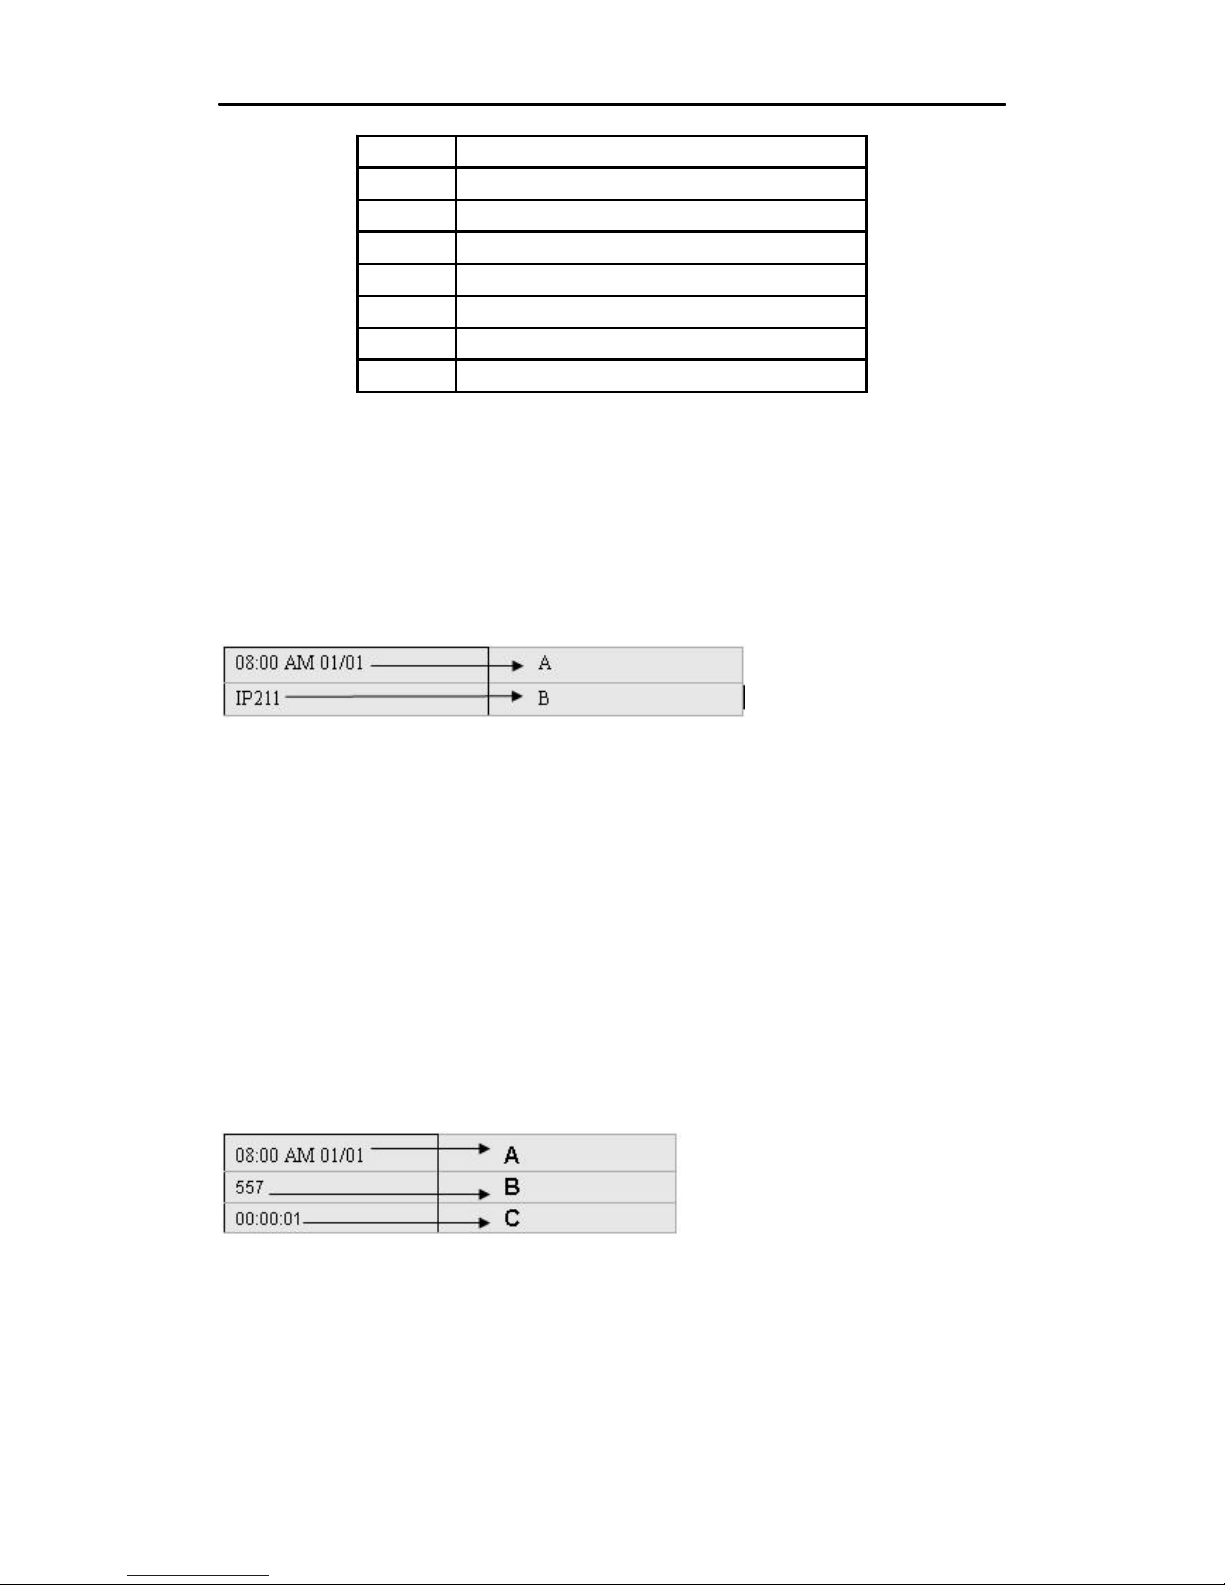
3.2 Viewing the LCD in Idle State
A. Date and Time
The date and time will then be displayed. At this time the date and time is not correct. Once the IP
phone is connected to the internet, it will receive the date and time information from the internet
and display the current date and time. There is no need for manual setting of the date and time. If
it is showing an incorrect date and time, it means that it have not accessed the internet yet. If the
phone settings are correct, it usually can obtain the date and time information within a few
minutes.
B. Title
The title displayed on the LCD such as IP211 can be set by the user as he or she likes.
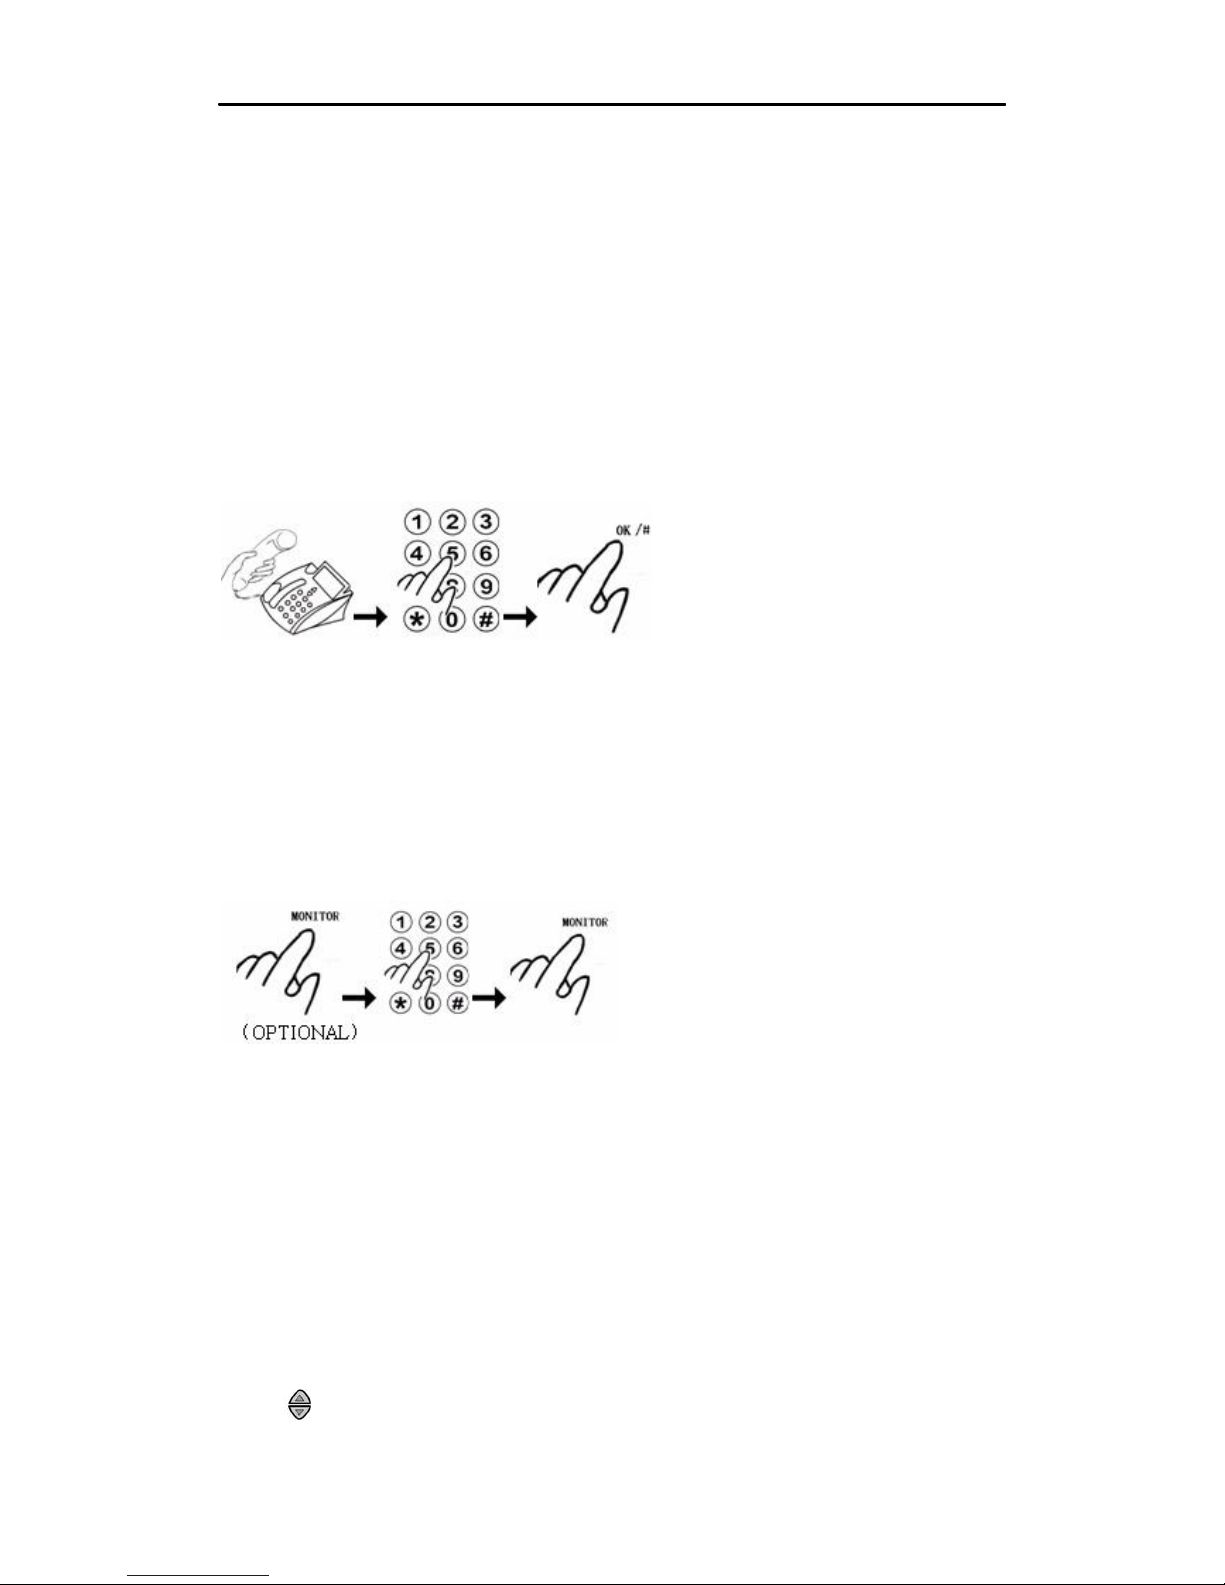
3.3 Call Status Display
Once a call is answered, the LCD displays the information in the table below:
A. Date and Time
It is the date and time when the call occurs.
B. Phone Number
It is the phone number of the other side.
C. Duration Time
It displays the period from the time when the connection is successful or the conversation starts to
the end of the call.
•
12
DBL Technology EP-636 User Manual
Once a call is terminated, the LCD displays “Call Ended”.
3.4 How to Make a Call
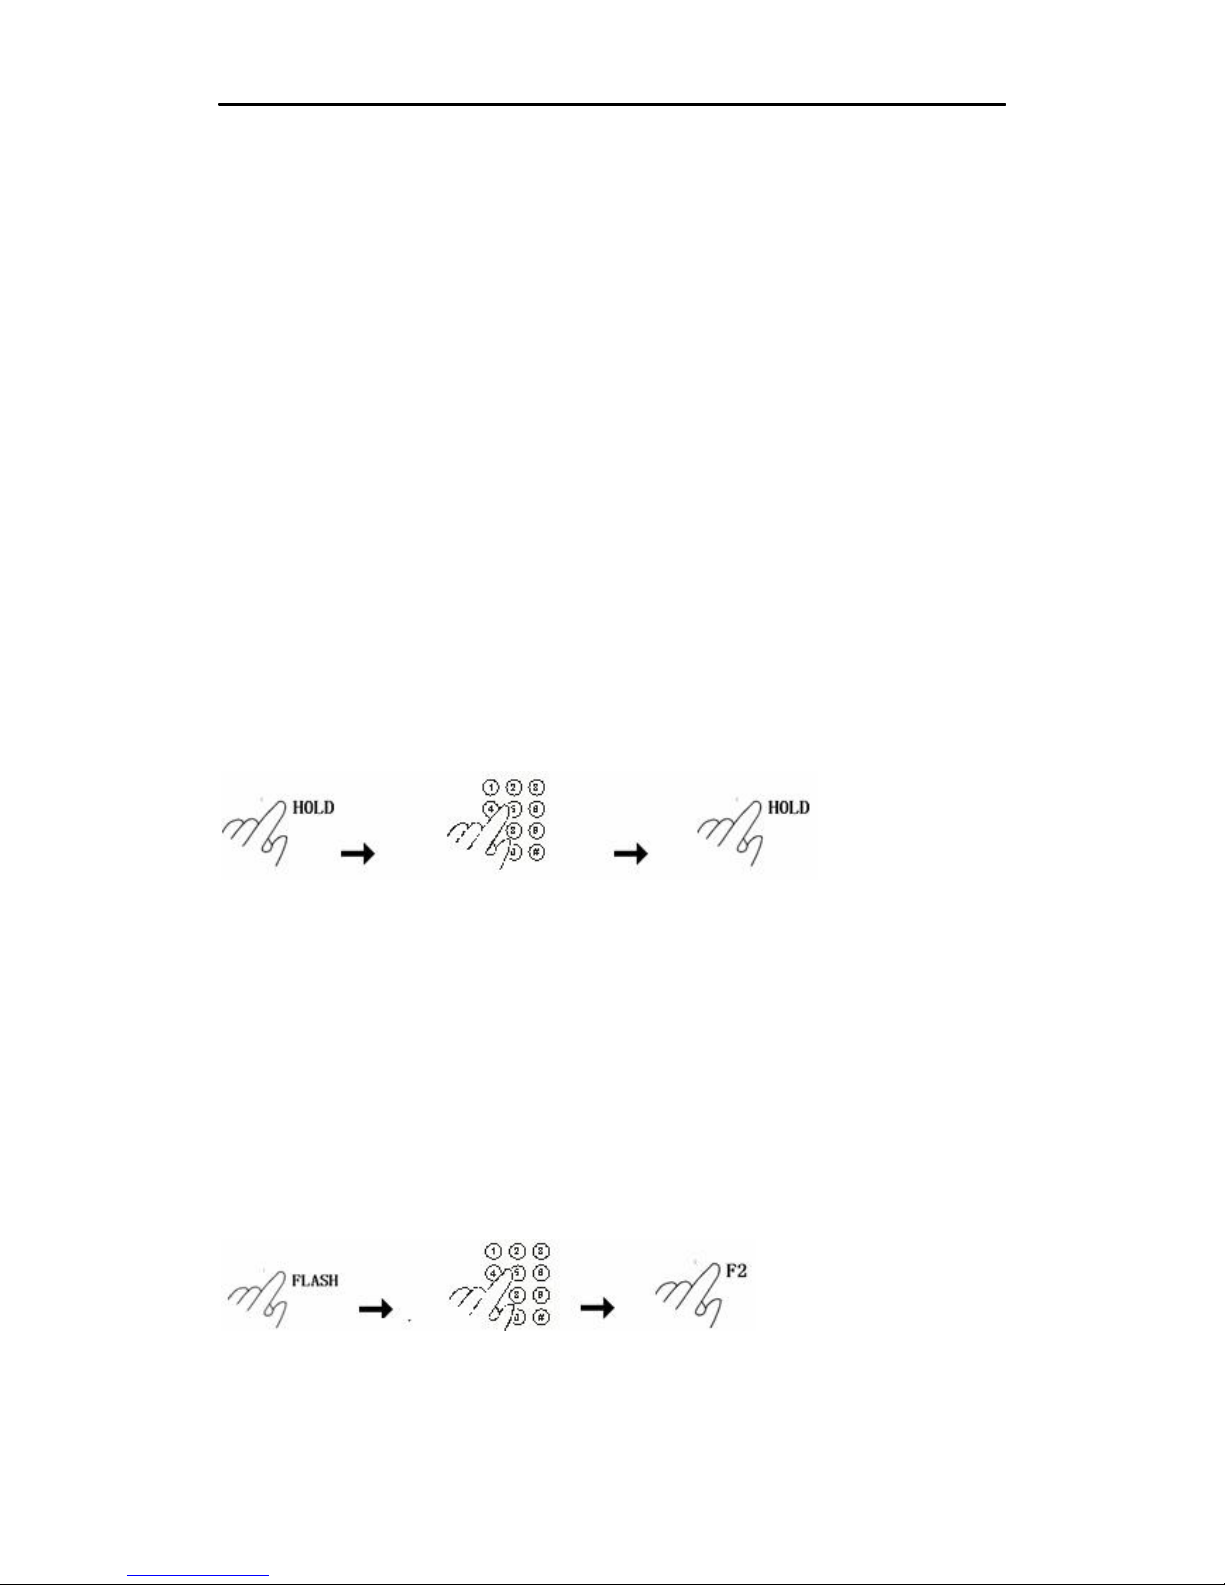
3.4.1 Normal
Pick up the handset. A dial tone is heard from the Handset Receiver.
Press the phone number via the number keypad. If you want to delete your input, press “F1”.
Press “#” or “OK” button
After the call is terminated, place the handset on the cradle to hang up the phone call.
3.4.2 Speakerphone
1) Press “MONITOR” button. A dial tone is heard from the speaker. (This step is optional and
can be skipped.)
2) Press the phone number via the number keypad
3) Press “#” or “OK”.
4) After the call is terminated, press “MONITOR” to hang up the phone call.
3.4.3 Switching between Normal and Speakerphone
1) While the IP phone is in normal mode, press “MONOTOR” to switch to speakerphone mode.
2) While in speakerphone mode, lift the handset off the cradle to switch to normal mode.
3.4.4 Making a Phone Call with the Up/Down Scroll Keys
1) Pick up the handset or press “MONITOR”. (This step is optional and can be skipped. If skipped,
the call will be in Speakerphone mode only.)
2) Press to view the outgoing calls’ history.
•
13

DBL Technology EP-636 User Manual
3) Highlight the phone number to be dialed out.
4) Press “OK”.
3.4.5 Making a Phone Call via Call List
There are three types of phone history: Received Calls, Unanswered Calls, and Outgoing Calls.
1) Pick up the handset or press “MONITOR”.
2)Press “MENU” button to view the call list. Press “OK” button.
3)Press “1” to select “MISSED CALLS” history. Press “2” to select “RECEIVED CALLS”
history. Press “3” to select “OUTGOING CALLS” history. (You can also press “OK” button to
select one item.)
4)Use to select one phone number to be dialed out.
5)Press “OK” button to dial out the number you want.
3.4.6 Making a Phone Call via the Phone Book
1) Pick up the handset or press “MONITOR”.
2) Press “MENU”, and use to select “PHONE BOOK”. Press “OK”. (Or you can press
“PHONEBOOK” button directly.)
3) Press “1” to select “VIEW”.
4) Use to select one phone number to be dialed out.
5) Press “OK” to dial out the number you want.
3.5 Answering an Incoming Call
1) The IP Phone rings.
2) The caller ID is displayed on the LCD.
3) Pick up the handset or press “MONITOR”.
•
14
DBL Technology EP-636 User Manual
3.6 Answering a Waiting Call
When you are in the process of a call and another call comes in, a short tone sounds in your
handset and the LCD displays an incoming call message.
There are two methods for you to select:
(1) First hang up the current call, then picks up the handset and press “FLASH” or “HOLD” key.
(2) Press “FLASH” or “HOLD” key directly during the current conversation.
When endpoint type uses SIP Phone, press “FLASH” key. When endpoint type uses H323 Phone,
press “HOLD” key.
3.7 Call Hold
“Call Hold” lets you put a caller on hold for a certain period of time.
1) When you are in the process of a call, if the endpoint type uses H323 Phone, press “HOLD”
key to hold the current call and enter dial mode by hearing a dial tone. If the endpoint type uses
SIP Phone, press “HOLD” key to hold the current call without hearing a dial tone, or press
“FLASH” key to hold the current call and enter dial mode by hearing a dial tone.
2) Enter a new phone number to make another call.
3) After finishing the second call, you can press “HOLD”(H323) or “FLASH” (SIP) again to
return to the former call on hold.
Besides, when another call is incoming during the process of your present call, you can also press
“HOLD” to put the present call on hold and answer the new incoming call. After pressing
“HOLD”, you can also do something else such as opening the door, or meeting a guest. Press this
key again to return to the former call on hold.
3.8 Call Conference
You can initiate a call conference under the following two circumstances:
When endpoint type uses SIP Phone, press “FLASH” key. When endpoint type uses H323 Phone,
press “HOLD” key.
Initiate a Call Conference during a Call
1) Press “FLASH” (SIP) or “HOLD” (H323) to hold the current call in process and to start a new
dial tone.
2) Dial a phone number and wait for the called party to answer the call.
•
15
 Loading...