

Page 1

A Capital Safety Company
Model Number(s):
8513158
ADVANCED SYSTEMS
UCT-300 Tripod
ENTRY/RETRIEVAL SYSTEMS
OPERATOR’S MANUAL
FORM NO: 8515531 REV: A
MAN RATED
CONFINED SPACE
CSG UCT-300 TRIPOD
© Copyright 2011, DB Industries, Inc.
Page 2
UCT-300 TRIPOD
SETUP AND WINCH INSTALLATION INSTRUCTIONS
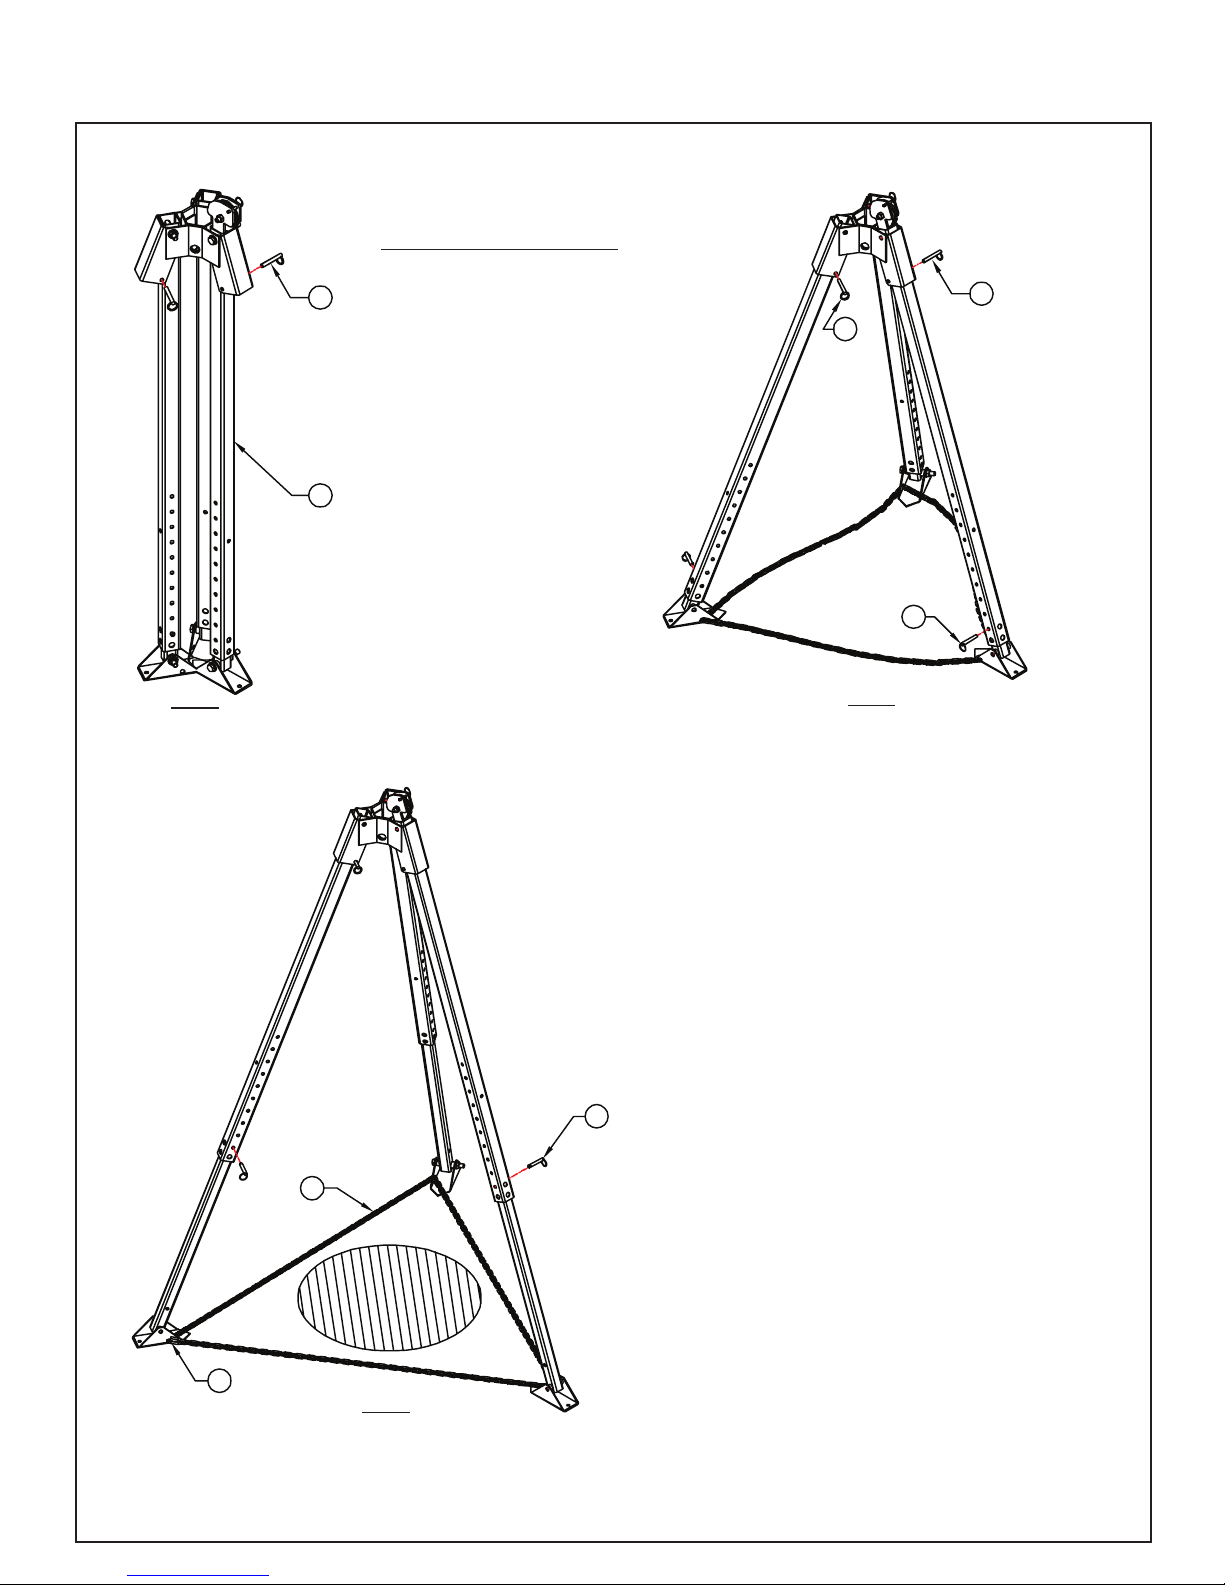
A) Setting up the UCT-300 Tripod
FIG 1
1. Stand collapsed Tripod[1] on oor with
2
1
feet down (See Fig. 1 ).
2. Remove leg retainer pins[2] from 3 places
in tripod head (See Fig. 1 ).
3. Fully spread all 3 legs. Install leg retainer
pins[2] in 3 places to secure legs in a spread
position (See Fig. 2).
4. Remove 3 leg adjustment pins[3] from
legs, and extend legs to fully extended
position. Install 3 leg adjustment pins to
secure leg in the fully extended position.
2
3
2
FIG 2
5. Position tripod over entry ( See Fig.3)
and ensure structure is level. Adjust lengths
of leg(s) as required by removing leg
adjustment pins and extending or retracting
leg(s) as needed. Be careful to reinstall all leg
adjustment pins once tripod is level.
6. Ensure that slack is removed from leg
chain[4] between all legs after setup and
leveling. Adjust chain by loosening quick
connect links at feet[5], and moving quick link
on chain as required.
3
4
5
FIG 3
2
Page 3

UCT-300 TRIPOD
SETUP & WINCH INSTALLATION INSTRUCTIONS
6
B) Installing the Winch to UCT-300 Tripod
Once tripod has been set up & leveled install
the winch assembly as follows.
1. Select whichever tripod leg you wish to
mount the winch on. This will be inuenced
by the location of the leg top pulley(s)[6], any
accessories being used with the tripod, and any
11
10
9
8
12
obstructions around the work area.
2. Remove winch mount pins[7], [8], [9] from
winch mount bracket[10] and position the winch
so that the cable[11 } leaves the winch as shown
(See Fig. 4 ).
3. Slide winch mount bracket[10] over leg
tube[12] (See Fig 5), and position winch where
desired. Install pin[7] through leg bracket and leg
tube using appropriate hole. Install pins[8], [9] as
shown thru bracket and behind leg tube.
See page 3
FIG 4
9
8
7
Pin #7 in any
one of these
of 3 holes.
7
FIG 5
3
Page 4

UCT-300 TRIPOD
SETUP & WINCH INSTALLATION INSTRUCTIONS
13
14
B) Installing the Winch to UCT-300 Tripod (c'ont)
4. Remove cable retainer pin[13] from top pulley
assembly[14] and route cable over pulley and
thru head as shown ( See Fig. 6 ).
5. Repeat steps 1 thru 4 as required to install
cable
any other winches and / or fall arrest devices
being used.
6. Refer to the appropriate operators manuals
for instructions on installation, use and
proper maintaince procedures for any and all
accessories being used with the tripod.
FIG 6
4
Page 5

UCT-300 TRIPOD
SETUP & WINCH INSTALLATION INSTRUCTIONS
Model includes the following
4
Item Description
1 UCT-300 7ft. (2m) Tripod
1
2
3
The CSG Safety Systems UCT-300 Tripod combines the quality
and user friendly performance of all CSG Safety equipment with
the economy of the basic tripod. Constructed of lightweight tubular
aluminum with a rugged steel head assembly, the UCT-300 tripod
can be combined with a variety of pulleys, winches and fall-arrest
devices to meet a wide range of conned space entry / retrieval
and rescue requirements. Plastic sliders between inner and outer
leg tube provide smooth adjustment and prevent inner tube from
inadvertently pulling out of outer tube. Quick release pins positively
locate components at all adjustment points for tool-less setup and
adjustment.
General specications:
Rated Capacity (working load) 450 lbs. (204 Kgs.)
@ 11:1 design factor
Max. Allowed Arresting Force
(M.A.F.) rating for retractable
devices or shock absorbers
Proof Load
Leg mounted Pro-man winch
(outside of leg)
Anchor Point 5000 lbs. (11 kN).
Weight 45 lbs. (20.5 Kgs.)
1800 lbs.(8kN)
5000lbs. (11 kN).
Accessories shown in gray but not included
2 Digital 100 Winch
3 Winch Mounting Bracket
4 Top Pulley Ass'y
DESCRIPTION
Application Restrictions:
1. Maximum allowed arresting force (M.A.F.)
rating for retractable devices or shock
absorbers is 1800 lbs. (8kN).
2. Retractable devices or shock absorbers
MUST BE installed and used in accordance
with the manufacture's instructions.
3. All winch or block mounting hardware
MUST BE supplied or approved Capital
Safety Group Ltd.
4. Each installation MUST BE approved to
local standards by a qualied engineer.
Materials & Construction:
General Construction Aluminum / Welded Steel
Tubular Components 6061-T6 Aluminum
Head Assembly H.R. Steel
Hardware Gr.5, Gr.8 steel, zinc plated
Finish
(outer leg & head) Green & Black powder coat
(inner leg) Mill nish
Plating Specications ASTM designated B633-85
type lll, SC2
5
Page 6

T-300/T-1000 TRIPOD SYSTEM
SETUP AND WINCH INSTALLATION INSTRUCTIONS
INSTALLATION OF WINCHES, SELF-RETRACTING LIFELINES ( SRL's), WORK POSITIONING AND FALL-ARREST
DEVICES NOT MANUFACTURED BY CAPITAL SAFETY GROUP
Your T-1000 TRIPOD SYSTEM can be used as a support structure for various types of safety devices.
Some of these can mount directly to the anchor point at the top of the tripod head, while others may require an adapter
bracket available from your dealer. Any accessories being used for the hoist MUST BE installed, inspected, maintained
and operated according to the manufactures instructions. All installations MUST BE approved to local standards by a
qualied engineer.
INSPECTION OF EQUIPMENT PRIOR TO USE.
- Check all structural parts for damage: dents, cracked welds bend or crushed tubes. Minor cosmetic damage will not
affect the structural integrity of the hoist, but any seriously damaged parts MUST BE repaired or replaced before using
the hoist.
- Check all hardware ( pins, tri-screws, adjuster screws, nuts, bolts, pulleys, rollers and winch brackets) for damaged
threads, bend, damaged or missing fasteners, loose fasteners. Check all pulleys and rollers for chips, grooves and
excessive wear. Ensure that all pulleys and rollers turn freely.
- Inspect all equipment for missing, damaged or otherwise illegible warning stickers. Any damaged, missing or
otherwise illegible stickers MUST BE replaced before using hoist.
- If you are using Digital Series Winches with your hoist, inspect the winch and cable as outlined in the "maintenance
and inspection" section of the Digital Series Winch operators manual.
- Any additional winches, self-retracting lifelines (SRL's), work positioning or fall-arrest equipment being used with
your T-1000 Tripod System MUST BE installed, inspected, maintained and operated according to the manufactures
instruction.
- Report any problems with the equipment to your supervisor and DO NOT USE the equipment until it has been
repaired or replaced.
INSPECTION / MAINTENANCE SCHEDULE
DAILY ( BEFORE EACH USE) : (SEE ABOVE) INSPECTION OF EQUIPMENT PRIOR TO USE
WEEKLY: Perform a complete visual inspection of equipment as outlined in " Inspection of Equipment Prior to Use".
Clean equipment as required, to thoroughly inspect all welds, labels, pins, fasteners, pulleys, rollers, brackets and parts.
Record all ndings on a copy of the "hoist inspection log". If any problems are found with the equipment DO NOT USE
until it has been repaired.
ANNUALLY: Clean unit throuroghly, using a damp cloth and a mild soap solution. Perform a complete visual
inspection as described in section(F) " Inspection of Equipment Prior to Use" Record all ndings on a copy of the "hoist
inspection log". If any problems are found with the equipment DO NOT USE until it has been repaired.
6
Page 7

T-300/T-1000 TRIPOD SYSTEM
INSPECTION LOG BOOK
MODEL # SERIAL # MFG. DATE
HOIST INSPECTION LOG: (SAMPLE FORM - Copy to start inspection log book)
TYPE OF INSPECTION: o DAILY o WEEKLY o ANNUALLY
Date of Inspection (d / m / y)
Inspected By:
LABELS
DAMAGE
CORROSION
FASTENERS
T
R
PULLEYS
I
ROLLER
P
ANCHOR POINTS
O
D
WINCH BRACKET
SRL's BRACKET
WELDS
OTHER
COMMENTS:
FAILURE TO COMPLY AND FOLLOW REGULAR INSPECTION PROCEDURES STATED IN THIS MANUAL WILL RESULT IN VOIDING OF THE MANUFACTURES WARRANTY AND / OR
POSSIBLE SERIOUS INJURY OR DEATH TO THE OPERATOR / ENTRANT.
7
Page 8

LIMITED LIFETIME WARRANTY
ISO
Warranty to End User: D B Industries, Inc., dba CAPITAL SAFETY USA (“CAPITAL SAFETY”) warrants to the
original end user (“End User”) that its products are free from defects in materials and workmanship under
normal use and service. This warranty extends for the lifetime of the product from the date the product is
purchased by the End User, in new and unused condition, from a CAPITAL SAFETY authorized distributor.
CAPITAL SAFETY’S entire liability to End User and End User’s exclusive remedy under this warranty is limited
to the repair or replacement in kind of any defective product within its lifetime (as CAPITAL SAFETY in its sole
discretion determines and deems appropriate). No oral or written information or advice given by CAPITAL
SAFETY, its distributors, directors, ofcers, agents or employees shall create any different or additional
warranties or in any way increase the scope of this warranty. CAPITAL SAFETY will not accept liability for defects
that are the result of product abuse, misuse, alteration or modication, or for defects that are due to a failure to
install, maintain, or use the product in accordance with the manufacturer’s instructions.
CAPITAL SAFETY’S WARRANTY APPLIES ONLY TO THE END USER. THIS WARRANTY IS THE ONLY WARRANTY
APPLICABLE TO OUR PRODUCTS AND IS IN LIEU OF ALL OTHER WARRANTIES AND LIABILITIES, EXPRESSED
OR IMPLIED. CAPITAL SAFETY EXPRESSLY EXCLUDES AND DISCLAIMS ANY IMPLIED WARRANTIES OF
MERCHANTABILITY OR FITNESS FOR A PARTICULAR PURPOSE, AND SHALL NOT BE LIABLE FOR INCIDENTAL,
PUNITIVE OR CONSEQUENTIAL DAMAGES OF ANY NATURE, INCLUDING WITHOUT LIMITATION, LOST PROFITS,
REVENUES, OR PRODUCTIVITY, OR FOR BODILY INJURY OR DEATH OR LOSS OR DAMAGE TO PROPERTY, UNDER
ANY THEORY OF LIABILITY, INCLUDING WITHOUT LIMITATION, CONTRACT, WARRANTY, STRICT LIABILITY, TORT
(INCLUDING NEGLIGENCE) OR OTHER LEGAL OR EQUITABLE THEORY.
CSG USA & Latin America
3833 SALA Way
Red Wing, MN 55066-5005
Toll Free: 800.328.6146
Phone: 651.388.8282
Fax: 651.388.5065
solutions@capitalsafety.com
CSG EMEA
(Europe, Middle East, Africa)
Le Broc Center
Z.I. 1ère Avenue
5600 M B.P. 15 06511
Carros
Le Broc Cedex
France
Phone: + 33 4 97 10 00 10
Fax: + 33 4 93 08 79 70
information@capitalsafety.com
A Capital Safety Company
CSG Canada
260 Export Boulevard
Mississauga, ON L5S 1Y9
Phone: 905.795.9333
Toll-Free: 800.387.7484
Fax: 888.387.7484
info.ca@capitalsafety.com
CSG Australia & New Zealand
95 Derby Street
Silverwater
Sydney NSW 2128
AUSTRALIA
Phone: +(61) 2 8753 7600
Toll-Free : 1 800 245 002 (AUS)
Toll-Free : 0800 212 505 (NZ)
Fax: +(61) 2 87853 7603
sales@capitalsafety.com.au
www.capitalsafety.com
CSG Northern Europe
Unit 7 Christleton Court
Manor Park
Runcorn
Cheshire, WA7 1ST
Phone: + 44 (0)1928 571324
Fax: + 44 (0)1928 571325
csgne@capitalsafety.com
CSG Asia
Singapore:
16S, Enterprise Road
Singapore 627666
Phone: +65 - 65587758
Fax: +65 - 65587058
inquiry@capitalsafety.com
Shanghai:
Rm 1406, China Venturetech Plaza
819 Nan Jing Xi Rd,
Shanghai 200041, P R China
Phone: +86 21 62539050
Fax: +86 21 62539060
9001
Certificate No. FM 39709
 Loading...