

Page 1
Safl ok
™
Pole Anchor System
Model Numbers: 2104800, 2104801, 2104802, 2104803
USER INSTRUCTION MANUAL:
SAFLOK VERTICAL LIFELINE ROPE POLE ANCHOR SYSTEM
This manual is intended to meet the Manufacturer’s Instructions requirement of applicable standards defi ned in
Section 1.2 and should be used as part of an employee training program as required by the identifi ed agencies.
WARNING: This product is part of a personal fall arrest system1. The user must read and follow the
manufacturer’s instructions for each component or part of the complete system. These instructions must be
provided to the user of this equipment. The user must read and understand these instructions or have them
explained to them before using this equipment. Manufacturer’s instructions must be followed for proper use and
maintenance of this product. Alterations or misuse of this product or failure to follow instructions may result in
serious injury or death.
1
IMPORTANT: If you have questions on the use, care, or suitability of this equipment for your application,
contact Capital Safety.
IMPORTANT: Record the product identifi cation information from the ID label in the Inspection and Maintenance
Log in Section 9.
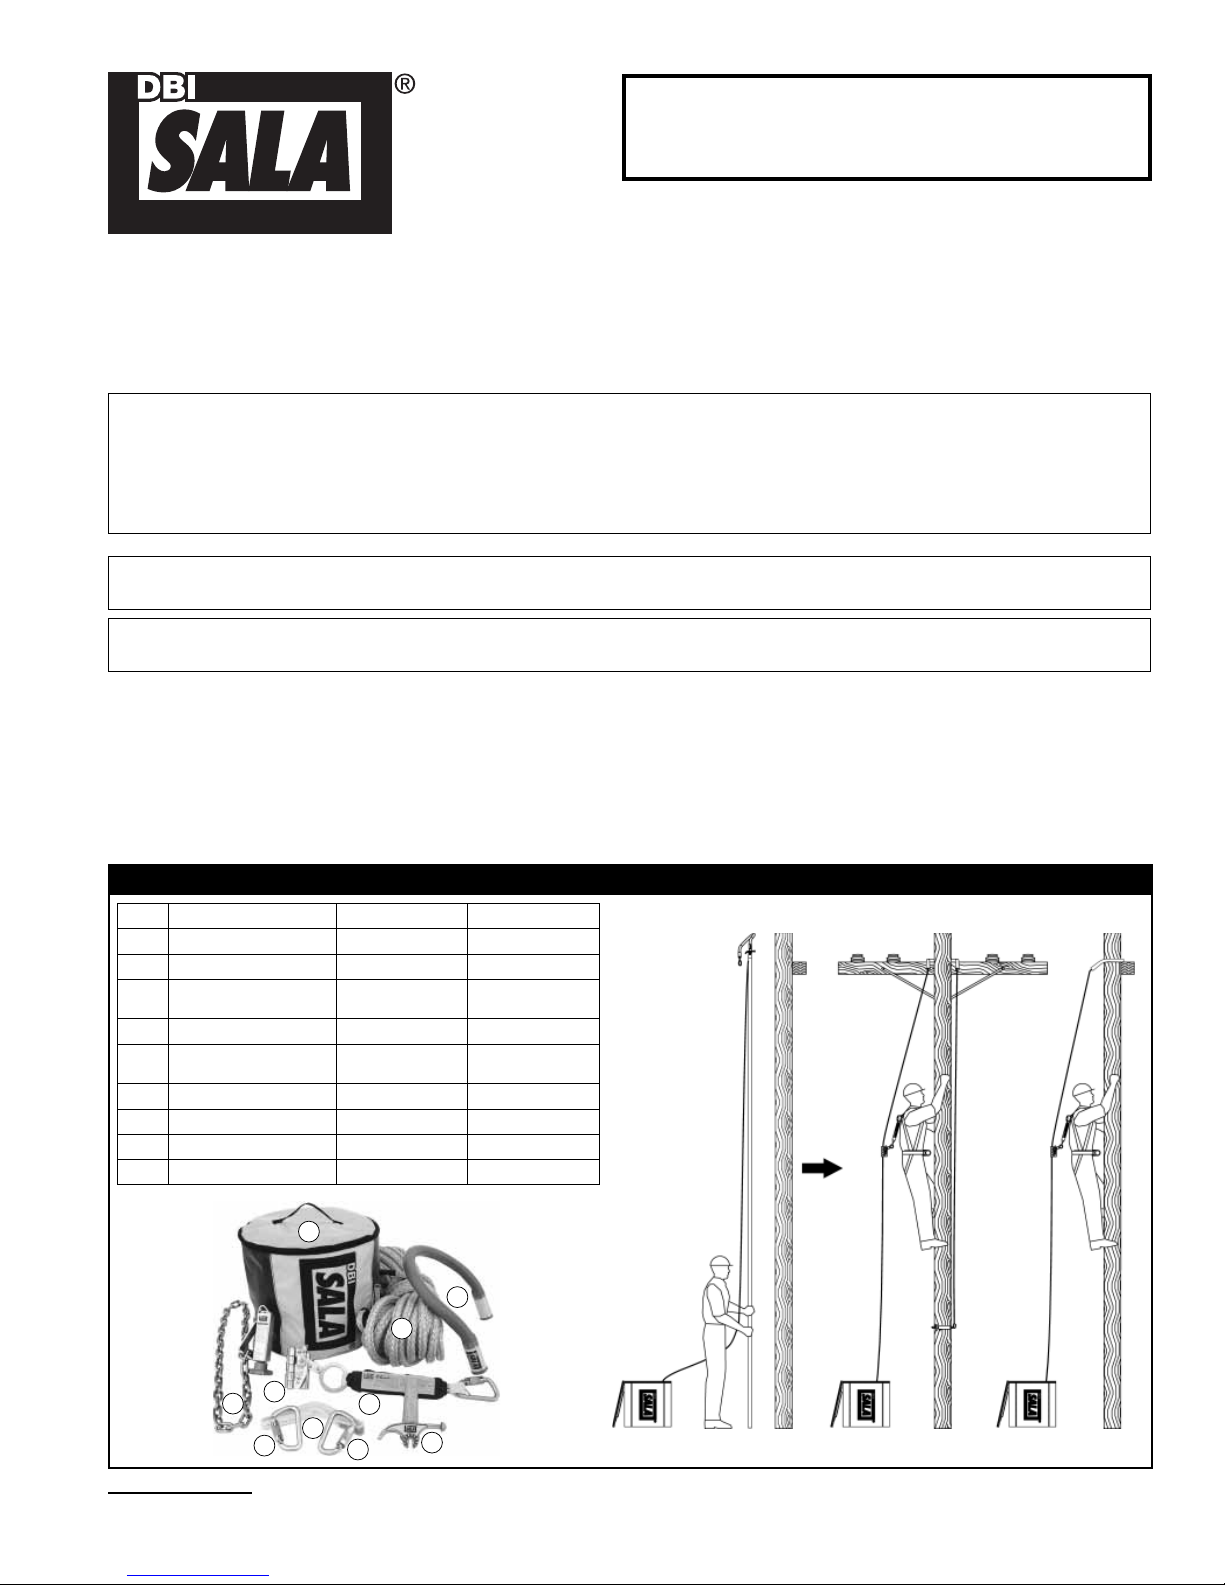
DESCRIPTION:
Figure 1 illustrates the components that comprise the Safl ok™ Pole Anchor System. The Pole Anchor System
consists of a dielectric Vertical Lifeline Rope (1A) passing through a formed Anchor Tube (1B). The Anchor Tube
drapes over the crossarm (or similar component) on a wooden utility pole and is placed with a Telescoping Hot
Stick (1C) and attached Installation/Removal Tool (1D) to suspend the lifeline vertically for attachment of a fall
arrest subsystem: Rope Grab (1E) with Shock Absorber (1F), and Full Body Harness. A Chain Tensioner (1G) and
Endless Loop Sling (1H) are provided to secure the bottom end of the lifeline to the base of the pole.
Figure 1 - Safl ok Pole Anchor System
Item Description 2104800/802 2104801/803
A Vertical Lifeline Rope 1 1
B Anchor Tube 1 1
C Telescoping Hot Stick
(purchased separately)
D Installation/Removal Tool 1 1
EFRope Grab with
Shock Absorber
G Chain Tensioner 0 1
H Endless Loop Sling 0 1
I Carabiner 1 2
J Carrying Bag 1 1
J
00
11
A
E
G
I
F
H
I
1 Fall Arrest System: A system that prevents the worker from colliding with an obstruction or lower level by arresting a fall.
Form: 5903024 Rev: C
B
D
© Copyright 2010, DB Industries, Inc.
Page 2

1.0 APPLICATION
1.1 PURPOSE: The Safl ok
System (PFAS) when climbing and working on wooden utility poles (power poles, telephone poles, etc.).
1.2 STANDARDS: Refer to local, state, and federal (OSHA) requirements governing occupational safety for
additional information regarding Personal Fall Arrest Systems. Refer to the following national standards on fall
protection:
ANSI Z359-0 Defi nitions and Nomenclature User for Fall Protection and Fall Arrest
ANSI Z359-1 Safety Requirements for Personal Fall Arrest Systems, Subsystems, and Components
ANSI Z359-2 Minimum Requirements for a Comprehensive Managed Fall Protection Program
CSA Z259.2.1 Fall Arrestors, Vertical Lifelines, and Rails
1.3 TRAINING: This equipment is intended to be used by persons trained in its correct application and use. It is the
responsibility of the user to assure they are familiar with these instructions and are trained in the correct care and use
of this equipment. Users must also be aware of the operating characteristics, application limits, and the consequences of
improper use.
™
Pole Anchor System is is a Vertical Lifeline System for use as part of a Personal Fall Arrest
2.0 SYSTEM LIMITATIONS & REQUIREMENTS
Consider the following limitations/requirements prior to installing or using this equipment:
2.1 CAPACITY: This equipment is designed for use by a one climber at a time. Combined weight of the climber
(person, clothing, tools, etc.) should not exceed 310 lbs (141 kg).
2.2 ANCHORAGE: In accordance with ANSI Z359.1, anchorages selected for Fall Arrest Systems must have a
strength capable of sustaining static loads applied in the directions permitted by the system of at least:
Non-Certifi ed Anchorages: 5,000 lbs (22.2 kN)
Certifi ed Anchorages: 2 times the Maximum Arresting Force
2.3 FALL ARREST FORCES: The Personal Fall Arrest System must limit fall arrest forces to 1,800 lbs (8 kN) and
deceleration distance must not exceed 42 inches (107 cm).
2.4 FREE FALL: Per ANSI Z359.1, Personal Fall Arrest subsystems used with the Pole Anchor System must limit free
fall to 6 feet (1.8 m). To avoid increased fall distance, do not work above the anchorage level.
2.5 FALL CLEARANCE: Ensure that adequate clearance exists in the fall path to prevent striking an object during
a fall. The clearance required is dependent on the type of connecting subsystem (rope grab, lanyard), the
anchorage location, and the elongation characteristics of the lifeline. Table 1 approximates elongation for varied
lengths of dry Lifeline. Wet Lifelines generally elongate further than dry Lifelines.
Table 1 - Lifeline Elongation
Lifeline Length
10 ft
(3.0 m)
Elongation: 0.4 ft
(11.1 cm)
20 ft
(6.1 m)
0.7 ft
(22.6 cm)
30 ft
(9.1 m)
1.1 ft
(33.7 cm)
40 ft
(12.2 m)
1.5 ft
(45.2 cm)
50 ft
(15.2 m)
1.9 ft
(56.3 cm)
60 ft
(18.3 m)
2.2 ft
(67.5 cm)
70 ft
(21.3 m)
2.6 ft
(78.7 cm)
80 ft
(24.4 m)
3.0 ft
(90.1 cm)
2.6 ENVIRONMENTAL HAZARDS: Use of this equipment in areas where environmental hazards exist may require
additional precautions to reduce the possibility of injury to the user or damage to the equipment. Hazards may
include, but are not limited to: high heat, caustic chemicals, corrosive environments, high voltage power lines,
explosive or toxic gases, moving machinery, or sharp edges.
2.7 BODY SUPPORT: A Full Body Harness must be used with the Safl ok Pole Anchor System. The harness
connection point must be above the user’s center of gravity. A body belt is not authorized for use with the
Pole Anchor System. If a fall occurs when using a body belt it may cause unintentional release and possible
suffocation because of improper body support. Substitutions of equipment or system components must not be
made without the written consent of Capital Safety.
2.8 COMPATIBILITY OF COMPONENTS: Unless otherwise noted, DBI-SALA equipment is designed for use with
DBI-SALA approved components and subsystems only. Substitutions or replacements made with non approved
components or subsystems may jeopardize compatibility of equipment and may affect safety and reliability of the
complete system.
2
Page 3
2.9 COMPATIBILITY OF CONNECTORS: Connectors are considered to be compatible with connecting
elements when they have been designed to work together in such a way that their sizes and shapes do not
cause their gate mechanisms to inadvertently open regardless of how they become oriented. Connectors
(hooks, carabiners, and D-rings) must be capable of supporting at least 5,000 lbs. (22 kN). Connectors
must be compatible with the anchorage or other system components. Do not use equipment that is not
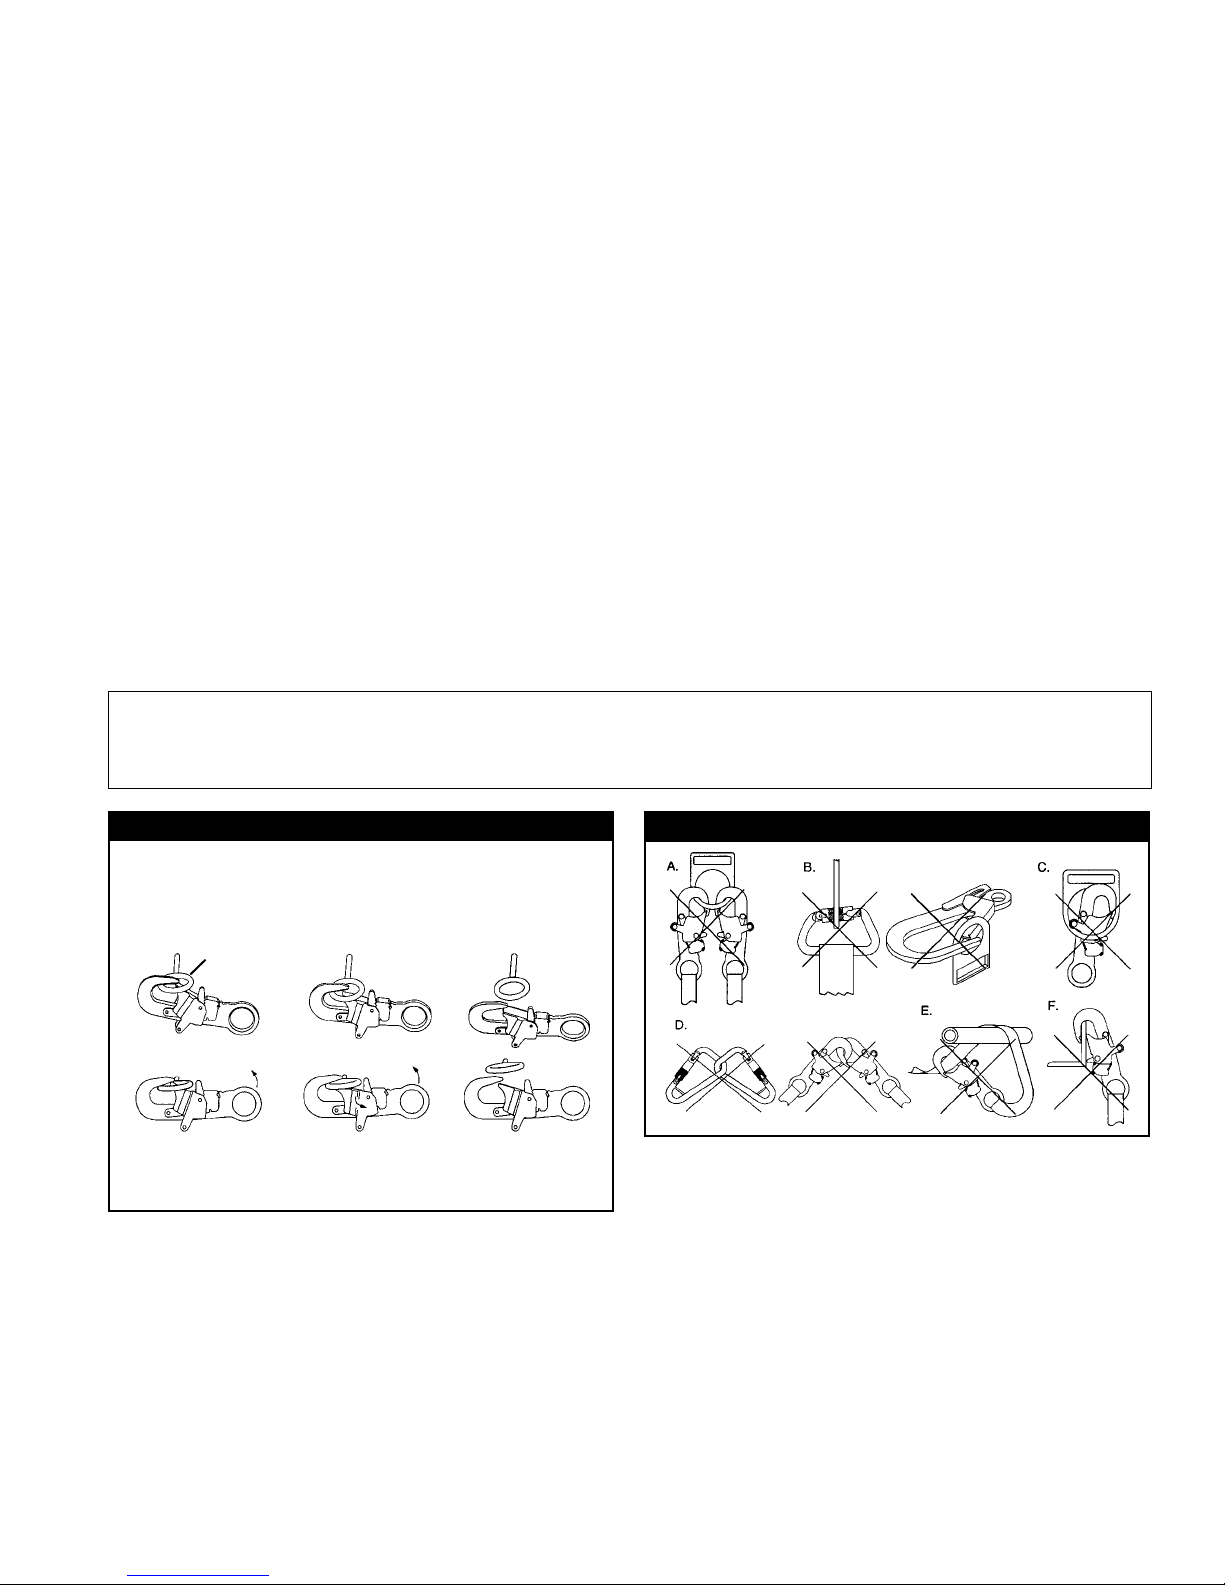
compatible. Non-compatible connectors may unintentionally disengage (see Figure 2). Connectors must
be compatible in size, shape, and strength. Self-locking snap hooks and carabiners are required by ANSI
Z359.1 and OSHA.
2.10 MAKING CONNECTIONS: Use only self-locking snap hooks and carabiners with this equipment. Only use
connectors that are suitable to each application. Ensure all connections are compatible in size, shape and
strength. Do not use equipment that is not compatible. Ensure all connectors are fully closed and locked.
DBI-SALA connectors (snap hooks and carabiners) are designed to be used only as specifi ed in each
product’s user’s instructions. See Figure 3 for illustration of the inappropriate connections stated below. DBISALA snap hooks and carabiners should not be connected:
To a D-ring to which another connector is attached.A.
In a manner that would result in a load on the gate.B.
IC. n a false engagement, where features that protrude from the snap hook or carabiner catch on the
anchor and without visual confi rmation seems to be fully engaged to the anchor point.
TD. o each other.
DE. irectly to webbing or rope lanyard or tie-back (unless the manufacturer’s instructions for both the
lanyard and connector specifi cally allow such a connection).
TF. o any object which is shaped or dimensioned such that the snap hook or carabiner will not close and
lock, or that roll-out could occur.
NOTE: Other than 3,600 lb. (16 kN) gated hooks, large throat opening snap hooks should not be connected
to standard size D-rings or similar objects which will result in a load on the gate if the hook or D-ring twists
or rotates. Large throat snap hooks are designed for use on fi xed structural elements such as rebar or cross
members that are not shaped in a way that can capture the gate of the hook.
Figure 2 - Unintentional Disengagement (Rollout)
If the connecting element to which a snap hook (shown) or carabiner
attaches is undersized or irregular in shape, a situation could occur
where the connecting element applies a force to the gate of the snap
hook or carabiner. This force may cause the gate (of either a selflocking or a non-locking snap hook) to open, allowing the snap hook
or carabiner to disengage from the connecting point.
Small ring or other
non-compatibly
shaped element
Force is applied7.
to the Snap
Hook.
The Gate8.
presses against
the Connecting
Ring.
The Gate opens9.
allowing the
Snap Hook to
slip off.
Figure 3 - Inappropriate Connections
3
Page 4

3.0 SYSTEM INSTALLATION
3.1 PLANNING: Plan your Fall Arrest System before using the Safl ok
limitations and requirements defi ned in Section 2 and the following logistical aspects:
A. ANCHORAGE: Figure 4 illustrates anchorage locations for the Anchor Tube. Select a rigid anchorage
point that is capable of sustaining the loads specified in Section 2. The Anchor Tube should always be
anchored around the Pole Top over a suitable bolted apparatus or material having a minimum 5/8 inch
(15.9 mm) bolt. At least 12 inches (30.5 cm) of pole top should extend above the Anchor Tube to
prevent to prevent it from flipping over the pole top. If insufficient pole top is available, the Anchor Tube
should extend over and under a Crossarm or similar device.
Figure 4 - Anchor Tube Anchorage
Good
™
Pole Anchor System. Consider all
Bad
Anchor Tube over and under
Crossarm and around Pole Top to
compensate for insuffi cient Pole
Top Extension.
Insuffi cient Pole Top extension
above Anchor Tube.
Anchor Tube anchored over Bolt
and under Equipment Arm to
compensate for insuffi cient Pole
Top Extension.
Insuffi cient Pole Top extension
above Anchor Tube.
Suffi cent Pole Top extension
above Anchor Tube and 5/8 inch
(15.875 mm) Through Bolt.
Anchor Tube should not be
anchored through Braces.
B. POLE INTEGRITY: Inspect and secure an unsound pole so it is safe for climbing.
C. SHARP EDGES: Avoid working where the Pole Anchor System and attached subsystems will contact
or abrade against unprotected sharp edges. Do not loop the Lifeline around small diameter structural
members. If working with the Pole Anchor System around sharp edges is unavoidable, apply a heavy
pad over the exposed sharp edge.
D. CLIMBING PATH: Identify the best climbing path prior to hanging the Vertical Lifeline Rope with the
Anchor Tube. The Vertical Lifeline Rope will align with the Anchor Tube and should be positioned on the
same side of the pole as the work area and best climbing path to avoid tangling the Lifeline.
E. GENERAL USE CONSIDERATIONS: Avoid working where your Lifeline may cross or tangle with that of
another worker. Do not allow your Lifeline to pass under you arms or tangle in your feet. Follow Live Line
procedures when working around exposed live components. Situate the Vertical Lifeline Rope within the
minimum approach distance.
F. RESCUE: The employer should always have a Rescue Plan in place and the ability to readily implement the plan.
3.2 INSPECTION: Prior to installing the Pole Anchor System, inspect all components per the Inspection Steps in Section 5.
3.3 INSTALLATION - HANGING THE VERTICAL LIFELINE ROPE: After planning your Fall Arrest System
(see Section 3.1), hang the Vertical Lifeline Rope from the wood pole with the Anchor Tube:
Step 1. Thread the Vertical Lifeline Rope through the Anchor Tube: Thread the running end of the
Vertical Lifeline Rope through the Anchor Tube until the Eye Splice is fully retracted into the tube
body (Figure 5). The rope may be inserted through the Anchor Tube in either direction to facilitate
maneuvering the tube and rope over and around the required anchorage points.
Step 2. Install the Installation/Removal Tool on the end of the Telescoping Extension Pole:
Attach the Installation/Removal Tool to the end of a dielectric tested Telescoping Extension Pole. Insert
the Installation/Removal Tool in the Anchor Tube so the trailing end of the Lifeline aligns in the tapered
groove on the Adapter (Figure 6).
4
Page 5

Step 3. Raise the Anchor Tube and Vertical Lifeline Rope to a position just below the Pole
anchorage point: Free the trailing end of the Vertical Lifeline Rope of any knots, kinks, or
tangles that might impede raising the Telescoping Extension Pole. Position the butt end of the
Extension Pole on the ground below the anchorage point (Figure 7). Raise the Extension Pole and
attached Anchor Tube to a point just below the desired anchorage by telescoping and locking each
extension of the Extension Pole (Figure 8).
WARNING: When extending the Extension Pole, keep fi ngers clear of the Lock Button Holes to
prevent pinching.
IMPORTANT: To ease raising and lowering of the Telescoping Extension Pole, keep the pole in
a vertical position (Figure 8).
NOTE: Exercise care to protect the Vertical Lifeline Rope from contaminates that will reduce the
rope’s dielectric properties. Keeping the unused end of the Vertical Lifeline Rope in the provided
Carrying Bag will help maintain the rope’s dielectric properties.
Step 4. Hang the Anchor Tube over the Pole Anchorage: Lift up on the Extension Pole slightly and
then twist the Anchor Tube into position on the desired anchorage points (Figure 9). When the
Anchor Tube is in position, lower the Extension Pole slightly to Hang the Anchor Tube on the
anchorage points and remove the Installation/Removal Tool (Figure 10).
Step 5. Retrieve the Eye Splice end of the Vertical Lifeline Rope for anchorage purposes: Insert
the Rope Hook end of the Installation/Removal Tool through the the Eye Splice (Figure 11)
and then retract the Telescoping Extension Pole to pull the Vertical Lifeline Rope through the
Anchor Tube and retrieve the Eye Splice.
Figure 5 Figure 6 Figure 7
Figure 8 Figure 9 Figure 10
Figure 11
NOTE: If an adequate amount
of clear pole top is available,
the Vertical Lifeline Rope can
be pre-choked prior to inserting
the Installation/Removal Tool
and raising the Anchor Tube
to the desired anchorage point
with the Extension Pole.
5
Page 6

3.4 INSTALLATION - ANCHORING THE VERTICAL LIFELINE ROPE: Once the Anchor Tube is correctly
secured on the Wood Pole, the Vertical Lifeline Rope should be anchored at the top or bottom of the pole:
To anchor the Vertical Lifeline Rope at the top of the Wood Pole with the Anchor Tube:
Step 1. Secure the provided Carabiner to the Eye Splice on the Vertical Lifeline Rope.
Step 2. Pass the Plain End of the Vertical Lifeline Rope through the Carabiner.
Step 3. Grasp the Plain End of the Lifeline and pull the Vertical Lifeline Rope through the Anchor Tube until
the Eye Splice and Carabiner are snug against the Anchor Tube and Pole Top anchorage (Figure 12
& Figure 13).
To anchor the Vertical Lifeline Rope at the bottom of the Wood Pole with the Chain Tensioner:
Step 1. Hold the Chain Tensioner against the Wood Pole and wrap the free end of the chain around the Wood
Pole. Feed the excess chain through the slot in the Chain Retainer and hook a link on the Button Head
Screw Pin protruding from the Retainer. Turn the Hand Wheel to tighten the chain. (Figure 14).
Step 2. Insert the Endless Loop Sling midway through the Eye Splice on the Vertical Lifeline Rope so a
loop protrudes from each side of the Eye Splice (Figure 15).
Step 3. Insert the Carabiner through the Shackle. Slide the two loops of the Endless Loop Sling over the
Carabiner and then lock the Carabiner to secure the Vertical Lifeline Rope to the Chain Tensioner.
(Figure 16).
WARNING: Failure to maintain a minimum of eight chain links between the Adjustment Housing
and Carabiner connecting the Vertical Lifeline Rope to the Chain Tensioner may result in the lifeline
pulling the chain link off the Screw Pin on the Chain Retainer, causing serious injury or death.
Figure 12 Figure 13
Figure 15 Figure 16
Figure 14
6
Page 7

Figure 17 - Pole Anchor System Diagrams
A
B
D
E
F
C
A Anchor Tube B Eye Splice C Carabiner D Dorsal D-Ring E Shock Absorber F Rope Grab G Chain Tensioner
H Endless Loop Sling
4.0 SYSTEM OPERATION
The Safl ok Pole Anchor System is designed for use with a Rope Grab in a single-person fall arrest system (see Figure 17).
WARNING: Do not alter or intentionally misuse this equipment. Consult DBI-SALA when using this equipment
in combination with components or subsystems other than those described in this manual. Some subsystem
and component combinations may interfere with the operation of this equipment. Use caution when using this
equipment around moving machinery, electrical hazards, chemical hazards, and sharp edges.
B
G
H
C
7
Page 8

WARNING: Consult your doctor if there is reason to doubt your fi tness to safely absorb the shock from a fall
arrest. Age and fi tness seriously affect a worker’s ability to withstand falls. Pregnant women or minors must not
use DBI-SALA Vertical Lifelines or subsystems.
4.1 BEFORE EACH USE: Inspect the components of the Pole Anchor System according to the Inspection
Guidelines (Section 5.2). Inspect the Full Body Harness according to the manufacturer’s instructions.
4.2 USE: Figure 17 illustrates Safl ok Pole Anchor Systems with bottom or top anchorage. Operating procedures
for either system are as follows:
WARNING: If the Safl ok Pole Anchor System is subjected to fall arrest forces, it should be removed from
service and destroyed.
Step 1. Don a Full Body Harness: A Full Body Harness equipped with a back Dorsal D-ring (17D)
should always be used with the Pole Anchor System. Don the harness per the manufacturer’s
instructions.
Step 2. Attach the the Rope Grab Shock Absorber to the Full Body Harness: The Rope Grab (17F)
is equipped with an attached Shock Absorber (17E). Secure the Carabiner on the end of the
Shock Absorber (17E) to the Dorsal D-ring (17D) on the Full Body Harness.
Step 3. Attach the Rope Grab to the Vertical Lifeline Rope: Figure 18 illustrates installation of the
Rope Grab on the Vertical Lifeline Rope. Procedures are as follows:
Ensure the Rope Grab is in the ‘UP’ position with the arrow (18A) on the the Rope Grab pointing A.
toward the top of the wood pole.
NOTE: The Rope Grab incorporates a Gravity-Lock Pin which slides out of the Locking Pin, preventing
the Lifeline Sleeve from mating with the Rope Grab Cam if the Rope Grab is not held upright.
Push the Opening Lever (18B) down until it reaches the bottom of the groove (18C) and then B.
slide it inward until the Release Button (18D) is completely pressed and covered by the Opening
Lever.
Pull the Lifeline Sleeve (18E) and Locking Cam (18F) halves apart until the Rope Grab is fully opened.C.
To install the Rope Grab on the Vertical Lifeline Rope, raise the Locking Cam (18F) to the ‘UP’ D.
position, align the rope inside the Lifeline Channel (18G) and close the hinged Rope Grab
halves.
Closing the Rope Grab halves releases the Opening Lever (18H) from the open position and
slides the Lock Pin (18I) into the Lock Ring at the top of the Lifeline Sleeve. The Opening Lever
should be resting at the top of the groove against the Lifeline Sleeve.
Test the Rope Grab for proper operation by pulling down on the Locking Cam (18J). The E.
Rope Grab should lock onto the Vertical Lifeline Rope and prevent descent down the lifeline
once the Cam is engaged.
Figure 18 - Attaching the Rope Grab to the Vertical Lifeline Rope
A
C
Step 4. Climb up and down the Wood Pole with the Rope Grab sliding up or down the
Vertical Lifeline Rope as you ascend or descend:
Using the Shock Absorber (17E) connected to the Rope Grab (17F), pull up slightly on the A.
Rope Grab’s Locking Cam (18J) to release it from the locked position. Always keep a minimum
of 12 feet (3.7 m) of rope below the Rope Grab to accommodate locking distance and fall
clearance.
J
F
B
D
E
G
I
H
8
Page 9

Maintin upward pressure on the Rope Grab’s Locking Cam as you climb to allow the Rope Grab B.
to travel on the Vertical Lifeline Rope without locking. To assure smooth travel of the Rope Grab
on the lifeline, apply tension to the Vertical Lifeline Rope. Lifeline tension can be achieved by
adding a weight on the unanchored end of the Vertical Lifeline Rope or extending additional
lifeline (in a hanging orientation) to provide weight.
When stationary, position the Rope Grab as high as possible on the Vertical Lifeline Rope to C.
reduce possible free fall. Lock the Rope Grab at the desired position by pulling the Locking
Cam all the way down or enabling the Parking Feature (Section 4.3). The Locking Cam must be
released before attempting to reposition the Rope Grab.
4.3 ROPE GRAB SAFETY FEATURES:
Parking Feature (Figure 19): The Rope Grab’s Parking Feature prevents the Rope Grab from traveling
down the Vertical Lifeline Rope; allowing the user to remain on the lifeline for extended periods without the
threat of the Rope Grab slipping down the lifeline when the user is active. The Rope Grab operates in manual
mode while the Parking Feature is engaged. To activate the Parking Feature, release the Auto-Locking Lever
(19A) from the tab (19B) on the side of the Rope Grab so it rotates from vertical to horizontal. To deactivate
the Parking feature, return the Auto-Locking Lever to an upright position so the hole in the lever catches on
the tab on the side of the Rope Grab. Lift up on the Locking Cam to unlock the Rope Grab, allowing travel up
and down the Vertical Lifeline Rope.
Anti-Panic Grip Feature (Figure 20): Rope Grabs with the Anti-Panic Grip feature are equipped with an
additional Center Cam between the two sides of the Locking Cam. In the event of a fall, the user may grasp
the Rope Grab in a manner that forces the Locking Cam into the open position. When the Locking Cam is
forced beyond the open position, the additional Center Cam pushes out and into the lifeline; stopping the fall
even though the Locking Cam is in the open position.
Figure 19 - Parking Feature
B
A
Figure 20 - Anti-Panic Grip Feature
WARNING: To ensure optimal safety when using the
Rope Grab and Vertical Lifeline Rope:
Always protect the lifeline if passing over or around sharp •
edges. Sharp edges can reduce rope strength by 70% or
more.
Keep lifelines clean.•
Avoid twisting or kinking lifelines when coiling or uncoiling.•
Avoid using lifelines near acids or alkalies. If the lifeline is •
used around chemicals or compounds, watch for signs of
deterioration.
Never use a knotted lifeline, knots can reduce rope strength •
by 50%.
Store lifelines properly (see Section 6.2).•
A
9
Page 10

5.0 INSPECTION
5.1 FREQUENCY:
Before Each Use: • Visually inspect all components of the Safl ok Pole Anchor System per the guidelines
defi ned in Section 5.2. Check the labels on the Rope Grab, Vertical Lifeline Rope, and Chain Tensioner
(see Section 8) to verify that annual inspection is current. If the condition of any component in the
system is in doubt, do not use.
Annual Inspection:• A formal inspection of all components comprising the Safl ok Pole Anchor System
must be performed at least annually by a competent person
1
other than the user.
After a Fall: • If a fall occurs while using the Safl ok Pole Anchor System, a formal inspection of the entire
system must be performed by a competent person other than the user.
5.2 INSPECTION GUIDELINES: To ensure safe effi cient operation, components of the Safl ok Pole Anchor System
should be inspected per the following guidelines:
Full Body Harness:
Before
Each Use
Every
Year
After
a Fall
Step 1. Inspect the Full Body Harness per the manufacturer’s instructions. XXX
Rope Grab: Reference Figure 21.
Step 1. Inspect the Attachment Eye (21B) and Locking Cam (21A) to ensure
Before
Each Use
XXX
Every
Year
After
a Fall
that the cam moves freely without hesitation, binding, or sticking.
Step 2. Inspect the Locking Cam (21A) and ensure that the teeth are not
XXX
rounded or worn.
Step 3. Inspect the Locking Cam (21A) Lever Spring and Auto-Locking Lever
XXX
Springs. Ensure they are in the proper location and undamaged.
Step 4. Inspect the spring for the Lock Pin (21D) spring (located in
XX
the Groove [21F]) and ensure it is in the proper location and
undamaged.
Step 5. Use the Opening Lever (21E) to ensure that the Locking Pin (21D)
XX
travels freely up and down the Locking Sleeve .
Step 6. Test repeatedly that the Rope Grab opens when the Release Button
XX
(21I) is depressed with the Opening Lever (21E). The Release
Button must be fully extended after the Rope Grab is closed.
Step 7. The two halves of the Rope Grab must close and open freely on the
XX
hinge. Inspect the Lifeline Channel (21G) and ensure that there are
no dips or depressions worn into the channel and that the Dimples
(21H) are without damage. Ensure all the labels and engravings are
legible.
Step 8. Inspect the Hinge (21J), Attachment Eye (21B), and the rest of the
XX
Rope Grab for signs of corrosion, wear, cracks, distortion or other
damage.
Step 9. With the Rope Grab open and upside-down, the Gravity-Lock Pin
XX
should drop down and prevent the Rope Grab from closing
Step 10. Activate the Parking Feature (Figure 19 & 21K) and verify that
XX
there is resistance against the Locking Cam (21A) when attempting
to raise the Attachment Eye (21B). With the parking feature
deactivated, there should be no resistance on the Locking Cam.
Step 11. To test models equipped with the Anti-Panic Grip Feature: Install the
XX
Rope Grab on the Vertical Lifeline Rope. Pass the thumb on one hand
through the Attachment Eye (21B) and grasp the Rope Grab body
with the rest of the hand. Force the Attachment Eye to open the
Locking Lever until it stops. Run the Rope Grab down the lifeline and
ensure that it locks onto the lifeline.
1 Competent Person: An individual knowledgeable of a manufacturer’s recommendations, instructions, and manufactured
components who is capable of identifying existing and predictable hazards in the proper selection, use, and maintenance of fall
protection equipment.
10
Page 11

Shock Absorber: Reference Figure 21.
Step 1. Inspect the condition of the Carabiner (21M). The Carabiner must
not be damaged or broken. It should be free of any sharp edges,
burrs, cracks, worn parts, or corrosion. The Gate (21N) should move
freely and lock upon closing.
Step 2. Inspect the Webbing (21O). All Webbing should be free of frayed,
cut or broken fi bers. Check for tears, abrasions, mold, burns,
discoloration, etc. The webbing must be free of knots, excessive
soiling, heavy paint buildup, and rust staining. Check for chemical or
heat damage indicated by brown, discolored, or brittle areas. Check
for ultraviolet damage indicated by discoloration and the presence of
splinters or slivers on the webbing surface. All of the above factors
are known to reduce webbing strength. Damaged or questionable
webbing should be replaced. Inspect stitching for pulled or cut
stitches. Broken stitches may indicate the Energy Absorber (21P)
has been impact loaded and must be removed from service.
Step 3. Inspect the Energy Absorber to determine if it has been activated.
There should be no evidence of elongation. Ensure the cover on the
Energy Absorber is secure and not torn or damaged.
Before
Each Use
Every
Year
After
a Fall
XXX
XXX
XX
Remove
from
Service
Vertical Lifeline Rope:
Step 1. Lifeline hardware must not be damaged, broken, distorted, or have
any sharp edges, burrs, cracks, worn parts, or corrosion. Ensure
included Carabiners work properly. Carabiner gates must move
freely and lock upon closing.
Step 2. Inspect the Vertical Lifeline Rope for concentrated wear. The material
must be free of frayed strands, broken yarns, cuts, abrasions, burns,
and discoloration. The rope must be free of knots, excessive soiling,
heavy paint buildup, and rust staining. Rope splices must be tight,
with fi ve full tucks, and thimbles must be held by the splice. Cracked
or distorted rope thimbles may indicate that the lifeline has been
impact loaded. Check for chemical or heat damage (indicated by
brown, discolored, or brittle areas). Check for ultraviolet damage,
indicated by discoloration and the presence of splinters and slivers
on the rope surface. All of the above factors are known to reduce
rope strength. Damaged or questionable ropes must be replaced.
Step 3. Inspect labels (identifi ed in Section 8). All labels must be present
and fully legible. Replace labels if illegible or missing.
Anchor Tube:
Step 1. The Anchor Tube must not be damaged or broken. It should be free
of any sharp edges, burrs, cracks, worn areas, or abrasions.
Before
Each Use
Every
Year
After
a Fall
XXX
XX
Remove
from
Service
XXX
Before
Each Use
Every
Year
After
a Fall
XXX
Figure 21 - Inspection, Rope Grab & Shock Absorber
J
C
D
A
F
B
A Locking Cam B Attachment Eye C Lock Ring D Lock Pin E Opening Lever F Groove G Lifeline Channel H Dimple
I Release Button J Hinge K Auto-Locking Lever L Locking Arm Spring M Carabiner N Gate O Webbing P Energy Absorber
Q i-Safe™ RFID Tag
G
E
H
I
K
L
O
P
O
Q
M
N
11
Page 12

Chain Tensioner: Reference Figure 22.
Step 1. Components of the Chain Tensioner must not be damaged. They
Before
Each Use
XXX
Every
Year
After
a Fall
should be free of any sharp edges, burrs, cracks, worn parts, or
corrosion.
Step 2. The Chain should be secure in the Adjustment Head (22A) of the
XXX
Tensioner with the Spring Pin (22B). The Spring Pin must not be
bent or cracked.
Step 3. The Button Head Screw Pin (22C) should be screwed tight in the
XXX
Chain Retainer (22D) and must not be bent.
Step 4. When the Knob (E) is turned, the Tensioning Screw (22F) should turn
XXX
freely in the Adjustment Head (22A) without the threads binding.
Step 5. The label must be present and fully legible (see Section 8). Replace
XXX
the label if illegible or missing
5.3 INSPECTION RECORDS: After each inspection, record the inspection date and results in the Inspection &
Maintenance Log (Section 9).
5.4 I-Safe™ RFID TAG: The Shock Absorber is equipped with an i-Safe™ Radio Frequency Identifi cation (RFID)
tag (Figure 21, Item Q). The RFID tag can be used in conjunction with the i-Safe handheld reading device
and web based portal to simplify inspection and inventory control and provide records for your fall
protection equipment.
5.5 UNSAFE OR DEFECTIVE CONDITIONS: If inspection reveals an unsafe or defective condition in a component
of the Saflok Pole Anchor System, remove the component from service and destroy it or contact an authorized service
center for repair.
Figure 22 - Inspection, Chain Tensioner
B
A
D
C
F
E
A Adjustment Head B Spring Pin C Button Head Screw Pin D Chain Retainer E Knob F Tensioning Screw
12
Page 13

6.0 MAINTENANCE, STORAGE, AND TRANSPORT
6.1 MAINTENANCE: Clean the Rope Grab, Shock Absorber, Chain Tensioner and Vertical Lifeline Rope with
water and a mild soap solution. Wipe off hardware with a clean, dry cloth, and hang to air dry. Do not force
dry with heat. An excessive buildup of dirt, paint, etc. may prevent components of the Pole Anchor System
from working properly, and in severe cases degrade components to a point where they have weakened and
should be removed from service. If you have any questions concerning the condition of any component of
the Pole Anchor System, or have any doubt about putting them into service, contact Capital Safety.
6.2 STORAGE: When not in use, store the Safl ok Pole Anchor System in a cool, dry, clean environment; out
of direct sunlight. Avoid areas where chemical vapors exist. After extended storage, thoroughly inspect all
components per the guidelines in Section 5.2.
6.3 TRANSPORT: Transport the Safl ok Pole Anchor System in the provided Carrying Bag.
7.0 SPECIFICATIONS
7.1 STANDARDS: When installed and used per the requirements and recommendations in this manual, the
Safl ok Pole Anchor System meets standards and requirements defi ned in Section 1.2.
7.2 SYSTEM:
CAPACITY:
WEIGHT:
VERTICAL LIFELINE ROPE:
ANCHOR TUBE:
CARABINER(S):
INSTALLATION/REMOVAL TOOL:
ROPE GRAB & SHOCK ABSORBER:
CHAIN TENSIONER:
One User - 310 lbs (140 kg)◊
Model 2104800 - 12 lbs (5.4 kg)◊
Model 2104801 - 20 lbs (9.07 kg)◊
5/8” (126 mm) x 80’ (24.3 m) Oletec-12-2 ply orange, 100% Polyolefi n◊
Lifeline, High Dielectric meets ASTM F1701-05
2-1/2” (3.5 mm) I.D. Locked Soft Eye Splice with Plastic Thimble◊
CPVC 4120 1” (25.4 mm) SCH 40 ASTM F 441, Grey◊
Heat Treated, Zinc Plated Steel◊
Locking Type: Double-Action Self Closing/Self Locking Gate Face/Side &◊
Minor Axis: 3,600 Lbs. (1633 Kg)
Minimum Proof Load: 3,600 lbs (1633 kg)◊
Tensile Strength: 5,000 lbs, (2268 kg)◊
Aluminum, Alloy Tool 206-T4◊
Finish: Sulfuric Anodize Clear per Mil-A-8625, Type 2, Class 1◊
Riveted and Welded with Hinged Rope Channel◊
Material Type: Body, Hinge, Cam and Attachment Eye – High Impact◊
Resistant Steel, Zinc Plated
Lifeline Diameter: 5/8” (16 mm)◊
Integrated◊
Parking Feature: Allows manual operation as required>◊
Anti-Panic Feature: Stops falls even when Locking Cam is open.◊
Zinc Plate per ASTM, TYPE II, CLASS Fe/Zn 12, Yellow◊
13
Page 14

9.0 INSPECTION AND MAINTENANCE LOG
SERIAL NUMBER:
MODEL NUMBER:
DATE PURCHASED: DATE OF FIRST USE:
INSPECTION DATE INSPECTION ITEMS
NOTED
Approved By:
Approved By:
Approved By:
Approved By:
Approved By:
Approved By:
Approved By:
Approved By:
CORRECTIVE ACTION MAINTENANCE
PERFORMED
Approved By:
Approved By:
Approved By:
Approved By:
Approved By:
Approved By:
Approved By:
Approved By:
Approved By:
Approved By:
View other clothing & work wear made by DBI-Sala on our website.
 Loading...