

Page 1

Due to continuous improvement of the product the Specifications are subject to change without notice.
LIMITED WARRANTY
DB DRIVE warrants any products purchased in the U.S.A. from
an authorized DB DRIVE dealer. All products are warranted to be free
from defects in material and workmanship under normal use and
service for a period of (1) year when the unit is installed by an authorized DB DRIVE dealer. Non-authorized dealer installed products carry
a one (1) year parts and labor limited warranty. This warranty applies to
the original purchase only.
DB DRIVE will either repair or replace (as its option) any unit
that has been found to be defective and under warranty provided the
defect occurs within:
One (1) year if purchased through an authorized DB DRIVE dealer.
This limited warranty does not extend to units that have been
subjected to misuse, abuse, neglect, or accident. Products that in DB
DRIVE’s judgment shows evidence of having been altered, modified, or
serviced without DB DRIVE’s authorization, will be ineligible under this
warranty.
SPA90.2 SPA90.4 SPA150.4
SPA1000D SPA1300D
SPA1600D SPA1900D
AMPLIFIERS
To obtain warranty service please contact your retailer or see
our web site at wwwdbdrive.net for more details.
DB Research L.L.P.
302 Hanmore Industrial Parkway // Harlingen, TX 78550
ph: 877.787.0101 // fx: 956.421.4513 // www.dbdrive.net
®
Instruction Manual
• Instalation Instructions / Owners Manual •
Page 2

INTRODUCTION
SAFETY PRECAUTIONS
Congratulations on your purchase of a DB Drive state-of-the-art power amplifier. Your
selection of a DB Drive car audio product indicates a true appreciation of fine musical
reproduction. Whether adding to an existing system or including your DB Drive amplifier in
a new system, you are certain to notice immediate performance benefits.
KEEP YOUR SALES RECEIPT
Take this time to attach your sales receipt to the manual and put in a safe place. In case
of any unforeseen reason this product may need warranty service, your receipt will be
necessary to establish purchase date.
RECOMMENDATION
A power amplifier’s performance is only as good as its installation. Proper installation will
maximize the system’s overall performance. It is recommended that you have our product
installed by an authorized DB Drive retailer. However, if you decide to install it yourself,
please carefully read through this manual and take your time to do a quality installation.
Due to continuing product improvements and possible manual revisions, we recommend
checking our website for latest product information at www.dbdrive.net.
IMPORTANT! Before making any connections, disconnect the car’s battery until the
installation is completed to avoid possible damage to the electrical system.
Fuse amplifiers power wire at the battery
Be sure to fuse the power wire within 12” of the car’s battery. This will protect the car’s
battery in case of a short circuit between the power amplifier and battery. THIS IS A
MUST, the amplifier’s built-in fuse will only protect the power amplifier not the car’s
battery!
Use high grade wire connectors
To ensure maximum power transfer and secure safe connections, it is recommended to
use high grade barrier spades (for connection at amplifier) and terminal rings (for connection at battery).
Do not run any wires underneath vehicle
Exposed wires have a chance of being cut or damaged. It is best to run all wires through
the vehicle under the carpet and/or side panels. This lends to a cleaner installation and
less risk of damage.
Use caution when mounting amplifier
Remember there are many electrical wires, gas lines, vacuum lines, brake lines as well as
a gas tank in the automobile. Make sure you now where they are when mounting the
amplifier to avoid puncturing lines, shorting wires or drilling holes in the gas tank.
Run signal wires away from electrical wires
WARNING!
Exposure to high power sound system can cause hearing loss or
damage. Listening to your system at loud levels while driving will
impair your ability to hear traffic sounds and emergency vehicles.
Use common sense when listening to your system.
Serial # ___________________ Model # _______________________
1 2
To avoid possibility of induced noise from the car’s electrical system (i.e. popping noises
or engine noise), run wires away from the car’s electrical wiring.
Make all ground wires as short as possible and at the same point
In order to reduce the chance of ground loops (i.e. engine noise), make the grounding
wire as short as possible to reduce the wire’s resistance. Also, when using multiple
components, make sure all units are grounded at the same point.
Avoid sharp edges when running the wires
To avoid the possibility of power, signal or speaker shorts, be careful not to allow the
amplifiers wires to come in contact with sharp edges. Use a grommet to protect the wire
when running through the fire wall.
Page 3

FEATURES AND BENEFITS
Line out
DC Offset Protection
This circuit protects the output of the amplifier against DC voltage. If for some reason DC
voltage is detected at the output stage, the amplifier will shut down protecting the speakers
from direct current.
Short Circuit Protection
The circuit protects the amplifier from damage due to a short found in the speakers or
wiring. If one of the speakers or its wiring comes in contact with ground, the amplifier will
shut down. To resume normal operation, correct the problem and turn the head unit off, then
back on. The amplifier will reset and play again.
Thermal Protection
To protect the amplifier circuitry against damage caused by prolonged exposure to high
temperatures, a thermal protection circuit is activated if the amplifier reaches excessively
high operating temperature. Once the thermal circuit is activated, the amplifier will shut
down to cool off. The amplifier will automatically turn back on once it cools down to a safe
operating temperature.
Power Indicator
The diagnostic L.E.D. illuminates when the amplifier is on and receiving power.
Built-in Crossover
The “Speed Series” amplifiers include a built-in variable crossovers. The crossover features
a variable frequency selection for precise low pass filtering for the SPA1000D, SPA1300D ,
SPA1600D and SPA1900D. The SPA90.2 , SPA90.4 and SPA150.4 also offer the same
frequency selection with the option of low or high pass filtering.
Full range line outputs have been provided for convenient connection to additional amplifiers in the system. The outputs are buffered to reduce signal loss. Please note that the
amplifier’s input level adjusts these level outputs.
Power Fusing
This protects the amplifier against short circuits and excessive current.
Remote Turn-on
Automatically turns amplifier on when connected to the head unit’s remote output. The
amplifier will turn on and off with the head unit to save current consumption. This control
also operates the reset circuit for the amplifier’s protection. It must be connected with the
head unit in order to reset protection circuits.
Adjustable Input Sensitivity
Allows you to fine-tune the level matching between your source and the power amplifier.
Low Impedance Stability
SPA1000D -1 Ohm Mono
SPA1300D -1 Ohm Mono
SPA1600D -1 Ohm Mono
SPA1900D -1 Ohm Mono
SPA90.2 -2 Ohm Stereo, 4 Ohm Bridged
SPA90.4 -2 Ohm Stereo, 4 Ohm Bridged
SPA150.4 -2 Ohm Stereo, 4 Ohm Bridged
Power and Speaker Distribution Blocks
Heavy gauge bare wire distribution blocks are provided for maximum power and signal
transfer with minimal resistance.
Bass Boost (SPA1000D SPA1300D SPA1600D SPA1900D)
For added low frequency performance the amplifiers are equipped with a variable *0~18 dB
bass boost @ 45Hz.
3 4
Page 4
MOUNTING LOCATION
Before you start the installation, it will be necessary to find a mounting location for the amplifier. Find a location in which the amplifier will receive adequate ventilation in order to
dissipate the heat it develops during operation. Two popular mounting locations are in the
trunk or under the seat.
Select the location in which you wish to mount the amplifier. Use caution when mounting
amplifier, there are many wires, gas lines, vacuum lines, brake lines as well as a gas tank
in the automobile. Make sure you know where they are when mounting the amplifier to
avoid puncturing lines, shorting wires or drilling holes in the gas tank. Once you are ready,
use a pencil to mark the mounting holes in the bottom panel. After you have marked the
locations of the holes move amplifier out of the way and drill small starter holes to make the
tapping screws easier to install. Use provided screws to tighten down the amplifier.
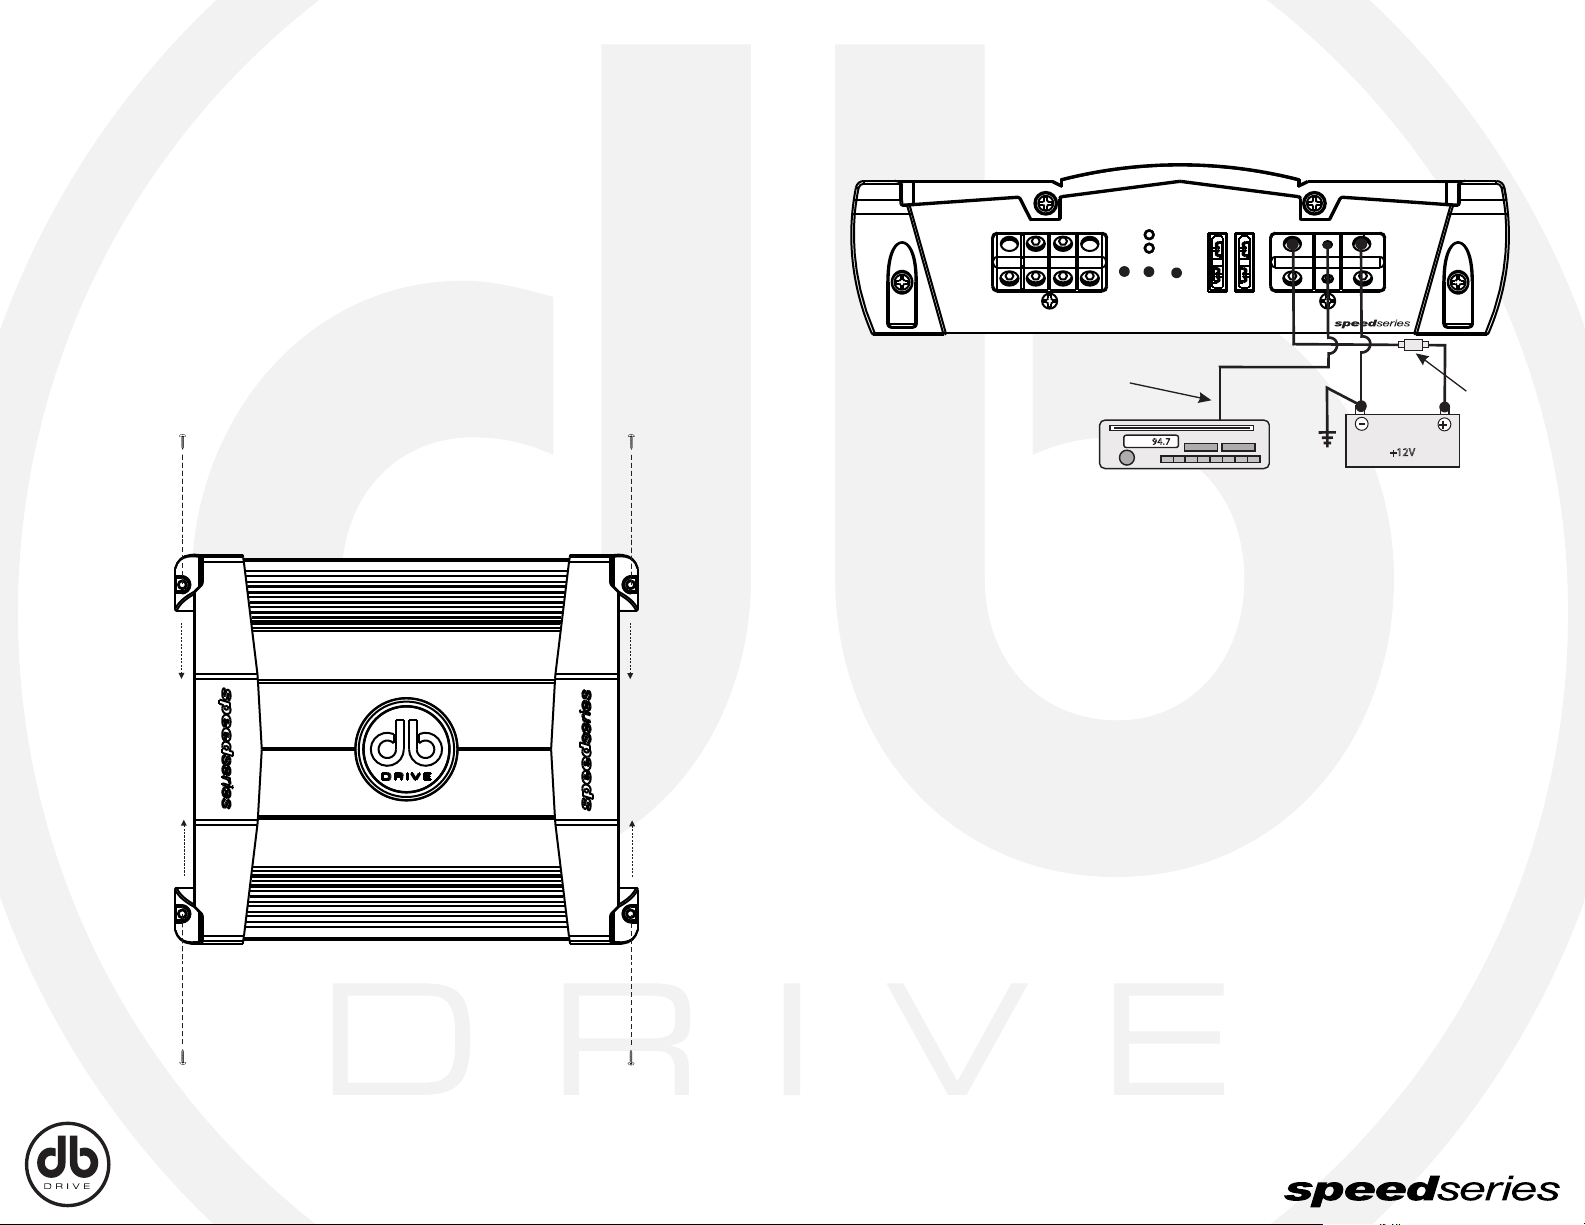
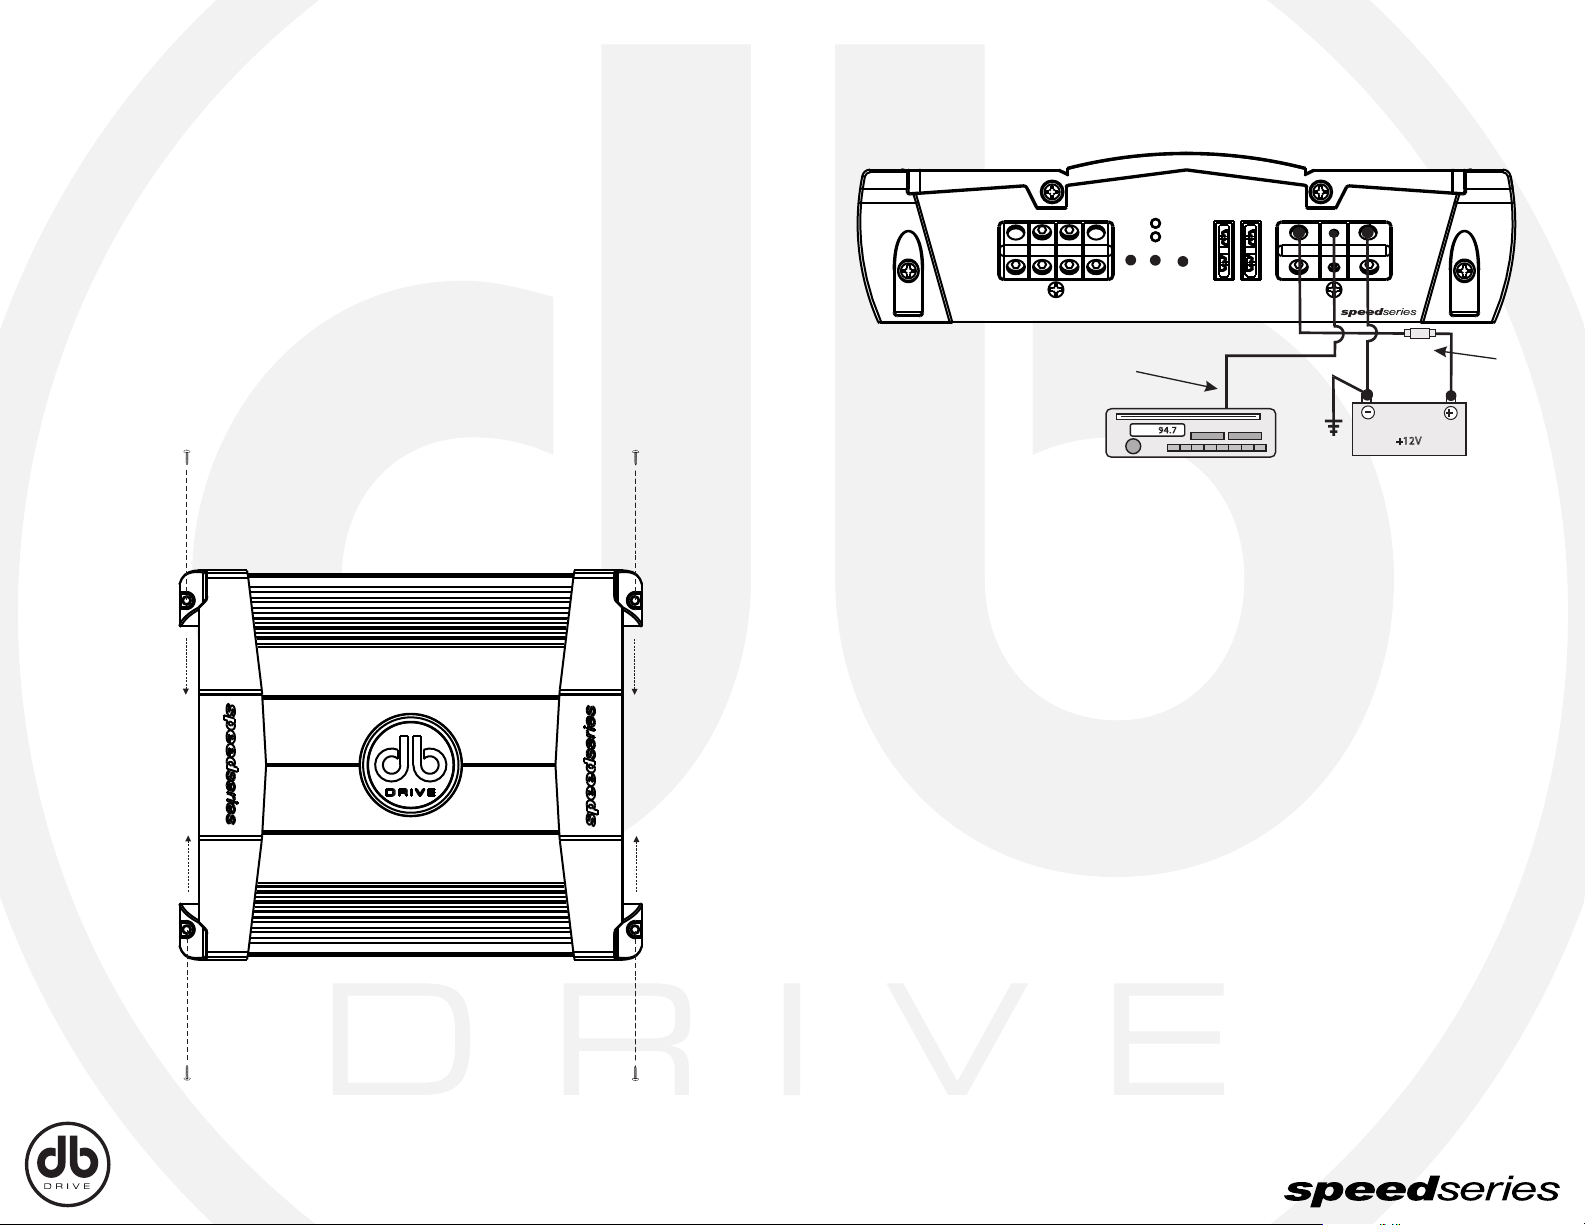
POWER CONNECTIONS
(SPA90.2 , SPA90.4 , SPA150.4 , SPA1000D ,
SPA1300D , SPA1600D , SPA1900D )
R (-) R (+) L (-) L (+)
speaker output
(-) ------ bridged ------ (+)
Turn on Remote
IMPORTANT! Before making any connections, disconnect the car’s battery until the installation is completed to avoid possible damage to the electrical system.
Connect the amplifier to the car’s battery
At times, the amplifier will need to draw large levels of current that cannot be provided by
any circuit in the car’s fuse box. We recommended using a 4 to 8 gauge power wire for your
connections depending on the amplifier and length of the wire. Strip one end of the wire to
connect to the terminal on the amplifier marked “batt+”. Loosen screw terminal and connect
bare wire and tighten. Use caution to make sure no stray wire strands come in contact with
surrounding terminals causing short circuits. Run the wire directly to the positive terminal of
the car’s battery. Make sure to use an in-line fuse within 12” of the car’s battery to protect
the electrical system and amplifier against short circuits and/or power surges.
power
protect
94. 7
fuses rem gnd+12v
In-Line Power fuse
Mounted Within 12”
-
Battery
+12V
+
From Battery
Recommended.
spa90.2
classAB 2 channel amplifier
Connect the ground terminal of the amplifier to the car’s chassis
350 watts
For the ground connection, use a 4 to 8 gauge wire (black) to connect to the terminal
marked “ground” and then connect it to the car’s chassis. Try to keep the length of the cable
as short as possible, preferably less than 6”. Also make sure that the point on the car where
the connection is to be made is free of paint and dirt.
Connect the remote terminal of the amplifier to a switchable +12V source
This connection allows the amplifier to be turned on and off with the power control of the
radio. If the radio has a REMOTE output terminal, connect it to the amplifier’s terminal
marked “remote” (using a 16 gauge wire or heavier). Now when the radio is turned on, the
amplifier will automatically turn on. This connection can also be made to the radio’s Power
Antenna wire.
5 6
Page 5
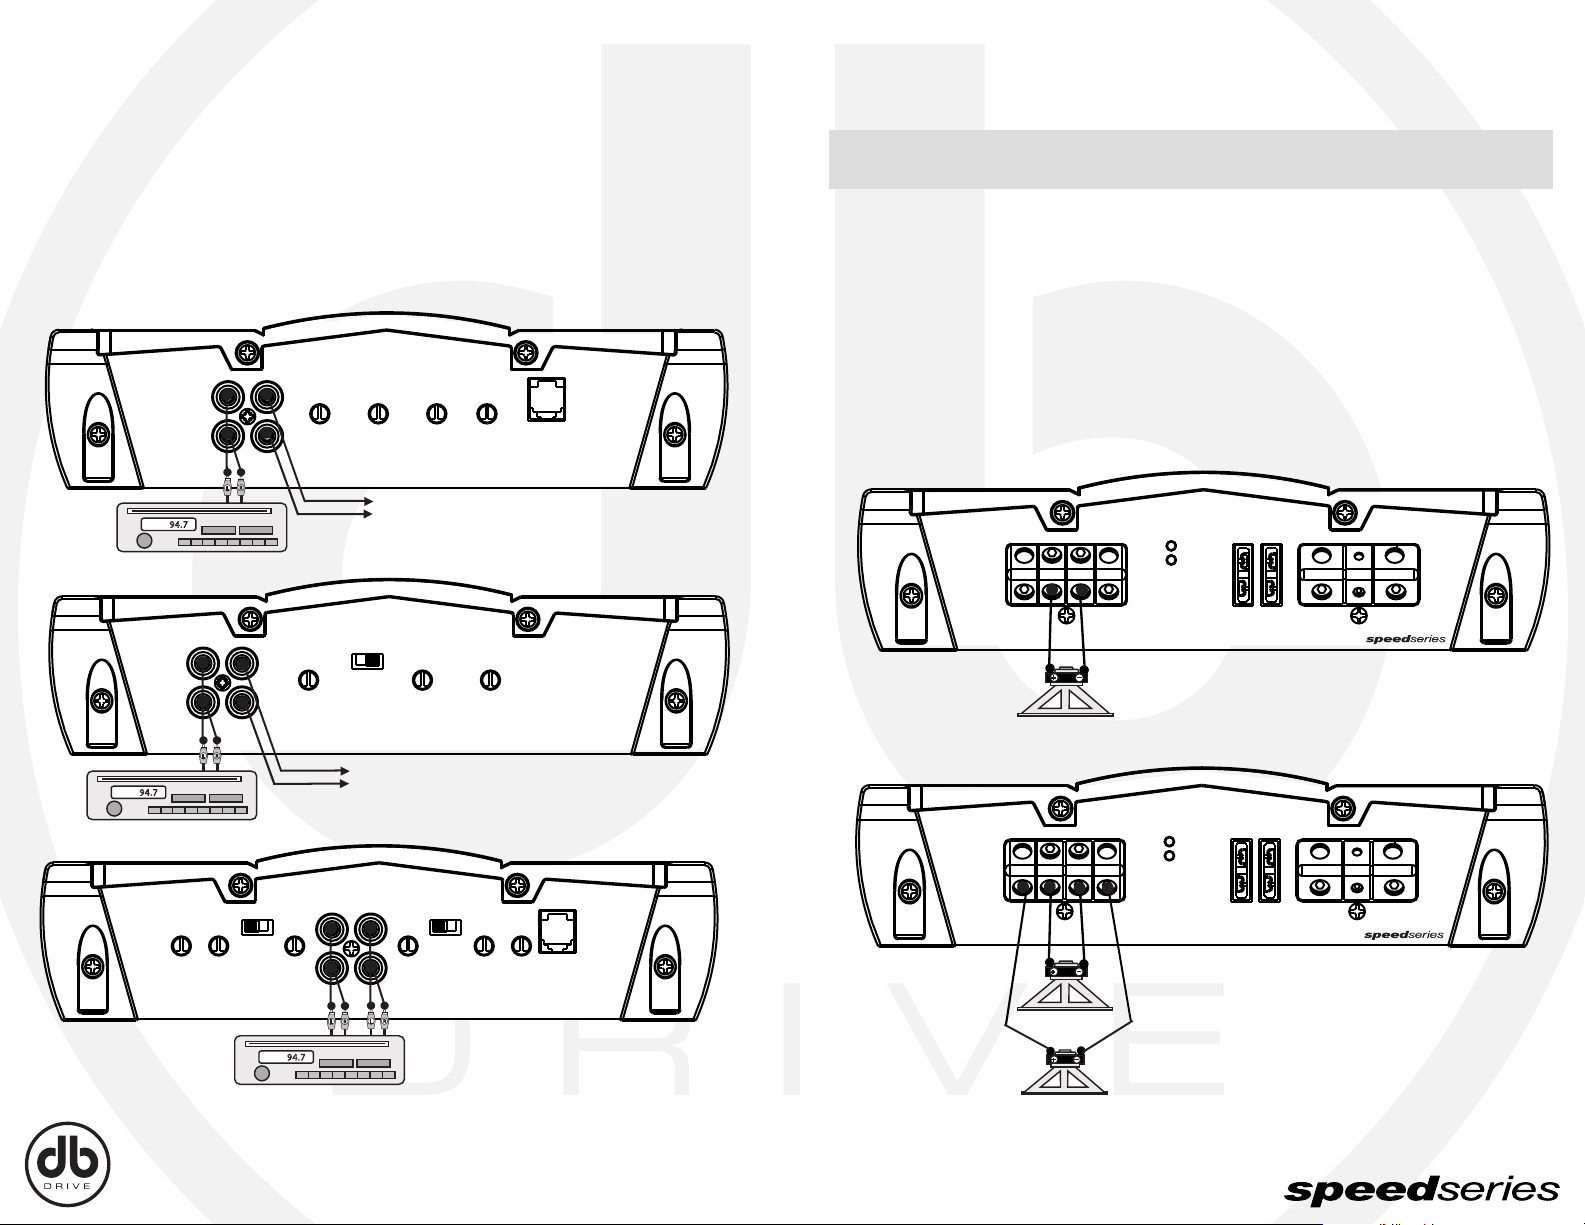
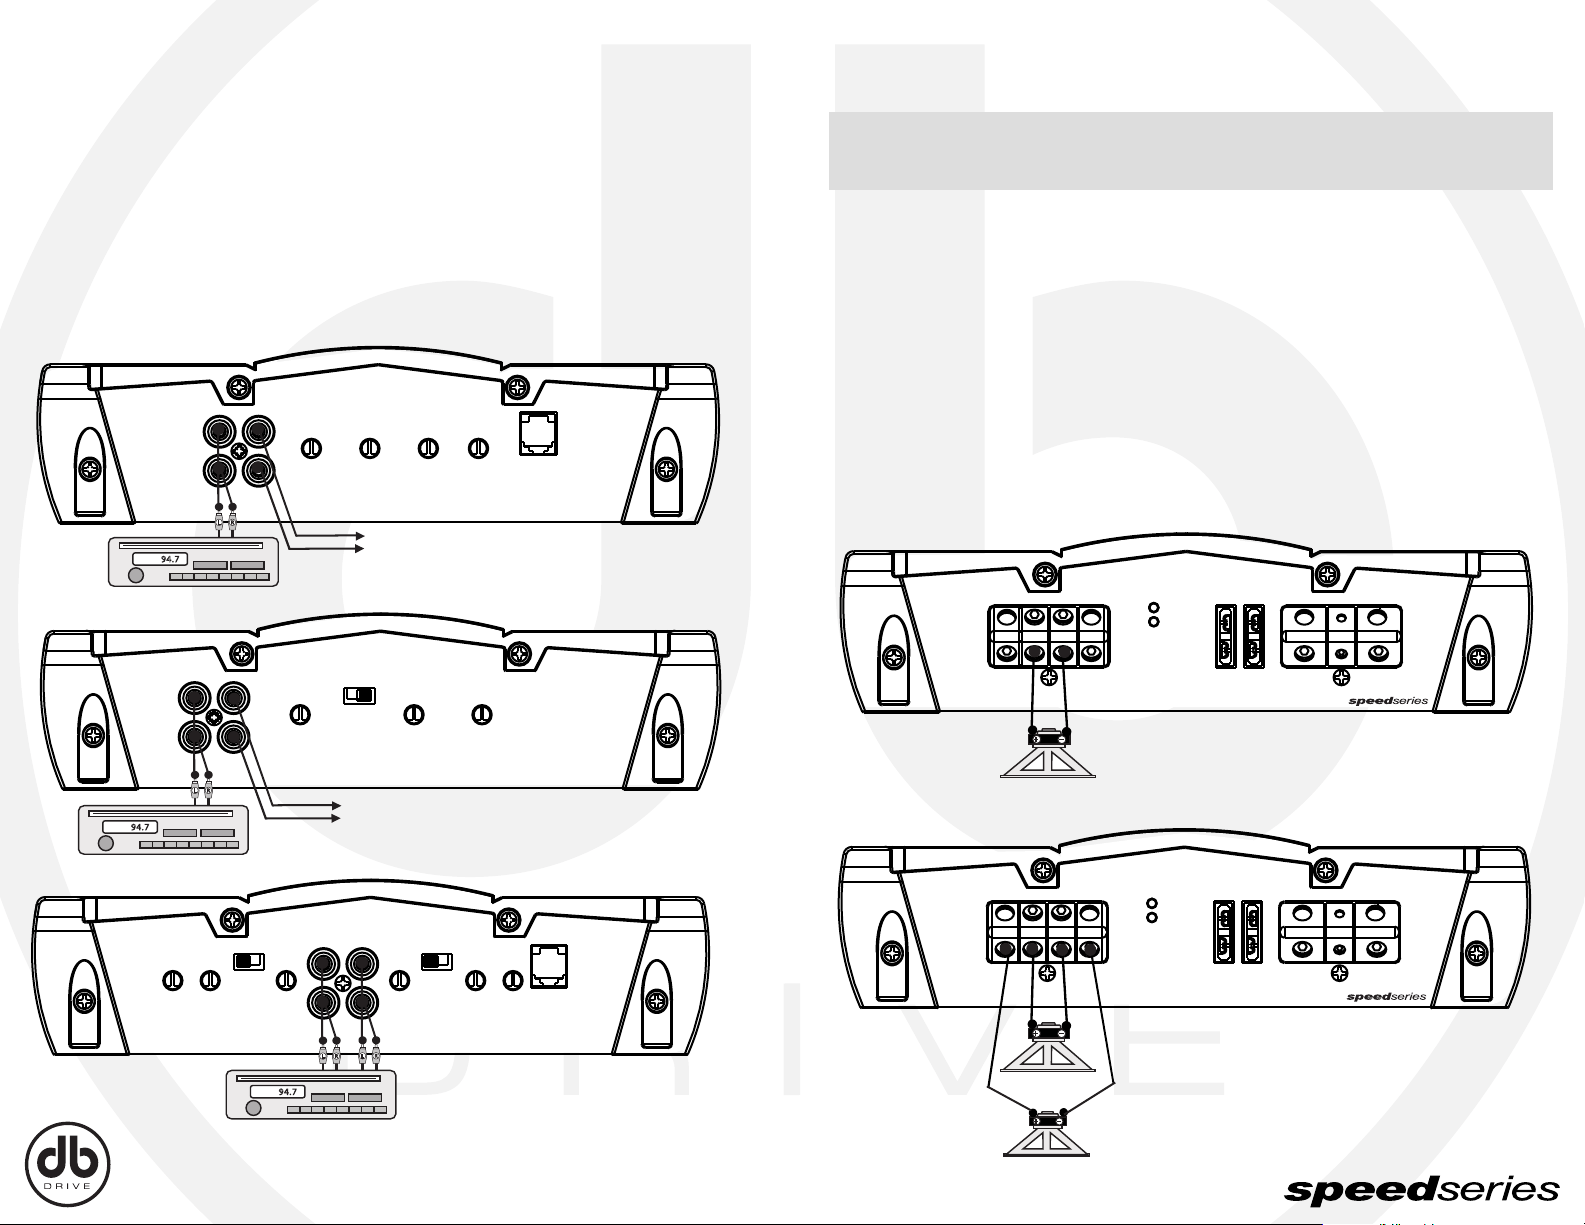
SIGNAL CONNECTIONS
SPEAKER CONNECTIONS
Connect the RCA output of the head unit (AM/FM cassette player, CD, or DAT) to the RCA
input terminals of the amplifier.
To make these connections, we recommend high quality RCA cables, which are available
at your local car audio retailer. Run signal wires away from electrical wires to avoid possibility of induced noise from the car’s electrical system (i.e. popping noises or engine noise).
94. 7
94. 7
L
R
in out
L
R
L
in out
R
L
level subsonic lpf
min max 20Hz 50Hz 40Hz 130Hz 0dB 18dB
R
level freq bass boost
min max 60Hz 400Hz 0dB 18dB
Optional full range line out connection
to addition addition in the system.
x-over
low full high
Optional full range line out connection
to addition addition in the system.
bass
boost
remote
spa1300D
classD monoblock amplifier
MONO SIGNAL
CONNECTION
classAB 2 channel amplifier
spa90.2
SIGNAL CONNECTION:
2 CHANNEL AMPLIFIERS
IMPORTANT! The following speaker connection are for the amplifier in normal mono
configuration.
Make the speaker connections using speaker wire that is at least 16 gauge or heavier.
As with any audio component, proper phasing of the amplifier and speakers is essential for
strong bass response. When connecting, make sure that positive (+) from the amplifier is
connected to the positive (+) of the speaker, and the same for negative (-).
Please note that although the SPA1000D, SPA1300D , SPA1600D and SPA1900D are
mono amplifiers, we have provided two sets of speaker terminals on the amplifier. These
terminals are connected in paralleled internally (connected together). The second set of
speaker terminals are intended for ease of connection when running multiple woofers.
R (-) R (+) L (-) L (+)
speaker output
(-) ------ bridged ------ (+)
-
+
4 Ohm Speaker
(1Ohm minimum)
R (-) R (+) L (-) L (+)
power
protect
power
fuses rem gnd+12v
fuses rem gnd+12v
0dB 18dB
bass
boost
freq
x-over
low full high
input
level
94. 7
input
ch 1 ch 3
ch 2 ch 4
R
L
x-over
low full high
min max
input
level
R
L
60Hz 400Hzmin max
freq
remote
0dB 18dB60Hz 400Hz
bass
boost
classAB 4 channel amplifier
spa150.4
SIGNAL CONNECTION:
speaker output
(-) ------ bridged ------ (+)
-
+
4 Ohm Speaker
-
+
4 Channel Amplifier using
2 pair of RCA inputs.
7 8
4 Ohm Speaker
protect
2 Ohm Speaker (1 Ohm minimum)
Page 6

SPEAKER CONNECTIONS
(SPA90.2 , SPA90.4 , SPA150.4)
Make the speaker connections using speaker wire that is at least 16
gauge or heavier.
As with any audio component, proper phasing of the amplifier and speakers is essential
for strong bass response. When connecting, make sure that positive (+) from the amplifier
is connected to the positive (+) of the speaker, and the same for negative (-).
***CAUTION! In the bridged mode, the amplifier must see a 4 Ohm load or higher. Any
lower than 4 ohms will cause the amplifier to overheat and possible cause permanent
damage to the amplifier!
R (-) R (+) L (-) L (+)
speaker output
(-) ------ bridged ------ (+)
+
4 Ohm Speaker
R (-) R (+) L (-) L (+)
speaker output
(-) ------ bridged ------ (+)
-
+
-
power
protect
power
protect
-
+
fuses rem gnd+12v
fuses rem gnd+12v
power
fuses
protect
- -
+
4 Ohm Speaker
rem gnd+12v
-
+
4 Ohm Speaker
ch4- ch4+ ch3- ch3+ ch2- ch2+ ch1- ch1+
speaker output
(-) ---- bridged ---- (+) (-) ---- bridged ---- (+)
-
+
4 Ohm Speaker
+
4 Ohm Speaker
REMOTE BASS CONTROL MODULE
(SPA1000D, SPA1300D, SPA1600D, SPA1900D Included)
Before connecting the remote, it will be necessary to find a mounting location that will be
easy to access for adjustment. Once you select your mounting location, you will need to run
the control wire from the remote to the amplifier. To avoid possibility of induced noise from
the car’s electrical system (i.e. popping noises or engine noise), run the cable from the
remote to the amplifier away from the car’s electrical wiring.
input
0dB 18dB
bass
boost
x-over
low full high
freq
min max
input
level
ch 1 ch 3
ch 2 ch 4
min max
input
level
x-over
low full high
60Hz 400Hz
freq
remote
0dB 18dB60Hz 400Hz
bass
boost
classAB 4 channel amplifier
spa90.4
4 Ohm Speaker
ch4- ch4+ ch3- ch3+ ch2- ch2+ ch1- ch1+
speaker output
(-) ---- bridged ---- (+) (-) ---- bridged ---- (+)
-
+
4 Ohm Speaker
4 Ohm Speaker
+
4 Ohm Speaker
power
fuses
protect
-
rem gnd+12v
9 10
POWER
Min
Max
Page 7

ADJUSTMENTS AND SETTINGS
FINE TUNE THE SYSTEM
The “Speed Series” amplifiers are equipped with built-in variable crossover networks allowing you to select the crossover mode (i.e. Low-Pass/Full/High-Pass or On/Off) and the
desired crossover point. For example if you wish to drive a pair of subwoofers, you can
select the “Low Pass” setting on the amplifier to filter out high frequencies. This will send
only low frequencies to your subwoofers (see example settings below). The crossover point
should be determined by the speakers operating range. Please refer to speaker manufactures recommended crossover point.
Filter selection for channel 3 & 4
input
ch 1 ch 3
ch 2 ch 4
min max
input
level
Adjust the frequency to the
desired point for speakers 3 & 4.
x-over
low full high
60Hz 400Hzmin max
freq
Bass Boost @ 45Hz
*0~18dB Channels 3 & 4
Only in Lowpass
remote
0dB 18dB60Hz 400Hz
bass
boost
classAB 4 channel amplifier
spa150.4
Adjust the frequency to the
desired point for speakers 1 & 2.
Bass Boost @ 45Hz
*0~18dB Channels 1 & 2
Only in Lowpass
0dB 18dB
boost
Filter selection for channel 1 & 2
x-over
low full high
bass
freq
input
level
Fine tune the amplifier’s input sensitivity
The gain sensitivity control for the “Speed Series” amplifier is located on the side panel.
This gain control has been included to allow adjustment to properly match the output of the
radio. This is one of the most misunderstood adjustments. By rotating the control in the
clockwise direction, the amplifier’s input will become more sensitive and the music will play
louder. This is not a volume control and you will not get more power out of the amplifier in
the maximum position! It may seem to deliver more output, but actually the system is only
playing louder faster as you turn the volume control on the radio. Ideally, to properly level
match the system the goal is to achieve maximum output from the amplifier without distortion at about ¾ of the volume control.
To determine if the amplifier’s gain is set properly, turn the system on and slowly increase
the volume control. You should be able to use about ¾ volume before the system gets loud
but not distorting. It is very important when making these adjustments that you do not over
drive the speakers (at point of distortion) this will cause permanent damage to the speakers.
If you are unable to achieve ¾ volume before distortion you will need to adjust gain control
(in this case you would reduce the gain). The gain controls should be adjusted very slowly.
It may help to have another person to assist you by adjusting the gain controls while you
listen for distortion.
Input Level
Min Max
11 12
Page 8

TROUBLE SHOOTING THE SYSTEM
Due to continuous improvement of the product the Specifications are subject to change without notice.
We have put together this trouble-shooting guide if you experience problems after
installing the amplifier. Please keep in mind that the majority of problems incurred are
caused by improper installation and not the equipment itself. In addition, there are many
components in the system that could cause various signal problems such as inducted
electrical noise and engine noise.
Before you can properly address the problem, you must first find the component that is
causing the problem. This will take patience and a process of elimination.
LOOK FOR….. SOLUTION
No Output
Blown fuse Replace
Bad RCA Cable(s) Replace
+12V at power terminal Check connection
+12V at remote terminal Check connection
Grounding point clean and tight Check for ground w/meter
Head Unit’s fader not in center position Set to center position
Master & Slave settings Confirm correct setting
Low Output
Check level adjustments
Re-adjust
Bad RCA cable(s) Replace
Improper level matching Re-adjust
Master & Slave settings Confirm correct setting
Engine Noise
Grounding points are clean and tight Check for ground w/meter
Ground all components at same point Ground at same point
Try different grounding point Change for better ground
Bad RCA cable(s) Replace
Use High Quality shielded RCA cables Rejects inducted noise
Low Vehicle charging system and/or battery Fix and/or replace
Red Protection L.E.D. illuminated
Speaker short Check speakers connection
for short circuit
Speaker grounding out Make sure speaker wires
Do not touch chassis ground
Impedance too low Check speaker impedance
Overheating Check mounting location
for Adequate air circulation
speaker impedance too low
Input Voltage @ 11 - 14.4 VDC:
@ 4 ohm
@ 4 ohms Bridged
@ 2 ohm
Frequency Resp.
S/N Ratio (A-weight)
Low Input Level
Crossover Type
Crossover Freq. (Lowpass)
Crossover Slope
Bass EQ.
Fuse Rating
Remote Bass
Input Voltage @ 11 - 14.4 VDC:
@ 4 ohm
@ 2 ohm
@ 1 ohm
Frequency Resp.
S/N Ratio (A-weight)
Low Input Level
Crossover Type
Crossover Freq. (Lowpass)
Crossover Slope
Bass EQ.
Subsonic Filter
Remote Control Included
Fuse Rating
Remote Bass
Input Voltage @ 11 - 14.4 VDC:
@ 4 ohm
@ 2 ohm
@ 1 ohm
Frequency Resp.
S/N Ratio (A-weight)
Low Input Level
Crossover Type
Crossover Freq. (Lowpass)
Crossover Slope
Bass EQ.
Subsonic Filter
Remote Control Included
Fuse Rating
Remote Bass
SPECIFICATIONS
SPA90.2
2 x 90W
1 x 350W
2 x 175W
10Hz-20Khz
>90dB
200mV. - 5.8 V
Hi/Low Pass
55Hz - 400Hz
12db per oct
18dB @ 45Hz
2 x 20 amp
no
SPA1000D
1 x 250W
1 x 500W
1 x 1000W
20Hz - 250Hz
>90dB
246mV - 5.9V
Low Pass
40Hz - 150Hz
18dB/oct
18dB @ 45Hz
20Hz - 50Hz
Yes
2 x 20 amp
included
SPA1600D
1 x 400W
1 x 800W
1 1600W
20Hz - 250Hz
>90dB
246mV - 5.9V
Low Pass
40Hz - 150Hz
18db/oct
18dB @ 45Hz
20Hz - 50Hz
Yes
2 x 30 amp
included
SPA90.4
4 x 90W
2 x 350W
4 x 175W
10Hz-20Khz
>90dB
200mV. - 5.8 V
Hi/Low Pass
55Hz - 400Hz
12db per oct
18dB @ 45Hz
2 x 25 amp
optional
SPA1300D
1 x 325W
1 x 650W
1 x 1300W
20Hz - 250Hz
>90dB
246mV - 5.9V
Low Pass
40Hz - 150Hz
18dB/oct
18dB @ 45Hz
20Hz - 50Hz
Yes
2 x 25 amp
included
SPA1900D
1 x 475W
1 x 950W
1 x 1900W
20Hz - 250Hz
>90dB
246mV - 5.9V
Low Pass
40Hz - 150Hz
18dB/oct
18dB @ 45Hz
20Hz - 50Hz
Yes
3 x 30 amp
included
13 14
Page 9

GARANTIA LIMITADA
Todas especificaciones son susceptibles cambiar sin nota debido a la mejora continua del producto y el desarrollo
DB DRIVE garantiza cualquier producto comprado en USA de
un vendedor autorizado por DB DRIVE. Todos los productos están
garantizados de no tener defectos en material y manufactura bajo un
uso normal y servicio por un periodo de un (1) año a partir de la instalación de la unidad por un técnico autorizado por DB DRIVE. Productos
instalados por personas no autorizadas por DB DRIVE tiene solo un (1)
año de garantía limitada en partes y mano de obra. Esta garantía se
aplica solamente a la compra original.
DB DRIVE reparará o reemplazará (según su discrecion)
cualquier unidad que haya sido encontrada con algun defecto bajo
garantía y que el defecto haya ocurrido:
Un (1) años si fue instalado por un técnico autorizado por DB DRIVE ,
Un (1) año si fue instalado por persona/s no autorizada por DB DRIVE.
Esta garantia limitada nó se extiende a unidades que hayan
sido sujetas a un mal uso, abuso, negligencia, o accidente. Productos
que según DB DRIVE muestran evidencias de haber sido alterados,
modificados, o utilizados sin la autorización de DB DRIVE serán
rechazados de cualquier tipo de garantía.
Para obtener servicio de garantía, favor de comunicarse con
su proveedor o visítenos a nuestro sitio www.dbdrive.net para más
detalles.
DB Research L.L.P.
302 Hanmore Industrial Parkway // Harlingen, TX 78550
ph: 877.787.0101 // fx: 956.421.4513 // www.dbdrive.net
®
SPA90.2 SPA90.4 SPA150.4
SPA1000D SPA1300D
SPA1600D SPA1900D
AMPLIFICADORES SERIE SPEED
Manual de Instrucciones
• Instrucciones para Instalacion / Manual de Instrucciones •
Page 10

INTRODUCCIÓN
MEDIDAS DE SEGURIDAD
Felicitaciones por su compra del amplificador de potencia SERIE SPEED más
moderno en el Mercado. El haber elegido un producto de audio DB DRIVE para su
automóvil muestra una verdadera apreciación en reproducción de música de
alta calidad. Cualquiera que fuera la razón , mejorar el sitema actual o la adquisición
de un sistema completamente nuevo , el amplificador de DB DRIVE le brindará beneficios
inmediatos.
GUARDE SU RECIBO DE COMPRA
Tómese el tiempo de adjuntar el recibo de compra al manual , y guárdelo en un lugar
seguro. En caso alguna razón imprevista , y necesitar servicio de garantia , le será
requerido monstrar el recibo de compra.
RECOMENDACIÓN
El rendimiento de potencia de un amplificador es tan bueno como su instalación. Una
Instalación apropiada aumentará el rendimiento global del systema. Se le recomienda
que la instalación de nuestro producto sea realizada por un técnico autorizado de DB
DRIVE. Sin embargo , si decide instalarlo usted mismo , por favor lea cuidadosamente el
manual , tómese su tiempo para realizar una instalación confiable.
Debido a una constante mejora de nuestros productos , y posibles correcciones de nuestros manuales , recomendamos que visite nuestro sitio www.dbdrive.net para obtener la
más reciente información de nuestros productos.
IMPORTANTE! Antes de hacer cualquier tipo de conexión , desconecte la batería de su
automóvil hasta finalizar al instalación para evitar daňos en el sistema.
¡ADVERTENCIA!
Exponerse a un sistema de sonido de alta potencia puede causar pérdida o
daňo de oído. Escuchar su sistema de sondio a niveles demasiado altos
mientras maneja , le impedirá su habilidad de oír el tráfico y/o vehículos de
emergencia. Utilice su sentido común cuando escuche su sistema.
Conectar el cable de encendido del amplificador a la bateria
Asegúrese de conectar el cable de encendido a unos 12” de la batería de su automóvil.
Esto protegerá a la batería de su auto en caso de un corto circuito entre el encendido del
amplificador y la batería. ESTO ES ABSOLUTAMENTE NECESARIO, el fusible integrado
del amplificador solamante protegerá al amplificador y no a la batería de su automovil!
Utilice conectores de alto grado
Para asegurar la máxima transferencia de potencia y la seguridad de las conexiones, se
recomienda utilizar conectores de alto grado (para conexión de amplificador) y anillos
terminales (para conección de bateria).
No corra ningún tipo de cableado por debajo del automóvil.
Cables expuestos tienen la tendencia a cortarse o dañarse. Lo mejor es correr los cables
a través del vehículo. Esto contribuye a una me jor instalación y a un menor riesgo de
daños.
Tenga cuidado durante el montaje del amplificador.
Recuerde que existen los cables de electricidad, las lineas de gasolina y frenos, y
además el tanque de combustible. Esté seguro de saber donde se halla todo lo anteriormente mencionado durante el montaje del amplificador para evitar cortos, dañar alguna
de las líneas, o agujerear el tanque de gasolina.
Corra la señal de alambrado lejos del alambre eléctrico.
Para evitar cualquier posibilidad de inducir interferencias en el sistema eléctrico de su
automóvil, (ej. ruidos repentinos or ruidos de motor), corra el alambrado lejos de los
alambres eléctricos de su automóvil.
Haga todo el alambrado a tierra lo más corto posible, y en el mismo
punto de conexión
Para reducir la posibilidad de crear un circuito cerrado (ej. ruido de motor), haga todo el
alambrado a tierra lo más corto posible lo que reducirá la resistencia en la alambrado.
Además, cuando utilice componentes múltiples, esté seguro de que todas las unidades
estén conectadas a tierra en el mismo punto.
Evite bordes filosos al correr el alambrado
Para evitar la posibilidad de pérdida de potencia, señal, o algún corto en las bocinas,
tenga cuidado con el alambrado de los amplificadores previniendo cualquier tipo de
contacto con bordes filosos. Utilice grommet como protección para los alambres cuando
los corra a través de la pared del vehículo.
1 2
Page 11

CARACTERISTICAS Y BENEFICIOS
Linea de Salida
Protección DC Offset
Este circuito protege la salida del amplificador contra un voltage DC. Si por alguna razón se
detectara un voltage DC en la salida, el amplificador se apagaría de inmediato para proteger
a las bocinas de una corriente directa.
Protección contra un Corto Circuito.
El circuito protege al amplificador de cualquier daño a través de un corto que se encuentra
en las bocinas o en el alambrado. Si una de las bocinas o algun alambre llega a tocar tierra,
el amplificador se apagará inmediatamente para enfriarse. El amplificador se encenderá
automáticamante una vez que la temperatura descienda a estado seguro para operar.
Indicador de Encendido
El diagnóstico L.E.D. se ilumina cuando el amplificador se enciende y esta recibiendo carga.
Crossover Incorporado
Los amplificadores de”Serie SPEED” incluyen crossovers variables incorporados. Las
características de los crossovers incluyen una selección de frequencia variable para un
preciso filtro de baja pasada hacia los modelos SPA1000D , SPA1300D ,SPA1600D ,y
SPA1900D. Los modelos SPA90.2 , SPA90.4 y SPA150.4 también ofrecen la misma selección de frequencia con opción a filtrados para pasada alta o baja.
Lineas de salida de rango completo son proporcionadas para una conexión más conveniente para amplificadores adicionales en el sistema. Las salidas están concentradas para
reducir pérdida de sonido. Favor de prestar atención que los niveles de entradas del amplificador se ajustan a estos niveles de salida.
Potencia de Fusión (Power Fusion)
Esto protege al amplificador contra corto circuitos y corriente excesiva.
Encendido de Remoto
El amplificador se enciende automáticamente cuando se conecta con la unidad de cabecera de salida remota. El amplificador se enciende y apaga con la unidad de cabecera para
ahorrar consumo de corriente. Este control también opera para reiniciar el circuito como
protección del amplificador. Debe estar conectado con la unidad de cabecera para reiniciar
la protección de los circuitos.
Entrada Ajustable de Sensibilidad
Tiene la opción de poner a punto los niveles de encuentro entre el generador y la potencia
del amplificador.
Estabilidad de Impedancia Baja
Distribución de Bloqueo de Potencia y Bocinas
Bloques de distribución de alto calibraje son facilitados para obtener máxima potencia y
señal de transferencia con un mínimo de resistencia.
Mejoramiento del Bajo (SPA1000D , SPA1300D ,SPA1600D ,y SPA1900D)
Para agregar rendimiento de frequencia baja los amplificadores son equipados con una
variable *0~18 dB de mejoramiento del bajo @ 45Hz.
3 4
SPA1000D -1 Ohm Mono
SPA1300D -1 Ohm Mono
SPA1600D -1 Ohm Mono
SPA1900D -1 Ohm Mono
SPA90.2 -2 Ohm Stereo, 4 Ohm de Puente (Bridged)
SPA90.4 -2 Ohm Stereo, 4 Ohm de Puente (Bridged)
SPA150.4 -2 Ohm Stereo, 4 Ohm de Puente (Bridged)
Page 12
LUGAR DE MONTAJE
Antes de comenzar con la instalación es necesario encontrar el lugar de montje para el
amplificador. Busque un lugar en el cual el amplificador recibirá una ventilación adecuada
así podrá disipar el calor que se genera mientras está operando. Dos de los lugares sugeridos son la cajuela o debajo del asiento.
Seleccione el lugar de montaje del amplificador. Tenga cuidado al montar el amplificador,
recuerde que hay muchos alambres, lineas de la gasolina y de los frenos, y también el
tanque de gasolina. Esté seguro del lugar de montaje para evitar cualquier tipo de agujeros
en las líneas, alambrado, o tanque de gasolina. Una vez que esté listo, utilice un lápiz para
marcar los hoyos de montaje para el panel bajo. Después que haya marcado los hoyos,
coloque el amplificador lejos del lugar de trabajo, y comience por hacer hoyos pequeños
para facilitar la instalación de las tuercas o tornillos. Utilice las herramientas que se le
proveen para ajustar el amplificador.
CONEXIÓNES DE ENCENDIDO
(SPA90.2 , SPA90.4 , SPA150.4 , SPA1000D ,
SPA1300D , SPA1600D , SPA1900D )
R (-) R (+) L (-) L (+)
speaker output
(-) ------ bridged ------ (+)
Encendido remoto
¡IMPORTANTE! de hacer cualquier tipo de conexión, desconecte la batería de su auto
hasta finalizar la instalación para evitar dañar el sistema eléctrico.
Conecte el amplificador a la batería de su automóvil.
Algunas veces, el amplificador necesitará descargar unos largos niveles de corriente que
no podrán ser provistas por ningun circuito de la caja de fusibles del automóvil. Recomendamos utilizar calibre 4 a 8 para sus conexiónes dependiendo del amplificador y de la
longitud del cable. Despegue una terminal del alambre para conectarlo con la terminal del
amplificador marcado “batt+”. Afloje el tornillo de la terminal, conéctelo con el alambre y
ajústelo. Tenga cuidado que el resto del alambrado no entren en contacto con las demás
terminales ya que puede causar un corto circuito. Corra el alambre diréctamente a la terminal positiva de la batería de su automóvil. Esté seguro de utilizar un fusible en-línea a unos
12” de la batería del automóvil para proteger el sistema eléctrico y el amplificador contra un
corto o descarga eléctrica.
power
protect
94. 7
fuses rem gnd+12v
Se recomienda
montar el fusible a
12 pulgadas de bateria.
-
Batería
+12V
+
spa90.2
classAB 2 channel amplifier
Conecte la terminal a tierra del amplificador con el chasis de su automóvil.
350 watts
Para la conección a tierra, utilice el alambre (calibre 4 a 8) negro para conectar la terminal
marcada “ground” (tierra) y luego conéctela con el chasis del automóvil. Trate de mantener
la longitud del cable lo más corto posible, preferiblemente meno de 6”. También, asegúrese
que el punto del automóvil donde se establecerá la conexión no tenga pintura ni esté sucia.
Repita los mismos pasos para la segunda conexión.
Conecte la terminal de remoto del amplificador a una fuente cambiable de +12V
Esta conexión permite que el amplificador pueda ser encendido o apagado con el control
de la radio. Si la radio tiene una salida terminal de REMOTO, conéctela con la terminal del
amplificador marcada “remote” (utilizando calibre 16 o más pesado). Ahora cuando se
encienda la radio, el amplificador se encenderá automáticamente. Esta conexión también
se la puede hacer al alambre de la antena de el radio.
5 6
Page 13
CONEXIÓNES DE SENALES
CONEXIÓNES DE BOCINAS
Conecte la salida del RCA de la unidad de cabecera (AM/FM cassette player, DC or
DAT) a la entrada RCA de las terminales del amplificador.
Para hacer estas conexiónes, recomendamos cables RCA de alta calidad, los cuales se
pueden adquirir en cualquier negocio de venta de audio para autos. Corra los alambres
de señal lejos de los alambres eléctricos para evitar cualquier tipo de interferencia del
sistema eléctrico de su automóvil. (ej. ruidos de motor)
94. 7
94. 7
L
R
in out
L
R
L
in out
R
L
level subsonic lpf
min max 20Hz 50Hz 40Hz 130Hz 0dB 18dB
R
level freq bass boost
min max 60Hz 400Hz 0dB 18dB
Línea opcional de conexión a
amplificadores en el sistema.
x-over
low full high
Línea opcional de conexión a
amplificadores en el sistema.
bass
boost
classD monoblock amplifier
classAB 2 channel amplifier
remote
spa1300D
Señal de conexión:
Mono amplificadores
spa90.2
Señal de conexión:
Amplificadores de dos canales
¡IMPORTANTE! La siguiente conexión de bocina es para un amplificador con configuración mono normal. Si usted está utilizando los amplificadores de configuración en
conexión multiple, por favor diríjase a las sección de conexiónes multiples de bocinas.
Utilice alambre de bocinas de al menos calibre 16 o más pesado para conectar las
bocinas.
Así como para cualquier componente de audio, para obtener una fuerte salida de bajo es
esencial utilzar una correcta fase de amplificador y bocinas. Cuando se conecte, esté
seguro que el positivo (+) del amplificador se conecte al positivo (+) de la bocina, y los
mismo sucede con el negativo (-).
Favor de fijarse que aunque los SPA1000D , SPA1300D , SPA1600D ,SPA1900D son
amplificadores mono, le hemos proveído con dos series de terminales de bocinas en el
amplificador. Estas terminales están conectadas internamente en paralelo (conectadas
juntas). La segunda serie de las terminales de bocinas están hechas para facilitar la
conexión cuando se corren woofers múltiples.
R (-) R (+) L (-) L (+)
speaker output
(-) ------ bridged ------ (+)
-
+
Bocina 4 de Ohm
(1 Ohm mínimo )
power
protect
fuses rem gnd+12v
0dB 18dB
bass
boost
freq
x-over
low full high
input
level
94. 7
input
ch 1 ch 3
ch 2 ch 4
R
L
R (-) R (+) L (-) L (+)
x-over
low full high
min max
input
level
R
L
60Hz 400Hzmin max
freq
Señal de conexión: Amplficador
remote
0dB 18dB60Hz 400Hz
bass
boost
classAB 4 channel amplifier
spa150.4
de 4 canales usando 2 pares
speaker output
(-) ------ bridged ------ (+)
-
+
Bocina 4 de Ohm
-
+
de entradas RCA
7 8
Bocina 4 de Ohm
power
protect
fuses rem gnd+12v
Bocina 2 Ohm (1 Ohm mínimo)
Page 14

CONEXIÓNES DE BOCINAS
(SPA90.2 , SPA90.4 , SPA150.4)
Para las conexiónes de bocinas, utilice alambrado para bocinas por lo meno calibre 16 o
más pesados.
ch4- ch4+ ch3- ch3+ ch2- ch2+ ch1- ch1+
power
fuses
rem gnd+12v
Así como para cualquier componente de audio, para obtener una fuerte salida de bajo es
esencial utilzar una correcta fase de amplificador y bocinas. Cuando se conecte, esté
seguro que el positivo (+) del amplificador se conecte al positivo (+) de la bocina, y lo
mismo sucede con el negativo (-).
**PRECAUCIÓN! En modo de Puente (puenteado), el amplificador debe tener una
carga de 4 Ohms o más alta. Cualquier carga por debajo de 4 Ohms causará un
sobrecalientamiento del amplificador y un posible daño permanente en el mismo!
R (-) R (+) L (-) L (+)
speaker output
(-) ------ bridged ------ (+)
+
Bocina 4 de Ohm
R (-) R (+) L (-) L (+)
speaker output
(-) ------ bridged ------ (+)
-
+
-
power
protect
power
protect
-
+
fuses rem gnd+12v
fuses rem gnd+12v
- -
+
protect
+
speaker output
(-) ---- bridged ---- (+) (-) ---- bridged ---- (+)
-
+
Bocina 4 de Ohm Bocina 4 de Ohm Bocina 4 de Ohm Bocina 4 de Ohm
-
+
MODULO DE CONTROL REMOTO DEL BAJO
(INCLUIDO)
(SPA1000D SPA1300D SPA1600D SPA1900D)
Antes de conectar el remoto, es necesario encontrar un lugar de montaje que sea de fácil
acceso para hacer reajustes. Una vez seleccionado el lugar, deberá correr el alambre de
control desde el remoto hasta el amplificador. Corra los alambres de señal lejos de los
alambres eléctricos para evitar cualquier tipo de interferencia del sistema eléctrico de su
automóvil. (ej. ruidos de motor).
input
0dB 18dB
bass
boost
x-over
low full high
freq
min max
input
level
ch 1 ch 3
ch 2 ch 4
min max
input
level
x-over
low full high
60Hz 400Hz
freq
remote
0dB 18dB60Hz 400Hz
bass
boost
classAB 4 channel amplifier
spa90.4
Bocina 4 de Ohm Bocina 4 de Ohm
ch4- ch4+ ch3- ch3+ ch2- ch2+ ch1- ch1+
speaker output
(-) ---- bridged ---- (+) (-) ---- bridged ---- (+)
-
+
Bocina 4 de Ohm
+
Bocina 4 de Ohm
power
fuses
protect
-
rem gnd+12v
9 10
POWER
Min
Max
Page 15

AJUSTES DE INICIO
AFINACIÓN DEL SISTEMA
Los amplificadores de “Serie SPEED: están equipados con un network de crossover incorporados, lo que le permite seleccionar el modo de crossover (ej. Low-Pass/Full/High-Pass
or Full) y el punto de crossover que desea. Por ejemplo, si usted desea correr un par de
subwoofers, puede seleccionar “Low Pass” en el amplificador para filtrar fuera altas
frequencia. Esto le enviaría solo frecuencias bajas a los subwoofers. (vea el ejemplo
debajo). El punto de crossover debería ser determinado por el rango de operación de las
bocinas. Por favor diríjase a las puntos de crossover recomendado por la compañía que
hace las bocinas.
Ajuste de frecuencia al punto
deseado para sus bocinas 1 & 2
Empujo Bajo @ 45Hz
*0~18dB canales 1 & 2
solamente en Lowpass
Seleccion de ltro para canales 1 & 2
x-over
low full high
0dB 18dB
bass
freq
boost
input
level
Seleccion de ltro para canales 3 & 4
input
ch 1 ch 3
min max
input
ch 2 ch 4
level
Ajuste de frecuencia al punto
deseado para sus bocinas 3 & 4
x-over
low full high
60Hz 400Hzmin max
freq
classAB 4 channel amplifier
Empujo Bajo @ 45Hz
*0~18dB canales 3 & 4
solamente en Lowpass
remote
0dB 18dB60Hz 400Hz
bass
boost
spa150.4
Afinación de la sensibilidad de entrada del amplificador
El control de sensibilidad del amplificador de “Serie SPEED” esta localizada a un lado del
panel. Este control ha sido incluído para permitir un ajuste correcto con la salida de la radio.
Este es uno de los ajustes con más problemas de comprender. Al rotar el control en dirección de las agujas del reloj, la entrada del amplificador se hará más sensible y la música
tocará más alta. Este no es un control de volumen y no obtendrá más potencia en la salida
del amplificador en la posición máxima!
Puede parecer que genere más salida, pero en realidad el sistema sólo toca más alto más
rápido al subir el volumen de la radio. Idealmente, para alcanzar el nivel de sistema
apropiado el lograrlo desde la salida del amplificador sin distorcionar alreador de ¾ del
control de volumen. Para determiner si la ganancia del amplificador es apropiada, encienda
el sistema y lentamente aumente el control de volumen sin distorción. Es muy importante
que cuando haga estos ajustes no sobrepase las bocinas (punto de distorción) ya que
causará daño permanente a las bocinas. Si no pudiera alcanzar ¾ de volumen antes de
que se distorcione deberá ajustar el control de ganancia (en este caso se reduciría la ganacia). Los controles de ganancia deben ser ajustados muy lentamente. Puede ser de gran
ayuda si hay otra persona que lo asista a ajustar los controles mientras usted escucha si
hay algún tipo de distorción.
Input Level
Min Max
11 12
Page 16

REPARACIÓN DEL SISTEMA
Hemos preparado esta guía de revision o chequeo en caso de que se encuentre con algun
tipo de problemas después de la instalación del amplificador. Tenga presente que la
mayoría de los problemas son causados por una instalación incorrecta y no necesariamente por el equipo mismo. Además, hay muchos components en el sistema que pueden
causar problemas de señal como ruidos eléctricos o de motor.
Antes de que pueda corregir el problema, debe encontrar primero que componente lo está
causando. Esto llevara paciencia y un proceso de eliminación.
PROBLEMA….. SOLUCION
No hay salida
Exploto un fusible Reemplazarlo
RCA Cable(s) dañado Reemplazarlo
+12V en el encendido terminal Revise conección
+12V en la terminal remota Revise coneccion
Toque a tierra limpio y apretado Revise conección a tierra c/metraje
Unidad de Cabecera fuera del Ajuste a posición central
posición central
Ajuste de Maestro y Esclavo Confirme ubicación correcta
Salida Baja
Revise los neveles de ajustes Readjuste
RCA cable(s) danados Reemplace
Nivelacion incorrecta Readjuste
Ajuste de Maestro y Esclavo Confirme una ajuste correcto
Ruido de Motor
Puntos a tierra están limpios y ajustados Revise conección a tierra c/metraje
Bajar a tierra todos los componentes al Bajar a tierra en un mismo punto
Mismo punto
Tratar distintos puntos a tierra Cambiar por major tierra
RCA cable(s) dañados Reemplazar
Usar Cables RCA protegidos Rechazar ruido inductos
de Alta Calidad
Cargador bajo de sistema y/o bateria Reparar y/o reemplazar
Protección Roja L.E.D. Iluminada
Un corto en la bocina Revise las conecciones de las
Bocinas por un corto circuito
No hay tierra para la bocina Esta seguro que los alambres
De la bocina no están tocando
Tierra con el chasis
Impedancia demasiado baja Revise impedancia de bocina
Sobrecalentamiento Revise lugar de montaje
Para una circulacion de aire
adecuada
Impedancia de bocina demasiado
baja
13 14
ESPECIFICACIÓNES
Entrada de Voltage @ 11 - 14.4 VDC:
@ 4 ohm
@ 4 ohms Bridged
@ 2 ohm
Frecuencia Resp. +/- 1 dB
S/N Ratio (A-weight)
Entrada de bajonive(RCA)
Typo de Crossover
Cruce de Freq. (Lowpass)
Pendienta de Crossover
EQ de Bajo
Fusable
Jack de Control Remoto
Entrada deVoltage @ 11 - 14.4 VDC:
@ 4 ohm
@ 2 ohm
@ 1 ohm
Frecuencia Resp.
S/N Ratio (A-weight)
Entrada de bajonive(RCA)
Typo de Crossover
Cruce de Freq. (Lowpass)
Pendienta de Crossover
EQ de Bajo
Filtro Subsonico
Control Remoto Incluido
Fusable
Jack de Control Remoto
Input Voltage @ 11 - 14.4 VDC:
@ 4 ohm
@ 2 ohm
@ 1 ohm
Frecuencia Resp.
S/N Ratio (A-weight)
Entrada de bajonive(RCA)
Typo de Crossover
Cruce de Freq. (Lowpass)
Pendienta de Crossover
EQ de Bajo
Filtro Subsonico
Control Remoto Incluido
Fusable
Jack de Control Remoto
SPA90.2
2 x 90W
1 x 350W
2 x 175W
10Hz-20Khz
>90dB
200mV. - 5.8 V
Hi/Low Pass
55Hz - 400Hz
12db per oct
18dB @ 45Hz
no
SPA1000D
1 x 250W
1 x 500W
1 x 1000W
20Hz - 250Hz
>90dB
246mV - 5.9V
Low Pass
40Hz - 150Hz
18dB/oct
18dB @ 45Hz
20Hz - 50Hz
Yes
2 x 20 amp
included
SPA1600D
1 x 400W
1 x 800W
1 1600W
20Hz - 250Hz
>90dB
246mV - 5.9V
Low Pass
40Hz - 150Hz
18db/oct
18dB @ 45Hz
20Hz - 50Hz
Yes
2 x 30 amp
included
SPA90.4
4 x 90W
2 x 350W
4 x 175W
10Hz-20Khz
>90dB
200mV. - 5.8 V
Hi/Low Pass
55Hz - 400Hz
12db per oct
18dB @ 45Hz
2 x 25 amp
optional
SPA1300D
1 x 325W
1 x 650W
1 x 1300W
20Hz - 250Hz
>90dB
246mV - 5.9V
Low Pass
40Hz - 150Hz
18dB/oct
18dB @ 45Hz
20Hz - 50Hz
Yes
included
SPA1900D
1 x 475W
1 x 950W
1 x 1900W
20Hz - 250Hz
>90dB
246mV - 5.9V
Low Pass
40Hz - 150Hz
18dB/oct
18dB @ 45Hz
20Hz - 50Hz
Yes
3 x 30 amp
included
 Loading...