

Page 1
SmarTalk
User
Guide
the quickest way
to get the most
out of your new
SmarTalk phone
Page 2

You can start fast with...
Using the speakerphone
buttons to enter the number and make a call without the
handset.
Face the SmarTalk and speak in a normal voice.
Press
handset during a call, lift the handset.
Adjust volume
Press M
Redialing
Putting a call on hold
press the
If SmarTalk
probably pressed a button. Press
until nothing happens in the display. Then answer.
If SmarTalk asks for
you get to “Entering Station Name” on page 12.
to end the call. To switch from speakerphone to
during a call by pressing either – or +.
to mute or ‘unmute’ your own voice.
Dial
: press
Line
button on which the call is held.
rings and you can’t answer
: press , then press number
twice.
Hold
: press
Station Name Here
. To get the call back,
, you’ve
Cancel
several times,
, ignore it until
BUT before anything else, you need to know...
How the arrow buttons work
How Shift, primary, and secondary button functions work
How the Cancel button works
How the Select button works
How the Save button works
If you try to figure this out on your own, you’ll be here all
day. If you use the Guide it’ll take half an hour.
So read on...
Page 3
You need to know...
How primary and secondary button functions work
Callers
Dial
How the Shift button works
How the Save button works
How the Cancel button works
Every SmarTalk button can have a primary and a
secondary function. For example, on the
secondary function is
To use the primary function, press the
use the secondary function, press
Whenever you press
lower right end of the display.
If you change your mind, press
You have to press
to save entries or finish things.
Cancel
Press
also press
numbers, to throw away changes instead of saving them.
In fact, if you can’t figure out what’s going on, you can
press
Cancel
Cancel
to get you out of anything and start again.
Callers
Shift
, an up arrow appears at the
Shift
first, then press the
to exit from a menu or function. You can
when you are entering names or
.
Dial
Shift
, then
Shift
again to cancel.
Dial
button, the
button. To
Callers
Save
.
button,
How the Select button works
How the buttons work
Press the
with a displayed item or menu. When scrolling through
lists of things, or looking through menu items, press
Select
something with a mouse button to
Use these buttons to select things, to scroll through lists,
or to move the cursor in the display.
Select
button to choose the option, or to work
to choose something. It’s like clicking on
select
it.
Page 4

You’ll also need to know this, but maybe later...
The difference between a SmarTalk alone, and in groups. .........go to page 6
How lists work............................................................................ go to page 18
How to give SmarTalk your own name, time, and date .............go to page 10
You’ll also want to be able to...
Use the Directory and speed dialing .......................................... go to page 23
Assign station buttons and use the Intercom............................. go to page 15
Make three-way calls, or conference calls................................. go to page 30
If you read this now, you’ll save time later...
Changing button functions......................................................... go to page 38
Displaying information about calls .............................................go to page 33
Monitoring other stations ........................................................... go to page 16
Editing numbers before dialing ..................................................go to page 32
Auto redialing............................................................................. go to page 31
Paging ....................................................................................... go to page 29
A detailed Table of Contents is next.
An index is at the back of the Guide.
Enjoy!!
Page 5

SmarTalk User Guide
Contents
Introduction to SmarTalk 1
SmarTalk Explained........................................................ 1
How SmarTalk Works...................................................... 2
How the Buttons Work..................................................... 3
How the Display Works ................................................... 5
Icons................................................................................ 6
Moving Around in the Display.......................................... 8
Setting Basics 9
Introduction ..................................................................... 9
Changing Settings........................................................... 9
Setting Time.................................................................. 10
Setting Date .................................................................. 11
Entering Station Name .................................................. 12
Having Fun With the Name Field .................................. 13
Adjusting Ring............................................................... 14
Assigning Station Buttons ............................................. 15
Labeling a Button .......................................................... 17
Using Lists 18
How Lists Work ............................................................. 18
Directory Structure ........................................................ 18
Entering Directory Items................................................ 18
Fixing a Partial Directory Item ....................................... 20
Changing Directory Items.............................................. 21
Locking and Unlocking Directory Items ......................... 21
Linking Speed Dial Buttons........................................... 22
Using the Directory........................................................ 23
Using the Dialed List ..................................................... 23
Using the Callers List .................................................... 24
Deleting from Lists......................................................... 25
Copying from Dialed or Callers List to Directory............ 25
Changing Items in the Dialed and Callers Lists............. 26
Calling 27
Making Calls.................................................................. 27
Using the Handset......................................................... 27
Using the Speakerphone............................................... 27
Adjusting Handset and Speakerphone Volume............. 27
Using the Intercom ........................................................ 28
Paging........................................................................... 29
Using Speed Dial Buttons ............................................. 29
iv Contents
Page 6

SmarTalk User Guide
Transferring Calls...........................................................30
Establishing Three-Way Calls........................................30
Redialing ........................................................................31
Redialing a Busy Number ..............................................31
Editing a Number Before Dialing ....................................32
Answering 33
Answering Calls .............................................................33
Displaying Caller Information .........................................33
Holding and Retrieving a Call.........................................34
Answering Second Calls ................................................34
Displaying Active and Held Calls....................................35
Answering Intercom .......................................................35
Using Do Not Disturb .....................................................36
Retrieving Messages......................................................37
Buttons Menu 38
Button Functions ............................................................38
Changing Button Functions............................................38
Safety, Regulations, Warranty 41
Safety Instructions..........................................................41
Regulatory Statements...................................................41
Product Specifications....................................................43
Product Warranty ...........................................................43
Troubleshooting SmarTalk 44
SmarTalk Concerns .......................................................44
Custom-calling and Centrex Services 45
Using Custom-calling Services.......................................45
Getting Other Custom-calling Services ..........................46
Troubleshooting Custom-calling Services ......................47
Glossary 48
Index 49
Contents v
Page 7
Introduction to SmarTalk
SmarTalk Explained
SmarTalk is a
can use SmarTalk in a group with other SmarTalks, or
alone. You can set up speed-dialing, and a list of your
most-often called telephone numbers.
Make calls with the handset, or hands-free with the
speakerphone. With the speakerphone you can include
others in the room in conference calls. Adjust the volume
as you speak, and mute SmarTalk for privacy.
Built into SmarTalk are all sorts of functions, and if you
want more custom-calling or Centrex services, you can
order them from your local telephone company or service
provider. Every button has two functions, many of which
you can change to suit your own needs.
The SmarTalk display is easy to read, and tells you a
great deal about what happens on your own SmarTalk
while you’re out, as well as what is going on in your group
of SmarTalks.
Click on a button or in the display to find out more.
smart
phone, flexible, and powerful. You
SmarTalk User Guide
Introduction to SmarTalk 1
Page 8
SmarTalk User Guide
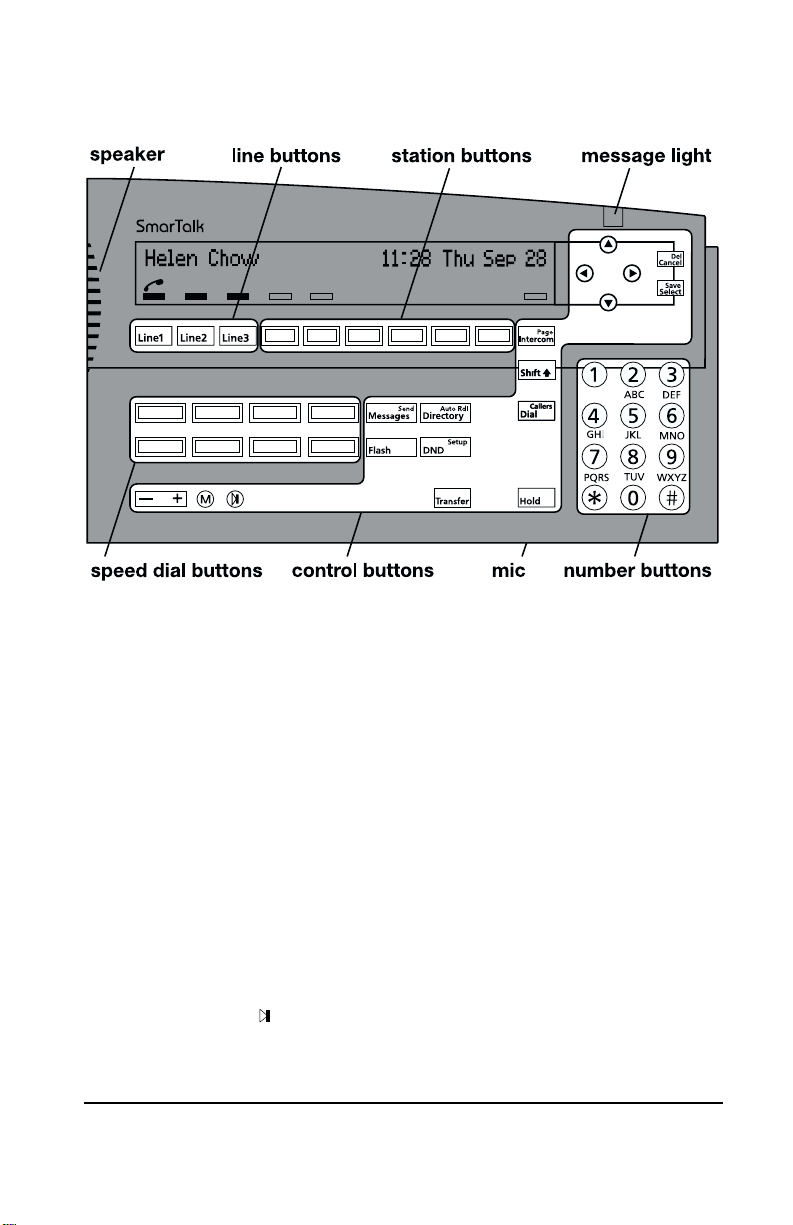
How SmarTalk Works
The illustration shows the basic grouping of SmarTalk
buttons by function. Your SmarTalk may have different
labels on some buttons.
Press a
has up to three lines.
Press a
a station to transfer a call. Station buttons are only on
SmarTalks in groups. They’re linked only if there’s a box
in the display above them.
Press a
Press
characters.
Press
of SmarTalk.
A description of each button and button type is in the
following pages.
2 Introduction to SmarTalk
line button
station button
speed dial button
number buttons
control buttons
to select an external line. SmarTalk
to dial a linked station or to select
to dial a linked Directory item.
for numbers, letters, or special
to operate many basic functions
Page 9

How the Buttons Work
To use the primary function, press the button. To use the
secondary function, press
appears in the display, press the button.
Button Functions
Line 1, Line 2, Line 3
Station buttons
Intercom
Page
Display more information, or move the
Cancel
Del
Select
Save
Shift
Speed Dial
Messages
Send
Directory
Auto Rdl
Dial
Callers
SmarTalk User Guide
Shift
, then when an up arrow
Select an external line.
Speed dial another station in the group,
or select a station to transfer a call.
There’s a primary link if there’s a box in
the display above the button.
Select the intercom line.
Page all SmarTalk speakerphones in
your group.
cursor in the display.
Exit from a menu or function, or reject
an editing change.
Delete single characters or list entries.
Select the displayed option.
Save entries or choices.
Select the secondary function of a
button by pressing this button first.
Speed dial a linked Directory item.
Display the message log.
Send a call-me message and turn on
the message light at another station in
your group.
Display the Directory.
Redial a busy number.
Call a displayed number or display the
Dialed list.
Display the Callers list.
Introduction to SmarTalk 3
Page 10
SmarTalk User Guide
Flash
DND
Setup
Transfer
Hold
Signal that special instructions will
follow. It is used to access some
Centrex and custom-calling services.
Turn the Do Not Disturb function on or
off.
Display the setup menu.
Put a call on hold to transfer it.
Put an outside call on hold.
Press sound control buttons to control sound on the
speaker and handset.
−−−−
++++
Adjust the volume of the handset,
speakerphone, or ringer.
M
Mute. Turn the handset or speaker
microphone on or off.
Speakerphone. Turn on the
speakerphone instead of the handset.
4 Introduction to SmarTalk
Page 11

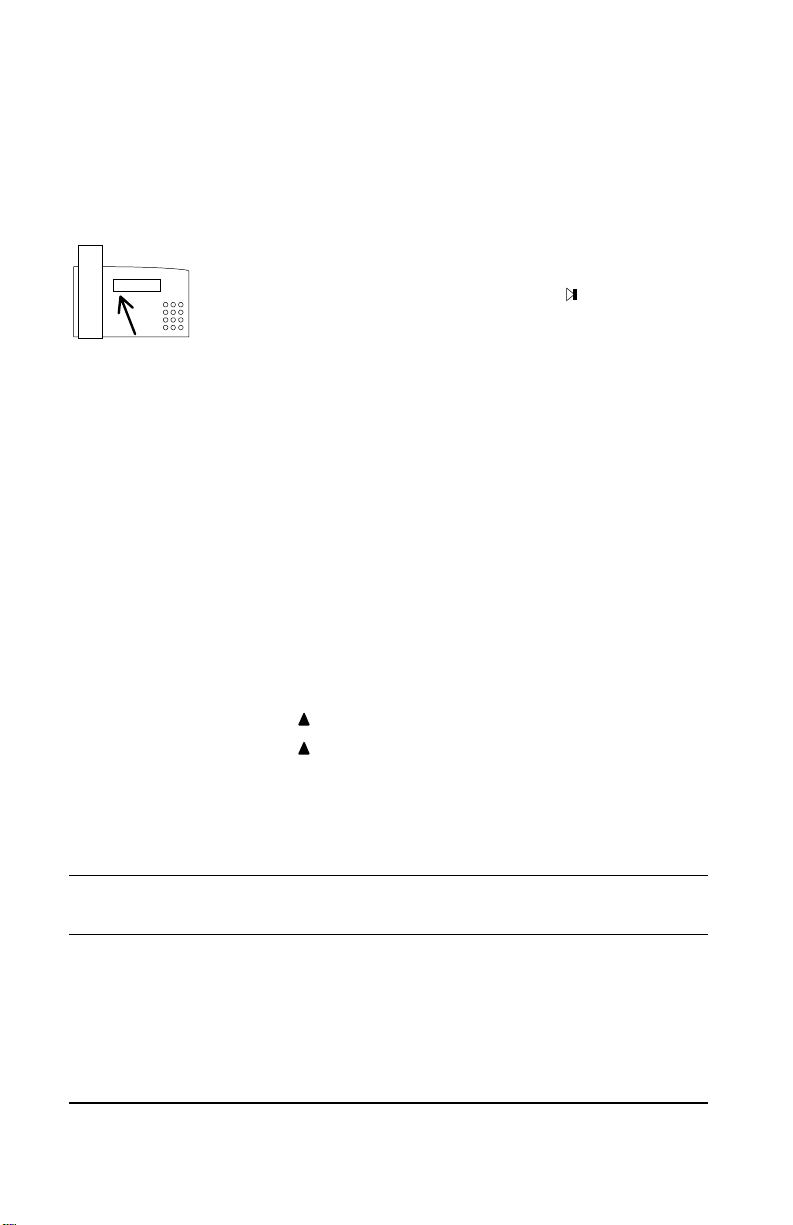
How the Display Works
The display shows text and icons to give information
about the status of SmarTalk. The display is blank only if
SmarTalk is not receiving power. The illustration shows
an example of a SmarTalk that is powered, and in use.
Text can display name, number, time, date, length of call,
prompts, and menu options.
If you have a long SmarTalk, the display looks like this:
SmarTalk User Guide
If you have a short SmarTalk, the display looks like this:
Introduction to SmarTalk 5
Page 12
SmarTalk User Guide
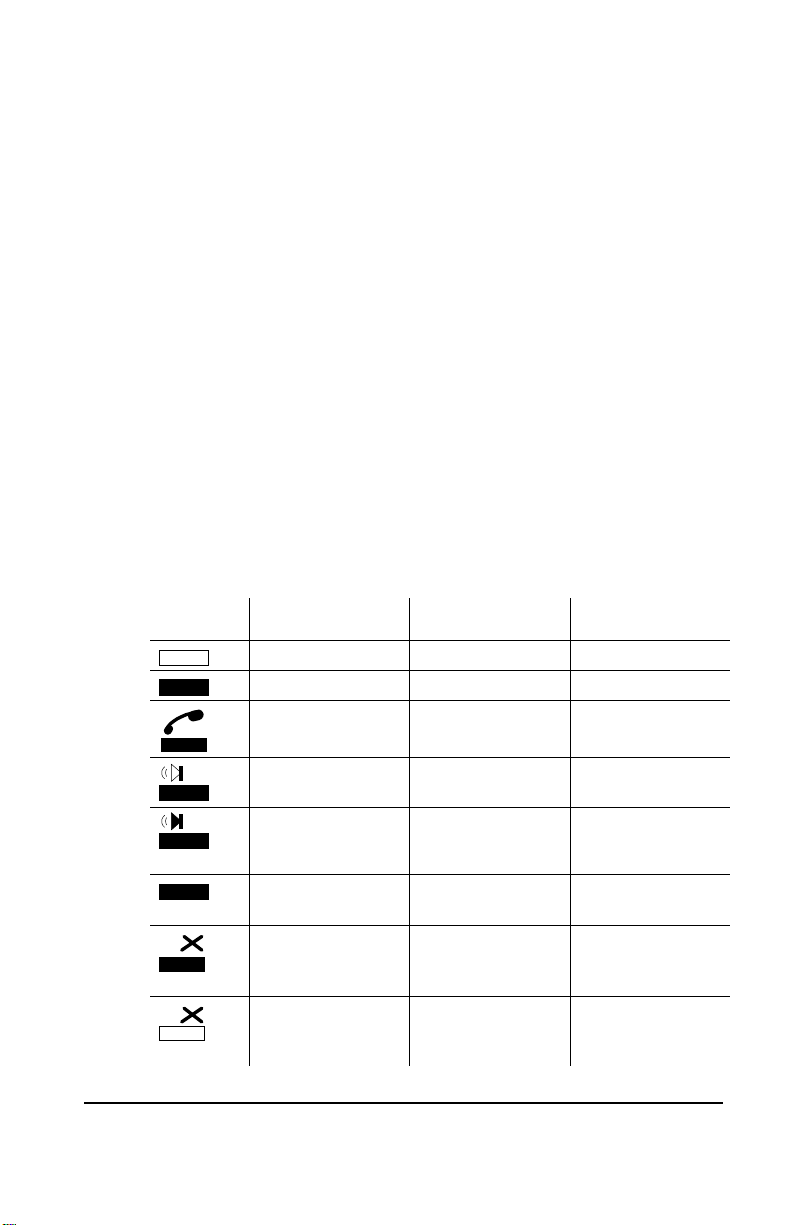
Icons
Line and Station Status Icons
Icon Line Status Station Status Intercom Status
flashing
flashing
X flashing
X flashing
Icons show the status of lines, handset, speakerphone,
batteries, and use of the
Twenty seconds after a power failure, all flashing display
icons, including battery icons, stop flashing.
Icons for line status appear above the Line buttons. If
your SmarTalk is in a group, icons for station, or intercom
status appear directly above the buttons. They show the
primary-function status only. Station and intercom
information are not on a solo SmarTalk.
Line icons are always present in the display. If no icon
appears above a line or Intercom button, the button
function has not been assigned. If no icon appears above
a station button, the button has not been linked. Please
also see “Assigning Station Buttons” on page 15.
Not in use Not in use Not in use
Busy In use
Handset in use Handset in use Handset in use
Speakerphone in
use
Ringing Ringing Ringing
On hold
On exclusive hold
Do Not Disturb
Shift
button.
Speakerphone in
use
Speakerphone in
use
6 Introduction to SmarTalk
Page 13
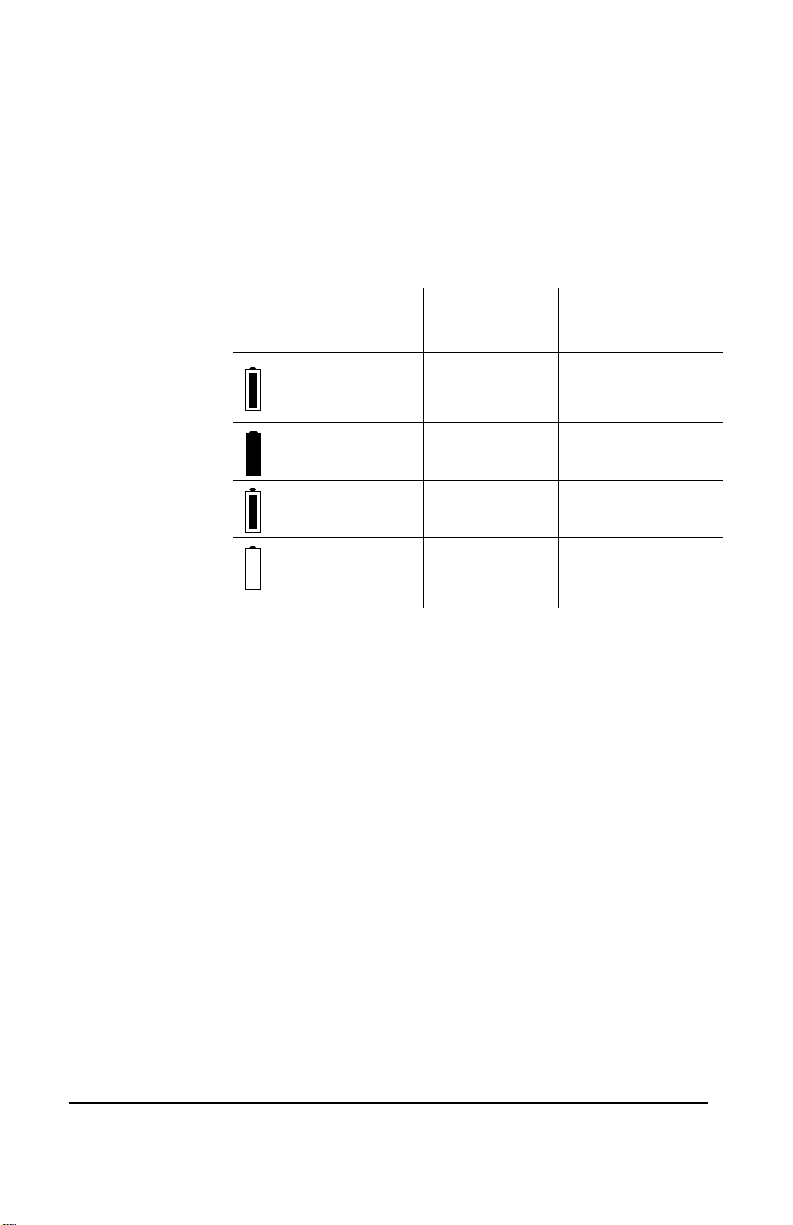
Battery Icons
Normal operation is when the SmarTalk is receiving
power through the line cord. No battery icon appears
when SmarTalk operates normally with good batteries.
Replace the NiCad batteries every five years.
SmarTalk User Guide
Battery Icon
Shift Icon
Whenever you press
lower right end of the display.
outline
flashing, inside
flashing
outline on,
inside on
outline on,
inside flashing
outline
flashing, inside
off
Normal
Operation
During Power
Failure
Fast charging
Good
Fair Fair
Poor Poor
Shift
, an up arrow appears at the
Introduction to SmarTalk 7
Page 14
SmarTalk User Guide
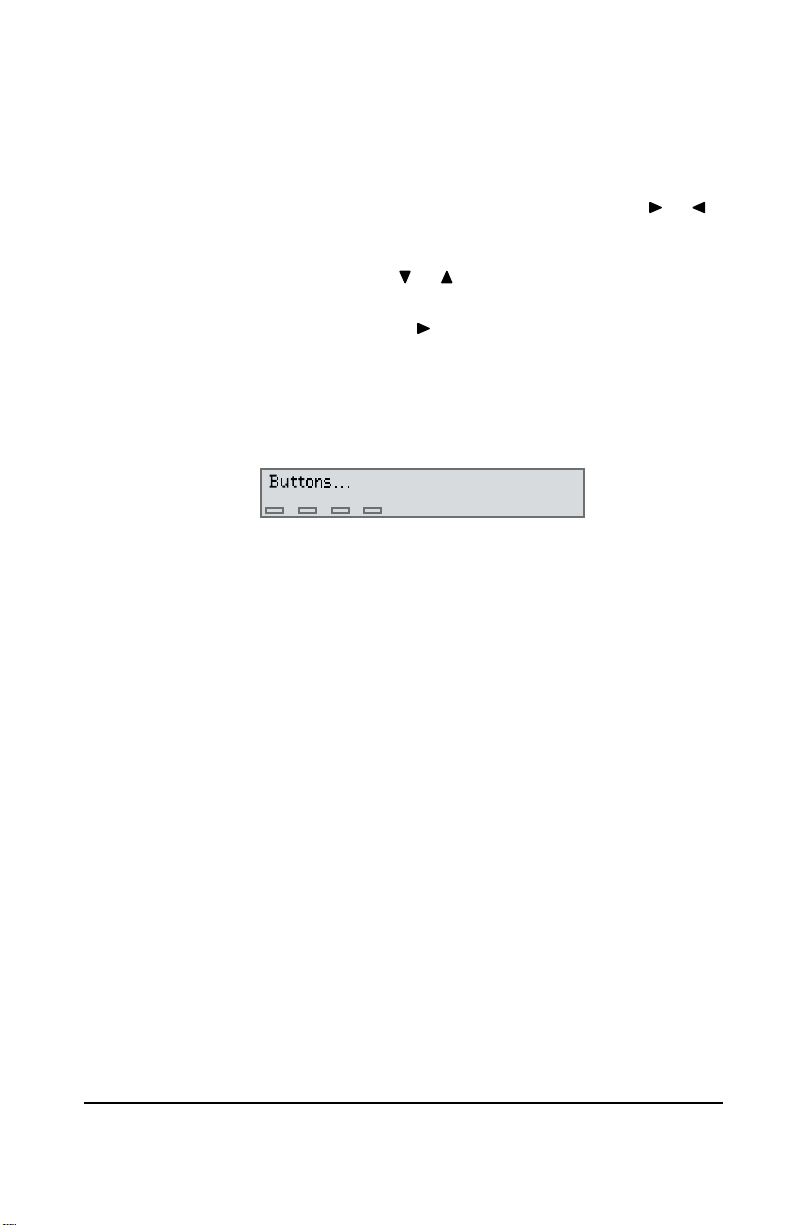
Moving Around in the Display
To enter or edit information in the display, press or
to move the cursor.
When you open a list or a menu, the first item is
displayed. Press
A right arrow (
you can hold down
Three periods after a menu option mean you need to
Select
press
For example, in the Setup menu, when you see
Buttons…
press
or to scroll through the items.
→→→→
) at the end of a call-me message means
to display the next level of options.
Select
to display more information.
to see the options.
8 Introduction to SmarTalk
Page 15

Setting Basics
Introduction
The basic settings of a SmarTalk are: time, date, and
station name.
These settings can be changed. However, if you change
the time and date on a SmarTalk that is in a group, your
changes will change every other SmarTalk in the group.
If you should happen to set the wrong date or time, this
will be corrected by a signal on the next incoming call
through your telephone company.
Changing Settings
SmarTalk comes from the factory with basic settings, and
sometimes with a few items in the Directory.
Set up a SmarTalk for a new user by changing the basic
settings for time, date, and station name.
Getting Out of Things
Press
start again.
Cancel
SmarTalk User Guide
repeatedly to get out of something and
Using Setup Mode
Use setup mode to set and change the time, the date, the
station name, and the functions of buttons.
•
•
Tip Press
Setting Basics 9
Shift
Press
setup mode.
Cancel
Press
Cancel
Setup
, then
to get out of setup mode.
repeatedly to return to the basic display.
to put the SmarTalk into
Page 16
SmarTalk User Guide
Setting Time
The displayed time can be either 24 hour or 12 hour.
Example
Press these buttons
Shift Setup Select
1 3 0 7
Shift Save Cancel
Procedure
For 12-hour time to display, with a time of 1:07 p.m.:
To set the time:
1. Press
2. Press number buttons to enter the time as 24-hour time.
If the time is correct, press
type of time.
3. Press to select a display of either 24 Hour or 12 Hour
time.
If you select 12-hour type of time, it doesn’t display until
you save your settings, and return to the main display.
4. Press
Cancel
To see this in the display
Time:
15:34 24 Hour
Time:
13:07 24 Hour
Time:
13:07 12 Hour
Your Name
1:07 Sat Apr 20
Shift
Shift
to get out of the setup mode.
then
, then
Setup,
Save
Select
then
to move past the time to the
to save your entry, then press
.
10 Setting Basics
Page 17
Setting Date
SmarTalk User Guide
Example
Press these buttons
Shift Setup
Shift Save Cancel
Procedure
2 0 0 0
For Tuesday, May 2, 2000:
Select
To set the date:
1. Press
The cursor is under the day of the week.
2. Press
3. Press
4. Press to move to the day, then select with .
5. Press to move to the year, then press number buttons
to enter the year.
6. Press
Cancel
To see this in the display
Date:
Sat Apr 20 1997
Date:
Tue Apr 20 1997
Date:
Tue May 20 1997
Date:
Tue May 23 1997
Date:
Tue May 23 2000
Your Name
1:07 Tue May 23
Shift
to select a different day.
to move to the month, then select with and .
Shift
to get out of the setup mode.
, then
, then
Setup
, then
Save
to save your entry, then press
, then press
Select
.
Setting Basics 11
Page 18
SmarTalk User Guide
Entering Station Name
SmarTalk has a station name whether it’s in a group or
not. You can enter up to 15 characters, including spaces,
for the station name.
To delete a character, put the cursor in the space and
Shift, Del
press
.
Example
Press these buttons
Shift Setup
7 7 7 7
Shift Save Cancel
Procedure
2 6
To enter the name SAM in upper-case letters:
Select
To set the station name:
1. Press
The cursor is in a blank space for the first letter, or under
the first letter of a name.
2. Press a numbered button to select and enter an uppercase letter, then press
To delete a character, put the cursor in the space and
press
3. Press
Cancel
4. To enter the station name in upper- and lower-case
letters, search for the letters with the
Or use the ! button for vowels, and the # button for
some lower-case letters, then the
through the rest of them.
To see this in the display
Station Name:
_
Station Name:
SAM
SAM
1:07 Tue May 23
Shift
Shift, Del
Shift
to get out of the setup mode.
, then
, then
Setup
.
Save
, then , then press
to move to the next space.
to save your entry, then press
Select
.
and buttons,
or buttons to scroll
12 Setting Basics
Page 19

SmarTalk User Guide
Example
Press these buttons
Shift Setup
7 7 7 7
Shift Save Cancel
To enter the name Sam in upper- and lower-case letters:
To see this in the display
Select
# # # #
!!!!
Station Name:
_
Station Name:
Sam
Sam
1:07 Tue May 23
Having Fun With the Name Field
You can decorate your station name, or make it special,
by entering special characters:
••••
Press 1 repeatedly to select and enter one of:
−
,
••••
Press 0 repeatedly to select and enter one of:
(a space), :, }, *,
••••
Scroll through all the other characters with the
buttons.
""""
, ~, !,
1
0
and
Tip To shorten your search through the long, special-
characters list, enter a letter or number, then hold down
the
or button.
Setting Basics 13
Page 20

SmarTalk User Guide
Adjusting Ring
Ring Sound
1. Hold down the button for the line until you hear a beep.
2. Press
3. Press
Ringer Volume
Ring Delay
1. Hold down the
2. Press
3. Press
Each line on SmarTalk can have a different ringing
sound. You can also turn off ringing for any line.
To change the ringing sound:
Select
, then
Shift, Save
To change the volume of the ringing sound, hold down
−−−− ++++
the
button while the handset is down and the
speakerphone is off.
If your SmarTalk rings several times before caller
information is displayed, delay the rings to match the
timing of caller information display. If it is available, caller
identification information displays before the third ring.
Select
,
want.
Shift, Save
until you find the sound you want.
to save your selection, then
Line
button until you hear a beep.
, then until you find the delay you
to save your selection, then
Cancel
Cancel
.
.
Ring Repetition
To change the number of times a line rings before
stopping:
1. Hold down the
2. Press ,
The message
3. Press
4. Press
14 Setting Basics
to select the number of rings.
Shift, Save
Line
button until you hear a beep.
Select
.
Abbrev. (Rings):
to save your selection, then
displays
Cancel
.
Page 21

Assigning Station Buttons
Speed dialing other stations is only possible if your
SmarTalk is connected to a group of other SmarTalks,
and each one is set up by the installer with station
numbering.
Station buttons can be linked to other stations.
Station buttons are the unlabeled, or hand-labeled
buttons to the right of the line buttons. When these
buttons are linked to other stations, you can also monitor
telephone use at those stations.
A station button has no primary link if there is no icon
above it in the display. It could have a secondary link. If
an icon is displayed above the button, there are one or
two links assigned. Only the primary link is monitored.
If the station buttons are hand-labeled, they may already
have station links assigned.
Please also see “Labeling a Button” on page 17.
Assigning a Station Link
To assign a primary station button to another station:
1. Hold down the button until you hear a beep and
Assignment...
2. Press
3. Press
4. With the correct station displayed, press
Select
A flashing dotted line is displayed with text above it.
If the text AND dotted line flash, the station is already
assigned, or not available for assignment.
save your selection, then
is displayed.
.
until you find the station to assign to this button.
SmarTalk User Guide
Cancel, Cancel
Shift, Save
.
to
To assign a secondary station button, press
you hold down the button. If you assign ONLY a
secondary button, nothing will display above the button.
Setting Basics 15
Shift
before
Page 22

SmarTalk User Guide
Deleting a Station Assignment
To delete the primary assignment:
1. Hold down the button until you hear a beep and
Assignment...
2. Press
Select
is displayed.
.
A flashing dotted line is displayed with text above it.
3. Press
4. Press
Shift, Del
Shift, Save
to delete the assignment to this button.
Cancel, Cancel
, then
.
To delete a secondary assignment, press
you hold down the button.
Monitoring Station Status
When the stations in your group have been assigned to
the station buttons, you can monitor the status of stations
by watching what goes on in the display.
In an emergency, you can press the station button of a
station that is in use, and automatically override with the
intercom.
Icon Station Status
Not in use
Handset in use
Speakerphone in use
Ringing
flashing
In Do Not Disturb mode
X flashing
Shift
before
16 Setting Basics
Page 23

Labeling a Button
To identify the blue, unlabeled buttons, use the extra
labels that come with SmarTalk as you enter button
settings.
1. Lift off the button cap by prying up each side with the tip
of a small screwdriver, or a nail file, or even an unbent
paper clip.
2. Write the primary and secondary setting names on the
label.
3. Stick the label on the button.
4. Replace the button cap.
SmarTalk User Guide
Setting Basics 17
Page 24

SmarTalk User Guide
Using Lists
How Lists Work
SmarTalk has three lists: a Directory, a Dialed list, and a
Callers list.
The Directory is a list that you create. The Dialed and
Callers lists are records that SmarTalk creates from the
calls you make and receive.
Directory Structure
A Directory item has a name and a number. The
Directory stores up to 40 entries, arranged alphabetically.
You may notice some items such as Centrex and customcalling services already in your Directory.
Entering Directory Items
Example
Press these buttons
Directory
Shift
Select
2
9
Shift Save Cancel
18 Using Lists
!!!! !!!! !!!! !!!!
1 8 0 0 5 5 5 1 2 3 4
To enter a new Directory item for “Ann” with the area
code 800, telephone number 555-1234, and 9 to get an
outside line:
!!!! !!!! !!!! !!!!
To see this in the display
Some Name
Some number
New Name Here
New Number Here
_
Ann
Ann
_
Ann
9,18005551234_
Sam
1:32 Tue May 23
Page 25

SmarTalk User Guide
To Enter a New Directory Item
To enter a new Directory item:
1. Press
2. Press
Directory
Shift
to display the first directory item.
,
to display
New Name Here
already displayed, then press
Select
, if it is not
.
The SmarTalk Directory has two types of fields for
entering information: name and number.
3. Enter characters in the name field. Press
after each
letter, to move to the next letter.
For special characters press the
or or 1 or 0 buttons
repeatedly. You can also press ! or # repeatedly for
shortcuts.
4. Press to move to the number field. You can enter
only numbers and some special characters in the number
field.
You don’t have to put a hyphen ( - ), or parentheses ( ), or
spaces in telephone numbers. Just put the numbers in a
string with nothing between them. It you need a pause for
an outside line, or to get long distance, or some other
special signal, look for the character to enter in “Special
Characters in the Number Field” on page 20.
For special characters press the
Cancel
Shift, Save
to exit.
to save the item in the Directory, then
5. Press
or buttons.
Special Characters in the Name Field
Press repeatedly To find
or
upper- or lower-case letters, numbers in different sizes,
and special characters
1
0
~ ! 1
− """"
(a space)
: } * 0
Tip To shorten your search through the long, special-
characters list, enter a letter or number, then hold down
the
or button.
Using Lists 19
Page 26

SmarTalk User Guide
Special Characters in the Number Field
F
R
?
W
D
S
↑↑↑↑
↓↓↓↓
−−−−
Some characters are code for special operations.
With your cursor in the number field, press
select special characters.
,
One-second pause
;
Five-second pause
Flash
Release
Wait for call-progress tone
Wait for normal or stutter dial tone
!
Wait for normal or stutter dial tone, hang up if not found
Wait for normal dial tone
Wait for stutter dial tone
Make SmarTalk send a “Calls Forwarded” message to itself.
Useful to include in Call Forwarding code
Delete “Calls Forwarded” message
Dash
(
Right parenthesis
)
Left parenthesis
Blank
or to
Fixing a Partial Directory Item
If you find a partial Directory item, or if you get only part
way through entering something in the Directory, you can
always fix it later.
1. Press
2. Press
3. When the item is fixed, press
20 Using Lists
Directory
Select
to be able to fix it.
or to move the cursor, then number buttons to
add to or change the item.
changes, then press
, then or to find the item, then press
Cancel
Shift, Save
to exit.
to save the
Page 27

SmarTalk User Guide
Changing Directory Items
You can change Directory entries that are not locked.
Tips When you edit a speed dial number, you are editing the
Directory item. Display or edit a speed dial number by
holding down the button until it beeps, then press
to edit.
To edit a Directory item:
1. Press
2. Press
3. Press
4. Edit the name or number by pressing number buttons.
5. Press
Directory
Or hold down a speed dial button, then press or .
Select
or to move the cursor.
Shift, Save
exit.
, then
to be able to change the item.
or to find the number.
to save the edits, then press
Select
Cancel
Locking and Unlocking Directory Items
You can lock a Directory item so that it cannot be
changed nor deleted, even accidentally.
to
To lock a Directory item:
1. Press
2. Press
3. Hold down
Using Lists 21
Directory
or to find the item.
To unlock an item, hold down
disappears. If you do not have a Transfer button, see
“Changing Button Functions” on page 38 for information
on assigning this function to a button.
to display the directory.
Transfer
until appears before the number.
Transfer
until
Page 28

SmarTalk User Guide
Linking Speed Dial Buttons
Speed dial buttons are linked to Directory items.
You can set up speed dial buttons to call the numbers
assigned to them.
A button does not store a number. It is linked to a
Directory item. If the Directory item is deleted, the speed
dial button no longer dials the number.
To link a speed dial button to a Directory item:
1. Press
2. Hold down the speed dial button until you hear a tone.
3. Press
Tip Use the button labels that come with your SmarTalk to
Directory
Cancel
To make a secondary link, press
down the speed dial button.
label your linked speed dial buttons.
, then
to exit.
or to find the Directory item.
Shift
before you hold
CAUTION You can’t unlink a button. You can change the link. But if
you delete the link, you delete the Directory item. Link to
another item, don’t delete.
If you cannot assign a link to a Directory item, the button
does not have Speed Dial function. Before you can link a
button to a Directory item, the button must have a
uniquely-numbered Speed Dial function, between SD1
and SD20. Please see “Buttons Menu” on page 38, to
assign button functions.
If you link a speed dial button to a locked Directory item,
you must unlock that Directory item before you can
change the link. Please see “Locking and Unlocking
Directory Items” on page 21.
22 Using Lists
Page 29

Using the Directory
After you’ve entered items in the Directory, you can scroll
through the Directory and select an item to dial. This
saves time in looking up telephone listings, and trying to
remember long-distance numbers.
To dial a Directory item:
1. Press
2. Press
Directory
Dial
, then
to call the displayed number.
or to find the Directory item.
SmarTalk User Guide
Tips
••••
The Directory is sorted with numbers and non-
alphabetical characters first, then upper-case letters, then
lower-case letters.
••••
To find a Directory item, you can press the numbered
button corresponding to the first letter in the name, then
press
Using the Dialed List
The Dialed list records the last 15 outgoing calls. Each
record includes the name or number, and the time, date,
and length of the call.
The most recent call is displayed first. If several calls
were made, one after the other, to the same number, only
the last call appears in the Dialed list.
Use the Dialed list to find a previously-called number.
Dial
Press
To display the Dialed list:
1. Press
2. Press
3. Hold down
4. Press
Dial
Cancel
or to find the item.
to call the displayed number.
to display the most recently dialed number.
to display earlier calls.
to see time, date, and length of a call.
to exit.
Using Lists 23
Page 30

SmarTalk User Guide
Using the Callers List
The Callers list records the last 25 incoming calls. Each
record includes the time, date, and length of the call. The
Callers list also records the time and date of missed calls.
If you subscribe to a caller-identification service, the
name or number of the caller is displayed.
The most recent call is displayed first. If you missed
several calls from the same caller, the time and date of
the most recent call and the number of missed calls are
displayed. If you answered several calls from the same
caller, each call is a separate record.
To display the Callers list:
1. Press
2. Press
3. Hold down to see time, date, and length of a call.
4. Press
Shift, Callers
Cancel
If you subscribe to a caller-identification service, use the
Callers list to quickly call someone who called you. Press
Dial
to call a displayed number.
to display the most recent call.
to display earlier calls.
to exit.
24 Using Lists
Page 31

SmarTalk User Guide
Deleting from Lists
You can delete any Directory item that is not locked and
any record from the Dialed and Callers lists.
CAUTION Use a lot of caution in deleting an item in the Directory. If
it is linked to a speed dial button, the button won’t work
after the Directory item is deleted.
To delete an item from a list:
1. Press
2. Press
3. Press
4. Press
Directory
list.
or to find the number.
Shift, Del
Cancel
When you assign a setting to a speed dial button, you are
linking the button to a Directory item. If you delete that
item, you disable the speed dial button.
Dial
, or
to delete the item.
to exit.
Shift, Callers
, or
to display the
Copying from Dialed or Callers List to Directory
You can copy a number from the Dialed or Callers list to
the Directory. You cannot copy a number that was speed
dialed. It is already in the Directory.
To copy a number to the Directory:
1. Press
2. Press
3. Press
4. Press
5. Press
6. Press
Using Lists 25
Dial
Callers list.
Shift, Save
You hear a confirmation tone or, if the Directory is full, an
error tone.
Directory
The copied item is displayed, and labeled
find the entry with
Select
Shift, Save
Shift, Callers
, or
or to find the number.
to save the entry to the Directory.
.
to enter or edit the name.
to save the item, and
to display the Dialed or
or .
Saved
Cancel
. If not,
to exit.
Page 32

SmarTalk User Guide
Changing Items in the Dialed and Callers Lists
You can edit, but not save, a number in the Dialed or
Callers list. For example, if you call a foreign country and
reach a wrong number, display the Dialed list to see if
you dialed the number correctly. Rather than dial the
whole number again, edit the incorrect number, then
Dial
press
To edit a number in the Dialed or Callers list:
1. Press
2. Press
3. Press
Dialing Editor:
If a number is not displayed, you can enter one at the
flashing cursor.
4. Press or to move the cursor.
5. Edit the number by pressing the number buttons.
To insert a digit, press
6. Press
The edited number is saved as a record in the Dialed list.
.
Dial
Shift, Callers
or
or to find the number.
Select
.
is displayed.
Shift
Dial
to call the edited number.
to display the list.
, .
26 Using Lists
Page 33

Calling
Making Calls
You can use either the handset or the speakerphone
when calling. During a call you can switch from one to the
other and adjust volume.
Using the Handset
Use the handset as with any telephone. SmarTalk
connects to a line when you lift the handset. If you do not
hear a dial tone, press an available line button.
To switch from handset to speakerphone during a call,
mic
press
handset without pressing
Using the Speakerphone
To make a handsfree call with the speakerphone:
1. Press
2. Enter the number.
3. Face the SmarTalk and speak in a normal voice.
4. Press
To switch from speakerphone to handset during a call, lift
the handset.
, then replace the handset. If you hang up the
.
to end the call.
SmarTalk User Guide
, you end the call.
Adjusting Handset and Speakerphone Volume
During a call, press
adjustments do not affect the listener.
At the end of the call, the handset volume returns to the
default setting. By returning to the default setting at the
end of the call, SmarTalk protects you from accidentally
being exposed to loud noise.
Calling 27
−−−− ++++
to adjust the volume. Volume
Page 34

SmarTalk User Guide
Using the Intercom
SmarTalks can be installed in groups of up to 10, to share
an intercom line. With the SmarTalk intercom line, you
can call any station in your group. Intercom calls can be
made with the handset or the speakerphone.
If your SmarTalk is not in a group, Intercom doesn’t work.
CAUTION There can be feedback if you use the intercom over the
speakerphone.
To make an intercom call:
1. Press
2. Enter the station number, or press a station button.
Intercom
Lift the handset, then press
If the station is busy, do one of the following:
•
Press
•
Remain on the line until the station is free and the call
connects.
•
Press
•
Hang up to cancel the call.
to make a speakerphone call.
Intercom
Select
to interrupt.
Shift, Send
to leave a call-me message.
for privacy.
You can make intercom calls that ring at all stations in
your group. This is useful for isolated sites, such as
shipping yards, since any station can answer.
To call all stations in your group, press
Tip Instead of
function. Please see “Changing Button Functions” on
page 38.
28 Calling
Intercom, #
, !, you can assign the Call All
Intercom, #
, !.
Page 35

SmarTalk User Guide
Paging
You can use the SmarTalk intercom line to page, or make
announcements to all stations in your group except those
in use or in Do Not Disturb mode.
CAUTION There can be feedback if you make an announcement
over the speakerphone.
To make an announcement:
1. Lift the handset.
2. Press
3. Make the announcement.
Shift, Page
.
Tip You can press
Intercom, #, #
instead of
Shift, Page
.
Using Speed Dial Buttons
SmarTalk has two kinds of speed dial buttons:
buttons for speed dialing stations within your group and
speed dial
buttons for speed dialing outside numbers.
Assigning station buttons is in “Assigning Station
Buttons” on page 15. Assigning speed dial buttons is in
station
speed dial
“Linking Speed Dial Buttons” on page 22.
To speed dial another station within your group, press the
station button to dial a primary setting. Press
the station button to dial a secondary setting.
To speed dial an outside number, press the speed dial
button to dial a primary setting. Press
Shift
speed dial number to dial a secondary setting.
Tip To make a speakerphone call, just press the station or
speed dial button.
Calling 29
station
Shift
, then
, then the
Page 36

SmarTalk User Guide
Transferring Calls
You can transfer calls from your station to any station in
your group that shares the line, except those in Do Not
Disturb mode.
To transfer a call:
1. Press
2. Enter the station number, or press a linked station button.
3. Hang up to complete the transfer.
Transfer
When the station answers, you can say who is calling.
If the station does not take the call, a hold reminder tone
sounds after the first minute, then every 30 seconds.
To retrieve an unanswered call, press
If you subscribe to Centrex call transfer, you can transfer
a call to any SmarTalk or other phone in your Centrex
group, or almost anywhere.
.
Establishing Three-Way Calls
You can make a three-way call with one outside number
and one station within your group.
Cancel
.
To make this type of three-way call:
1. Press
2. Enter the station number.
3. Press
4. Begin speaking.
To make a three-way call with an outside number, while
on an outside call:
1. Press
2. Press a line button and call the second outside number.
3. Press
4. Press the first and second held lines within four seconds.
5. Begin speaking.
30 Calling
Transfer
Transfer
Hold
.
Hold
.
to put the call on hold.
when the station answers.
Page 37

Redialing
To redial previously-called numbers use the Dialed list.
To redial the last number you called:
1. Press
2. Pick up the handset or press
Dial
twice.
Redialing a Busy Number
This function works best for speakerphone calls.
To automatically redial a busy number:
1. When you hear the busy signal, press
Do not hang up. SmarTalk continues to redial at intervals
until the call connects.
2. The Automatic Redial function ends if you press any
button, or switch from handset to speakerphone or from
speakerphone to handset.
When all the lines are busy, you can use Automatic
Redial to place your call as soon as a line is available.
SmarTalk User Guide
.
Shift, Auto Rdl
.
To make a call when all lines are busy:
1. Enter the number.
2. Press
Tip You can enter a number by selecting a record from the
Calling 31
Shift, Auto Rdl
Dialed or Callers list, but not from the Directory.
.
Page 38

SmarTalk User Guide
Editing a Number Before Dialing
You can enter a number into the Dialing Editor, edit it if
necessary, and then dial it. This lets you be sure that the
number is correct before dialing.
To edit a number before dialing:
1. Enter the number with the number buttons.
2. Press
3. Press
You can also edit, then dial, a number from the Dialed or
Callers list. For example, if you reach a wrong number,
you can display the number in the Dialed list to check
whether you made an error in entering the number. If so,
you can edit the number, then dial it.
To edit a number from a list:
1. Press
list.
2. Press
3. Press
4. Press
5. Press
or , then a number button to edit the number.
Dial
to dial the displayed number.
Directory
or to find the number.
Select
or , then a number button to edit the number.
Dial
to make the call.
Dial
, or
.
Shift, Callers
, or
to display the
32 Calling
Page 39
Answering
Answering Calls
SmarTalk tells you a lot about incoming calls, by ringing,
showing a ringing line icon, and displaying a message.
When you pick up the handset or press , SmarTalk
selects a ringing line. If it does not, press the line button
that is ringing.
If you subscribe to a caller-identification service, the
caller’s number or name is displayed.
Displaying Caller Information
You can display information about callers before you
answer, or while you are on another call:
•
the line number or station number, and call type (line,
intercom, or transferred)
•
the caller’s number or name, if you subscribe to a
caller-identification service
The information is displayed for five seconds, or as long
as your SmarTalk is idle.
SmarTalk User Guide
To display incoming-call information:
1. Press
2. Press
Call information is displayed for five seconds.
3. Press
4. Press
CAUTION If you press
you kill that call.
Answering 33
to display the earliest incoming call.
to display later incoming calls.
Select
to answer a displayed call.
Cancel
to stop displaying incoming calls.
Cancel
while a line is ringing in the display,
Page 40

SmarTalk User Guide
Holding and Retrieving a Call
Outside calls can be put on hold.
SmarTalk has two hold functions: hold and exclusive
hold. If you put a call on hold, any station that shares the
same line can retrieve the call. If you put a call on
exclusive hold, only your station can retrieve the call.
When you put a call on hold, the line icon flashes. A hold
reminder tone sounds after the first minute, then every 30
seconds.
To put a call on hold, press
To put a call on exclusive hold, press
To retrieve a call from hold, press the held
Tip The secondary function on the Hold button is
exclusive hold.
Hold
.
Shift, Hold
Line
Answering Second Calls
To answer a second call, put the current call on hold and
press the ringing line button.
.
.
Ex-Hold
,
34 Answering
Page 41

Displaying Active and Held Calls
If you have more than one line, SmarTalk can show you
the calls on your lines, including calls made by other
stations sharing the lines with you. The information
displayed includes line number or station number, and
call status (active, held, or busy). If two lines are showing
held calls, you can see from the station number which is
your call.
If you subscribe to a caller-identification service, the
name or number is displayed. You can use this function
when you have several calls on hold and forget who is on
which line.
For more information please see “Monitoring Station
Status” on page 16.
To display calls:
1. Press
2. Press repeatedly to display other calls, in order of line
number.
3. Press
to display the earliest call.
Cancel
to stop displaying calls.
SmarTalk User Guide
To retrieve a held call, when the call is displayed, press
Select
.
Answering Intercom
You only have intercom if your SmarTalk is installed in a
group.
Answer an intercom call in the same way as any call. The
display shows the station name and station number.
Answering 35
Page 42

SmarTalk User Guide
Using Do Not Disturb
You can use the Do Not Disturb function to block
incoming calls. Your SmarTalk will not ring. Outside
callers will be connected to your voice mail, if you
subscribe to that service. Stations within your group will
see the message you select.
To turn on Do Not Disturb function:
1. Press
2. Press
3. Press
DND
Select
To cancel, press
Do Not Disturb can be turned on or off at any time.
.
or to display message options.
to select the displayed message.
DND
.
36 Answering
Page 43

Retrieving Messages
Whenever the message light at the top right of SmarTalk
is flashing, you have at least one message. Other
stations in your group can leave a call-me message and
turn on your message light. If you subscribe to voice mail,
the message light flashes when you have one or more
messages.
To display messages:
1. Press
2. Hold down
3. Press
Messages
The display shows
The displayed station or voice mail service wants you to
call.
to display the first message.
Message from: name
to see the time and date of the call.
to display other messages.
SmarTalk User Guide
To delete a displayed message, press
To call the station in the displayed message, press
The message is automatically deleted.
To call voice mail, dial the number of your custom-calling
or Centrex service. Your installer can set up SmarTalk so
that you can press
when the voice mail message is displayed.
If you want the message light to go on when you miss
calls, contact your installer to set this up.
Tip If the message light doesn’t go out after you’ve picked up
all of your messages, it’s probably because the signal
didn’t arrive from the telephone company. Just delete all
message notices to get rid of the flashing light.
Answering 37
Dial
to call your voice mail service
Shift, Del
.
Dial
.
Page 44

SmarTalk User Guide
Buttons Menu
Button Functions
Every SmarTalk button can have primary and secondary
functions.
You can change the primary and secondary functions of
buttons that are not locked.
Station and speed dial buttons also have settings, which
link them to stations or Directory items. To assign those
settings, please see “Assigning a Station Link” on page
15, and “Linking Speed Dial Buttons” on page 22.
Locked Buttons
Btn: 29 ! Lock
Hold
Changing Button Functions
Standard button functions are assigned at the factory.
Button functions that operate SmarTalk, such as
Directory
factory.
You cannot change a locked function.
You can change the functions of buttons that are not
locked. For example, if you want to be able to end calls
without replacing the handset, you can change the
function of a speed dial button to Release.
Although a locked button cannot be changed, the same
function can be set up on another button. For example, if
you frequently use the Callers list, you can change the
function of a speed dial button from speed dialing to
Callers function, to have two Callers buttons.
, numbers, and
Setup
, are locked at the
,
To change the function of a button, first display the
function:
1. Press
2. Press
3. Press
4. Press the button to display a primary function.
38 Buttons Menu
Shift, Setup
Buttons…
Select
appears in the display.
to open the Setup menu.
.
.
Page 45

SmarTalk User Guide
Or, press
Shift
, then press the button to display a
secondary function.
The display shows the button number,
function or
↑↑↑↑
for a secondary function, and the function of
↓↓↓↓
for a primary
the button. If the button function is locked, the display
Lock
shows
.
5. Hold down the button, until you hear a tone and see a
flashing cursor under the function name.
Or, for a secondary function, press
Shift
before pressing
the button.
6. Press
7. Press
8. Press
Options in the Button Menu
and to scroll through the list of functions.
Shift, Save
Cancel, Cancel
to select the function in the display.
to exit.
Function Explanation
" # $ %
Scroll through menu options or move the
display cursor.
1 – 0 ! # Dial a call or make list entries.
Auto Rdl Redial a busy number.
Call All Call all stations in your group.
Callers Display the first record in the Callers list.
Cancel Exit from a menu or function, or reject an editing
change.
Del Delete single characters or list items.
Diag Display information about the data link.
Customer support may ask for this information.
Dial Dial a displayed number or display the first
record in the Dialed list.
Directory Display the first item in the Directory.
DND Turn Do Not Disturb on or off.
Stn1 – Stn12 Select a station in your group for an intercom
call or a transferred call. For grouped
SmarTalks only.
Buttons Menu 39
Page 46

SmarTalk User Guide
Function Explanation
Flash Signal that special instructions follow. Usually
Hold Put an outside call on hold.
Insert Duplicate a character in a Directory item. The
Intercom Select the intercom line. For grouped
Line 1, Line 2,
Line 3
Messages Display the first message.
Mute Turn the handset or speakerphone microphone
Null Has no function.
Page Page over SmarTalk speakerphones in your
Rel Release a line to end a call.
Save Save selections, entries, or editing changes.
SD1 – SD20 Speed dial a linked Directory item.
Sel Select the displayed option.
Send Msg Leave a call-me message and turn on the
Setup Display the first option in the setup menu.
Shift Select the secondary function of a button.
Spkr Select a line and turn on the speakerphone, or
Transfer Put a call on hold to transfer it or to make a
Vol ↓
Vol ↑
for Centrex functions.
character can then be edited.
SmarTalks only.
Select a line.
on or off.
group.
message light at another SmarTalk in your
group.
mute the handset microphone.
three-way call. Lock a Directory item.
Adjust the volume of the handset,
speakerphone, or ringer.
40 Buttons Menu
Page 47

SmarTalk User Guide
Safety, Regulations, Warranty
Safety Instructions
1 Follow all warnings and instructions
marked on the SmarTalk.
2 Never use the SmarTalk with a power
source different from the one
described on the label. If you are
unsure of the type of power supplied
to your premises, consult your local
power company.
3 Unplug the SmarTalk from the wall
outlet before cleaning. Do not use
liquid or aerosol cleaners.
4 Do not use the SmarTalk near water
or in a damp environment.
5 Do not place the SmarTalk on
unstable furniture as it may fall and be
seriously damaged.
6 Do not allow anything to rest on the
SmarTalk power cord or locate it
where it may be stepped on.
7 Do not overload wall outlets or
extension cords as fire or electric
shock can result.
8 Never use a telephone, other than
cordless, during an electrical storm.
There is a remote risk of electric
shock from lightning.
9 Never use a telephone to report a gas
leak when in the vicinity of the leak.
10 Unplug the SmarTalk from the wall
outlet and have it checked by qualified
service personnel if:
the power supply cord or plug is
••••
damaged or frayed
it has been exposed to water or
••••
has had liquid spilled on it
it has been dropped or the cabinet
••••
has been damaged
it exhibits a distinct change in
••••
performance
it does not operate normally when
••••
you follow the User Guide
instructions. Adjust only those
controls covered in the User
Guide. Improper adjustment of
other controls may result in
Safety, Regulations, Warranty 41
damage and could require
extensive work by a qualified
technician to restore the product
to normal.
Regulatory Statements
Canada: Industry Canada
The Industry Canada label identifies
certified equipment. This certification
means that the equipment meets certain
telecommunications network protective,
operational and safety requirements. The
Department does not guarantee the
equipment will operate to the user’s
satisfaction.
Before installing this equipment, users
should ensure that it is permissible to be
connected to the facilities of the local
telecommunications company. The
equipment must also be installed using an
acceptable method of connection. In some
cases, the company’s inside wiring
associated with a single line individual
service must be extended by means of a
certified connector assembly (telephone
extension cord). The customer should be
aware that compliance with the above
conditions may not prevent degradation of
service in some situations.
Repairs to certified equipment should be
made by an authorized Canadian
maintenance facility designated by the
supplier. Any repairs or alterations made
by the user to this equipment, or
equipment malfunctions, may give the
telecommunications company cause to
request the user to disconnect the
equipment.
Users should ensure for their own
protection that the electrical ground
connections of the power utility, telephone
lines and internal metallic water pipe
system, if present, are connected
Page 48

SmarTalk User Guide
together. This precaution may be
particularly important in rural areas.
CAUTION
make such connections themselves, but
should contact the appropriate electric
inspection authority, or electrician, as
appropriate.
New Zealand
The SmarTalk telephone system (max. of
10 stations) has a Ringer Approximate
Loading number, or RAL, of 1. When other
devices are connected to a SmarTalk
system the total sum of the RAL
connected to the PSTN should be less
than 5.
United Kingdom: OFTEL/BABT
The telephone has been approved for use
under the following conditions:
1 For connection to the Public Switched
2 SmarTalk phones have been
3 Any other usage will invalidate the
4 The telephone must not be connected
: Users should not attempt to
Telephone Network (PSTN) and
Compatible PBXs (Private Branch
Exchange), which use multi-frequency
signalling. Please consult your
supplier for an up-to-date list of
compatible PBXs.
approved for use on the following
facilities:
Two- or three-line simple
••••
telephone facility.
Storage of telephone numbers for
••••
retrieval by a predetermined code.
Automatic dialing.
••••
Automatic dialing of last number
••••
dialed.
Loud speaking full hands free
••••
operation.
PBX timed break register recall.
••••
Call Barring. (Toll Restriction)
••••
approval of the apparatus if, as a
result, it then ceases to conform to the
standards against which approval was
granted.
in the following manner:
As an extension to a pay phone.
••••
As a party line with shared
••••
service.
To a 1 + 1 carrier system.
••••
NOTE
: It cannot be guaranteed that the
apparatus will operate correctly under all
possible conditions or connections to
compatible PBXs. In case of any difficulty,
please consult your supplier.
5 This telephone may be used for the
purpose of making outgoing calls to
the emergency service.
The ringer equivalence number, or REN,
determines the number of apparatus that
may be connected to the exchange line.
The exchange line has a maximum REN
capacity of 4. The total REN value
assigned to a SmarTalk system is 1.
To determine the REN value of the
complete system, add together the REN
values of every apparatus. The total value
should not exceed 4, otherwise the
volume of the ringer in any phone will
decrease and one telephone or more may
not ring at all.
NOTE
: Operation cannot be guaranteed in
installations with mixed types of
apparatus.
United States: FCC Part 68
The FCC Part 68 label identifies certified
equipment. This certification means that
the equipment meets certain
telecommunications network protective,
operational and safety requirements. The
Department does not guarantee the
equipment will operate to the user’s
satisfactions.
Before installing this equipment, users
should ensure that it is permissible to be
connected to the facilities of the local
telecommunications company. The
equipment must also be installed using an
acceptable method of connection. In some
cases, the company’s inside wiring
associated with a single line individual
service must be extended by means of a
certified connector assembly (telephone
extension cord). The customer should be
aware that compliance with the above
42 Safety, Regulations, W arranty
Page 49

SmarTalk User Guide
conditions may not prevent degradation of
service in some situations.
Repairs to certified equipment should be
made by an authorized United States
maintenance facility designated by the
supplier. Any repairs or alterations made
by the user to this equipment, or
equipment malfunctions, may give the
telecommunications company cause to
request the user to disconnect the
equipment.
Users should ensure for their own
protection that the electrical ground
connections of the power utility, telephone
lines and internal metallic water pipe
system, if present, are connected
together. This precaution may be
particularly important in rural areas.
CAUTION
make such connections themselves, but
should contact the appropriate electric
inspection authority, or electrician, as
appropriate.
: Users should not attempt to
Product Specifications
CO Loop Range:
Maximum number of CO lines
3 loop start lines
Maximum length of interconnect wire
1000 feet of 24 AWG or 0.5mm twisted
pair cable per group
500 feet of 24 AWG or 0.5mm twisted pair
cable per single station run
Power requirements
1 power module per group
North America
Input - 120 VAC, 60 Hz, 25 Watts
Output - 24 VDC, 500mA
Australia
United Kingdom
Input - 240 VAC, 60 Hz, 25 Watts
Output - 24 VDC, 500mA
Line connector
modular jack
Optional battery back-up
4 AA Alkaline or Nickel Cadmium batteries
20-100mA
:
:
:
– part# 111-5033
– part# 111-5036
– part# 111-5037
: 8 position 8 conductor
:
(with clip - charcoal: part# 646-1018,
white: part# 646-1310)
Size & weight
NRG 3
24cm x 15cm x 7.6cm (9.5” x 6” x 3”)
585 grams (1.3 lbs.)
NRG 3E
28cm x 15cm x 7.6cm (11" x 6" x 3")
760 grams (1.7 lbs.)
Environment
Operating temperature: 0C to 40C (32F to
104F)
Storage temperature: –20C to 60C (-4F to
140F)
Relative humidity: 0 to 95%
noncondensing
:
:
Product Warranty
dba Telecom provides an industry
standard warranty that covers defects in
materials and workmanship. It does not
cover damage to products resulting from
physical abuse or electrical misuse.
In cases where the warranty has expired,
defective products will be returned to full
working order for a nominal charge plus
parts, labor and shipping.
There is a handling fee for returned
products in or out of warranty found to be
free of defects.
This warranty is in lieu of and excludes all
other warranties expressed or implied
including, but not limited to, the implied
warranty of merchantability or fitness for a
particular purpose. There are no
warranties which extend beyond this
limited warranty and in no event shall
dba Telecom be liable for loss of
anticipated profits, incidental or
consequential damages, loss of time or
other losses incurred in connection with
the operation, possession or use of the
equipment.
For complete terms and duration, refer to
the warranty information contained in the
product packaging.
Safety, Regulations, Warranty 43
Page 50

SmarTalk User Guide
Troubleshooting SmarTalk
SmarTalk Concerns
For problems with custom-calling and Centrex services,
please see “Troubleshooting Custom-calling Services” on
page 47.
If Then
The display is blank Check that the line cord is properly connected.
Check that the batteries are properly installed. Please
see the Installation Sheet at the dba Telecom website:
www.dbatele.com.
There is no dial tone
SmarTalk doesn’t ring Check the Ring Sound. See “Ring Sound” on page 14.
You want each line to have a
different ring
You cannot hear the other party
The other party cannot hear you
You cannot call from the Dialed,
Callers, or Directory lists
You want more speed dial
buttons
No caller information is
displayed
The message light doesn’t turn
off or doesn’t come on
SmarTalk needs cleaning
Check that the line cord and handset cord are properly
connected to the jacks on the back of the SmarTalk.
Check that the line cord is properly connected to the wall
jack.
Adjust the Ring Sound. See “Ring Sound” on page 14.
Use the −−−− ++++
If the display shows
Check that the handset is properly connected.
Check that the numbers have the necessary prefixes or
area codes.
Change the primary or secondary function of any button
that is not locked. See “Changing Button Functions” on
page 38. Then link the button to a Directory item. See
“Linking Speed Dial Buttons” on page 22.
This is a Centrex function. Contact your telephone
company to order it.
You can turn off a flashing message light. See “Retrieving
Messages” on page 37.
If your message light doesn’t come on, the problem is the
type of signaling used by your telephone company. Ask
your telephone company to fix the problem.
Use only a soft, water-dampened cloth to clean
SmarTalk.
button to adjust the volume.
Muted
, press M.
44 Troubleshooting SmarTalk
Page 51

SmarTalk User Guide
Custom-calling and Centrex Services
Using Custom-calling Services
Custom-calling services, including Centrex services, are
provided by your telephone company or service provider.
Many of these services may already be included in the
Directory of your SmarTalk, and linked to labeled speed
dial buttons. These may include: Call Park, Call Pickup,
Call Forward, Voice Mail, and many others.
Use most custom-calling services that are not in the
Directory, and not linked to SmarTalk speed dial buttons,
by pressing the ! or # button, then number buttons.
Cancel a service by pressing ! or # and different number
buttons.
Example
Using Longer Custom-calling Services
Call Forwarding:
Cancel Call Forwarding:
Some custom-calling services need more information.
They tell you this by making special sounds:
dial
tone regular, steady tone. Can be a prompt
more
prompt usually a series of beeps, three or
done
prompt a different series of beeps from the
oops
prompt usually a long series of fast beeps, or a
Hanging up for less than five seconds
90
!
for more information
more. A prompt for more information
more
is an acknowledgement that you have
finished and can hang up.
fast busy tone. You made a mistake, or
something is not available. Hang up for
at least five seconds. Then start again.
is usually understood as a
prompt.
91
!
prompt, usually two beeps. This
flash
Custom-calling and Centrex Services 45
Page 52

SmarTalk User Guide
Example
To forward your calls to another number:
1. Either: press the
2. When you hear the
which you want calls forwarded.
3. When you hear the
4. If you hear the
wrong. Hang up for at least five seconds, then start again.
Call Fwd
oops
button, or enter the code.
more
prompt, enter the number to
done
prompt, hang up.
prompt, you’ve done something
Getting Other Custom-calling Services
You can subscribe to more custom-calling services and
Centrex services. Some may be free, but most
companies charge small monthly fees.
Entering Extra Instructions with Codes
You can enter codes for custom-calling services as
Directory entries, then link them to speed dial buttons.
For example, for Call Park:
F ,
!
Call Park
8 4
1. Name the new Directory item,
2. Enter the code in the number field, with extra instructions
for hook flash and pause:
Press
Press
Press !
3. Press
Other instructions could be:
;
R
?
W
!
D
S
to enter F for Flash, then .
to enter , for a one-second pause, then .
8 4
to complete the code.
Shift, Save
five-second pause
Release
Wait for a call-progress tone
Wait for normal or stutter dial tone
Wait for normal or stutter dial tone, hang up if not found
Wait for normal dial tone
Wait for stutter dial tone
to complete the new Directory item.
.
46 Custom-calling and Centrex Services
Page 53

SmarTalk User Guide
Troubleshooting Custom-calling Services
If Then
You can’t use a custom-calling
service
The message light doesn’t turn
off or on
You moved to a new location
and your custom-calling
services no longer work
Check the codes and numbers entered in your Directory.
See “Custom-calling and Centrex Services” on page 45.
Contact your telephone company or service provider for
the valid codes for your area, and to check that the
custom-calling services have been turned on.
The problem is the type of signaling used by your
telephone company or service provider. Report the
problem to them.
However, you can turn off a flashing message light. See
“Retrieving Messages” on page 37.
Contact your telephone company or service provider.
They will give you the codes for your area.
Custom-calling and Centrex Services 47
Page 54

SmarTalk User Guide
Glossary
ASCII
American Standard
Code for Information
Interchange is a system
for encoding a basic set
of letters, numbers,
punctuation symbols,
and control codes used
by computers.
barring
Preventing. The same
as blocking in other
custom-calling or
Centrex services.
blocking
Preventing. The same
as barring in other
custom-calling or
Centrex services.
call barring
Bar calls from being
made on a specific
telephone.
call blocking
Block calls from ringing
on a specific telephone.
Centrex
Business and personal
services provided by a
telephone company or
service provider. Part of
custom-calling services.
Custom-calling
Services
Extra services ordered
through a telephone
company or service
provider. May include
Centrex services.
Dialing Editor
The function that allows
editing of a number.
DND
Do Not Disturb. Block
calls from ringing on the
specified phone, or
forward them to a
message.
group
One connected set of
SmarTalks.
PBX
A local switching
system.
power supply
The power adapter for
the SmarTalk. May be
small for a single
SmarTalk, or large for a
group.
station button
A SmarTalk button that
can be linked to other
stations in the group. A
linked station can be
monitored.
station name
The name of a person
or a department
associated with a
SmarTalk.
station number
The number of a
SmarTalk for intercom
calls. The PBX
extension number or
the Centrex directory
number.
stutter dial tone
Broken dial tone, not
constant.
T-jack
Adapter for a single
SmarTalk.
TRF
Transfer.
XFR
Transfer.
48 Glossary
Page 55

Index
#
!m, 13, 19, 20
#m, 12, 19
( ), 20
→→→→m, 8
*m, 13, 19
, m, 20
... m, 8
:m, 13, 19
; m, 20
?m, 20
}m, 13, 19
~m, 13, 19
0m, 13, 19
1m, 13, 19
Dm, 20
Fm, 20
-m, 13, 19, 20
Rm, 20
Sm, 20
Wm, 20
↑m, 20
↓m, 20
m, 19
!
" # $ %
1
12-hour, 10
2
24-hour, 10
A
Abbrev. (Rings):, 14
active calls, 35
adding
announcement, 29
answering
assigning.
, 39
speed dial buttons, 44
calls on hold, 34
intercom, 35
second calls, 34
See also
station link, 15
linking
Assignment..., 15
Auto Rdl, 3, 31, 39
Automatic Redial, 31
B
BABT, 42
battery
status icons, 7
beep, 15
See
bell.
blank character, 20
blank display, 44
blinking.
blocking incoming calls, 36
busy
buttons
C
Call All, 39
Call Forward, 45
Call Park, 45
Call Pickup, 45
caller identification
caller information
caller-identification, 24
Callers, 3, 39
Callers list, 3
ringing
See
flashing
all lines, 31
icon, 6
intercom call, 28
caps, 17
changing functions, 38
deleting speed dial, 22
displaying function, 38
functions of, 2, 3, 4, 38
labeling, 17
linking speed dial, 22
sound control, 4
speed dial, 2
types of, 2
control, 2
number, 2
speed dial, 22
station, 2
displaying, 14, 33
not displayed, 44
problems with, 44
SmarTalk User Guide
See
calling.
call-me message, 3, 28
call-progress tone, 20
calls.
all stations, 28
answering second, 34
display information, 24
displaying active, held,
displaying information,
exclusive hold, 34
handsfree, 27
held order, 35
holding, retrieving, 34
incoming, 33
killed, 33
light for missed, 37
missed, 24
repeated, 23
status, 33
three way, 30
type of, 33
using handset,
calls-forwarded message,
Canada
regulations, 41
Cancel, 3, 39
canceling
custom-calling services,
caps for buttons, 17
Centrex.
changing.
basic settings, 9
Directory items, 21
ring, 14
characters
numbers entry, 19
special in name field, 19
special in numbers field,
checking.
dialing
See also
Callers list
35
33
speakerphone, 27
20
45
calling services
assigning, linking,
editing
19
See
custom-
See also
See
Dialed list,
monitoring
Index 49
Page 56

SmarTalk User Guide
cleaning SmarTalk, 44
concerns
about custom-calling
services, 47
about SmarTalk, 44
conference calls.
three-way call
connecting.
linking
connection.
control buttons, 2
copying into Directory, 25
cursor
controls, 3
flashing, 26, 39
custom-calling services,
45
canceling, 45
D
dash, 20
date, 9
setting, 11
day of the week, 11
decorating station name,
13
Del, 3, 39
delay ringing, 14
deleting
characters, 12
from lists, 25
locking to avoid, 21
messages, 37
speed dial links, 22
station links, 16
Diag, 39
Dial, 3, 39
dial tone
none, 44
Dialed list, 3
problems with, 44
dialing
Directory items, 23
editing before, 32
when all lines busy, 31
Directory, 3, 39
copying into, 25
deletion caution, 25
entering items, 19
See
assigning,
See
links
See
example of new item,
18
finding items, 23
linking to speed dial, 22
locked item, 22
locking & unlocking
items, 21
new name, 19
new number, 19
structure of, 18
using, 23
disabling ring, 14
display
description of, 5
icons, 5
is blank, 44
short or long SmarTalk,
5
text, 5
displaying
active, held calls, 35
button function, 38
call information, 33
Callers list, 24
data link info, 39
Dialed list, 23
Directory list, 23
display is blank, 44
messages, 37
type of call, 33
DND, 39
Do Not Disturb, 4
and paging, 29
icon, 6, 16
using, 36
dotted line flashing, 15
E
See also
editing.
before dialing, 32
Callers, Dialed items,
26
Directory items, 21
speed dial number, 21
entering
characters, 12
new Directory items, 19
station name, 12
examples
button functions, iii
changing
new Directory item, 18
of a custom-calling
entry, 46
of call forwarding, 45
of changing button
function, 38
of editing numbers, 26,
32
of prompts, 46
of three dots, 8
exclusive hold, 34
icon, 6
exit, iii
external line, 3
F
factory settings, 9
FCC Part 68, 42
feedback with paging, 28,
29
finding
Callers items, 24
Dialed items, 23
Directory items, 23
special name
characters, 19
special number
characters, 19
fixing
Directory items, 20
Flash, 4, 20, 40
flashing
cursor, 26, 39
display icons, 6
dotted line, 15
message light, 37
text and dotted line, 15
fun with station name, 13
functions
changing, 38
displaying, 38
options for button, 39
primary, secondary, 3,
38
G
See
getting.
retrieving
50 Index
Page 57

SmarTalk User Guide
H
handset
in use icon, 6, 16
switching to
speakerphone, 27
volume, 27
handsfree call, 27
hearing.
held calls, 35
history.
Hold, 4, 40
holding
I
icons
image.
Insert, 40
intercom
Intercom, 40
K
keeping an eye on.
L
labeling buttons, 17
labels for speed dial
See
volume
See
Callers list,
Dialed list
a call, ii, 34
reminder tone, 30
battery status, 7
busy, 6
descriptions, 16
descriptions of, 6
flashing, 6
in display, 5
line and status, 6
Shift, 7
See
icon
answering, 35
doesn’t work, 28
Intercom button, 3
interrupting with, 28
override, 16
station status, 35
status icon, 6
using, 28
monitoring
buttons, 22
See
last number.
list
light
problems with, 44
light flashing, 37
line
flashing dotted, 15
Line
buttons, 3
number, 33
status icons, 6
Line 1, Line 2, Line 3, 40
See also
linking.
speed dial buttons, 22
station button.
assigning
links
deleting, 16
primary, secondary
stations, 15
lists
copying to Directory, 25
deleting from, 25
editing, 21
locked, 25
structures of, 18
locked
Directory item, 22
lists, 25
locking
Directory items, 21
loudness.
M
M button, 4
message
problems with light, 44
messages
calls-forwarded, 20
deleting, 37
displaying, 37
for DND, 36
light, 37
light for missed calls, 37
retrieving, 37
Messages, 3, 40
missed calls, 24
monitoring station status,
16
month, 11
See
See
Dialed
assigning
See
volume
moving.
Mute, 40
N
name.
name field, 19
new.
New Zealand
Null, 40
number
number buttons, 2
numbers
O
OFTEL/BABT, 42
order of held calls, 35
override with intercom, 16
P
Page, 3, 40
paging, 29
parentheses, 20
pause
pick up.
picture.
primary
Private Branch Exchange,
prompts
See
scrolling
See
station name
special characters, 19
See
Directory
regulations, 42
field entry, 19
field in Directory, 19
not displayed, 26
of rings, 14
station identification, 15
copying into Directory,
25
editing before dialing,
32
five-second, 20
one-second, 20
See
retrieving
See
icons
button functions, iii
links, 22
42
done, 45
more, 45
oops, 45
types of, 45
Index 51
Page 58

SmarTalk User Guide
PSTN, 42
Q
See
quiet.
R
redialing, 31
regulations
Rel, 40
Release, 20
REN, 42
repetitions of ring, 14
retrieving
ringer equivalence
ringing
S
safety
Save, 3, 40
saving.
scrolling in the display, 8
SD1 – SD20, 40
secondary
seeing.
Sel, 40
volume
busy, 31
Canada, 41
New Zealand, 42
United Kingdom, 42
United States, 42
held calls, 30, 34
number, 42
adjusting volume, 1
blocking, 36
changing sound, 1
changing, disabling, 14
delay, 14
icon, 6, 16
line selection, 33
no ring, 44
repetitions, 14
types of, 44
volume, 14
instructions, 41
power, 41
See
assigning,
entering
button functions, iii
links, 22
See
viewing
Select, 3
Send, 3
Send Msg, 40
services.
setting.
settings
Setup, 4, 40
setup mode, 9
Shift, 3, 40
SmarTalk
sound.
speakerphone, 4
special characters
specifications, 43
speed dial buttons, 2, 3,
speed dialing
Spkr, 40
station buttons, 2, 3, 15
station name, 9, 12
station number displayed,
stations
status
See
custom-
calling services
See
assigning,
changing, editing,
linking,
changing, 9
factory, 9
time, date, station
name, 9
icon, 7
cleaning, 44
specifications, 43
See
ringing, tone
in use icon, 6, 16
switching to handset, 27
using, 27
volume, 27
in Directory name, 19
in Directory number, 20
in station name, 13
22
add buttons, 44
caution deleting, 22
editing number, 21
primary, secondary, 15
33
calling all, 28
monitoring status, 16
numbering, 15
status icon, 6
icons, 6
monitoring stations, 16
of incoming calls, 33
of intercom, lines,
stations, 6
Stn1 – Stn12, 39
See
storing.
structure
of Callers list, 24
of Dialed list, 23
of Directory, 18
of lists, 18
stutter dial tone, 20
supervising.
switching handset to
T
text in display, 5
three periods, 8
three-way call, 30
time, 9
setting, 10
type of, 10
tips
editing numbers, 21
on deleting Directory
on deleting settings, 22
on Directory, 23
on hold, 34
on paging, 29
on redialing, 31
on special characters,
on speed dialing, 29
on using intercom, 28,
tone
call progress, 20
confirmation, 25
error, 25
hold reminder, 30
no dial tone, 27, 44
normal dial, 20
stutter dial, 20
tones
types of, 45
Transfer, 4, 40
assigning,
copying, entering
See
monitoring
speaker, 27
item, 25
13, 19
29
52 Index
Page 59

to lock Directory item,
21
troubleshooting, 44
type of time, 10
U
United Kingdom
regulations, 42
United States
regulations, 42
unlock Directory item, 22
using
Callers list, 24
Dialed list, 23
Directory, 23
V
voice mail, 37
Voice Mail, 45
Vol ↑, 40
Vol ↓, 40
volume
adjusting, 27
cannot hear, 44
controls, 4
handset, 4
speakerphone, 4
SmarTalk User Guide
W
warranty, 43
watching.
Y
year, 11
See
monitoring
Index 53
 Loading...