

Page 1
Z5356 E4/E5 Ball joint adapter
Mounting instructions (1.2 EN)
Page 2

General information
Z5356 E4/E5 Ball joint adapter
Mounting instructions
Version: 1.2 EN, 03/2013, D2964.EN.01
Copyright © 2013 by d&b audiotechnik GmbH; all rights
reserved.
Keep this manual with the product or in a safe place
so that it is available for future reference.
When reselling this product, hand over this manual to the new
customer.
d&b audiotechnik GmbH
Eugen-Adolff-Strasse 134, D-71522 Backnang, Germany
T +49-7191-9669-0, F +49-7191-95 00 00
docadmin@dbaudio.com, www.dbaudio.com
Page 3

Contents
1. Z5356 Mounting instructions..................................... 4
1.1. Safety precautions....................................................... 4
1.2. Intended use................................................................ 4
1.3. Assembly...................................................................... 4
1.4. Z5038 Fixing plate M10........................................... 5
d&b Z5356 E4/E5 Ball joint adapter , Mounting instructions (1.2 EN) 3
Page 4

1. Z5356 Mounting instructions
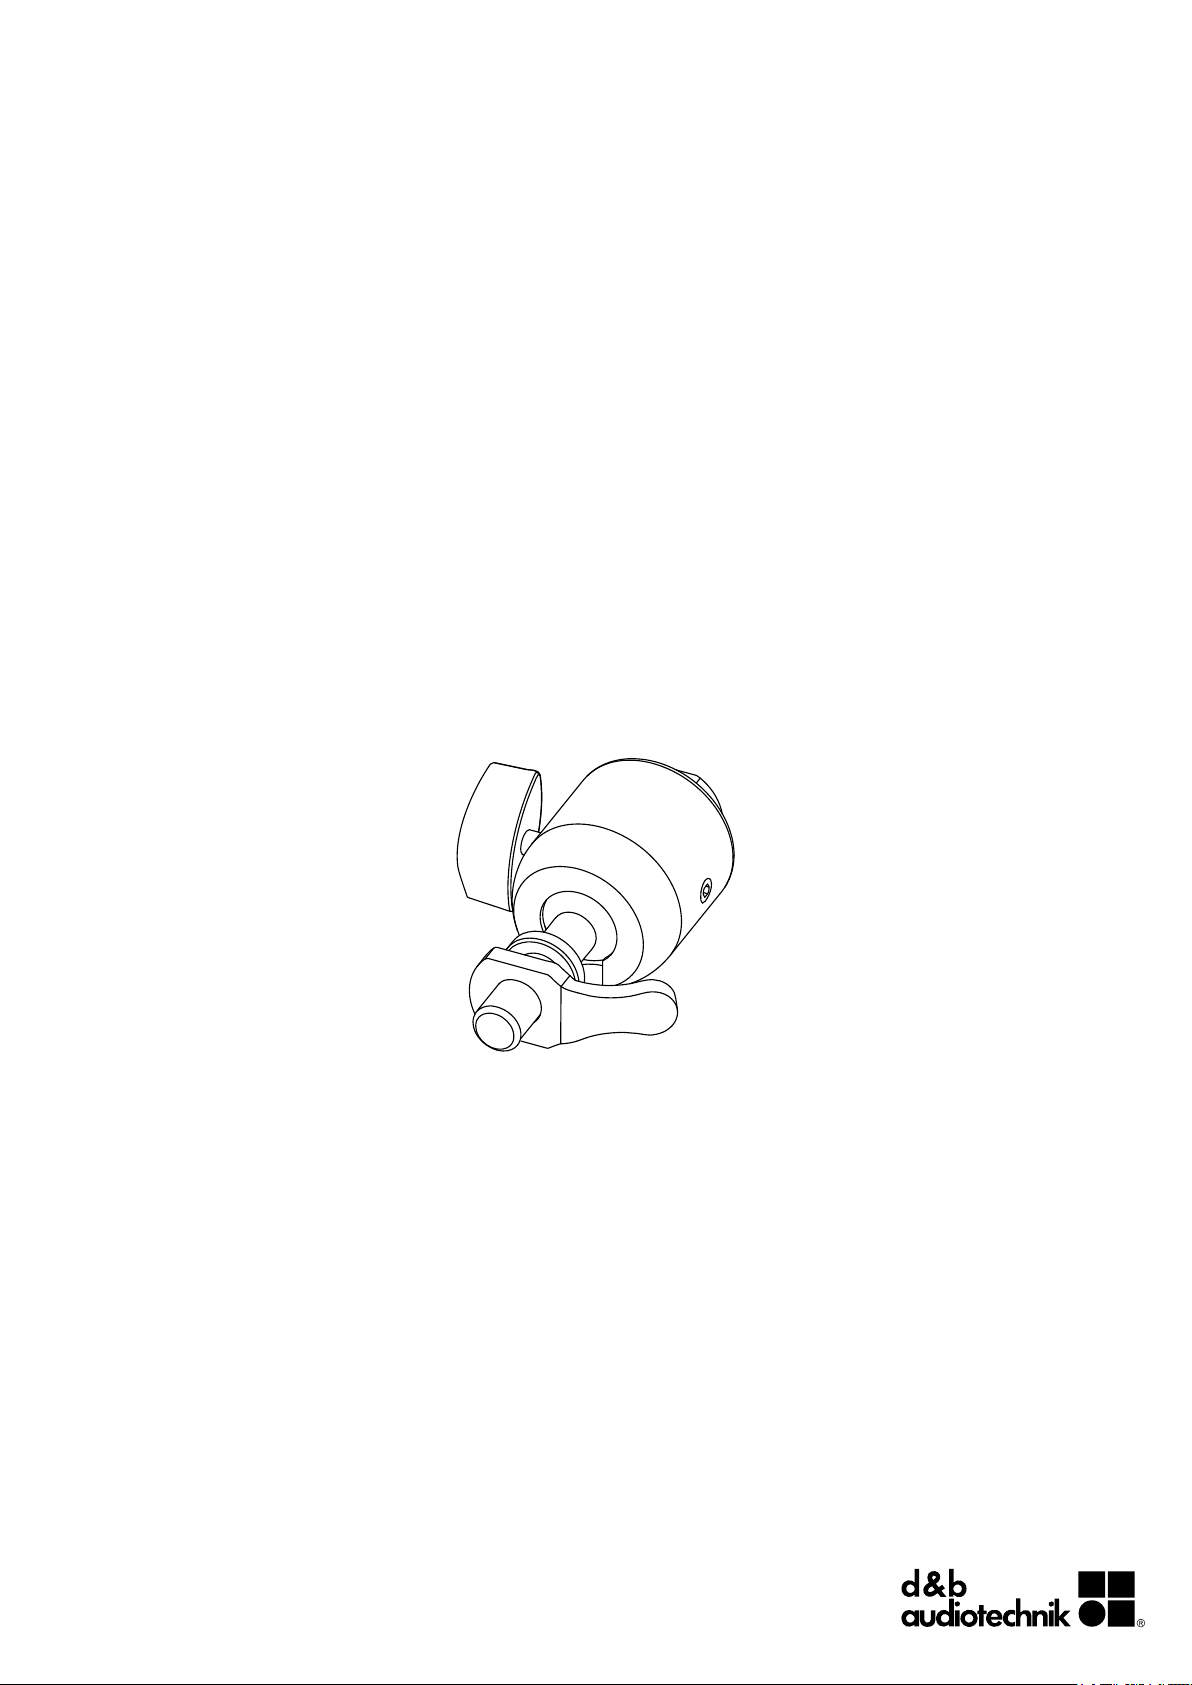
Fig. 1: Z5356 E4/E5 Ball joint adapter
1.1. Safety precautions
General safety
Installation and setup should only be carried out by qualified and
authorized personnel observing the valid national Rules for the
Prevention of Accidents (RPA).
It is the responsibility of the person installing the assembly to ensure
that the suspension/fixing points are suitable for the intended use.
Always carry out a visual and functional inspection of the items
before use. In case you have any doubt as to the proper
functioning and safety of the items, these must be withdrawn from
use immediately.
Load safety information
The maximum permitted working load of the Z5356 E4/E5 Ball
joint adapter is 3 kg (6.6 lb) (according to BGV C1) which implies
the weight of one E4 or E5 cabinet.
1.2. Intended use
The d&b Z5356 E4/E5 Ball joint adapter must only be used in
conjunction with the d&b E-Series loudspeakers E4 and E5 as
described in these mounting instructions.
The adapter allows E4 and E5 cabinets to be connected to
different d&b mounting accessories such as:
– E6532 Super Clamp with
E6533 M10 adapter for Super Clamp
– Z5029 TV spigot
– Z5034 Stand adapter
– Z5035 M10 to 3/8" adapter
– Z5038 Fixing plate M10
1.3. Assembly
Tools required:
– Open-ended spanner/wrench (size #17)
– Allen hex key 3 mm
Ball joint adapter
The ball joint adapter is equipped with a set screw. It is used to
preset the clamping of the ball joint.
If necessary, adjust the set screw using the 3 mm Allen hex key.
d&b Z5356 E4/E5 Ball joint adapter , Mounting instructions (1.2 EN)4
Page 5

Attaching the ball joint adapter to the cabinet
1. Attach the ball joint adapter to the M10 threaded insert on the
rear panel of the cabinet.
2. Fix the adapter to the cabinet by tightening the locking device
[C] accordingly.
Alternatively an open-ended spanner (size #17) can be used
for this purpose.
1.4. Z5038 Fixing plate M10
The Z5038 Fixing plate M10 can be used to mount the E4 or E5
cabinets to walls, ceilings or other surfaces.
Note: Refer to the respective mounting instructions which are
supplied together with the fixing plate.
If the cabinets are mounted to a wall, both horizontal or vertical
mounting is possible. If the cabinets are mounted to a ceiling, the
horizontal setup is recommended.
The following mounting options and angle settings are applicable
no matter whether the cabinets are mounted to walls or ceilings or
other suitable surfaces.
E4 loudspeaker
For the E4 cabinet, angles can be set from 0° to –50° (vertical
setup) or from 0° to –80° (horizontal setup).
E5 loudspeaker
For the E5 cabinet, angles can be set from 0° to –35° (vertical
setup) or from 0° to –75° (horizontal setup).
d&b Z5356 E4/E5 Ball joint adapter , Mounting instructions (1.2 EN) 5
Page 6

Attaching the assembly to the fixing plate
To attach the assembly to the fixing plate, proceed as follows:
1. Slacken the fixing screw [F] and the set screw [S] to release
the M10 socket [I] of the ball joint.
2. Attach the assembly and bolt down the threaded insert to the
fixing plate.
3. Tighten the M10 socket using the spanner (size #17).
4. Set the desired angle of the cabinet and adjust the set screw
[S].
5. Finally tighten the fixing screw [F].
d&b Z5356 E4/E5 Ball joint adapter , Mounting instructions (1.2 EN)6
Page 7

D2964.EN.01, 03/2013 © d&b audiotechnik GmbH
www.dbaudio.com
 Loading...