

Page 1

xA-Series
Rigging manual (1.1 EN)
Page 2

General information
xA-Series
Rigging manual
Version: 1.1 EN, 02/2012, D2962.EN .01
Copyright © 2012 by d&b audiotechnik GmbH; all rights
reserved.
Keep this manual with the product or in a safe place
so that it is available for future reference.
When reselling this product, hand over this manual to the new
customer.
d&b audiotechnik GmbH
Eugen-Adolff-Strasse 134, D-71522 Backnang, Germany
T +49-7191-9669-0, F +49-7191-95 00 00
docadmin@dbaudio.com, www.dbaudio.com
Page 3

Contents
1. System safety................................................................... 4
1.1. Intended use................................................................ 4
1.2. Load capacity.............................................................. 4
1.2.1. Approved array configurations............................... 4
1.2.2. xA-Series loudspeaker cabinet weights.................. 4
1.3. ArrayCalc / TI 385..................................................... 5
1.4. Operational safety...................................................... 5
2. Rigging concept............................................................... 6
2.1. Tool box....................................................................... 7
2.2. xA-Series rigging components.................................... 7
2.2.1. xA-Series loudspeaker cabinets.............................. 7
2.2.2. Z5413 Flying bar connector plate xA................... 7
2.2.3. Z5414 Flying bar xA............................................... 8
2.2.4. Z5415 Flying bar adapter xA................................ 9
2.2.5. Z5419 Load bar xA................................................ 9
2.2.6. Z5416 Connector plate 10A............................... 10
2.2.7. Z5417 Connector plate 10AL.............................. 10
2.2.8. Z5418 Connector plate xA-SUB.......................... 10
2.2.9. Z5421 Connector plate xA, neg. splay............... 11
2.2.10. Z5420 Load eyebolt.......................................... 11
2.3. Setting the splay angle............................................. 11
2.4. Connector plate hole grids....................................... 13
3. Suspension options...................................................... 15
3.1. Vertical arrays........................................................... 15
3.1.1. Z5415 Flying bar adapter xA.............................. 15
3.1.2. Additional suspension options.............................. 16
4. xA-Series arrays and assembly............................. 17
4.1. xA-Series array configurations................................. 17
4.2. Assembly preparations............................................. 18
4.2.1. Tools required........................................................ 18
4.2.2. Assembly area....................................................... 18
4.2.3. Orientation of the HF section................................ 18
4.3. Vertical arrays........................................................... 18
4.3.1. Horizontal assembly on the ground..................... 18
4.4. Ground stacks........................................................... 20
5. Hoisting the array........................................................ 21
5.1. Safety guidelines....................................................... 21
6. Declarations.................................................................... 22
Manufacturer's declaration...................................... 22
6.1.
6.2. Disposal..................................................................... 22
d&b xA-Series, Rigging manual (1.1 EN) 3
Page 4

1. System safety
1.1. Intended use
The xA-Series rigging components (Flying bar, Flying bar adapter,
Connector plates) must only be used in conjunction with d&b xASeries loudspeakers as described in this rigging manual.
Installation and setup should only be carried out by qualified and
authorized personnel observing the valid national Rules for the
Prevention of Accidents (RPA).
It is the responsibility of the person installing the assembly to ensure
that the suspension/fixing points are suitable for the intended use.
Always carry out a visual and functional inspection of the items
before use. In case you have any doubt as to the proper
functioning and safety of the items, these must be withdrawn from
use immediately.
1.2. Load capacity
1.2.1. Approved array configurations
The xA-Series rigging system is designed to allow the following
approved array configurations for indoor applications.
Flown arrays Ground stacks
Array configuration Number and type of cabinets
Configuration Number and type of cabinets
10AL Line array – Up to 9 x 10AL (-D) cabinets. Mixed ground stack – Up to 6 x 10AL (-D) cabinets on
top of up to 3 x 18A or 27A
subwoofers as ground support.
10A Vertical array – Up to 6 x 10A (-D) cabinets. SUB stack – Up to 4 x 18A or 27A
subwoofers.
Mixed arrays – Up to 6 x TOP cabinets
combined with up to 2 x SUB
cabinets at the top of the array.
– Up to 3 x cabinets at the top of
the array with up to 2 x SUB
cabinets in-between and up to 3
x TOP cabinets at the bottom.
SUB column – Up to 4 x 18A subwoofers.
– Up to 3 x 27A subwoofers.
1.2.2. xA-Series loudspeaker cabinet weights
Cabinet Weight in kg (lb)
10A (-D)/10AL (-D) 14 kg (31 lb)
18A-SUB 32 kg (71 lb)
27A-SUB 41 kg (90 lb)
d&b xA-Series, Rigging manual (1.1 EN)4
Page 5

1.3. ArrayCalc / TI 385
For safety reasons xA-Series arrays must be designed using the
d&b ArrayCalc simulation tool. The software is available for
download at
www.dbaudio.com.
The use of ArrayCalc is described in the technical information
TI 385 "d&b Line array design, d&b ArrayCalc", which is also
provided with this rigging manual.
Carefully read this TI to become familiar with the operation and
behavior of ArrayCalc and in particular with the mechanical load
conditions and limitations.
We also recommend you to attend the regularly hosted d&b xASeries training seminars. Further information regarding the d&b
seminars can be requested directly from the d&b audiotechnik
sales partners.
1.4. Operational safety
During assembly pay attention to the possible risk of crushing.
Wear suitable protective clothing.
Observe all instructions given on the rigging components and the
loudspeaker cabinets.
When chain hoists are in operation, ensure that there is nobody
directly underneath or in the vicinity of the load who is not involved
in the setup.
Do not under any circumstances climb on the array
d&b xA-Series, Rigging manual (1.1 EN) 5
Page 6

2. Rigging concept
d&b xA-Series, Rigging manual (1.1 EN)6
Page 7

2.1. Tool box
– Hex head socket wrench (Torque wrench) #13 mm.
– Screw driver with torx bit TX30.
– Torx socket wrench (Torque wrench) with torx bit TX45.
– Allen hex key 5 mm.
– Securing glue (such as Loctide®).
2.2. xA-Series rigging components
The xA-Series loudspeaker cabinets together with the xA-Series
rigging components allow the setup of various array
configurations, either flown or ground stacked.
The following overview provides a basic description of the
intended use of each component.
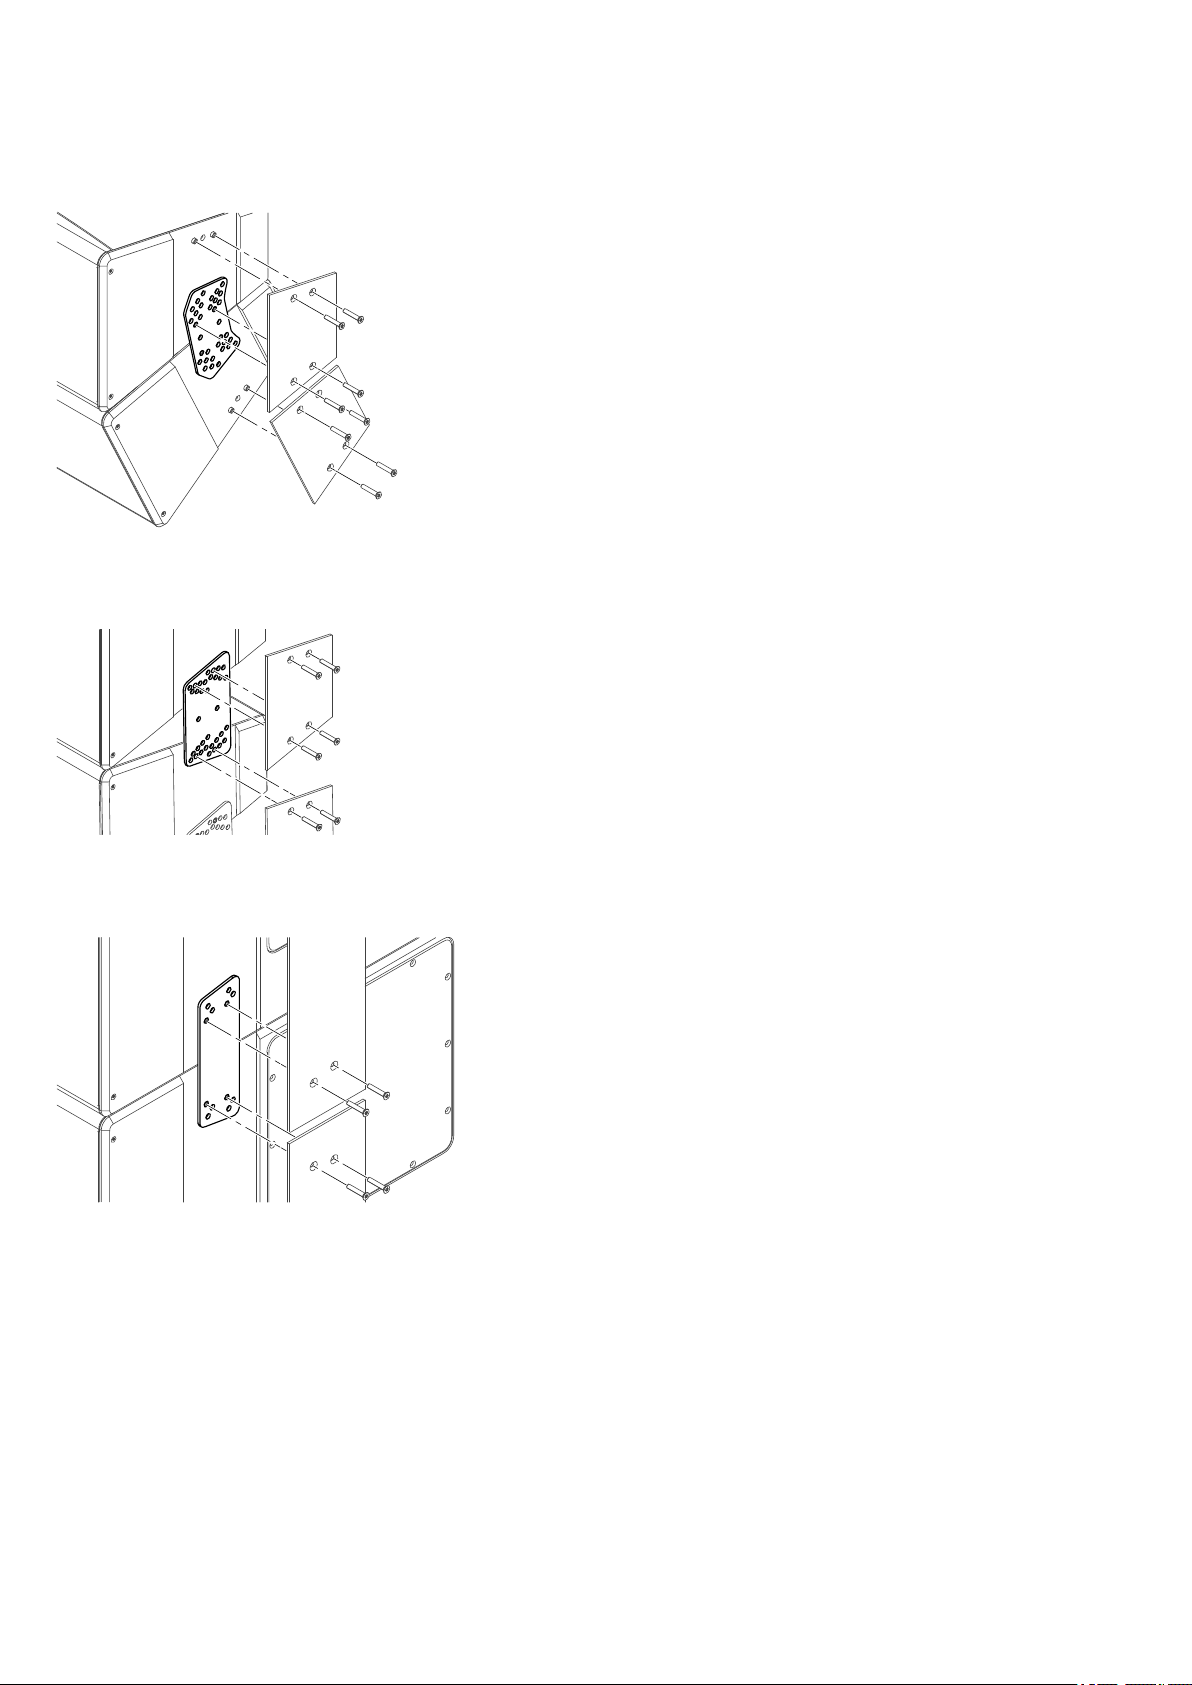
2.2.1. xA-Series loudspeaker cabinets
The cabinet side panels are equipped with integrated rigging
points to accept the corresponding xA connector plates.
To attach the connector plates, the rigging points can easily be
accessed by removing the cover plates.
Once the respective connector plates are attached to both sides of
the cabinets, the cover plates are refitted to build a solid
mechanical connection between the cabinets or to the flying bar.
2.2.2. Z5413 Flying bar connector plate xA
Intended use
The Flying bar connector plate xA is used to connect the flying bar
to the entire array. For this purpose, the connector plate is
equipped with two pairs of holes.
The lower pair is used to connect the flying bar to SUB cabinets, if
these are integrated at the top of the array.
To connect the flying bar to 10A (-D) or 10AL (-D) cabinets, either
the lower or the upper pair can be used. Using the upper pair
allows the flying bar to be connected as close as possible to the
first cabinet of the entire array.
The connector plate is equipped with an additional suspension
hole of 12.5 mm [0.5"] [S] to allow the suspension of the array
(dual pickpoint operation) using a 1t Shackle (e.g. d&b E6507)
instead of the flying bar adapter.
The connector plate can also be used to attach a second pickpoint
at the end of the array to act as a pullback anchor device, if
required.
d&b xA-Series, Rigging manual (1.1 EN) 7
Page 8

NOTICE!
Risk of damage to the rigging components.
When using the additional suspension hole of the connector plate
to suspend and/or lash the array, the Z5414 Flying bar xA must
be used as supporting device between the two connector plates.
Alternatively, the Z5419 Load bar xA can be used for this
purpose. It is recommended to attach the load bar to the rear
fixing hole of the connector plate as shown in the graphic
opposite.
A detailed description of the various suspension options is given in
Þ Chapter 3. "Suspension options" on page 15.
2.2.3. Z5414 Flying bar xA Scope of supply
Qty. d&b Code Description
1
Z5414 d&b Flying bar xA [1]
Including:
4
4
Spring washer [1.1]
Pan head bolt M8 x 18/12.9 [1.2] (torx
#T45)
Intended use
CAUTION!
Risk of damage to the rigging components.
Only use the supplied and specified pan head bolts [1.2] with a
quality grade of 12.9.
The Flying bar xA is used to suspend xA arrays with the following
options:
– Either single or dual pickpoint operation in conjunction with
the Z5415 Flying bar adapter xA. In this combination the
flying bar can be attached in two directions to provide an
extended hole grid using the flying bar adapter.
– Dual pickpoint operation in conjunction with the Z5413 Flying
bar connector plate xA.
– It can also be used to attach a second pickpoint between
adjacent cabinets in the lower part of the array or at the end
of the array acting as a pullback anchor device, if required.
– The flying bar is also used as supporting device for horizontal
array configurations in conjunction with the Q9031 M8
Safety eyebolt.
A detailed description of the various suspension options is given in
Þ Chapter 3. "Suspension options" on page 15.
d&b xA-Series, Rigging manual (1.1 EN)8
Page 9

2.2.4. Z5415 Flying bar adapter xA Scope of supply
Qty. d&b Code Description
1
Z5415 d&b Flying bar adapter xA [2]
Including:
2
2
Pan head bolt M8 x 16, torx T45 [2.1]
Self-securing nut M8 [2.2]
Intended use
The Flying bar adapter xA is used in conjunction with the Z5414
Flying bar xA and allows single or dual pickpoint operation.
It is attached to the flying bar by simply sliding it onto the bar and
fixing it at the center position using the pan head screws [2.1] and
self-securing nuts [2.2].
The flying bar also allows the attachment of two flying bar
adapters at each end of the bar, which are fixed using one pan
head screw [2.1] and self-securing nut [2.2] for each adapter.
A detailed description of the various suspension options is given in
Þ Chapter 3. "Suspension options" on page 15.
2.2.5. Z5419 Load bar xA Scope of supply
Qty. d&b Code Description
1
Z5419 d&b Load bar xA [3]
Including:
2
2
2 Q9031
Spring washer [3.1]
Pan head bolt M8 x 18, torx T45 [3.2]
M8 Safety eyebolt [3.3]
Intended use
The Z5419 Load bar xA can be used in different ways:
– as supporting device instead of using the Z5414 Flying bar
xA.
– to suspend vertical arrays in conjunction with the Z5420 Load
eye bolt.
– as supporting device for horizontal array configurations in
conjunction with the supplied Q9031 M8 Safety eyebolt.
– to attach a second pickpoint between adjacent cabinets in the
lower part of the array or at the end of the array acting as a
pullback anchor device together with the Z5420 Load eye
bolt, if required.
– to attach a second pickpoint to fix the horizontal aiming of the
array using the Q9031 M8 Safety eyebolt and appropriate
steel wire ropes.
A detailed description of the various suspension options is given in
Þ Chapter 3. "Suspension options" on page 15.
d&b xA-Series, Rigging manual (1.1 EN) 9
Page 10
2.2.6. Z5416 Connector plate 10A
The connector plate is used to interconnect 10A (-D) cabinets and
set them to different splay angles.
Splay angles between adjacent cabinets can be set in the range
from 25° to 60° in 5° steps.
Note: When setting up horizontal arrays consisting of 10A (D) cabinets, set the minimum splay angle between adjacent
cabinets to 30° to allow for the attachment of the Z5419
Load bar xA or Z5415 Flying bar adapter xA as supporting
and suspension device.
2.2.7. Z5417 Connector plate 10AL
Intended use
The connector plate is used to interconnect 10AL (-D) cabinets and
set them to different splay angles.
Splay angles between adjacent cabinets can be set to 0°, 1°, 2°,
4°, 6°, 9°, 12° or 15°.
Note: The connector plate can also be used in a mixed
vertical array when adding 10A (-D) cabinets below a SUB
cabinet.
2.2.8. Z5418 Connector plate xA-SUB
Intended use
The connector plate is used to interconnect xA-SUB cabinets and
allows splay angle settings between adjacent SUB cabinets of 0°,
2.5° or 5°.
d&b xA-Series, Rigging manual (1.1 EN)10
Page 11
2.2.9. Z5421 Connector plate xA, neg. splay
Intended use
The connector plate is used in ground stack setups to apply a
downtilt (negative splay) to the first TOP cabinet.
The connector plate can also be used in mixed vertical arrays to
apply either an uptilt to the first TOP cabinet below a SUB cabinet
or a downtilt to the first TOP cabinet above a SUB cabinet.
Angles can be set to 0°, 1°, 2°, 4°, 6° or 9°.
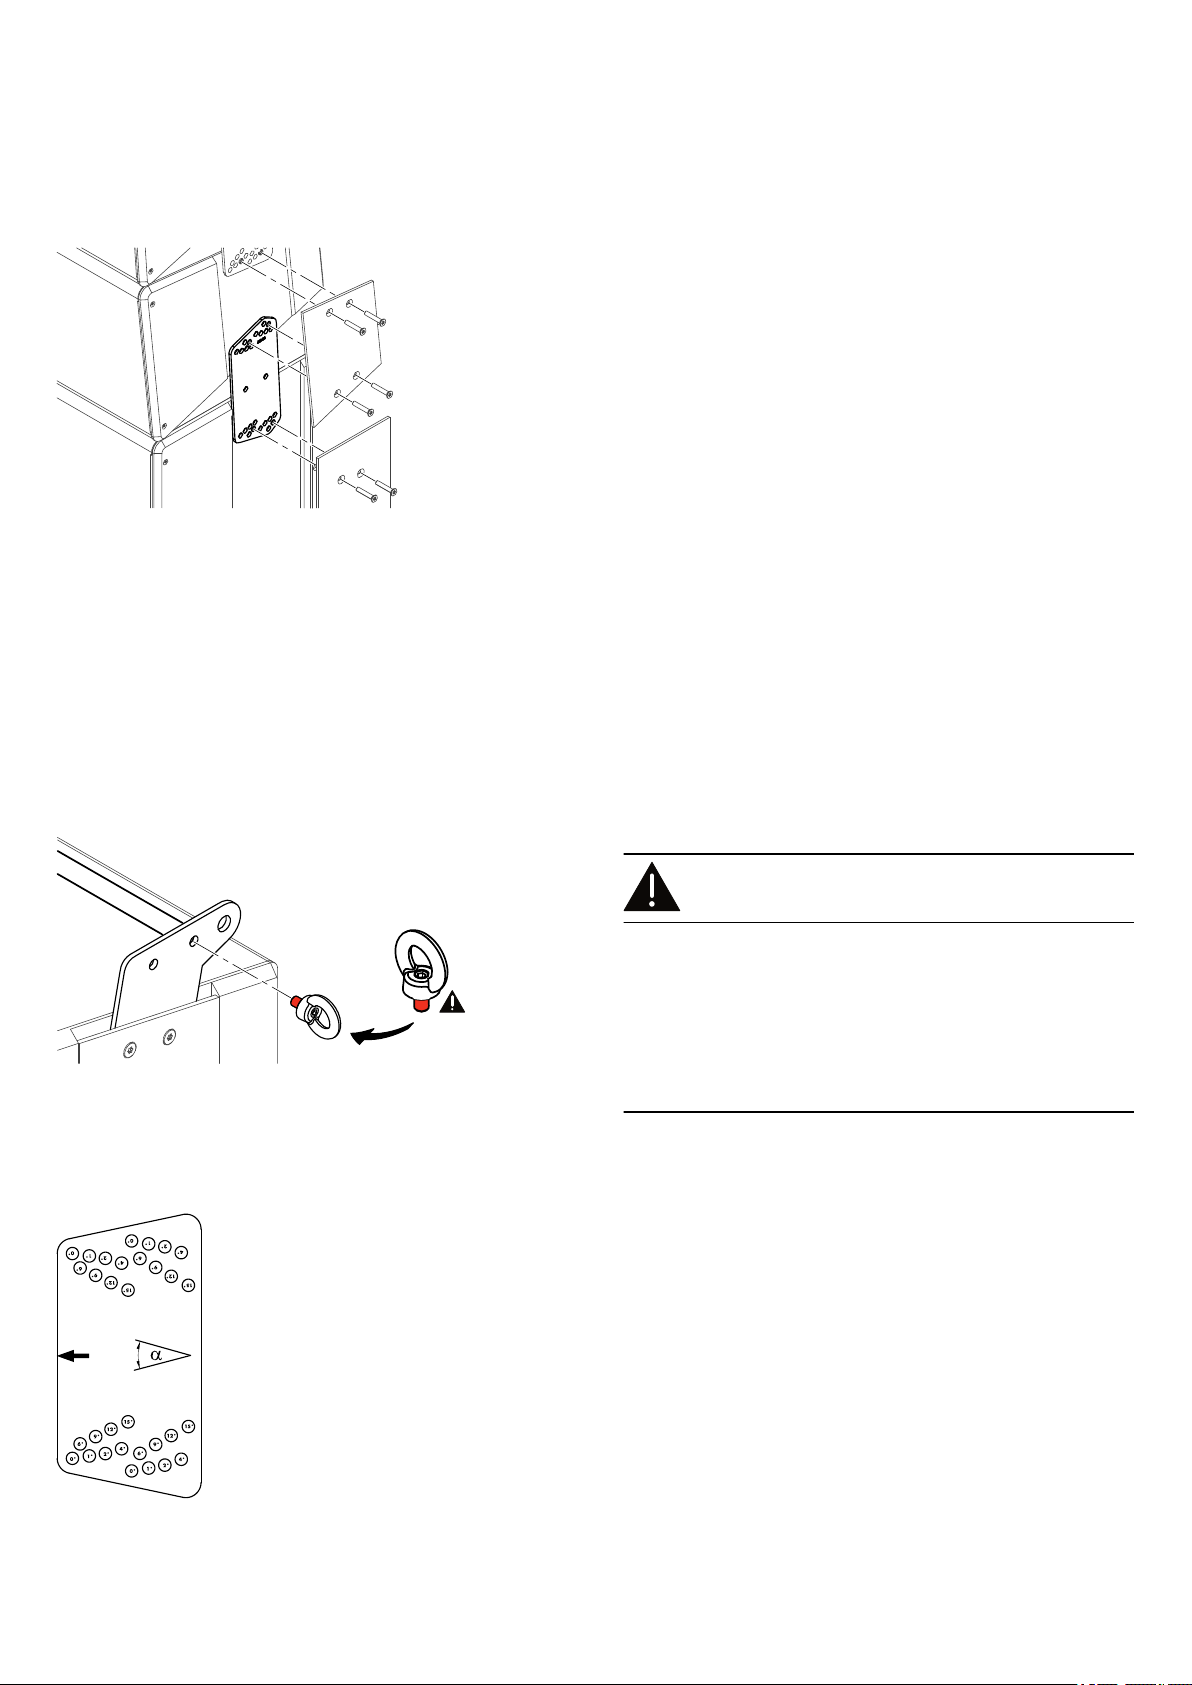
2.2.10. Z5420 Load eyebolt
Intended use
The Z5420 Load eye bolt is rotatably supported and is used to
suspend the array in conjunction with the Z5413 Flying bar
connector plate xA and the Z5419 Load bar xA.
It can also be used to attach a second pickpoint between adjacent
cabinets in the lower part of the array or at the end of the array
acting as a pullback anchor device together with the Z5419 Load
bar xA, if required.
Assembly
CAUTION!
Potential risk of loosening of the fixing screw.
The integrated fixing screw of the eyebolt is rotatably supported
and therefore cannot be secured against loosening using a spring
or lock washer. To prevent the screw from loosening, an
appropriate securing glue such as "Loctide®" must be used.
When attaching the eyebolt, handtighten the screw using a 5 mm
Allen hex key. Do not use any extension tool as this might apply
too much torque and cause an overload on the fixing screw.
2.3. Setting the splay angle
The procedure of setting the splay angles between adjacent
cabinets (TOP or SUB cabinets) is the same for all connector plates
of the xA-Series. For this purpose, the connector plates are
equipped with a hole grid at each end.
To set the desired splay angle, use the respective pair of holes on
the connector plate for the upper and for the lower cabinet.
A correspondingly labeled diagram of the connector plate's hole
grids and possible angle settings is provided in the following
section (Þ Chapter 2.4. "Connector plate hole grids"
on page 13.
The following graphics show example settings for each of the
connector plates, indicating the holes to be used and the set splay
angles.
d&b xA-Series, Rigging manual (1.1 EN) 11
Page 12
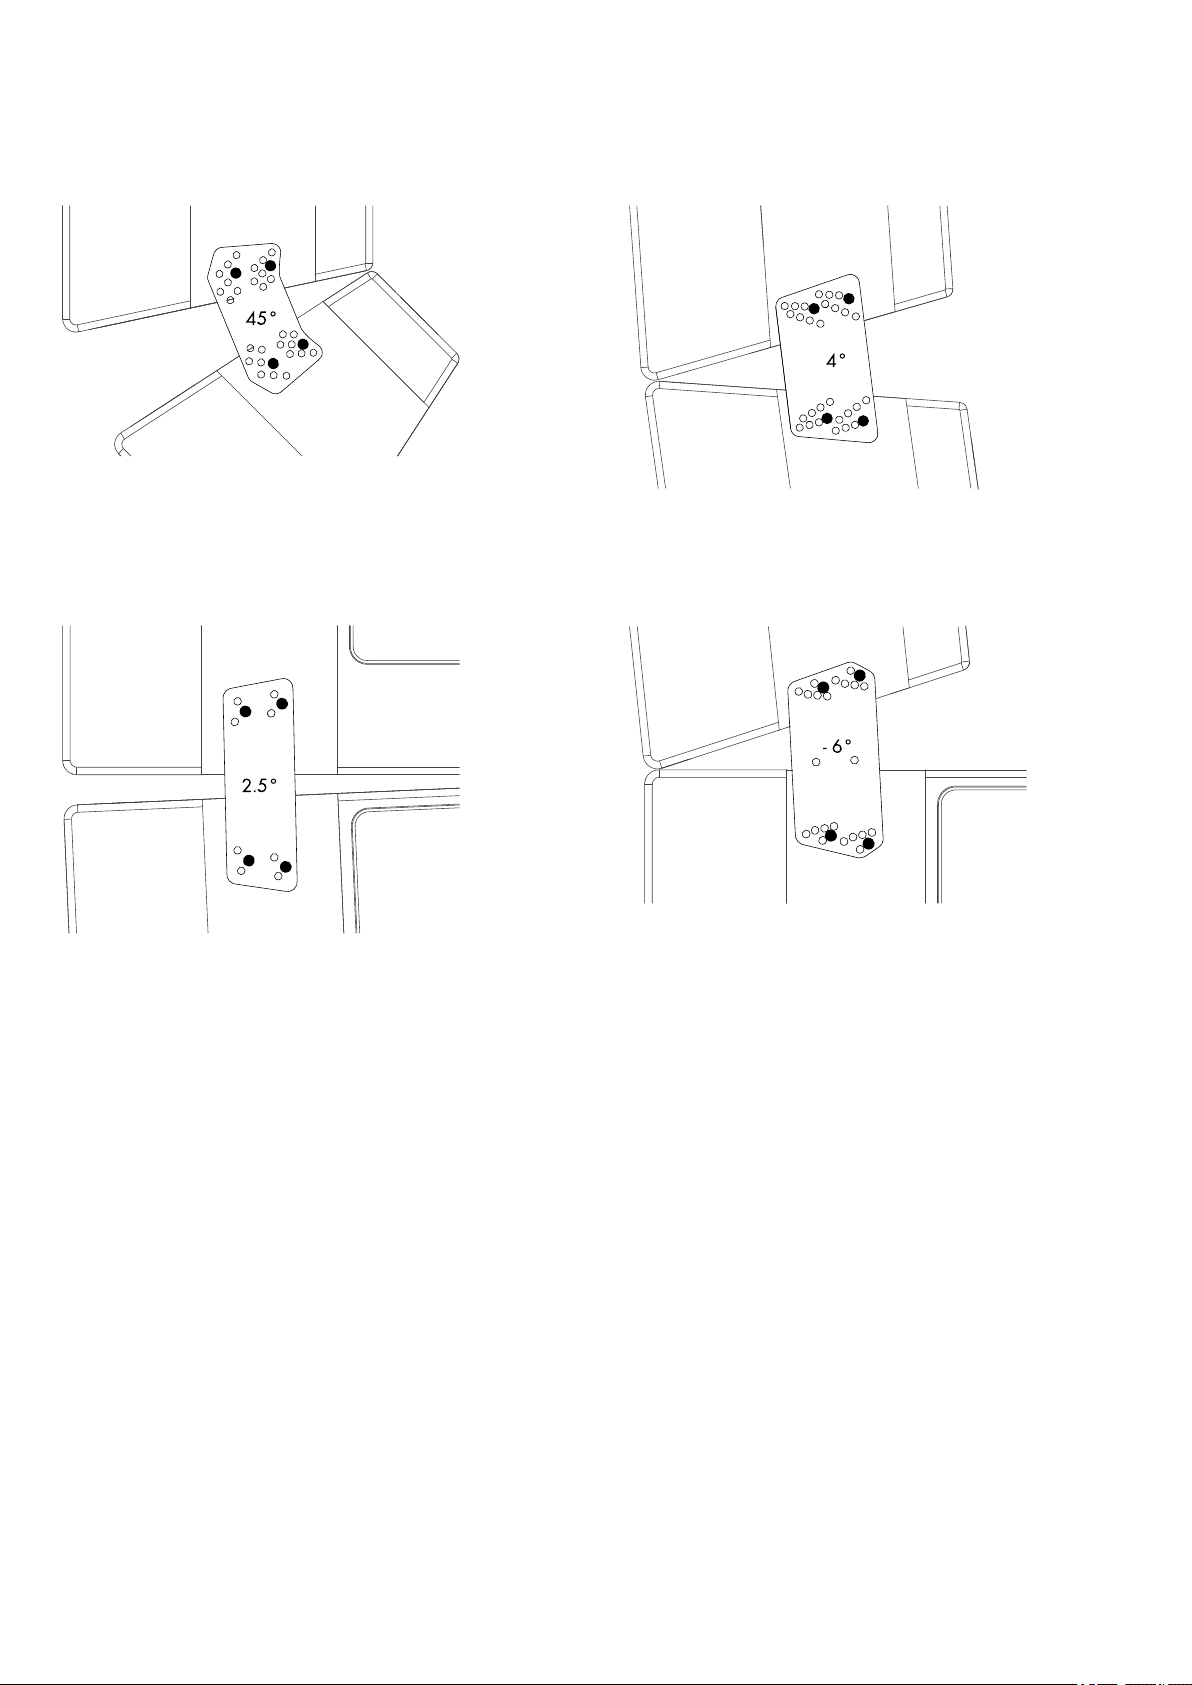
Fig. 1: Z5416 Connector plate 10A, angle setting
Fig. 3: Z5418 Connector plate xA-SUB, angle setting
Fig. 2: Z5417 Connector plate 10AL, angle setting
Fig. 4: Z5421 Connector plate xA, neg. splay, angle setting
d&b xA-Series, Rigging manual (1.1 EN)12
Page 13
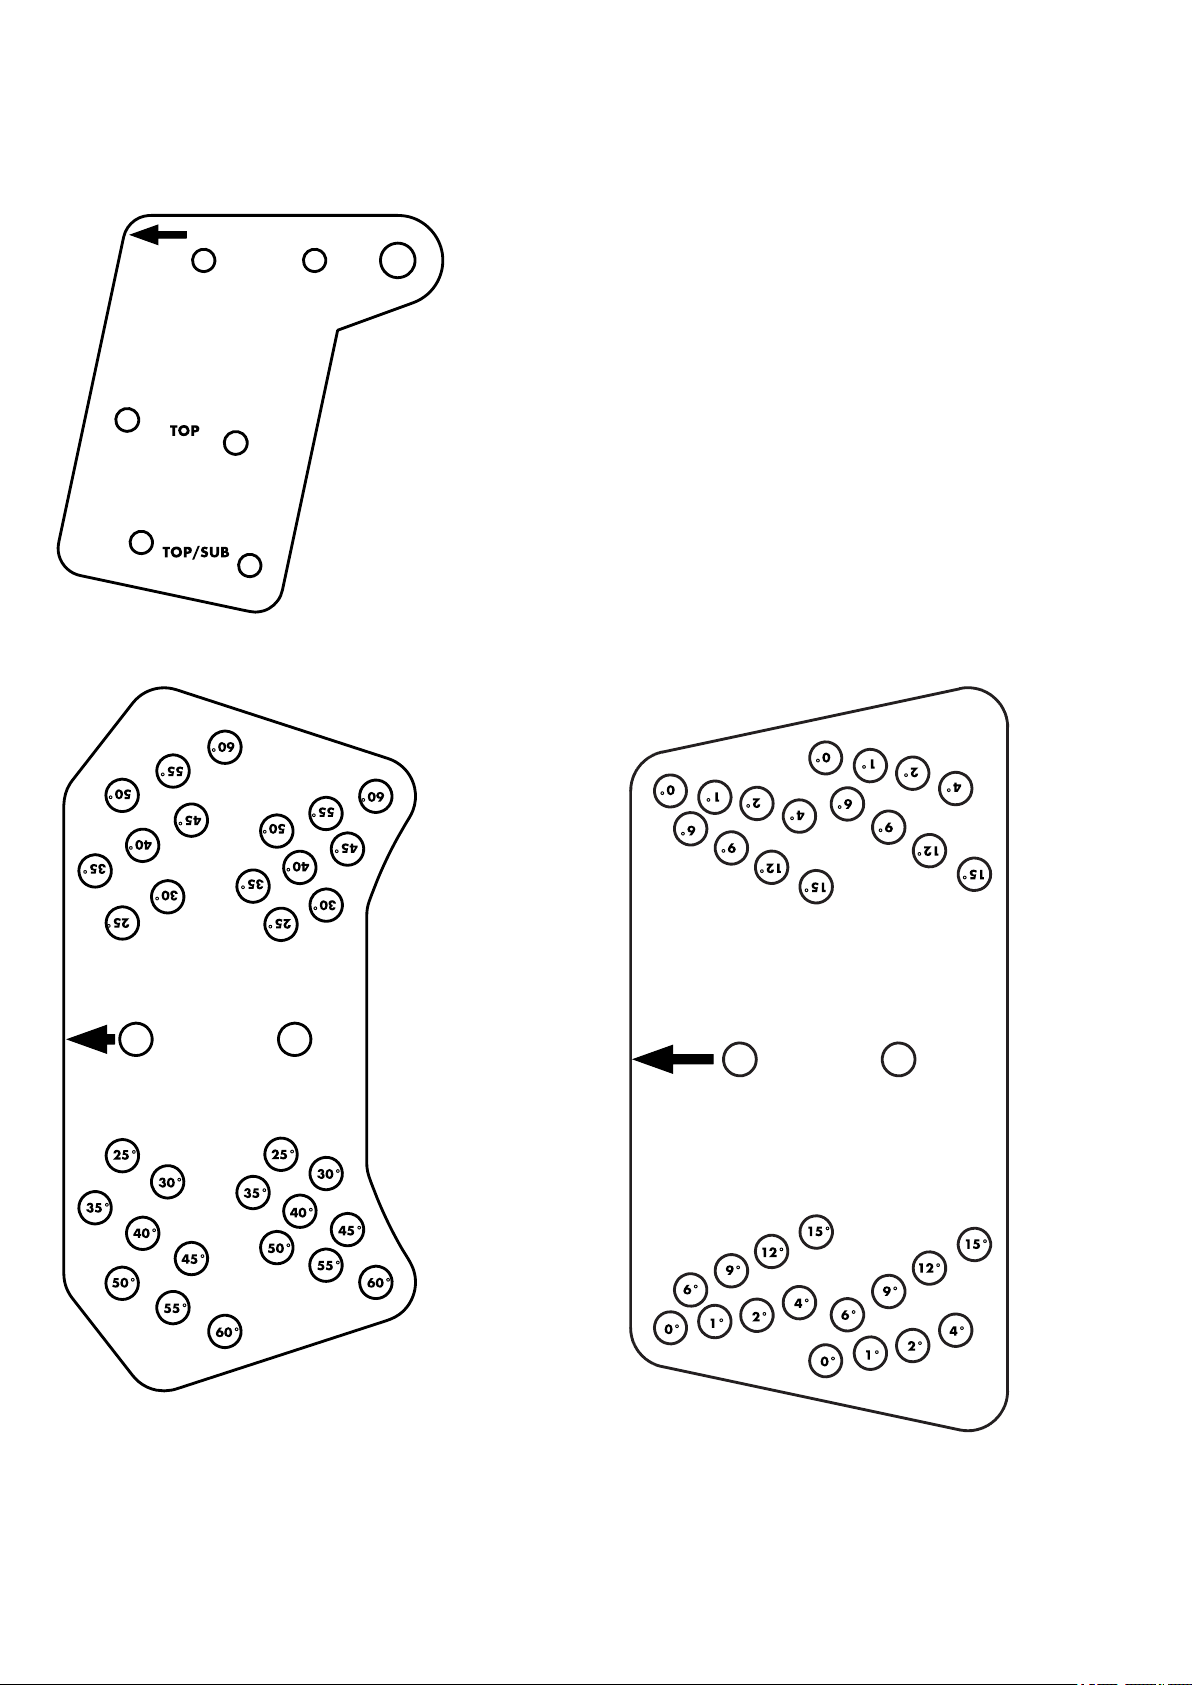
Fig. 5: Z5413 Flying bar connector plate xA
2.4. Connector plate hole grids
In the following, the hole grids of the xA connector plates are
labeled with the corresponding angle settings.
Note:
– The graphics are not to scale.
– The arrow indicates the mounting direction of the
connector plate toward the front of the respective cabinet.
Fig. 6: Z5416 Connector plate 10A
Fig. 7: Z5417 Connector plate 10AL
d&b xA-Series, Rigging manual (1.1 EN) 13
Page 14

Fig. 8: Z5418 Connector plate xA-SUB
Fig. 9: Z5421 Connector plate xA, neg. splay
d&b xA-Series, Rigging manual (1.1 EN)14
Page 15

3. Suspension options
The xA-Series rigging system provides several options to suspend
xA-Series arrays depending on the various requirements on-site.
WARNING!
The array must be suspended using appropriate steel wires or
hoisting chains or using the d&b Z5147 Rota clamp (single
pickpoint operation). Any other type of suspension of the array is
not allowed.
The working load limits of the steel wires or chain hoists and their
suspension points must be high enough to carry the total system
weight.
Each of the suspension points must be able to carry the total system
weight.
3.1. Vertical arrays
Vertical xA-Series arrays may consist of 10AL (-D) or 10A (-D)
cabinets in combination with 18A or 27A subwoofers. This section
describes the suspension options for 10AL (-D) line arrays planned
using ArrayCalc.
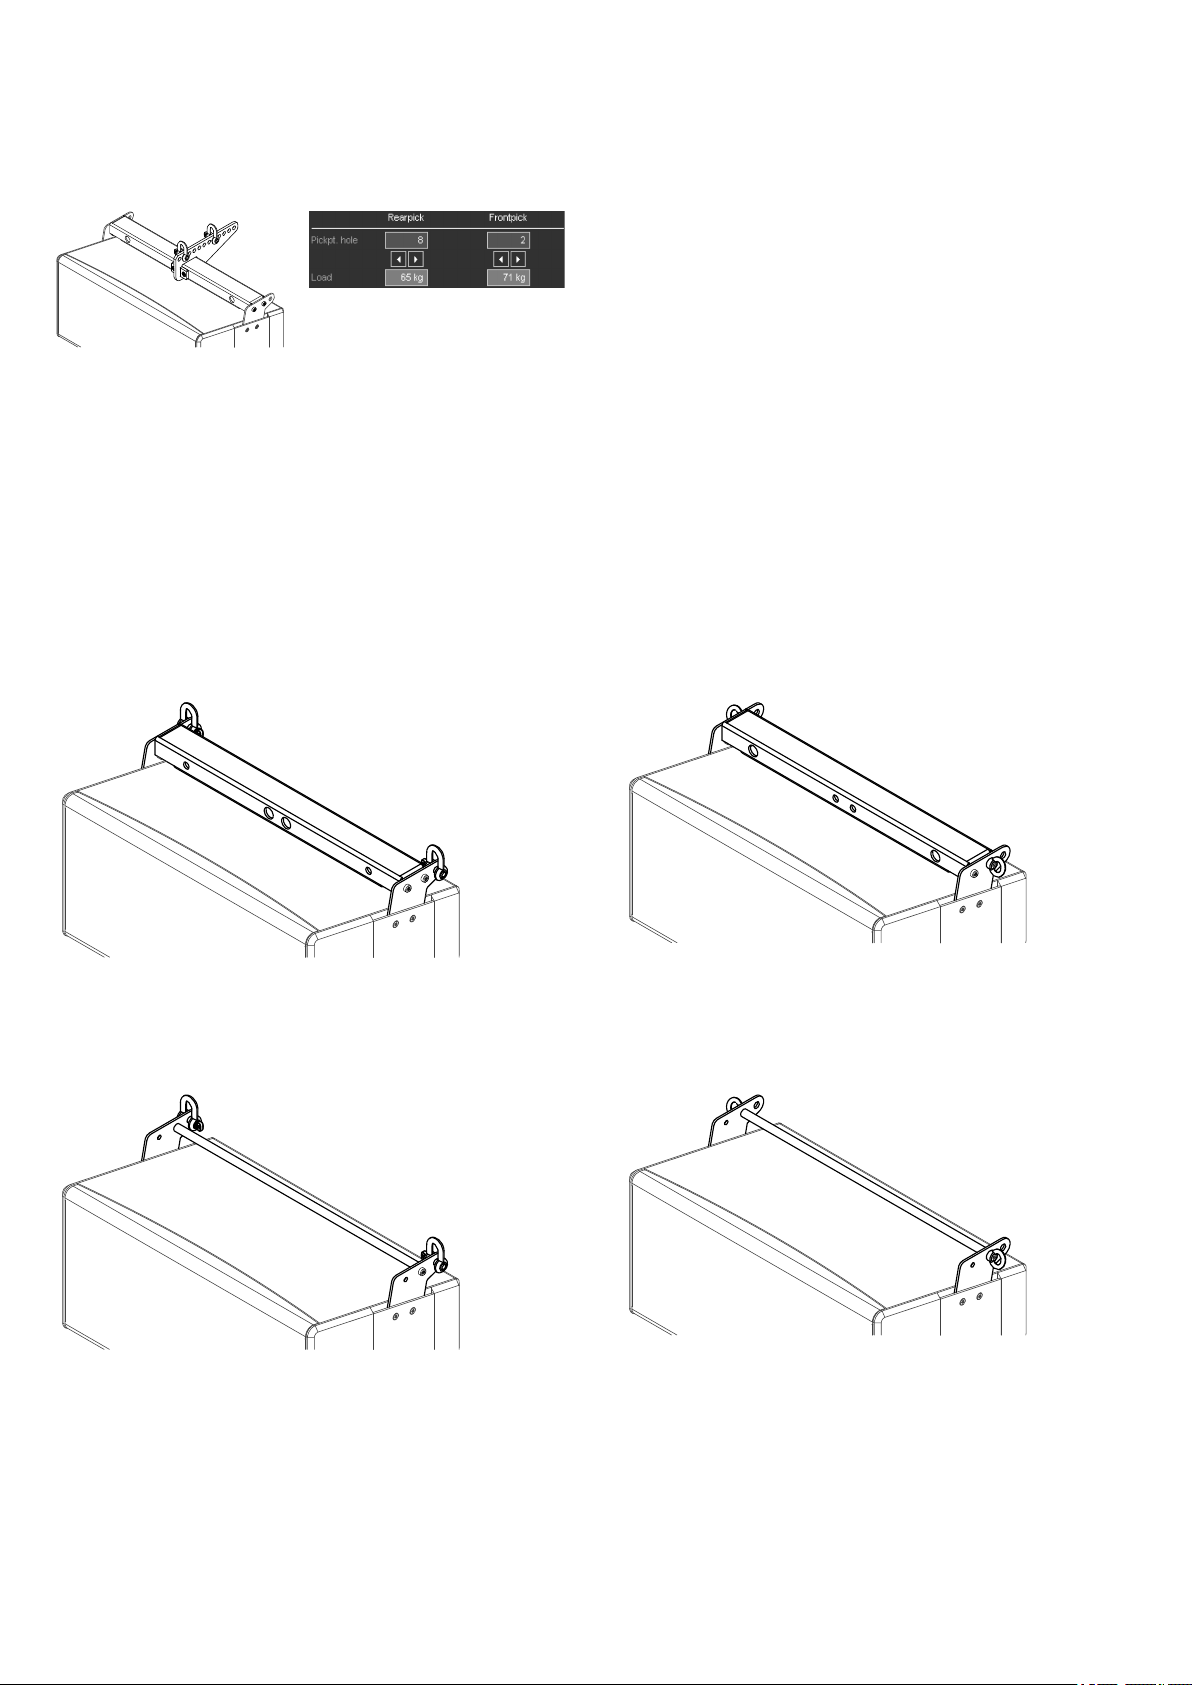
3.1.1. Z5415 Flying bar adapter xA
The array is suspended using the Z5414 Flying bar xA together
with the Z5415 Flying bar adapter xA. Single or dual pickpoint
operation is possible.
On the upper edge of the flying bar adapter twelve 12.5 mm
[0.5"] holes are provided to accept:
– 1t Shackle (e.g. d&b E6507)
– d&b Z5147 Rota clamp
Þ single pickpoint operation to allow the attachment to
overhead bars or truss with a tube diameter of up to 51 mm
(2").
The adapter can be aligned in two directions (rearward [R] or
forward [F]) by simply turning the flying bar through 180°.
The corresponding hole positions for either single or dual pickpoint
operation are calculated using ArrayCalc.
Note: The calculated hole positions also apply when two
flying bar adapters are attached to the flying bar.
Single pickpoint operation
In single pickpoint operation, the position of the chosen hole
defines the overall vertical aiming of the entire array.
Within ArrayCalc the orientation of the adapter changes
according to the center of gravity of the array. If both orientations
are possible, the rearward orientation [R] is chosen. The direction
in which the holes are counted changes correspondingly.
d&b xA-Series, Rigging manual (1.1 EN) 15
Page 16
Dual pickpoint operation
With dual pickpoint operation the overall vertical aiming of the
entire array is set by trimming the hoist motors after the array has
been fully assembled and lifted to its operating position.
3.1.2. Additional suspension options
In addition to the standard suspension option using the Flying bar
xA together with the Flying bar adapter xA, vertical arrays can be
suspended using one of the following options.
Note: All these options require a second pickpoint acting as
a pullback anchor device to set the overall vertical aiming of
the entire array. This second pickpoint is attached in the lower
part of the array between adjacent cabinets or at the end of
the entire array. Refer to .
Option 1: Suspension of the array using the Z5414 Flying bar
xA together with 2 x 1t shackle, e.g. d&b E6507.
Option 3: Suspension of the array using the Z5419 Load bar
xA together with 2 x 1t shackle, e.g. d&b E6507.
Option 2: Suspension of the array using the Z5419 Load bar
xA together with 2 x Z5420 Load eye bolt.
Option 4: Suspension of the array using the Z5419 Load bar
xA together with 2 x Z5420 Load eye bolt.
d&b xA-Series, Rigging manual (1.1 EN)16
Page 17

4. xA-Series arrays and assembly
4.1. xA-Series array configurations
xA-Series arrays can be assembled in the following ways.
Fig. 10: 10AL line array 9-deep Fig. 11: xA-Series mixed array,
type 1
Fig. 12: xA-Series mixed array,
type 2
Fig. 13: xA-SUB column
Fig. 14: 10A array 3-deep Fig. 15: xA-Series ground stack
d&b xA-Series, Rigging manual (1.1 EN) 17
Page 18
4.2. Assembly preparations
xA-Series arrays are mainly assembled horizontally on the ground.
Assembly may be carried out by a single person. However, as
during assembly the array needs to be rotated through 180° and
depending on the size of the array, a second person should assist
in the work.
4.2.1. Tools required
– Screw driver with torx bit TX30.
– Torx socket wrench (Torque wrench) with torx bit TX45.
– 13 mm hex head socket wrench.
4.2.2. Assembly area
To carry out the assembly on the ground, make sure:
– the surface is flat and clean.
– there is enough space for the overall dimensions of the array.
– to provide an additional protective underlay for assembly to
prevent the cabinets from scratching or other damage during
assembly.
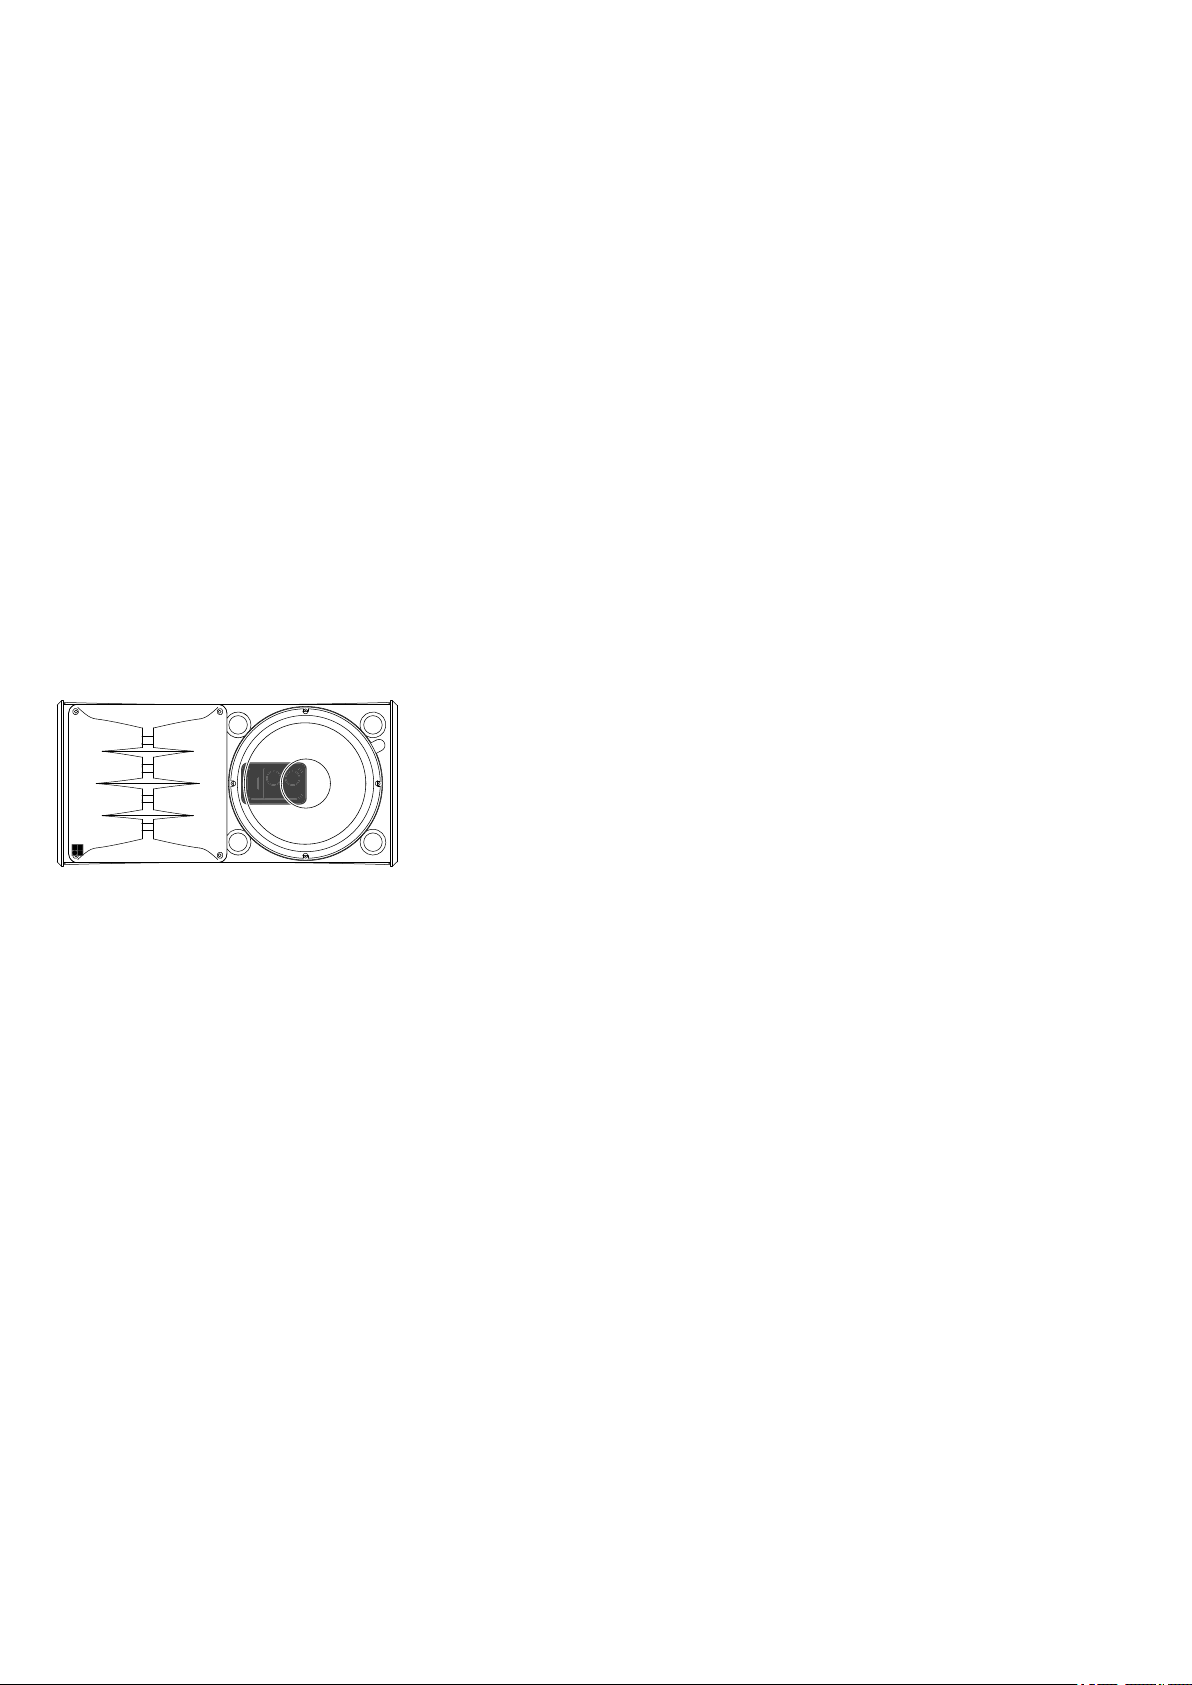
4.2.3. Orientation of the HF section
Before starting to assemble the array, you must define the
orientation of the HF section of the TOP cabinets.
The xA-Series TOP cabinets have a biaxial design. In default
orientation, the HF waveguide is located to the left, viewed from
the audience side. To enable a symmetrical setup for stereo
systems, the cabinet orientation may be reversed.
The cabinet's connector plate at the rear may serve to indicate the
orientation of the HF section, as shown in the graphic opposite.
4.3. Vertical arrays
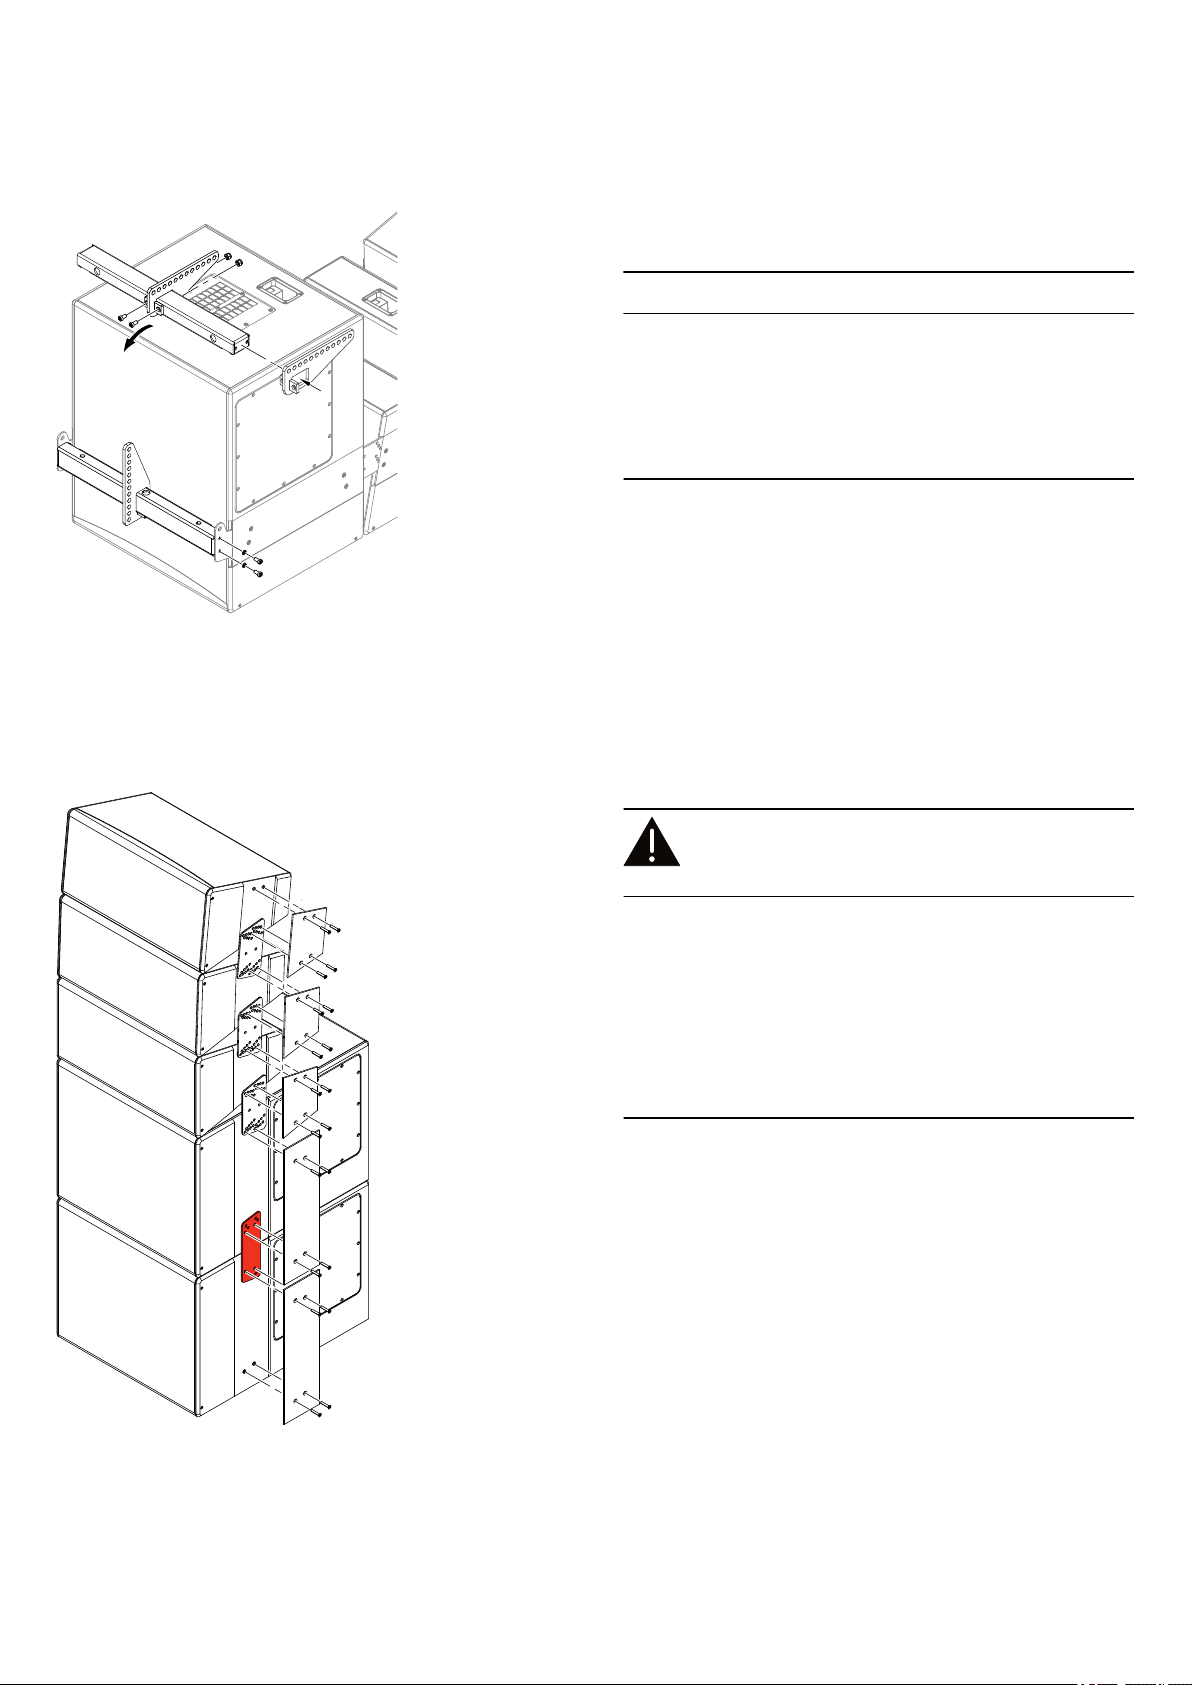
4.3.1. Horizontal assembly on the ground
This section describes the assembly of a mixed 10AL line array.
The same procedure applies to the assembly of 10A arrays. SUB
columns may, most appropriately, be assembled vertically.
d&b xA-Series, Rigging manual (1.1 EN)18
Page 19

4.3.1.1. Assembly procedure Joining the cabinets together
The procedure applies to both sides of the cabinets.
1. Place the cabinets with their side panels next to each other in
the right order and with the right orientation of the HF sections.
2. Remove the cover panels.
3. Attach the respective connector plates and set the desired
splay angles.
4. Refit the cover panels and tighten the screws to a torque of
12 N·m.
5. Recheck your work.
6. Carefully turn the array through 180°.
Þ Depending on the size (length) of the array, a second
person should assist you.
7. Complete the assembly by proceeding in the same manner.
8. Carefully turn the array over onto the front of the cabinets.
9. Recheck all your work:
– Check the splay angles.
– Ensure all screws are properly tightened.
The array is now ready for the attachment of the desired
Þ
suspension device.
d&b xA-Series, Rigging manual (1.1 EN) 19
Page 20
Attaching the suspension device
Depending on the suspension option chosen, attach the suspension
device correspondingly.
NOTICE!
Observe all safety instructions applicable for the respective
suspension option given in Þ Chapter 3. "Suspension options"
on page 15.
Before hoisting the array to its operating position, recheck all your
work. In particular, make sure that all screws are properly
tightened.
Hoisting the array
When all the mechanical adjustments, system checks and safety
checks have been performed, the array can be hoisted up to its
operating position.
Depending on the total system weight and overall size (length) of
the array, adequate precautions must be taken during the hoisting
procedure. For this purpose, refer to Þ Chapter 5. "Hoisting the
array" on page 21.
4.4. Ground stacks
WARNING!
Potential risk of personal injury and/or
damage to material!
Always secure ground stacked setups against movement and
possible tipping over.
When xA-Series subwoofers 18A- and 27A-SUB are stacked, the
cabinets must be interconnected on both sides using the Z5418
Connector plate xA-SUB.
It is also recommended to place the entire ground stack onto an
appropriate additional non-slip mat to prevent the ground stack
from moving.
Assembly
When assembling mixed ground stacks, the same requirements
regarding the assembling area, orientation of the HF section and
safety precautions apply as described in Þ Chapter 4.2.
"Assembly preparations" on page 18.
The assembly of mixed ground stacks is carried out in the same
manner as described in Þ Chapter 4.3.1. "Horizontal assembly
on the ground" on page 18.
SUB stacks may be assembled in vertical order.
d&b xA-Series, Rigging manual (1.1 EN)20
Page 21

5. Hoisting the array
Due to the various array configurations and on-site conditions an
applicable hoisting procedure is not possible in general.
Depending on the array configuration, system weight and on-site
conditions the persons hoisting the array must review the on-site
situation and decide an applicable hoisting procedure respectively.
In addition observe the following safety guidelines.
5.1. Safety guidelines
CAUTION!
Unpredictable dynamic forces and swing.
When hoisting the array, unpredictable dynamic forces as well as
swinging of the array must be taken into account. This may lead to
personal injury and/or damage to the rigging components and
loudspeaker cabinets.
Ensure that there is nobody directly underneath or in the vicinity of
the load who is not involved in the setup.
xA-Series arrays with a total system weight of up to 140 kg
(309 lb) may be lifted directly from their horizontal assembly
position (i.e. the arrays were assembled horizontally on the
ground).
– Before starting to hoist the array, make sure to prevent the
cabinets from scratching or other possible damage.
– Ensure the array's pickpoint is in line with the rigging point and
hoisting devices.
– When changing over from horizontal to vertical position,
observe the following (depending on the size (length) and
weight of the array):
– Two persons, one on each side of the array, should support
you to prevent unpredictable lateral tensile forces from
acting on the array.
– It is advisable that all persons involved in hoisting the array
are in close proximity so that you will be able to give
instructions, if necessary.
– When the array is about to leave the ground, make sure there
is enough support to prevent the array from unpredictable
movement and swinging.
– During the further hoisting procedure raise the array slowly
and evenly so that it does not swing or move from side to side.
d&b xA-Series, Rigging manual (1.1 EN) 21
Page 22

6. Declarations
6.1. Manufacturer's declaration
This declaration covers:
d&b xA-Series loudspeaker cabinets
– Z1555/56, 10A/10A-D
– Z1557/58, 10AL/10AL-D
– Z1571, 18A-SUB
– Z1581, 27A-SUB
d&b xA-Series rigging components
– Z5413 Flying bar connector plate xA
– Z5414 Flying bar xA
– Z5415 Flying bar adapter xA
– Z5416 Connector plate 10A
– Z5417 Connector plate 10AL
– Z5418 Connector plate xA-SUB
– Z5419 Load bar xA
– Z5420 Load eye bolt
– Z5421 Connector plate xA, neg. splay
National standards and technical specifications
applied:
DIN 18 800, DIN 1055, BGV C1, BGI 810-3.
Backnang, 2012-02-03
Frank Bothe,
Managing Director
d&b audiotechnik GmbH
6.2. Disposal
When out of use the rigging components must be disposed of in
accordance with the national environmental regulations.
Ensure that damaged rigging components are disposed of in a
way that they cannot be used again.
d&b xA-Series, Rigging manual (1.1 EN)22
Page 23

D2962.EN .01, 02/2012 © d&b audiotechnik GmbH
www.dbaudio.com
 Loading...