

Page 1

Dazzle
®
Universal 3 in 1 Reader/Writer™
User’s Guide
Copyright SCM Microsystems. All rights reser ved. Trademarks are used for informational purposes, and remain the property of their
owners.
Revision C 1/7
/03
Page 2

Table of Contents
Introduction
Congratulations!. . . . . . . . . . . . . . . . . . . . . . . . . . . . . . . . . . . . . . . . . . . . . . . 3
What’s Included . . . . . . . . . . . . . . . . . . . . . . . . . . . . . . . . . . . . . . . . . . . . . . . 4
About This Guide . . . . . . . . . . . . . . . . . . . . . . . . . . . . . . . . . . . . . . . . . . . . . . 5
Getting Started
Minimum System Requirements . . . . . . . . . . . . . . . . . . . . . . . . . . . . . . . . . . . 6
Registering Your 3 in 1 Reader/Writer . . . . . . . . . . . . . . . . . . . . . . . . . . . . . . . 7
Hardware Over view. . . . . . . . . . . . . . . . . . . . . . . . . . . . . . . . . . . . . . . . . . . . . 8
Software Overview . . . . . . . . . . . . . . . . . . . . . . . . . . . . . . . . . . . . . . . . . . . . . 8
Installing the Software on a PC . . . . . . . . . . . . . . . . . . . . . . . . . . . . . . . . . . . . 9
Installing the Hardware on a PC. . . . . . . . . . . . . . . . . . . . . . . . . . . . . . . . . . . 14
Installing the Software on a Macintosh . . . . . . . . . . . . . . . . . . . . . . . . . . . . . 16
Installing the Hardware on a Macintosh . . . . . . . . . . . . . . . . . . . . . . . . . . . . . 20
Using the 3 in 1 Reader/Writer
Digital Media Card Compatibility . . . . . . . . . . . . . . . . . . . . . . . . . . . . . . . . . . 22
Inserting a SmartMedia Card . . . . . . . . . . . . . . . . . . . . . . . . . . . . . . . . . . . . 23
Inserting a CompactFlash Card . . . . . . . . . . . . . . . . . . . . . . . . . . . . . . . . . . . 24
Inserting a Memory Stick Card . . . . . . . . . . . . . . . . . . . . . . . . . . . . . . . . . . . 25
Accessing a Card on a PC . . . . . . . . . . . . . . . . . . . . . . . . . . . . . . . . . . . . . . . 26
Formatting a Card on a PC . . . . . . . . . . . . . . . . . . . . . . . . . . . . . . . . . . . . . . 27
Removing a Card on a PC . . . . . . . . . . . . . . . . . . . . . . . . . . . . . . . . . . . . . . . 32
Mounting and Accessing a Card on a Macintosh . . . . . . . . . . . . . . . . . . . . . . . 32
Formatting a Card on a Macintosh . . . . . . . . . . . . . . . . . . . . . . . . . . . . . . . . . 33
Removing a Card on a Macintosh . . . . . . . . . . . . . . . . . . . . . . . . . . . . . . . . . 39
Troubleshooting
Frequently Asked Questions . . . . . . . . . . . . . . . . . . . . . . . . . . . . . . . . . . . . . 40
Technical Support
Dazzle’s North American Technical Resource Center . . . . . . . . . . . . . . . . . . . 43
Dazzle’s European Technical Resource Center . . . . . . . . . . . . . . . . . . . . . . . . 44
Warranty . . . . . . . . . . . . . . . . . . . . . . . . . . . . . . . . . . . . . . . . . . . . . . . . . . . 46
Dazzle Universal 3 in 1 Reader/Writer User’s Guide • Table of Contents • Page 2
Page 3
Introduction
Congratulations!
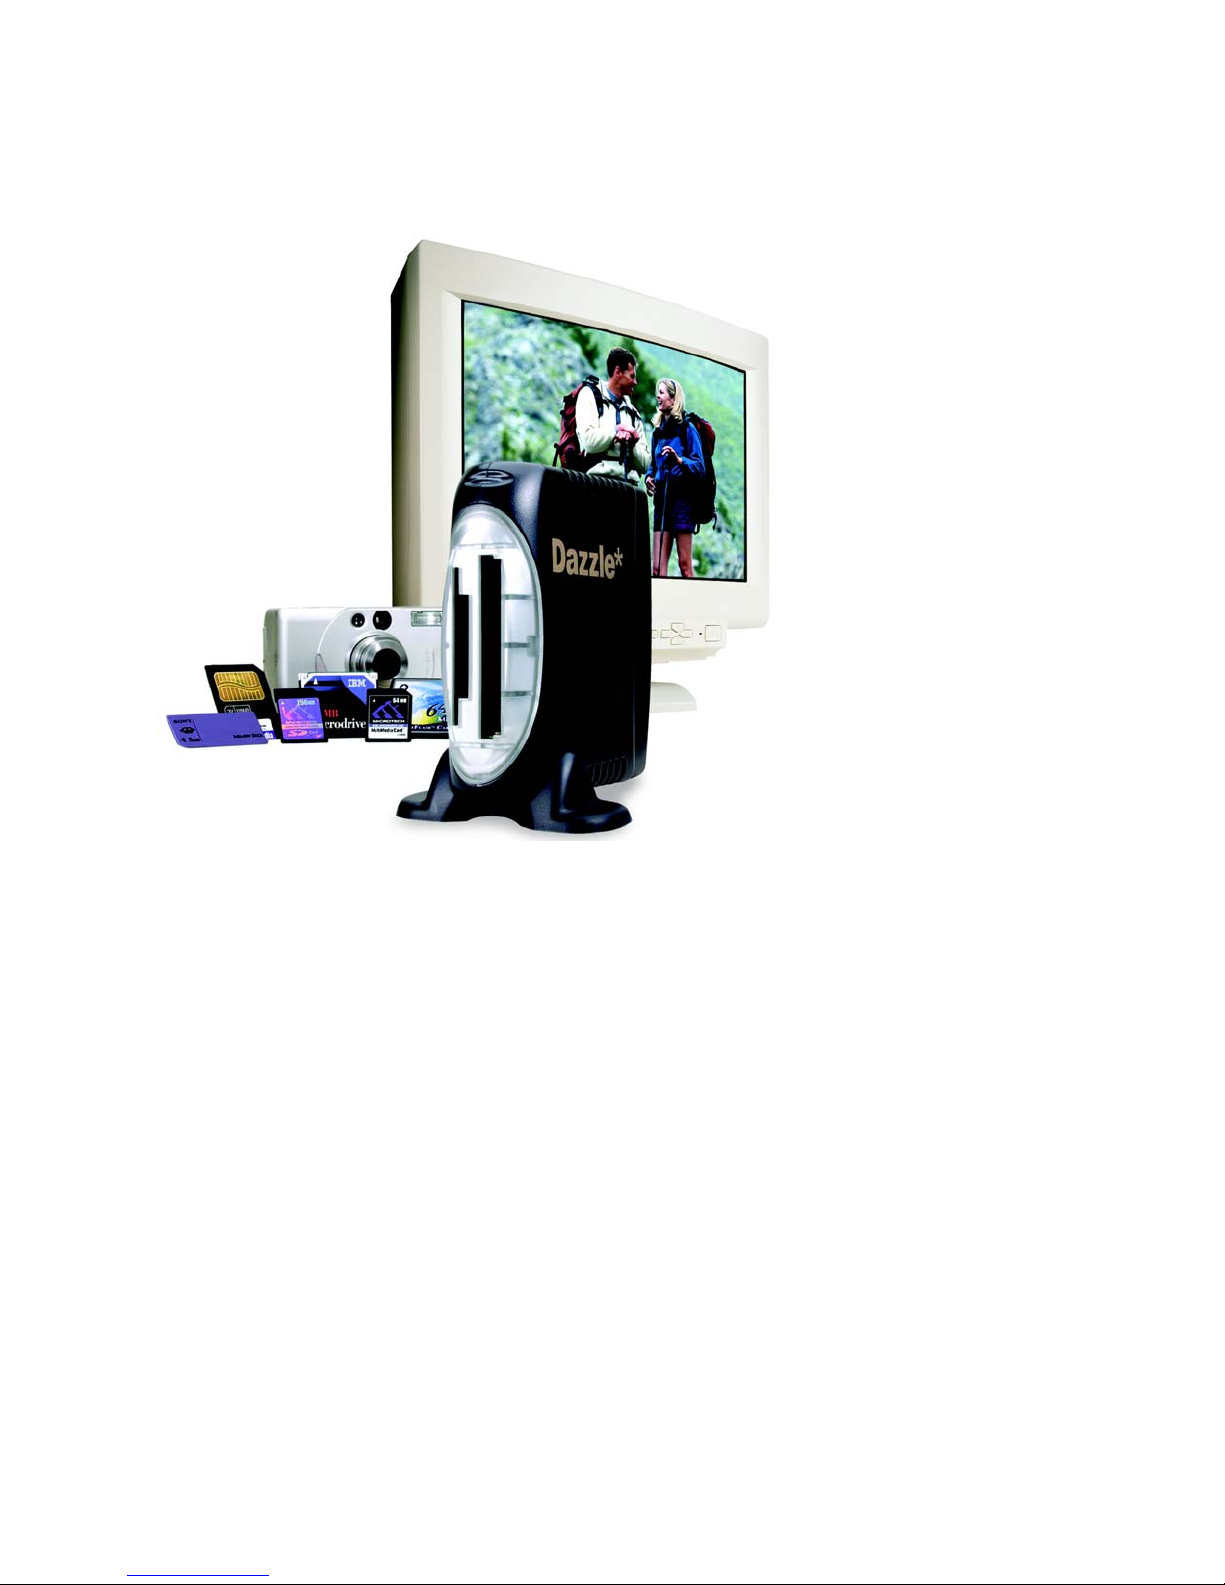
You have just purchased the Dazzle Universal 3 in 1 Reader/Writer™ (also referred to as
3 in 1 Reader/Writer or reader/writer throughout this guide).
The 3 in 1 Reader/Writer reads photos, MP3’s, or other files from your digital media without the need to connect your digital device to your PC. The 3 in 1 Reader/Writer reads
CompactFlash™ (Type I and II, including IBM Microdrive™), Memory Stick™, and Smar tMedia™, allowing you to access over 90% of the digital media in use today. With the supplied
Dazzle OnDVD software, you can also create photo slideshows for your DVD player.
You can connect your 3 in 1 Reader/Writer to computers with USB 1.1 or USB 2.0 ports.
In either case, the 3 in 1 Reader/Writer transfers data at the Full-Speed rate.
Dazzle Universal 3 in 1 Reader/Writer User’s Guide • Introduction • Page 3
Page 4
What’s Included
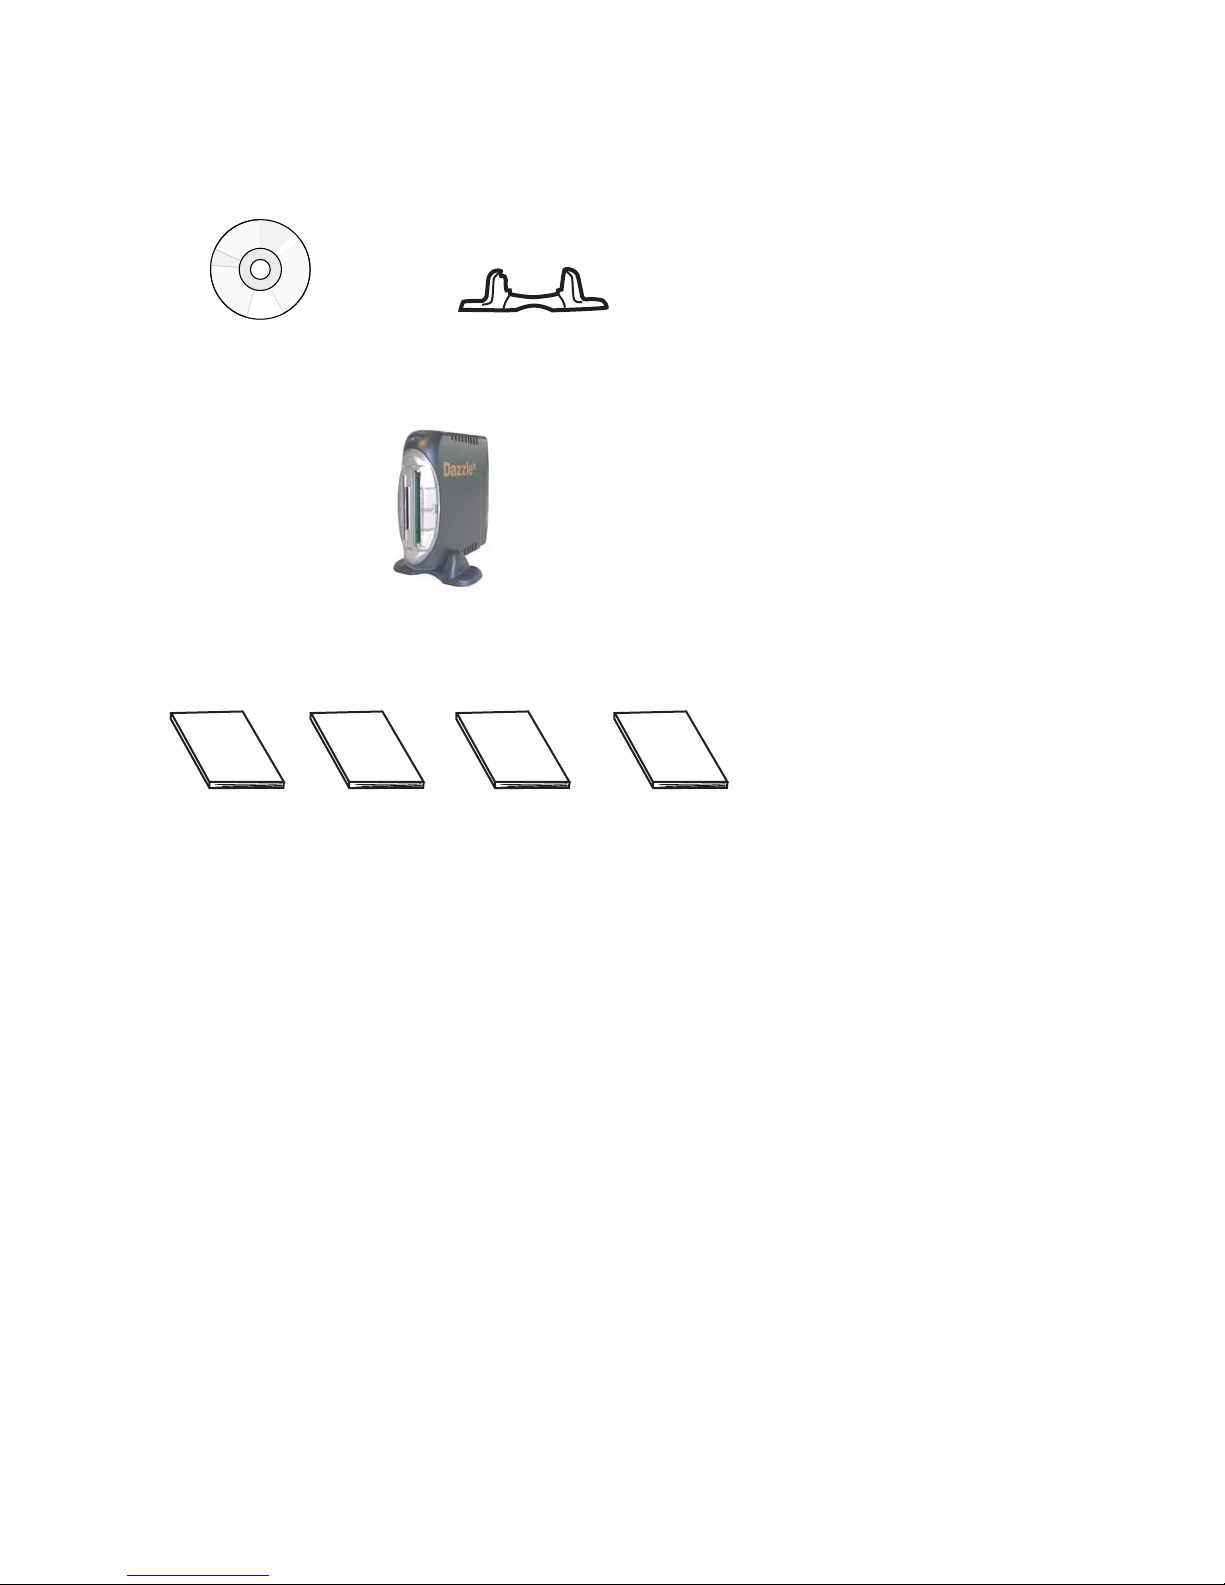
Dazzle Installation CD Base
3 in 1 Reader/Writer
OnDVD
User’s Guide
(Included on CD)
3 in 1 Reader/Writer
User’s Guide
(Included on CD)
3 in 1 Reader/Writer
Quickstart Guide
(included on inside
of packaging)
Technical Support
Resources
(Included on CD)
Dazzle Universal 3 in 1 Reader/Writer User’s Guide • Introduction • Page 4
Page 5

About This Guide
This Guide explains how to use the Dazzle 3 in 1 Reader/Writer. Following is a description
of each section:
“Getting Started” lists the minimum system requirements for the 3 in 1 Reader/Writer,
provides a hardware over view and a software overview, and describes the software and
hardware installation process for PC and Macintosh computers.
“Using the 3 in 1 Reader/Writer” shows you how to insert, access, format, and remove
digital media cards on PC and Macintosh computers.
“Troubleshooting” provides solutions to possible problems and answers frequently asked
questions.
“Technical Support” provides information on the Dazzle Nor th American and Dazzle
European Technical Resource Centers and tells you how to contact Dazzle Technical
Support.
Dazzle Universal 3 in 1 Reader/Writer User’s Guide • Introduction • Page 5
Page 6

Getting Started
Minimum System Requirements
To use the 3 in 1 Reader/Writer, your computer system must meet the following minimum
requirements:
PC Requirements
200MHz or faster processor
USB Port
Windows® 98 SE, Me, XP, or 2000
CD-ROM Drive (for driver software and bonus software installation)
1MB free disk space
Macintosh Requirements
G3 processor or faster (iMac, iBook, PowerBook, PowerMac G3 and G4)
USB Port
Mac OS 9.x or 10.1.2 and higher
CD-ROM Drive (for software installation)
1MB free disk space
Dazzle OnDVD Software (PC Only) Requirements
500MHz or faster processor
50MB free disk space
Windows® 98 SE, 2000, Me, or XP
64MB RAM minimum (128MB recommended)
PC must have sound card
CD Burner for Video CD creation
CD/DVD-ROM drive for software installation
DVD player must support Video CD format and either CD-R or CD-RW media
Dazzle Universal 3 in 1 Reader/Writer User’s Guide • Getting Started • Page 6
Page 7
Registering Your 3 in 1 Reader/Writer
Thank you again for purchasing the Dazzle 3 in 1 Reader/Writer. We encourage you to
register your 3 in 1 Reader/Writer as soon as possible. Registering your reader/writer
entitles you to the following benefits:
• Free periodic driver software updates when available
• Technical Resources from Dazzle
Registering On a PC
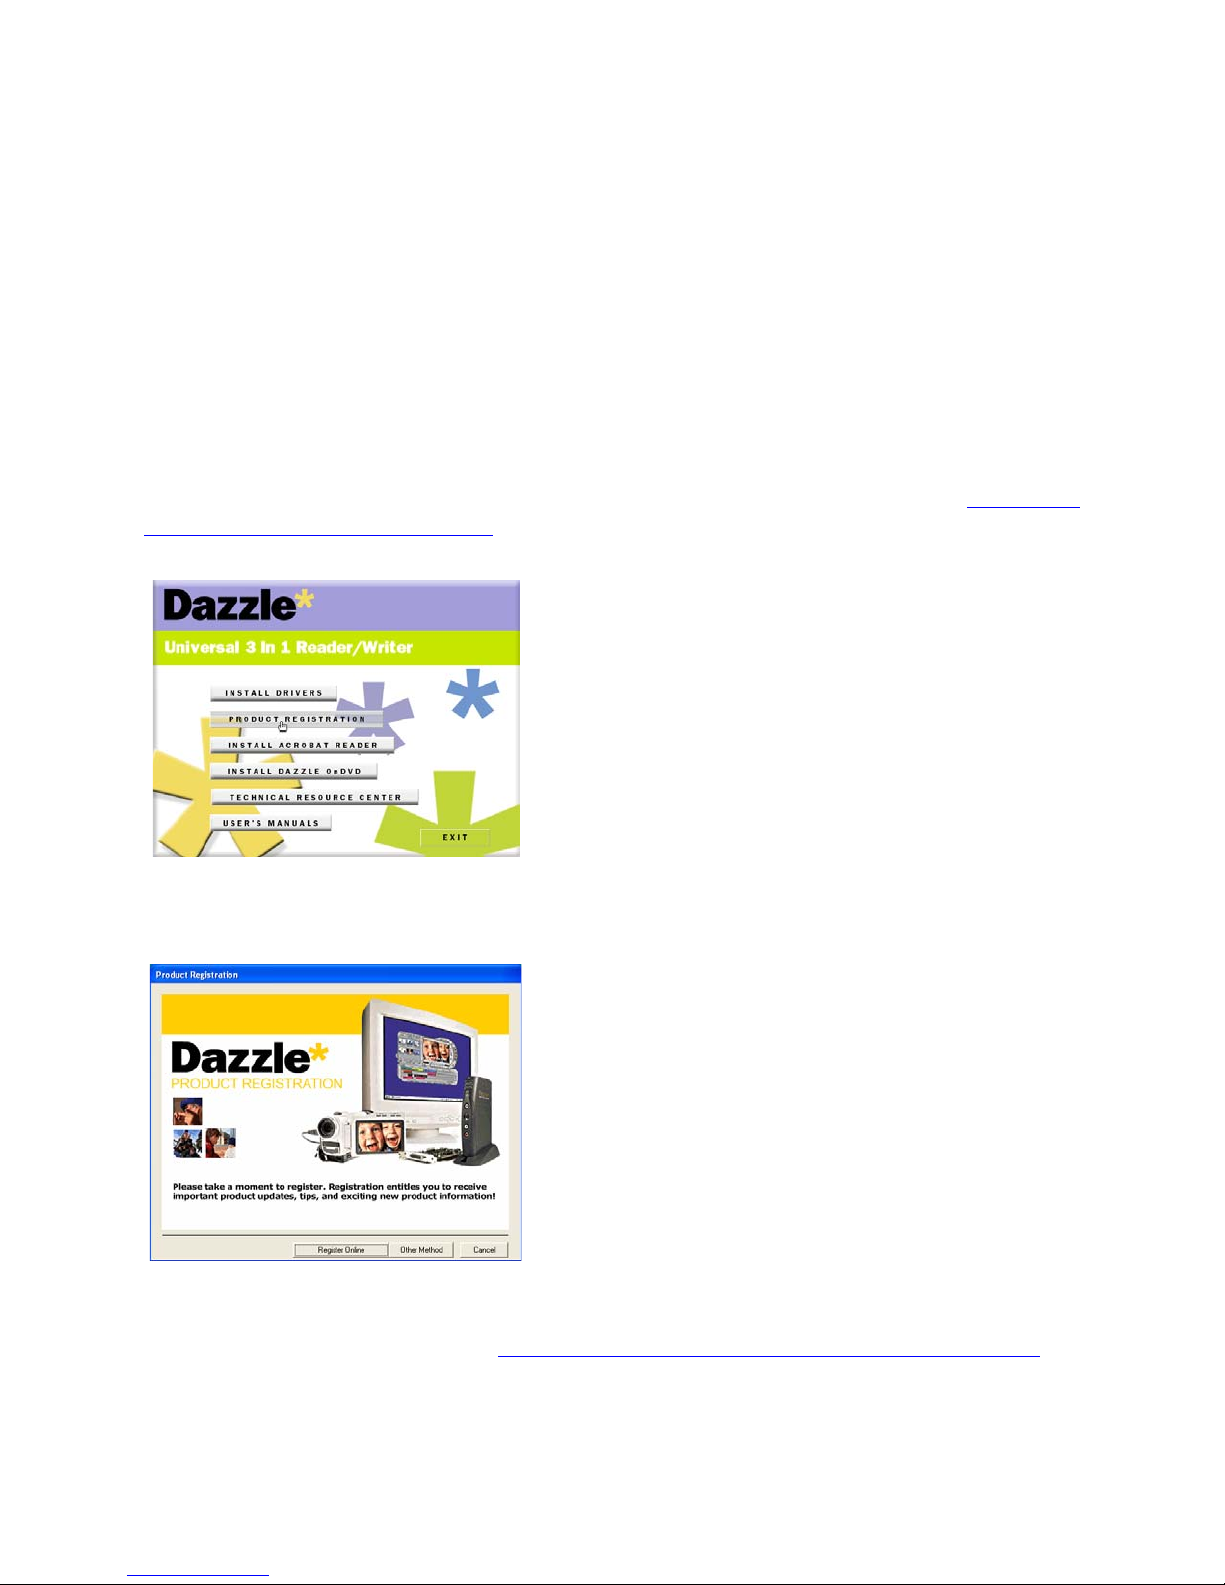
To register on a PC, insert your Dazzle Installation CD in your CD-ROM drive, select your
language, and then click Product Registration in the Installer Main menu to display the
Registration Form (English only). For more information on the PC Installer, see “Installing
the Software On a PC” on page 9.
When the Product Registration Form appears, click Register Online to register your 3 in 1
Reader/Writer on the Web or click Other Method to register by e-mail, modem, or fax.
Registering On a Macintosh
To register on a Macintosh, go to http://www.onlineregister.com/dazzle/cgi/index.cgi.
Dazzle Universal 3 in 1 Reader/Writer User’s Guide • Getting Started • Page 7
Page 8
Hardware Overview
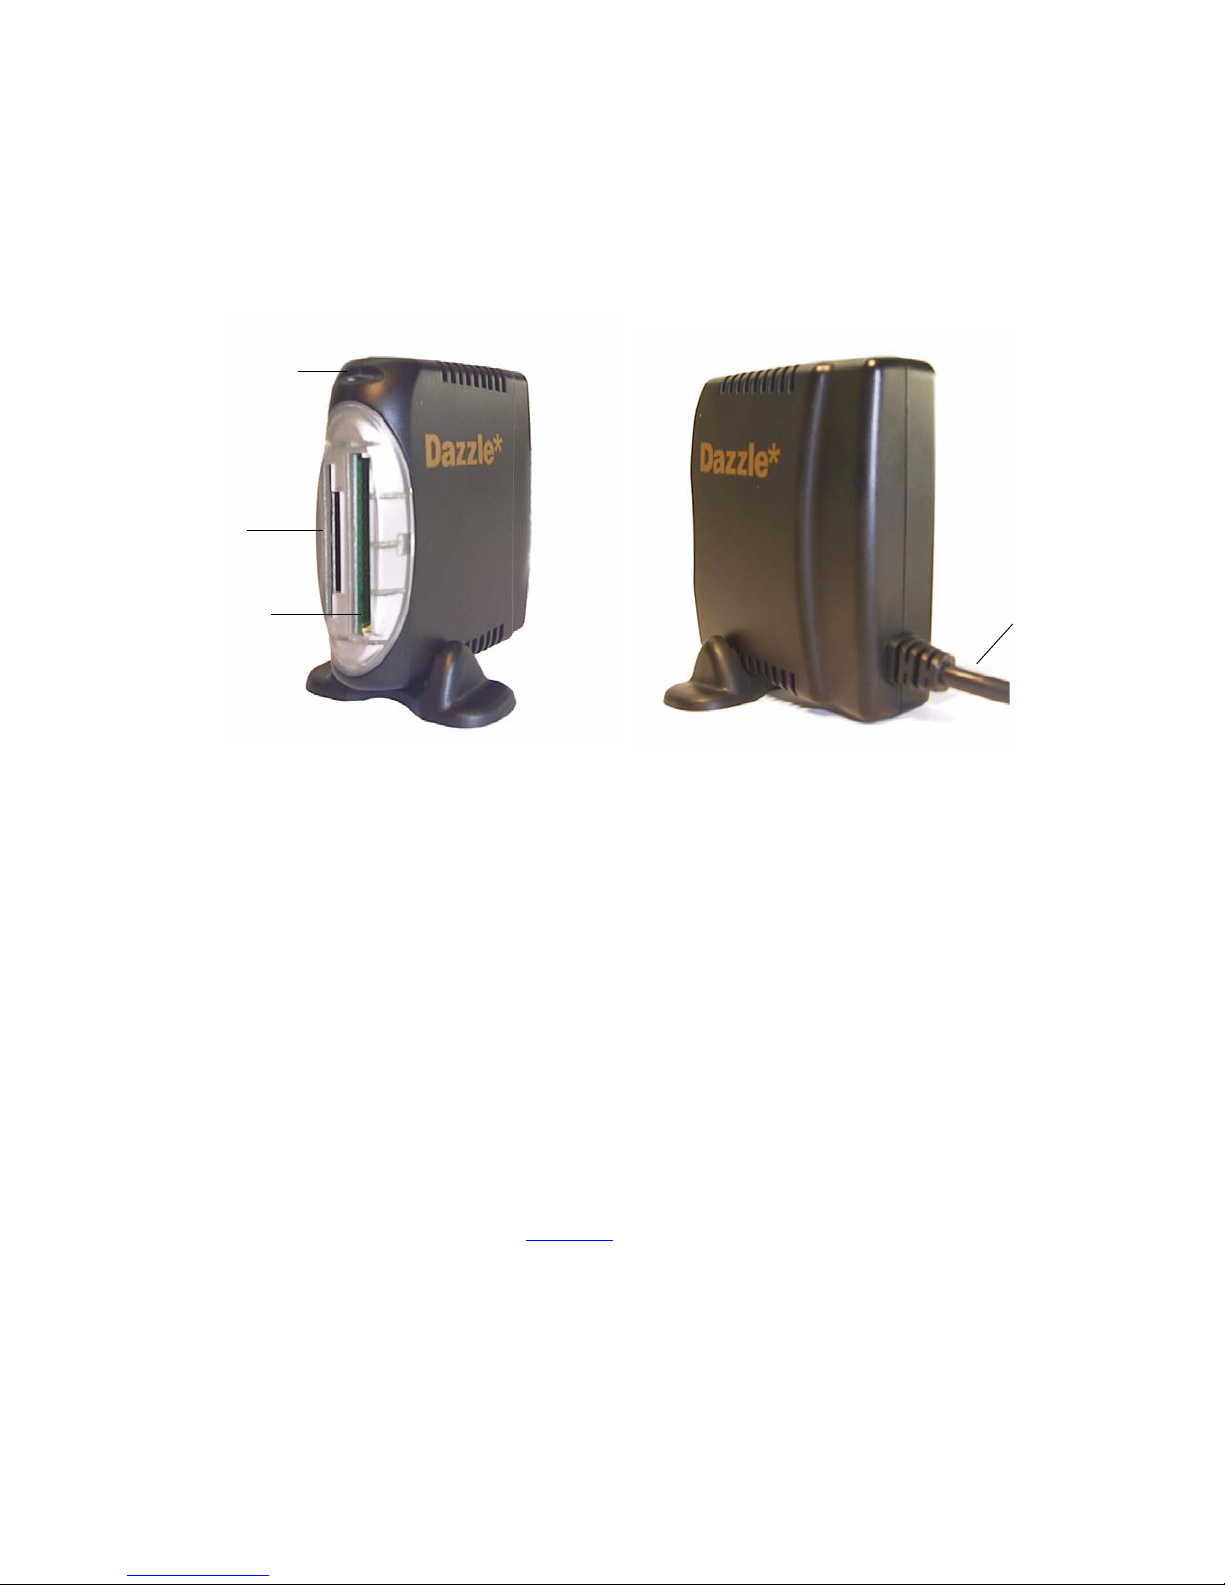
The 3 in 1 Reader/Writer can read/write CompactFlash Type l and ll, IBM Microdrive,
Memory Stick, and SmartMedia cards. You can connect your 3 in 1 Reader/Writer to
computers with USB 1.1 or USB 2.0 ports. In either case, the 3 in 1 Reader/Writer
transfers data at the Full-Speed rate.
Access
Indicator
Memory Stick,
SmartMedia
Slots
CompactFlash,
IBM Microdrive
Slots
3 in 1 Reader /Writer/Front View
3 in 1 Reader/Writer/Rear View
USB Cable
Software Overview
Driver Software
The PC driver software is required for Windows 98 SE and Windows 2000. It is not
required for Windows Me and XP. The Macintosh driver software is required for
Mac OS 9.x. It is not required for Mac OS 10.1.2 or above. PC and Macintosh Installation
instructions are provided on the following pages.
Dazzle OnDVD (PCs only)
Digital cameras allow you to take an unlimited number of pictures that quickly pile up on
your computer and become difficult to manage. With OnDVD, you can take your digital pictures, arrange them in a timeline, edit your photos, add background music and burn a
slideshow on a CD, which can be played back on a home DVD player. You can install
OnDVD following the instructions on page 13
shows, refer to your OnDVD User’s Guide (included on the Dazzle Installation CD).
of this guide. For a tutorial on creating slide-
®
*Adobe
Acrobat® Reader 5 is provided for PC and Macintosh users who do not have it
already installed on their systems. You need this application to read the supplied
electronic users’ guides.
Dazzle Universal 3 in 1 Reader/Writer User’s Guide • Getting Started • Page 8
Page 9
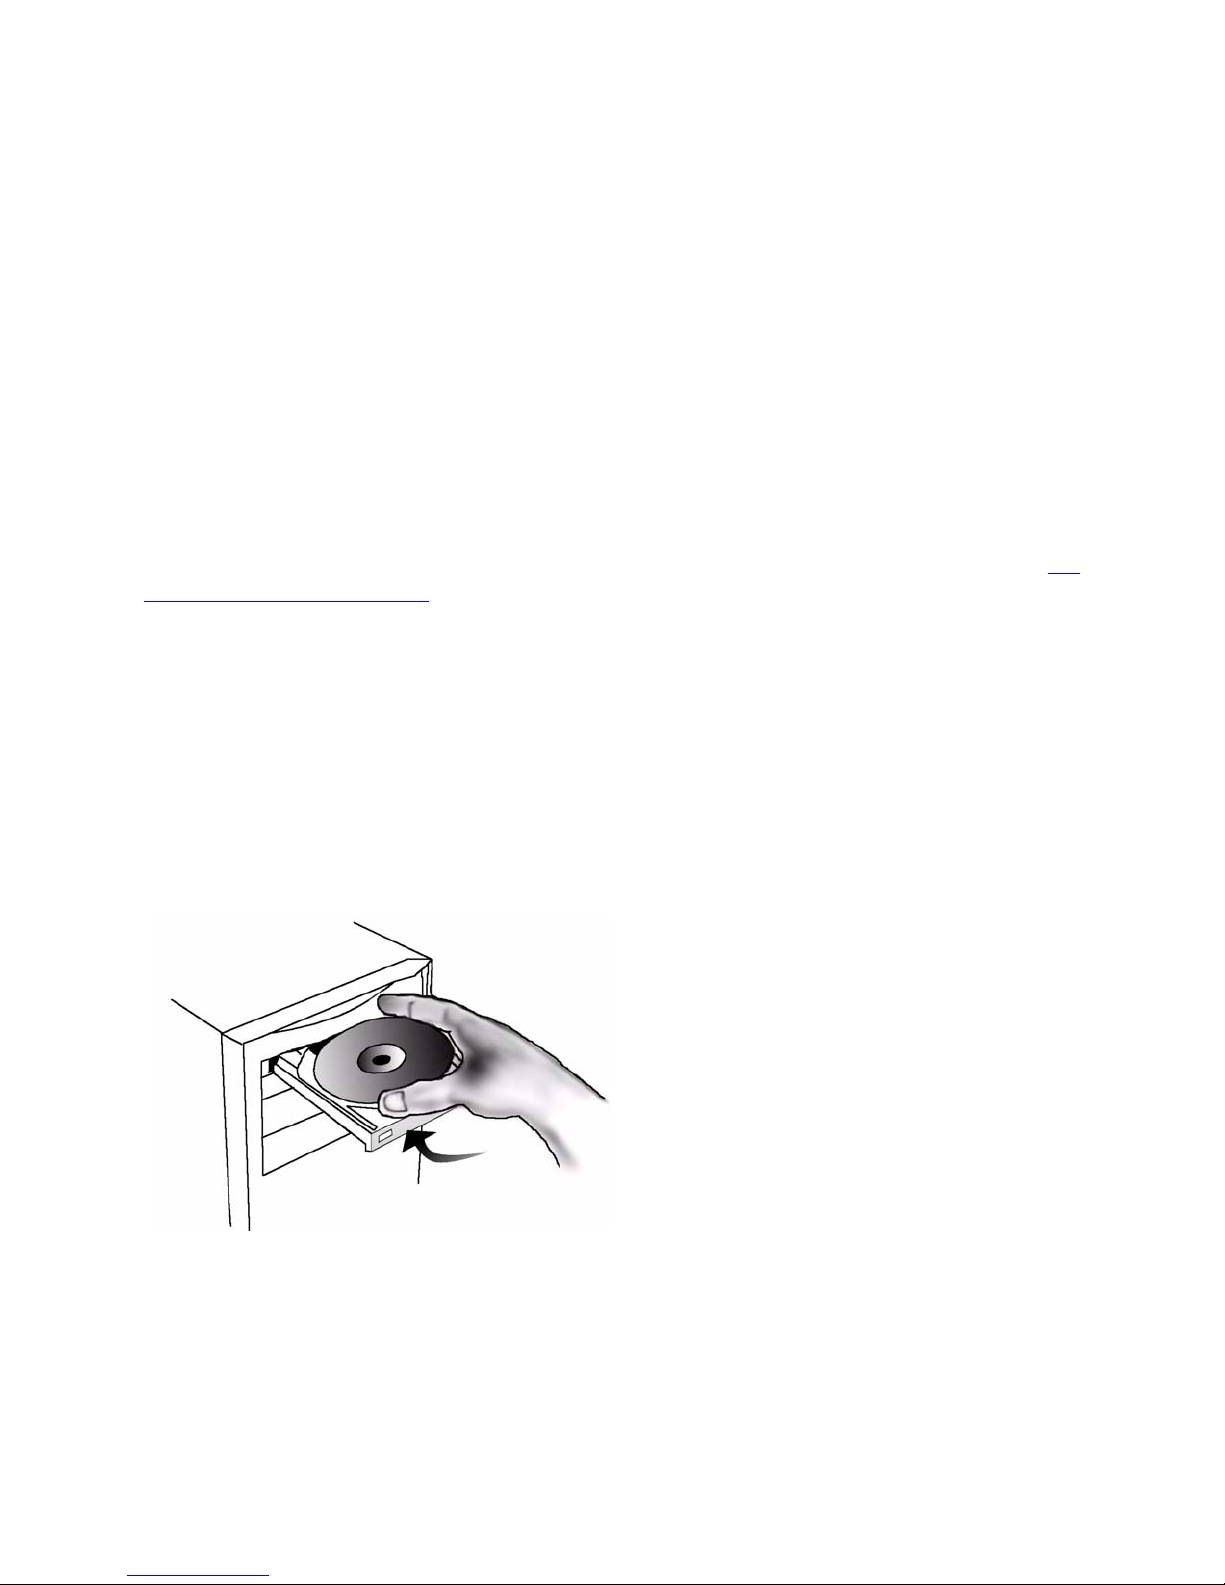
Installing the Software On a PC
The Dazzle Installation CD includes the following PC software components:
• Hardware Drivers for Windows 98 SE and 2000
• Dazzle Formatting Utilities
• Dazzle OnDVD software
• Adobe Acrobat Reader (required for electronic documentation)
• Dazzle Technical Resource Center Information (Nor th America only)
• Dazzle Products Demo
• Dazzle Online Registration (English only)
• Electronic Users’ Guides (English only)
Important Note: To begin using your 3 in 1 Reader/Writer with Windows Me or XP, you do
not need to install any software. Simply connect the reader/writer to your computer’s USB
port and access your media using the Removable Disk icons located in My Computer, as
explained later in this guide. If you are using Windows 98 SE or 2000, you must follow the
installation procedure below to install the required drivers (before connecting the 3 in 1
Reader/Writer).
During the installation, the Dazzle formatting utilities are also installed. If you are using
Windows Me or XP and you want to install the Dazzle formatting utilities, you must also follow the installation procedure below.
To install the Dazzle software, follow the steps below. To avoid complications during the
installation process, please follow the steps in order.
1. Insert the Dazzle Installation CD in your computer’s CD/DVD-ROM drive.
Dazzle Universal 3 in 1 Reader/Writer User’s Guide • Getting Started • Page 9
Page 10
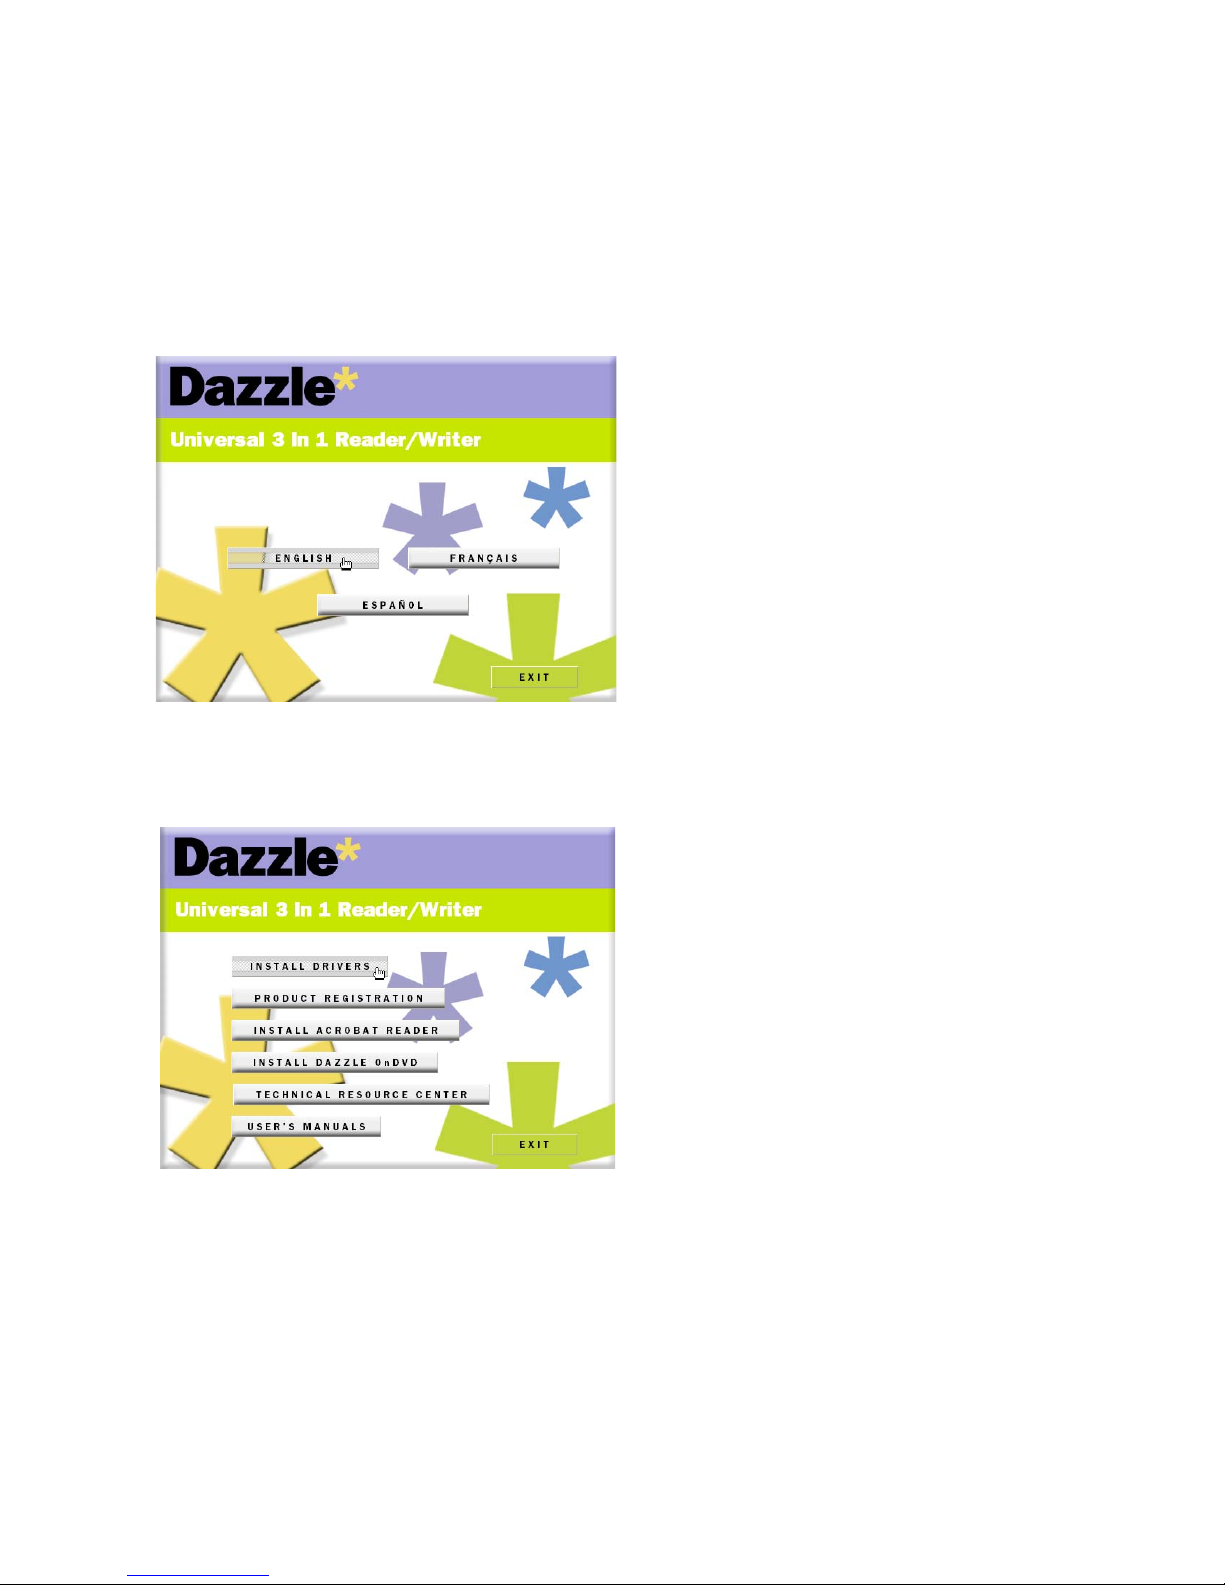
The auto-run program launches the setup application and then the Language screen
appears, as shown in the example below for North America.
Note: The European installer also displays Italian and German.
If the installer does not begin automatically, open My Computer, then double-click the
Setup.exe file on your Dazzle Installation CD.
2. Select your language.
The Installer Main menu appears.
Dazzle Universal 3 in 1 Reader/Writer User’s Guide • Getting Started • Page 10
Page 11
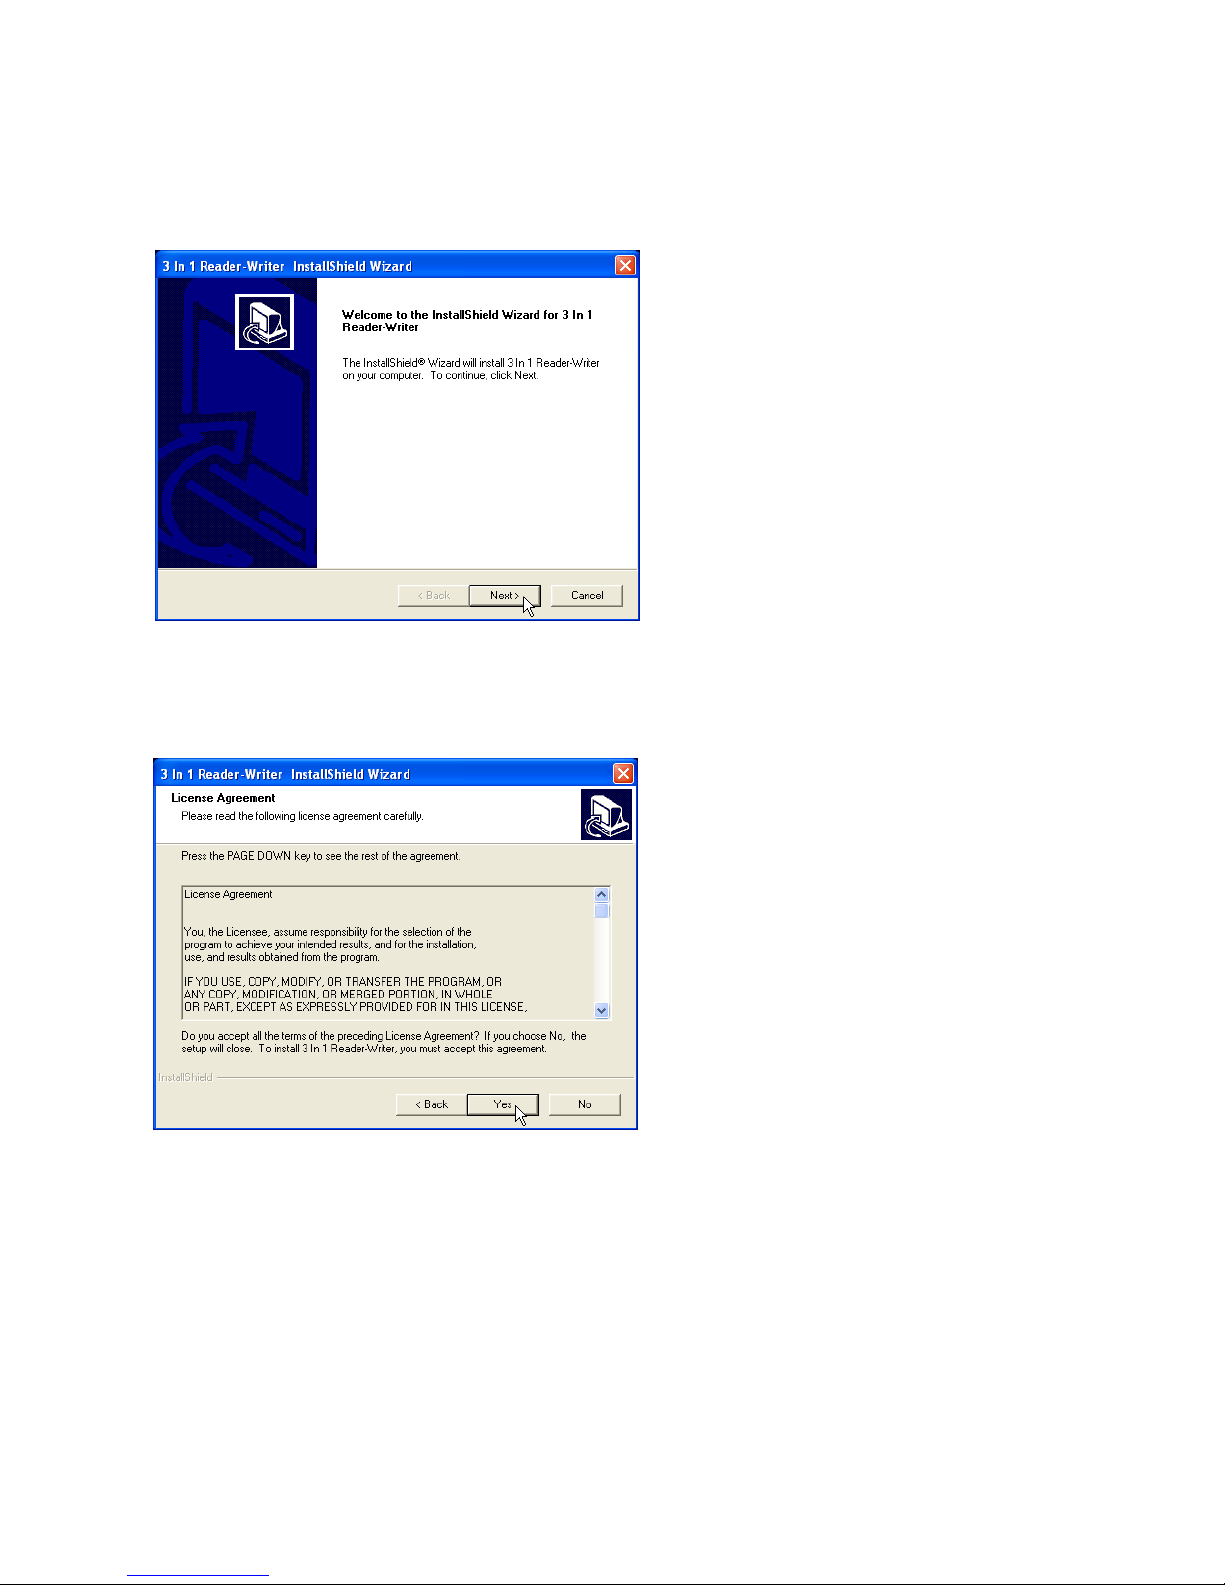
3. Click the Install Drivers button.
The InstallShield Wizard Welcome window appears.
4. Click Next.
The License Agreement screen appears. To use the 3 in 1 Reader/Writer, you must
agree to the terms of the license.
5. Click Yes to accept the license agreement.
Dazzle Universal 3 in 1 Reader/Writer User’s Guide • Getting Started • Page 11
Page 12
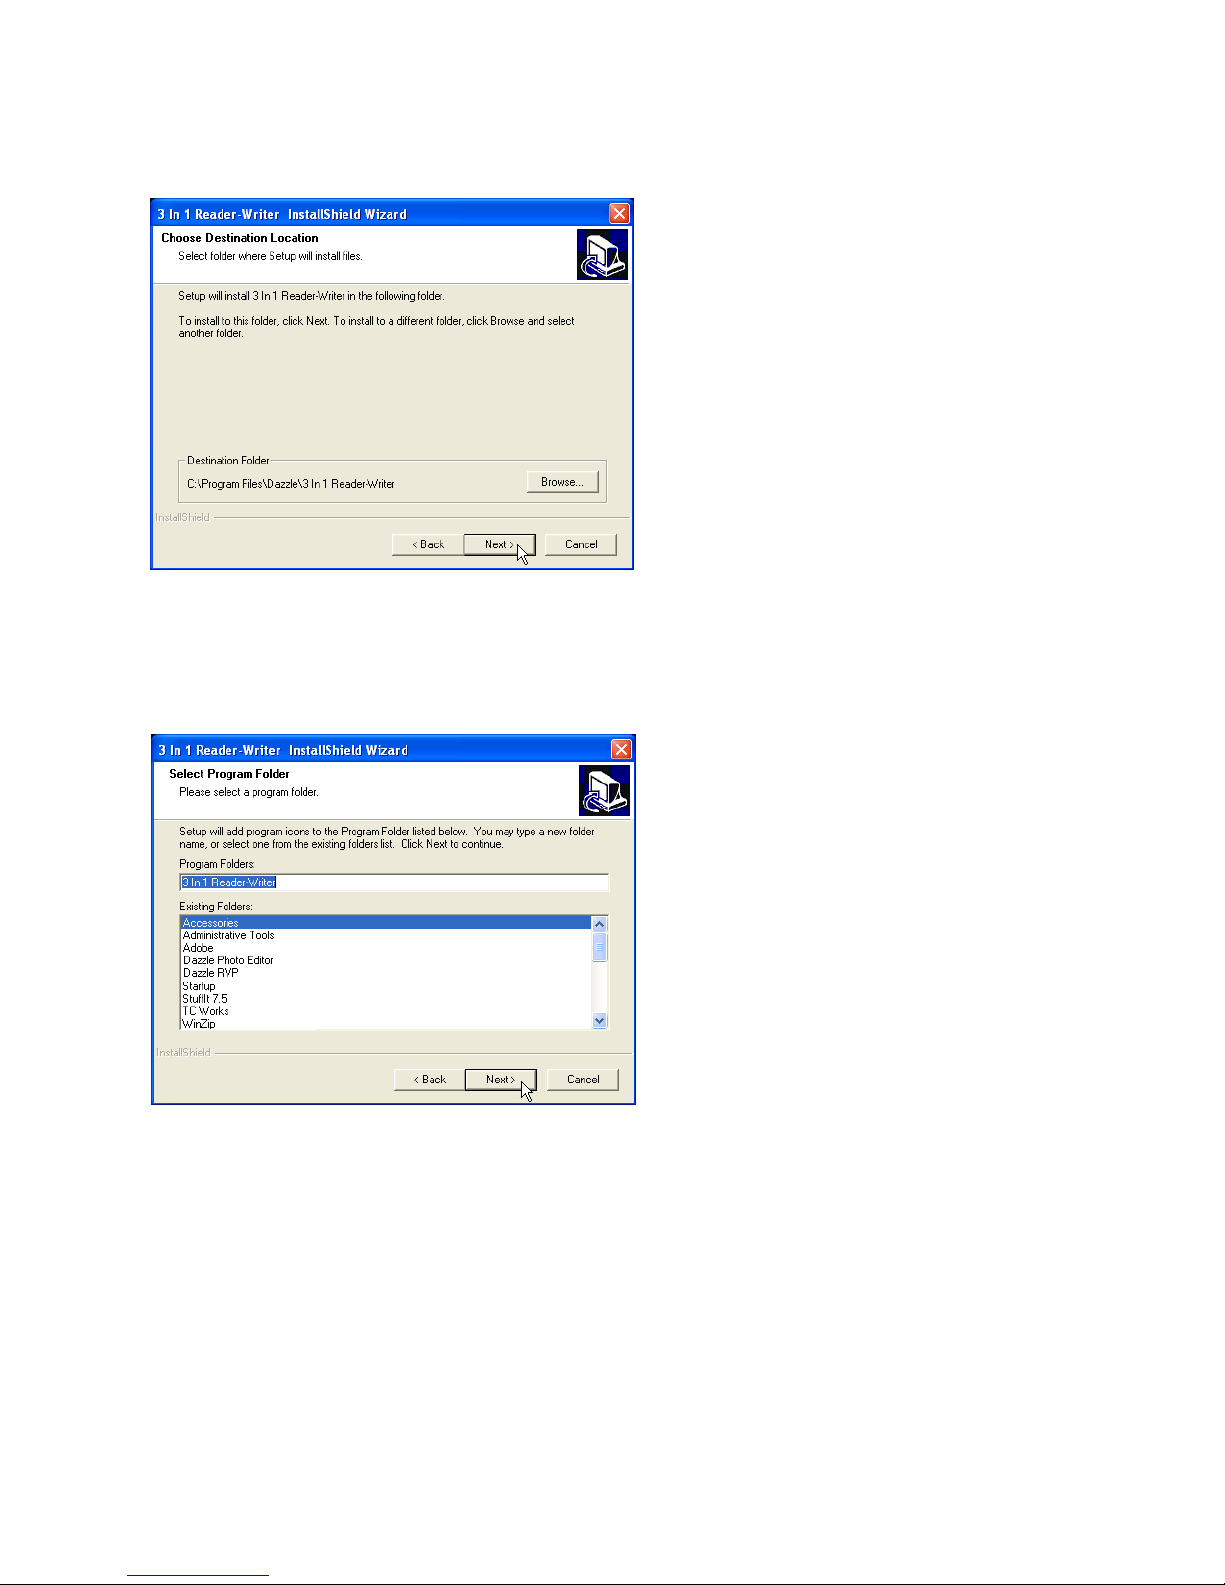
The Choose Destination Location window appears.
6. Click Next to install the required drivers and/or formatting utilities to the default loca-
tion on your computer.
The Select a Program Folder window appears.
7. Click Next to accept the default program folder for your 3 in 1 Reader/Writer.
The Start Copying Files window displays an overview of the installation.
Dazzle Universal 3 in 1 Reader/Writer User’s Guide • Getting Started • Page 12
Page 13
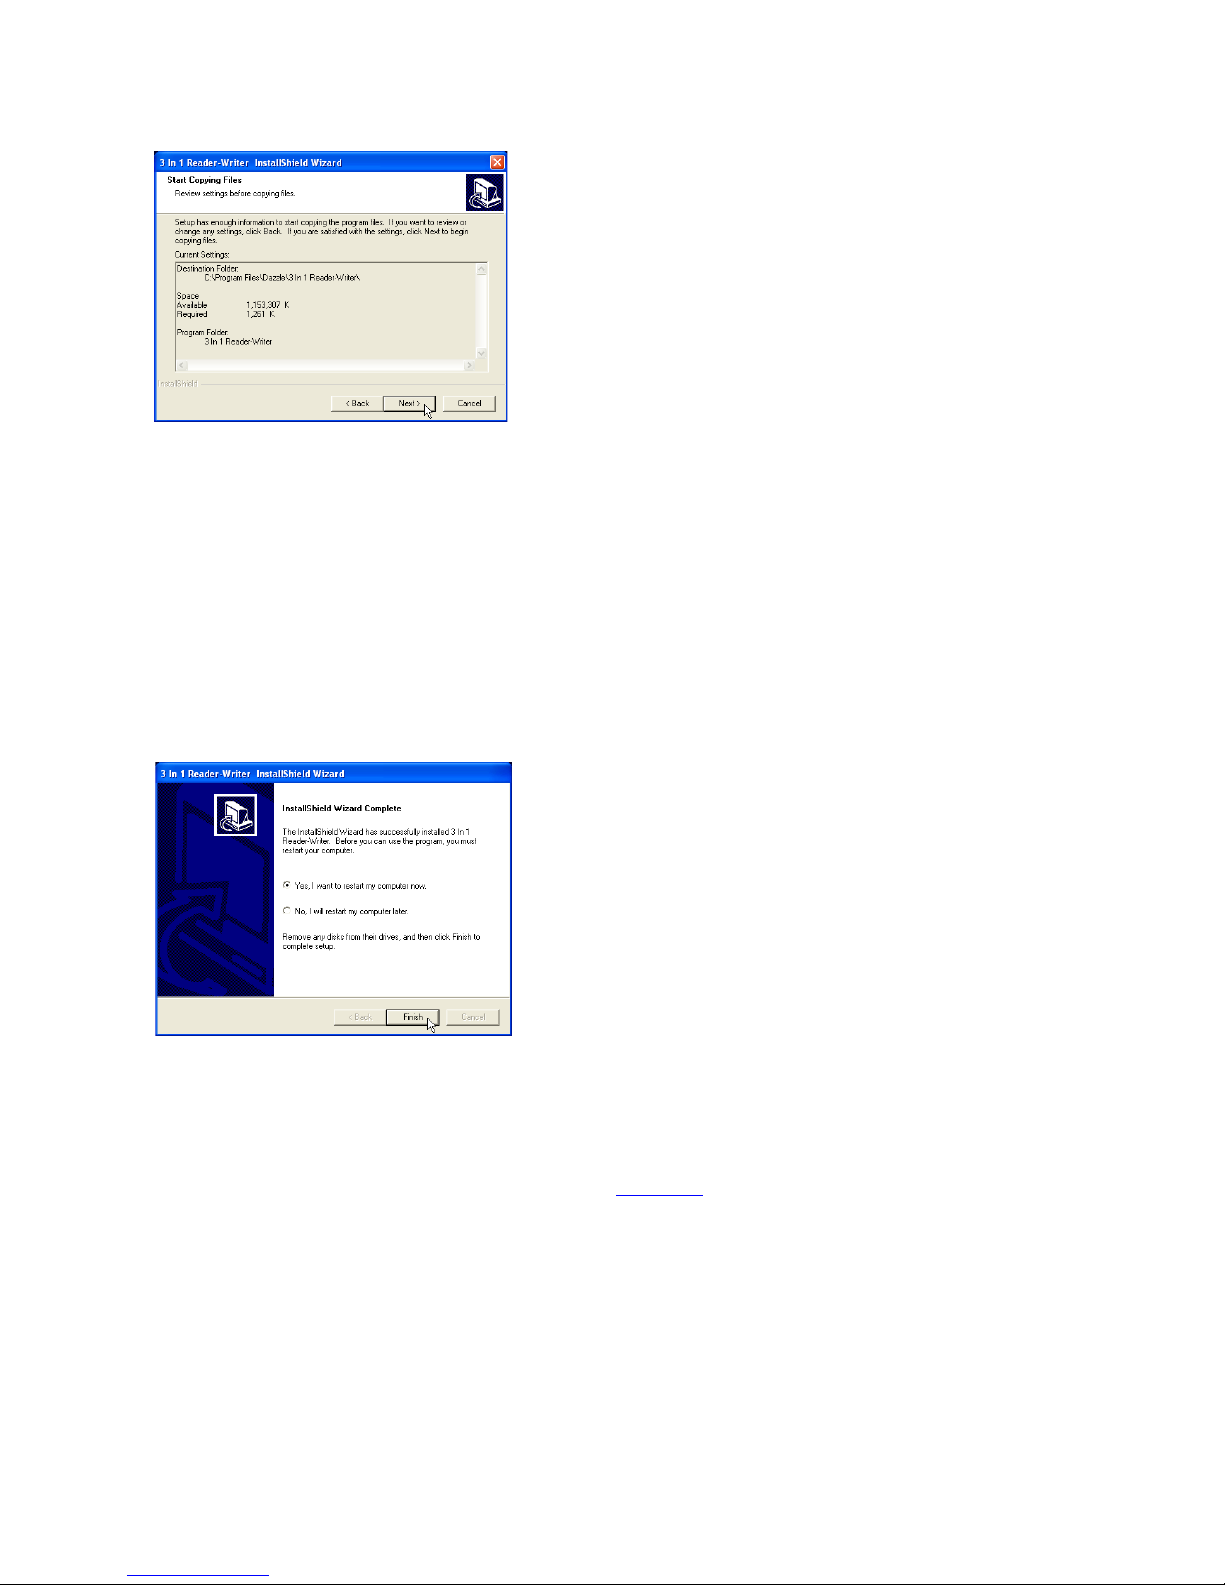
8. Click Next.
The Setup Status window displays the installation progress, and then the InstallShield
Wizard completes the installation. If you are using Windows 98 SE or 2000, the
required drivers and the Dazzle Formatting Utilities are installed. For Windows Me and
XP, only the Formatting Utilities are installed (drivers are not required).
The Installation Complete screen appears. Depending on your operating system, this
screen may prompt you to restar t your computer. If you are prompted to restar t, you
must restart your computer now or at a later time before you can use the 3 in 1
Reader/Writer.
9. If you are prompted to restar t, click Yes to restar t your computer or No to return to the
Installer Main Menu, and then click the Finish button. If you are not prompted to
restart, click the Finish button to return to the Installer Main menu. You can display
the Installer Main menu at any time by inserting your Dazzle Installation CD and
selecting your language, as described on page 10
In the Installer Main menu, you can access the Product Registration (English only),
Users’ Manuals, Dazzle North American Technical Resource Center Information, and
the OnDVD and Acrobat Reader installers. If you want to install Dazzle OnDVD, click
Install Dazzle OnDVD in the Installer Main menu and follow the screen directions. During the OnDVD installation, you can also install the Dazzle Product Demo. For an
OnDVD tutorial on creating slideshows, refer to the supplied OnDVD User’s Guide
(requires Adobe Acrobat Reader 5). If you do not have Acrobat 5 Reader installed, click
Install Acrobat Reader in the Installer Main menu and follow the screen directions.
Dazzle Universal 3 in 1 Reader/Writer User’s Guide • Getting Started • Page 13
.
Page 14
Installing the Hardware on a PC
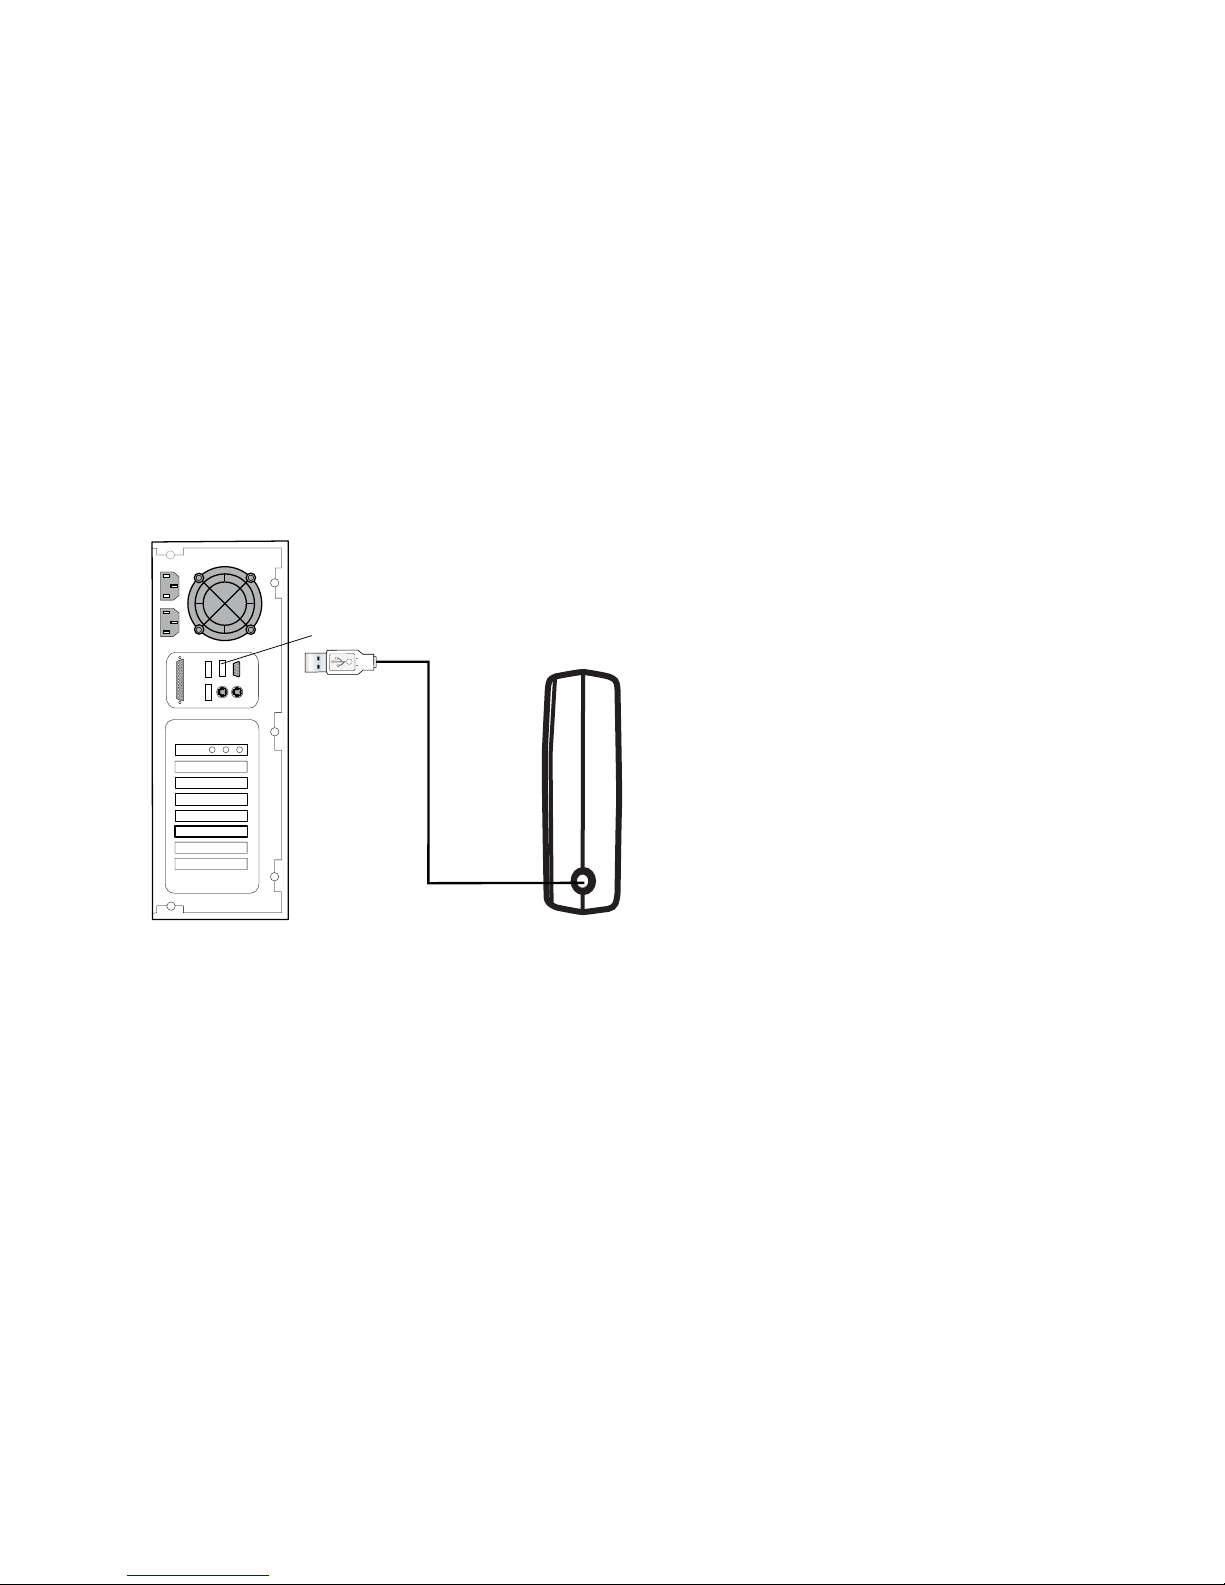
After you install the 3 in 1 Reader/Writer software, you can install the hardware.
Connecting to a Computer’s USB Port
Connect the USB cable (attached to the back of the 3 in 1 Reader/Writer) to the USB port
on your computer.
You can connect your 3 in 1 Reader/Writer to computers with USB 1.1 or USB 2.0 ports.
In either case, the 3 in 1 Reader/Writer transfers data at the Full-Speed rate.
Note: Be sure the cable is properly aligned before connecting and do not force the connection.
USB Port
3 in 1 Reader/Writer
USB Cable
Back
Dazzle Universal 3 in 1 Reader/Writer User’s Guide • Getting Started • Page 14
Page 15
Connecting to a USB Hub
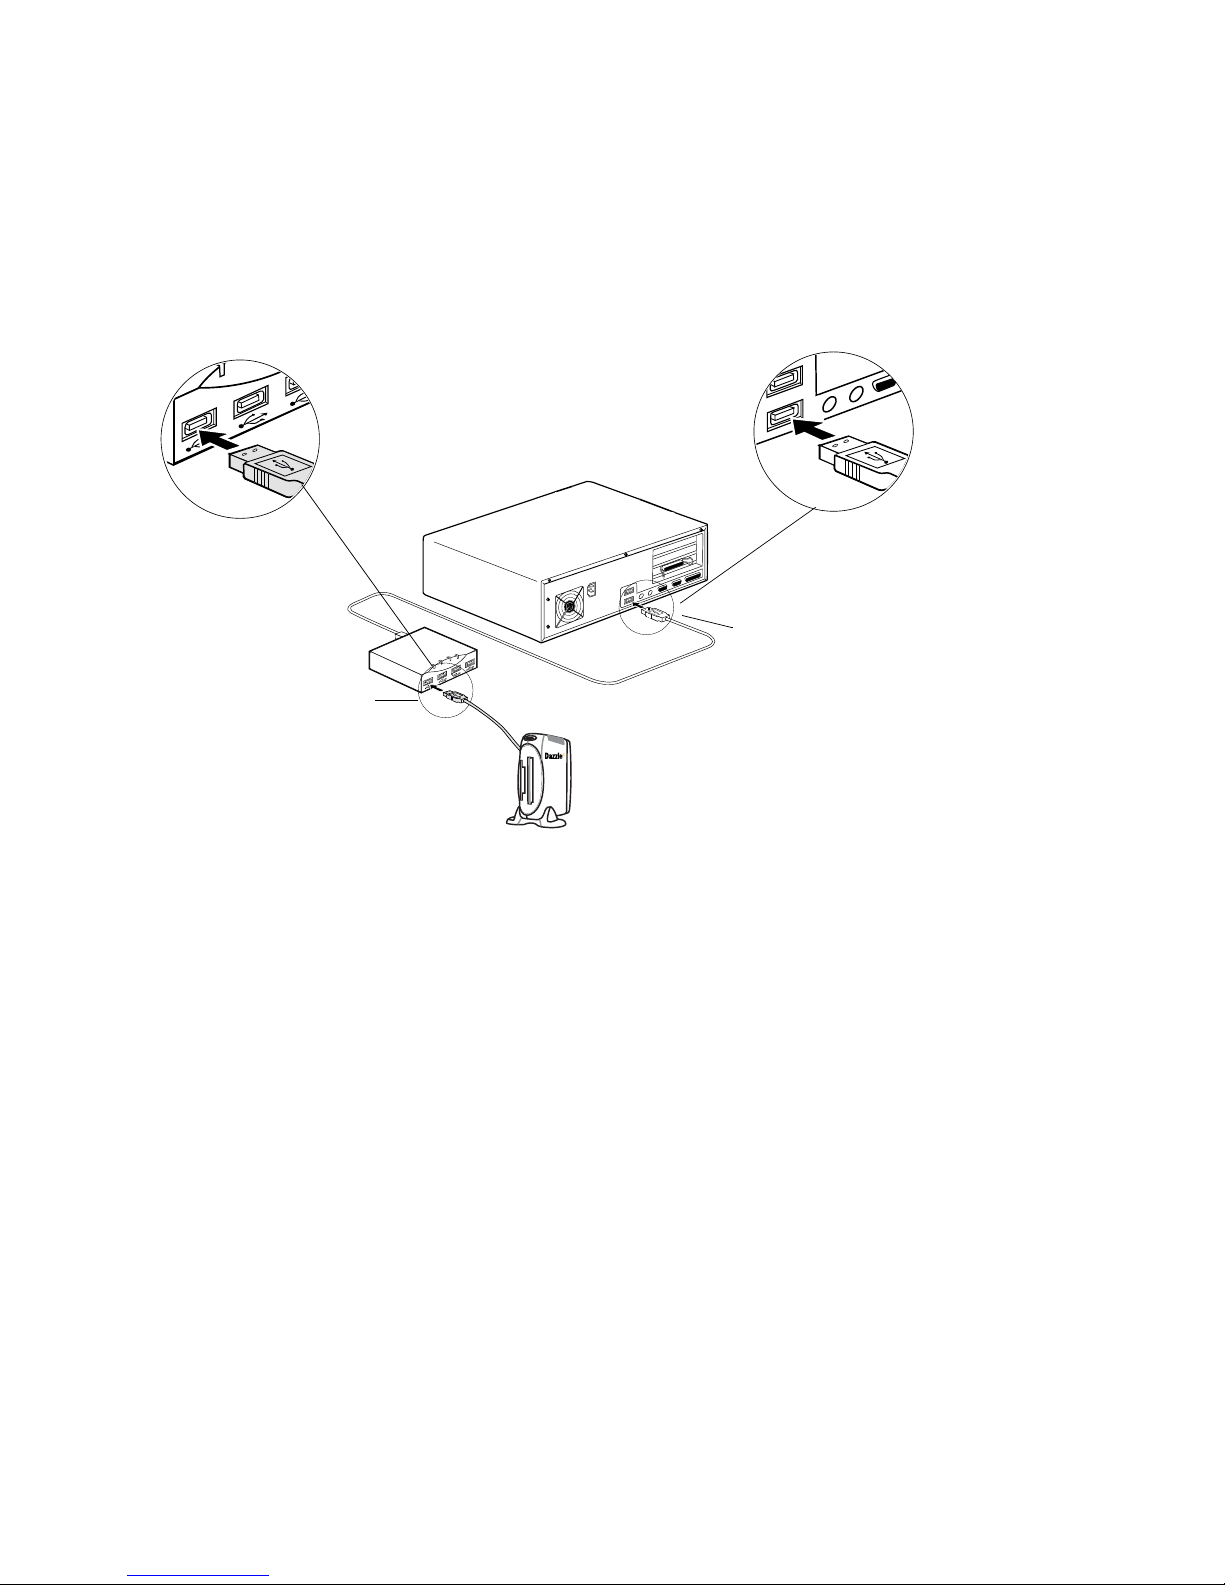
1. Connect the USB hub (purchased separately) to your computer's USB port.
2. Connect the 3 in 1 Reader/Writer USB cable to a port on the USB hub.
Note: Be sure the cable ends are properly aligned before connecting and do not force the
connection.
Enlarged View
Connect USB cable from
3 in 1 Reader/Writer
to USB port on USB hub
Enlarged View
Connect USB cable from USB port on
USB hub to USB port on computer
Dazzle Universal 3 in 1 Reader/Writer User’s Guide • Getting Started • Page 15
Page 16
Installing the Software On a Macintosh
The Dazzle Installation CD includes the following Macintosh software components:
• Hardware drivers (Mac OS 9.x only)
• Adobe Acrobat Reader (required for electronic documentation)
• Dazzle Technical Resource Center Information (Nor th America only)
• Dazzle Products Demo Clips
• Electronic user’s guide (English only)
To begin using your 3 in 1 Reader/Writer with Mac OS 10, please be sure you have version
10.1.2 or later installed. If you do not have version 10.1.2 or later installed, please contact Apple for an upgrade. Once installed, simply connect the reader/writer to your Mac’s
USB port and insert your media card.
To install the required drivers for Mac OS 9.x, follow the steps below. To avoid complications during the installation process, please follow the steps in order.
1. Start your Macintosh and close all open applications.
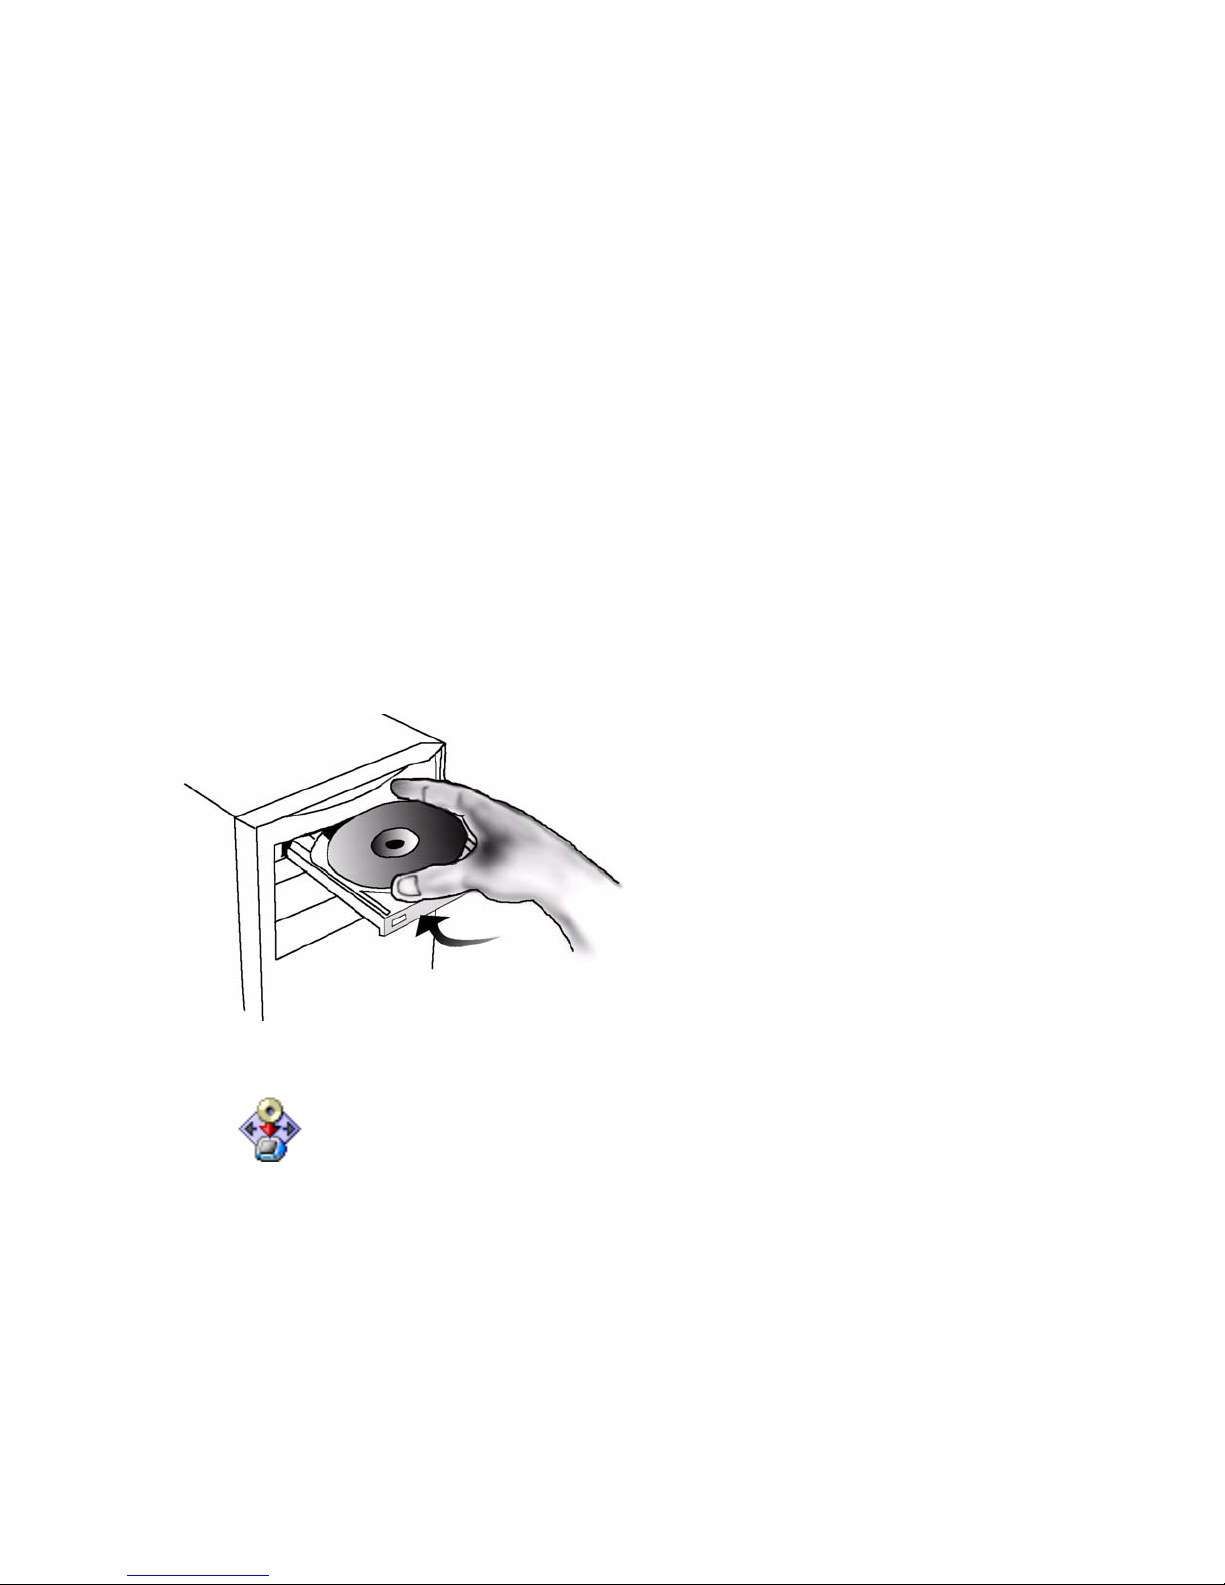
2. Insert the provided Installation CD in your Mac’s CD/DVD-ROM drive.
3. Double-click the 3 In 1 Reader/Writer Installer Icon.
3
3 in 1 Reader/Writer
Dazzle Universal 3 in 1 Reader/Writer User’s Guide • Getting Started • Page 16
Page 17
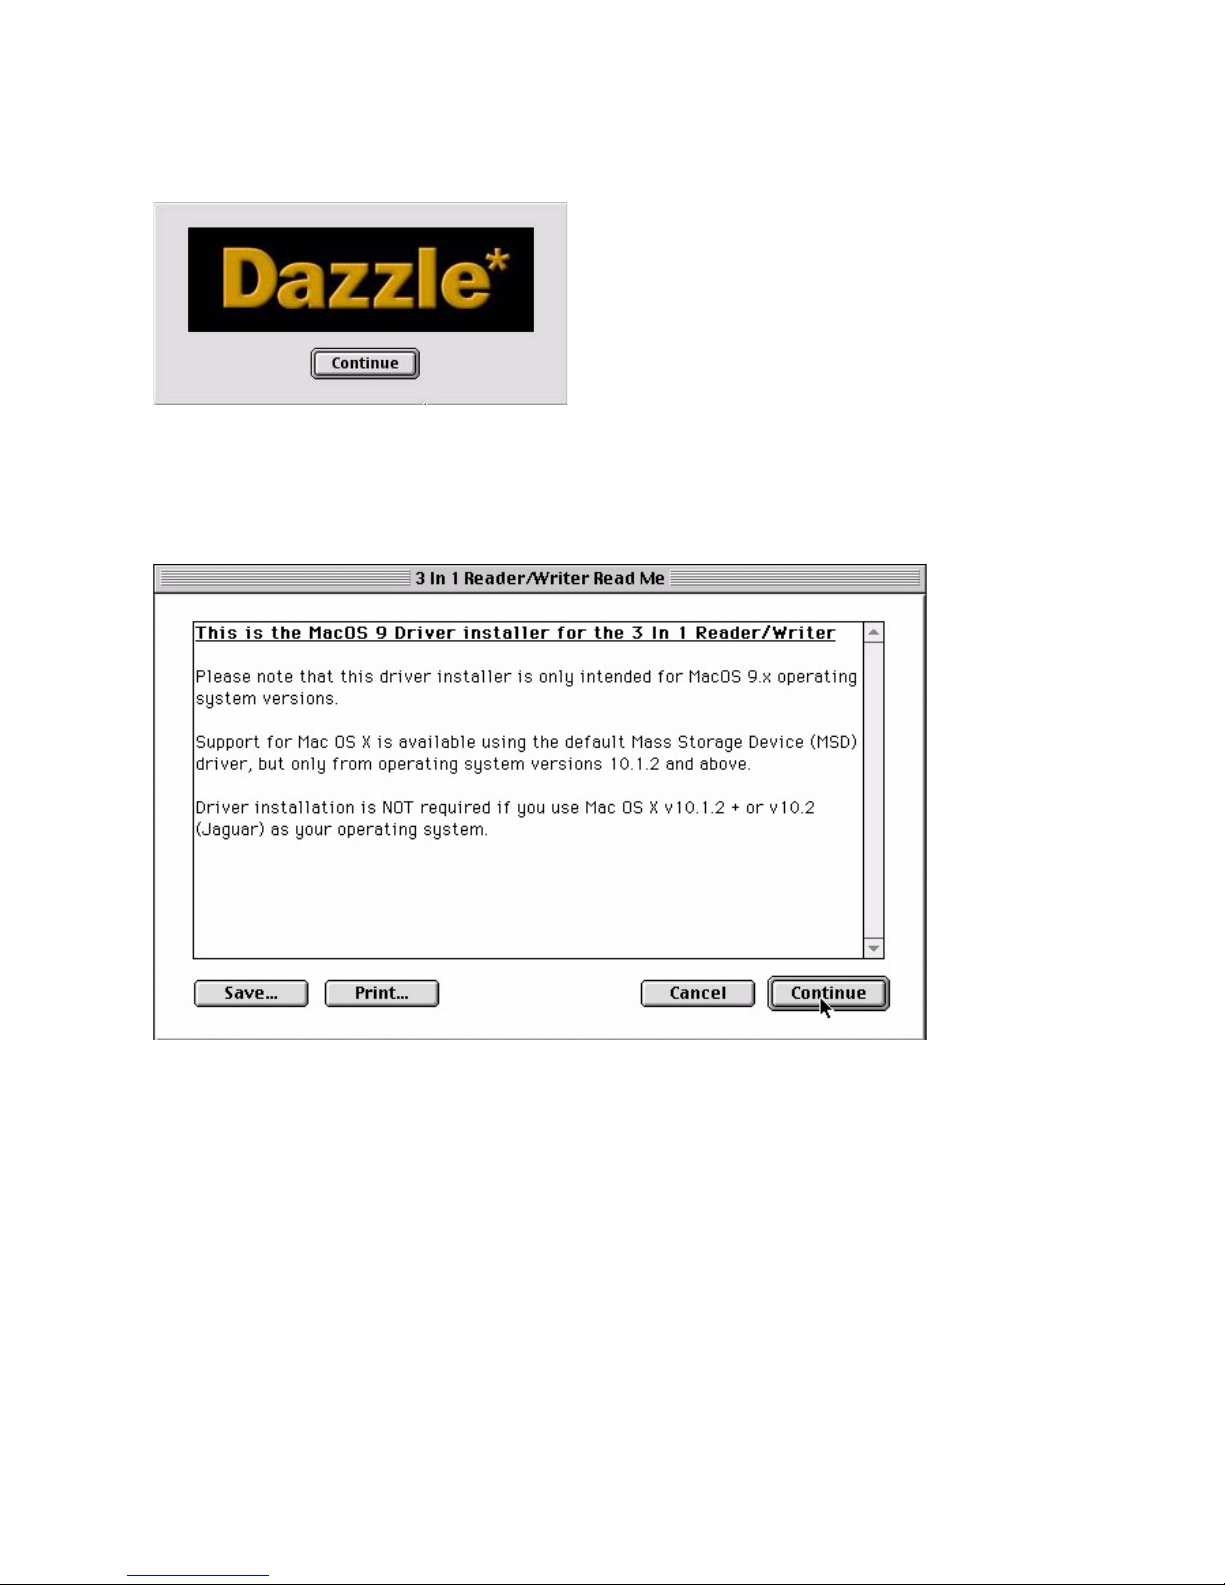
A Splash screen appears.
4. Click Continue in the Splash screen.
A Read Me screen explains that the drivers are only required for Mac OS 9.x and are
not required for Mac OS 10.1.2 and above.
Dazzle Universal 3 in 1 Reader/Writer User’s Guide • Getting Started • Page 17
Page 18
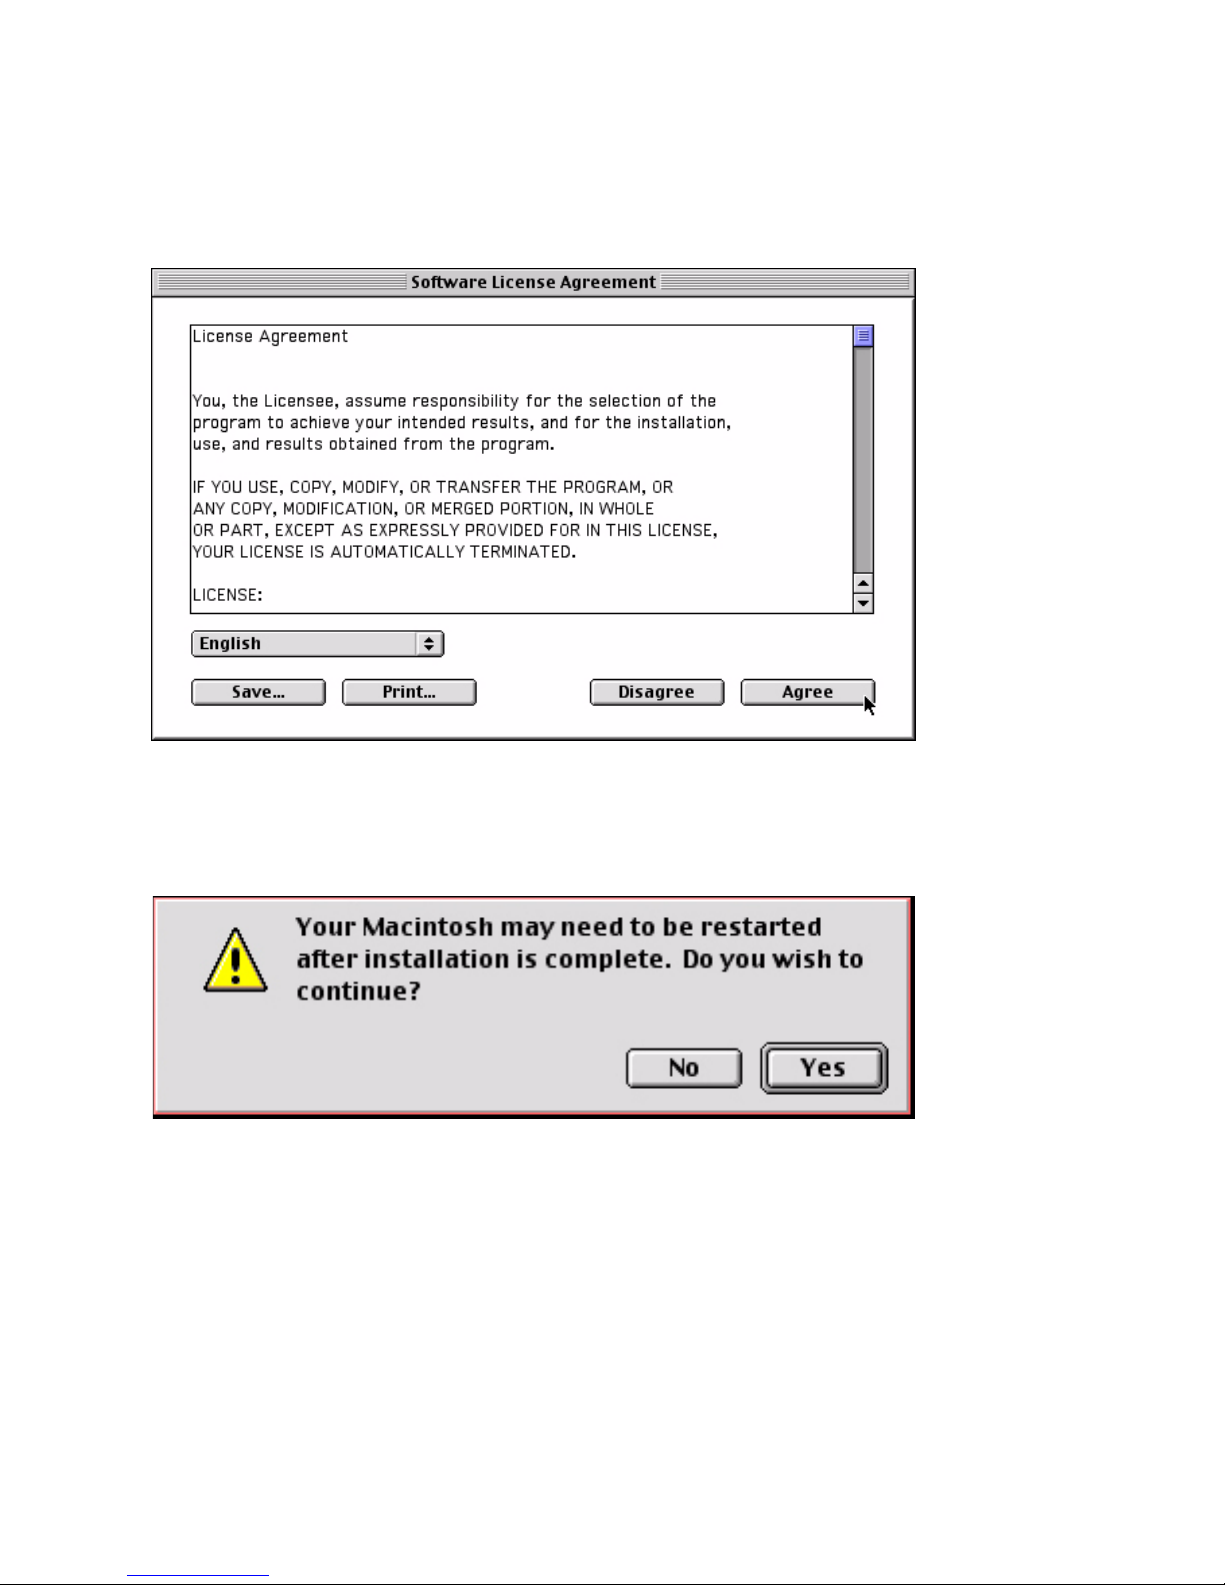
5. Click Continue in the Read Me screen.
The License Agreement screen appears. To use the 3 in 1 Reader/Writer, you must
agree to the terms of the license.
6. Click Agree to accept the terms of the license agreement.
A dialog box (similar to the figure below) appears that says you may have to restar t
your Macintosh after installing the software,
7. Click Yes to continue.
Your Macintosh begins the installation and a status bar displays the installation
progress.
Note: The driver installation should take only a few seconds.
Dazzle Universal 3 in 1 Reader/Writer User’s Guide • Getting Started • Page 18
Page 19
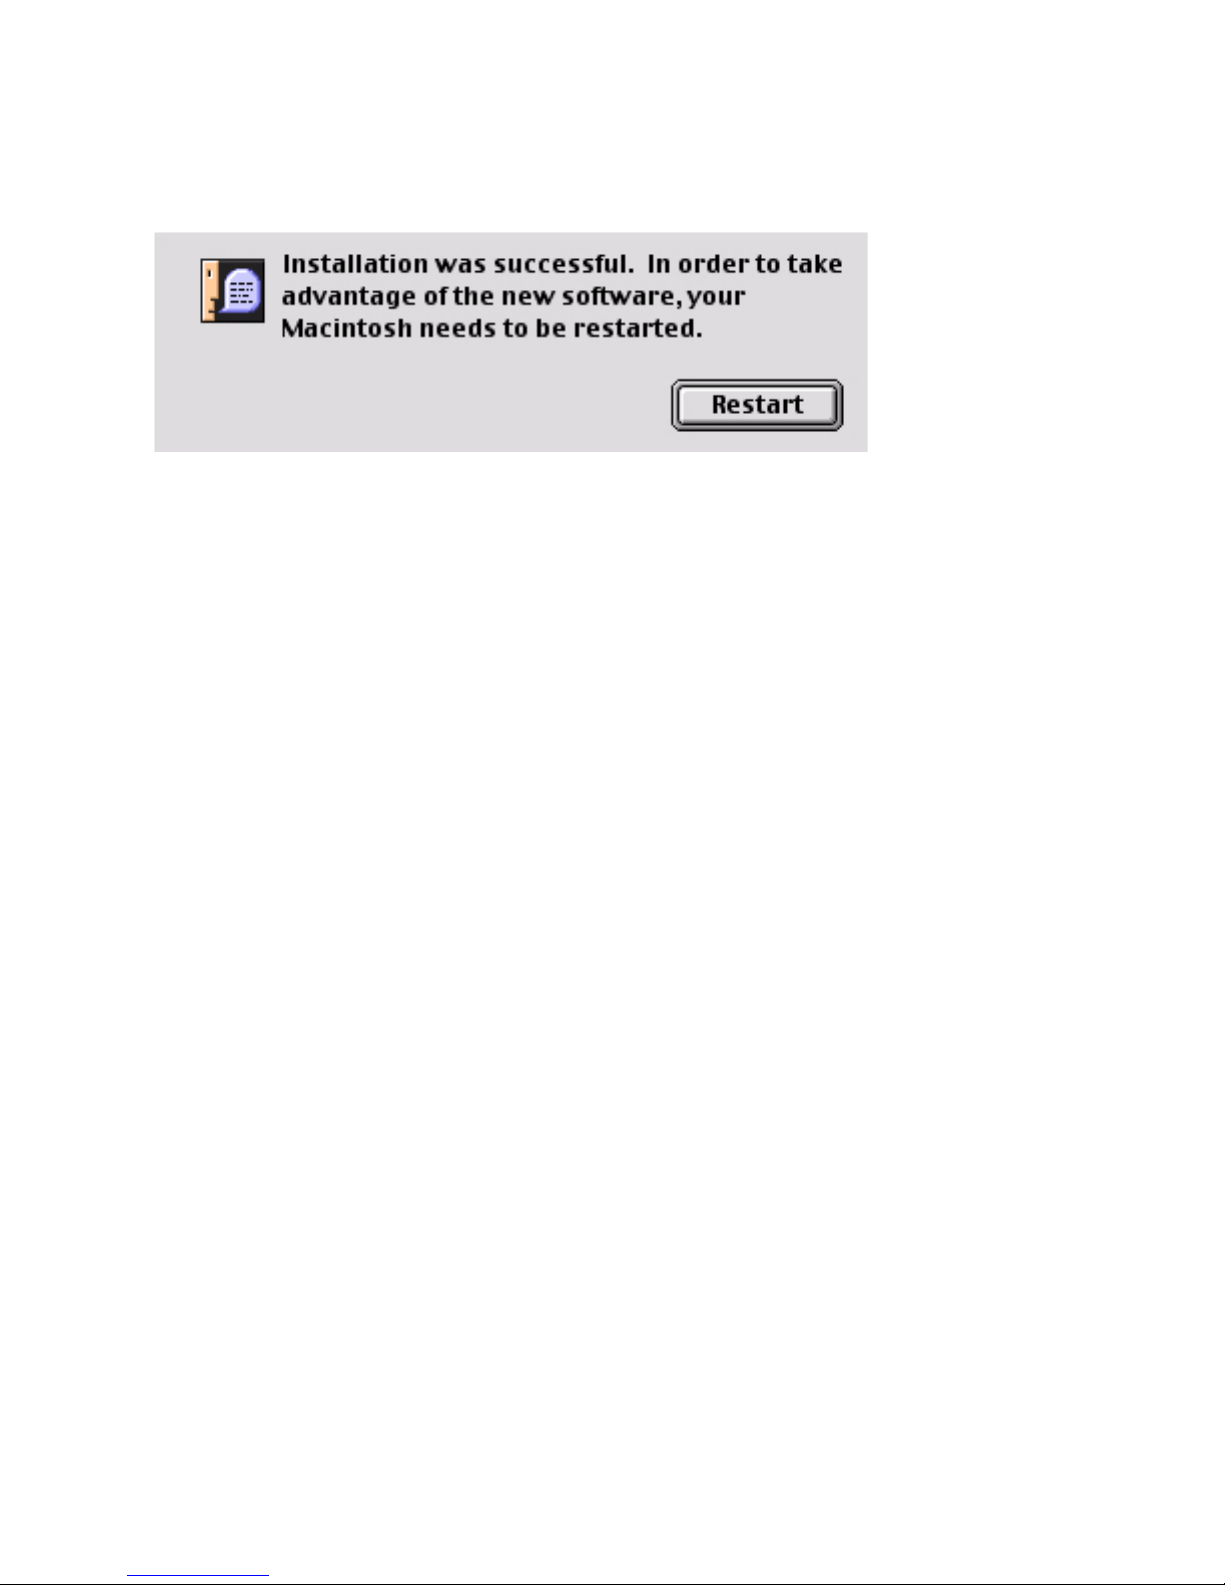
A final dialog box appears that says the installation was successful and your Macin-
tosh needs to be restarted.
8. Click Restart in the dialog box to restart your Macintosh.
To read the electronic documentation, you need Acrobat Reader 5. If you do not have
Acrobat 5 Reader installed, it is included on your installation CD.
Dazzle Universal 3 in 1 Reader/Writer User’s Guide • Getting Started • Page 19
Page 20
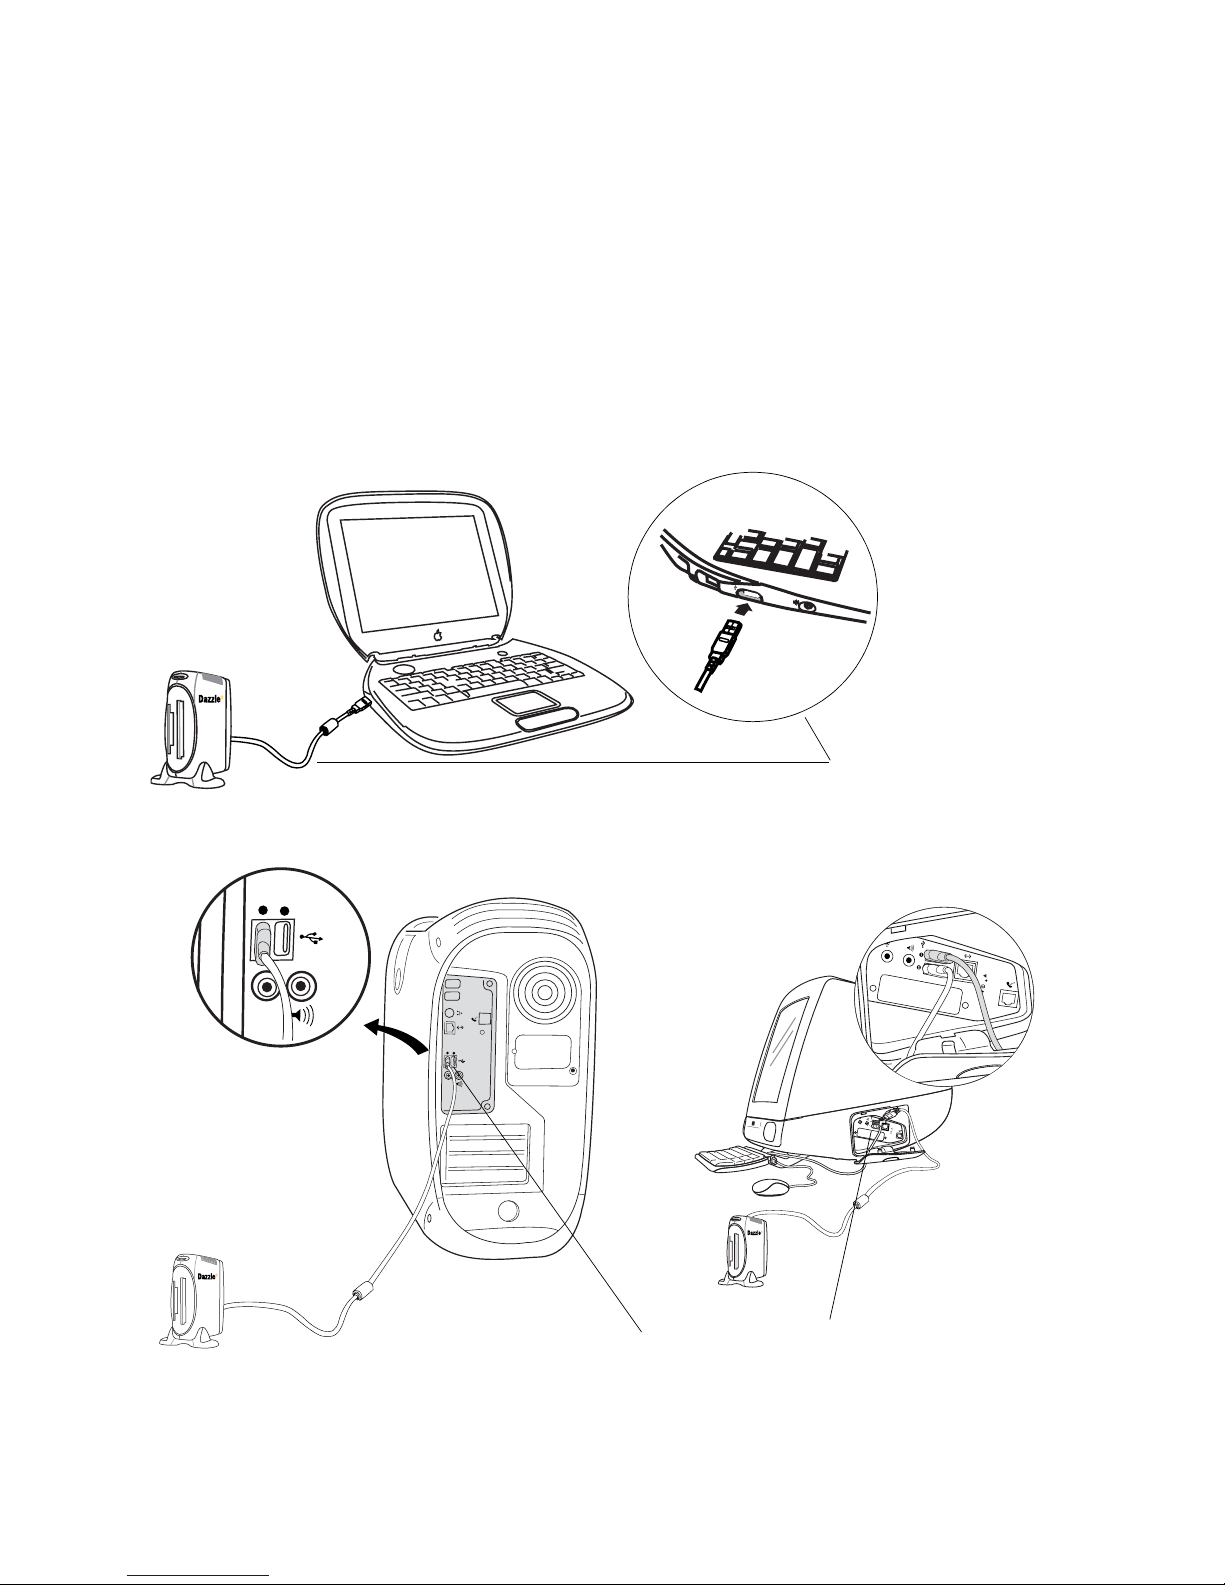
Installing the Hardware on a Macintosh
Connecting to a Macintosh USB Port
Connect the USB cable (attached to the back of the 3 in 1 Reader/Writer) to the USB port
on your Macintosh. You can connect your 3 in 1 Reader/Writer to computers with USB 1.1
or USB 2.0 ports. In either case, the 3 in 1 Reader/Writer transfers data at the FullSpeed rate.
Note: Be sure the cable is properly aligned before connecting and do not force the connection.
Connect USB cable
from 3 in 1
Reader/Writer directly to
USB port on your
Macintosh
Enlarged View
Dazzle Universal 3 in 1 Reader/Writer User’s Guide • Getting Started • Page 20
Enlarged
View
Connect USB cable
from 3 in 1
Reader/Writer directly to
USB port on your
Macintosh
Page 21
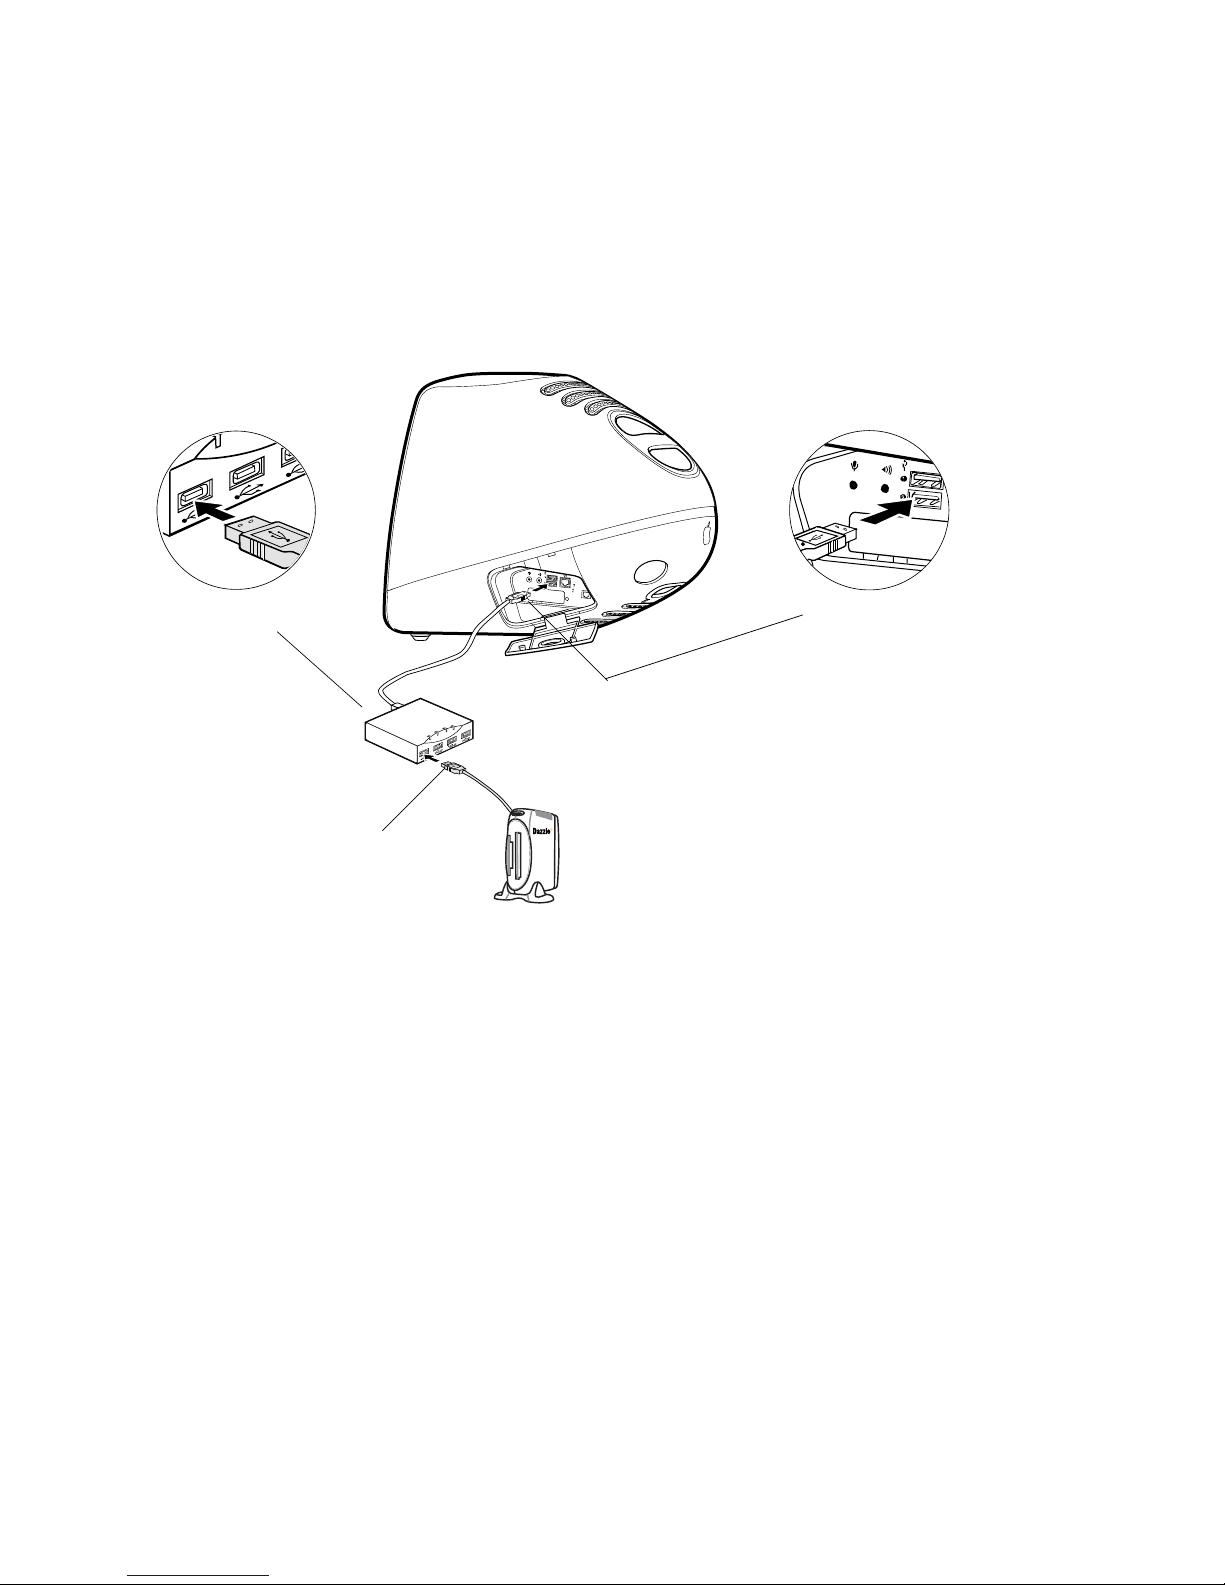
Connecting to a USB Hub
1. Connect the USB hub (purchased separately) to your Macintosh USB port.
2. Connect the USB connector of the reader/writer to a port on the USB hub.
Note: Be sure the cable ends are properly aligned before connecting and do not force the
connection.
Enlarged View Enlarged View
Connect USB cable from USB port on
USB hub to USB port on your Macintosh
Connect USB cable from
3 in 1 Reader/Writer
to USB port on USB hub
Dazzle Universal 3 in 1 Reader/Writer User’s Guide • Getting Started • Page 21
Page 22
Using the 3 in 1 Reader/Writer
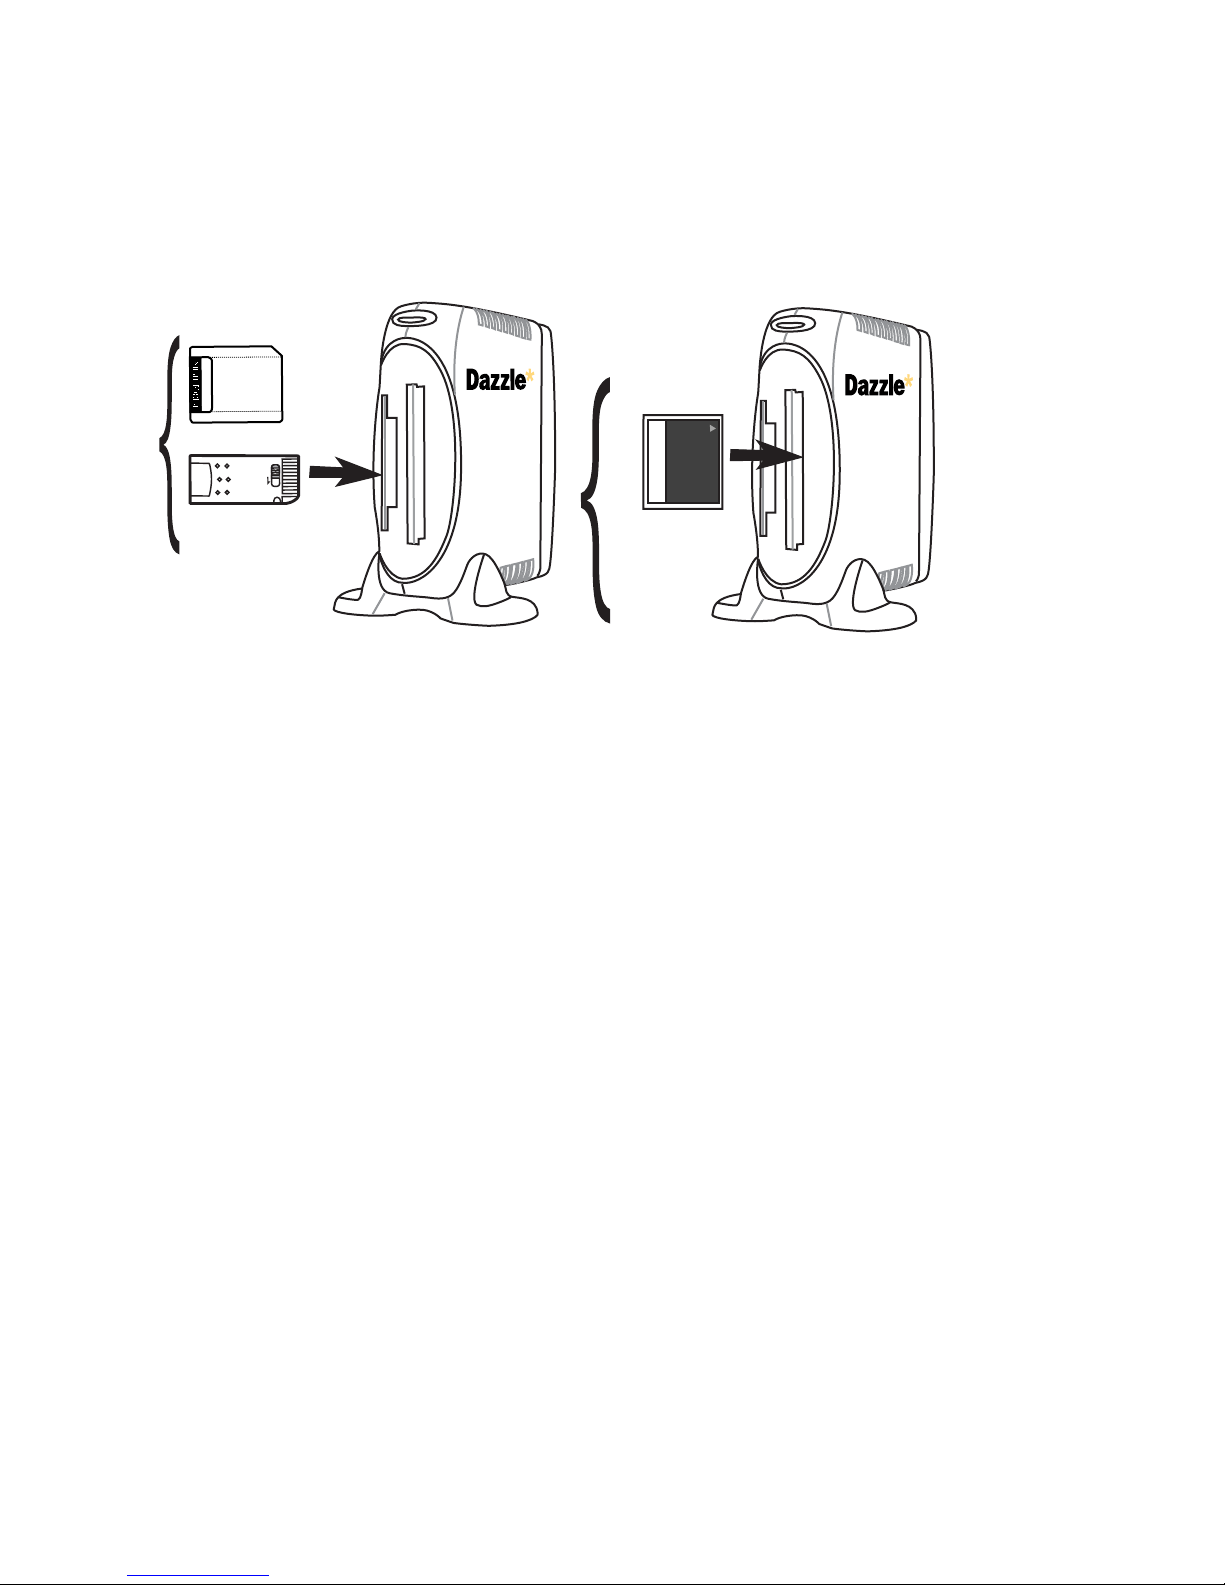
This section explains how to use the 3 in 1 Reader/Writer with digital media cards.
128MB
Digital FlashFilm
LO
C
K
SmartMedia*
Memory Stick
*SmartMedia 3.3 Volt Only
SD/MMC
SmartMedia*
Memory Stick
Microdriv
e
SD/MMC
SmartMedia*
Memory Stick
Digital Media Card Compatibility
The 3 in 1 Reader/Writer is compatible with the following digital media cards:
• SSFDC Smart Media cards (3.3 Volt only)
• All current CompactFlash cards and cards in the CF II and CF+Type II formats, such as
the IBM Microdrive
• Memory Stick media
Important: The 3 in 1 Reader/Writer’s left media slot accepts Smar tMedia and Memor y
Stick cards. You can inser t only one of these media types at the same time.
CompactFlash
Dazzle Universal 3 in 1 Reader/Writer User’s Guide • Using the Reader/Writer • Page 22
Page 23
Inserting a SmartMedia Card
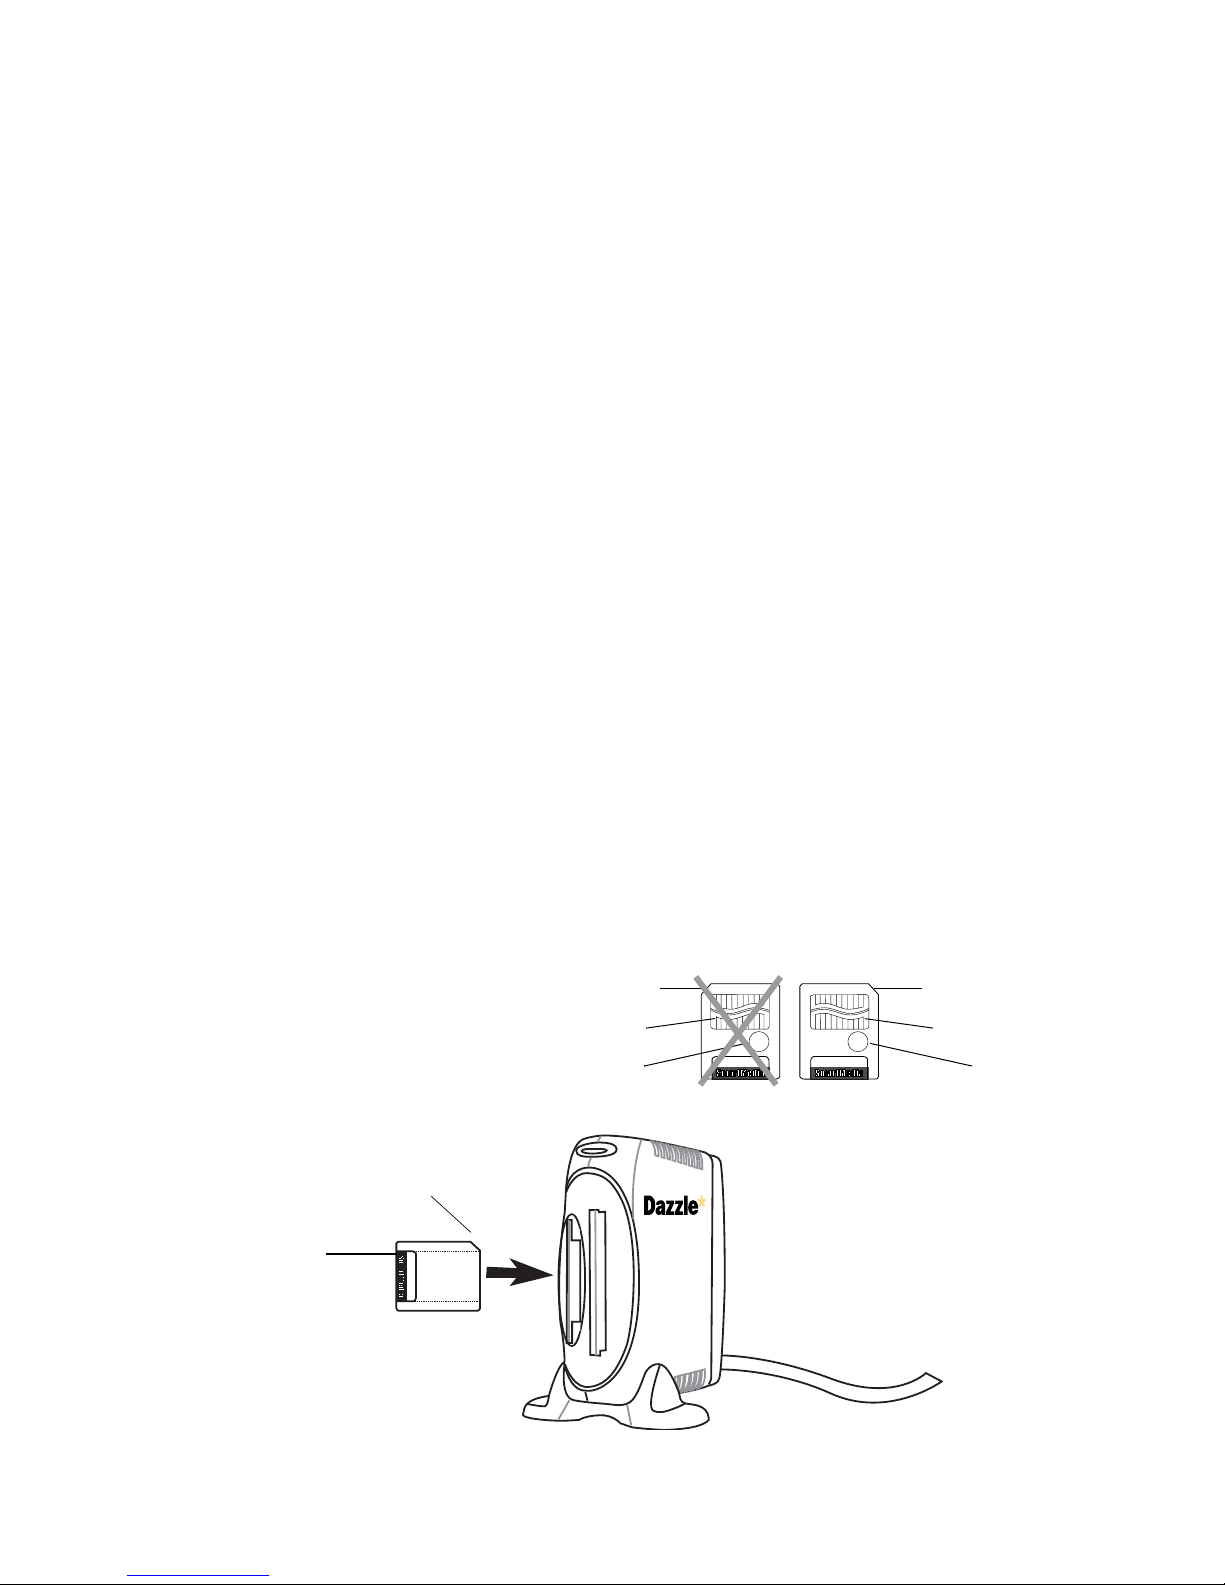
Before you insert a Smar tMedia card, be sure to place the 3 in 1 Reader/Writer in it’s
base with the Dazzle logo on the right side. If you plan on writing to or deleting from your
SmartMedia card and the card’s write protection sticker is covering the write protect area
(see illustration below), you must remove the sticker. To insert a Smar tMedia Card, follow
these steps:
1. Position the SmartMedia card in the direction shown in the illustration below.
Note: The 3 in 1 Reader/Writer accepts only 3.3V SmartMedia cards. It does not sup-
port 5V SmartMedia cards.
2. Insert the card in the left media slot with the gold contacts on the left side. The card’s
notch must be located at the top corner.
Notice the notched corner of the Smar tMedia card. The notch appears on the
right-hand side when you are looking directly at the gold contacts on the top of a 3.3V
SmartMedia card (see the illustration below).
Caution: Be careful not to insert the SmartMedia card in the wrong direction. Be sure
to insert the SmartMedia card with the gold contacts on the left side. If it is forced in,
the reader/writer or the SmartMedia card may be damaged, or data on the card may
be lost or corrupted. If the computer does not recognize the media, or if it does not fit
correctly, re-position the card and tr y reinser ting it.
3. Gently push the card in all the way until it locks in place.
Important: If excessive force is required or the card just doesn’t seem to fit, do not
force the card in the reader. Contact the Dazzle Technical Resource Center for assistance.
SmartMedia Card Comparison (view of cards from top)
Right notch
indicates 3.3V card
Gold contacts
Write protect
area
Insert the SmartMedia
card in the left slot
with the gold contacts
inserted first and facing to
the left
Notch on top
SmartMedia
Left notch
indicates 5V card
Gold contacts
Write protect
area
5V SmartMedia card
(not compatible)
3.3V SmartMedia card
(compatible)
Dazzle Universal 3 in 1 Reader/Writer User’s Guide • Using the Reader/Writer • Page 23
Page 24
Inserting a CompactFlash Card
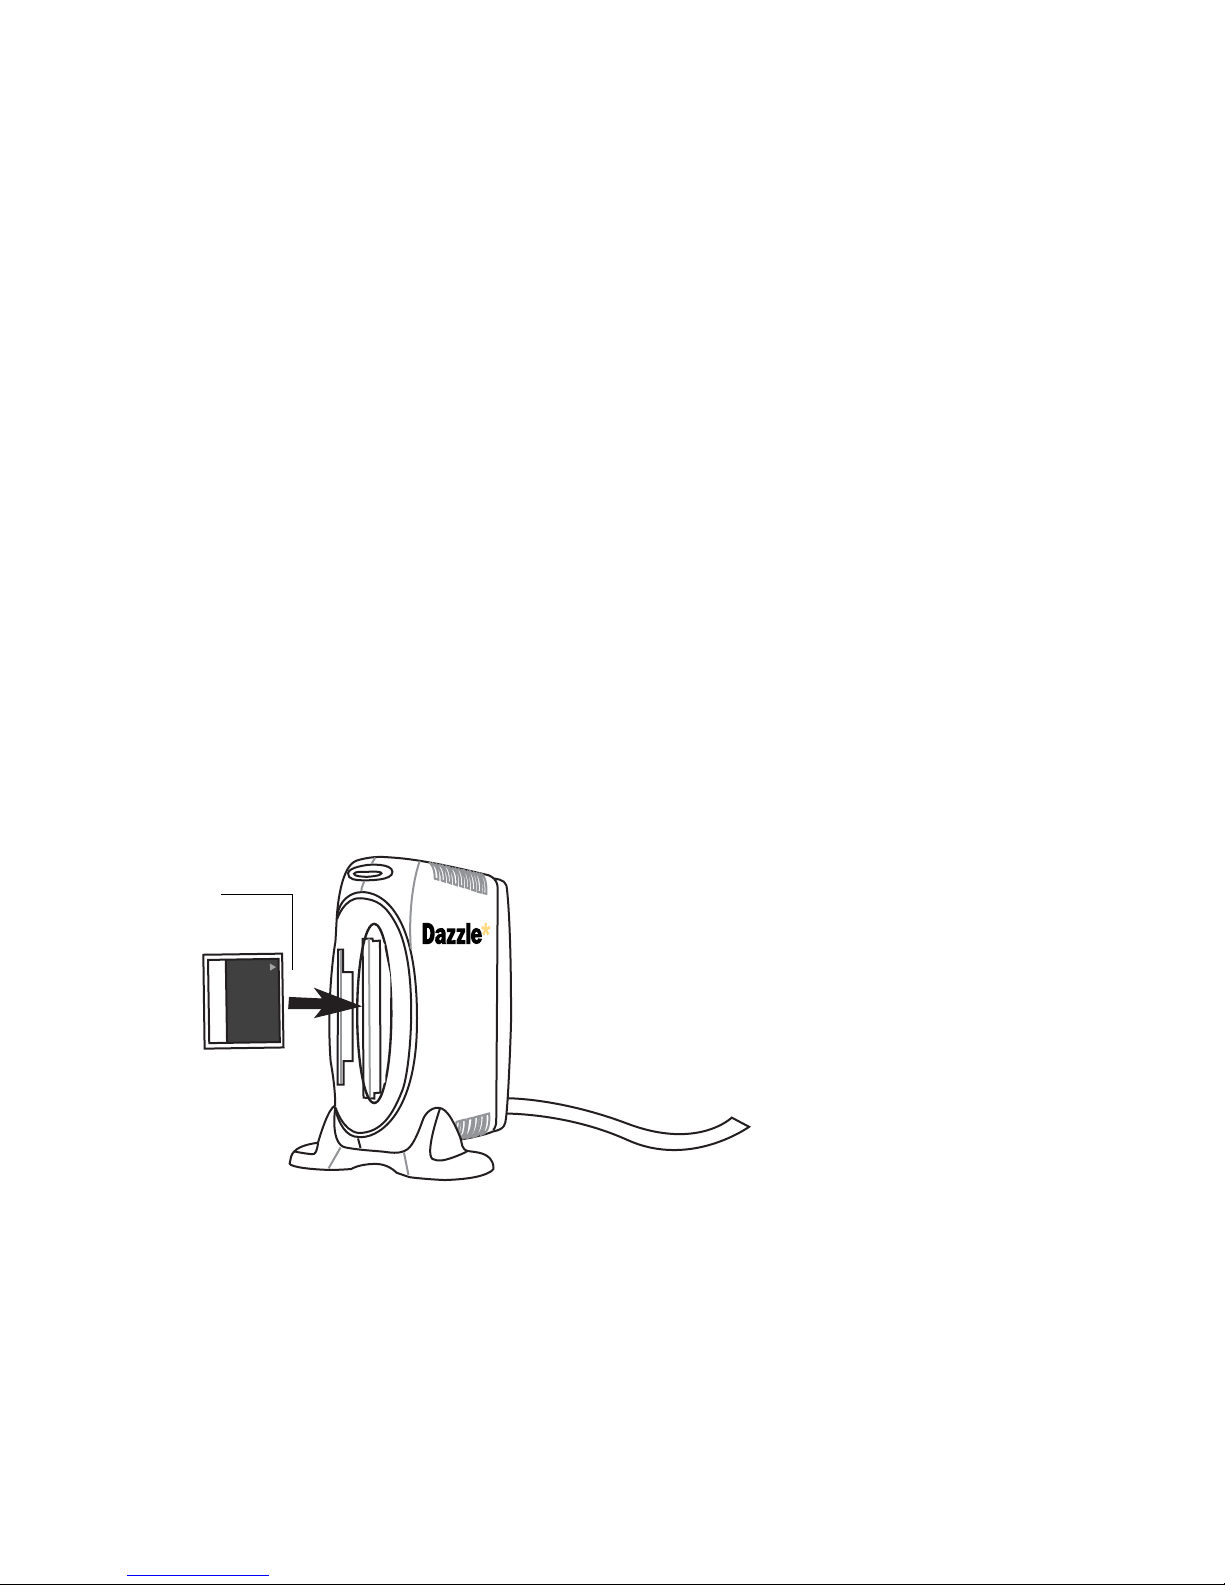
Before you insert a CompactFlash Card (including IBM Microdrive), be sure to place the
3 in 1 Reader/Writer in it’s base with the Dazzle logo on the right-hand side. To inser t a
CompactFlash Card, follow these steps:
1. Position the CompactFlash card in the direction shown in the illustration below.
2. Insert the card in the right media slot with the card manufacturer’s label on the right
and the connectors facing inward.
Make sure you position the card properly. All CompactFlash card manufacturers adhere
to a specification that requires a positive keying of the card.
Caution: Be careful not to insert the CompactFlash card in the wrong direction.
Make sure the connectors are facing inward and the card is not inser ted upside down.
If it is forced in, the reader/writer or CompactFlash card may be damaged or data on
the card may be lost or corrupted.
3. Gently push the card in all the way until it locks in place.
The card slides in on the molded rails and you should feel a slight amount of
resistance as the connectors make contact.
Important: If excessive force is required or the card just doesn’t seem to fit, do not
force the card in the reader. Contact the Dazzle Technical Resource Center for
assistance.
Insert the CompactFlash
Card with connectors
facing in
128
Digital FlashFilm
MB
Compact Flash
Dazzle Universal 3 in 1 Reader/Writer User’s Guide • Using the Reader/Writer • Page 24
Page 25
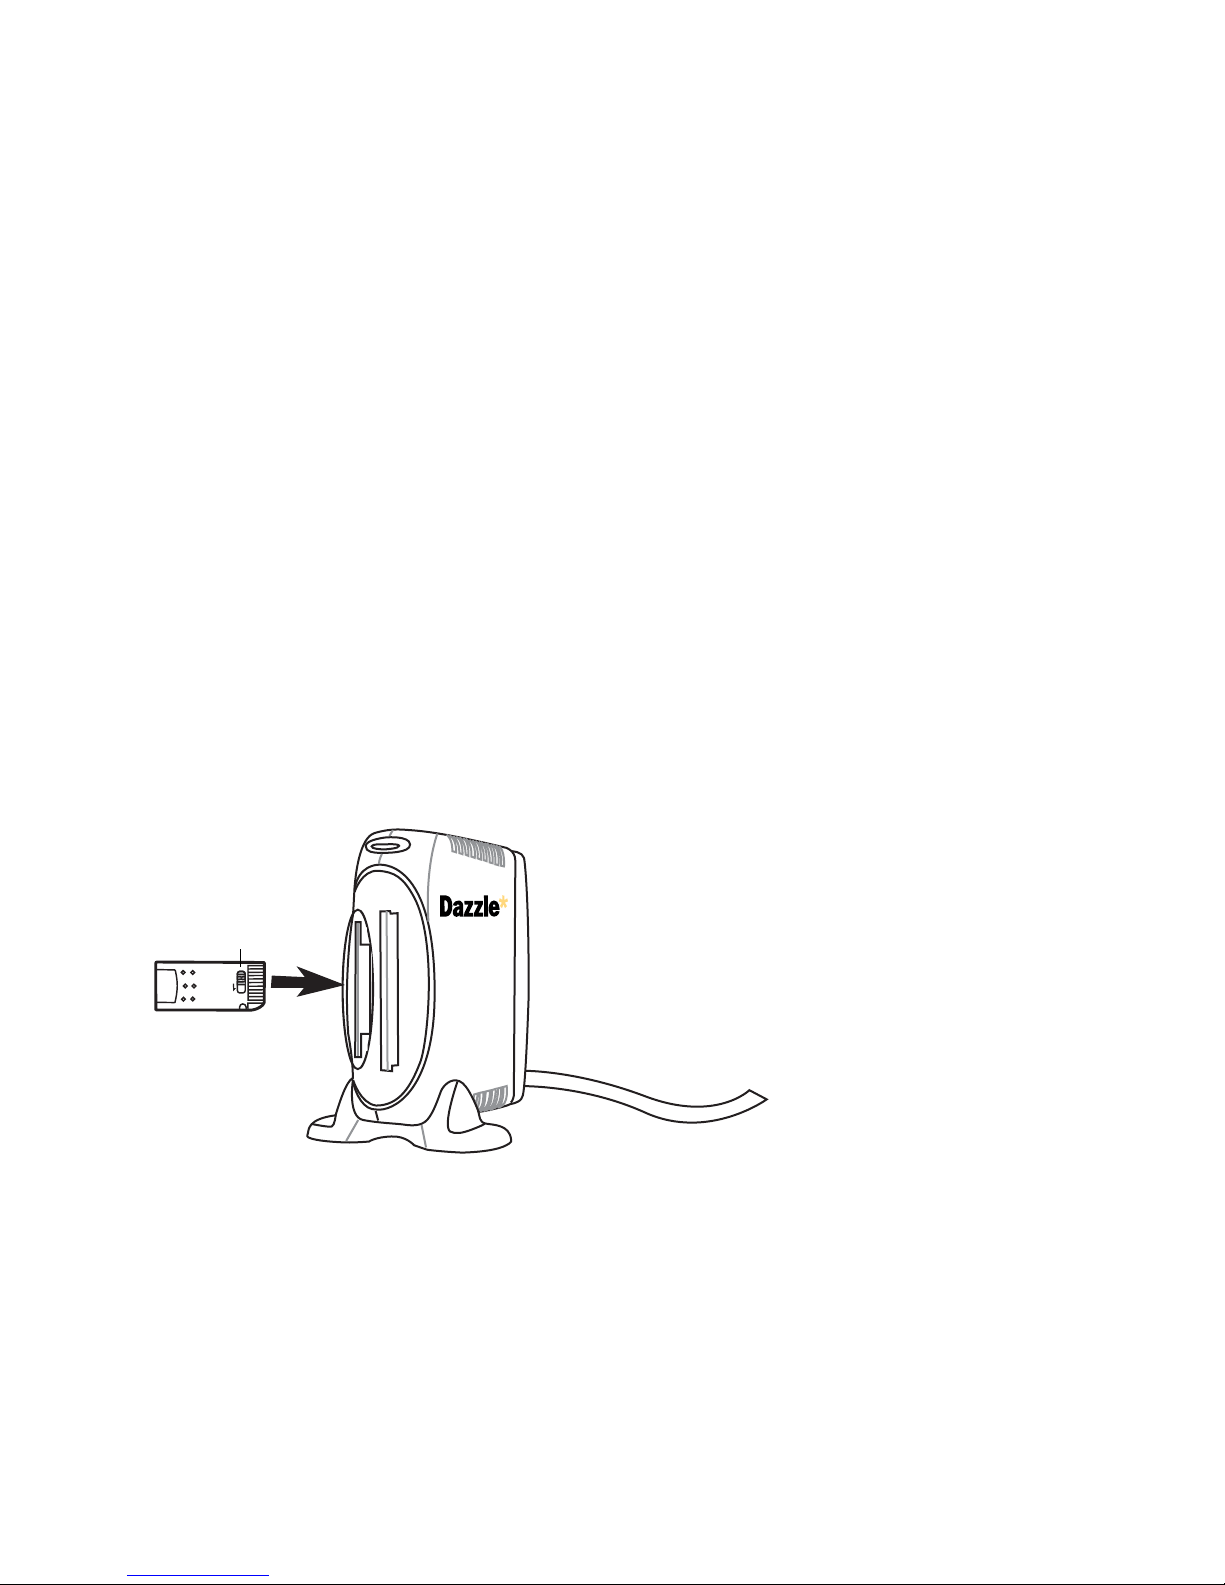
Inserting a Memory Stick Card
Before you insert a Memor y Stick Card, be sure to place the 3 in 1 Reader/Writer in it’s
base with the Dazzle logo on the right-hand side. If you plan on writing to or deleting from
your Memory Stick card, make sure the card’s lock tab is not in the lock position (see the
illustration below). To insert a Memory Stick Card, follow these steps:
1. Position the Memory Stick in the direction shown in the illustration below.
A portion of the left media slot is designed for inserting Memor y Stick media cards.
This portion utilizes the center of the media slot for Memory Stick inser tion.
2. Insert the Memory Stick in the left media slot with the gold contacts facing to the
right.
Caution: Notice the rounded corner of the Memor y Stick card and be careful not to
insert the card in the wrong direction. To inser t properly, be sure the card is positioned
with the rounded corner on the bottom. You should see the gold contacts on the right
side when inserting the media into the slot.
3. Gently push the Memory Stick in all the way until the card locks in place.
Important: Insert the Memory Stick gently. If it is forced in, the reader/writer or the
Memory Stick may be damaged, or data on the card may be lost or corrupted. If
excessive force is required, or the card just doesn’t seem to fit, do not force the card
in the reader. Contact the Dazzle Technical Resource Center for assistance.
Lock Tab
LOCK
Memory Stick
Note: The card’s
rounded corner must
be located at the bottom
when inserting.
Dazzle Universal 3 in 1 Reader/Writer User’s Guide • Using the Reader/Writer • Page 25
Page 26
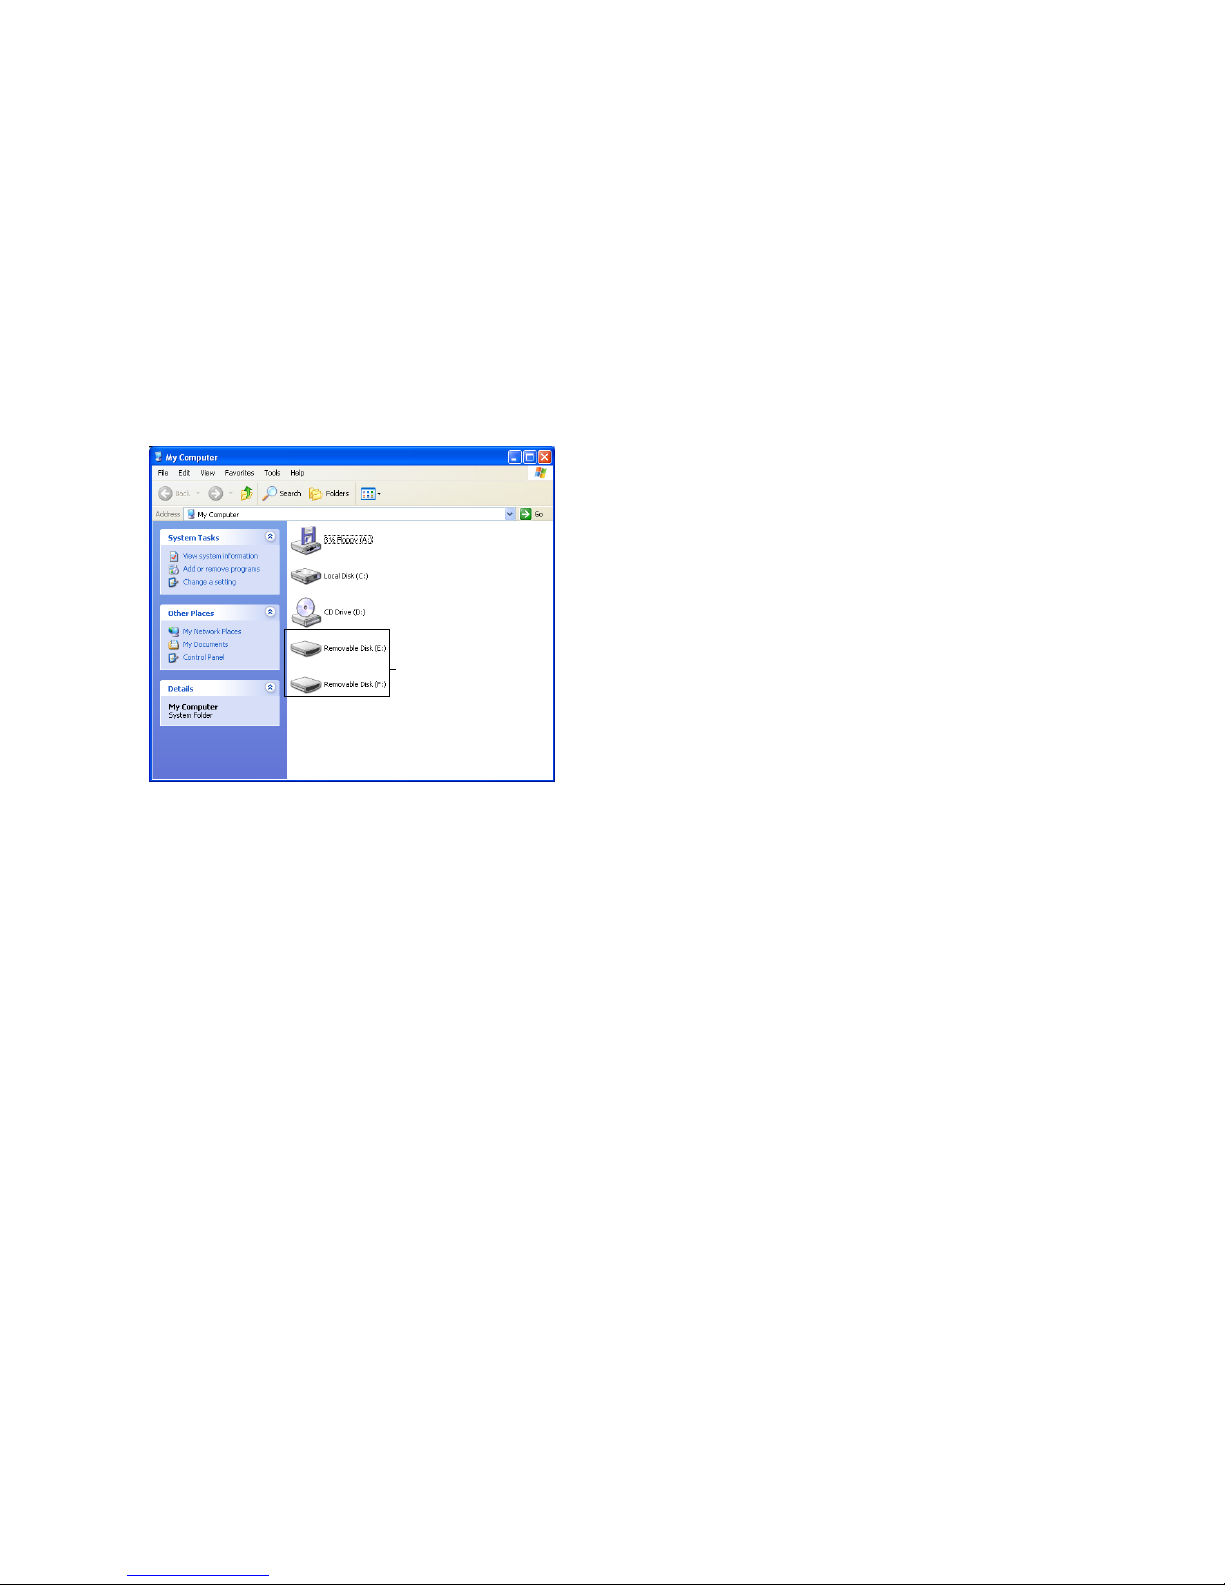
Accessing a Card on a PC
When the 3 in 1 Reader/Writer is connected to your PC, two Removable Disk icons appear
in My Computer (with newly assigned drive letters). The first icon represents the right slot
(CompactFlash/Microdrive) and the second icon represents the left slot (Smar tMedia and
Memory Stick).
Hint: In Windows Me, XP, or 2000, you can rename the Removable Disk icons to represent
the corresponding media type. Simply right-click on the icon, select Rename from the
popup menu, and enter the desired name.
3 in 1 Removable
Disk Icons
Note: If you are running Windows XP and you inser t a digital media card, a dialog box
appears that asks what you want to do with the files on the Removable Disk. You can
access the files by selecting from several options. This is a default feature of Windows XP.
For all other supported versions of Windows (including XP) you can access a card as
follows:
1. Double-click on the card’s Removable Disk icon.
The contents of the media card appear. You can then access the data on the card.
Digital cameras usually create one or more folders on a digital media card, which
contains your digital images. To display a digital image, open the folder(s), then
double-click on the icon(s) representing the digital image(s) you want to view.
Note: If a card is not inserted when you double-click a Removable Disk icon, a
message appears that says: Device not ready or Please insert a disk. If you see this
message, insert a card and tr y accessing the media again.
2. To transfer files between your computer and a card, use the basic Windows file
transfer functions. For example, drag and drop or copy and paste files from your
computer to a card or from a card to your computer.
Important: The 3 in 1 Reader/Writer’s left media slot accepts SmartMedia and
Memory Stick cards. You can insert only one of these media types at the same time.
However, you can use both the CompactFlash slot (right slot) and the left slot
concurrently.
Dazzle Universal 3 in 1 Reader/Writer User’s Guide • Using the Reader/Writer • Page 26
Page 27

Formatting a Card on a PC
Sometimes you may need to format a digital media card in the 3 in 1 Reader/Writer rather
than in your digital device (camera, MP3 player, cell phone, etc.). In some cases, your
device may not have a format option, or you may be required or prompted to format a card.
Caution: Formatting a CompactFlash, Smar tMedia, or Memor y Stick card completely
erases any data stored on the card. If there are important images or files you want to safeguard for later use, save a backup copy on your hard drive, CD-R drive, or other type of
removable media before formatting a card.
Formatting a Card Using the Dazzle Formatting Utilities
To format a digital media card in the 3 in 1 Reader/Writer using the Dazzle Formatting
Utilities, follow the steps below. Before you can use the Dazzle Formatting Utilities, you
must perform the software installation, as explained earlier in this guide.
You can also format your cards using the Windows formatting utility for your Operating
System, as described on page 30. Formatting your media using a Windows formatting
utility conforms only to Windows specifications. The Dazzle Formatting Utilities
automatically perform additional operations, such as deleting an existing par tition and
creating a new partition and checking for and restoring bad data blocks. In addition, each
formatting utility has its own unique features.
The screens below may vary slightly from those on your computer.
1. Click Start> Programs, and then click 3 In 1 Reader-Writer.
A pop-up menu displays the Dazzle formatting utilities (CFPREP for CompactFlash,
SMPREP for SmartMedia, and MSPREP for Memory Stick).
Following is a description of each formatting utility:
CFPREP - Formats CompactFlash cards, providing one format option, which creates a
single formatted par tition on your card.
SMPREP - Formats Smar tMedia cards, providing two format options. In most cases,
select Quick (default option) to format your cards. If you experience problems with your
SmartMedia card, you may want to select the Full option to completely erase and scan
your SmartMedia card for any bad data blocks.
MSPREP - Formats Memor y Stick cards, providing two format options. In most cases,
select Quick (default option) to format your cards. If you experience problems with your
Memory Stick you may want to select the Full option to completely erase and scan
your Memory Stick for bad data blocks.
Dazzle Universal 3 in 1 Reader/Writer User’s Guide • Using the Reader/Writer • Page 27
Page 28
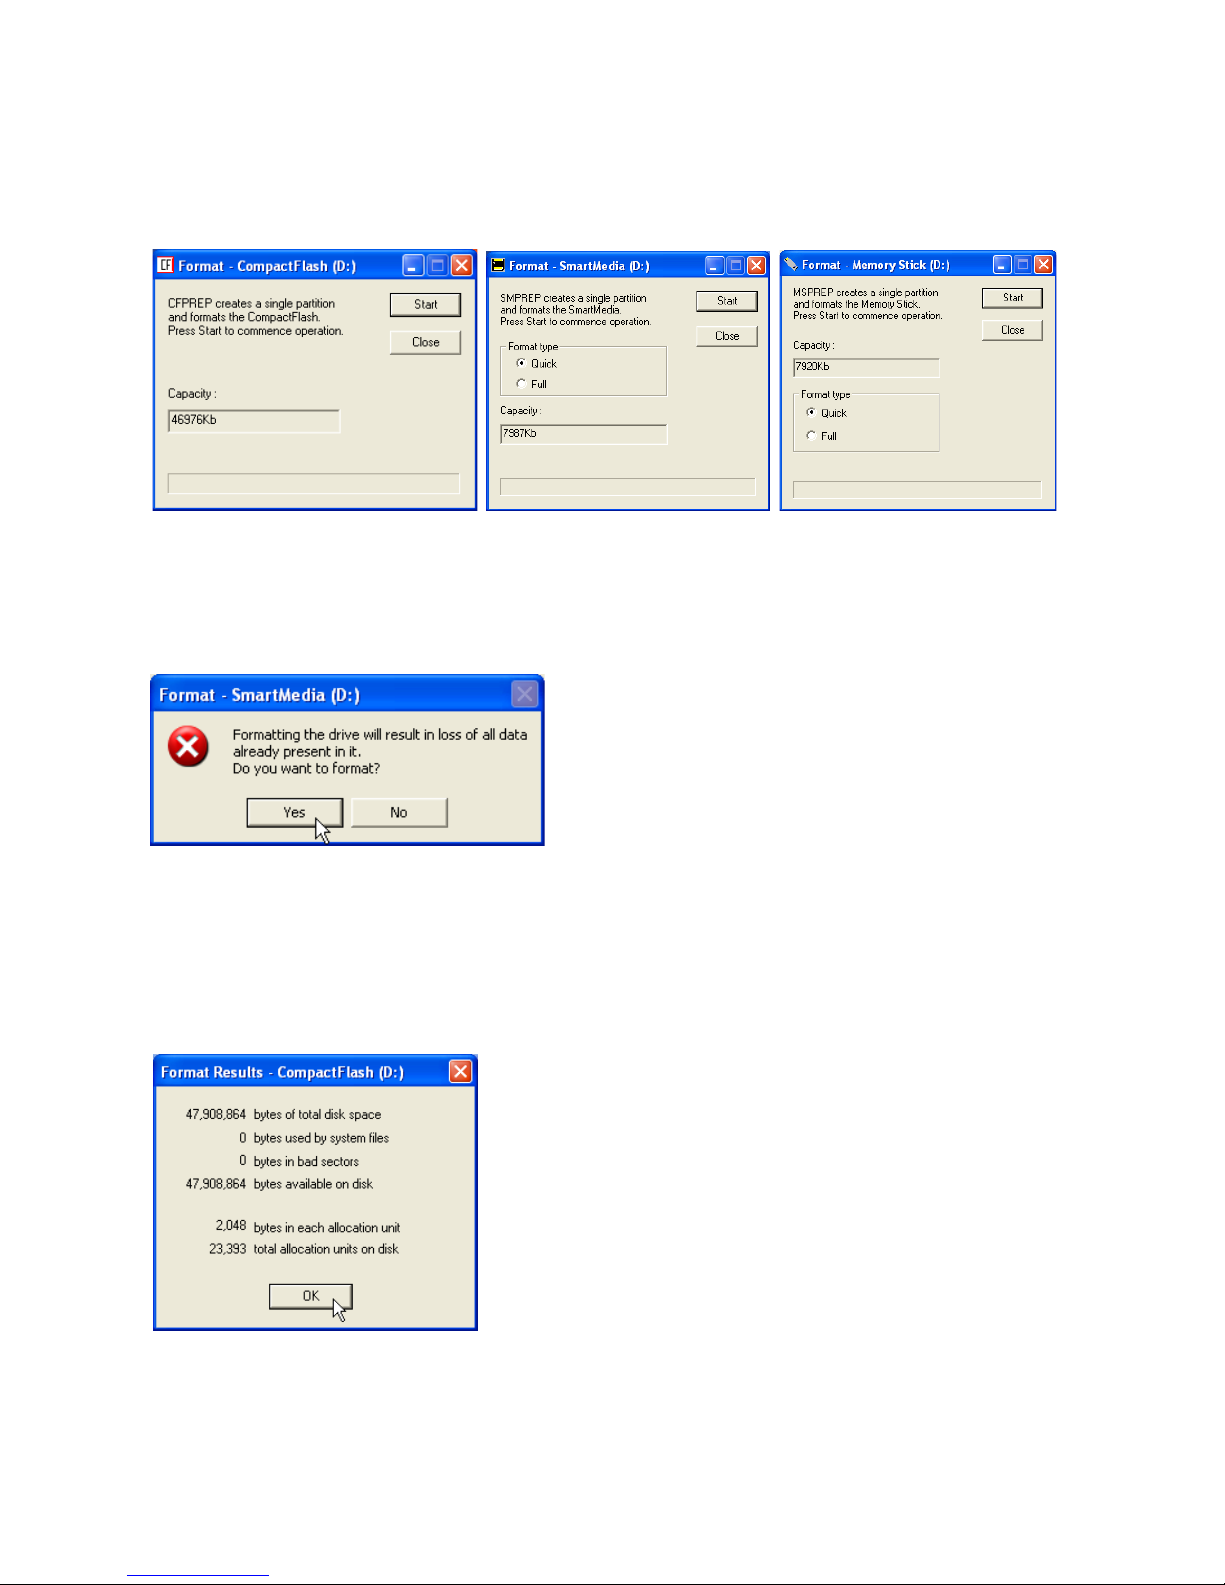
2. Select the formatting utility for your media type.
A dialog box appears for the appropriate formatting utility. Examples are shown below.
3. Click Start in the formatting utility dialog box for your media type.
A dialog box appears (similar to the example shown below) informing you that you are
about to erase all data on your media card.
4. Click Yes (or OK) in the dialog box to format your media card, or click No to quit.
The formatting process begins and a format status screen appears until the formatting
is complete.
When the formatting is complete, the Format Results dialog box appears, which
displays the formatting results.
5. Click OK in the dialog box to exit the formatting utility.
Dazzle Universal 3 in 1 Reader/Writer User’s Guide • Using the Reader/Writer • Page 28
Page 29
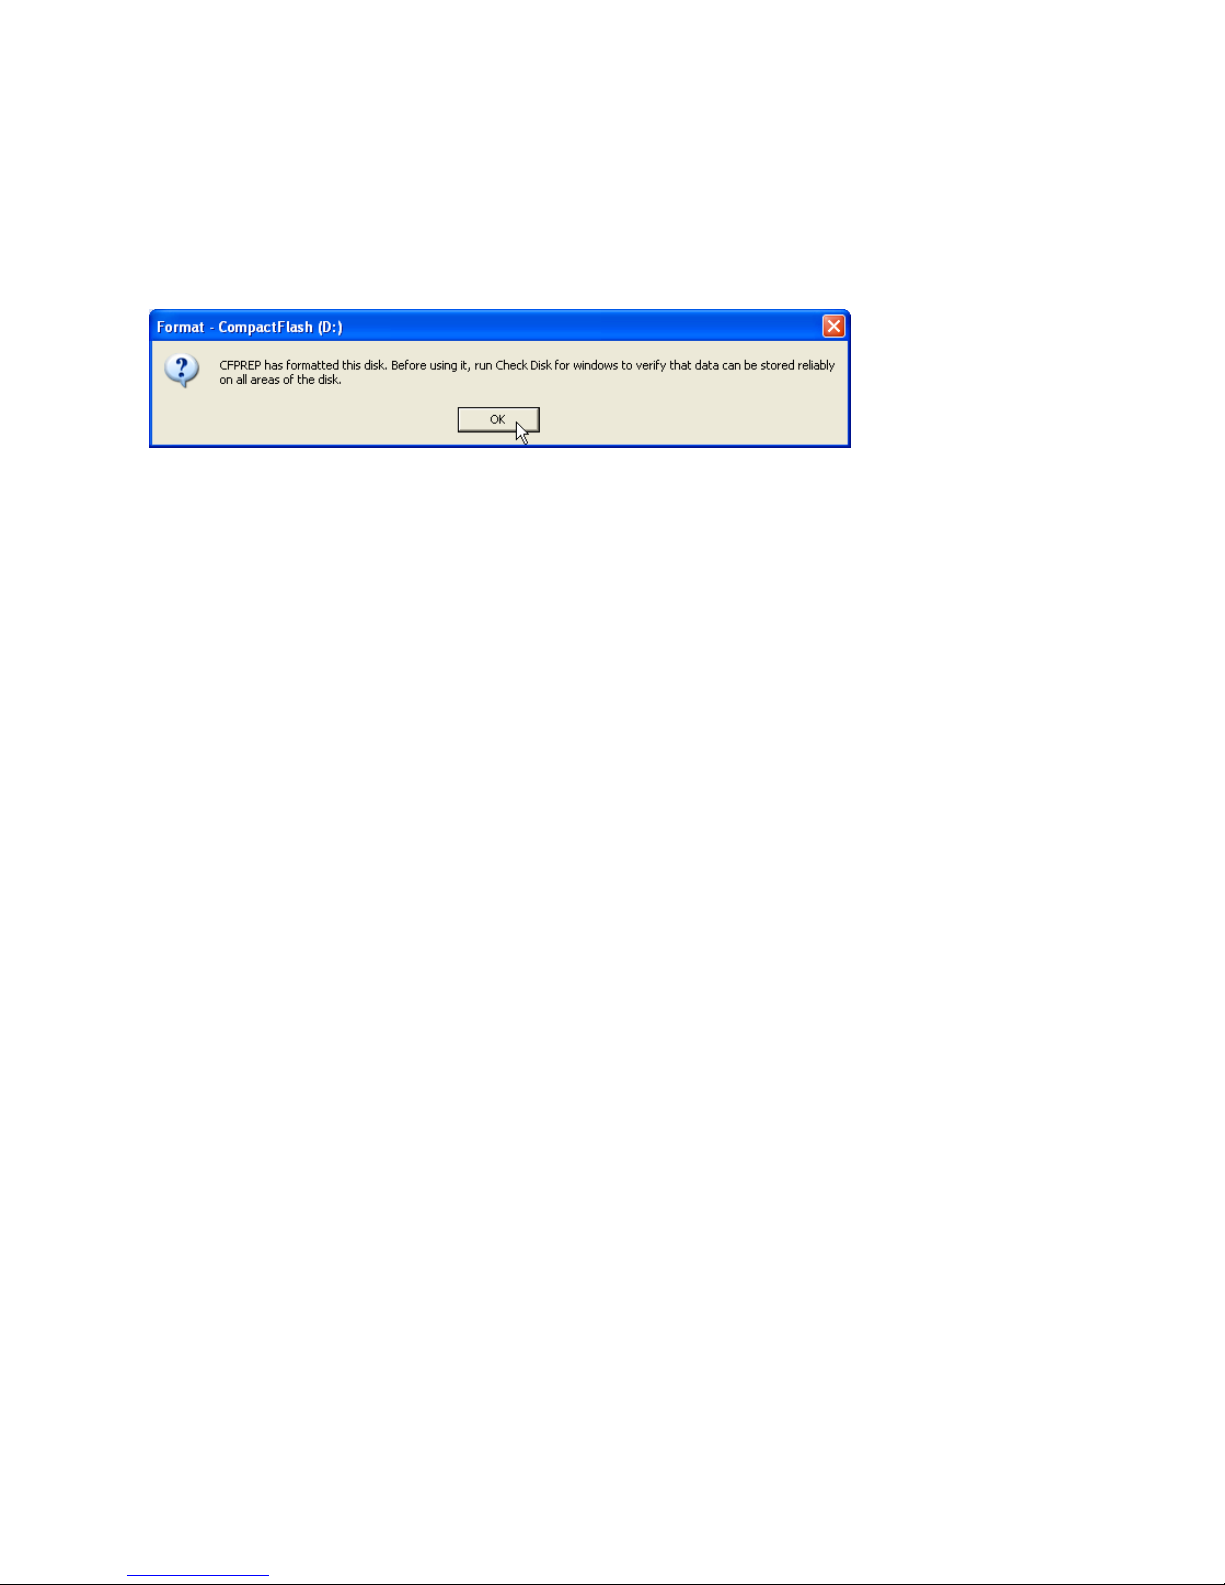
After formatting your digital media card, a dialog box (similar to the one shown below)
may appear recommending that you run the CheckDisk or ScanDisk utility. If you are
experiencing problems with your card, click OK (or Yes) and use the CheckDisk or
ScanDisk utility to verify that data can be stored reliably on all areas of your card.
However, in day-to-day use you should not have to run the utility.
The first formatting utility dialog box reappears.
6. Click Close in the formatting utility dialog box to exit the utility.
Dazzle Universal 3 in 1 Reader/Writer User’s Guide • Using the Reader/Writer • Page 29
Page 30
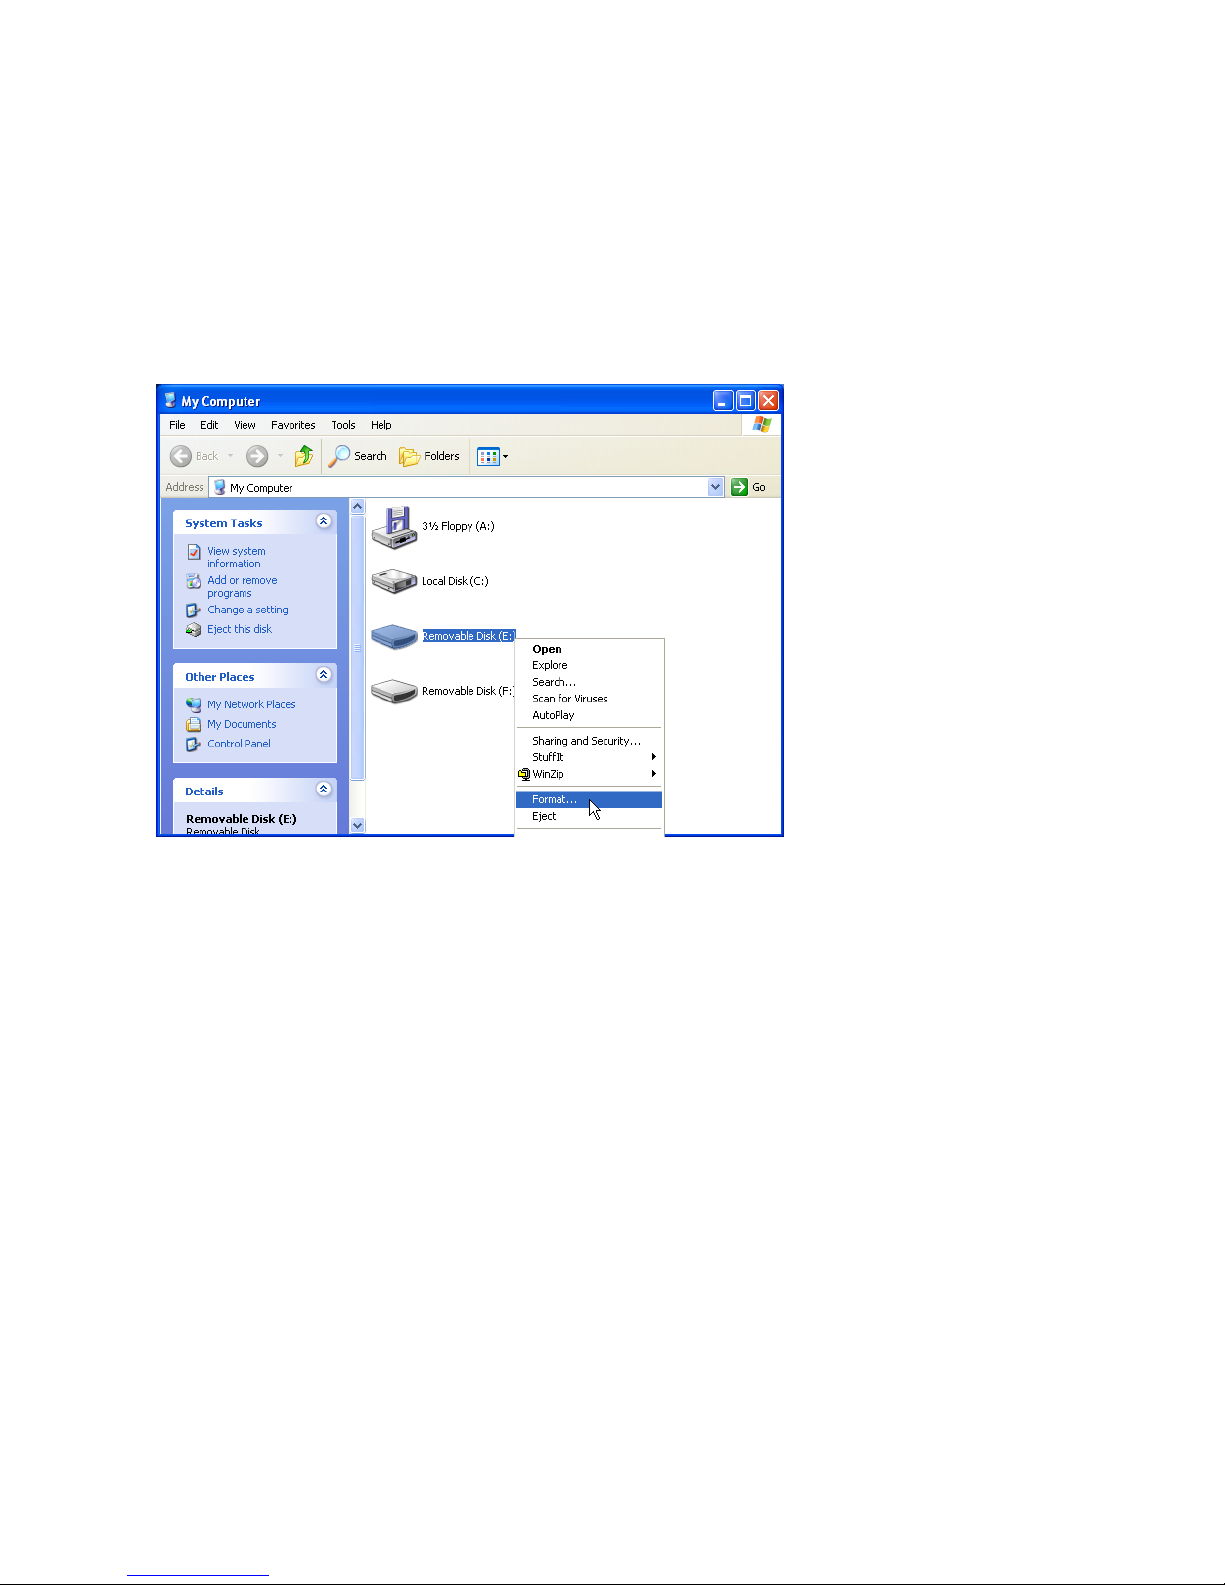
Formatting a Card Using the Windows Formatting Utility
If you want to format a card in your reader/writer and you did not install the Dazzle formatting utilities, follow the steps below:
Note: The screenshots below may vary slightly from those on your computer.
1. Right-click on the Removable Disk icon that corresponds to your media type, then
select Format from the pop-up menu.
The Format window appears for your operating system.
2. Select the desired format type (Quick or Full) in the Format window.
Dazzle Universal 3 in 1 Reader/Writer User’s Guide • Using the Reader/Writer • Page 30
Page 31
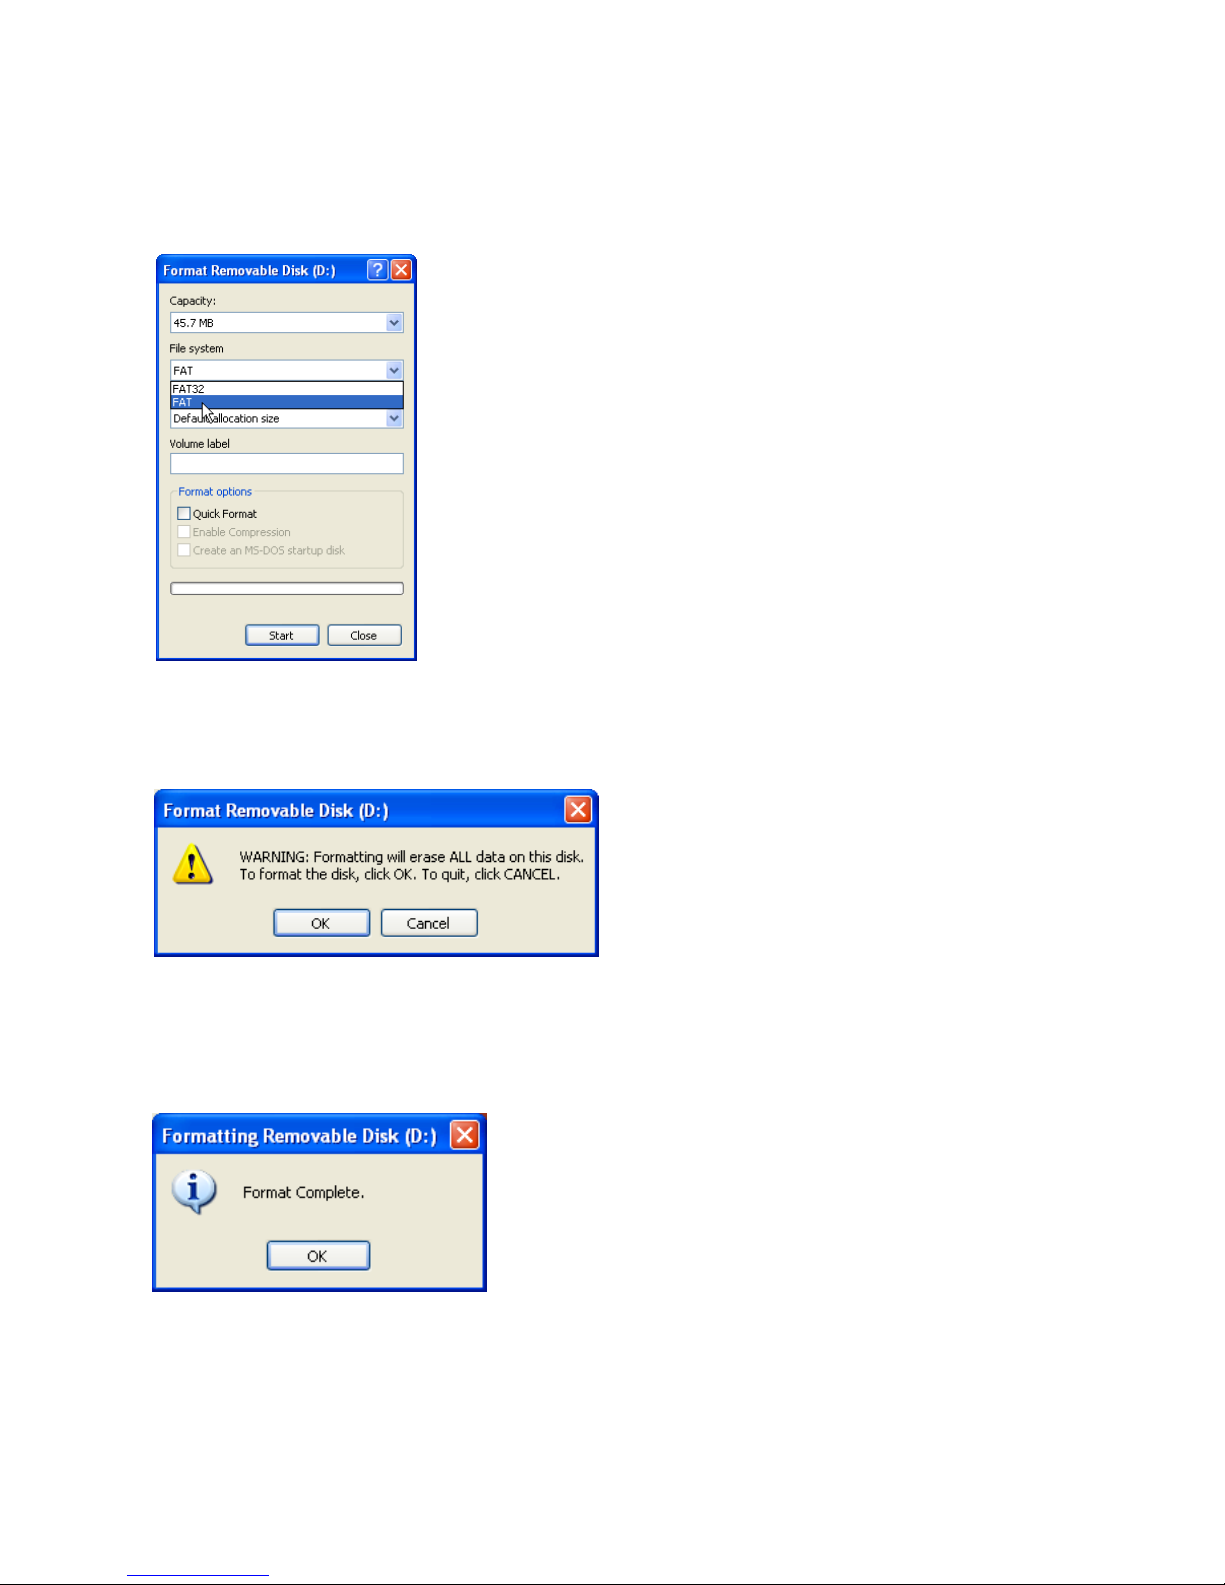
Important Note: If you are using a CompactFlash card with Windows XP, choose FAT
from the File System drop-down menu. This ensures the correct format for digital cameras and other digital devices.
3. Click Start in the Format window.
A warning dialog box informs you that formatting erases all your data.
4. Click OK in the warning dialog box to format your card, or click Cancel to quit.
The formatting operation begins. When formatting is completed, a confirmation dialog
box appears.
5. Click OK in the confirmation dialog box.
Dazzle Universal 3 in 1 Reader/Writer User’s Guide • Using the Reader/Writer • Page 31
Page 32
Removing a Card on a PC
Before you remove a digital media card, make sure that the Access Indicator at the front
of the 3 in 1 Reader/Writer is not flashing. The Indicator flashes when the 3 in 1 Reader/
Writer is reading or writing data on a card. Please wait until the read/write operations are
complete and the Indicator stops flashing before you remove a card. Removing a card
during read/write access causes lost or corrupted data.
To remove a card, grasp the end of the card with your thumb and index fingers, and remove
it from the appropriate slot.
Mounting and Accessing a Card on a Macintosh
After you insert a card on a Macintosh, a distinct icon appears on the Mac OS desktop.
This is the mounted state, which allows you to perform read and write operations on the
card. After inserting a card, the time required for mounting depends on the type and brand
of card. Usually, a card mounts on the desktop within a few seconds.
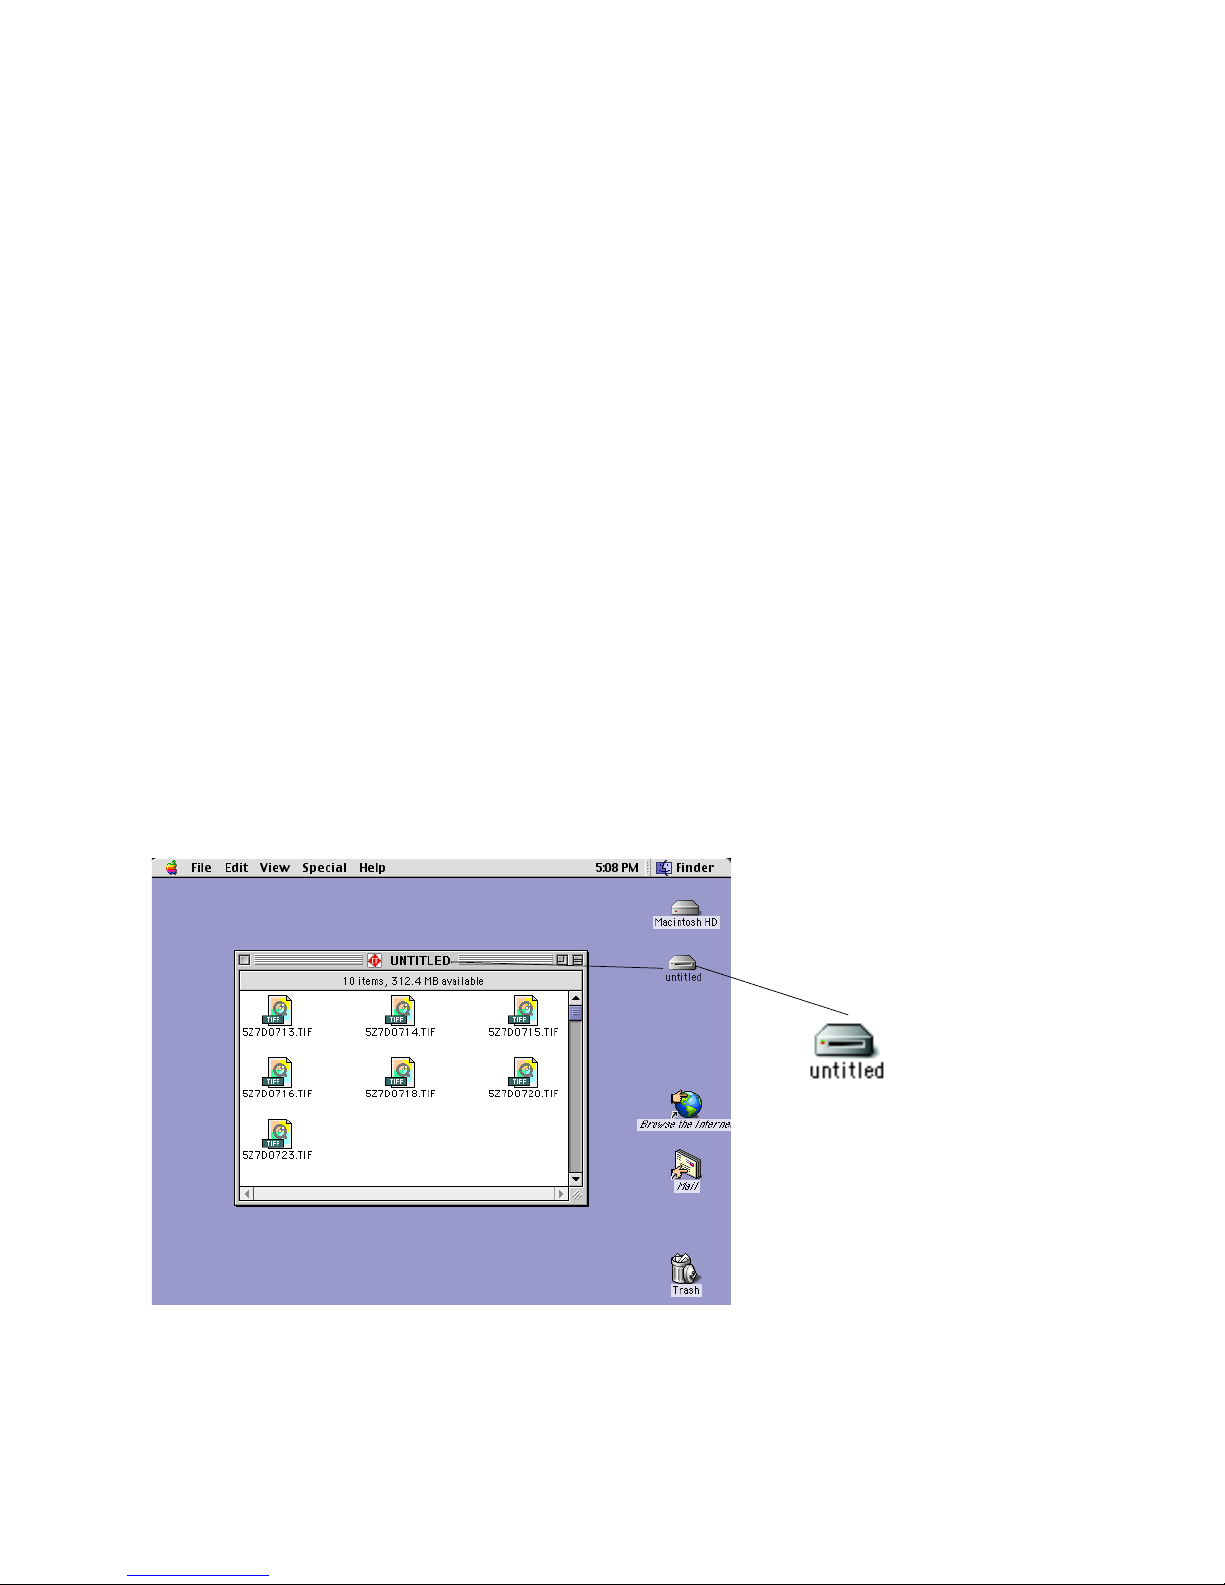
You can access a mounted card just like a floppy or other type of removable disk.
Double-click the card’s icon to open it's file window. In the example below, an untitled
media card was inserted in the 3 in 1 Reader/Writer. The card’s file window shows that it
contains 10 high resolution TIF images from a professional digital camera. You can display, copy, edit, or delete any of the images stored on the card.
Note: The screen below differs slightly for Mac OS 10.1.2 and higher.
Removable Disk icon
(example shown represents
IBM 340MB Microdrive)
Note: Files on a card can
be accessed by double-clicking
on the card’s icon.
IMPORTANT: If you are running Mac OS 9, be sure the Apple "File Exchange" control panel
is set to load in your system folder - you can activate it using the Apple "Extensions Manager" control panel.
Dazzle Universal 3 in 1 Reader/Writer User’s Guide • Using the Reader/Writer • Page 32
Page 33
Formatting a Card on a Macintosh
Dazzle strongly recommends that you format your digital media cards in your digital device
(camera, MP3 player, cell phone, etc.). However, there may be times when you need to
format a card in the 3 in 1 Reader/Writer. In some cases, your digital device may not have
a format option, or you may be required or prompted to format a card.
Caution: Formatting a CompactFlash, Smar tMedia, or Memor y Stick card completely
erases any data stored on the card. If there are important images or files you want to
safeguard for later use, save a backup copy on your hard drive, CD-R drive, or other type
of removable media before formatting a card.
Formatting a Card Using Mac OS 9
To format a digital media card in the 3 in 1 Reader/Writer using Mac OS 9.x, follow the
steps below.
Note: The screens below may vary slightly from those on your computer.
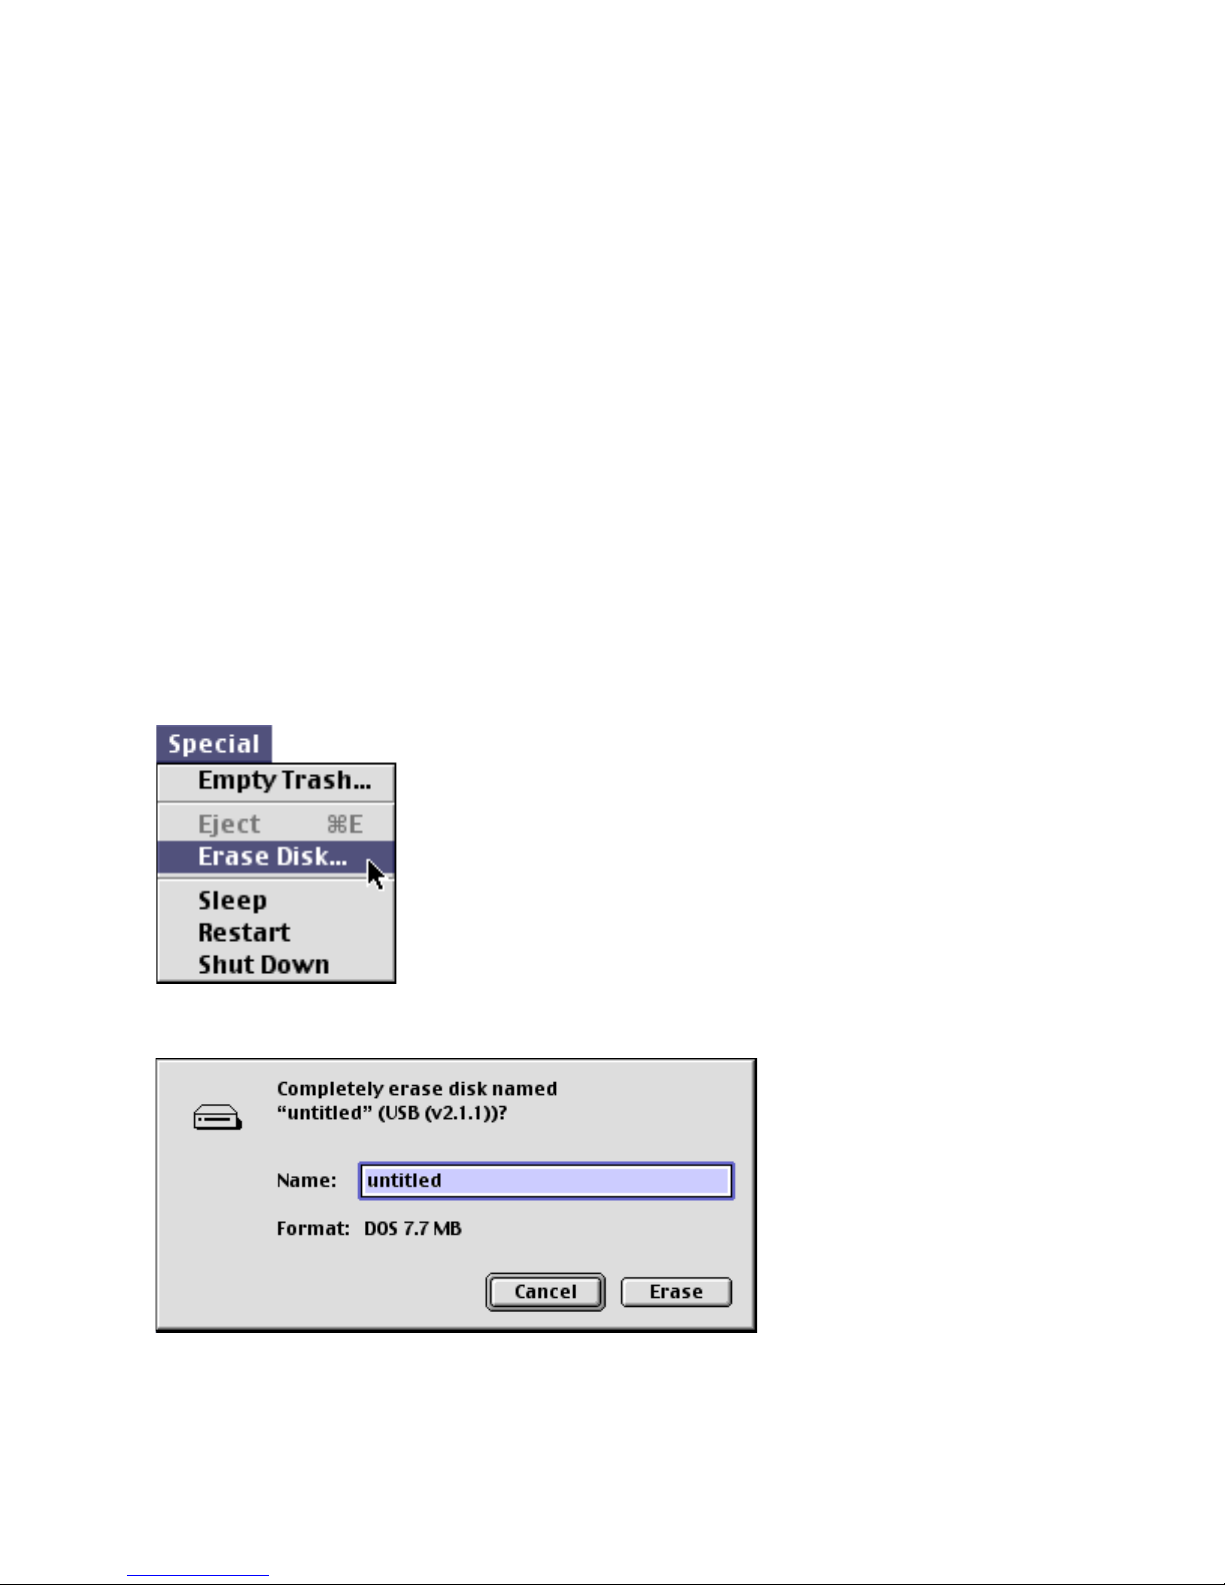
1. Mount the card you want to format and click once on its icon to select it.
2. Select Erase Disk in the Special menu.
A confirmation dialog box asks whether you want to completely erase the card.
3. Click Erase to format the card, or click Cancel to quit.
Dazzle Universal 3 in 1 Reader/Writer User’s Guide • Using the Reader/Writer • Page 33
Page 34
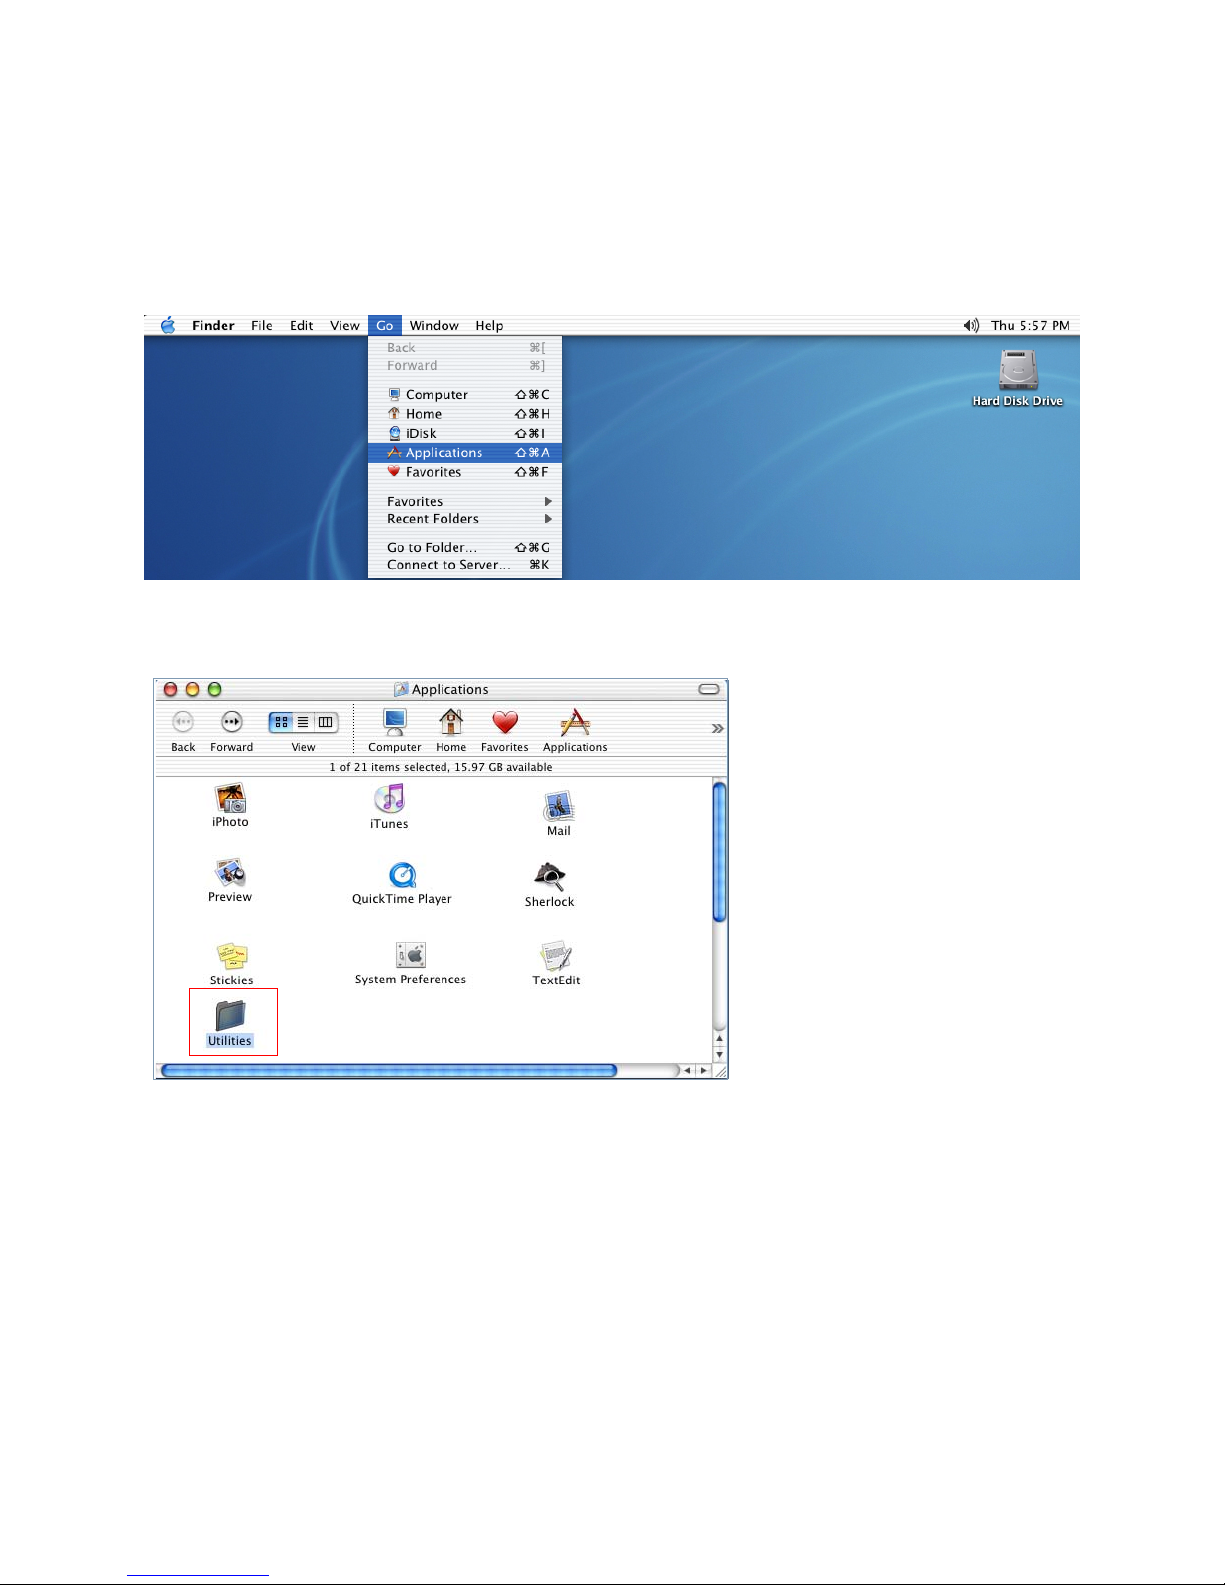
Formatting a Card Using Mac OS X
To format a digital media card in the 3 in 1 Reader/Writer using Mac OS X, follow the
steps below.
1. Choose Applications from the Go menu.
The Applications window appears.
2. Double-click the Utilities icon.
Dazzle Universal 3 in 1 Reader/Writer User’s Guide • Using the Reader/Writer • Page 34
Page 35
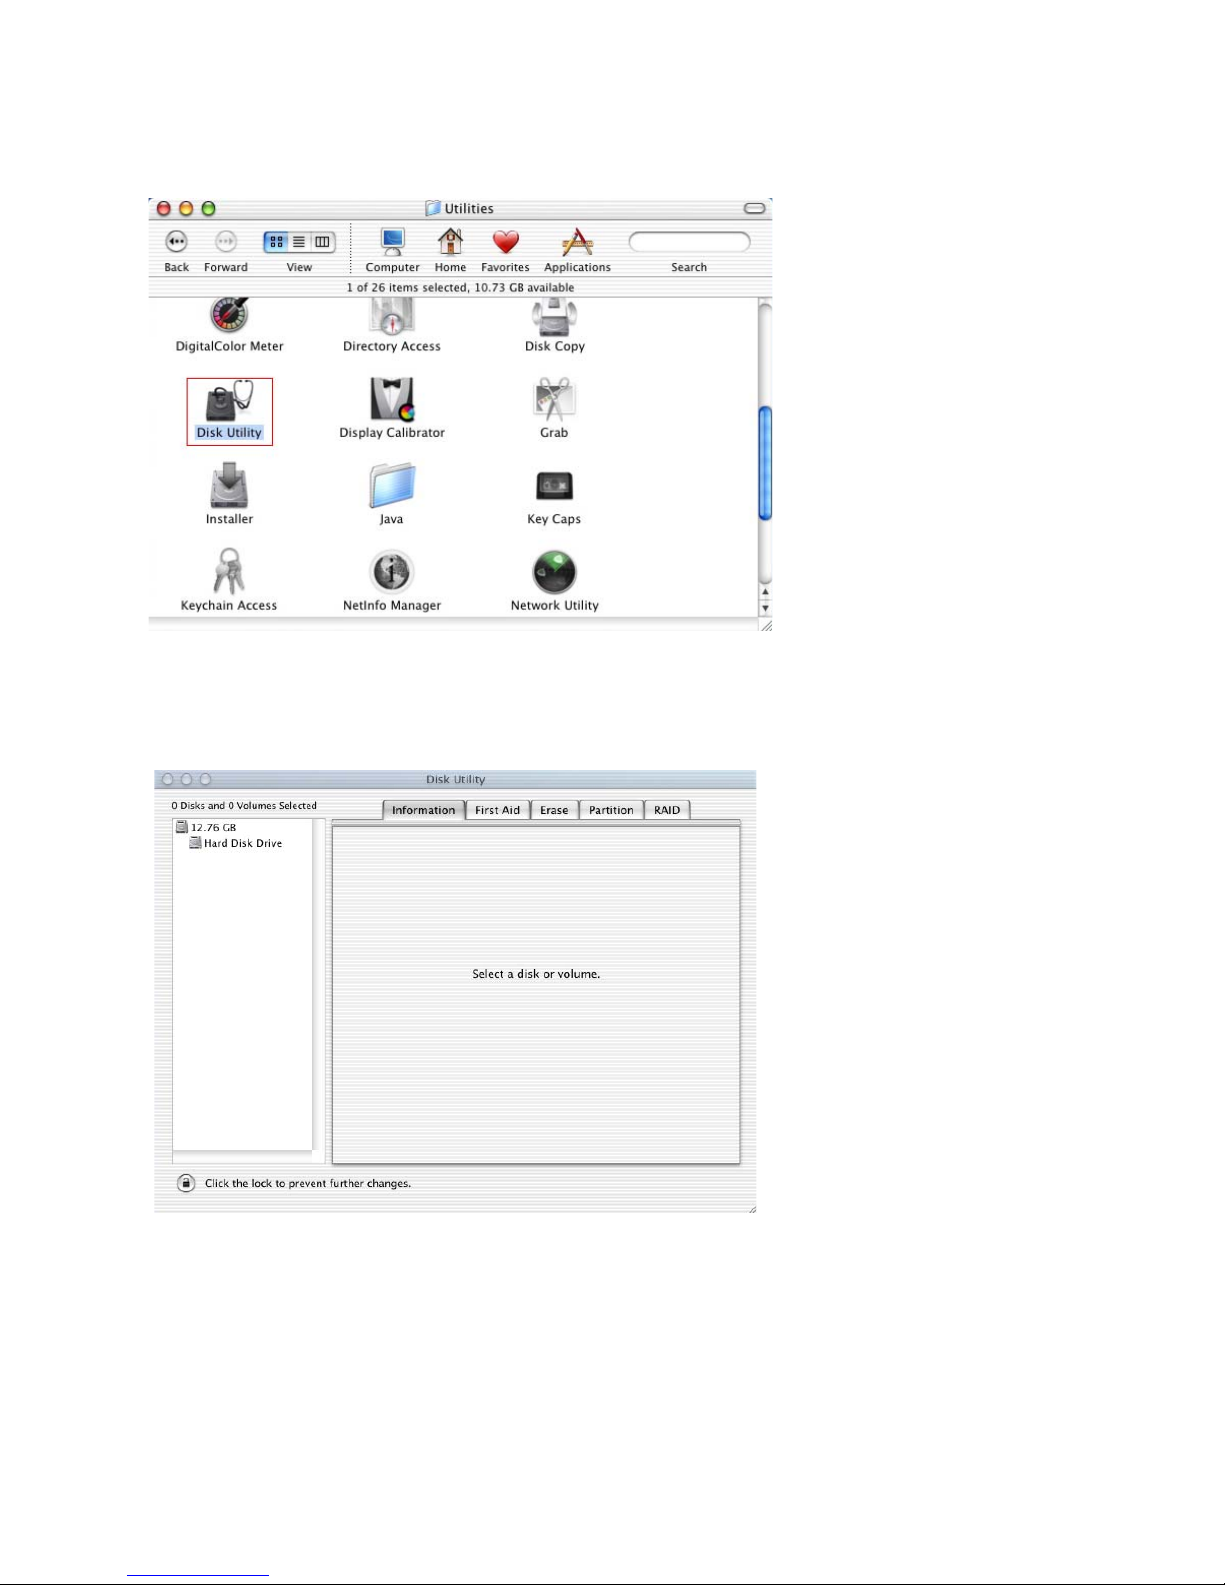
The Utilities window appears.
3. Double-click the Disk Utility icon.
The Mac OS X Disk Utility window appears. In this window, you can test, repair,
and/or erase a partition or disk.
Dazzle Universal 3 in 1 Reader/Writer User’s Guide • Using the Reader/Writer • Page 35
Page 36
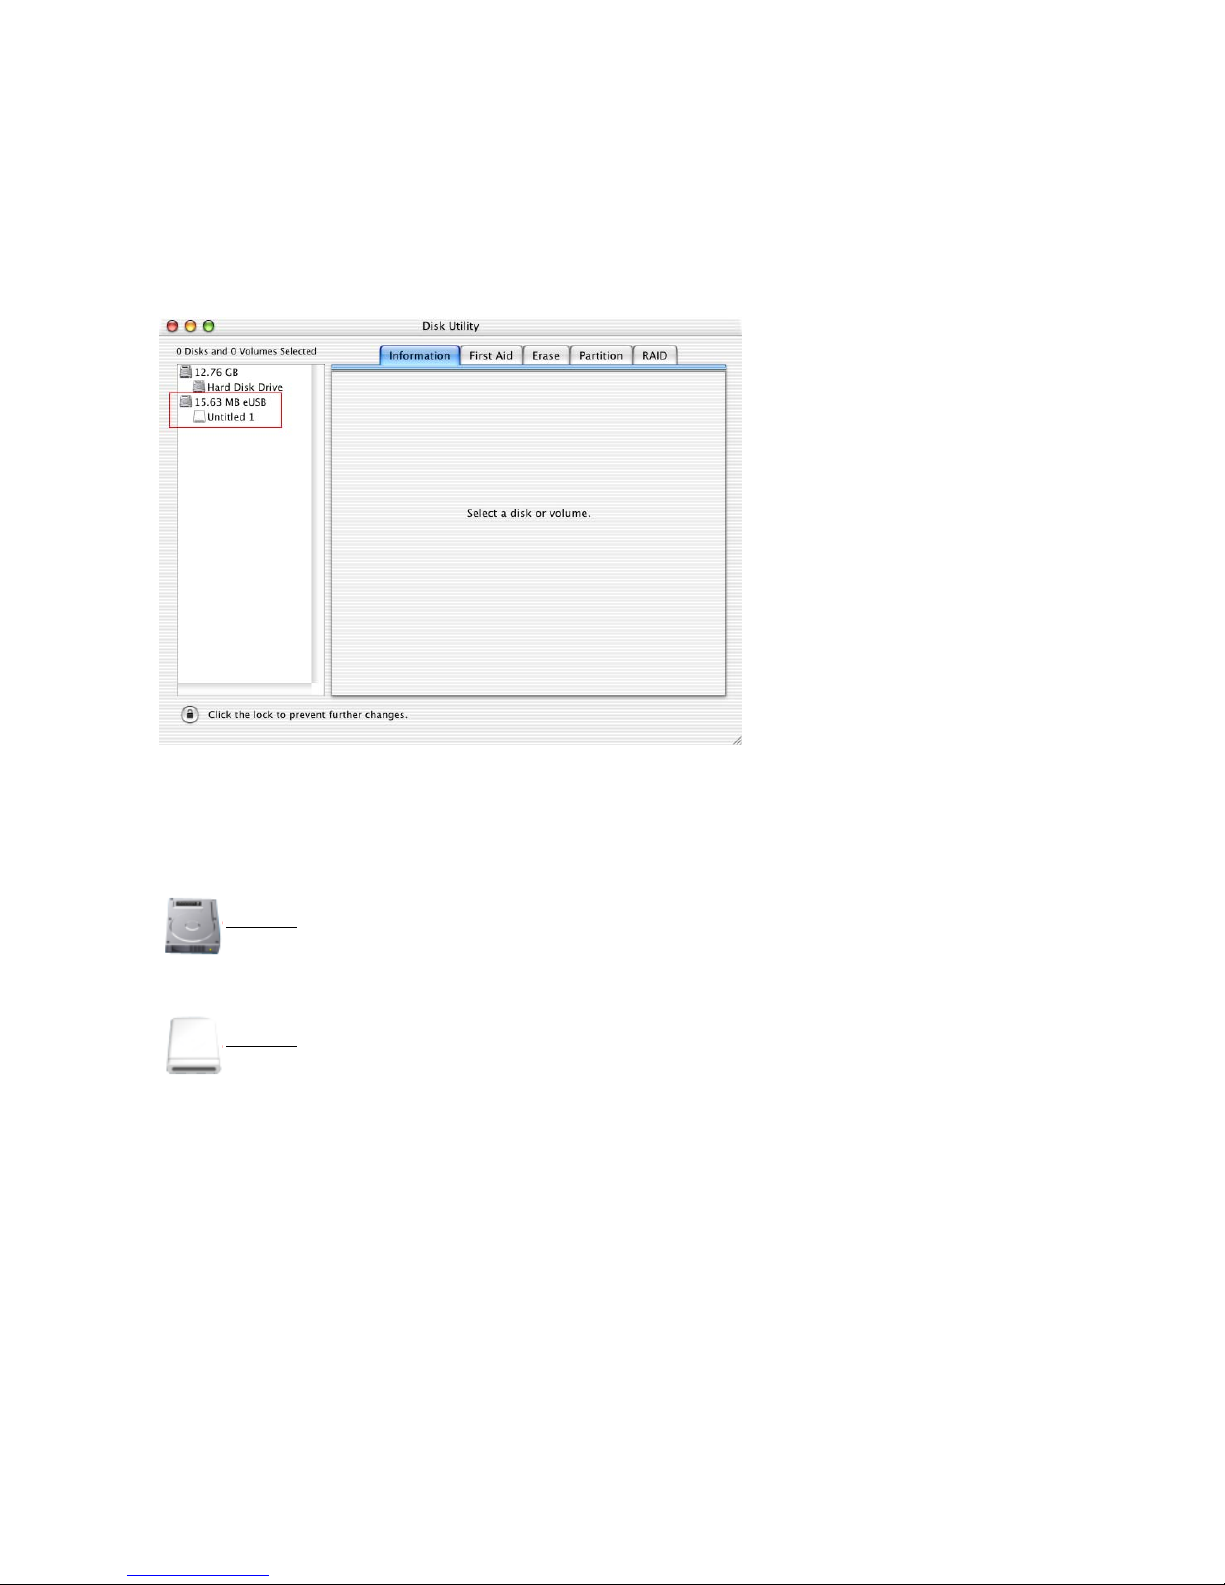
4. Insert your digital media card in the 3 in 1 Reader/Writer.
The card mounts on your Mac desktop and appears as a disk icon.
The card also registers in the Disk Utility, and its disk icon and disk volume icon appear
in the Disk Utility window’s left pane, as shown in the example below.
NOTE: If the volume icon does not appear, simply click the disk icon (see the illustra-
tion below). If you insert two digital media cards in your 3 in 1 Reader/Writer, two disk
icons and two volume icons appear.
Disk Icon
Volume Icon
Dazzle Universal 3 in 1 Reader/Writer User’s Guide • Using the Reader/Writer • Page 36
Page 37
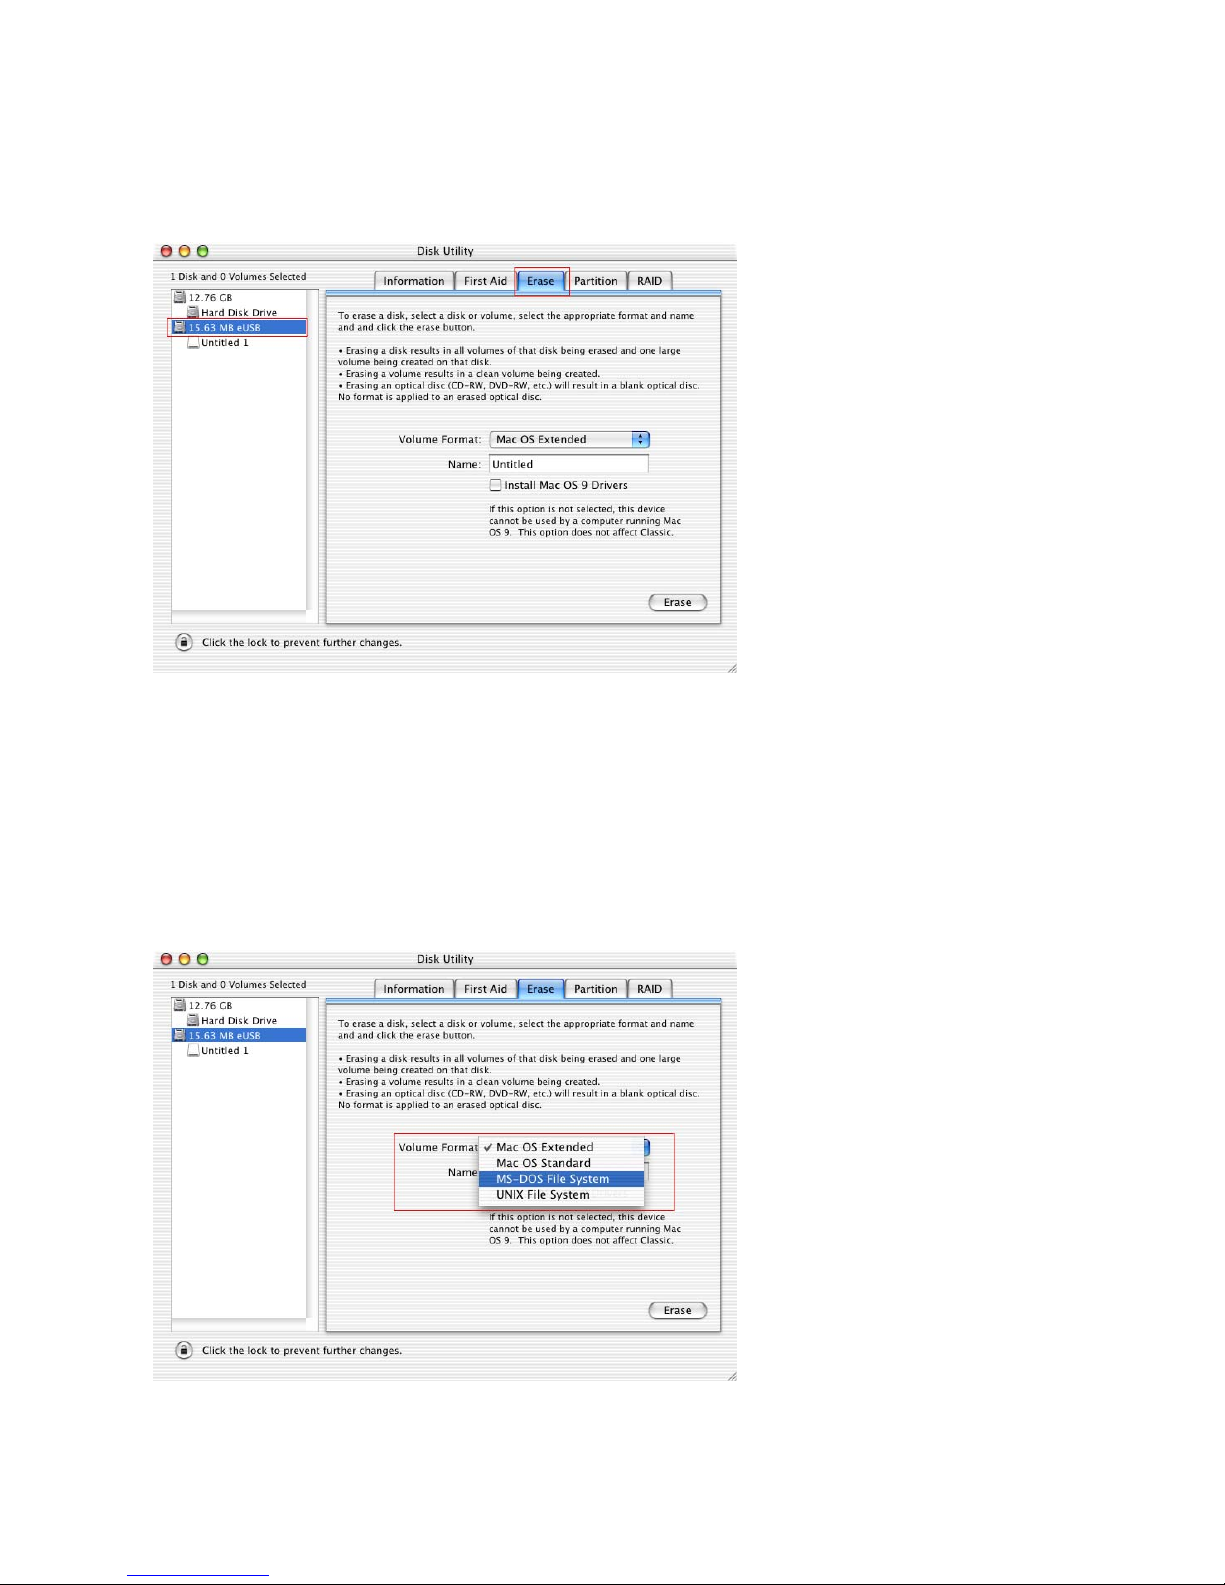
5. Select the disk icon in the Disk Utility window, then click the Erase tab.
The Erase instructions and related information appear in the Disk Utility window.
6. Click on the Volume Format box, then choose MS-DOS File System from the drop-
down menu.
Important: Do not specify a name in the Name field. The Disk Utility retains the exist-
ing volume name or provides a default volume name. Your digital device was probably
the last device to format the card and may have labeled the volume with a specific
name to ensure proper operation. In such a case, if you change the volume name, you
may have to re-format the card when you reinsert it in the original digital device.
Dazzle Universal 3 in 1 Reader/Writer User’s Guide • Using the Reader/Writer • Page 37
Page 38
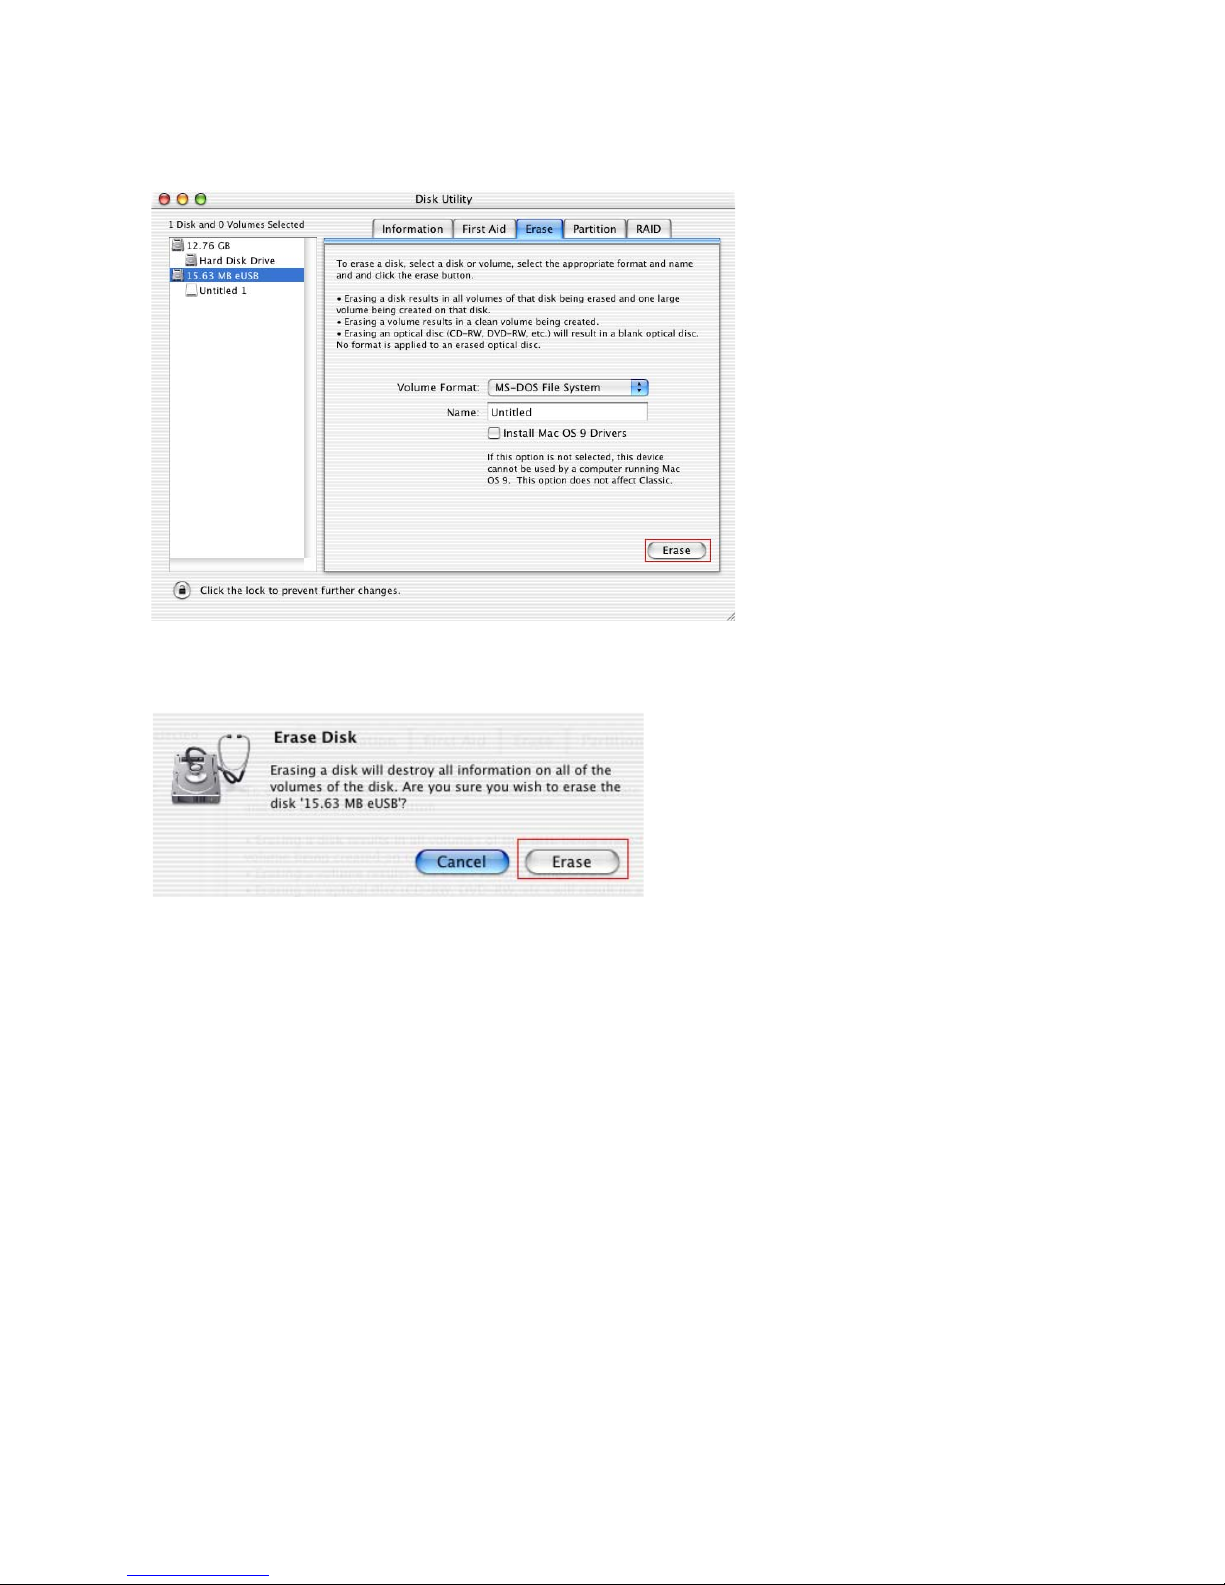
7. Click the Erase button in the Disk Utility window.
A warning dialog box informs you that erasing the disk destroys any data on the disk.
8. Click the Erase button in the warning dialog box to format the card, or click Cancel to
quit.
Dazzle Universal 3 in 1 Reader/Writer User’s Guide • Using the Reader/Writer • Page 38
Page 39
Removing a Card on a Macintosh
Before you remove a digital media card, make sure that the Access Indicator at the front
of the 3 in 1 Reader/Writer is not flashing. The Indicator flashes when the 3 in 1 Reader/
Writer is reading or writing data on a card. Please wait until the read/write operations are
complete and the Indicator stops flashing before you remove a card. Removing a card during read/write access causes lost or corrupted data.
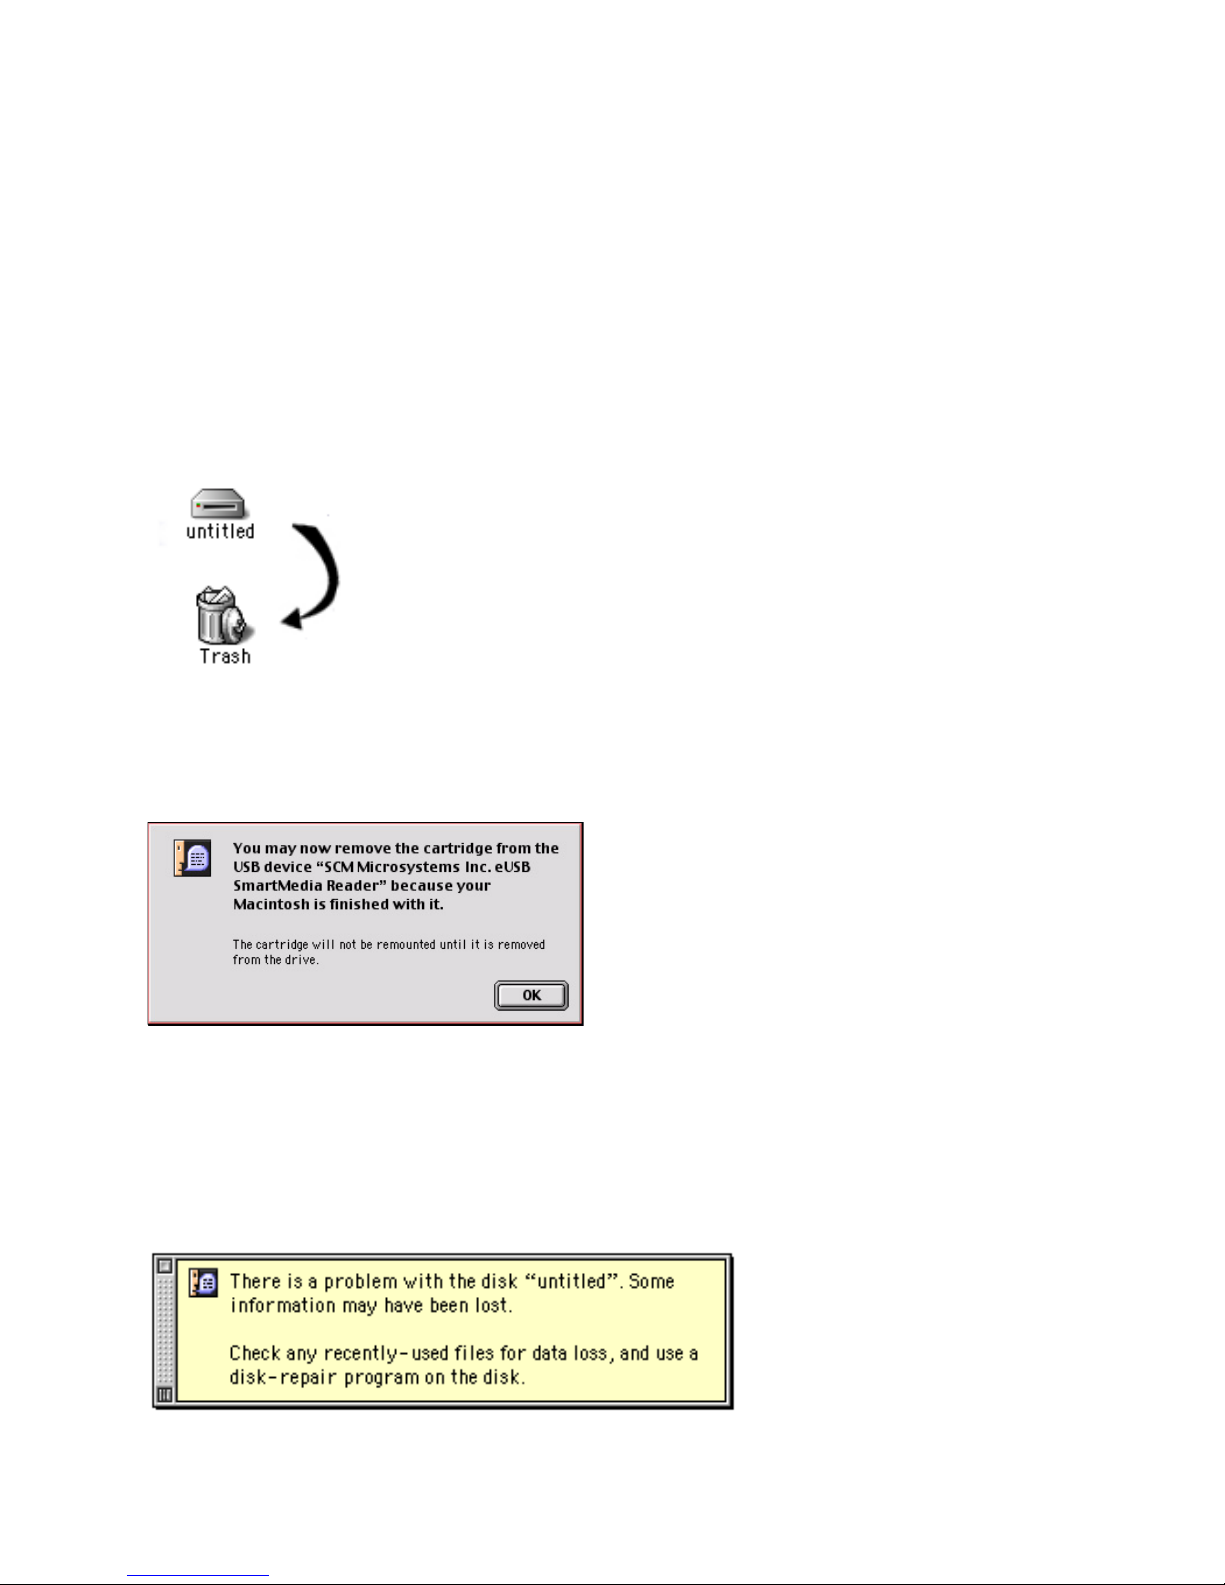
1. To remove a card, drag the card icon and drop it onto the trash icon.
Note: The icons below and their desktop locations differ slightly for Mac OS 10.1.2 and
higher.
The card icon disappears from the desktop. A dialog box similar to the one below appears.
It is now safe to remove the card.
Note: The dialog box below does not appear in Mac 0S 10 and higher.
2. Click OK in the dialog box, then grasp the end of the card with your thumb and index
fingers, and remove it from the slot.
Caution: Do not remove a mounted card without first dragging the card icon to the trash.
Improper removal can corrupt the data stored on your card. If removed improperly, a warning message may state that there is a problem with the media and prompt you to check
the disk for data loss.
Dazzle Universal 3 in 1 Reader/Writer User’s Guide • Using the Reader/Writer • Page 39
Page 40

Troubleshooting
Frequently Asked Questions
If you experience difficulties with your 3 in 1 Reader/Writer, please check the
troubleshooting section below for possible solutions. If the problems persist, please go to
page 43
page 44 for information on Dazzle’s European Technical Resource Center.
During installation, my 3 in 1 Reader/Writer is connected to my computer’s USB port,
but does not find the required drivers.
PC
Before connecting the 3 in 1 Reader/Writer to your computer’s USB port, you must install
the reader/writer driver software for Windows 98 SE and 2000. The driver software is
provided on the Installation CD. For installation instructions, please refer to “Installing the
Software On a PC” on page 9 of this user’s guide. Windows Me and XP do not require the
driver installation.
Macintosh
Before connecting the 3 in 1 Reader/Writer to your computer’s USB port, you must install
the reader/writer driver software (if required). Mac OS 10.1.2 and above does not require
driver installation. Driver installation is required for Mac 9.x. The software for Mac 9.x is
located on the provided installation CD-ROM. For installation instructions, please refer to
“Installing the Software On a Macintosh” on page 16 of this user’s guide.
for information on Dazzle’s Nor th American Technical Resource Center, or
I installed the required driver software (where necessary) and the 3 in 1 Reader/Writer
is connected to my computer’s USB port, but nothing happens when I inser t my digital
media card.
PC
The 3 in 1 Reader/Writer is accessed as a removable disk, as described in “
Card on a PC” on page 26 of this user’s guide. If you are running Windows XP, and you
insert a digital media card, a dialog box asks what you want to do with the files on the
Removable Disk. You can select from several options. This is a default feature of Windows
XP.
When using Windows 98 SE, Me, or 2000 you must access a digital media card through
its Removable Disk icon. You do this by opening My Computer where two Removable Disk
icons appear that represent your 3 in 1 Reader/Writer. Double-click on the respective
Removable Disk icon to display the contents of the media inserted in your reader/writer.
This is where your digital images or data are located.
Digital cameras usually create one or more folders on a digital media card, which contains
your digital images. Depending on the digital camera you have, the folder names can vary.
Double-click on the respective folder name to access the digital images located in the
folder. You can display a preview by double-clicking on one of the image icons.
Accessing a
Dazzle Universal 3 in 1 Reader/Writer User’s Guide • Troubleshooting • Page 40
Page 41

Macintosh
After you insert a card on a Macintosh, a distinct icon appears on the Mac OS desktop.
This is the mounted state, which enables read and write operations for the media.
Depending on the media used, the mounting time can vary. Opening the media icon provides access to the images stored on the respective media card.
When I insert a digital media card in my 3 in 1 Reader/Writer, I cannot access my data.
Begin by placing the 3 in 1 Reader/Writer in its base with the reader/writer media slots
facing toward you and the Dazzle Logo on the right-hand side.
If you are using a SmartMedia card, be sure to inser t the card with the gold contacts
facing to the left and the notch on top. For more information on inser ting your SmartMedia
card, please refer to “Inser ting a Smar tMedia Card” on page 23 of this user’s guide.
If you are using a CompactFlash card or IBM Microdrive, be sure to insert the card with the
card manufacturer’s label on the right and the CompactFlash connectors facing inward.
For more information on inser ting a CompactFlash card or an IBM Microdrive, please refer
to “Inserting a CompactFlash Card” on page 24 of this user’s guide.
If you are using a Memory Stick card, be sure to insert the card with the gold
contacts facing to the right and the rounded corner on the bottom. For more information on
inserting Memory Stick cards, please refer to “Inser ting a Memory Stick Card” on page 25
of this user’s guide.
How do I copy a file from a digital media card to my computer?
PC
You can copy images and data from the 3 in 1 Reader/Writer to your computer using basic
Windows file transfer functions. For example, you can drag and drop or copy and paste
files from the 3 in 1 Reader/Writer to your computer.
For information on drag and drop, copy and paste, and other functions, please refer to your
Windows Help file, or Help and Support in Windows XP. You can find the Windows Help file
and Help and Support under the Start button located in the lower left corner of your
desktop. After you open Windows Help, click on the Index tab to display its contents.
Then scroll down to, and double-click on copying files, folders. To access help information
in Help and Support in Windows XP, simply enter the desired function in the search box, for
example, copy and paste.
Dazzle Universal 3 in 1 Reader/Writer User’s Guide • Troubleshooting • Page 41
Page 42

Macintosh
You can access a mounted card just like a floppy or other type of removable disk. Doubleclick the card’s icon to open it's respective file window. Then hold down the option key and
drag and drop the desired images from the card to the location of your choice.
When I try to write to a Memory Stick, an error message appears.
Make sure the Memory Stick lock tab is not in the lock position (see the illustration on
page 25). When this tab is in the lock position, the card is locked and therefore write-
protected. You cannot write to or delete from the card until you move the tab to the
unlocked position.
When I try to write to a SmartMedia card, an error message appears.
Make sure the card’s write protection sticker is not covering the write protect area (see
illustration on page 23). You cannot write to or delete from the card until you remove the
sticker.
Dazzle Universal 3 in 1 Reader/Writer User’s Guide • Troubleshooting • Page 42
Page 43
Technical Support
Dazzle’s North American Technical Resource Center
The Dazzle 3 in 1 Reader/Writer is easy to use and normally should not produce
complications. However, if you need assistance or have questions of any kind, our trained
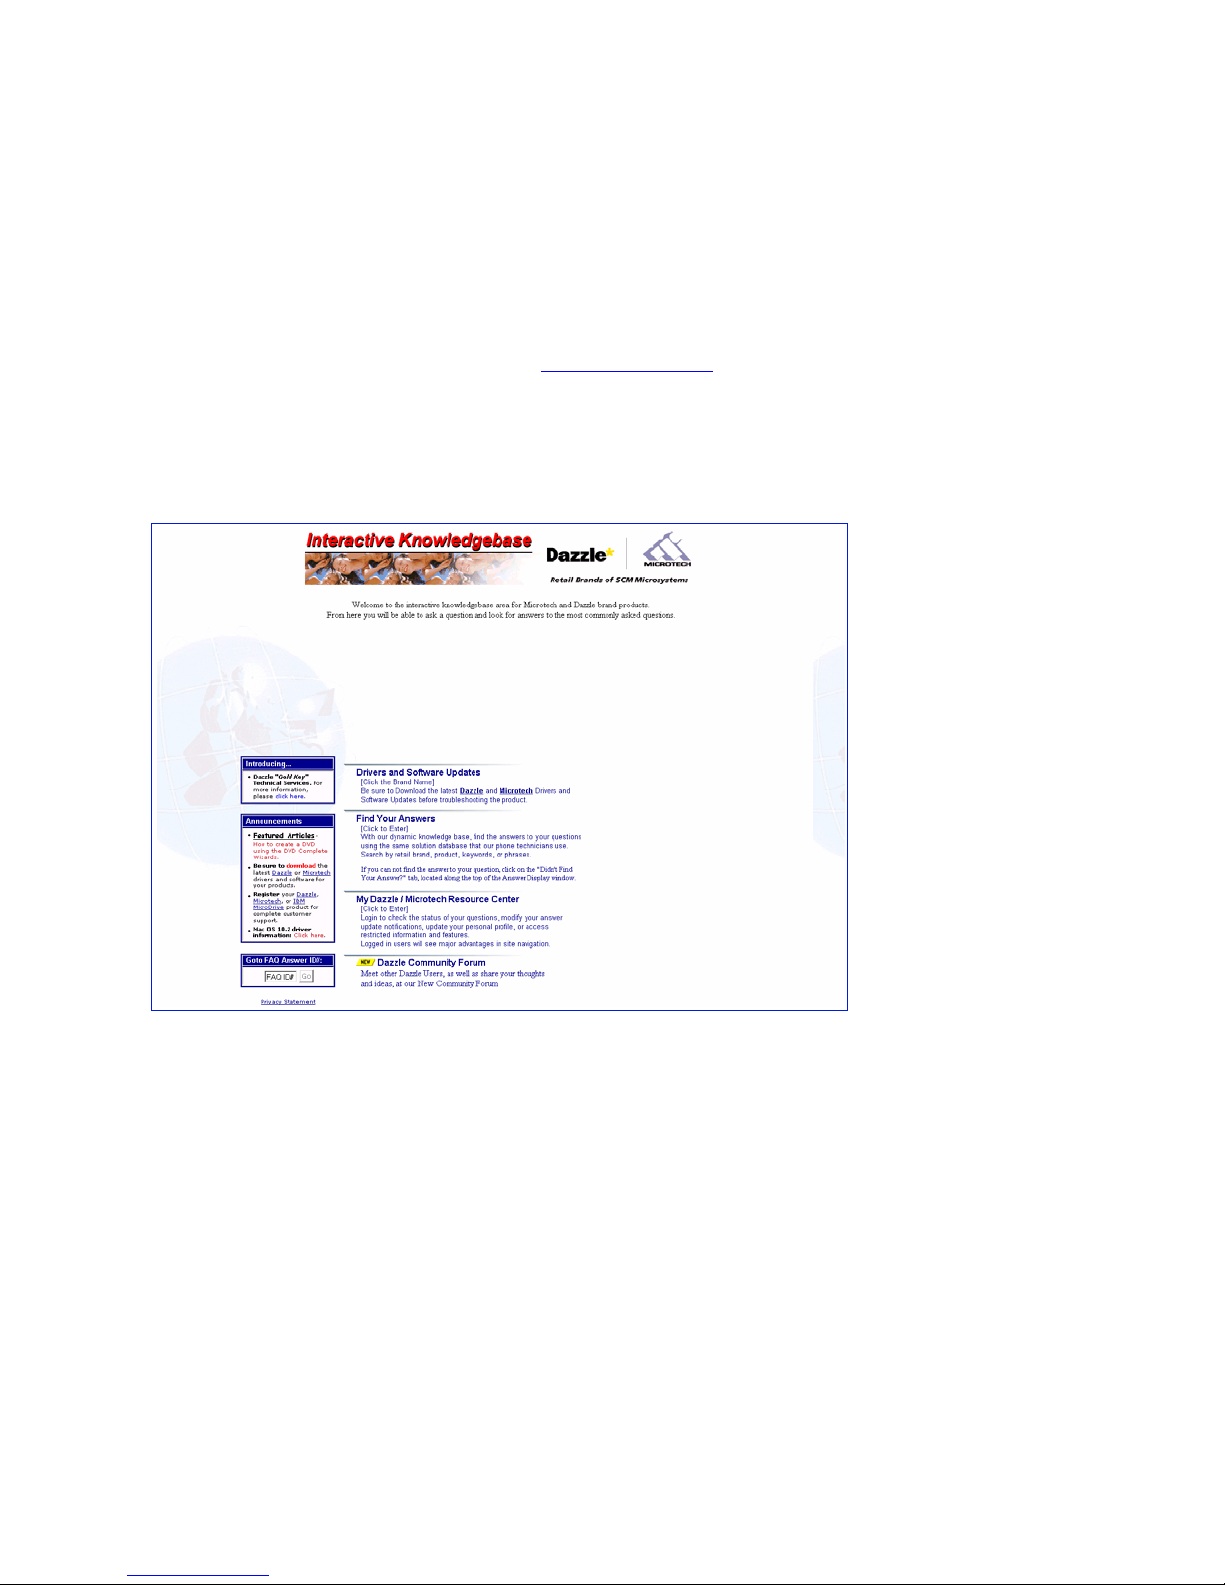
staff members are ready to help. Visit www.Dazzle.com and use the Support menu item to
access Dazzle’s various support resources. We highly recommend that you use the Dazzle
Interactive Knowledgebase as this is the fastest method of accessing support resources
for your Dazzle product. E-mail support is also available via our Interactive
Knowledgebase.
Dazzle's Technical Resource Center can be reached 24 hours a day 7 days a week.
If you are calling for the first time, or if you are within your 30 day free technical suppor t
Dazzle at (203) 315-4230.
If you have extended beyond your free 30 day technical support window, contact Dazzle at
(800) 570-9548 (charges apply). We highly recommend having your computer nearby when
calling to facilitate troubleshooting.
If you wish to contact Dazzle’s Technical Resource Center via fax, you may do so at
(203) 483-5985.
Dazzle Universal 3 in 1 Reader/Writer User’s Guide • Technical Support • Page 43
Page 44
Dazzle’s European Technical Resource Centers
The Dazzle 3 in 1 Reader is easy to use and normally should not produce complications.
However, if you need assistance or have questions of any kind, our trained staff members
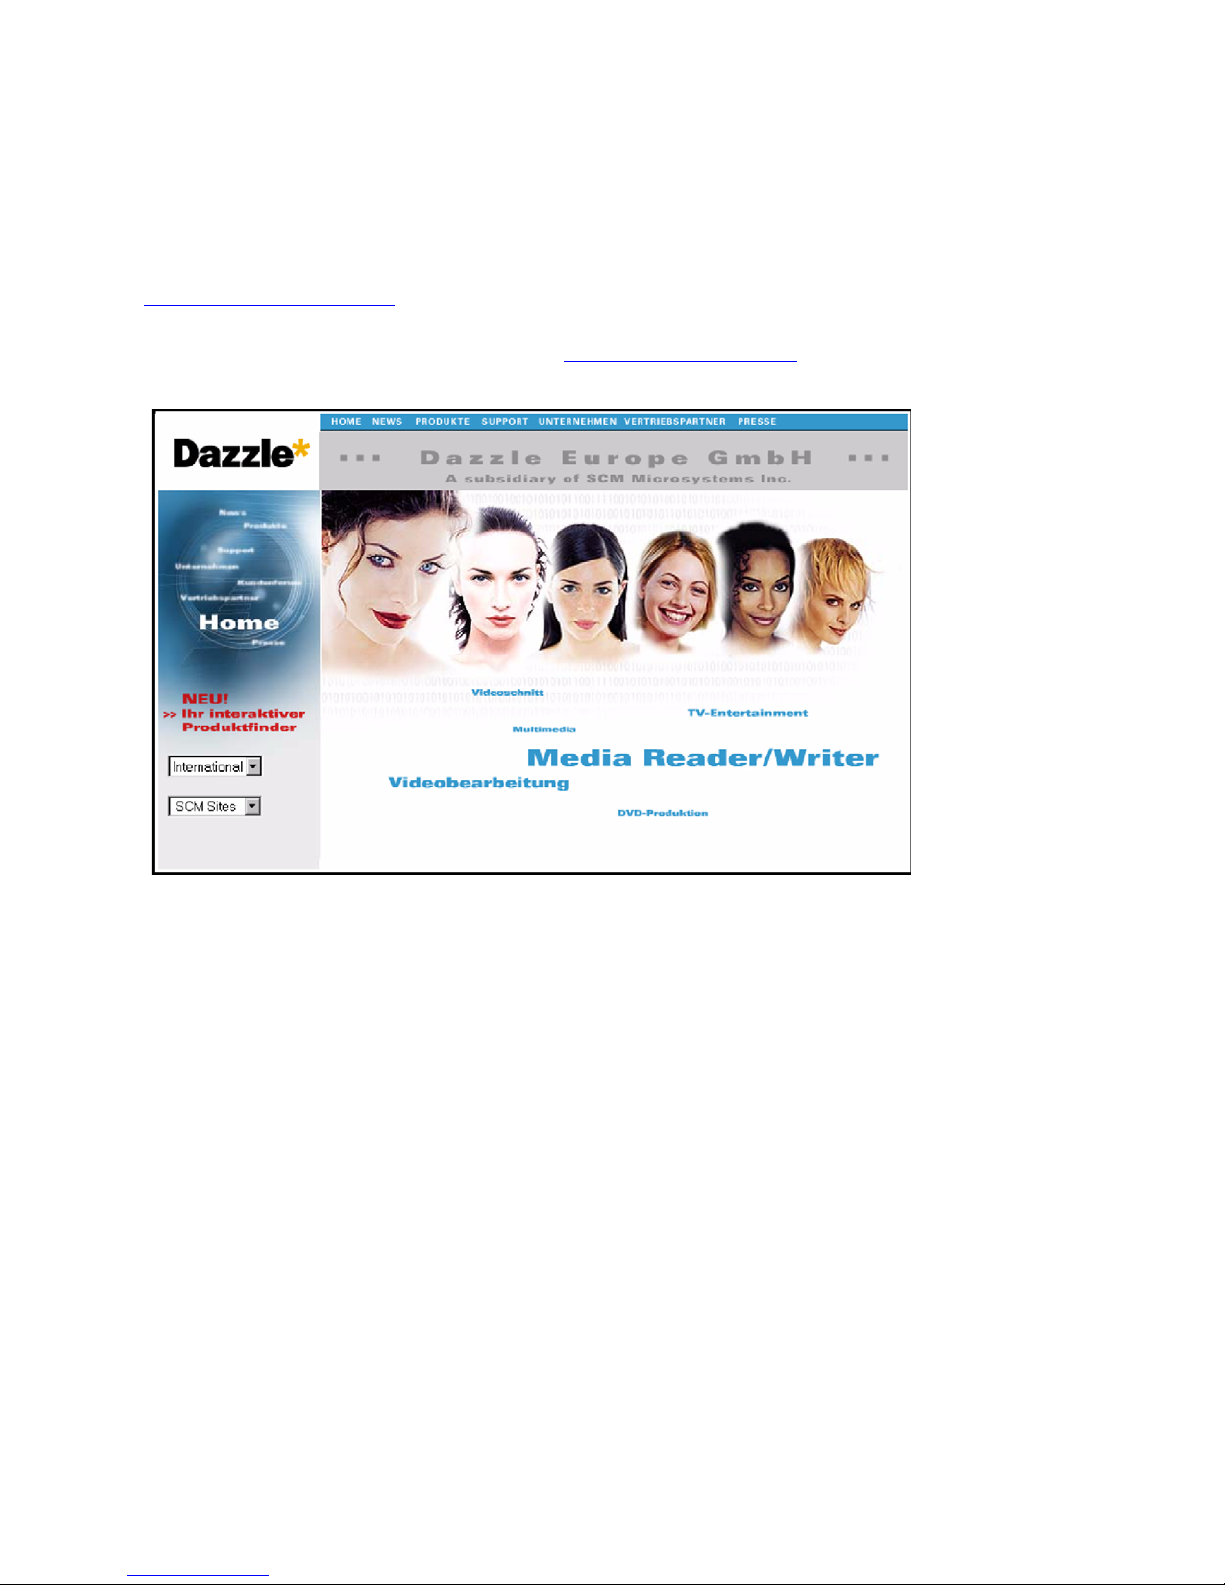
are ready to help. We highly recommend that you first check the Dazzle Europe website at
www.Dazzle-Europe.com for updates and downloads for your Dazzle product. E-mail sup-
port is also available via the Dazzle Europe website. Additional information can also be
found on the Dazzle German website at www.Dazzle-Europe.de.
If you have checked the Dazzle website for updates and downloads and if you have been
unable to resolve your difficulties or answer your questions via E-mail, please contact the
local technical resource center using the phone numbers provided below.
Germany:
0190 89 5021 (€1, 86/Min)
Austria:
0900 97 1124 (€1, 88/Min)
Switzerland:
0900 57 6003 (SFR 3, 13/Min)
France:
0 825 023 308
(0,118 € /Min)
TTC/MN
Dazzle Universal 3 in 1 Reader/Writer User’s Guide • Technical Support • Page 44
Page 45

United Kingdom:
09062 160 180 (25p/Min)
Italy:
If you have checked the Dazzle website for updates and downloads and if you have been
unable to resolve your difficulties or answer your questions via E-mail, please contact local
support using the phone numbers listed on our website at www.Dazzle-Europe.com. Click
the Support link and select Contact from the provided menu.
Spain:
+34 90 112 0247
Dazzle Universal 3 in 1 Reader/Writer User’s Guide • Technical Support • Page 45
Page 46

SCM Microsystems, Inc. One Year Limited Warranty
Coverage
SCM warrants this hardware product to be free from defects in materials and workmanship for the warranty period. This non-transferable, limited warranty is only to you, the first
end-user purchaser. The warranty begins on the date of purchase and lasts for one (1)
year, unless otherwise stated on the product packaging.
Excluded Products and Problems
This warranty does not apply to: (a) SCM Software Products; (b) expendable components
such as fuses and bulbs; (c) third party products, hardware or software, supplied with the
warranted product. SCM makes no warranty of any kind of such products, which, if
included, are provided “AS IS”. Excluded is damage caused by accident, misuse, abuse,
unusually heavy use, use of non-SCM supplied or approved accessories.
Remedies
Your sole and exclusive remedy for a covered defect is repair or replacement of the defective product, at SCM’s sole option and expenses, and SCM may use new or refurbished
parts or products to do so. If SCM is unable to repair or replace a defective product, your
alternate exclusive remedy shall be refund of the original purchase price.
The above is SCM’s entire obligation to you under this warranty. IN NO EVENT SHALL SCM
BE LIABLE FOR INDIRECT, INCIDENTAL, CONSEQUENTIAL OR SPECIAL DAMAGES OR
LOSSES, INCLUDING LOSS OF DATA, USE, OR PROFITS EVEN IF SCM HAS BEEN ADVISED
OF THE POSSIBILITY OF SUCH DAMAGES. In no event shall SCM’s liability exceed the original purchase price of the product. Some jurisdictions do not allow the exclusion or limitation of incidental or consequential damages, so the above limitation or exclusion may not
apply to you.
Obtaining Warranty Service
You must notify SCM within the warranty period to receive warranty ser vice. You must
retain proof of purchase in the form of a dated sales receipt or dated purchase order to
confirm your product is still under warranty. Proof that the product is still under warranty is
your sole responsibility. SCM does not accept responsibility for tracking your purchase
date. For information on warranty service, visit our website at www.dazzle.com;
www.microtechint.com; www.scmmicro.com; call 1-203-315-4200; write to Customer Service at 20 Carter Drive, Guilford, CT, 06437,USA; or contact your SCM Dealer. SCM’s specific customer support policies (including fees for service) and procedures change as
technology and market conditions dictate. SCM reserves the right to change the above
stated conditions without any advance notice.
Dazzle Universal 3 in 1 Reader/Writer User’s Guide • Technical Support • Page 46
Page 47

If the SCM representative determines your product is eligible for warranty ser vice, you will
be required to return it to SCM packaged sufficiently to avoid damage, shipping prepaid,
along with proper identification, a return authorization number provided by the representative, and proof of purchase. Customers located in Latin America may obtain warranty service by returning the SCM product to the dealer where it was purchased.
SCM will not protect, recover, or return data during warranty service so you should duplicate your data before shipment.
Limitations
THE ABOVE WARRANTY IS EXCLUSIVE AND IN LIEU OF ALL OTHER WARRANTIES, EXPRESS
OR IMPLIED. To the extent permitted by applicable law, SCM SPECIFICALLY DISCLAIMS
ANY IMPLIED WARRANTIES, INCLUDING ANY IMPLIED WARRANTY FOR MERCHANTABILITY
OR FITNESS FOR A PARTICULAR PURPOSE. Any implied warranty required by applicable law
shall be limited in duration to the express warranty term. Some jurisdictions do not allow
disclaimers of implied warranties or limitations on how long an implied warranty lasts, so
the above limitation may not apply to you. This warranty gives you specific legal rights and
you may also have other rights that vary from jurisdiction to jurisdiction. Any suit for breach
of any warranty on your Product must be filed within one (1) year of the first date the suit
could have been brought.
SCM Microsystems, Inc., Retail Brands Group, 20 Car ter Drive, Guilford, CT 06437
Dazzle Universal 3 in 1 Reader/Writer User’s Guide • Technical Support • Page 47
 Loading...