

Page 1
1
USER'S
MANUAL
6 In 1 Reader
™
Page 2

USER'S
MANUAL
USER'S
MANUAL
2
CONTENTS
Getting Started
Connecting to a Macintosh
Connecting to a PC Compatible
How to Use the Dazzle 6 In 1 Reader
Dazzle OnDVD Software for
PC compatible computers
Troubleshooting Your Dazzle 6 In 1
Reader
Obtaining Technical Support
How-to Contact Us
Page 3

USER'S
MANUAL
USER'S
MANUAL
3
1
Introduction
What's Included with the
Dazzle 6 In 1 Reader
System Requirements
Parts of the Dazzle 6 In 1 Reader
Registering Your Dazzle 6 In 1 Reader
GETTING
STARTED
Page 4

Introduction
Thank you for purchasing the Dazzle 6 In 1 Reader™.
The Dazzle 6 In 1 Reader is a USB card reader/writer compatible with CompactFlash™, IBM
Microdrive™, SmartMedia™, Secure Digital™ / MultiMediaCard™, and Memory Stick™ for new
Apple iMac™, iBook™, G3/G4, and PC compatible owners. The Dazzle 6 In 1 Reader is easy to use
and provides transfer rates of up to 1.5MB/sec. With the Dazzle 6 In 1 Reader, audio and video files,
cell phone databases, and more can now be shared easily between your digital devices (cameras, cell
phones, MP3 players, etc. and your computer). Simply remove the digital media from your digital
device and insert it into the 6 In 1 (connected to your PC or Mac) to transfer or view your digital data.
What's Included with the Dazzle 6 In 1 Reader
The Dazzle 6 In 1 Reader includes the following package contents:
■ Dazzle 6 In 1 Reader
■ Dazzle Installation CD (includes this User's Manual, driver software, and free OnDVD
software for use with PC compatible computers).
■ Quick-Start Guide (located on inside of insert card)
■ Registration Card
■ Warranty Certificate
System Requirements
PC Compatible:
■ Desktop or laptop PC Compatible with an available USB port
■ 200MHz or faster processor
■ Windows® 98SE, 2000, Me, or XP
■ CD-ROM Drive (for driver software and bonus soft ware installation)
■ 1MB free disk space (32MB of disk space required for installation of OnDVD software)
Macintosh:
■ G3 processor or faster (iMac, iBook, PowerBook, PowerMac G3 and G4)
■ Available USB port
■ Mac OS 9.x
■ CD-ROM Drive (for software installation)
■ 1MB free disk space
USER'S
MANUAL
USER'S
MANUAL
4
Page 5
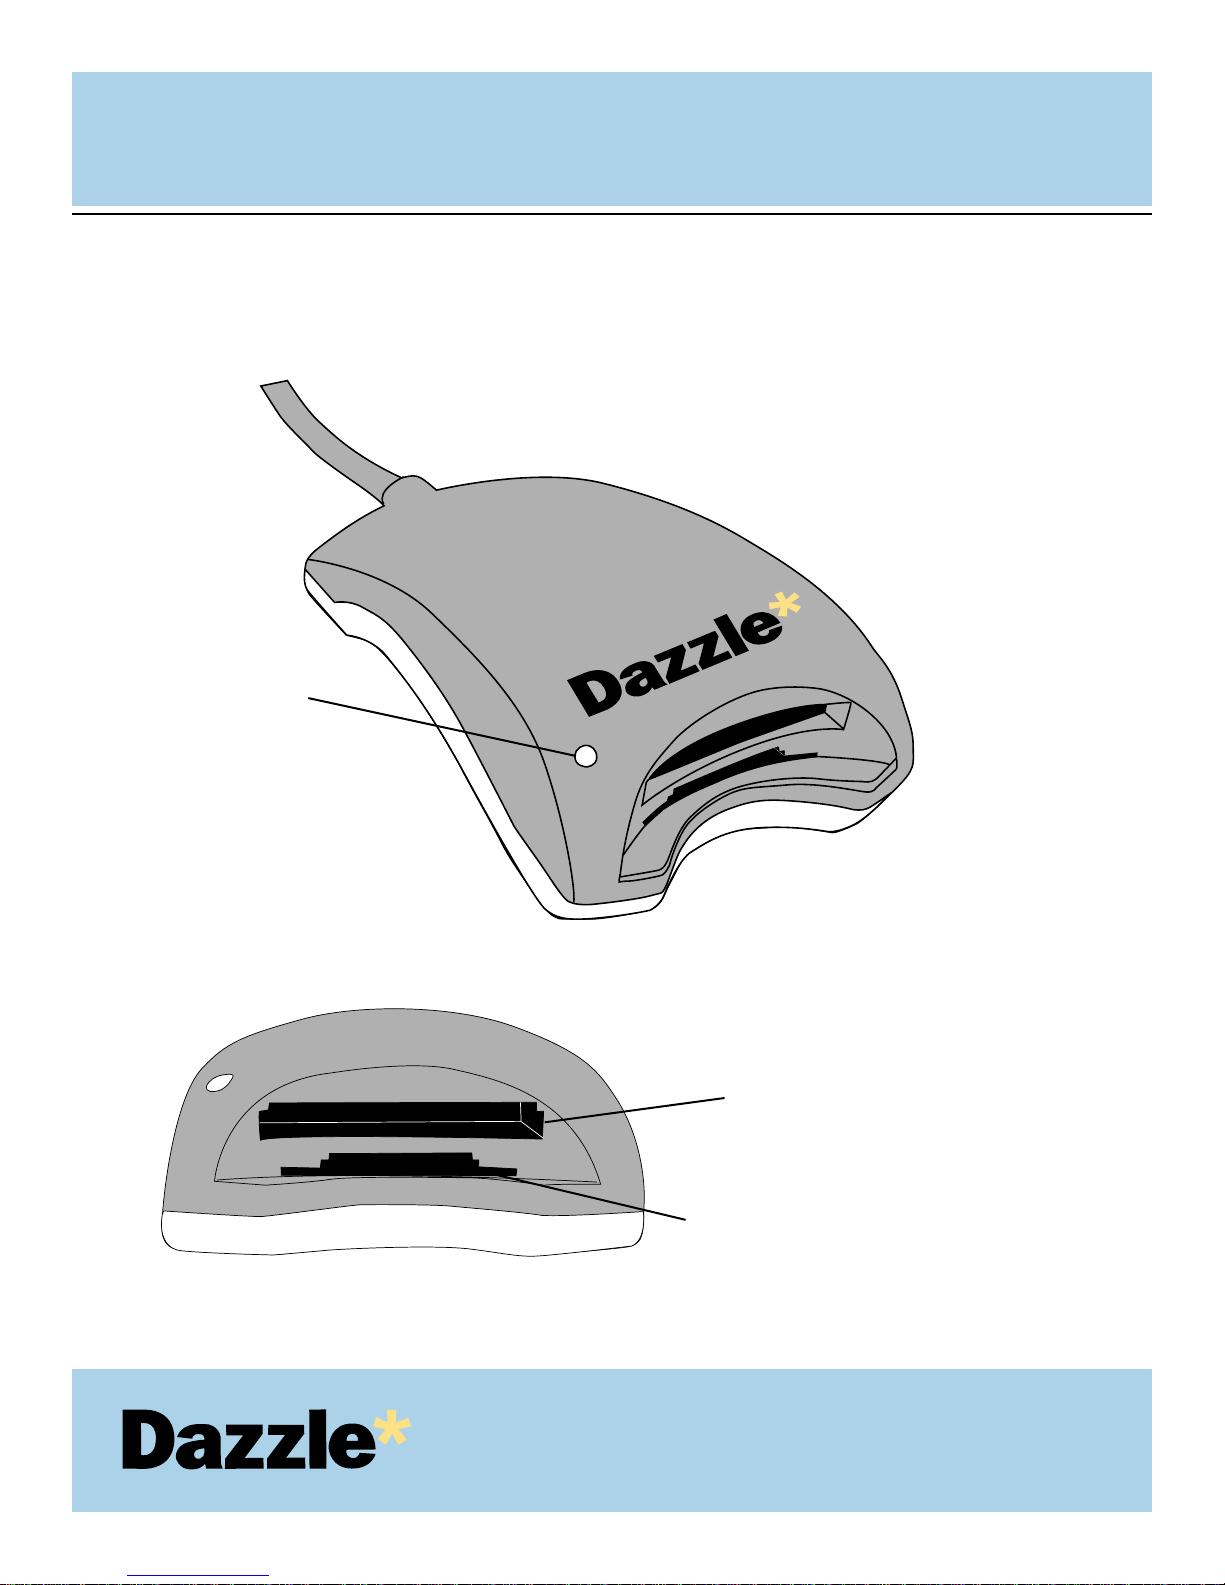
Parts of the Dazzle 6 In 1 Reader
USER'S
MANUAL
USER'S
MANUAL
5
CompactFlash Type I & II
(including IBM Microdrive)
SmartMedia, Secure Digital, MultiMediaCard
and Memory Stick (only 1 of 4 media types
maybe inserted at one time)
Access Indicator
Page 6

Registering Your Dazzle 6 In 1 Reader
Thank you again for purchasing the Dazzle 6 In 1 Reader. In order for us to better serve you, we
encourage you to register your card reader as soon as possible. There are several benefits to
registering your card reader:
Registering your Dazzle 6 In 1 Reader entitles you to free periodic driver software
updates when available.
Registering your Dazzle 6 In 1 Reader entitles you to technical support from Dazzle.
There are three options for you to register the Dazzle 6 In 1 Reader:
Register online at http://www.Dazzle.com/support/prodreg.html
for instant registration.
Complete and mail the included Registration Card.
Complete and fax the included Registration Card to Customer Service
at 800-483-5106.
USER'S
MANUAL
USER'S
MANUAL
6
1.
1.
2.
2.
3.
Page 7

USER'S
MANUAL
USER'S
MANUAL
7
2
Installation Overview
Installing the Driver Software
Connecting to the USB Port
Connecting to a USB Hub
CONNECTING
to a Macintosh
Page 8
Installation Overview
The Dazzle 6 In 1 Reader is relatively easy to inst all and operate. To avoid complications during
the installation process, please follow the steps in order as described in this chapter. Before
connecting and using the card reader, you must first install the driver software located on the
accompanying Dazzle Installation CD-ROM.
Installing the Driver Software
Driver Software Installation on Mac OS 9.x
Start your Macintosh computer running Mac OS 9.x and close all open applications.
Insert the Dazzle Installation CD-ROM.
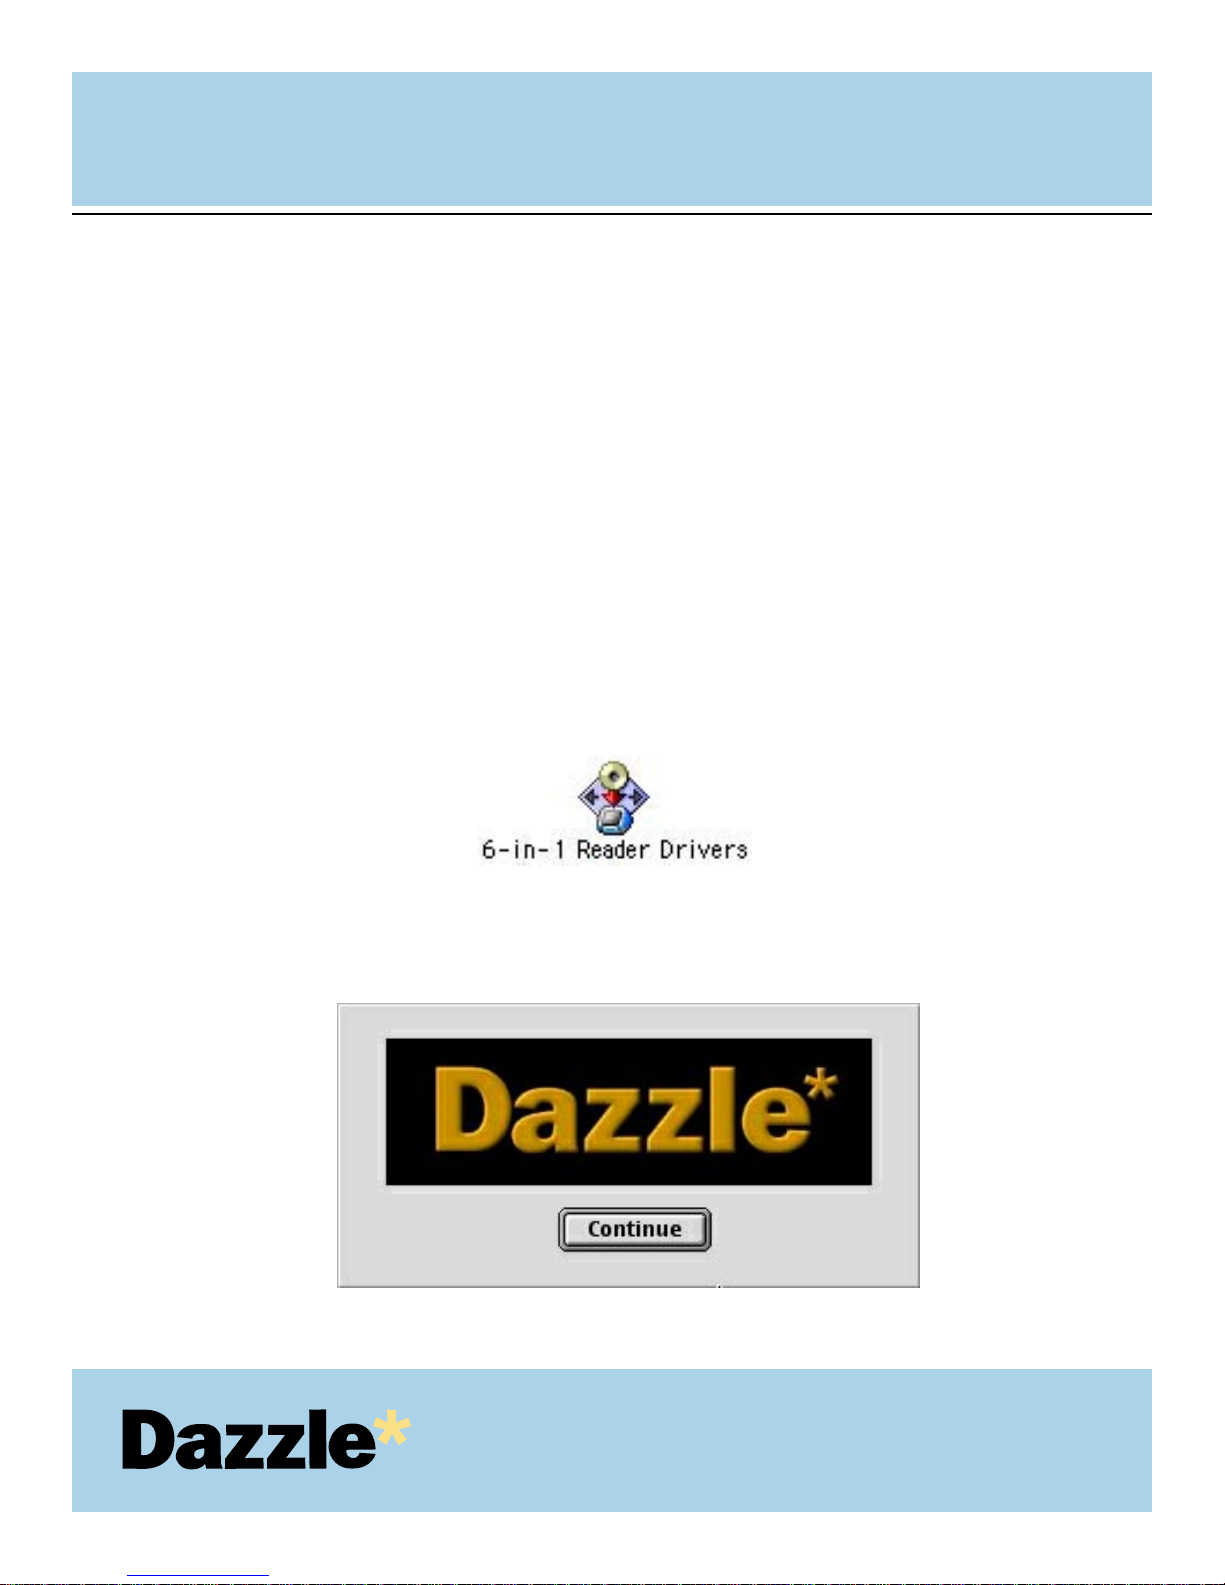
Double-click on the "6-In-1 Reader Drivers” Installer Icon.
A splash screen will appear. Click "Continue."
USER'S
MANUAL
USER'S
MANUAL
8
1.
2.
3.
4.
Page 9
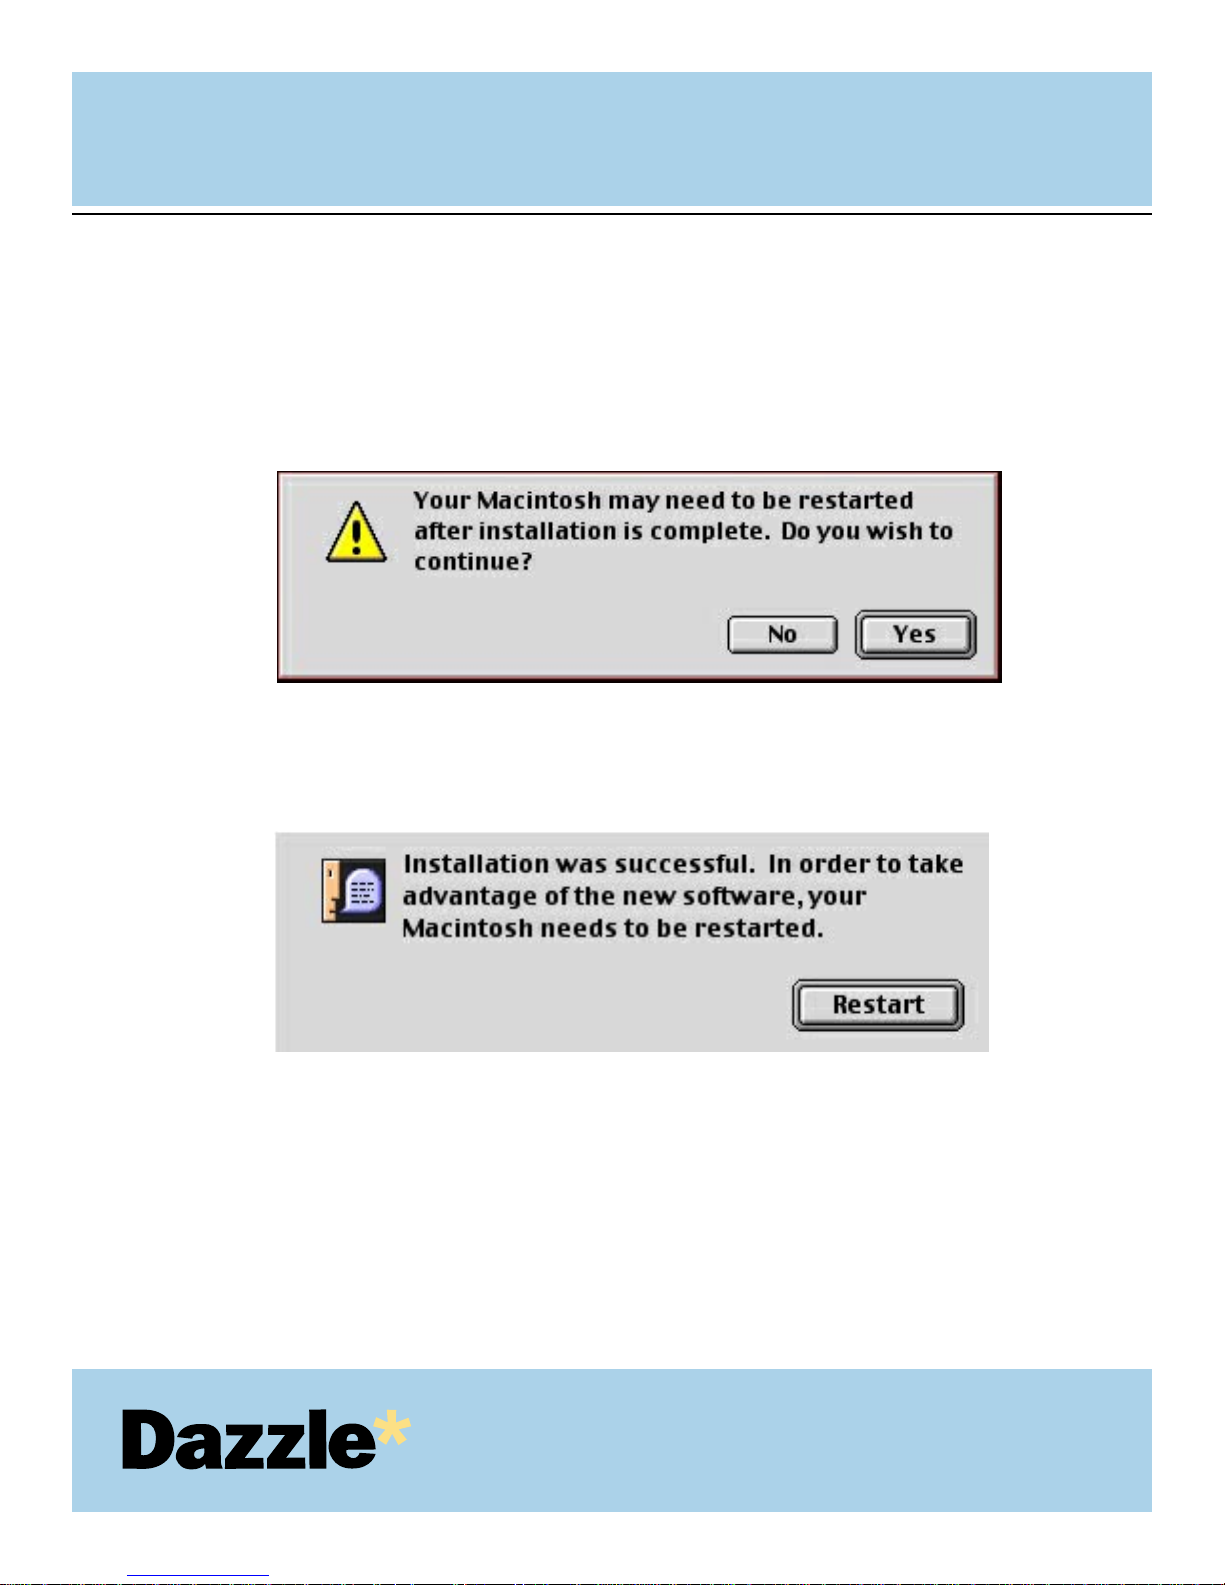
A dialog box (similar to the illustration below) will appear advising that you may have to
restart your computer after installing the software, click "Ye s " to continue. Your Macintosh
will then begin performing the installation and a status bar will appear displaying the
progress of the installation.
NOTE:The actual driver installation should take only a few seconds.
A final dialog box will appear advising that the soft ware was successfully installed.
Click "Restart."
Congratulations! Driver installation is now complete. You may now connect the Dazzle
6 In 1 Reader to your computer after restarting . Proceed to the next page for instructions
on connecting the Dazzle 6 In 1 Reader.
USER'S
MANUAL
USER'S
MANUAL
9
5.
6.
Page 10
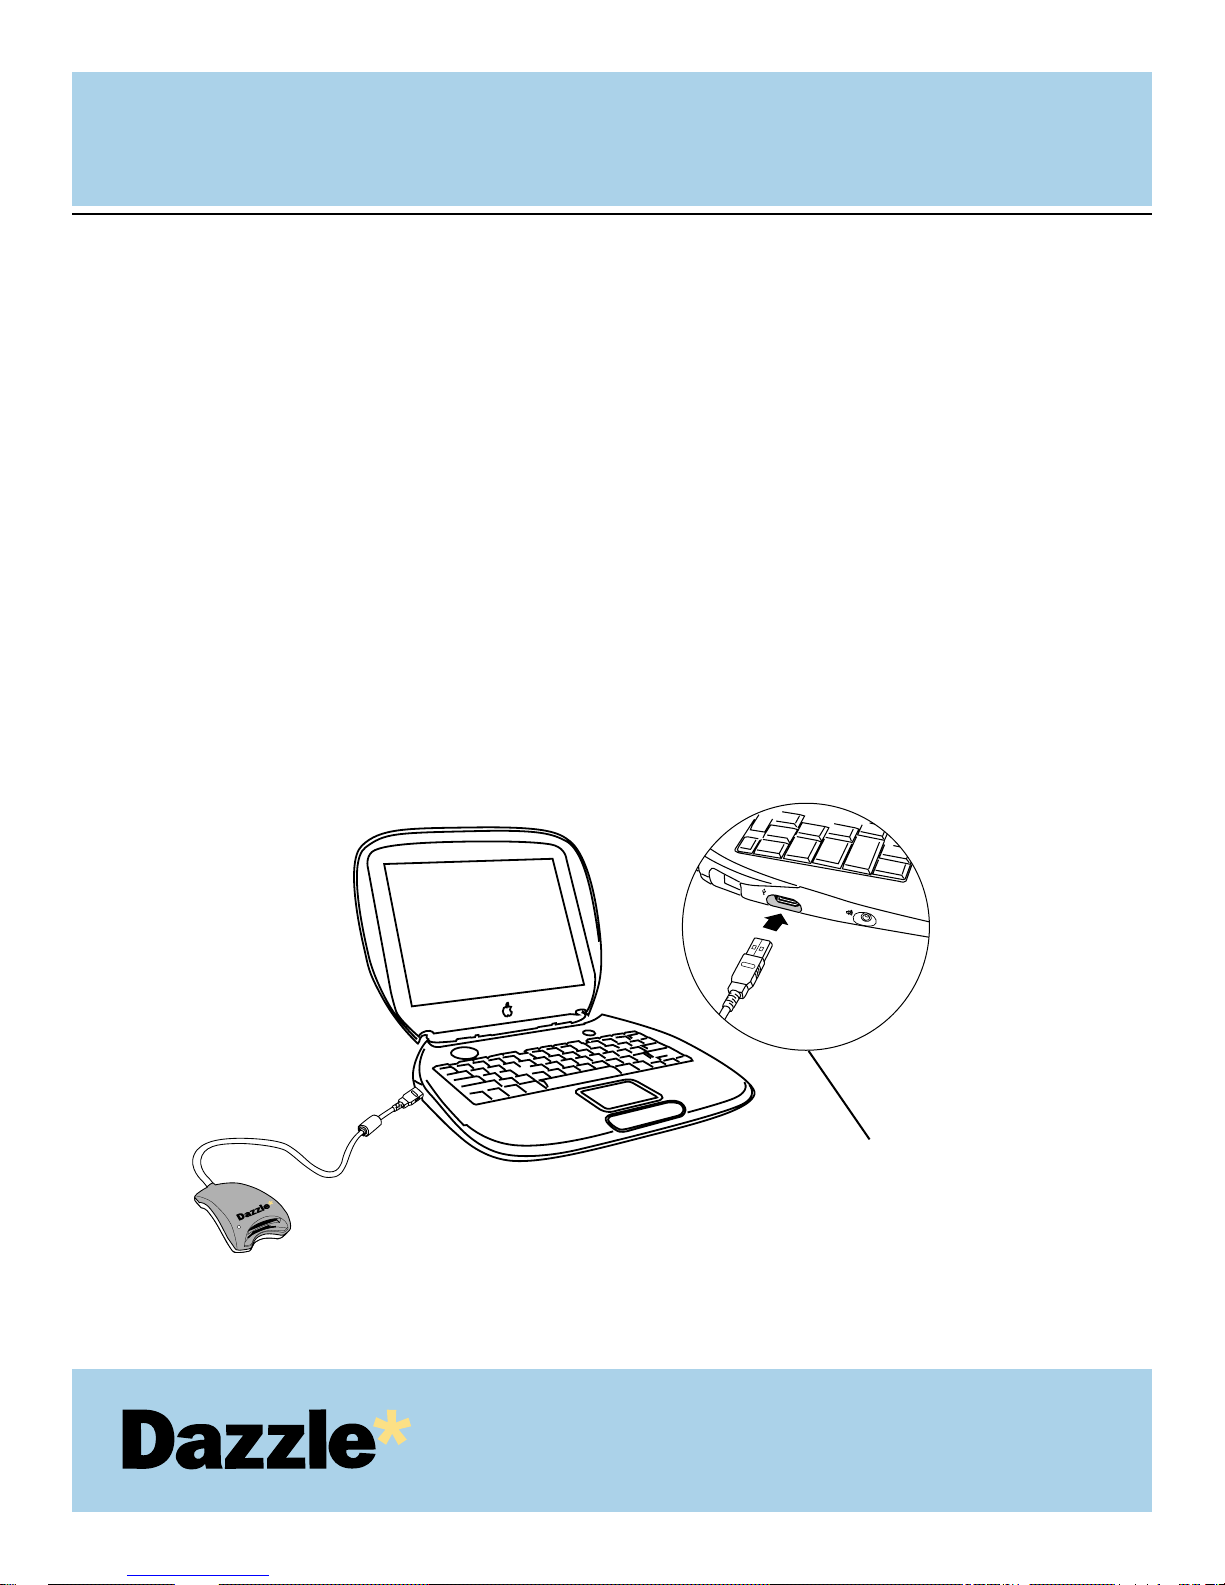
Connecting to the USB Port
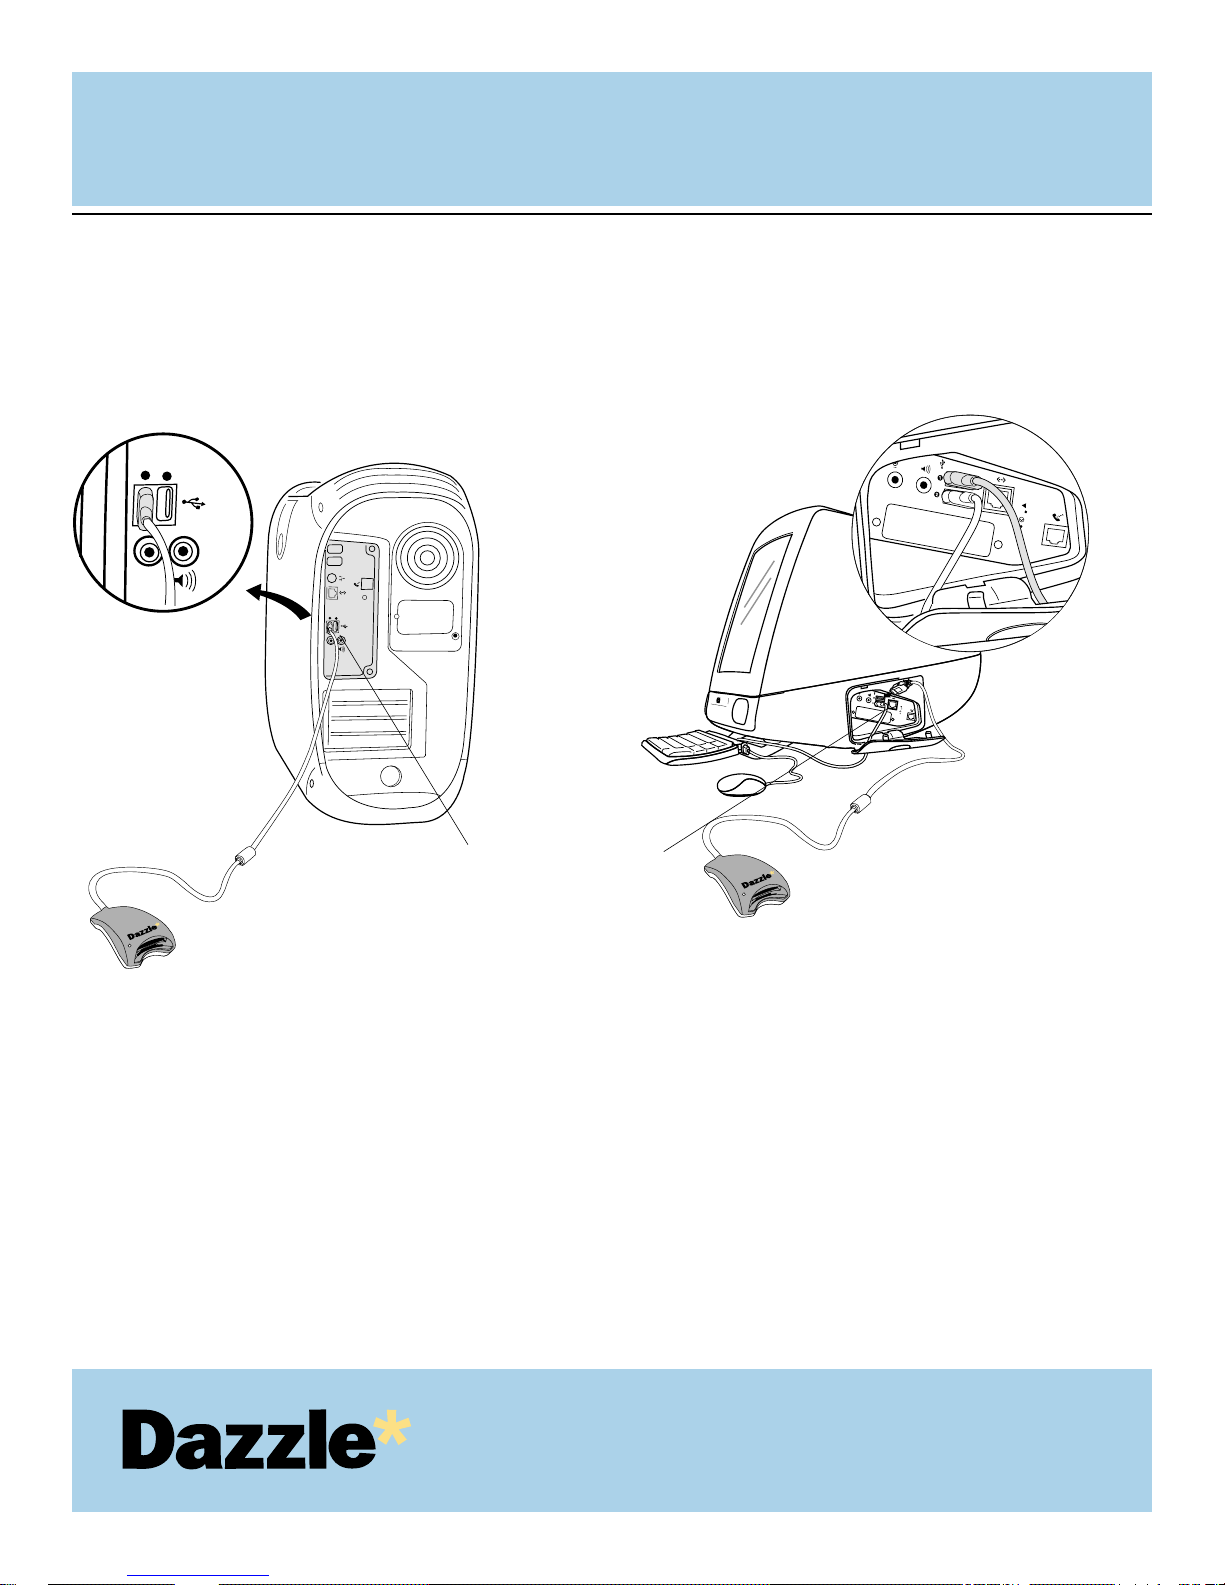
Connect the USB connector of the Dazzle 6 In 1 Reader to the USB port of your
Macintosh computer.
NOTE:The USB cable may be connected to the computer while the computer is running
Make sure the cable ends are firmly connected. Be careful not to confuse the upper
and lower parts of the connector. Do not force connections, as this may damage the
computer or the card reader.
In the illustrations below and on the next page, the Dazzle 6 In 1 Reader connects directly
to the USB port on your Macintosh. Your Dazzle card reader can also be connected to a
USB hub - see page 12 for more information.
USER'S
MANUAL
USER'S
MANUAL
10
Connect the USB plug of the Dazzle
6 In 1 Reader directly to the USB port
on your Macintosh.
1.
2.
Page 11
USER'S
MANUAL
USER'S
MANUAL
11
Connect the USB plug of the
Dazzle 6 In 1 Reader to the USB port
on your Macintosh
Enlarged view
Enlarged view
Page 12
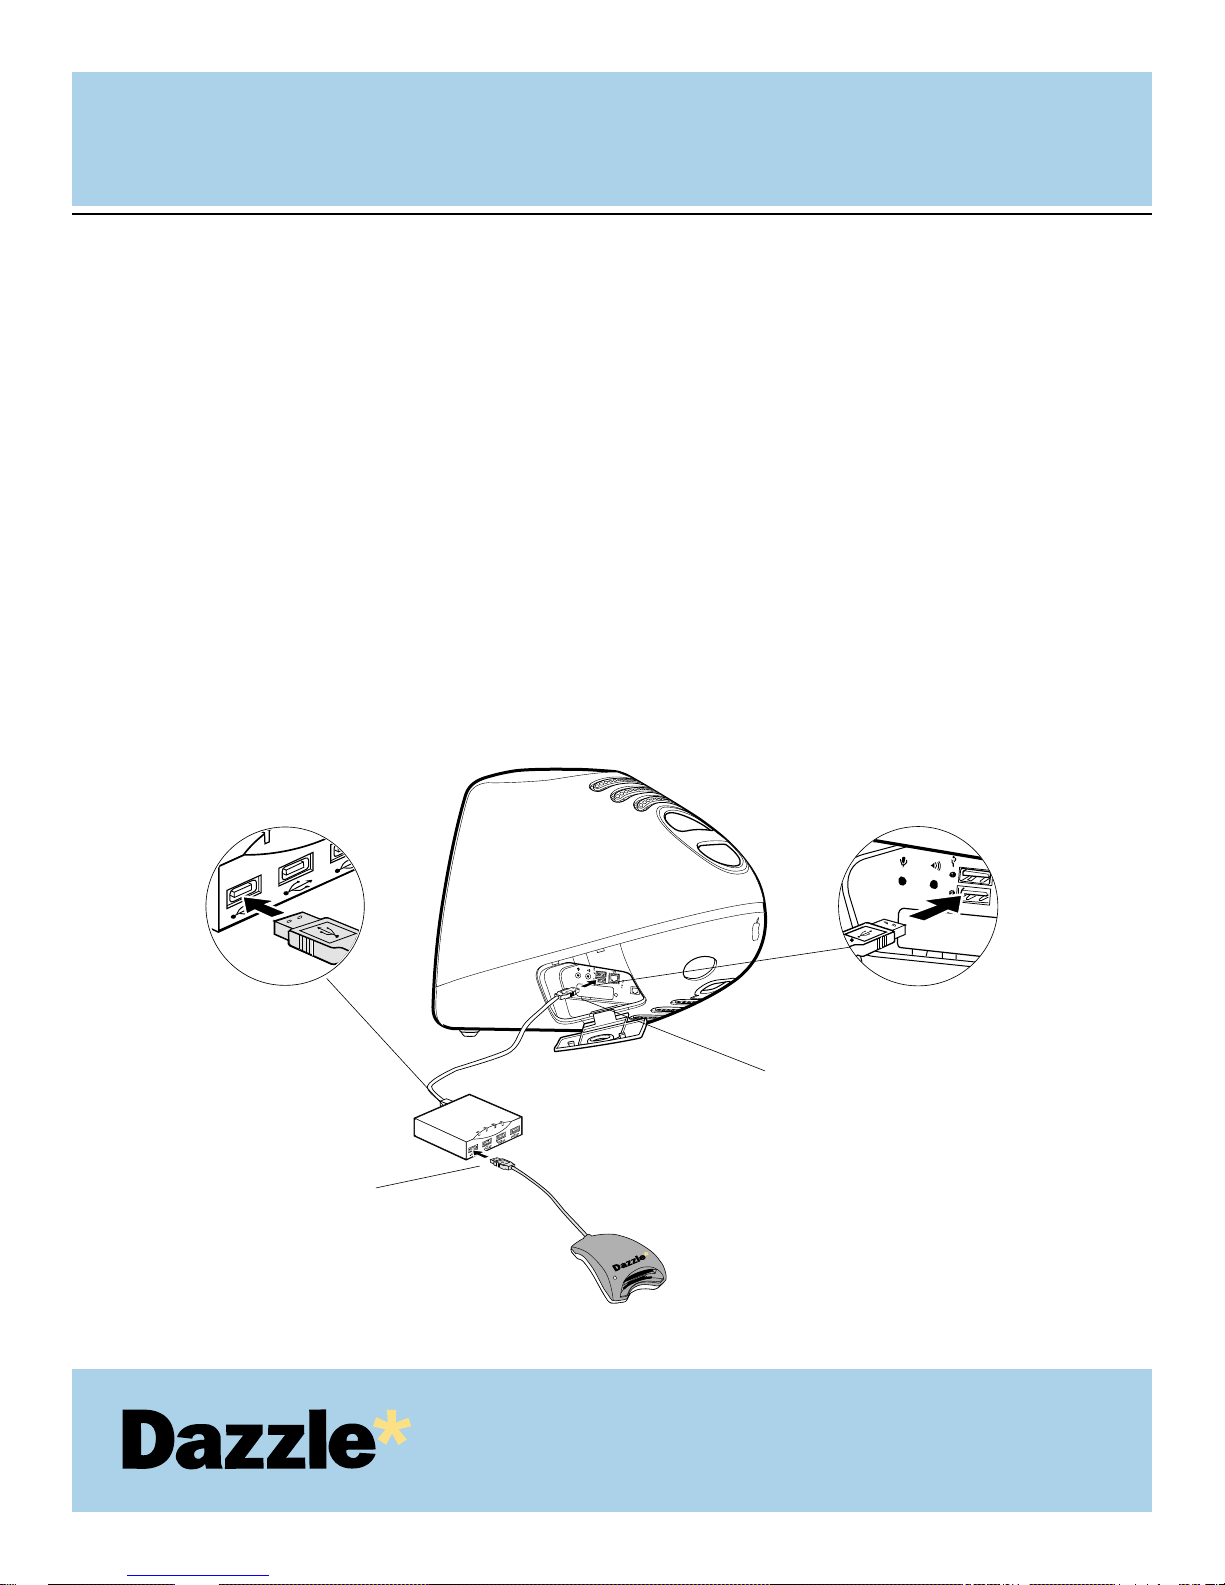
Connecting to a USB Hub
NOTE: When using a Microdrive concurrent with another media, the reader becomes a
high power device requiring direct connection to the host computer or self-powered hub.
Connect the USB hub (purchased separately) to the USB port on your Macintosh.
Then connect the USB connector of the Dazzle card reader to a port on the USB
hub.
NOTE: The USB cable may be connected to the computer or USB hub while the
computer is running.
IMPORTANT: Make sure the cable ends are firmly connected. Be careful not to
confuse the upper and lower parts of the connector. Do not force connections, as this
may damage the computer or the card reader.
USER'S
MANUAL
USER'S
MANUAL
12
1.
2.
Attach the USB connector from the USB hub
to the USB port on your computer
Enlarged view
Attach the USB connector from
the Dazzle 6 in 1 Reader to the USB
port on the USB hub
Enlarged view
Page 13

3
Installing the Driver Software
Installing OnDVD
on Windows Me and XP
Connecting to the USB Port
Connecting to a USB Hub
USER'S
MANUAL
USER'S
MANUAL
13
CONNECTING
to a PC Compatible
Page 14

Installing the Driver Software
The Dazzle 6 in 1 Reader is relatively easy to inst all and operate. To avoid complications during
the installation process, please follow the steps in order as described in this chapter. Before
connecting and using the card reader, you must first install the driver software located on the
accompanying Dazzle Installation CD-ROM.
IMPORTANT NOTE: Verify that your operating system requires the installation of drivers prior to
installing the driver software. Driver inst allation is not required for W indows Me and XP. Simply
connect the card reader to your computer’s USB port and access your media using the
“Removable Disk” icons (drive letters will also be assigned) located in “My Computer”. Driver
installation is required for W indows 98 SE as well as Windows 200 0. Users of Windows 98SE
and 2000 proceed with Step 1.
NOTE:The screenshots below may vary slightly from those on your computer.
Installing the Driver Software and OnDVD Software
on Windows 98SE and 2000
Before connecting the Dazzle 6 In 1 Reader, start your computer running Windows 98SE
or W indows 2000. Please close any open applications. Insert the Dazzle Installation CD.
The auto-run program will then launch the setup application. If the installer does not begin
automatically, double-click on "My Computer." Next double-click on the drive correspond-
ing to your CD-ROM drive, and then double-click on the "Setup.exe" file to begin.
A menu will appear with several options. Select “Install 6 In 1 Reader Drivers” from the
menu options.
USER'S
MANUAL
USER'S
MANUAL
14
1.
2.
Page 15
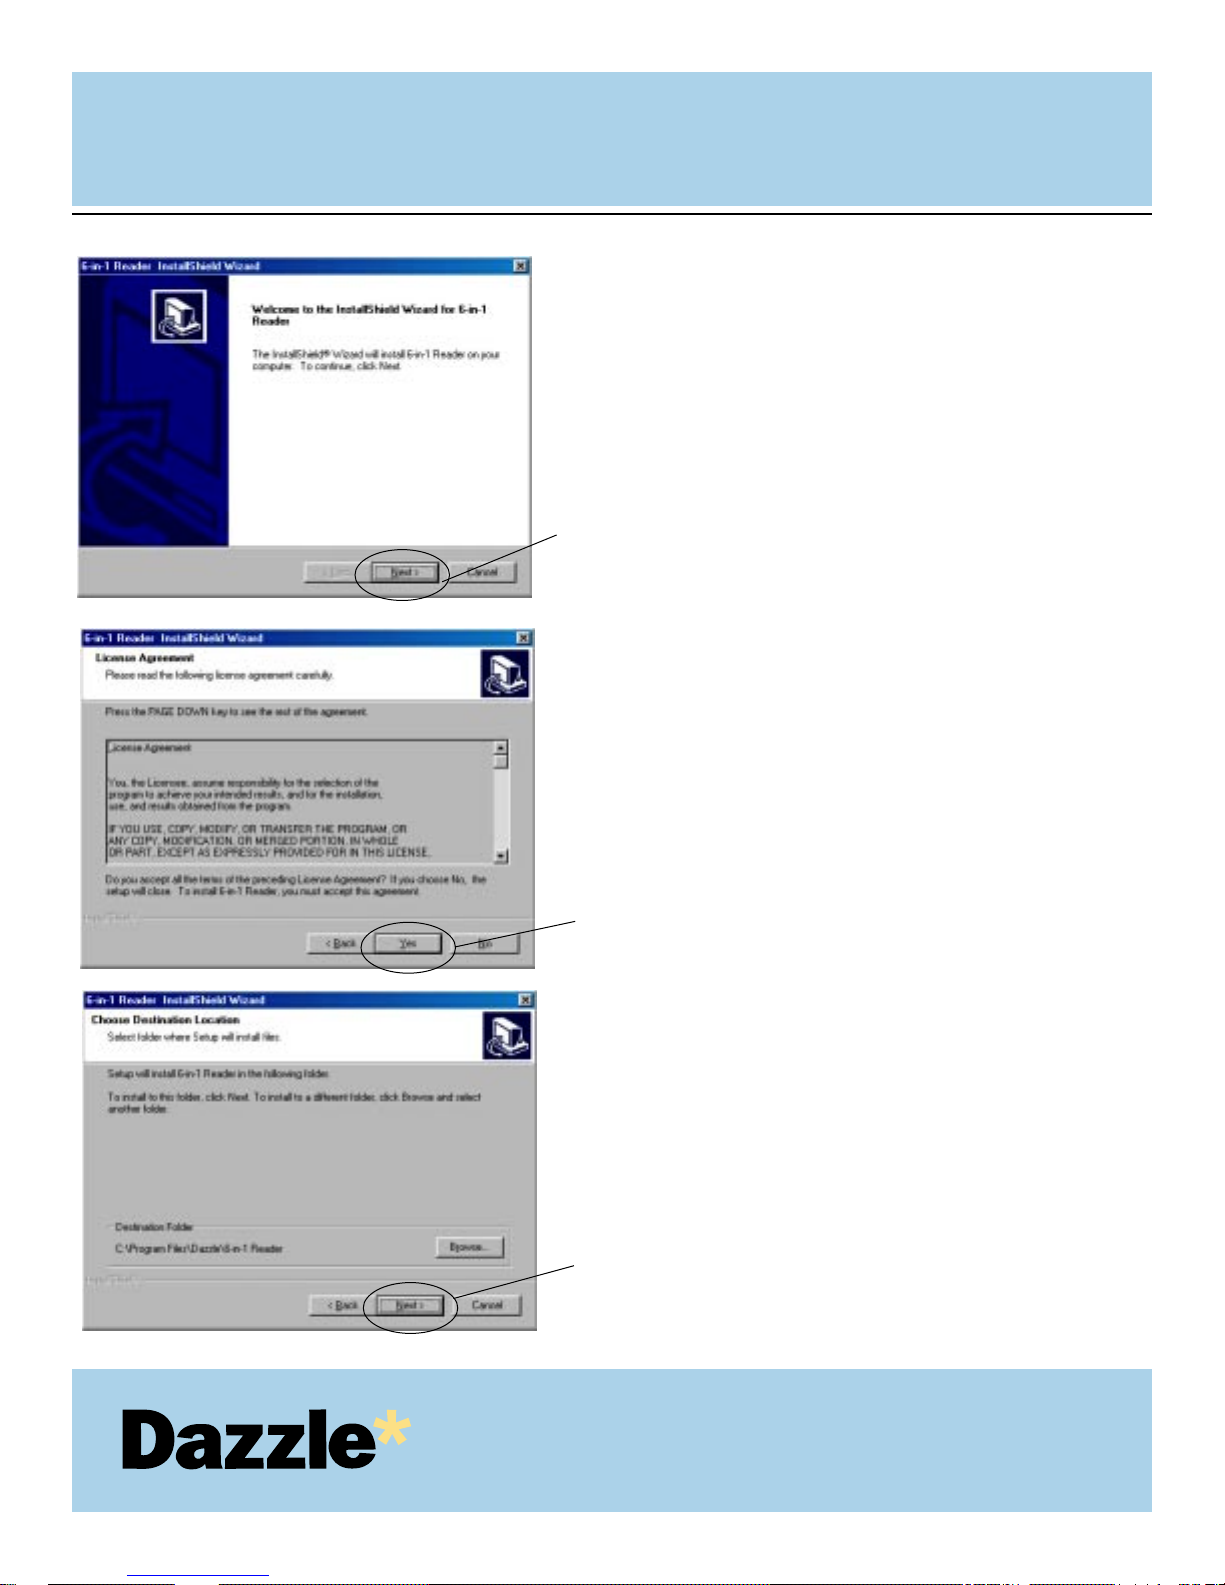
The “Inst allShield Wizard for 6 In 1
Reader” welcome screen will greet
you. Click “Next” to proceed
Read the “License Agreement”. T o
agree to the terms of the License
Agreement and continue the
installation click “Yes” as shown in the
window on the left.
Click “Next” to install the drivers to the
default location on your computer.
USER'S
MANUAL
USER'S
MANUAL
15
3.
4.
5.
Click Yes.
Click Next.
Click Next.
Page 16
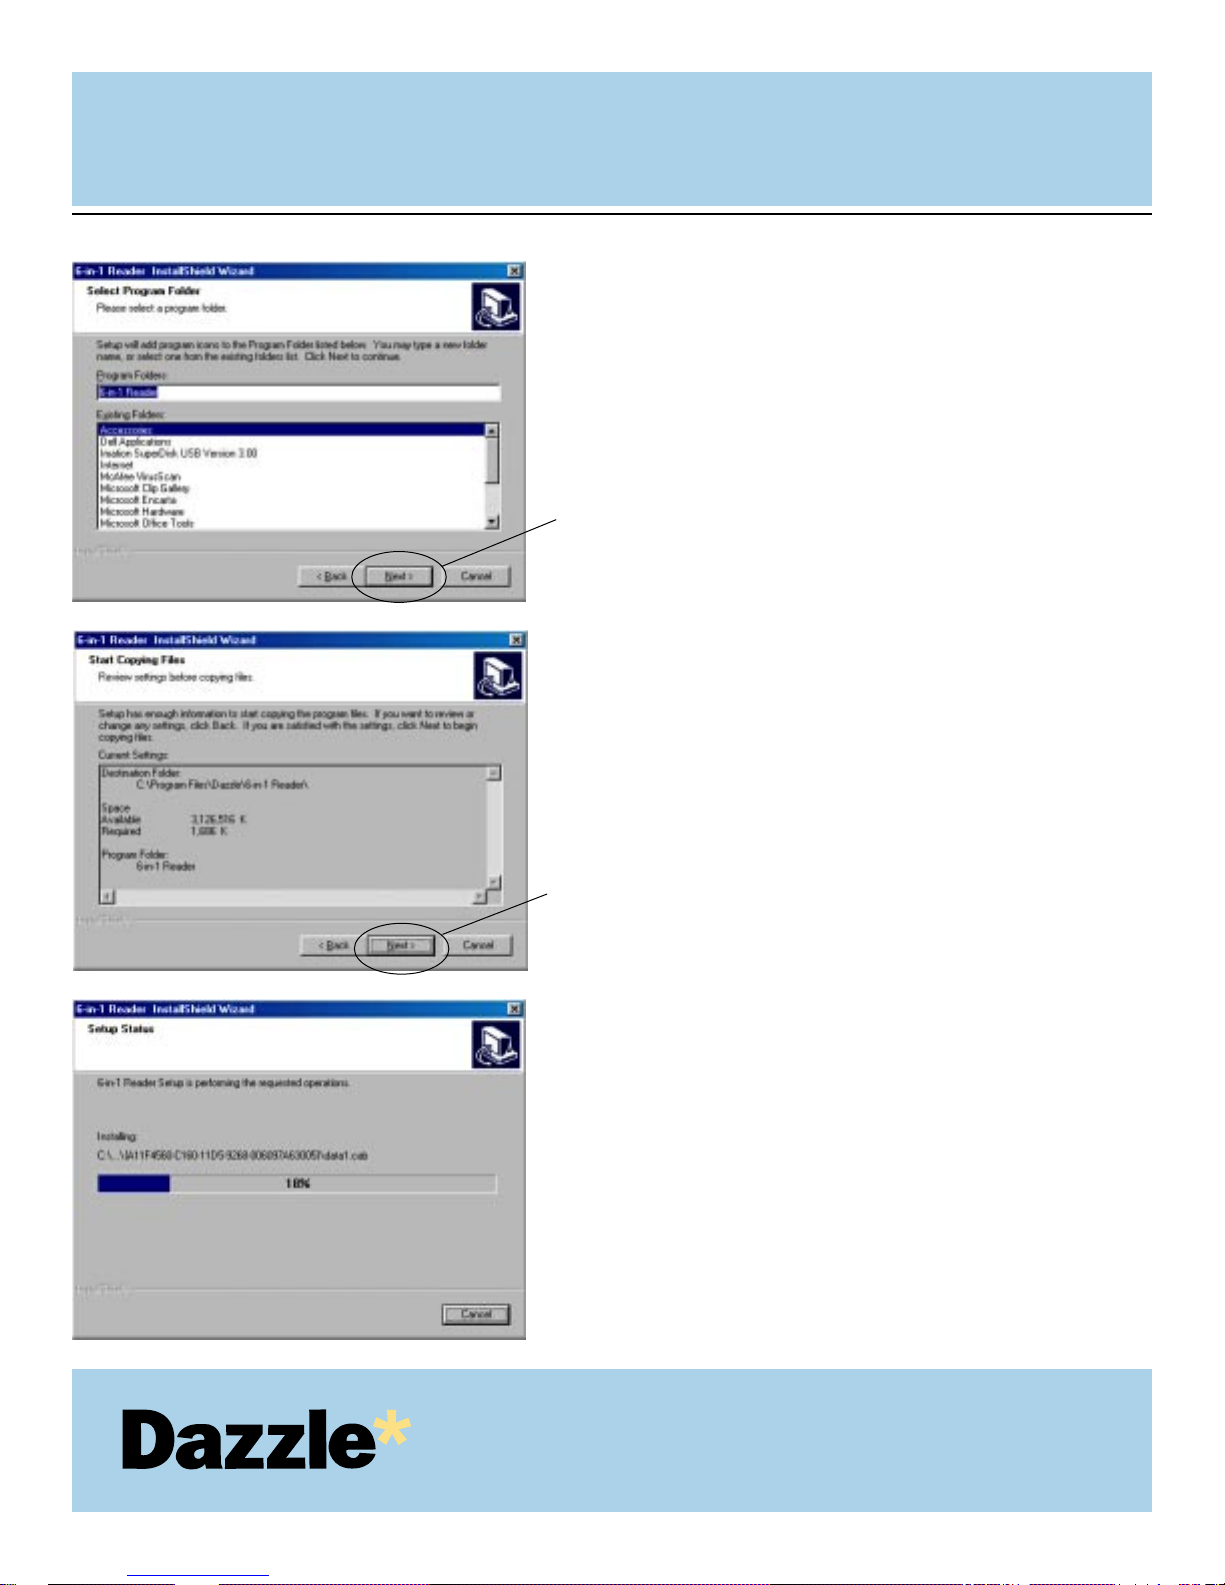
Click “Next” to accept the default
program folder that will be installed for
your Dazzle 6 In 1 Reader.
An overview of the installation will
appear. Click "Next" to continue the
installation.
You will then see a st atus window
advising the progress of the current
installation (as shown on left).
USER'S
MANUAL
USER'S
MANUAL
16
6.
7.
8.
Click Next.
Click Next.
Page 17
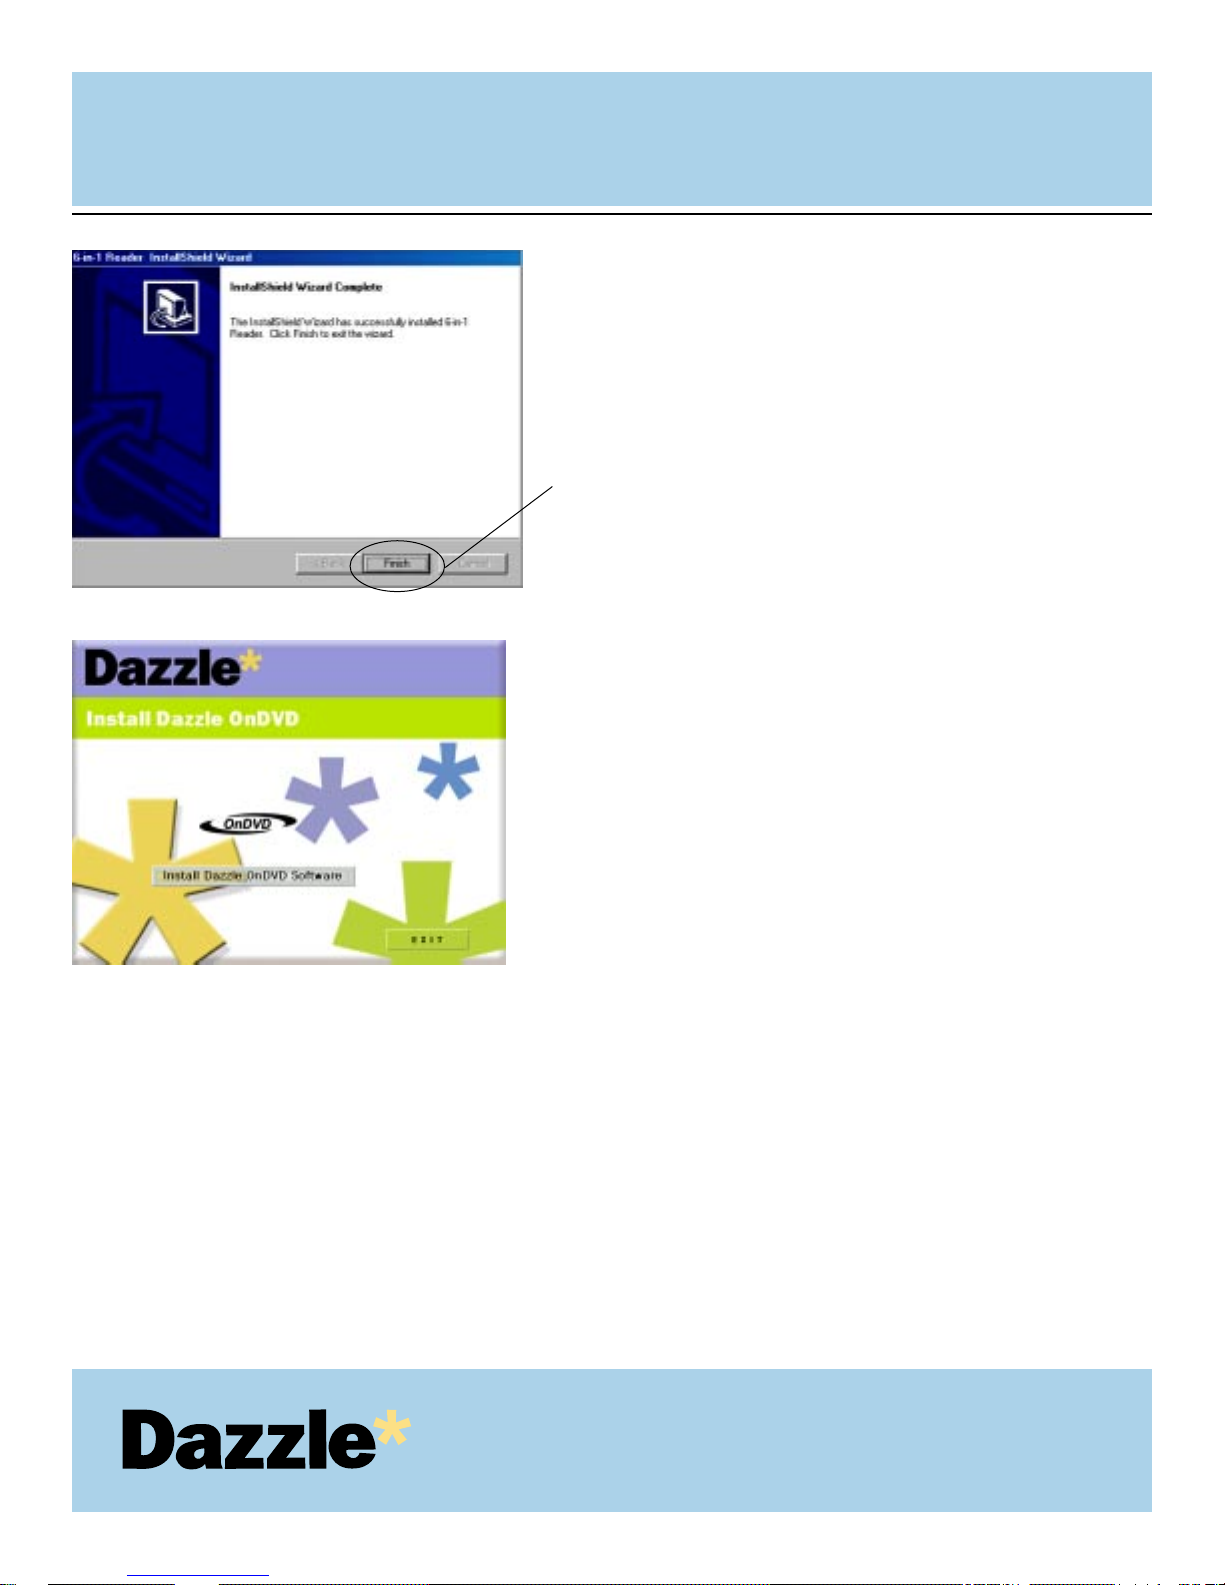
A dialog box will appear asking if
you would like to view the “ReadMe”
file. T o view the “ReadMe ”, click
"Next." A window containing the
ReadMe file will open. When
finished viewing the file close the
window. If you choose not to view the
file, deselect the check box near "Yes I
want to view the ReadMe file” and
click "Next."
Click "Finish" to complete the driver
software installation.
The “Inst all Dazzle OnDVD” splash
screen will appear. To install the
OnDVD software, click “Install Dazzle
OnDVD Software.” If you choose not
to install the software, click “EXIT”,
and restart your computer. Refer to
the sections “Connecting to a USB
Port”, or “Connecting to a USB Hub”
respectively for information on
connecting your 6 In 1 Reader to your
computer.
NOTE:The OnDVD software may be installed at anytime by inserting the Dazzle Installation CD
and selecting “Install Dazzle OnDVD” from the first menu.
USER'S
MANUAL
USER'S
MANUAL
17
Click “Finish”
9.
10.
11.
Page 18
USER'S MANUAL
USER'S MANUAL
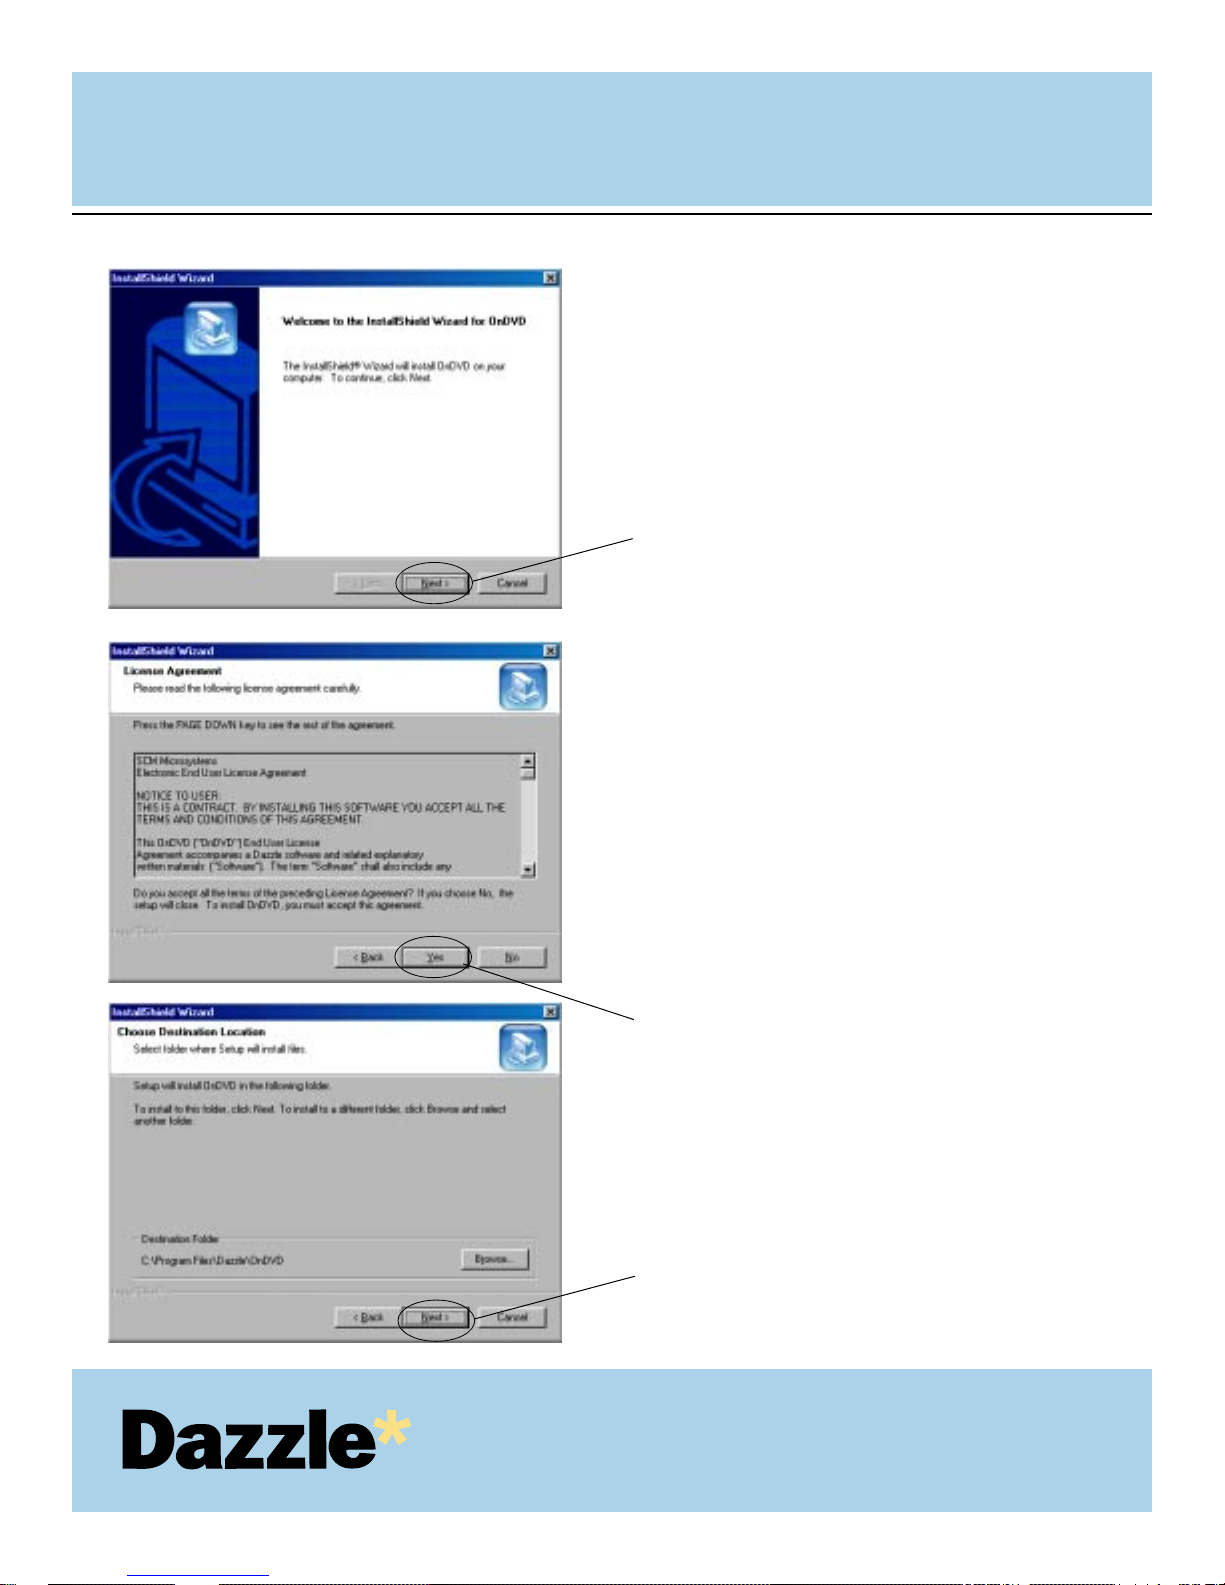
At the OnDVD Welcome Screen, click
“Next” to continue the installation.
Read the License Agreement. To agree
to the terms of the License Agreement
and continue with the OnDVD
installation, click “Yes” as shown on
left.
Click “Next”, to install OnDVD to the
default location on your computer.
12.
13.
Click Next.
Click Yes
14.
Click Next.
Page 19
USER'S MANUAL
USER'S MANUAL
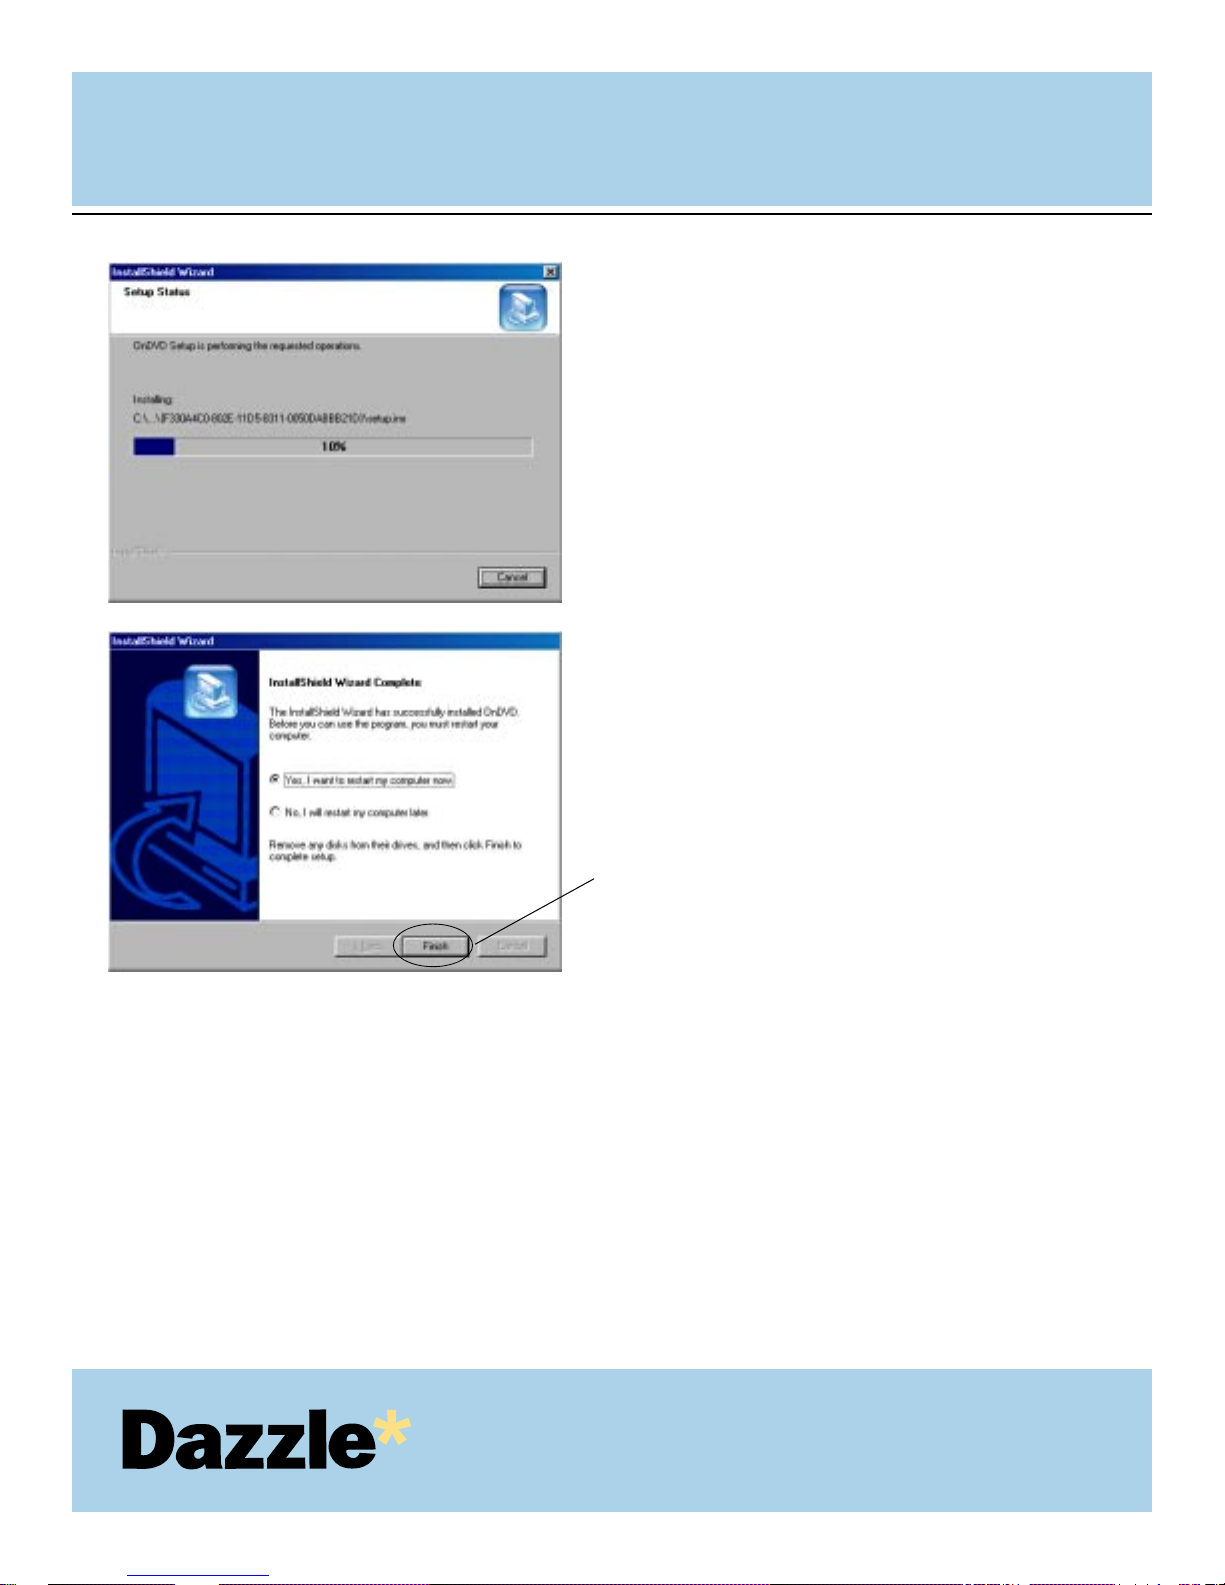
OnDVD will begin the installation
operation displaying a status box as
shown on left.
Click “Finish” to restart your computer.
Congratulations! The installation is now complete. You may connect the Dazzle 6 In 1 Reader to
your computer after rest arting. Proceed to “Connecting to a USB Port”, or, “Connecting to a USB
Hub” respectively for information on connecting your 6 In 1 reader.
15.
16.
Click Finish
19
Page 20
USER'S
MANUAL
USER'S
MANUAL
20
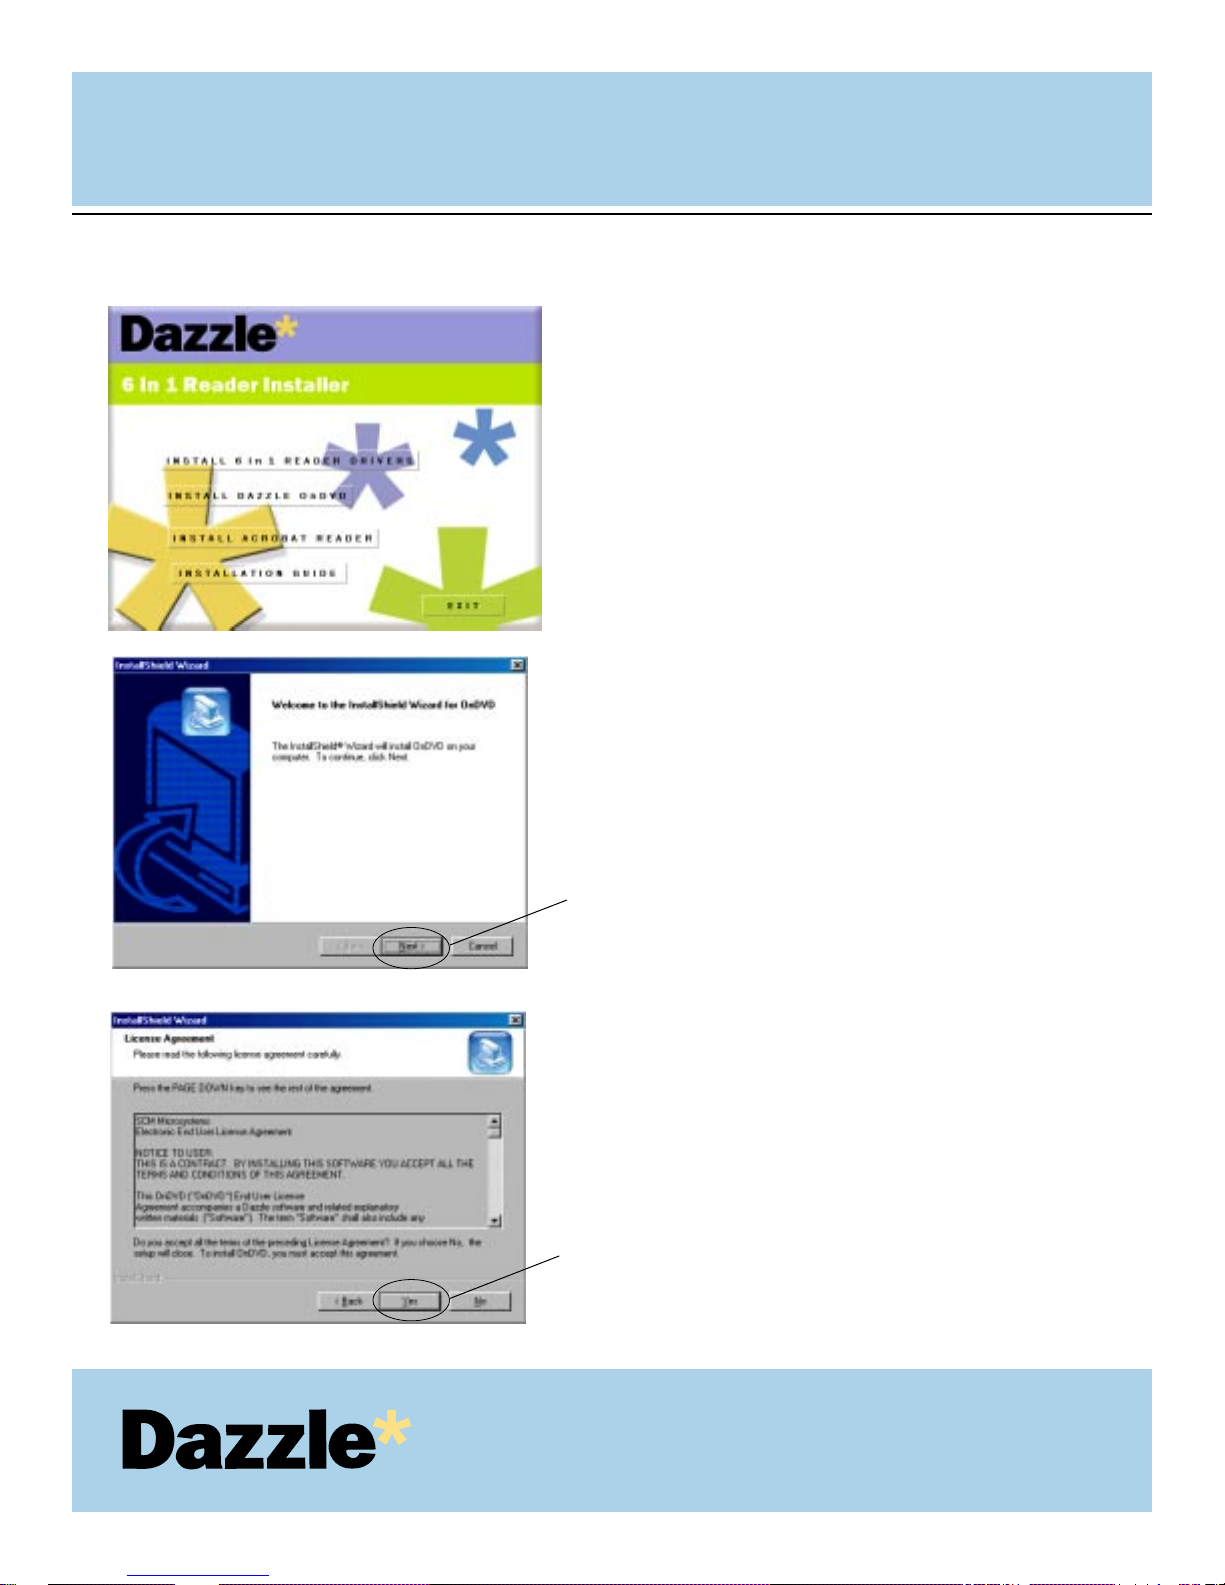
Installing OnDVD on Windows Me and XP:
Insert the Dazzle Installation CD and
close any open applications.
A menu will appear with several
options. Select "Install Dazzle
OnDVD" from the menu to begin the
installation.
At the OnDVD Welcome screen, click
"Next" to continue the installation.
Read the License Agreement. To agree
to the terms of the License Agreement
and continue with the OnDVD
installation, click "Yes" as shown on
left.
1.
2.
3.
Click Next
4.
Click Yes
Page 21
21
USER'S
MANUAL
USER'S
MANUAL
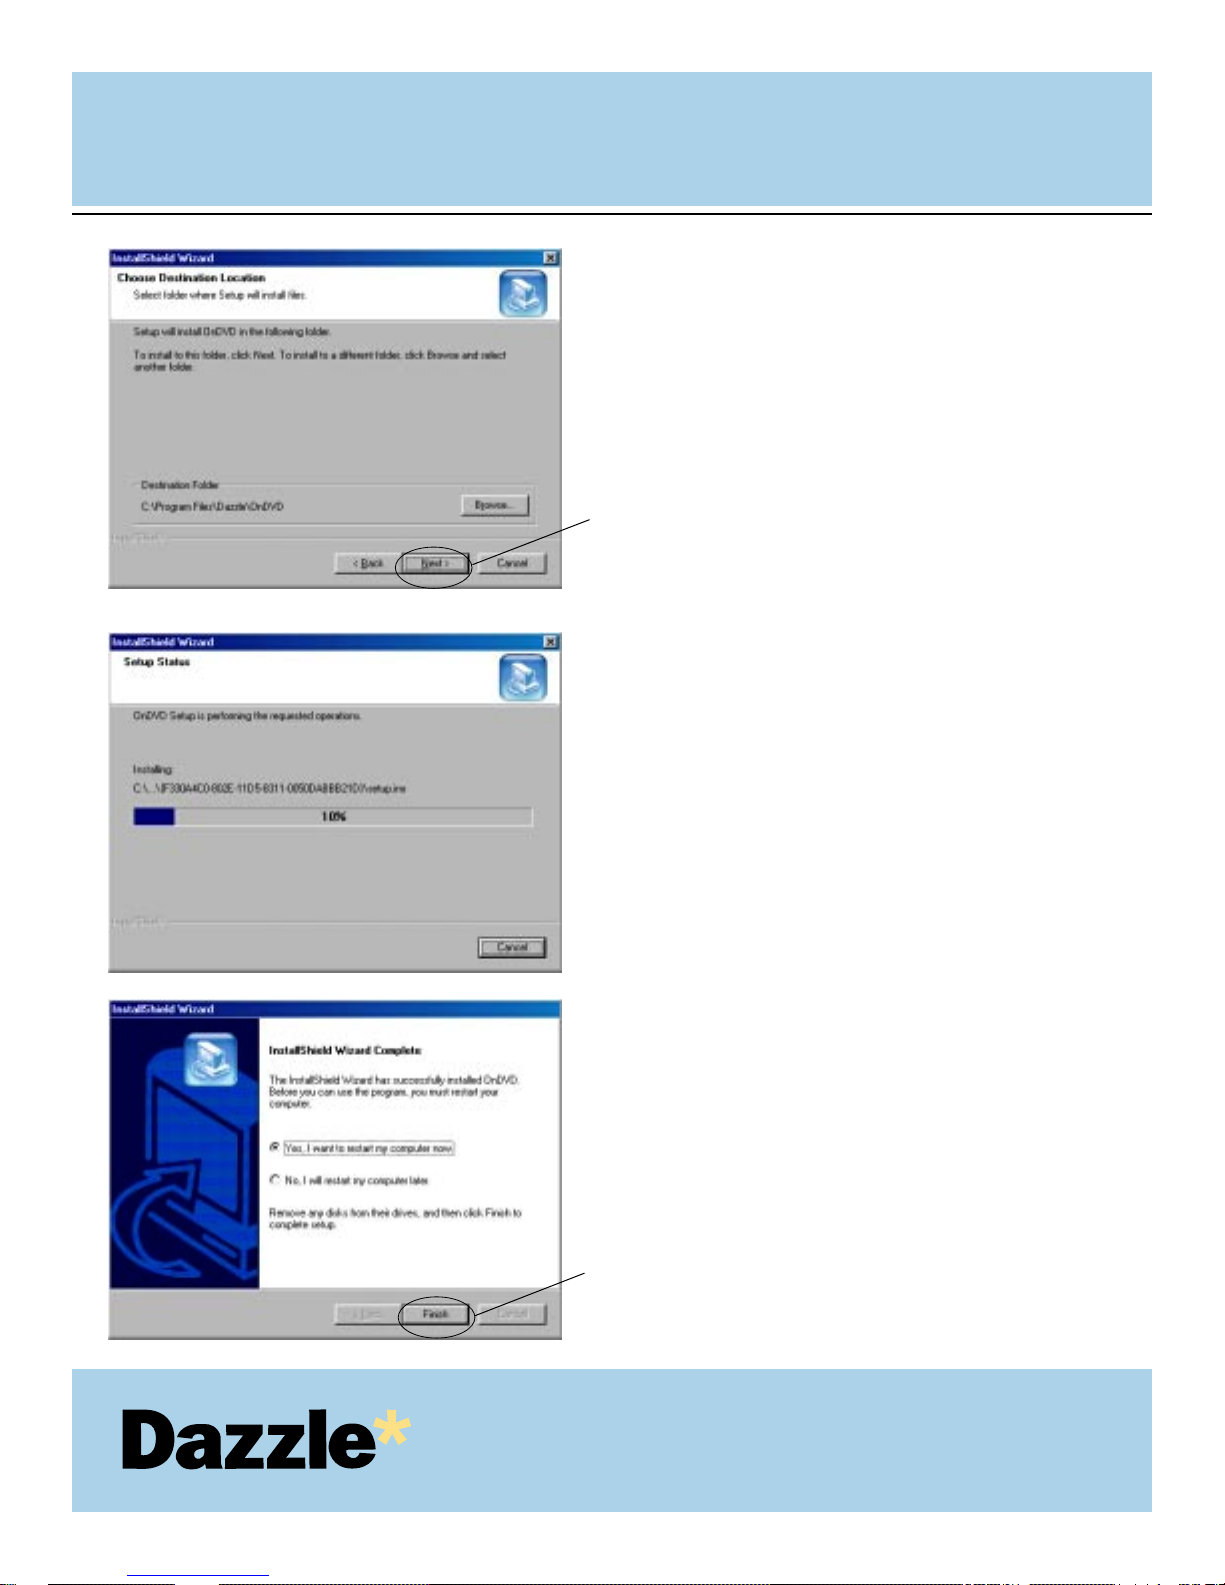
Click “Next” to install OnDVD into the
default location of your computer.
OnDVD will begin the installation
operation displaying a status box as
shown on left.
Click "Finish" to complete the OnDVD
installation and restart your computer.
Congratulations! The Dazzle OnDVD
software installation is now complete.
5.
6.
7.
Click Next
Click Finish
Page 22
USB CameraMate
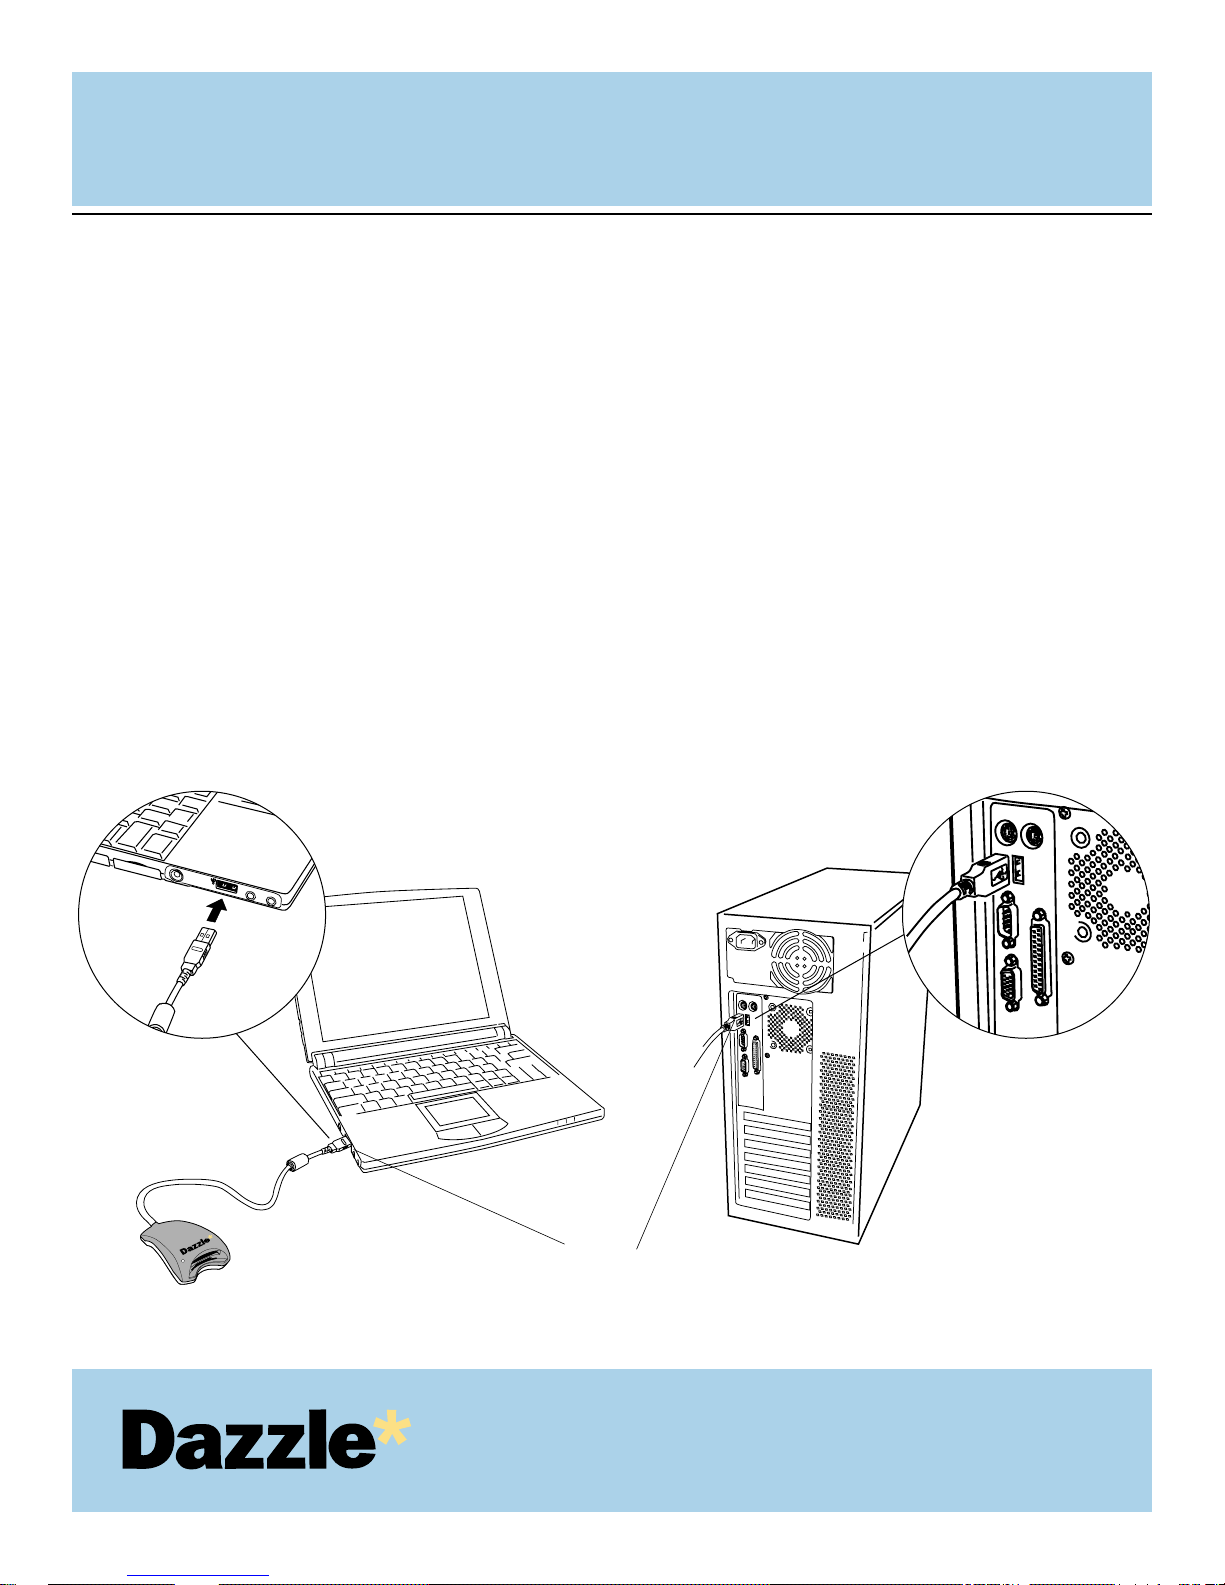
Connecting to the USB Port
Connect the USB connector of the Dazzle 6 In 1 Reader to the USB port on your
computer.
NOTE:The USB cable may be connected to the computer while the computer is running.
Make sure the cable ends are firmly connected. Be careful not to confuse the upper
and lower parts of the connector. Do not force connections, as this may damage the
computer or the card reader.
In the illustration below, the Dazzle card reader connects directly to the USB port on
your PC compatible computer. Your Dazzle card reader can also be conected to a USB hub
- see next page for more information.
USER'S
MANUAL
USER'S
MANUAL
22
Enlarged view
1.
2.
Attach the USB connector from the
Dazzle card reader to the USB port on
your computer.
Enlarged view
Page 23
USER'S
MANUAL
USER'S
MANUAL
23
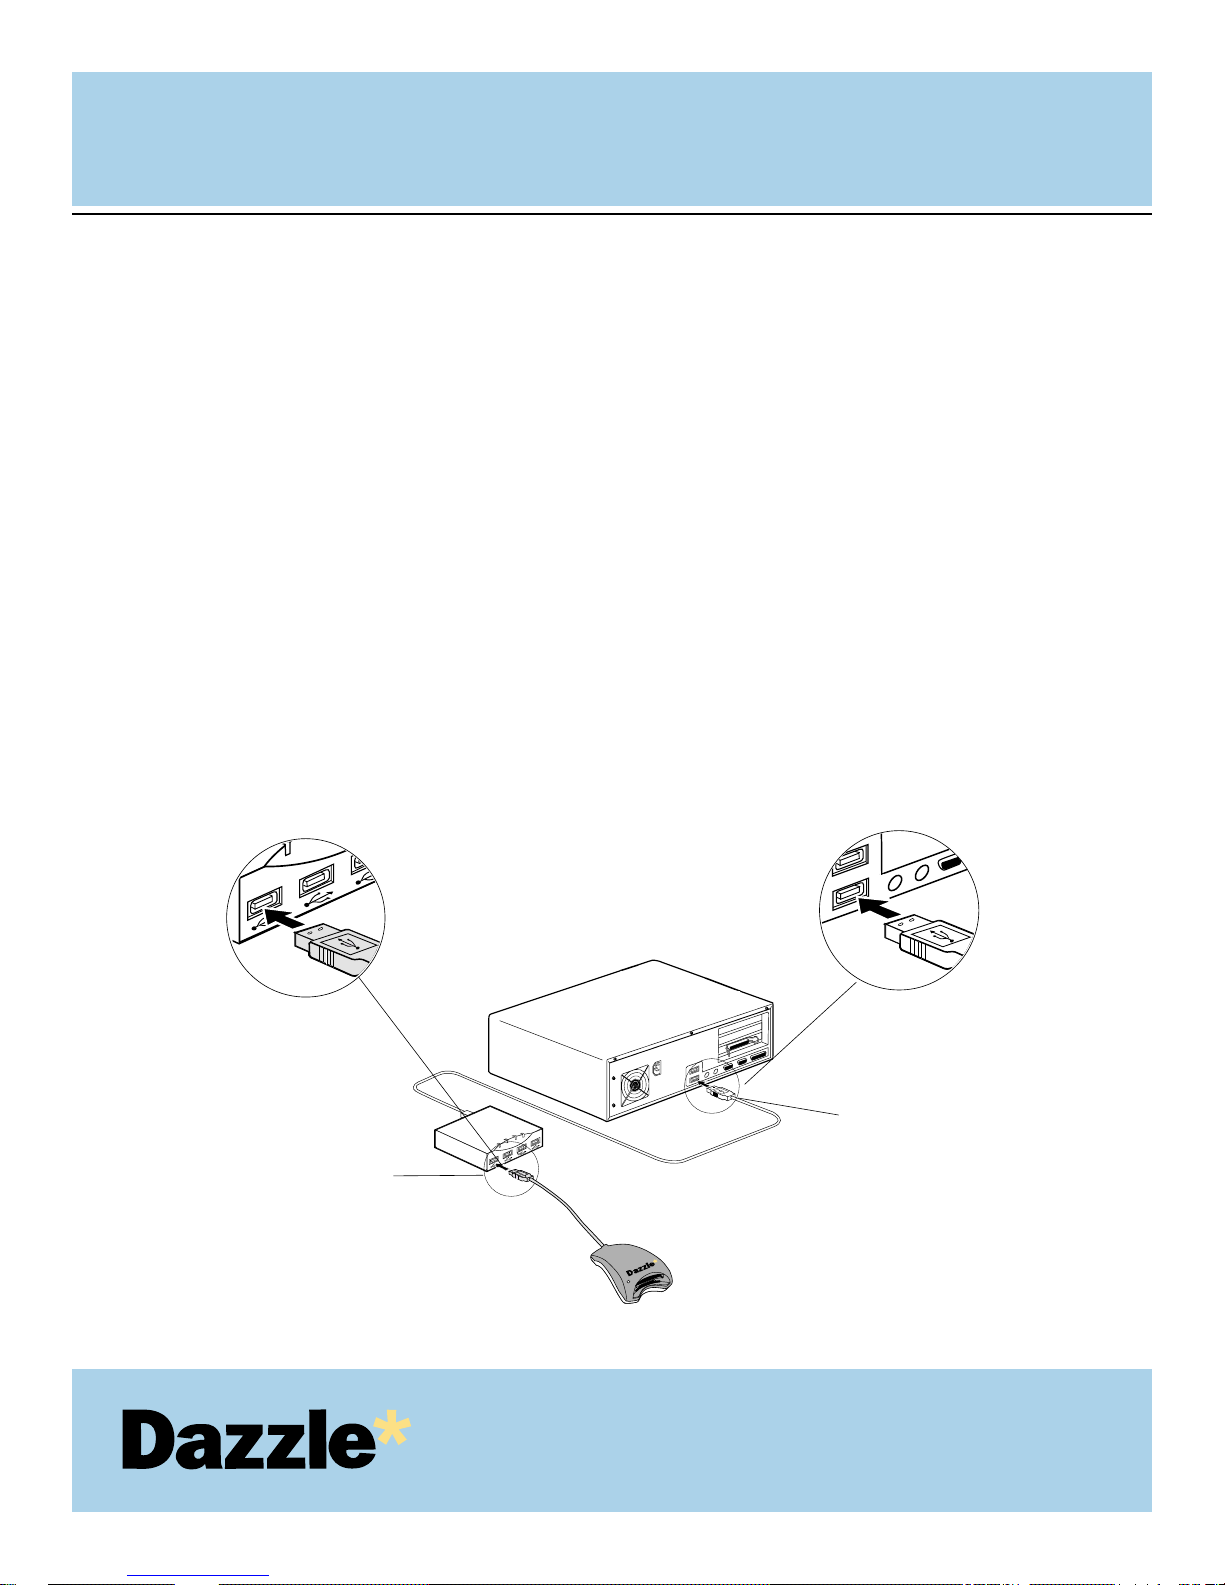
Connecting to a USB Hub
NOTE: When using a Microdrive concurrent with another media, the reader becomes a
high power device requiring direct connection to the host computer or self-powered hub.
Connect the USB hub (purchased separately) to your computer's USB port.
Then connect the USB connector of the card reader to a port on the USB hub.
NOTE: The USB cable may be connected to the computer or USB hub while the
computer is running.
IMPORTANT: Make sure the cable ends are firmly connected. Be careful not to
confuse the upper and lower parts of the connector. Do not force connections, as this
may damage the computer or the Dazzle card reader.
Attach the USB connector from the USB hub
to the USB port on your computer
Enlarged view
Attach the USB connector from the
Dazzle 6 In 1 Reader to the USB port on the
USB hub
Enlarged view
1.
2.
Page 24

Digital Media Card Compatibility
Inserting a SmartMedia Card
Inserting a CompactFlash Card
Inserting a MultiMediaCard
or Secure Digital Card
Inserting a Memory Stick Card
Mounting and Accessing a Card
(Macintosh)
Formatting Cards (Macintosh)
Removing a Card (Macintosh)
Inserting and Accessing a Card (PC)
Formatting Cards (PC)
Removing a Card (PC)
USER'S
MANUAL
USER'S
MANUAL
24
4
HOW TO USE
the Dazzle 6 In 1 Reader
Page 25

This section describes the operation relating to the Dazzle 6 In 1 Reader and digital media cards. To
avoid complications while attempting to use your Dazzle card reader, Dazzle recommends reading
this entire chapter. For installation information, refer to “Chapter 2: Connecting to a Macintosh”
(page 7) or “Chapter 3: Connecting to a PC Compatible” (page 13).
Digital Media Card Compatibility
The Dazzle 6 In 1 Reader is a USB card reader/writer compatible with CompactFlash Type I & II, IBM
Microdrive, SmartMedia, Secure Digital, MultiMediaCard, and Memory Stick digital media.
Information regarding supported media types and capacities is detailed below:
The Dazzle 6 In 1 Reader is compatible with:
- SmartMedia cards in the 3.3 Volt SSFDC format only, in current capacities of up to
128MB
- All current CompactFlash cards available on the market, as well as cards in the CF II and
CF+Type II formats, such as the IBM Microdrive
- Most brands of MultiMediaCard and Secure Digital formats
- Memory Stick as well as MagicGate Memory Stick media
NOTE: Secure mode of Sony MagicGate is not supported.
IMPORTANT NOTE: The lower media slot of the Dazzle 6 In 1 Reader was designed to
accept SmartMedia, Secure Digital, MultiMediaCard, and Memory Stick. Only one of the
four supported media types may be inserted at one time.
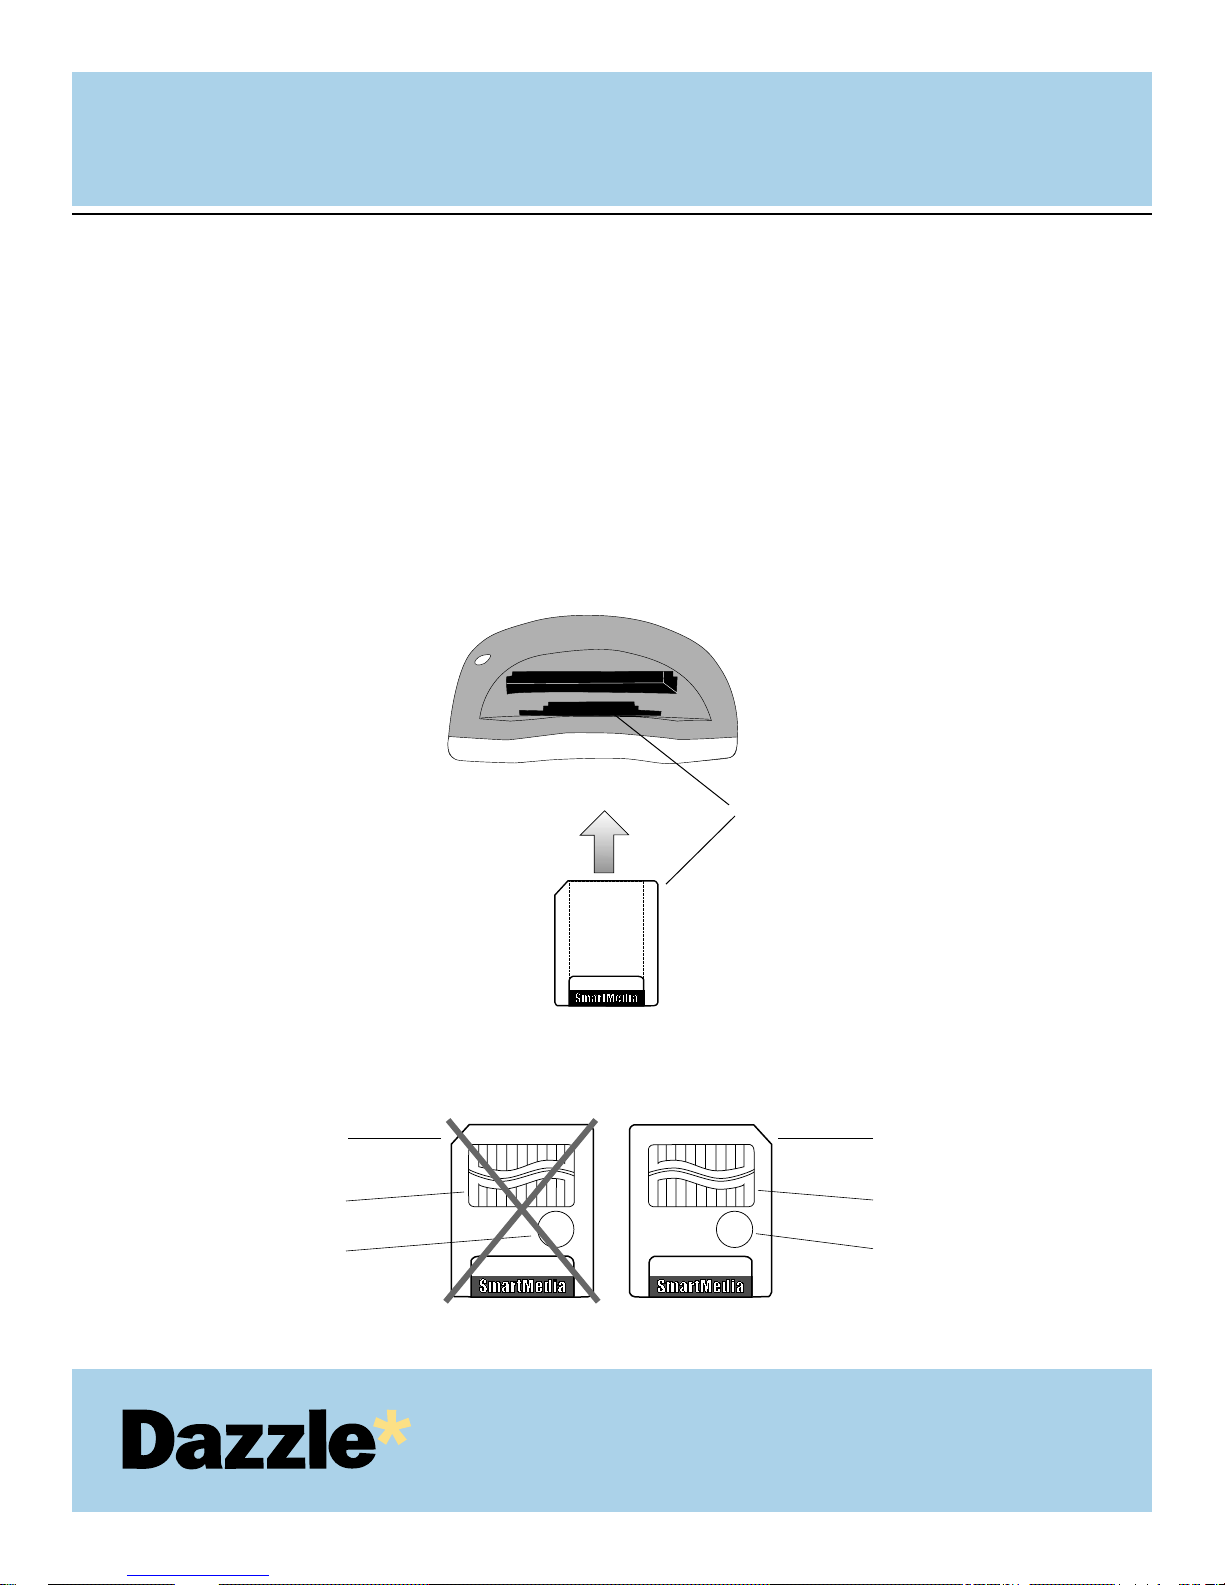
Inserting a SmartMedia Card
Position the SmartMedia card in the direction as shown in the illustration on the next
page.
Insert the card into the lower media slot with the gold contact facing down. Gently push
the card in all the way until the card is fixed in place.
WARNING: Be careful not to insert the SmartMedia card in the wrong direction. Be sure to
insert the SmartMedia with the gold contacts facing down. If it is forced in, the card reader or
the SmartMedia may be damaged, or data on the card may be lost or corrupted. If the computer
is not recognizing the media, or if it does not fit correctly, re-orientate the media and try
reinserting it.
USER'S
MANUAL
USER'S
MANUAL
25
1.
2.
Page 26
Inserting a SmartMedia Card (continued)
Insert the SmartMedia card as shown below. The Dazzle 6 In 1 Reader can only accept 3.3V
SmartMedia cards. Notice the notched corner of the SmartMedia card. The location of the notch
for a 3.3V SmartMedia card will appear on the right-hand side when you are looking directly at
the gold contacts from the top - refer to the illustration at the bottom of the page. Flip the card
over and be sure to insert the (3.3V) SmartMedia card with the gold contacts facing down
(therefore the notch will now be located on the left when the gold contacts are face down).
IMPORTANT NOTE: 5V SmartMedia cards are not supported with the Dazzle 6 In 1 Reader.
USER'S
MANUAL
USER'S
MANUAL
26
Left notch
indicates 5V card
Right notch
indicates 3.3V card
Write protect area
Gold contacts
Gold contacts
Write protect area
SmartMedia Card Comparison (view of cards from top)
Insert card into lower slot with the
notched corner inserted first and the
gold contacts face down.
Note: As shown on the left, you
should not see the gold contacts or
write protect area when inserting the
card into the Dazzle card reader.
5V SmartMedia cards
(NOT COMPATIBLE)
3.3V SmartMedia cards
(COMPATIBLE)
Page 27
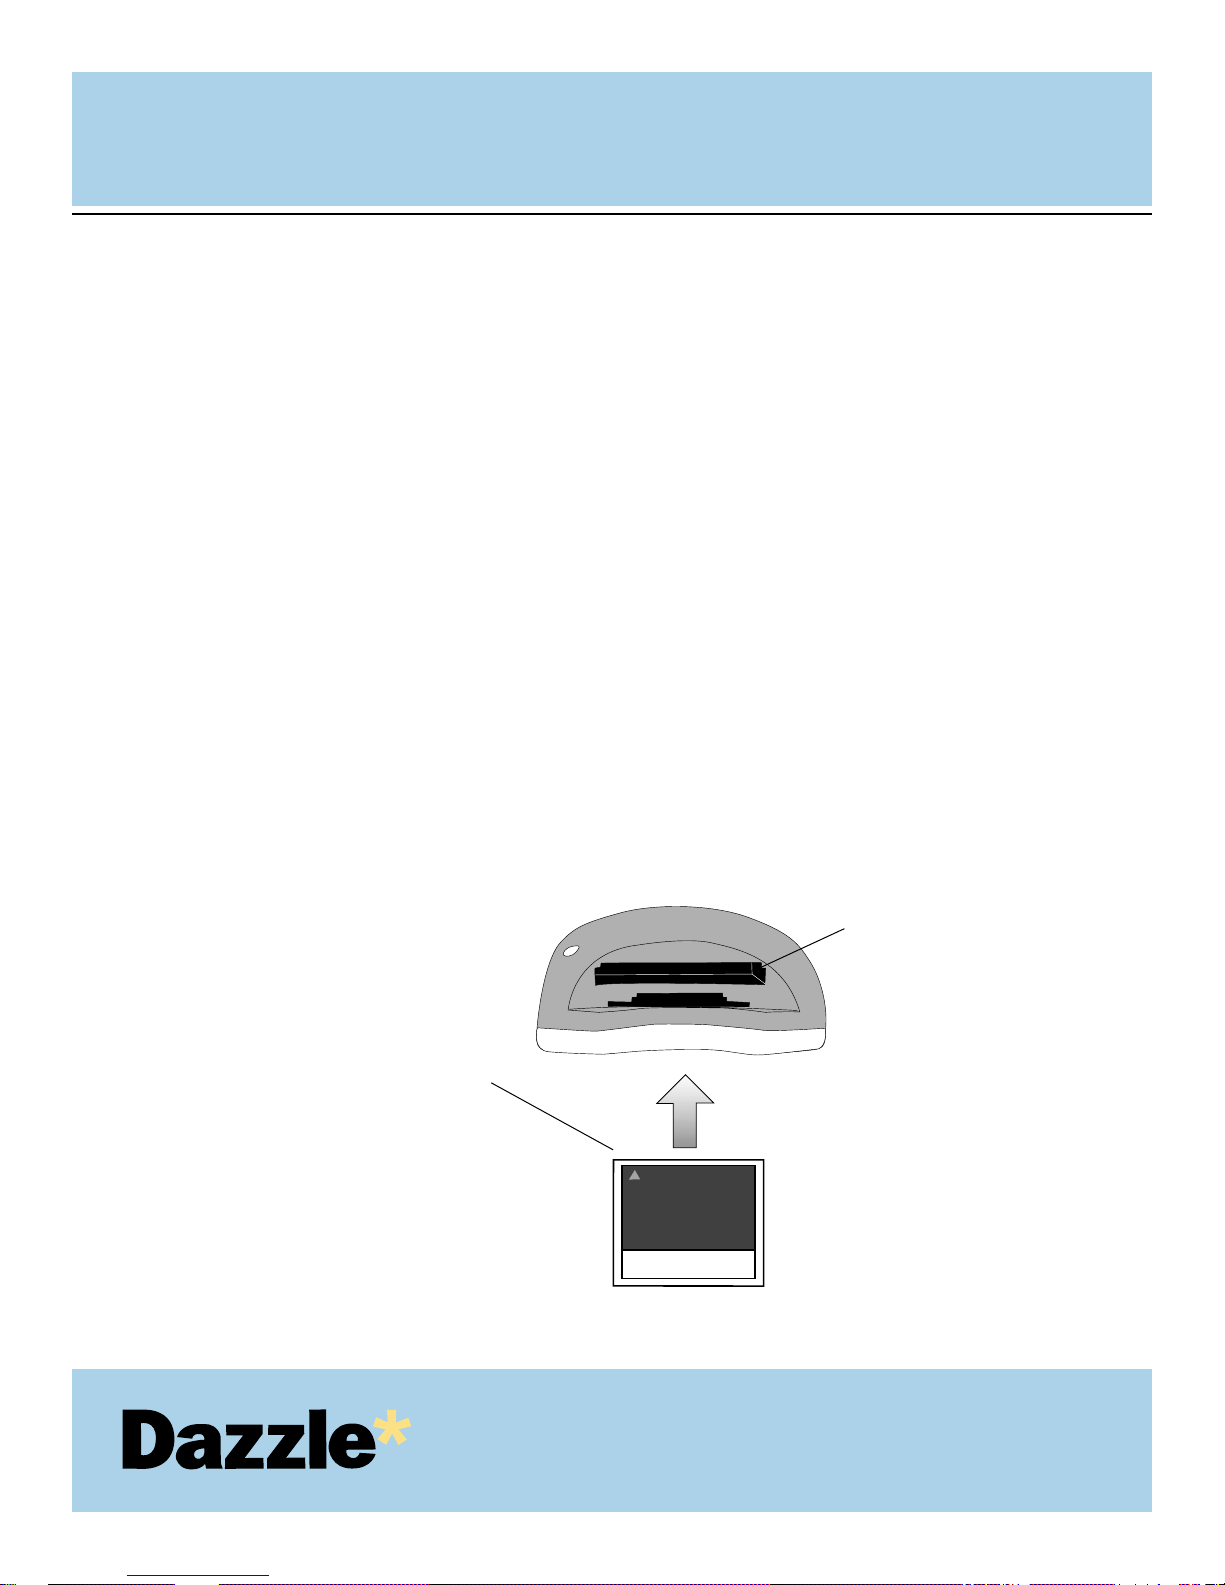
Inserting a CompactFlash Card
NOTE: When using a Microdrive concurrent with another media, the reader becomes a high
power device requiring direct connection to the host computer or self-powered hub.
Position the CompactFlash card in the direction as shown in the illustration below.
Insert the card into the top media slot being certain of the orientation - all leading
manufacturers of CompactFlash cards adhere to a specification requiring a positive keying
of the card. Gently push the card in all the way until the card is locked in place. The card
will slide in on the molded rails and a slight amount of resistance will be felt as the
connectors make contact. This is normal.
WARNING: Be careful not to insert the CompactFlash card in the wrong direction - be sure the
connectors are facing inward and the card is not inserted upside down. If it is forced in, the card
reader or CompactFlash card may be damaged or data on the card may be lost or corrupted.
IMPORTANT: If excessive force is required or the card just doesn’t seem to fit, do not attempt
to force the card in the reader, instead, contact Dazzle Technical Support for assistance.
USER'S
MANUAL
USER'S
MANUAL
27
1.
2.
CompactFlash connectors
Insert CompactFlash card
into top slot with connectors
facing inward (as shown in
illustration on the left).
128MB
Digital FlashFilm
Page 28
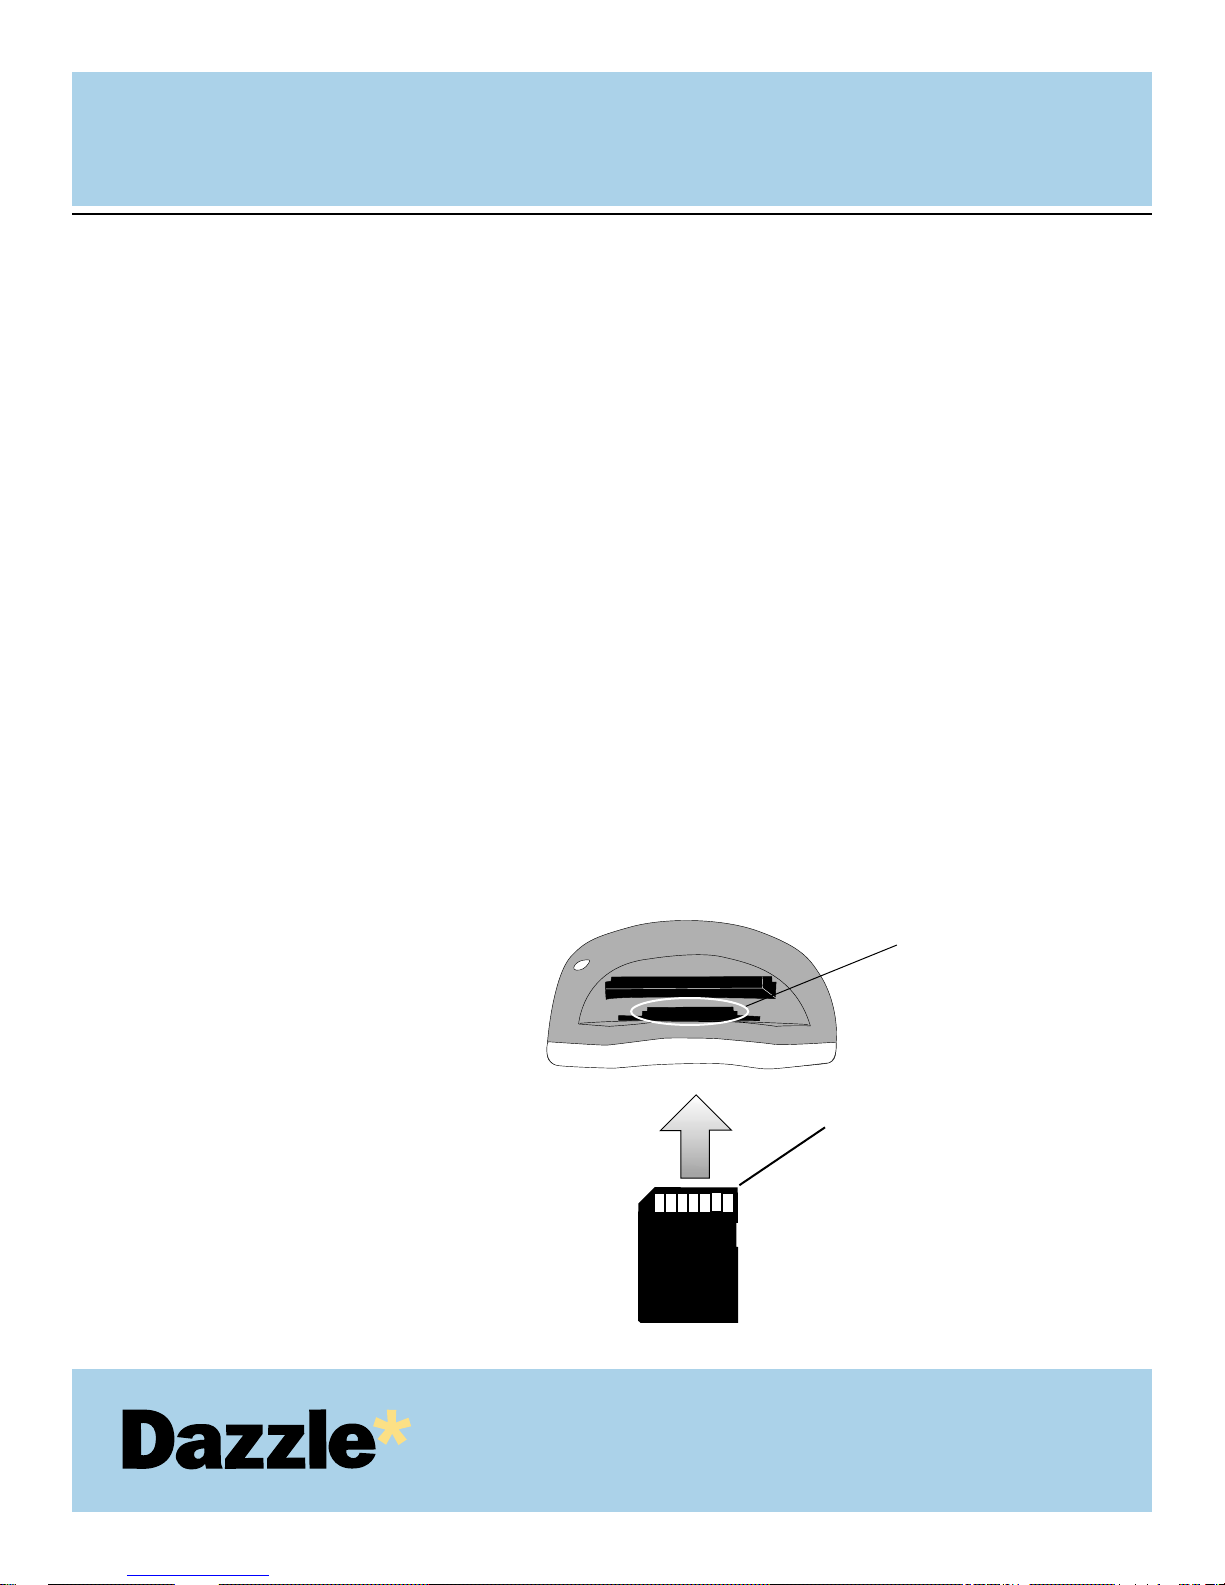
Inserting a MultiMediaCard or Secure Digital Card
Position the MultiMediaCard or Secure Digital card in the direction as shown in the
illustration below. A portion of the lower media slot was designed for insertion of
MultiMediaCard and Secure Digital cards. This portion of the media slot will use the top
of the SmartMedia slot as a guide. The Secure Digital or MultiMediaCard will slide in just
above the SmartMedia slot.
Insert the card into the slot with the gold contacts facing up. Gently push the card in all
the way until the card is fixed in place.
IMPORTANT: Notice the notched corner of the MultiMediaCard or Secure Digital card and be
careful not to insert the MultiMediaCard/Secure Digital card in the wrong direction. To insert
properly, be sure that the card is positioned so that the recessed notch is located on the upper
left corner. You should see the media’s gold contacts when inserting it into the slot. When
inserted properly, the gold contacts will be visible and farthest from you as you look at it from
the top. Refer to the illustration below for proper insertion.
WARNING: Insert the card gently. If it is forced in, the card reader or the actual card may be
damaged, or data on the card may be lost or corrupted. If excessive force is required, or the card
just doesn’t seem to fit, do not attempt to force the card in the reader, instead contact Dazzle
Technichal Support for assistance.
NOTE:To utilize advanced features of
Secure Digital cards as well as locking
and encryption features, please refer to
the documentation provided with your
Secure Digital card or host device.
USER'S
MANUAL
USER'S
MANUAL
28
1.
2.
Position the card as shown.
NOTE:The recessed notch should
be located in the upper left corner
of the card with the gold contacts
facing up.
MultiMediaCard/Secure
Digital portion of media
slot
Page 29
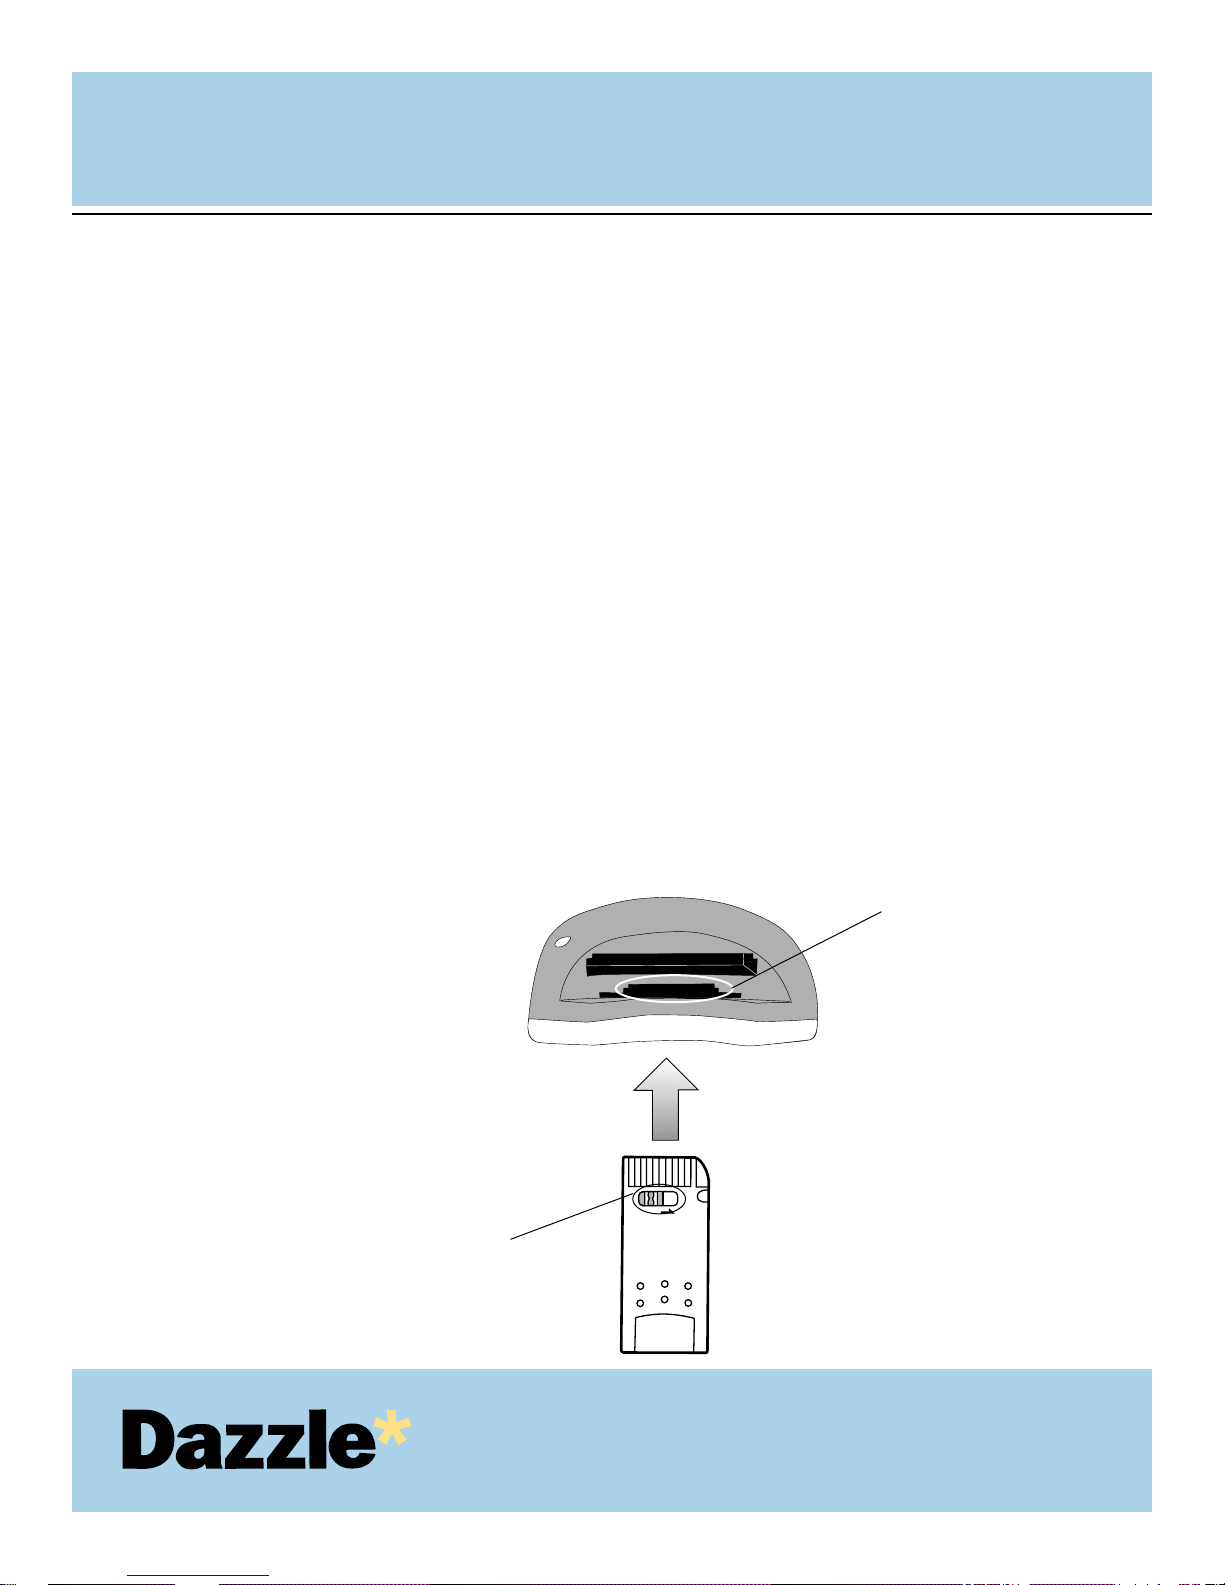
Inserting a Memory Stick Card
Position the Memory Stick in the direction as shown in the illustration below. A portion of
the lower media slot was designed for insertion of Memor y Stick media cards. This
portion utilizes the center of the media slot for Memory Stick insertion.
Insert the Memory Stick into the slot with the gold contacts facing up. Gently push
the Memory Stick in all the way until the card is fixed in place.
IMPORTANT: Notice the rounded corner of the Memory Stick card and be careful not to insert
the Memory Stick in the wrong direction. To insert properly, be sure that the card is positioned
so that the rounded corner is in the upper right corner. You should see the gold contacts of the
Memory Stick when inserting it into the slot. When inserting properly, the gold contacts will be
visible and farthest from you as you look at it from the top. Please refer to the illustration below
for proper insertion.
WARNING: Insert the Memory Stick gently. If it is forced in, the card reader or the Memory
Stick may be damaged, or data on the card may be lost or corrupted. If excessive force is
required, or the card just doesn’t seem to fit, do not attempt to force the card in the reader,
instead contact Dazzle Technical Support for assistance.
NOTE:The secure mode of Sony
MagicGate is not supported.
NOTE: If you intend on writing to or
deleting from your Memory Stick
media, make sure the Memory Stick
is not locked. The lock tab can be
found on the under side of the
Memory Stick.
USER'S
MANUAL
USER'S
MANUAL
29
1.
2.
Position the card as shown in the
illustration on the left.
NOTE:The rounded corner should
be located in the upper right corner
of the card when inserting.
Memory Stick portion of
media slot
Lock Tab
LOCK
Page 30
Mounting and Accessing a Card (Macintosh)
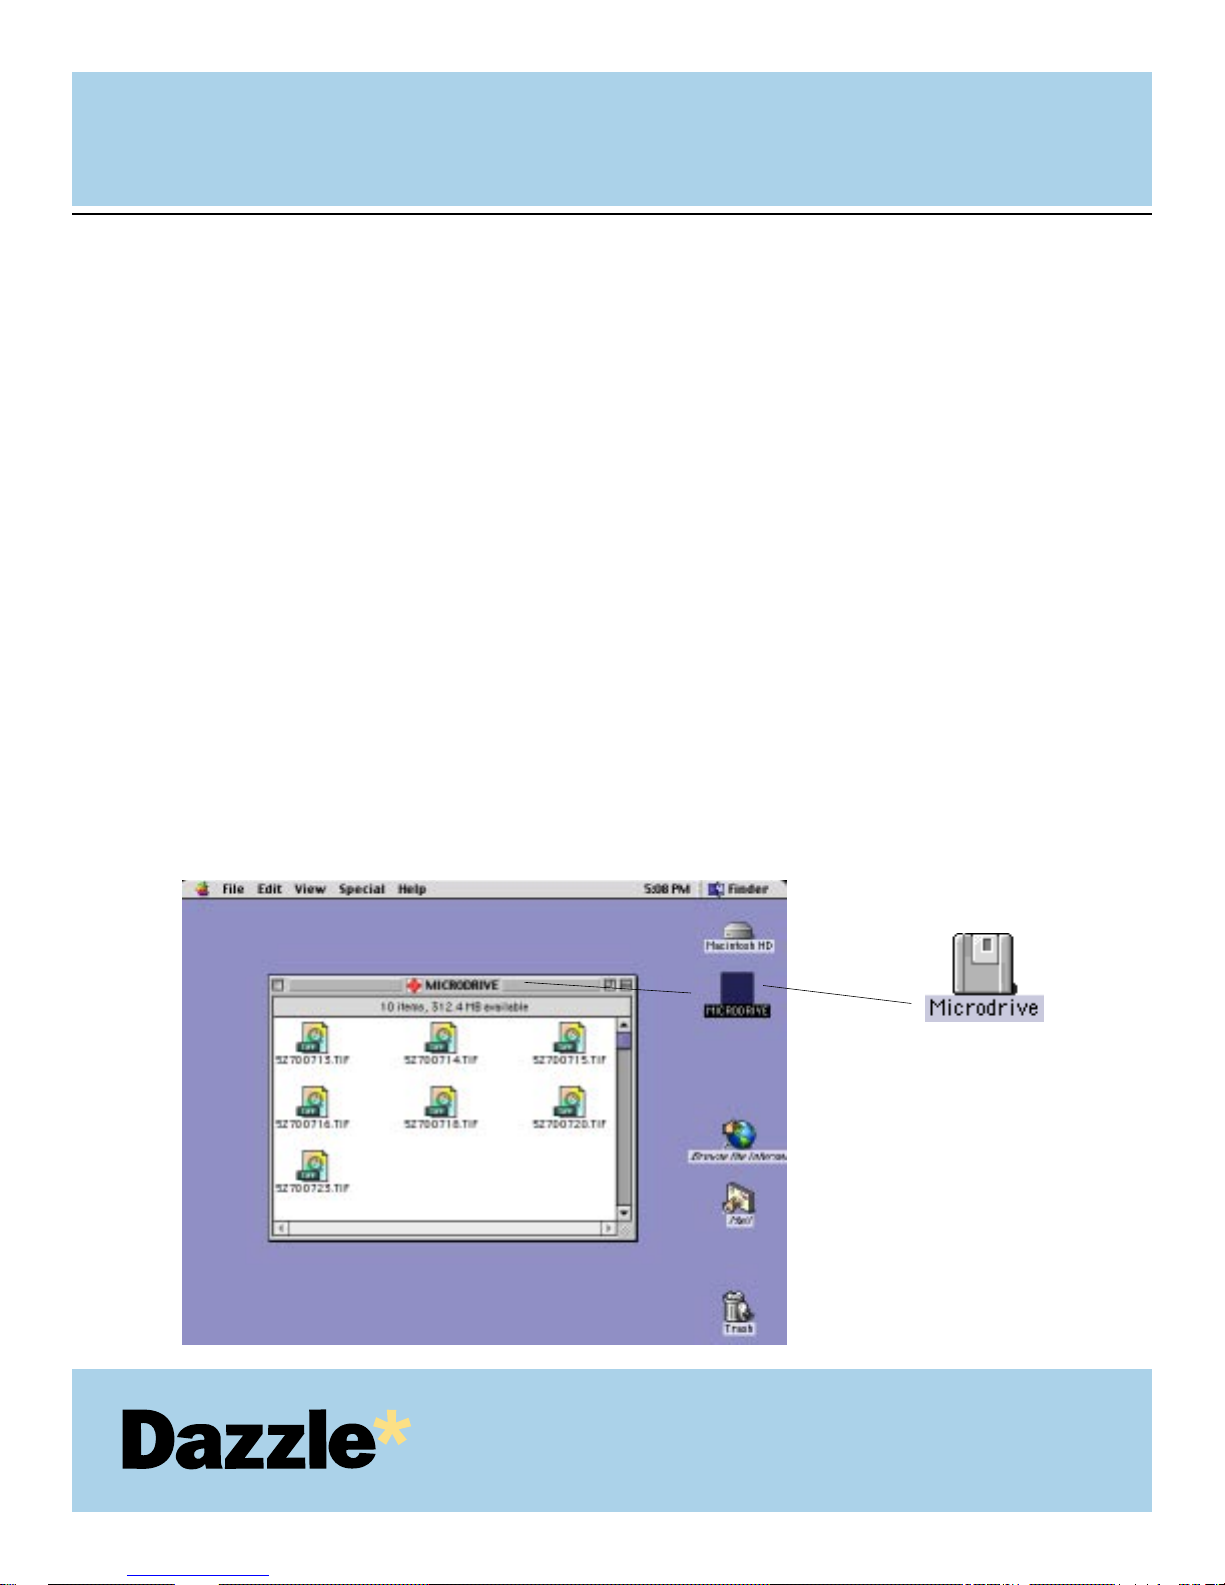
After a card is inserted on a Macintosh computer, a distinct icon will appear on the Mac OS
desktop. This is the “mounted” state, which enables read and write operations for the card. The
time required between card insertion and mounting depends on the type and brand of card.
Usually, a card can be mounted and accessed within a few seconds.
When a card is mounted, it can be used in the same fashion as a floppy or other type of removable disk. Double-click the icon to open it's respective file window. For example, in the screen
shot below - an IBM 340MB Microdrive was inserted into the Dazzle 6 In 1 Reader. By doubleclicking on the Microdrive icon you will see it contains 10 high resolution TIF images taken on a
professional digital camera. The images stored on this Microdrive can be copied, opened, edited,
deleted, and so forth. With the Dazzle 6 In 1 Reader, audio and video files, cell phone dat abases,
and more can now be shared easily between your digital device (camera, cell phone, MP3 player,
etc) and your Macintosh.
IMPORTANT: Be sure you have installed the Dazzle 6 In 1 Reader drivers prior to attempting to
operate the card reader. Also be sure the Apple "File Exchange" control panel is set to load in
your system folder - you can activate it using the Apple "Extensions Manager" control panel.
USER'S
MANUAL
USER'S
MANUAL
30
Removable Disk Icon
(example shown representing:
IBM 340MB Microdrive)
NOTE : Files contained within a card
can be accessed by double-clicking on
the cards respective icon.
Page 31
Formatting Cards (Macintosh)
There may be instances where you may wish to format a card in the Dazzle card reader rather
than in the original digital device (camera, MP3 player, etc.). There may also be times when you
may be required or prompted to format your card. As such, please read the information in this
section for information on formatting CompactFlash, MultiMediaCard, Secure Digital,
SmartMedia, and Memory Stick cards.
WARNING: Formatting a card will completely erase all data currently stored on the card. If there
are important images or files you wish to safeguard for later use, make a backup copy on your
hard drive, CDR drive, or other type of removable media.
Formatting CompactFlash, SmartMedia, MultiMediaCard, Secure Digital, and Memory
Stick cards:
NOTE: Screenshots below may var y slightly from those on your computer.
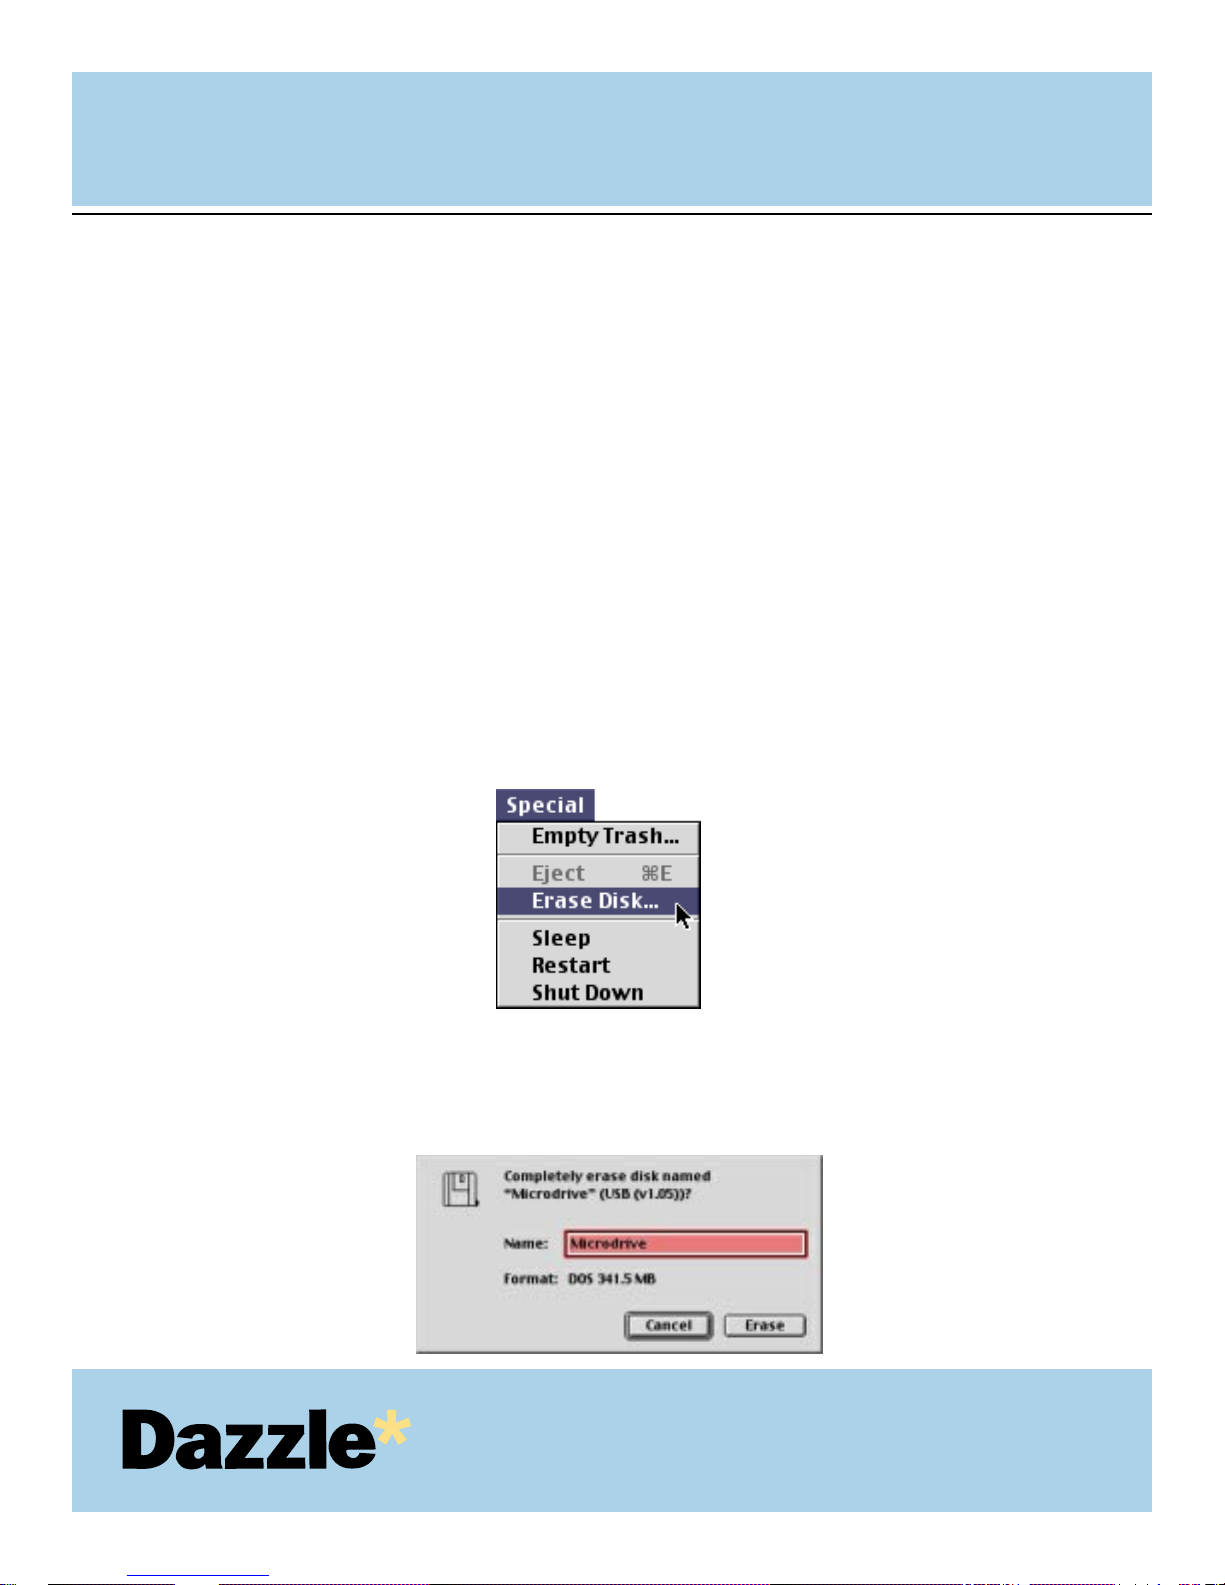
Select the "Erase Disk" command in the "Special" menu (as shown below).
As formatting a card will completely erase any data currently stored on the card, a dialog
box will appear asking if you wish to completely erase the card as shown below. Click
"Erase" to begin formatting the card. Or, click "Cancel" if you do not wish to format the
card.
USER'S
MANUAL
USER'S
MANUAL
31
1.
2.
Page 32
Removing a Card (Macintosh)
Make sure that the "Access" indicator is not flashing. The access indicator will
flash when data is being read or written on the card. Wait until the operations are
complete and the access indicator is no longer flashing before attempting to remove the
card. Removing a card during access operations will cause the data to be lost or
corrupted.
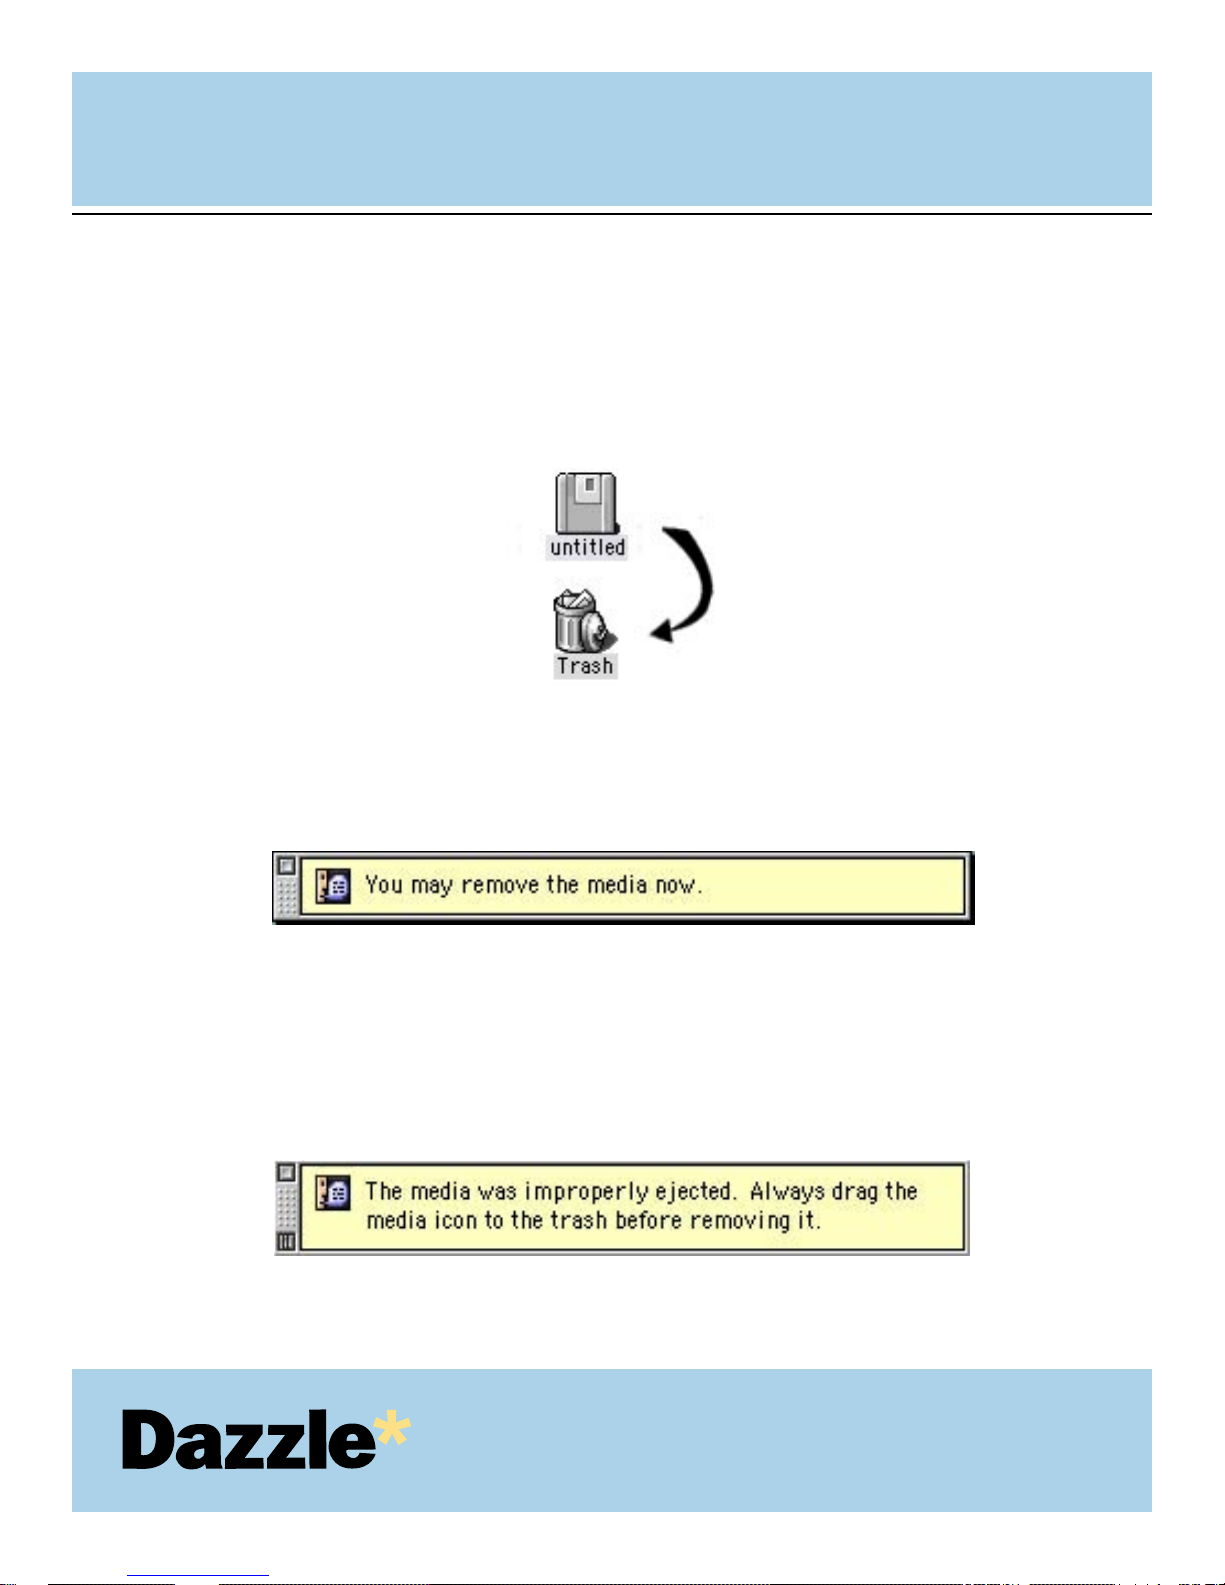
Drag the card icon and drop it onto the trash icon as shown above. The card icon will
disappear from the desktop. A dialog box similar to the one below will appear. It is now
safe to remove the card. To remove a card, grasp the end of the card with your
thumb and index fingers, and remove the card from the slot.
WARNING: Do not remove a mounted card without first dragging the card icon to the trash. You
may risk the chance of corrupting data stored on your card if removed improperly. If removed
improperly, a warning message may appear on the screen - warning you that the media was not
properly ejected.
USER'S
MANUAL
USER'S
MANUAL
32
1.
2.
Drag the card icon to the trash.
The card icon will disappear and
a dialog box similar to the one
below will appear.
Page 33
USER'S
MANUAL
USER'S
MANUAL
33
Inserting and Accessing a Card (PC)
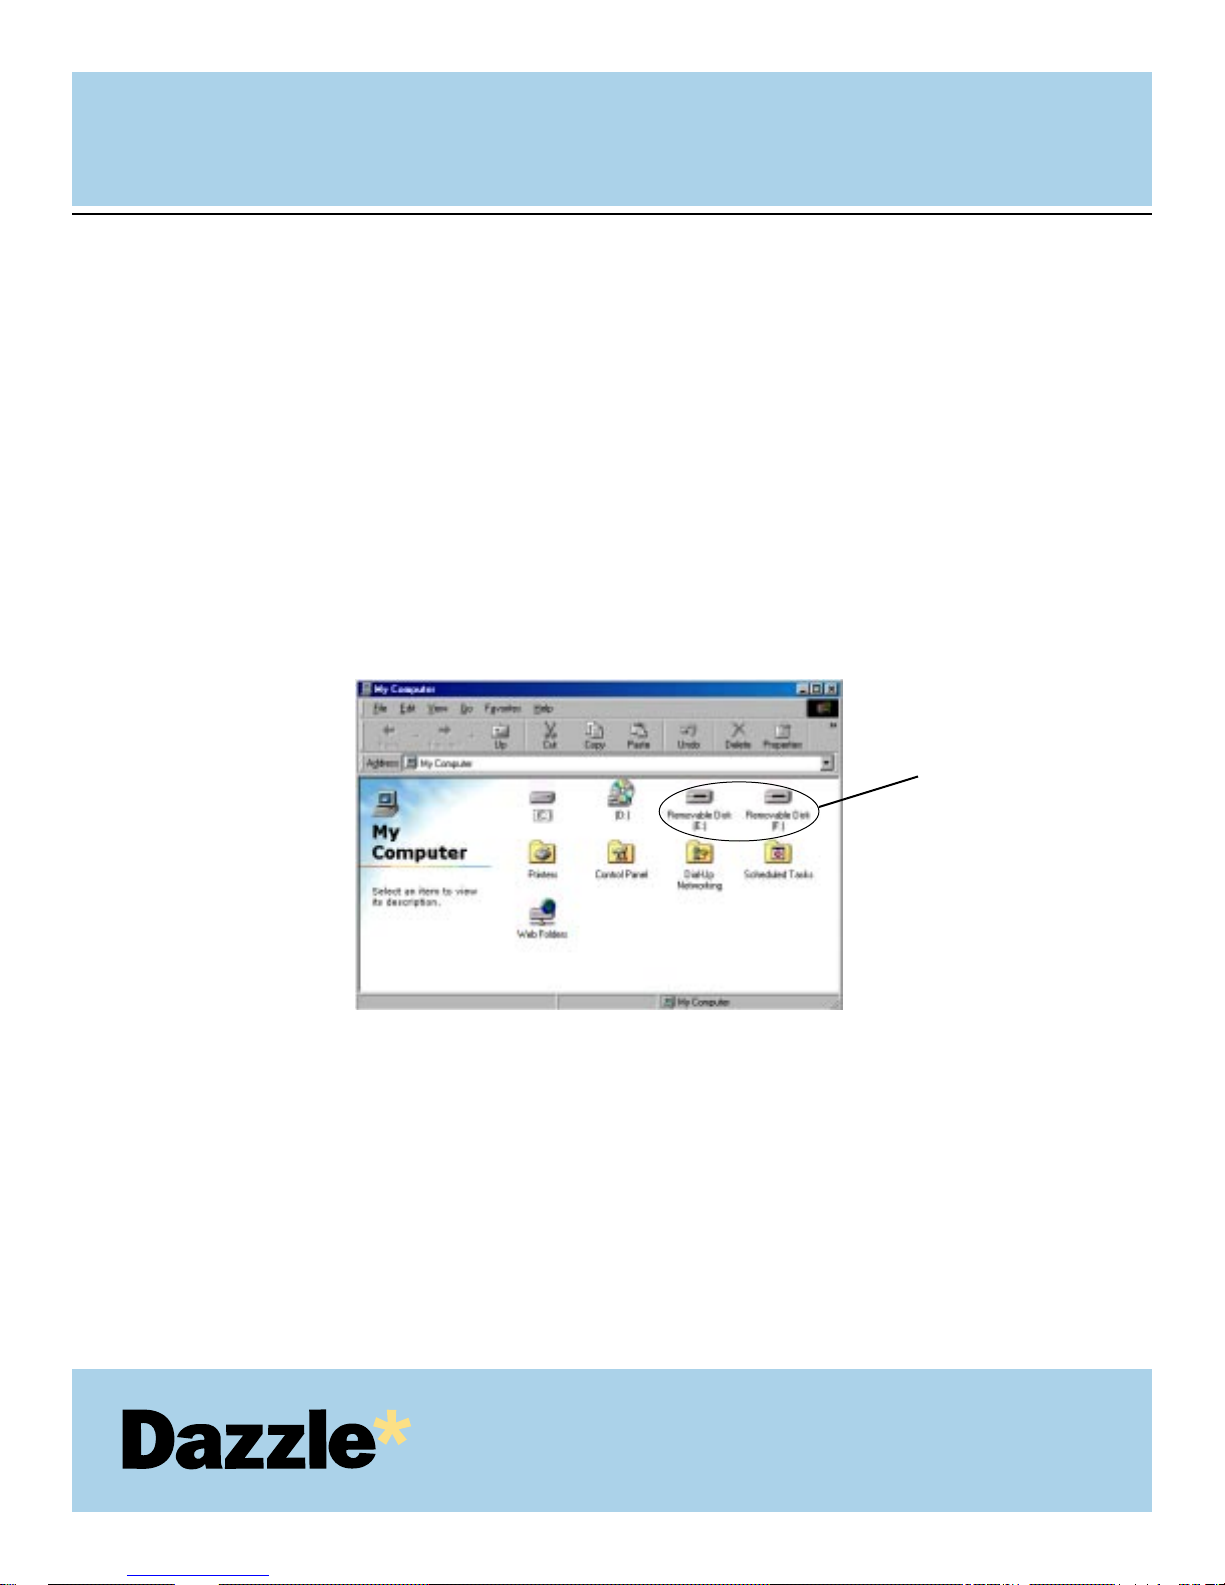
With a PC compatible computer running Windows (98SE, 200 0, Me, or XP), t wo "Removable
Disk" icons with newly assigned driver letters (see illustration below) will appear in "My
Computer". In general, the first "Removable Disk" icon will be assigned to the upper or
CompactFlash slot. The second "Removable Disk" icon will be assigned to the lower or
SmartMedia, Secure Digital, MultiMediaCard, and Memor y Stick slot. This lower slot is
designed to accept any of the four supported media types listed above. Only one of the four
supported media types may be inserted at one time.
To access your digital media, double-click on the media’s respective “Removable Disk” icon. If
media is not inserted while double-clicking the icon, the message "Device not ready" or "Please
insert a disk" will appear. Insert a card and tr y accessing the media again. Once you have
opened the drive, the contents of the media card will be displayed. This is how you will access
your images or data stored on your media.
NOTE: Digital cameras will usually create a folder on the digital media card, which contains your
digital images. To access the digital images, you must first open the folder(s) and double-click
on the icon(s) representing the digital image(s) you wish to view.
IMPORTANT: The lower media slot of the Dazzle 6 in 1 Reader is designed to accept one of
four supported media types at one given time. In the course of usage, you may insert either
SmartMedia, Secure Digital, MultiMediaCard, or Memor y Stick media into the lower slot of the
Dazzle 6 In 1 Reader at any one time. However, it is possible to use both the CompactFlash slot
and one of the four media types supported for use in the lower media slot concurrently.
Dazzle 6 In1 Reader
“Removable Disk” icons.
Page 34
Formatting Cards (PC)
There may be instances where you may wish to format a card in the Dazzle card reader rather than
in your original digital device or when the format option is not present. There may also be times
when you may be required or prompted to format your card. As such, please read the information
in this section for information on formatting cards.
WARNING: Formatting a CompactFlash, SmartMedia, MultiMediaCard , Secure Digital, or Memory
Stick card will completely erase all data currently stored on the card. If there are
important images or files you wish to safeguard for later use, make a backup copy on your
hard drive, CDR drive, or other type of removable media.
Formatting CompactFlash, MultiMediaCard, Secure Digital, SmartMedia, or Memory Stick
cards:
NOTE: If you have not installed the drivers for your Dazzle 6 In 1 Reader or if driver
installation is not required; you may format the media using the standard Windows
operating system format option only.
Windows Me and Windows XP
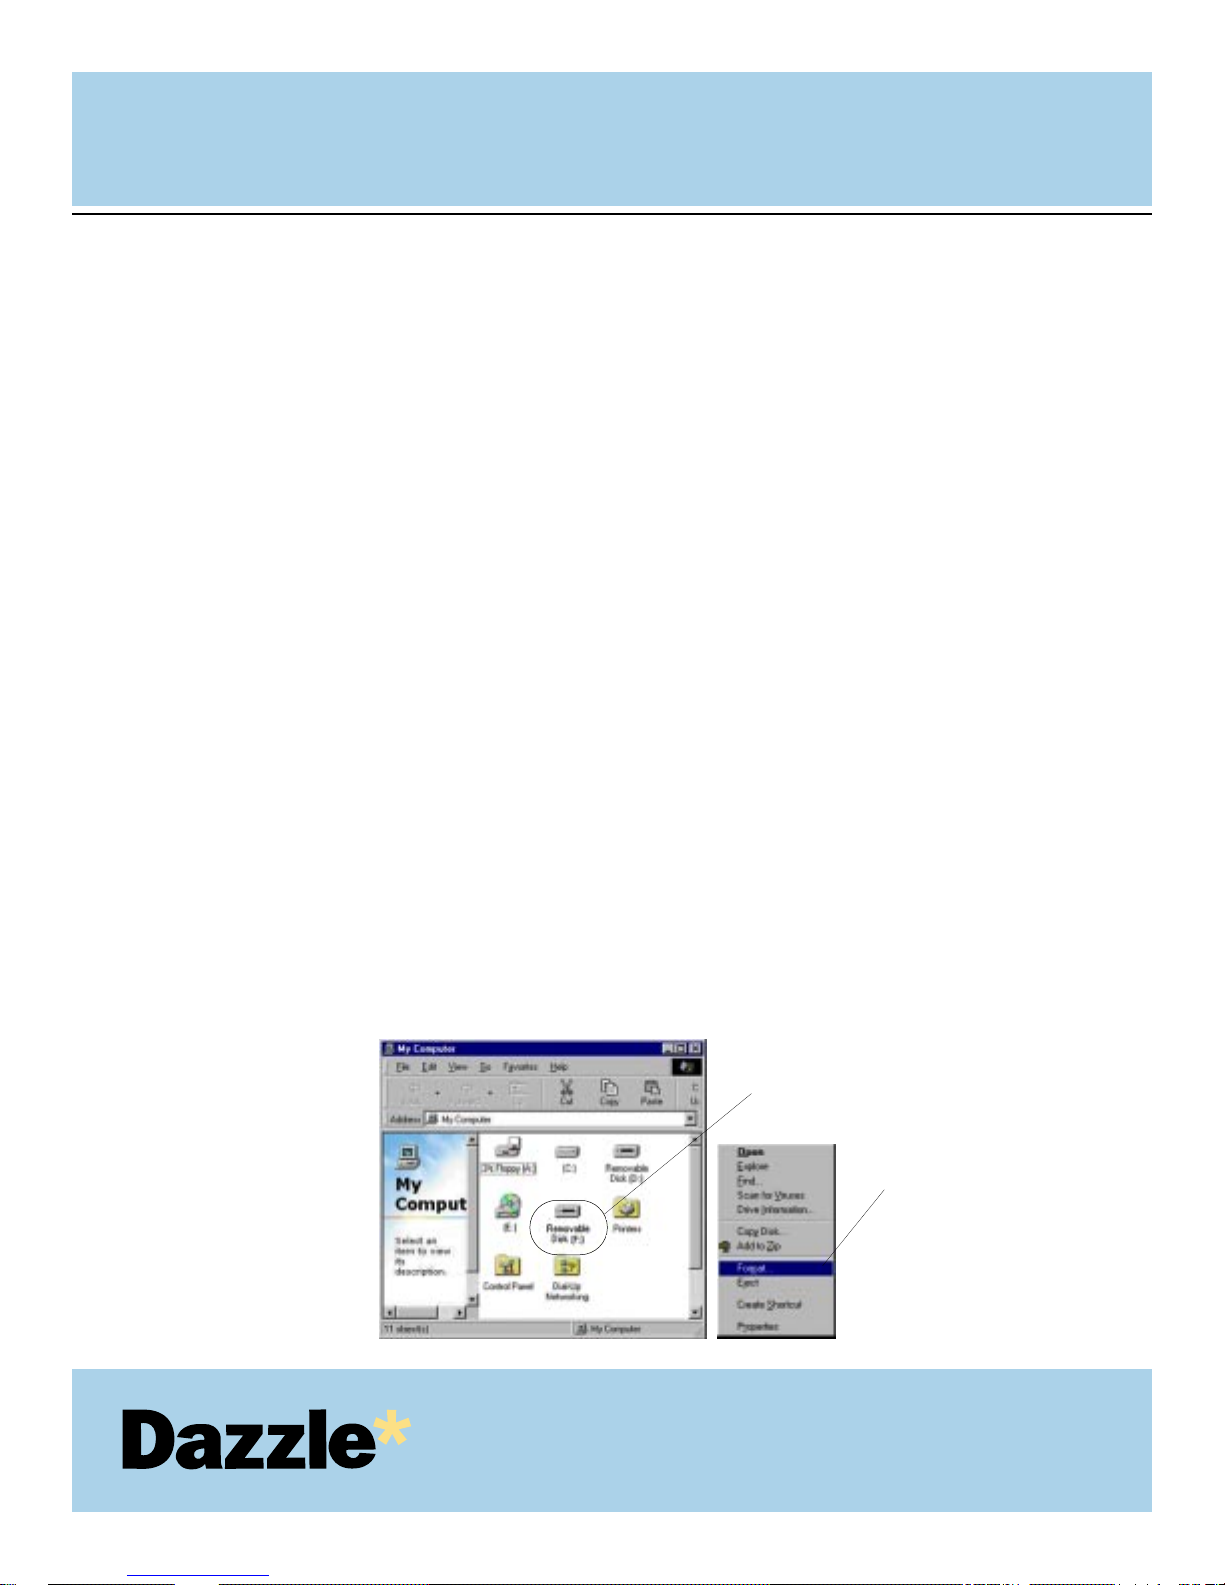
Open “My Computer” or “Windows Explorer”.
Right-click the “Removable Disk” icon (drive letter will also be assigned) that pert ains to
your media type and select “Format” from the pop-up window.
USER'S
MANUAL
USER'S
MANUAL
34
Dazzle 6 In 1 Reader
“Removable Disk” icons
Select “Format”
from the pop-up menu
1.
2.
Page 35
USER'S
MANUAL
USER'S
MANUAL
35
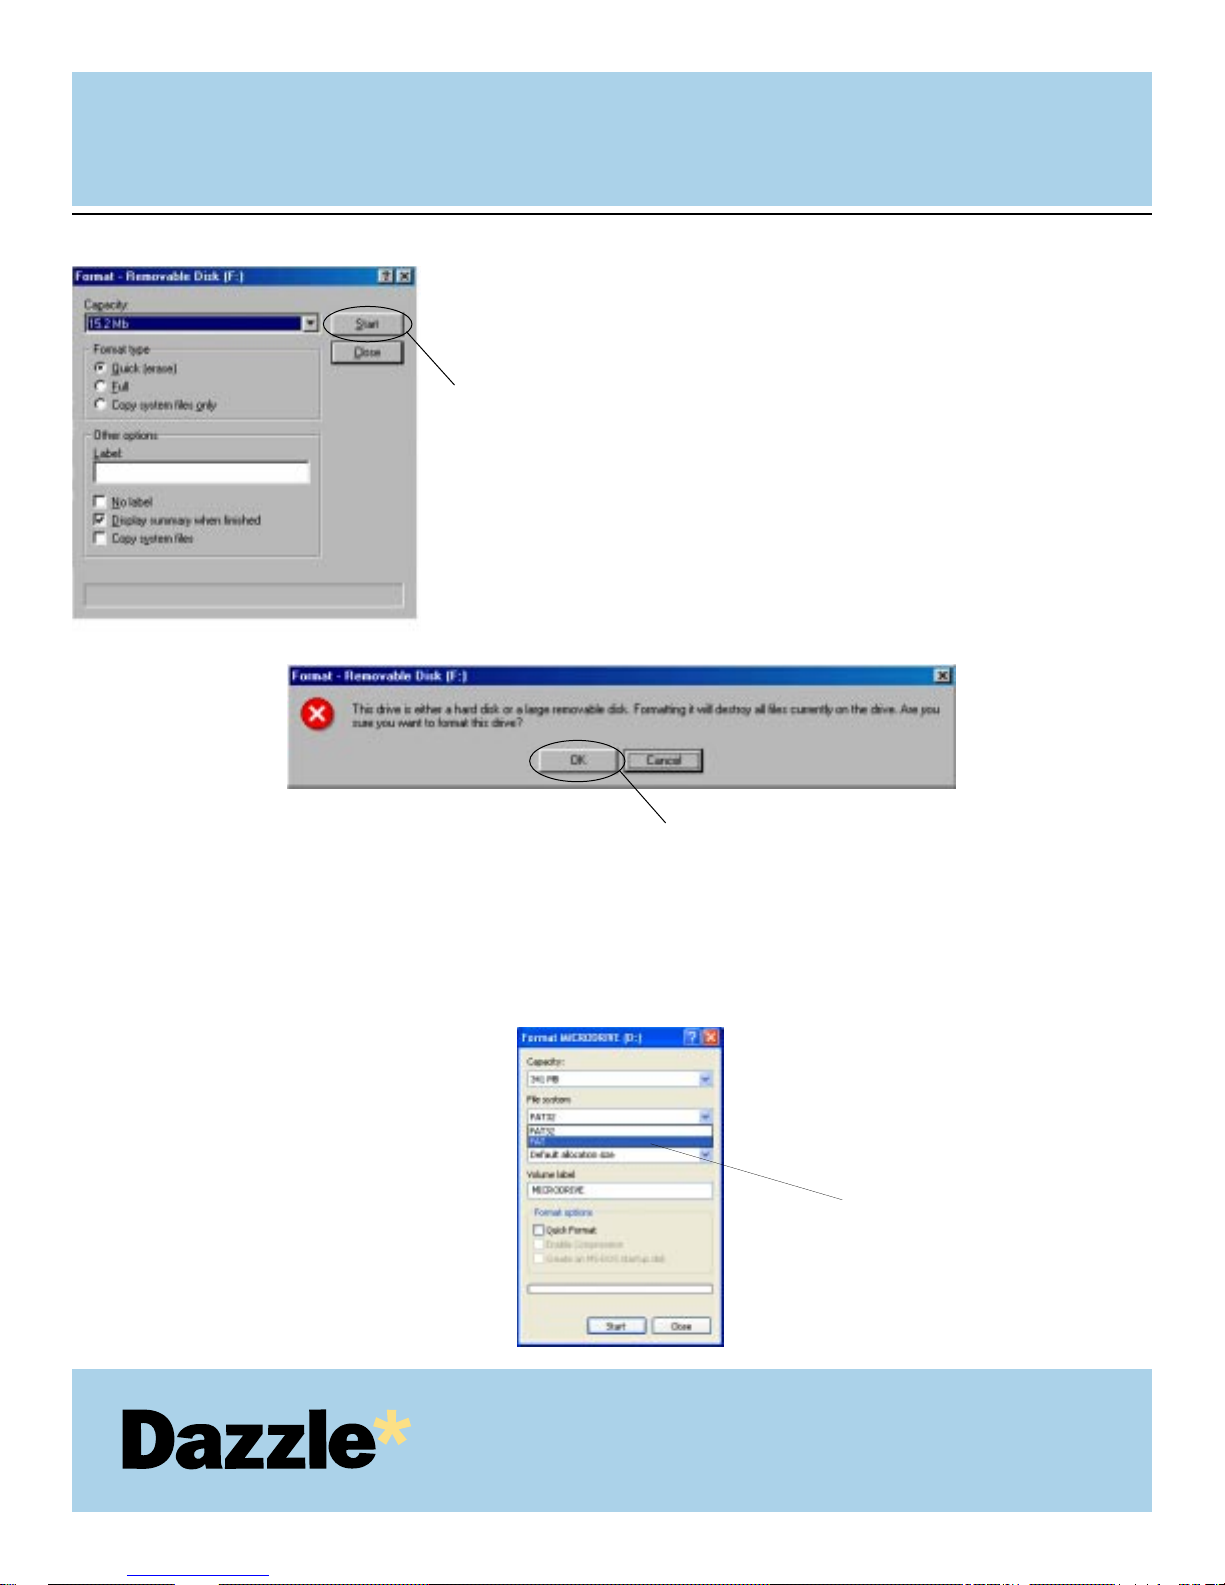
Select your format type (Full or Quick)
and click “Start” to begin.
A dialog box similar to the example
shown below will appear warning
that you are about to erase everything
on the media.
Click“OK” to proceed.
IMPORTANT NOTE: When formatting your digital media on Windows XP using the
Dazzle 6 In 1 Reader, select “FAT” from the “File System” drop-down menu. This will
ensure that your media has been properly formatted for use in digital cameras as well as
other digital devices requiring the “FAT” file system.
3.
4.
5.
Click “Start”
Click “OK”
Select “FAT” from the “File System”
drop-down menu.
Page 36
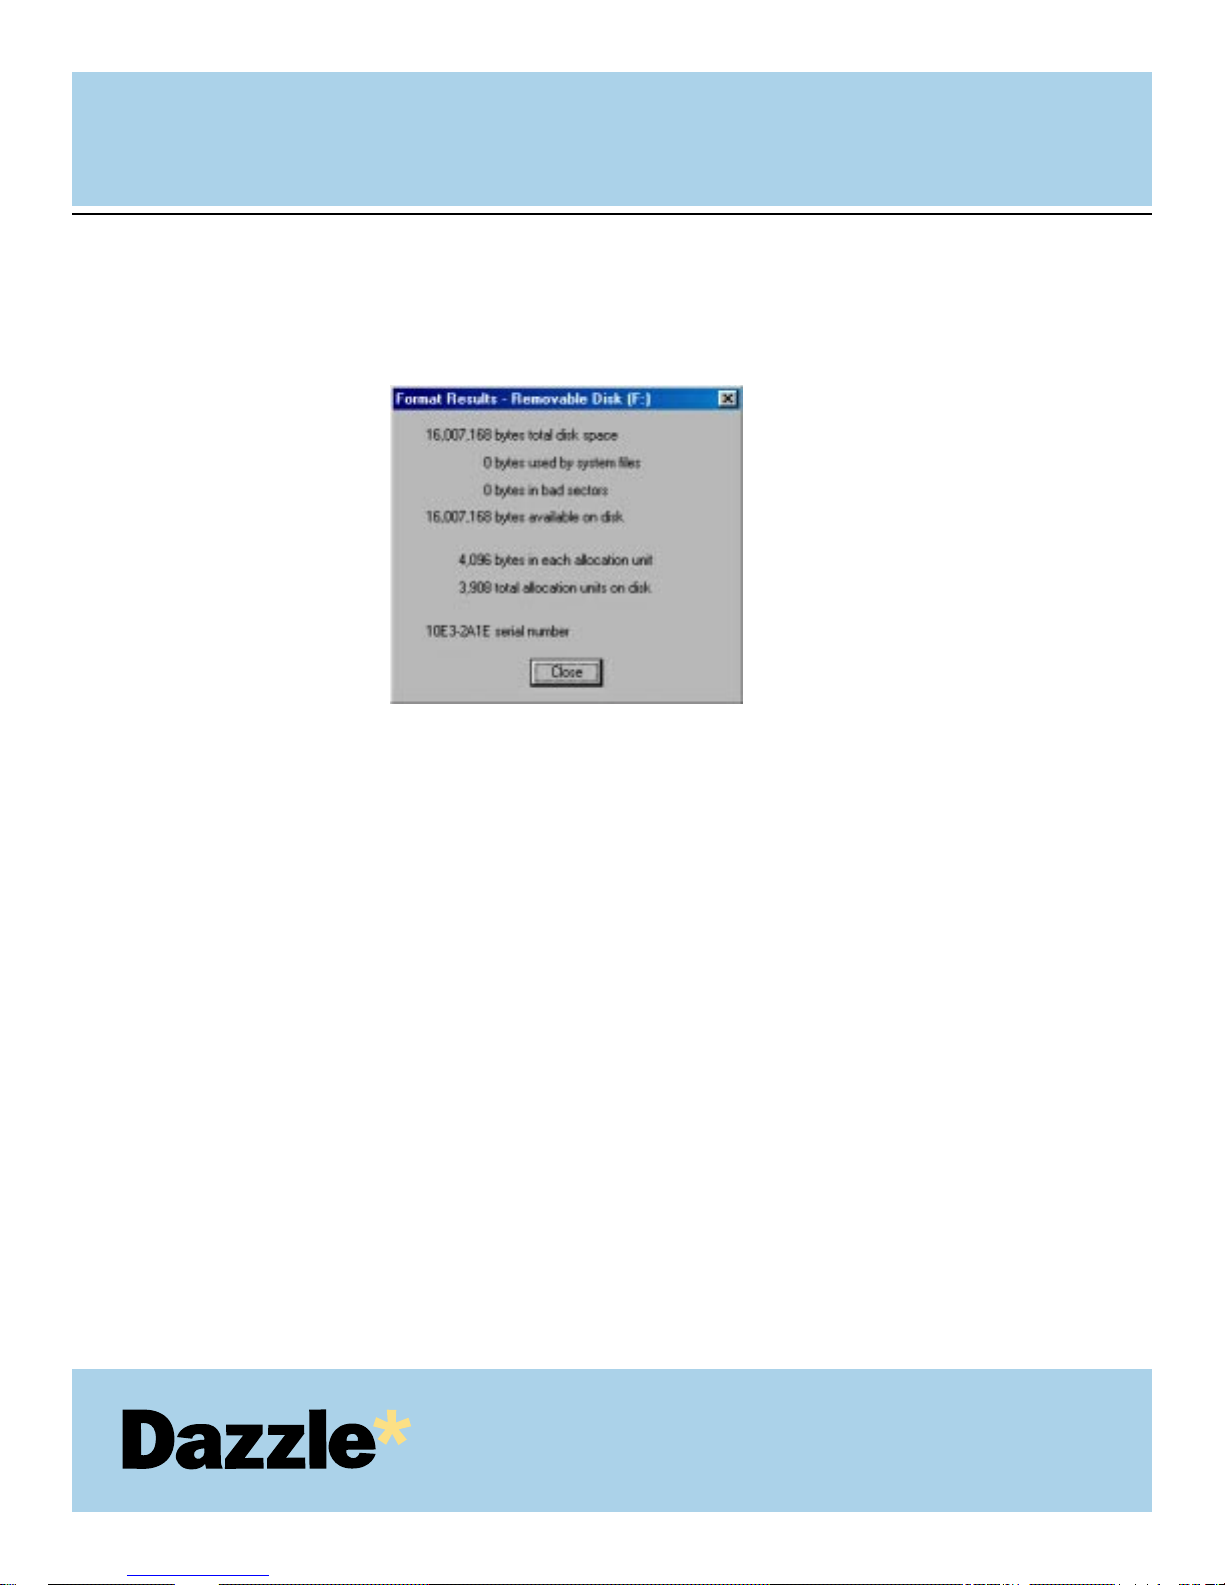
Click "Close". Format is now complete.
NOTE: Formatting your media using the standard Windows format option conforms only
to W indows operating system specifications.
USER'S
MANUAL
USER'S
MANUAL
36
6.
Page 37
Windows 98SE and Windows 2000
Click on the “Start” button located in the lower left hand corner of your desktop and
select “Programs” from the pop-up menu.
This will display a list of the programs installed on your computer. From the list of
programs select “6 In 1 Reader”.
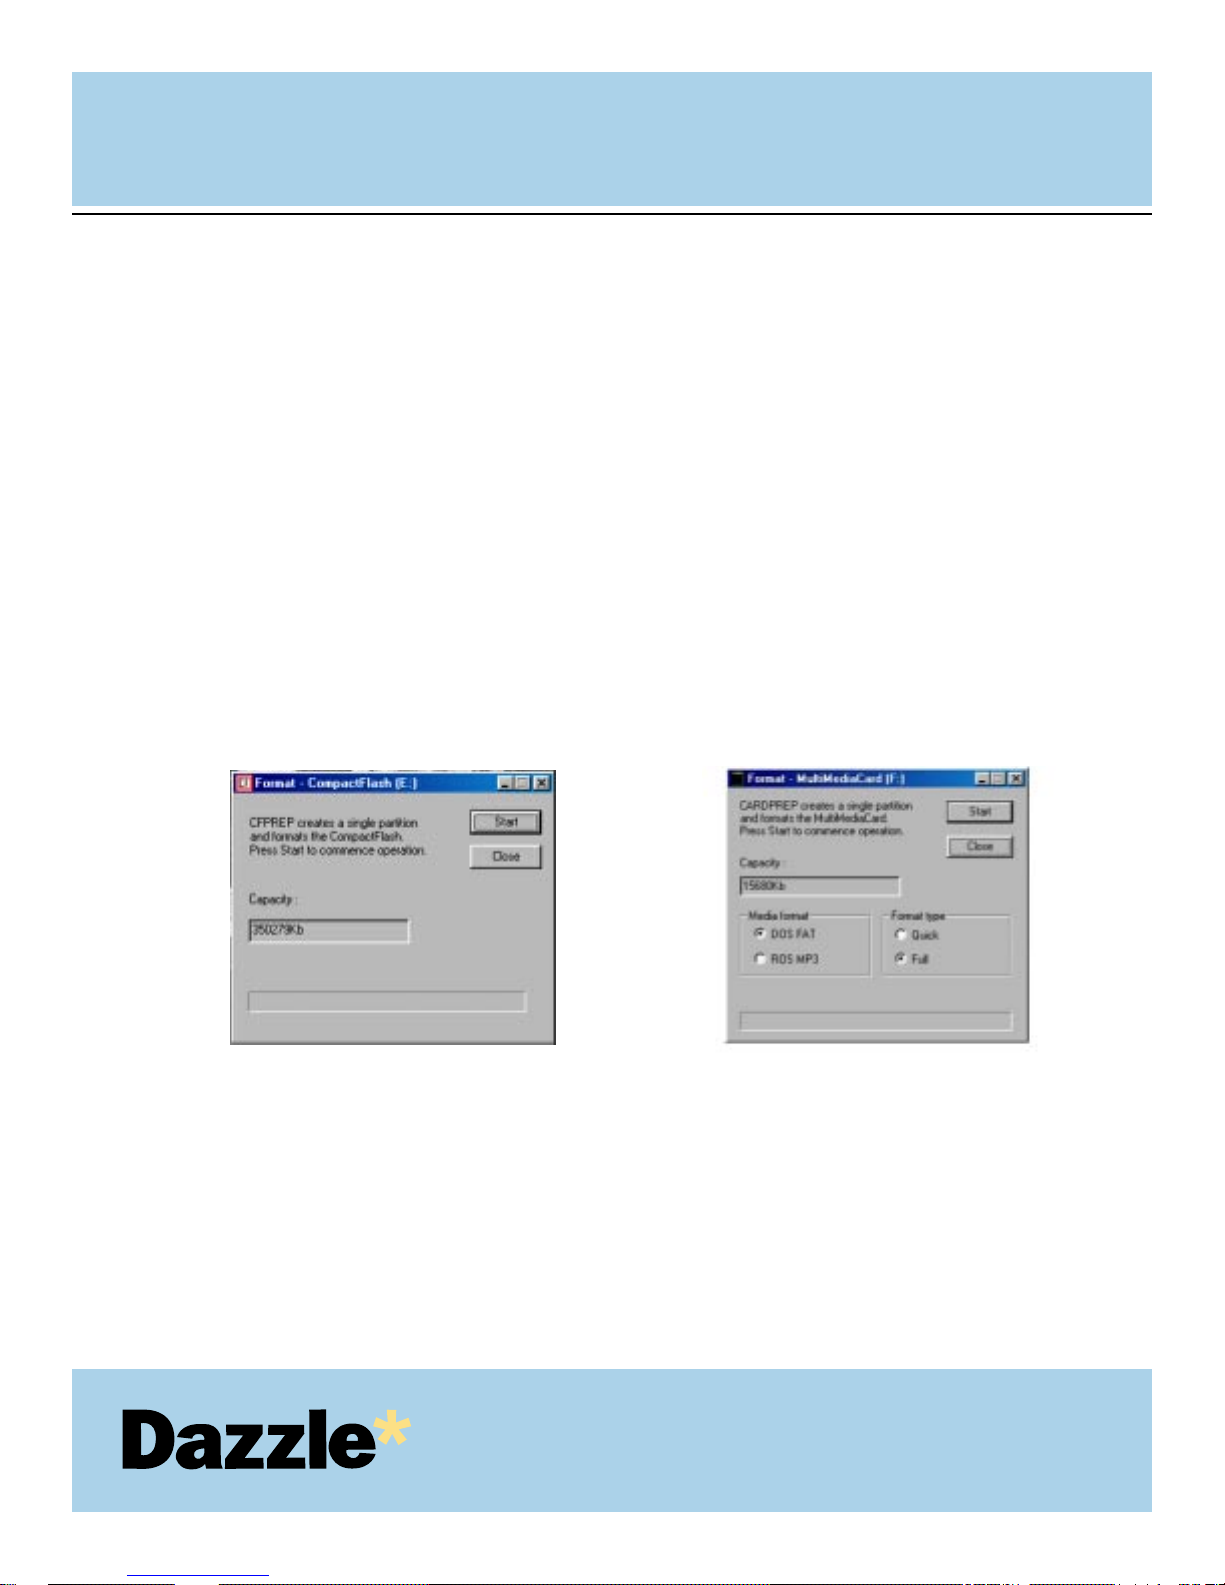
Once you have selected the “6 In 1 Reader”, you will notice there is a media prep
utility for each supported media type (i.e. CFPREP for CompactFlash, SMPREP
SmartMedia, CARDPREP for MultiMediaCard and Secure Digital, and MSPREP for
Memory Stick). Select the media prep utility that pertains to your media type. You will see
a message similar to one of the examples shown below.
USER'S
MANUAL
USER'S
MANUAL
37
CompactFlash format screen:
The CFPREP utility will create a single formatted
partition on your CompactFlash card - no other
formatting options are available.
MultiMediaCard/Secure Digital
format screen:
The CARDPREP utility for your MultiMediaCard or
Secure Digital cards, provides two format options.
In general, select the “DOS FAT” option to format
your card. However, in some instances owners of
MP3 players may be required to format a card in
“ROS MP3” format. Consult the manufacturer of
your MP3 device to find out if it uses this file
format.
3.
1.
2.
Page 38
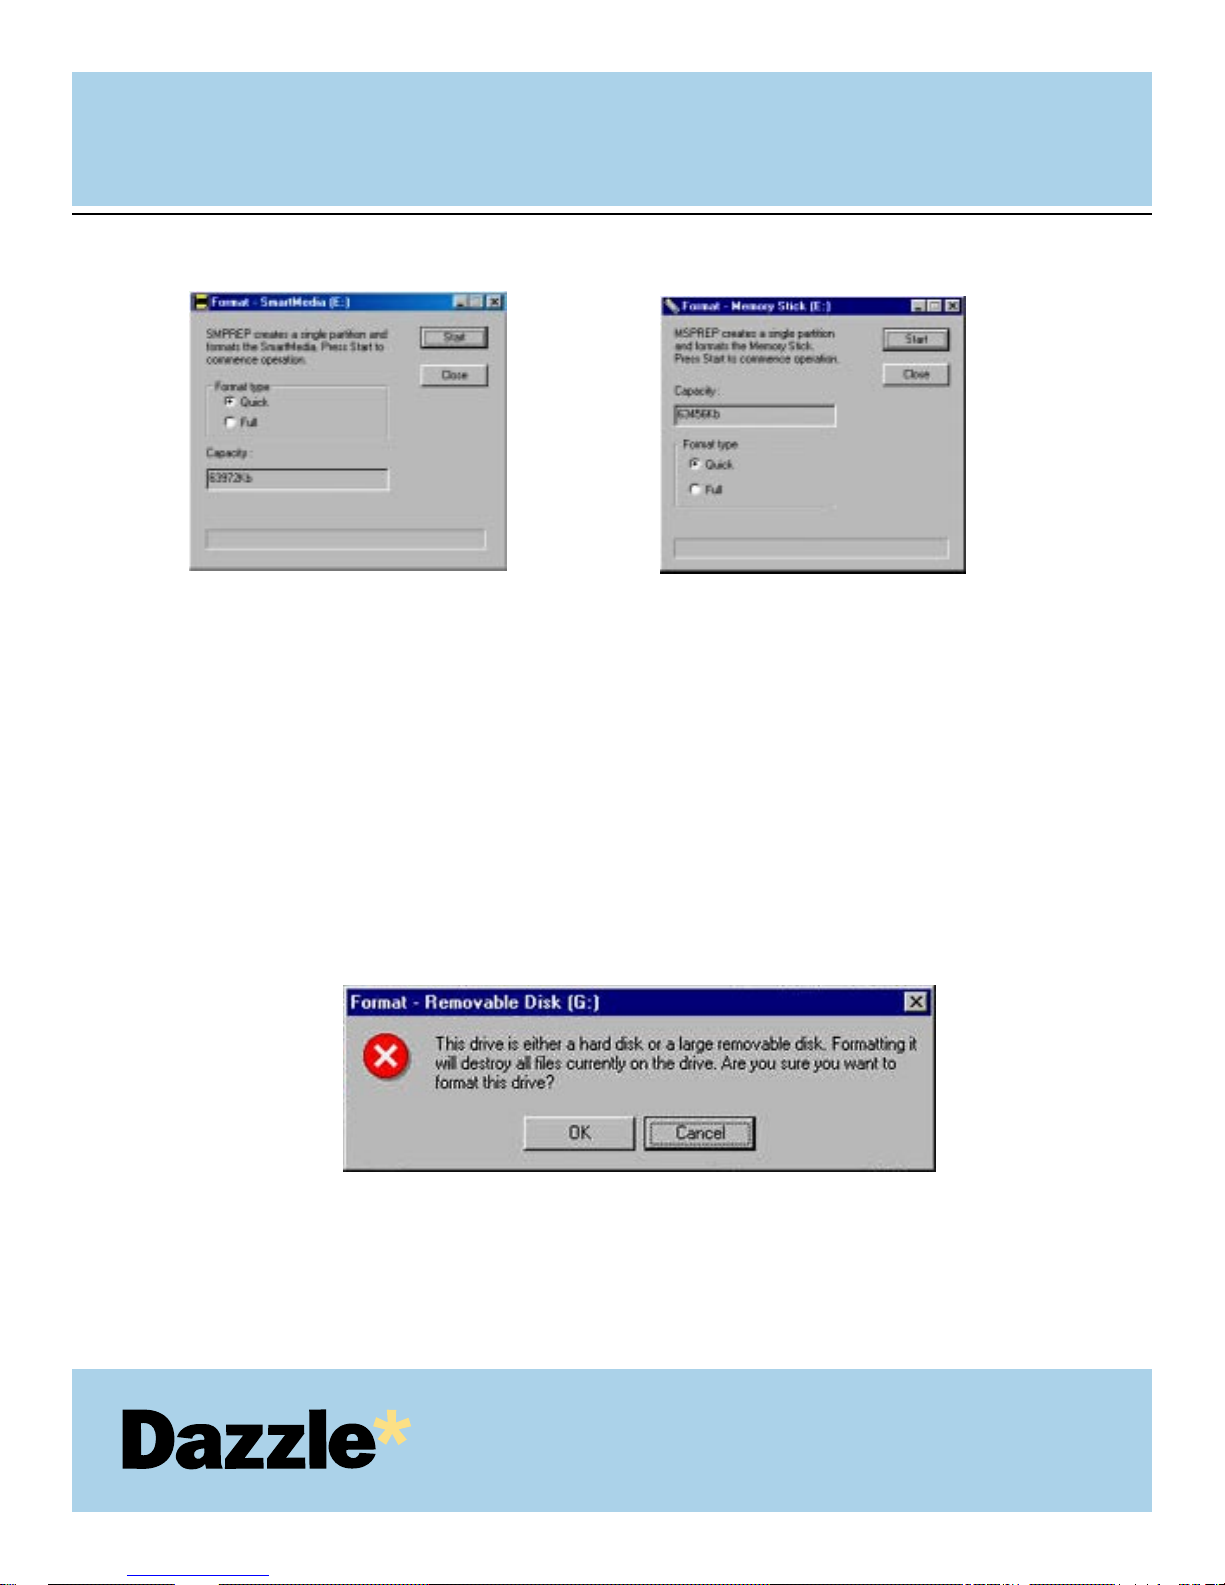
Click “Start”. A dialog box similar to the example shown below will appear warning that
you are about to erase everything on the media.
Click“Yes” to proceed. This will format the media, bringing up a format status screen
until the format completion.
USER'S
MANUAL
USER'S
MANUAL
38
SmartMedia format screen:
The SMPREP utility provides two format options
for your SmartMedia card. The “Quick” format
option is selected by default, and recommended
for general use to erase data on your
SmartMedia card. If you experience problems
with your SmartMedia, you may wish to select
the “Full” format option to completely erase and
scan your SmartMedia card for any bad data
blocks.
Memory Stick format screen:
The MSPREP utility provides two format
options for your Memory Stick card. The
“Quick” format option is selected by default,
and recommended for general use to erase
data on your Memory Stick, if you experience
problems with your Memory Stick you may
wish to select the “Full” format option to
completely erase and scan your Memory Stick
for bad data blocks.
4.
5.
Page 39
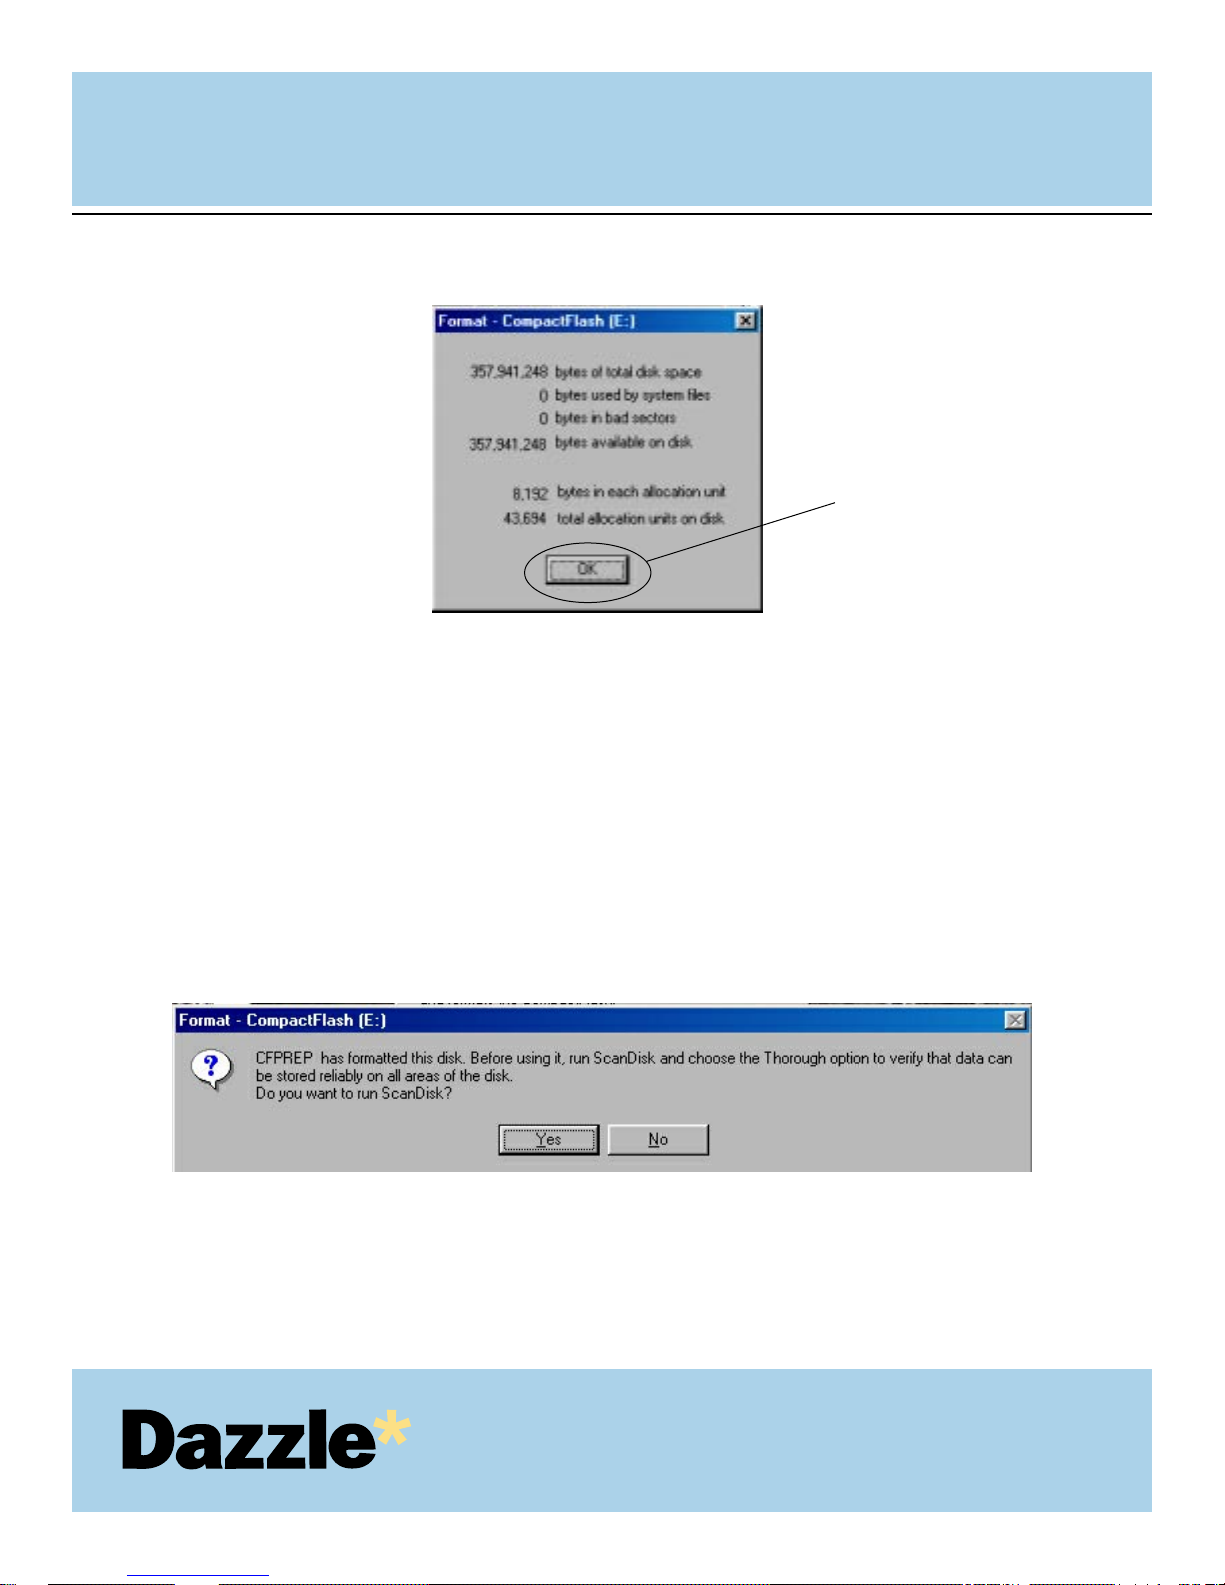
Click “OK”. Formatting is now complete.
Finally, click “Close” on the format screen to exit the formatting utility.
USER'S
MANUAL
USER'S
MANUAL
39
6.
Click "OK" to
finish the format.
IMPORTANT NOTE:
After formatting MultiMediaCard, Secure Digital, Memory Stick, and CompactFlash cards in
Windows 98SE, a dialog box (similar to the one below) will appear recommending that you run
the “ScanDisk” Utility. If you are experiencing problems with your card you may wish to click
"Ye s " to verify that data can be stored reliably on all areas of your card. However in day-to-day
use clicking "No" will suffice. In Windows 2000, upon format completion, it will be suggested
that you run the “Check Disk” Utility to verify that data can be stored reliably. As in Windows
98SE, if you are experiencing difficulties with your media, running the utility is recommended. If
you are not experiencing difficulties, it will not be necessary to run the utility.
7.
Page 40

USER'S
MANUAL
USER'S
MANUAL
40
Removing a card (PC)
Make sure that the "Access" indicator is not flashing. The access indicator will flash when
data is being read or written on the card. Wait until the operations are complete and the
access indicator is no longer flashing before attempting to remove the card. Removing a
card during access operations will cause the data to be lost or corrupted.
To remove a card, grasp the end of the card with your thumb and index fingers, and
remove the card from the slot.
2.
1.
Page 41

5
Introduction
Definitions
Getting Started
Menu Items Reference
Troubleshooting
Upgrade Information
USER'S
MANUAL
USER'S
MANUAL
Dazzle OnDVD
Software for PC Compatible
Computers
41
Page 42

USER'S
MANUAL
USER'S
MANUAL
Dazzle OnDVD Software
INTRODUCTION
Dazzle OnDVD is easy-to-use software that lets you take your digital pictures and turn them into a
slideshow you can record to a CD for playback on your DVD player. Simply select the pictures you
want to put into your slideshow (maximum 50 0 pictures per CD), arrange them on the timeline and
record the slideshow to a CD with your CD-Recorder.
OnDVD records two copies of your pictures to the CD disc. The first session is a slideshow in the
VideoCD (VCD) format, which can be played back in a DVD player (or VCD player), connected to your
TV. The second session is a backup copy of all your high qualit y pictures, which can be read back from
your PC's CD-ROM or DVD-ROM drive. If you put the CD into a DVD Player, the slideshow will automatically play. If you put the CD into your PC, you can automatically look at the archived pictures.
DEFINITIONS
CD-R Discs (CD-Recordable) - On this media type, you can write data to a CD but you cannot erase it
once you have written it. Not all DVD players can read CD-R discs. If your DVD player does not read
CD-R discs, try recording your slideshow on a CD-RW disc. Check your DVD player owner ’s manual
to see if your player reads CD-R discs.
CD-R
W Discs - On this type of media, you can write, erase and re-write data many times. All DVD
Players should be able to read CD-RW media.
CD-R
ecorder - A PC peripheral which records information from a computer onto a CD-R or CD-RW
disc.
D
VD - Digital Video Disk. DVD is the latest format for high quality video. DVD is an extremely versatile
and high quality format and is used extensively for distributing movies. DVDs can be played back in
DVD players connected to a TV or also in DVD-ROM drives on a computer using DVD player soft ware.
D
VD Player - A consumer electronics device which can be connected to a TV to play back DVDs. Most
DVD Players can also play back VideoCDs.
42
Page 43

USER'S
MANUAL
USER'S
MANUAL
DEFINITIONS (continued)
JPG - Also known as 'JPEG', this file format is used by the vast majority of digit al cameras and applications for digital photographs. JPG is the predominant file format for digital picture files on the
Internet.
V
CD -VideoCD. VideoCD is a special CD format normally used for video but which can also be used
for photos. VCDs can be played in all VCD Players and almost all DVD players connected to a TV.
V
CD Player - A consumer electronics device which can be connected to a TV to play back VideoCDs.
VideoCD Players are popular in Asia but seldom found elsewhere.
GETTING STARTED
System Requirements-
Operating Systems- Windows® 98
Windows® 2000
Windows® NT
Windows® ME
Windows® XP
CPU- Pentium® II 300 MHz or higher
AMD K6® III 400 MHz or higher
RAM- 32 MB required
64 MB recommended
Available Disk Space
32 MB for Application Installation
Up to 1 GB available for workspace
Other necessary hardware:
Digital Camera
Flash Memory Card Reader
CD-R or CD-RW Recorder
DVD Player, VCD Player, CD-ROM or DVD-ROM Drive
43
Page 44

USER'S
MANUAL
USER'S
MANUAL
Tutorial - How to use Dazzle OnDVD 1.5
Creating VCD slideshows
Step 1 - Locate your digital pictures
The pictures may be in a directory on your computer or in the digital camera. In most cases, your
digital camera loads pictures onto a flash memory card. Access these pictures easily by removing the
card from the camera and inserting it into a flash memory card reader. You can view the contents of
the card reader in W indows Explorer.
Step 2 - Launch Dazzle OnDVD
- Click the 'Start' Button, then select 'Programs' and then 'OnDVD'
Step 3 - Load your digital pictures
- Click on the 'Add Directory' button to add all the files in a folder or click 'Add Image' to add
one image at a time
- Navigate to the directory which contains the pictures you wish to import
- Select that director y or image and click 'OK'
A dialog box will appear to inform you of how many images were added.
- Click 'OK'
Your pictures will be added to the Picture List in the left pane of the software and a thumbnail
image of the pictures will be displayed on the timeline bar in the bottom pane in the order in
which they will appear in the slide show.
Step 4 - Select images to view
Click on the filename in the Picture List to display that picture in the Picture Preview window.
44
Page 45

USER'S
MANUAL
USER'S
MANUAL
Tutorial (cont.)
Step 5 - Remove unwanted pictures
- Click on the picture that you wish to remove from your slideshow
- Click the 'Remove' button or press the 'Delete' key to remove the selected picture
- Click the 'Remove All' button to remove all the pictures from your slideshow.
The selected pictures will be removed from the Picture List and the Timeline but will not be deleted
from your computer.
Step 6 - Preview your slideshow
Before you record the CD, make sure you are happy with the slideshow by previewing it.
- Click the 'Preview' button in the toolbar to view the slideshow
- The slideshow will return to the main screen when the preview is complete
- Press the 'Esc' key to cancel the preview at any time
Note: Each picture in the slideshow will stay on the screen for 3 seconds before moving to the next
picture. If you wish to increase the amount of time that a certain picture will be displayed, click the
right mouse button on the name of the picture in the image list and go to 'Display Time'. After you
have changed the display time, click 'OK'.
Step 7 - Write the CD
Now that you have the slideshow ready, you can create the CD.
- Insert a blank CD-R or CD-RW disc into the CD-Recorder
- Click the 'Write VCD' button on the toolbar
Step 8 - Play your CD in a VCD or DVD player
Insert the CD into a VCD or DVD player, and you will be able to view your slideshow on a television
screen. The slideshow plays in an auto-repeat loop. When you are finished viewing the slideshow, just
press the 'Stop' button on the DVD player and eject the disk.
45
Page 46

USER'S
MANUAL
USER'S
MANUAL
Tutorial (cont.)
Step 9- See the original picture files on the CD
- Insert the CD into the CD-ROM or DVD-ROM drive on your PC.
• The viewer application should automatically open
• If the viewer window does not automatically launch, open Windows Explorer.
• Navigate to the drive letter of the CD-ROM or DVD-ROM drive
• Launch the application on the CD named 'Viewer.exe'
• The OnDVD Viewer application will be launched.
- In the OnDVD Viewer window, select the CD-ROM or DVD-ROM drive from the drop-down
list all of the original high-resolution pictures are stored on this disc. In addition to creating a
slideshow disc, you have created an archive of the original pictures on the CD.
Webcasting
- Follow steps 1-7 above to create your slideshow
- Click the 'WebCast' button and then click 'Next'. OnDVD will create a video slideshow to
send to the web. Click 'Next' again and type in your Dazzle WebCast Theater username and
password. Then click 'Login' If you have never used WebCast Theater before, click
'Register' and fill out the appropriate information. Once you are finished, anyone can view
your files by going to the Dazzle Webcast Theater website by first visiting www.Dazzle.com
and selecting “Webcast”, then “Webcast Theater”.
46
Page 47

USER'S
MANUAL
USER'S
MANUAL
MENU ITEMS REFERENCE
File/Exit - Closes the Dazzle OnDVD application
Video CD/Add Picture - Adds a specific picture to the timeline
Video CD/Add Directory - Adds an entire directory of pictures to the timeline
Video CD/Remove Picture - Removes a selected picture from the timeline
Video CD/Remove All - Removes all pictures in the Picture List from the timeline
Video CD/Write VCD - Creates a Video CD from your slideshow
View/Picture List - Toggles the view of the Picture List window pane
View/Timeline - Toggles the view of the Timeline window pane
View/Options - Opens the Video Standard Options. Most TV's in North America and Asia are NTSC.
Most in Europe are PAL.
Help/About - Gives version information for Dazzle OnDVD
Help/Help Topics - Launches the help file
47
Page 48

USER'S
MANUAL
USER'S
MANUAL
TROUBLESHOOTING
My slideshow won't play on my DVD player.
a) Check the Owner's Manual of your DVD player to see if it can read VCDs (VideoCDs). If
it can, go on to step b. If it cannot, you will not be able to view your slideshow on this
DVD player.
b) If you recorded the slideshow onto a CD-R disc, check the Owner's Manual of your
DVD player to see if your DVD player can read CD-R discs. If it can read a CD-R disc but
it will not play the slideshow, you probably have a damaged CD-R disc. Re-record it and
try again. If your DVD player cannot read CD-R discs, re-record your slideshow to a CDRW disc and try to play it again.
c) If you recorded the slideshow onto a CD-RW disc and it will still not play, check the
bottom of the CD-RW disc for fingerprints or scratches. Re-record to a new CD-RW disc
if necessary.
d) If you are unable to find information in your DVD player Owners Manual, you can often
find the information on the Internet. Check the DVD player's manufacturer website. You
can also visit www.vcdhelp.com for information on many different DVD players.
I can't read the archived files from the CD on my PC.
a) You must use the included file viewer program to read the CD from your PC.
b) If the viewer program did not automatically launch when you inserted the CD, remove
the CD and re-insert it.
c) If the viewer program still did not launch, click on the 'Viewer.exe' file on the CD.
d) If the viewer launched and no files are visible, re-record the CD and try again.
1.
2.
48
Page 49

USER'S
MANUAL
USER'S
MANUAL
TROUBLESHOOTING (continued)
I can't record to my CD-Recorder. Does OnDVD support my CD-Recorder?
a) OnDVD supports almost all commercially available CD-Recorders and new recorders are
constantly being added. If you cannot record to your CD-Recorder, check the Dazzle
website for software upgrades.
b) If you downloaded all upgrades and you can still not record to your CD-Recorder, call
technical support to check on when support for your CD-Recorder will be added.
c) Make sure the CD is blank. OnDVD requires that the destination CD be blank.
For the most up to date support information, please refer to:
http://www.Dazzle.com/support/trouble.html
UPGRADE INFORMATION
For OnDVD upgrade information, please go to www.Dazzle.com.
3.
49
Page 50

6
Common TroubleShooting Questions
and Answers
USER'S
MANUAL
USER'S
MANUAL
Troubleshooting
your Dazzle 6 In 1 Reader
50
Page 51

USER'S
MANUAL
USER'S
MANUAL
51
Troubleshooting your Dazzle 6 In 1 Reader
Installation and use of the Dazzle 6 In 1 Reader is relatively easy and normally should not produce
complications. However, if you are experiencing difficulties with your card reader, please refer to the
following troubleshooting guide for a possible solution. Additional tips and solutions as well as product information can be found on the Dazzle interactive support website: www.Dazzle.com/support.
If the problems persist after trying the solutions provided below and on our web site, please cont act
our Technical Support Department.
I have connected my Dazzle 6 In 1 Reader to my computer’s USB port and was
unable to find the appropriate drivers during installation.
PC Compatible:
Prior to connecting the Dazzle 6 In 1 Reader to your computer ’s USB port, you must first
install the card reader driver software (if required). The Dazzle 6 In 1 Reader does not
require driver installation on W indows Me or W indows XP. Driver inst allation is required
on W indows 98SE and 2000. The software for Windows 98SE and Windows 200 0 is
located on the accompanying installation CD-ROM. Please refer to the section of the
User’s Manual titled "Inst alling the Driver Software" for inst allation instructions.
Macintosh:
Prior to connecting the Dazzle 6 In 1 Reader to your computer ’s USB port, you must first
install the Dazzle 6 In 1 Reader driver soft ware. Driver installation is required. The soft ware
for Mac OS 9.x is located on the accompanying installation CD-ROM. Please refer to the
section of the User’s Manual titled "Inst alling the Driver Software" for inst allation
instructions.
1.
Page 52

USER'S
MANUAL
USER'S
MANUAL
52
I have installed the Dazzle 6 In 1 Reader drivers (where necessary) and have the card
reader plugged into my USB port, but when I insert my digital media card nothing
happens.
PC Compatible:
The Dazzle 6 in 1 Reader is a digital card reader/writer that is accessed as a removable
disk. In order to access the digital images or data stored on your media card, you must
access the card reader through it’s "Removable Disk" icons. This can be done by first
opening "My Computer". Here you will see two "Removable Disk" icons (drive letters will
also be assigned) representing your Dazzle card reader. Now double-click on the
respective "Removable Disk" icon to display the contents of the media inserted in your
card reader. This is where your digital images or data will be located.
Digital cameras will usually create a folder on the digital media card, which will contain
your digital images. Depending on the digital camera you have, the folder names will var y.
Double-click on the respective folder name to access the digital images cont ained within.
You can create a preview by double-clicking on one of the image icons.
Macintosh:
Once a card is inserted on a Macintosh, a distinct icon will appear on the Mac OS desktop.
This is the "mounted" state which enables read and write operations for the media.
Opening the media icon will allow you access to the images stored on your respective
media card. Depending on the media used, the time it takes a media card to mount
may vary.
2.
Page 53

USER'S
MANUAL
USER'S
MANUAL
53
I have inserted my media card into my Dazzle card reader, but I am unable to access
my data.What do I do?
If you are using a SmartMedia card, make sure that you have inserted the SmartMedia card
into the Dazzle card reader with the gold contacts facing down. For more information
regarding inserting your SmartMedia, please refer to the section titled "Inserting a
SmartMedia Card" in the User’s Manual.
If you are using a MultiMediaCard or a Secure Digital card, make sure that you have
inserted the card with the gold contact facing up. For more information regarding inserting
your MultiMediaCard or Secure Digital card, please refer to the section titled "Inserting a
MultiMediaCard or Secure Digital Card" in the User’s Manual.
If you are using a CompactFlash card or IBM Microdrive, make sure that you are inserting
the media with the media label up and CompactFlash connectors inserted into the card
reader first. For more information regarding inserting a CompactFlash card or an IBM
Microdrive, please refer to the section titled "Inserting a CompactFlash Card" in the User ’s
Manual.
If you are using a Memory Stick card, make sure that you are inserting the media with the
gold contacts facing up. For more information regarding inserting Memory Stick cards,
please refer to the section titled "Inserting a Memory Stick Card" in the User’s Manual.
3.
Page 54

USER'S
MANUAL
USER'S
MANUAL
54
I can see the images on my media inserted in the Dazzle 6 In 1 Reader, but how do I
download them to my computer.
PC Compatible:
Images and data can be downloaded or transferred to your computer using basic Windows
file transfer techniques. Two of such techniques are drag and drop as well as copy and
paste.
For information on both drag and drop as well as copy and paste, please refer to your
Windows “Help” file, or “Help and Support” in W indows XP, under the "Start" button
located in the lower left corner of your W indows desktop. Once you have opened Windows
“Help", begin by clicking on the "Index" tab. This will display the contents of the Windows
“Help". Now scroll down to and double click on "copying files, folders". To access help
information in “Help and Support” on Windows XP, simply enter copy and paste into the
search box.
Macintosh:
When a card is mounted, it can be used in the same fashion as a floppy or removable disk.
Double-click on the icon to open its respective file window. Once you have opened the file
window, holding down the option key, drag and drop the desired images from the media to
a location of your choice.
I am trying to write to my Memory Stick card, but I am getting an error that the
Memory Stick is write protected or locked.
Please make sure that the lock t ab located on the bottom of the Memory Stick media is
not in the lock position.
4.
5.
Page 55

7
Contacting Technical Support
Returning Products for Service
Limited Warranty
USER'S
MANUAL
USER'S
MANUAL
55
OBTAINING
Technical Support
Page 56

Contacting Technical Support
The Dazzle 6 In 1 Reader is relatively easy to maint ain and operate and normally should not produce
complications. However, if you need assist ance or have questions of any kind, our trained staff
members are ready to help. Our Technical Support Department can be reached by calling
203-315-4230 from 8:00 a.m. to 9:00 p.m. (EST), Monday through Friday or by fax at
203-483-5985. In the U.K, please contact local support at +44 118 979 1026. We recommend having
your computer nearby when calling to facilit ate troubleshooting . Email support as well as 24 hour
Technical Support is available via our interactive support website: www.Dazzle.com/support.
Returning products for service
When calling for support, if a Technical Support specialist recommends that you return the product
to Dazzle, the Technical Support specialist will transfer you to Customer Service for a Return
Merchandise Authorization (RMA) number. The RMA number must appear on the outside of your
shipping carton. Our Receiving Department will refuse any package that does not carry an RMA
number. Pack the Dazzle 6 In 1 Reader in its original box. Be certain that it fits snugly and is
surrounded with the original packing material. If original packing material is not available, product
must be secured in packing material as not to cause damage.
■ Improper packing can result in damage to the device, and may result in voiding the warranty.
■ We will not accept an improperly packaged device.
You are responsible for paying the cost of shipping the device in for repair; we will pay the return
shipping on any Warranty RMA. Be sure to include the RMA number on the outside of the box.
Please ship the device to:
SCM Microsystems, Inc.
Retail Brands Group
20 Carter Drive
Guilford, CT 06437 USA
USER'S
MANUAL
USER'S
MANUAL
56
Page 57

SCM Microsystems, Inc. LIMITED WARRANTY
SCM Microsystems, Inc. warranty obligations are limited to the terms set forth below:
SCM Microsystems, Inc., Retail Brands Group, ("The Company") warrants this product against defects in material and workmanship
for a period of one (1) year from the date of original retail purchase. For residents of the European Union, the warranty is two (2)
years from the original date of purchase.
This limited warranty is made only to the original end user purchaser ("you") of the product and does not extend to any subsequent
purchasers or owners of the product. The "original end user" is the first user to put the product into ser vice in any fashion, but the
term "original end user" shall exclude dealers. Dealers shall not be entitled to the benefits of the limited warranty.
It is your responsibility to establish the warranty period by verifying the original purchase date. Accordingly, to avoid dispute, you
should return the warranty card within ninety (90) days after the date of purchase.
If you discover a defect, The Company will, at its option, repair or replace this product with a new or reconditioned product at no
charge to you, provided you return it during the warranty period, with transportation charges prepaid. (You can obtain additional information by contacting a Customer Service Representative at the telephone number printed on the certificate.) In the event that an
alternate product is unavailable, The Company will refund the cost of goods at a pro-rated amount. To each product returned for warranty service, please attach your name, address, telephone number, and a copy of the bill of sale bearing the appropriate serial numbers as proof of date of original retail purchase, as well as a detailed description of the problem for which ser vice is requested. Prior
to returning the product, you must obtain from The Company a Return Merchandise Authorization Number (RMA#). You are responsible for packaging the product to be returned, and should take care that the product is packed in its original packaging. If the repairs
are covered by the Limited Warranty and if the product was properly shipped to The Company, The Company will pay the return shipping charges.
This warranty applies only to hardware products manufactured by The Company that can be identified by The Company’s trademark,
trade name, or logo affixed to them. This warranty does not cover: damage resulting from accident, misuse, abuse, or neglect and/or
damage during any type of transportation resulting from improper packaging; damage to any product which has been altered in any
fashion, including the alteration or removal of any serial number; damage resulting from causes other than product defects, including
and not by way of limitation, lack of technical skill, competence, or experience of the user, and/or failure to use the product in accordance with the instructions provided in the User’s Manual; and service performed by an unauthorized person or entity.
All computer software either sold and/or licensed to a purchaser or user is done so on an "as is" basis. The only warranties relating to
such software, if any, are provided by the Master Licensor of such software and are set forth in the User’s Manual. The entire risk as
to the quality and performance of such software is with the purchaser or user. Should such software prove defective following its
purchase the purchaser or user, as the case may be (and not The Company) assumes the entire cost of all necessary servicing or
repair.
Any implied warranties including fitness for use and merchantability are limited in duration to the period of the expressed warranty
set forth above. The remedies provided under this warranty are exclusive and in lieu of all others.
The Company hereby expressly disclaims liabilit y and shall not be responsible for incidental, consequential and contingent damages
of any kind or nature, including, without limitation: damages to persons or property, whether a claim for such damages is based upon
warranty, contract, tort or otherwise; damages due to or arising out of the loss of data; or lost profits.
The Company shall not be responsible for any damages caused by the presence of error or omission in any so-called "foreign language version" of its manuals, instructions or related materials.
SCM Microsystems, Inc., Retail Brands Group — 20 Carter Drive — Guilford, CT 06437 USA
USER'S
MANUAL
USER'S
MANUAL
57
Page 58

SCM Microsystems, Inc. is a leading supplier of solutions that open
the Digital World by enabling people to conveniently access digital
content and services. SCM Microsystems advanced silicon solutions, hardware and soft ware enable secure exchange of electronic
information for digital applications from e-commerce to broadband
content delivery by providing controlled access points to platforms
such as PCs, digital camera, and digital television set-top boxes.
SCM Microsystems, Inc. serves the retail market through its Dazzle
and Microtech product brands. Global headquarters are in Fremont,
CA, with European headquarters in Munich, Germany. Operations
for the company’s Retail Brands Group are in Guilford, CT., U.S.A.
Operating hours are Monday through Friday from 8:00 A.M.
to 6:00 P.M. (U.S. Standard Time) with Dazzle Technical Support from 8:00
A.M. to 9:00 P.M. (U.S. Standard Time).
SCM Microsystems, Inc.
Retail Brands Group
20 Carter Drive
Guilford, 06437 USA
Tel: 203-315-4200
Fax: 203-483-5106
Website: www.Scmmicro.com
USER'S
MANUAL
USER'S
MANUAL
58
HOW-TO
Contact Us
Page 59

Copyright Information
The contents of this manual are copyrighted by SCM Microsystems, Inc. and may not be reproduced in whole or in part without written permission of SCM Microsystems, Inc. The same proprietary and copyright notices must be affixed to any permitted copies as
were affixed to the original. This exception does not allow copies to be made for others, whether or not sold, but all of the material
purchased (with all backup copies) may be sold, given or loaned to another person. Under the law, copying includes translating into
another language or format. You may use the software on a single computer owned by you and extra copies cannot be made.
Third-party products mentioned are in most cases for informational purposes only and constitute neither an endorsement nor a
recommendation. SCM Microsystems, Inc. assumes no responsibility with regard to the performance or use of the products.
Product specifications and information contained herein are subject to change without notice.
© Copyright 2002 SCM Microsystems, Inc. All rights reserved. Manual version 2.0 — 1.16.02 SYS-JB
Trademarks
Dazzle and the Dazzle insignia are registered trademarks of SCM Microsystems, Inc.
Digital FlashFilm, Compact FlashFilm, DPA Drives, and the DPA logo are trademarks of SCM Microsystems, Inc.
Microsoft, Windows, the Windows Logo, and MS-DOS are registered trademarks of Microsoft Corporation.
Apple, Macintosh, and Mac OS are registered trademarks of Apple Computer, Inc.
Mac and iMac are trademarks of Apple Computer, Inc.
CompactFlash™ is a trademark of SanDisk Corp. and is licensed royalty-free to the CFA
(CompactFlash™ Association) which in turn will license it royalty-free to CFA members.
Memory Stick™ and MagicGate™ are trademarks of Sony Corp Corporation.
Secure Digital is a trademark of the Secure Digital Association.
SmartMedia and SSFDC are trademarks of the Toshiba Corporation.
MultiMediaCard is a trademark of the MultiMediaCard Association.
Microdrive is a trademark of the IBM Corporation.
All other company names and product names are trademarks or registered trademarks of their respective owners.
For more information contact:
SCM Microsystems, Inc.
Retail Brands Group
20 Carter Drive
Guilford, CT 06437 USA
Web site: http://www.Scmmicro.com
USER'S
MANUAL
USER'S
MANUAL
59
 Loading...