

Page 1
4-ZONE WI-FI
SMART STREAMER
Model: WFA400 User Manual
Page 2
Thank you for purchasing the Dayton Audio WFA400 4-Zone Wi-Fi Smart Streamer. This multi-zone pre-amp is ideal for
commercial and residential applications. The WFA400 is compatible with the Hi-Fly app for convenient control over all your
zones individually or all zones together in multi-room audio mode.
Package Contents:
• WFA400 4-Zone Wi-Fi Smart Streamer
• 12VDC 1.5A Power Supply
• 2 x Removable Rack Ears
• Manual
WFA400 Features:
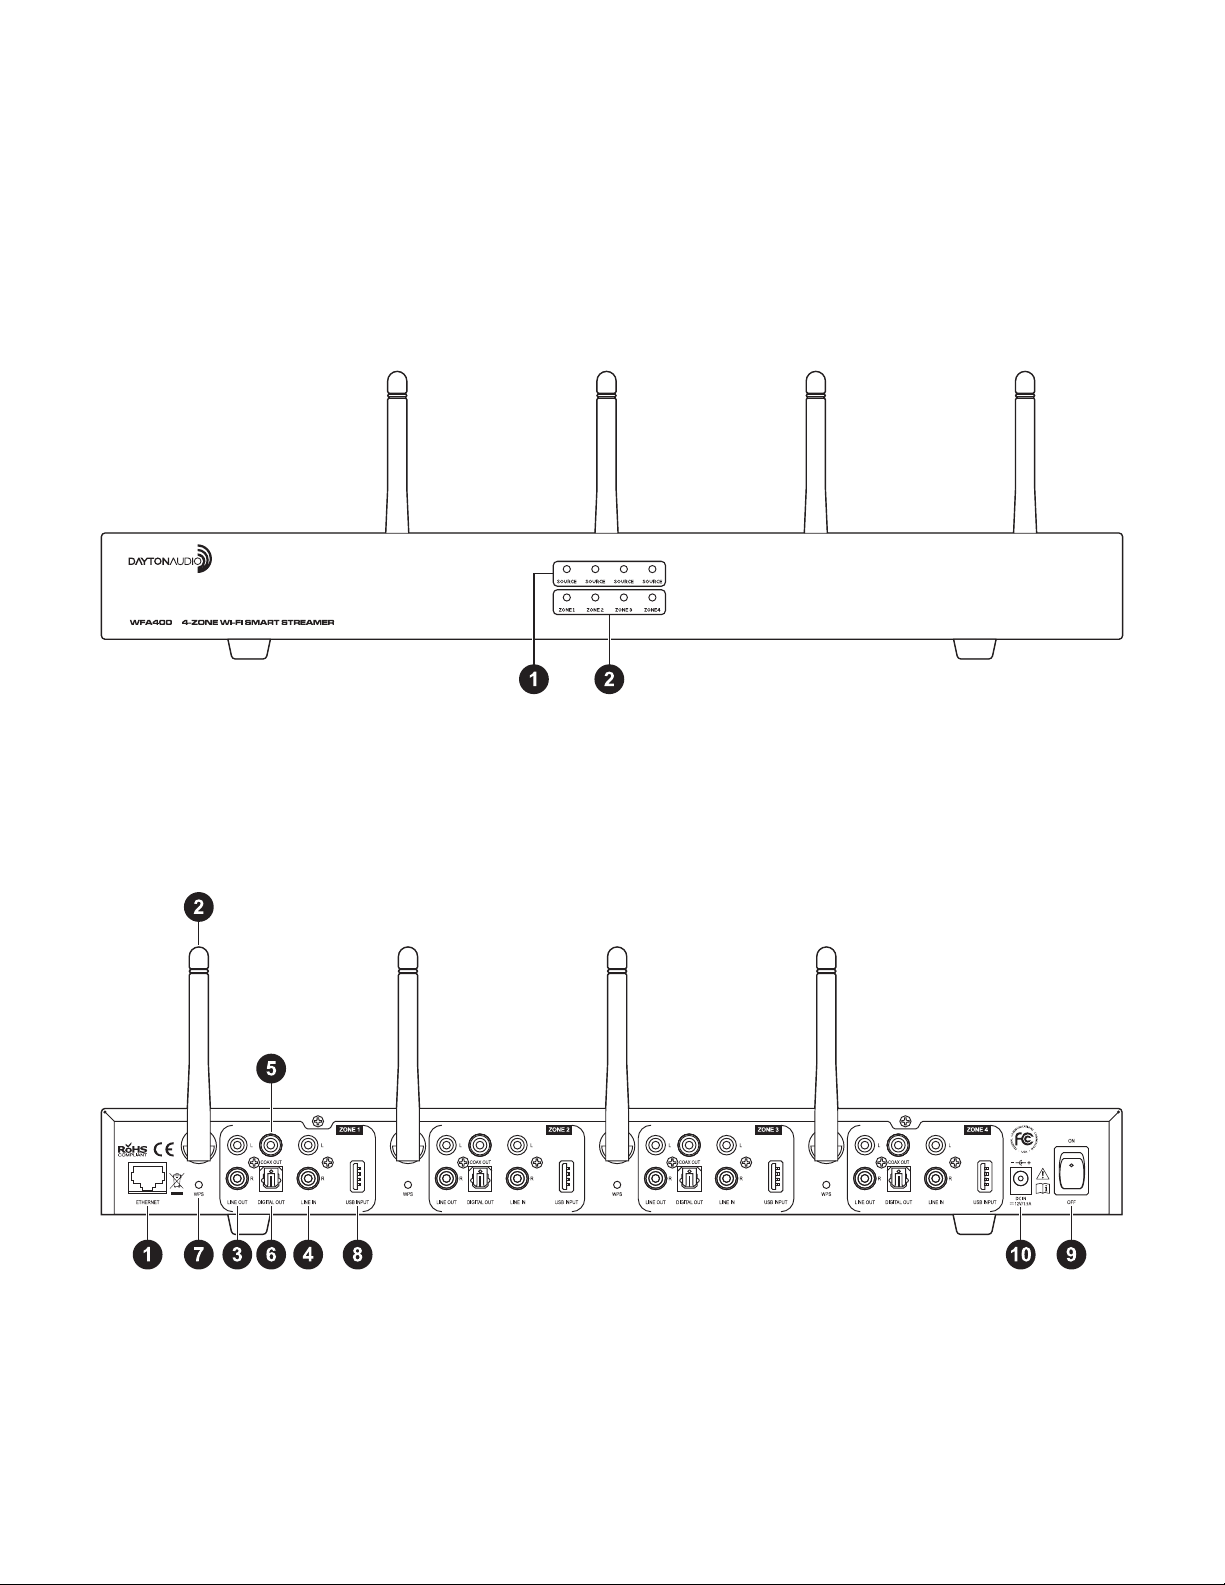
Front Panel:
1. Zone Audio Source Indicators
-Blue/Wi-Fi
-Red/Line-In
-Purple/USB
2. Zone Power Indicators
Rear panel:
1. Ethernet: LAN input
2. Antenna (Zone 1-4): Wi-Fi antenna
3. Line Out (Zone 1-4): RCA stereo output
4. Line In (Zone 1-4): RCA stereo input
5. Coax Out (Zone 1-4): Coaxial output
6. Digital Out (Zone 1-4): Digital optical output
7. WPS button (Zone 1-4): Press to connect to WPS
enabled network
8. USB Input (Zone 1-4): Read U disk function, does not
support USB charging
9. Power switch: Turns device on/off
10. DC In: 12V/1.5A
2
Page 3

Getting Started
Remove the WFA400 from the box and inspect the device to make sure it is free of any damage and that all package contents are accounted for. Place the WFA400 in your desired location and plug the included power supply into the WFA400
and an available outlet. The next step is to connect the WFA400 to your network for streaming and control of each zone
using the Hi-Fly app.
Wi-Fi connectivity: Wireless Multi-Room Audio
1.
Download and install the Hi-Fly app by scanning the QR code or search “Hi-Fly” in the app store/Google Play store.
2. Follow the setup instructions in the Hi-Fly app to connect to your Wi-Fi network.
Each zone will need to be connected the Wi-Fi router individually, repeat setup instructions for zone 1-4.
LAN connectivity:
1. Download and install the Hi-Fly app by scanning the QR code or search “Hi-Fly” in the app store/Google Play store.
2. Connect the WFA400 to your router using the RJ45 Ethernet port on the rear panel.
3. LAN connection will automatically setup all zones. Ensure your mobile device is connected to the same network and
open the Hi-Fly control app.
See below for a wire diagram and connection options.
Dayton Hi-Fly App
Download the Dayton Audio Hi-Fly app using the QR code or visit the
App Store or Play Store and search for Hi-Fly.
For questions or additional product information please visit:
http://www.daytonaudio.com/index.php/hi-y-multi-room.
Wire Diagram
iOS Android
3
Page 4

Connections
Lan Port
This port allows you to plug the WFA400 directly into your
network. Once the WFA400 is connected it should automatically detect and setup all four zones. The zones will
be displayed in the device menu of the Hi-Fly app. Please
ensure that your phone or wireless device is connected to
the same network.
Wi-Fi
If you choose to set up the WFA400 wirelessly, each zone
will need to be setup individually through the Hi-Fly app.
Open the app and follow the on-screen instructions for wireless setup of each zone.
Line Out
Connect the analog line output to any line level input on
your audio amplier or powered speakers. This line level
output will be the most commonly used audio connection
and will work with most audio devices.
Digital Coax Out
The digital coax output can be used if your audio ampli-
er has a digital coax input. Digital coax can handle two or
more channels of audio through a single cable. This cable
shares the same RCA connectors as a line level cable, but
will only work when plugged into a digital coax input.
Digital Optical Out
The digital optical output connection will be available on
most modern audio ampliers. This uses a toslink-type ber
optic cable instead of copper-stranded RCA patch cables
like line level or coax.
Line In
This allows an outside line level source (CD player, computer, TV etc.) to be added to each zone as an additional
source of music. This input can be selected in the “Music”
menu of the Hi-Fly app (*See images below).
USB (Media player)
Plug in a USB thumb drive for an additional source of music. This input can be selected in the “My Music” menu of
the Hi-Fly app (**See images below).
*Selecting Line Input via Hi-Fly app:
First connect the external audio source to the line input of
the zone you choose for audio playback. Open the Hi-Fly
app and nd the Zone in the device menu and select the
Line In option from the music menu.
**Selecting USB input via Hi-Fly app:
First connect the USB media device to the zone you choose
for audio playback. Open the Hi-Fly app and select "My
Music" from the music menu, choose USB DISK to select
the songs from the USB media device.
4
Page 5

Important Safety Instructions
To reduce the risk of electric shock, do not remove cover. No user serviceable
parts inside. Refer servicing to qualifi ed personnel. To reduce the risk of fi re and
shock do not expose unit to rain or moisture. The unit should be connected to
an earth grounded AC electrical socket. The unit should be operated in a well
ventilated area. Minimum clearance is 2 inches from the ventilation openings.
FCC Statement
1. This device complies with Part 15 of the FCC Rules. Operation is subject to the following two conditions:
(a) This device may not cause harmful interference.
(b) This device must accept any interference received, including interference that may cause undesired operation.
2. FCC Radiation Exposure Statement: Mobile device.
This equipment complies with FCC radiation exposure limits set forth for an uncontrolled environment. In order to avoid the
possibility of exceeding the FCC radio frequency exposure limits, human proximity to the antenna shall not be less than
20cm (8 inches) during normal operation.
5-Year Limited Warranty
See daytonaudio.com for details
daytonaudio.com
tel + 937.743.8248
info@daytonaudio.com
Dayton Audio® Last Revised: 11/19/2018
705 Pleasant Valley Dr.
Springboro, OH 45066
USA
 Loading...