


Operating Manual
Smart Control
SC16 3-Channel for matrix
Dear Customer,
Thank you for choosing a WALTRON daytime® lighting controller.
Your daytime® lighting controller is a high-quality product that was specially designed, along with
the daytime® LED lighting line, for aquatic and aquarium applications. It satisfies the most demanding safety requirements.
The features of this daytime® product are described in detail in the following chapters.
Please read the operating manual carefully and completely. We would be happy to answer any
questions that you may have.
The entire team at WALTRON wishes you a "bright" future with our daytime® lighting!
Notice, warning and safety symbols
The European Standard prescribes the use of the following symbols for specific situations; they
are not intended to unsettle the user. They are a part of modern operating manuals for any electrically operated appliance.
General description:
Warning!
Serious injuries can result from an electric
shock if you do not follow the information
marked by this symbol.
Notice!
The daytime® products may malfunction or be
damaged if the information marked by this
symbol is not observed.
Info
Sections marked by this symbol contain helpful recommendations and tips for using the
daytime® products.
Information for disposing of the product in an
environmentally responsible manner
Compliance with EC directives
Proper and intended usage
This product is designed for private household usage. It may only be used to control WALTRON
GmbH's daytime® LED lighting systems for aquariums and terrariums.
Read and observe this entire operating manual before using the lighting controller for the first time.
The warranty does not cover damage or defects which have resulted from not observing the information in the operating manual. Keep this operating manual accessible near the device. Make
sure that it is given to any subsequent users.
WALTRON assumes no liability for the consequences of improper usage.
For your safety
Warning!
Carefully read and observe the following important safety information. In order to avoid an
electric shock:
Position the device in a suitable place to ensure
that it is not exposed to water (from condensation
or falling into water).
Info
WALTRON recommends making "drip loops" in
the converter cables to prevent water (condensation) from running along the cable to the converter
or outlet.
Notice!
Make sure that all cables:
• have no kinks in them,
• are not routed over sharp edges,
• cannot be jammed or snagged,
and cannot come into contact with hot surfaces
(> 60 °C).
Warning!
If you notice that the power cable is damaged,
disconnect the device from mains power supply
immediately. Contact an authorized daytime® service partner or the manufacturer (WALTRON
GmbH) directly.
Warning!
If the operating device's power cable or secondary cable(s) are damaged, they must be repaired,
either by an authorized daytime® service partner
or directly by the manufacturer.
Never use a device which has a damaged or defective power cable (operating device).
Warning!
Never open or repair the operating devices and
lights by yourself. Do not make any changes
which are not described in these operating instructions. The operating device contains live
(current-carrying) parts (with 230 V AC). A fatal
injury can result from an opened device.
Repairs may only be made by authorized daytime® service partners or by Waltron, using only
original spare parts and accessories.
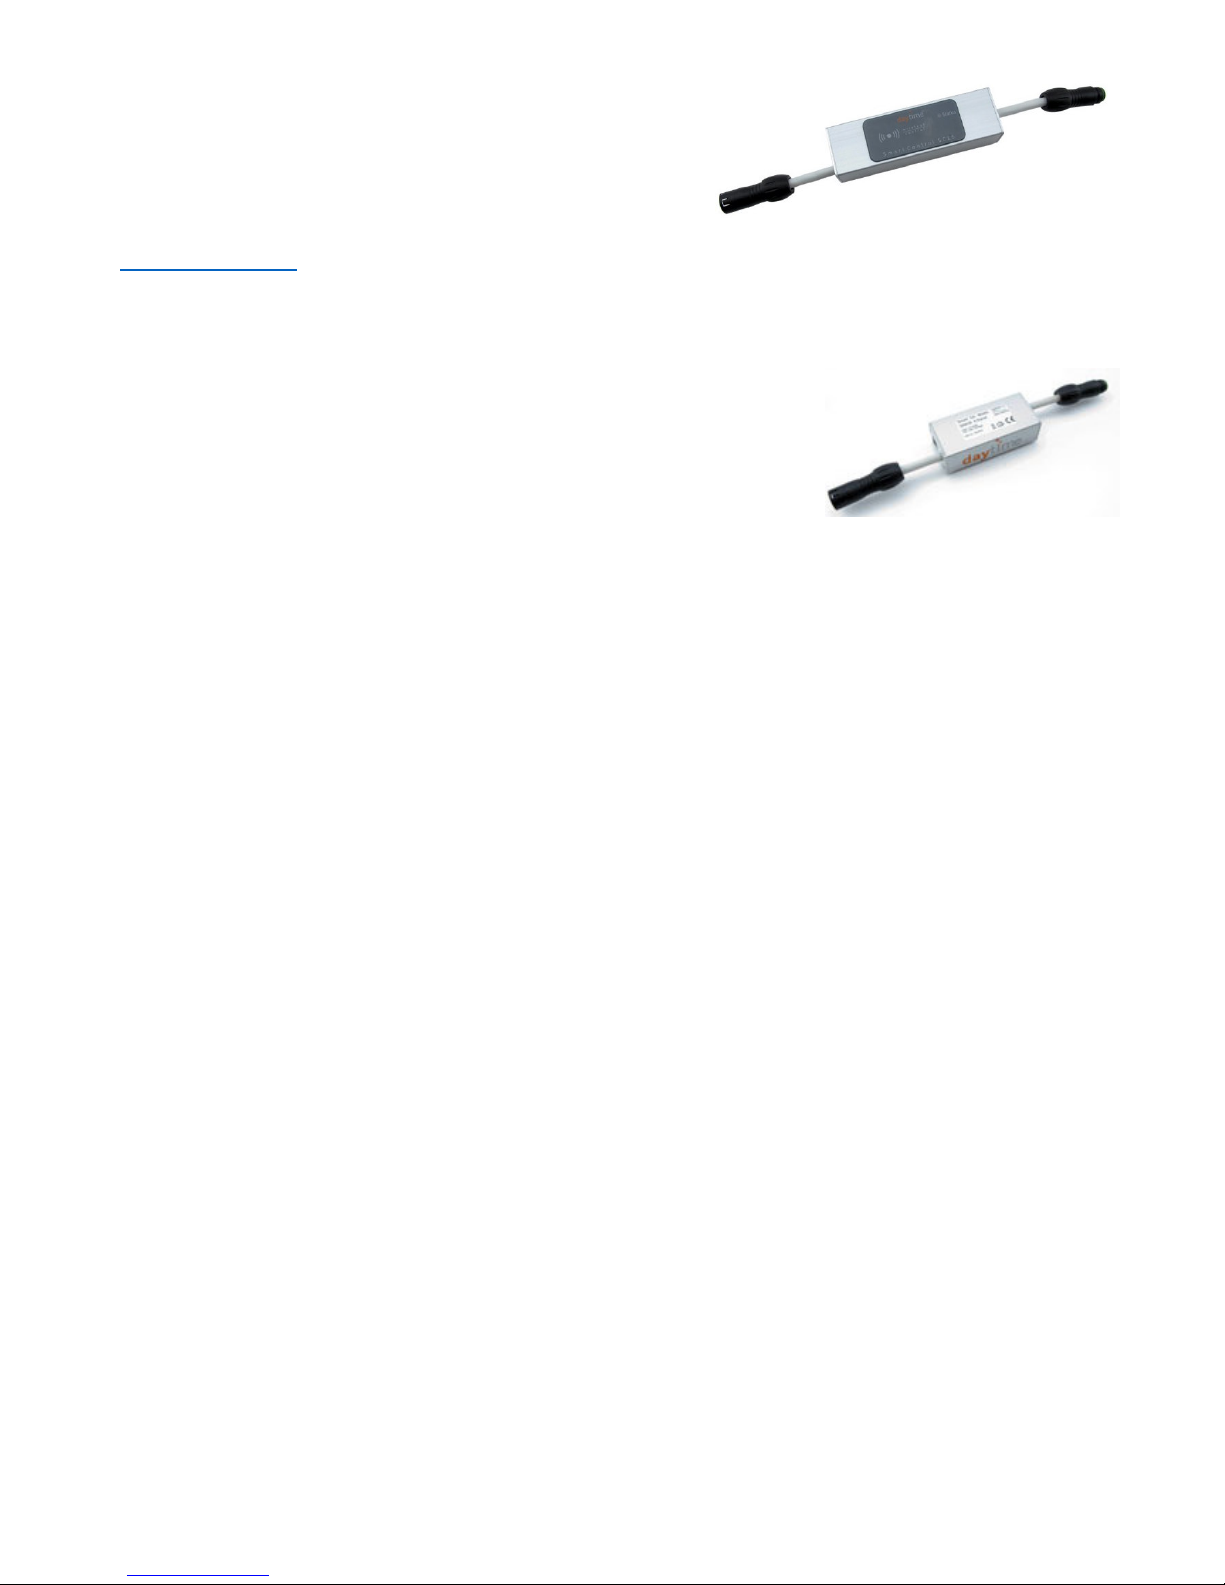
Scope of delivery
1 lighting controller: Smart Control SC16 three-channel for matrix
1 operating manual
The daytime SC16 Android® app can be downloaded free at
www.daytime.de
Optional accessories
Single-channel performance extension module SEM16, for eco & cluster
Three-channel performance extension module SEM16, for cluster control
Three-channel performance extension module SEM16, for matrix
Features & functions
• Sunrise, sunset, dusk (morning and evening), midday reduction, etc. – simulating nat-
ural lighting conditions and changes, with up to ten programmable switching or dimming
times
• Can be conveniently and securely programmed using Android smartphones and tablets
(an iOS app is planned).
• Smoothly dims with virtually no "jumps" over the entire range of brightness
• Individually adjustable lighting scenarios for each day or night time
• Clouds and storms – weather simulations can be selected in three intensity levels
• Demonstration mode with constantly changing scenarios
• Manually change the lighting characteristics in real time using the slider
• Moving clouds and lightning at the press of a button – weather simulation can be trig-
gered manually
• Professional "Plug & Play" connector system manufactured by Binder – the controller is
simply inserted between the converter and the lighting: can also be retrofit!
• Operates the daytime® matrix lighting with up to 240 watts (24 matrix modules)
• Parallel/combined operations for all daytime® lighting products is possible when using the
corresponding optional SEM16 performance extension module.
• An app can be used to conveniently update the software at home.
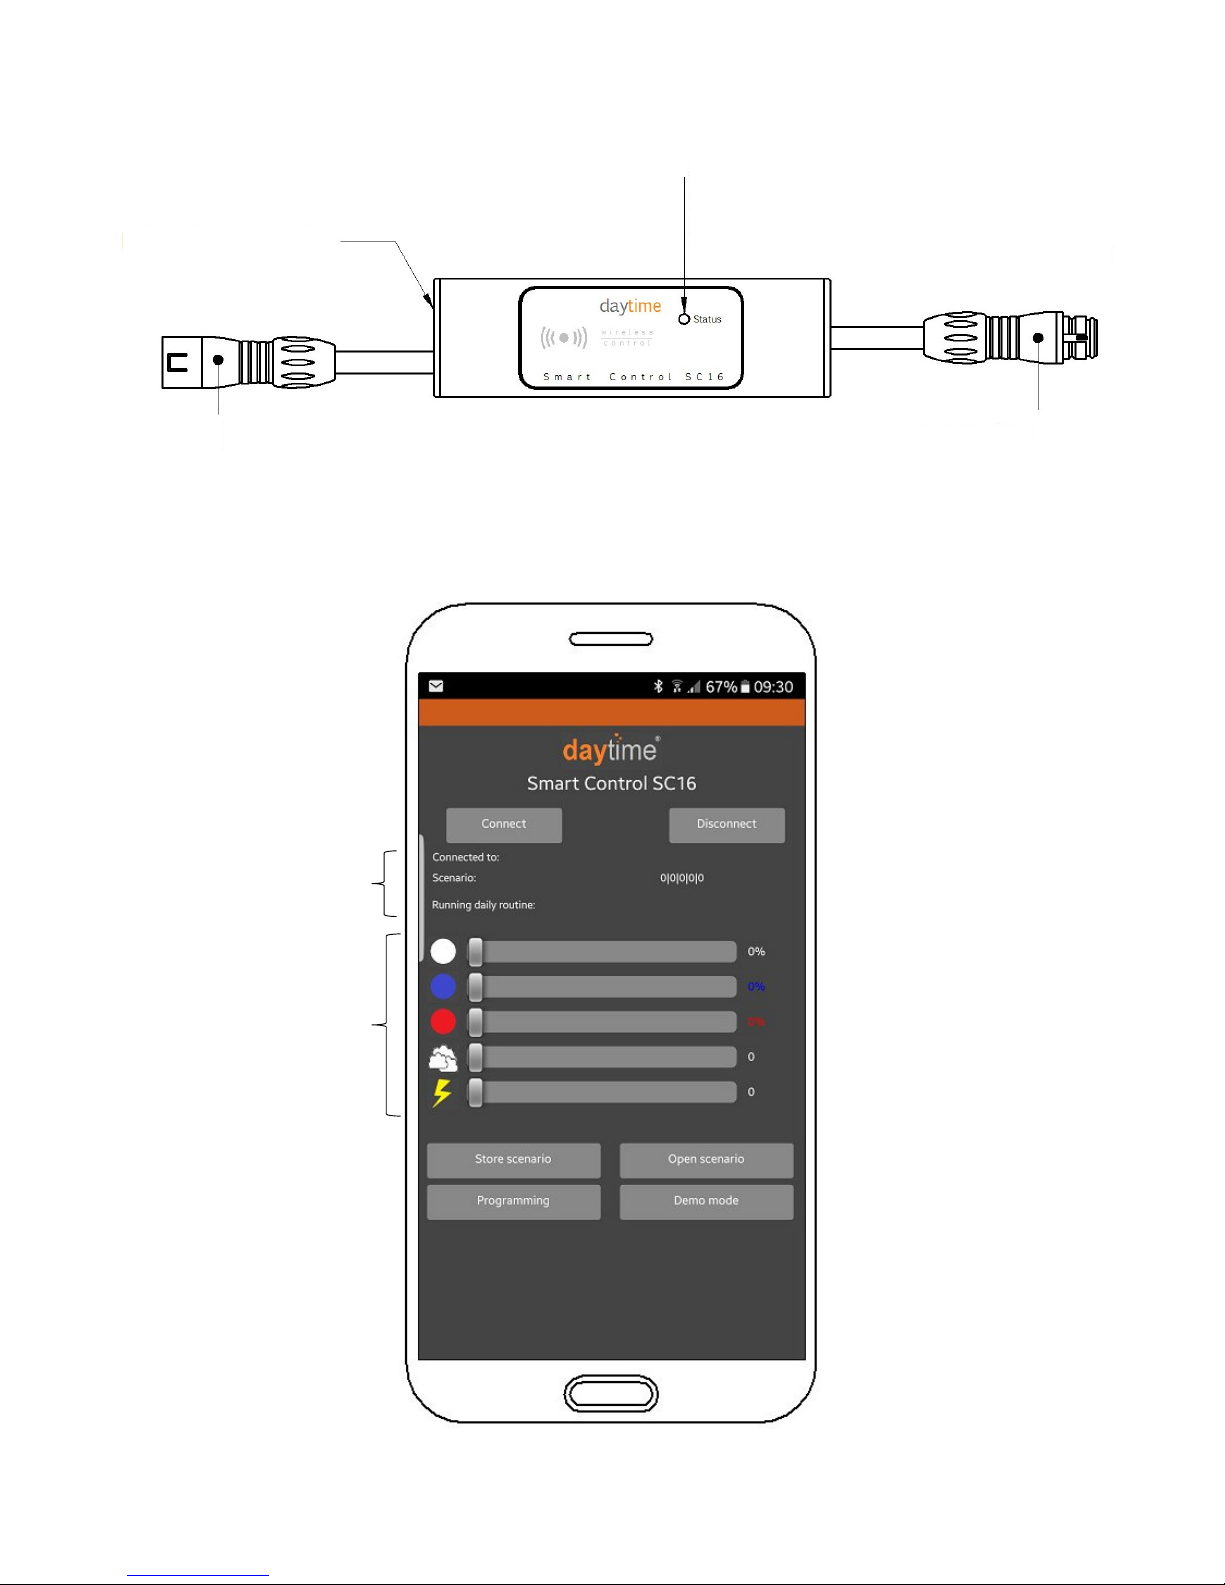
Device overview and explanation
Overview of the daytime SC16 app – start page
Sliders
Current status
Status LED
Green -> automatic mode (not connected)
Green blinking -> active scenario change
Red -> manual mode (Bluetooth connection)
RJ11 socket | Outlet for
the SEM16 performance extension mod-
5-pin plug
(for 24V converter connection)
5-
pole socket
(for connecting light or distributor)
1. Setup and initial usage
Install the daytime SC16 app (download and instructions can be found at www.daytime.de).
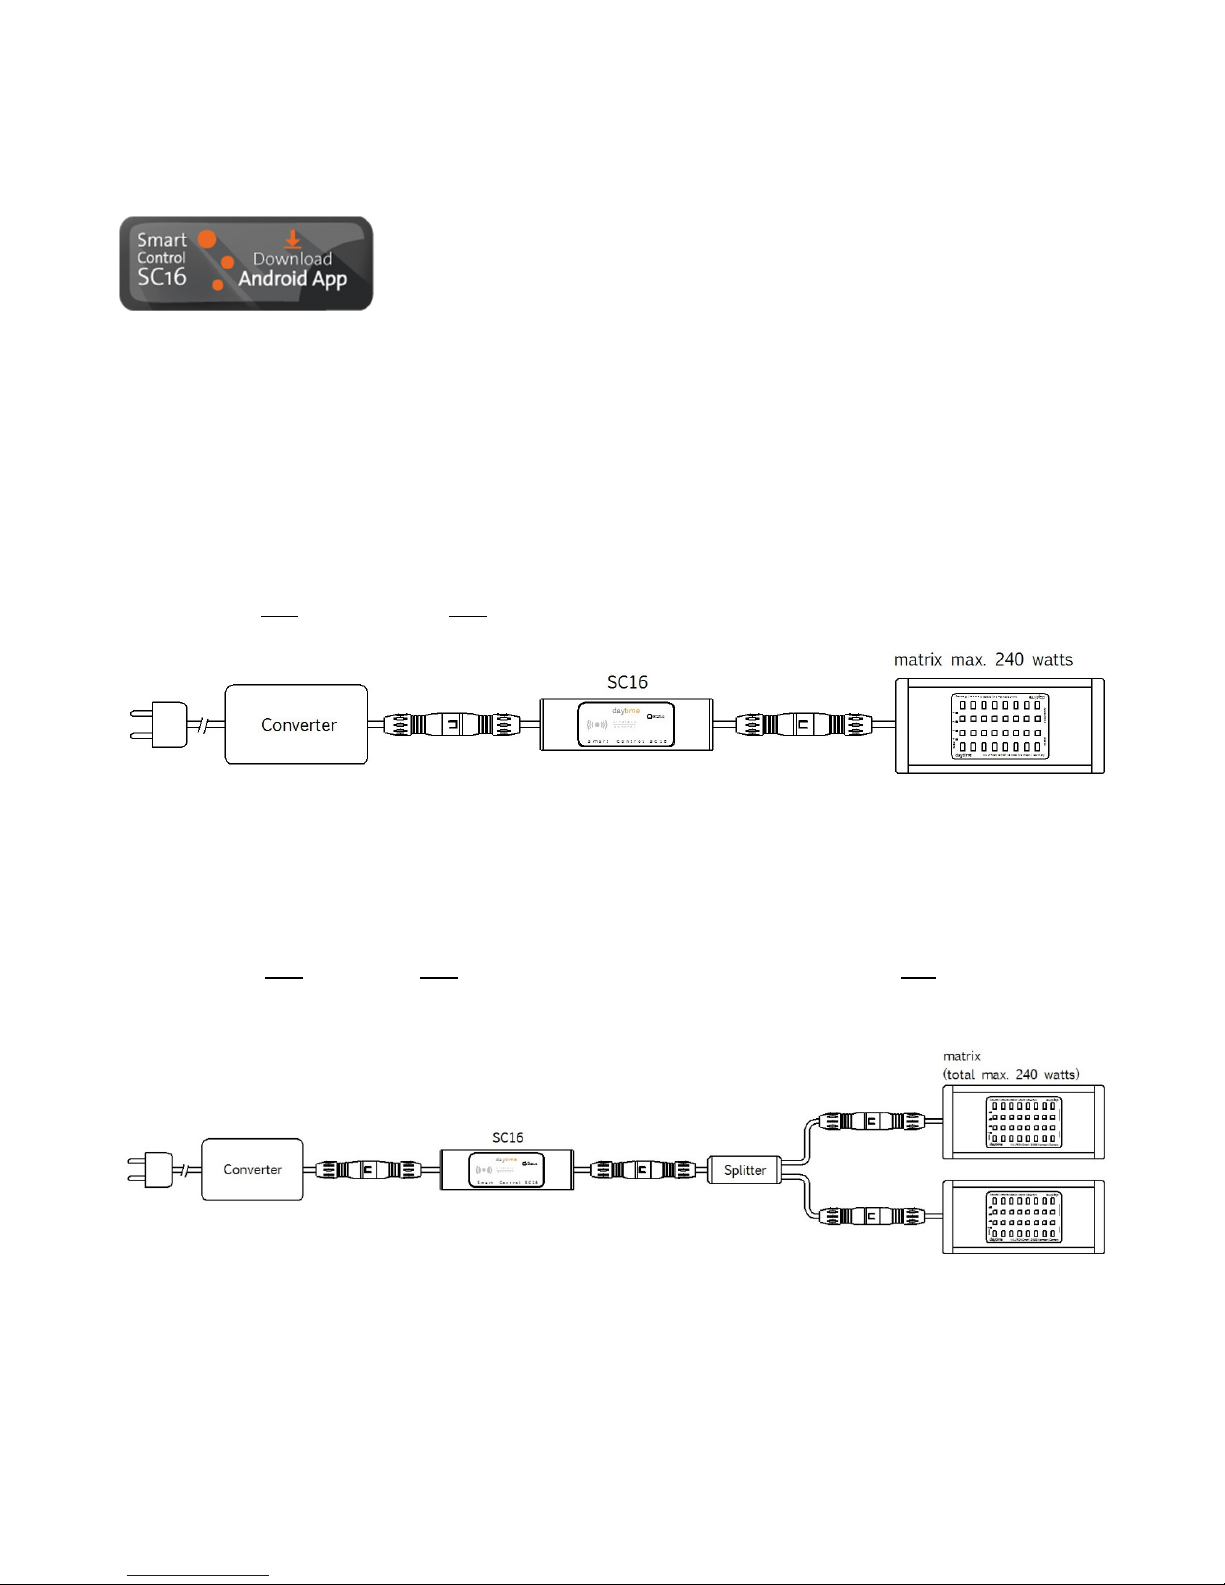
All electrical connections and components (except for the power plug) should be connected according to the following examples. Observe any relevant safety instructions!
Example with one converter and one daytime® matrix light, with an output of max. 240 watts:
Example with one converter, one two-way splitter (optionally available), and two daytime® matrix
lights, with a total output of max. 240 watts:

Example with multiple converters, SEM16 performance extension modules three-channel for matrix (optionally available) and multiple daytime® matrix lights, each with an output of max. 240
watts:
Plug in the mains power plug or switch on the power supply/supplies.
The SC16's status LED illuminates green. The controller is ready for operations. It switches to automatic mode.
Info: The factory settings are used to specify the daily routine during the initial start-
up.
BLUETOOTH® pairing between the SC16 and an Android device (smartphone, tablet, etc.)
NOTICE: Observe the documentation and user manual for the Android device.
Enable BLUETOOTH® on the Android device.
Start the search (scan) for "available devices".
• After the device has been found, SC16_XXX will be listed under "Available devices" (XXX
signifies the sequential serial number.)
Select the device for pairing.
• The PIN code request will then appear.
Enter the PIN number 1234 and confirm with OK.
• The daytime SC16 light controller will now appear under the list of "Connected devices".
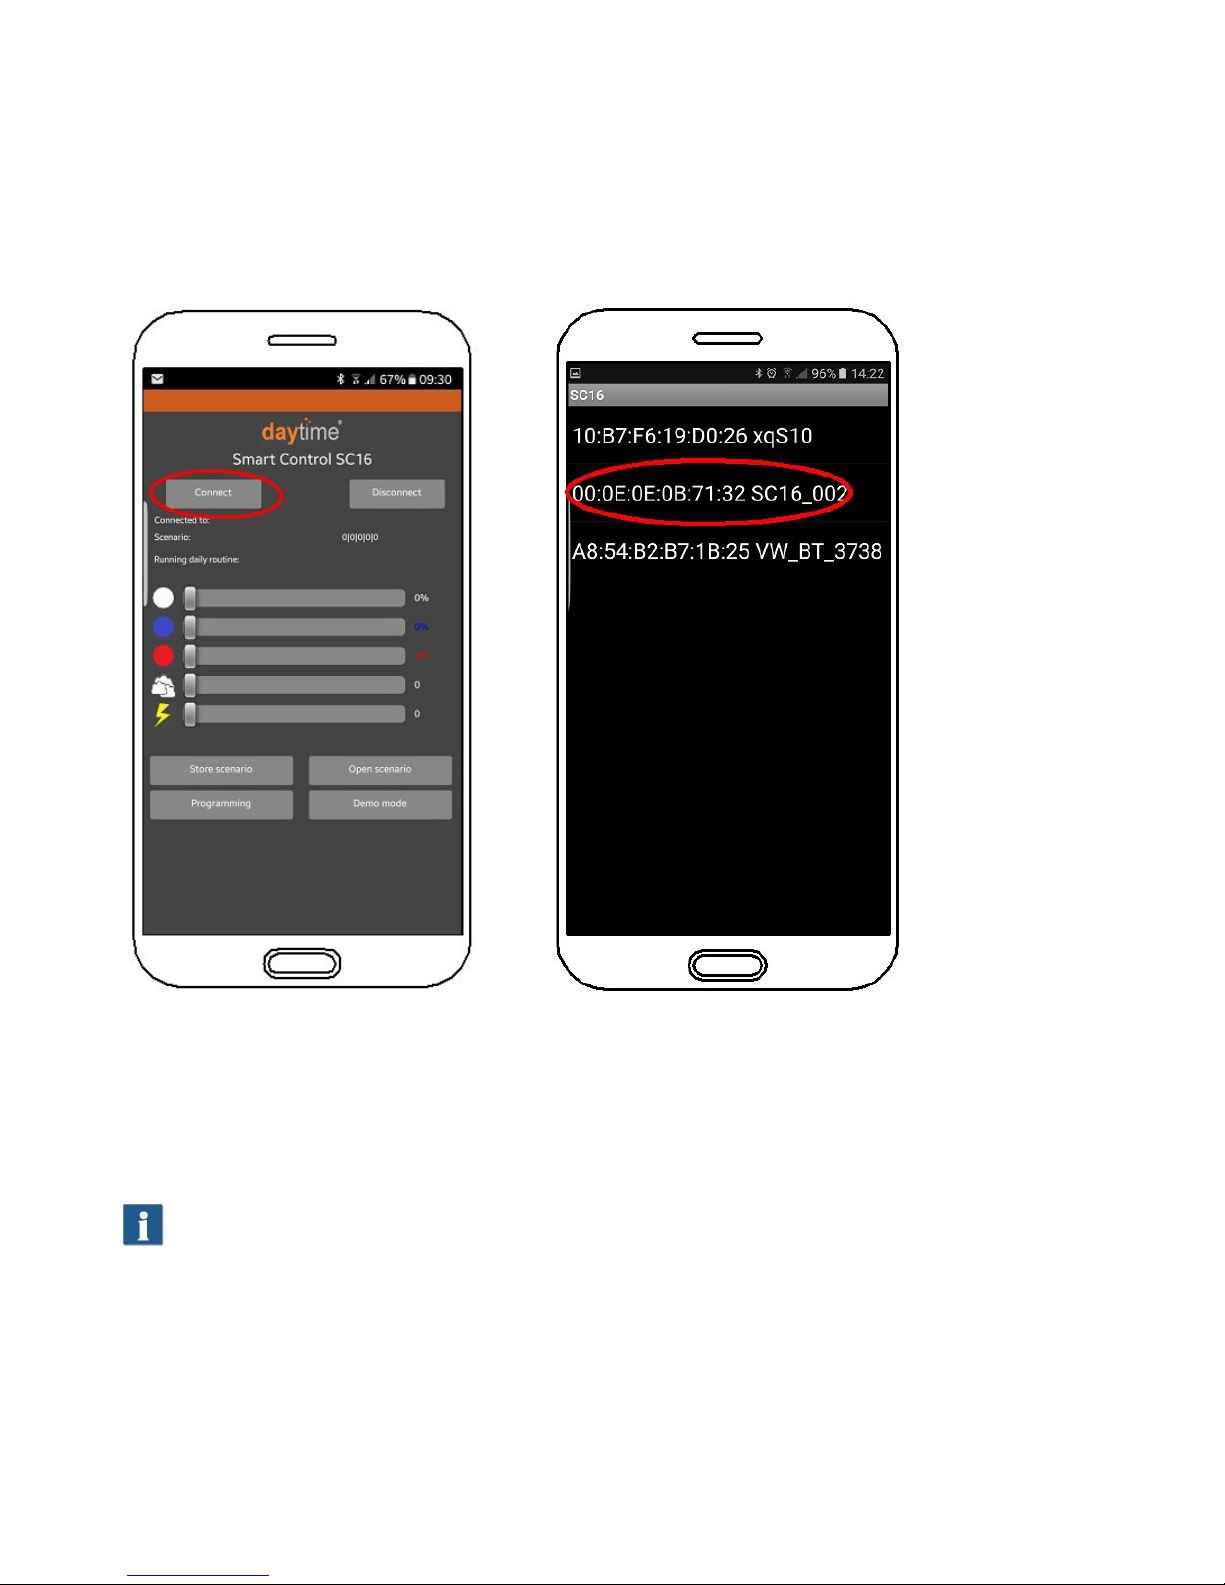
2. Connect the controller with the Android device
Open the SC16 app and click on "Connect".
The list of paired devices will then be shown. Select/click on the corresponding SC16. The controller's status LED illuminates in red; this indicates manual mode. The time is automatically synchronized.
3. Manual operations
You can use the sliders (WHITE, BLUE, RED) to adjust the brightness or the intensity for each
light colour separately.
Info: If the matrix modules are being used without the red LED, then the RED slider will
have no function or influence. This also applies to the WHITE and BLUE sliders.
Click on the Cloud icon to start a random cloud simulation (which will last about 30 seconds). The
slider is not enabled during manual operations.
Click on the Lightning icon to start a random thunderstorm simulation (which will last from 5 – 10
seconds). The slider is not enabled during manual operations.

4. Programming
You can create and save a lighting configuration "scenario" for each time of day. Your saved scenarios are inserted in the "Daily routine" table along with their specific start and end times.
The time gap between a scenario's "Time to" and the "Time from" specified for the next scenario
define the duration for the change (for sunrise or sunset). The change takes place uniformly (linearly).
4.1 Creating and saving scenarios
Use the sliders to adjust the brightness, light colour, clouds and thunderstorm intensity. Then click
on "Store scenario". Then specify a name (e.g. Day) and confirm by clicking on OK. Any number
of scenarios can be created and saved.
The saved scenarios can be opened, changed and re-saved by clicking on the button corresponding to the scenario.
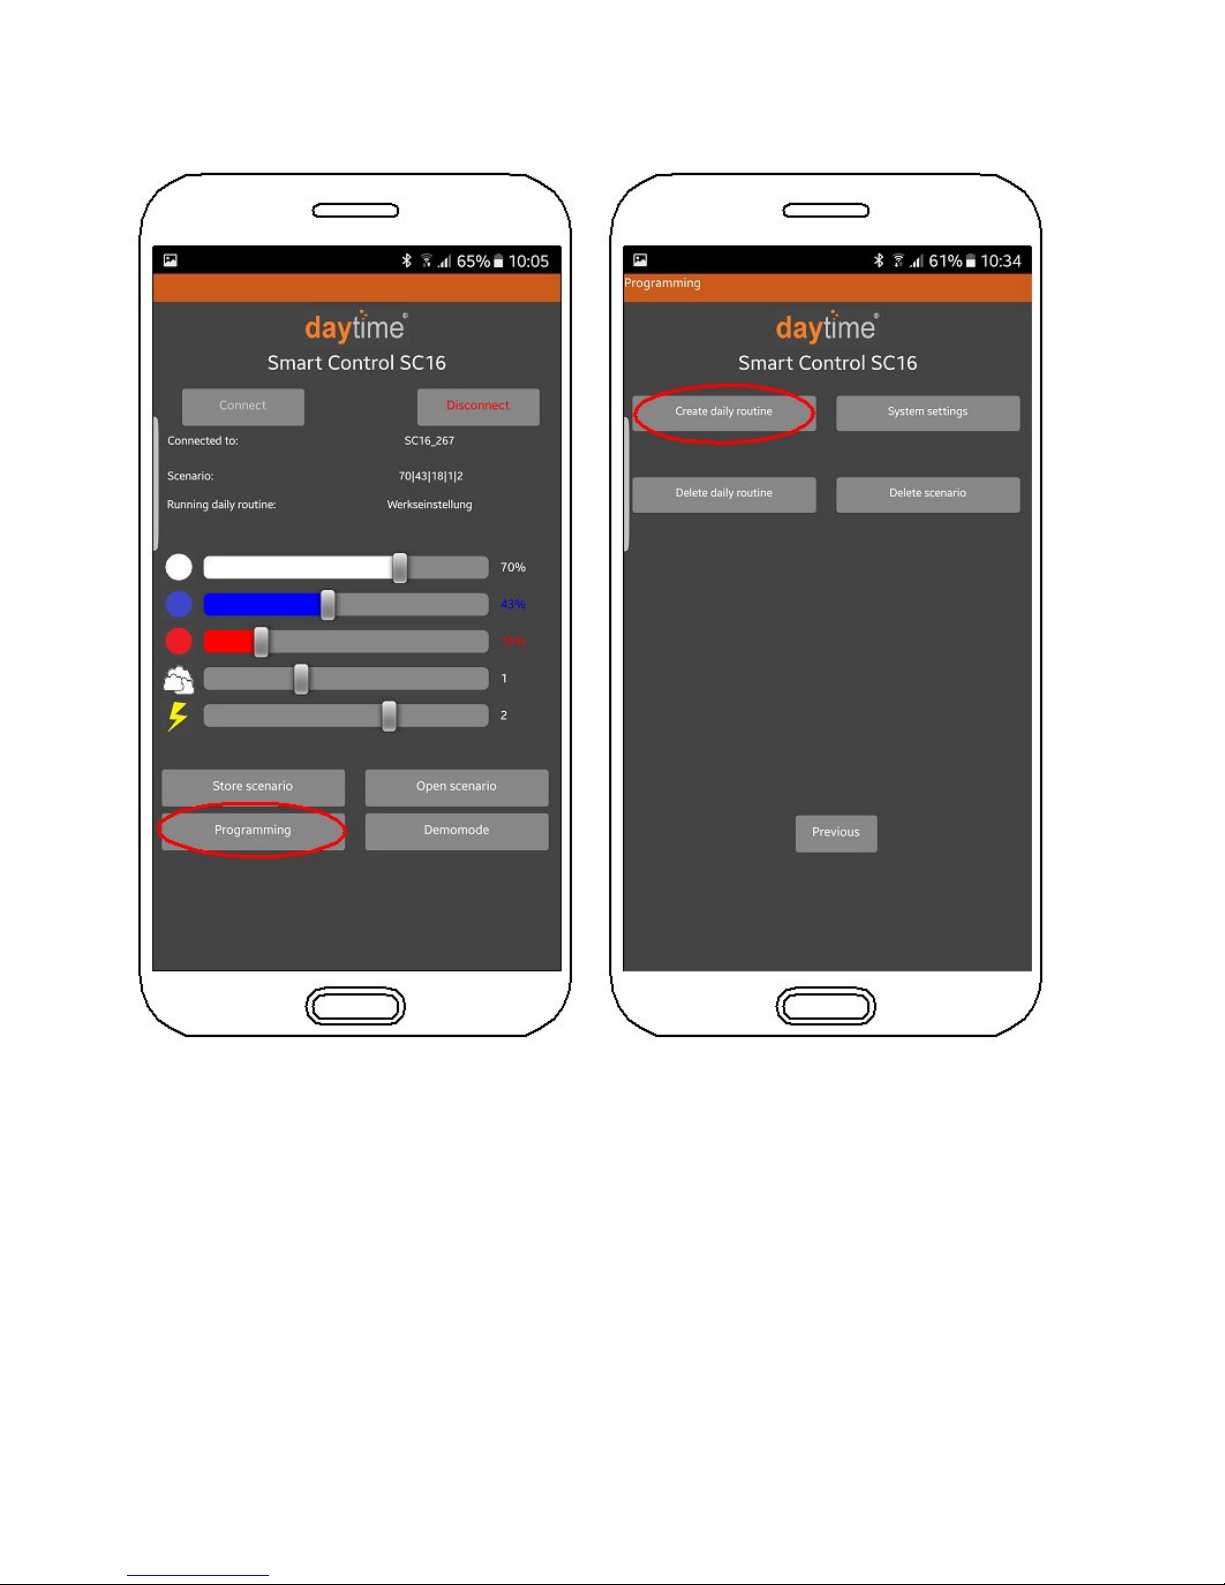
4.2 Creating and saving a daily routine
Click on "Programming" and then on "Create daily routine".

Add your desired scenarios and define the times in the daily routine table by clicking on the associated buttons, as shown in the example below. Once a line is completely filled out, it is displayed
with a dark grey background (as shown below, bottom left).
Then save (not yet send) the completed table by clicking on the "Store daily routine" button. Any
number of daily routines can be created and saved.
To transmit a daily routine, click on "Open daily routine". Then select the desired routine and click
on "Send daily routine" (the controller must be connected to the Android device for this to work).
Note: The table cannot be filled out when no scenarios have been saved.
The change of day (midnight / 0:00) must be included in the last scenario (see the illustration below) or within the interval between the end of the last scenario and the start of the first
scenario (for example: the last scenario ends at 23:00 and the first scenario starts at 04:30).
Explanations
• A daily routine corresponds to 24 hours and is repeated continuously.
• Up to 10 scenarios can be inserted into a daily routine.
• The duration for the continual change (sunrise, sunset, etc.) is derived from the time interval
starting at "Time to" of a scenario and ending at the "Time from" for the next scenario.
This time interval must be at least one minute!
• After the last scenario, the routine starts again with scenario 1. The duration for this
changeover is determined by the difference between the "Time to" for the last specified
scenario and the "Time from" for scenario 1.
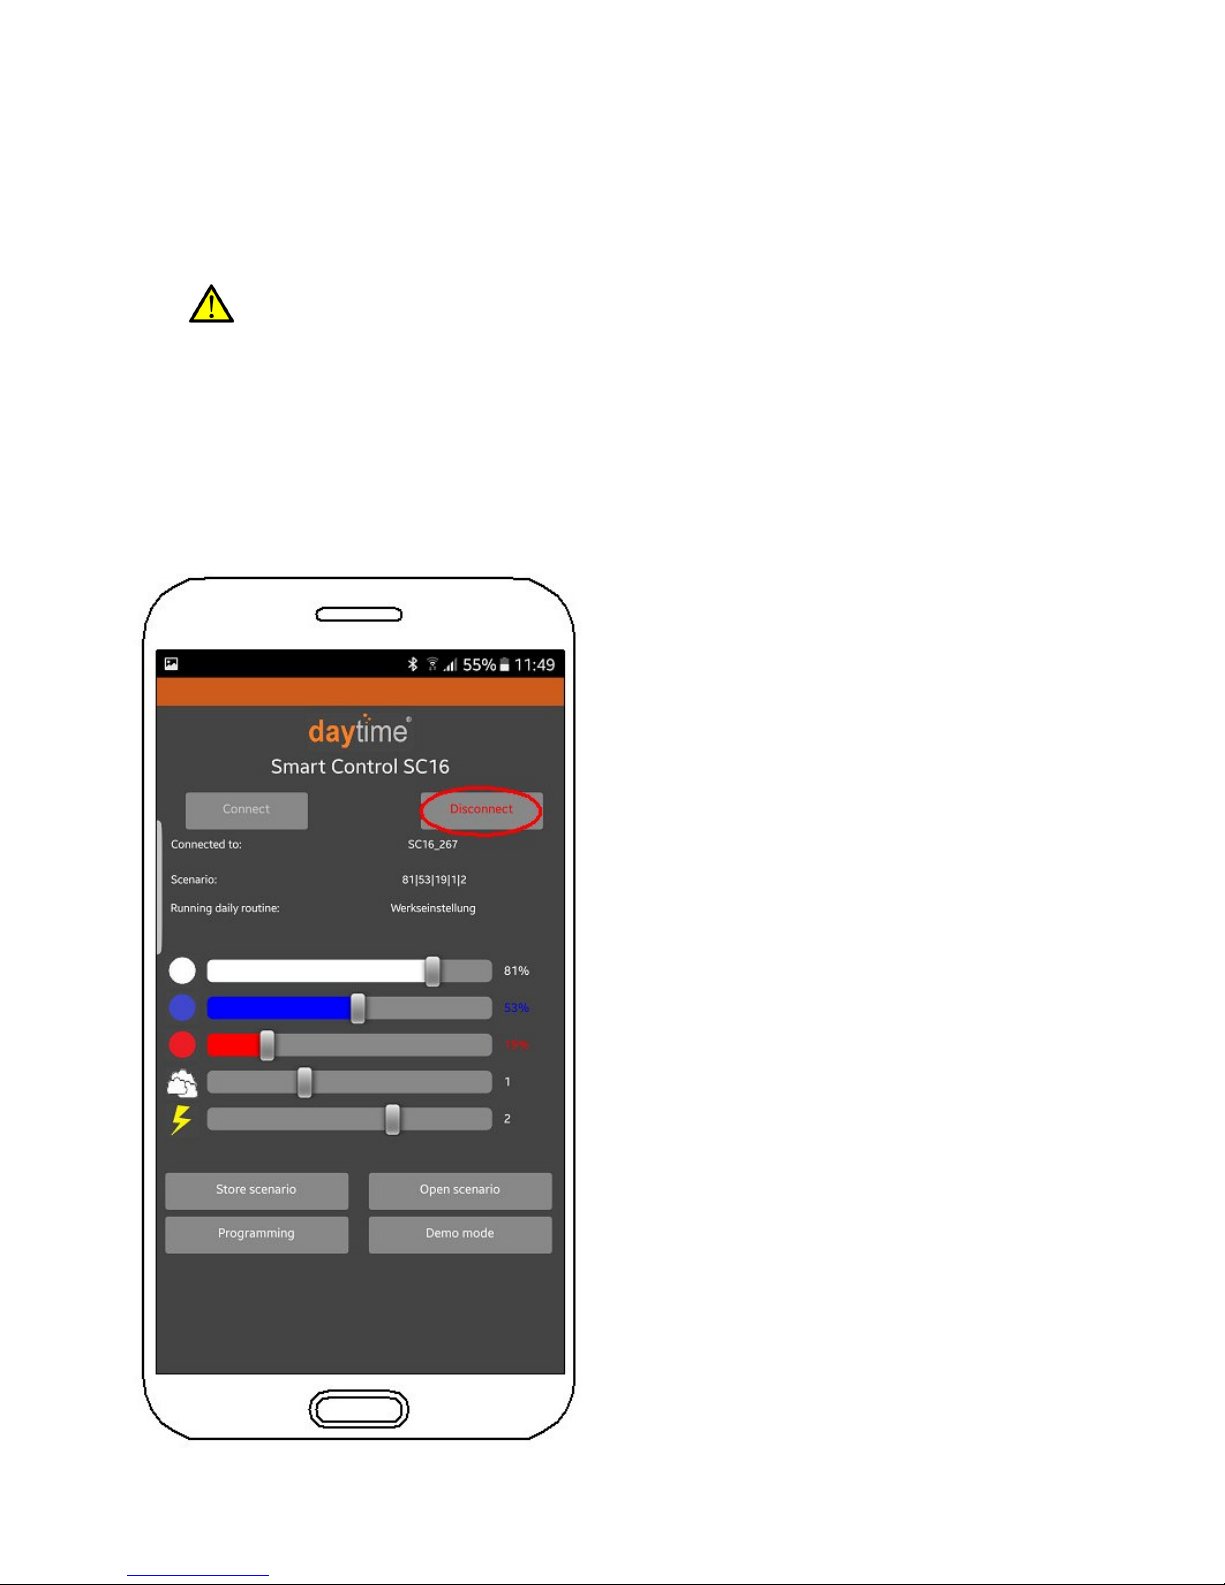
Click on the Previous buttons to get back to the Start menu and then click on Disconnect. The
connection is then terminated. The controller's status LED illuminates green to signal that automatic mode is running according to the specified and transmitted daily routine.
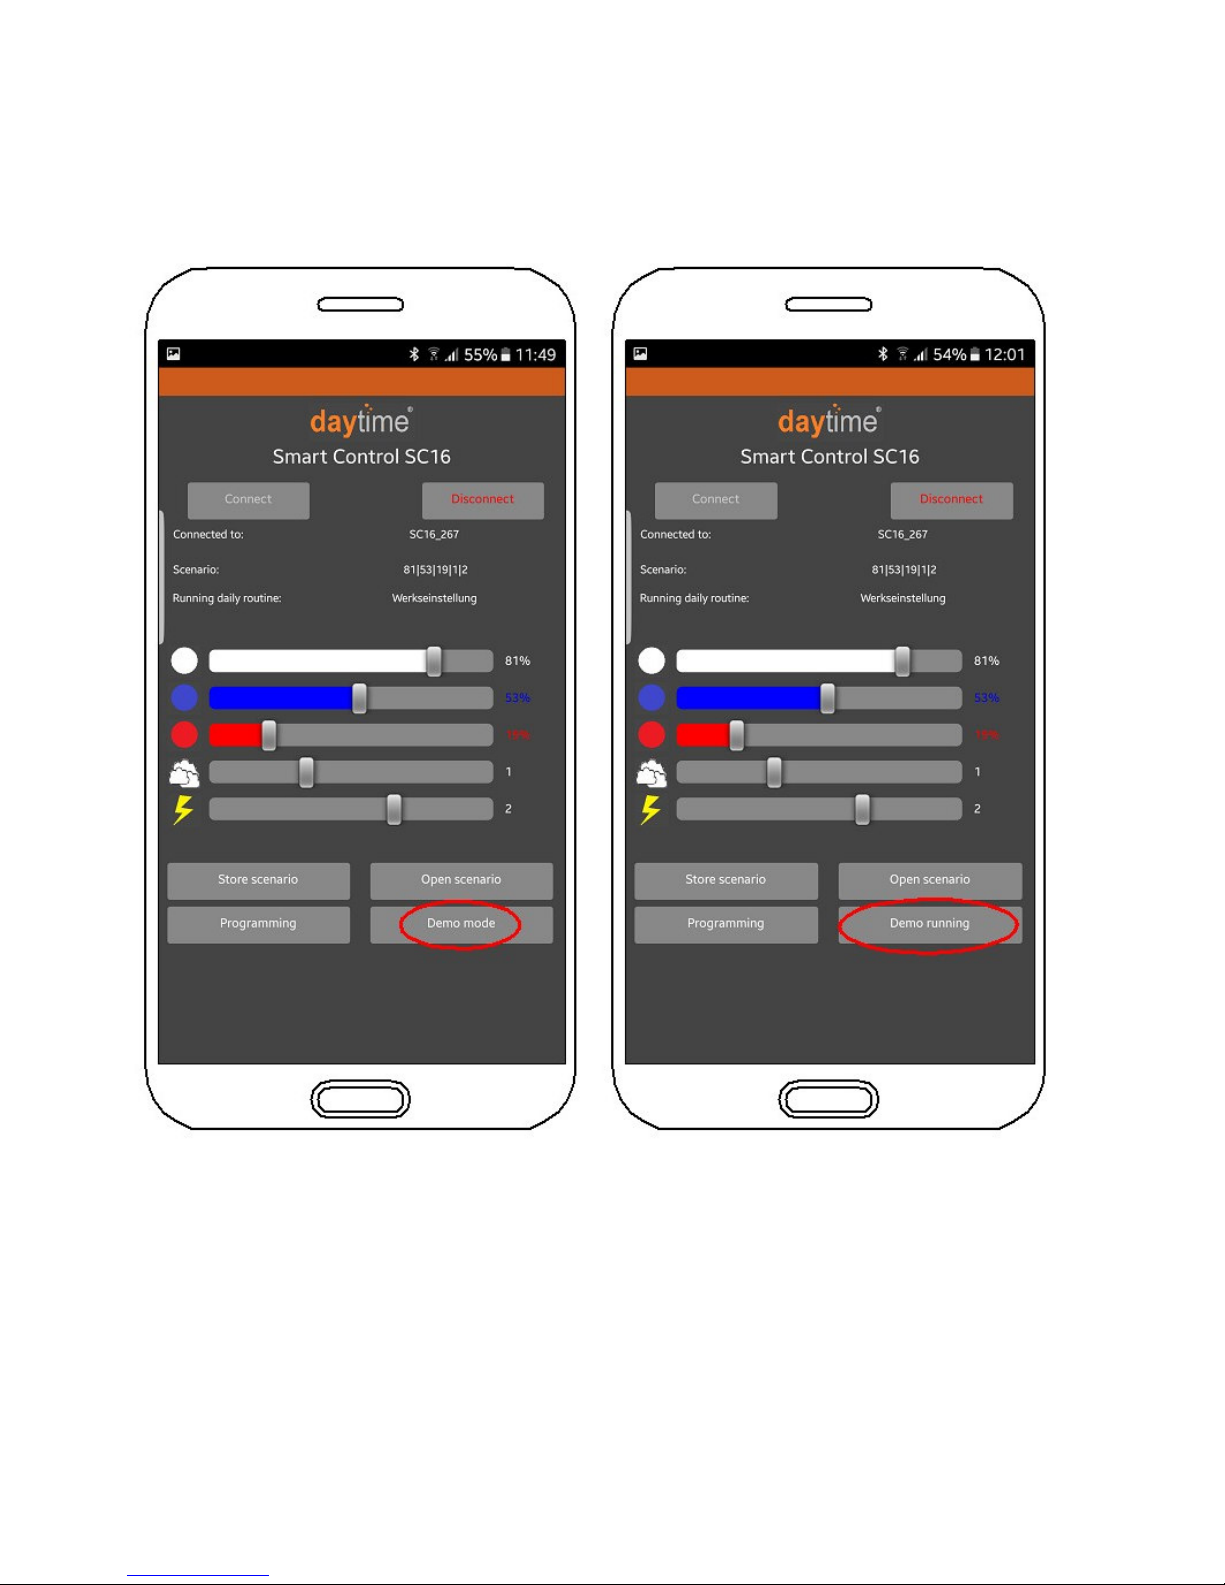
5. Demo mode
The demo mode is enabled by clicking on the corresponding button on the Start page (the app
must be connected to the controller). When demo mode is enabled, the button will display "Demo
running".
The controller continuously switches, in fast-motion time lapse, between the scenarios specified in
the daily routine. (Clouds and lightning are disabled in demo mode)
The demo mode remains switched on until you click again on the "Demo mode" button, even if the
controller disconnects from the app. If the controller has been disconnected, you will need to reconnect and click twice on the "Demo mode" button to stop demo mode.
After you click on "Demo running" to stop demo mode, the active changeover will be completed. In
rare cases, the controller must be disconnected from the power supply and then reconnected.

6. System settings
In this menu, the name of the controller can be changed, the software can be updated, and the
daily routine can be reset to the factory default settings.
Click on "Programming" and then "System settings" to access this screen.

Confirm the following message by clicking on "OK". Then click "Connect".
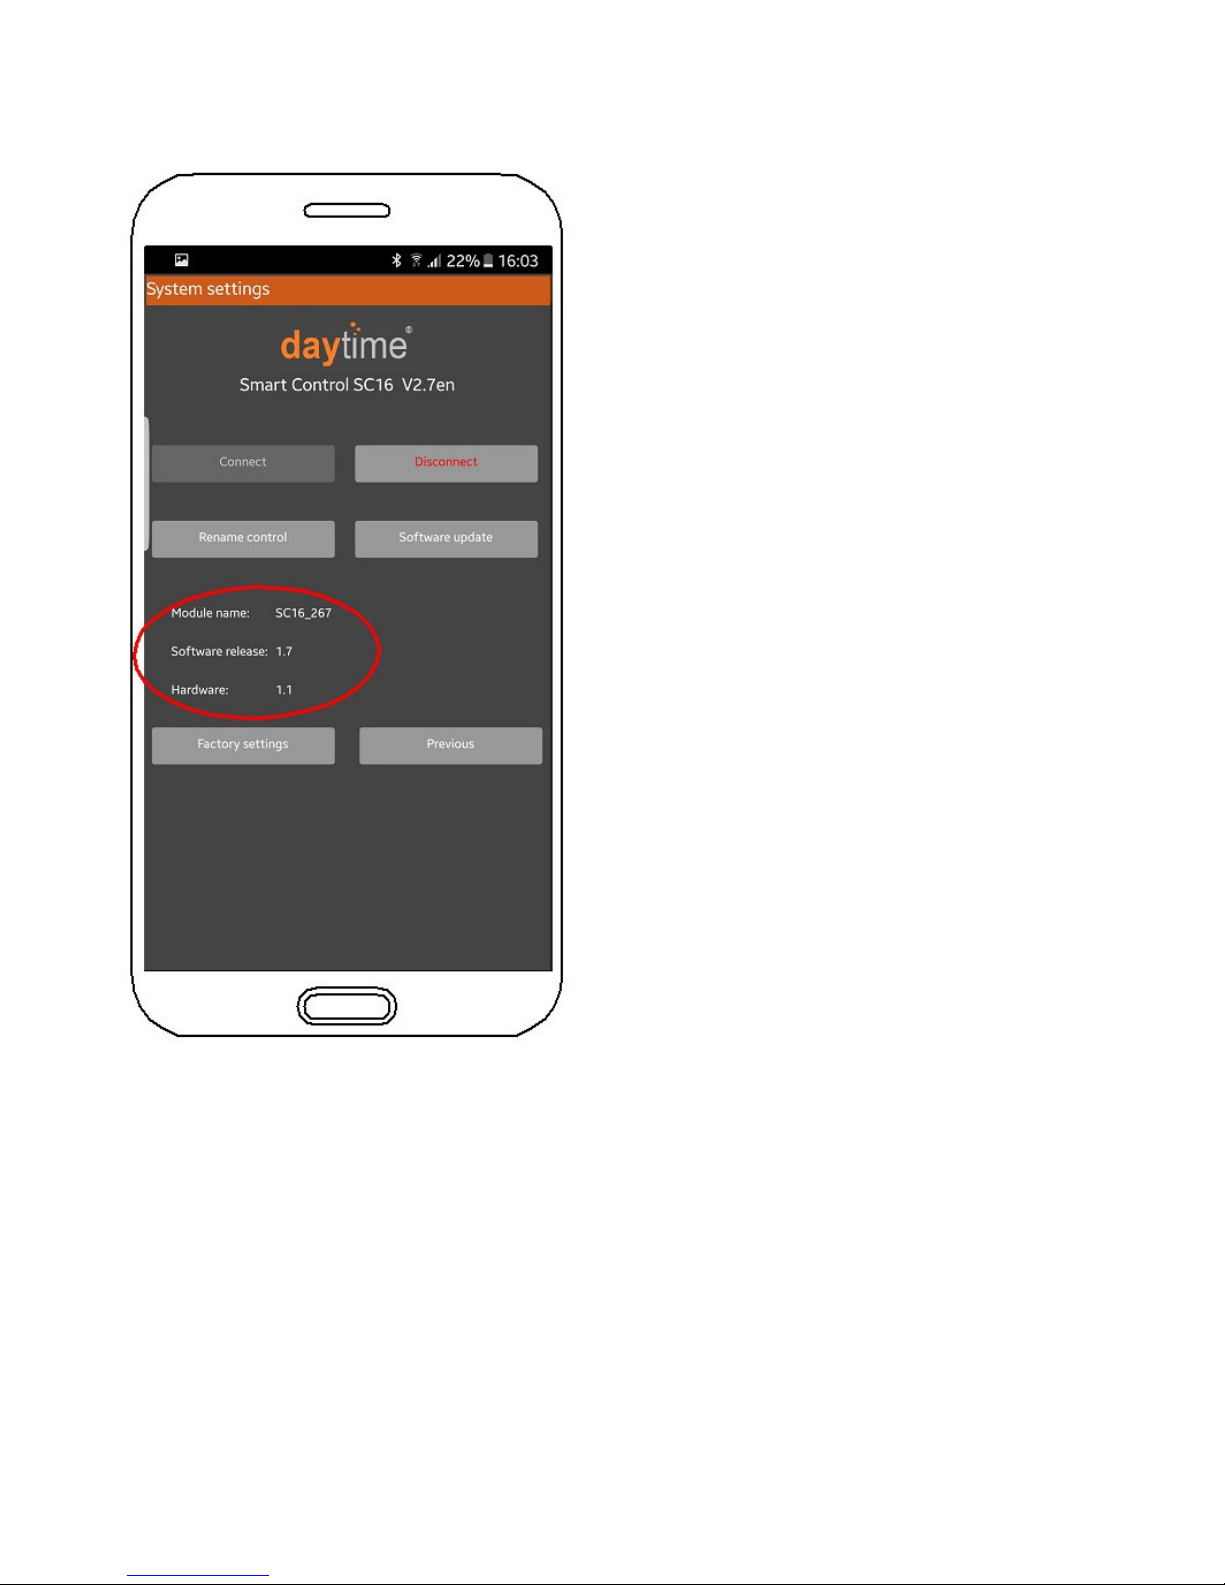
The following screen displays the actual name of the controller in the "Module name" field. The
software and hardware version numbers are also shown here.

6.1 Changing the name of the controller (the module name)
Click on "Rename control". The screen shown below then appears. Specify a new name (e.g.
lounge aquarium, test aquarium, etc.) and confirm by clicking OK. The new name will be shown
after you disconnect and reconnect.

6.2 Restoring the factory default settings
Click on "Factory settings". The next screen will show the daily routine table corresponding to the
factory settings in the background. Click on "OK" to confirm that you wish to load the factory settings.
Note: Only the values for the daily routine are specified in the factory settings. The name of
the controller (the module name) will not be reset.

6.3 Factory default settings:
Scenario "Day" from 9:00 to 20:00
White: 100%
Blue: 100%
Red: 100 %
Cloud: 0 (Off)
Thunderstorm: 0 (Off)
Scenario "Night" from 21:00 to 08:00
White: 0%
Blue: 0%
Red: 0%
Cloud: 0 (Off)
Thunderstorm: 0 (Off)
6.4 Updating the software
We are constantly striving to improve our daytime products. You can always find the most up-todate operating software, containing all current optimizations, at www.daytime.de. A guide to updating the software is also available at this link.
7. Technical specifications
Dimensions L/W/H (without connecting cables): 125 x 37 x 26 mm
Length of connecting cables (primary / secondary): approx. 90 mm (including plug and socket)
Weight: approx. 100 g
Operating voltage: 24 VDC (safety extra low voltage)
Max. capacity: 24 matrix LED-modules
Wireless transmission type: BLUETOOTH® Classic | BLUETOOTH® LE
Protection degree: IP20

Further information and advice
For each step there are video instructions.
At our website www.daytime.de you will find a link to our - channel where these instructions are clearly arranged.
Furthermore local daytime retailers and our technical support staff will be pleased to give you detailed answers via e-mail or by phone.
Warranty notice
We have a 24 month warranty for daytime® products that we deliver within the EU.
Exceptions are damages due to non-compliance with the operating manual or other improper handling.
If, contrary to expectations, you have grounds for a complaint within this warranty period, please
fill out and submit the enclosed warranty card to your nearest daytime® dealer.
daytime® – a trademark of:
Sapelloh 51
31606 Warmsen, Germany
Tel.: +49 (0) 5767 / 941 439 – 0
Fax: +49 (0) 5767 / 941 493 – 15
BA-SC16 three-channel for matrix
E-mail: info@waltron-gmbh.com
92-0007 V.08
www.daytime.de | www.waltron-gmbh.com
We reserve the right to make changes. We assume no liability for printing errors.
 Loading...