

DayStar Filters SOLAR SCOUT User Manual
DAYSTAR FILTERS
SOLAR SCOUT 60mM
DEDICATED SOLAR TELESCOPE
Congratulations on your purchase of a Solar Scout 60mm dedicated
Hydrogen Alpha solar telescope. Please read this manual before using
the product.
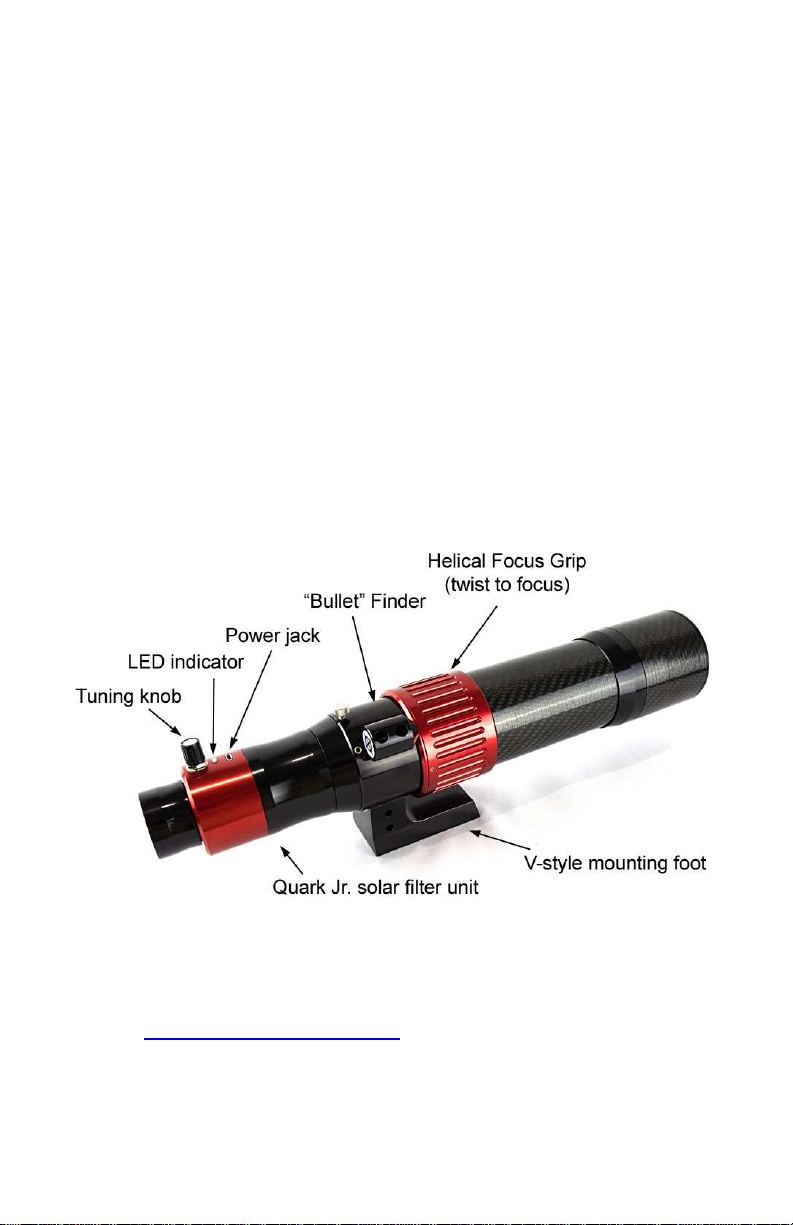
To begin, plug in the included power supply, then insert a diagonal
in the rear of the telescope, and insert an eyepiece or camera in the
diagonal. Turn the tuning knob to point straight away from the LED
light. When the light turns green in about 5-10 minutes your
viewing experience can begin. Align the telescope to the Sun by
observing the white screen on the rear of the bullet finder. Twist
the large red focus grip multiple revolutions to achieve sharpest
focus.
For assistance:
Call: 1 (866) 680-6563
Email: service@daystarfilters.com
Visit: http://www.daystarfilters.com

Cautions & Warnings:
There are no user serviceable parts inside the telescope. Do not
diassemble the unit. Certain components are under pressure and
disassembly can cause permanent damage. All elements are required
for proper operation and removal of any internal component will cause a
malfunction that could result in unfiltered light which can cause blindness
or damage to equipment.
Solar Observing with a telescope is sensitive to certain risks.
• Caution and care of the telescope and filter is advised in
assembly, use and dismantling at all times.
• Telescope owners must use caution when affixing the filter to the
telescope never to point any telescope at the sun without the
solar filter safely installed first.
• While observing, owners must take care and caution that all
parts of the filter and telescope assembly are properly affixed
and that no pieces have been opened, tampered with or
removed.
• Owners must also use caution when the telescope is being
assembled and dismantled to assure the telescope is never
pointing at the sun without the solar filter unit properly
installed.
• Responsible owners will be prudent to inform guest or novice
observers of the special nature of the telescope configuration so
not to imply that telescopic observing of the sun is safe without
proper filtration.
A few very important points that owners and operators must
understand:
• DayStar filters are rear-mounted and can be applied to a
choice of telescopes if applied properly. If application is
incorrect, the filter will not perform as specified.
• DayStar Filters are interference filters. If light reaches a
DayStar Filter at an angle, it will cause wavelength
wingshift.
• DayStar filters are temperature sensitive. Changing the
temperature will change the wavelength (CWL) that the filter will
transmit. Users need to be aware of temperature tuning issues.

USAGE:
The Scout is an F/3.75 native achromatic doublet objective with an
integrated 4.3x telecentric barlow, this results in an approximately
930mm F/15.5 image to provide the best performance.
Because of the included barlow, and ample backfocus is available and a
large magnification is achieved with normal focal length eyepieces.
The filter must be plugged in using the supplied power supply. The
etalon cavity is precision heated to regulate the wavelength of the filter
output.
Any other USB power source you wish to use must be rated for at least 2
amps at 5 volts. Computer USB ports and cell phone chargers do not
normally support this much power.
After letting the filter come up to temperature and settle, the light will turn
green and viewing can begin.
Knob tuning:
If the image lacks contrast, you may need to adjust the center
wavelength of the filter.
A knob is provided to adjust the center wavelength of the filter. Turn the
knob counter clockwise to lower the wavelength towards the blue by up
to 0.5Å. Turn clockwise to raise the wavelength towards the red by up to
0.5Å. Each click of the knob is 0.1Å.
Heavy accessories or a loose connection can cause droop, which results
in blue shift. Turn the knob clockwise 2-3 clicks and wait 5-10 minutes to
see if the view is improved.
Additional tuning can be performed, just keep in mind that after every
adjustment of the knob the filter must settle in temperature for
approximately 5-10 minutes before your change becomes effective.
Tuning can also be used to observe Doppler shifted features moving
towards or away from you. A feature moving towards you will be brighter
in blue (counterclockwise) wing shift, away from you will be reddened
(clockwise knob tuning).
Finding the Sun:
NEVER look “up” along the telescope towards the Sun, or operate
the telescope without the solar filter unit installed or eye damage
may result.
1) Observe the shadow of the telescope, and point the telescope until the
smallest shadow is obtained.
2) Observe the rear white screen on the bullet finder. Adjust the
pointing of the telescope so that the bright dot appears in the center of
the target.
3) Install your widest eyepiece, such as a 25, 32 or 40mm to locate the
Sun in the eyepiece.
Using the Quark Jr. Filter Unit on other telescopes:
The Quark Jr. solar filter portion of the Scout can be removed by
unscrewing it from the cone section of the Scout. With the addition of
optional 1.25” or 2” snouts (part # SZ12, not included) it can be used on
other refractors in the F/4-F/9 focal ratio range. Note that the Scout
60mm filter unit has a 16mm clear aperture, slightly smaller than a
standard Quark and therefore offers a slightly smaller field of view on
other telescopes than a standard Quark.
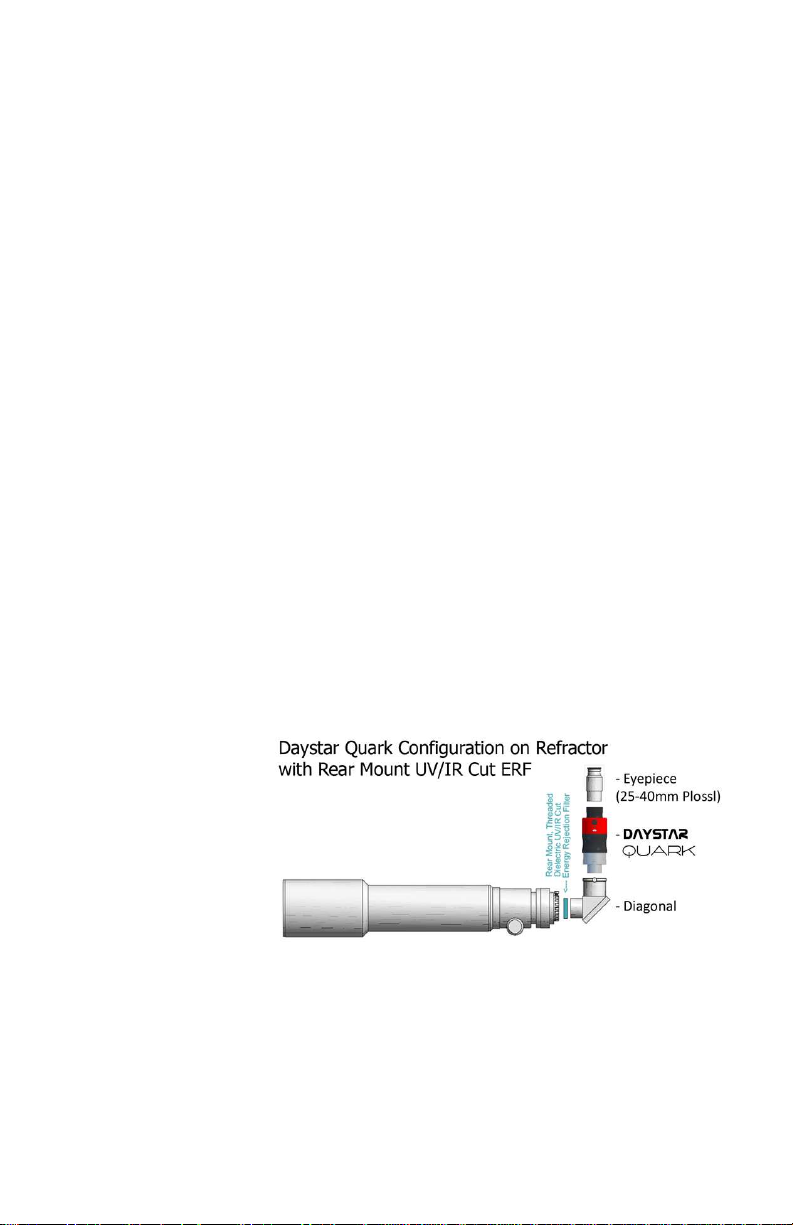
In this application,
the Quark should
usually be placed
after the telescope
diagonal.
Telescopes over
80mm of aperture
will require the use
of an Energy Rejection Filter. Either use a UV/IR cut filter placed before
the telescope diagonal, or use a front mounted yellow/red glass Energy
Rejection Filter custom built to your telescope.
Please note, a Herschel Wedge or white light filter cannot be used with
the Quark. These filters pass very little light by design and so will result
in an extremely dark image if used with the Quark.
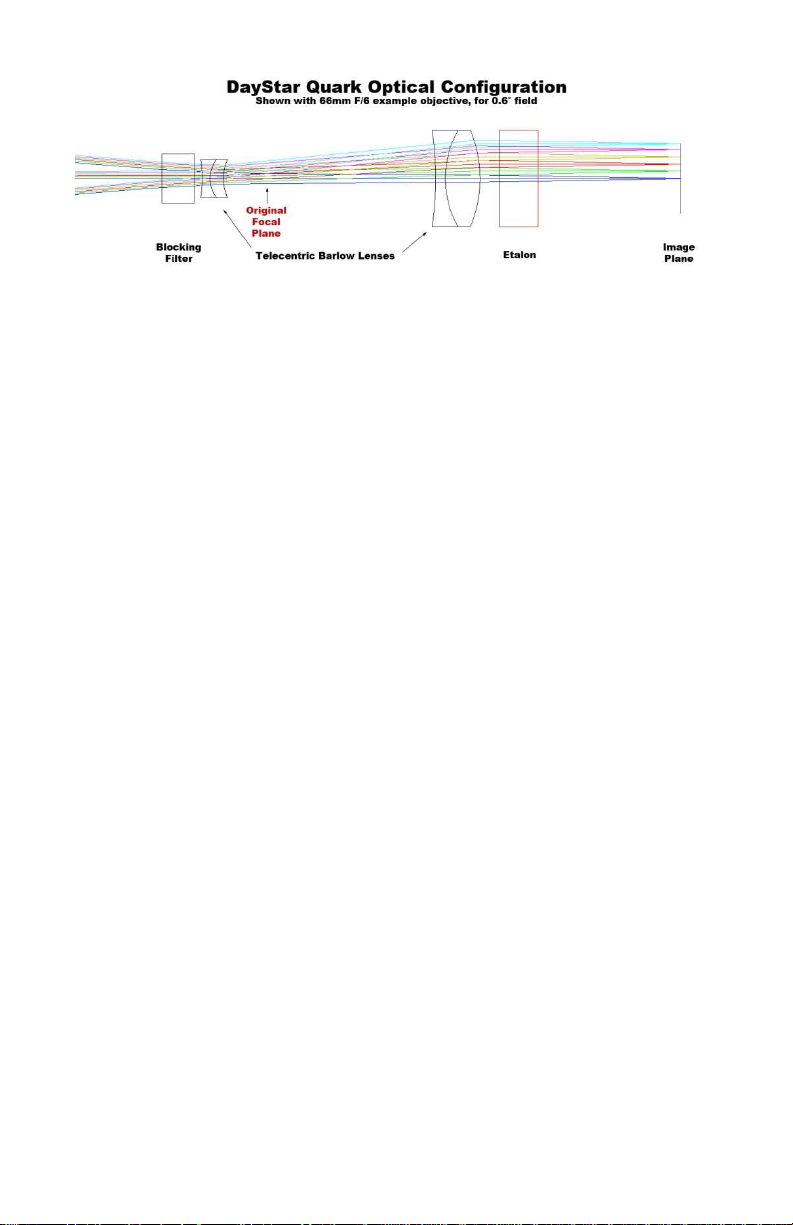
How it works:
After the objective, light from the telescope enters the blocking filter (at
left), where wavelengths near H alpha are transmitted while the rest are
reflected back out. Red H alpha light then passes through the telecentric
barlow lens elements to achieve a slower focal ratio, more parallel light
beam. The Etalon passes a very narrow range of light wavelengths, but
it is sensitive to temperature and light angle. In the Quark, the Etalon is
heated to approximately 100-150°F to control the wavelength passed,
and the telecentric barlow controls the angle of light entering the Etalon.
Care and cleaning:
While not in use, we recommend that users store the optics with their
end caps on, in a climate controlled environment. The optical filter life
expectancy is extended up to 2-3 times by climate controlled storage.
Do not touch the optical elements. While the exterior glass surface
coatings are durable, they are easily scratched. A few specks of dust will
have no effect on the quality of the image, and may be gently blown off
with a squeeze bulb. Do NOT use compressed air cans to blow dust off
any optical surfaces. Small amounts of residual 'film' will not affect visual
performance. Fingerprints, smudges and smears must be cleaned off.
Preferred cleaning method is to return the telescope to the DayStar
Filters laboratory for proper factory cleaning.
Do not unscrew, open or separate your filter assembly. The optical
elements are held under pressure by design and will become damaged if
opened. Opening the optical filter assembly will void your warranty. The
safest cleaning method is to moisten a very soft, lint-free tissue, cloth or
"Qtip" with a pure acetone, methanol, or Isopropyl Alcohol (reagent
grade) and gently whisk away the stain. Do not apply solutions directly to
the glass surface. Stroke from the center of the aperture outward only.
After each cleaning stroke, use a fresh applicator. The fewer strokes, the
better! The metal housing and other non optical parts are anodized
surfaces and can be cleaned with Windex.
 Loading...