


GenesisMP
User Guide
DayStar Digital, Inc.
Technical Support Department
5556 Atlanta Highway
Flowery Branch, GA 30542
770-967-2077 fax: 770-967-3018
http://www.daystar.com/


Preface
About Genesis MP
The Media-Publishing Workstation for the Next Century. . . . . . . . . . . . . . . . . . . . . . . 7
Three Configurations to Best Meet Your Needs . . . . . . . . . . . . . . . . . . . . . . . . . . . . . . 8
Genesis MP is Built for Expandability. . . . . . . . . . . . . . . . . . . . . . . . . . . . . . . . . . . . . 9
A Next-Generation Solution that Works Alongside Today’s Technology . . . . . . . . . . . . . . . 9
A Fine-Tuned Solution for Media-Publishing. . . . . . . . . . . . . . . . . . . . . . . . . . . . . . . 10
Toward the Future . . . . . . . . . . . . . . . . . . . . . . . . . . . . . . . . . . . . . . . . . . . . . . . . . . . 11
Chapter 1
Setting Up Your Genesis MP
Table of Contents
Unpacking Your Genesis MP . . . . . . . . . . . . . . . . . . . . . . . . . . . . . . . . . . . . . . . . . . . 13
Choosing a Work Space . . . . . . . . . . . . . . . . . . . . . . . . . . . . . . . . . . . . . . . . . . . . . . . 13
Important External Components of Your Genesis MP. . . . . . . . . . . . . . . . . . . . . . . . . 14
Important Internal Components of Your Genesis MP . . . . . . . . . . . . . . . . . . . . . . . . . 15
Plugging in Your Genesis MP . . . . . . . . . . . . . . . . . . . . . . . . . . . . . . . . . . . . . . . . . . 16
Expansion Cards . . . . . . . . . . . . . . . . . . . . . . . . . . . . . . . . . . . . . . . . . . . . . . . . . . . . 16
SCSI Devices. . . . . . . . . . . . . . . . . . . . . . . . . . . . . . . . . . . . . . . . . . . . . . . . . . . . . . . 16
Connecting Your Monitor . . . . . . . . . . . . . . . . . . . . . . . . . . . . . . . . . . . . . . . . . . . . . . 17
Connecting the Mouse and Keyboard. . . . . . . . . . . . . . . . . . . . . . . . . . . . . . . . . . . . . 18
Turning on Your Genesis MP . . . . . . . . . . . . . . . . . . . . . . . . . . . . . . . . . . . . . . . . . . . 19
Shutting Down Your Genesis MP. . . . . . . . . . . . . . . . . . . . . . . . . . . . . . . . . . . . . . . . 20
Where to Go From Here . . . . . . . . . . . . . . . . . . . . . . . . . . . . . . . . . . . . . . . . . . . . . . 20
GenesisMP
Table of Contents
◆ 3

Chapter 2
Help is at Your Fingertips
The Macintosh Tutorial . . . . . . . . . . . . . . . . . . . . . . . . . . . . . . . . . . . . . . . . . . . . . . . 21
Balloon Help . . . . . . . . . . . . . . . . . . . . . . . . . . . . . . . . . . . . . . . . . . . . . . . . . . . . . . . 21
The Macintosh Guide. . . . . . . . . . . . . . . . . . . . . . . . . . . . . . . . . . . . . . . . . . . . . . . . . 22
Chapter 3
Connecting Additional Peripherals
Adding External Devices to Your Genesis MP
ADB Devices . . . . . . . . . . . . . . . . . . . . . . . . . . . . . . . . . . . . . . . . . . . . . . . . . . . 28
Serial port/GeoPort Devices. . . . . . . . . . . . . . . . . . . . . . . . . . . . . . . . . . . . . . . . . 28
Network . . . . . . . . . . . . . . . . . . . . . . . . . . . . . . . . . . . . . . . . . . . . . . . . . . . . . . . 28
External SCSI Devices. . . . . . . . . . . . . . . . . . . . . . . . . . . . . . . . . . . . . . . . . . . . . 28
Adding Audio Devices. . . . . . . . . . . . . . . . . . . . . . . . . . . . . . . . . . . . . . . . . . . . . 33
Adding Video Devices (Three Slot Genesis MP Only) . . . . . . . . . . . . . . . . . . . . . 35
Adding Internal Devices to Your Genesis MP
Opening Your Genesis MP
Adding Memory . . . . . . . . . . . . . . . . . . . . . . . . . . . . . . . . . . . . . . . . . . . . . . . . . 39
Adding Video RAM (Three Slot Genesis MP Only) . . . . . . . . . . . . . . . . . . . . . . . . . . . 41
Adding PCI cards . . . . . . . . . . . . . . . . . . . . . . . . . . . . . . . . . . . . . . . . . . . . . . . . 43
Upgrading the nPOWER Processor Card . . . . . . . . . . . . . . . . . . . . . . . . . . . . . . . 44
Adding Internal SCSI Drives. . . . . . . . . . . . . . . . . . . . . . . . . . . . . . . . . . . . . . . . 46
Adding SCSI Devices into the Internal 3.5" bay . . . . . . . . . . . . . . . . . . . . . . 47
Adding SCSI Devices into the Internal 5.25" bay. . . . . . . . . . . . . . . . . . . . . . 50
Replacing the Lithium Battery. . . . . . . . . . . . . . . . . . . . . . . . . . . . . . . . . . . . . . . 54
Table of Contents
GenesisMP4 ◆

Chapter 4
Installing Genesis MP System Software
Installing the Mac OS
Performing an Easy Install or Clean Install . . . . . . . . . . . . . . . . . . . . . . . . . . 57
Performing a Custom Install . . . . . . . . . . . . . . . . . . . . . . . . . . . . . . . . . . . . . 59
Installing Genesis MP Software
Performing an Easy Install. . . . . . . . . . . . . . . . . . . . . . . . . . . . . . . . . . . . . . . 60
Performing a Custom Install . . . . . . . . . . . . . . . . . . . . . . . . . . . . . . . . . . . . . 61
Chapter 5
Troubleshooting
Troubleshooting. . . . . . . . . . . . . . . . . . . . . . . . . . . . . . . . . . . . . . . . . . . . . . . . . . . . . 63
Control Panel or Extension Conflicts . . . . . . . . . . . . . . . . . . . . . . . . . . . . . . . . . . . . . 67
Clearing Parameter RAM. . . . . . . . . . . . . . . . . . . . . . . . . . . . . . . . . . . . . . . . . . . . . . 67
Incompatible Formatting Software. . . . . . . . . . . . . . . . . . . . . . . . . . . . . . . . . . . . . . . 67
Performance Notes. . . . . . . . . . . . . . . . . . . . . . . . . . . . . . . . . . . . . . . . . . . . . . . . . . . 68
Appendix
Product Warranty. . . . . . . . . . . . . . . . . . . . . . . . . . . . . . . . . . . . . . . . . . . . . . . . . . . . 69
Upgrading Your Genesis MP . . . . . . . . . . . . . . . . . . . . . . . . . . . . . . . . . . . . . . . . . . . 69
How to Service Your Genesis MP . . . . . . . . . . . . . . . . . . . . . . . . . . . . . . . . . . . . . . . 70
Contacting DayStar . . . . . . . . . . . . . . . . . . . . . . . . . . . . . . . . . . . . . . . . . . . . . . . . . . 70
Index
Index. . . . . . . . . . . . . . . . . . . . . . . . . . . . . . . . . . . . . . . . . . . . . . . . . . . . . . . . . . . . . 73
CANADIAN RFI REQUIREMENTS
This digital apparatus does not exceed the Class A limits for radio noise emissions
from digital apparatus set out in the Radio Interference Regulations of the Canadian
Department of Communications.
Le present appareil numerique n’emet pas de bruits radioelectriques depassant les limites applicables aux appareils numeriques de la classe A prescrites dens le Reglement
sur le brouillage radioelectrique edicte par le ministere des Communications du Canada.
GenesisMP
Table of Contents
◆ 5

FCC Statement
This equipment has been tested and found to comply with the limits for a Class A
digital device, pursuant to Part 15 of the FCC Rules. These limits are designed to
provide reasonable protection against harmful interference when the equipment is operated in a commercial environment. This equipment generates, uses, and can radiate
radio frequency energy and, if not installed and used in accordance with the instruction
manual, may cause harmful interference to radio communications. Operation of this
equipment in a residential area is likely to cause harmful interference in which case the
user will be required to correct the interference at his own expense.
!
∆
IMPORTANT:
Changes or modifications to this product not authorized by DayStar Digital, Inc., could
void the FCC Certification and negate you own authority to operate the product.
This product was tested for FCC compliance under conditions that included the use
of DayStar peripheral devices and DayStar shielded cables and connectors between
system components. It is important that you use FCC compliant peripheral devices and
shielded cables and connectors between system components to reduce the possibility of
causing interference to radios, television sets, and other electronic devices. You can
obtain DayStar peripheral devices and the proper shielded cables and connectors
through a DayStar-authorized dealer. For non-DayStar peripheral devices, contact the
manufacturer or dealer for assistance.
Lithium Battery
Genesis MP uses a lithium battery to store users’ preferences and time and date
information while the unit is not turned on.
!
∆
CAUTION
Danger of explosion if battery is incorrectly replaced. Replace only with the same or
equivalent type recommended by the manufacturer. Dispose of used batteries according
to the manufacturer’s instructions.
CD-ROM Drive
!
∆
!
∆
Information on Communications Regulations
CAUTION
Making adjustments or performing procedures other than those specified in your
equipment’s manual may result in hazardous exposure.
CAUTION
Do not attempt to disassemble the cabinet containing the laser. The laser beam used in
this product is harmful to the eyes. The use of optical instruments, such as magnifying
lenses, with this product increases the potential hazard to your eyes. For your safety,
have this equipment serviced only by a DayStar-authorized service provider.
If you have an internal DayStar CD-ROM drive in your Genesis MP, your computer is
a Class 1 laser product. The Class 1 label, located in a user-accessible area, indicates
that the drive meets minimum safety requirements. A service warning label is located in
a service-accessible area.
GenesisMP6 ◆

Preface
About Genesis MP
The Media-Publishing Workstation for the Next Century
Congratulations. You own the new standard in the computer industry—the DayStar
Genesis MP. Now Macintosh users can have the speed they associate with expensive,
high-end workstations—but at a reasonable price. DayStar Digital is pleased to have
signed an agreement with Apple Computer, Inc. to build Genesis MP, a next-generation
platform for the Mac OS.
Genesis MP is the fastest Mac OS based system available—the first Mac OS based
computer with speed built-in. Using its expertise in multiprocessing, DayStar created
Genesis MP with internal multiprocessing hardware and software. Adopted by Apple,
DayStar’s nPOWER multiprocessing extensions to the Mac OS are now the official
standard for multiprocessing on the Mac.
As computer software becomes more sophisticated, designers, illustrators, video editors,
animators and multimedia producers will require a machine that’s fast enough to keep
pace with their flow of ideas. Genesis MP is a Media-Publisher’s dream come true.
Genesis MP will run the software you know at speeds you have only imagined.
First— Genesis MP begins with a fast, upgradable PCI-bus motherboard, featuring 2
SCSI busses, Ethernet, 16-bit stereo sound and room for ample memory expansion.
Then— DayStar adds its nPOWER scalable multiprocessing technology (which
includes both hardware and software), a fast tray-loading CD-ROM drive and a
solidly-built tower case with 10 drive bays, 350 watt power supply and three large
cooling fans for improved system reliability.
At the heart of Genesis MP is nPOWER—DayStar’s upgradable processor card, which
features four PowerPC 604 processors. A single PowerPC 604 chip, running at 132
MHz executes instructions 50% faster than the 110 MHz PowerPC 601 CPU used in
the Power Macintosh 8100.
nPOWER’s multiprocessing is very efficient—the quad processor nPOWER card can
nearly quadruple the speed of multiprocessing applications. Since the processors are on
a card, Genesis may be upgraded as faster and more advanced processor technology
becomes available.
To allow programs to take advantage of nPOWER’s speed, DayStar has developed an
open multiprocessing API (Application Programming Interface). The API makes it very
easy for programmers to add multiprocessing support to applications. The API standard
is available to all interested developers.
GenesisMP
About Genesis MP
◆ 7

Apple has acquired the rights to DayStar’s nPOWER architecture. With Apple’s
commitment, nPOWER (now known as the Apple Multiprocessing Application
Programming Interface) is assured of software support in future versions of the
Macintosh operating system. Software developers that provide support for nPOWER
include Adobe, Metrowerks, Strata, Elastic Reality and many others.
Three Configurations to Best
Meet Your Needs
(3) Slot Genesis MP
The entry level three slot
Genesis MP provides multiprocessing PowerPC 604 performance without the extensive memory and PCI
slot expansion of the six slot unit.
It’s on-board graphic display provides fast, entry level performance
supporting resolutions up to 1,152 x
870 at 24-bit (with additional 2 MB
VRAM expansion). The three slot
unit’s 8 DIMM sockets support up to
1 GB of RAM using 128 MB
DIMM modules. This Genesis MP
model also provides 24-bit
Multimedia video input.
(3) Slot Genesis MP
w/ Multimedia Video Out
This three slot Genesis MP configuration provides all of the features of
the three slot system above, but adds
Composite and S-Video output.
(6) Slot Genesis MP
The six slot Genesis MP offers the
ultimate performance and expandability for running the Mac OS. This
Genesis MP model provides six
total PCI slots allowing users to
tailor the system for their specific
needs. The 12 DIMM sockets provide for RAM expansion up to 1.5
GB, 50% greater than the three slot
Genesis MP. And with six PCI slots,
users can create their own “ultimate
workstation” using the latest technology such as SCSI-3, Fast
Ethernet, even professional quality
audio/video capability.
Component 3 Slot 3 Slot 6 Slot
Description 001374 001398 001381
nPOWER Quad 604 Board
512K Secondary Cache
CD-ROM Drive
1.4 MB Floppy Drive
PCI Expansion Slots 3 3 6
5.25” Internal Bay 1 1 1
Internal 3.5” Internal Drive Bays 7 7 7
DIMM Sockets 8 8 12
350 Watt Power Supply
Dual Internal Cooling Fans
Front Mounted Power Switch
Locking Side Panel
Power-on Light
Monitor Power Socket
External SCSI Port
Ethernet AAUI Port
Ethernet 10BASE-T Port
Printer Port/GeoPort
ADB Port
Modem Port/GeoPort
Sound Input/Output Ports
Monitor Port
Audio Input/Output Ports
Composite Video Input Port
Composite Video Output Port
S-Video Input Port
†
120MHz 120MHz 132MHz
✓✓✓
✓✓✓
✓✓✓
✓✓✓
✓✓✓
✓✓✓
✓✓✓
✓✓✓
✓✓✓
✓✓✓
✓✓✓
✓✓✓
✓✓✓
✓✓✓
✓✓✓
✓✓✓
✓✓
✓✓
✓✓
✓
✓✓
Preface – About Genesis MP
S-Video Output Port
✓
GenesisMP8 ◆
Genesis MP is Built for Expandability
The large number of DIMM memory slots allow you to plug in additional DIMMs
without removing existing memory. The large power supply and many drive bays mean
that you won’t outgrow your Genesis.
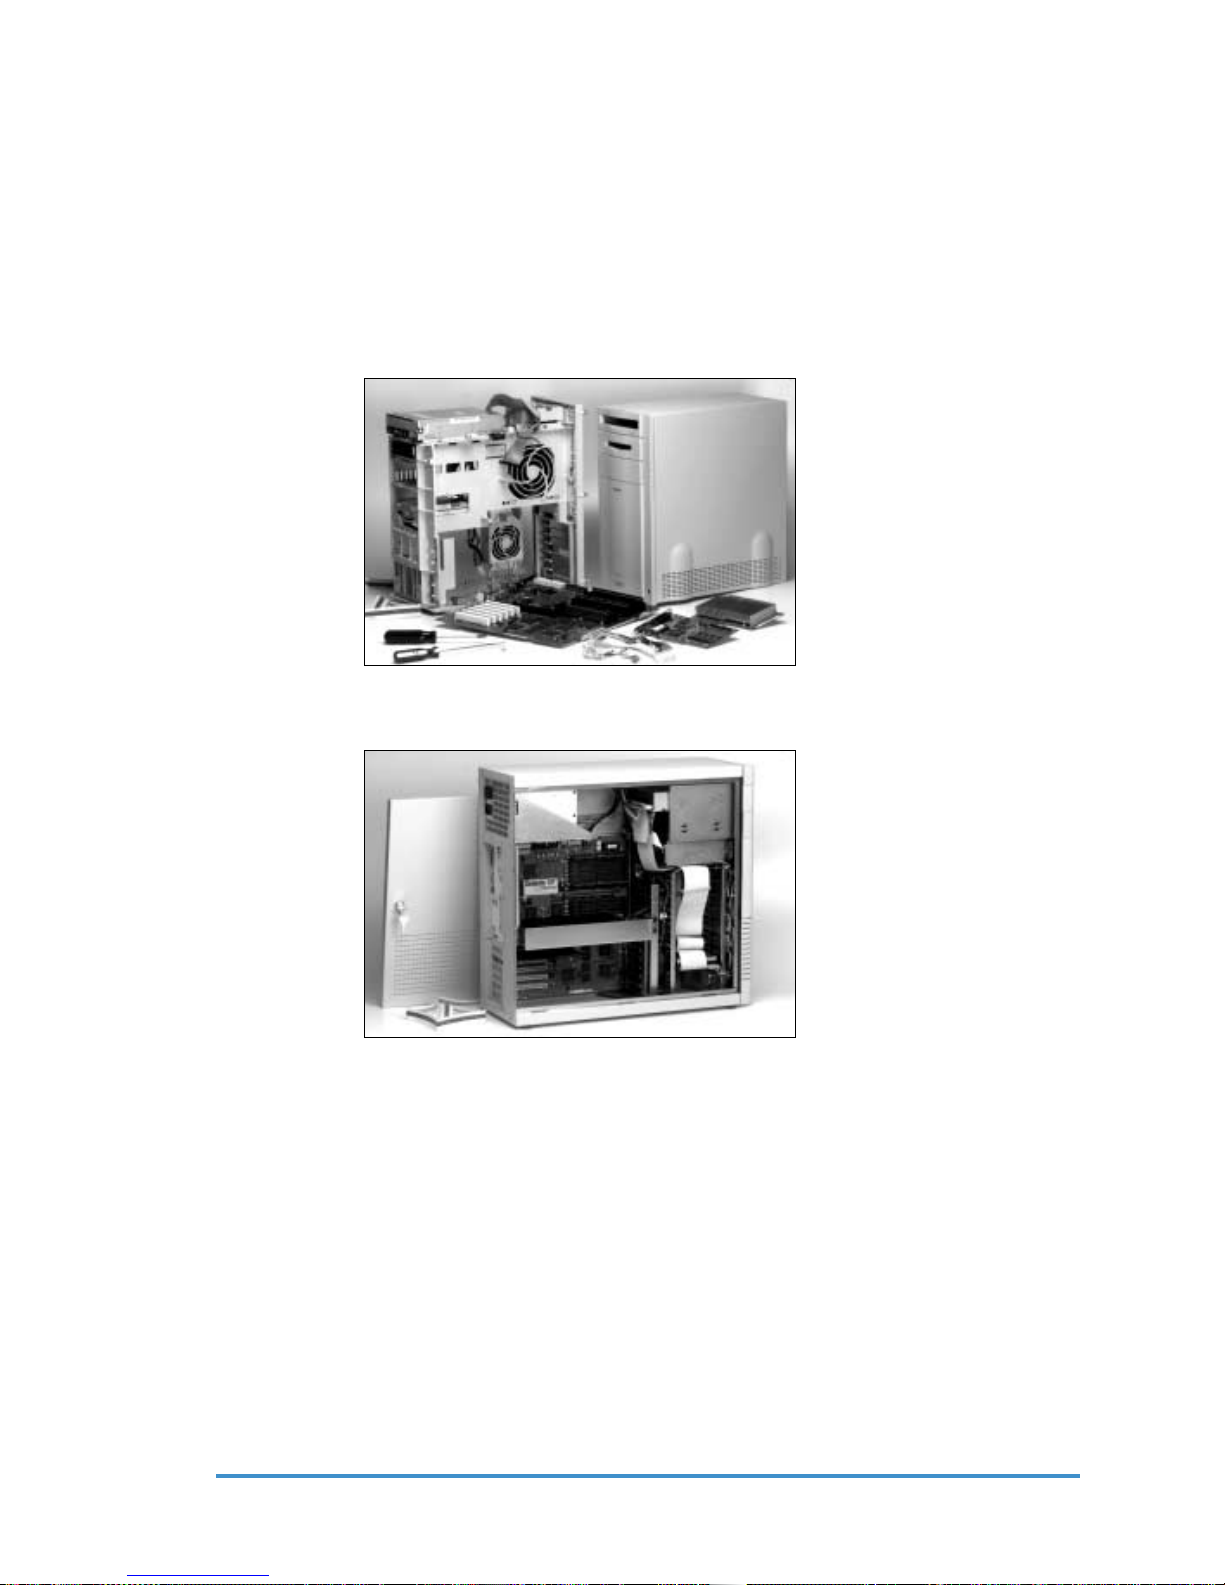
The full-access design of Genesis MP’s case makes expansion even easier. Just open
the side door and you can add storage devices, memory, and PCI expansion cards with
ease. By comparison, the Power Macintosh 9500 requires complete disassembly of the
case to access memory slots.
Adding Memory to the Apple
Power Macintosh 9500
A Next-Generation Solution that Works Alongside Today’s Technology
Since Genesis MP runs the Mac OS, your transition to multiprocessing speed is an
evolution, not an experiment. You can retain your favorite applications and working
environment. Genesis MP accepts your existing SCSI peripherals and network
connections, and you can add even faster peripherals in the future via the PCI bus.
GenesisMP
Adding Memory to the DayStar
Genesis MP
Preface – About Genesis MP
◆ 9

Genesis MP Takes on the Field
In the competitive world of high-performance platforms, Genesis MP has some important advantages which set it apart from UNIX workstations, such as those from Silicon
Graphics, and other Mac OS platforms.
• Genesis MP is the ultimate in speed, expandability, and upgradability. DayStar
provides more machine than you can get from Apple or any other vendor of
Mac OS based systems. Its ample expansion space, beefy power supply and
processor upgradability make it the Mac OS workstation of choice.
• Where the criterion is speed, Genesis MP has it. Fast SCSI-2, fast PCI
expansion, fast processors and more of them. More speed means jobs get done
quicker and the workstation is available for more paying work. And designers
can spend more time grappling with creative issues and less time watching the
progress bar.
• Because Genesis MP is built on the Mac OS, you’ll have access to thousands
of popular and well-known applications. By contrast, UNIX systems are often
specialty installations, designed to run a small suite of applications.
• Software for UNIX machines is very expensive, sometimes running into tens of
thousands of dollars for critical applications. Because the installed base of Mac
OS systems is so much larger than that of any of the specialized workstations,
competitive pressures keep prices reasonable and software updates coming on a
regular basis.
• UNIX is a very powerful operating system, but also very complex. Graphical
interfaces which run on top of UNIX can make life easier, but your creative
staff still has to learn an entirely new environment, with syntax that is similar
to MS-DOS—only more cryptic. You’ll certainly need a knowledgeable UNIX
system administrator, either on-staff, or as a regular consultant. Mac OS is
powerful, flexible, easy, and in use by 70% or more of the publishing
industry today.
A Fine-Tuned Solution for Media-Publishing
Genesis MP – DayStar’s high performance Media-Publishing system built around the
Mac OS – uses a revolutionary new multiprocessing (MP) technology developed in
partnership with Apple Computer. Genesis MP is the first and only Mac OS based platform designed explicitly for the workstation user – a platform that has the ease of use
and broad application base of the Macintosh with more processing power than hard-touse UNIX-based workstations from SGI and Sun Microsystems.
If you own a business you don’t have to learn a new operating system or retrain your
staff. Your current staff can perform all of the typical system chores with Genesis MP,
and you can hire from a broad pool of talented artists, designers and other creatives.
Genesis MP is delivered with a multiprocessing extension to Adobe Photoshop 3.0.4 or
greater which accelerates hundreds of functions across multiple processors. It’s huge
memory expansion and fast disk access make Genesis MP ideal for image editing
applications.
Print publishers will enjoy the large available storage and fast disk access. Service
bureaus have plenty of room for multiple hard drives for server and array use. The multiple processors and large memory speed RIPing of complex artwork.
Preface – About Genesis MP
GenesisMP10 ◆

3-D illustrators and animators are able to make use of the huge memory expansion
capability to design more complex scenes. Multiprocessing acceleration allows for
faster renders, making it easier to use ray-tracing, particle systems, and gases. The fast
SCSI-2 interface allows animators to play back animations directly to video tape via
third party PCI video cards.
Video editors and multimedia producers will love the high speed disks for video
recording. The fast PCI bus and disks allow higher throughput for highest quality video
recording and playback. Multiprocessing speeds video compression to QuickTime,
JPEG, and eventually MPEG formats.
Toward the Future
As your creative needs grow, so will your demand for processing power. In the future,
it will become commonplace for desktop computers to have memory as large as today’s
hard disks. Increased use of imagery, animation, virtual reality technology and full
motion video will test the limits of all but the most agile computing platforms.
Genesis MP can meet the challenge, with the features and expandability to satisfy the
needs of the Media-Publisher today—and into tomorrow.
GenesisMP
Preface – About Genesis MP
◆ 11


Setting Up Your Genesis MP
Unpacking Your Genesis MP
It’s time to take your new Genesis MP out of the box and set it up!
Genesis MP comes with:
• Genesis MP system
• Mac OS
• Multiprocessing system software
• Genesis MP User’s Manual
• Warranty card
• Power cord
• Anti-Static wrist strap
Chapter 1
• Mouse
• Keyboard with ADB cable
You’ll also need:
• Monitor with power cord
• Monitor cable
• PCI graphic card (only required for 6 slot Genesis MP)
Choosing a Work Space
Genesis MP was designed to be placed on the floor. That’s so you can use your whole
desk as a work area. If you want to place Genesis MP on your desk or on another
raised surface, you must be sure that the surface is strong enough to hold everything
that goes with your unit.
Your Genesis MP weighs approximately 50 lbs. all by itself. And remember, your
monitor and other peripherals will add even more total weight. But whatever you
decide, you’ll want to place your Genesis MP on a sturdy, flat surface near a grounded
three-hole wall outlet.
GenesisMP
Setting Up Your Genesis MP
◆ 13
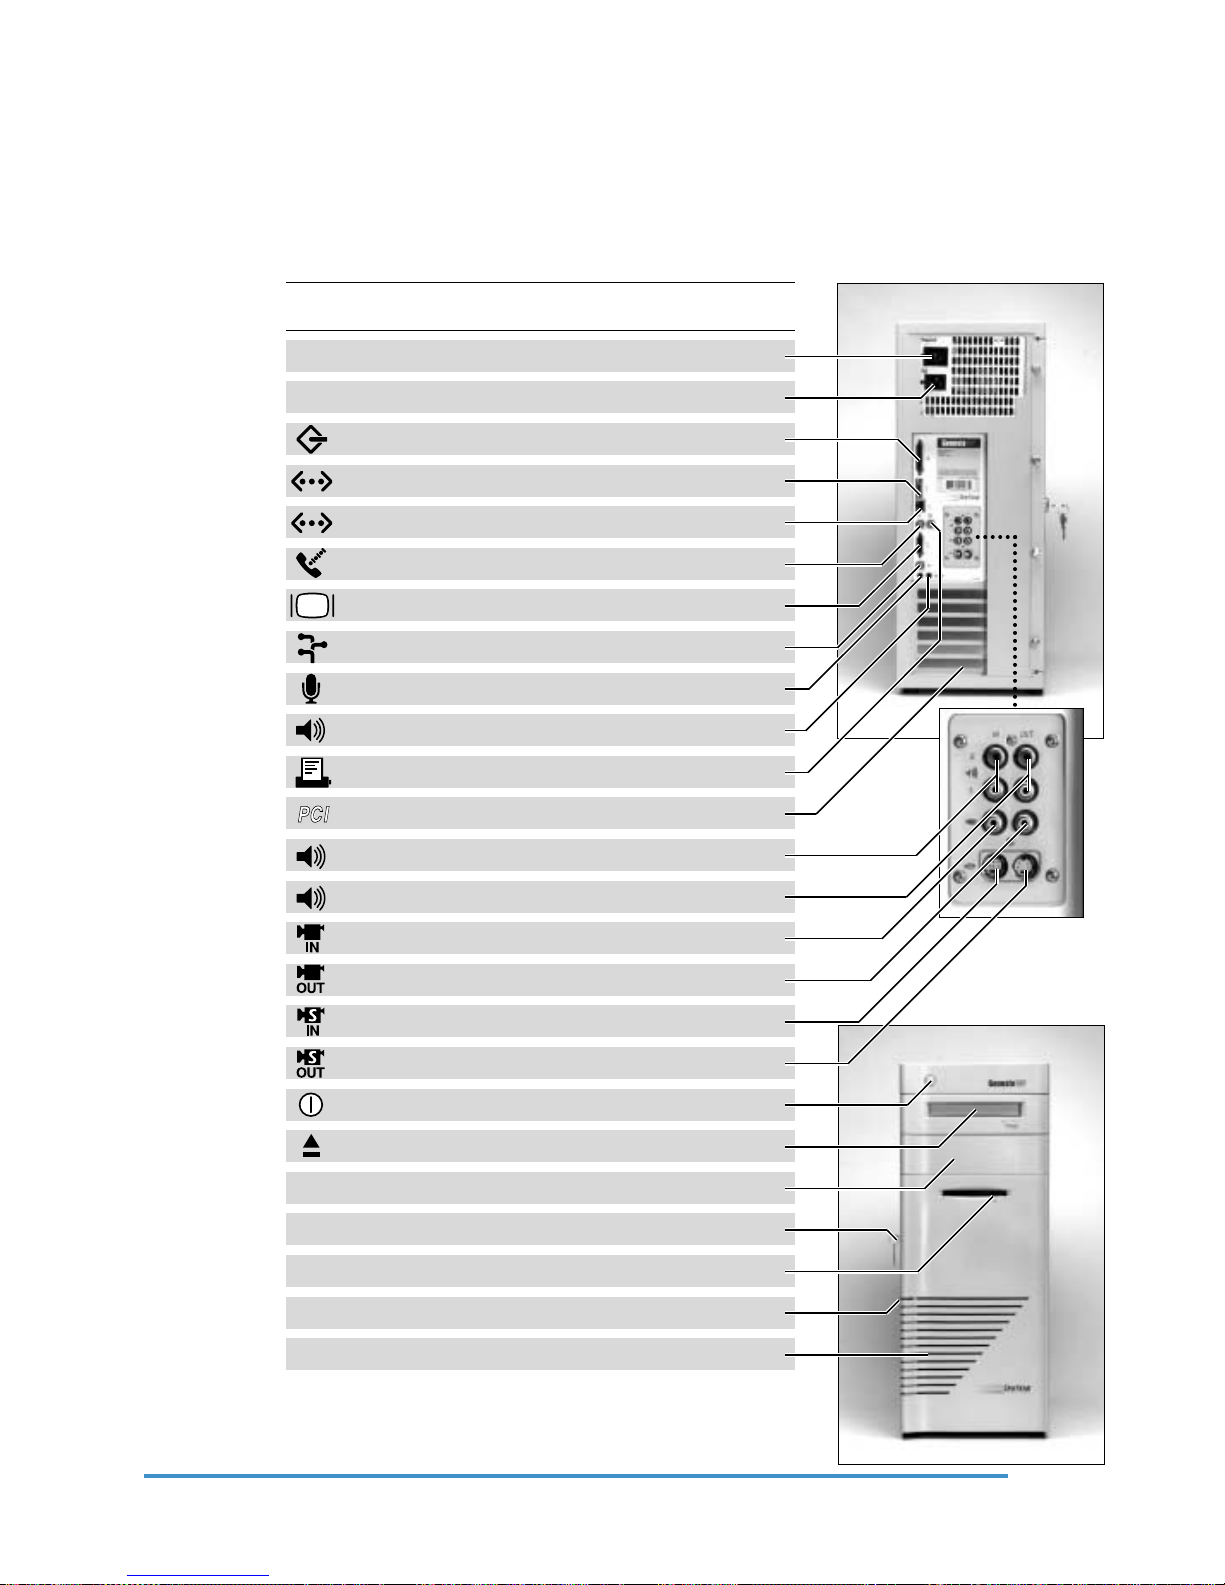
Important External Components of Your Genesis MP
PCI
This photograph lists all the important external components and features of your Genesis
MP. This graphic will help you follow along with the following set-up instructions.
(No check mark means that a particular model does not provide the listed capability
without the use of a third party PCI expansion card.)
Component 3 Slot 3 Slot 6 Slot
Monitor Power Socket
Power Socket
~
External SCSI Port
Ethernet AAUI Port
Ethernet 10BASE-T Port
Modem Port/GeoPort
Monitor Port
ADB Port
Sound Input Port
Sound Output Port
Printer Port/GeoPort
PCI Expansion Slots 3 3 6
Audio Input Ports
w/video out
✓✓✓
✓✓✓
✓✓✓
✓✓✓
✓✓✓
✓✓✓
✓✓
✓✓✓
✓✓✓
✓✓✓
✓✓✓
✓✓
BACK
Audio Output Ports
Composite Video Input Port
Composite Video Output Port
S-Video Input Port
S-Video Output Port
Power Switch
CD-ROM Drive
5.25” Internal Bay 1 1 1
Locking Side Panel
1.4 MB Floppy Drive
Power-on Light
Cooling Vents
✓✓
✓✓
✓
✓✓
✓
✓✓✓
✓✓✓
✓✓✓
✓✓✓
✓✓✓
✓✓✓
FRONT
Chapter 1 – Setting Up Your Genesis MP
GenesisMP14 ◆
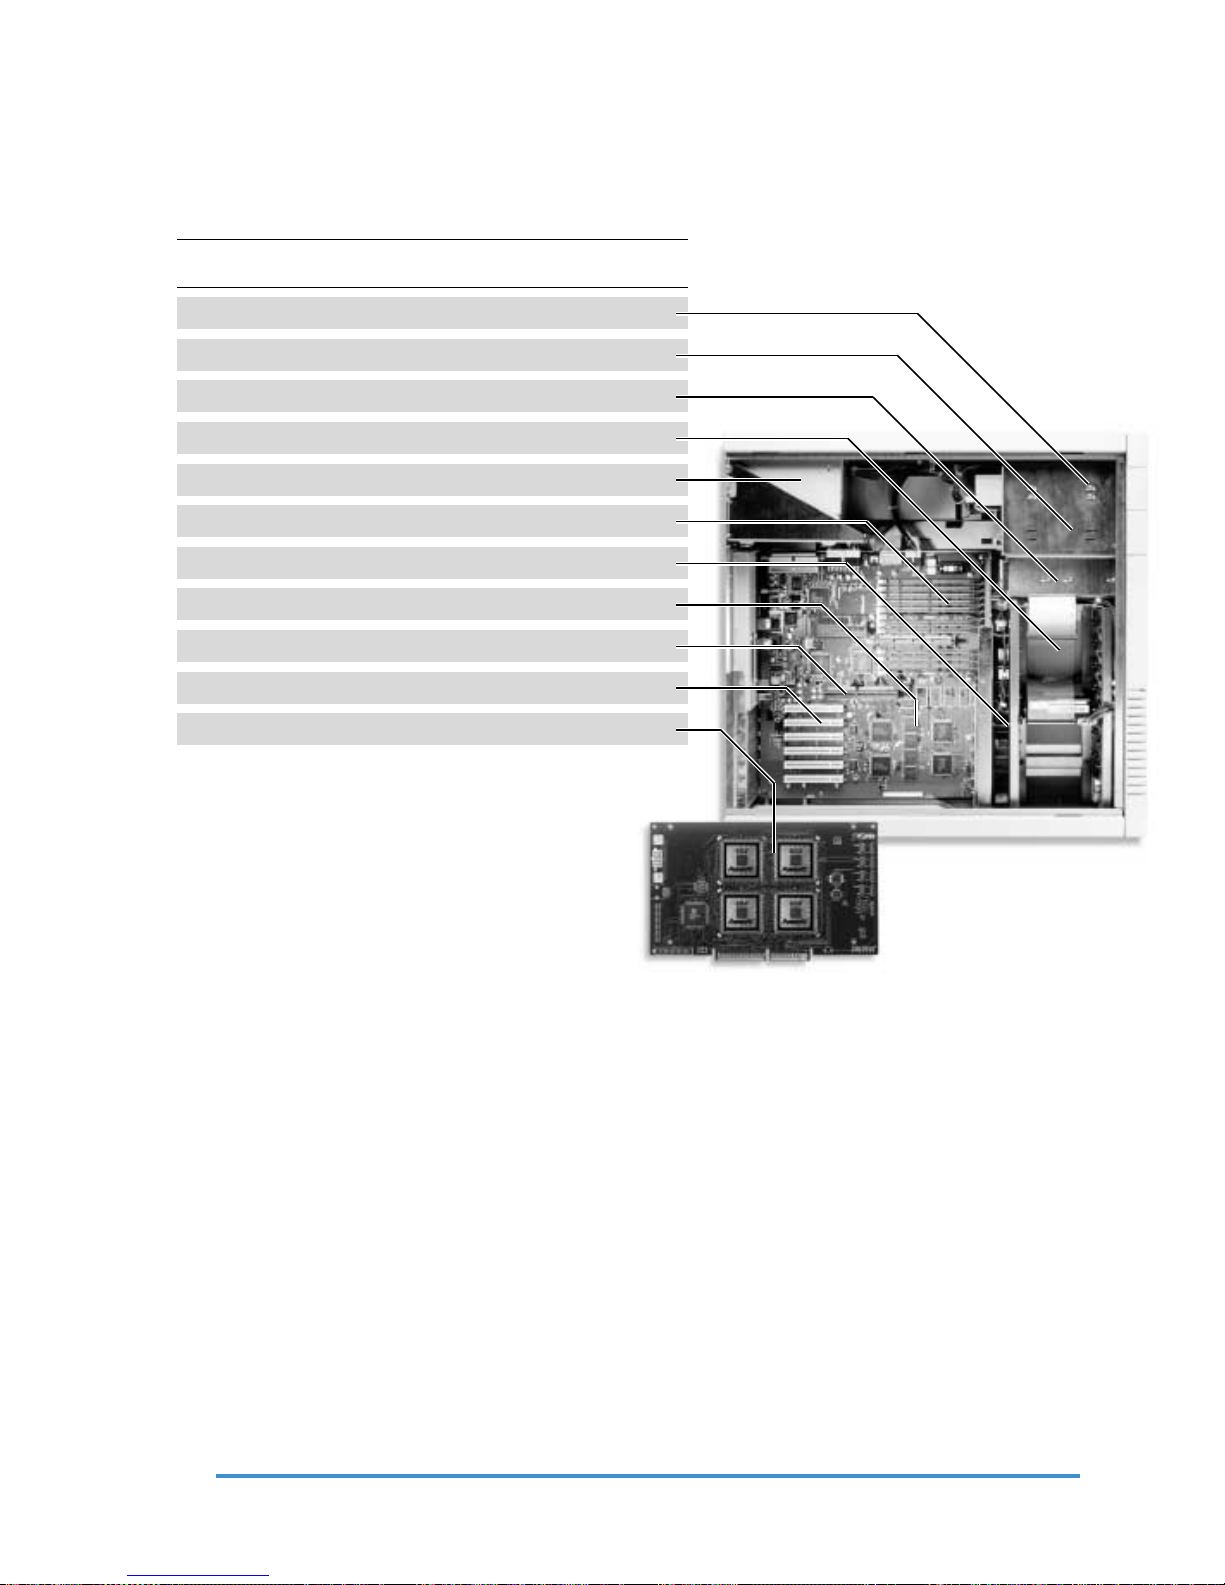
Important Internal Components of Your Genesis MP
This photograph lists all the important internal components and features of your Genesis
MP. This graphic will help you follow along with the following set-up instructions.
Component 3 Slot 3 Slot 6 Slot
CD-ROM Drive
5.25” Internal Bay 1 1 1
1.4 MB Floppy Drive
Internal 3.5” Internal Drive Bays 7 7 7
350 Watt Power Supply
DIMM Sockets 8 8 12
Dual Internal Cooling Fans
512K Secondary Cache
nPOWER Card Connector
PCI Expansion Slots 3 3 6
nPOWER Quad 604 Board
w/video out
✓✓✓
✓✓✓
✓✓✓
✓✓✓
✓✓✓
✓✓✓
✓✓✓
GenesisMP
Chapter 1 – Setting Up Your Genesis MP
◆ 15

Plugging in Your Genesis MP
Before you begin, please take a few extra minutes to read the rest of the set-up instructions in this chapter.
Before you plug anything into your Genesis MP, first plug your unit into the grounded
three-hole wall outlet first. The plug grounds the machine and protects it from any
electrical damage that might occur while you are setting up your Genesis MP.
Now–
1. Plug the socket end of the power cord into the recessed power socket on the back of
your Genesis MP. It’s marked with this symbol ~.
2. Then plug the other end into a three-hole grounded outlet or power strip.
Note: The only way to completely disconnect your power is to unplug it. Therefore,
be sure that at least one end of the power cord is within your easy reach.
!
∆
CAUTION
Your Genesis MP is equipped with a three-wire grounding plug—the third wire is the
grounding pin. This plug will only fit into a grounded AC outlet. But this safety feature
won’t do you or your Genesis MP any good if you ignore it. Don’t use any device [like
a cheater plug] to override this important safety feature. If your work space doesn’t
have a grounded AC outlet, call a licensed electrician and install one.
Expansion Cards
If you have PCI cards to install, you can do so now. Read and follow the documentation that came with each piece of equipment you are installing and also consult Chapter
3 of this manual for installation instructions.
Remember: A PCI graphics card is required for operation of your six slot Genesis MP.
If it was not already installed in your Genesis MP, you must install one now. The six
slot Genesis MP won’t run without one.
If you are new to Mac OS based systems or plan to install a large number of cards, we
suggest that you get your Genesis MP up and running successfully before adding
additional cards.
SCSI Devices
If you have additional SCSI devices to install, you can do that now as well. Read and
follow the documentation that came with each piece of equipment you are installing.
Again, if you are new to Mac OS based systems or plan to install a large number of
peripherals, we suggest that before installing any additional devices, you get your
Genesis MP up and running successfully.
Chapter 1 – Setting Up Your Genesis MP
GenesisMP16 ◆
Connecting Your Monitor
PCI
Please check this first:
Be sure that the monitor is compatible with either the PCI graphics card or the motherboard graphics of the three slot Genesis MP, whichever you will be using.
Note: Some monitor/graphics port combinations may require special cables or
adapters for their proper operation. Read the documentation that came with your
monitor or graphics card to determine if you will need special cables or adapters.
3
Three slot Genesis MP: The motherboard graphics of this machine do not support
“sync on green” monitors. If you are uncertain which type of monitor you have,
contact the vendor.
Here’s how to set up and connect your monitor.
• Place the monitor near your Genesis MP.
• Position your monitor to minimize glare and reflections. Overhead lights and
windows are usually the cause of distractions.
• Position the top of the screen at slightly below eye level when you’re sitting at
the keyboard.
• Give your monitor and Genesis MP enough space to breath! Your Genesis MP
has three internal fans to ensure adequate cooling and air flow. For these fans
to operate properly, it is important that you provide a few inches for air circulation around the vents at the front, rear and left hand side of your Genesis MP.
• Connect the power cord that came with your monitor into the back of your
monitor. (Some monitors may have built-in cords.)
• Now you’re ready to plug the monitor power cord into either the back of your
Genesis MP—or into a three-hole grounded electrical outlet, depending on the
type of power cord that came with your monitor.
Note: Some monitor power cords are designed to plug into the back of your Genesis
MP and some must be connected to a grounded electrical outlet, not your Genesis
MP. Check your monitor documentation to be sure.
After you plug in the monitor power cord, you can connect the monitor to your Genesis
MP’s monitor port or an installed PCI graphics card.
• Connect the monitor cable to the monitor if it is not already attached.
• Connect the monitor cable to your Genesis MP’s monitor port or an installed
PCI graphics card.
Three slot Genesis MP monitor port
Installed PCI graphics card
GenesisMP
Connecting the Monitor
Chapter 1 – Setting Up Your Genesis MP
◆ 17

If you wish to place your Genesis MP on the floor and have purchased a non-Genesis
MP keyboard, be sure that the keyboard and video cables that you use will be long
enough to reach the floor. If you need a longer cable or an extender, you can contact
Global at 800-845-6225, Inmac at 800-547-5444 or your DayStar Authorized Reseller.
You have a choice of several keyboards to use with your Genesis MP—some have a
separate cable and others have a built-in cable.
Note: Some monitors have a port for your keyboard or mouse. If you wish to use this
feature, see the specific documentation that came with your monitor.
Connecting a keyboard with a built-in cable.
• The plug and port are marked with the icon or symbol. A port marked with
this icon is called an Apple Desktop Bus (ADB) port. Plug the keyboard cable
into the ADB port at the back of your Genesis MP. Match the symbols before
you insert the plug.
• Plug your mouse into the keyboard. If your keyboard has more than one ADB
port, you have a choice where to plug in the mouse. Match the symbols before
you insert the plug.
Connecting a keyboard with a separate cable.
• The plug and the ADB port are both marked with the same icon. Match the
symbols before you insert the plug.
!
∆
• Now you can plug the keyboard cable into the other port on the keyboard.
Match the symbols before you insert the plug.
If you plugged the mouse cable in on the right, then you will plug the keyboard cable
in on the left. Both ends of the cable are the same.
• Plug the keyboard cable into the ADB port marked with the icon on the
back of your Genesis MP.
CAUTION
Be sure not to connect or disconnect the keyboard or mouse cables while your Genesis
MP is turned on. This can cause damage.
Chapter 1 – Setting Up Your Genesis MP
GenesisMP18 ◆

Turning on Your Genesis MP
First, turn on your monitor.
If your monitor’s power cord is plugged into the rear of your Genesis MP, you can sim-
ply leave the monitor turned on and it will automatically be turned on and off when
your Genesis MP is turned on or off.
You can turn on your Genesis MP’s power in two ways:
• By pressing the power key on your keyboard, or
• By pressing the power button on the top left hand corner of your Genesis MP.
You will hear a tone from your Genesis MP as it starts up.
When you look at the image on your monitor, you should see:
• The Mac OS logo followed by the Mac OS desktop.
Note: Because a self test is performed when you turn on your Genesis MP, it will
take more time for the screen image to appear if you have a large amount of memory
installed in your Genesis MP.
If you see a blinking question mark, please turn to Chapter 5—Troubleshooting.
If you see anything else or if you see no image at all, please check the following:
W2@@@@@@@@@@@@@@@6X
7(M?hfI'1
@H ?N@
@? @
@? @
@?gW2@?g@
@?f?W.Y@?g@
@?fW.Y?@?g@
@?f*Ue@?g@
@?fV/X?@?g@
@?f?V/X@?g@
@?gV4@?g@
@? @
@? @
@L ?J@
3)K?hfO&5
V4@@@@@@@@@@@@@@@0Y
• Is the green light on the front of your Genesis MP turned on? This would show
that your Genesis MP is on and is receiving power.
If not:
Is the power cable properly installed into your Genesis MP and into an electrical outlet?
If the power cord is plugged into a power strip or wall outlet that can be turned on and
off, is the outlet or strip turned on?
Check to be sure that the keyboard cable is firmly connected to your Genesis MP and
to the keyboard.
• If the monitor has a power light, is it turned on? This would show that the
monitor is on and receiving power.
If not:
Is the monitor’s power cable properly installed into your Genesis MP or into an
electrical outlet?
Check the Brightness and Contrast controls on your monitor. Are they turned all the
way down? Now is a good time to adjust them.
GenesisMP
Chapter 1 – Setting Up Your Genesis MP
◆ 19

Shutting Down Your Genesis MP
Your machine should be shut down properly to ensure that your documents are saved
and that the hard drives are prepared for being powered off.
• Once in the Finder, select Shut Down from the Special menu, or
• Press the keyboard’s power key .
Both of these methods prepare your Genesis MP for a quicker restart and remind you
to save your work before turning off the power.
Note: You should not use the power button on the top left hand corner of your
Genesis MP to turn off your Genesis MP. This button does not perform the recommended shut down procedure and should only be used to start your Genesis MP or to
restart the unit if the restart command key combination (Command-Control- ) is
ineffective. In some rare instances, it may become necessary to remove your Genesis
MP’s power cord in order to shut the unit down.
Where to Go From Here
Now that you have set up your Genesis MP, it’s time to learn about its many helpful
features.
Chapter 2: Help is at Your Fingertips outlines the various ways that your Genesis MP
itself can help you with some questions and problems you may encounter.
W2@@@@@@@@@@@@@@@6X
7(M?hfI'1
@H ?N@
@? @
@? @
@?gW2@?g@
@?f?W.Y@?g@
@?fW.Y?@?g@
@?f*Ue@?g@
@?fV/X?@?g@
@?f?V/X@?g@
@?gV4@?g@
@? @
@? @
@L ?J@
3)K?hfO&5
V4@@@@@@@@@@@@@@@0Y
W2@@@@@@@@@@@@@@@6X
7(M?hfI'1
@H ?N@
@? @
@? @
@?gW2@?g@
@?f?W.Y@?g@
@?fW.Y?@?g@
@?f*Ue@?g@
@?fV/X?@?g@
@?f?V/X@?g@
@?gV4@?g@
@? @
@? @
@L ?J@
3)K?hfO&5
V4@@@@@@@@@@@@@@@0Y
Chapter 3: Connecting Additional Peripherals gives you step by step instructions for
connecting or installing the most common expansion devices to your Genesis MP.
Chapter 4: Genesis MP Software provides instructions on installing the necessary
Genesis MP software.
Chapter 5: Troubleshooting addresses common problems and provides solutions you
can understand.
Index
Chapter 1 – Setting Up Your Genesis MP
GenesisMP20 ◆
Help is at Your Fingertips
The Macintosh Tutorial
If you are new to the Mac OS (Operating System), or there’s something you’ve forgotten or something you would like to understand a little bit better, the Macintosh Tutorial
has the answers. This tutorial will give you the help you need to understand the basic
skills necessary to operate the Mac OS.
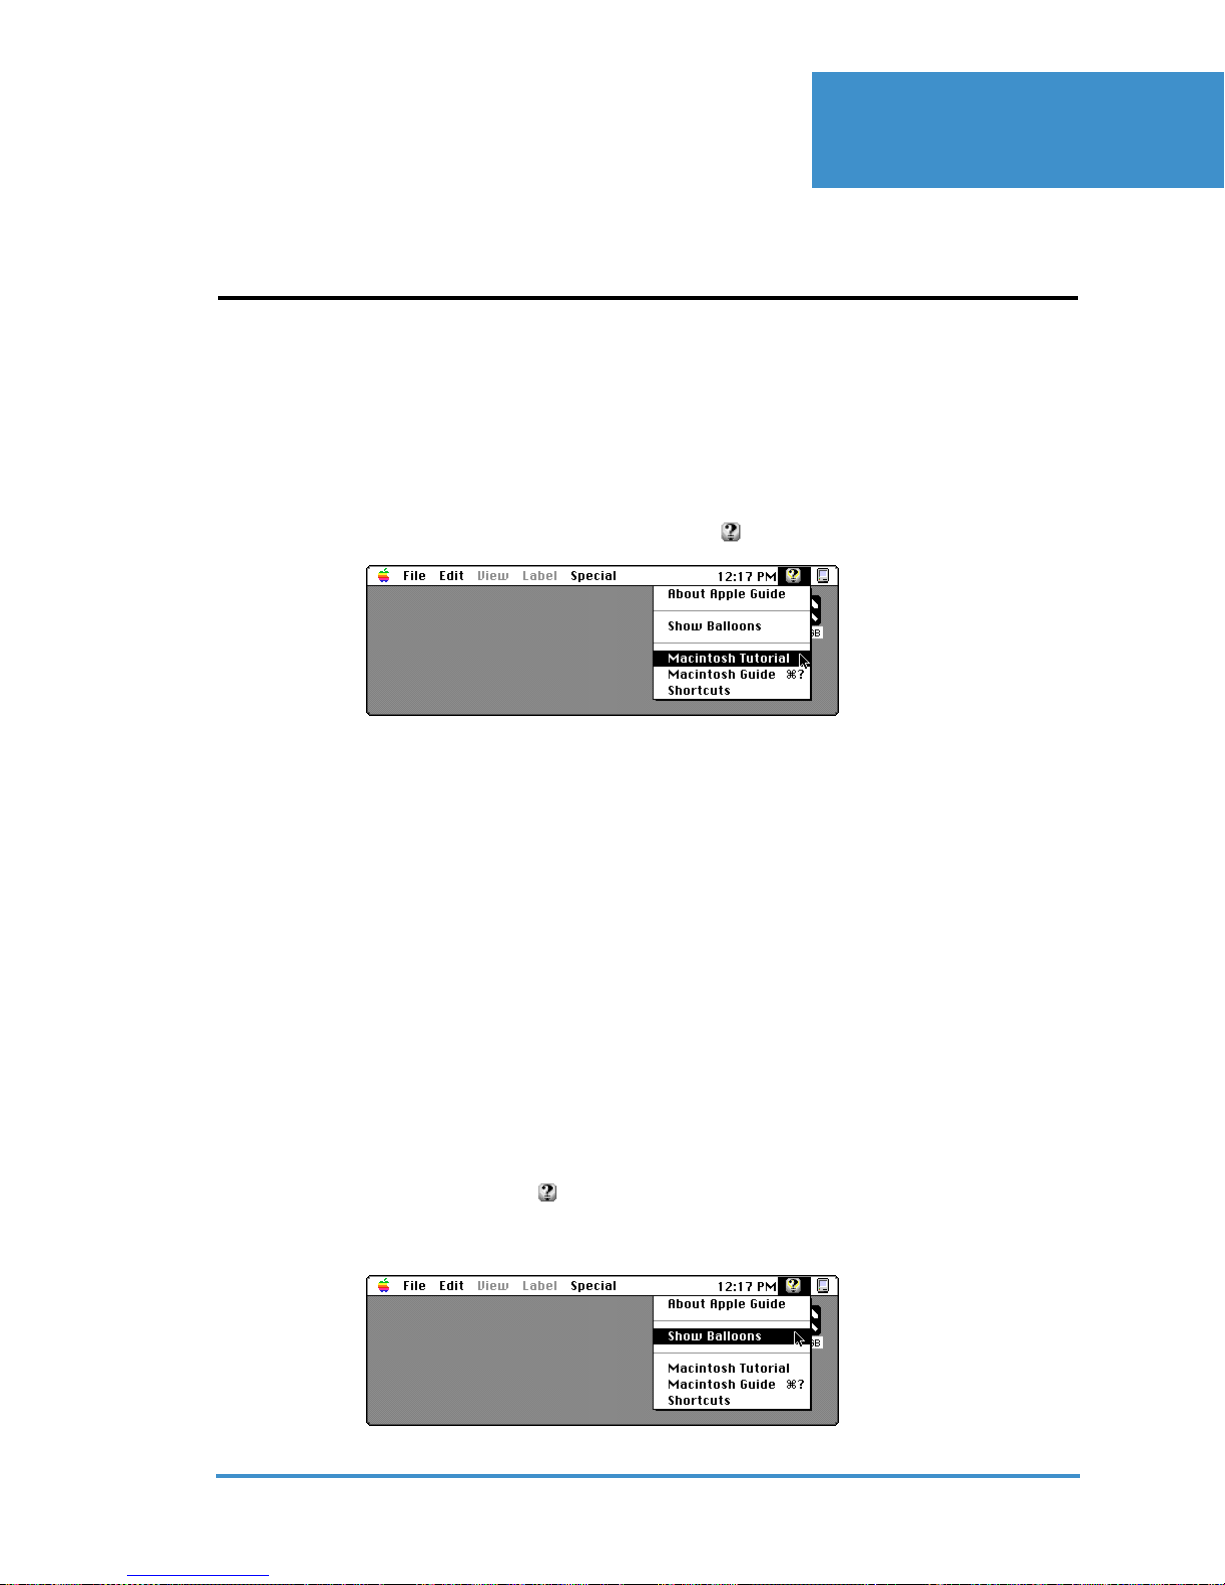
To run the Macintosh Tutorial, go to the top right-hand corner of your screen. Select
Macintosh Tutorial from the question mark menu on the menu bar.
Chapter 2
Balloon Help
Follow along with the tutorial.
Note: Macintosh Tutorial must be installed from the Mac OS CD-ROM before you
can use it.
Another helpful source on your desktop is Balloon Help. Sometimes you’ll see an unfamiliar item on the screen and wonder, “What’s that?”
You can easily find out by using Balloon Help.
Like in a comic strip, Balloon Help explains the function of icons, menus, commands
and other items on your screen. The answers pop up and speak to you from inside the
balloons.
Here’s how to activate Balloon Help—
1. Click once and hold down the mouse button as you pull down the Guide menu
(marked with the icon). Drag or pull down the arrow until it rests on the words
Show Balloons. It will be highlighted. Release your mouse and Show Balloons will
be active.
GenesisMP
Help is at Your Fingertips
◆ 21
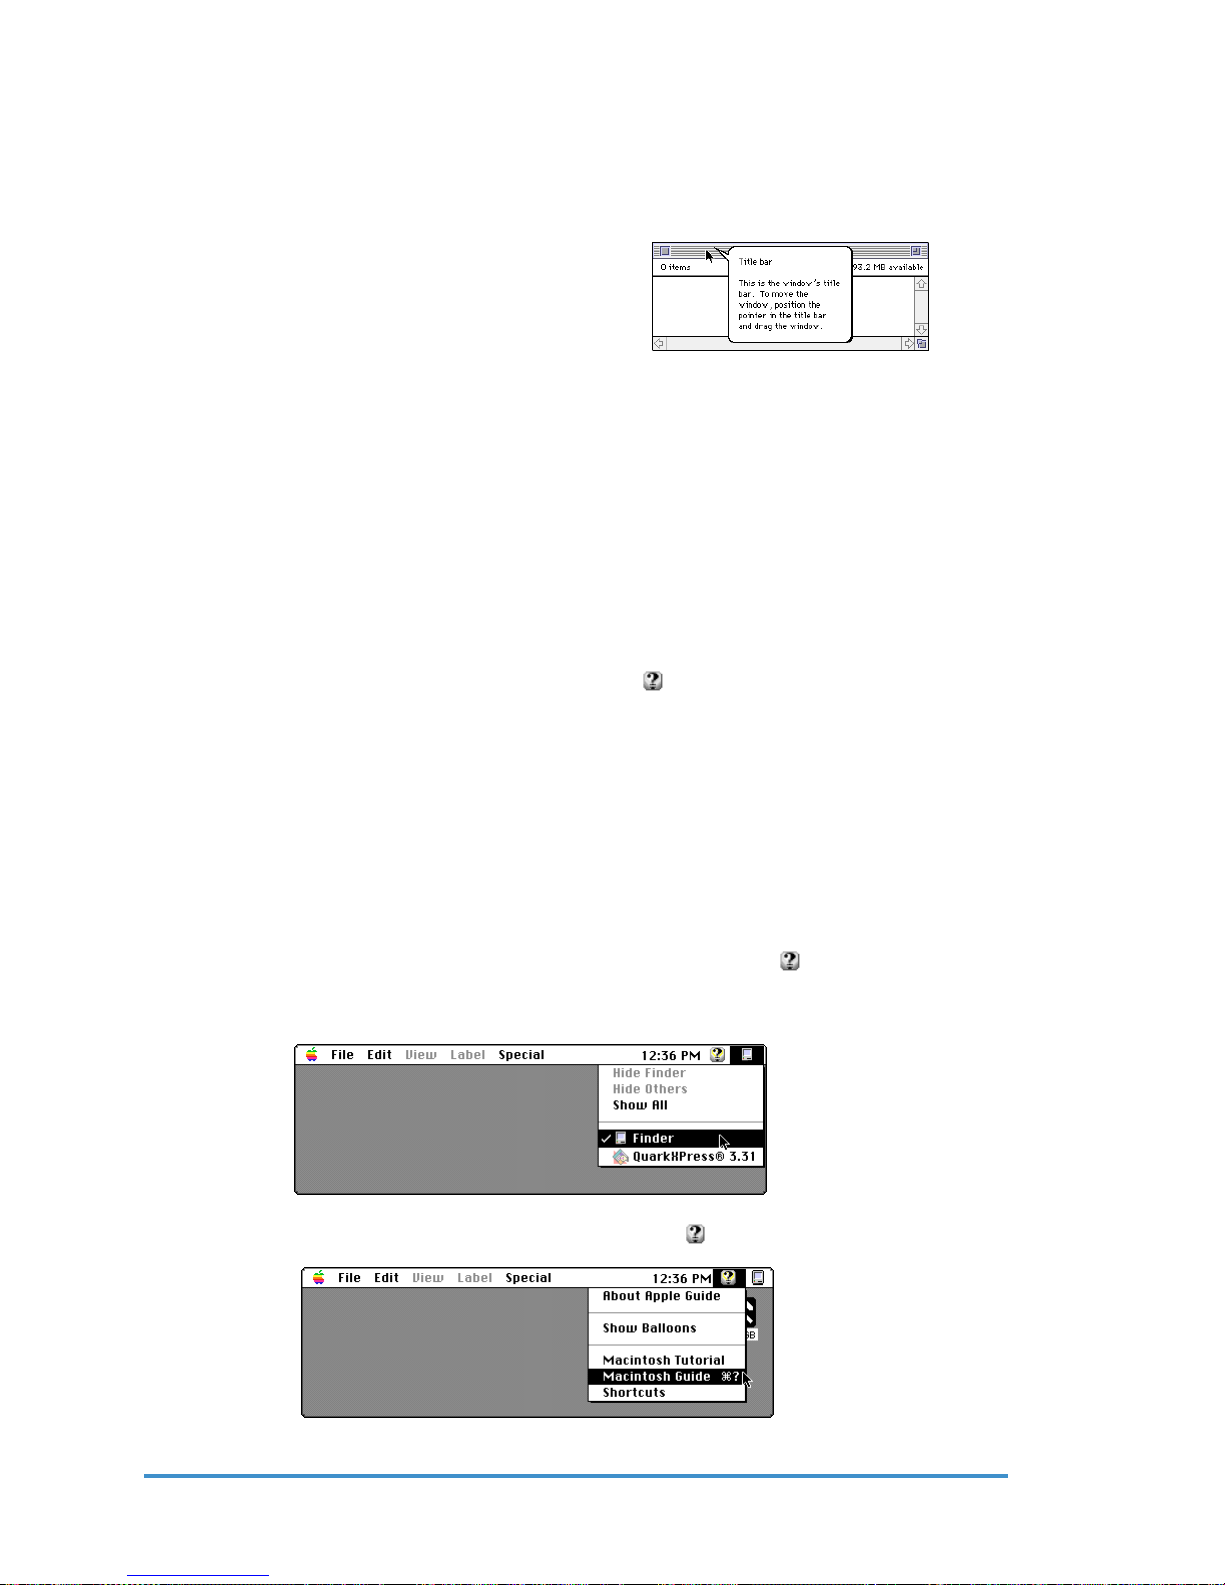
2. With your mouse, point to any object on the screen and a balloon will appear— pop
up next to that object.
For example: If you point the arrow at the gray bar at the top of a window, a balloon
will identify it as a window’s Title bar. Next it will say that to move the window, you
can position the pointer in the
title bar and drag the window.
Try it. See—you can move the window.
You can even keep on working if a
balloon is speaking to you!
3 But soon you will want to turn it off. And that’s real easy. Just go back to the Guide
menu and select Hide Balloons.
Note: Some applications may not provide information via Balloon Help. It is up to
the software developer to support this feature.
The Macintosh Guide
The Macintosh Guide menu is your main source of information when you’re working
with your Genesis MP. The information in this chapter will help you learn about the
Guide menu—your immediate source for help.
The menu is identified by a question mark located in the upper-right corner of your
screen.
Note: Apple Guide may not be available with extensions disabled or if it is not
installed properly.
Getting Answers
If you have a question when you’re working with your Genesis MP, choose the
Macintosh Guide from the Guide menu to get the answer.
Here’s How—
1. Pull down the Application menu (just to the right of the ) and choose Finder. You
have now made Finder your active program. A check mark in the menu verifies that
the Finder is now active.
2 Pull down the Guide menu (marked with the icon) and choose Macintosh Guide.
Chapter 2 – Help is at Your Fingertips
GenesisMP22 ◆
The Macintosh Guide window will appear in front of your other windows. But if the
window gets in your way, just move it by dragging the title bar (remember the gray bar
across the top of the window).
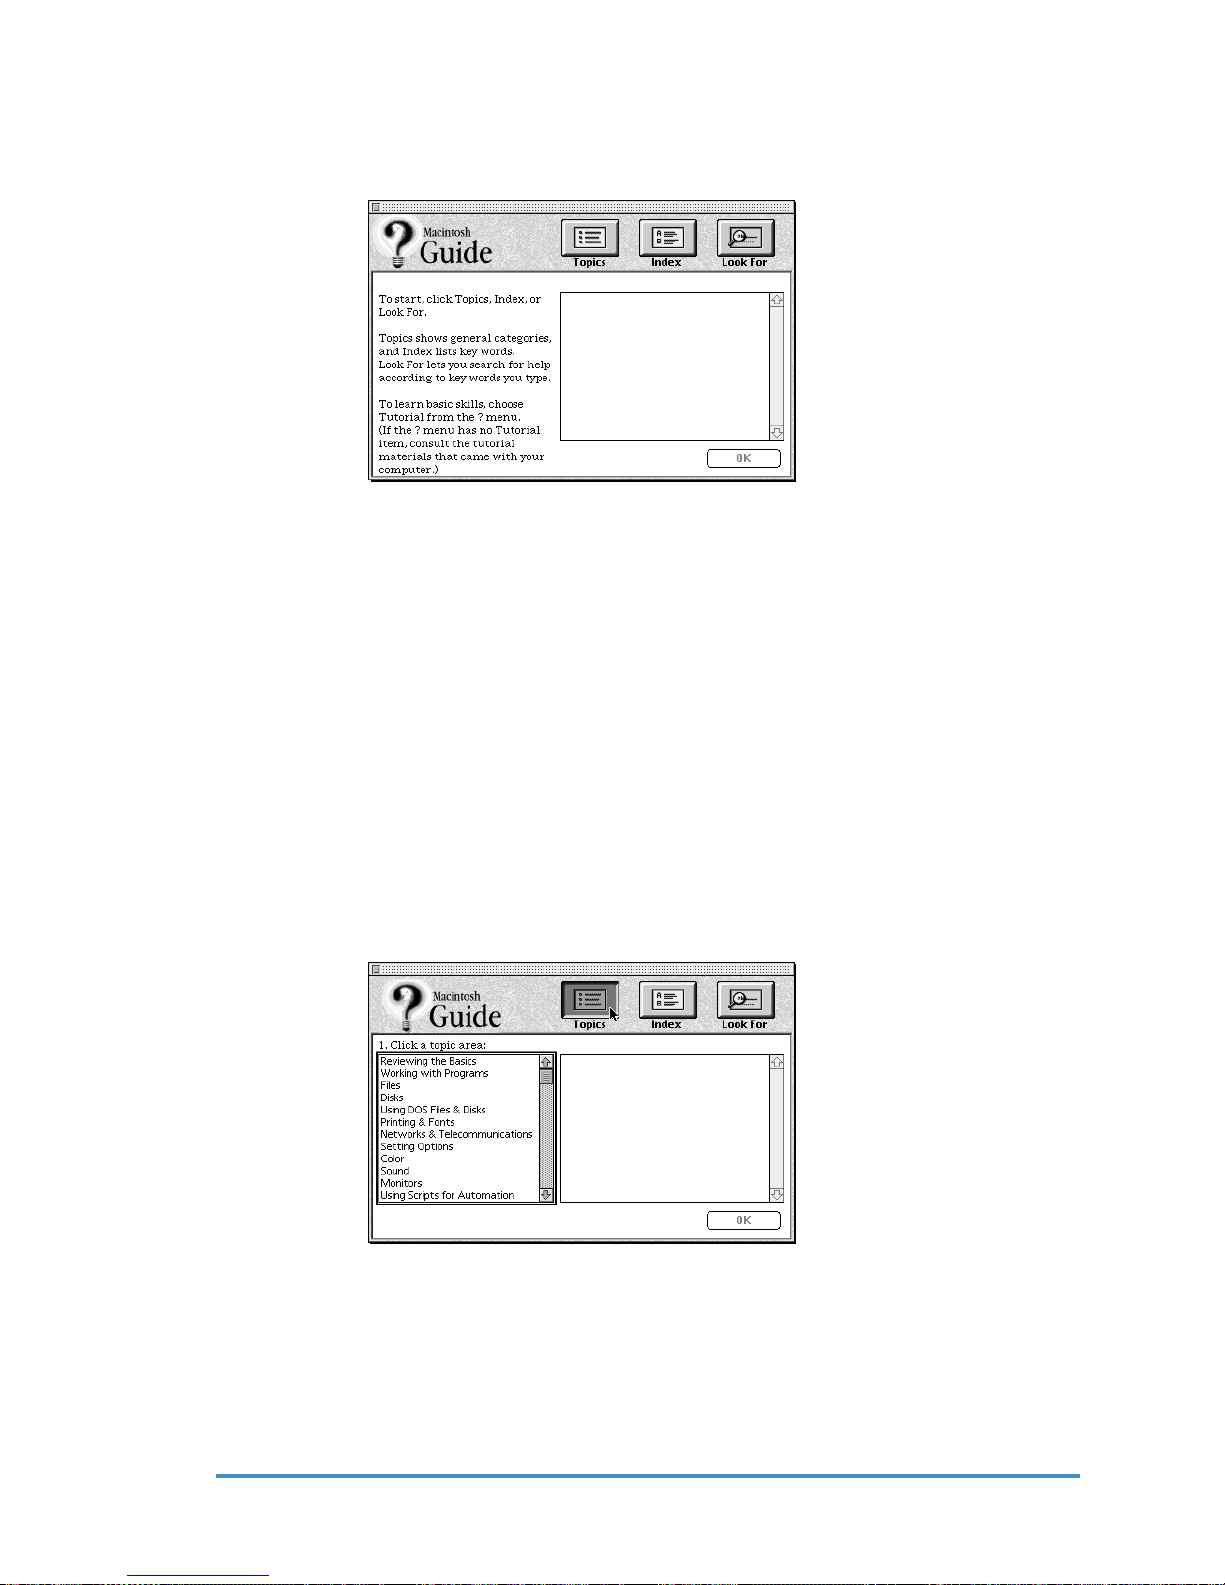
3. There are three buttons at the top of the window—Topics, Index and Look For.
They represent the three different ways to get information.
• Topics lets you choose from a list of general subjects—like a table of contents.
• Index lets you choose from an alphabetical list of more specific subjects.
• Look For lets you search for information by typing a specific word or phrase.
In the following sections you can practice using each method. If you have problems using
the Macintosh Guide, please turn to Things to Remember at the end of this chapter.
Using the Topics button
1. Click on the Topics button at the top of the Macintosh Guide window.
A list of general topics will appear on the left side of the Macintosh Guide window.
Your list may look different, reflecting the hardware and software on your Genesis MP.
This would be a good time to look at the list of topics and become aware of the areas
where help is available.
2. Click on a topic area.
For example: Select Setting Options from the list of topics. A list of related questions
will appear on the right side of the Macintosh Guide window.
GenesisMP
Chapter 2 – Help is at Your Fingertips
◆ 23
3. Pick the question that addresses your problem. Let’s click on the question, How do I set
the time and date? and then click OK. A small window will appear with your answer.
Tip: A quicker way to reach the answer window is to double click on the question.
4. Read the step-by-step instructions in the window. As you complete each step, click
the right arrow in the lower-right corner to see the next step. If you want to recheck a
step, click on the left arrow in the lower-right corner and go back to the previous step.
5. You may click on the Topics button in the lower-left corner to return to the main
Macintosh Guide Window.
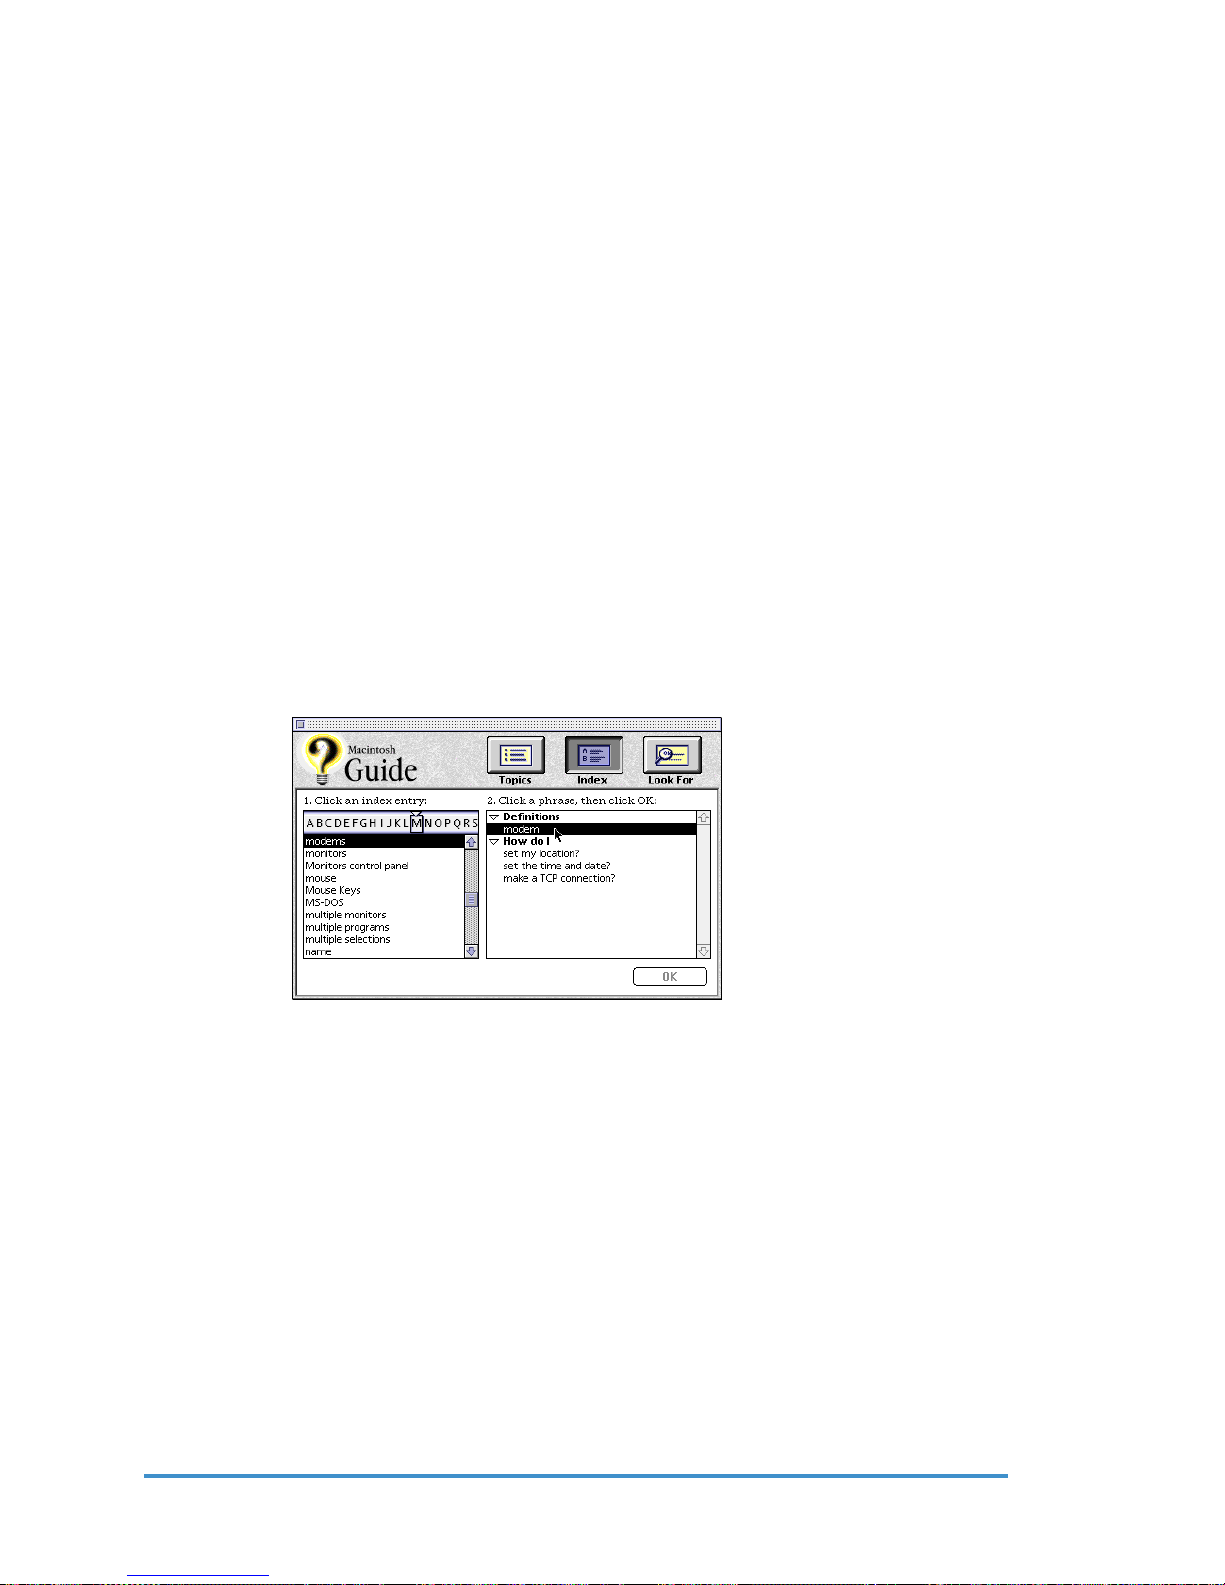
Using the Index Button
1. Click on the Index button at the top of the Macintosh Guide window. An alphabetical list of subjects will appear on the left side of the window.
2. Scroll through the list and look at the index entries. You can scroll by using the scroll
bar at the right of the list or by dragging the slider to the letter you wish to read.
Let’s say you want to learn more about modems.
3. Click on the word modems in the alphabetical list.
When you click on any index entry, a list of related questions will appear on the right
side of the Macintosh Guide window. One of the choices for modem is definitions.
This is a good way to learn the definitions of many computer-related terms.
4. When you click on What is a modem?, you learn two things.
• A modem is a device that enables a computer to communicate with another
computer over ordinary telephone lines, and
• A modem converts digital information into analog signals that can be transmitted over telephone lines.
The third way to get information from the Macintosh Guide is the Look For button.
Chapter 2 – Help is at Your Fingertips
GenesisMP24 ◆

Using The Look For button
1. Click on the Look For button. A small box will appear on the left side of the window with instructions for typing your question.
2 First click on the arrow to activate the text box.
3. If you want to change your menu items, but don’t know how, type in the word menu
and click on Search.
4 Then click on the question, How do I change items in the Apple menu?
A box will appear and you can choose to learn about adding an item, removing an item
or adjusting submenus in the menu. Read and follow the instructions in the box to
make your choice.
5. As you follow the instructions in the box, use the arrows in the lower-right corner
to move from one instruction to the next. The right arrow goes forward and the left
arrow goes back. Don’t skip ahead. Do each thing in the order you are asked.
At the bottom of your screen is another helper—the Huh! button. if you’re just not sure
about what you’ve read and would like even a little more explanation, try Huh! If there
is more information, you’ll see it. If the button is dimmed, that means that all the information has been shown.
6. When you are done, click on the close box in the upper-left corner to close
Macintosh Guide.
GenesisMP
Chapter 2 – Help is at Your Fingertips
◆ 25

Things to Remember
• Macintosh Guide is operational only when you activate the Finder. To activate
the Finder, select it from the application menu to the right of the question
mark.
• You may read ahead only when you are looking at the menu choices. This will
give you an idea of what topics are available.
• When you are responding to the instructions in the answer window, don’t skip
ahead or read ahead. Follow each step in order. That way your computer can
check to make sure you’ve completed a step correctly.
• There are three ways to get help—by Topics, by Index and by Look For (you
name the subject).
• The Macintosh Guide window will always stay in front of any other windows
on the screen. That way, your instructions will never be covered.
• You can move your Guide window by dragging on the gray title bar at the top
of the window.
• You can also move the window by clicking the zoom box in the upper-right
corner. Click the box once to shrink the window. Click it a second time to
return the box to its original size.
• Click the Huh button if you need more information about an instruction or a
term.
• If the Huh button is dimmed, there’s no additional information available.
• Click on the Topics button in the lower-left corner to return to the main
Macintosh Guide window.
• Click the close box in the upper-left corner to exit Macintosh Guide.
Chapter 2 – Help is at Your Fingertips
GenesisMP26 ◆

Connecting Additional Peripherals
Genesis MP has the ability to grow and expand more than any other Mac based platform.
This chapter gives you instructions for connecting or installing the most common expan-
sion devices to your Genesis MP. If you want to install a peripheral that’s not covered in
this chapter, please consult the instructions that came with your piece of equipment.
Note: It’s important that your Genesis MP is turned off before you connect or install any
hardware devices.
Note: If you wish to add an expansion device to your Genesis MP, it must be compatible with the unit. Please read the specifications that came with the product. Genesis
MP supports most products that are compatible with Apple’s Power Macintosh 7500,
8500 and 9500. If you are unsure of the product’s compatibility, contact the reseller or
product’s manufacturer.
Adding External Devices to Genesis MP
Chapter 3
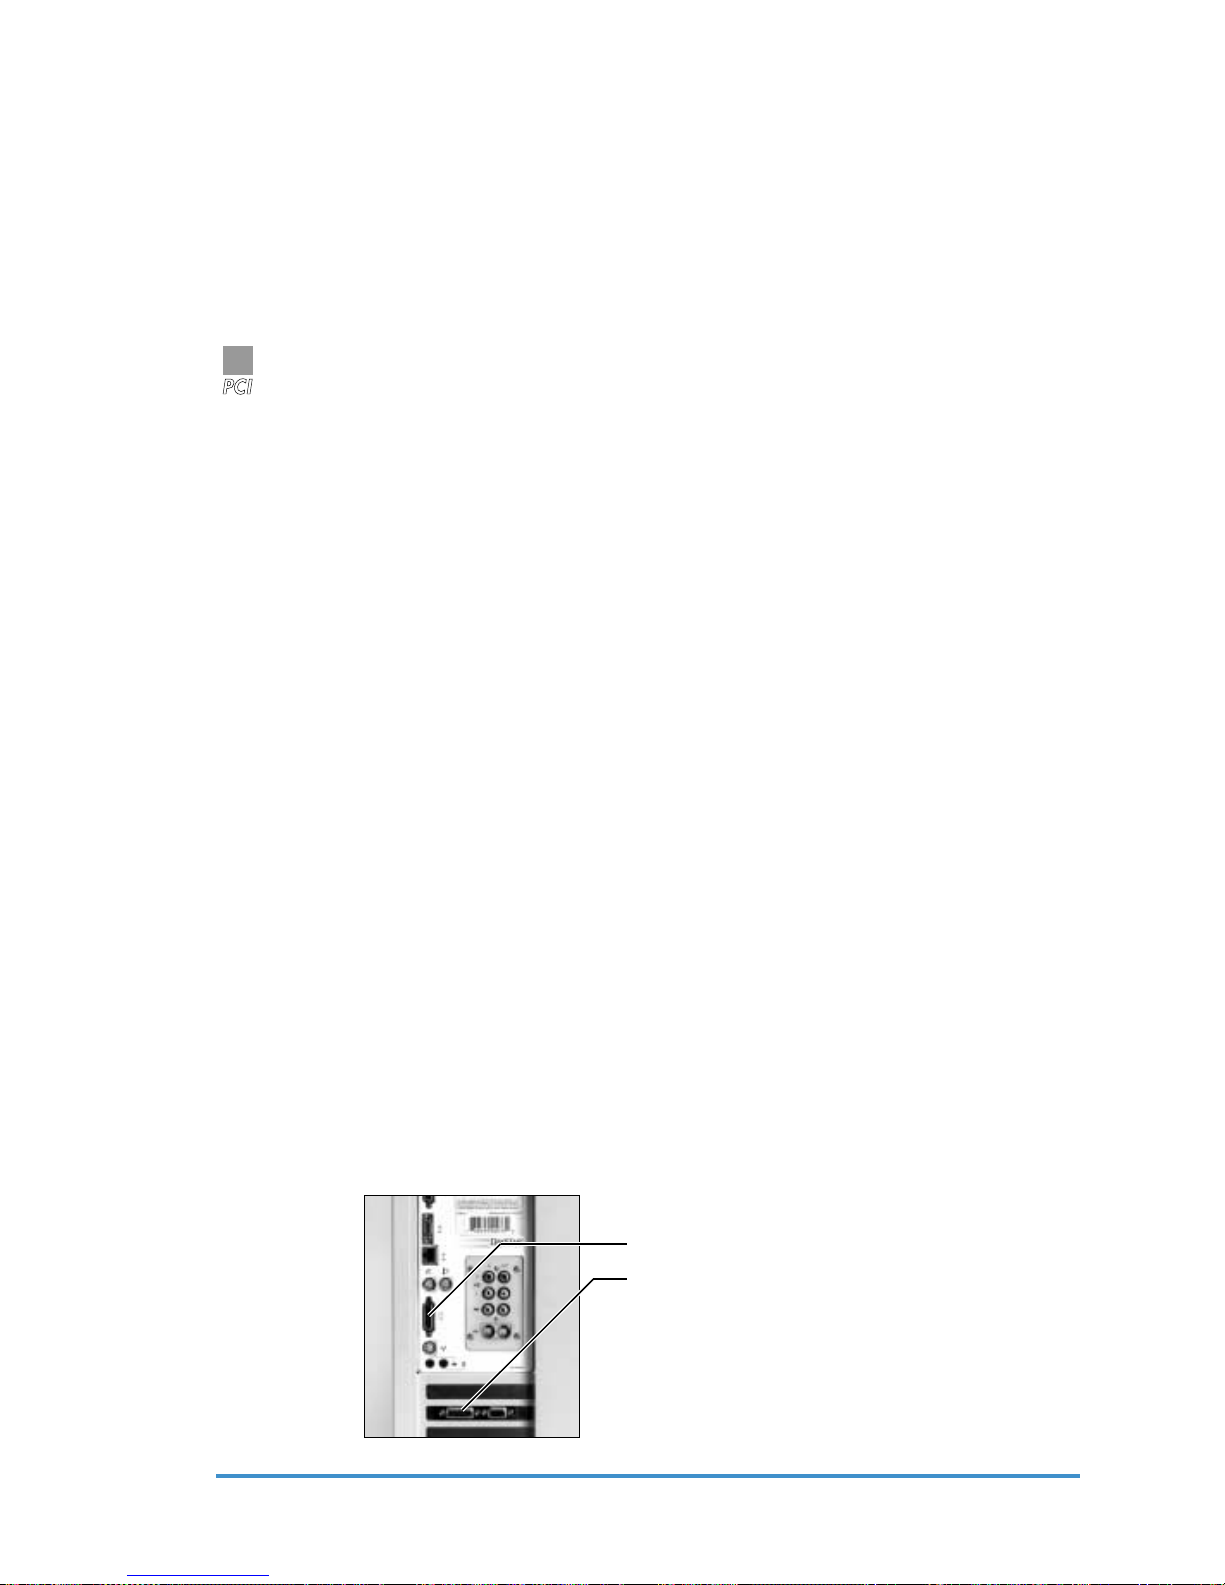
The illustration below shows the basic external ports
MP which will be covered in this section. For a complete listing of basic components,
please refer to Page 14 of this manual, Important Components of your Genesis MP.
Port/Connector 3 Slot 3 Slot 6 Slot
External SCSI Port
Ethernet AAUI Port
Ethernet 10BASE-T Port
Modem Port/GeoPort
ADB Port
Sound Input Port
Sound Output Port
Printer Port/GeoPort
Audio Input Ports
Audio Output Ports
Composite Video Input Port
w/video out
✓✓✓
✓✓✓
✓✓✓
✓✓✓
✓✓✓
✓✓✓
✓✓✓
✓✓✓
✓✓
✓✓
✓✓
(or connecting points)
of Genesis
Composite Video Output Port
S-Video Input Port
S-Video Output Port
GenesisMP
✓
✓✓
✓
Connecting Additional Peripherals
◆ 27

ADB Devices
ADB stands for Apple Desktop Bus. It’s on the back of your Genesis MP and is used to
attach components to your unit. The keyboard, mice, trackballs, drawing tablets, game
controllers, and other input devices, are examples.
Genesis MP’s ADB port (connecting point) can handle up to three devices, chained
together. You’ve already installed the typical ADB input devices when you set up your
Genesis MP.
Most ADB devices receive power through the ADB cable from Genesis MP and therefore do not have to be connected to an electrical outlet.
Remember, your Genesis MP must be turned off before adding or removing all ADB
devices.
Serial port/GeoPort Devices
Genesis MP provides two combination serial port/GeoPort connectors and
for attaching external modems, local printers, LocalTalk networks or GeoPort Adapters.
Consult the documentation that came with the device for specific installation and operating instructions.
Note: Be sure that Genesis MP and the device you are installing are turned off
before attempting the installation.
Network Support
Genesis MP supports both 10 Mb Ethernet and LocalTalk networks.
An Ethernet network can be connected via Genesis MP’s built-in 10BASE-T or AAUI
ports . The AAUI port requires the use of a standard transceiver, which can provide a thin coaxial, thick coaxial or 10BASE-T network connection.
Genesis MP also supports standard LocalTalk networks via the Printer port .
Note: Having more than one network port active at one time requires version 1.1 or
greater of Apple’s Open Transport extension.
External SCSI Devices
SCSI, pronounced “skuh-zee” means Small Computer System Interface. The SCSI
ports on your Genesis MP permit high-speed communication between your SCSI
devices. Genesis MP has two SCSI buses, one for internal storage devices and one for
internal/external connections. The internal hard disk drive and CD-ROM in your
Genesis MP are connected to the fast internal SCSI interface. The external SCSI port
can be found on the back panel of your Genesis MP. It’s marked with the symbol .
You can chain together multiple SCSI devices. The first device is plugged into the port
at the back of your machine. The rest plug into each other. Genesis MP allows you to
chain together seven SCSI devices on the external port.
Chapter 3 – Connecting Additional Peripherals
GenesisMP28 ◆

Before You Install Anything
Note: If the device you are installing requires device drivers (software that makes a
device work with your Genesis MP) for operation, they must be installed. Please
check the instructions that came with the unit before connecting it to your Genesis
MP. Be sure that each device driver is compatible with your Genesis MP. (If the unit
is compatible with the Mac OS and did not come with device drivers, none are needed. )
Also, when adding a new device to an existing SCSI chain, be sure that you set the
new device’s ID to one that is not currently in use by any other device on that SCSI
bus. Using two or more devices with the same ID number could cause your equipment to malfunction and you could lose data. SCSI ID numbers are typically set via
a rotor push button on the rear of the SCSI device. The numbers range from 0 to 6.
Consult the documentation that came with the device for further information.
Rotary SCSI ID switch
Setting the SCSI ID on a
Typical Hard Drive
Next you need the appropriate cable for attaching a SCSI device to your Genesis MP. If
the device is the first or only one you’re connecting, use a SCSI system cable (25-pin to
50-pin) to connect it to the SCSI port at the back of your Genesis MP.
Typical 25-50 pin
SCSI System Cable
GenesisMP
Chapter 3 – Connecting Additional Peripherals
◆ 29

If the device will be connected to another device, you will typically use the SCSI
peripheral interface cable (50-pin to 50-pin).
Typical 50-50 pin
SCSI Peripheral Cable
Note: Use only high quality SCSI cables with 110-ohm impedance such as those
from Apple Computer. Also, the entire length of the external SCSI bus (the total
length of the SCSI chain)should not exceed 20 feet (6 meters).
Some Additional Information about SCSI Cables and SCSI Chains
• There are two common types of external SCSI connectors: 25-pin and 50-pin.
(SCSI-II PCI cards with external ports often have a third type of connector.)
• Genesis MP has a 25-pin external SCSI connector.
• The first external connection from your Genesis MP is typically with a 25-pin
to a 50-pin cable. This cable can also be used to connect a device with a 25-pin
connector to a device with a 50-pin connector in the SCSI chain.
• A 50-pin to 50-pin is generally required to connect external SCSI devices to
one another in the SCSI chain.
• A 25-pin to 25-pin cable is generally required to connect Genesis MP to a
device with a 25-pin connector, such as the Iomega Zip drive. This type of
cable can also be used to connect two 25-pin devices to one another in the
SCSI chain.
Chapter 3 – Connecting Additional Peripherals
Typical 25-25 pin SCSI Cable
GenesisMP30 ◆

The Last Link in the SCSI Chain
In order for a SCSI chain to operate properly, the last device in the chain requires termination.
There are various ways that a device can provide termination.
• Many devices today provide active termination or an on-off switch for easy
control. Active termination automatically senses the condition of the SCSI bus
and provides termination if it is needed.
Active SCSI termination switch
Checking for Active
Termination
• Termination can also be provided by connecting an external terminator to the
last device on the bus.
External SCSI Terminator
GenesisMP
Chapter 3 – Connecting Additional Peripherals
◆ 31

• Termination is provided on some devices with the use of small resistor packs
inside of the SCSI case that provide termination. If your SCSI device has an
internal terminator, you can use it in the last (or only) position in the chain. If
you wish to use the device in the middle of the chain, the internal termination
must be removed.
SCSI terminating resistor packs
Removing Internal Termination
if Required
• If you are adding a device to the middle of your SCSI chain and that device
provides termination, you must disable the SCSI termination.
• If the device is the only one on your external SCSI bus or is being added to the
end of the SCSI bus, it must provide termination. Any other devices on the bus
must not provide termination.
• A long SCSI bus, or one with numerous devices connected to it, may require
termination at specific points in the middle of the chain. You should always
first try terminating only the device at the end of the chain. Typically in this situation, only one additional terminated device is required, so try adding
termination at different points in the chain.
Here’s how to install a SCSI device:
1. Turn off—your Genesis MP, the device you wish to connect and any other SCSI
devices already installed on the SCSI chain.
2. Connect the new device to the SCSI chain making sure that it has a unique SCSI ID
number, and that it follows the terminations rules listed above.
3. Plug the SCSI device’s power cord into a grounded electrical outlet.
4. Turn on all of your external SCSI devices.
5. Turn on your Genesis MP.
If you experience problems, review the SCSI ID and termination rules listed above. If
you continue to have problems, consult Chapter 5—Troubleshooting or contact your
DayStar Authorized Reseller or DayStar at 770-967-2077.
Chapter 3 – Connecting Additional Peripherals
GenesisMP32 ◆

Adding Audio Devices
Genesis MP provides 16-bit stereo input, and output at 44.1 and 22.05 kilohertz (KHz).
• You can connect sound input devices such as VCRs, tape deck, Apple Plain
Talk microphone or a compatible line-level microphone to record your voice or
other sounds. (The lower quality, round Apple microphone is not supported.)
• You can connect sound output devices such as VCRs, tape decks, headphones or
external, amplified stereo speakers to improve the sound output of your Genesis
MP.
• You can listen to or reproduce stereo sound by connecting audio equipment to
your Genesis MP, as well as play and record from a variety of sources.
• With your internal CD-ROM player, you may also use your Genesis MP to
play and record sound from audio compact discs (CDs).
The sound input and output ports are compatible with both the standard stereo
miniplug and the extended stereo miniplug.
Almost everyone is familiar with the standard stereo miniplug. They’re most often
found on stereo equipment—for example, on a pair of personal headphones. The
extended stereo miniplug is slightly longer and is found on voice-quality microphones.
If you purchased the three slot Genesis MP, you also have separate RCA-type connectors for left and right channel audio input. If your equipment has a different type of
connector, you can still use it. But you will have to modify it with an adapter available
at an electronics supply store.
RCA-type plug
Stereo miniplug
Extended miniplug
Identifying Audio Plugs
This section covers the installation of a microphone, amplifier, tape deck or a pair of
speakers.
Note: For additional information on using your machine’s audio input and output
options, see the “Sound” topic in Macintosh Guide, located in the menu.
GenesisMP
Chapter 3 – Connecting Additional Peripherals
◆ 33

First let’s connect audio equipment (like a boom box) to your Genesis MP
1. Find the stereo miniplug connector or RCA-type connectors on your audio equipment. If there are none, attach the appropriate adapter.
2. Make sure the you have turned off both your Genesis MP and the audio equipment.
3. Place the equipment close to your Genesis MP.
4. Attach the cable to the audio equipment and the correct port on Genesis MP.
Remember: For incoming sound, attach the audio equipment to the sound or audio
input ports. For outgoing sound, the sound or audio output ports must be used.
Microphone port
Stereo out port
Adding a Boom Box for
Incoming Sound
Connecting a Microphone
With software that supports sound input such as the Sound control panel, you can use
the Apple PlainTalk Microphone or a compatible line-level microphone to record your
voice or other sounds to use on your Genesis MP.
1. Shut off your Genesis MP
2. Plug the connector of the microphone into the sound input port on the back of
your Genesis MP.
3. Place the microphone at a distance of one to three feet away from you.
4. Then center the microphone so that it is directly in front of you.
5. Turn on your Genesis MP and—
You’re ready to record.
Note: You cannot use the round lower-quality Apple microphone with your
Genesis MP.
Chapter 3 – Connecting Additional Peripherals
GenesisMP34 ◆

Adding external stereo speakers to your Genesis MP
PCI
Your Genesis MP’s stereo sound output allows you to add high quality external speakers to Genesis MP.
1. Choose the speakers you want based on your own personal sound needs.
2. Purchase enough cable (with a stereo miniplug or RCA-type plugs at one end) to
connect one or both speakers to Genesis MP.
3. Be sure your Genesis MP is turned off.
4. Plug the stereo miniplug or RCA-type plugs into the appropriate sound output ports
on your Genesis MP.
5. Connect the speakers together with speaker wires, if necessary.
Speaker port
Turn on your Genesis MP and listen to the music.
Note: You can control the volume of your external speakers by adjusting them
through your control panel. Open your sound control panel and choose volume from
the pop-up menu, You will then be able to adjust the volume of any of your input and
output devices.
Adding Video Devices(Three Slot Genesis MP Only)
The three slot Genesis MP models provide video input capability for viewing and cap-
3
turing video images on your Genesis MP. The three slot Genesis MP with multimedia
video out also provides video output capability for outputting video to a VCR or TV.
• You can connect video input devices such as VCRs, laser-disk players and
video cameras.
• You can connect video output devices such as VCR to output your video to
tape.
• You can view or reproduce video images by connecting video equipment to
your Genesis MP from a variety of sources.
Typical Speaker Connection
GenesisMP
Chapter 3 – Connecting Additional Peripherals
◆ 35

Genesis MP supports both S-video and composite video connectors. S-video is a higher
PCI
quality signal often found in more expensive televisions and video gear, such as High-8
video cameras. The composite video connectors are more common and are found on
most TVs, VCRs, laser-disk and video cameras.
Composite video connector
S-video connector
Identifying V ideo Connectors
Note: Although the S-video connectors resemble the other connectors on your
Genesis MP, such as the ADB port and serial/GeoPorts, the are not interchangeable.
This section covers the installation of a stereo VCR or video camera. Connecting other
video devices would be similar.
3
Note: For additional information on using your machine’s audio input and output
options, see the “Video” topic in Macintosh Guide, located in the menu.
Connecting video equipment (like a VCR) to your Genesis MP
1. Find the S-video connector and/or RCA-type composite video connectors on your
video equipment. If there are none, attach the appropriate adapter.
2. Make sure the you have turned off both your Genesis MP and the video equipment.
3. Place the equipment close to your Genesis MP.
4. Attach the cables to the video equipment and the correct port
on Genesis MP. (Don’t forget to connect your RCA-type
,,
audio connectors if you wish to also have sound input or output.)
Remember: For incoming video attach the video equipment to the video input ports.
For outgoing video, the video output ports must be used.
Audio input port (right)
Audio input port (left)
Composite video input port
or
Chapter 3 – Connecting Additional Peripherals
Adding a VCR for Incoming
Video & Sound
GenesisMP36 ◆

Adding Internal Devices to Genesis MP
The illustration below shows the basic internal components of your Genesis MP which
will be covered in this section. For a complete listing of basic components, please refer
to Page 14 of this manual, Important Internal Components of your Genesis MP.
Component 3 Slot 3 Slot 6 Slot
5.25” Internal Bay 1 1 1
Internal 3.5” Internal Drive Bays 7 7 7
Lithium Battery*
DIMM Sockets* 8 8 12
nPOWER Card Connector
PCI Expansion Slots 3 3 6
nPOWER Quad 604 Board
Video RAM*
* Position of this item on the three slot Genesis configuration differs from photo
w/video out
✓✓✓
✓✓✓
✓✓✓
✓✓
GenesisMP
Chapter 3 – Connecting Additional Peripherals
◆ 37

Opening Your Genesis MP
It’s easy to get inside your Genesis MP. Just remove the side door panel.
Genesis MP ships with a keyed lock that allows you to control the access to the inside
of your Genesis MP.
Note: If you are not concerned with the security of your machine, you can leave the key
installed in the lock for ready access.
1. Before you open the machine, be sure to turn your Genesis MP—and all peripherals
attached to it—completely off.
Key lock
4 hand screws
Opening Your Genesis MP
!
∆
2. Unlock the key lock on the side door panel.
3. Unscrew the four hand screws on the rear of the side panel by turning them counter
clockwise. They will not come completely out of the side panel.
4. Slide the side door panel back about 1/2" and pull the side panel away from
Genesis MP.
Hand screw
unlocked
Hand screw
locked
Removing the Side Door
CAUTION
Before you begin any installation, put on the anti-static wrist strap that came with
Genesis MP. Follow the instructions that came with it.
Chapter 3 – Connecting Additional Peripherals
GenesisMP38 ◆

Adding Memory
Adding memory to your Genesis MP was designed to be extremely easy.
Just remove the side panel, and you will be able to install your Dual Inline Memory
Modules (DIMMs) into the DIMM sockets. Genesis MP supports DIMM sizes of 8, 16, 32,
64 or 128 MB. The six slot Genesis MP has 12 DIMM sockets and supports up to 1,536
MB of RAM, while the three slot model has 8 DIMM sockets and support up to 1,024 MB.
DIMMs should be 64-bit wide, 168-pin fast-paged mode with 70ns or faster access times.
Performance tip: Although DIMMs can be added one at a time to your system, you can
increase your performance by only installing like pairs of memory in your machine. By
installing memory in pairs into the correct locations, you can enable memory interleaving, which effectively provides 128-bit memory access from 64-bit DIMMs.
Steps for installing Memory
1. Open Genesis MP (loosen the side door panel) by following the easy instructions
listed previously in this chapter. Remember to turn everything off.
2. Put on your anti-static wrist strap.
3. Locate the DIMM sockets on the motherboard
Bank 4
Bank 3
Bank 2
Bank 1
Bank 4
Bank 3
Bank 2
Bank 1
3-S
lot Genesis MP Motherboard
Bank 6
Bank 5
Bank 4
Bank 3
Bank 2
Bank 1
Bank 6
Bank 5
Bank 4
Bank 3
Bank 2
Bank 1
6-Slot Genesis MP Motherboard
4. Choose the DIMM sockets you wish to use for the installation.
GenesisMP
Chapter 3 – Connecting Additional Peripherals
◆ 39

Here’s what to consider:
If you are installing an odd number of DIMMs or you do not have pairs of identical
size DIMMs, they can be installed into any open DIMM slots.
If you are installing pairs of identical size DIMMs, be sure to install the identical pairs
in their matching banks for optimal performance.
5. Being careful not to touch the DIMMs edge connector, align them over the DIMM
socket.
Note: DIMMs are designed to fit into a DIMM socket in only one direction. Be sure
to match the notches in the DIMM connector to the ribs in the DIMM socket for
proper orientation.
Notches in DIMM
Ribs in DIMM socket
Installing DIMMs
6. Push down firmly on the DIMM until it snaps into place.
7. Close the side door panel by tightening the four screws that are attached to it.
8. Turn on your Genesis MP.
If your Genesis MP starts up properly, select About This Macintosh under the Apple
menu in the Finder and check that the amount of total memory matches the amount of
total memory you have installed in your Genesis MP. (Since About This Macintosh
reports memory in kilobytes (K) you will need to divide this number by 1,024 to
convert the number to megabytes (MB). 1 MB = 1,024K)
If you experience problems when starting up your machine, or About This Macintosh
does not list the correct amount of RAM, review this section to make sure that your
DIMMs are firmly and properly installed.
If you continue to have problems, it is possible that one of the DIMMs you installed is
malfunctioning.
Chapter 3 – Connecting Additional Peripherals
GenesisMP40 ◆

Here’s how to check:
PCI
1. Re-open your Genesis MP and keep on your anti-static wrist strap while you
complete this check.
2. Use the ejector(s) located on the side of the DIMM connectors to begin systematically removing each DIMM. (Your machine may have a single ejector or one
located on each side of the DIMM.)
DIMM Ejector
3. Push down and away from the DIMM to eject the module.
4. Remove the DIMMs, one at a time, restarting your Genesis MP each time, until you
find the malfunctioning DIMM.
Adding Video RAM (Three Slot Genesis MP Only)
3
Your three slot Genesis MP comes with 2 MB of Video RAM (VRAM) installed,
providing 24-bit color on screens up to 832 x 624. By adding 2 MB of additional VRAM
your Genesis MP can support resolutions up to 1152 x 870 with 24-bit color.
Adding VRAM to your Genesis MP was designed to be extremely easy.
Just remove the side panel, and you will be able to install two additional 1 MB VRAM
Dual Inline Memory Modules (DIMMs) into the VRAM DIMM sockets.
VRAM DIMMs should be 32-bit wide, 112-pin fast-paged mode with 70ns or faster
access times. Genesis MP does not support 256K and 512K VRAM SIMMs used in
older Macintosh models.
Here are the steps for installing VRAM.
1. Open Genesis MP (loosen the side door panel) by following the easy instructions
listed previously in this chapter. Remember to turn everything off.
2. Put on your anti-static wrist strap.
GenesisMP
Chapter 3 – Connecting Additional Peripherals
◆ 41

3. Locate the two empty VRAM DIMM sockets on the motherboard
Empty VRAM Sockets
Locating VRAM Sockets
4. Being careful not to touch the VRAM DIMMs edge connector, align them over the
VRAM DIMM sockets.
Note: VRAM DIMMs are designed to fit into a VRAM DIMM socket in only one
direction. Be sure to match the notches in the VRAM DIMM connector to the ribs in
the VRAM DIMM socket for proper orientation.
Ribs in VRAM socket
Notches in VRAM DIMM
Installing VRAM
6. Push down firmly on the VRAM DIMM until it snaps into place.
7. Close the side door panel by tightening the four screws that are attached to it.
8. Turn on your Genesis MP.
If your Genesis MP starts up properly, select the Monitors Control Panel under the
Apple menu in the Finder and select millions of colors.
If you experience problems when starting up your machine, or millions of colors is not
listed in the Monitors Control Panel, review this section to make sure that your VRAM
DIMMs are firmly and properly installed.
If you continue to have problems, it is possible that one or both of the VRAM DIMMs
you installed is malfunctioning. Contact your DayStar Authorized Reseller or VRAM
DIMM vendor for further assistance.
Chapter 3 – Connecting Additional Peripherals
GenesisMP42 ◆

Adding PCI cards
You can add from three to six expansion cards in Genesis MP, depending on the model,
through the Peripheral Component Interconnect (PCI) bus. Cards are available to add
graphics, video, networking and other expanded capabilities to Genesis MP.
Genesis MP supports all PCI cards that work in Apple’s PCI equipped Power Macintosh.
PCI cards that only support IBM-compatibles are not compatible with your Genesis MP.
Here are the steps for installing a PCI card.
1. Open Genesis MP (loosen the side door panel) by following the easy instructions
listed previously in this chapter. Remember to turn everything off.
2. Put on your anti-static wrist strap.
3. Unscrew the screw and remove the metal PCI slot cover from the PCI slot you wish
to use to install your card.
Removing PCI Slot Covers
4. Align the PCI card over the motherboard connector and push down on the card
until it is firmly seated in the motherboard.
Installing PCI Card
Note: If you are installing a full length PCI card, be sure that the card aligns inside
of the card guide on the right edge of the card.
5 Reinstall the screw and replace the access port cover to secure the PCI card.
6. Reinstall Genesis MP’s side door panel by tightening down the four screws.
7. Install any software that came with the card.
GenesisMP
Chapter 3 – Connecting Additional Peripherals
◆ 43

Performance Tips (six slot Genesis MP):
The six PCI slots are grouped into two groups of three each. Because the circuitry
linking the top three PCI slots is also used for other motherboard I/O, most expansion
cards perform slightly faster when installed in one of the bottom three PCI slots.
If you are installing a SCSI array with two PCI cards, you can typically increase
performance by installing one card in one of the top three PCI slots and the second
card in one of the bottom three PCI slots.
Disk array PCI card
Disk array hard drives
PCI Fast & Wide SCSI-2
Disk Array
Upgrading the nPOWER Processor Card
Genesis MP’s processors are found on an exchangeable daughtercard. They are
designed this way so that you are able to easily increase the performance of your
machine as faster processors become available.
To upgrade your processor daughtercard:
1. Open Genesis MP (loosen the side door panel) by following the easy instructions
listed previously in this chapter. Remember to turn everything off.
2. Put on your anti-static wrist strap.
3. Disconnect the power connector from the nPOWER card. Be sure to disengage the
connector lock as you pull the plug.
Connector lock
nPOWER power connector
Chapter 3 – Connecting Additional Peripherals
Connecting Power to nPOWER
GenesisMP44 ◆

4. Locate and unscrew the two hand screws on either side of the nPOWER card bracket. Be careful to support the card as the last screws are unscrewed.
Note: These screws are designed to stay attached to the bracket once they have been
unscrewed from the chassis.
nPOWER card bracket
4 hand screws
Locating the nPOWER
card bracket
5. Holding both sides of the nPOWER card bracket, firmly pull the bracket away from
the chassis to remove the card from the motherboard nPOWER processor slot.
GenesisMP
Removing the nPOWER card
6. Once the nPOWER card and its bracket have been removed from the chassis, place
the unit —with the metal bracket side face down—on a clean flat surface
7. Remove the nPOWER card from the bracket by unscrewing the four Phillips head
screws in each corner of the nPOWER card.
4 phillips head screws
4 Phillips Head Screws
Chapter 3 – Connecting Additional Peripherals
◆ 45

8. Install the bracket on your new nPOWER card by placing the card over the bracket
and reinstalling the four Phillips head screws.
9. Install the combined nPOWER card and bracket into Genesis MP by carefully
aligning the card over the nPOWER slot on the motherboard and then firmly
pushing the card into the slot.
Installing nPOWER Card
10.Continue to support the card and screw the two hand screws on either side of the
nPOWER card bracket into Genesis MP’s chassis.
11.Reinstall Genesis MP’s side door panel by tightening down the four hand screws.
Adding internal SCSI drives
Genesis MP was designed to make it extremely easy for you to add internal SCSI
devices. With its internal Fast SCSI-2 bus, internal SCSI devices can run up to twice as
fast as those connected to the standard external SCSI bus. Genesis MP comes with a 1"
high, 3.5" drive, with active termination, installed into the bottom drive bay.
Genesis MP was designed to support both 1" high and 1.6" high, 3.5" SCSI drives.
Because 1.6" high devices take up roughly twice the space of a 1" high device, adding
a 1.6" device blocks two 1" high bays.
One empty 5.25"bay
Six empty 3.5"bays
Single 3.5"hard drive
Standard Configuration
Chapter 3 – Connecting Additional Peripherals
GenesisMP46 ◆

1" Tall 1.6" Tall
Drives Drives
(1/3 height) (1/2 height)
70
51
32
13
If you are installing drives of both sizes, the table to the left shows the maximum
number of each size drive that may be installed into a Genesis MP.
1.6” high drives
1” high drives
Installing multiple hard drives
Adding SCSI devices into the Internal 3.5" bay
1. Open Genesis MP (loosen the side door panel) by following the easy instructions
listed previously in this chapter. Remember to turn everything off.
2. Put on your anti-static wrist strap.
3. Locate a pair of the small black SCSI rails and the four flat Phillips head screws
that came with Genesis MP.
4. Install the rails onto each side of the 3.5" SCSI device so that the thumb end of the
rails are on the side of the SCSI device which has the power and SCSI connectors.
GenesisMP
3.5" Drive Rails & Screws
SCSI power connector
SCSI connector
Thumb end of drive rail
Installing Drive Rails
Chapter 3 – Connecting Additional Peripherals
◆ 47

5. Following the directions that came with the SCSI drive, select a unique SCSI ID
number for the device and disable termination.
Note: The last drive in the internal SCSI chain should be the only one providing
termination.
6. Locate an empty 3.5" bay in Genesis MP and move the SCSI ribbon cable to the
left and the SCSI power cable to the right.
Moving SCSI & Power Cables
Note: If you have multiple internal 3.5" drives installed and are installing a 1.6"
high drive, you may need to move previously installed devices in order to make room
for your new drive.
7. Position the drive in front of the bay so that the drive’s SCSI connector is on the left
side and the power connector is on the right.
8. Slide the new SCSI drive into the bay with the drive rails between the three metal
flanges found on either side of the drive.
Inserting 3.5" Drive
9. Once you slide the drive completely into the drive bay, the rails will then lock the
drive in place.
Chapter 3 – Connecting Additional Peripherals
GenesisMP48 ◆

10.Connect the SCSI ribbon connector to the drive.
Note: This connector is designed to fit in only one direction, so be sure to orient the
connector properly. This means that the rib in the SCSI ribbon cable should mate
with the notch in the SCSI connector.
Rib in SCSI Ribbon Cable
Connecting SCSI Ribbon Cable
11.Connect the SCSI power connector to the drive.
Note: This connector is designed to fit in only one direction, so be sure to orient the
connector properly.
GenesisMP
Connecting SCSI Power Cable
12.Reinstall Genesis MP’s side door panel by tightening down the four screws.
13.Using the software that came with the drive, or the software included with Genesis
MP, format the drive.
Chapter 3 – Connecting Additional Peripherals
◆ 49

Adding SCSI Devices into the Internal 5.25" bay
Genesis MP’s internal 5.25" drive bay supports either 5.25" or 3.5" SCSI devices. This
bay can be used for large hard drives or for removable media devices such as SyQuest
5.25" or 3.5", Iomega Zip or Bernoulli or tape back-up units.
Note: Contact your DayStar Authorized Reseller or DayStar to obtain the bezels with
3.5" or 5.25" openings required for use with removable media drives.
1. Open Genesis MP (loosen the side door panel) by following the easy instructions
listed previously in this chapter. Remember to turn everything off.
2. Put on your anti-static wrist strap.
3. Locate the bezel on the front of Genesis MP between the CD-ROM and floppy drives.
4. Firmly grasping either side of the bezel, carefully pull the bezel away from the chassis.
Removing 5.25" Bezel
5. If you are installing a 3.5" device into the 5.25" bay, you will need a 3.5" to 5.25"
adapter bracket such as the one below. Contact the 3.5" device’s manufacturer or your
DayStar Authorized Reseller if an adapter bracket was not included with the device.
3.5" to 5.25" Adapter Bracket
Chapter 3 – Connecting Additional Peripherals
GenesisMP50 ◆

6. Locate the single large black SCSI rail and the two small Phillips head screws that
came with Genesis MP.
5.25" SCSI Rail & Screws
7. Facing the front of the SCSI device, install the rail onto the right side of the device,
making sure that the tapered end faces the rear of the device as shown below.
Tapered end of 5.25" drive rail
5.25" SCSI Rail Installed
8. Following the directions that came with SCSI drive, select a unique SCSI ID for the
device and disable termination.
Note: The last drive in the internal SCSI chain should be the only one providing
termination.
9. Position the drive in front of the machine’s 5.25" bay and with the right drive rail
between the metal flanges in the chassis, slide the new SCSI device completely into
the bay.
Inserting 5.25" Device
GenesisMP
Chapter 3 – Connecting Additional Peripherals
◆ 51

10.Snap the appropriate bezel onto the front of Genesis MP.
11.Locate four of the screws that came with your SCSI device.
12.Grasping the back of the new SCSI device from inside Genesis MP, slide it toward
the front bezel until it fits snugly against it.
Positioning the 5.25" Device
13.Install the screws through the chassis into the side of the 5.25" device (or into the
adapter bracket if you are installing a 3.5" device).
Phillips head screws
Screws Installed in
5.25" Device
Note: Some devices may only have two holes and therefore only require that you
install two Phillips head screws.
Chapter 3 – Connecting Additional Peripherals
GenesisMP52 ◆

14.Connect the SCSI ribbon connector to the drive.
Note: This connector is designed to fit in only one direction, so be sure to orient the
connector properly. This means that the rib in the SCSI ribbon cable should mate
with the notch in the SCSI connector.
Rib in the SCSI ribbon cable
Connecting the SCSI Ribbon
Cable
15.Connect the SCSI power connector to the drive.
Note: This connector is designed to fit in only one direction, so be sure to orient the
connector properly.
16.Reinstall Genesis MP’s side door panel by tightening down the four screws.
17.Install any software that came with the SCSI device. If it is a hard drive, use the
software that came with the drive—or the software included with Genesis MP—to
format the drive.
GenesisMP
Connecting SCSI Power Cable
Chapter 3 – Connecting Additional Peripherals
◆ 53

Replacing the Lithium Battery
Genesis MP uses a lithium battery to store users’ preferences and time and date
information while the unit is not turned on.
!
∆
CAUTION
Danger of explosion if battery is incorrectly replaced.
Replace only with the same or equivalent type recommended by the manufacturer.
Dispose of used batteries according to the manufacturer’s instructions.
Lithium battery
Three Slot Genesis MP
Battery Location
Lithium battery
Here are the steps for replacing the lithium battery.
1. Open Genesis MP (loosen the side door panel) by following the easy instructions
listed previously in this chapter. Remember to turn everything off.
2. Put on your anti-static wrist strap.
Chapter 3 – Connecting Additional Peripherals
Six Slot Genesis MP
Battery Location
GenesisMP54 ◆

3. Remove the battery cover by placing a thin bladed screw driver between the battery
and the black battery cover and gently pushing the tip of the blade away from the
battery while lifting up on the battery cover. It may be necessary to duplicate this
step on both sides of the battery.
Removing the Battery Cover
4. With the battery cover removed, note the orientation of the battery and then grasp
the battery on the sides and pull it out.
5. Orient the new battery properly over the battery connector and and push it into place.
6. Reinstall the battery cover.
7. Reinstall Genesis MP’s side door panel by tightening down the four screws.
GenesisMP
Chapter 3 – Connecting Additional Peripherals
◆ 55


Installing Genesis MP System Software
Installing the Mac OS
Genesis MP requires Apple’s Mac OS version 7.5.2 or greater for operation. Your
Genesis MP ships with the current version of the Apple system software pre-installed
on the hard drive and included on a CD-ROM.
If you wish to install your system software onto a new drive, or need to reinstall your
system software, this section describes the steps required for installation. The CDROM may also include additional Apple software which you may choose to install.
Consult the Read Me files on the CD for additional information on such software.
Performing an Easy Install or Clean Install
Note: If you are installing system software onto a new hard drive, make sure that the
drive has been formatted. You may use FWB’s Hard Disk Toolkit, included with your
Genesis MP, to format the drive, or use the software that came with the drive. If your
boot drive needs to be reformatted follow the steps below, skipping steps 3-7.
Chapter 4
1. Turn off Genesis MP.
2. Insert your Genesis MP Boot Disk into the floppy drive and turn on your Genesis MP.
When told that the floppy is locked, click OK.
3. Insert the Apple system software CD-ROM into the CD-ROM player.
4. Open the Disk First Aid application located in the Utilities folder of the CD-ROM.
5. Verify, and repair if necessary, the hard drive you wish to install the system software on by following the instructions on the screen.
6. Once you have finished using Disk First Aid, quit the application.
7. Remove the Apple System software CD-ROM from the CD-ROM player.
8. Insert your Genesis MP CD-ROM into the CD-ROM player.
9. Open HDT Primer and select your hard drive from the list of connected devices by
clicking on it.
10.From the Driver menu select Update Driver…
Note: If your hard disk was formatted with a utility other than FWB’s Hard Disk
Toolkit, you can update your drivers using the latest version of that application
or use Hard Disk Toolkit. If you do not know which software was used to
format your disk, contact the vendor who sold it to you.
Note: If your drive needs to be formatted, click on the format button. Performing a
format on your drive will cause all data on that drive to be destroyed.
GenesisMP
Installing Genesis MP System Software
◆ 57

11.Once completed, quit HDT Primer and remove your Genesis CD-ROM from your
CD-ROM player.
12.Restart your Genesis MP from the Genesis MP Boot Disk.
13.Insert the Apple system software CD-ROM into the CD-ROM player.
14.Open the Install System Software folder and then open the Install System Software
application. Click Continue. The Easy Install window shown below appears.
Mac OS Easy Install Window
15.Be sure that the drive you wish to install the system software on is selected as the
Destination Disk. If it’s not, click Switch Disk until the correct drive appears.
16.If you are installing the system software on a drive that already has system software
on it, you may wish to perform a clean installation. A clean install creates a brand
new System Folder and moves the contents of your old System Folder to a new
folder named Previous System Folder. A clean install is recommended if your old
System Folder has become corrupt or files that have been added to your System
Folder are causing compatibility problems.
To perform a clean install, hold
down the Command-Shift-K keys
at the same time. When the window shown below appears,
select Install New System Folder
and click OK.
17.Click on the Install or Clean Install button in the main window.
18.Once the installation is completed, you can install any additional Apple system software from the CD-ROM that you choose to have installed. If you are new to the Mac
OS, we suggest that you install the Macintosh Tutorial software.
19.Once you have installed the Apple software, you will need to install your Genesis MP
software located on your Genesis MP CD-ROM. We also recommend that you do not
reinstall system extensions and applications that may have been deleted, or moved to
the Previous System Folder, until after installing your Genesis MP software.
Chapter 4 – Installing Genesis MP System Software
GenesisMP58 ◆

Performing a Custom Install
If you wish to install or update only specific portions of the Mac OS, you can perform
a Custom Install by following these steps.
Note: If you are installing system software onto a new hard drive, make sure that the
drive has been formatted. You may use FWB’s Hard Disk Toolkit, included with your
Genesis MP, to format the drive, or use the software that came with the drive. If your
boot drive needs to be reformatted, boot from your Genesis MP Boot Disk to get your
machine up and then format the drive with the formatting software.
1. Turn off Genesis MP.
2. Insert your Genesis MP Boot Disk into the floppy drive and turn on your Genesis MP.
3. Insert the Apple system software CD-ROM into the CD-ROM player.
4. Open Install System Software and click Continue.
5. Select Custom Install from the pop-up menu in the upper left corner of the window.
Mac OS Custom Install
Window
6. Select the system software components you wish to install. You may get information
about each component by clicking on the i to the right of each component. If you
wish to select only individual items of a component, click on the arrow to the left of
the component.
7. Be sure that the drive you wish to install the system software on is selected as the
Destination Disk. If it’s not, click Switch Disk until the correct drive appears.
8. Click on the Install button.
9. Once the installation is completed, you will need to install your Genesis MP software
located on the DayStar Genesis MP CD-ROM if you have not already done so.
GenesisMP
Chapter 4 – Installing Genesis MP System Software
◆ 59

Installing Genesis MP Software
Genesis MP requires that specific software be installed in order to take full advantage
of your machine’s capabilities. Your Genesis MP ships with this additional software
pre-installed on the hard drive and included on a CD-ROM.
If you wish to install your Genesis MP software onto a new drive, or need to reinstall
it, this section describes the steps required for installation. Consult your Genesis MP
Read Me file for a complete and up to date list of the files that your Genesis MP
installer places on your hard drive.
Note: You must install the Mac OS (see previous section) before installing your
Genesis MP software.
Performing an Easy Install
1. Turn off Genesis MP.
2. Insert your Genesis MP Boot Disk into the floppy drive and turn on your Genesis MP.
3. Insert your Genesis MP CD-ROM into the CD-ROM player.
4. Open Genesis MP Installer and click Continue. The Easy Install window shown
below appears.
Genesis MP Easy Install
Window
5. Be sure that the drive you wish to install the software on is selected as the
Destination Disk. If it’s not, click Switch Disk until the correct drive appears.
6. Click on the Install button.
7. The installer may ask you to locate specific applications on your hard drive in order
to place multiprocessing plug-ins in their appropriate locations. If you do not own
these applications simply click on the cancel button and these files will be placed
in the Applications folder. You can also later install these files using the Custom
Install feature of the installer software.
Installing Plug-ins
Chapter 4 – Installing Genesis MP System Software
GenesisMP60 ◆

8. Once the installation is completed, restart your machine.
Note: If you previously performed a clean install of the Mac OS system software you
can now move items from the Previous System Folder into the System Folder. Files
that you may wish to copy back into the System Folder include Control Panels,
Extensions and Preference files. Be sure not to copy older versions of the system
software from the Previous System Folder over new files in the System Folder.
If your machine does not operate properly or your performance decreases after placing Control Panels or Extensions back into the System Folder, remove the files and
add them one at a time, booting up after each, until you find the problematic file.
Once you find the file, remove it and continue adding the other files until all such
files have been removed from the System Folder. Some conflicts can be overcome by
changing the first character in the file name, which changes the order in which the
files load. If you continue to have problems with specific files, contact the developer
for assistance.
Performing an Custom Install
1. Turn off Genesis MP.
2. Insert your Genesis MP Boot Disk into the floppy drive and turn on your Genesis MP.
3. Insert your Genesis MP CD-ROM into the CD-ROM player.
4. Open Genesis MP Installer and click Continue.
5. Select Custom Install from the pop-up menu in the upper left corner of the window.
Genesis MP
Custom Install Window
6. Select the software components you wish to install. You may get information about
each component by clicking on the i to the right of each component. If you wish to
select only individual items of a component, click on the arrow to the left of the
component.
7. Be sure that the drive you wish to install the system software on is selected as the
Destination Disk. If it’s not, click Switch Disk until the correct drive appears.
8. Click on the Install button.
9. Once the installation is completed, restart your Genesis MP.
GenesisMP
Chapter 4 – Installing Genesis MP System Software
◆ 61


Troubleshooting
This section discusses possible problems that you may encounter and how to solve
them. If the information in this section does not solve your problem, please contact
your Genesis MP Authorized Reseller or call DayStar Technical Support (9
6
P.M
. EST) at 770-967-2077 for further assistance.
Your Genesis MP crashes and you cannot quit the application or restart
the computer from the Finder.
• Force the application or the Finder to quit by holding down the CommandOption-Esc keys at the same time. If this is successful you should save any
work in your other open applications and then Restart your Genesis MP.
• Force the Genesis MP to restart by holding down the Command-Controlkeys at the same time.
Chapter 5
A.M
. to
W2@@@@@@@@@@@@@@@6X
7(M?hfI'1
@H ?N@
@? @
@? @
@?gW2@?g@
@?f?W.Y@?g@
@?fW.Y?@?g@
@?f*Ue@?g@
@?fV/X?@?g@
@?f?V/X@?g@
@?gV4@?g@
@? @
@? @
@L ?J@
3)K?hfO&5
V4@@@@@@@@@@@@@@@0Y
!
∆
CAUTION
These option will cause you to lose unsaved data. If you can see information
on the screen that has not been saved, you may wish to write it down so that it
may more easily be reentered into the computer.)
You are experiencing problems with your Genesis MP.
• You may be able to solve many problems by clearing your Genesis MP’s
parameter RAM. Refer to the section entitled “Clearing the Parameter RAM.”
Your Genesis MP will not start up, no error screens appear and the
Mac OS splash screen does not appear.
• Try removing the DIMMs one at a time until the problem goes away. If
removing the DIMMs solves the problem, replace them with known
working modules.
• Try booting from your Genesis MP Boot Disk, with all external SCSI devices
turned off and the command, option, shift and delete keys held down until the
Finder desktop appears. This keeps your internal hard drive from mounting. If
the machine starts up properly, update your hard disks or removable media with
the latest version of the application that was used to format them. Refer to the
section entitled “Incompatible formatting software” for further information.
GenesisMP
• As a final test try removing all PCI cards (other than the the display card in the
six slot Genesis MP); disconnect all external and internal SCSI devices; disconnect any non-Apple/DayStar mice, keyboards, trackballs or tablets connected to
the ADB ports and also disconnect any cables connected to the Ethernet, printer or modem ports. Insert your Genesis MP Boot Disk and turn on your
Troubleshooting
◆ 63

Genesis MP. If it starts up properly, one of the devices you disconnected is conflicting with your Genesis MP. Try adding the devices back one at a time until
you pinpoint the incompatible device. Contact the manufacturer of the device
for the latest updates.
If none of these suggestions solves your problem, contact your DayStar Authorized
Reseller or call DayStar Technical Support (9 a.m. to 6 p.m. EST) at 770-967-2077 for
further assistance.
Your Genesis MP locks up after the Mac OS splash screen appears, but
does not start up completely.
• Hold down the shift key and turn your Genesis MP on.
If the machine starts up properly…
• Refer to the section entitled “Control Panel and Extension Conflicts.”
If the machine does not start up properly…
• Try booting from your Genesis MP Boot Disk, with all external SCSI devices
turned off and the command, option, shift and delete keys held down. If the
machine starts up properly, update your hard disks or removable media with the
latest version of the application that was used to format them. Refer to
“Incompatible Formatting Software” for further information.
If the machine still does not start up properly…
• Refer to the section entitled “
If the machine still does not start up properly…
• As a final test try removing all PCI cards (other than the the display card in the
six slot Genesis MP); disconnect all external and internal SCSI devices; disconnect any non-Apple/DayStar mice, keyboards, trackballs or tablets connected to
the ADB ports and also disconnect any cables connected to the Ethernet, printer or modem ports. Insert your Genesis MP Boot Disk and turn on your
Genesis MP. If it starts up properly, one of the devices you disconnected is conflicting with your Genesis MP. Try adding the devices back one at a time until
you pinpoint the incompatible device. Contact the manufacturer of the device
for the latest updates.
If none of these suggestions solves your problem, contact your DayStar Authorized
Reseller or call DayStar Technical Support (9 a.m. to 6 p.m. EST) at 770-967-2077 for
further assistance.
Installing a Clean System”
in the previous chapter.
An error message appears at startup that informs you that the RAM is
either not installed properly or is failing the self test.
• Make sure the DIMMs are installed properly.
If you continue to have this problem…
• Try removing the DIMMs one at a time until the problem goes away. If
removing the DIMMs solves the problem, replace them with known
working modules.
Chapter 5 – Troubleshooting
GenesisMP64 ◆

You don’t have as much system memory as you expected.
• You may have incorrectly installed the DIMMs in your Genesis MP. Check
your Genesis MP Control application and be sure that the amount of memory
that the software sees is equal to what you expected. (Refer to your Genesis
MP Control Read Me)
You are unable to use Virtual Memory and multiprocessing at the same time.
• Virtual Memory is not currently supported in the Apple Multiprocessing
Application Programming Interface (API). Because Connectix uses virtual
memory in RAM Doubler, it is also not currently compatible with your Genesis
MP’s multiprocessing software. Turning on Apple’s VM or Connectix RAM
Doubler will cause your Genesis MP to run off of a single CPU, and therefore
drastically reduces performance in MP aware applications.
You notice a decrease in your computer’s speed after adding a control
panel or system extension.
• The software may not work well with PowerPC-based computers. To find out if
your special software is the problem, remove the problem software from your
System Folder (it may be in the Control Panels or Extension folders). If the
computer performs better when the software is removed, contact the software’s
manufacturer for information or an upgrade.
Your PowerPC native applications will not run; they give you a message
that a file could not be found; or they crash when you use them.
The application may not have enough memory to operate properly. Try the following:
• Allocate more memory to the application by quitting the application, selecting
the application and then choosing Get Info from the File menu in the Finder.
You should increase both the Minimum and Preferred memory sizes.
• Quitting other applications to free up memory.
• Turn on the Modern Memory Manager located in the Memory Control Panel.
• Install more memory in your Genesis MP.
If the problem does not appear to be memory related, try the following…
• PowerPC applications use a new type of file called a shared resource. When you
install a PowerPC native application, any required shared resource files should
be installed into your System Folder. Check the documentation that came with
your application to be sure that the required shared resource files were installed
properly.
• Hold down the shift key and turn your Genesis MP on. This will turn all your
extensions off at bootup. Keep the shift key held down until your Genesis MP
completely starts up. Run the application. If the application works properly,
refer to the section marked “Control Panel and Extension Conflicts.”
GenesisMP
Chapter 5 – Troubleshooting
◆ 65

Your non-native applications will not run or they crash when you use them.
• Disable the Modern Memory Manager, located in the Memory Control Panel.
Restart your Genesis MP. If this solves the problem, you should turn the
Modern Memory Manager back on for best performance when using native
applications.
• Hold down the shift key and turn your Genesis MP on. This will turn all of
your extensions off at bootup. Keep the shift key held down until the
Macintosh completely starts up. Run the application. If the application works
properly, refer to the section entitled “Control Panel and Extension Conflicts.”
When the mouse cursor moves, the cursor jerks erratically.
• This is generally due to a low memory situation. Try quitting out of some of
the other open applications or adding more memory.
• The problem may also be dirty mouse or trackball. Most mice can be cleaned
by removing the circular locking ring around ball on the underside of the
mouse. With the ball removed, use a cotton swab or a finger nail to clean the
three rollers inside the mouse.
If these suggestions fail to solve the problem try switching to known good mice or
trackballs. If the problem goes away contact your reseller or the manufacturer for
repair or replacement information.
Your floppy disk will not eject from your Genesis MP’s floppy drive.
• Try holding down the Command-Shift-1 keys at the same time.
• Turn off your Genesis MP and hold down the button on your mouse or other
pointing device until the Mac OS splash screen appears.
• Insert a large, straightened paper clip into the small hole near the floppy drive’s
opening. Carefully push the paper clip in to eject the floppy disk.
If none of these suggestions solves your problem, contact your DayStar Authorized
Reseller or call DayStar Technical Support (9 a.m. to 6 p.m. EST) at 770-967-2077 for
further assistance.
Your Genesis MP’s clock no longer keeps correct time and/or your Genesis
MP forgets user settings such as the Startup Disk.
• Replace your Genesis MP’s lithium battery. See previous chapter for replacement instructions.
Icons do not appear properly on the desktop.
• Try rebuilding your desktop. First shut down your Genesis MP. While holding
down the Command-Option keys restart your computer and continue holding the
keys down until you see a message asking if you wish to rebuild your desktop.
Click OK.
Chapter 5 – Troubleshooting
GenesisMP66 ◆

Control Panel or Extension Conflicts
If you are experiencing problems with specific applications or your Genesis MP hangs
while starting up, it could be due to Control Panel (CDEV) or Extension (INIT) files
that are conflicting with one another or are not PowerPC compatible. To fix this
problem, do the following:
1. Hold down the shift key and turn your Genesis MP on. Keep the shift key held
down until your Genesis MP completely starts up.
2. Remove all non-Apple/DayStar Control Panels and Extensions from the hard
drive’s System Folder.
3. Restart your Genesis MP from the hard drive. (If your Genesis MP does not start up
properly at this point, it is probably due to a contaminated system. Refer to the
section entitled “Installing a clean system” in the previous chapter.)
4. Reinstall the Control Panel and Extension files into the System Folder one at a
time. Restart the machine after adding each file until you encounter a problem.
After this happens, restart while holding down the shift key at startup and remove
the last file loaded. Proceed again with this systematic check until you have
removed all conflicts.
Note: You can overcome some conflicts by changing the first character of the
troublesome file’s name. Since these files load in alphabetical order, this will alter
the order in which they load. It is also possible that the troublesome file is not
PowerPC compatible. Contact the author of the Control Panel or Extension for the
latest version.
Note: Connectix RAM Doubler is not currently compatible with your Genesis MP.
Clearing the Parameter RAM
Your Genesis MP has a small amount of memory, or parameter RAM, for storing its
settings. It is possible for this information to become corrupt, or to contain improper
information. To Clear or “Zap” your Genesis MP’s parameter RAM, hold down the
Command-Option-P-R keys simultaneously while starting your Genesis MP and continue holding them down until the machine restarts itself. (In some instances you may
need to use power switch to turn your Genesis MP on after clearing the parameter
RAM.) Since this clears many of the Control Panel settings, you will need to reset your
system preferences for items such as the time and date.
Incompatible Formatting Software
Your Genesis MP is shipped with FWB’s Hard Disk Toolkit for formatting hard drives
and removable media. If you choose to use different formatting software, or some of
your existing devices were formatted with other software, the devices may cause problems with your Genesis MP if the software does not support PowerPC-based machines.
If your Genesis MP will not start properly, try booting from your Genesis MP Boot Disk,
with all external SCSI devices turned off and the command, option, shift and delete keys
held down. If the machine starts up properly, you will need to update the driver on your
hard disks or removable media. You may use FWB’s Hard Disk Toolkit, which came with
your Genesis MP, or the latest version of your own formatting software.
GenesisMP
Chapter 5 – Troubleshooting
◆ 67

Performance Notes
Here are some tips to get the most from your Genesis MP.
• Upgrade your non-native applications, control panels and extensions to multiprocessing versions as they become available.
• Keep the number of control panel and system extension files that you have in
the System Folder to a minimum. If you find that you are not using the features
of such a file, remove the file from the System Folder. (You can always add it
back when needed.) Not only can these files cause conflicts with one another,
they can also rob the system’s performance, especially if they are not written in
the native PowerPC format.
• Vary the size of the Apple Disk Cache, located in the Memory control panel, to
find an optimal setting for your system. Some hard drives and applications such
as Adobe Photoshop perform better with the cache set to its minimum.
• Whenever possible, keep the Modern Memory Manager enabled.
• Apple may increase the portion of the operating system that is coded in native
PowerPC in future versions of the system software. By upgrading to these new
versions, you will be able to further increase your performance.
Chapter 5 – Troubleshooting
GenesisMP68 ◆

Product Warranty
DayStar Digital, Inc. warrants that it will repair or replace, at its option, any defective
products properly returned to our factory at no additional charge for a period of ONE
(1) FULL YEAR from the date the product is purchased by the original enduser.
This warranty does not apply if the hardware product has been damaged by accident,
misused, abused, installed with non-compatible products, modified in any way or if the
serial number has been removed or defaced. This warranty does not apply to damage or
failure to any other add-in boards. This warranty is extended only to original endusers.
THE GUARANTEE, WARRANTY AND REMEDIES SET FORTH ABOVE ARE
EXCLUSIVE AND IN LIEU OF ALL OTHERS, ORAL OR WRITTEN, EXPRESS
OR IMPLIED. DAYSTAR IS NOT RESPONSIBLE FOR SPECIAL, INCIDENTAL
OR CONSEQUENTIAL DAMAGES RESULTING FROM ANY BREACH OF WARRANTY OR UNDER ANY LEGAL THEORY, INCLUDING BUT NOT LIMITED
TO LOST PROFITS, DOWNTIME, GOODWILL, DAMAGE TO OR REPLACEMENT OF EQUIPMENT AND PROPERTY AND ANY COSTS OF RECOVERING,
PROGRAMMING OR REPRODUCING ANY PROGRAM OR DATA STORED OR
USED WITH DAYSTAR PRODUCTS.
Appendix
DAYSTAR DIGITAL, INC. OR ITS LICENSOR MAKES NO WARRANTIES,
EITHER EXPRESS OR IMPLIED, REGARDING THE ENCLOSED COMPUTER
SOFTWARE PACKAGE, ITS MERCHANTABILITY OR ITS FITNESS FOR ANY
PARTICULAR PURPOSE. THE EXCLUSION OF IMPLIED WARRANTIES IS NOT
PERMITTED IN SOME STATES. THE ABOVE EXCLUSION MAY NOT APPLY TO
YOU. THIS WARRANTY PROVIDES YOU WITH SPECIFIC LEGAL RIGHTS.
THERE MAY BE OTHER RIGHTS THAT YOU MAY HAVE WHICH VARY FROM
STATE TO STATE.
Upgrading Your Genesis MP
As faster PowerPC 604 CPUs are introduced, contact your DayStar Authorized
Reseller or DayStar for information on upgrading your Genesis MP’s nPOWER processor card.
GenesisMP
Appendix
◆ 69

How to Service Your Genesis MP
If you believe service is needed, please contact your DayStar Authorized Reseller or
call the DayStar Technical Support Department for assistance at 770-967-2077 (or
EMail as shown below) before you return the product. Many times we can solve
problems without asking you to return your Genesis MP for service.
Contacting DayStar
Please direct all correspondence and technical questions to:
DayStar Digital, Inc.
Technical Support Department
5556 Atlanta Highway
Flowery Branch, GA 30542
770-967-2077 fax: 770-967-3018
http://www.daystar.com/
Internet:
Complete information on DayStar and our products is available on our home page on the world
wide web: http://www.daystar.com/. Our EMail address is support@daystar.com
AppleLink:
Our software is available at the following location: Third Parties; Third Parties A-G; DayStar
Digital; File Library/Utilities. Our Link address is: DAYSTAR.TECH.
America Online:
DayStar has a forum in the Industry Connection Area. Our Address is: DAYSTAR OL.
CompuServe:
You can contact DayStar through our forum, Macintosh A Vendor Forum Section 6 or at our
EMail address: 75300,1544.
eWORLD:
Our address is: DAYSTAR OL.
We appreciate comments you may have on this manual.
Appendix
GenesisMP70 ◆

DayStar Digital is a registered trademark and Genesis MP is a trademark of DayStar
Digital, Inc. DayStar product specifications are subject to change without notice.
America Online is a service mark of Quantum Computer Services, Inc.
Apple, Apple Desktop Bus, AppleScript, AppleShare, AppleTalk, Balloon Help,
Chicago, Disk First Aid, eWorld, Finder, GeoPort, LaserWriter, LocalTalk, Macintosh,
Power Macintosh and QuickDraw are trademarks of Apple Computer, Inc.
Adobe Photoshop is a trademark of Adobe Systems Incorporated.
CompuServe is a registered trademark of CompuServe, Inc.
IBM is a registered trademark of International Business Machines Corporation.
Motorola is a registered trademark of Motorola Corporation.
PowerPC and the PowerPC logo are trademarks of International Business Machines
Corporation.
Part Number: 81-00504
Copyright 1996, DayStar Digital, Inc.
Manual version number 1.1, 02/96
AL, DM, GD, LG, DP
GenesisMP
Appendix
◆ 71


Index
A
AAUI 8, 14, 27, 28
Adobe Photoshop 10, 68, 71
America Online 70, 71
Apple Desktop Bus (ADB) 8, 13, 18, 14, 27, 28,
36, 63, 64
AppleLink 70
B
Balloon help 21, 22, 71
Battery 6, 55, 67
C
Cables
audio equipment 34
Ethernet 63, 64
external speakers 35
keyboard 13, 18, 19
monitor 12, 17, 19
mouse 18
printer 63
SCSI 29, 30, 48, 49, 53, 54
Cache (see Static RAM Cache or Disk Cache)
CD-ROM 6, 7, 8, 14, 15, 21, 28, 32, 50, 56, 57,
58, 69, 60, 61
Clean Install 57, 58, 61
Clock Battery (see battery)
CompuServe 70, 71
Connecting
audio equipment 33, 34
Ethernet 63, 64
external speakers 35
keyboard 13, 18, 19
monitor 12, 17, 19
mouse 18
printer 63
SCSI devices 29, 30, 31, 48, 49, 53, 54
Connectix 66, 68
Control Panels & Extensions Conflicts 67
Custom Install
Mac OS 59, 61
Genesis MP system software 60, 61
D
DIMMs 9, 39, 64, 66
Disk Cache 68
Disk driver 29, 57, 68
Disk First Aid 57, 71
Driver (see Disk driver)
E
Easy Install
Mac OS 57
Genesis MP system software 60
Emulation 6-8, 62, 66-68, 75, 79-80, 82
Error message 64
Ethernet 7, 8, 14, 27, 28, 63, 64
eWORLD 70, 71
Expansion cards
PCI 9, 16, 43, 44
nPOWER processor card 44, 69
Extensions (see Control Panels & Extensions)
External speakers 35, 57
F
Fan 7, 8, 14, 17
Floppy Drive 8, 14, 15, 50, 57, 59, 60, 61, 67
Format (see Disk driver)
G
Grounding 16
GeoPort 28, 71
GenesisMP
Index
◆ 73

H
Hard Disk Toolkit 57, 59, 68
Hard drives
connecting internal drives 47, 50
formatting 68
repairing 57
updating 47
I
Icons 21, 67
Initializing hard drives (see disk driver)
Input device
Keyboard 28, 63, 64
Mouse 28, 63, 64
Tablet 28, 63, 64
Trackball 28, 63, 64
Installing software
Mac OS 57-59
Genesis MP system software 60, 61
Clean system 64-68
Installing hardware
RAM 39, 40, 41, 64
VRAM 41, 42
PCI expansion cards 8, 9, 16, 17, 31, 43, 44,
63, 64
nPOWER processor card 44, 69
K
Keyboard 13, 17, 18, 19, 20, 28
L
Level 2 cache (see Static RAM Cache)
LocalTalk 28, 71
M
Macintosh Tutorial 21, 58
Memory
Allocating 66
Configurations 8, 36, 46
Interleaving 39
Memory allocation and requirements
(applications) 66, 69
DIMM (Dual Inline Memory Module) 9, 39,
41, 66
Virtual memory 66
VRAM 41
Microphone 33, 34
Modem port (see Ports)
Modern Memory Manager 66-68
Monitor
cable 17, 19
card 17
port 17, 18
power cord 17, 19
Mouse
cable 18
cleaning 67
connecting 18
problems with 67
N
Native software 66
Network 9, 26, 28, 43
Non-native (see Emulation) 67-68
P
Parameter RAM 63, 68
Performance tips 44
Peripheral Component Interconnect (PCI) cards
7-9, 10-11,13, 14, 16-17, 30, 31, 43, 44, 63, 64
Ports
ADB 8, 14, 18, 27, 28, 36
Ethernet 8, 14, 27
keyboard 18
modem 14, 27
monitor 8, 14, 17-18
mouse 18
printer 14, 27-28
SCSI 14, 27-29
Sound 14, 27, 34-35
Video 8, 14, 27, 36
Power button 19-20
Power cords 17
Power-on light 8, 14
Power supply 7-10, 15
Previous System Folder 58, 61
Index
GenesisMP74 ◆

R
RAM (see DIMMs)
Rebuilding the desktop 67
Replacing the clock battery (see Battery)
Removables (see hard drives)
Restarting Genesis MP 20, 41, 61, 63, 67-68
S
Serial Port (see Ports)
SCSI (Small Computer System Interface)
cables 29, 30, 48, 49, 53, 54
termination 31, 32, 46, 48, 51
IDs 29, 32, 48, 51
ports 14, 27, 28, 29
Shared libraries (see Shared resource)
Shared resource 65
Sound 7, 8, 27, 33, 34-36
audio in 33, 34, 36
microphone 33
Static RAM cache (see Disk Cache)
Stereo miniplug 33-35
Stereo speakers, connecting 33, 35
System Extensions 58, 61, 67
System Software 13, 57-61
V
Ventilation 14
Video cards (see PCI)
Video RAM (VRAM)
Virtual memory 65
W
Warranty 69
T
Technical Support 63, 64, 67, 70
Terminators (see SCSI)
Troubleshooting
clock 67
floppy disks 8, 14, 15, 50, 57, 59, 60, 61, 66
hard disk 67
icons 67
restarting Genesis MP 63
start up 63-64
turning off extensions and control panels 68
turning off your Genesis MP 66
U
Updating the hard drive 47
Upgrading the nPOWER card 69
GenesisMP
Index
◆ 75


System Info
For your convenience we have provided an easy way to inventory all the components
of your Genesis system. Refer to this page for future upgrades and have it handy
when calling for technical support.
Genesis MP Serial Number ________________________________________________
Primary Monitor ________________________________________________________
Additional Monitor ______________________________________________________
PCI Cards Installed ______________________________________________________
DIMMS ______________________________________________________________
______________________________________________________
______________________________________________________
______________________________________________________
______________________________________________________
______________________________________________________
Internal SCSI Devices____________________________________________________
____________________________________________________
____________________________________________________
____________________________________________________
____________________________________________________
____________________________________________________
External SCSI Devices
____________________________________________________
____________________________________________________
____________________________________________________
____________________________________________________
____________________________________________________
____________________________________________________
GenesisMP
System Info
◆ 77


Service Diary
Here you may wish to keep a record of any service calls made or upgrades performed
on your system.
Date Description
GenesisMP
Service Diary
◆ 79

Additional Notes
GenesisMP
Additional Notes
◆ 80
 Loading...