

Page 1
IMPORTANT: The net amount of ride height increase depends upon the age and use of the vehicle, wheel offset, and
numerous other factors. Stated torsion bar ride height increases are based upon factory specifications. If the torsion
bars were “cranked up” at some point in the past, expect a
corresponding reduction in overall height increase with the
new torsion keys. Note that torsion bars, like any other
spring, are subject to fatigue and sagging over time. Also,
torsion bars have different ratings depending on how the vehicle was equipped from the factory. In some cases, installing
heavier rated bars (which can be purchased from a dealer)
may be the only solution to regaining ride height lost from
adding heavy aftermarket accessories, such as a winch
bumper or snow plow.
KG09109
2000-06 AVALANCHE/T AHOE/YUKON/
ESCALADE/SUBURBAN WD
TORSION BAR LEVELING KIT
TOOLS NEEDED
Floor Jack X 1
Jack Stands X 2
Puller Tool X 1
Hand Tools
18mm socket and wrench
BILL OF MATERIALS
P11321 X 2 Torsion Keys
P11402 X 1 Instructions
NOTE: Various types of puller tools are available, however, due to the
extreme loads present in four-wheel drive suspension systems, we have
found the two-jaw style tool that clamps to the crossmember tends to slip
and damage the crossmember. A C-clamp style puller tool is preferred
and available through tool companies such as OTC and Kent Moore.
WWW.DAYSTARWEB.COM
www.Daystarweb.com
Tech Support Contact Info
Tech@DaystarWeb.com
Phone: 623.907.0081
Fax: 623.907.0088
841 South 71
st
Avenue
Instruction Sheet P11402
2007 Daystar Products International Inc.
Page 2
Thank you for choosing Daystar Products
Daystar recommends a certified technician install this system . In
addition to these instruction , professional knowledge of disassemble/reassembly procedures as well as post instructions checks must
be known. Attempts to install this system without this knowledge
and expertise may jeopardize the integrity and/or operating of the
vehicle.
Please read all the instructions before beginning the installation.
Check the kit hardware against the parts list. Be sure you have all
the needed parts and understand where they go. If anything is missing , do not proceed with the installation, call Daystar Products to
obtain needed items.
As a general rule, the taller a vehicle is the easier it will roll. We
strongly recommend , because of rollover possibility, that seat belts
and shoulder harness be worn at all times. Avoid situations where a
side rollover may occur.
Braking performance and capabilities are decreased when significantly large/heavier tires and wheels are used. Take this into consideration while driving, also , speedometer recalibration is necessary
when larger tires are installed.
Do no add, alter, or fabricate any factory or after-market parts which
increase vehicle height over the intended height of the Daystar Product purchased. Mixing component brands, lifts, and/or combining
body lift with suspension lift voids all warranties. Daystar makes no
claims regarding lifting devices and excludes any and all implied
claims. We will not be responsible for any products that is altered.
Product Use Information
12. Using the same precautions and procedures that were
used during removal, load the torsion bar enough to install the nut block using the appropriate puller tool.
Place the nut block back in the crossmember and start
the adjuster bolt. Tighten the adjuster bolt to the same
exposed length noted during disassembly. Unload the
remove the pulled tool.
13. Lower the vehicle to the floor, manually bounce the
front of the vehicle several times enough to settle the
suspension.
14. Measure the ride height on each side. To raise the
height, tighten the torsion bar adjuster bolt; to lower ride
height, lessen the adjuster bolt. The torsion key is capable of increasing the ride height 1-1/2” (mid-size) to
2” (full-size) over factory specifications. Do not increase ride height above the specification.
15. Realign the vehicle to factory specifications.
Page 3

9. Using extreme caution, tighten the puller tool enough to
take the load off the adjuster bolt. Remove the adjuster
bolt and nut block, then unload the puller tool.
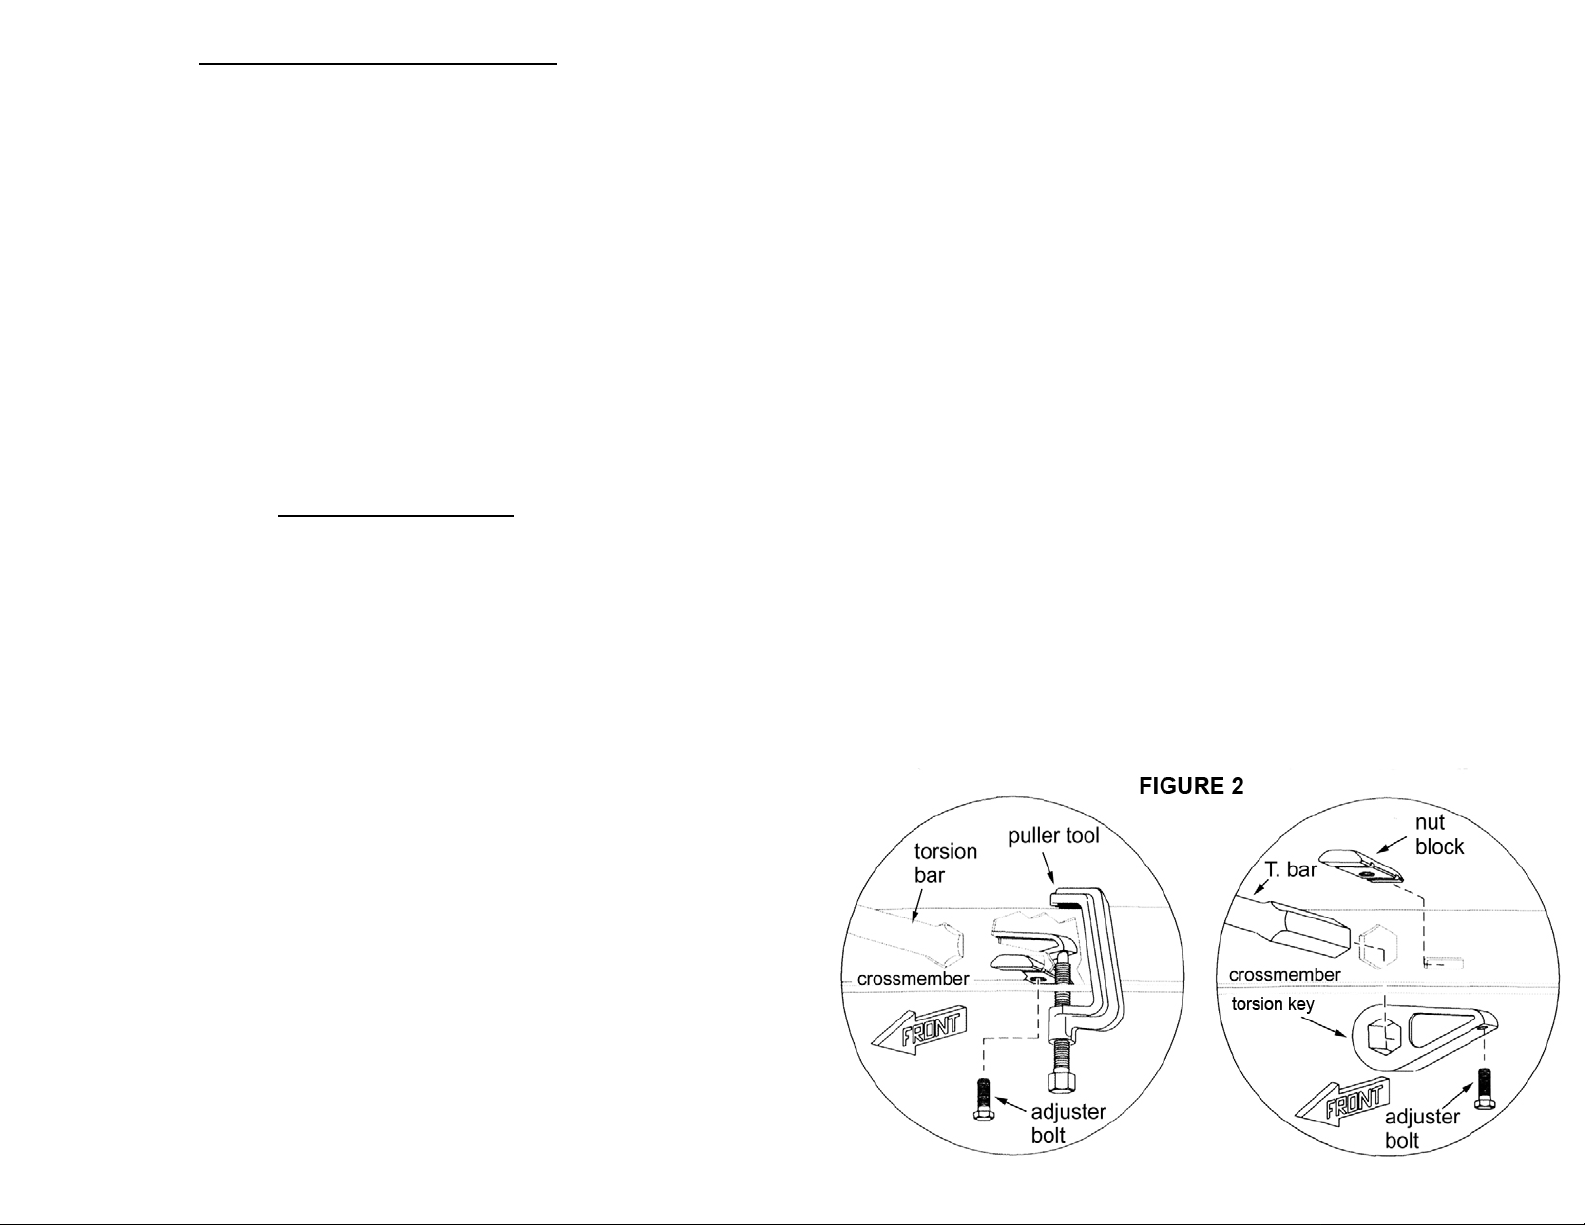
10. Note the orientation of the torsion bar key in relation to
the end of the torsion bar. Slide the torsion bar forward,
out of the torsion bar crossmember, and set the factory
torsion bar key aside. It is not necessary to remove the
torsion bars from the vehicle. NOTE: the torsion key
should slide easily off the end of the torsion bar. However, depending on the age and use of the vehicle, rust
and road debris may prevent easy removal. The installer
can use a variety of methods to separate the torsion key if
it is “stuck”, but using heat is not recommended.
11. Place the Daystar torsion key in the torsion bar crossmember, matching the same orientation as the original
key. Slide the torsion bar back through the crossmember
and into the torsion key. See Figure 2.
NOTE: Various types of puller tools are available, however, due to the
extreme loads present in four-wheel drive suspension systems, we have
found the two-jaw style tool that clamps to the crossmember tends to slip
and damage the crossmember. A C-clamp style puller tool is preferred
and available through tool companies such as OTC and Kent Moore.
Notice to Dealer and Vehicle Owner
Any vehicle equipped with any Daystar Product must have the
“Warning to driver” decal installed on the sun visor or dash. The
decal is to act a constant reminder for whoever is operating the vehicle of its unique handling characteristics. INSTALLING
DEALER— Its is your responsibility to install the warning decal
and forward these instructions on to the vehicle owner for review
and to be kept in the vehicle for service life.
After installation occurs, a qualified alignment facility is required to
align the vehicle to factory specs.
NOTES:
• Installation requires a professional Mechanic.
• Have a factory service manual on hand for reference and for
appropriate torque specifications.
• WARNING: Torsion bars have a tremendous amount of energy
stored in them, even with the suspension at full extension travel.
Safely loading / unloading the torsion bars requires a special
tool. Refer to the factory service manual. Use extreme caution
when working with torsion bars and wear all appropriate safety
equipment.
• Read through all installation steps before proceeding. If you
have questions, contact Daystar before beginning the installation.
Page 4

Installation steps
1. Place the vehicle on a level surface. Prior to beginning,
record ride height on each side of the vehicle by measuring from the center of the spindle to a consistent point
on the wheel well. Record these measurements for future reference.
st
2. Put the transmission in Park or 1
gear (manual trans-
missions) and chock the rear tires.
3. Raise the front of the vehicle using a jack. Raise it
enough to completely unload the front suspension.
Place a jack stand under each frame rail just behind the
lower control arms for the front suspension. Ease the
frame down on to the stands, but leave a slight load on
the jack as a safety precaution.
4. Verify the front tires are off the ground and that the suspension is unloaded, or at full extension travel.
5. Locate the torsion bar crossmember. There is a bolt on
each side of the crossmember that adjusts torsion bar
preload. Measure or mark the exposed length of the adjuster bolt for reference during re-assembly. See Figure
1.
6. Position the appropriate torsion bar puller tool on the
crossmember. Be sure the top of the puller tool engages
the recess present in most crossmembers. Also be sure
the lower end of the puller tool engages a recess on the
torsion key near the adjuster bolt. See Figure 2.
7. Locate the torsion bar crossmember. There is a
bolt on each side of the crossmember that adjusts
torsion bar preload. Measure or mark the exposed
length of the adjuster bolt for reference during reassembly. See Figure 1.
8. Position the appropriate torsion bar puller tool on
the crossmember. Be sure the top of the puller
tool engages the recess present in most crossmembers. Also be sure the lower end of the
puller tool engages a recess on the torsion key
near the adjuster bolt. See Figure 2.
 Loading...