

Page 1

DaynaPORT
Small
and
Lightweight.
the
Ideal
Ethernet
Connector
for
the
PowerBook
Pocket
SCSI/Link
Portable Macint
osh
Ethernet
Adapter
User's
Guide
Page 2

Pocket
SCSI/Link
Quick
Start
This
card
outlines the basic installation
steps
for DaynaPORT
Pocket
SCSI/Link external adapters. Installation typically
should
take
less
than
five minutes.
1.
Make sure the Macintosh
is
turned
off. Set
the
SCSI/ID switch
on
the
Pocket SCSI/Link.
Connect
Pocket SCSI/Link to
your
Macintosh
SCSI
bus
and
your
network
cable system.
Connect
the
ADB
power
cord
or
AC
adapter
and
plug
it
in
to
turn
on
Pocket SCSI/Link.
Turn
on
the
Macintosh.
2.
Insert the DaynaPORT Installer disk in
your
Macintosh
floppy disk drive. Double-click
the
Installer icon
and
click
the
INSTALL
button. TIle Installer will
copy
the DaynaPORT
driver
and
AppleTalk into
your
System.
When
it's
done,
restart
your
Macintosh.
3.
Open
the Network control
panel
and
select the EtherTalk
Alternative icon
and
a default zone. (Refer to
the
section
Choosing
the
Software
Connection
in
Chapter 2 for
instructions.)
4.
To
verify that
the
Pocket
SCSI/Link has a
working
network
connection,
open
the
Chooser. Select a zone, click the
AppleShare icon,
and
choose
a server
to
log
in to.
Chooser
APP1'T~:wri(";
;
Si~~~~!:::~ea;erver:
1.~~~D~:I~i~°ll!cl!!I
••••••
11
~
IIISi
~
Image-Writer
LaserJet UlSi
{}
AppleTalk
Zones:
Kathy's
HD
Lori
Bowcult·s
Mac
Administration
{}
Old
Faithful 2
Orkin
111111
Engineering
PPBIOO
~Ianufacturing
CD
Marketing
i
Sales
Tech
Support
I
@Actlve
Test
Zone
{)-
AppleTalk
o Inactive
7.2
You
can
also
run
the
DaynaPORT diagnostics (see
the
Diagnostics Read Me file
on
the
disk)
to
verify that
your
Pocket SCSI/Link
and
its software
are
installed correctly.
You're
now
ready to access
the
Ethernet
network
via
Pocket
SCSI/Link.
Page 3

Page 4

DaynaPORT
Pocket
SCSI/Link
User's
Guide
External Ethernet
Connector
for
Power
Books
Network
Interface
Products
for
EtherTalk
Page 5

First Edition
Second
Revision
September
1995
Copyright © 1994, 1995
Dayna
Communications, Inc.
All
rights
reserved.
Document
Number: 22099
Dayna
and
the
Dayna
logo
are
registered
trademarks
and
DaynaPORT
and
Pocket
SCSI/Link
are
trademarks
of
Dayna
Communications, Inc.
All
other
product
names
are
trademarks
or
registered
trademarks
of
their respective holders.
Dayna
Communications, Inc.
Sorenson
Research
Park
849
West
Levoy Drive
Salt Lake City, UT 84123
For Technical Service
and
Support, call
(801)
269-7200
Page 6

Limited Lifetime Warranty on Media and Manuals
Dayna
Communications, Inc.
makes
no
warranty,
either
express
or
implied, for
the
media
and
manuals
enclosed
herein
UNLESS
the
Warranty Registration
Card
which
accompanies
this
product
has
been
filled
out
completely
and
returned
to
Dayna
Communications, Inc.,
within
thirty (30)
days
of
the
initial
purchase
of
the
product.
If, after
returning
the
completed
Warranty Registration Card,
you
discover
defects
in
the
media
on
which
any
software
is dis
tributed
by
Dayna,
or
the
documentation
distributed
with
the
software,
Dayna
will, at its
sole
option,
repair
or
replace
the
media
or
documentation
free
of
charge,
provided
you
return
the
defective
item
with
proof
of
its
purchase
to
Dayna
Communications
or
an
Authorized
Dayna
Dealer.
Dayna
reserves
the
right
to
revise this
documentation
and
the
software
and
hard-
ware
described
herein
or
make
any
changes
to
the
specifications
of
the
product
described
herein
at
any
time
without
obligation
to
notify
any
person
of
such
revision
or
change.
ANY
IMPLIED WARRANTY
ON
THE MEDIA
AND
MANUAL, INCLUDING
IMPLIED WARRANTIES
OF MERCHANTABILITY
AND
FITNESS
FOR
A PARTICU-
LAR PURPOSE, ARE
liMITED
TO
THE ORIGINAL PURCHASER
OF
TIllS
EQUIPMENT.
DAYNA
COMMUNICATIONS, INC. MAKES
NO
WARRANTY
OR
REPRESENTA TION, EITHER EXPRESS
OR
IMPLIED, WITH RESPECT TO
TIllS
SOFTWARE, ITS QUALITY, PERFORMANCE, MERCHANTABIUTY,
OR
FITNESS
FOR A PARTICULAR PURPOSE. AS A RESULT,
TIllS
SOFTWARE IS SOLD "AS
IS"
AND
YOU
THE PURCHASER ARE ASSUMING THE ENTIRE RISK AS TO ITS
QUAliTY
AND
PERFORMANCE.
IN
NO
EVENT WILL
DAYNA
COMMUNICATIONS, INC. BE RESPONSmLE FOR
DIRECT, INDIRECT, SPECIAL, INCIDENTAL,
OR
CONSEQUENTIAL DAMAGES
RESULTING
FROM
ANY
DEFECT
IN
THE SOFTWARE
OR
ITS DOCUMENTA-
TION, EVEN IF ADVISED
OF
THE
POSSmIUTY
OF SUCH DAMAGES.
IN
PARTICULAR,
DAYNA
SHAlL
HAVE
NO
liABIUTY
FOR
ANY
PROGRAMS
OR
DATA STORED
IN
OR
USED
WITH
DAYNA
PRODUCTS, INCLUDING THE COSTS
OF
RECOVERING
ANY
SUCH PROGRAMS
OR
DATA.
THE WARRANTY
AND
REMEDIES SET FORTH ABOVE ARE EXCLUSIVE
AND
IN
LIEU
OF
ALL
OTHERS, ORAL
OR
WRITTEN, EXPRESS
OR
IMPLIED.
NO
DAYNA
DEALER, AGENT, OR EMPLOYEE IS AUTHORIZED
TO
MAKE
ANY
MODIFICATION, EXTENSION, OR ADDITION TO THIS WARRANTY.
Some
states
do
not
allow
the
exclusion
or
limitation
of
implied
warranties
or
lia bility
for incidental
or
consequential
damages,
so
the
above
limitation
or
exclusion
may
not
apply
to
you. This
warranty
gives
you
specific legal rights,
and
you
may
also
have
other
rights
which
vary from
state
to
state.
See
separate
warranty
information
on
hardware
products.
FCC Radio Frequency Interference Statement
Note: This
equipment
has
been
tested
and
found
to
comply
with
the
limits for a
Class A digital device,
pursuant
to
Part
15
of
FCC Rules.
These
limits
are
designed
to
provide
reasonable
protection
against harmful interfer
ence
when
the
equipment
is
operated
in a commercial
environment.
This
equipment
generates, uses,
and
can
radiate radio fre
quency
energy
and,
if
not
installed
and
used
in
accordance
with
the
instruction
manual,
may
cause
harmful
interference
to
radio
communications.
Operation
of
this
equip
ment
in a residential
area
is likely
to
cause
interference,
in
which
case
users will
be
required
to
correct
the
interference
at
their
own
expense.
iii
Page 7

Limited Lifetime Warranty on Hardware
Dayna
Communications,
Inc.
makes
no
warranty,
either
express
or
implied
for
the
hardware
enclosed
herein
UNLESS
the
Warranty Registration Card
which
accompanies
this
product
has
been
filled
out
completely
and
returned
to
Dayna
Communications, Inc.,
within
thirty (30)
days
of
the
initial
purchase
of
the
product.
With
the
return
of
the
Warranty
Registration Card,
Dayna
Communications,
Inc.
warrants
DaynaPORT
cards
to
the
original
purchaser
against
defects
in
materials
and
workmanship
for as
long
as
the
product
is
used
in
its original installation.
If
you
discover
a defect,
Dayna
will, at its
option,
repair,
replace
or
refund
the
purchase
price
of
the
product
at
no
charge
to
you,
provided
you
return
it
during
the
warranty
period,
transportation
charges
prepaid,
to
the
Authorized
Dayna
Dealer
from
whom
you
purchased
it
or
to
any
other
Dayna
Dealer
within
the
coun
try
of
the
original
purchase.
(You
can
obtain
additional
information
directly
from
Dayna
at
the
address
printed
on
the
back
cover
of
this
manual.)
To
each
product
returned
for
warranty
service,
please
attach
your
name,
address,
telephone
number, a description
of
the
problem
and a copy
of
the
bill
of
sale
bearing
the
appropriate
serial
numbers
as
proof
of
the
date
of
the
original retail
purchase.
It
may
be
necessary
to
return
the
unit
directly
to
Dayna
Communications
for
repairs.
If so,
please
contact
the
Customer
Service
Department
at
Dayna
to
get a Return
Merchandise
Authorization
Number
(RMA#).
You
must
write this
number
on
the
outside
of
the
package
where
it
can
be
easily
seen.
No
unit
will
be
accepted
without
an
RMA#.
For
help,
call
(80l)
531-0600.
This
warranty
applies
only
to
hardware
products
and
is
not
transferable.
See
separate
warranty
informa
tion
on
software
media
and
manuals.
This
warranty
does
not
apply
if:
(1)
the
product
has
been
damaged
by
accident,
abuse,
misuse
or
misapplication,
or
has
not
been
operated
in
accordance
with
the
procedures
described
in
this
and/or
other
accompa
nying
manuals; (2)
the
prod
uct
has
been
altered
or
repaired
by
other
than
an
Authorized
Dayna
Dealer
or
Dayna
Customer Service
person
nel;
or
(3),
any
serial
number
has
been
removed,
defaced
or
in
any
way
altered.
Dayna
Communications
may
use
remanufactured,
refurbished,
or
used
parts
and
modules
in
making
warranty
repairs.
AIL
IMPLIED WARRANTIES, INCLUDING IMPLIED WARRANTIES OF
MER-
CHANTABILITY
AND
FITNESS FOR A PARTICULAR PURPOSE, ARE
liMITED
TO
THE ORIGINAL PURCHASER OF
TIllS
EQUIPMENT.
THE
WARRANTY
AND
REMEDIES SET FORTH ABOVE ARE EXCLUSIVE
AND
IN
LIEU OF
AIL
OTHERS, ORAL
OR
WRITTEN, EXPRESS
OR
IMPLIED.
NO
DAYNA
DEALER, AGENT,
OR
EMPLOYEE IS AUTHORIZED TO MAKE
ANY
MODIFICATION, EXTENSION,
OR
ADDITION TO
TInS
WARRANTY.
DAYNA
COMMUNICATIONS, INC. IS
NOT
RESPONSmLE
FOR
SPECIAL, INCI-
DENTAL, OR CONSEQUENTIAL DAMAGES RESULTING FROM
ANY
BREACH OF
WARRANTY,
OR
UNDER
ANY
LEGAL THEORY, INCLUDING LOST PROFITS,
DOWNTIME,
GOODWILL, DAMAGE
TO
OR REPLACEMENT OF EQUIPMENT
AND
PROPERTY,
AND ANY
COSTS OF RECOVERING, REPROGRAMMING OR
REPRODUCING
ANY
PROGRAM
OR
DATA STORED
IN
OR
USED
WITH
DAYNA
PRODUCTS.
Some
states
do
not
allow
the
exclusion
or
limitation
of
implied
warranties
or
liabil ity
for incidental
or
consequential
damages,
so
the
above
limitation
or
exclusion
may
not
apply
to
you.
This
warranty
gives
you
specific legal rights,
and
you
may
also
have
other
rights
which
vary from state
to
state.
iv
Page 8

Contents
Introduction
............................................................................. 1
Pocket
SCSI/Link
Quick
Start .................................................... 2
What's
New
with
Pocket
SCSI/link
.......................................... 3
How
to
Use This
Guide
............................................................. 3
Pocket
SCSI/Link Models .......................................................... 3
What
You
Get
with
DaynaPORT
Pocket
SCSI/Link. ................ 4
Chapter
1
Installing
and
Connecting
Pocket
SCSI/Link. .................... 5
The
Pocket
SCSI/Link Device ................................................... 6
Using
SCSI
Cables
with
Pocket
SCSI
Link ................................ 7
Connecting
Pocket
SCSI
Link to
the
Macintosh
SCSI
Port
...... 7
Seeing
the
Termination/ID
Switch ............................................ 8
Connecting
and
Terminating
Pocket
SCSI/Link ....................... 9
Using
Pocket
SCSI
Links
and
PowerBooks
....................... 9
As
the
Only
Device
............................................................. 9
As
the
Middle Device ......................................................... 10
As
the
Last
Device
..............................................................
11
Connecting
Pocket
SCSI/Link
to
the
Network
.........................
11
Using
the
BNC
Connector
.................................................. 12
Using
the
RJ-45
Connector
................................................. 12
Turning
On
and
Shutting
Down
Pocket
SCSI/link
................. 13
Using
the
External
AC
Adapter
.......................................... 13
Using
the
ADB
Power
Cable .............................................. 14
Understanding
the
Activity Light' ......................................
15
Removing
the
Pocket
SCSI/Link Device ................................... 16
Chapter
2
Installing
the
DaynaPORT
Software
.................................... 17
Before
Running
the
Installer ..................................................... 17
DaynaPORT Software Easy Install ............................................ 18
Choosing
the
Software
Connection
.......................................... 20
Selecting
a
Phase 2 Connection
......................................... 20
Installing
the
phase
1 Driver .............................................. 22
Selecting a
phase 1 Connection
......................................... 23
Changing
the
Network
Connection
..........................................
23
Switching
to
LocaITalk. .......................................................
23
Switching
Between
AppleTalk
Phase 1 and
Phase
2 ....... 24
Changing
the
AppleTalk
Zone
........................................... 24
Removing
the
DaynaPORT Software ........................................ 24
v
Page 9

Chapter
3
Solving
Problems
.................................................................... 27
Checking
the
Hardware
............................................................. 27
Checking
the
Network
Software ............................................... 27
Appendix
A
Service,
Service,
Support,
Sales
and
Specifications
......... 29
Technical
Support
...................................................................... 29
Product
Information
and
Sales .................................................. 30
Pocket
SCSI/Link Specifications ................................................ 30
Operating
Environment ...................................................... 30
Power
.................................................................................. 30
Physical Description ...........................................................
30
Connectors
and
Cables .......................................................
30
Certification ......................................................................... 30
Glossary
....................................................................................
31
Index
......................................................................................... 33
vi
Page 10

Introduction
Welcome
to
the
DaynaPORT
family
of
Ethernet
products
for
Macintosh
computers.
In
addition
to
incorporating
the
latest
innovations
in
high-speed
Ethernet
technology,
DaynaPORT
provides
an
Ethernet
solution
for
the
entire
Macintosh
family.
The
DaynaPORT
Pocket
SCSI/Link-T
and
Pocket
SCSI/Link-M
external
adapters
are
the
newest
members
of
the
DaynaPORT
family.
Their
revolutionary
design
makes
them
the
lightest
and
most
compact
external
network
adapters
available
for
Macintosh
networking.
Since
the
Pocket
SCSI/Link
uses
your
Macintosh's
SCSI
port
to
connect
to
an
Ethernet
network,
it's
the
ideal
network
connection
for
compact
systems,
such
as
the
Macintosh
Plus,
Classic, Classic
II,
and
portable
systems
with
no
internal
card
slot,
such
as
the
Macintosh
Portable,
PowerBook,
and
PowerBook
Duo.
Pocket
SCSI/Link's DB-25
and
HDI-30
SCSI
ports
support
SCSI
pass-through
and
let
you
easily integrate
Pocket
SCSI/Link
into
any
SCSI
chain.
Pocket
SCSI/Link
comes
with a single
HDI-30
system
cable
that
lets
you
connect
to
either
the
DB-25
SCSI
port
on
desktop
Macintosh
computers,
or
to
the
HDI-30
SCSI
port
on
PowerBook
and
Duo
computers.
The
DaynaPORT
SCSI/Link driver
works
with
all
current
Macintosh
operating
systems, from System 6.0.5
to
the
latest
version
of
System
7.
DaynaPORT
supports
both
AppleTalk
Phase 1 and
Phase
2
networking
protocols.
Once
you've
installed
the
DaynaPORT
software,
your
Macintosh
will
be
able
to
communicate
with
servers,
modems,
printers,
and
other
network
devices
on
an
Ethernet
cable
system.
DaynaPORT drivers
support
multiple
networking
protocols,
including TCP/IP, DECnet, IPX,
and
NCP. All DaynaPORT
products
support
AppleTalk
Connection
for Macintosh
and
TCP/IP
Connection
for Macintosh,
Apple's
new
Simple
Network
Management
Protocol
(SNMP)
agents
for
the
Macintosh.
Introduction
Page 11

Pocket
SCSI/Link
Quick
Start
This
section
outlines
the
basic installation
steps
for
DaynaPORT
Pocket
SCSI/Link
external
adapters.
Installation typically
should
take
less
than
five
minutes.
1.
Make
sure
the
Macintosh is
turned
off. Set
the
SCSI/ID
switch
on
the
Pocket
SCSI/Link.
Connect
Pocket
SCSI/Link
to
your
Macintosh
SCSI
bus
and
your
network
cable
system.
Connect
the
ADB
power
cord
or
AC
adapter
and
plug
it
in
to
turn
on
Pocket
SCSI/Link.
Turn
on
the
Macintosh.
2.
Insert
the
DaynaPORT
Installer disk
in
your
Macintosh
floppy
disk drive.
Double-click
the
Installer
icon
and
click
the
INSTALL
button.
The
Installer will
copy
the
DaynaPORT
driver
and
AppleTalk
into
your
System.
When
it's
done,
restart
your
Macintosh.
3.
Open
the
Network
control
panel
and
select
the
EtherTalk
Alternative
icon
and a default
zone.
(Refer
to
the
section
Choosing
the
Software
Connection
in
Chapter
2 for
instructions.)
4.
To
verify
that
the
Pocket
SCSI/Link
has a working
network
connection,
open
the
Chooser.
Select a
zone,
click
the
AppleShare
icon,
and
choose a server
to
log
in to.
o
ImageWritE-t'"
Chooser
v
~
''''',
ApplE'Talk···9>:oVritE'r
ijH\
I1ISi
~
las
..
rJet
IIISi
..0-
Select a file
server:
annettes
mac
DAVNA
donb
Duo
270c
Franko
arth
Kathy's
HD
AppleTalk
Zones:
Lori Bowcutt's nae
r.A~dmrnl!in.io.'t.r.a.tl.·o.n
•••••
v
l
Old Faitl",ful 2
~ Ot'kin
Engi
neeri
ng
PPB 1 00
Manufacturing
~lar'ket
i
ng
Sales
Tech
Support
Test
Zone
@Active
{7
AppleTalk
0
Inactive
7.2
You
can
also
run
the
DaynaPORT
diagnostics
(see
the
Diagnostics
Read
Me file
on
the
disk)
to
verify
that
your
Pocket
SCSI/Link
and
its
software
are
installed correctly.
You're
now
ready
to
access
your
Ethernet
network
via
Pocket
SCSI/Link.
2
Introduction
Page 12

What's
New
with
Pocket
SCSI/link
DaynaPORT
Pocket
SCSI/Link
adapters
come
with
these
new
features:
• At
41/1
inches
by 3 inches
by
1 1/1 inches,
Pocket
SCSI/Link
is
the
smallest
external
Ethernet
adapter
available for
Macintosh
computers
•
Apple
Desktop
Bus (ADB)
powered
for
Pocket
SCSI/Link-T
models,
or
light-weight (2.7
oz.)
digital
power
supply
for
Pocket
SCSI/Link-M
models
(USA
models
only)
•
SCSI
pass-through
via
HDI-30
and
DB-25
SCSI
ports
Single HDI-30
system
cable
provides
connections
to
either
desktop
or
notebook
Macintosh
computers
• Single SCSI ID
and
termination
switch
How
to
Use
This
Guide
This
guide
describes
how
to
connect a Macintosh
to a working
Ethernet
network,
install
and
use
the
network
software,
and
solve
any
problems
that
you
may
encounter
using
Pocket
SCSI/Link.
Chapter
1,
Installing
and
Connecting
Pocket
SCSI/Link,
describes
how
to
connect
Pocket
SCSI/Link
external
adapters
to
Macintosh
and
PowerBook
computers
with
the
power
supply
or
ADB
power
cable
and
connection
to
your
network
cable
system.
Chapter
2,
Installing
the
DaynaPORT
Software,
describes
how
to
install
and
remove
the
DaynaPORT
software
and
select
the
EtherTalk Alternative driver for
your
workstation.
Chapter
3,
Solving
Problems,
explains
how
to
test for errors
and
isolate
problems
with
DaynaPORT.
Appendix
A,
Service,
Support,
Sales,
and
Specifications,
explains
how
to
get
technical
support
from
Dayna
Communications
for
your
product.
This
guide
ends
with
a
Glossary
and
Index.
Pocket
SCSI/link
Models
Pocket
SCSI/Link
comes
in
two
versions:
Pocket
SCSI/Link-T,
which
has a single RJ-45
connector
for lOBASE-T
networks,
and
Pocket
SCSI/Link-M,
which
comes
with
a BNC
connector
for
thin
Ethernet
networks
and
a RJ-45
connector
for lOBASE-T
networks.
Introduction 3
Page 13

What
You
Get
with
DaynaPORT
Pocket
SCSI/Link
Pocket
SCSI/Link
adapters
come
with
these
items.
DaynaPORT
Installer
Disk
DaynaPORT
Pocket
SCSI/Link
driver
software, diagnostics,
and
test
utilities
are
supplied
on
the
DaynaPORT
Installer
disk.
User's
Guide
and
Warranty
Registration
Card
This
guide
includes a warranty
registration card. Be
sure
to
fill
out
and
return
the
warranty
registration
card
to
us
within
30 days
of
purchase
to
ensure
that
your
Dayna
Ethernet
product
is
registered
for its warranty. As a
registered
customer,
you'll receive
product
information
and
free issues
of
the
Dayna
Communique
newsletter.
Cables
and
Connectors
All
Pocket
SCSI/Link
models
come
with
a HDI-30 SCSI
cable
with
HDI-30
and
DB-25
connectors,
which
connects
to
both
portable
and
desktop
Macintosh
computers.
All
Pocket
SCSI/Link
models
come
with
an
AC
power
adapter
and/or
an
ADB
power
cable.
Pocket
SCSI/Link-T
comes
with
a lOBASE-T cable,
while
Pocket
SCSI/Link-M
comes
with
a BNC
Y-connector
and
a lOBASE-T cable.
Read
Me
First
File
The
Read
Me First file
on
the
DaynaPORT
Installer
disk
includes
information
that
wasn't
available
when
this
guide
was
printed.
To
read
the
file,
simply
double-click
its icon.
Diagnostics
Read
Me
File
The
Diagnostics
Read
Me file
is
in
the
self-extracting Diagnostics
archive
on
the
DaynaPORT
Installer disk. Double-click
the
Diagnostics
icon
and
extract
the
files
onto
your
hard
drive.
The
Diagnostics
Read
Me file
contains
instructions
for
using
the
hardware
and
software
diagnostic
utilities.
These
utilities will
help
you
verify
that
your
Pocket
SCSI/Link is installed
correctly
and
find
the
device's
Ethernet
address.
It
also
describes
how
to
use
the
SendEcho
utility
to
test
your
network
connection.
Ethernet
Address
and
Serial
Number
Each
DaynaPORT
product
has a unique
12-digit
Ethernet
address.
The
first six digits
are
always
00-
80-19
and
identify
Dayna
Communications
as
the
manufacturer.
Use
the
Software Diagnostics
utility
to
determine
the
Ethernet
address.
Instructions for
using
the
diagnostics
are
in
the
Diagnostics Read Me file
on
the
DaynaPORT
Installer disk.
The
DaynaPORT serial
number
is
printed
on
a sticker
on
the
bottom
of
the
Pocket
SCSI/Link. You'll
need
the
serial
number
if
you
contact
Dayna
Customer
Service.
4
Introduction
Page 14

Cha~ter
1
Installing
and
Connecting
Pocket
SCSI/Link
Pocket
SCSI/Link
adapters
offer a
quick
and
easy
way
to
connect
any
Macintosh
computer
with a SCSI
port
(that
is, Macintosh Plus
and
later
models)
to
an
Ethernet
network.
Pocket
SCSI/Link
is
particularly
well
suited
for
compact
Macintosh
models
such
as
the
PowerBook,
Classic, Portable,
and
Duo
that
don't
have
an
internal
card
slot
for
an
Ethernet
adapter.
Here's a step-by-step
summary
of
how
to
install
Pocket
SCSI/Link.
•
Make
sure
the
Macintosh
is
turned
off
• Set
the
Pocket
SCSI/Link's
SCSI
ID/Terrnination
switch
•
Connect
Pocket
SCSI/Link
to
the
SCSI
chain
•
Connect
Pocket
SCSI/Link
to
the
Ethernet
cable
system
•
Plug
in
Pocket
SCSI/Link
using
the
AC
adapter
or
ADB
power
cable
to
turn
it
on
• Switch
on
the
Macintosh
and
install
the
DaynaPORT
software
Pocket
SCSI/Link
models
come
with
an
HDI-30
SCSI
system
cable
that
supports
both
desktop
and
notebook
Macintosh
computers.
All
Pocket
SCSI/Links
have
a DB-25
SCSI
port
and
an
HDI-30
SCSI
port
that
let
you
connect
the
Pocket
SCSI/Link
as
either
the
first,
middle,
or
last
device
on a SCSI
chain.
Pocket
SCSI/Link
supports
System 6.0.5
and
later
and
is fully
System 7
compatible.
Pocket
SCSI/Link
supports
both
AppleTalk
Phase 1 and
Phase 2 protocols.
This
means
that
no
matter
how
large
your
network
becomes,
Pocket
SCSI/Link lets
your
Macintosh
access
any
Ethernet
network
service
from
any
zone.
Note-
If
you're
using
the Pocket SCSI/Link as the
only
device
on
a
PowerBook SCSI/Bus, refer to the
section
Connecting
and
Terminating
Pocket
SCSI/Links
and
PowerBooks
If
you're
using
a PowerBook
and
Pocket SCSI/Link
with
multiple SCSI
devices, refer to the PowerBook user's
guide
section
entitled
Checking
that
the
SCSI
Chain
is
Properly
Terminated
to
learn
how
to
connect
and
terminate
a Pocket SCSI/Link
on
a
PowerBook
SCSI chain.
Installing
and
Connecting
Pocket
SCSI/Link
5
Page 15

The
Pocket
SCSI/Link
Device
The
top
of
the
Pocket
SCSI/Link
device
has
three
lights
representing
Power,
Activity,
and
Link Status.
The
lights
are
visible
as
three
bars
on
the
top
of
the
device.
The
longest
bar
is
the
green
power
light
that
comes
on
when
Pocket
SCSI/Link is initially
turned
on.
A flashing
power
light
indicates
an
error
condition.
The
green
link status light
in
the
middle
of
the
light
bars
indicates
that
the
Pocket
SCSI/Link-T RJ-45
port
is
connected
to
a lOBASE-T
cable
system
that
has
a valid
cable
connection
to a hub.
The
shortest
bar
is
the
amber
activity light
that
flashes as
data
is
transmitted
through
the
device.
The
front
of
the
Pocket
SCSI/Link-M
has a power
port,
a RJ-45
connector,
and a thin
Ethernet BNC
connector.
The
Pocket
SCSI/Link-T
has
a single RJ-45 jack
to
connect
to
a lOBASE-T
network.
Pocket
SCSI/Link-M
Front
View
6 Chapter 1
Page 16

The
back
of
the
Pocket
SCSI/Link
has
a single
switch
that
handles
SCSI
ID
selection
and
termination.
It
also
has
the
DB-25
and
HDI-
30
SCSI
ports
that
let
you
connect
to
your
Macintosh
SCSI
port
or
to
a
SCSI
bus.
Pocket
SCSI/Link
Back
View
Using
SCSI
Cables
with
Pocket
SCSI/link
Pocket
SCSI/Link
models
come
with
a single HDI-30
SCSI
cable
that
lets
you
connect
to
either a PowerBook
or
desktop
Macintosh. This
is
the
only
cable
you
need
to
connect a Pocket
SCSI/Link
to
any
type
of
Macintosh,
but
if
you
have a SCSI
chain
that
contains
additional
devices, you'll
need
the
kinds
of
cables
that
support
the
devices
on
your
SCSI
chain.
For
example,
if
you
want
to
connect
a
SCSI
device
with a 50-pin
connector
to
Pocket
SCSI/Link,
you'll
need
a HDI-30
cable
with a 50-pin
connector
or
a 25-pin-to-50-pin
SCSI
cable.
If
you
need
additional
SCSI cables,
you
can
obtain
them
from
your
local
supplier
or
contact
Dayna
Customer
Service for assistance.
Connecting
Pocket
SCSI/link
to
the
Macintosh
SCSI
Port
How
you
connect
Pocket
SCSI/Link
depends
on
whether
Pocket
SCSI/Link is
the
only, first,
middle,
or
last
SCSI
device
connected
to
your
Macintosh.
The
Pocket
SCSI/Link
must
be
part
of
a SCSI
chain
that
is
terminated
properly.
This
chapter
contains
installation
instructions for all
four
cases
and
describes
how
to
ensure
that
your
SCSI
chain
is
terminated
correctly.
Instal/ing
and
Connecting Pocket SCSI/Link 7
Page 17

Caution-
Always
unplug
Pocket SCSI/Link to
turn
it
off
when
you
connect
or
disconnect
itfrom
your
Macintosh
or
any
other SCSI device. Never
connect
or
disconnect
Pocket SCSI/Link while
it
is
powered
on.
Doing so
could
damage
the circuits
in
Pocket SCSI/Link
or
other
connected
SCSI devices.
Setting
the
T ermination/ID
Switch
You
can
connect
up
to
six
external
SCSI
devices
to
your
Macintosh
through
its
SCSI
port.
Each
device,
including
Pocket
SCSI/Link,
must
have
its
own
SCSI
ID
number
for
your
Macintosh
to
know
it's
there
and
distinguish it from
the
other
SCSI
devices.
If
it's
the
last
device
on a SCSI
bus,
the
device
must
also
be
terminated.
Pocket
SCSI/Link
handles
setting
both
the
SCSI
ID
and
termination
through
a single
switch
on
the
connector
side
of
the
device.
It
lets
you
choose
from
terminated
and
unterminated
SCSI
ID
numbers.
The
Pocket
SCSI/Link
comes
with
the
SCSI
ID
pre-set
to
a
terminated
SCSI
ID
of
3. If
the
Pocket
SCSI/Link is
the
last
device
in
a
SCSI
chain
or
the
only
SCSI
device,
do
not
adjust
the
SCSI
ID
or
termination. If
the
Pocket
SCSI/Link is
not
the
last
device
in a
SCSI
chain,
select
an
unterminated
SCSI
ID.
On
Pocket
SCSI/Link,
set
the
ID
number
and
termination
setting
using a screw
driver
or
similar
tool.
SCSI
Termination/ID
Switch
If
you
change
the
SCSI
and/or
termation
setting,
make
sure
you
turn
Pocket
SCSI/Link
off
and
back
on
again,
and
restart
your
Macintosh.
The
switch
settings
range
from °
to
7 for
both
the
terminated
and
unterminated
settings.
Your
Macintosh is always
identified
as
number
7. Most
Macintosh
internal
hard
drives
use a SCSI
ID
number
of
0,
but
non-Apple
drives
often
use
other
ID
numbers.
SCSI ID
numbers
2, 3, 4,
5,
and 6 are
generally
available.
If
Pocket
SCSI/Link is
the
only
SCSI
device
connected
to
your
Macintosh,
it
doesn't
matter
what
this
switch
setting
is, as
long
as
it's
not ° or
7.
You
can
leave
it
at
the
factory setting
of
3.
8 Chapter 1
Page 18

If
there
are
other
SCSI
devices
connected
to
your
Macintosh,
you
must
find
out
the
number
of
each
and
set
the
SCSI
ID
of
the
Pocket
SCSI/Link
to
an
unused
number.
If
two
devices
have
the
same
number,
neither
will
work.
Remember
that
if
you
move
Pocket
SCSI/Link from
one
Macintosh
to
another,
you
may
need
to
change
the
SCSI
ID
number
each
time
if
there
are
other
SCSI
devices
attached.
Connecting
and
Terminating
Pocket
SCSI/Link
The
following
sections
describe
how
to
connect a Macintosh
or
PowerBook
to
Pocket
SCSI/Link
and
terminate
the
SCSI
chain
correctly.
The
illustrations
show
how
to
connect a PowerBook
to
a
SCSI
bus
using
Pocket
SCSI/Link.
Note-
Always
turn
your
Macintosh
off
before
connecting
and
disconnecting SCSI devices.
Using
Pocket
SCSI/links
and
PowerBooks
If
you
connect a Pocket
SCSI/Link
to a PowerBook,
the
Pocket
SCSI/Link
must
be
turned
on
or
the
PowerBook
won't
boot
up,
since
power
is
not
available
through
the
PowerBook
SCSI ports. If
you
can't
boot
your
PowerBook
with a Pocket
SCSI/Link
connected
to
its
SCSI
port,
simply
turn
on
the
Pocket
SCSI/Link, or,
if
you
don't
need
the
Pocket
SCSI/Link,
remove
it from
the
SCSI port.
PowerBook
computers
use a unique
SCSI
termination
strategy.
PowerBooks
require
termination
of
the
first
and
last
devices
in
a
SCSI
chain. Refer
to
your
PowerBook
user's
guide
for
termination
procedures
for
SCSI
buses
supporting
multiple
devices.
As
the
Only
Device
Here's
how
to
install
Pocket
SCSI/Link as
the
only
SCSI
device
con-
nected
to
your
Macintosh.
Use
the
HDI-30
SCSI
cable
provided
with
your
Pocket
SCSI/Link.
Make
sure
your
Macintosh
and
Pocket
SCSI/Link
are
turned
off.
1.
Make
sure
the
Termination/ID
switch
is
in
the
default
position, a
terminated
3.
2.
Connect
the
SCSI
cable
to
the
SCSI
port
on
your
Macintosh
and
to
the
SCSI
port
on
your
Pocket
SCSI/Link.
Installing
and
Connecting Pocket SCSI/Link 9
Page 19

To
connect
to a PowerBook,
plug
the
HDI
30
SCSI
connector
into
the
PowerBook
and
the
25-pin
SCSI
connector
into
the
Pocket
SCSI/Link.
Termination
On
I~~
~
HDI-30 Cable
Connecting
Pocket
SCSI/Link
as
the
Only
Device
As
the
Middle
Device
Here's
how
to
connect
Pocket
SCSI/Link
to a Macintosh
and
another
SCSI
device
in
the
middle
of a SCSI
chain.
Note
that
you'll
need
two
HDI-30
cables
to
connect
the
Pocket
SCSI/Link
to
a
PowerBook
and
to
another
device. Make
sure
to
switch
off
your
Macintosh
and
Pocket
SCSI/Link.
1.
Set
the
SCSI
Termination/ID
switch
to
an
unterminated
SCSI
ID
number
between 1 and
6.
Make
sure
the
number
doesn't
conflict
with
the
SCSI
ID
number
of
any
other
device
on
the
SCSI
chain.
2.
Connect
the
SCSI
cable
to
the
SCSI
port
of
the
previous
device
and
to
the
SCSI
port
on
your
Pocket
SCSI/Link.
3.
Connect
an
appropriate
style SCSI
cable
from
the
unused
Pocket
SCSI/Link
SCSI
port
into
the
SCSI
port
of
the
next
SCSI
device.
4.
Make
sure
the
last
SCSI
device
in
the
chain
is
terminated.
Termination
On
HDI-30
Cable
Connecting
Pocket
SCSI/Link
as
the
Middle
Device
10 Chapter 1
Page 20
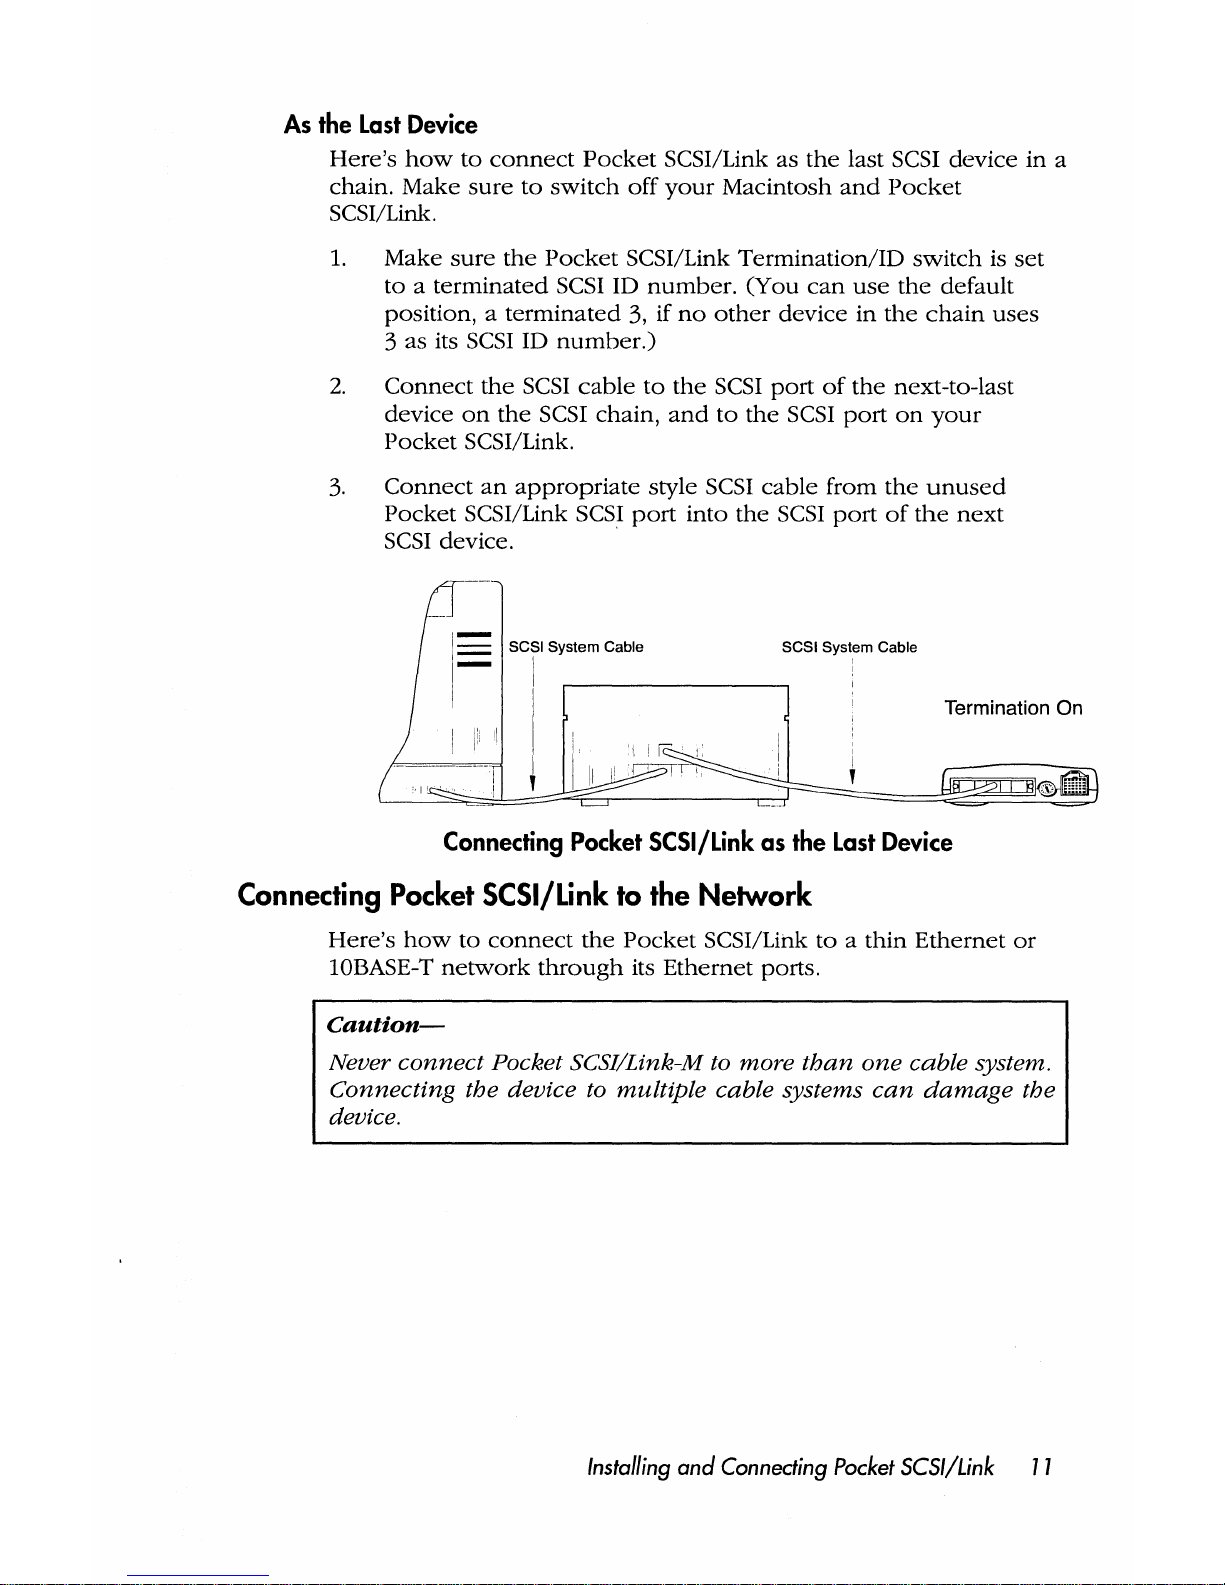
As
the
Last
Device
Here's
how
to
connect
Pocket
SCSI/Link
as
the
last SCSI
device
in
a
chain.
Make
sure
to
switch
off
your
Macintosh
and
Pocket
SCSI/Link.
1.
Make
sure
the
Pocket
SCSI/Link
Termination/ID
switch
is
set
to a terminated
SCSI ID
number.
(You
can
use
the
default
position, a terminated
3, if
no
other
device
in
the
chain
uses
3
as
its
SCSI
ID
number.)
2.
Connect
the
SCSI
cable
to
the
SCSI
port
of
the
next-to-last
device
on
the
SCSI chain,
and
to
the
SCSI
port
on
your
Pocket
SCSI/Link.
3.
Connect
an
appropriate
style SCSI
cable
from
the
unused
Pocket
SCSI/Link SCSI
port
into
the
SCSI
port
of
the
next
SCSI
device. .
SCSI System Cable SCSI System Cable
Termination On
Connecting
Pocket
SCSI/Link
as
the
Last
Device
Connecting
Pocket
SCSI/Link
to
the
Network
Here's
how
to
connect
the
Pocket
SCSI/Link
to a thin
Ethernet
or
10BASE-T
network
through
its
Ethernet
ports.
Caution-
Never connect Pocket SCSI/Link-M to more
than
one
cable system.
Connecting the device
to
multiple cable systems
can
damage
the
device.
Installing
and
Connecting
Pocket
SCSI/Link
11
Page 21

Using
the
BNC
Connector
Here's
how
to
connect
Pocket
SCSI/Link-M
to a thin
Ethernet
cable.
1.
Attach
the
BNC
Y-connector
to
the
thin
Ethernet
cable. If
Pocket
SCSI/Link
-M
is
the
last
device
on
the
cable,
make
sure
that
the
Ethernet
cable
is
terminated
properly
with
a .
50Q
BNC terminator.
V-connector
Thin Ethernet
cables
Connecting
to
Thin
Ethernet
Cable
2.
Attach
the
BNC
Y-connector
to
the
BNC
port
on
the
Pocket
SCSI/Link-M.
Using
the
RJ-45
Connector
To
connect
Pocket
SCSI/Link
to
a lOBASE-T
network,
simply
insert
the
lOBASE-T cable's
RJ
-45
plug
into
the
RJ
-45
jack
on
the
Pocket
SCSI/Link.
Plug
the
other
end
of
the
lOBASE-T
cable
into
your
network
hub.
When
Pocket
SCSI/Link
has a working
connection
to
the
network
hub,
the
device's link
status
light will
light up.
RJ-45
Plug
and
Jack
for
lOBASE-T
Cable
System
12
Chapter 1
Page 22

Turning
On
and
Shutting
Down
Pocket
SCSI/Link
Here's
how
to
turn
on
Pocket
SCSI/Link
with
either
the
AC
adapter
or
ADB
power
cable.
Note-
Always
power
on
the Pocket SCSI/Link device before switching
on
the Macintosh.
Using
the
External
AC
Adapter
1.
Connect
the
DC
adapter
cord
to
the
Pocket
SCSI/Link
power
port
and
then
plug
the
AC
adapter
into
an
electrical outlet.
This
turns
on
Pocket
SCSI/Link.
AC
Adapter
The
green
power
light will
turn
on,
and
the
amber
activity
light
on
the
top
of
Pocket
SCSI/Link will flash
on
and
off
in
response
to
network
broadcasts.
On
Pocket
SCSI/Link-T
models,
the
green
link status light
will flash
on
and
then
off,
and
then
remain
on
when
the
adapter
has a working
connection
to a hub.
Note-
if
the
power
light flashes, it indicates a
hardware
error. Contact
Customer Service
at
801-269-7200
for
assistance.
Installing
and
Connecting
Pocket
SCSI/Link
13
Page 23

2.
Switch
on
the
Macintosh
and
install
the
DaynaPORT
software.
Note-
The activity light will flash
in
response to a
network
broadcast even
before the driver is loaded.
Once
you've
turned
on
Pocket
SCSI/Link, it will
automatically
shut
down
and
start
up
with
your
Macintosh.
Using
the
ADS
Power
Cable
The
ADB
power
cable
may
be
used
in
place
of
the
AC
adapter
by
following
these
steps.
Caution-
Do
not
"hot
plug"
any
ADB
devices while the Macintosh
computer
is
turned
on.
All
ADB
connections
should
be
established
prior
to
turning
on
the Macintosh computer.
1.
Connect
the
ADB
power
cable
to
the
Pocket
SCSI/Link
power
port
and
insert
the
other
end
into
the
ADB
port
at
the
back
of
the
computer.
ADS
PTe,
cable~
___
_
ADS
Power
Cable
Note-
Plug
the
ADB
power
cable into
the
ADB
jack
at
the
back
of
the
computer,
not
into
keyboard
or
mouse
ADB
jacks.
Always
use
the
PowerBook's
AC
adapter
when
the Pocket SCSI/Link is
attached
to
the
ADB
port.
If
not,
increased
battery
drain
will
reduce
PowerBook operation
time
by
about
30%.
On
Pocket
SCSI/Link-T
models,
the
green
link status light
will flash
on
and
then
off,
and
then
will
come
on
when
the
adapter
has a working
connection
to a hub.
14
Chapter
1
Page 24

Note-
If
the
power
light flashes, it indicates a
hardware
error. Contact
Customer Service
at
801-269-7200
for
assistance.
2.
Switch
on
the
Macintosh
and
install
the
DaynaPORT
software.
The
activity light will flash
in
response
to
a
network
broadcast
even
before
the
driver
is
loaded.
Once
you've
turned
on
Pocket
SCSI/Link, it will automatically
shut
down
and
start
up
with
your
Macintosh.
Caution-
No
additional
ADB
powered
devices
should
be
used
when
the
Pocket SCSI/Link is
connected
to
the
PowerBook's
ADB
port.
External keyboards,
mouse
devices (such as trackballs),
and
ADB-
powered
modems
may
cause
unreliable Ethernet operation
and
could
potentially
damage
the host computer.
The
Macintosh Plus
computer
does
not
have
an
ADB port. If
you
want
to
use
the
Pocket
SCSI/Link
with a Macintosh
Plus, call
Dayna
Customer
Service
to
order
the
necessary
5V,
1.0
Amp
power
supply.
Caution-
Dayna
does
not
recommend
using
ADB
power
when
connecting
to
and
using
thin
Ethernet (10BASE-2) cabling.
If
you
want
to
use
ADB
power
with
thin
Ethernet cabling, set the SCSI
termination
switch to
one
of
the
termination
off
SCSI ID positions. The Pocket
SCSI/Link
should
not
be
used
as
the last device
in
a SCSI
chain
when
more
than
one
external
SCSI device is connected. Instead,
simply use the Pocket SCSI/Link as
an
intermediary device
in
the
SCSI chain.
Understanding
the
Activity
Light
The
activity light is
the
shortest
light
on
the
top
of
the
Pocket
SCSI/Link.
It
flashes
amber
when
the
hardware
is
working,
indicating
that
the
Macintosh
can
communicate
with
the
Ethernet
network
and
that
data
is
being
transmitted
through
the
device.
Installing
and
Connecting Pocket SCSI/Link 15
Page 25

Removing
the
Pocket
SCSI/Link
Device
Before
removing
Pocket
SCSI/Link,
shut
down
your
Macintosh
and
either
unplug
the
AC
adapter
from
the
electrical
outlet
or
disconnect
the
ADB
power
cable.
Remove
the
cables
that
connect
Pocket
SCSI/Link
to
the
Macintosh.
To
remove
the
DaynaPORT
software, refer
to
the
section
Removing
the
DaynaPORT
Software
in
Chapter
2.
16
Chapter 1
Page 26
Chapter
2
Installing
the
DaynaPORT
Software
This
chapter
describes
how
to
install
the
DaynaPORT
software
in
a
Macintosh
workstation
and
select
the
EtherTalk Alternative
icon
in
the
Network
control
panel.
Note-
The Pocket SCSI/Link
should
be
fully
installed
and
can nected to the
network cable before
you
install the software.
This
chapter
also
describes
how
to
remove
the
DaynaPORT
software
from
the
Macintosh.
If
you
permanently
disconnect
the
Macintosh from
the
Ethernet
network,
you
may
wish
to
remove
the
DaynaPORT
software
to
save
memory.
The
Installer automatically identifies
the
DaynaPORT
hardware
and
type
of
Macintosh,
and
the
System
and
EtherTalk
versions
installed
on
your
workstation.
The
Easy Install
procedure
will automatically
install
the
correct
version
of
the
DaynaPORT software.
Before Running the Installer
Before
running
the
Installer,
make
sure
you've
installed
the
DaynaPORT
hardware
correctly.
You
should
also
remove
all virus
protection
software
from
your
System Folder,
turn
off
all System
Extensions
(or
Inits),
and
restart
your
computer.
(Under
System 7,
you
can
simply
hold
down
the
SHIFT
key
while
you
restart.) If
you
run
the
Installer
without
turning
off
your
virus
protection
software,
you
may
get a warning
that
the
Installer is
damaged.
The
Installer
requires
you
to
close
all
applications
and
restart
your
Macintosh.
If
you
launch
the
Installer
while
running
other
applica-
tions,
the
Installer will let
you
terminate
the
installation
or
exit
from
the
application
and
continue.
Under
some
conditions,
the
Installer
will display a notification
dialog
even
though
you're
not
running
any
other
applications.
In
this case,
simply
click
CONTINUE.
The
DaynaPORT
software
requires
less
than
lOOK
of
disk
space.
However,
to
install
the
software
on
your
currently
active disk,
you
must
have
enough
room
on
the
disk
for
the
Installer
to
create
a
temporary
copy
of
your
System file.
Installing
the
DaynaPORT
Software 17
Page 27

DaynaPORT
Software
Easy
Install
Here's
the
easy
way
to
install
the
DaynaPORT software.
1.
Install
and
connect
your
DaynaPORT
device
and
start
up
your
Macintosh.
Insert
the
DaynaPORT
Installer disk in
the
floppy
disk
drive.
2.
Double-click
the
Installer
icon
on
the
DaynaPORT
Installer
disk.
3.
This
dialog
box
will
open.
Click OK.
DaynaPORT Installer
for
use
"With:
Da.vuaPORT
Em
D,'vnaPORT EI30
DayroPORT Elsi
Da;'ftaPORT EILC
DaynaPORT( St)EIII
DaYMf'ORT EI30S
DaYmPORT ElSE
D,ymPORT
EIZ
DaYflilPORT
SCSI/Link
Da.y""ILaPO
RT
Elsi30
YIla
© 1993 D8.ynaCommunicatioIlS,Inc.
4.
The
Easy Install
dialog
box
will
open.
It
lists
the
driver
for
the
DaynaPORT
device
used
with
your
Macintosh,
the
system
version,
and
the
version
of
AppleTalk
the
driver
supports.
Make
sure
the
options
are
correct
for
your
Macintosh
and
click
the
INSTALL
button.
18
Chapter 2
Page 28
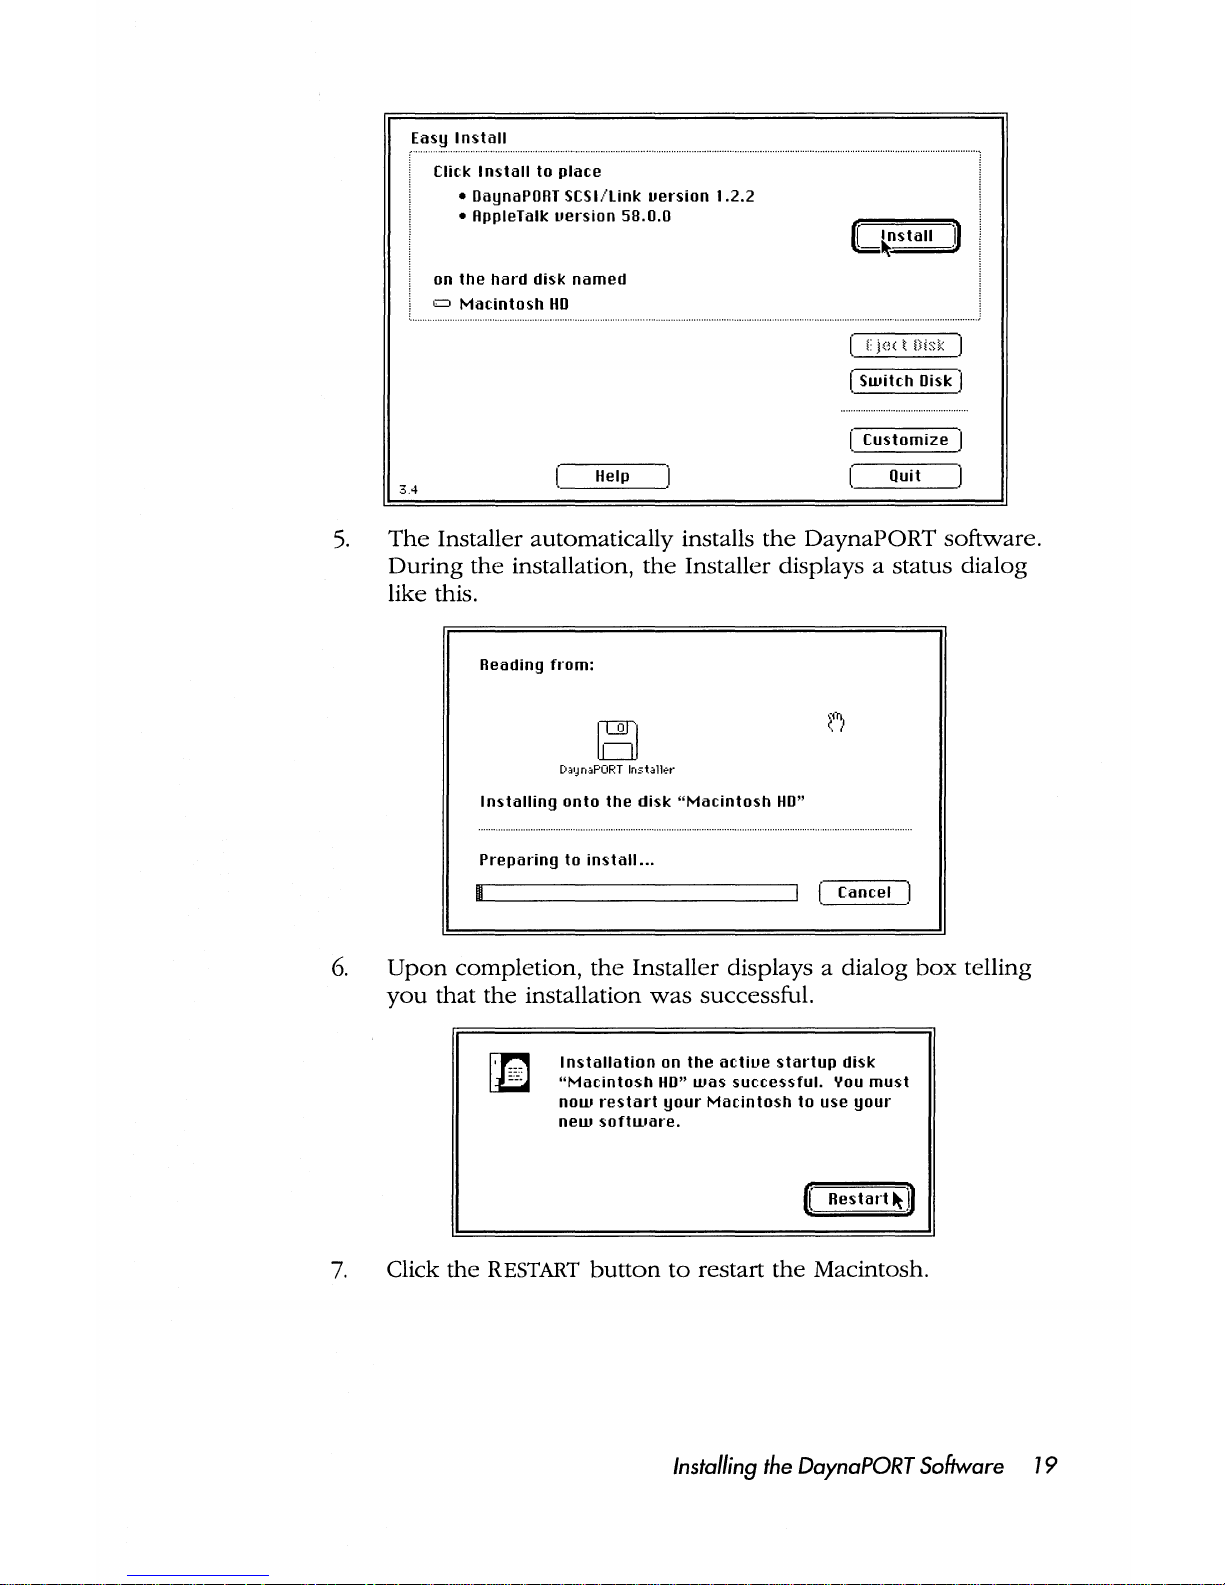
3.4
Install
Click I
nstall
to
place
• oaynaPORT
SCSI/link
uersion
1.2.2
• AppleTalk
uersion
5B.0.0
on
the
hard
disk
named
=
Macintosh
Ho
Help
[ I j(H t o;s" I
[
Switch
Disk I
I:
Customize
I
Quit
5.
The
Installer automatically installs
the
DaynaPORT software.
During
the
installation,
the
Installer displays a status
dialog
like this.
Reading
from:
[)a'Jn.F'ORT
Installer
Installing
onto
the
disk
"Macintosh
Ho"
Preparing
to
install
...
Cancel I
6.
Upon
completion,
the
Installer displays a
dialog
box
telling
you
that
the
installation
was
successful.
~
~
Installation
on
the
actiue
startup
disk
"Ma(:intosh
HO"
was
successful.
You
must
now
restart
your
Macintosh
to
use
your
new
software.
([
Restart
~
I)
7.
Click
the
RESTART
button
to
restart
the
Macintosh.
Installing
the
DaynaPORT
Software
19
Page 29

Choosing
the
Software
Connection
This section describes
how
to
use
the
Network
control
panel
to
select
the
correct
EtherTalk driver for AppleTalk
Phase 1 or
Phase
2
protocols
on
your
Ethernet network,
and
how
to
switch
back
to
LocalTalk.
Selecting a Phase 2 Connection
Here's
how
to
choose
Phase 2 support
for
the
Ethernet
networking
system.
1.
Access
the
Control Panel. Locate
the
Network
control
panel
icon
and
double-click
to
launch
it.
Network
Under
System 6,
the
Network control
panel
looks
something
like this
when
you
select
the
Network
icon.
20
Chapter
2
<l)~
~I
st.:.rtu; Device 0
3.3.3
Control Panel
~
EtherTalk
Alternative
Current
Zone: < No
zones avail
..
ble
>
Apple-Talk
Version:
58.0
LocalTalk Version:
58.0
3.0
Page 30

Under
System
7,
you'll
see a window
that
looks
like this.
D
Network
Appl€'Tiillk
CDnnection:
~
Etho?rT~lk
AH",rn.tltive
App
102' T .alk
Wrsion:
58.0
Loc.alTalk
V",,";:ion:
58.0
3.0
The
Network
control
panel
can
contain
several
icons.
The
LocalTalk Built-In
icon
represents
AppleTalk
network
protocols
on
a LocalTalk
networking
system.
LocalT.~lk
Built-In
The
EtherTalk Alternative
icon
represents
the
driver for
external
DaynaPORT
adapters.
EtherTalk
A Hemath"e
2.
To
select
Phase
2,
click
the
EtherTalk Alternative icon,
and
close
the
Control Panel.
If
the
LocalTalk Built-In
icon
was
previously
selected
(which
is
usually
the
case), you'll
see
a
message
warning
that
the
current
network
services will
be
disrupted.
Click OK.
Installing
the
DaynaPORT
Software
21
Page 31

3.
If
there
is a
Phase 2 gateway
on
your
network,
you
can
assign
your
Macintosh
to
a zone.
To
do
so,
open
the
Network
Control
Panel
and
select a
zone
in
the
CURRENT
ZONE
pull-down
menu.
aD
Netlllork
AppleTalk Connection:
3.0
~
II
{}
LooalTalk
-
Bum
In
Adminisk ation
1--0(}
Dayna
Manufacturing
AppleTalk
Veor
Marketing
Eth>?rTalk
Vel'"
Sal",s.
T
eoh
Support
Te-st
ZonE'
You
can
also
double-click
the
EtherTalk Alternative
icon
to
open
the
ZONES
dialog box. Select
an
AppleTalk
zone,
click
OK,
and
close
the
Control Panel.
r.R~d~m~in!lis~t~ro_t.iolln
••
II({}d
Please
select
~
•
this computer's
~:~~~:~~~~ing
!iilil
RppleTolk
zone.
Marketing
Sales
II
OK
~)
I Cancel I
4.
Your
Macintosh is
now
assigned
to
the
zone
you've
selected.
If
you
don't
select a
zone,
your
Macintosh will
be
located
in
the
network's
default zone. If
you
select a
Phase
2 zone,
other
users
will
see
any
network
services
(such
as mail services)
handled
from
your
workstation
in
that
zone.
Installing
the Phase 1
Driver
If
your
network
uses
AppleTalk
Phase
1 protocols,
here's
how
to
install
them
for
use
with
DaynaPORT.
1.
Install
the
DaynaPORT software
as
already
described. Insert
the
DaynaPORT
Installer disk
and
open
the
EtherTaik
Phase
1 folder.
22 Chapter 2
Page 32

2.
Drag
the
ET
Phase 1 icon
(the
icon
with
single
arrows)
to
your
System Folder.
(Under
System 7,
make
sure
the
file is
installed
in
the
Extensions folder.)
3.
Restart
your
Macintosh.
Follow
the
procedures
in
the
next
section
to
select
the
Phase
1 driver.
Selecting a Phase 1 Connection
Here's
how
to
select
Phase 1 support
for
the
Ethernet
networking
system.
1.
Access
the
Control Panel. Locate
the
Network
control
panel
icon
and
double-click
the
icon
to
launch
it.
2.
To
select
Phase
1, click
the
ET
Phase 1 icon.
3.
Close
the
Network
control
panel
and
use
the
Chooser
to
connect
with
network
devices
such
as
servers
and
printers.
Changing the
Network
Connection
Whenever
you
select a new
network
connection
after using
the
current
connection
in
any
way
(even
to
view
a list
of
services
in
the
Chooser), a
warning
like this will
appear.
Changing
your
RppleTalk
connection
will
interrupt
turrent
network: seruices and
they
will
haue
to
be
reestablished.
Are
you
sure
you
want
to
change
from
EtherTalk
to
localTalk?
If
you
need
to
close
or
back
up
your
files
on
an
AppleShare
server,
or
you
don't
want
to
end
your
current
connection,
click
CANCEL.
If
you
want
to
complete
the
change
in
your
network
connection,
click
OK
and
close
the
Network
control
panel.
Switching
to
LocalTalk
If
the
Macintosh
has
both
a LocalTalk
and
an
Ethernet
connection,
you
can
switch
to
the
LocalTalk
connector
at
any
time. Simply
access
the
Network
control
panel
and
click
the
LocalTalk Built-In
Installing the DaynaPORT Software
23
Page 33
icon
to
use
the
LocalTalk system.
When
the
warning
dialog
appears,
click OK. Close
the
Network
control
panel
and
check
the
Chooser
for LocalTalk devices.
Note-
If
your
network
has
IocalTalk network printers,
but
doesn't use a
network device
such
as
Dayna
s EtherPrint, a router,
or
gateway to
allow Ethernet network devices to access IocalTalk printers, switch
to
the IocalTalk Built-In connection
to
print.
Switching
Between
AppleTalk
Phase 1 and
Phase
2
If
your
Ethernet
network
supports
both
AppleTalk
Phase 1 and
Phase 2 network
devices,
you
might
need
to
switch
between
Phase
1
and
Phase 2 to
access
all
the
available services.
If
you
install
and
choose
Phase 2 on
the
Macintosh,
and
you
find
that
you
can't
see
an
AppleTalk
service
in
the
Chooser,
access
the
Network
control
panel
and
click
the
ET
Phase
1 icon.
When
the
warning
appears,
click OK. Close
the
Network
control
panel
and
check
the
Chooser
for
Phase
1 devices.
Similarly, if
you
install
and
choose
Phase
1,
you
might
not
be
able
to
access
Phase 2 nodes.
To
select
the
Phase
2 driver,
open
the
Network
control
panel
and
click
the
Phase
2 EtherTalk Alternative
icon.
When
the
warning
appears,
click OK. Close
the
Network
control
panel
and
check
the
Chooser
for
Phase
2 devices.
Changing
the
AppleTalk
Zone
When
you're
running
Phase
2 software,
you're
automatically
assigned
to
the
default
zone
or
prompted
to
select a zone
name
from a list. This is
the
zone
that
your
system
resides
in
and
it
does
not
necessarily
affect
your
ability
to
use
services
in
other
zones.
To
change
your
zone,
open
the
Network
control
panel
and
select
the
zone
from
the
pop-up
menu.
You'll
remain
in
the
selected
zone
until
you
change
the
network
connection
or
choose
another
zone.
Note-
If
your
computer
prOVides services to other users
on
the network,
you
may
want
to notify them
when
you
change zones.
Removing
the
DaynaPORT
Software
To
remove
the
DaynaPORT
software
from
your
startup
disk,
use
the
Installer
on
the
DaynaPORT Installer disk.
24
Chapfer
2
Page 34
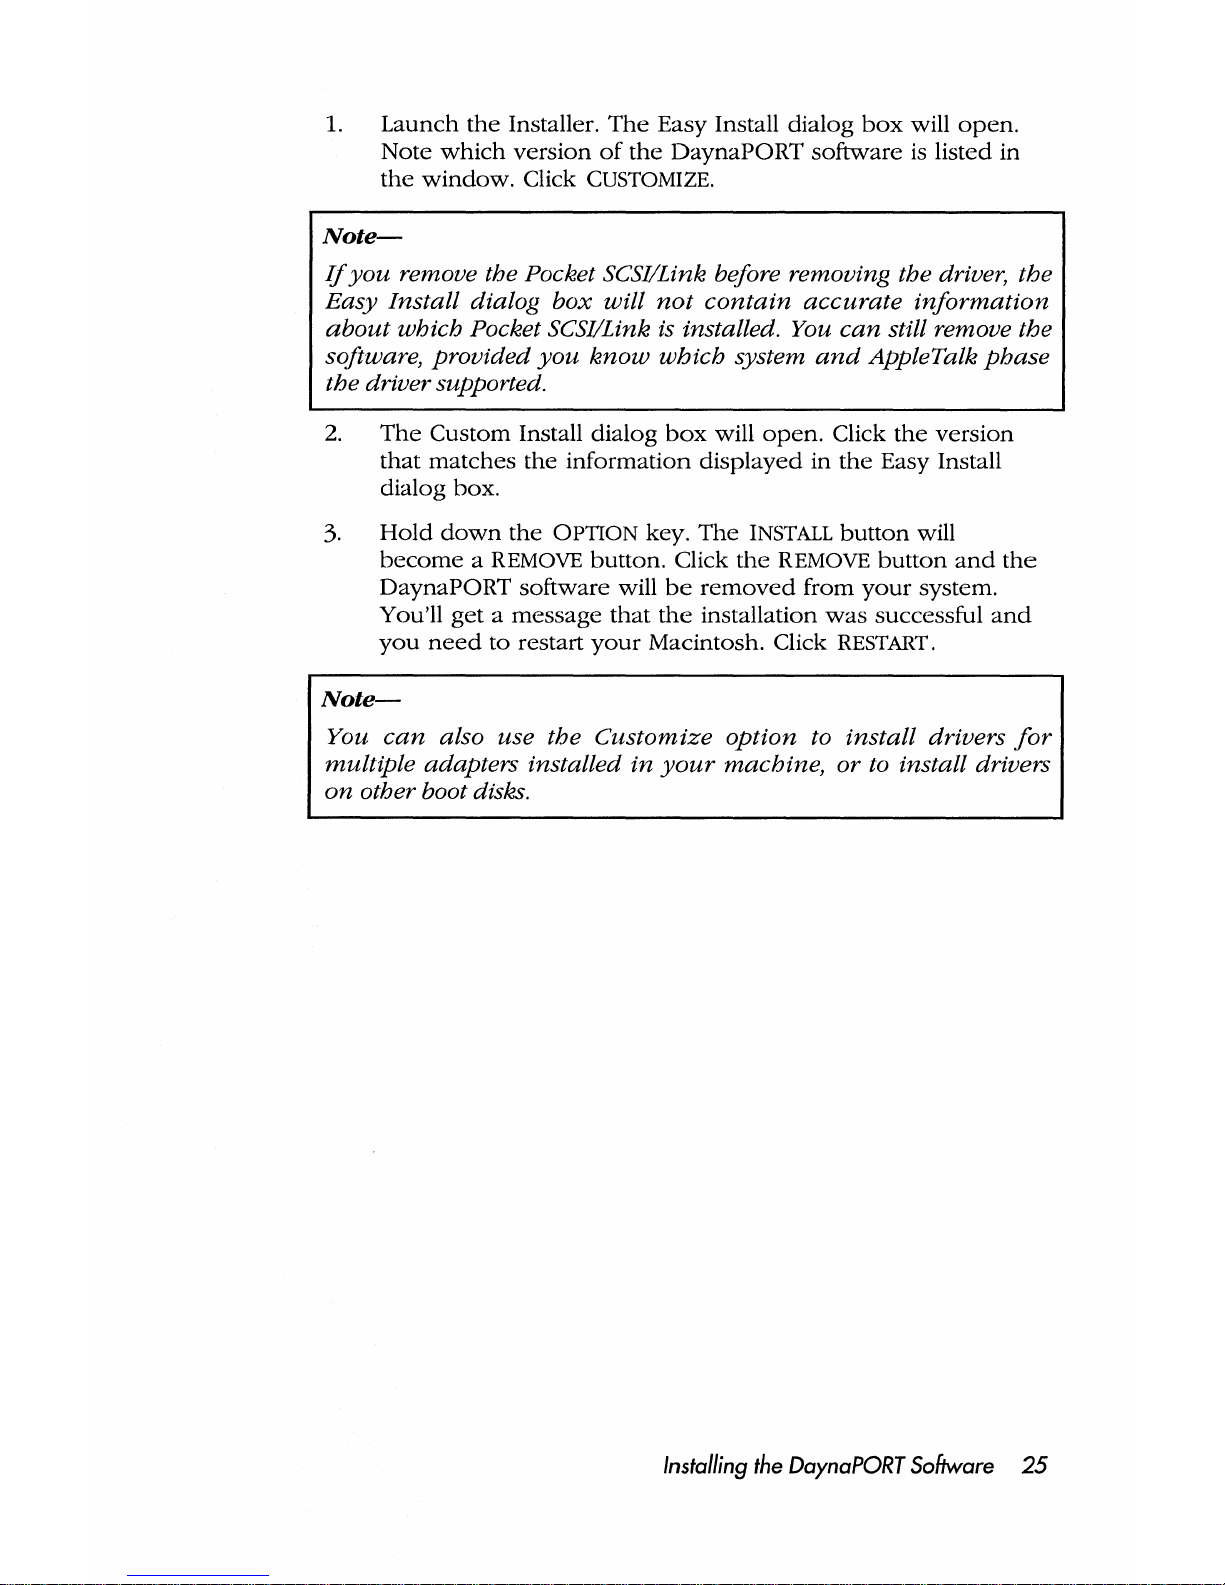
1.
Launch
the
Installer.
The
Easy Install
dialog
box
will
open.
Note
which
version
of
the
DaynaPORT
software
is
listed
in
the
window.
Click
CUSTOMIZE.
Note-
Jj
you
remove the Pocket SCSI/Link before removing the driver, the
Easy Install dialog
box
will
not
contain
accurate
information
about
which Pocket SCSI/Link
is
installed. You
can
still remove the
software,
provided
you
know
which system
and
AppleTalk
phase
the driver supported.
2.
The
Custom
Install
dialog
box
will
open.
Click
the
version
that
matches
the
information
displayed
in
the
Easy Install
dialog box.
3.
Hold
down
the
OPTION key.
The
INSTALL
button
will
become a REMOVE
button.
Click
the
REMOVE
button
and
the
DaynaPORT
software
will
be
removed
from
your
system.
You'll
get a message
that
the
installation
was
successful
and
you
need
to
restart
your
Macintosh. Click
RESTART.
Note-
You
can
also use the
Customize
option to install drivers
for
mUltiple adapters installed
in
your
machine, or to install drivers
on
other boot disks.
Installing
the
DaynaPORT
Software
25
Page 35

Page 36

Chapter
3
Solving
Problems
This
chapter
describes
problems
you
may
encounter
installing
and
using
DaynaPORT
hardware
and
software. It
assumes
that
you've
followed
this
guide's
installation instructions
and
that
your
system
is
connected
to
a functioning
Ethernet
network.
Checking
the
Hardware
In
general,
if
you
have a problem
establishing a
network
connec-
tion
for
the
Macintosh
with
Pocket
SCSI/Link,
check
the
hardware
connection
first
and
run
the
Hardware
Diagnostics as
described
in
the
Diagnostics Read Me file
on
the
DaynaPORT Installer disk.
The
Diagnostics Read Me file is
in
the
compressed
Diagnostics file.
Double-click
to
decompress
the
file
and
extract
the
files
onto
your
hard
drive.
Check
that
the
network
connector
is
attached
correctly. Also, verify
that
your
network
cable
system
meets
Ethernet
cabling
standards.
If
you're
connected
to
thin
Ethernet
cable, follow
these
steps.
• Twist
the
sleeve
on
the
Y-connector
or T -connector
to
make
sure
the
connection
is
secure
• Make
sure
both
ends
of
the Y -connector
or T -connector
are
connected
to
the
thin
Ethernet
cable
and
the
cable
ends
are
terminated
properly
with
SOQ
BNC terminators
• Make
sure
the
workstation
uses a Y-connector
or
T-connector
and
is
not
"directly
connected"
to
the
Ethernet
cable.
Such a connection
will
disrupt
the
entire
network
If
you're
connected
to
a lOBASE
-T
cable
system,
make
sure
the
link
status
light is lit.
If
not,
reseat
the
plug
in
the
jack.
Checking
the
Network
Software
When
you've
verified
that
the
hardware
is installed
properly,
check
the
software
installation instructions
in
Chapter
2.
You
may
want
to
run
the
Software Diagnostics as
described
in
the
Diagnostics
Read
Me file
on
the
DaynaPORT Installer disk.
Double-click
the
compressed
Diagnostics archive file
on
the
disk
and
extract
the
files
onto
your
hard
drive.
In
the
Chooser,
make
sure
that
the
AppleTalk
ACTIVE
radio
button
is
enabled.
Solving
Problems
27
Page 37

Check
the
Network
control
panel
to
make
sure
that
the
correct
Network
icon
is selected.
The
LocalTalk Built-In
icon
identifies a
LocalTalk
network
connection
through
the
printer
port. Make
sure
to
select
the
EtherTalk Alternative
icon
for
an
Ethernet
connection.
The
AppleTalk
Phase 1 and
Phase 2 icons
choose
the
respective
Phase 1 or
Phase
2 protocols.
In
certain
circumstances,
choosing
either
protocol
can
prevent
you
from "seeing"
the
other
protocol's
services.
If
you
can't
communicate
with
a service,
try
installing
and
choosing
the
other
icon
in
the
Network
control
panel.
Then
use
the
Chooser
to
see
if
the
service is visible.
28 Chapter3
Page 38

Appendix A
Service,
Support,
Sales,
and
Specifications
Dayna
Communications
offers
customers
technical
support,
product
information,
and
sales assistance.
Technical
Support
Technical
support
is free
to
any
owner
of a registered
Dayna
product.
To
register
your
product,
fill
out
the
warranty
registration
card
included
in
the
guide
and
mail it
to
Dayna
or
FAX
it
to
(801)
269-7363 (269-SEND). This will
ensure
that
your
DaynaPORT
adapter
is
registered
for a lifetime
warranty
on
hardware.
Customer
Service
personnel
are
experts
in
using
all
Dayna
products.
They
are
available to
help
you
when
you
run
into
problems
not
explained
in
this
guide.
Before calling
Customer
Service, find
the
serial
number
on
the
sticker
on
the
bottom
of
the
DaynaPORT device. Call (801) 269-
7200
between
8:00
AM
and
5:00
PM
Mountain
Time,
Monday
through
Friday. Ask for
Customer
Service.
Please
have
your
product
serial
number
ready
when
you
call.
Customer
Service maintains a
24-hour
bulletin
board
that
you
can
access
to
download
the
latest versions
of
drivers
and
other
software.
Dayna
Communications
Bulletin
Board
Baud
Modem
(up
to
14400): (801) 269-7398
Setup:
N81
Login: Use
your
own
name
or
company
name
You
can
also
contact
Dayna
Customer
Service
using
the
following
on-line
services
under
these
ID
names.
AppleLink: DA YNA.TECH
E-mail
Addresssupport@dayna.com
FTP Site ftp.dayna.com
WWW
Page
www.dayna.com
America Online: DA YNACOM
Dayna's
mailing
address
is:
Dayna
Communications, Inc.
Sorenson
Research Park
849
West
Levoy Drive
Salt Lake City UT 84123
Service, Support,
Sales, and Specifications
29
Page 39

Again,
our
service
numbers
are:
Customer
Service (801) 269-7200
FAX
(801) 269-7363 (269-SEND)
Product
Information
and
Sales
Sales
representatives
are
available
to
give
you
information
about
any
Dayna
product
and
to
take
your
order.
For
product
information,
call (801) 269-7200
and
ask
for Sales.
Pocket
SCSI/Link
Specifications
Operating
Environment
Operating
Temperature:
Storage
Temperature:
Relative Humidity:
Altitude:
Power
10°
to
40° C (50°
to
104° F)
10°
to
40° C (50°
to
104° F)
5%
to
95%
(noncondensing)
o
to
12,000 feet
Apple
Desktop
Bus
(ADB)
power
cable
or
External 5 VDC 1.0A
adapter
90-130
or
220-240
VAC
50-60
Hz
(factory
configurable)
Caution-
Do
not
use
an
AC-AC
power
adapter
with
Pocket
SCSI/Link.
Use
only the AC-DC
power
adapter supplied with Pocket SCSI/Link
ora
120V60Hz
25Winput/5
VDC
1.0Amp
output adapter
for
u.s.
power
systems
and
240V
50Hz
12W
input/5
VDC
1.0
Amp
output
adapter
for
foreign
power
systems.
Physical
Description
Size: 4.25 in. x 3.1 in. x 1.25 in.
Weight: 5.2 oz.
Connectors
and
Cables
HDI-30/DB-25 Cable
BNC
"Y"
Connector
Twisted
Pair Cable for RJ-45
Certification
FCC Class A
30
Appendix A
Page 40

Glossary
activity
light
The
amber
activity light is
the
shortest
bar
on
the
top
of
the
Pocket
SCSI/Link device. It flashes
while
data
is
being
transmitted
through
the
Pocket
SCSI/Link.
AppleTalk
Phase
2
AppleTalk
Phase 2 protocols
provide
extensions
to
the
Ethernet
networking
system
that
support
multiple
zones
and
more
devices.
BNC
connector
The
BNC
connector
is
used
to
connect
thin
Ethernet
cables
and
network
devices
using
a BNC
V-connector
or
T -connector.
EtherTalk
A
high-speed
AppleTalk
network
system
that
uses
the
cables
of
an
Ethernet
network.
EtherTalk
Alternative
The
name
of
the
EtherTalk driver
shown
in
the
Network
control
panel
that
supports
Pocket
SCSI/Link devices.
You
must
select
this
icon
in
the
control
panel
to
activate
your
network
connection.
external
transceiver
External transceivers
are
needed
to
connect
thick
Ethernet
or
fiber-
optic
cables
to
DaynaPORT
devices. Typically,
the
transceiver
box
connects
to
the
Ethernet
trunk
line
and
uses a transceiver
cable
with
an
AUI
connector
to
attach
to
DaynaPORT
devices.
link
status
light
The
green
link
status
light is
the
middle
bar
on
the
top
of
the
Pocket
SCSI/Link.
It
indicates
that
the
Pocket
SCSI/Link -T
RJ
-45
port
is
connected
to
a 10BASE-T
cable
system
that
has
a valid
cable
connection
to a hub.
power
light
The
longest
bar
on
the
top
of
the
Pocket
SCSI/Link is
the
green
power
light
that
comes
on
when
Pocket
SCSI/Link is initially
turned
on. A flashing
power
light indicates
an
error
condition.
Send
Echo
A test utility
that
can
help
you
determine
if
the
DaynaPORT
hardware
and
software
are
installed
and
working
properly.
lOBASE-T
cable
An Ethernet
cable
system
using
unshielded
twisted-pair
wiring
with
RJ-45
eight-conductor
plugs
at
each
end.
10BASE-T
cable
standards
are
defined
by
the
IEEE Std. 802.3.
Glossary
31
Page 41

thick
Ethernet
Thick
Ethernet
refers
to
industry-standard
Ethernet
cable
or
any
other
cable
that
uses
the
IEEE 802.3 Media Access Unit (MAU)
interface.
thin
Ethernet
cable
Usually
quarter-inch
black
coaxial
cable, identified
by
type
such
as
RG-58/U.
Sometimes
called
lOBASE2 cable.
zone
A logical
grouping
of
devices
in
an
internet
that
makes
it
easier
for
users
to
locate
network
services.
Zones
are
defined
during
the
router
setup.
zone name
A
name
defined
for
each
zone
in
an
internet. A LocalTalk
network
can
have
just
one
zone
name.
An
AppleTalk
Phase 1 network
can
have
just
one
zone
name.
An
AppleTalk
Phase 2 network
can
have
multiple
zone
names,
called a zone
list.
32 Glossary
Page 42

Index
A
activity light 13, 15
ADB
power
cable
14
AppleTalk
Connection
for Macintosh 1
AppleTalk
Phase 1 and
Phase 2 protocols
1,
20, 24, 28
AppleTalk
zone
22
changing
24
B
BNC
connector
6,31
D
DaynaPORT
quick
start 2
DaynaPORT Installer Disk 4, 18, 22, 24
DaynaPORT
software
installing 17-19
removal 24
DECnet
1
default
zone
24
Diagnostics
Read
Me file
4,
27
E
ET
Phase
1 23, 24
Ethernet
address
4
EtherTalk
2,
17, 20, 22,
31
EtherTalk Alternative 17, 21, 22, 24, 28, 31
H
Hardware
Diagnostics 27
I
Installer 17
Installing
As
the
Last
Device
11
As
the
Middle Device 10
As
the
Only
Device 9
IPX 1
L
link status light 12, 13, 14
LocalTalk 23
Locaffalk
Built-In
icon
21
Index
33
Page 43

M
Macintosh
Plus
computer
15
N
NCP
1
network
connection
23
Network
control
panel
2, 20, 21, 23, 24, 28
p
Phase
1 23
Phase 1 and
Phase 2 protocols
5
phone
numbers
and
addresses
29
Pocket
SCSI/Link
Adapters
5, 6
installation 7-16
power
light 13
PowerBook
5,
7, 9
S
SCSI
cable
9, 10
SCSI
ID
number
8, 9
SCSI
port
8, 9, 10
SendEcho
31
serial
number
4, 29
Simple
Network
Management
Protocol
1
T
TCP/IP 1
lOBASE-T
12,27,31
Termination/ID
switch
9
W
warranty
registration
card
29
Z
zone
2,
22, 24, 32
34
Index
 Loading...