

Daymakers Alpine touring adapters Owner's Manual
$/3,1(7285,1*$'$37(56
2:1(560$18$/

Table of Contents
Introduction
Box Contents
Step 1. Determine the Boot Sole Length
Step 2. Remove the Heel Plate
Step 3. Determine the Heel Plate Position
Step 4. Assemble the Heel Plate
Step 5. Position the Wire Bails
Step 6. Test Fit and Final Assembly
How To: Step In to the Daymakers
How To: Use the Elevators
How To: Step Out of the Daymakers
Things Not to Do
Troubleshooting
Maintenance
Warranty and Returns
Contact Info
∤∤∤∤∤∤∤∤∤∤∤∤∤∤∤∤∤∤∤∤∤∤∤∤∤∤∤∤∤∤∤∤∤∤∤∤∤∤∤∤∤∤∤∤∤∤∤∤∤∤∤∤∤∤∤∤∤∤∤∤∤∤∤∤∤∤∤3
∤∤∤∤∤∤∤∤∤∤∤∤∤∤∤∤∤∤∤∤∤∤∤∤∤∤∤∤∤∤∤∤∤∤∤∤∤∤∤∤∤∤∤∤∤∤∤∤∤∤∤∤∤∤∤∤∤∤∤∤∤∤∤∤∤∤∤∤∤∤∤∤4-5
∤∤∤∤∤∤∤∤∤∤∤∤∤∤∤∤∤∤∤∤∤∤∤∤∤∤∤∤∤∤∤∤∤∤∤∤∤∤∤∤∤∤∤∤∤∤∤∤∤∤∤∤∤∤∤∤∤∤∤∤∤∤∤∤∤∤∤∤∤∤6-7
∤∤∤∤∤∤∤∤∤∤∤∤∤∤∤∤∤∤∤∤∤∤∤∤∤∤∤8-9
∤∤∤∤∤∤∤∤∤∤∤∤∤∤∤∤∤∤∤∤∤∤∤∤∤∤∤∤∤∤∤∤∤∤∤∤∤∤10-11
∤∤∤∤∤∤∤∤∤∤∤∤∤∤∤∤∤∤∤∤12-13
∤∤∤∤∤∤∤∤∤∤∤∤∤∤∤∤∤∤∤∤∤∤∤∤∤∤∤∤∤∤∤∤∤∤∤14-15
∤∤∤∤∤∤∤∤∤∤∤∤∤∤∤∤∤∤∤∤∤∤∤∤∤∤∤∤∤∤∤∤∤∤∤∤∤∤16-17
∤∤∤∤∤∤∤∤∤∤∤∤∤∤∤∤∤∤∤∤∤∤∤∤∤∤∤∤∤∤∤18-19
∤∤∤∤∤∤∤∤∤∤∤∤∤∤∤∤∤∤∤∤∤∤∤∤∤∤∤∤∤∤∤∤∤20-21
∤∤∤∤∤∤∤∤∤∤∤∤∤∤∤∤∤∤∤∤∤∤∤∤∤∤∤∤∤∤∤∤∤∤∤∤∤∤∤∤∤∤∤∤∤22-23
∤∤∤∤∤∤∤∤∤∤∤∤∤∤∤∤∤∤∤∤∤∤∤∤∤∤∤∤∤∤24-25
∤∤∤∤∤∤∤∤∤∤∤∤∤∤∤∤∤∤∤∤∤∤∤∤∤∤∤∤∤∤∤∤∤∤∤∤∤∤∤∤∤∤∤∤∤∤∤∤∤∤∤∤∤∤∤∤∤∤∤∤∤26-27
∤∤∤∤∤∤∤∤∤∤∤∤∤∤∤∤∤∤∤∤∤∤∤∤∤∤∤∤∤∤∤∤∤∤∤∤∤∤∤∤∤∤∤∤∤∤∤∤∤∤∤∤∤∤∤∤∤∤∤∤∤28-29
∤∤∤∤∤∤∤∤∤∤∤∤∤∤∤∤∤∤∤∤∤∤∤∤∤∤∤∤∤∤∤∤∤∤∤∤∤∤∤∤∤∤∤∤∤∤∤∤∤∤∤∤∤∤∤∤∤∤∤∤∤∤∤∤∤∤∤∤∤∤∤∤∤30
∤∤∤∤∤∤∤∤∤∤∤∤∤∤∤∤∤∤∤∤∤∤∤∤∤∤∤∤∤∤∤∤∤∤∤∤∤∤∤∤∤∤∤∤∤∤∤∤∤∤∤∤∤∤∤∤∤31
∤∤∤∤∤∤∤∤∤∤∤∤∤∤∤∤∤∤∤∤∤∤∤∤∤∤∤∤∤∤∤∤∤∤∤∤∤∤∤∤∤∤∤∤∤∤∤∤∤∤∤∤∤∤∤∤∤∤∤∤∤∤∤∤∤∤∤∤∤∤∤∤∤∤32
3
7$%/(2)&217(176
2
All Rights Reserved. © 2017, Daymaker Touring LLC. Print Version V4

-
-
-
Always ski with a trusted and prepared partner and carry
an avalanche beacon, shovel, and probe when traveling in
avalanche terrain. Know how to use your equipment.
Backcountry skiing is inherently dangerous and requires
an acceptance of the risks involved, and implies a willing-
ness to take responsibility for educating oneself about
these dangers and ways to mitigate them.
We recommend that backcountry travelers take an AIARE
Level One class or the equivalent, and practice the skills
they learn regularly with their partner.
5
BE SAFE IN THE BACKCOUNTRY!
The Daymakers Alpine Touring Adapters allow for any stand-
ard boot and binding to be used in conjunction with climbing
skins to create an extremely capable alpine touring setup.
Like any high-performance lightweight equipment, Day-
makers rely on proper setup, usage, and maintenance to
deliver optimum results.
Failure to follow these instructions may result in pre-
mature wear, failure of product, user injury or even death!
These are all things that will NOT make your day, so please
take the time to read these instructions in full before using
or assembling the product. If you are not comfortable setting
up the Daymakers, please take them to your favorite ski shop
or contact us directly for assistance. We are happy to help!
-
-
-
,1752'8&7,21
4
7
A
B
C
D
E
F
G
H
I
J
K
L
M
N
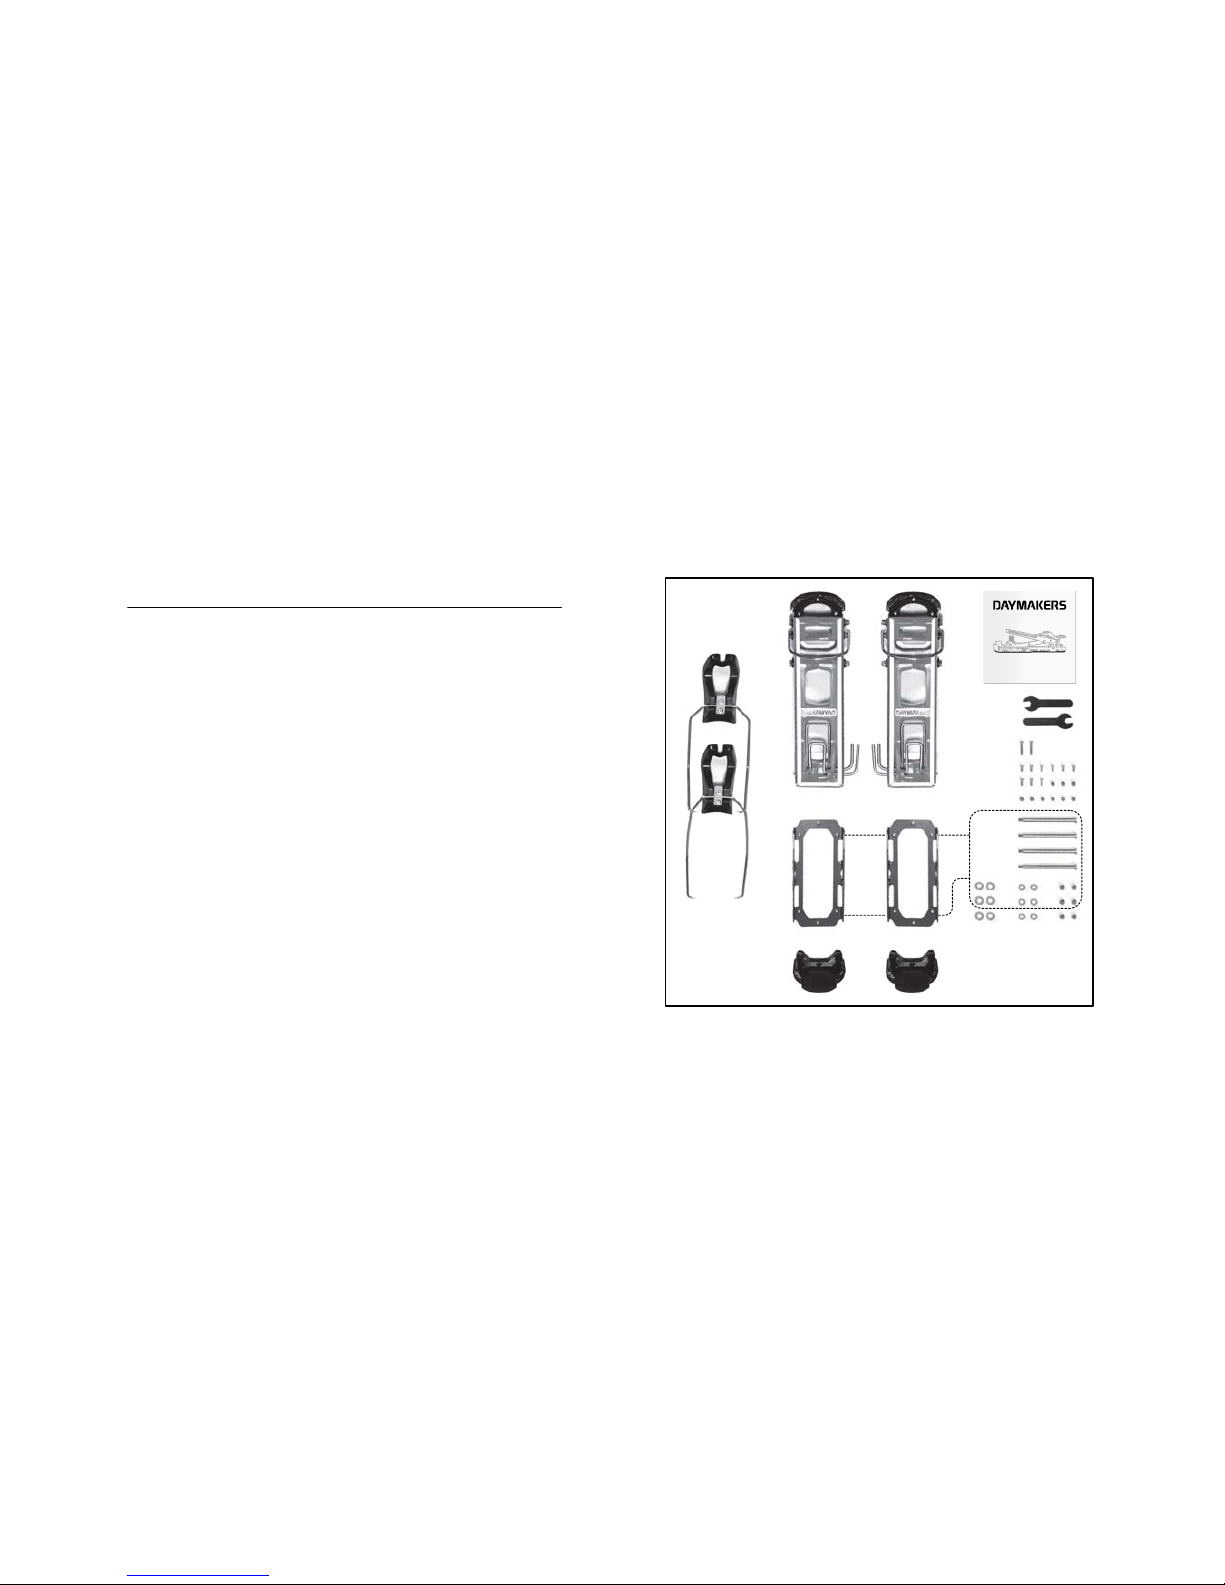
Two heel clamp assemblies
One Daymaker assembly, left
One Daymaker assembly, right
Two heel plates
Two heel lugs
Owners manual
Two 7mm wrenches
Two M3 x 25mm screws (spares)
Nine M3 x 10mm screws (3 spares)
Nine M3 lock nuts (3 spares)
Four pivot bolts (pre-installed)
Six large washers (2 spares) , (4 pre-installed)
Six small washers (2 spares) , (4 pre-installed)
Six M4 lock nuts (2 spares) , (4 pre-installed)
6
%2;&217(176
E
D
CBA
F
H
G
I
J
K
MLN
$/3,1(7285,1*$'$37(56
2:1(560$18$/
9
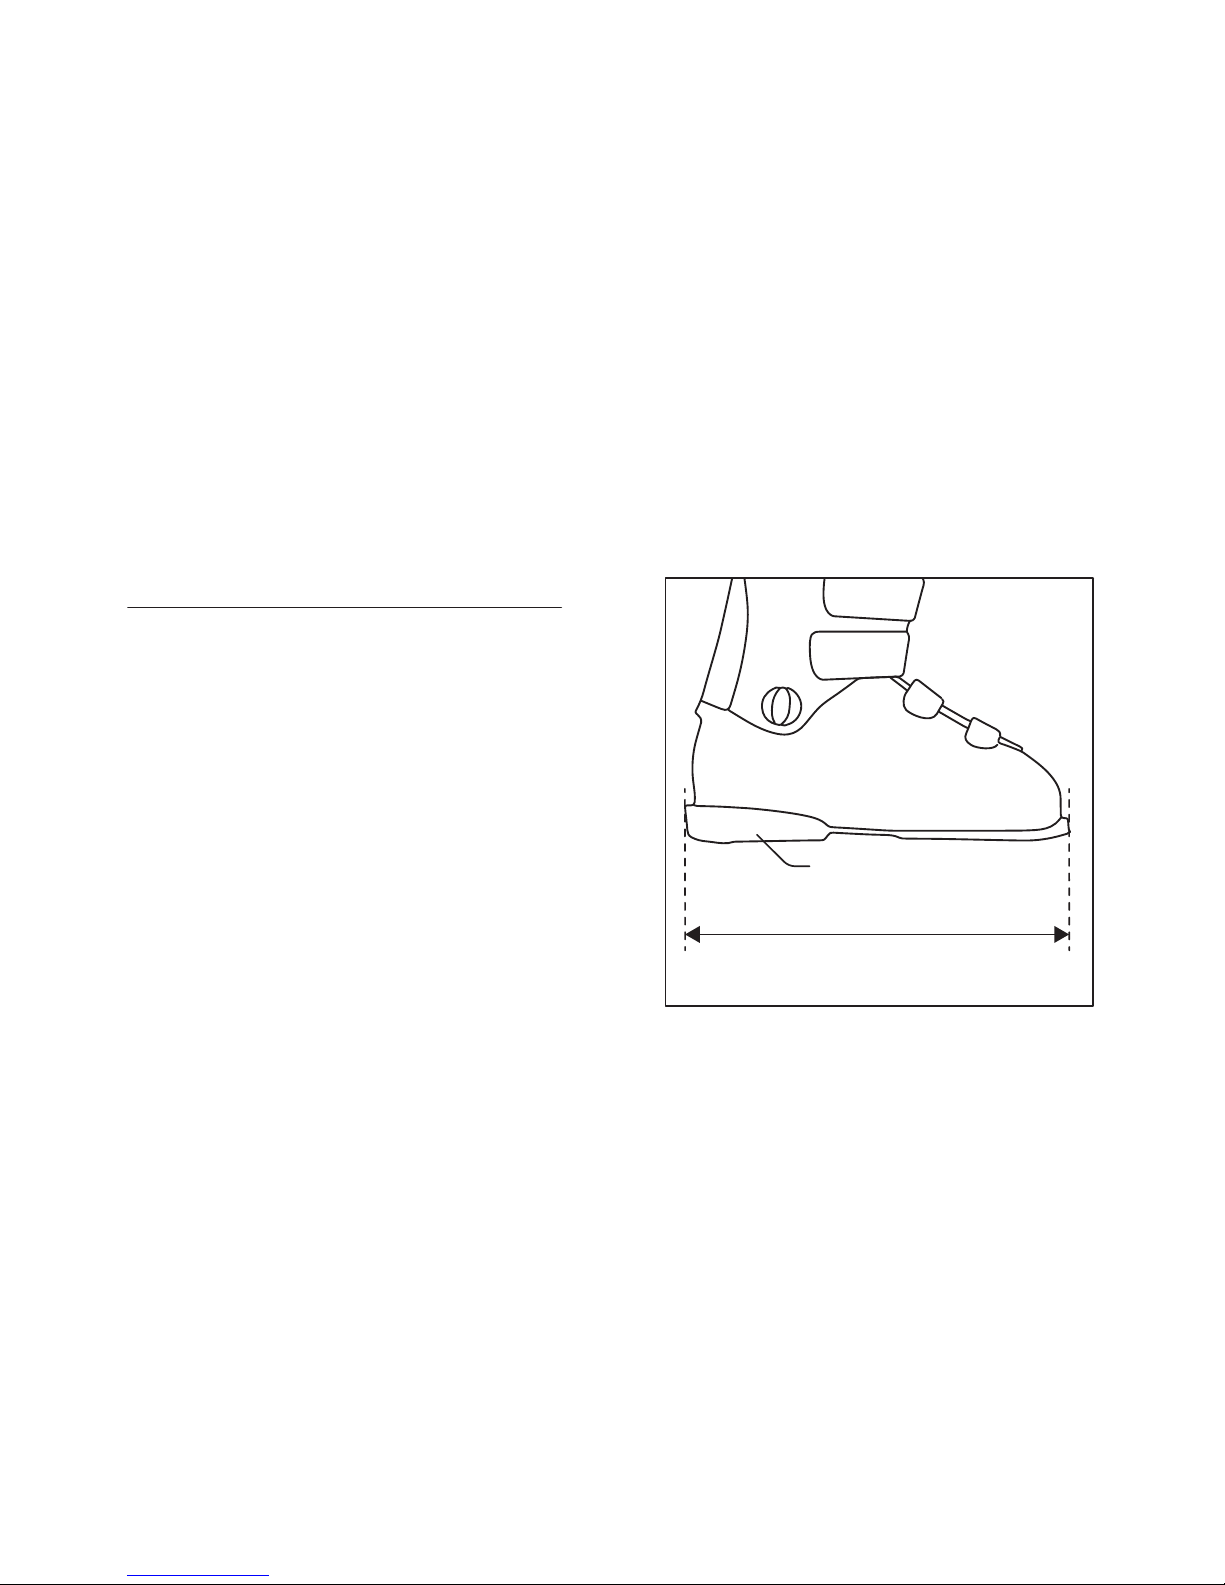
315 mm
315 mm
BSL Measurement
-
-
-
-
-
The “Boot Sole Length”, also commonly abbreviated as BSL,
is the exact length of the boot at the boot lugs in millimeters.
This can be found via a number of ways.
The BSL is typically molded into the boot near the heel lug.
If the number is illegible, check the other boot.
If the BSL cannot be found on either boot, accurately mea-
sure the distance between the lugs with a metric ruler.
Alternatively, you can usually web-search the BSL online by
searching for the make, model, and size of your boot.
You can note your boot’s BSL here: _____________________
8
67(3
DETERMINE THE BOOT SOLE LENGTH
-
-
-
-
-
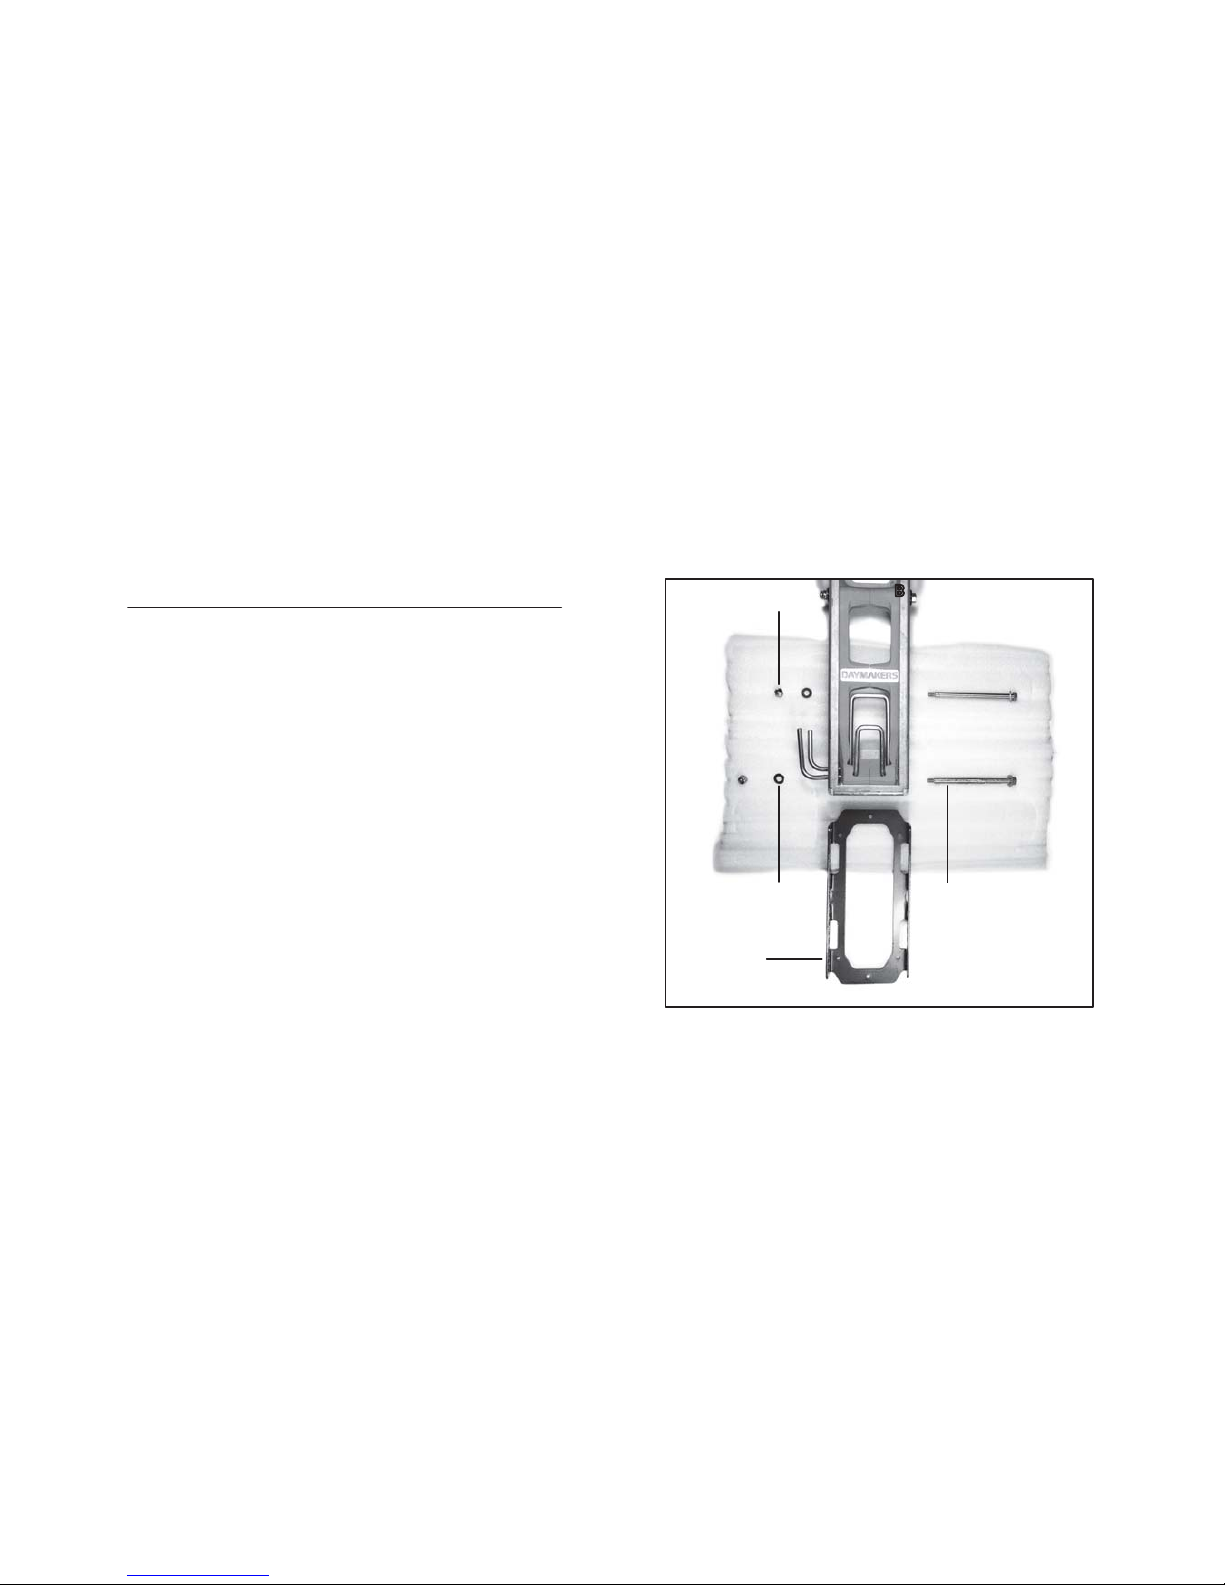
The blue heel plate comes pre-installed with the nuts finger-
tight. Remove the two sets of nuts, washers, and bolts.
The bolt that passes through the long orange link is greased.
Remove it carefully and set it on the foam divider or another
clean surface.
Avoid hinging the Daymaker without the rear bolt through
the link as this will cause it to unseat and move out of
position.
Do not remove the grease from the bolt and take care to
avoid contaminating it or other parts with debris.
It is recommended to set up one Daymaker completely and
then build the second to match.
10
67(3
REMOVE THE HEEL PLATE
Greased
Ungreased
Foam Divider
Bolt /
Large Washer
x2
Small Washer
x2
Heel Plate
M4 Locknut
x2
11
 Loading...