

Page 1

Gatto Electric Bike
Rickshaw King
Manual
User Manual
Page 2

Table of Contents
About Daymak 3
Safety 4
Mobility Scooter Diagram 5
Riding Instructions 6
Starting The Vehicle 6
Steering Lock 6
Driving the Vehicle 7
Features
Right Handlebar 7
Display Dashboard 8
Left Handlebar 9
Radio / Mp3 9
Remote Control 10
Bluetooth App 11
Bluetooth Features 12
Storage 13
Seat 14
Charging your unit 15
Best Practices 15
Safety and Trouble Shooting 16
Mirrors 16
Kill Switch 16
Brake Lock 17
60 Second Check 18
Service 18
Page 3

About Daymak
Daymak is one of Canada’s largest Alternative Vehicle providers. We design, engineer, manufacture, import and repair everything from recreational dirt bikes, go-karts and electric
golf cars to alternative transportation solutions such as e-bikes and gas scooters.
Our electric bicycles represent an energy-e cient and eco-friendly alternative for people
who need to get around the city. They greatly increase the practicality of bicycle transportation in urban centres. Costing only a few cents to charge, an e-bike can make city life
more convenient and much less expensive.
While there are many new Green technologies that are still in their infancy, electric bicycles
have been developing over the last 40 years or more. E-bike technology has been dramatically re ned since the introduction of the rst custom-conversion bicycles. Today, electric
bicycles are a supremely reliable and a ordable means of transportation.
Daymak is constantly developing new eco-friendly alternative transportation strategies,
led by its own Research and Development department in Toronto, Canada. We are always
improving our products. Our innovative in-house engineering and quality testing provide
customers with many new kinds of reliable, eco-friendly vehicles, designed to help change
the lives of our customers and the world.
Daymak warranties, services, and stocks parts for everything it sells. We support our products.
Please feel free to visit our website. You’ll nd the latest in cool transportation solutions,
support for the products you’ve purchased and contact information.
Page 4

Safety
When operating the Rickshaw King please make sure you adhere to
the following:
Always check your mirrors and blind spots when operating the vehicle.
Turn on headlights when in need of additional visibility.
Make sure that your battery power is suffi cient before you go out to ride
Obey all laws of the road.
Periodically charge the unit when not in use for long periods of time
If you bring your charger avoid shaking / rattling charger while riding
Perform the 60 second check before riding.
Do not take a second passenger.
Do not over charge the battery by leaving the charger in the charging
port. Once the battery is fully charged remove the charger immediately.
Do not try to operate the unit while charging.
Do not let anyone uner the age of 16 years old operate this vehicle.
Do not make sharp / abrupt turns at high speeds to avoid tipping.
Do not operate under the infl uence of any use of drugs or alcohol
Do not completely submerge the unit in water
Do not operate in harsh weather conditions.
For customer service call 1-800-649-9320
4
Page 5

Mobility Scooter Diagram
Diagram 1:
This diagram illustrates the various parts of your mobility scooter. Please note that many of these parts are
not user-serviceable and should be repaired only by trained professionals. This is especially true of the elec-
trical systems and the mechanical components.
A) Mirrors
B)Windshield
C) Seat
D) Basket
E) Brake Lights
F) Safety Wheels
G) Rear Wheels
H) Front Wheels
I) Turn Signals
J) Headlight
K) Charging Port
5
Page 6
Riding Instructions
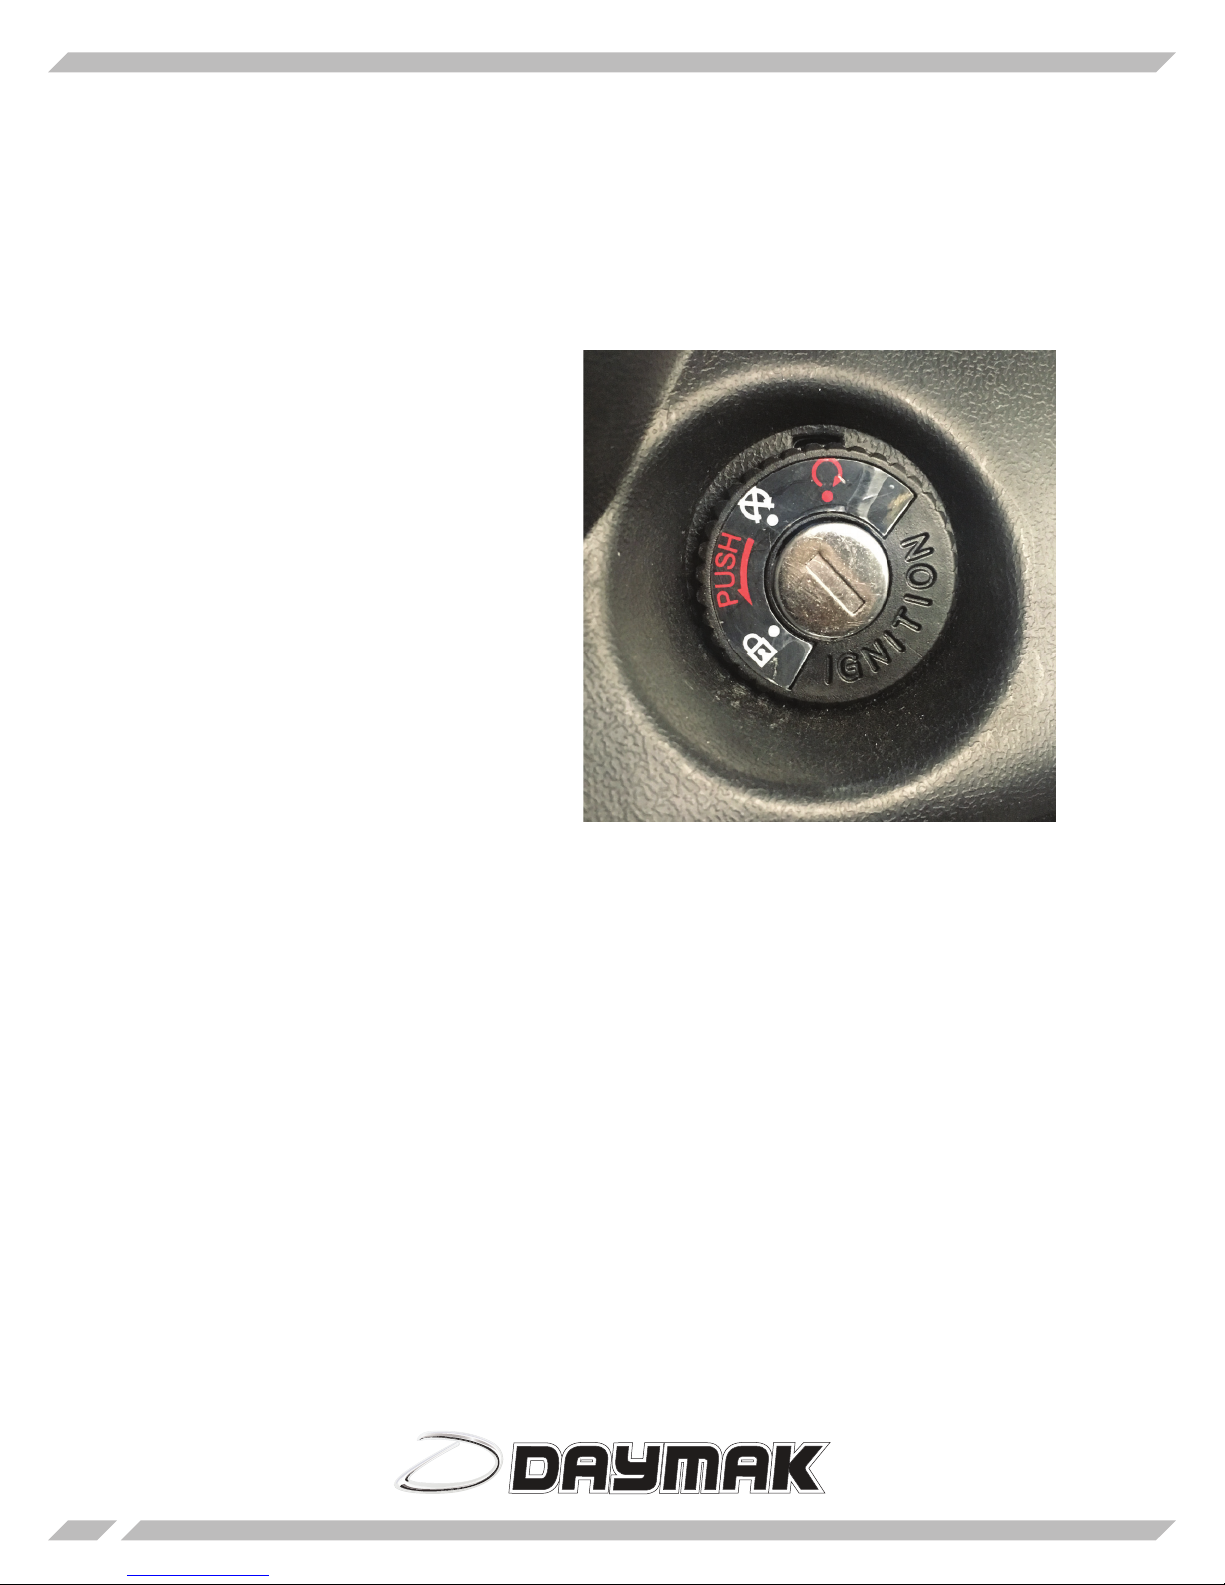
To start the vehicle
Once you have received the vehicle. Sit on the unit and put the keys in the ignition. The
ignition is located on the main dash of the unit below the right handlebar.
To turn on the unit, turn the keys clockwise
so the key is pointing at the right position.
To turn o the unit turn it the opposite
direction.
Steering lock
To lock the steering to prevent theft,
the Rickshaw King comes with a locking
mechanism that locks the wheel perpendicular to the unit.
To engage this:
1) Turn handlebars so they are facing the
left.
2) With the key in the o position, push
the key in further and turn counterclockwise. Reverse this process to unlock it.
Please note: When engaging the steering lock if you are unable to get it over the stop to
get it on the wheel lock position, try moving the handlebars slightly the opposite direction.
6
Page 7
Riding Instructions
Driving the vehicle
Make sure that you are properly situated on the unit. Once the vehicle is on (you will see
that the dashboard is lit up). Use the throttle on the right hand to rotate towards you.
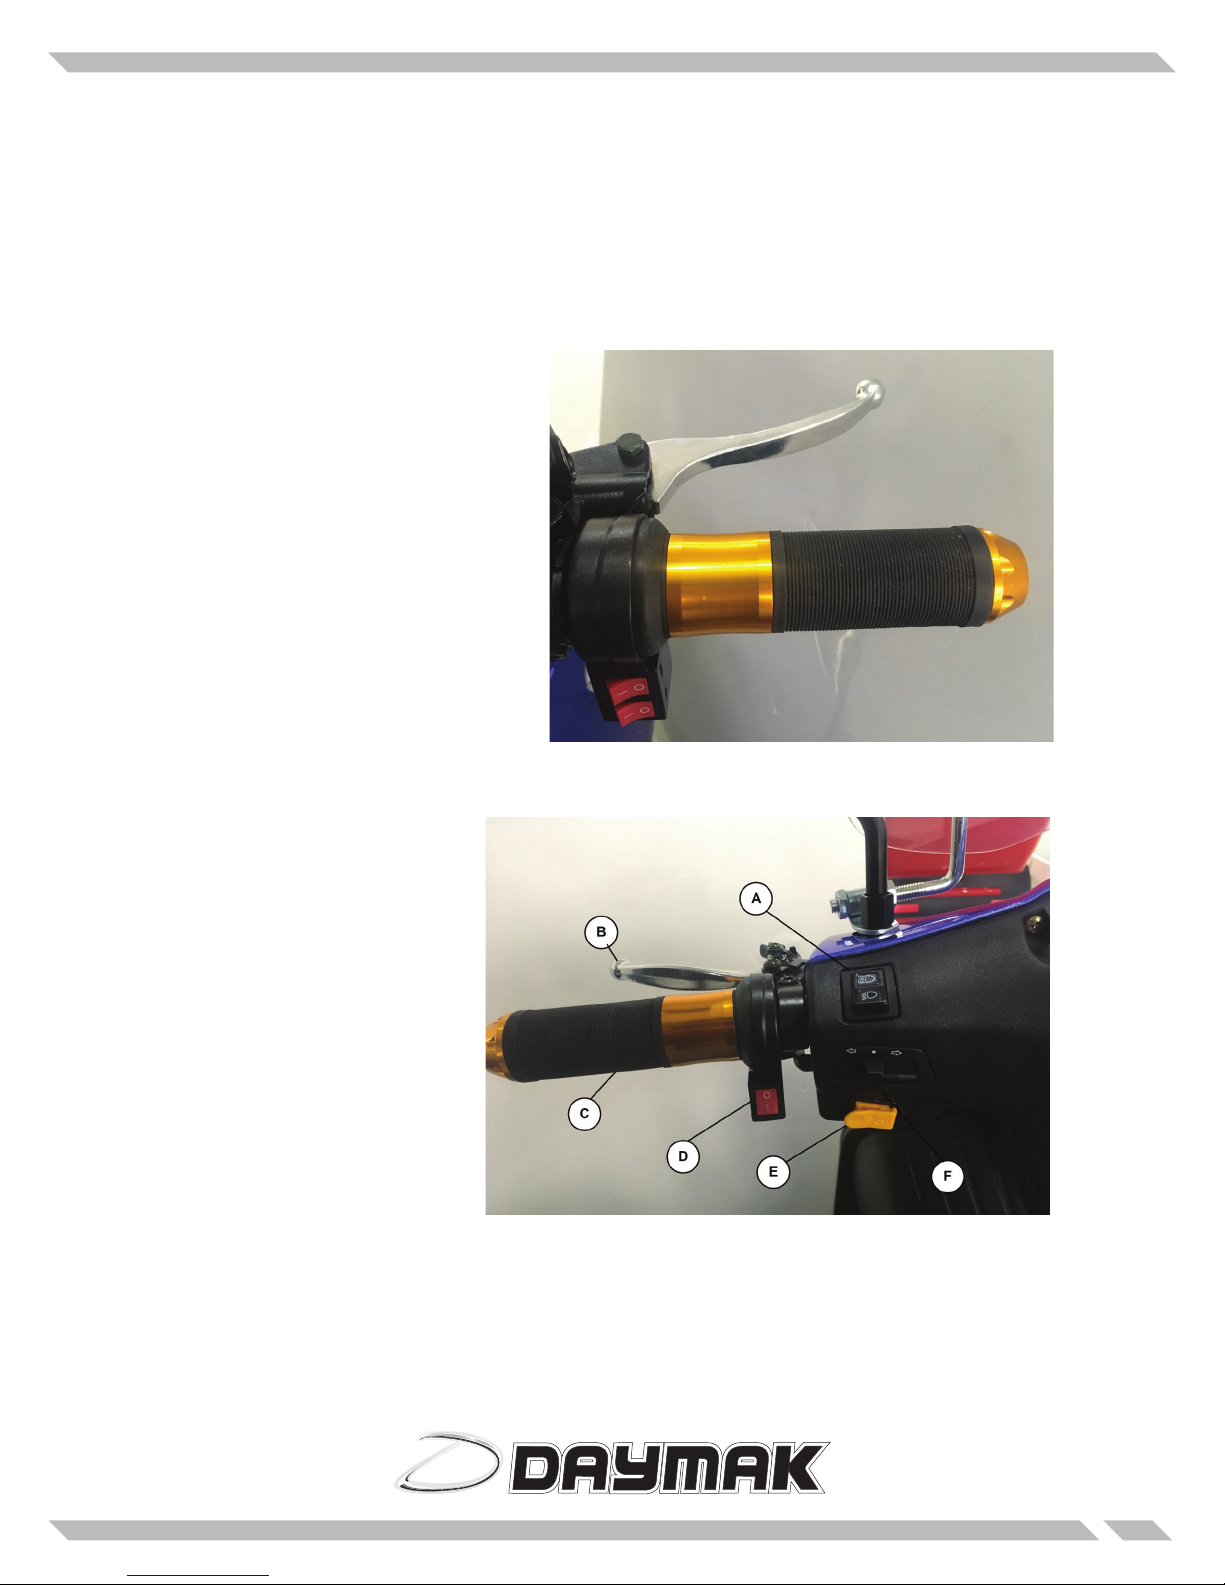
Pictured to the right is the throttle
and the braking mechanism.
Brakes (silver part): Pull that towards
you to slow down and disengage the
motor
Throttle (gold and black part): Rotate
that towards you to drive.
We will now go through all the features
Features
A) High Beam/Low Beam Push this in the up position to aim the
lights higher, down to aim it lower.
B) Rear Brake Handle Pull this towards you to engage the
rear brakes. Use this rst when stopping before the front brakes.
C) Left handlebar Use this to steer the unit.
D) Heated Handgrips - Set this to one
to turn on heat to the handles. Set it
to 0 to turn it o .
E) Horn - Press this to honk the horn
F) Turn Signals - Push this switch to the left to engage the left turn signal. Set it to the middle and press it
in to turn it o . Push it to the right for the right turn signal.
*Please note that the turn signals do not turn itself o automatically when you turn it o *
7
Page 8

Features
The Rickshaw King features a digital LED display to show your speed travel time and moe.
A) Speed - Your current speed that you are travelling in KM/h
B) Battery / Voltage reading - Shows how much power you have. 5 Bars means it has
a full battery.
*Please note the Rickshaw King is a 60V battery so a full charge unit should read
approximately 68V.
**Please note that the accurate remaining battery reading is what it is showed at
cruising speed, not at a stop or during acceleration.
C) Odometer - Shows how many Kilometers travelled total
D) ermometer - Shows the temperature outside.
8
Page 9

Features
Radio / Mp3
A) Speed Setting - This dial will help you set the speed you
want to travel at. Turn the white market towards the turtle
to go slow and towards the rabbit to go fast.
B) Lights - Set it to the rightmost position for all lights to be
o . Middle position for the rear lights to be on. Leftmost
position to turn on all lights.
C) Flasher - Press this button to ash the headlights on and
o quickly.
D) High Speed / Low Speed - Set the switch to 1 to set it to
set it to low speed. 0 to set it to high speed.
E) Forward / Reverse - Set the switch 0 to go forward and
1 to go in reverse.
F) Front Brake - Pull this towards you to engage the front
brake.
The Rickshaw King comes with a built in radio and mp3 player so you can listen to your music. The Mp3 player can take either a
USB stick or MicroUSB card. Put your songs on to your drive as Mp3’s for compatibility.
To access the Mp3 player, on the center steering column of the unit unlock the key the compartment with your keys.
A) MicroUSB card Reader
B) USB Stick Reader
Please note to play music on your Rickshaw King you
must use the remote.
See remote control for more information.
9
Page 10

Remote Control
The Rickshaw King comes with a remote control that allows you to arm and disarm the alarm system as well as change
songs that you are listening to.
A) Alarm / Volume Reset - Once the unit is turned o press this
button to turn on the alarm. Press it again to turn it o . While on
press this to turn o the radio and reset volume to low.
*Please note that once you turn the alarm on there is a 5 second
delay before it is activated*
B) Play / Pause music - Press this is to turn on the radio / Mp3
player press it a second time to pause / stop the radio / Mp3 player.
C) Seek Reverse / Last Song / Volume Increase- Press this button
to nd a station with a lower frequency or play the last song played
on the Mp3 player. Press and hold this button to increase the volumae
D) Seek Forward / Next Song - Press this button to nd a station
with a higher frequency or play the next song on the Mp3 player
E) Source - Press this button once to switch from Mp3 player or radio
Bluetooth App
The Rickshaw King comes with a Daymak Drive Bluetooth app that allows you to control your speed acceleration and
more. Available on the iOS and Google Play Store for both Android and Ios, connect via your smart phone to change
the core performance of your vehicle.
To connect to your unit, turn on the Rickshaw King, open the app on your smart phone and click on the Bluetooth
device that says Daymak Drive
*Please note for the rst time you connect to the unit you will need a password. For this input 12345678
For more information on the Daymak Drive App, you can check out the following links.
http://www.daymak.com/manuals/DAYMAK_APP_MANUAL_IOS.pdf - IOS
http://www.daymak.com/manuals/Daymak%20Drive%20Manual.pdf - Android
10
Page 11

Bluetooth Features
Fast Start: Fast start has priority while opening at the same time as soft start. Reduces the
time needed to achieve maximum speed. Higher values make your bike accelerate quicker
(1-10) Fast start supersedes slow start when it is activated.
Soft Start: Display the star mode and range adjustment of controller while starting. The
range is divided into 10 grades. The higher, the slower. Entering the following interface,
soft star can be set, turn on or o and turn up or down. The acceleration of your bike will
slow down. Higher values make acceleration slower (values 1-10)
Overspeed On/O : Weak magnetic overdrive grades (10 grades). The higher, the faster.
That’s to say, speed up to 120%~130%. Low speed ratio, speed of rst gear (10%~80%),
Matching with low speed switch.
Forward/reverse: Spins the motor positive or negative direction. Only works if the motor
supports this.
Manual Cruise: Turn on or o the button of manual cruise. The controller keeps the real-time speed, matching with manual button.
ON/OFF values: Controller keeps the real-time speed when turned on.
Auto Cruise: Turn on the button of Auto Cruise or keep hold of the throttle for 8 seconds,
auto cruise begins. If manual cruise turns on, auto cruise will be invalid. When this is on, the
rider must hold the throttles position for 8 seconds to allow controller to hold the speed.
Auto cruise does not work when Manual is on.
Speed Limit: Adjust the highest speed (30%-60%) of vehicle. Too Low speed limit a ects
starting torque. Adjust the speed of the motor. You can limit the speed of the motor by
30-60%. Low Values can a ect the acceleration speed.
Reverse speed Limit: Adjust the highest speed (10%-100%) of reverse. Much too low
speed a ects reverse torque. Similar to speed limit. This controls the spin rate of the motor
in reverse (10%-100%). Low values will a ect acceleration in reverse.
EBS Braking Force: intensity range of electronic braking (10 grades) The higher, The stronger, matching with braking function. Increases the sensitivity of your Electronic braking
(1-10 Values) higher values require less pressure on the brake lever.
11
Page 12

Bluetooth Features
Battery Current Limit (A): Adjust the max output of battery (50%~100%) Too small output current a ects starting torque. Change the max output current of the battery. (50100%) Smaller values can have an e ect on acceleration and torque.
Phase Current Limit (A): Adjust the max phase current of motor (50%~100%) Too small
phase current a ects starting torque. Adjust the max Phase current of motor (50-100%)
Hall Sensor Phase Angle: Motor hall installation angle (120° or 60°). Phase can’t be
matched if choose wrong angle.
Eco mode: After starting all current becomes weak. It is suitable for small battery to increase mileage. Preset mode that reduces battery current after starting the bike. This feature increases mileage and is ideal for small batteries.
Adjust Accelerator Curve: Start linear control and nonlinear control shift, increasing controllability of low speed.
Boost: Higher mode output, torque by 20%. Auto Shuto while controller temp exceeds
80°C. High torque mode. Controller pushes the torque up to 20% or until the motor temperature reaches 80°C.
Low Voltage Cuto : Adjust cut-o voltage of controllers. When the battery reaches this
voltage, controller stops working and protects itself. Adjusting range depends on the controller setting. This feature allows you to set a low voltage setting. If your battery reaches
your setting it will shut o .
Motor Lock: Manual start locks the motor mode so that vehicle can’t be moved. This mode
is kept even more power o until the power on next time, unless shut down by app, being
used when the power switch turns on. This feature disables the motor. Can be used for
anti-theft measures of act as a kill switch. (On/O Values)
Restore factory settings: Restore Controller’s Original factory setting. Controllers inside
parameters will be restored to original factory settings. All adjusting parameters will be
substituted with factory settings parameters. Double con rm after clicking and sending
directly without clicking send button. Restores the settings back to the original sate.
12
Page 13
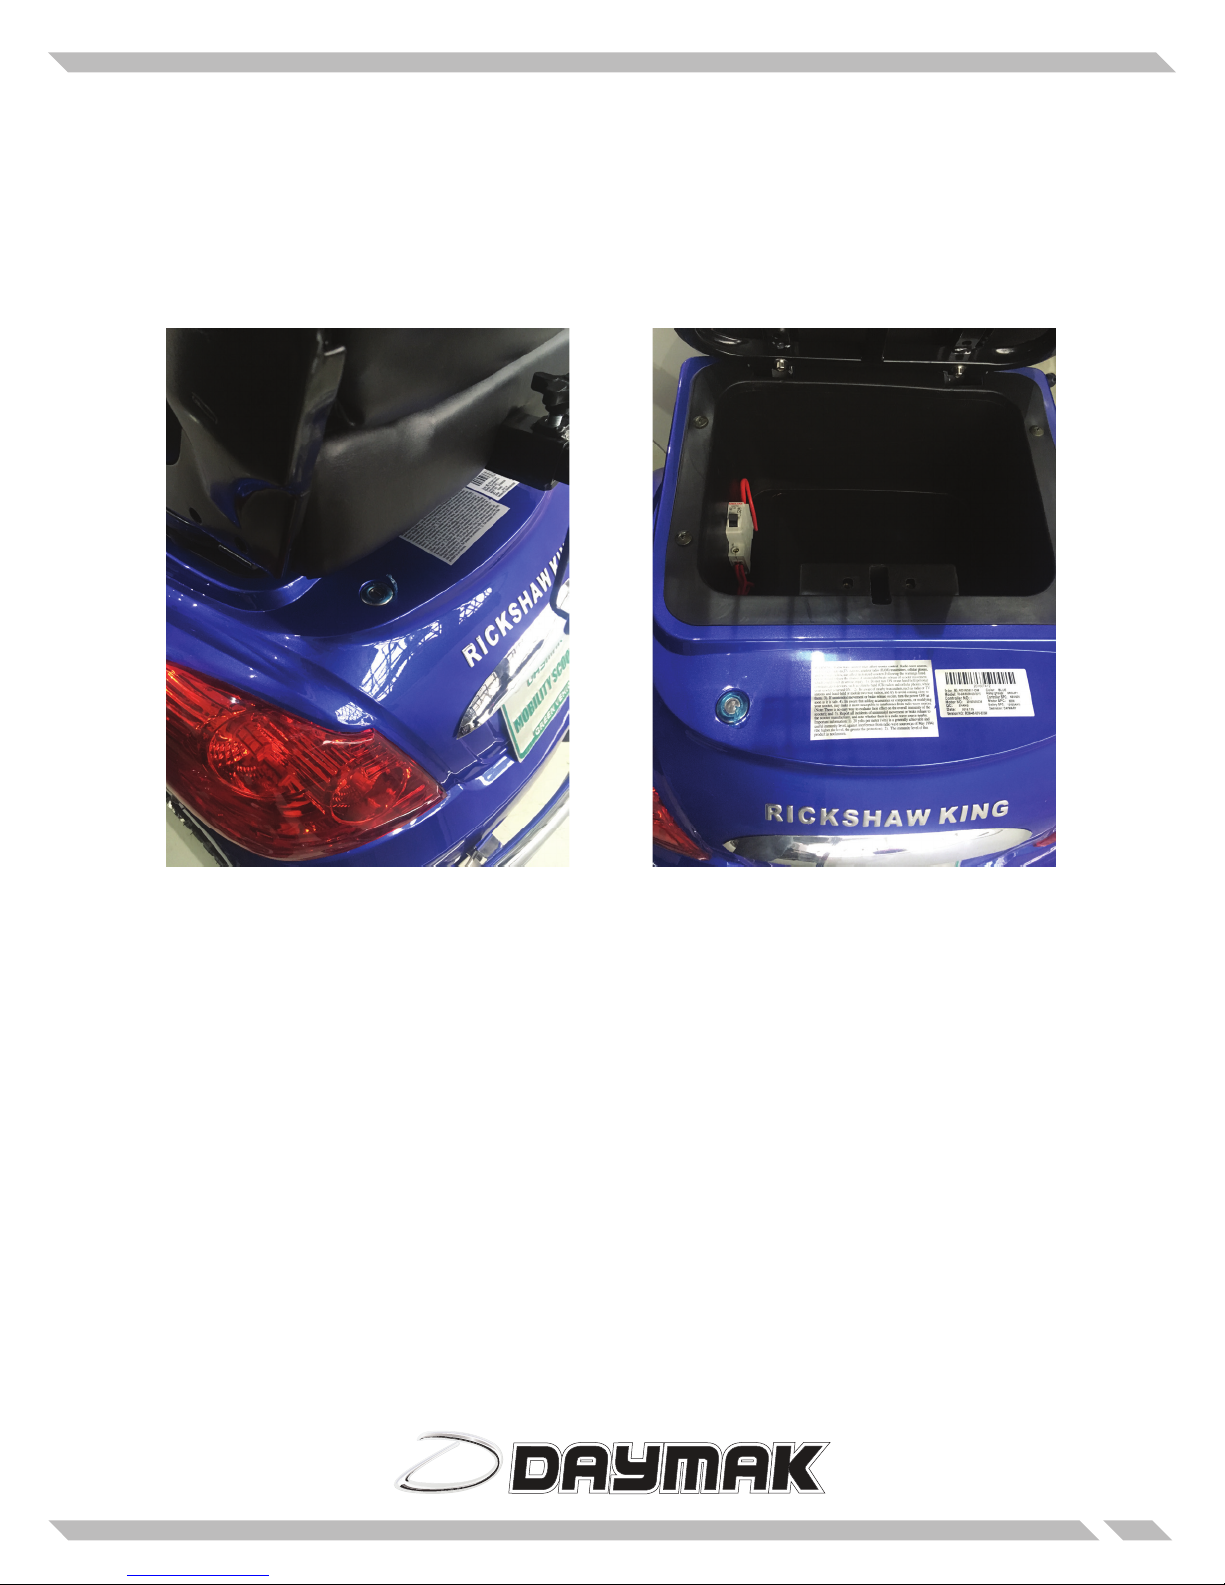
Storage
The Rickshaw King comes with a basket for storage as well as storage compartment under
the seat. To access the storage compartment under the seat you must unlock it using the
key and lift the seat up.
13
Page 14

Seat
The Rickshaw King features an adjustable seat to make sure you are comforatble when
you ride.
To pivot the seat to angle it forward or back lift the lever pictured above and push the seat the direction
you want it to go while holding it.
To slide the seat forward or backward lift this lever pictured above and push the seat the direction you
want it to go while holding it.
14
Page 15

Charging your unit
On the outside of the unit under seat you will
nd a charging port.
*Please note there will be a little ap that you
must lift up before you see the image on the
right*
To charge the unit take the charger that came
with the Rickshaw King and plug it into a wall
socket.
Then take the other end of the charger and plug it into the unit.
The charger will turn RED while it is charging and Green when it is done.
Best practices
Charge as needed, it is not neccesary to charge the battery from 0 power.
Plug the charger into the wall rst and then the unit
Do not leave the charger charging after it is fully charged. If you see the charge is green unplug it.
It is recommended to get an outlet timer and set it for the recommended charging hours, so
that as soon its done charging the timer will cut out the power completely.
15
Page 16

Safety and Troubleshooting
Mirrors
If you are having trouble adjusting the mirrors you may need to adjust them at the base.
Lift the cover as seen in gure A) up and use a wrench to losen the bolt at gure B). Reposition it as needed and then screw back in the mirror and retighten the bolt then put the
cover back over it.
Kill Switch
If you turn the keys in the ignition and you receive 0 power (nothing lights up) either your
battery is completly dead or more likely the kill switch is set to o . Lift up the rear seat (see
Storage section for more info) and you will nd on the left the kill switch. Flip that switch
if it is set to o .
16
Page 17

Brake lock
To prevent the Rickshaw King from rolling backwards when the unit is o , you need to put
on the brake lock.
To engage the brake lock
1) Pull the rear brake (left brake handle) towards you.
2) Using your index nger pull the black lever also towards you.
3) Line it up the black lever with the raised stop position and then release the rear brake
17
Page 18

60 Second check
Check brake levers to make sure they are birth rm
Check tires to make sure it is rm and that all bolts are tight.
Turn on your bike and check your battery to make sure that you can get to where you need
to.
Make sure your mirrors are tightly secured and adjusted as needed to see behind you.
Service
For all technical service please contact us at 1-800-649-9320 for help or visit us online at
Daymak.com
We recommend that you don’t try to x things yourself and that you should have a trained
technician do any service work.
18
Page 19

THANK YOU FOR
CHOOSING DAYMAK
19
 Loading...