

Page 1

Boomerbuggy X
User Manual
Page 2

About Daymak
Daymak is one of Canada’s largest Alternative Vehicle providers. We design, engineer, manufacture, import and repair everything from recreational dirt scooters, go-karts and electric golf cars to alternative transportation solutions such as e-scooters and gas scooters.
Our electric scooters represent an energy-e cient and eco-friendly alternative for people
who need to get around the city. They greatly increase the practicality of scooter transportation in urban centres. Costing only a few cents to charge, an e-scooter can make city life
more convenient and much less expensive.
While there are many new Green technologies that are still in their infancy, electric scooters have been developing over the last 40 years or more. E-scooter technology has been
dramatically re ned since the introduction of the rst custom-conversion scooters. Today,
electric scooters are a supremely reliable and a ordable means of transportation.
Daymak is constantly developing new eco-friendly alternative transportation strategies,
led by its own Research and Development department in Toronto, Canada. We are always
improving our products. Our innovative in-house engineering and quality testing provide
the lives of our customers and the world.
Daymak warranties, services, and stocks parts for everything it sells. We support our products.
Please feel free to visit our website. You’ll nd the latest in cool transportation solutions,
support for the products you’ve purchased and contact information.
Page 3

Introduction
Thank you for purchasing Daymak’s Boomerbuggy X Mobility Scooter. We thank
you for choosing a Daymak scooter, especially one that has been designed to provide you with years of trouble-free, comfortable, quiet, and eco-friendly service.
Your scooter has been equipped with the latest technologies that assist in providing you with the most e cient and comfortable ride you’ve ever felt. We at Daymak Inc. recognize the importance of your comfort when it comes to mobility, and
our Boomerbuggy Mobility Scooters provide just that; with our direct drive transaxles and electromagnetic brakes, you will glide e ortlessly whereever you choose to go.
Please be sure to take time reading this manual thoroughly before operating your
new scooter. As the operator, you are solely responsible for the manner in which you
operate and maintain your scooter. Daymak Inc. is not responsible for any damage or
personal injury incurred through improper or unsafe usage of the Boomerbuggy X Mobility Scooter.
For more information about our products, warranty, or services, or if you are having trouble understanding the instructions presented in this manual, please contact your nearest
Daymak dealer, or call Daymak headquarters at 1-800-649-9320, or visit our website at
www.daymak.com.
3
Page 4

Safety
When operating the Boomerbuggy X please make sure you adhere to the following:
Always check your mirrors and blind spots when operating the vehicle.
Turn on headlights when in need of additional visibility.
Make sure that your battery power is suffi cient before you go out to ride
Obey all laws of the road.
Periodically charge the unit when not in use for long periods of time
If you bring your charger avoid shaking / rattling charger while riding
Do not over charge the battery by leaving the charger in the charging port. Once the
battery is fully charged remove the charger immediately.
Do not try to operate the unit while charging.
Do not let anyone uner the age of 16 years old operate this vehicle.
Do not make sharp / abrupt turns at high speeds to avoid tipping.
Do not operate under the infl uence of any use of drugs or alcohol
Do not completely submerge the unit in water
Do not operate in harsh weather conditions.
Do not operate this unit with additional passengers.
For any questions or concerns please call
1-800-649-9320 or visit www.daymak.com
4
Page 5

Boomerbuggy X
Diagram 1: The Boomerbuggy X Electric Scooter
This diagram illustrates the various parts of your scooter. Please note that many of these parts are not user-serviceable and should be repaired only by trained professionals. This is especially true of the electrical
systems and the mechanical components.
1) Windshield Wipers
2) Mirrors
3) Headlights
4) Tires
5) Door Handle
5
Page 6
Operation
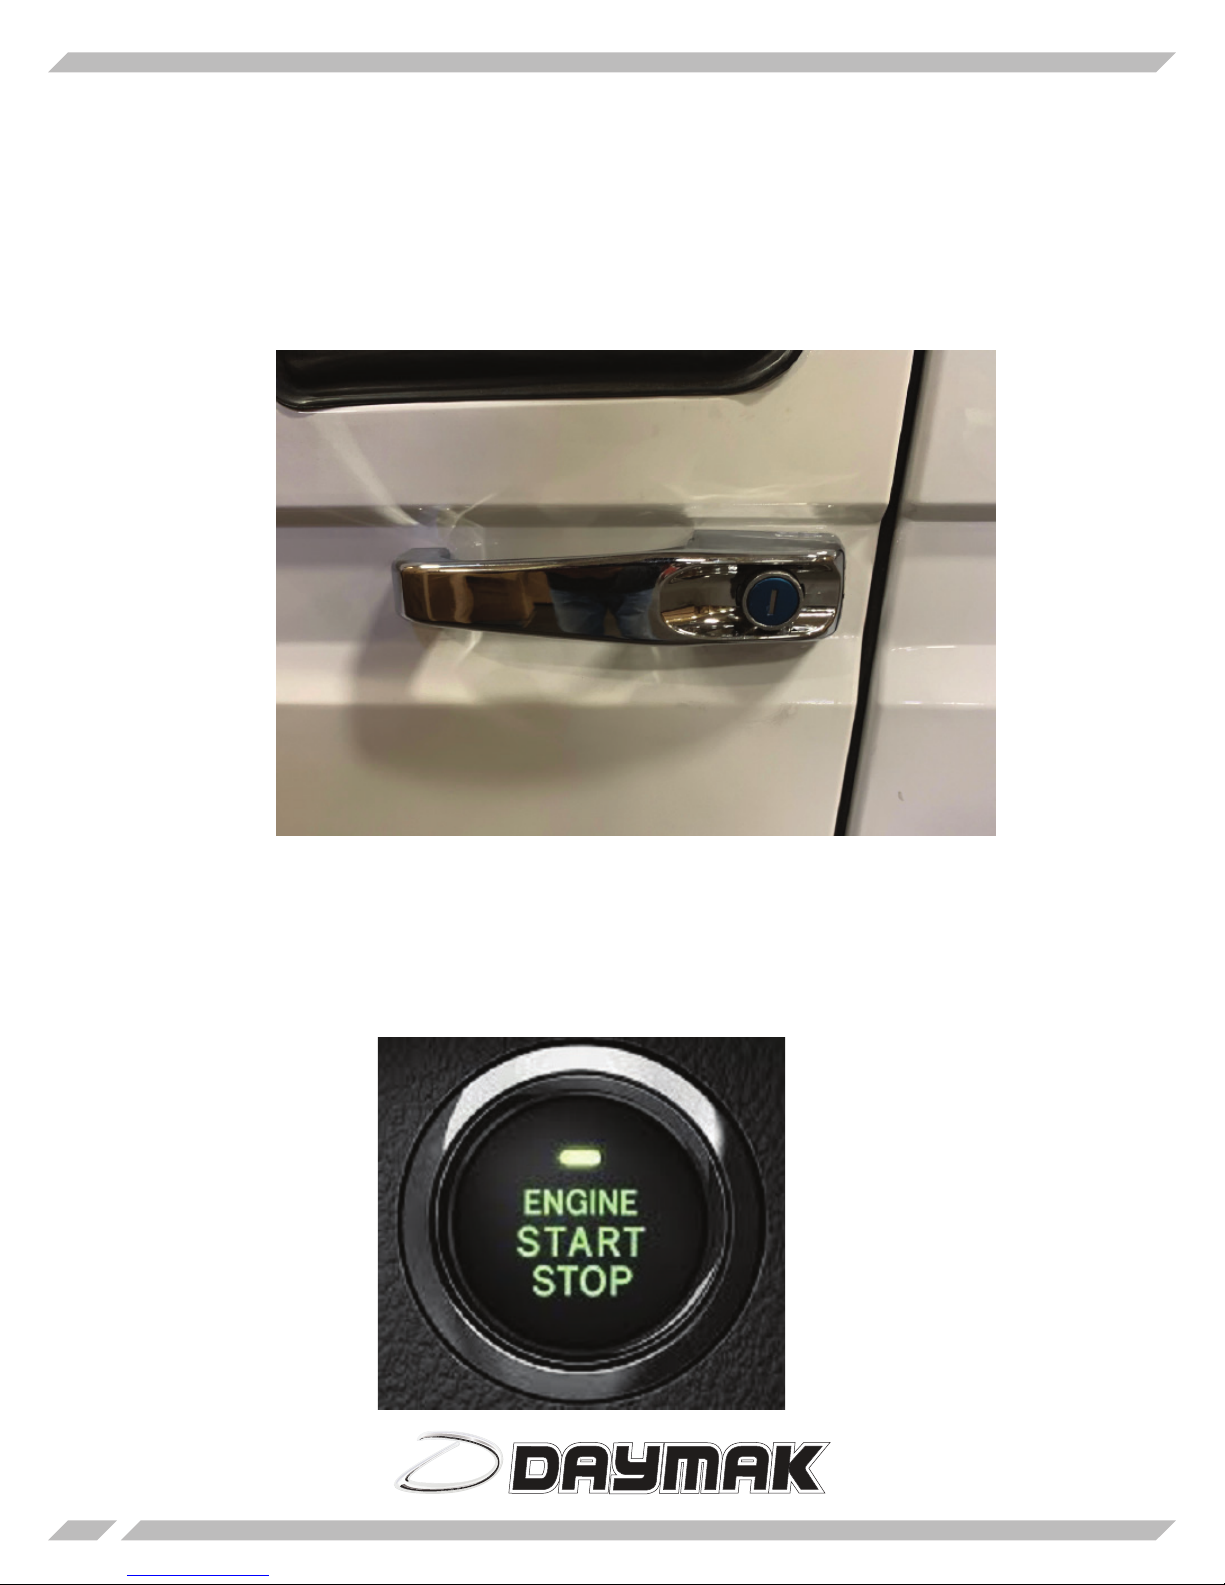
To begin, start by opening the handle door handle located on the either side of the unit.
If the door is locked, insert the key and turn it counterclockwise to unlock the door. Once
unlocked push in the key lock with your thumb and pull the door open.
Ignition
The Boomerbuggy X comes with a keyless ignition. To turn on the Boomerbuggy X press
the button seen here when the unit is unlocked. Press it once more to turn o the unit.
See next page for more details on unlocking and locking the unit.
6
Page 7
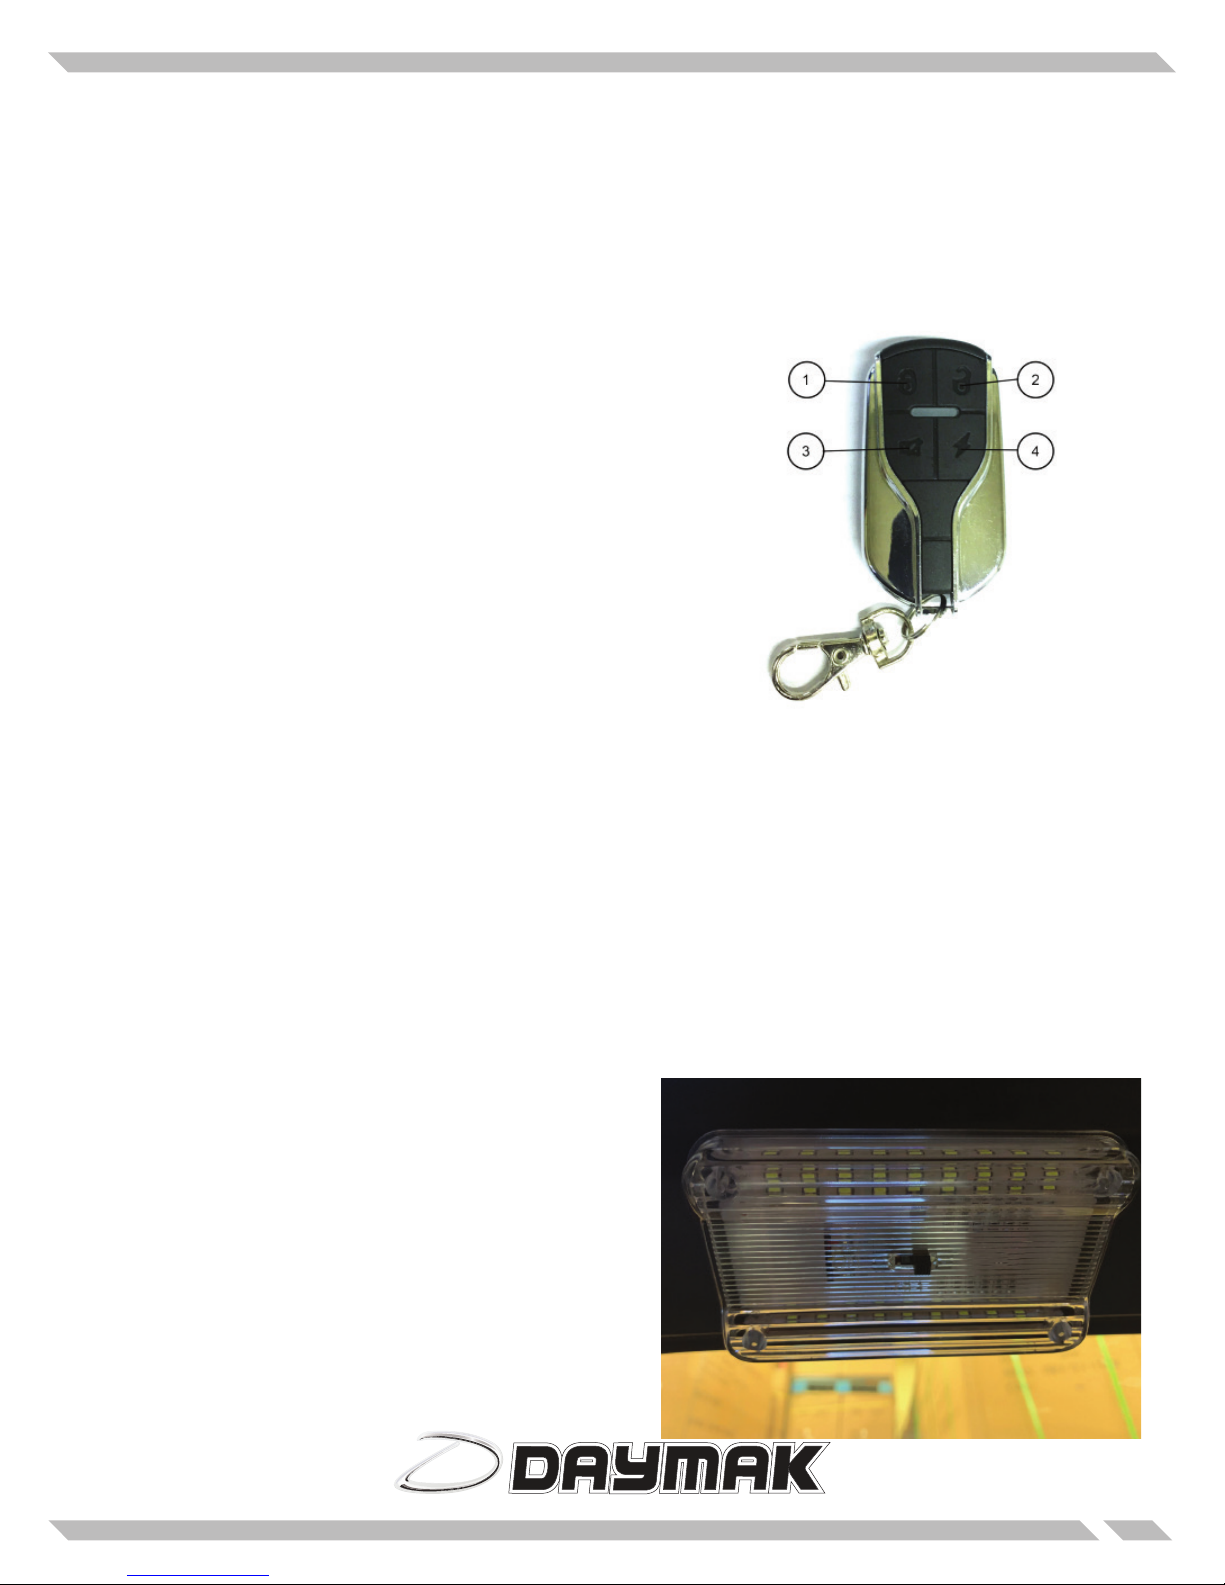
Alarm System / Remote
The Boomerbuggy X comes with two wireless remotes that activate / deactivate your alarm system remote start your machine and more.
1) Disengage Igntion / Arm Alarm / Lock Unit - Press this button once so the push to start does not function and to turn on
the alarm system. After waiting 5 seconds, if anyone moves your
machine your alarm will activate. Always press this button when
the unit is o to prevent theft.
2) Engage Igntion / Disarm Alarm / Turn o Remote Start -
Press this button once to activate the keyless push to start button and to disarm the alarm or to stop the alarm if it is already
activated. This button doubles as the turn o button when the
remote start is activated.
3) Panic Button - Press this button to set o the alarm immediately.
4) Remote start - Press this button twice to turn on the machine without putting the keys in the ignition. Press the disarm
alarm button (2) once your trip is completed.
IMPORTANT - The Boomerbuggy X push to start is NOT activated by NFC (Near eld Communication)
which means if the remote control is left unlocked anyone can start the unit and drive away with it.
Always press the Lock button on your remote once nished using the Boomerbuggy X
Lights
In addition to the headlights, the Boomerbuggy X comes with a LED light inside to help for visibility inside your cabin.
Push the switch to the right most position to turn o
the lights.
Push the switch to the left most position to turn on
the lights.
7
Page 8

Display
The display on your Boomerbuggy X is an LED that shows the metrics of your machine
including speed, travel distance and more.
1) Motor Power - This shows how much wattage is being given to your motor to engage
the machine. As you turn the throttle the meter will ll up and as soon as you start cruising
or engage the brake it will go back down.
2) Trip Meter / Odometer - When you rst turn on the machine it will show your total distance travelled, then shortly after will switch to how far you have travelled since you have
turned on the machine this ride.
3) Speedometer - Shows you the speed that you are currently travelling.
4) Battery Meter - Shows the amont of power left before your machine will no longer run.
8
Page 9

Driving your Boomerbuggy X
Below you will nd your two handle bars. You will use these to steer the unit turning left and right as well
as to engage the motor and brakes. Below is some more detailed explanation on all the buttons and their
functions.
Right handlebar
1) Brake - Pull this lever towards you
to engage the brakes. This will start the
front wheel brakes.
2) Throttle - Rotate the handle towards
you to engage the motor and start moving in the direction that is chosen.
3) Forward / Reverse - Push this button
towards F to go forward and R to go into
Reverse. When R is pressed in your rear
view camera will turn on.
4) 3 Speed switch - Choose from Low /
Medium / High Speeds. Low will get you
the furthest range at the slowest speed,
high will get you the least range at the
fastest speed.
5) Ignition - Put the keys here to turn on
the machine.
9
Page 10

Driving your Boomerbuggy X (cont’d)
Left Handlebar
1) Lights - Press this button to turn the
ligths on and o .
2) Turn Signals - Push this button to the
right to use your right indicators and left
to use your left indicator. Push it to the
middle once completed the turn.
3) Horn - Press this button to honk the
horn.
4) Brake - Pull this lever towards you to
engage the brakes. This will start the
rear wheel brakes.
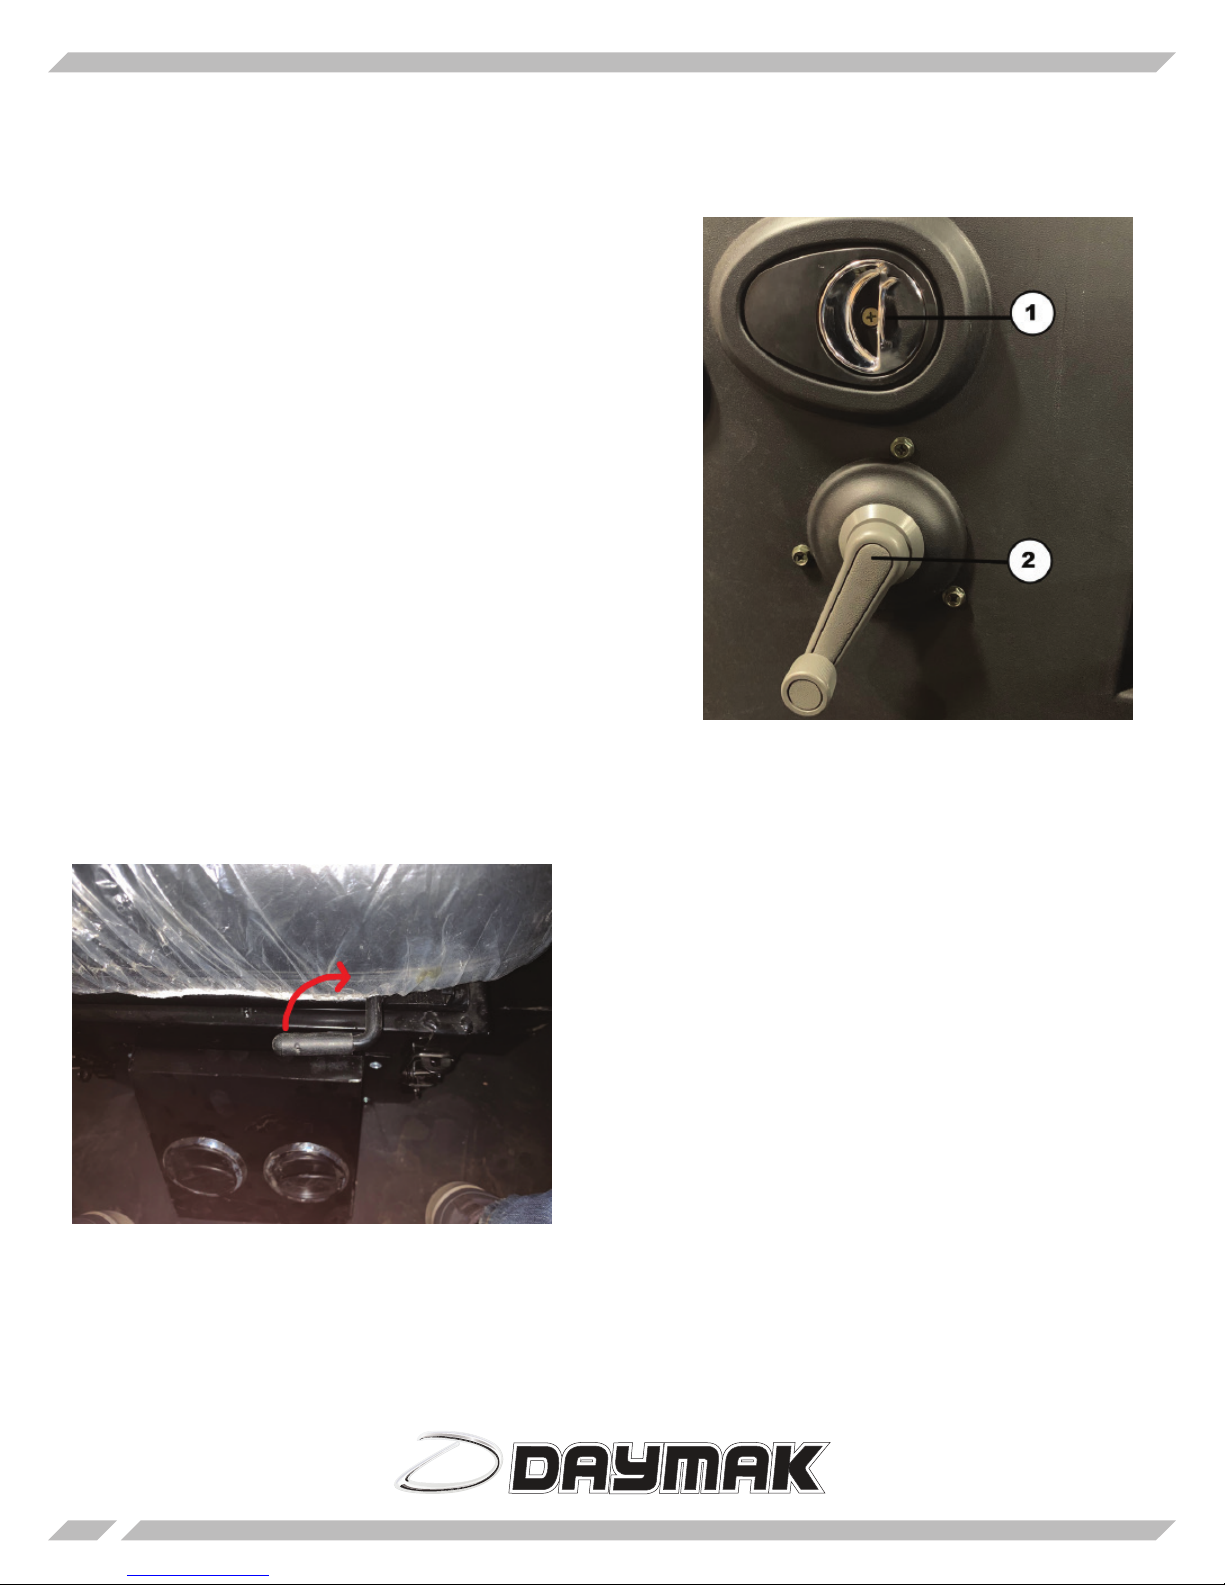
Engaging / Disengaging the Brake Lock
The Boomerbuggy X comes with a brake lock that prevents the unit from rolling when parked on an incline.
To engage the brake lock, pulled the brake lever towards you. While holding the brakes close to you, pull
the parking brake lever seen below and pull it into the grooves of the brakes. Then release the brake.
To release the brake, pull the brake close to you and move the parking brake lever to its original position
10
Page 11

Charging your Boomerbuggy X
In the rear storage area behind the driving seat you will nd a charging port where you plug in your
Boomerbuggy X to charge. Lift up the ap as seen below and plug the in your charger and the other end
into a 110V outlet. Once it is nished charging unplug the charger and you are ready to go.
On your charger you will nd an LED
light. If it is fully charged or not plugged
into the machine it will glow green. If it
is charging this light will turn red.
**DO NOT leave the charger plugged
in for extensive periods of time.**
**Once the charger is nished
charging unplug it as soon as possible**
11
Page 12

Features
The Boomerbuggy X comes with a lot of features, get the speci cs on them below!
The Boomerbuggy X comes with a built in rear view
camera. This camera only activates when the unit is
put into reverse.
There are green yellow and red lines to help gauge
how close you are to whatever is behind you. When
the object is in the red area be very careful as you
may bump or scratch your machine.
**ALWAYS check your surroundings while using
your back up camera**
Fans / Heating / Air Conditioning
On the center console you will nd a red and black
button.
Windshield Wipers (red) - Turns on and o the
windshield wipers.
Fan (black) - Turns on the fan (built in the machine). This needs to be turned on for the heating /
air conditioning to work.
**Air conditioning comes in deluxe and ultimate
models**
12
Page 13

Fans / Heating / Air Conditioning (cont’d)
If your Boomerbuggy X is the Deluxe or
Ultimate models you will have both buttons
shown on the right.
If you only have the standard Boomerbuggy X
you will only have the red button.
Heating (Red Button) - Turns on and o the
heating.
Air Conditioning (Green Button) - Turns on
and o the Air Conditioning
** These buttons only work if the internal
fan is turned on (see previous page)**
Additionally, the Boomerbuggy X comes with
and adjustable exterior fan for additional
cooling.
To turn on the fan press the red button to
the 1 position seen to the right.
This fan has a stationary and oscillate feature.
Press the lever up and down as shown on the
left to toggle this feature.
13
Page 14
Doors / Windows
1) Door handle - Pull this lever to open the door
2) Windows - Rotate this lever counterclockwise to roll down
the window and rotate this clockwise to roll up the window.
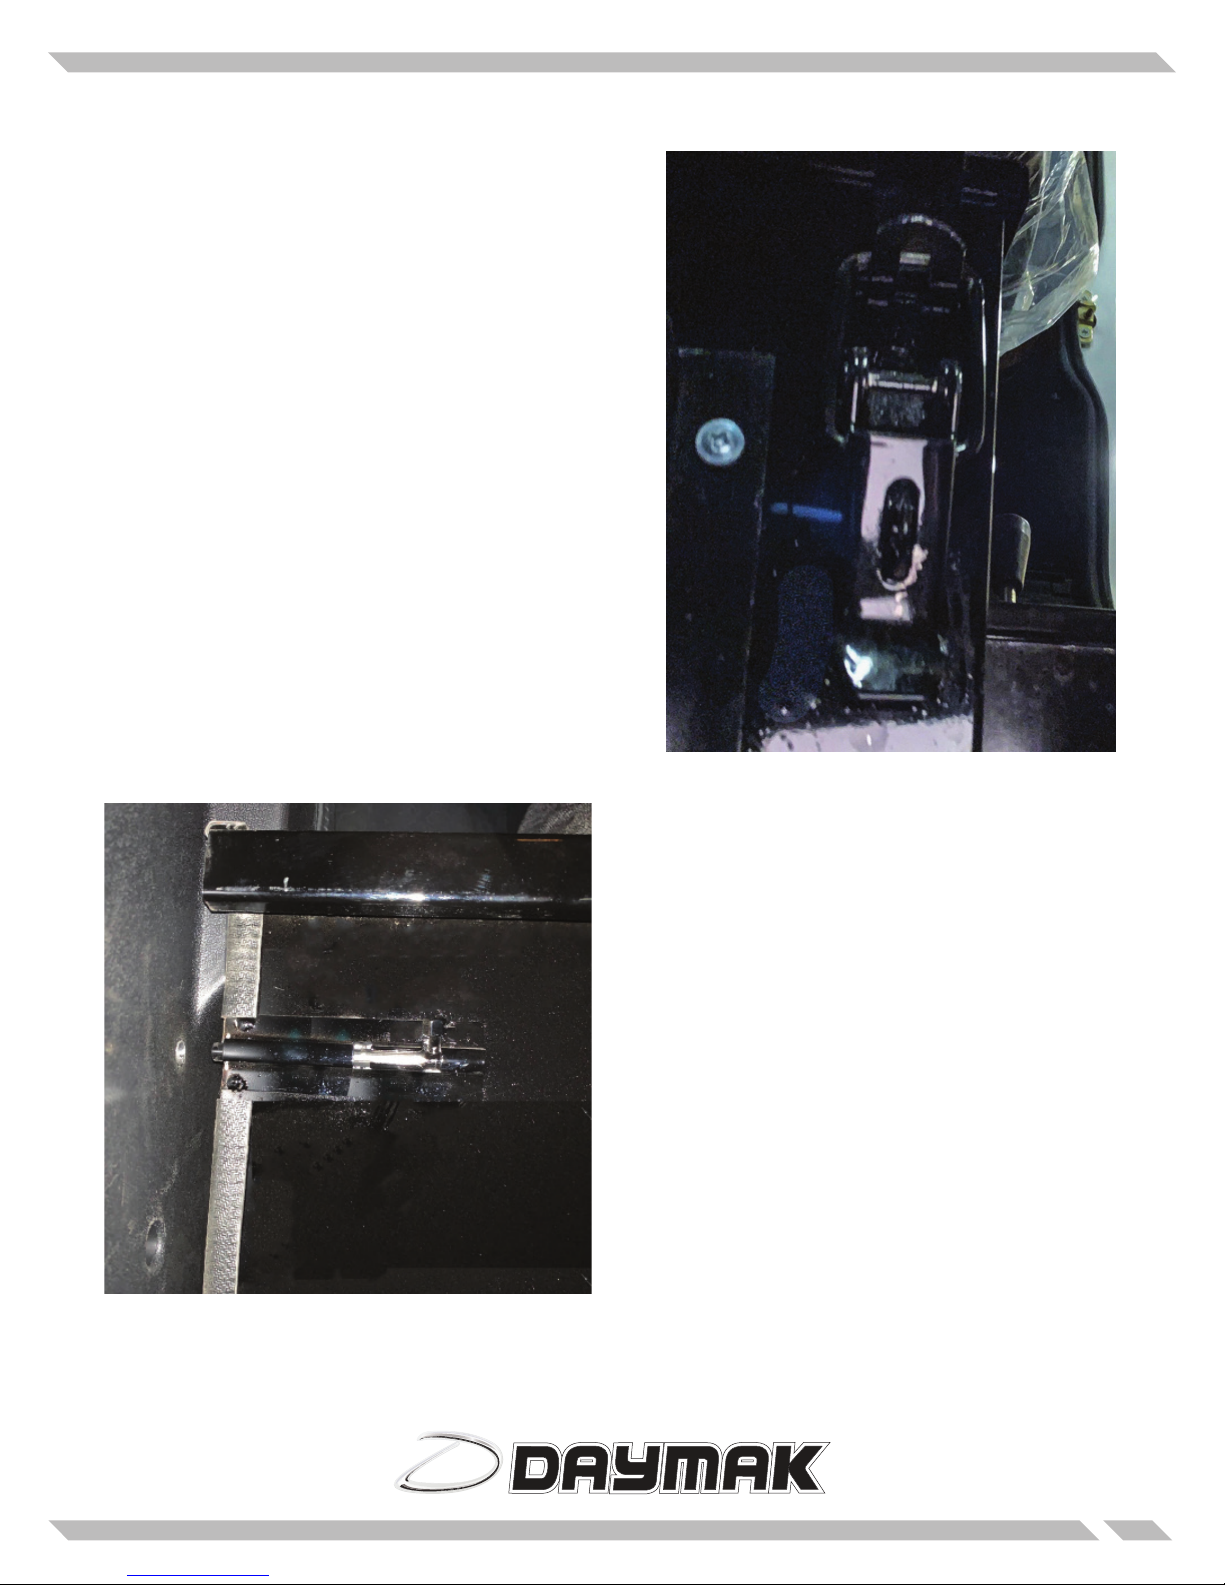
Seats and Storage
On the left of the seat, you will nd a lever shown on
the left.
Lift this lever up and while holding it up slide the
seat either forward or backwards.
14
Page 15
Seats and Storage (cont’d)
Under the seat you will nd two latches as seen on
the right (one on the left and one on the right). Lift
these latches up.
Once these latches are up you can now lift the seat
for a storage compartment under the seat.
In the rear storage compartment behind the seat
you have a latch that can be open to let down the
rear trunk for longer parcel storage.
15
Page 16
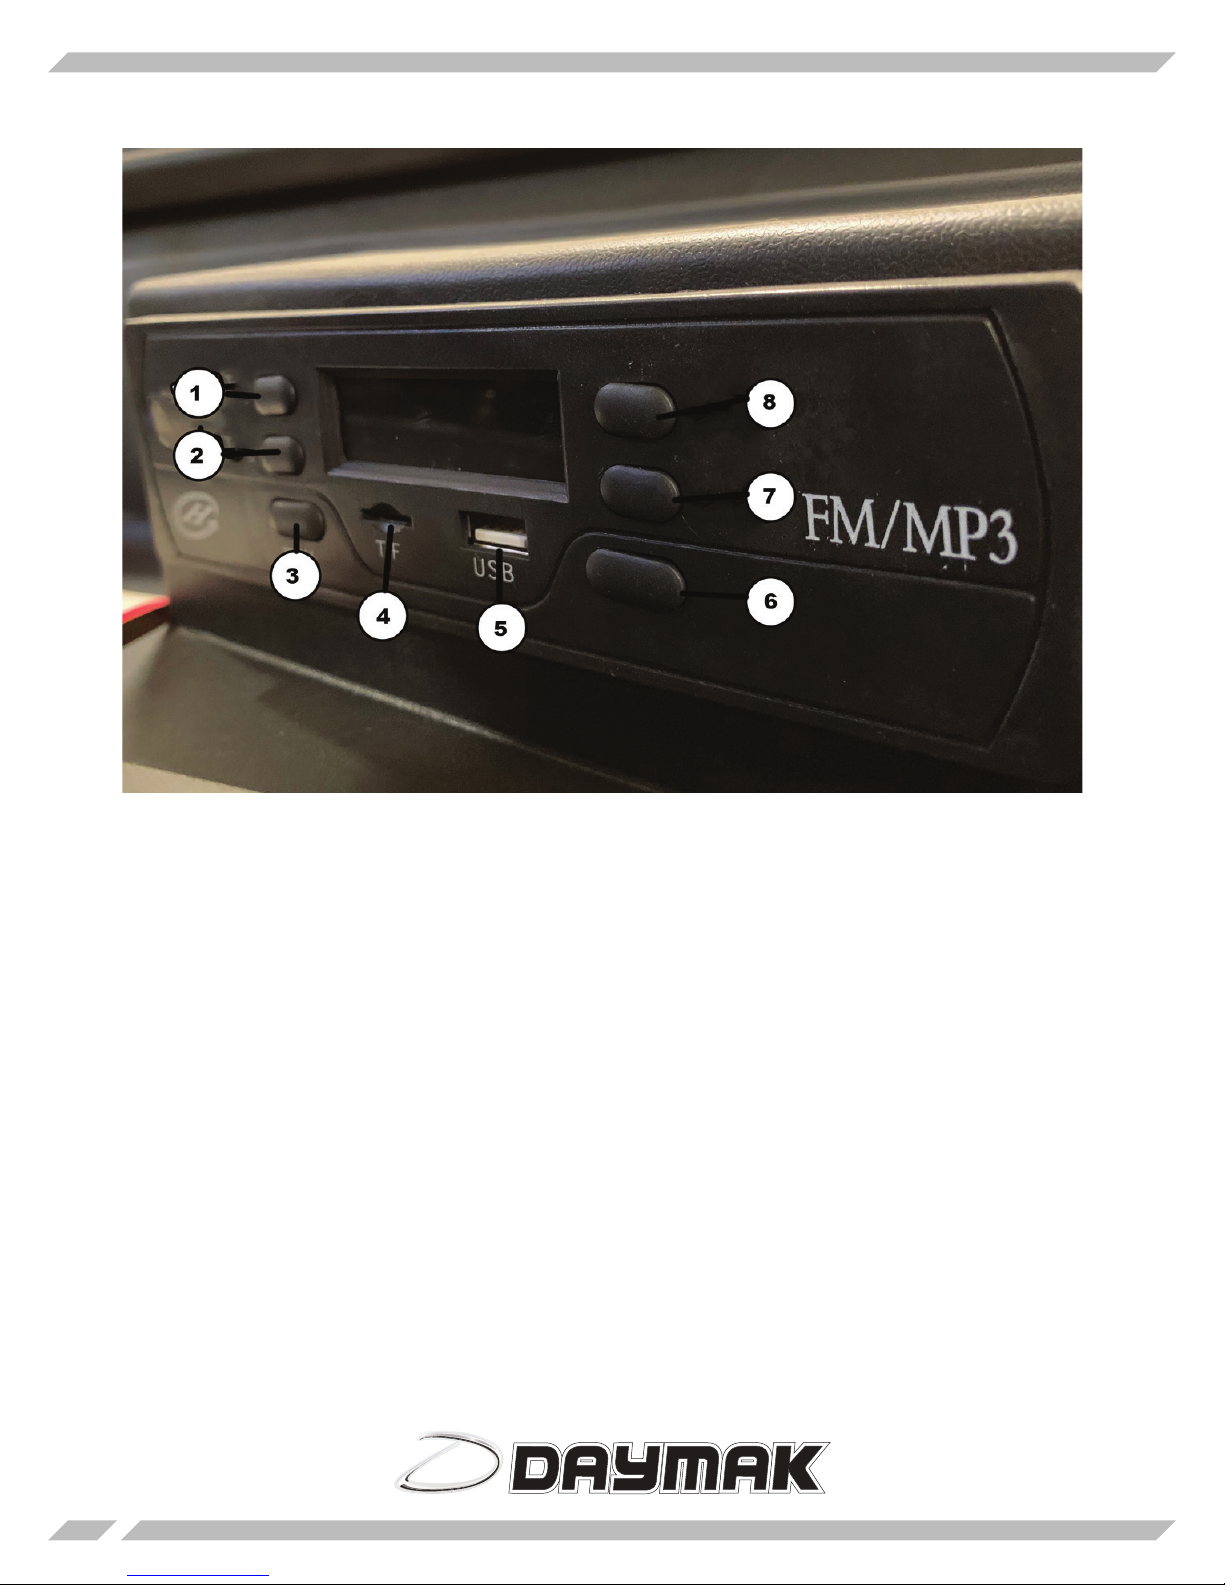
Radio
1) Previous Song - Go back to the last song you played or go to the previous station
2) Next Song - Go to the next song or go the next station
3) Power - Turn on the Radio / MP3 player
4) Micro SD Port - Insert a MicroSD with music to play your own music.
5) USB Port - Insert a USB key with music to play your own music
6) Seek - Press and hold to nd stations in your area with reception
7) Volume Down - Decrease the volume of the Radio / MP3 Player
8) Volume Up - Increase the volume of the Radio / MP3 Player
16
Page 17

Maintenance and Troubleshooting
This section outlines problems you may have and solutions you may be able to use.
Many of the parts in this product are not user-serviceable and should be repaired by
trained professionals. This is especially true of the electrical systems and the mechanical
components. Alteration of these components voids the warranty.
Before riding
We recommend performing the 60 second check on your electric vehicle seen here
https://www.youtube.com/watch?v=6mGpLqeW0zM&t=
Troubleshooting Checklist
If you are having trouble operating your scooter, please check the following:
- The unit is switched on
- All plugs and connectors are rmly xed
- Battery is fully charged
- Parking break is o
- Call Daymak Service 1-800-649-9320
17
Page 18

Thank you for choosing Daymak
18
 Loading...